K-Cam4K - Security Camera Kramer - Free user manual and instructions
Find the device manual for free K-Cam4K Kramer in PDF.


| Product Type | 4K Security Camera |
| Model | K-Cam4K |
| Brand | Kramer |
| Resolution | 4K (3840 x 2160) |
| Dimensions | 70 x 70 x 130 mm (2.76 x 2.76 x 5.12 in) |
| Weight | 0.4 kg (0.88 lbs) |
| Power Supply | 12V DC, 1A (adapter included) |
| Power Consumption | 8W (max) |
| Night Vision | Infrared up to 30m (98 ft) |
| Motion Detection | Yes, with adjustable sensitivity |
| Field of View | 90° horizontal |
| Weather Rating | IP66 (outdoor use) |
| Connectivity | Wi-Fi 802.11 b/g/n, Ethernet |
| Storage | MicroSD up to 128GB, Cloud (subscription) |
| Audio | Built-in microphone and speaker |
| Mounting | Wall or ceiling bracket included |
| Operating Temperature | -20°C to 50°C (-4°F to 122°F) |
| Compatibility | iOS and Android app |
| Cleaning | Wipe with soft dry cloth; avoid solvents |
| Safety | Do not expose to rain or moisture (outside rating) |
| Spare Parts | Contact Kramer support for replacements |
Frequently Asked Questions - K-Cam4K Kramer
User questions about K-Cam4K Kramer
0 question about this device. Answer the ones you know or ask your own.
Ask a new question about this device
Download the instructions for your Security Camera in PDF format for free! Find your manual K-Cam4K - Kramer and take your electronic device back in hand. On this page are published all the documents necessary for the use of your device. K-Cam4K by Kramer.
USER MANUAL K-Cam4K Kramer
natural_image
Black KRAMER video camera on a rectangular base (no visible text or symbols on device body)Contents
Introduction 1
Getting Started 1
Overview 2
Typical Applications 3
Defining K-Cam4K 4K PTZ Camera 4
Mounting K-Cam4K 5
Mounting K-Cam4K 5
Connecting K-Cam4K 7
Connecting to K-Cam4K via RS-232 8
Operating and Controlling K-Cam4K 9
Controlling Via IR Remote Control Transmitter 10
Operating via the OSD Menu 12
Operating via Ethernet 16
Using Embedded Web Pages 20
Changing Interface Language 21
Navigating K-Cam4K in Real Time 22
Controlling via the OSD Menu 22
Viewing Live Preview 23
Configure Video Settings 24
Defining Audio Parameters 26
Defining General System Parameters 27
Configure Network Settings 28
Viewing Device Information 29
Upgrading Firmware 30
Technical Specifications 31
Default Communication Parameters 33
Introduction
Welcome to Kramer Electronics! Since 1981, Kramer Electronics has been providing a world of unique, creative, and affordable solutions to the vast range of problems that confront the video, audio, presentation, and broadcasting professional on a daily basis.
Getting Started
We recommend that you:
- Unpack the equipment carefully and save the original box and packaging materials for possible future shipment.
- Review the contents of this user manual.

Go to www.kramerav.com/downloads/K-Cam4K to check for up-to-date user manuals, application programs, and to check if firmware upgrades are available (where appropriate).
Achieving Best Performance
- Use only good quality connection cables (we recommend Kramer high-performance, high-resolution cables) to avoid interference, deterioration in signal quality due to poor matching, and elevated noise levels (often associated with low quality cables).
- Do not secure the cables in tight bundles or roll the slack into tight coils.
- Avoid interference from neighboring electrical appliances that may adversely influence signal quality.
- Position your Kramer K-Cam4K away from moisture, excessive sunlight and dust.
Safety Instructions

Caution:
- This equipment is to be used only inside a building. It may only be connected to other equipment that is installed inside a building.
- For products with relay terminals and GPI\O ports, please refer to the permitted rating for an external connection, located next to the terminal or in the User Manual.
- There are no operator serviceable parts inside the unit.

Warning:
- Use only the power cord that is supplied with the unit.
- To ensure continuous risk protection, replace fuses only according to the rating specified on the product label which is located on the bottom of the unit.
Recycling Kramer Products
The Waste Electrical and Electronic Equipment (WEEE) Directive 2002/96/EC aims to reduce the amount of WEEE sent for disposal to landfill or incineration by requiring it to be collected and recycled. To comply with the WEEE Directive, Kramer Electronics has made arrangements with the European Advanced Recycling Network (EARN) and will cover any costs of treatment, recycling and recovery of waste Kramer Electronics branded equipment on arrival at the EARN facility. For details of Kramer's recycling arrangements in your particular country go to our recycling pages at www.kramerav.com/il/quality/environment.
Overview
Congratulations on purchasing your Kramer K-Cam4K 4K PTZ Camera. K-Cam4K incorporates an ultra-low, 8.51Mpixel CMOS image sensor together with 3D DNR technology, providing 4K ultra high definition, up to 4K@30fps image coding output, and downwards compatibility with 1080P, 720P resolution.
K-Cam4K provides exceptional quality, advanced and user-friendly operation, and flexible control.
- Smooth PTZ operation – featuring a horizontal field of view (HFoV), easy pan ( ±170^ ) and tilt ( ±30^ ) using a whisper-silent motor.
- High quality zoom –12x optical zoom and 16x digital zoom providing a crystal-clear image and highly accurate close-ups.
- Multiple Interface Support – HDMI and 3G-SDI interface, effective transmission distance up to 150 meters (1080P30). HDMI, LAN or 3G-SDI, LAN can output 2 high-definition digital signals at the same time.
- Efficient power-saving features – supports low-power sleep/wake-up, consuming as little as 400mW.
- HDMI Support – 4K@30Hz as specified in HDMI 1.4.
- Built-in noise reduction – 3D noise reduction algorithm reduces image noise efficiently (SNR ≥ 55dB), thus maintaining a clean and clear also under very low illumination conditions.
- Built-in OLED – displays HDMI and SDI frame rate and resolution as well as the IP address.
- AVT Port – supports RJ-45 over twisted pair and BNC coaxial connector.
Typical Applications
K-Cam4K is ideal for the following typical applications:
- Hybrid video conferencing in meeting rooms.
- Recording and broadcasting of classroom and auditorium sessions.
Controlling your K-Cam4K
Control your K-Cam4K:
- By RS-232 serial commands (VISCA protocol) transmitted by a touch screen system, PC, or other serial controller.
- Remotely, from the infrared remote control transmitter.
- Via OSD menu
- Via the Ethernet using built-in user-friendly Web pages.
Defining K-Cam4K 4K PTZ Camera
This section defines K-Cam4K.
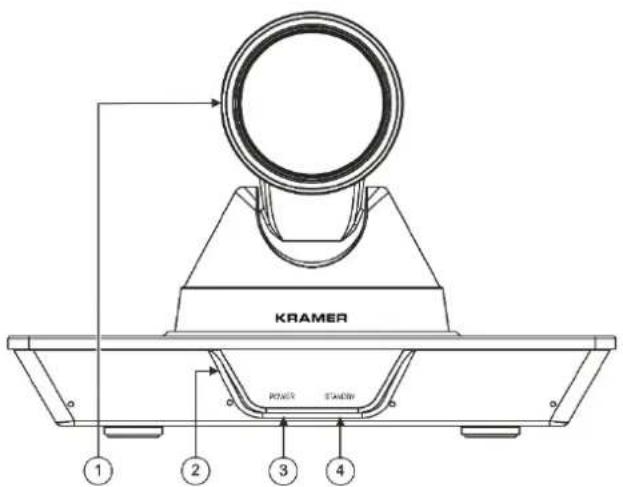
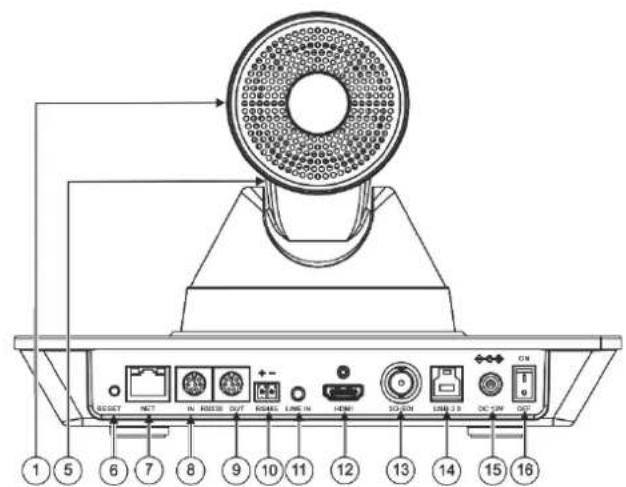
Figure 1: K-Cam4K 4K PTZ Camera
| # | Feature | Function | |
| 1 | Camera | Front and rear views. | |
| 2 | Front Panel OLED | Displays frame rate and resolution for HDMI and SDI output signals, as well as the IP address. | |
| 3 | POWER LED | Lights when powered. | |
| 4 | STANDBY LED | Lights when in standby mode. | |
| 5 | Tilting Mechanism | Can be set to any of 255 preset positions. | |
| 6 | RESET | Press for 5 seconds to reset to factory default parameters. | |
| 7 | NET RJ-45 Connector | Connect to your network or directly to a computer (supports PoE). | |
| 8 | RS232 8-pin DIN Connector | IN | Connect to a camera controller using the included RS-232 VISCA (m) to 9-pin D-sub (f) cable. |
| 9 | OUT | ||
| 10 | RS485 2-pin Terminal Block Connector | N/A | |
| 11 | LINE IN 3.5mm Mini Jack | N/A | |
| 12 | HDMI Out Connector | Connect to a recording/streaming device. | |
| 13 | 3G-SDI Out BNC Connector | Connect to a recording/streaming device. | |
| 14 | USB 3.0 Type-B Connector | Connect to computer or collaboration device using the USB-3 cable (included). | |
| 15 | DC 12V Power Connector | Connect to the 12V power adapter. | |
| 16 | ON/OFF Switch | Turn the unit on and off. | |
Mounting K-Cam4K
This section provides instructions for mounting K-Cam4K. Before installing, verify that the environment is within the recommended range:

- Operation temperature – 0° to 40°C (32° to 104°F).
- Storage temperature -40^ to +60^ (-40° to +140°F).
- Humidity – 10% to 90%, RHL non-condensing.

Caution:
- Mount K-Cam4K before connecting any cables or power.

Warning:
- Ensure that the environment (e.g., maximum ambient temperature & air flow) is compatible for the device.
- Avoid uneven mechanical loading.
- Keep away from children – product includes small accessories and components.
- Appropriate consideration of equipment nameplate ratings should be used for avoiding overloading of the circuits.
- Reliable earthing of rack-mounted equipment should be maintained.
• Maximum mounting height for the device is 2 meters.
Mounting K-Cam4K
You can mount your camera to a wall, ceiling, or place it on a surface. A built-in gravity sensor automatically corrects the image orientation enabling mounting K-Cam4K straight or upside-down.

Note that you can also attach the device upside down, from under the bracket.
To mount K-Cam4K on a wall:
- find the correct location on the wall.
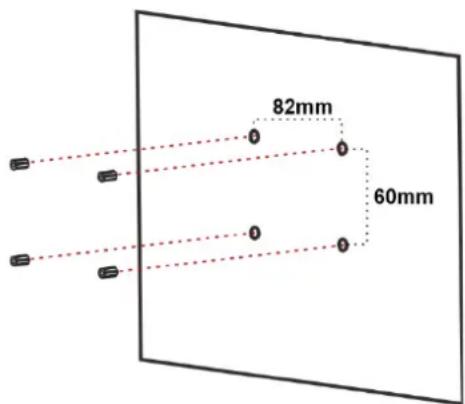
- in the desired location, drill 4 holes 82mm and 60mm apart (using a 6mm drill-bit) to fit the 4 holes of the wall-mounting bracket.
- Insert the four expansion plugs into the holes.
-
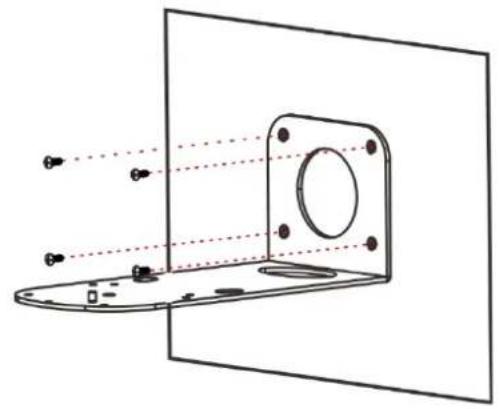
Attach the wall bracket to the wall, using the four wall-bracket screws. You can place the bracket upside-down to mount the camera the other way around.
-
Attach the device to the wall bracket by fitting the mortise (on the bracket) into the tenon (on the camera).
-
Fix the camera by screwing (A) Nickel screw to the center and (B) then tighten with 3 black screws.
K-Cam4K is mounted on the wall.
natural_image
Technical line drawing of a mechanical bracket with mounting holes and dashed alignment lines (no text or symbols)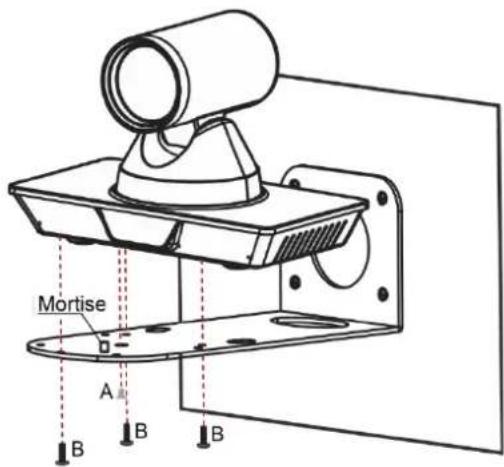
Always switch off the power to each device before connecting it to your K-Cam4K. After connecting your K-Cam4K, connect its power and then switch on the power to each device.
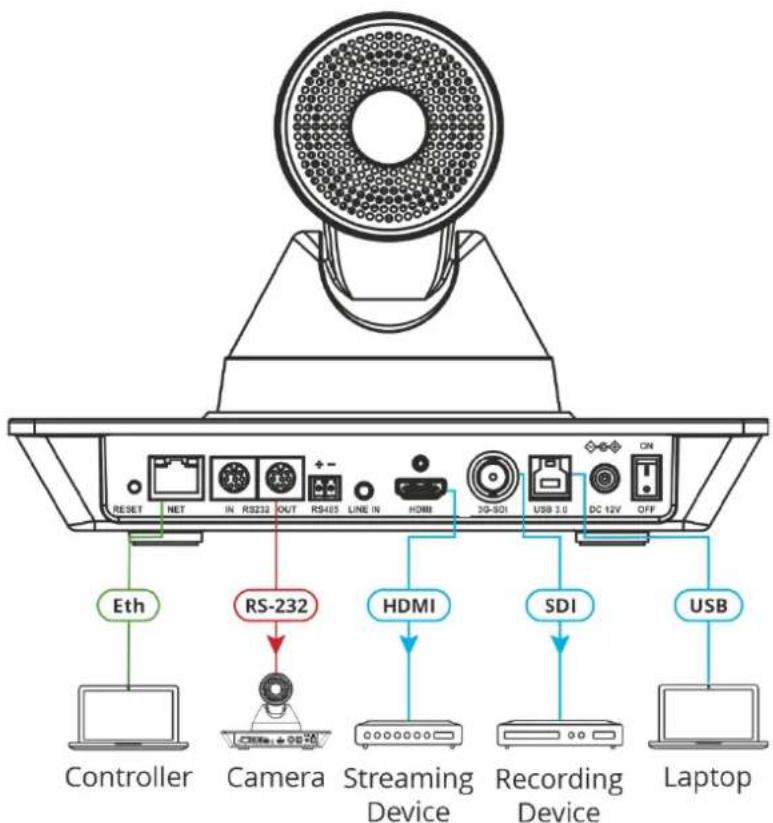
Figure 2: Connecting to the K-Cam4K Rear Panel
To connect K-Cam4K as illustrated in the example in Figure 2:
- Connect a laptop to the NET RJ-45 connector ⑤ directly or via the network.
- Connect the RS232 OUT 8-pin DIN Connector ⑦ to an additional Camera.
- Connect the HDMI connector ⑯ a streaming device.
- Connect the 3G-SDI connector ⑩ a recording device.
- Connect the USB 3.0 port ⑬ a laptop.
- Connect the power adapter to K-Cam4K and to the mains electricity (not shown in Figure 2).
Connecting to K-Cam4K via RS-232
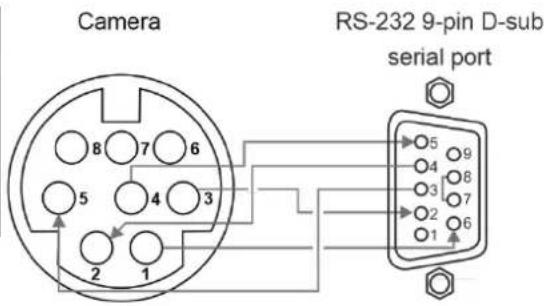
You can connect to K-Cam4K via an RS-232 connection ⑥ / ⑦ using, for example, a PC or an additional camera.
Connect the K-Cam4K RS-232 8-pin Min DIN connector to an RS-232 9-pin D-sub serial port, as follows:
| Camera Pin | RS-232 9-Pin D-Sub Serial Pin |
| 1 (DTR) | 6 (DSR) |
| 2 (DSR) | 4 (DTR) |
| 3 (TXD) | 2 (RXD) |
| 4 (GND) | 5 (GND) |
| 7 (RTS) shorted to 8 (CTS) |
Operating and Controlling K-Cam4K
After connecting the K-Cam4K (see Connecting K-Cam4K on page 7), switch the device ON ⑦. The device initializes the front panel displays "Starting", the connection indicator light (green), the IR indication light (blue) flash and the data indicator (orange) flashes. Following initialization, the LCD displays the IP address and the HDMI and SDI resolutions and refresh rates. The camera is ready for operation.
Control K-Cam4K via:
• Controlling Via IR Remote Control Transmitter on page 10.
• Operating via the OSD Menu on page 12.
• Operating via Ethernet on page 16.
Controlling Via IR Remote Control Transmitter
Use the IR remote control to control K-Cam4K and the OSD to configure it. Use shortcut keys for quick settings (see Shortcut Keys on page 11)
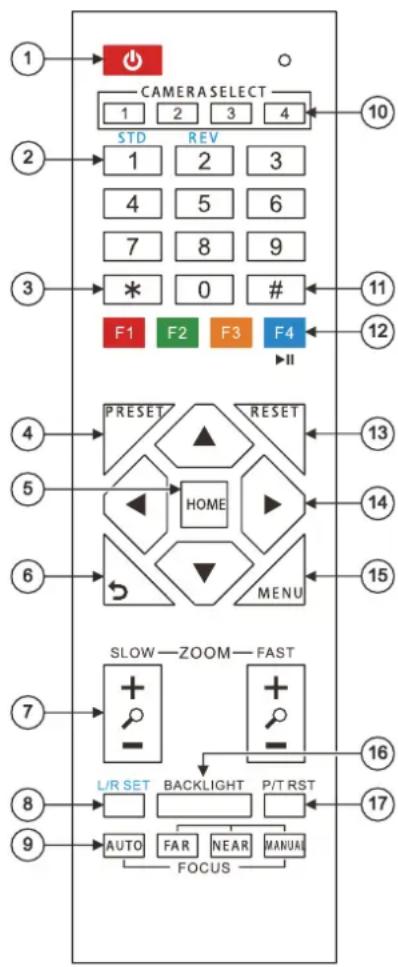
| # | Key | Function | ||
| 1 | Power | Press once to enter standby mode. Press again to enter normal operation mode. | ||
| 2 | Number (0 to 9) | Configure or edit a preset. | ||
| 3 | * Key | Use together with other keys for various functions. | ||
| 4 | PRESET | Press PRESET + a numerical key (0 to 9) to save the current configuration to that preset number. | ||
| 5 | HOME | Press to return K-Cam4K to its default position. When in the OSD, press to enter a submenu or confirm menu. | ||
| 6 | Return | Return to previous item on the menu. | ||
| 7 | ZOOM | SLOW | Press for slow zoom in (+) or out (-). | |
| FAST | Press for quick zoom in (+) or out (-). | |||
| 8 | L/R Set | STD (1) | Press L/R + STD (1) keys to set Pan-Tilt to same direction as L/R setting. | |
| REV (2) | Press L/R + REV (2) keys to set Pan-Tilt to the direction opposite to the L/R setting. | |||
| 9 | FOCUS | AUTO | Press to automatically set the focus to the center of the image. | |
| MANUAL | Press to enter manual focus mode. Then press FAR or NEAR. | |||
| FAR | When in MANUAL mode, press to focus on a far object | |||
| NEAR | When in MANUAL mode, press to focus on a near object. | |||
| 10 | CAMERA SELECT | Select the camera to configure and control (1 to 4), see Assigning up to 4 K-Cam4K Units to the IR Remote Controller on page 11). | ||
| 11 | # Key | Use together with other keys for various functions. | ||
| 12 | IR RC | Press * + # + (F1 to F4) to assign a camera address to the remote. For example, point the remote to a camera, press *+#+F1. The remote assigns CAMERA SELECT 1 key to this camera. To use the remote to control camera 1 press the CAMERA SELECT 1 key (see Assigning up to 4 K-Cam4K Units to the IR Remote Controller on page 11). Press F4 to freeze the image (see Freezing an Image on page 11) | ||
| 13 | RESET | Press RESET+ a key number (0 to 9) to delete a preset configuration. Press *+#+RESET to delete all preset configurations. | ||
| 14 | PTZ Control | Control camera panning and tilting using arrow keys (left, right, up, and down). | ||
| 15 | MENU | Enter/exit OSD menu (see Operating via the OSD Menu on page 12). | ||
| 16 | BACKLIGHT | Press to turn backlight compensation on or off. Available when exposure mode is set to Auto (via the OSD menu). | ||
| 17 | P/T RST | Press to self-check preset Pan/Tilt on camera. | ||
Assigning up to 4 K-Cam4K Units to the IR Remote Controller
You can use one IR remote controller to control several cameras. To do so, you need to assign each device to the remote controller via IR learning.
To assign a device to the IR remote controller:
- Turn the camera on.
-
Point the IR controller towards the front panel of the camera and press the following keys:
-
To assign Camera 1 – Press *, # and F1 simultaneously to set IR address to "CAMERA SELECT 1".
- To assign Camera 2 – Press *, # and F2 simultaneously to set IR address to "CAMERA SELECT 2".
- To assign Camera 3 – Press *, # and F3 simultaneously to set IR address to "CAMERA SELECT 3".
- To assign Camera 4 – Press *, # and F4 simultaneously to set IR address to "CAMERA SELECT 4".

When assigning a camera to the remote, make sure you point directly to that camera and check that the other cameras in the area are powered down.
Cameras are assigned to IR remote controller.
Freezing an Image
You can freeze/unfreeze an image manually:
- To freeze an image, press F4 on the remote controller. The image freezes and the display shows "Freeze" on the top left side for 5 seconds.
- To Unfreeze the image, press F4 (once again) on the remote controller. The image unfreezes and the display shows "Unfreeze" on the top left side for 5 seconds.
Shortcut Keys
Use the following shortcut keys to set the following:
• *+#+1: OSD default (English).
• *+#+3: OSD default (Chinese).
• *+#+4: Display current IP address.
• *+#+6: Quickly recover the default.
• *+#+8: View the camera version.
• *+#+9: Quickly set up inversion.
• *+#+MANUAL: Restore default IP address.
Operating via the OSD Menu
K-Cam4K enables controlling and defining the device parameters via the OSD, using the IR remote control MENU buttons (see Controlling Via IR Remote Control Transmitter on page 10) or via the embedded webpages (see Controlling via the OSD Menu on page 22).
To enter and use the OSD menu buttons:
-
Press MENU.
-
Press:
-
Arrow buttons to move through the OSD menu, which is displayed on the video output.
■ HOME to enter a submenu and accept changes.
Use the OSD menu to perform the following operations:
- Configuring Camera Exposure on page 13.
- Configuring Color Settings on page 13.
- Setting Image Parameters on page 14.
- Setting P/T/Z Parameters on page 14.
- Setting Digital Noise Reduction Level on page 15.
• Defining Setup Parameters on page 15. - Configuring Communication Parameters on page 16.
• Restoring to Default Settings on page 16.
Configuring Camera Exposure
K-Cam4K enables configuring exposure parameters:
To adjust the image parameters:
- On the IR remote press MENU. The menu appears.
- Use the arrows to select Exposure.
- Click HOME to enter Exposure menu. Adjust the following:
| Menu Item | Function | ||
| Mode | Set the exposure mode: Auto, Manual, SAE, AAE or Bright. Each exposure mode includes the relevant sub-menu settings. | ||
| Auto | Automatic exposure settings. | ||
| Manual | Control exposure settings manually. | ||
| SAE | Shutter Automatic Exposure. | ||
| AAE | Aperture Automatic Exposure. | ||
| Bright | Adjusts the brightness level manually | ||
| Sub-Menu | Function | Enabled in: | |
| ExpCompMode | Select On to allow changes to the automatically-set exposure. Select Off to keep auto settings. | Auto mode | |
| ExpComp | Adjust the exposure compensation from -7 to 7. | Auto mode and ExpCompMode=On | |
| Backlight | Select On to allow backlight compensation. Select Off to keep auto settings. | Auto mode | |
| Bright | Control brightness level from 0 to 17. | Bright mode | |
| Gain Limit | Set maximum gain limit from 0 to 15. | Auto, SAE, AAE and Bright modes | |
| Anti-Flicker | Set anti flicker to Off, 50Hz or 60Hz. | Auto, AAE and Bright modes | |
| Meter | Select the exposure meter to Average, Center, Smart or Top. | All modes | |
| Iris | Set the aperture value to F1.8, F2.0, F2.4, F2.8, F3.4, F4.0, F4.8, F5.6, F6.8, F8.0, F9.6, F11.0 or Close. | Manual and AAE modes | |
| Shutter | 1/30, 1/60, 1/90, 1/100, 1/125, 1/180, 1/250, 1/350, 1/500, 1/725, 1/1000, 1/1500, 1/2000, 1/3000, 1/4000, 1/6000 or 1/10000. | Manual and SAE modes | |
| Gain | Set gain from 0 to 7. | Manual mode | |
| DRC | Set Dynamic Range Compression strength from 0 to 8. | All modes | |
Exposure is configured.
Configuring Color Settings
K-Cam4K enables configuring color parameters.
To adjust the color parameters:
- On the IR remote press MENU. The menu appears.
-
Use the arrows to select Color.
-
Click HOME to enter Color menu. Adjust the following:
| Menu Item | Function |
| WB Mode | Set white balance mode to Auto, Indoor, Outdoor, One Push, Manual. |
| RG Tuning | Fine tune red gain from -10 to 10 (enabled in Auto mode). |
| BG Tuning | Fine tune blue gain from -10 to 10 (enabled in Auto mode). |
| Saturation | Set the color saturation from 60% to 200%. |
| Hue | Set the color hue from -10 to 10. |
| RG | Set red gain from 0 to 255 (enabled in Manual mode). |
| BG | Set blue gain from 0 to 255 (enabled in Manual mode). |
Color parameters are adjusted.
Setting Image Parameters
K-Cam4K enables configuring image parameters.
To adjust the image parameters:
- On the IR remote press MENU. The menu appears.
- Use the arrows to select Image.
- Click HOME to enter Image menu. Adjust the following:
| Menu Item | Function |
| Luminance | Adjust luminance from 0 to 14. |
| Contrast | Adjust contrast from 0 to 14. |
| Sharpness | Adjust sharpness from 0 to 14. |
| Flip-H | Define horizontal flip to On or Off. |
| Flip-V | Define vertical flip On or Off. |
| B&W Mode | Set black and white mode to On or Off. |
| Style | Set the image style to Norm, Bright or PC. |
Image parameters are adjusted.
Setting P/T/Z Parameters
K-Cam4K enables configuring pan tilt and zoom parameters.
To adjust the P/T/Z parameters:
- On the IR remote press MENU. The menu appears.
-
Use the arrows to select P/T/Z.
-
Click HOME to enter P/T/Z menu. Adjust the following:
| Menu Item | Function |
| SpeedByZoom | Set to On, to control pan and tilt speed as a function of zoom. |
| AF-Zone | Set auto focus to front, center top or bottom area. |
| AF Sense | Set auto focus sensitivity to low, normal or high. |
| L/R Set | Set pan direction to STD (Standard) or REV (Reverse). |
| Display Info | Set to On, to display information or set to Off. |
| Image Freeze | Set to On, to freeze the image before recalling a preset. Once the camera points to the recalled preset position, the camera returns to normal operation. |
| Digital Zoom | Set digital zoom to 2x, 4x, 8x or 16x. |
| Call Preset Speed | Adjust the pan and tilt movement speed from 1 (lowest) to 24 (highest). |
| Pre Zoom Speed | Adjust the preset zoom speed from 0 to 7. |
Pan tilt and zoom parameters are adjusted.
Setting Digital Noise Reduction Level
Set 3D noise reduction for a clearer picture when light conditions are low.
To set noise reduction level:
- On the IR remote press MENU. The menu appears.
- Use the arrows to select NR3D-Level.
- Click HOME to enter NR3D-Level menu.
- Set the noise reduction level from 1 to 9, or set to Off.
Noise reduction level is set.
Defining Setup Parameters
Define general setup parameters.
To define setup parameters:
- On the IR remote press MENU. The menu appears.
- Use the arrows to select SETUP.
- Click HOME to enter SETUP menu. Define the following:
| Menu Item | Function |
| Language | Define the user language: English, Chinese or Russian. |
| DVI Mode | Set to HDMI, or DVI, depending on the connection type. |
| Video Format | Set the output video format: 1080P60, 1080P50, 1080I60, 1080I50, 1080P30, 1080P25, 720P60, 720P50, 1080P29.97, 1080I59.94, 1080P59.94, 720P59.94, 4KP29.97, 4KP25, 4KP30. |
| Auto Scan | Set to On or Off. |
| SDI-3G Mode | Set to LEVEL-A or LEVEL-B mapping. |
| Video Output | HDMI or SDI. |
| Auto Flip | Set to On, for automatic flip of the view. |
| USB Audio | Set to On or Off. |
| OSD Flip | Set flipping the OSD to On or Off. |
Setup parameters are defined.
Configuring Communication Parameters
Define communication parameters.
To define communication parameters:
- On the IR remote press MENU. The menu appears.
-
Use the arrows to select COMMUNICATION SETUP.
-
Click HOME to enter SETUP menu. Define the following:
| Menu Item | Function |
| Protocol | Select the control protocol to VISCA, PELCO-D or PELCO-P. |
| V_Address | Set the number of a camera in a daisy-chain setting (1 to 7). Set the first camera to 1 the second in the chain to 2, and so on (enabled in Auto mode, when VISCA protocol is selected). To daisy-chain cameras you need to use the VISCA protocol, Net Mode to Serial and set the baud rate to 9600 (default). To daisy-chain cameras you need to use the VISCA protocol, Net Mode to Serial and set the baud rate to 9600 (default). |
| V_AddrFix | Set to On or Off. |
| P_D_Address | Set from 0 to 254 (enabled in Auto mode, when PELCO-D protocol is selected). |
| P_P_Address | Set from 0 to 31 (enabled in Auto mode, when PELCO-P protocol is selected). |
| Net Mode | Set to serial port Network control to Serial or Paral. |
| Baudrate | Select 2400, 4800, 9600 or 38400. |
Setup parameters are defined.
Restoring to Default Settings
To restore default settings:
- On the IR remote press MENU. The menu appears.
- Use the arrows to select RESTORE DEFAULT.
- Click HOME to enter RESTORE DEFAULT menu.
- Select Restore and then select Yes.
Default settings are restored.
Operating via Ethernet
You can connect to K-Cam4K via Ethernet using either of the following methods:
- Directly to the PC using a crossover cable (see Connecting Ethernet Port Directly to a PC on page 17)
- Via a network hub, switch, or router, using a straight-through cable (see Connecting Ethernet Port via a Network Hub on page 19)
Note: If you want to connect via a router and your IT system is based on IPv6, speak to your IT department for specific installation instructions.
Connecting Ethernet Port Directly to a PC
You can connect the Ethernet port of K-Cam4K directly to the Ethernet port on your PC using a crossover cable with RJ-45 connectors.

This type of connection is recommended for identifying K-Cam4K with the factory configured default IP address.
After connecting K-Cam4K to the Ethernet port, configure your PC as follows:
- Click Start > Control Panel > Network and Sharing Center.
- Click Change Adapter Settings.
- Highlight the network adapter you want to use to connect to the device and click Change settings of this connection.
The Local Area Connection Properties window for the selected network adapter appears as shown in Figure 3.
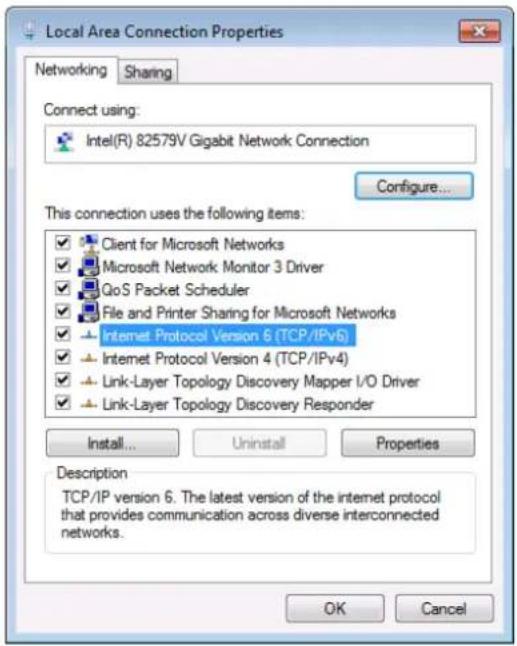
Figure 3: Local Area Connection Properties Window
-
Highlight either Internet Protocol Version 6 (TCP/IPv6) or Internet Protocol Version 4 (TCP/IPv4) depending on the requirements of your IT system.
-
Click Properties.
The Internet Protocol Properties window relevant to your IT system appears as shown in Figure 4 or Figure 5.
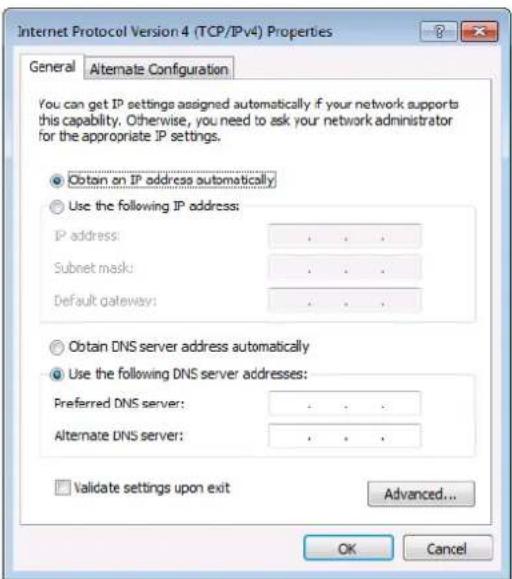
Figure 4: Internet Protocol Version 4 Properties Window
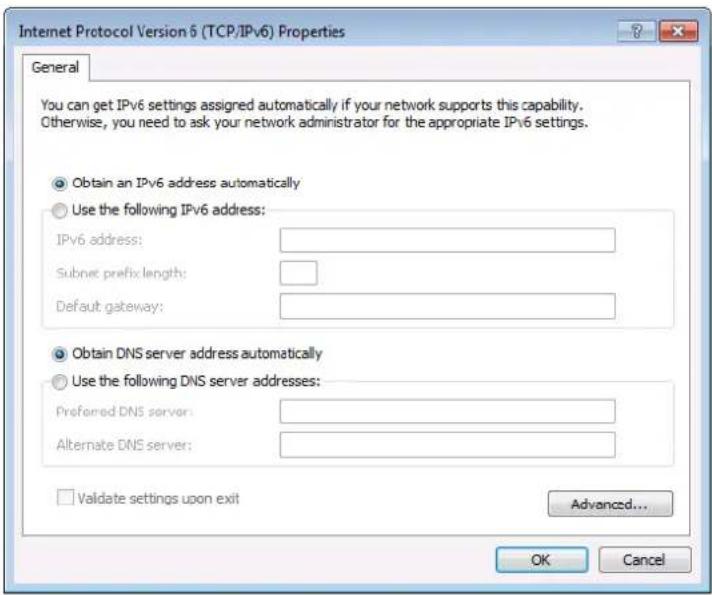
Figure 5: Internet Protocol Version 6 Properties Window
- Select Use the following IP Address for static IP addressing and fill in the details as shown in Figure 6.
For TCP/IPv4 you can use any IP address in the range 192.168.100.1 to 192.168.100.255 (excluding 192.168.100.88) that is provided by your IT department.
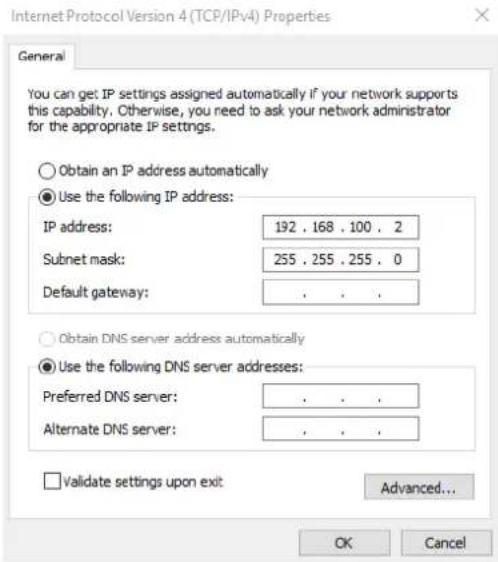
Figure 6: Internet Protocol Properties Window
- Click OK.
- Click Close.
Connecting Ethernet Port via a Network Hub or Switch
You can connect the Ethernet port of K-Cam4K to the Ethernet port on a network hub or using a straight-through cable with RJ-45 connectors.
Configuring Ethernet Port
You can set the Ethernet parameters via the embedded Web pages.
Using Embedded Web Pages
K-Cam4K can be operated remotely using the embedded Web pages. The Web pages are accessed using a Web browser and an Ethernet connection.
When connecting to a Network, do the following
- Connect K-Cam4K camera to your internet or to your PC via network cable.
- Turn on 12V DC power.
- If the network connection is normal, the connection light (green) at the network interface will light up within 5 seconds, and the data indicator (orange) will flash, indicating that the physical connection of the camera has been completed. To
Each page includes two menu areas:
• Real time monitoring, on the left side.
• Device configuration on the right side.
Before attempting to connect:
• Perform the procedures in Operating via Ethernet on page 16.
- Ensure that your browser is supported.
Operating Environment
K-Cam4K supports the following Network settings:
- Operating System: Windows 7/8/10, Mac OS X, Linux and Android.
• Network Protocol: TCP/IP. - Client PC: P4/128M RAM/40G HDD/ supports scaled graphics card, supports DirectX 8.0 or higher version.

Some features might not be supported by some mobile device operating systems.
K-Cam4K enables performing the following:
• Changing Interface Language on page 21.
- Navigating K-Cam4K in Real Time on page 22.
• Controlling via the OSD Menu on page 22.
• Viewing Live Preview on page 23.
- Configure Video Settings on page 24.
• Defining Audio Parameters on page 26.
• Defining General System Parameters on page 27.
- Configure Network Settings on page 28.
• Viewing Device Information on page 29.
Browsing the K-Cam4K Webpages
To Browse the K-Cam4K Webpages
- Open your Internet browser.
- Type the IP address of the device in the Address bar of your browser. For example, the default IP number:

The Controller application page appears.
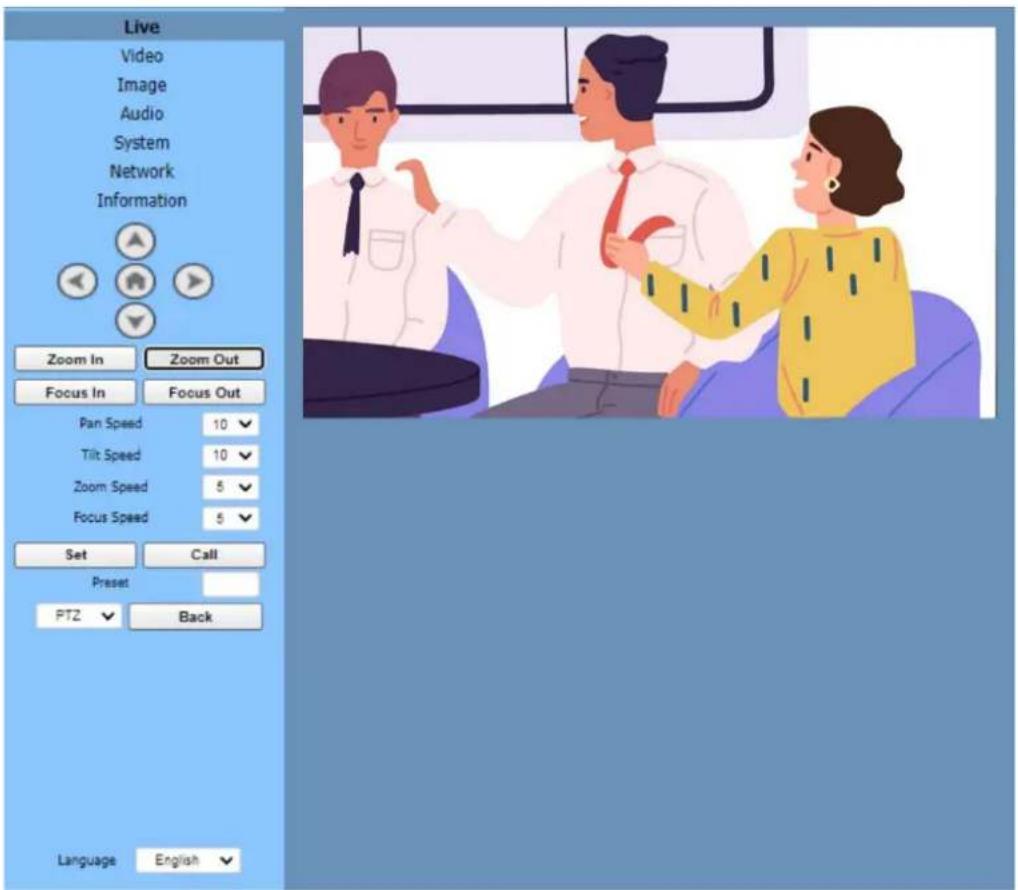
Figure 7: Live Page
- Click the menu items on the top left side of the screen to access the relevant web page.
Changing Interface Language
K-Cam4K enables you to change the interface language.
Changing the Language
To change the interface language:
- On the lower left side open the drop-down box.
- Select the required language (English, Chinese or Russian). The window refreshes.
Language interface has changed.
Navigating K-Cam4K in Real Time
The real-time navigation buttons on the window left side enable the user to control K-Cam4K in real time. All real-time navigation buttons can be accessed from each of the embedded webpages.
To navigate K-Cam4K via embedded webpages:
- Access the embedded webpages (see Browsing the K-Cam4K Webpages on page 21). The Live page appears (see Figure 7).
-
Perform the following actions:
-
Use the up, down to the left or the right arrows to manually move the camera to the desired position.
- Click to move the camera to its default position.
- Click Zoom In (narrow view) or Zoom Out (wide view) for manual zoom, as required.
- Click Focus In, or Focus Out, for manual focusing, as required.
- Select the Pan Speed, Tilt Speed, Zoom Speed and Focus speed, via the relevant drop-down boxes.
Saving and Recalling a Preset
You can save up to 255 presets (0 to 254) from any one of the embedded webpages. Note that preset 0 is always the power on position.
To save/recall a preset:
- Access the embedded webpages (see Browsing the K-Cam4K Webpages on page 21). The Live page appears (see Figure 7).
- Configure the camera position and settings, as desired. Settings include the camera positions.
- Enter a preset number (0 to 254) to the Preset text box.
- Click Set.
- Click Call to recall the preset.
Preset is saved/recalled.
Controlling via the OSD Menu
To control K-Cam4K via the OSD, from the embedded webpages:
-
Access the embedded webpages (see Browsing the K-Cam4K Webpages on page 21). The Live page appears (see Figure 7).
-
Click the PTZ drop-down box and select OSD.
-
Use the arrow buttons select menu items.
OSD is accessed via embedded webpages.
Viewing Live Preview
View a live preview via the Live page. The size of the preview window corresponds to the resolution of the video. The higher the resolution, the larger the image is.
To perform live preview actions:
- Access the embedded webpages (see Browsing the K-Cam4K Webpages on page 21). The Live page appears (see Figure 7).
- Hover over the camera view. The view controls appear.
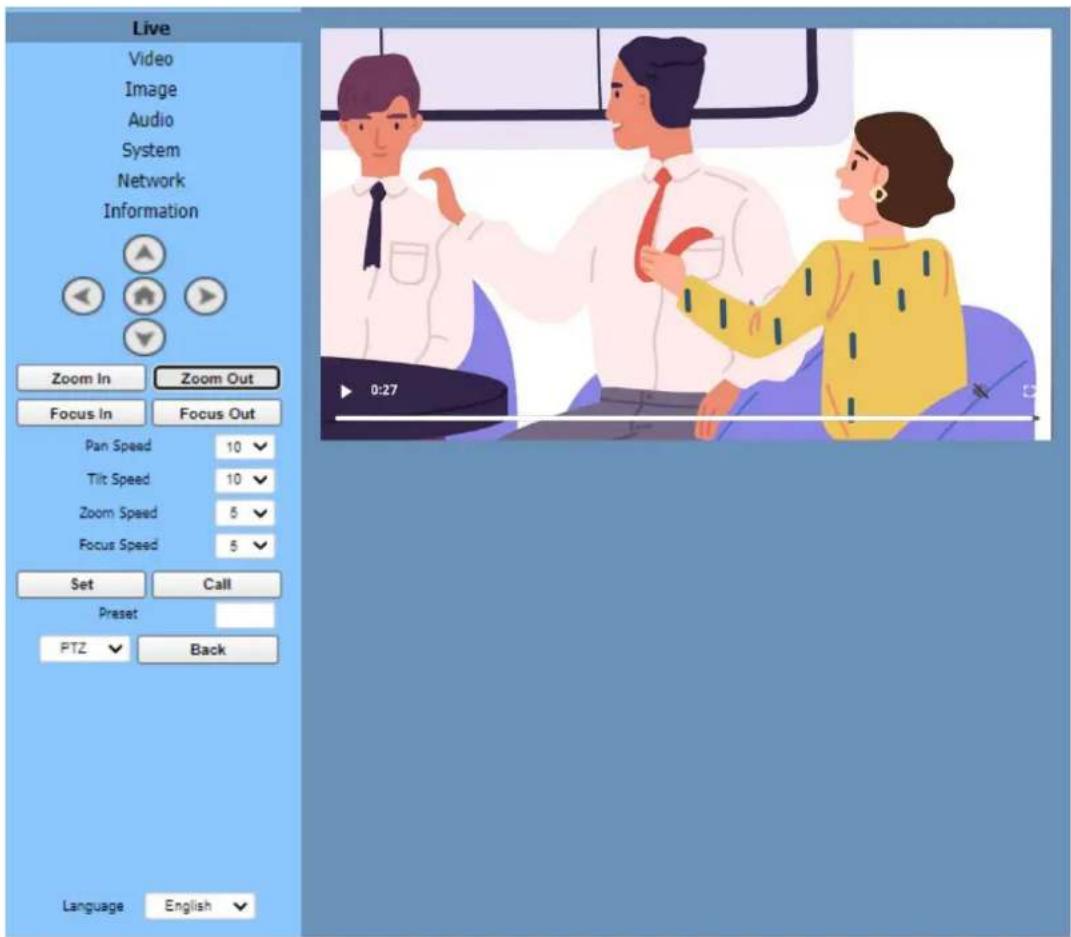
Figure 8: Live View
-
Perform the following actions:
-
Double-click the viewing pane to toggle between full-screen view and normal view.
- Click play or pause buttons to pause or play live view.
- Click square brackets on the right for full view.
- Click mute/unmute icon to mute or unmute the audio.
Configure Video Settings
Configure the K-Cam4K video and streaming settings. The Video page enables performing the following functions:
To configure video settings:
- Access the embedded webpages (see Browsing the K-Cam4K Webpages on page 21). The Live page appears (see Figure 7).
- Select the Video page. The video page appears.
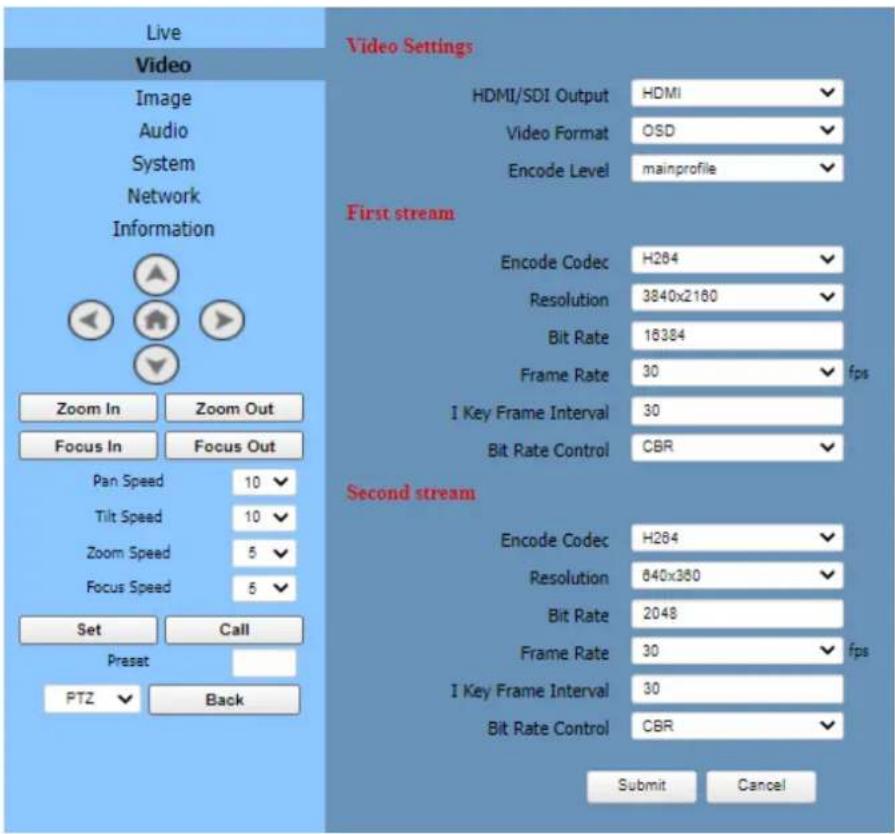
Figure 9: Video Page
-
Define video settings:
-
Select HDMI or SDI.
- Set video format to OSD (meaning that you can set the video HDMI output format, such as 4K30, via the OSD menu settings of the camera), 50Hz (PAL) or 60Hz (NTSC).
-
Set encoding level to mainprofile or highprofile.
-
Configure the first and second streams:
| Set | First Stream | Second Stream |
| Encode Codec | H.264, H.265 or MJPEG | |
| Resolution | 3840x2160, 1920x1080, 1280x720, 1024x576, 720x480, 720x408, 640x480, 640x360 | 720x480, 720x408, 640x480, 640x360, 480x320, 320x240 |
| Bit Rate | Enter the bit rate value. The higher the bit rate the clearer the image, depending on the bandwidth. A narrow bandwidth and a high bit rate may result in a low-quality transmission. The higher the bit rate the clearer the image, depending on the bandwidth. A narrow bandwidth and a high bit rate may result in a low-quality transmission. | |
| Frame Rate | Enter the frame rate. Set a high frame rate for a smoother image. | |
| I Key Frame Interval | The higher the interval the lower the response. | |
| Bit Rate Control | CBR (Constant Bit Rate): Video coder is coding according to preset speed.VBR (Variable Bit Rate): Video coder adjusts the speed based on preset speed to gain the best image quality. | |
5. Click Submit.
Video settings are defined.
Defining Audio Parameters
Set the image parameters.
To set audio parameters:
- Access the embedded webpages (see Browsing the K-Cam4K Webpages on page 21). The Live page appears (see Figure 7).
- Select the Audio page. The Audio page appears.
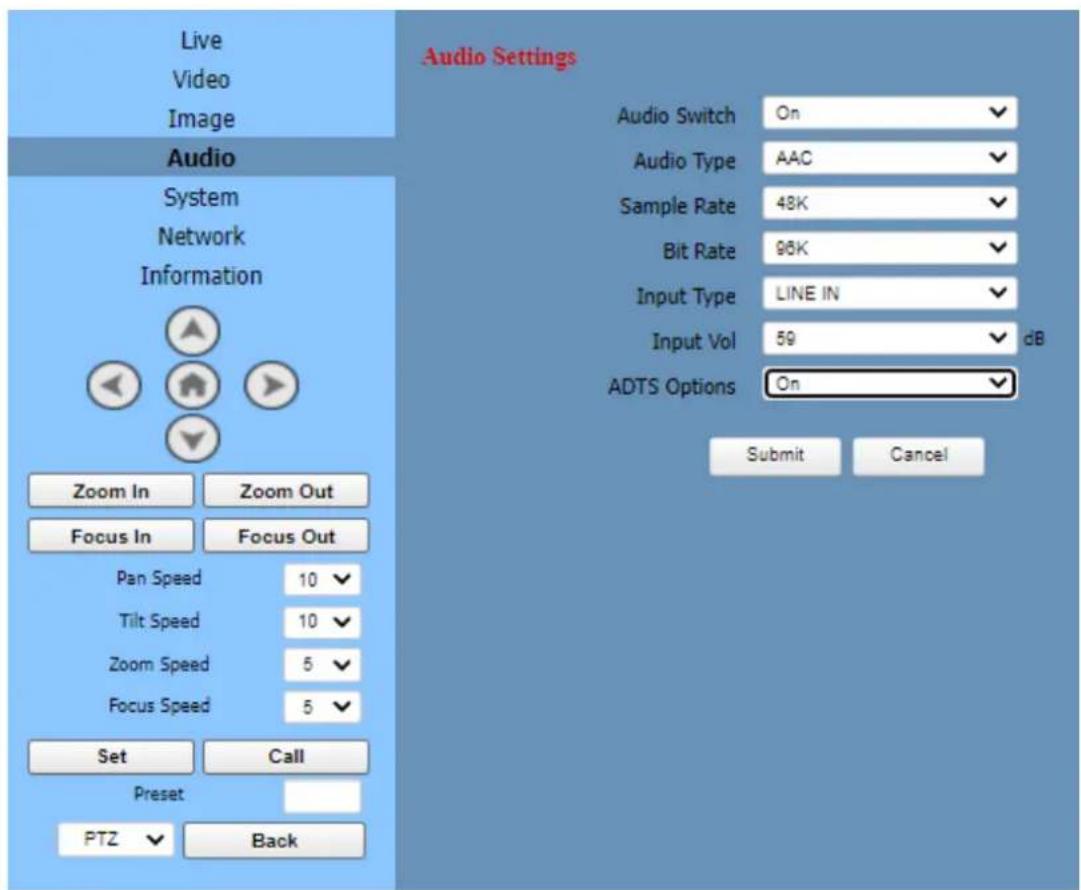
Figure 10: Audio Page
- Set the following parameters:
■ Audio Switch: On or Off.
■ Audio Type: AAC or G711A.
■ Sample Rate: 44.1K or 48K.
- Bit Rate: 96K or 128K.
- Input Type: LINE IN.
- Input Vol: select the volume from the drop-down box.
■ ADTS Options (Audio Data Transport Stream): On or Off.
4. Click Submit.
Audio parameters are set.
Defining General System Parameters
Set the general system parameters.
To set image parameters:
- Access the embedded webpages (see Browsing the K-Cam4K Webpages on page 21). The Live page appears (see Figure 7).
- Select the System page. The System page appears.
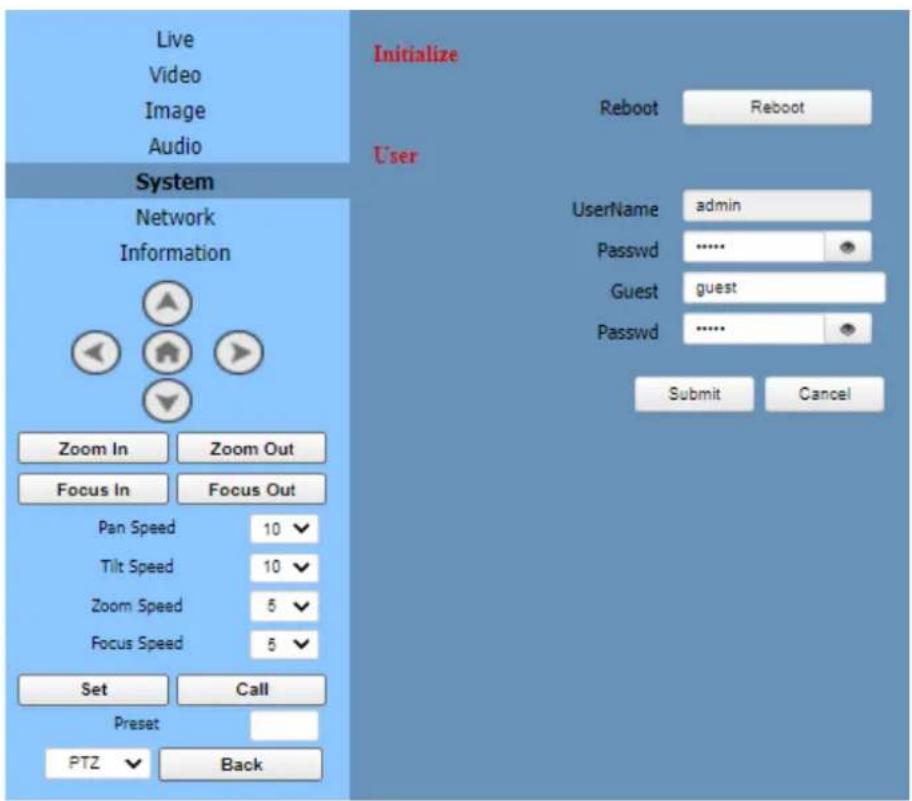
Figure 11: System Page
- Click Reboot to reboot the camera.
- Define User Name and password (default admin/admin).
- Define Guest name and guest password (default guest/guest).

Note that when accessing as guest, you can view the local preview, select the presets and control camera motion and so on, access is denied to audio and video settings, as well as Network settings.
- Click Submit.
System settings are defined.
Configure Network Settings
Set the Network parameters.
To set Network parameters:
- Access the embedded webpages (see Browsing the K-Cam4K Webpages on page 21). The Live page appears (see Figure 7).
- Select the Network page. The Network page appears.
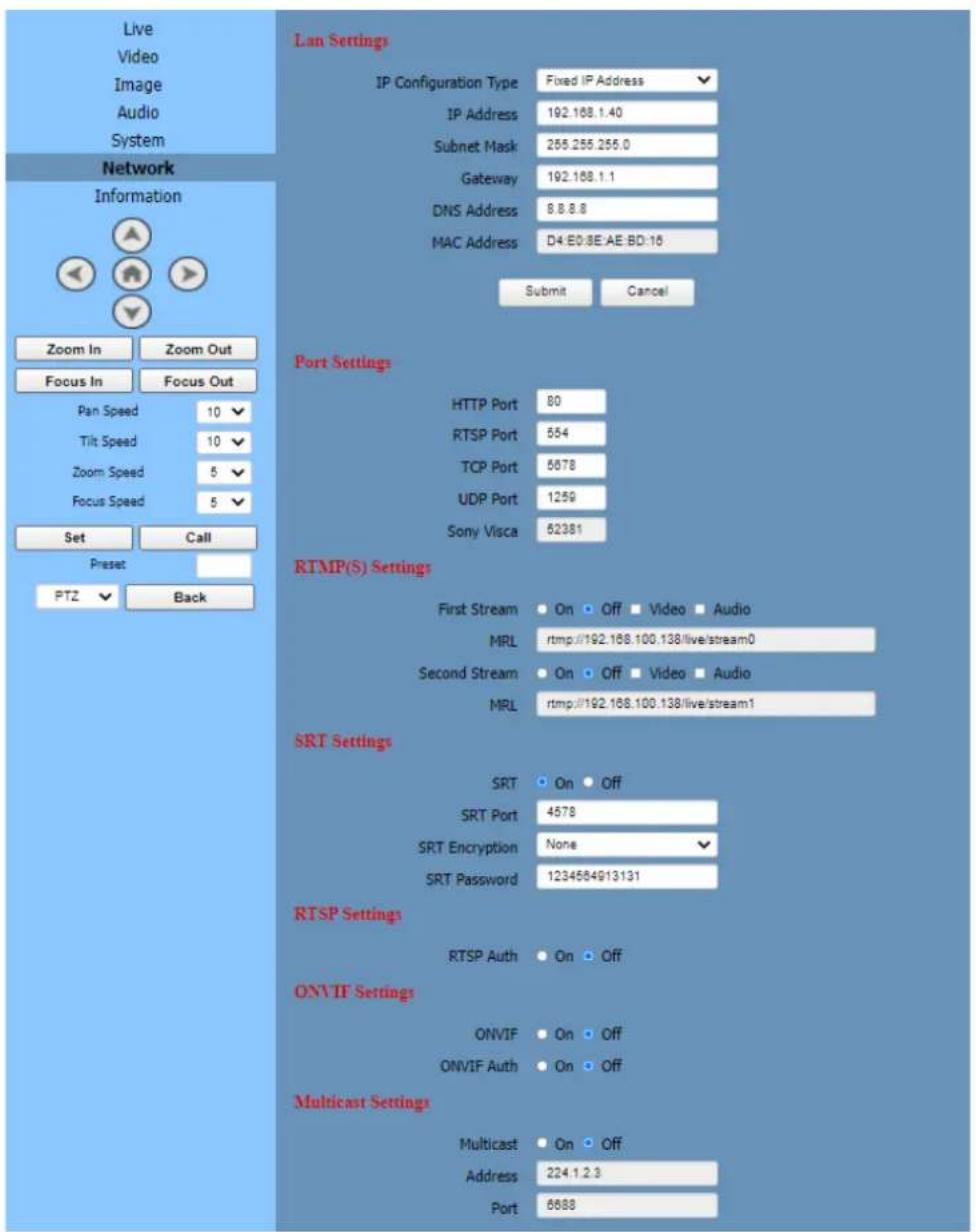
Figure 12: Network Page
-
Define LAN settings.
-
Define a fixed IP address (static IP) or a Dynamic IP address (DHCP).
-
Set the IP Address (default: 192.168.100.88), Gateway, Subnet Mask and DNS address.
■ View the MAC Address -
Click Submit to save LAN settings.
- Define Port Settings (default settings are displayed in Figure 11).
- Set RTSP authorization On or Off.
- Set ONVIF (Open Network Video Interface Forum) On or Off and ONVIF authorization On or Off.
- Set Multicast settings to On or Off. Setting the multicast address (default value is 224.1.2.3) and port (default value is 6688, and is the multicast port of the first stream; 6690 is the multicast port of the second stream).
- Set NTP (Network Time Protocol) time sync to On or Off as well as time zone, server address and so on.
- Click Submit.
Network settings are defined.
Viewing Device Information
To view device information:
- Access the embedded webpages (see Browsing the K-Cam4K Webpages on page 21). The Live page appears (see Figure 7).
- Select the Information page. The Information page appears.
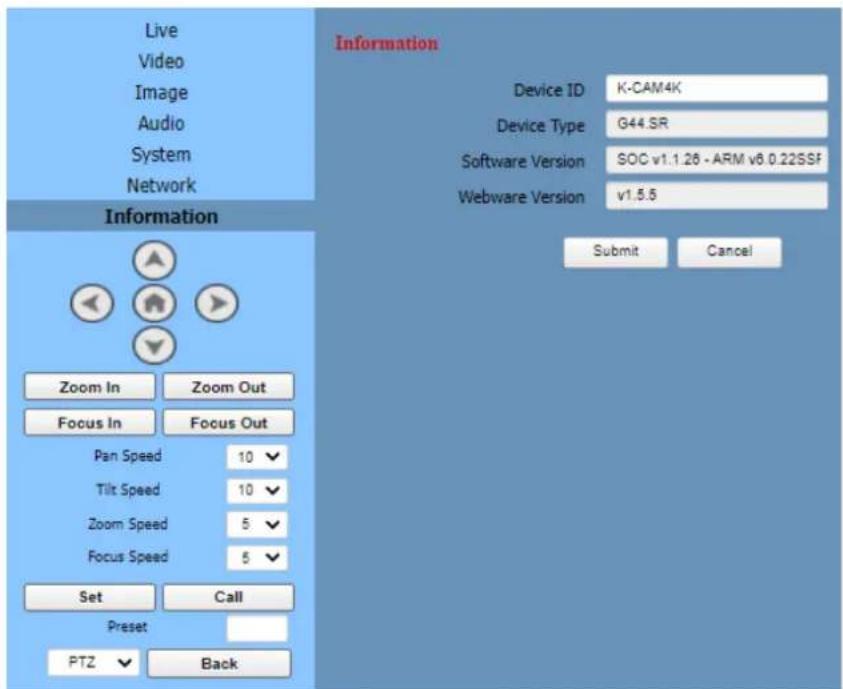
Figure 13: Information Page
- View the Information.
- If requires change the device ID.
- Click Submit.
Upgrading Firmware
Contact Tech support if you need to upgrade the firmware (support@kramerav.com).
Technical Specifications
| Ports | USB-C 2.0 | On a USB-C connector |
| RS-232 IN | On an 8-pin Min DIN, Max Distance: 30mProtocol: VISCA / Pelco-D / Pelco-P | |
| RS-232 OUT | On an 8-pin Min DIN, Max Distance: 30mProtocol: VISCA / Pelco-D / Pelco-P | |
| RJ-45 | 10/100/1000M Adaptive Ethernet Port | |
| RS-485 | On a 2-pin phoenix connector, Max Distance: 1200m, Protocol: VISCA / Pelco-D / Pelco-P | |
| Audio Line In | On a 3.5mm mini jack | |
| HDMI | On an HDMI connector | |
| 3G-SDI | On a BNC connector, 800mVp-p, 75Ω. Along to SMPTE 424M standard | |
| USB | On a USB type B connector Up to 4K@30fps compressed video and 1080P original video can be output | |
| Camera | Video System | HDMI: 1080P60, 1080P50, 1080I60, 1080I50, 1080P30, 1080P25, 720P60, 720P50, 1080P29.97, 1080I59.94, 1080P59.94, 720P59.94, 4KP29.97, 4KP25, 4KP30 |
| 3G-SDI: 1080P60, 1080P50, 1080I60, 1080P59.94, 1080I59.94, 1080I50, 1080P30, 1080P29.97, 1080P29.97, 1080P25, 720P60, 720P59.94, 720P50 | ||
| Sensor | 1/2.5 inch, CMOS, Max Effective Pixel: 8.51M | |
| Scanning Mode | Progressive | |
| Lens | 12x, f = 4.4mm ~ 52.8mm, F1.8 ~ F2.6 | |
| Digital Zoom | 16x | |
| Minimal Illumination | 0.5 Lux @ (F1.8, AGC ON) | |
| Shutter | 1/30s ~ 1/10000s | |
| White Balance | Auto, Indoor, Outdoor, One Push, Manual | |
| Backlight Compensation | Support | |
| Digital Noise Reduction | 3D Digital Noise Reduction | |
| Video S/N | ≥55dB | |
| Horizontal Angle of View | 71° ~ 8.2° | |
| Vertical Angle of View | 42.7° ~ 4.5° | |
| Horizontal Rotation Range | ±170° | |
| Vertical Rotation Range | ±30° | |
| Pan Speed Range | 1.6°/s ~ 76°/s | |
| Tilt Speed Range | 0.5°/s ~ 15°/s | |
| H & V Flip | Support | |
| Image Freeze | Support | |
| Number of Presets | 255 | |
| Preset Accuracy | 0.1° | |
| USB Features | Video Format | YUY2: max to 1080P@30fps |
| H.264 AVC/SVC: max to 2160P@30fps | ||
| MJPEG: max to 4K@30fps | ||
| Operating System | Windows 7, Windows 8, Windows 10, Mac OS X, Linux, Android | |
| Color System / Compression | YUY2 / MJPEG / H.264 / H.265 | |
| USB Audio | Support | |
| USB Video Communication Protocol | UVC 1.1~1.5 | |
| UVC PTZ | Support | |
| Network Features | Video Compression | H.264/H.265/MJPEG |
| Video Stream | First Stream, Second Stream | |
| First Stream Resolution | 3840x2160, 1920x1080, 1280x720, 1024x576, 720x480, 720x408, 640x480, 640x360 | |
| Second Stream Resolution | 720x480, 720x408, 640x480, 640x360, 480x320, 320x240 | |
| Video Bit Rate | H264: ~60Mbps MJPEG: ~200Mbps | |
| Bit Rate Type | Variable Rate, Fixed Rate | |
| Frame Rate | 50hz: 4K max to 30fps, 1080P max to 50fps60hz: 4K max to 30fps, 1080P max to 60fps | |
| Audio Compression | G711A, AAC | |
| Audio Bit Rate | 96K, 128K | |
| Protocols | TCP/IP, HTTP, RTSP, RTMP/RTMPS, ONVIF, DHCP, SRT, Multicast | |
| Controls | IR Remote Control Transmitter | OSD |
| Embedded web pages | ||
| Power | Source | 12V DC, 2A max. |
| Consumption | 12W max. | |
| Environmental Conditions | Operating Temperature | 0° to +40°C (32° to 104°F) |
| Storage Tewmperature | -40° to +60°C (-40° to 140°F) | |
| Humidity | 10% to 90%, RHL non-condensing | |
| Altitude | Below 5000 meters | |
| Regulatory Compliance | Safety | CE, FCC |
| Environmental | RoHs, REACH | |
| Enclosure | Type | Aluminum and plastic |
| General | Net Dimensions (W, D, H) | 23.5cm x 14.5cm x 17cm (9.2" x 5.7" x 6.7") |
| Shipping Dimensions (W, D, H) | 30cm x 24.5cm x 24.5cm (11.8" x 9.6" x 9.6") | |
| Net Weight | 1.42kg (3.1lbs) approx. | |
| Shipping Weight | 3.35kg (7.4lbs) approx. | |
| Accessories | Included | Power adapter and cord, IR remote control transmitter, 1 USB 3.0 cable, wall bracket kit, lens cover |
Specifications are subject to change without notice at www.kramerav.com
Default Communication Parameters
RS-232
| Baud Rate: | 9600 | |
| Data Bits: | 8 | |
| Stop Bits: | 1 | |
| Parity: | None | |
| Command Format: | ASCII | |
| To reset the IP settings to the factory reset values go to: Menu->Setup -> Factory Reset-> press Enter to confirm | ||
| IP Address: | 192.168.100.88 | |
| Subnet mask: | 255.255.0.0 | |
| Default gateway: | 192.168.1.2 | |
| Default username: | admin | |
| Default password: | admin | |
| Full Factory Reset | ||
| OSD | Go to: Menu-> RESTORE DEFAULT -> confirm | |
| Reset button | Press the RESET button for 5 seconds to reset the machine | |
The warranty obligations of Kramer Electronics Inc. ("Kramer Electronics") for this product are limited to the terms set forth below:
What is Covered
This limited warranty covers defects in materials and workmanship in this product.
What is Not Covered
This limited warranty does not cover any damage, deterioration or malfunction resulting from any alteration, modification, improper or unreasonable use or maintenance, misuse, abuse, accident, neglect, exposure to excess moisture, fire, improper packing and shipping (such claims must be presented to the carrier), lightning, power surges, or other acts of nature. This limited warranty does not cover any damage, deterioration or malfunction resulting from the installation or removal of this product from any installation, any unauthorized tampering with this product, any repairs attempted by anyone unauthorized by Kramer Electronics to make such repairs, or any other cause which does not relate directly to a defect in materials and/or workmanship of this product. This limited warranty does not cover cartons, equipment enclosures, cables or accessories used in conjunction with this product.
Without limiting any other exclusion herein, Kramer Electronics does not warrant that the product covered hereby, including, without limitation, the technology and/or integrated circuit(s) included in the product, will not become obsolete or that such items are or will remain compatible with any other product or technology with which the product may be used.
How Long this Coverage Lasts
The standard limited warranty for Kramer products is seven (7) years from the date of original purchase, with the following exceptions:
- All Kramer VIA hardware products are covered by a standard three (3) year warranty for the VIA hardware and a standard three (3) year warranty for firmware and software updates; all Kramer VIA accessories, adapters, tags, and dongles are covered by a standard one (1) year warranty.
- Kramer fiber optic cables, adapter-size fiber optic extenders, pluggable optical modules, active cables, cable retractors, ring mounted adapters, portable power chargers, Kramer speakers, and Kramer touch panels are covered by a standard one (1) year warranty. Kramer 7-inch touch panels purchased on or after April 1st, 2020 are covered by a standard two (2) year warranty.
- All Kramer Calibre products, all Kramer Minicom digital signage products, all HighSecLabs products, all streaming, and all wireless products are covered by a standard three (3) year warranty.
- All Sierra Video MultiViewers are covered by a standard five (5) year warranty.
- Sierra switchers & control panels are covered by a standard seven (7) year warranty (excluding power supplies and fans that are covered for three (3) years).
- K-Touch software is covered by a standard one (1) year warranty for software updates.
- All Kramer passive cables are covered by a lifetime warranty.
Who is Covered
Only the original purchaser of this product is covered under this limited warranty. This limited warranty is not transferable to subsequent purchasers or owners of this product.
What Kramer Electronics Will Do
Kramer Electronics will, at its sole option, provide one of the following three remedies to whatever extent it shall deem necessary to satisfy a proper claim under this limited warranty:
- Elect to repair or facilitate the repair of any defective parts within a reasonable period of time, free of any charge for the necessary parts and labor to complete the repair and restore this product to its proper operating condition. Kramer Electronics will also pay the shipping costs necessary to return this product once the repair is complete.
- Replace this product with a direct replacement or with a similar product deemed by Kramer Electronics to perform substantially the same function as the original product. If a direct or similar replacement product is supplied, the original product's end warranty date remains unchanged and is transferred to the replacement product.
- Issue a refund of the original purchase price less depreciation to be determined based on the age of the product at the time remedy is sought under this limited warranty.
What Kramer Electronics Will Not Do Under This Limited Warranty
If this product is returned to Kramer Electronics or the authorized dealer from which it was purchased or any other party authorized to repair Kramer Electronics products, this product must be insured during shipment, with the insurance and shipping charges prepaid by you. If this product is returned uninsured, you assume all risks of loss or damage during shipment. Kramer Electronics will not be responsible for any costs related to the removal or re-installation of this product from or into any installation. Kramer Electronics will not be responsible for any costs related to any setting up this product, any adjustment of user controls or any programming required for a specific installation of this product.
How to Obtain a Remedy Under This Limited Warranty
To obtain a remedy under this limited warranty, you must contact either the authorized Kramer Electronics reseller from whom you purchased this product or the Kramer Electronics office nearest you. For a list of authorized Kramer Electronics resellers and/or Kramer Electronics authorized service providers, visit our web site at www.kramerav.com or contact the Kramer Electronics office nearest you.
In order to pursue any remedy under this limited warranty, you must possess an original, dated receipt as proof of purchase from an authorized Kramer Electronics reseller. If this product is returned under this limited warranty, a return authorization number, obtained from Kramer Electronics, will be required (RMA number).
You may also be directed to an authorized reseller or a person authorized by Kramer Electronics to repair the product.
If it is decided that this product should be returned directly to Kramer Electronics, this product should be properly packed, preferably in the original carton, for shipping. Cartons not bearing a return authorization number will be refused.
Limitation of Liability
THE MAXIMUM LIABILITY OF KRAMER ELECTRONICS UNDER THIS LIMITED WARRANTY SHALL NOT EXCEED THE ACTUAL PURCHASE PRICE PAID FOR THE PRODUCT. TO THE MAXIMUM EXTENT PERMITTED BY LAW, KRAMER ELECTRONICS IS NOT RESPONSIBLE FOR DIRECT, SPECIAL, INCIDENTAL OR CONSEQUENTIAL DAMAGES RESULTING FROM ANY BREACH OF WARRANTY OR CONDITION, OR UNDER ANY OTHER LEGAL
THEORY. Some countries, districts or states do not allow the exclusion or limitation of relief, special, incidental, consequential or indirect damages, or the limitation of liability to specified amounts, so the above limitations or exclusions may not apply to you.
Exclusive Remedy
TO THE MAXIMUM EXTENT PERMITTED BY LAW, THIS LIMITED WARRANTY AND THE REMEDIES SET FORTH ABOVE ARE EXCLUSIVE AND IN LIEU OF ALL OTHER WARRANTIES, REMEDIES AND CONDITIONS, WHETHER ORAL OR WRITTEN, EXPRESS OR IMPLIED. TO THE MAXIMUM EXTENT PERMITTED BY LAW, KRAMER ELECTRONICS SPECIFICALLY DISCLAIMS ANY AND ALL IMPLIED WARRANTIES, INCLUDING, WITHOUT LIMITATION, WARRANTIES OF MERCHANTABILITY AND FITNESS FOR A PARTICULAR PURPOSE. IF KRAMER ELECTRONICS CANNOT LAWFULLY DISCLAIM OR EXCLUDE IMPLIED WARRANTIES UNDER APPLICABLE LAW, THEN ALL IMPLIED WARRANTIES COVERING THIS PRODUCT, INCLUDING WARRANTIES OF MERCHANTABILITY AND FITNESS FOR A PARTICULAR PURPOSE, SHALL APPLY TO THIS PRODUCT AS PROVIDED UNDER APPLICABLE LAW. IF ANY PRODUCT TO WHICH THIS LIMITED WARRANTY APPLIES IS A "CONSUMER PRODUCT" UNDER THE MAGNUSON-MOSS WARRANTY ACT (15 U.S.C.A. §2301, ET SEQ.) OR OTHER APPLICABLE LAW, THE FOREGOING DISCLAIMER OF IMPLIED WARRANTIES SHALL NOT APPLY TO YOU, AND ALL IMPLIED WARRANTIES ON THIS PRODUCT, INCLUDING WARRANTIES OF MERCHANTABILITY AND FITNESS FOR THE PARTICULAR PURPOSE, SHALL APPLY AS PROVIDED UNDER APPLICABLE LAW.
Other Conditions
This limited warranty gives you specific legal rights, and you may have other rights which vary from country to country or state to state.
This limited warranty is void if (i) the label bearing the serial number of this product has been removed or defaced, (ii) the product is not distributed by Kramer Electronics or (iii) this product is not purchased from an authorized Kramer Electronics reseller. If you are unsure whether a reseller is an authorized Kramer Electronics reseller, visit our web site at www.kramerav.com or contact a Kramer Electronics office from the list at the end of this document.
Your rights under this limited warranty are not diminished if you do not complete and return the product registration form or complete and submit the online product registration form. Kramer Electronics thanks you for purchasing a Kramer Electronics product. We hope it will give you years of satisfaction.


P/N:

Rev:

SAFETY WARNING
Disconnect the unit from the power supply before opening and servicing
For the latest information on our products and a list of Kramer distributors, visit our website where updates to this user manual may be found.
We welcome your questions, comments, and feedback.
The terms HDMI, HDMI High-Definition Multimedia Interface, and the HDMI Logo are trademarks or registered trademarks of HDMI Licensing Administrator, Inc. All brand names, product names, and trademarks are the property of their respective owners.

- Contents
- Introduction 1
- Defining K-Cam4K 4K PTZ Camera 4
- Mounting K-Cam4K 5
- Connecting K-Cam4K 7
- Operating and Controlling K-Cam4K 9
- Using Embedded Web Pages 20
- Upgrading Firmware 30
- Technical Specifications 31
- Introduction
- Getting Started
- Achieving Best Performance
- Safety Instructions
- Caution:
- Warning:
- Recycling Kramer Products
- Overview
- Typical Applications
- Controlling your K-Cam4K
- Defining K-Cam4K 4K PTZ Camera
- Mounting K-Cam4K
- To mount K-Cam4K on a wall:
- To connect K-Cam4K as illustrated in the example in Figure 2:
- Connecting to K-Cam4K via RS-232
- Operating and Controlling K-Cam4K
- Controlling Via IR Remote Control Transmitter
- Assigning up to 4 K-Cam4K Units to the IR Remote Controller
- Freezing an Image
- Shortcut Keys
- Operating via the OSD Menu
- To enter and use the OSD menu buttons:
- Configuring Camera Exposure
- Configuring Color Settings
- Setting Image Parameters
- Setting P/T/Z Parameters
- Setting Digital Noise Reduction Level
- To set noise reduction level:
- Defining Setup Parameters
- To define setup parameters:
- Configuring Communication Parameters
- Restoring to Default Settings
- To restore default settings:
- Operating via Ethernet
- Connecting Ethernet Port Directly to a PC
- Connecting Ethernet Port via a Network Hub or Switch
- Configuring Ethernet Port
- Using Embedded Web Pages
- Operating Environment
- Browsing the K-Cam4K Webpages
- To Browse the K-Cam4K Webpages
- Changing Interface Language
- Changing the Language
- Navigating K-Cam4K in Real Time
- Saving and Recalling a Preset
- To save/recall a preset:
- Controlling via the OSD Menu
- Viewing Live Preview
- To perform live preview actions:
- Configure Video Settings
- To configure video settings:
- Click Submit.
- Defining Audio Parameters
- To set audio parameters:
- Click Submit.
- Defining General System Parameters
- To set image parameters:
- Configure Network Settings
- To set Network parameters:
- Viewing Device Information
- To view device information:
- Upgrading Firmware
- Default Communication Parameters
- What is Covered
- What is Not Covered
- How Long this Coverage Lasts
- Who is Covered
- What Kramer Electronics Will Do
- What Kramer Electronics Will Not Do Under This Limited Warranty
- How to Obtain a Remedy Under This Limited Warranty
- Limitation of Liability
- Exclusive Remedy
- Other Conditions
Brand : Kramer
Model : K-Cam4K
Category : Security Camera