
LN24REFL - Fridge LYNX - Free user manual and instructions
Find the device manual for free LN24REFL LYNX in PDF.


| Product Type | Undercounter Refrigerator / Beverage Center |
| Model Number | LN24REFL |
| Width (Cabinet) | 23 7/8 inches (60.7 cm) |
| Height (Adjustable) | 33 3/4 to 34 3/4 inches (85.7 to 88.3 cm) |
| Depth (Cabinet) | 23 23/32 inches (60.2 cm) |
| Depth (Overall) | 26 3/4 inches (67.9 cm) |
| Weight | 140 lbs (63.6 kg) |
| Electrical Requirements | 115 V, 60 Hz, 15 A dedicated circuit |
| Refrigerant Type | R600a (Isobutane), flammable |
| Control Type | Electronic with digital display |
| Temperature Range | 34°F to 45°F (1°C to 7°C) |
| Interior Light | LED, auto on with door, optional 3-hour stay-on |
| Shelving | 2 perforated stainless steel cantilever shelves |
| Door Type | Solid or glass (optional) |
| Anti-Tip Device | Included; must be installed for freestanding use |
| Sabbath Mode | Yes, disables lights and display |
| Showroom Mode | Yes, disables cooling for display |
| Temperature Display | Digital, shows actual interior temperature |
| Temperature Units | °F or °C, switchable |
| Defrost Type | Automatic (frost-free) |
| Front Grille | Removable for cleaning; must remain unobstructed |
| Warranty | 2 years full, 6 years sealed system parts, 12 years limited |
| Leveling Legs | Adjustable front and rear |
| Installation Options | Built-in or freestanding (with anti-tip device) |
Frequently Asked Questions - LN24REFL LYNX
User questions about LN24REFL LYNX
0 question about this device. Answer the ones you know or ask your own.
Ask a new question about this device
Download the instructions for your Fridge in PDF format for free! Find your manual LN24REFL - LYNX and take your electronic device back in hand. On this page are published all the documents necessary for the use of your device. LN24REFL by LYNX.
USER MANUAL LN24REFL LYNX
natural_image
Exterior view of a white stainless steel冷冻 refrigerator with visible cooling fins and ventilation grilles (no text or symbols)CONTENTS AND SAFETY INSTRUCTIONS
Contents
Safety information 2
Unpacking your appliance ....3
Warranty registration 3
Installing your appliance ....4
Cabinet clearances ....4
Leveling the appliance ....4
Electrical connection 5
Installing the anti-tip device 6
Product Dimensions 8
Using your Electronic control 10
Shelving configurations ....11
Care and cleaning 13
Long term storage / winterization 14
Stainless steel maintenance 15
Energy saving tips 16
Obtaining service 16
Troubleshooting 17
Warranty 18
Important Safety Instructions
Warnings and safety instructions appearing in this guide are not meant to cover all possible conditions and situations that may occur. Common sense, caution, and care must be exercised when installing, maintaining, or operating this appliance.
Recognize Safety Symbols, Words, and Labels.

WARNING
WARNING-You can be killed or seriously injured if you do not follow these instructions.

CAUTION
CAUTION-Hazards or unsafe practices which could result in personal injury or property / product damage.
NOTE
NOTE-Important information to help assure a problem free installation and operation.

WARNING
WARNING-This unit contains R600a (Isobutane) which is a flammable hydrocarbon. It is safe for regular use. Do not use sharp objects to expedite defrosting. Do not damage refrigerant circuit.

WARNING
State of California Proposition 65 Warning:
This product contains one or more chemicals known to the State of California to cause cancer.

WARNING
State of California Proposition 65 Warning:
This product contains one or more chemicals known to the State of California to cause birth defects or other reproductive harm..
UNPACKING YOUR APPLIANCE

WARNING
EXCESSIVE WEIGHT HAZARD
Use two or more people to move product. Failure to do so can result in personal injury.
Remove Interior Packaging
Your appliance has been packed for shipment with all parts that could be damaged by movement securely fastened. Remove internal packing materials and any tape holding internal components in place. The owners manual is shipped inside the product in a plastic bag along with the warranty registration card, and other accessory items.
Important
Keep your carton and packaging until your appliance has been thoroughly inspected and found to be in good condition. If there is damage, the packaging will be needed as proof of damage in transit. Afterwards please dispose of all items responsibly.

WARNING
WARNING - Dispose of the plastic bags which can be a suffocation hazard.
Note to Customer
This merchandise was carefully packed and thoroughly inspected before leaving our plant. Responsibility for its safe delivery was assumed by the retailer upon acceptance of the shipment. Claims for loss or damage sustained in transit must be made to the retailer.
NOTE
DO NOT RETURN DAMAGED MERCHANDISE TO THE MANUFACTURER - FILE THE CLAIM WITH THE RETAILER.

CAUTION
If the appliance was shipped, handled, or stored in other than an upright position for any period of time, allow the appliance to sit upright for a period of at least 24 hours before plugging in. This will assure oil returns to the compressor. Plugging the appliance in immediately may cause damage to internal parts.
Warranty Registration
It is important you send in your warranty registration card immediately after taking delivery of your appliance or you can register online at:
www.lynxgrills.com/support/registration
The following information will be required when registering your appliance.
Service/Model Number
Serial Number
Date of Purchase
Dealer's name and address
The service/model number and serial number can be found on the serial plate which is located inside the cabinet on the left side near the top. (See Figure 1).
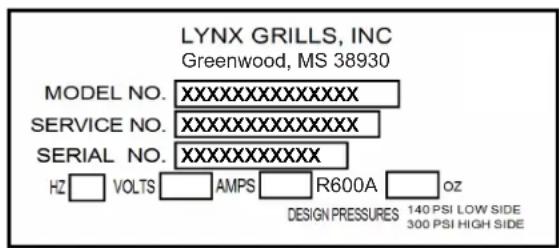
Figure 1

WARNING
WARNING - Help Prevent Tragedies
Child entrapment and suffocation are not problems of the past. Junked or abandoned refrigerators are still dangerous - even if they sit out for "just a few hours".
If you are getting rid of your old refrigerator, please follow the instructions below to help prevent accidents.
Before you throw away your old refrigerator or freezer:
• Take off the doors or remove the drawers.
- Leave the shelves in place so children may not easily climb inside.
INSTALLING YOUR APPLIANCE
Select Location
The proper location will ensure peak performance of your appliance. We recommend a location where the unit will be out of direct sunlight and away from heat sources. To ensure your product performs to specifications, the recommended installation location temperature range is from 15 to 100°F (10 to 38°C).
Cabinet Clearance
Ventilation is required from the bottom front of the appliance. Keep this area open and clear of any obstructions. Adjacent cabinets and counter top can be installed around the appliance as long as the front grille remains unobstructed.
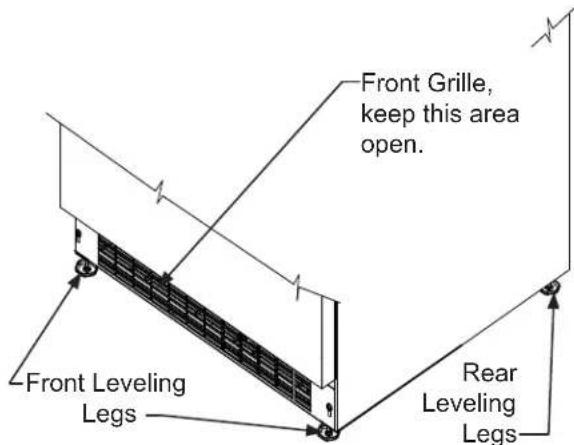
Figure 2
Leveling Legs
Adjustable legs at the front and rear corners of the appliance should be set so the unit is firmly positioned on the floor and level from side to side and front to back. The overall height of your Lynx appliance may be adjusted between the minimum, 33 ^3/4 " (85.7 cm), by turning the leveling leg in (CW ⭕) and the maximum, 34 ^3/4 " (88.3 cm) by turning the leveling leg out (CCW ⭕).

CAUTION
Front Grille
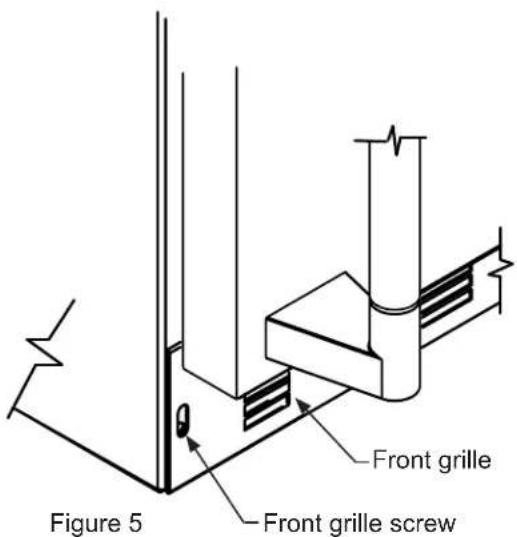
Do not obstruct the front grille. The openings within the front grille allow air to flow through the condenser heat exchanger. Restrictions to this air flow will result in increased energy usage and loss of cooling capacity. For this reason it is important this area not be obstructed and the grille openings kept clean. Lynx Grills does not recommend the use of a custom made grille as air flow may be restricted. (See Figure 2).
To adjust the leveling legs, place the appliance on a solid surface and protect the floor beneath the legs to avoid scratching the floor. With the assistance of another person, lean the appliance back to access the front leveling legs. Raise or lower the legs to the required dimension by turning the legs. Repeat this process for the rear by tilting the appliance forward using caution. On a level surface check the appliance for levelness and adjust accordingly.
The front grille screws may be loosened and the grille adjusted to the desired height. When adjustment is complete tighten the two front grille screws. (See Figure 5).
INSTALLING YOUR APPLIANCE
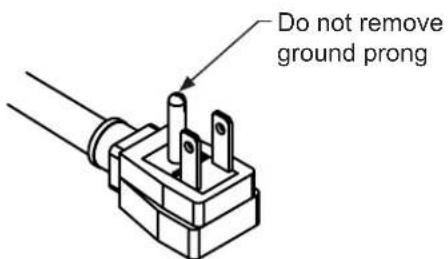
Figure 3
natural_image
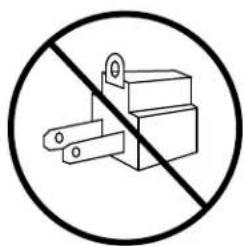
Symbol of a mechanical switch crossed out by a diagonal line, representing no protection or disconnection (no text present)Figure 4

WARNING
Electrical Shock Hazard
- Do not use an extension cord with this appliance. They can be hazardous and can degrade product performance.
- This appliance should not, under any circumstances, be installed to an un-grounded electrical supply.
- Do not remove the grounding prong from the power cord. (See Figure 3).
- Do not use an adapter. (See Figure 4).
- Do not splash or spray water from a hose on the appliance. Doing so may cause an electrical shock, which may result in severe injury or death.
Electrical Connection
A grounded 115 volt, 15 amp dedicated circuit is required.
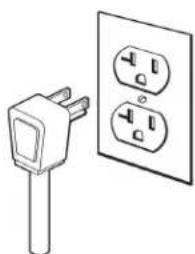
This product is factory equipped with a power supply cord that has a three-pronged, grounded plug. It must be plugged into a mating grounding type receptacle in accordance with the National Electrical Code and applicable local codes and ordinances (see Figure 6). If the circuit does not have a grounding type receptacle, it is the responsibility and obligation of the customer to provide the proper power supply. The third ground prong should not, under any circumstances, be cut or removed.
natural_image
Simple line drawing of an electrical plug and two separate socket (no text or symbols)Figure 6
NOTE
Ground Fault Circuit Interrupters (GFCI) are prone to nuisance tripping which will cause the appliance to shut down. GFCI's are generally not used on circuits with power equipment that must run unattended for long periods of time, unless required to meet local building codes and ordinances.
INSTALLING THE ANTI-TIP DEVICE

WARNING

• ALL APPLIANCES CAN TIP RESULTING IN INJURY.
• INSTALL THE ANTI-TIP BRACKET PACKED WITH THE APPLIANCE.
• FOLLOW THE INSTRUCTIONS BELOW
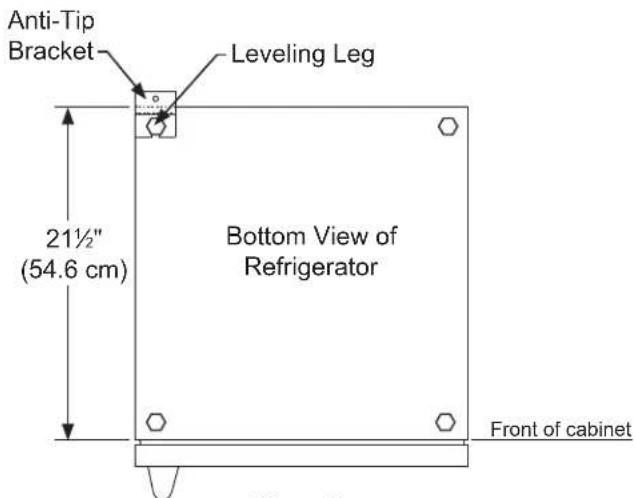
Figure 7
Anti-Tip Device

WARNING
If your refrigerator is not located under a counter top (free standing), you must use an anti-tip device installed as per these instructions. If the refrigerator is removed from its location for any reason, make sure that the device is properly engaged with the anti-tip bracket when you push the refrigerator back into the original location. If the device is not properly engaged, there is a risk of the refrigerator tipping over, with the potential for property damage or personal injury.
NOTE
If installing on a concrete floor, concrete fasteners are required, (not included with the anti-tip kit).

CAUTION
Any finished flooring should be protected with appropriate material to avoid damage when moving the unit.
Floor Mount Installation
The anti-tip bracket is to be located on the floor in the left or right rear corner of the refrigerator as shown in Figure 7.
Step by Step Instructions
for locating the position of the bracket:
1) Decide where you want to place the refrigerator. Slide it into place, being careful not to damage the floor, leaving 1" (2.5 cm) of clearance from the rear wall to allow room for the anti-tip bracket.
2) Raise the rear leveling legs approximately 1/4" (6 mm) to allow engagement with the anti-tip bracket. Level the unit by adjusting all the leveling legs as required. Turning the leveling leg counterclockwise will raise the unit and clockwise will lower the unit.
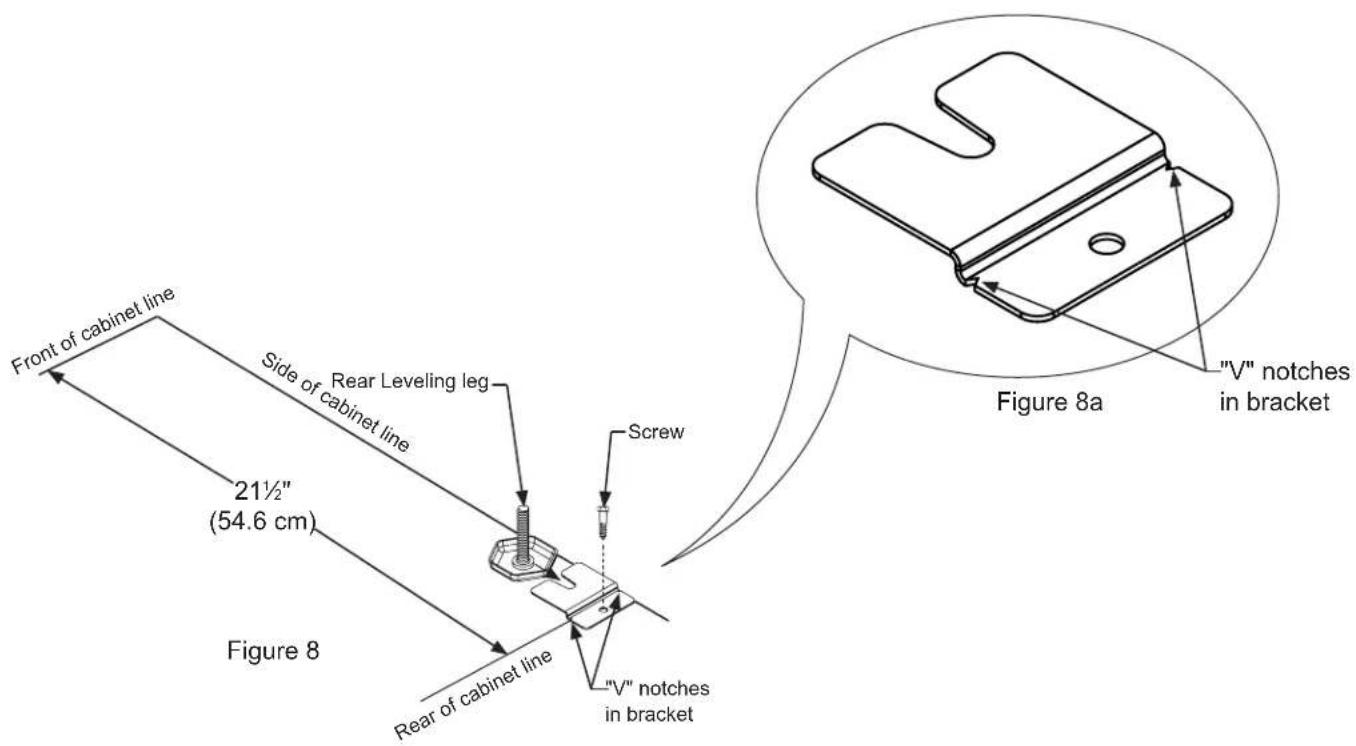
3) Make sure the refrigerator is in the desired location, then mark on the floor the rear and side corner of the cabinet where the anti-tip bracket will be installed. If the installation does not allow marking the rear corner of the cabinet, then make temporary lines on the floor marking the front corner of the cabinet, excluding the door. Slide the refrigerator out of the way. From the temporary line extend the sidewall line back 21½" (54.6 cm) as shown in Figure 8.
4) Align the anti-tip bracket to the marks on the floor so the side of the bracket lines up with the side of the cabinet mark, and the "V" notches on the anti-tip bracket line up with the end of the 21 12 (54.6 cm) line (Rear of cabinet line).
5) Fasten the anti-tip bracket to the floor using the supplied screw. (See Figure 8).
6) Slide the cabinet back into position, making sure the rear cabinet leveling leg slides under the anti-tip bracket engaging the slot.
INSTALLING THE ANTI-TIP DEVICE
NOTE
When the floor mounted anti-tip bracket is used the minimum adjusted height of the cabinet is increased by 38 " (9 mm).
PRODUCT DIMENSIONS
| MODEL | ROUGH-IN OPENING DIMENSIONS CABINET DIMENSIONS | ||||||||
| "A" | "B" | "C" | "D" | "E" | "F" | "G" | "H" | "J" | |
| LN15REF | 15"(38.1 cm) | **34" to 35"(86.4 to 88.9 cm) | * | 14 78 " (37.8 cm) | 33 34 " to 34 34 " (85.7 to 88.3 cm) | 23 ^23/_22 " (60.2 cm) | 26 34 " (67.9 cm) | 37 ^13/_32 " (95 cm) | 17 14 " (45.1 cm) |
| LN24REFLN24REFG | 24"(61 cm) | **34" to 35"(86.4 to 88.9 cm) | * | 23 78 " (60.7 cm) | 33 34 " to 34 34 " (85.7 to 88.3 cm) | 23 ^23/_22 " (60.2 cm) | 26 34 " (67.9 cm) | 46 ^13/_32 " (117.9 cm) | 26 14 " (67.9 cm) |
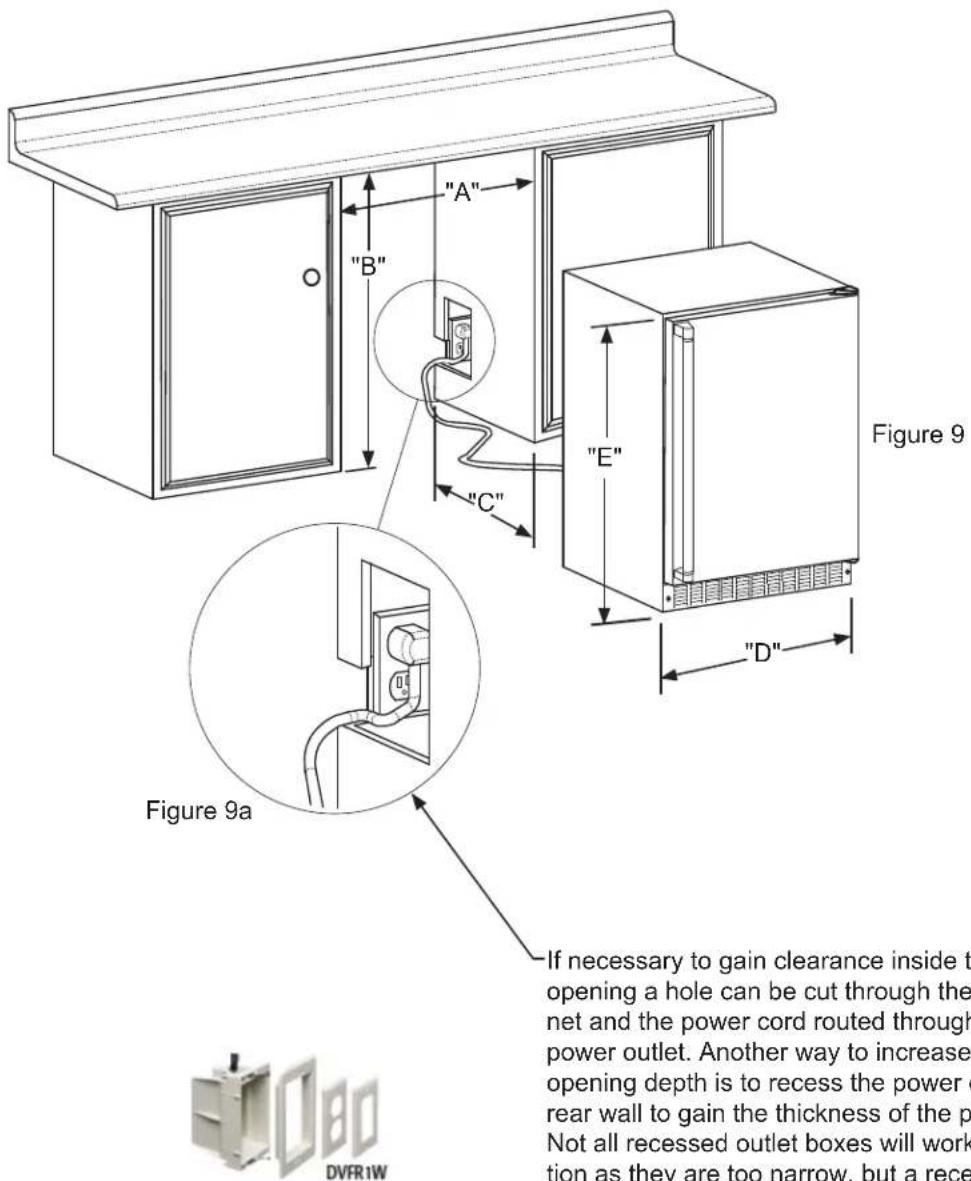
Figure 10
-If necessary to gain clearance inside the rough-in opening a hole can be cut through the adjacent cabinet and the power cord routed through this hole to a power outlet. Another way to increase the available opening depth is to recess the power outlet into the rear wall to gain the thickness of the power cord plug. Not all recessed outlet boxes will work for this application as they are too narrow, but a recessed outlet box equivalent to Arlington #DVFR1W is recommended for this application, (see Figure 10).
PRODUCT DIMENSIONS
| MODEL | PRODUCT DATA | |
| ELECTRICAL REQUIREMENTS # | PRODUCT WEIGHT | |
| LN15REF 115V | /60Hz/15A | 105 lbs(47.7 kg) |
| LN24REFLN24REFG | 115V/60Hz/15A | 140 lbs(63.6 kg) |
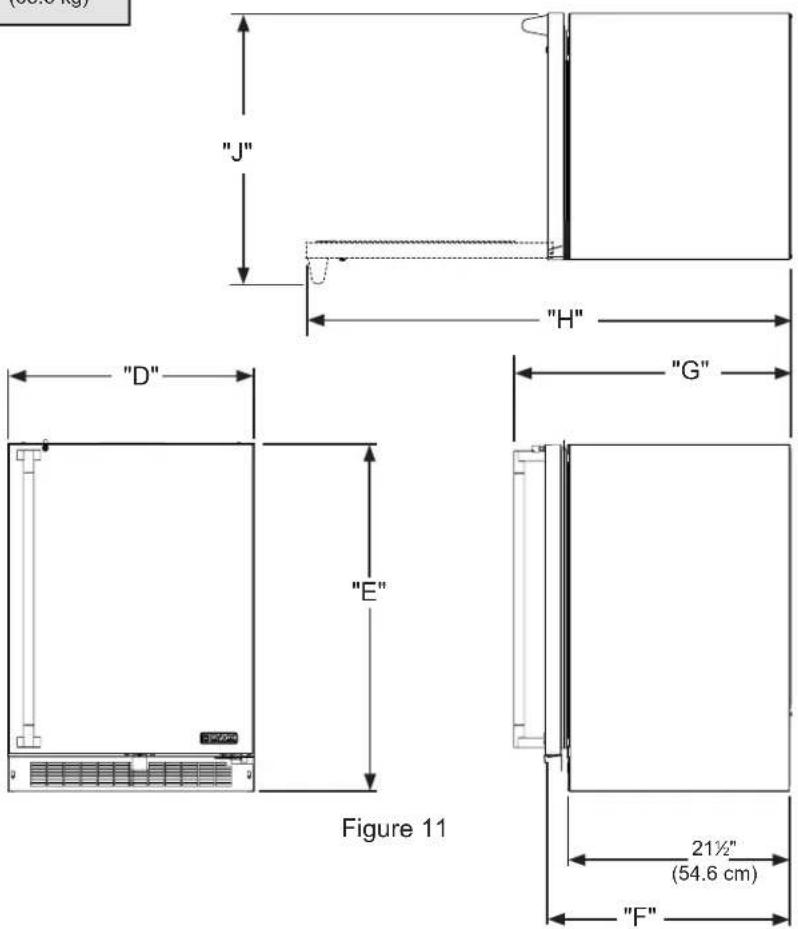
* Depth dimension of rough-in opening may vary depending on each individual installation. To recess entire door "F" dimension plus 1" (2.5 cm) for thickness of power cord plug is required.
** Minimum rough-in opening required is to be larger than the adjusted height of the cabinet.
A grounded 15 amp dedicated circuit is required. Follow all local building codes when installing electrical and appliance.

WARNING
Floor mount Anti-tip Bracket must be installed for freestanding applications. Not required for built in applications.
USING YOUR ELECTRONIC CONTROL

Figure 13
Electronic control
Control Function Guide
| Function Command | Notes | |
| ON/OFF Press and hold for 5 | seconds. Unit will immediately turn ON or OFF. | |
| Leave Interior Light On | Press and release to leave interior light on for 3 hours, press again to deactivate. | After 12 hours, factory default is restored; light will turn on when door is open. |
| Adjust Temperature Press or | and release. | When the display is flashing, press + or — to adjust the set point temperature. Note: temperature displayed is the actual temperature inside unit. |
| Toggle Between ^oF / ^oC Hold | and + for 5 seconds. The display will change units. | |
| Enable Sabbath Mode Press | and hold for 5 seconds and release. | The ^oF / ^oC symbol will flash briefly after 5 seconds. Interior light and display will go dark and remain so until user resets mode - unit continues to operate. |
| Disable Sabbath Mode | Press , hold for 5 seconds and release. | Display and interior light return to normal operation. |
| Showroom Mode Hold and | for 5 seconds. | Display will show SH for 2 seconds. Interior light and display will function normally, but the compressor and fans will not be energized. Repeat command to return to normal operation. Display will show EH for 2 seconds. |
NOTE
Temperature displayed reflects actual temperature inside unit. If the temperature displayed is different than selected, the unit is progressing towards the selected temperature. Time to reach set point varies based upon ambient temperature, temperature of product loaded, door openings, etc. Lynx Grills recommends allowing the unit to reach set points before loading.
SHELVING CONFIGURATIONS
Loading Tips and Suggestions
Your appliance is equipped with a cantilever shelf system which provides maximum adjust ability and customizing of the shelving arrangements listed below.
15" (38.1 cm) Wide Models:
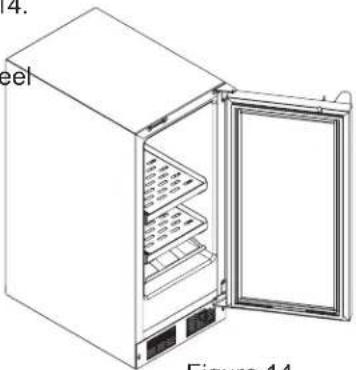
With a solid door. Figure 14.
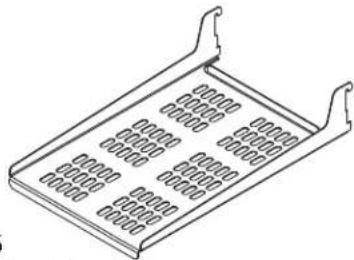
(2) perforated stainless steel slide out shelves. (See Figure 15).
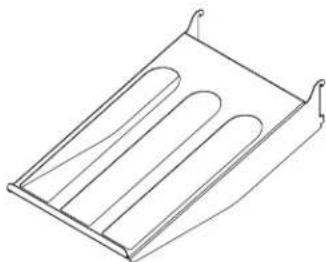
(1) 3 bottle wine shelf (see Figure 16).
natural_image
Line drawing of a refrigerator with open door and side shelves (no text or symbols)Figure 14
natural_image
Isometric line drawing of a rectangular tray with perforated sides and two side handles (no text or symbols)Figure 15 perforated metal shelf
natural_image
Line drawing of a rectangular tray with three vertical slots, no text or symbols presentFigure 16 Wine shelf, 3 bottle
Refrigerator:
24" (61 cm) Wide Models:
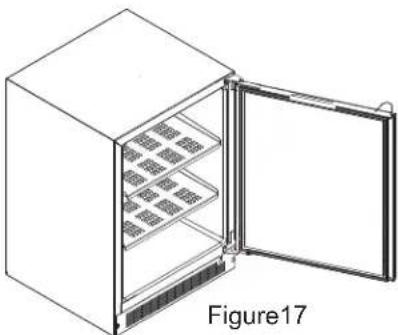
With a solid or glass door. Figure 17.
(2) perforated metal cantilever shelves. (See Figure 18).
natural_image
Line drawing of a refrigerator with open door and side shelves (no text or symbols)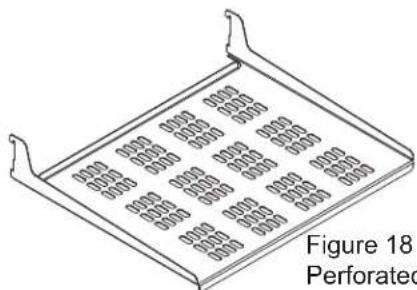
Perforated metal shelf
SHELVING CONFIGURATIONS

CAUTION
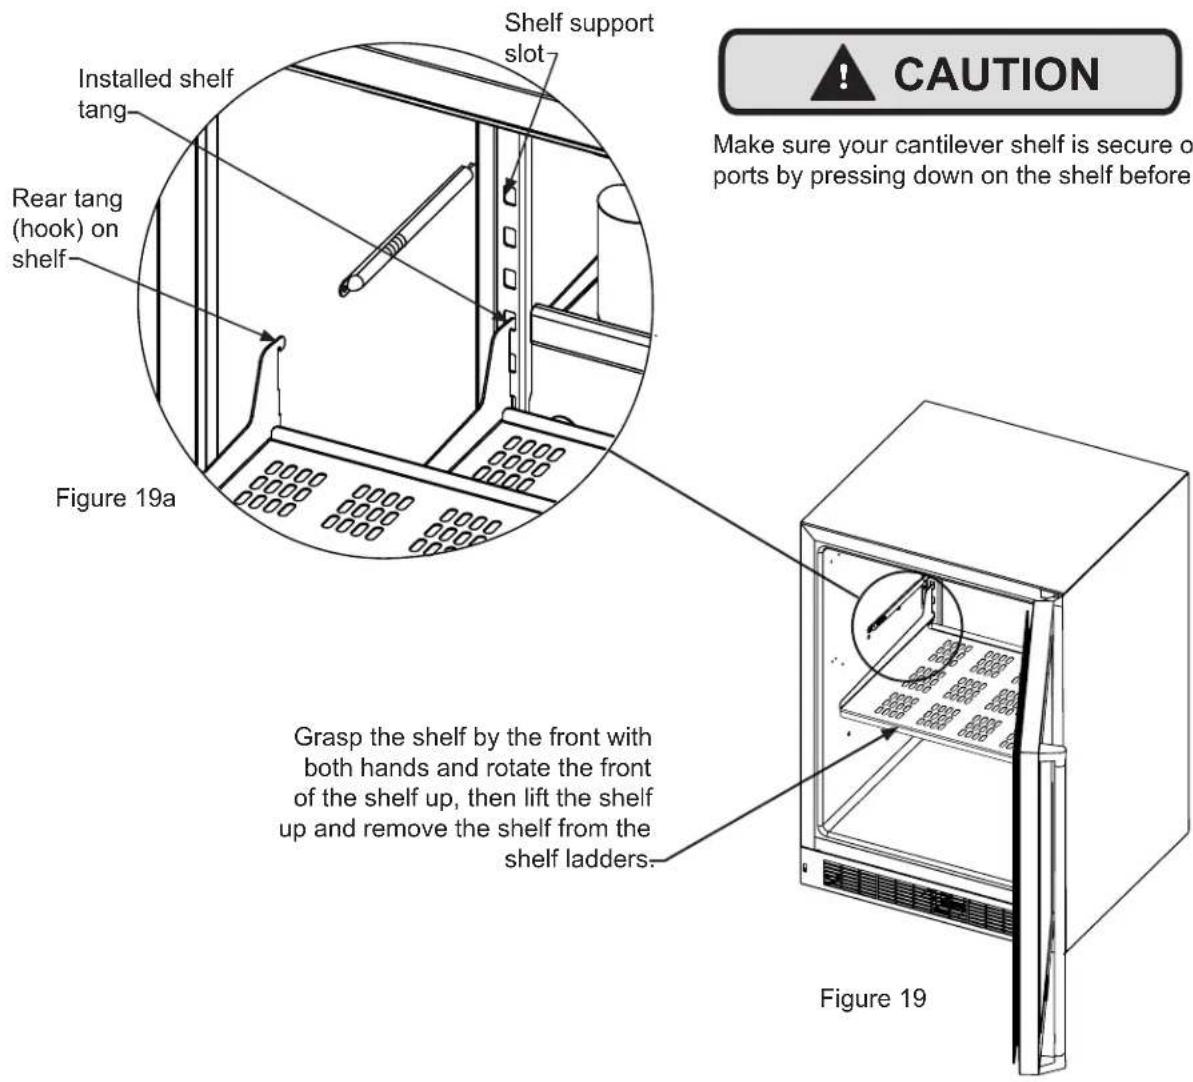
Never try to move a loaded shelf, remove everything from the shelf before moving. Use both hands when moving the shelf.
To Add or Remove a Shelf
Remove stored product from the shelf. Do not try to remove a loaded shelf from the appliance. Grasp the shelf front with both hands, rotate the front upward and lift out. (See Figure 19). To install a shelf insert the shelf in the appliance and insert the top hooks into the shelf support slots and drop the shelf down so the hooks drop over the bottom of the slots.
CARE AND CLEANING
Front Grille
Be sure that nothing obstructs the required air flow openings in front of the cabinet. At least once or twice a year, brush or vacuum lint and dirt from the front grille area (see page 4).

CAUTION
SHOCK HAZARD: Disconnect electrical power from the appliance before cleaning with soap and water.
Cabinet
The stainless steel cabinet can be washed with either a mild soap and water and thoroughly rinsed with clear water. See "Stainless Steel Maintenance" on page 15.
Interior
Wash interior compartment with mild soap and water. Do NOT use an abrasive cleaner, solvent, polish cleaner or undiluted detergent.
Care of Appliance
- Avoid leaning on the door, you may bend the door hinges or tip the appliance.
- Exercise caution when sweeping, vacuuming or mopping near the front of the appliance. Damage to the grille can occur.
- Periodically clean the interior of the appliance as needed.
In the Event of a Power Failure
If a power failure occurs, try to correct it as soon as possible. Minimize the number of door openings while the power is off so as not to adversely affect the appliance's temperature.
Light Assembly Replacement
All models use LED lamps to illuminate the interior of the appliance. This component is very reliable, but should one fail, contact a qualified service technician for replacement of the LED.

WARNING
Electrocution Hazard
- Never attempt to repair or perform maintenance on the appliance until the main electrical power has been disconnected. Turning the appliance control "OFF" does not remove electrical power from the unit's wiring.
- Replace all parts and panels before operating.
Long Term Storage/Winterization
- Time to Winterize, when the daily low ambient temperature is at or below 38^ F ( 3.3^ C).

CAUTION
Operation of the unit at ambient temperatures below the recommended Winterization temperature will void your warranty.
2. Turn unit off, (see page 10)
3. Remove all contents.
4. If necessary, move the unit so you can gain access to the rear of the product.
5. Unplug the unit from the power outlet.
6. It is also recommended that the power to the outlet be turned-off if the circuit is not required for other items during the Winter season.
7. When cleaning unit pay particular attention to any cracks and crevices that may have accumulated dirt and debris.
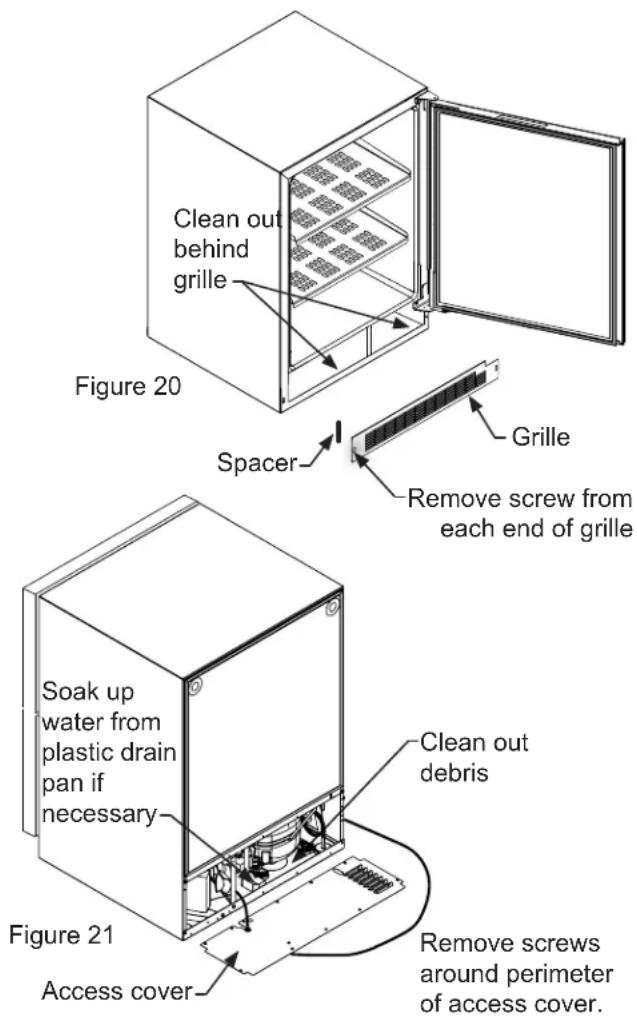
8. Remove the front toe-grille, (see Figure 20), and use a brush and vacuum to clean dirt and debris from beneath the unit.
9. Thoroughly clean the toe-grille and re-install on the unit. (See Figure 20).
10. Remove the rear access cover, (see Figure 21), and use a brush and vacuum to clean dirt and debris from the machine compartment.
- If the plastic defrost drain pan located under the compressor contains water, use a sponge to remove as much water as possible.
- Thoroughly clean the rear access cover and re-install on the unit.
- Wipe down all interior surfaces with anti-bacterial cleaner to be followed with clean rinse water to remove any residual chemicals which could cause staining. Do not use any abrasive cleaners or scouring pads.
- Leave the door open and allow to completely dry out before closing the door.
- Thoroughly clean the door gasket with anti-bacterial cleaner to be followed with clean rinse water to remove any residual chemicals.
- Thoroughly clean the exterior with a cleaner approved for stainless steel. Do not use any abrasive cleaners or scouring pads. See "Stainless Steel Maintenance" on page 15.
- Any mounting hardware / fasteners that are showing signs of corrosion should be replaced.
-
Once the exterior has been thoroughly cleaned, you may want to apply a coating of car wax to help protect against spotting from moisture, dirt, and debris that may accumulate on the surfaces during the Winterization period.
-
Do not place a cover on the unit, as this can trap condensation.
After completion of the above, you may choose to store the unit indoors, although this is not required.
Start-up after Long Term Storage
- If stored outside, it is recommended that the unit again be thoroughly inspected per the storage instructions above to address any dirt or debris from the weather and/or animals/insects.
- Connect the unit to electrical power.
- Turn unit on and confirm your desired control settings.
- Allow 24-hrs for the unit to stabilize before loading contents.
STAINLESS STEEL MAINTENANCE
Background
Stainless steel does not stain, corrode, or rust as easily as ordinary steel, but it is not stain or corrosion proof. Stainless steels can discolor or corrode if not maintained properly.
Stainless steels differ from ordinary carbon steels by the amount of chromium present. It is this chromium that provides an invisible protective film on the surface called chrome-oxide. This protective chrome-oxide film on the surface can be damaged or contaminated, which may result in discoloration, staining, or corrosion of the base metal.
Care and Cleaning
Routine cleaning of the stainless steel surfaces will serve to greatly extend the life of your product by removing contaminants. This is especially important in coastal areas which can expose the stainless to severe contaminants such as halide salts, (sodium chloride).
It is strongly recommended to periodically inspect and thoroughly clean crevices, weld points, under gaskets, rivets, bolt heads, and any locations where small amounts of liquid could collect, become stagnant, and concentrate contaminates. Additionally, any mounting hardware that is showing signs of corrosion should be replaced.
Frequency of cleaning will depend upon the installation location, environmental, and usage conditions.
Choosing a Cleaning Product
The choice of a proper cleaning product is ultimately that of the consumer, and there are many products from which to choose. Depending upon the type of cleaning and the degree of contamination, some products are better than others.
Typically the most effective and efficient means for routine cleaning of most stainless steel products is to give the surfaces a brisk rubbing with a soft cloth soaked in warm water and a gentle detergent, or mild mixture of ammonia. Rubbing should, to the extent possible, follow the polish lines of the steel, and always insure thorough rinsing after cleaning.
Although some products are called "stainless steel cleaners," some may contain abrasives which could scratch the surface, (compromising the protective chrome-oxide film), and some many contain chlorine bleach which will dull, tarnish or discolor the surface if not completely removed.
After the stainless surfaces have been thoroughly cleaned, a good quality car wax may be applied to help maintain the finish.
NOTE
Stainless steel products should never be installed, or stored in close proximity to chlorine chemicals.
Whichever cleaning product you chose, it should be used in strict accordance with the instructions of the cleaner manufacturer.
ENERGY SAVING TIPS AND OBTAINING SERVICE
Energy Saving Tips
The following suggestions will minimize the cost of operating your refrigeration appliance.
- Do not install your appliance next to a hot appliance (cooker, dishwasher, etc.), heating air duct, or other heat sources.
- Install product out of direct sunlight.
- Ensure the front grille vents at front of appliance beneath door are not obstructed and kept clean to allow ventilation for the refrigeration system to expel heat.
- Plug your appliance into a dedicated power circuit. (Not shared with other appliances).
- When initially loading your new product, or whenever large quantities of warm contents are placed within refrigerated storage compartment, minimize door openings for the next 12 hours to allow contents to pull down to compartment set temperature.
- Maintaining a relatively full storage compartment will require less appliance run time than an empty compartment.
- Ensure door closing is not obstructed by contents stored in your appliance.
- Allow hot items to reach room temperature before placing in product.
- Minimize door openings and duration of door openings.
- Use the warmest temperature control set temperature that meets your personal preference and provides the proper storage for your stored contents.
- When on vacation or away from home for extended periods, set the appliance to warmest acceptable temperature for the stored contents.
- Set the control to the "off" position if cleaning the appliance requires the door to be open for an extended period of time.
If Service is Required:
- If the product is within the first year warranty period please contact your dealer or call Lynx Grills Customer Service at 888.289.5969 for directions on how to obtain warranty coverage in your area.
- If the product is outside the two-year warranty period, Lynx Grills Customer Service can provide recommendations of service centers in your area.
- In all correspondence regarding service, be sure to give the service/model number, serial number, and proof of purchase.
- Try to have information or description of nature of the problem, how long the appliance has been running, the room temperature, and any additional information that may be helpful in quickly solving the problem.
- Table "A" is provided for recording pertinent information regarding your product for future reference.
| For Your Records | |
| Date of Purchase | |
| Dealer's name | |
| Dealer's Address | |
| Dealer's City | |
| Dealer's State | |
| Dealer's Zip Code | |
| Appliance Serial Number | |
| Appliance Service/Model Number | |
| Date Warranty Card Sent (Must be within 10 days of purchase). | |
Table A
TROUBLESHOOTING
Before You Call for Service
If the appliance appears to be malfunctioning, read through this manual first. If the problem persists, check the trouble-shooting guide below. Locate the problem in the guide and refer to the cause and its remedy before calling for service. The problem may be something very simple that can be solved without a service call. However, it may be required to contact your dealer or a qualified service technician.

WARNING
Electrocution Hazard
- Never attempt to repair or perform maintenance on the appliance until the main electrical power has been disconnected. Turning the appliance control "OFF" does not remove electrical power from the unit's wiring.
- Replace all parts and panels before operating.

CAUTION
In the unlikely event you lose cooling in your unit, do not unplug the product from the electric supply, but do call a qualified service technician immediately. It is possible that the loss of cooling capacity is a result of excessive frost build-up on the evaporator cooling coil. In this case, removing power to the unit will result in the melting of this excessive quantity of ice, which could generate melt water that exceeds the capacity of the defrost drain system and could result in water damage to your home. The end-user will be ultimately responsible for any water damage caused by prematurely turning the unit off without appropriately managing the excess water run-off.
| Problem Possible Cause | Remedy | |
| Appliance not cold enough(See “Adjusting the temperature” on page 10) | • Control set too warm• Content temperature not stabilized. | • Adjust temperature colder. Allow 24 hours for temperature to stabilize. |
| • Excessive usage or prolonged door openings. | • Allow temperature to stabilize for at least 24 hours. | |
| • Airflow to front grille blocked. | • Airflow must not be obstructed to front grille. See “clearances” on page 4. | |
| • Door gasket not sealing properly. | • Replace door gasket. | |
| Appliance too cold(See “Adjusting the Temperature” on page 10) | • Control set too cold | • Adjust temperature warmer.Allow 24 hours for temperature to stabilize. |
| • Door gasket not sealing properly. | • Replace door gasket. | |
| No interior light. | • Failed LED light assembly or light switch. | • Contact a qualified service technician. |
| Light will not go out when door is closed | • Display light is turned on. (Glass door models only. | • Turn off display light, shut door. |
| • Door not activating light switch. | • Appliance not level, level appliance, (See page 4, “leveling legs”) | |
| • Failed light switch | • Contact a qualified service technician. | |
| Noise or Vibration | • Appliance not level | • Level appliance, see “Leveling Legs” on page 4. |
| • Fan hitting tube obstruction. | • Contact a qualified service technician. | |
| Appliance will not run. | • Appliance turned off | • Turn appliance on. See “Starting your appliance” on page 10. |
| • Power cord not plugged in. | • Plug in power cord. | |
| • No power at outlet. | • Check house circuit. |
UNDERCOUNTER REFRIGERATOR / BEVERAGE CENTER WARRANTY
TWO YEAR FULL WARRANTY
Undercounter refrigerators / Beverage Centers and all of their component parts, except as detailed below*†, are warranted to be free from defective materials or workmanship in normal residential use for a period of two (2) years from the date of original retail purchase. Lynx, warrantor, agrees to repair or replace, at its option, any part which fails or is found to be defective during the warranty period.
*FULL NINETY (90) DAY COSMETIC WARRANTY: Product is warranted to be free from cosmetic defects in materials or workmanship (such as scratches on stainless steel, paint/porcelain blemishes, etc.) for a period of ninety (90) days from the date of original retail purchase or closing date for new construction, whichever period is longer. Any defects must be reported to the selling dealer within ninety (90) days from date of original retail purchase. Lynx uses high quality processes and materials available to produce all color finishes. However, slight color variation may be noticed because of the inherent differences in painted parts and porcelain parts as well as differences in kitchen lighting, product locations, and other factors. Therefore, this warranty does not apply to color variation attributable to such factors.
†FULL NINETY (90) DAY WARRANTY IN "RESIDENTIAL PLUS" APPLICATIONS: Lynx products are designed and certified for residential use only. They are not intended for use in commercial applications. Lynx products should only be used in accordance to national and local codes. Lynx is not responsible for property damage or injury resulting from use in a commercial application. To support the manufacturing quality of its appliance's Lynx will provide a full 90 day warranty for products used in "Residential Plus" applications. This "Residential Plus" warranty applies to applications where use of the product extends beyond residential use but is in compliance with national and local code. In some jurisdictions these applications are zoned as residential. Examples of, but not limited to, such applications covered by this warranty are bed and breakfasts, fire stations, private clubs, churches, condominium/apartment common areas etc. Under this "Residential Plus" warranty, the product, its components and accessories are warranted to be free from defective material or workmanship for a period of ninety (90) days from the date of original retail purchase. Lynx warranter, agrees to repair or replace, at its option, any part which fails or is found to be defective during the warranty period. This warranty covers parts and labor. This warranty excludes use of the product in all commercial locations such as restaurants, food service locations and institutional food service locations.
SIX YEAR FULL WARRANTY ON SEALED REFRIGERATION PARTS AS LISTED
Any sealed refrigeration system component, as listed below, is warranted to be free from defective materials or workmanship in normal household use during the third through the sixth year from the date of original retail purchase. Lynx, waranter, agrees to repair or replace, at its option, any part which fails or is found to be defective during the warranty period.
Sealed Refrigeration System Components: Compressor, Evaporator, Condenser, Connecting Tubing, Dryer/Strainer
TWELVE YEAR LIMITED WARRANTY ON SEALED REFRIGERATION PARTS AS LISTED
Any sealed refrigeration system component, as listed above, which fails due to defective materials or workmanship in normal household use during the seventh through the twelfth year from the date of original retail purchase will be repaired or replaced, free of charge for the part itself, with the owner paying all other costs, including labor.
WARRANTY TERMS
This warranty extends to the original retail purchaser of the product warranted hereunder and to each transferee owner of the product during the term of the original purchaser's warranty. the warranty is transferable by the original retail purchaser via home sale only. If a transferee owner is unable to provide proof of purchase from the original purchaser and the product has not been previously registered, the production date of the product, located in the serial number of the product, will serve as the effective warranty start date.
The activation date of the warranty begins from the date of original retail purchase. In the case of new product purchase via building development sales, activation begins from the earlier date of either certificate of occupancy or 24 months from date of manufacture. Note date of manufacture is identified by serial tag on product.
This warranty does not cover units purchased as b-stock, liquidation, salvage, seconds, refurbished, as-is, used products.
This warranty shall apply to products purchased in the United States and Canada. Products must be purchased in the country where service is requested. Warranty service must be performed by a Lynx authorized service agency or representative. Warranty shall not apply to damage resulting from abuse, accident, natural disaster, loss of electrical power to the product for any reason, alteration, improper installation, improper operation, or repair service of the product by anyone other than a Lynx authorized service agency or representative. This warranty does not apply to commercial usage. Warrantor is not responsible for consequential or incidental damage whether arising out of breach of warranty, breach of contract or otherwise. Some jurisdictions do not allow the exclusion or limitation of incidental or consequential damages, so the above limitations do not apply to you.
Owner shall be responsible for proper installation, providing normal care and maintenance, providing proof of purchase upon request, and making the product reasonably accessible for service. If the product or one of its component parts contains a defect or malfunction during the warranty period, after a reasonable number of attempts by the warrantor to remedy the defects or malfunctions, the owner is entitled to either a refund or replacement, at the warrantor's discretion of the product or its component part or parts. Warrantor's liability on any claim of any kind, with respect to the goods or services covered hereunder, shall in no case exceed the price of the goods or service or part thereof which gives rise to the claim.
WARRANTY SERVICE
Under the terms of this warranty, service must be performed by a Lynx authorized service agent or representative. Service will be provided during normal business hours Labor performed at overtime or premium rates shall not be covered by the warranty. To obtain warranty service contact Lynx Customer Care at 1-888-289-5969. Please have model number, serial number, and date of original purchase available when calling. IMPORTANT: Retain proof of original purchase to establish warranty period. The return of the owner registration card is not a condition of warranty coverage. You should, however, return the owner registration card so Lynx can contact you should any question of safety arise which could affect you. Any implied warranties of merchantability and fitness applicable to the above described burner assemblies, infrared rotisserie burners, grill grates, and stainless steel parts are limited in duration to the period of coverage of the applicable express written limited warranties set forth above. Some jurisdictions do not allow limitations on how long an implied warranty lasts, so the above limitations may not apply to you. This warranty gives you specific legal rights, and you may also have other rights which may vary from jurisdiction to jurisdiction.
Specifications subject to change without notice.

The best outdoor kitchen products come from: Lynx Grills
62201 Highway 82 West Greenwood, MS 38930
Service: (888)-289-5969
www.lynxgrills.com
- CONTENTS AND SAFETY INSTRUCTIONS
- Contents
- Important Safety Instructions
- Recognize Safety Symbols, Words, and Labels.
- WARNING
- CAUTION
- NOTE
- UNPACKING YOUR APPLIANCE
- EXCESSIVE WEIGHT HAZARD
- Remove Interior Packaging
- Important
- Note to Customer
- Warranty Registration
- WARNING - Help Prevent Tragedies
- INSTALLING YOUR APPLIANCE
- Select Location
- Cabinet Clearance
- Leveling Legs
- Front Grille
- Electrical Shock Hazard
- Electrical Connection
- INSTALLING THE ANTI-TIP DEVICE
- Anti-Tip Device
- Floor Mount Installation
- Step by Step Instructions
- for locating the position of the bracket:
- PRODUCT DIMENSIONS
- A grounded 15 amp dedicated circuit is required. Follow all local building codes when installing electrical and appliance.
- USING YOUR ELECTRONIC CONTROL
- SHELVING CONFIGURATIONS
- Loading Tips and Suggestions
- 15" (38.1 cm) Wide Models:
- Refrigerator:
- To Add or Remove a Shelf
- CARE AND CLEANING
- Cabinet
- Interior
- Care of Appliance
- In the Event of a Power Failure
- Light Assembly Replacement
- Electrocution Hazard
- Long Term Storage/Winterization
- Start-up after Long Term Storage
- STAINLESS STEEL MAINTENANCE
- Background
- Choosing a Cleaning Product
- ENERGY SAVING TIPS AND OBTAINING SERVICE
- Energy Saving Tips
- The following suggestions will minimize the cost of operating your refrigeration appliance.
- If Service is Required:
- TROUBLESHOOTING
- Before You Call for Service
- UNDERCOUNTER REFRIGERATOR / BEVERAGE CENTER WARRANTY
- TWO YEAR FULL WARRANTY
- SIX YEAR FULL WARRANTY ON SEALED REFRIGERATION PARTS AS LISTED
- TWELVE YEAR LIMITED WARRANTY ON SEALED REFRIGERATION PARTS AS LISTED
- WARRANTY TERMS
- WARRANTY SERVICE
Brand : LYNX
Model : LN24REFL
Category : Fridge