
EV-700 - Wi-Fi repeater TOA - Free user manual and instructions
Find the device manual for free EV-700 TOA in PDF.


| Type de produit | Digital Announcer (EV-700) with configuration software |
| Marque / Modèle | TOA EV-700 |
| Fonctions principales | Edit broadcast contents, device settings, control playback/recording, status monitoring, maintenance (memory card copy, compare, delete, initialization) |
| Formats audio supportés | WAV, Linear PCM, 32 or 44.1 kHz, 16-bit, mono |
| Configuration PC requise | CPU 1 GHz, RAM 1 GB (32-bit) / 2 GB (64-bit), écran 1280x768, 10 MB disque libre, Windows 7/8.1/10, .NET Framework 4.5 |
| Connexion réseau | LAN via switching hub ou direct, câble droit/croisé |
| Modes utilisateur | Simple mode (non-expert) et Full-function mode (avancé) |
| Capacité d'enregistrement | Jusqu'à ~3 heures (44.1 kHz) ou ~4 heures (32 kHz) total |
| Support mémoire | Carte mémoire (FAT16/32), slot A et B |
| Mise à jour firmware | Via le logiciel EV-700 Setting Software |
| Détection d'appareil | Automatique sur réseau local, ou entrée manuelle IP |
| Maintenance | Copie, comparaison, suppression de carte mémoire, initialisation des réglages |
| Entretien et nettoyage | Gardez les connecteurs propres, utilisez un chiffon sec pour l'extérieur |
| Sécurité | Utilisez uniquement les accessoires fournis, respectez les consignes du manuel |
| Réparabilité | Consultez un distributeur TOA agréé pour les réparations ; mises à jour logicielles disponibles en ligne |
| Informations générales | Fabricant : TOA Corporation, Japan. Site : http://www.toa.jp/ |
Frequently Asked Questions - EV-700 TOA
User questions about EV-700 TOA
0 question about this device. Answer the ones you know or ask your own.
Ask a new question about this device
Download the instructions for your Wi-Fi repeater in PDF format for free! Find your manual EV-700 - TOA and take your electronic device back in hand. On this page are published all the documents necessary for the use of your device. EV-700 by TOA.
USER MANUAL EV-700 TOA
DIGITAL ANNOUNCER EV-700

TOA
EV-700
Setting Software
TOA Corporation
TABLE OF CONTENTS
1. INTRODUCTION 7
1.1. General Description ...... 7
1.1. Features ...... 7
1.1.1. Simple mode and Full-function mode 7
1.1.2. Functions enabled with the EV-700 Setting software 7
1.2. System Requirements 8
1.2.1. Recommended PC requirements 8
1.2.2. Connecting between the PC and the EV-700 9
1.2.3. Network 10
1.2.4. Audio file format 10
2. SOFTWARE HANDLING PRECAUTIONS ...... 11
3. SOFTWARE SETUP 12
3.1. Installing the Software 12
3.2. File Configuration after Installation 14
3.3. Uninstalling the Software 14
3.4. Reinstalling the Software 14
4. MAKING A BACKUP COPY OF PRERECORDED AUDIO FILES 15
4.1. Making Backup Copy Using a PC 15
4.2. Making Backup Copy Using the EV-700 15
SIMPLE MODE
GENERAL DESCRIPTION OF SIMPLE MODE
- GENERAL DESCRIPTION ...... 17
- STARTING UP IN THE SIMPLE MODE 18
- EASY-TO-UNDERSTAND GUIDE TO OPERATION IN SIMPLE MODE 19
- MENU CONFIGURATION 21
4.1. Menu Items 21
4.1.1. File 21
4.1.2. Tool 21
4.1.3. Help 21
4.2. Tool Buttons 22
CONNECTION
5. CONNECTING TO THE EV-700 23
5.1. Detecting and Connecting to the EV-700 23
5.2. Connecting to the Last Connected EV-700 24
SETTING
6. EDITING BROADCAST CONTENTS 25
6.1. Workflow 25
6.2. Acquiring Audio Data and Broadcast Contents 26
6.2.1. Acquiring via LAN 26
6.2.2. Reading Data saved on the Memory Card or in the PC 29
6.3. Editing Broadcast Contents ...... 31
6.3.1. Displaying the broadcast content edit screen 31
6.3.2. Changing audio sources 35
6.3.3. Deleting audio sources 37
6.3.4. Adding audio sources 39
6.3.5. Changing the playback order of the audio sources 41
6.3.6. Make recording 43
6.3.7. Adjusting the audio volume 47
6.4. Test Listening 48
6.4.1. Previewing broadcast contents 48
6.4.2. Previewing audio sources 49
6.5. Reflecting the Edited Contents to the EV-700 50
6.5.1. Reflecting to the EV-700 via LAN 50
6.5.2. Saving to the memory card 54
OPERATION
7. MAKING BROADCAST BY OPERATING THE EV-700 ...... 55
MONITORING
8. CONFIRMING THE CURRENT BROADCASTING STATUS OF THE EV-700 56
FULL-FUNCTION MODE
GENERAL DESCRIPTION OF FULL-FUNCTION MODE
- GENERAL DESCRIPTION 58
- STARTING UP IN THE FULL-FUNCTION MODE 59
- EASY-TO-UNDERSTAND GUIDE TO OPERATION IN FULL-FUNCTION MODE 60
3.1. Example of the Project Change 60
3.1.1.Contents on the supplied memory card 60
3.1.2. Contents to be changed 61
3.1.3. Operating procedure 61
3.2. Alteration Example of Device Setting 63
3.2.1. Initial settings of Device setting (excerpt) 63
3.2.2. Content to be changed 63
3.2.3. Operating procedure 63
5.1. Outline of Connections 67
5.2. Detecting and Connecting to the EV-700 69
5.2.1. Adding an undetectable EV-700 71
5.2.2. Changing the network setting 72
5.2.3. Updating the EV-700's firmware 73
5.3. Making Connections Using the Network Setting of the Device Setting File ..... 74
5.4. Connecting to the Last Connected EV-700 74
GENERAL DESCRIPTION OF SETTINGS
6. PHRASE AND PROGRAM 75
6.1. What is Phrase? 75
6.2.What is Program? 75
7. TYPES OF EMERGENCY BROADCASTS 77
8. WHAT IS A PROJECT? 78
8.1. Files Comprising a Project 78
8.1.1. Project information file (EV-700T) 78
8.1.2.Table file 78
8.1.3. Audio files (WAV file) 78
8.2. File Configuration of the Memory Card 79
9. WHAT IS THE DEVICE SETTING? 80
10. EDIT WORKFLOW 82
10.1. Project Edit 82
10.1.1. Creating a new project and reflecting to the EV-700 82
10.1.2. Editing the already created project and reflecting to the EV-700 83
10.2. Editing the Device Setting 84
10.2.1. Creating a new device setting file and reflecting to the EV-700 84
10.2.2. Editing the already created device setting file and reflecting to the EV-700 85
10.3. Confirming the Device Setting File 86
PROJECT SETTING
11. EDITING THE PROJECT 87
11.1. Creating a New Project 87
11.2. Setting or Editing the Project Information 88
11.2.1. Project information screen description 88
11.2.2. Setting 89
11.3. Setting or Editing the Phrase 90
11.3.1. Description of the Audio source registration screen 90
11.3.2. Phrase setting 91
11.3.3. Registering the audio source for emergency playback 93
11.4. Setting or Editing the Program 95
11.4.1. Description of the Program screen 95
11.4.2. Description of the program screen (when the program in the Program list is selected) 96
11.4.3. Editing the program 100
11.4.4. Description of the Program screen (when the Emergency playback button is selected) 106
11.4.5. Emergency playback program setting 107
11.4.6. Description of the Program screen (when the R.E.M. button is selected) 109
11.4.7. R.E.M. playback program setting 110
11.5. Editing the Created Project 112
11.5.1. Acquiring via LAN 112
11.5.2. Reading Data saved on the Memory Card or in the PC 114
11.5.3. Editing 115
12. REFLECTING THE PROJECT SETTING TO THE EV-700 ... 116
12.1. Reflecting to the EV-700 via LAN 116
12.1.1. Uploading to the EV-700 116
12.1.2. Uploading Difference data to the EV-700 119
12.2. Saving to the Memory Card 121
DEVICE SETTING
13. EDITING THE DEVICE SETTING 122
13.1. Creating a New Device Setting File 122
13.2. Making the Broadcast Setting and System Setting 123
13.2.1. Description of the Broadcast and System setting screen 123
13.2.2. Setting 124
13.3. Making the Network Setting 125
13.3.1. Description of the Network setting screen 125
13.3.2. Setting 126
13.4. Making the Control Setting 127
13.4.1. Description of the control setting screen 127
13.4.2. Setting 128
13.5. Editing the Created Device Setting File 129
13.5.1. Acquiring via LAN 129
13.5.2. Reading Data saved on the Memory Card or in the PC 130
13.5.3. Editing 131
14. REFLECTING THE DEVICE SETTING TO THE EV-700 ... 132
14.1. Reflecting to the EV-700 via LAN 132
14.2. Saving to the Memory Card 133
15. SAVING THE DEVICE SETTING FILE IN CSV FORMAT ... 134
15.1. Saving 134
15.2. Configuration of the Setting File in CSV Format 135
OPERATION
16. OPERATING THE EV-700 FROM A PC 136
16.1. Displaying the Device Operation Screen 136
16.2. Description of the Device Operation Screen 137
16.3. Confirming The Current Broadcasting Status Of The EV-700 139
16.4. Starting the Program Broadcast 140
16.5. Recording an Audio Source for use as the Phrase 141
16.6. Deleting the Phrase Audio Source 142
16.7. Starting the Emergency Playback Broadcast 143
16.8. Recording the Audio Source to be used for the Emergency Playback Broadcast 144
16.9. Deleting the Audio Source used for the Emergency Playback Broadcast ..... 145
16.10. Starting the R.E.M. Playback 146
16.11. Stopping Broadcast and Recording 147
16.12. Setting the EV-700's Clock 148
MONITORING AND CHECK
17. CONFIRMING THE EV-700 OPERATION STATE 149
17.1. Displaying the Monitoring and Check Screen 149
17.2. Description of the Monitoring and Check Screen 150
17.3. Restarting the EV-700 152
17.4. Returning the EV-700's Operation to That Using the Memory Card A ...... 153
17.5. Executing Failure Detection of the EV-700 154
17.6. Confirming the Audio Sources Registered in the EV-700 155
OPERATION LOG
18. CONFIRMING THE EV-700'S OPERATION LOG .... 156
18.1. Reading the History File 156
18.1.1. Reading the EV-700's history file when the PC and EV-700 are online ... 156
18.1.2. Reading the history file saved on the memory card 157
18.2. Description of the History Screen 158
18.3. Saving the History in CSV Format 159
18.3.1. Saving 159
18.3.2. How to see history file in csv format 160
MAINTENANCE
19. PERFORMING MAINTENANCE 161
19.1. Maintenance with the EV-700 Setting Software 161
19.2. Displaying the Maintenance Screen 161
19.3. Description of the Maintenance Screen 162
19.4. Initializing the Device Setting 163
19.4.1. Initializing all the device setting items 163
19.4.2. Initializing the network setting 164
19.4.3. Initializing the device setting items except the network setting 165
19.5.Managing the Memory Card 166
19.5.1. Copying the data on the memory card 166
19.5.2. Comparing the contents of both memory cards 167
19.5.3. Deleting all the contents on the memory card 168
19.6. Changing the User Authentication Information 169
19.7. Making the Network Setting 170
19.7.1. When changing the address setting 170
19.7.2. When changing the port number setting 171
SUPPLEMENTARY
19. HISTORY CODE LIST 172
19.1. Operation History 172
19.2. Event 176
APPENDIX
1. ERROR LIST 180
1.1. Errors Related to the EV-700 180
1.2. Errors not Related to the EV-700 184
1.2.1. Message display at invalid file detection 184
1.2.2. Messages displayed at error detection related to the device setting ..... 184
1.2.3. Other errors 185
2. TROUBLESHOOTING 187
Notes
- Windows and Excel are the registered trademarks of Microsoft Corporation in the United States and other countries.
- Regarding other company names and products, they are also trademarks of individual companies.
1. INTRODUCTION
1.1. General Description
The EV-700 Setting software is a software program used to perform creation and edit of EV-700's broadcast contents, reference and edit of the device's settings, control of playback and recording, status monitoring, and maintenance.
Such work can be performed online by connecting the EV-700 to the LAN.
Also, the broadcast contents and device's settings edited using this software can be saved into a folder on a PC or the memory card supplied with the EV-700.
This software provides 2 modes of user operation: Simple mode and Full-function mode, either of which a user can select according to his/her purpose and requirement.
1.1. Features
1.1.1. Simple mode and Full-function mode
This software provides 2 modes of user operation: Simple mode and Full-function mode.
The Simple mode is a user interface that allows a user not familiar with the EV-700 to operate it easily. As this mode is designed for non-expert users, only the limited functions are available.
If you are a software installer and also an operator for the Simple mode, read from "SOFTWARE HANDLING PRECAUTIONS" (p. 11) through "SIMPLE MODE" (p. 16). If you are an operator for the Simple mode, read p. 16, "SIMPLE MODE"
The Full-function mode includes all functions from edit of broadcast contents to device's maintenance and is intended for users who are familiar with the EV-700.
For users of the Full-function mode, read this manual except p. 16, "SIMPLE MODE"Operation explanation of the Full-function mode begins from p. 57, "FULL-FUNCTION MODE"
1.1.2. Functions enabled with the EV-700 Setting software
• Edit of broadcast contents and their reflection to the EV-700
- EV-700 settings
- Reference and edit of the EV-700's settings can be made.
- Initialization of the EV-700 settings (returning the settings to the factory default) can be made.
• Control of the EV-700
- Playback and recording can be made.
- Following maintenance related to a memory card can be made.
Memory card copy
Memory card comparison
Deletion of memory card contents
Memory card operation switching
- Operation check can be made.
Device operation check
Check of Audio files on a memory card
• Status confirmation of the EV-700
- Busy and error statuses can be confirmed.
- Operation history can be confirmed.
1.2. System Requirements
1.2.1. Recommended PC requirements
| Hardware requirements | |
| CPU Over 1 GHz or fas | er, 32-bit (x86) processor or 64-bit (x64) processor |
| Memory 1 GB RAM (32-bit) or 2 GB RAM (64-bit) | |
| Display 1280 x 768 or h | gher resolution |
| Free Hard Disk Space O | Over 10 MB (excluding space for audio source storage)Note: Free hard disk space is separately required for the copied audio sources. |
| Software requirements | |
| OS Windows 7 Professional (32/64-bit), Windows 7 Home Premium (32/64-bit),Windows 8.1 Pro (32/64-bit), Windows 8.1 Enterprise (32/64-bit)Windows 10 Home (32/64-bit), Windows 10 Pro (32/64-bit) | |
| Required Component .N | NET Framework Ver. 4.5 needs to be installed.NoteIf .NET Framework Ver. 4.5 is not installed in the PC, you cannot start the EV-700 Setting software. |
1.2.2. Connecting between the PC and the EV-700
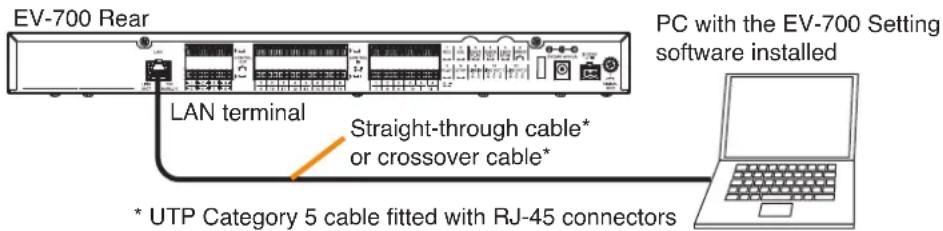
Connect the EV-700's Network connection terminal to the PC via a switching hub. Use the straight-through cable for connection.
If the EV-700 has been connected to the network, connect the PC to the switching hub on the same local area network. For details, consult your network administrator of the facilities where the EV-700 is installed.
Notes
- Use the EV-700 Setting software having the same version number as the unit's firmware. You cannot establish a connection between a PC and the EV-700 when their versions are different.
To confirm the EV-700's firmware version, see the instruction manual supplied with the EV-700.
To confirm the EV-700 Setting software version, select "Help → Version information" from the menu. (See p. 21 or p. 65.)
If both versions are different, update the firmware using the EV-700 Setting Software. The EV-700's firmware version becomes equal to that of the EV-700 Setting Software, enabling communications between them. (See p. 73, "Updating the EV-700's firmware.")
Download the latest version of EV-700 Setting Software from the TOA Products Data download site http://www.toa.products.com/international/.
- Two or more PCs with the EV-700 Setting software installed cannot simultaneously establish connection to a single EV-700.
Also, only a single EV-700 can be connected from a PC with the EV-700 Setting software installed.

flowchart
graph LR
    A["EV-700 Rear"] --> B["LAN terminal"]
    B --> C["Switching hub"]
    C --> D["Laptop with the EV-700 Setting software installed"]
    C --> E["Straight through cable*"]
Tip
You can also connect the EV-700 directly to a PC. Either a straight-through cable or a crossover cable can be used for connection.
But direct connection between the EV-700 and a PC may not be possible depending on your PC settings. In such cases, connect them via a switching hub as shown above.
1.2.3. Network
- Perform the network setting for the PC in advance following the instructions of the network administrator of the facilities where the EV-700 is installed.
If incorrect setting has been performed, this may adversely affect other devices connected to the same network.
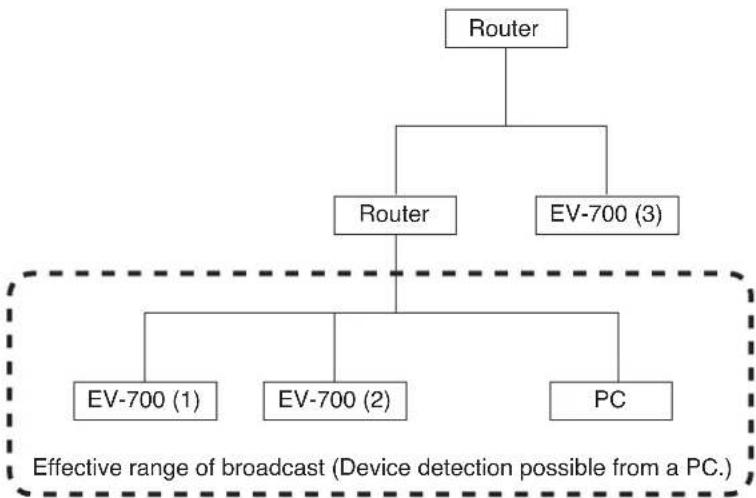
- The EV-700 that communicates with this software can be detected using the Device detection function. The Device detection function detects the EV-700 connected on the local area network.
A "Broadcast" communication method is used for detection.
Therefore, this detection function is available only within the effective range of broadcast. Broadcast will not reach beyond the router even within the local area network.
flowchart
graph TD
    A["Router"] --> B["Router"]
    A --> C["EV-700 (3)"]
    B --> D["EV-700 (1)"]
    B --> E["EV-700 (2)"]
    B --> F["PC"]
    style D fill:#f9f,stroke:#333
    style E fill:#f9f,stroke:#333
    style F fill:#f9f,stroke:#333
In the network configuration shown above, the EV-700 (3) cannot be detected if the device detection executed from the PC.
For the effective range of broadcast, consult your network administrator of the facilities where the EV-700 is installed.
The PC can be connected with the EV-700 (3) by directly entering the IP address. (See p. 71, "Adding an undetectable EV-700.")
1.2.4. Audio file format
The table below shows the requirements of usable audio files.
| File format WAV* | |
| Encode Linear PCM | |
| Sampling frequency 32 kHz or 44.1 kHz (depending on the project settings)Note: Sampling frequency of prerecorded audio files is 44.1 kHz. | |
| Quantization bit rate 16 bits | |
| Stereo/Monaural Monaural* | |
* As for the WAV files of the Broadcast Wave Format (BWF) and those of Stereo, they are registered after converted into the format which can be used in the EV-700.
The original audio file remains intact as the conversion is made after the audio file is copied.
Notes
• Either a file recorded at 44.1 kHz or one recorded at 32 kHz can be saved to the memory card.
• Audio file with a file name including 2-byte characters cannot be used.
2. SOFTWARE HANDLING PRECAUTIONS
Important
Be sure to save a backup copy of the Prerecorded audio files to the PC or the optional memory card before using them.
Prerecorded audio files cannot be restored once deleted. Their redistribution is fee-based.
- Prerecorded audio files on the memory card supplied with the EV-700 can only be used with the EV-700. Never use them with other products.
- If the contents created or edited on this software are saved to the EV-700's accessory memory card or transferred to the EV-700 with a memory card inserted, the prerecorded audio files contained on the memory card may be lost.
To use the memory card supplied with the EV-700, it is recommended to back up the contents on the memory card to your PC or the optional memory card in advance. (See p. 15, "MAKING A BACKUP COPY OF PRERECORDED AUDIO FILES.")
3. SOFTWARE SETUP
3.1. Installing the Software
Note
Use the EV-700 Setting software having the same version number as the unit's firmware. You cannot establish a connection between a PC and the EV-700 when their versions are different.
To confirm the EV-700's firmware version, see the instruction manual supplied with the EV-700.
If both versions are different, update the firmware using the EV-700 Setting Software. The EV-700's firmware version becomes equal to that of the EV-700 Setting Software, enabling communications between them. (See p. 73, "Updating the EV-700's firmware.")
Download the latest version of EV-700 Setting Software from the TOA Products Data download site http://www.toa.products.com/international/.
Step 1. Double-click the "Setup.exe."
The installer is activated.
Tip
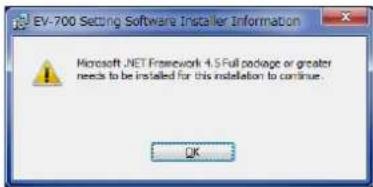
If the screen shown below appears, .NET Framework Ver. 4.5 needs to be installed on your PC. Download it from the Microsoft website.
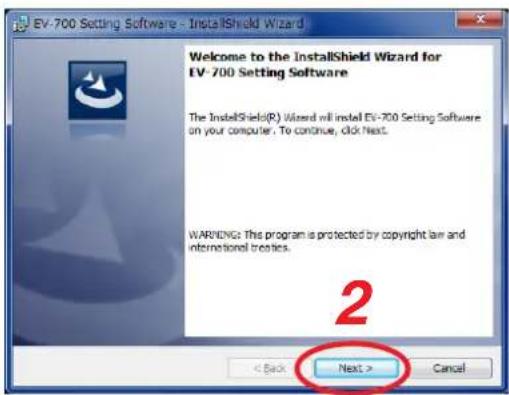
Step 2. Click the Next button.
The "License Agreement" window appears.
Step 3. Read the Software End User License Agreement, then select "I accept the terms in the license agreement."
Tips
- The Software End User License Agreement can be printed if you click the Print button.
- If you select "I do not accept the terms in license agreement" and click the Cancel button, the installation will be terminated without completion.
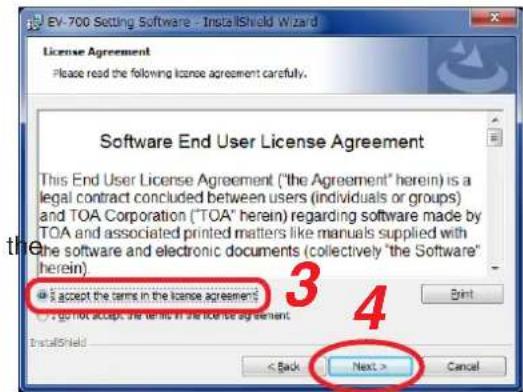
Step 4. Click the Next button.
The "Destination Folder" screen appears.
Step 5. If you wish to change the installation destination folder, select the desired folder.
To install into a different folder other than the folder displayed in "Destination Folder," click the Change button and select the folder.
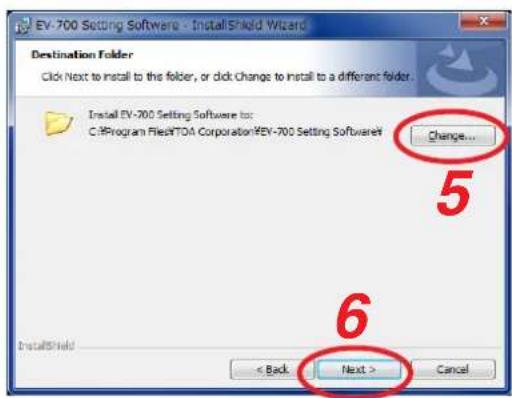
Step 6. Click the Next button.
The "Ready to Install the Program" screen appears. Tip
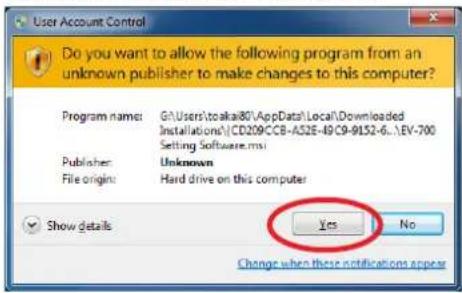
A "User Account Control" confirmation screen may appear depending on the Windows settings. In this case, click the Yes button.
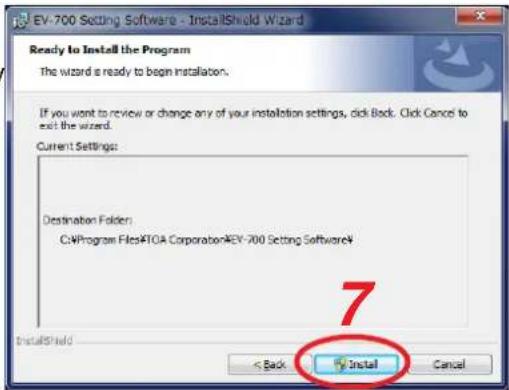
Step 7. Click the Install button.
Installation into the selected folder starts.
The "Installation Wizard Completed" screen will appear when the installation is successfully completed.
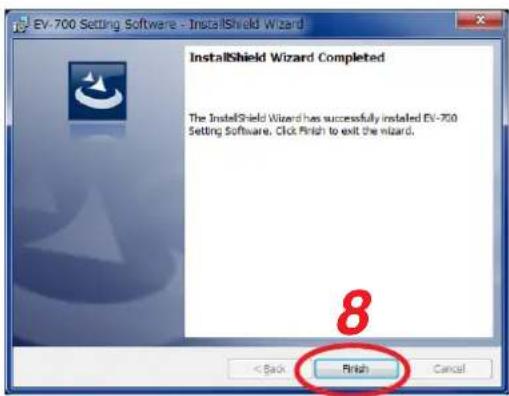
Step 8. Click the Finish button.
3.2. File Configuration after Installation
The EV-700 Setting software is to be installed in "C:/Program Files/TOA Corporation/EV-700 Setting Software" by default.
The hierarchy chart below shows the Install folder configuration.
Note
Never change the folder configuration and file names in the Install folder.
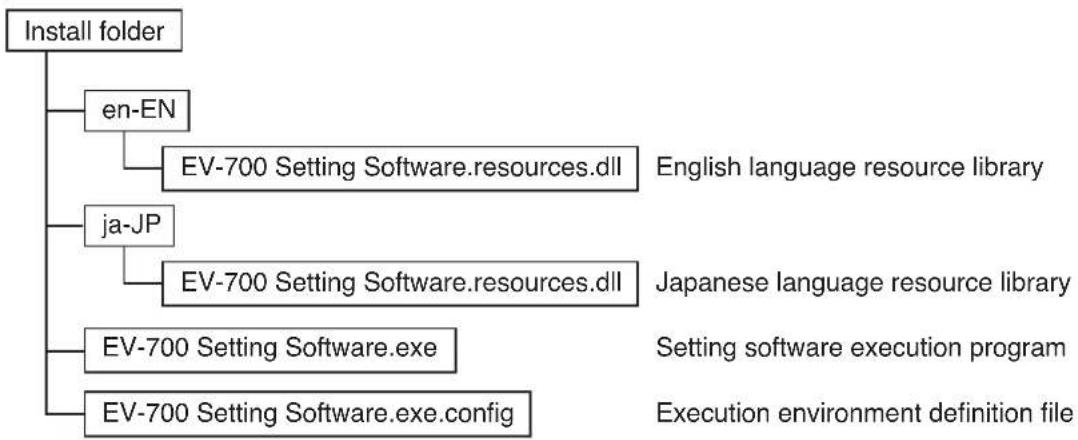
flowchart
graph TD
    A["Install folder"] --> B["en-EN"]
    B --> C["EV-700 Setting Software.resources.dll"]
    A --> D["ja-JP"]
    D --> E["EV-700 Setting Software.resources.dll"]
    A --> F["EV-700 Setting Software.exe"]
    A --> G["EV-700 Setting Software.exe.config"]
    style A fill:#f9f,stroke:#333
    style B fill:#ccf,stroke:#333
    style D fill:#ccf,stroke:#333
    style F fill:#cfc,stroke:#333
    style G fill:#fcc,stroke:#333
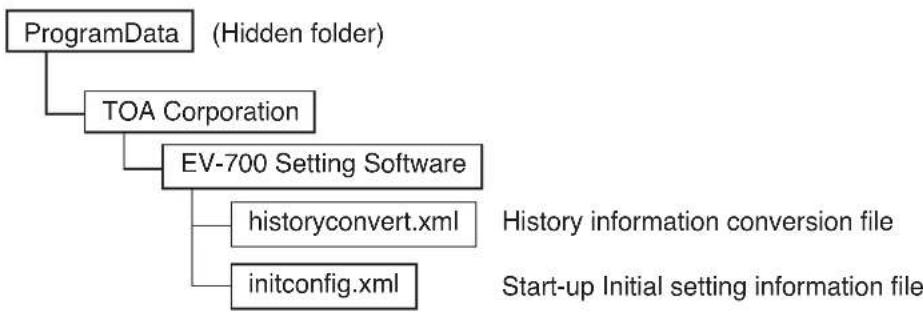
flowchart
graph TD
    A["ProgramData"] --> B["TOA Corporation"]
    B --> C["EV-700 Setting Software"]
    C --> D["historyconvert.xml"]
    C --> E["initconfig.xml"]
    style A fill:#f9f,stroke:#333
    style B fill:#ccf,stroke:#333
    style C fill:#cfc,stroke:#333
    style D fill:#fcc,stroke:#333
    style E fill:#cff,stroke:#333
3.3. Uninstalling the Software
Select "Control panel -Programs and functions" from the start menu of the PC to uninstall the software. As the files stored in the Program Data remain, delete them if not needed.
3.4. Reinstalling the Software
If you wish to reinstall the software, uninstall the software first, then reinstall it.
4. MAKING A BACKUP COPY OF PRERECORDED AUDIO FILES
When reflecting the edited contents to the EV-700 via LAN (p. 116), all data on the memory card inserted into the connected EV-700 will be deleted before the edited contents are written.
Therefore, save a backup copy of the prerecorded audio files in advance.
Prerecorded audio files cannot be restored once deleted. Their redistribution is fee-based.
4.1. Making Backup Copy Using a PC
Step 1. Insert the memory card supplied with the EV-700 into a PC.
Step 2. Use the Windows explorer to copy the contents of the memory card.
Note
Make a backup copy of all files and folders on the memory card. Also, ensure that the file and folder configurations on the memory card are identical to those at the copy destination.
4.2. Making Backup Copy Using the EV-700
Backup copy can be made at the EV-700.
For details on how to make a copy, read the installation manual supplied with the EV-700.
Notes
• To make a backup copy, prepare the commercial memory card.
- The table below shows the rough time required for copying the memory card.
| Data on the memory card Copying time |
| Prerecorded audio files only About 11 minutes |
| Data size of 1 GB About 37 minutes |
It is recommended to use the Windows Copy Function (preceding paragraph) when making a backup copy.
SIMPLE MODE
1. GENERAL DESCRIPTION
The Simple mode allows non-expert users to operate the EV-700 easily. Since the usable functions are limited to broadcasts from the EV-700, EV-700's current operation status confirmation, and edit of broadcast contents, even users not familiar with the EV-700 can easily perform operations.
In this Simple mode, you can perform operations from Editing the broadcast contents using a PC," "Transferring to the EV-700" to "Playing according to the edited contents."
[Functions enabled with the Simple mode]
- Connected Device Detection Function (See p. 23.)
Automatically detects the EV-700 to be connected by the EV-700 Setting software.
• Editing the Broadcast Contents (See p. 25.)
A function that allows you to read out the information about the registered broadcast contents from the EV-700 via a network or using the memory card, and to edit these contents.
You cannot create a new broadcast content.
The edited contents can be transferred to the EV-700 via a network, or read into the EV-700 after being saved to the memory card.
- Broadcasting from the EV-700 (See p. 55.)
You can play the registered broadcast by designating it to the EV-700.
- Confirming the Current Operation Status of the EV-700 (See p. 56.)
You can confirm the current operation mode and the broadcast status of the EV-700.
Broadcast contents being broadcast can also be confirmed.
2. STARTING UP IN THE SIMPLE MODE
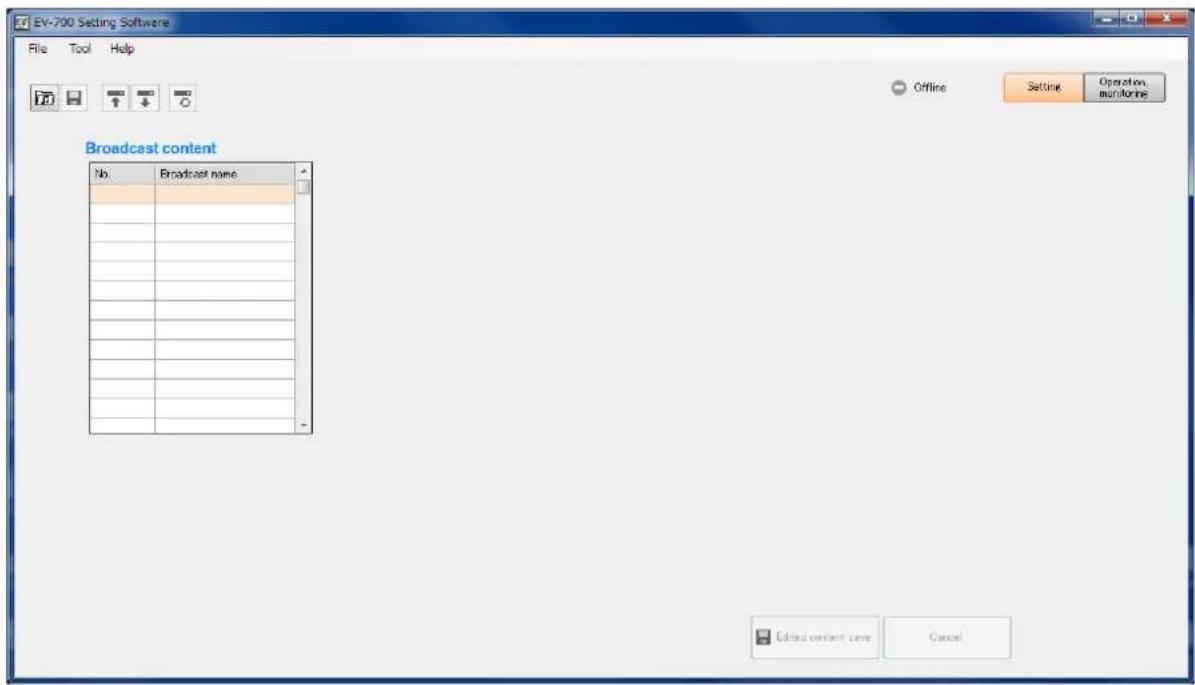
Double-click the "EV-700 Setting Software Sim..." shortcut icon (figure at right) of the EV-700 Setting software created on the desktop when the software has been installed. Alternatively, select "All programs →TOA Corporation EV-700 Setting Software EV-700 Setting Software Simple mode" from the start menu, then the EV-700 Setting software is activated in the Simple mode.
Note
If .NET Framework Ver. 4.5 is not installed in the PC, you cannot start the EV-700 Setting software.
3. EASY-TO-UNDERSTAND GUIDE TO OPERATION IN SIMPLE MODE
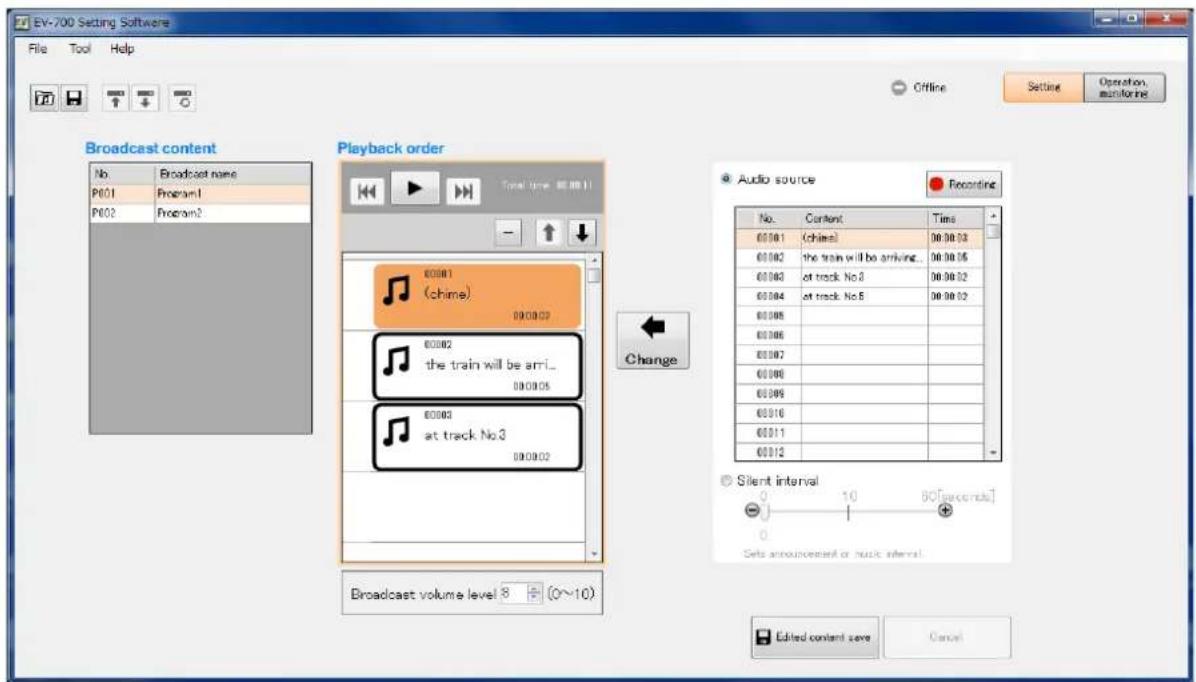
Perform editing work on the broadcast contents set as shown below.
[Broadcast contents] [Broadcast order of P001 (Program 1)]
| No. | Broadcast name |
| P001 | Program1 |
| P002 | Program2 |
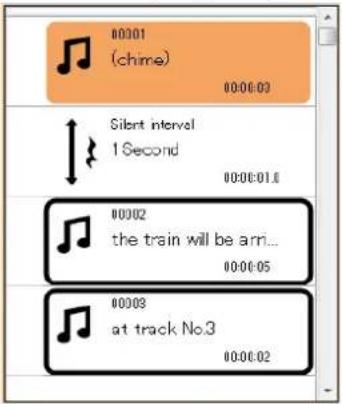
[Registered audio sources]
| No. | Content | Time |
| 00001 | (chime) | 00:00:03 |
| 00002 | the train will be arriving... | 00:00:05 |
| 00003 | at track No.3 | 00:00:02 |
| 00004 | ||
| 00005 | (chime2) | 00:00:03 |
| 00006 | ||
| 00007 | ||
| 00008 | ||
| 00009 | ||
| 00010 | ||
| 00011 | ||
| 00012 |
When wishing to add new audio sources to the broadcast contents
[Broadcast order of P001 (Program 1)]
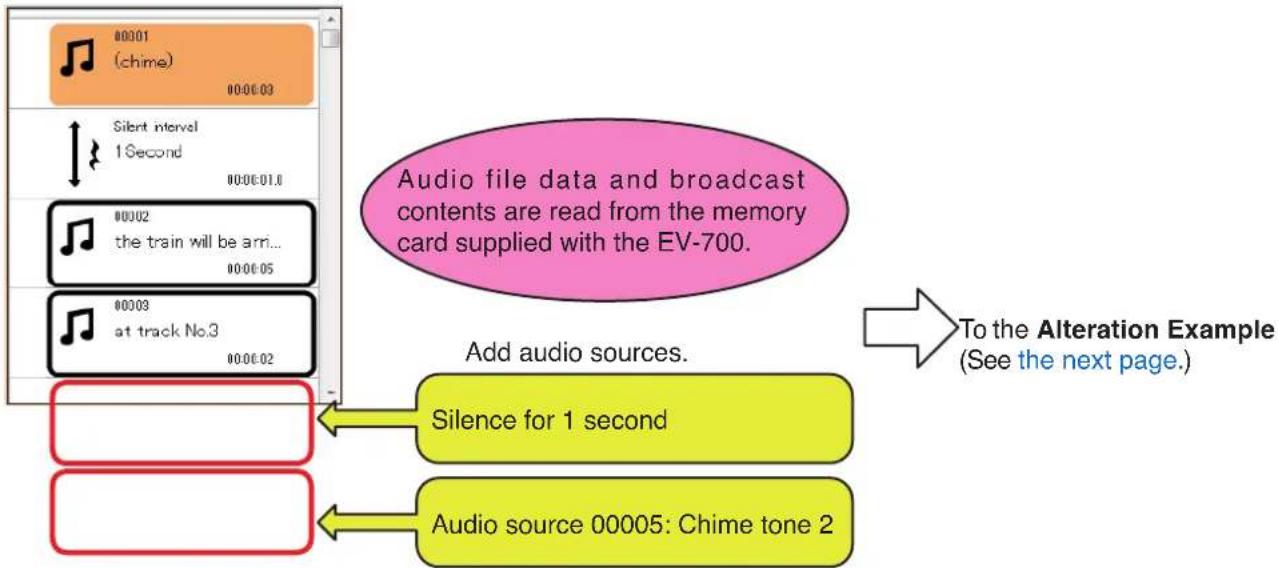
flowchart
graph TD
    A["Audio source 00005: Chime tone 2"] --> B["Silence for 1 second"]
    A --> C["Add audio sources."]
    D["Chime (chime)"] --> E["Silent interval 1 Second"]
    E --> F["Audio file data and broadcast contents are read from the memory card supplied with the EV-700."]
    G["the train will be arrived"] --> H["Audio file data and broadcast contents are read from the memory card supplied with the EV-700."]
    I["at track No.3"] --> J["Add audio sources."]
    K["To the Alteration Example (See the next page.)"] --> L["Add audio sources."]
There are 2 methods to read audio file data and broadcast contents into the EV-700.
- Reading from the memory card supplied with the EV-700. (See p. 29.)
- Reading via a network. (See "CONNECTING TO THE EV-700" on p. 23 and "Acquiring via LAN" on p. 26.)
Similarly, there are 2 methods to reflect the edited audio file data and broadcast contents to the EV-700.
• Reflecting by inserting the memory card into the EV-700 (See p. 54.)
- Reflecting via a network (See "Reflecting to the EV-700 via LAN" on p. 50.)
When using the memory card, a memory card reader is required.
Example: Adding new audio file data to the broadcast contents
Step 1. Read audio file data and broadcast contents.
Read audio file data and broadcast contents from the EV-700 via a network.
Acquire audio file data and broadcast contents by connecting a PC with the EV-700.
(See "CONNECTING TO THE EV-700" on p. 23 and "Acquiring via LAN" on p. 26.)
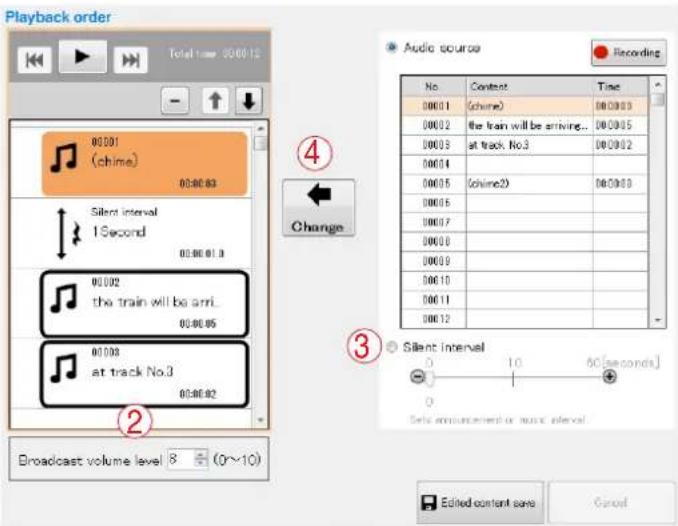
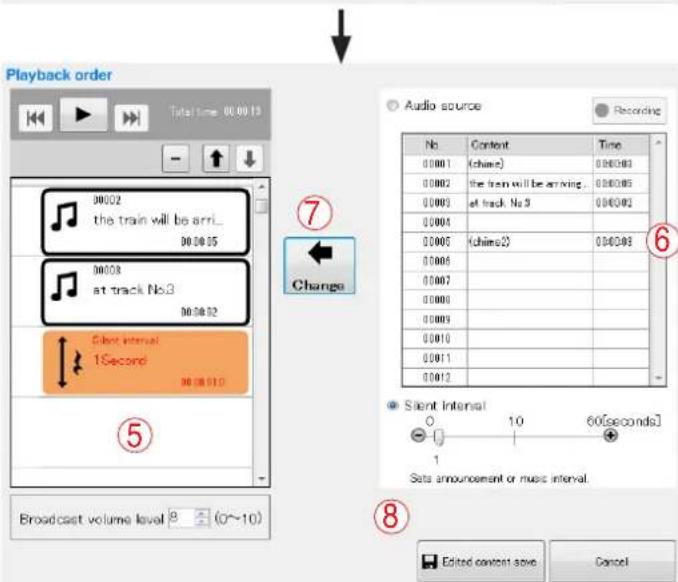
Step 2. Add an audio source.
(1) Select the broadcast to be changed (P001) from the Broadcast content list displayed on the left of the screen.
(2) Click on the 5th step (blank) of "Playback order" displayed on the center of the screen.
(3) Select "Silent Interval" displayed on the right of the screen, then set interval to 1.0 (sec.) by moving the slide bar.
(4) Click the Change button.
(5) Click on the 6th step (blank) of "Playback order" displayed on the center of the screen.
(6) Select "Audio source" displayed on the right of the screen, then select an audio source to be changed (00005: Chime tone 2).
(7) Click the Change button.
(8) Click the Edited content save button.
①
| No. | Broadcast name |
| P001 | Program 1 |
| P002 | Program2 |
Step 3. Reflect the edited contents.
Broadcast is made with the altered contents by inserting the memory card into the EV-700. (See p. 54.)
Opens the saved audio data and broadcast contents.
Save: Overwrites the existing audio data and broadcast contents with the new ones.
Save in a designated folder: Saves the audio data and broadcast contents into other folder.
Download from device
→ Project:
Acquires the audio data and broadcast contents from the connected EV-700 and displays the setting contents on a PC screen using the EV-700 Setting software.
Upload to device: Transfers the audio data and broadcast contents being edited with the EV-700 Setting software to the connected EV-700.
Tip
Use this function when swapping all audio data and broadcast contents to be used for the EV-700.
Note
After deleting all data on the EV-700's memory card, transfer all audio data and broadcast contents. Make a backup copy of the contents on the memory card, if necessary. (See p. 15, "MAKING A BACKUP COPY OF PRERECORDED AUDIO FILES.")
Difference data upload to device: Transfers only the altered file(s) of audio data and broadcast contents being edited with the EV-700 Setting software to the connected EV-700.
Tip
When you have added audio sources to the audio data and broadcast contents used for the EV-700 or when you have altered a part of the broadcast contents, use this function to reflect only the altered contents to the EV-700. Execution time for this function is less than that for "Upload to device."
Note
Use this "Difference data upload to device" only when you have edited the same project as the one used for the EV-700.
Performing the Difference data upload using data different from that used for the EV-700 may cause an EV-700's data error, possibly resulting in operation error.
Exit: Exits the EV-700 Setting software.
4.1.2. Tool
Connect:
Connects to the last connected EV-700. (See p. 24, "Connecting to the Last Connected EV-700.")
When "Connect" is selected first after starting the EV-700 Setting Software, detects the connected devices and connects to the detected EV-700 in the same manner as in the case of "Connect settings."
Disconnect: Disconnects the communication with the EV-700. This item becomes effective only while online with the EV-700.
Connect settings:
Detects the connected devices, then connects to the detected EV-700. (See p. 23, "Detecting and Connecting to the EV-700.")
4.1.3. Help
Version information: Displays the EV-700 Setting software version number.
4.2. Tool Buttons
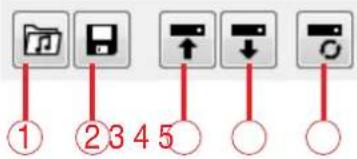
1. Opens project file
Opens the saved audio data and broadcast contents.
This action is the same as selecting "File Open → Project" from the menu.
2. Save
Overwrites the existing audio data and broadcast contents with the new ones.
This action is the same as selecting "File Save" from the menu.
3. Upload to device
Transfers the audio data and broadcast contents being edited with the EV-700 Setting software to the connected EV-700.
This action is the same as selecting "File → Upload to device" from the menu.
Tip
Use this function when swapping all audio data and broadcast contents to be used for the EV-700.
Note
After deleting all data on the EV-700's memory card, transfer all audio data and broadcast contents. Make a backup copy of the contents on the memory card, if necessary. (See p. 15, "MAKING A BACKUP COPY OF PRERECORDED AUDIO FILES.")
4. Download form device
Acquires the audio data and broadcast contents from the connected EV-700 and displays the setting contents on a PC screen using the EV-700 Setting software.
This action is the same as selecting "File → Download form device -Project" from the menu.
5. Difference data upload to device
Transfers only the altered file(s) of audio data and broadcast contents being edited with the EV-700 Setting software to the connected EV-700.
This action is the same as selecting "File → Difference data upload to device" from the menu.
Tip
When you have added audio sources to the audio data and broadcast contents used for the EV-700 or altered a part of the broadcast contents, use this function to reflect only the altered contents to the EV-700.
Execution time for this function is less than that for "Upload to device."
Note
Use this "Difference data upload to device" only when you have edited the same project as the one used for the EV-700.
Performing the Difference data upload using data different from that used for the EV-700 may cause an EV-700's data error, possibly resulting in operation error.
5. CONNECTING TO THE EV-700
Place the EV-700 in an online state following the procedure described below in order to acquire the audio data or have the EV-700 perform operations like playback in communication with the EV-700 via a network.
Note
Use the EV-700 Setting software having the same version number as the unit's firmware. You cannot establish a connection between a PC and the EV-700 when their versions are different.
To confirm the EV-700's firmware version, see the instruction manual supplied with the EV-700.
To confirm the EV-700 Setting software version, select "Help → Version information" from the menu. (See p. 21 or p. 65.)
If both versions are different, update the firmware referring to the procedures explained in Full-function mode since firmware update can be executed even when in Simple mode in the same manner as in Full-function mode. The EV-700's firmware version becomes equal to that of the EV-700 Setting Software, enabling communications between them. (See p. 73, "Updating the EV-700's firmware.")
Download the latest version of EV-700 Setting Software from the TOA Products Data download site http://www.toa.products.com/international/.
5.1. Detecting and Connecting to the EV-700
Detect the communicable EV-700 units on the network, then select the EV-700 to connect to.
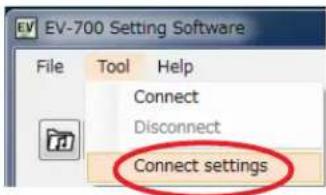
Step 1. Select "Tool → Connect settings" from the menu.
Tip
When multiple IP addresses have been set in a PC, the IP address selection screen of the PC appears only at the first start-up after the EV-700 Setting Software has been installed.
Select the main IP address to connect to the EV-700, then click the OK button. Consult your network administrator of the facilities where the EV-700 is installed about which IP address corresponds to which EV-700 unit.
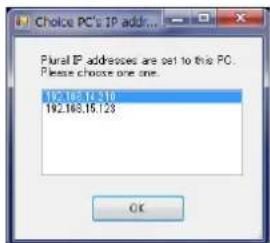
The IP setting screen appears and you can confirm information of the EV-700 units on the network. The connectable EV-700 units appear in the "Communicable devices" field.
Tip
When no EV-700 is displayed in the "Communicable devices" field or when you want to identify which EV-700 unit corresponds to the displayed one, consult your network administrator of the facilities where the EV-700 is installed.
Step 2. Click the Next button.
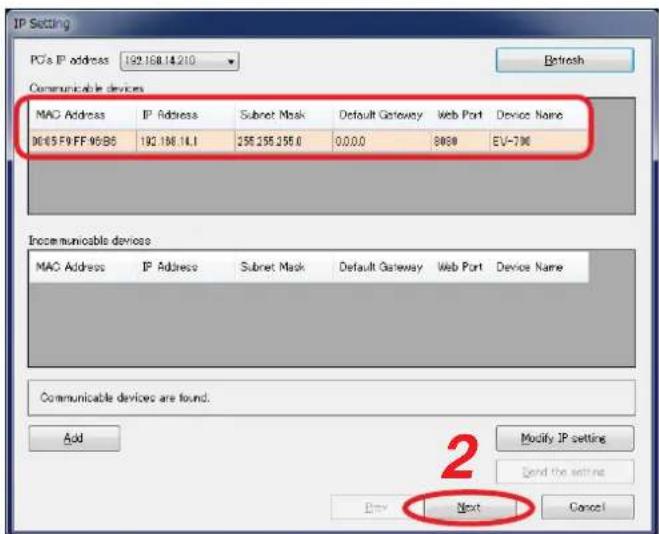
The firmware version confirmation scree appears.
The connectable EV-700 units appear in the "Connectable devices" field.
Tip
When no EV-700 is displayed in the "Connectable devices" field or when you want to identify which EV-700 unit corresponds to the displayed one, consult your network administrator of the facilities where the EV-700 is installed.
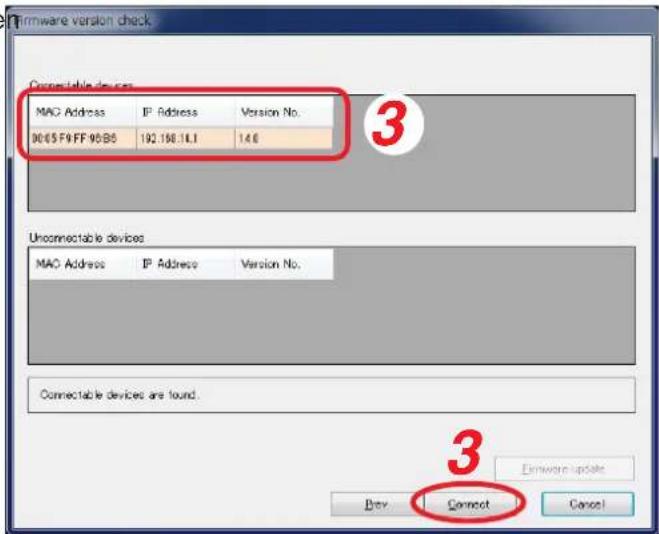
Step 3. Select the EV-700 to connect to from the "Connectable devices" field, then click the Connect button. The Authentication screen appears.
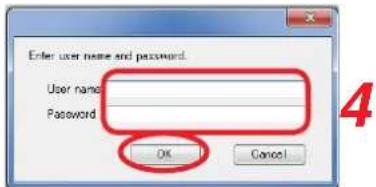
Step 4. Enter the user name and password, then click the OK button. When the authentication is completed successfully, the EV-700 becomes online.
Shown below is the initial setting.
User name: EV700
Password: guest
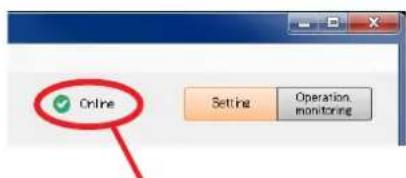
Indication in online state
Tip
If connection cannot be established though you followed the procedure above, make settings using the same method as in Full-function mode. Perform the procedure described on p. 67, "CONNECTING TO THE EV-700" while in Simple mode.
5.2. Connecting to the Last Connected EV-700
When reconnecting to the EV-700 after it was detected and connected, and then disconnected, follow the procedure below.
Step: Select "Tool Connect" from the menu.
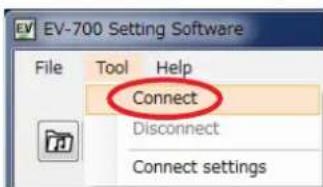
Tip
When "Tool → Connect" is selected first after starting the EV-700 Setting Software, detects the connected devices and connects to the detected EV-700 in the same manner as in the case of "Tool → Connect settings." See the previous page, "Detecting and Connecting to the EV-700."
6. EDITING BROADCAST CONTENTS
6.1. Workflow
In the Simple mode, perform edit of broadcast contents following the steps below.
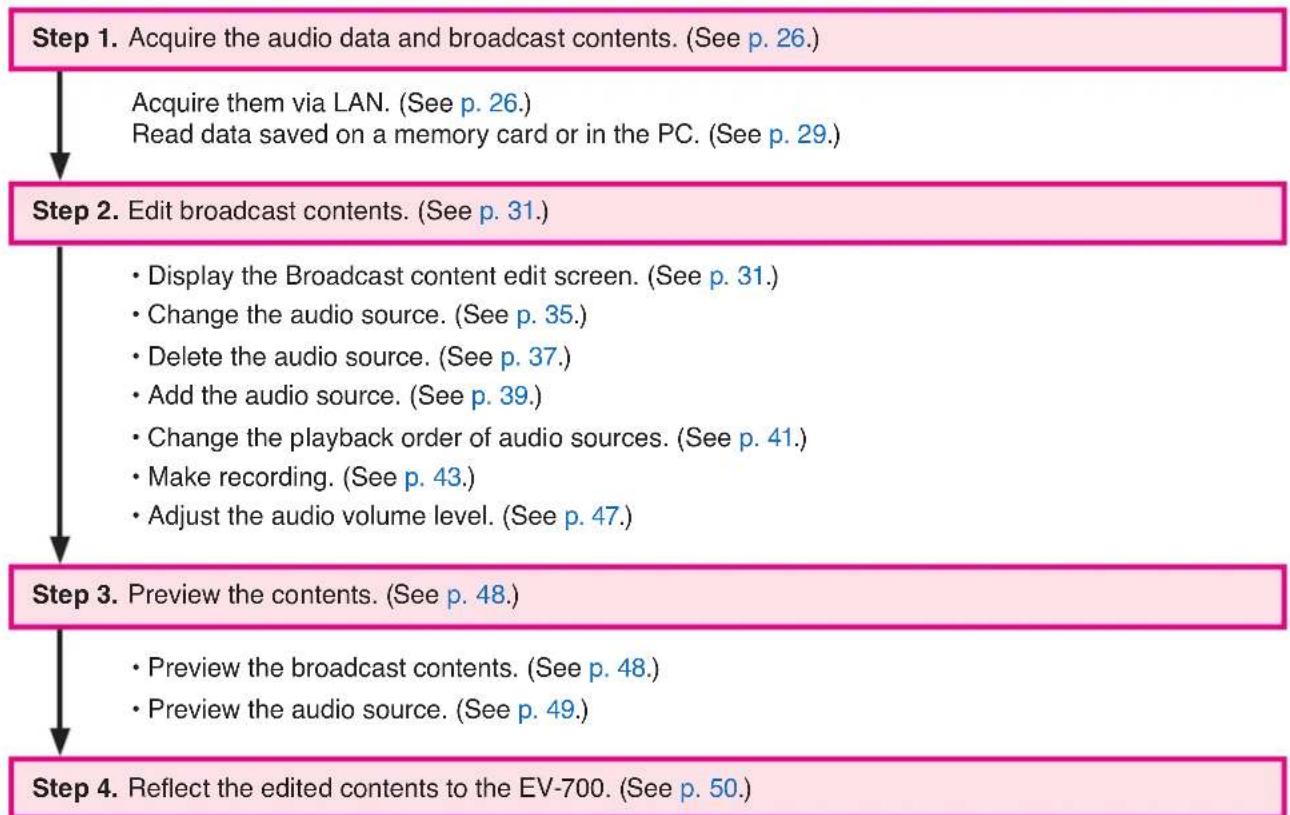
flowchart
graph TD
    A["Step 1. Acquire the audio data and broadcast contents. (See p. 26.)"] --> B["Step 2. Edit broadcast contents. (See p. 31.)"]
    B --> C["Step 3. Preview the contents. (See p. 48.)"]
    C --> D["Step 4. Reflect the edited contents to the EV-700. (See p. 50.)"]

    A -->|Acquire them via LAN. (See p. 26.) Read data saved on a memory card or in the PC. (See p. 29.)| B
    B -->|Display the Broadcast content edit screen. (See p. 31.) Change the audio source. (See p. 35.) Delete the audio source. (See p. 37.) Add the audio source. (See p. 39.) Change the playback order of audio sources. (See p. 41.) Make recording. (See p. 43.) Adjust the audio volume level. (See p. 47.)| C
    C -->|Preview the broadcast contents. (See p. 48.) Preview the audio source. (See p. 49.)| D
- Reflect to the EV-700 via LAN. (See p. 50.)
- Save to the memory card. (See p. 54.)
6.2. Acquiring Audio Data and Broadcast Contents
6.2.1. Acquiring via LAN
Download the audio data and broadcast contents from the EV-700 via LAN.
Connect the EV-700 to a PC online in advance. (See p. 23, "CONNECTING TO THE EV-700.")
It takes about 3 minutes to download all audio data and broadcast contents (about 66 MB) contained on the supplied memory card. It may take longer time depending on the network environments.
Note
Note that the EV-700 is placed in maintenance state during download, disabling emergency broadcast start.
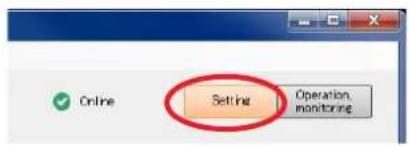
Step 1. Click the Setting button located at the upper right corner of the Initial screen displayed after the EV-700 Setting software has started.
The setting screen appears.
Step 2. Select "File → Download from device → Project" from the menu or click the "Download from device" button.
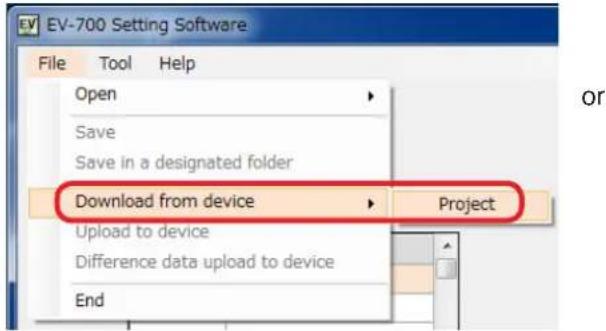
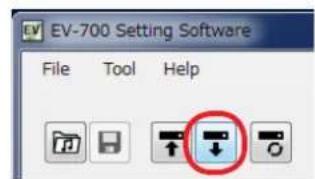
A confirmation dialog appears.
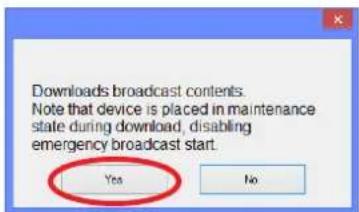
3
Step 3. After confirming that dialog, click the Yes button.
The folder selection screen appears.
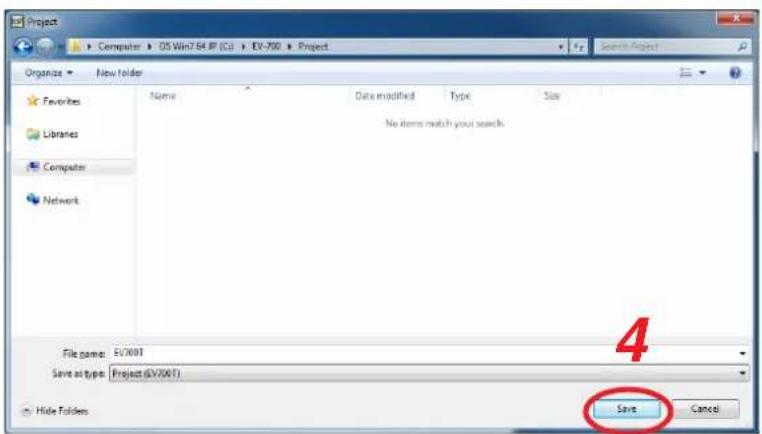
Step 4. Select a folder of download destination, then click the Save button.
Download starts.
Note
If a file to which broadcast contents have been set exists at the download destination, the Save confirmation screen appears before download starts.
Click the Yes button to overwrite the file, otherwise the No button. If the No button is selected, the download is aborted.
Take care that selecting the Yes button causes the existing file to be overwritten even if the downloaded file is invalid.
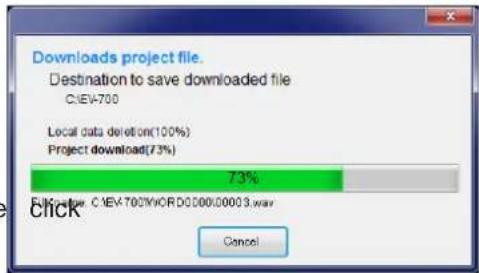
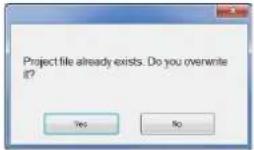
The Download completed screen appears when the download is successfully completed.
Tip
When download failed, its transfer result can be checked in a list. For details, see "When download failed" on the next page.
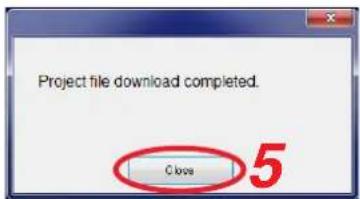
Step 5. Click the Close button.
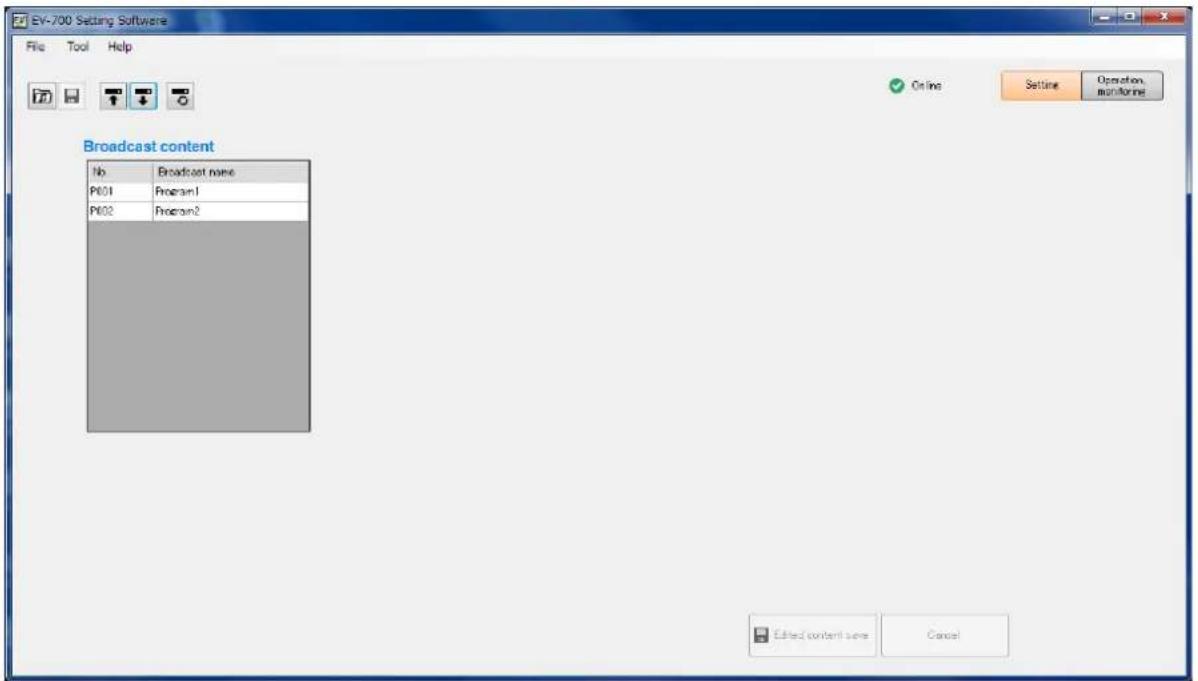
Broadcast contents of the downloaded project appear in the Broadcast content list on the setting screen.
This screen is called Broadcast content screen.
[Broadcast content screen]
When download failed
When download from the EV-700 failed due to failures such as communication error, a dialog shown below will appear. Transfer result of the transfer files can be checked in a list.
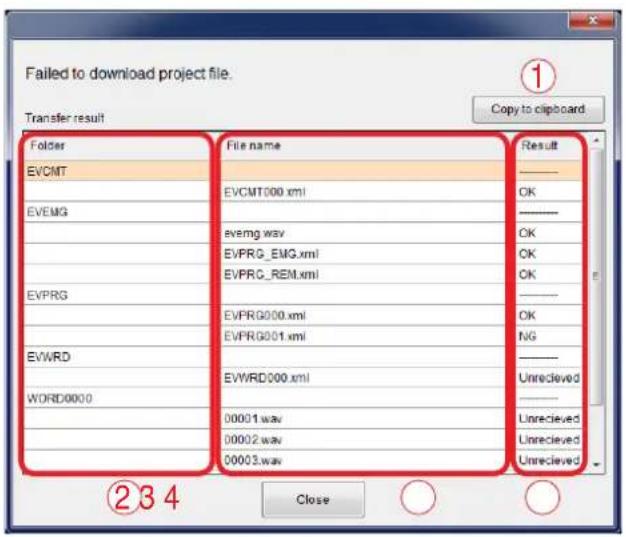
1. [Copy to clipboard] button
Copies the contents of the transfer result to a clipboard in text format with tab delimiters.
2. Folder
Displays the folder names.
When there is no folder, the "/" indication is displayed.
3. File name
Displays the file names in the most recently opened folder.
4. Result
Displays the transfer results for each file.
"OK": Transfer has been completed.
"NG": Transfer failed.
"Unreceived": Transfer files are not received as abnormality occurred before starting transfer.
6.2.2. Reading Data saved on the Memory Card or in the PC
Note
Make sure the data saved in the PC is identical to the one being used for the EV-700 before reading the data saved in the PC. Consult a person in charge of the equipment maintenance if the data being used for the EV-700 is unknown.
Uploading to the EV-700 or performing recording operation using the data different from the one being used for the EV-700 causes EV-700's data error, resulting in equipment malfunction.
Step 1. When reading from the memory card, remove the memory card from the EV-700 and insert it into a PC.
Step 2. Click the Setting button located at the upper right corner of the Initial screen displayed after the EV-700 Setting software has started. The setting screen appears.
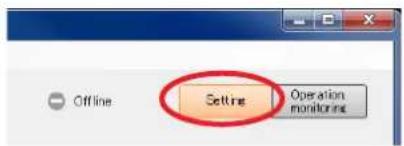
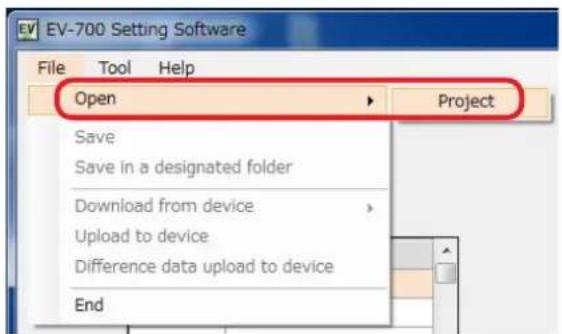
Step 3. Click "File → Open → Project" from the menu or click the "Open project" tool button icon.
or
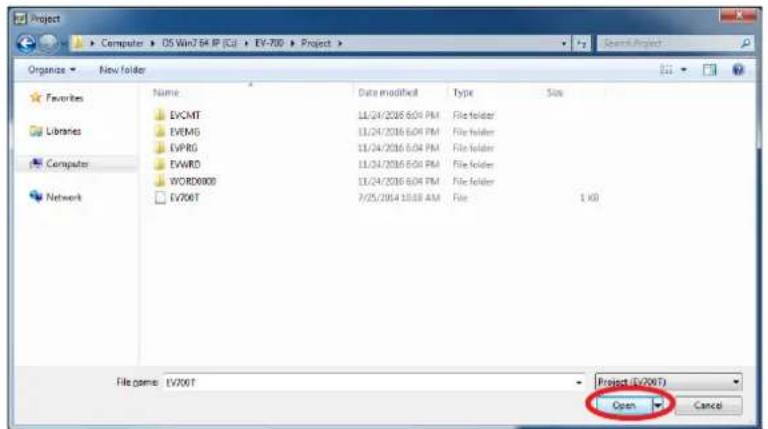
The folder selection screen appears.
4
Step 4. Select the folder to read, then click the Open button.
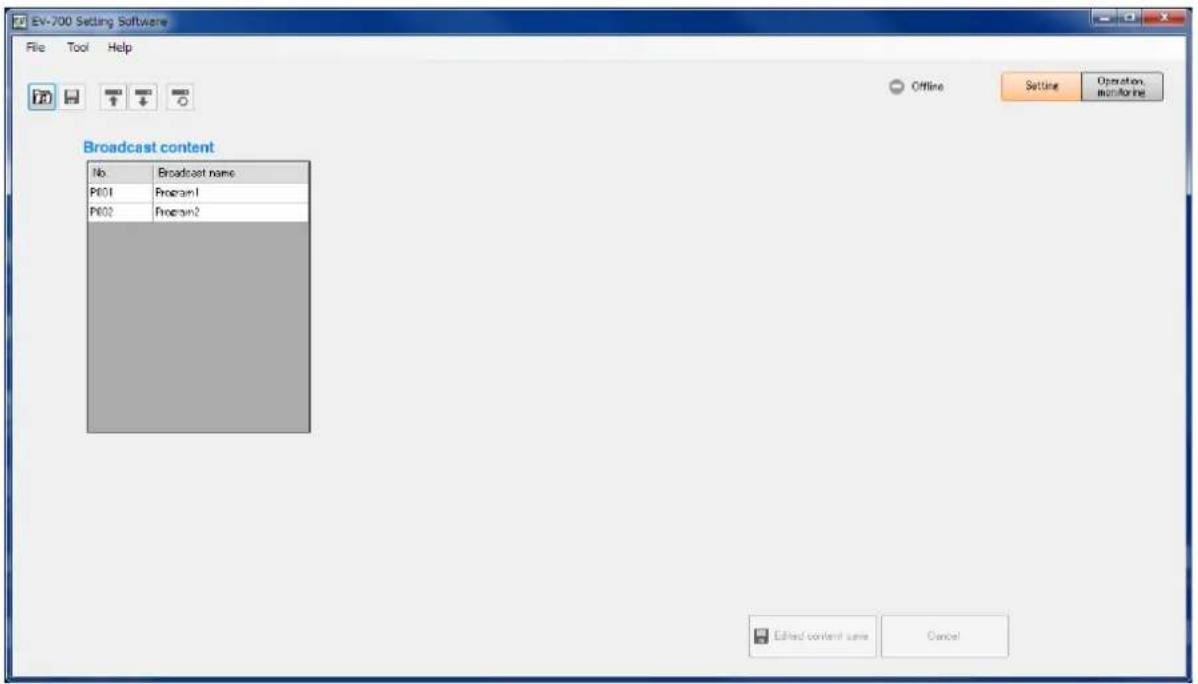
Broadcast contents of the selected project appear on the setting screen.
This screen is called Broadcast content screen.
[Broadcast content screen]
6.3. Editing Broadcast Contents
This chapter describes the method to perform change, deletion, addition, broadcast order change, recording, and volume level adjustment of audio sources to broadcast.
6.3.1. Displaying the broadcast content edit screen
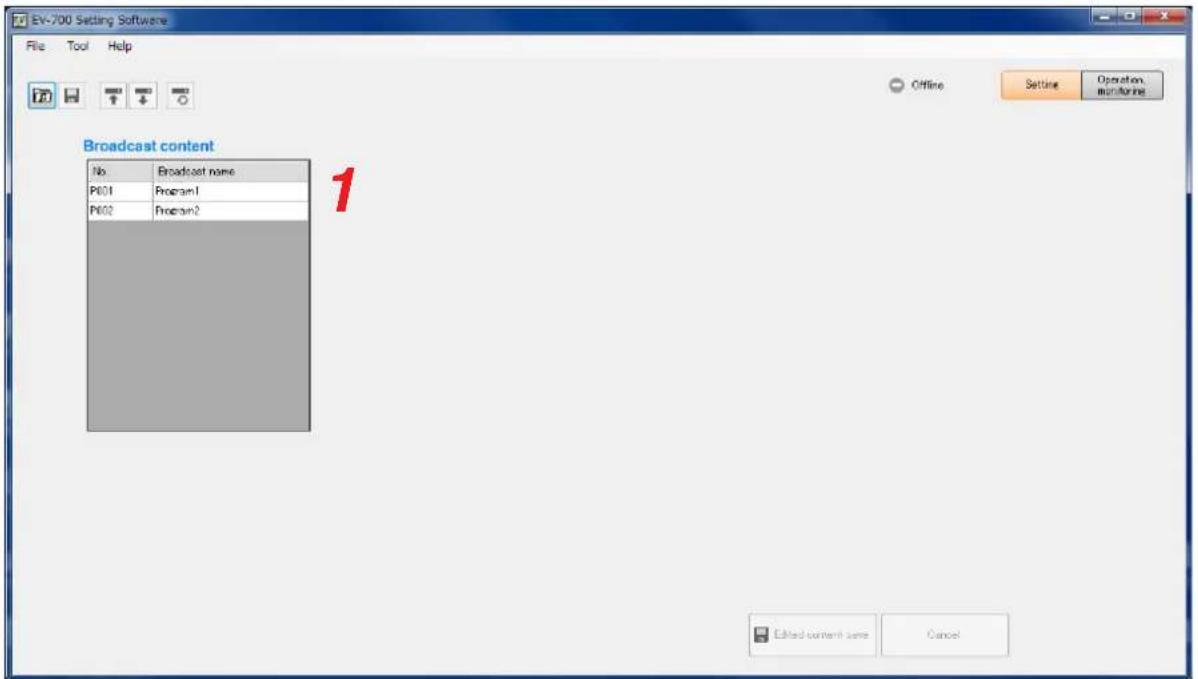
Step 1. Click on the broadcast number or broadcast name to be changed in the Broadcast content list on the Broadcast content screen.
Playback order list (setting content) of the selected broadcast appears on the center of the screen.
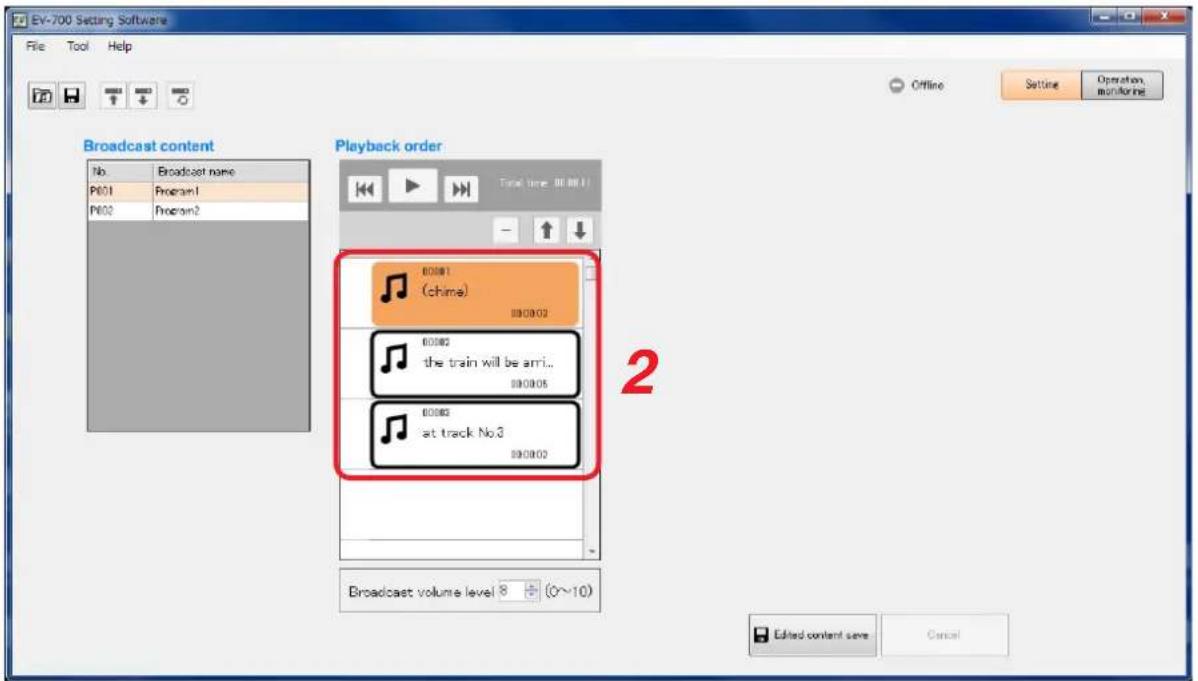
Step 2. Click the audio source to be changed or blank space in the Playback order list.
Audio source list appears on the right of the screen.
This screen is called "Broadcast content screen."
[Broadcast content screen]
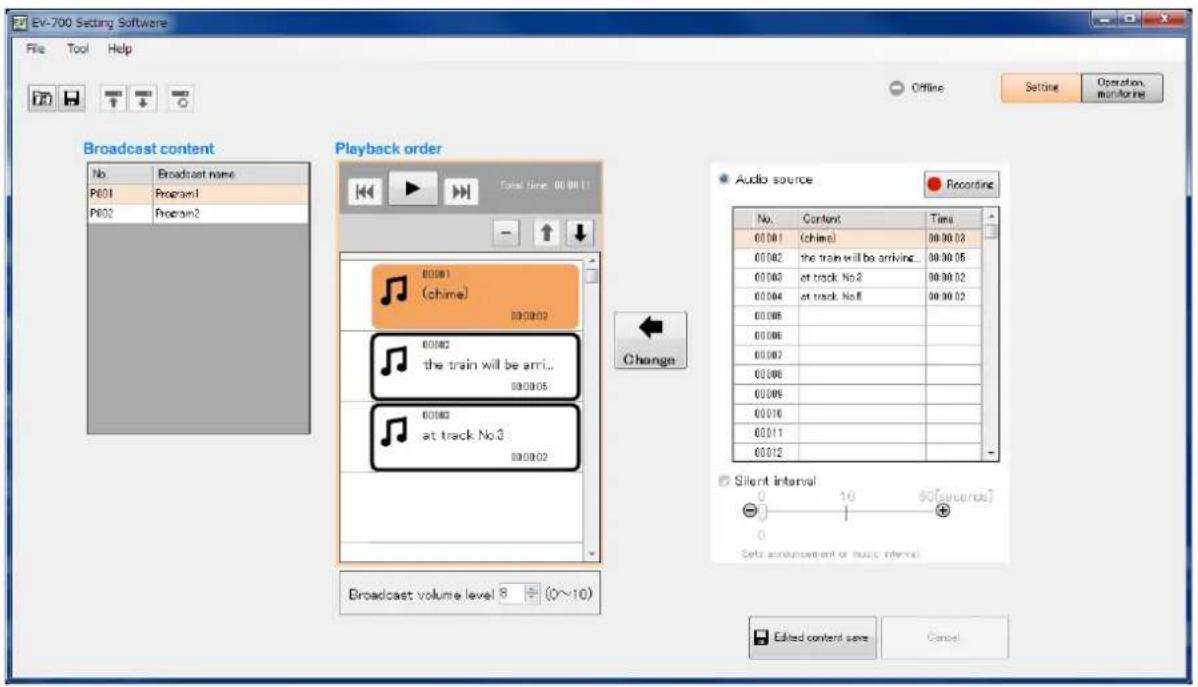
[Broadcast content edit screen description]
![EV-700 Setting Software File Tool Help Offline Setting Operation, monitoring Broadcast content No. Broadcast name P001 Program1 P002 Program2 Playback order Total time: 00:00:11 60081 (chime) 60082 the train will be arri... 60083 at track No3 60084 at track No5 60085 60086 60087 60088 60089 60090 60091 60092 60093 60094 60095 60096 60097 60098 60099 60100 60101 60102 60103 60104 60105 Audio source Recording No. Content Time 60:01 (chime) 30:30:33 60:02 the train will be arriving... 30:30:35 60:03 at track No3 30:30:32 60:04 at track No5 30:30:33 Change Silent interval 0 10 80[seconds] Data announcement or music interval. Edited content save Cancel 1718 19](/content/2026/05/953756/images/393407650913ab807acacc72e0b21c4f1fae737bbc6345e96cc1f6682990b186.jpg)
- Broadcast content list • Playback order list • Audio source list
![Broadcast content No. Broadcast name P001 Program 1 P002 Program 2 1 2 34567 Playback order Total time (0:00:11) 8 9 10 11 12 Audio source Recording 13 14 15 Silent interval 0 1.0 60[seconds] 1.0 Sets announcement or music interval 16 Broadcast volume level 3 (0~10)](/content/2026/05/953756/images/45312041c8ec6a3478e385457d0069934317906daed8a627c9226ade4147249d.jpg)
1. Broadcast number (No.)
Displays broadcast numbers.
2. Broadcast name
Displays broadcast names.
3. Reverse button
This button is enabled during broadcast playback. If you click this button during playback, the audio source during playback is played from its beginning. But if you click this button within 2 seconds after the 2nd and subsequent audio source has been played, playback will be made from the beginning of the previously played audio source.
4. Play/Stop button
The Play button changes to the Stop button during playback. If you click the Stop button, playback stops. Playback in progress mark appears at the left side of the audio source being played.
5. Forward button
This button is enabled during broadcast playback. If you click this button during playback, the audio source of the next order is played from its beginning. But if you click this button while the audio source of the last order is played, the playback stops.
6. Delete button
Deletes the selected audio source item or silent item from the list.
7. List order up button
Replaces the selected audio source item or silent item with the previous item. But the list order remains unchanged when the first item selected.
8. Playback total time display
Displays the broadcast total time.
9. List order down button
Replaces the selected audio source item or silent item with its next item. But the list order remains unchanged when the last item is selected.
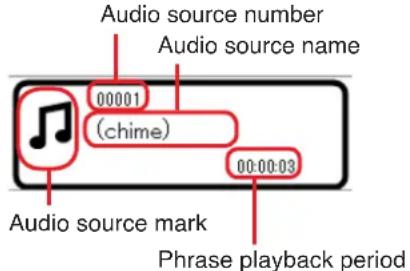
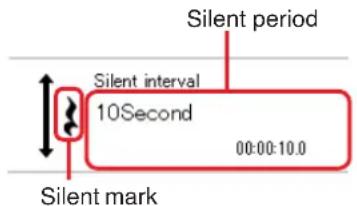
10. Broadcast audio source playback order list
Information about the selected broadcast audio source is displayed in order of playback.
[For audio source]
[For silent interval]
11. Broadcast volume level
Sets the broadcast volume level in the range of 0 to 10. It is not possible to set the volume levels of individual audio sources.
12. Audio source selection button
When selected, operation of the Audio source selection list (14) becomes valid.
13. Record button
Click this button when recording audio sources.
[Maximum recordable time]
| Sampling frequency setting | Recording time limit(Total of all audio sources) |
| 44.1 kHz About 3 | hours |
| 32 kHz About | 4 hours |
Note
Recording stops if the memory card becomes full.
14. Audio source selection list
Displays the audio source information registered in project.
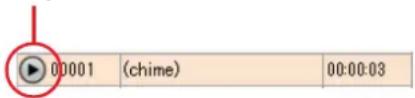
When an audio source is selected, the Playback button appears on the left of the Audio source No., enabling preview using a PC.
Playback button
15. Silent interval selection button
When selected, operation of the Silent interval becomes enabled.
16. Silent interval setting switch
Set the Silent interval period by moving the slide bar.
Setting range: 0 to 60 seconds (settable 0 to 10 seconds in 0.1-second units and 10 to 60 seconds in 1-second units)
17. Change button
Replaces the selected audio source in the Broadcast audio source playback order list (10) with the selected Audio file in the Audio source selection list (14) or the silent interval set by the Silent interval setting switch (16).
In the similar manner, an audio source or a silent interval can be added by selecting blank step in the Broadcast audio source playback order list.
18. Edited content save button
Saves the edited content, then closes the Broadcast content edit screen.
19. Cancel button
Cancels the edit state, then closes the Broadcast content edit screen.
6.3.2. Changing audio sources
To change the audio source, perform the following operations on the Broadcast content edit screen. (See p. 32, "Audio source list appears on the right of the screen.")
Step 1. Click the audio source or silent interval to be changed in the Playback order list.
![EV-700 Setting Software File Tool Help Offline Setting Operation monitoring Broadcast content No Broadcast name P601 Program1 P602 Program2 Playback order Total time: 00:00:11 00:00:1 (chime) 00:00:03 the train will be arrived... 00:00:05 at track No.2 00:00:02 at track No.5 00:00:02 00:00:03 00:00:04 00:00:05 at track No.3 at track No.5 Audio source Recording No. Content Time 00:00:1 (chime) 98:00:03 00:00:2 the train will be arriving... 98:00:05 00:00:3 at track No.2 98:00:02 00:00:4 at track No.5 98:00:02 Change 3 2-2 Silent interval - 1 10 98[acoustic] Set announcement or music interval Broadcast volume level 8 + (0~10) Edited content save Cancel](/content/2026/05/953756/images/1c392935f4841425b497b1f0b6b57a299079357c5c97098933b80edd1902dd67.jpg)
Step 2. Set the audio source or silent interval to be newly used.
2-1. When setting the audio source
Select the Audio source selection button, then click on the audio source to be newly used in the Audio source selection list.
Tip
You can preview the audio source in the Audio source selection list using the PC. (See p. 49.)
2-2. When setting the silent interval
Select the Silent interval button, then set the Silent interval period by moving the slide bar.
Step 3. Click the Change button.
The new audio source or silent interval appears in the Playback order list.
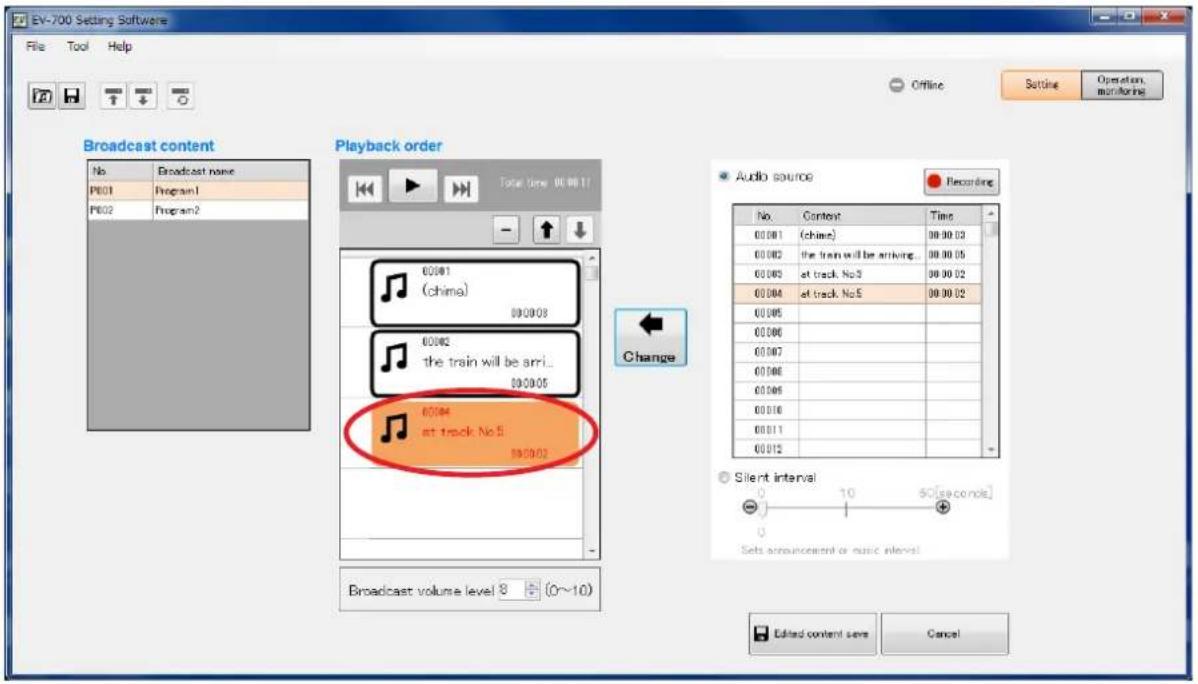
Step 4. Click the Edited content save button.
A confirmation dialog appears.
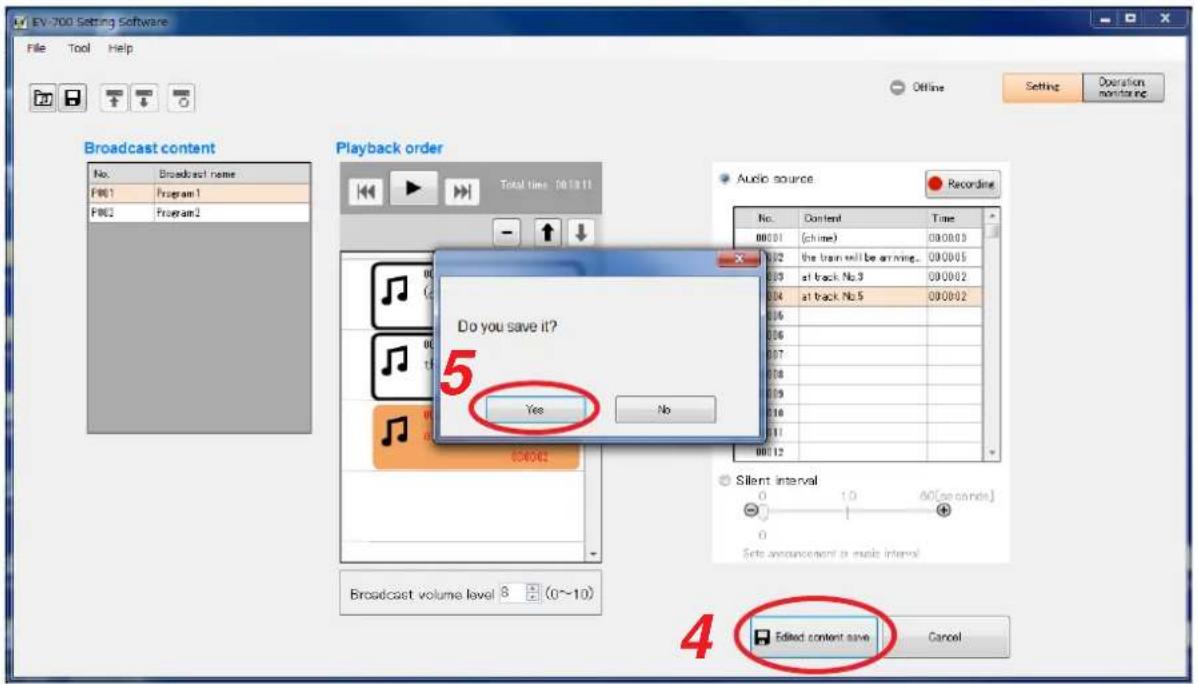
Step 5. Click the Yes button.
6.3.3. Deleting audio sources
To delete the audio source, perform the following operations on the Broadcast content edit screen. (See p. 31, "Displaying the broadcast content edit screen.")
Step 1. Click on the audio source to be deleted in the Playback order list.
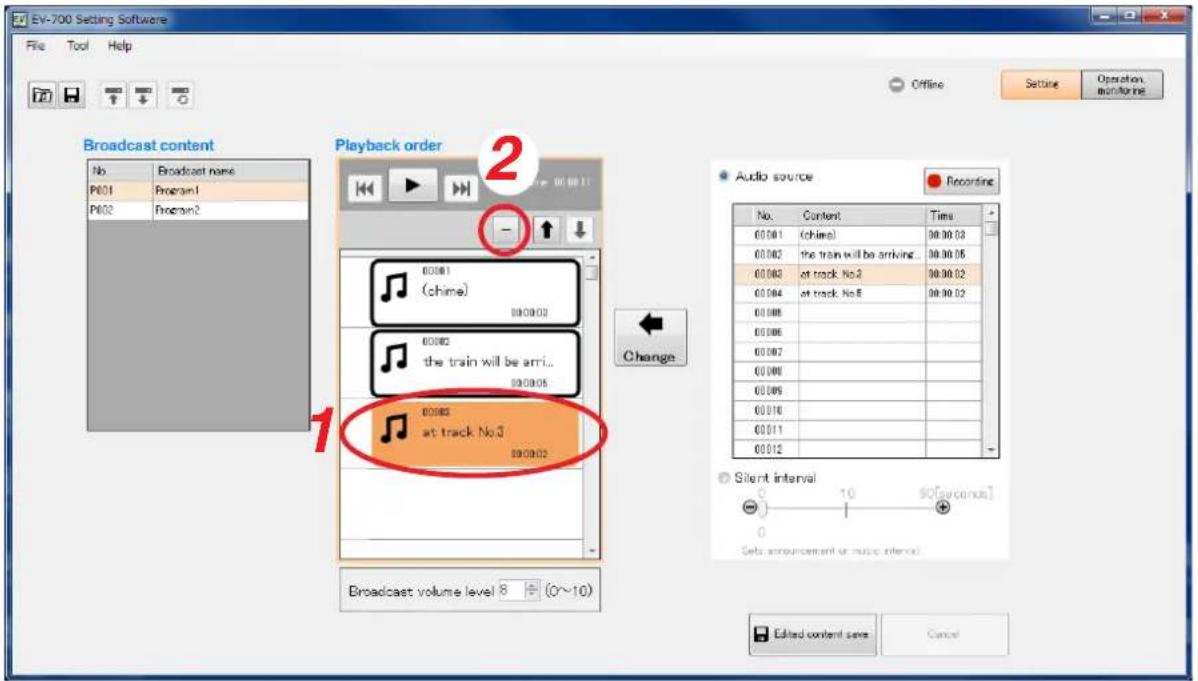
Step 2. Click the Delete button.
A confirmation dialog appears.
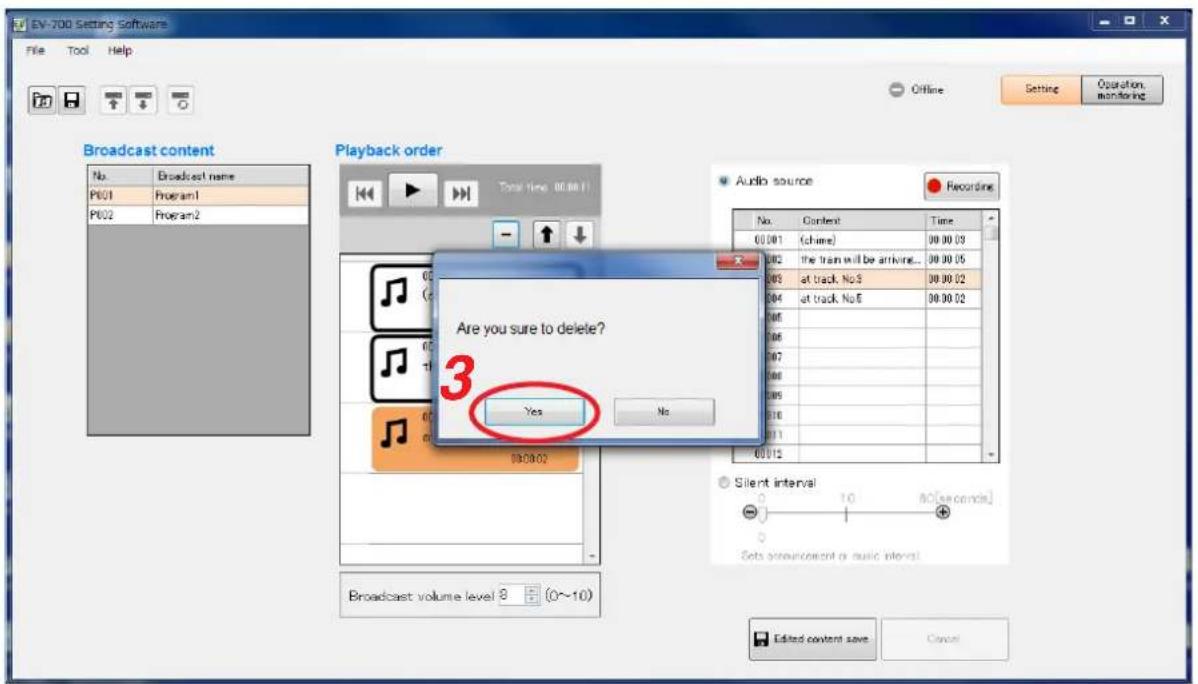
Step 3. Click the Yes button.
The selected audio source is deleted.
Step 4. Click the Edit content save button.
A confirmation dialog appears.
![EV-700 Setting Software File Tool Help Offline Setting Operation monitoring Broadcast content No Broadcast none P801 Program1 P802 Program2 Playback order Total time: 00:00:05 Audio source Recording No. Content Time 00:00:1 (ohne) 00:00:03 00:2 the train will be arriving. 00:00:05 00:3 at track No3 00:00:02 00:4 at track No8 00:00:02 00:5 00:6 00:7 00:8 00:9 01:0 01:1 01:2 Silent interval: 0 10 50[seconds] 0 Sets announcement or music intervals 5 Do you save it? Yes No 65 4 Edited content save Cancel](/content/2026/05/953756/images/f004bdeea1ca92a843efa343110370a4c9bc4e75bc9832198844363b1691c50c.jpg)
Step 5. Click the Yes button.
6.3.4. Adding audio sources
To add an audio source, perform the following operations on the Broadcast content edit screen. (See p. 31, "Displaying the broadcast content edit screen.")
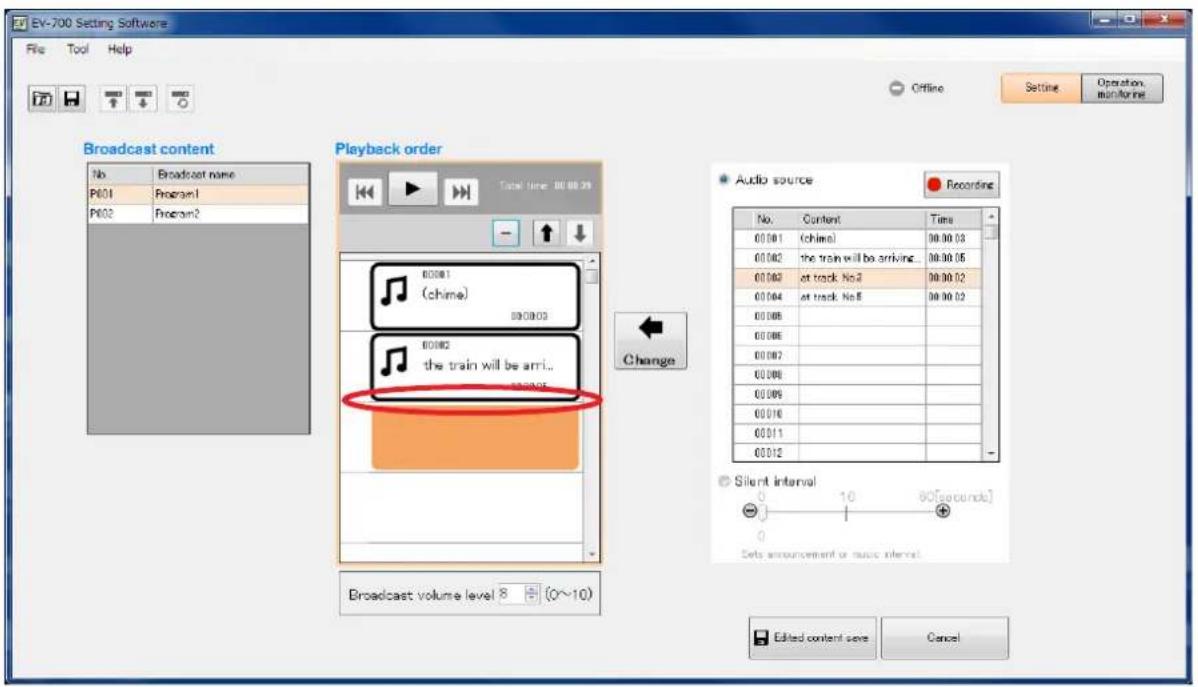
Step 1. Click the blank step for which no audio source is set in the Playback order list.
![EV-700 Setting Software File Tool Help Offline Setting Operation monitoring Broadcast content No Broadcast name P601 Program1 P602 Program2 Playback order Total time: 00:00:11 00:00:1 (chime) 00:00:2 the train will be arri... 00:00:3 at track No.3 00:00:4 at track No.5 00:00:5 00:00:6 00:00:7 00:00:8 00:00:9 00:01:0 00:01:1 00:01:2 Audio source Recording No. Content Time 00:00:1 (chime) 90:00:03 00:00:2 the train will be arriving 90:00:05 00:00:3 at track No.3 90:00:02 00:00:4 at track No.5 90:00:02 Change 3 2-2 Silent interval 0 10 90[seconds] 1 Sets announcement or music interval Broadcast volume level 8 + (0~10) Edited content save Cancel](/content/2026/05/953756/images/0d46192cc3aa95bd87679527365ee1bee0e97e0d5e18b13180c64836c570ad82.jpg)
Step 2. Set the audio source or silent interval to be newly used.
2-1. When setting the audio source
Select the Setting button, then click on the audio source to be newly used in the Audio source selection list.
Tip
You can preview the audio source in the Audio source selection list using the PC. (See p. 49.)
2-2. When setting the silent interval
Select the Silent interval button, then set the Silent interval period by moving the slide bar.
Step 3. Click the Change button.
The new audio source or silent interval is added to the Playback order list.
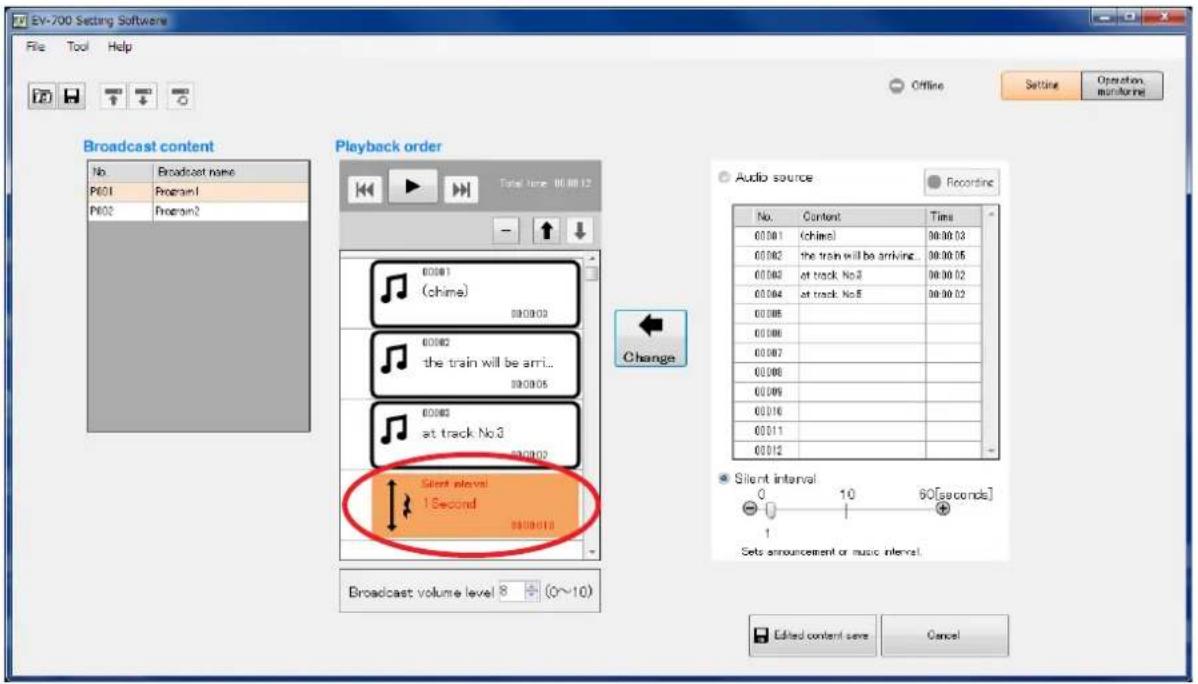
Step 4. Click the Edited content save button.
A confirmation dialog appears.
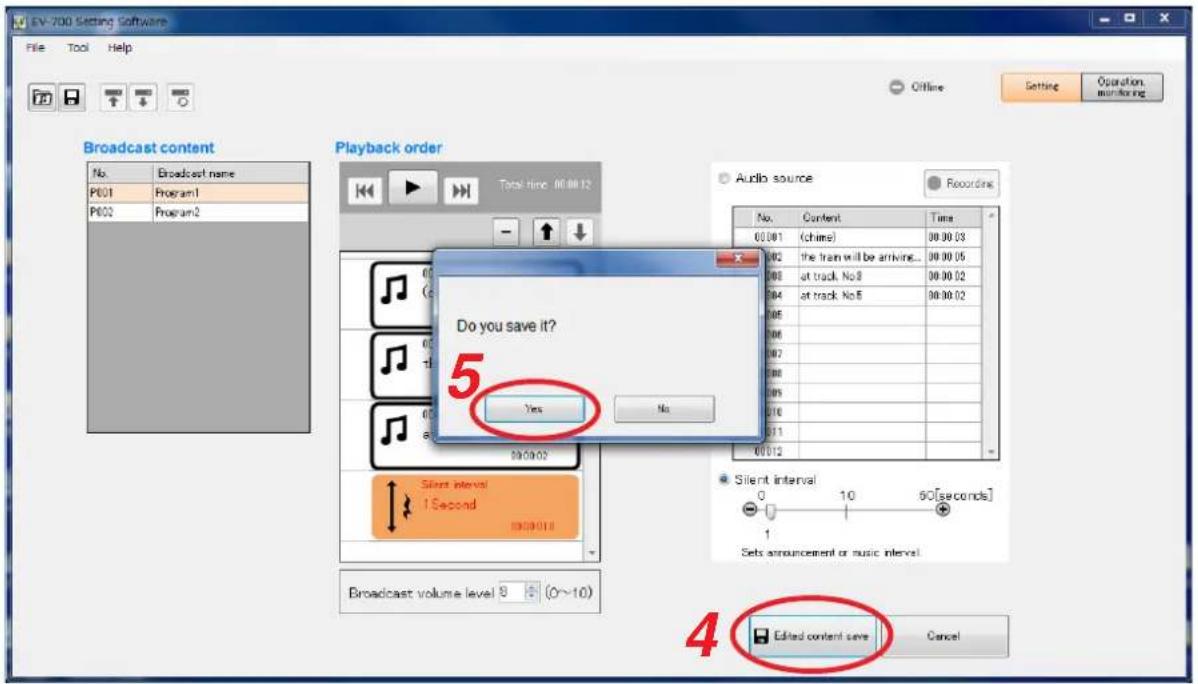
Step 5. Click the Yes button.
6.3.5. Changing the playback order of the audio sources
To change the playback order, perform operations described below on the Broadcast content edit screen. (See p. 31, "Displaying the broadcast content edit screen.")
Step 1. Click on the audio source or silent interval of which playback order you wish to change in the Playback order list.
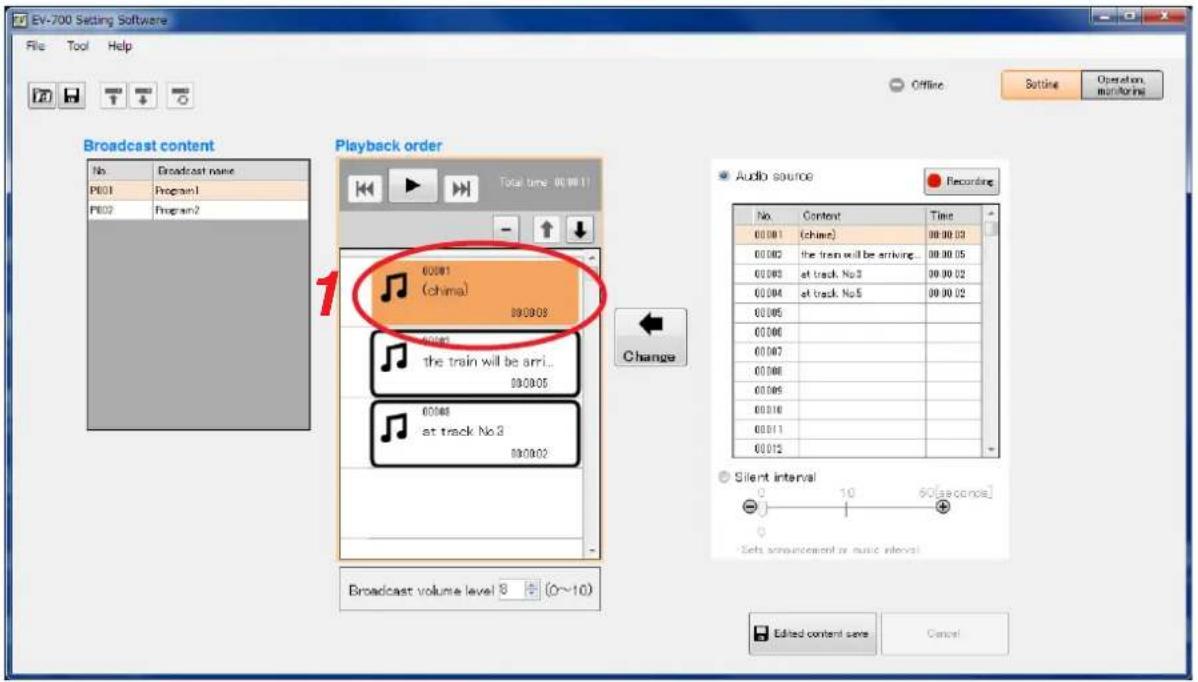
Step 2. Click the List order up or List order down button some times until the desired playback order is set.
![EV-700 Setting Software File Tool Help Offline Setnire Operation monitoring Broadcast content No Broadcast name P601 Program1 P602 Program2 Playback order Total time: 00:00:01 - ↑ ↓ 2 Change Audio source Recording No. Content Time 00:00:1 (chime) 00:00:03 00:00:2 the train will be arriving... 00:00:05 00:00:3 at track No.2 00:00:02 00:00:4 at track No.5 00:00:02 00:00:5 00:00:6 00:00:7 00:00:8 00:00:9 00:01:0 00:01:1 00:01:2 Silent interval - 10 90[seconds] Sett announcement or music interval Broadcast volume level 8 + (0~10) Edited content save Cancel](/content/2026/05/953756/images/11ad8bb523bff88b96575242723da253d322adfb5221d535f89af297d7c1c4f2.jpg)
Step 3. Click the Edited content save button.
A confirmation dialog appears.
![EV-700 Setting Software File Tool Help Offline Setting Operation, monitoring Broadcast content No Broadcast name P031 Program1 P032 Program2 Playback order Total time (0:00:11) Audio source Recording No Content Time 0001 (ohne) 00:00:02 002 the train will be arriving. 00:00:05 003 at track No3 00:00:02 004 at track No5 00:00:02 005 006 007 008 009 010 011 012 88:38:35 Sile at interval 0 10 60[seconds] 0 Sits announcement or audio interval. Broadcast volume level 8 (0~10) 3 Edited content save Cancel](/content/2026/05/953756/images/a08422d7d9506c6227a4240f22758b1766ee6a8268fff4a51a210a83e2ec2a80.jpg)
Step 4. Click the Yes button.
6.3.6. Make recording
An audio source recorded by the EV-700 can be registered to use.
Connect the microphone to the EV-700's microphone input terminal or audio source equipment to the EV-700's line input terminal, then perform operation described below on the Broadcast content edit screen. (See p. 31, "Displaying the broadcast content edit screen.")
Connect the EV-700 to a PC online in advance. (See p. 23, "CONNECTING TO THE EV-700.") The table below shows the maximum recordable time.
| Sampling frequency setting | Recording time limit (Total of all audio sources) |
| 44.1 kHz About 3 hours | |
| 32 kHz About 4 hours | |
Note
Recording stops if the memory card becomes full.
Step 1. Click on the audio source you wish to replace with the audio source to be recorded or silent interval in the Playback order list.
To add a newly recorded audio source, click the unregistered blank step in the Playback order list.
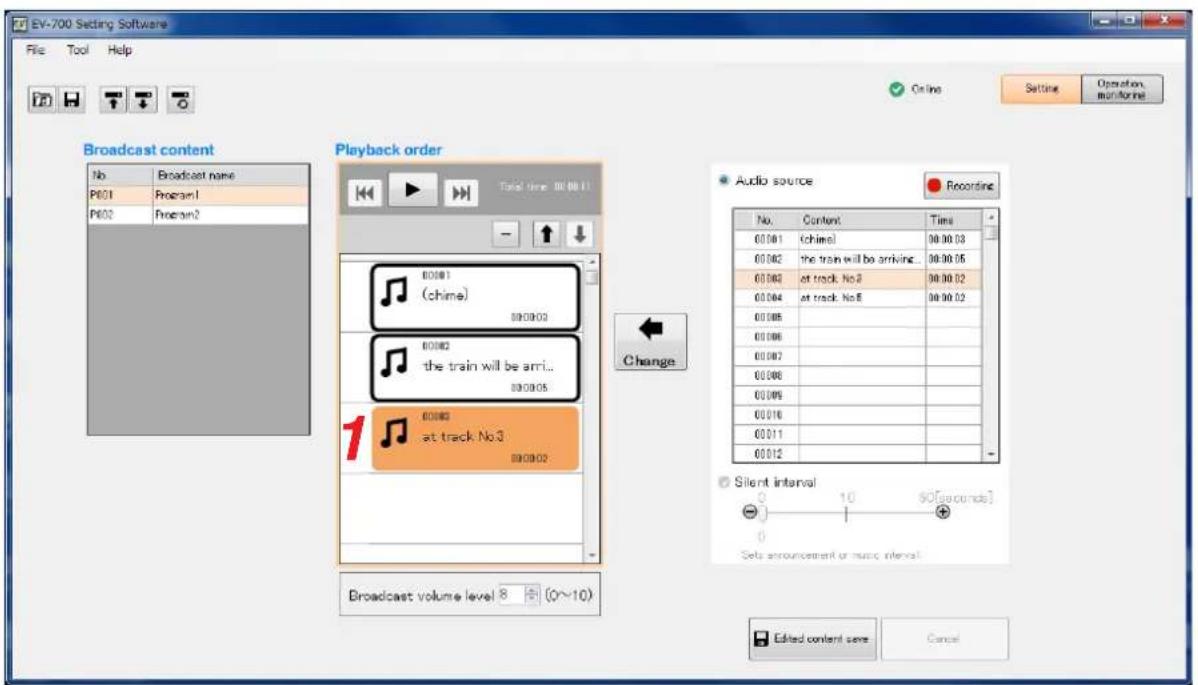
Step 2. Click a blank column in the Audio source list.
The blank column in the Audio source list is selected.
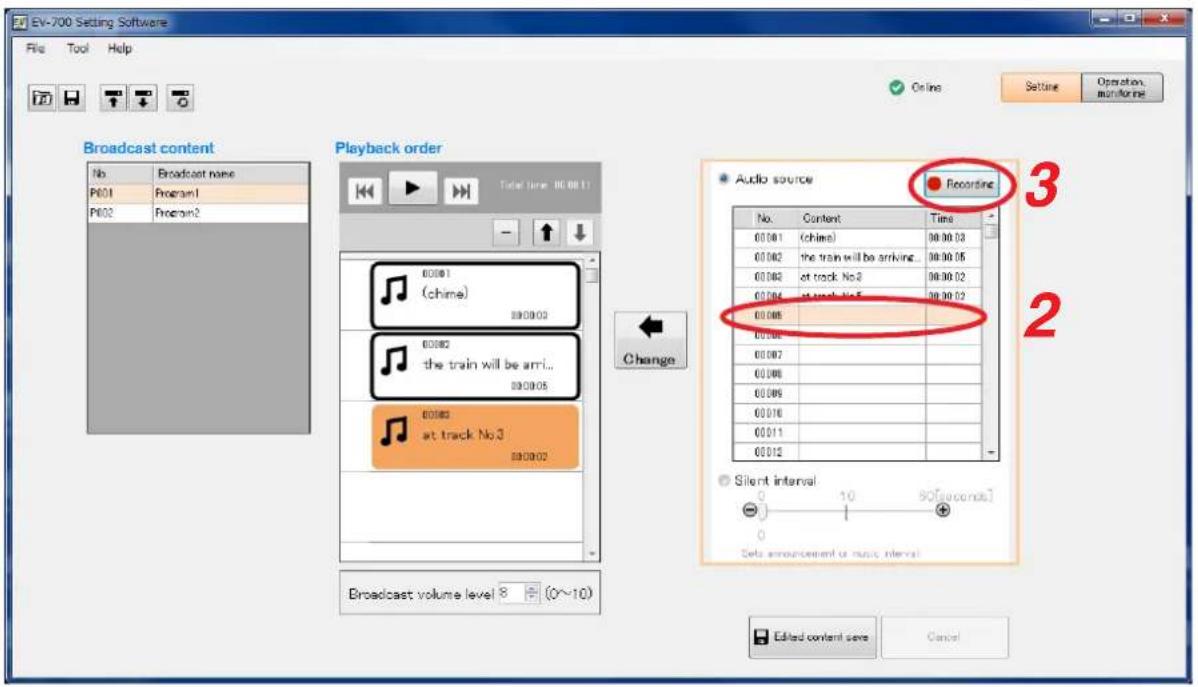
Step 3. Click the Recording button.
A confirmation dialog appears.
Tip
When an audio source's registered number (not blank column) is selected in Step 2 or the Recording button is clicked without performing Step 2's operation, a blank column in the Audio source list is selected automatically.
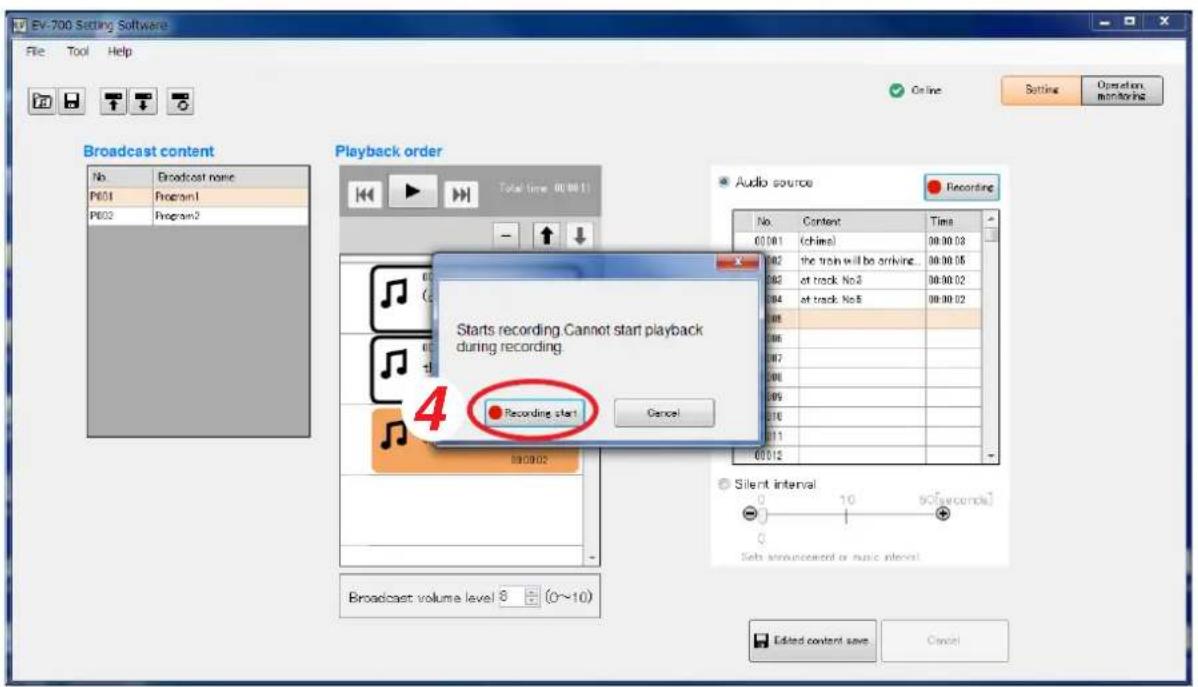
Step 4. Click the Recording start button.
Recording starts at the EV-700.
The Recording start button changes to the Recording stop button.
Step 5. Make recording.
Speak into the microphone.
Note
When recording an audio source from the external equipment, play the external equipment.
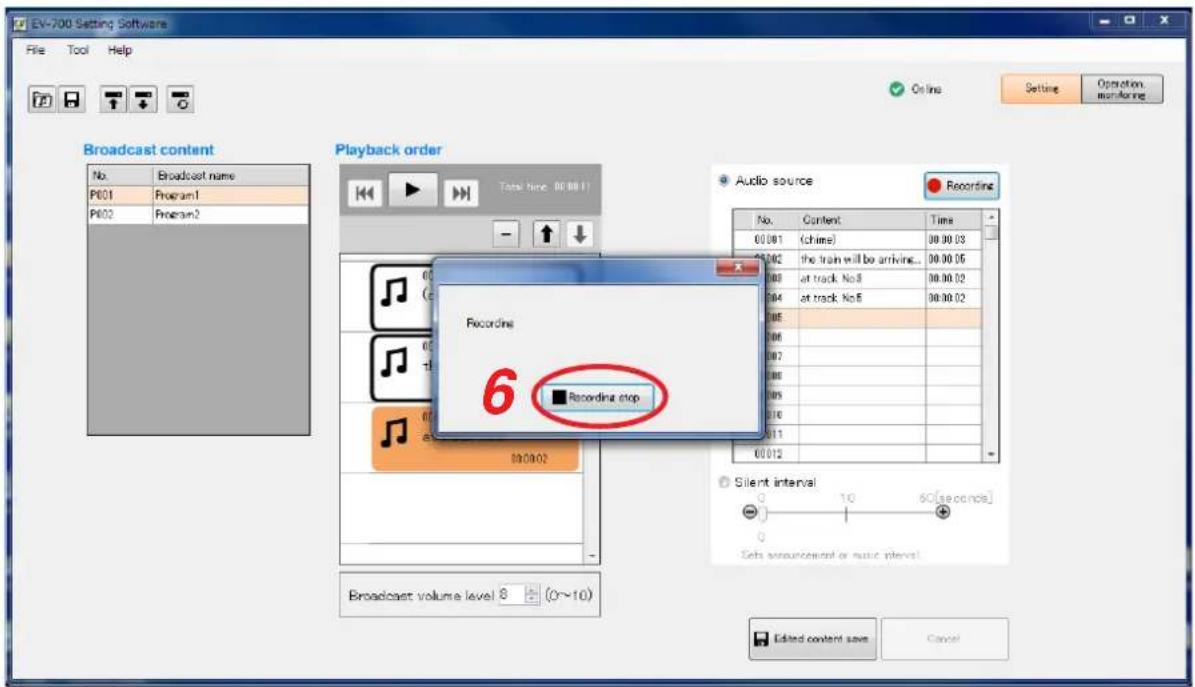
Step 6 To terminate recording, click the Recording stop button.
A transfer dialog appears, then a confirmation dialog appears.
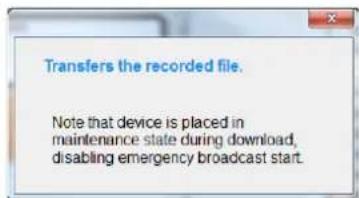
Tip
If the Test button is clicked, the recorded audio source can be previewed by the PC.
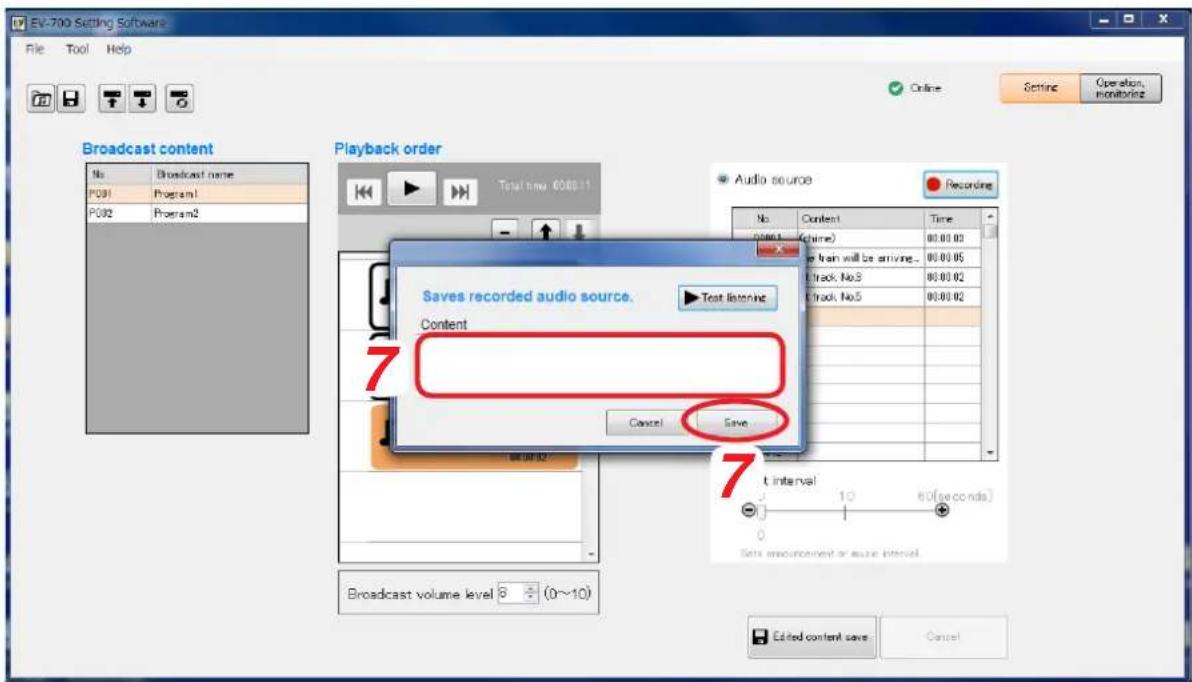
Step 7. Enter the comment on the recorded audio source into the Content column, then click the Save button. The recorded audio source is added to the Audio source list.
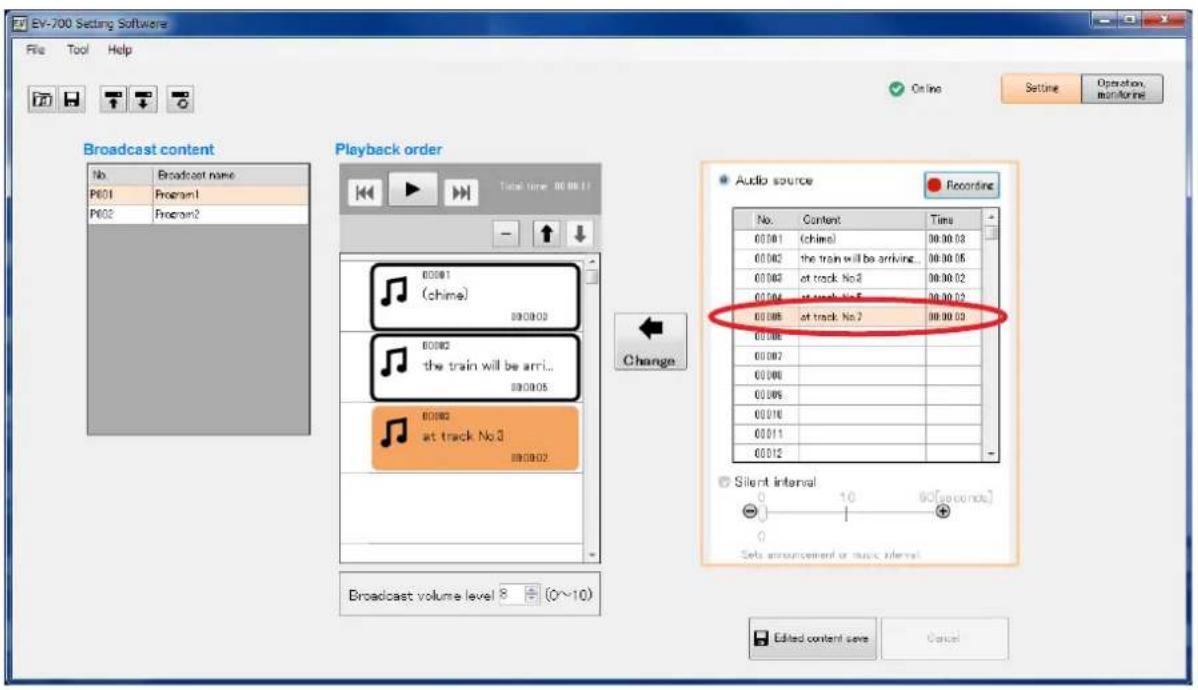
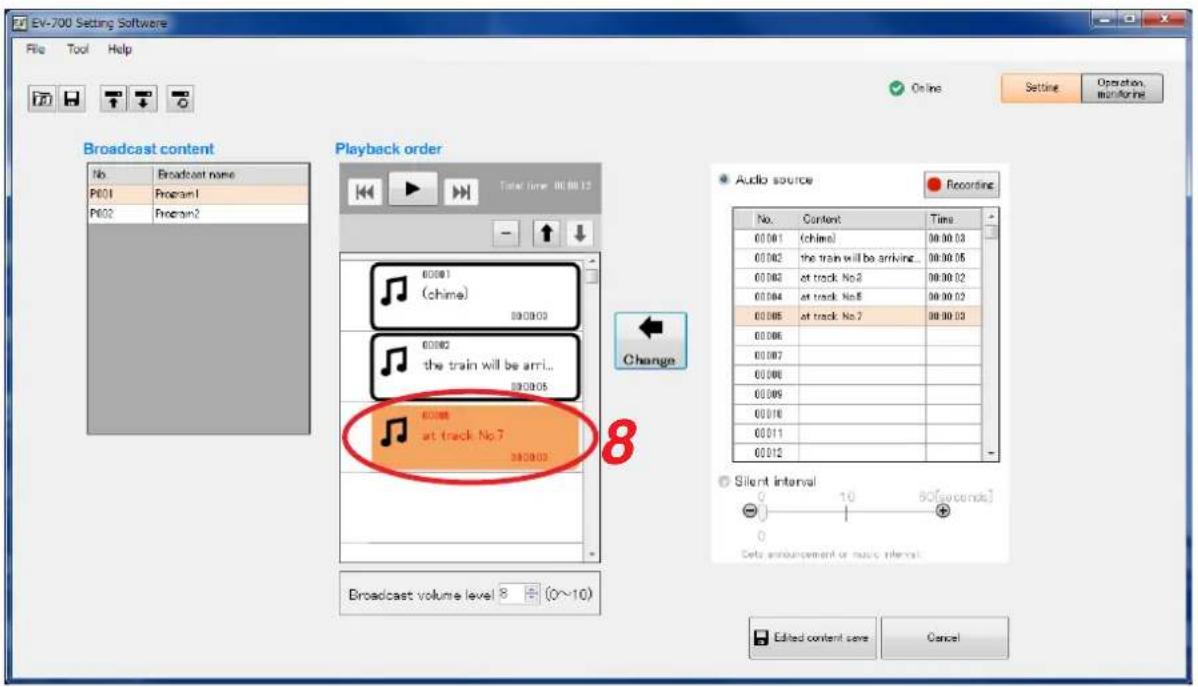
Step 8. Click the Change button.
The audio source is replaced.
6.3.7. Adjusting the audio volume
You can adjust the audio volume for each broadcast.
Enter the broadcast volume level or set it with the Up and Down buttons in the Broadcast content edit screen. (See p. 31, "Displaying the broadcast content edit screen.")
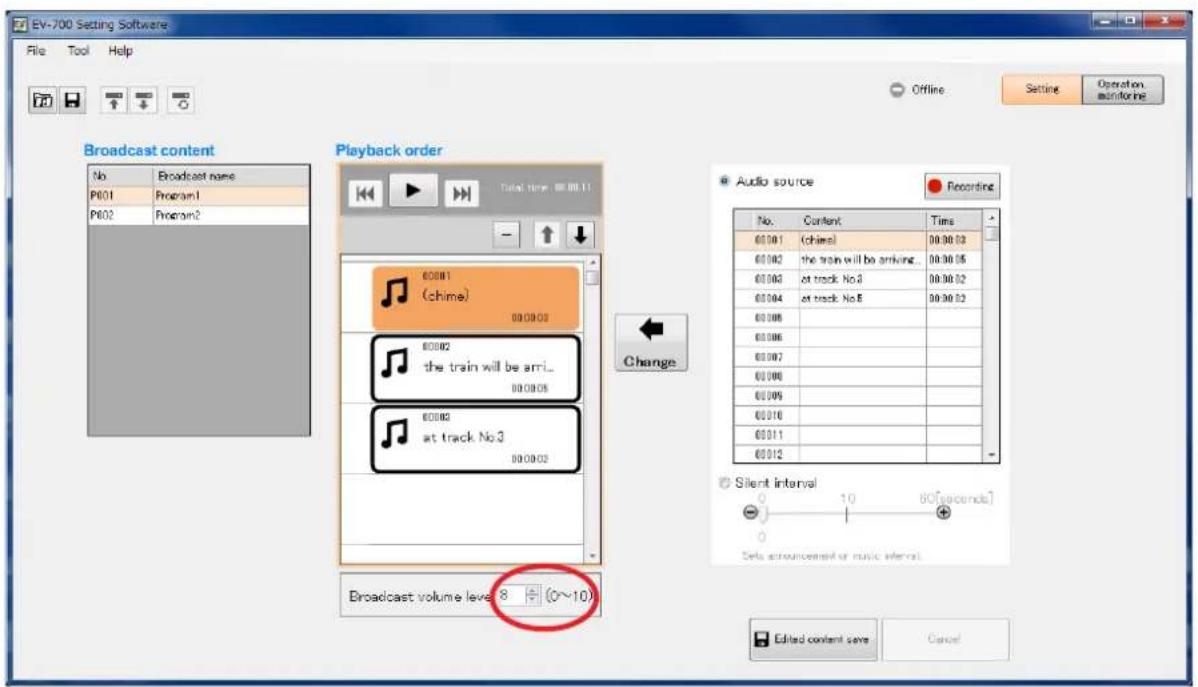
Note
The volume level of each individual audio source in the Playback order list cannot be set.
6.4. Test Listening
6.4.1. Previewing broadcast contents
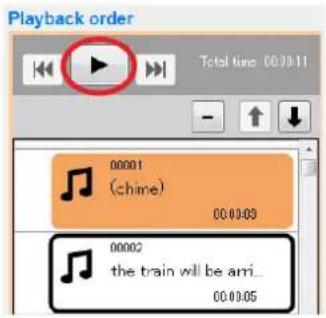
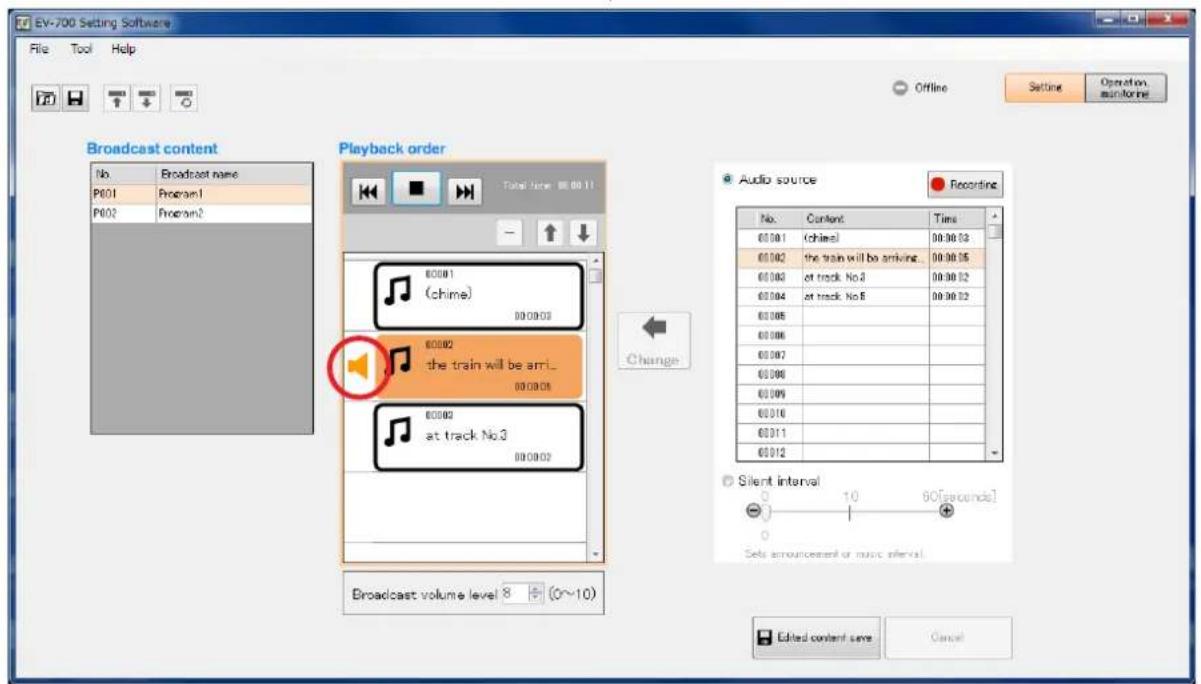
Clicking the Play button in the Broadcast content edit screen allows the PC to play audio sources in the set order. (See. p. 31, "Displaying the broadcast content edit screen.")
A playing mark appears at the left side of the audio source being played. Playback stops automatically when the audio source playback is complete.
![EV-700 Setting Software File Tool Help Broadcast content No. Broadcast name P601 Program1 P602 Program2 Playback order Total time: 00:00:11 00:00:1 (chime) 00:00:03 00:00:2 the train will be arr... 00:00:05 00:00:4 at track No.4 00:00:12 00:00:4 at track No.8 00:00:12 00:00:5 00:00:6 00:00:7 00:00:8 00:00:9 00:01:6 00:01:7 00:01:8 00:01:9 00:01:10 00:01:11 00:01:12 Audio source Recording No. Content Times 00:01 (chime) 00:00:13 00:02 the train will be arriving. 00:03 at track No.4 00:00:15 00:04 at track No.8 00:00:12 Change Playing mark 8 (o~10) 8 (o~11) 8 (o~12) 8 (o~13) 8 (o~14) 8 (o~15) 8 (o~16) 8 (o~17) 8 (o~18) 8 (o~19) 8 (o~20) Silent interval O 1.0 8.0[seconds] Set announcement or music interval. Edited content save Cancel](/content/2026/05/953756/images/16a9841633113759f26525cb3e444fc0a5eccfacc15577d1f357838f7d1f7185.jpg)
6.4.2. Previewing audio sources
To preview an audio source, perform operations described below on the Broadcast content edit screen. (See p. 31, "Displaying the broadcast content edit screen.")
Step 1. Click on the audio source to preview in the Audio source list.
Step 2. Click the Preview button.
The selected audio source is played.
![EV-700 Setting Software File Tool Help Offline Setting Operation monitoring Broadcast content No Broadcast name P601 Program1 P602 Program2 Playback order Total time: 00:00:01 80001 (chime) 80000 the train will be arri... 80005 80002 at track No3 80002 Change Audio source Recording No. Content Time 00:00: (chime) 00:00:03 00:00: the train will be arriving 00:00:05 00:00: at track No3 00:00:02 00:00: at track No5 00:00:02 00:00: 00:00: 00:00: 00:00: 00:01: 00:01: 00:01: Silent interval - 80[seconds] + Seta announcement at music interval Editd content save Cancel](/content/2026/05/953756/images/a9a92ec96371652c0f297ca3c7275256f57a034343569a7d5ffd7345d063d65c.jpg)
6.5. Reflecting the Edited Contents to the EV-700
6.5.1. Reflecting to the EV-700 via LAN
To reflect the edited contents to the EV-700 via LAN, perform "Upload to device" or "Difference data upload to device."
Connect the EV-700 to a PC online in advance. (See p. 23, "CONNECTING TO THE EV-700.")
Use "Upload to device" when swapping all the audio data and broadcast contents to be used for the EV-700. Use "Difference data upload to device" to reflect only the altered contents to the EV-700 when you have added audio sources to the audio data and broadcast contents or when you have altered a part of broadcast contents. Execution time for "Difference data upload to device" is less than that for "Upload to device."
[Uploading to the EV-700]
Uploading all project files (about 66 MB) on the supplied memory card takes about 7 minutes. It may take longer time depending on the network environments.
Notes
- Before transferring all audio data and broadcast contents, delete all data on the EV-700's memory card. Make a backup copy of the contents on the memory card if necessary. (See p. 15, "MAKING A BACKUP COPY OF PRERECORDED AUDIO FILES.")
- All operations including emergency broadcast activation cannot be performed during upload. If upload made during broadcast, broadcast (except emergency broadcast) is stopped.
Step 1. Select "File → Upload to device" from the menu or click the "Upload to device" tool button icon.
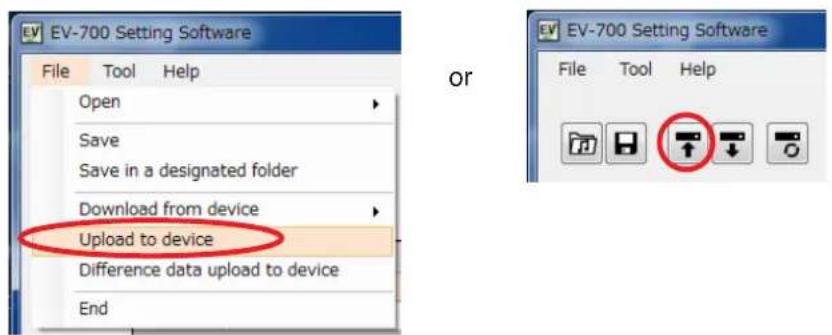
A confirmation dialog appears.
![EV-700 Sectang Software File Tool Help Broadcast content Nb Broadcast name P601 Program1 P602 Program2 P603 Program3 P604 Program4 P605 Program5 P606 Program6 P607 Program7 P608 Program8 P609 Program9 P610 Program10 P611 Program11 P612 Program12 P613 Program13 Playback on Updates broadcast content. Storage location of transfer source file C:\EV-700 Uploads edited content to device Uploading edited content to device may cause audio file saved in device to be overwritten. Back up file saved in device before uploading if necessary. Note that device is placed in maintenance state during upload, disabling emergency broadcast start. Memory card data deletion(0%) Project transfer(0%) Project transfer finalization(0%) 0% Start Cancel 2 50[seconds] 8 (0~10) Broadcast volume level 8 Edited content save Cancel Recording Time 00:00:04 phone chime 00:00:04 Back up file saved in device before uploading if necessary. Please. The tr. 00:00:10 Please e. 00:00:06 Use A few 00:00:10 Use chime 00:00:04 time 00:00:59 Edited content save Cancel](/content/2026/05/953756/images/c36a54286f8716c1f56c8a8bd26e2df2b1a6e51b83353c42b9e8005644a0f096.jpg)
Step 2. Click the Start button.
Upload starts.
![EV-700 Setting Software File Tool Help Broadcast content No Broadcast name P601 Program1 P602 Program2 P603 Program3 P604 Program4 P605 Program5 P606 Program6 P607 Program7 P608 Program8 P609 Program9 P610 Program10 P611 Program11 P612 Program12 P613 Program13 Playback on Updates broadcast content Storage location of transfer source file C:\EV-700 Uploads edited content to device Uploading edited content to device may cause audio file saved in device to be overwritten. Back up file saved in device before uploading if necessary Note that device is placed in maintenance state during upload, disabling emergency broadcast start Memory card data deletion(100%) Project transfer(30%) Project transfer finalization(0%) 30% File name: C:\EV-700\WORD0000\C27_2Theta.wax Start Cancel 8 (0~10) 80[seconds] 80 [seconds] 80 [seconds] 80 [seconds] 80 [seconds] 80 [seconds] 80 [seconds] 80 [seconds] 80 [seconds] 80 [seconds] 80 [seconds] 80 [seconds] 80 [seconds] 80 [seconds] 80 [seconds] 80 [seconds] 80 [seconds] 80 [seconds] 80 [seconds] 80 [seconds] 80 [seconds] 80[seconds] 80[seconds] 80[seconds] 80[seconds] 80[seconds] 80[seconds] 80[seconds] 80[seconds] 80[seconds] 80[seconds] 80[seconds] 80[seconds] 80[seconds] 80[seconds] 80[seconds] 80[seconds] 80[seconds] 80[seconds] 80[seconds] 80[seconds] 80 [Edited content save] Cancel](/content/2026/05/953756/images/12cf582c1ab14661a2afce7dbb404f3a9744db7566feb488050d414ea182defb.jpg)
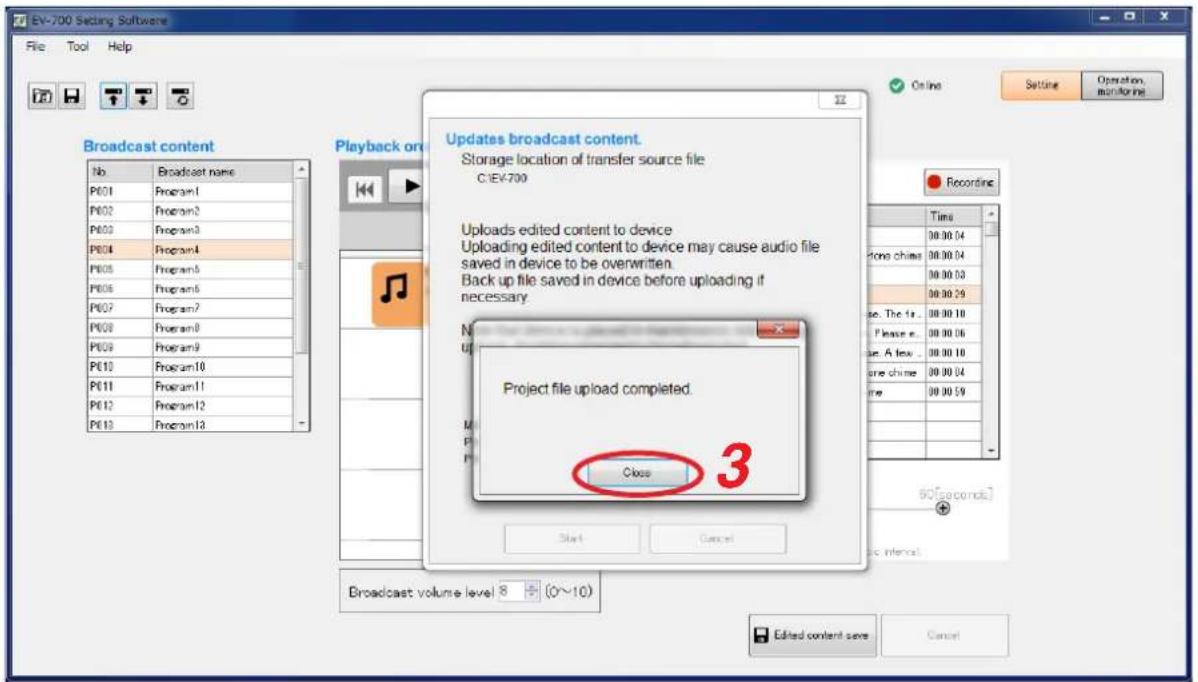
The "Project file upload completed" window appears when upload is complete.
Tip
When upload failed, its transfer result can be checked in a list.
For details, see "When upload failed" on the next page.
Step 3. Click the Close button.
When upload failed
When file upload or difference data upload to the EV-700 failed due to irregularities such as communication error, a dialog shown below will appear. Transfer result of the transfer files can be checked in a list.
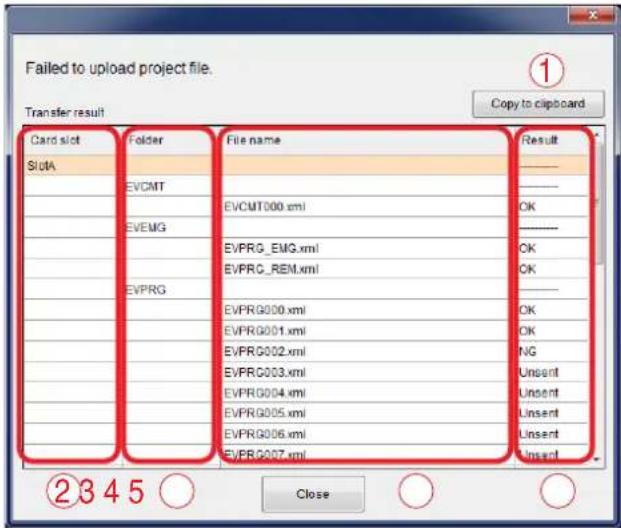
1. [Copy to clipboard] button
Copies the contents of the transfer result to a clipboard in text format with tab delimiters.
2. Card slot
Displays the card slot name of the upload destination.
3. Folder
Displays the folder names.
When there is no folder, the "/" indication is displayed.
4. File name
Displays the file names in the most recently opened folder.
5. Result
Displays the transfer results for each file.
"OK": Transfer has been completed.
"NG": Transfer failed.
"Unsent": Transfer files are not sent as abnormality occurred before starting transfer.
[Uploading Difference data to the EV-700]
Notes
- Use this difference data upload function when you have edited the data identical to that used for the EV-700. Uploading the difference data to the EV-700 using the data different from that used for the EV-700 causes EV-700's data error, resulting in equipment malfunction.
- All operations including emergency broadcast activation cannot be performed during upload. If upload made during broadcast, broadcast (except emergency broadcast) is stopped.
Step 1. Select "File → Difference data upload to device" from the menu or click the "Difference data upload to device" tool button icon.
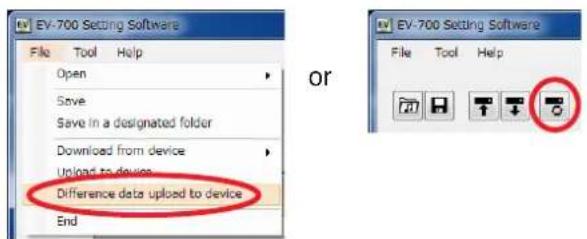
A dialog below appears.
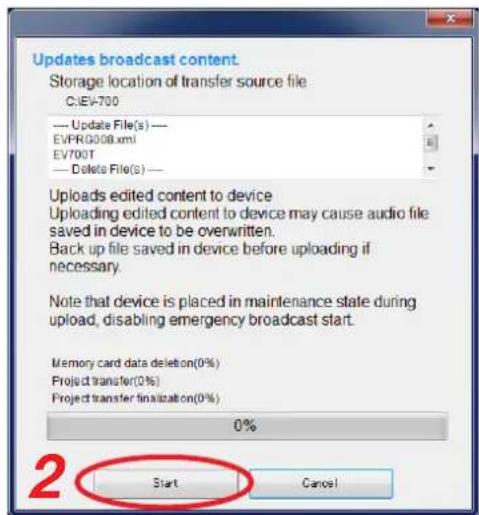
The dialog displays the storage location of transfer source file and the target file list to be updated or deleted at the EV-700.
Note
Uploading the edited contents to the EV-700 causes the Audio file saved in the EV-700 to be overwritten.
Make a backup copy of the file saved in the EV-700 before uploading if necessary.
Step 2. Click the Start button.
The project file is uploaded to the EV-700.
Tip
When difference data upload failed, its transfer result can be checked in a list.
For details, see "When upload failed" on p. 52.
6.5.2. Saving to the memory card
Step 1. Insert the memory card into the PC.
Step 2. Select "File → Save in a designated folder" from the menu.
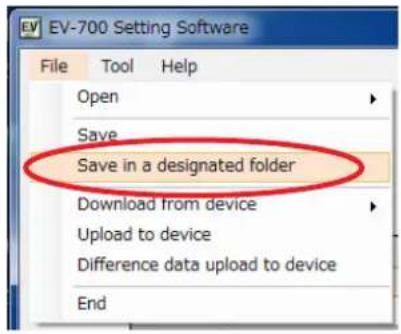
The folder selection screen appears.
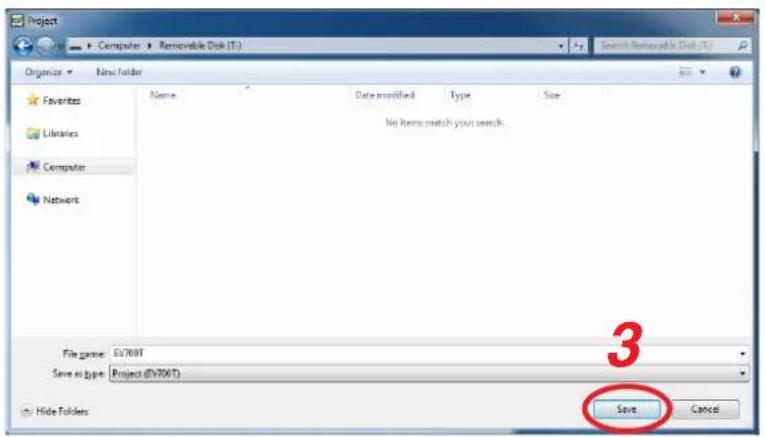
Step 3. Select the memory card inserted in Step 1, then click the Save button.
Step 4. Remove the memory card from the PC, then insert it into the EV-700's Card slot A.
![[Inside the Front cover] Card slot A A B MEMORY CARD MAINTENANCE OFF ON RESET EV-700](/content/2026/05/953756/images/d25947330940788d995603c8aa7df6dce985c3cf73c3eb3c2f9c3d6543cc3cf4.jpg)
The designated broadcast contents can be broadcast by manually operating the EV-700 on the Operation and Monitoring screen of the EV-700 Setting software.
Connect the EV-700 to a PC online in advance. (See p. 23, "CONNECTING TO THE EV-700.")
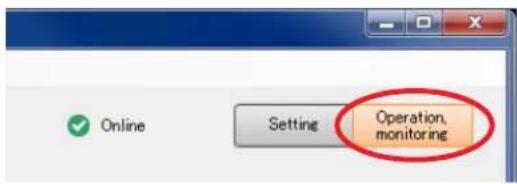
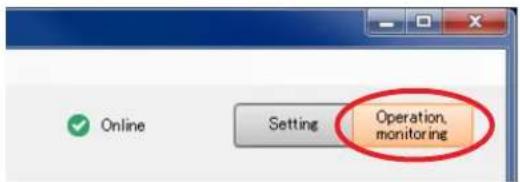
If you click "Operation, monitoring" button located at the upper right corner of the Initial screen, the Operation and Monitoring screen appears.
Step 1. Click on the program to be broadcast in the Broadcast content column.
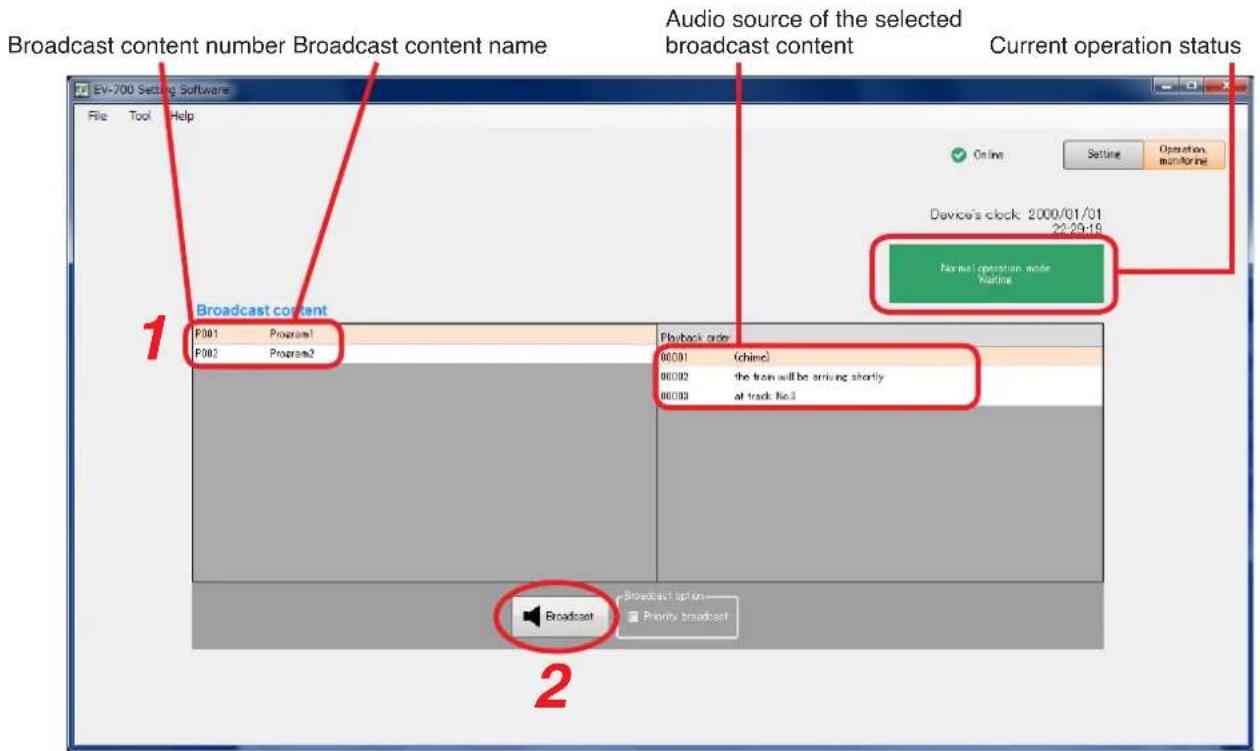
Step 2. Click the Broadcast button.
Tips
- While other broadcast contents are being broadcast, the Broadcast button is invalid. In this case, select any one of the methods shown below to make broadcast.
(1) Click the Broadcast button after the current broadcast ends.
(2) When wishing to give a priority to the broadcast for the designated broadcast contents, click the Broadcast button after marking the checkbox "Priority broadcast" of Broadcast option.
The current broadcast is stopped and the broadcast for the designated broadcast contents starts. But note that Emergency broadcast takes precedence while the emergency broadcast is being made.
- The current operation status of the EV-700 is displayed under the Device's clock indication.
Green: Broadcast can be made instantly.
Orange: Broadcast (including Line broadcast and Microphone broadcast) or monitor playback in progress. By setting the broadcast option, the broadcast contents currently being made are interrupted, allowing a new broadcast to go through.
Russet: Recording or deletion in progress. No broadcast can be made.
Red: Emergency broadcast in progress. No other broadcasts can be made.
Yellow: Maintenance in progress. No broadcast can be made.
The Broadcast button changes to the Stop button once broadcast starts.

To interrupt the broadcast, click the Stop button.
8. CONFIRMING THE CURRENT BROADCASTING STATUS OF THE EV-700
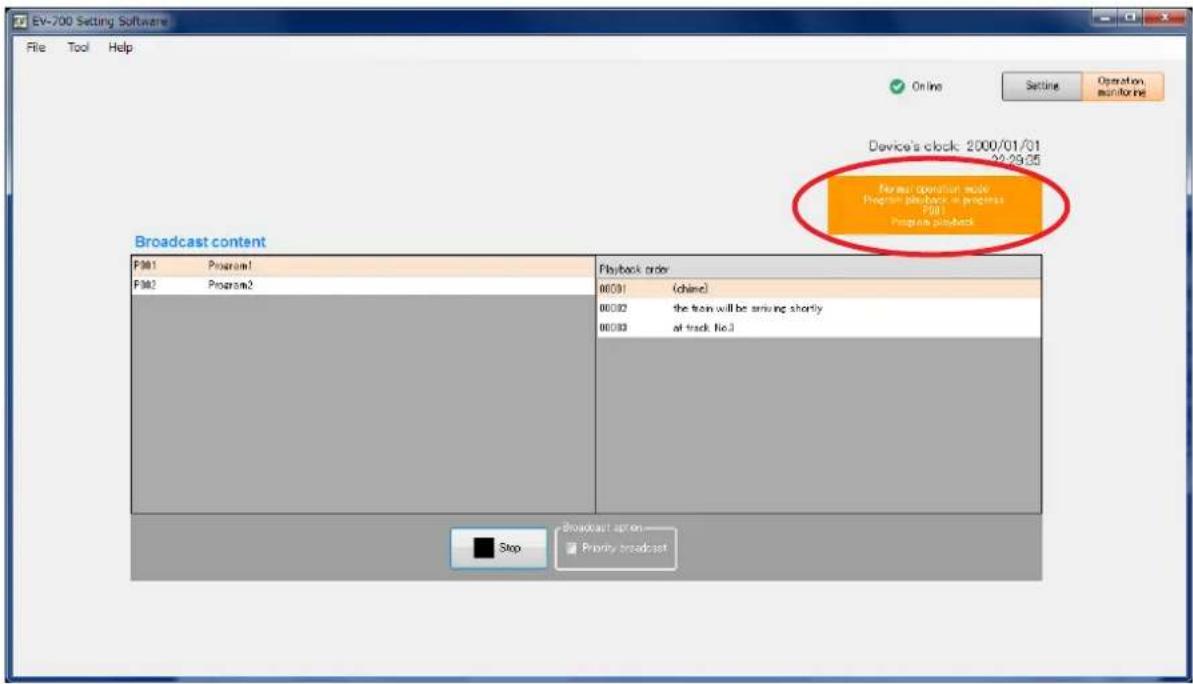
The current broadcasting status of the EV-700 can be confirmed on the Operation and Monitoring screen of the EV-700 Setting software.
Connect the EV-700 to a PC online in advance. (See p. 23, "CONNECTING TO THE EV-700.")
If you click "Operation, monitoring" button located at the upper right corner of the Initial screen, the Operation and Monitoring screen appears.
The EV-700's current operation mode and broadcasting status appear at the upper right of the screen. Broadcast contents are displayed while broadcast is in progress.
[Operation indication and availability of broadcast]
| Color of display section | Message example appearing in display section | Operation status Availability of broadcast | |
| Green |  | Standby Broadcast can be made instantly. | |
| Orange |  | Broadcast in progress (including Line broadcast and Microphone broadcast), or Monitor playback in progress | By setting the broadcast option, the broadcast currently being made is interrupted, allowing the selected broadcast contents to go through. |
| Russet |  | Recording in progress or deletion in progress | No broadcasts can be made. |
| Red |  | Emergency broadcast in progress | No other broadcasts can be made. |
| Yellow |  | Maintenance in progress No broadcasts can be made. | |
FULL-FUNCTION MODE
![EV-700 Setting Software File Edit Tool Help Card A Disconnect Card B Backup function Setting Operation. monitoring Project Project Information Audio source registration Program Program name Program1 No. Program name P001 Program1 P002 Program2 P003 P004 P005 P006 P007 P008 P009 P010 P011 P012 P013 P014 P015 P016 Emergency playback REML Program name Program1 Playback system Program playback Repeat count 8Times Repeat interval Record Easy output during repeat interval Step Type Content Playback time 00001 (chime) 000008 00002 the train will be arriving shortly 000005 00003 at track No.3 000002 Priority level 4 Output Output 1 Output 2 Program sound volume 5 [ 6dB] Automatic gain control (AGC) 1 2 3 4 5 6 7 8 Program playback busy output ✓ ✓ ✓ ✓ ✓ ✓ ✓ ✓ ✓ ✓ ✓ ✓ ✓ ✓ ✓ ✓ ✓ ✓ ✓ ✓ ✓ ✓ ✓ ✓ ✓ ✓ ✓ ✓ ✓ ✓ ✓ ✓ ✓ ✓ ✓ ✓ ✓ ✓ ✓ ✓ ✓ ✓ ✓ ✓ ✓ ✓ ✓ ✓ ✓ ✓ ✓ ✓ ✓ ✓ ✓ ✓ ✓ ✓ ✓ ✓ ✓ ✓ ✓ ✓ ✓ ✓ ✓ ✓ ✓ ✓ ✓ ✓ ✓ ✓ ✓ ✓ ✓ ✓ ✓ ✓ ✓ ✓ ✓ ✓ ✓ ✓ ✓ ✓ ✓ ✓ ✓ ✓ ✓ ✓ ✓ ✓ ✓ ✓ ✓ ✓✓✓✓✓✓✓✓✓✓✓✓✓✓✓✓✓✓✓✓✓✓✓✓✓✓✓✓✓✓✓✓✓✓✓✓✓✓✓✓✓✓✓✓✓✓✓✓✓✓✓✓✓✓✓✓✓✓✓✓✓✓✓✓✓✓✓✓✓✓✓✓✓✓✓✓✓✓✓✓✓✓✓✓✓✓✓✓✓✓✓✓✓✓✓✓✓✓✓✓✓√✓✓✓✓✓✓✓✓✓✓✓✓✓✓✓✓✓✓✓✓✓✓✓✓✓✓✓✓✓✓✓✓✓✓✓✓✓✓✓✓✓✓✓✓✓✓✓✓✓✓✓✓✓✓✓✓✓✓✓✓✓✓✓✓✓✓✓✓✓✓✓✓✓✓✓✓✓✓✓✓✓✓✓✓✓✓✓✓✓✓✓✓✓✓✓✓✓✓✓](/content/2026/05/953756/images/4d71ce37a5eff0b4c2f2b8033f1a114f6fe5c8f65153ca65e702a9eef3c17799.jpg)
1. GENERAL DESCRIPTION
The Full-function mode is designed for users familiar with the EV-700 such as a person in charge of equipment maintenance. In this Full-function mode, you can operate and execute all functions from program edit to device's maintenance.
The Full-function mode features the following 6 functions.
[Functions enabled with the Full-function mode]
- Connected Device Detection Function (See p. 67.)
Automatically detects the EV-700 to be connected by the EV-700 Setting software.
• Device Setting (See p. 122.)
Performs settings related to EV-700's operations such as Whole sound volume and Control out settings.
- Project Setting (See p. 87.)
Performs edit of broadcast contents.
Creates a new program and edits the created program.
• Operation of the EV-700 (See p. 136.)
Instructs the EV-700 to perform operations such as program playback and recording of audio sources.
• Monitoring, Check, and History Information of the EV-700 (See p. 156.)
Monitors and displays the busy and abnormality occurrence statuses.
The history information can be confirmed.
- Maintenance (See p. 161.)
Makes a copy of the memory card and initializes the EV-700's setting.
2. STARTING UP IN THE FULL-FUNCTION MODE
Double-click the "EV-700 Setting Software Det..." shortcut icon (figure at right) of the Setting software created on the desktop when the software has been installed.
Alternatively, select "All programs → TOA Corporation → EV-700 Setting Software → EV-700 Setting Software Full-function mode" from the start menu, then the EV-700 Setting software is activated in the Full-function mode.
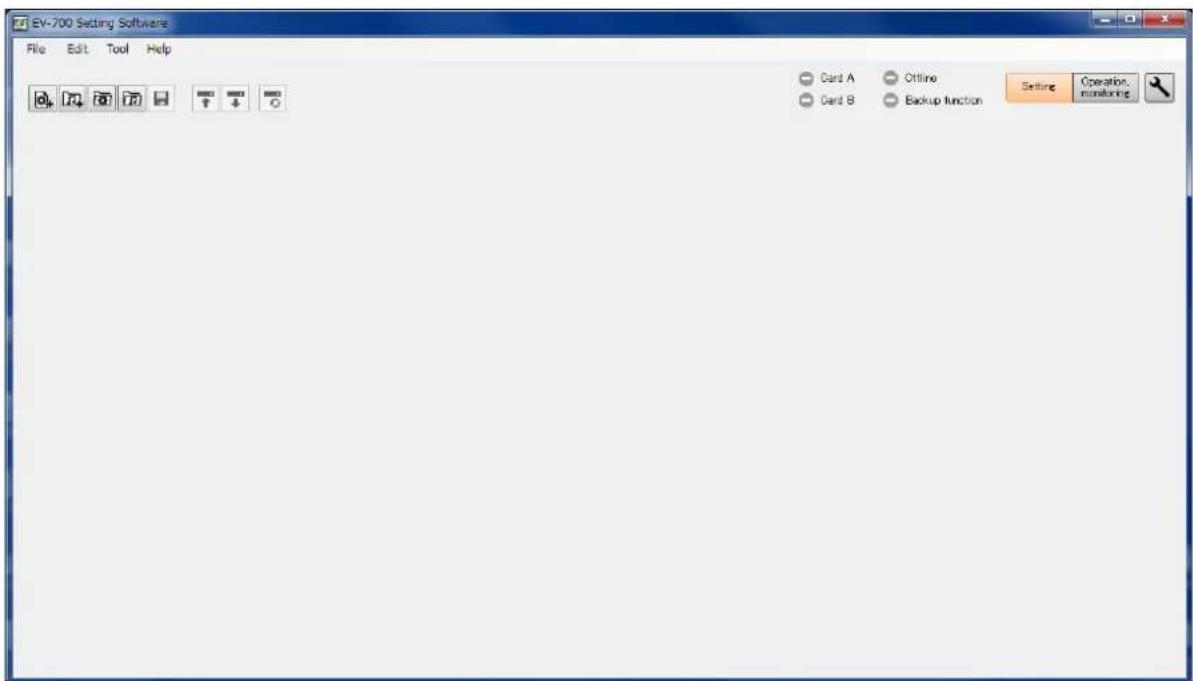
Note
If .NET Framework Ver. 4.5 is not installed in the PC, you cannot start the EV-700 Setting software.
3. EASY-TO-UNDERSTAND GUIDE TO OPERATION IN FULL-FUNCTION MODE
3.1. Example of the Project Change
3.1.1. Contents on the supplied memory card
Shown below is the factory-preset project setting on the memory card supplied with the EV-700.
[Relationship between program and phrase numbers]
| Program No. Phrase No. | |
| P001 00001 | |
| P002 00002 | |
| P003 00003 | |
| P004 00004 | |
| P005 00005 | |
| P006 00006 | |
| P007 00007 | |
| P008 00008 | |
| P009 00009 | |
| P010 00010 | |
| P011 00011 | |
| P012 00012 | |
| P013 00013 | |
| P014 00014 | |
| P015 00015 | |
| P016 00016 | |
[Audio source contents registered to each phrase No.]
| Phrase No. | Phrase content |
| 00001 2-tone chime | |
| 00002 | Descending 4-tone chime |
| 00003 | Gong |
| 00004 | Yelp |
| 00005 | Attention please. The fire alarm is ... |
| 00006 | There is a fire. Please eva... |
| 00007 | Attention please. A few mi... |
| 00008 | Ascending 4-tone chime |
| 00009 | Unregistered |
| 00010 | Unregistered |
| 00011 | Unregistered |
| 00012 Unregistered | |
| 00013 | Unregistered |
| 00014 Unregistered | |
| 00015 Unregistered | |
| 00016 | Unregistered |
[Excerpt of the audio sources not registered to the project (contained on the memory card only)]
| Westminster chime (normal) |
| Westminster chime (fast) |
| Westminster chime (slow) |
| I’ve Been Working On The Railroad |
| Schubert Lullaby |
| Seven little babies |
| My country home |
| First bell |
Notes
- The audio sources shown at left are part of the audio sources on the memory card. For the list showing all audio sources, see the operation instruction manual supplied with the EV-700.
- A sampling frequency of the audio sources on the supplied memory card is 44.1 kHz.
3.1.2. Contents to be changed
| Program No. | Phrase No. |
| P001 00001 | |
| P002 00002 | |
| P003 00003 | |
| P004 00004 | |
| P005 00005 | |
| P006 00006 | |
| P007 00007 | |
| P008 00008 | |
| P009 00009 | |
| P016 00016 |
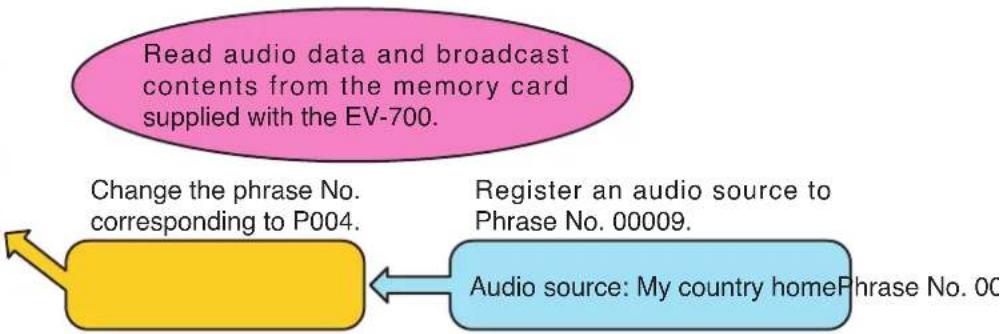
flowchart
graph TD
    A["Read audio data and broadcast contents from the memory card supplied with the EV-700."] --> B["Change the phrase No. corresponding to P004."]
    A --> C["Register an audio source to Phrase No. 00009."]
    B --> D["Audio source: My country homePhrase No. 0C"]
    C --> D
Change the audio source used for the Program No. P004 from "When The Sun Begins to Fall" to "My country home."
There are 2 methods to read audio data and broadcast contents into the EV-700.
- Reading from the memory card supplied with the EV-700. (See p. 114 and p. 130.)
- Reading via a network. (See p. 112 and p. 129.)
Similarly, there are 2 methods to reflect the edited audio data and broadcast contents to the EV-700.
- Reflecting by inserting the memory card into the EV-700 (See p. 121 and p. 133.)
• Reflecting via a network (See p. 116 and p. 132.)
When using the memory card, a memory card reader is required.
3.1.3. Operating procedure
Step 1. Read the project.
Read the project used for the EV-700 from the memory card supplied with the EV-700. (See p. 130.)
Step 2. Register the audio source.
(1) Select the Audio source registration menu.
(2) Click the "Refer to" button.
(3) When the File selection dialog appears, select the audio source "My country home" on the memory card.
(4) Enter "My country home" into the Content column.
(5) Click the Set button.

Project information Audio source registration Program
Audio source registration
| No | File name | Content | Time |
| 00001 | C02_fnotemay | 2-tone chime | 00:00:04 |
| 00002 | C05_fnotedownay | Descending 4-tone chime | 00:00:04 |
| 00003 | C08_gongmay | Gong | 00:00:08 |
| 00004 | E06_yelpmay | Yelp | 00:00:29 |
| 00005 | A_fire01may | Attention please. The fire... | 00:00:10 |
| 00006 | A_fire02may | There is a fire. Please eva... | 00:00:06 |
| 00007 | A_fire03may | Attention please. A few m... | 00:00:10 |
| 00008 | C04_fnotepunmay | Ascending 4-tone chime | 00:00:04 |
| 00009 | M05_furusctoway | My country home | 00:00:59 |
| 00010 | |||
| 00011 | |||
| 00012 | |||
| 00013 | |||
| 00014 | |||
| 00015 | |||
| 00016 | |||
| Emergency | - - - - - - - - - - - - - - - - - - - - - - - - - - - - - - - - - - - - - - - - - - - - - - - - - - - - - - - - - - - - - - - - - - - - - - - - - - - - - - - - - - - - - - - - - - - - - - - - - - - - - | ||
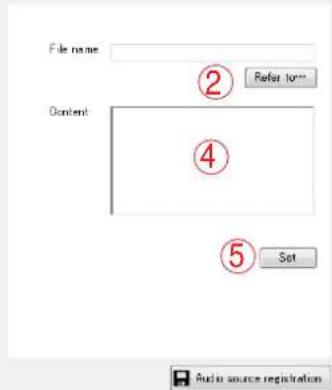
Step 3. Change the Step.
(1) Select the Program menu.
(2) Select "P004" from the Program list.
(3) As the Program edit screen appears, click the Edit button.
①
![Project Information Audio source respiration Program Program No. Program name P001 Program 1 P002 Program 2 P003 Program 3 P004 Program 4 P005 Program 5 P006 Program 6 P007 Program 7 P008 Program 8 P009 Program 9 P010 Program 10 P011 Program 11 P012 Program 12 P013 Program 13 P014 Program 14 P015 Program 15 P016 Program 16 Emergency playback REM Program name Program4 Initial setting Playback system Program playback Repeat count iTimes Repeat interval iSecond Busy output during repeat interval Step Edit Type Content Playback time 06:00: Yes 06:0:26 Priority level 4 Output Output 1 Output 2 Program sound volume 8 [ 0dB] Automatic gain control (AGC) Program playback busy output 1 2 3 4 5 6 7 8 Program edit screen Program save](/content/2026/05/953756/images/1be80818262612d31db95d2153d69e452e86d1eb2e9b6e366ae6f2220a3345a9.jpg)
(4) Select "Yelp" from the Step list on the left of the Step Edit screen.
(5) Select the Audio source button located on the upper right of the screen, then select the audio source (No. 00009: My country home) to be changed.
(6) Click the Change button.
(7) Click the Edit complete button.
(8) Confirm that the Step indication on the Program edit screen is changed to the altered content, then click the Program save button.
![Step edit Type Content Playback time 00004 Yol 00:00:29 Change Audio source No. Content Playback time 00:001 2-tone chime 00:00:04 00:002 Decoording 4-ton... 00:00:04 00:003 Gone 00:00:03 00:004,Yelp 00:00:29 00:005 Attention please... 00:00:10 00:006 There is a fine.PL 00:00:05 00:007 Attention please... 00:00:10 00:008 According to home 00:00:14 00:009.My country home 00:00:59 00:10 00:11 00:12 Silent interval 10 69 [seconds] Edit Cancel](/content/2026/05/953756/images/2d328d712f7068bf04e50bff93a3098536c7f819bf6067a537a48d4d8c3bc5f5.jpg)
Step 4. Reflect the project.
Broadcast is made with the altered contents by inserting the memory card into the EV-700. (See p. 121.)
3.2. Alteration Example of Device Setting
3.2.1. Initial settings of Device setting (excerpt)
| Setting item Initial setting | |
| Whole sound volume -6 dB | |
| Delay time 2 seconds | |
| Broadcast priority level | Priority order 1 (High): Microphone broadcastPriority order 2: Normal broadcastPriority order 3 (Low): Line input broadcast |
| Backup function OFF | |
| Health check interval 15 seconds | |
| Keep-alive Time 30 seconds | |
| Interval 10 seconds | |
| Retry 3 times | |
3.2.2. Content to be changed
Change the Whole sound volume from "-6 dB" to "0 dB."
3.2.3. Operating procedure
Step 1. Acquire the contents of device setting.
Acquire the current device setting from the EV-700 via a network.
Establish connection to the EV-700, then acquire the device setting. (See "CONNECTING TO THE EV-700" on p. 67 and "Acquiring via LAN" on p. 129.)
Step 2. Change the Whole sound volume.
(1) Select the "Broadcast, System" menu.
(2) Change the Whole sound volume to "0." (Directly enter a figure of "0" or change the volume to "0" using the up and down buttons.)
(3) Click the Device setting save button.

![Broadcast setting Whole sound volume 6 [dB] Delay time 2 [seconds] Broadcast priority level Priority order 1 Microphone broadcast 2 Normal broadcast 3 Line input broadcast System setting Backup function OFF ON To enable backup function, memory cards with the same contents contained must be inserted into card slots A and B. Health check interval 15 [seconds] Keep alive Time 30 [seconds] Interval 10 [seconds] Retry 3 Quick stop Disabled Enabled Set whether or not to enable playback stop by the Start/Stop key while in Lock mode. Device setting save](/content/2026/05/953756/images/e1745c9697106741b17e156f76f600b859294c8d2e8931773ca8e7e55e88f61a.jpg)
Step 3. Reflect the device setting contents.
Reflect the altered device setting contents to the EV-700 via a network. (See p. 132, "Reflecting to the EV-700 via LAN.")
| → Device setting file: | Creates a new device setting file. |
| → Project: | Creates a new project file. |
Open
| → Device setting file: | Opens the saved device setting file. |
| → Project: | Opens the saved project file. |
Save: Overwrites a complete set of files which makes up the project.
| Save in a designated folder: | Saves the device setting file or a complete set of files comprising the project to a different folder. |
| CSV output | |
| → Device setting: | Saves the device setting contents in edit in CSV format using the EV-700 Setting Software.NoteThe device setting file saved in CSV format cannot be read with the EV-700 Setting Software. |
| → History: | Saves the currently displayed history with the EV-700 Setting Software in CSV format. A history file saved in CSV format can be read with the EV-700 Setting Software. |
| Download from device | |
| → Device setting file | Acquires the device setting file from the connected EV-700, then displays the setting contents on a PC screen using the EV-700 Setting software. |
| → Project: | Acquires a complete set of files comprising the project from the connected EV-700, then displays the setting contents on a PC screen using the EV-700 Setting software. |
| Upload to device: | Transfers the device setting file currently being edited by the EV-700 Setting software or a complete set of files comprising the project to the connected EV-700.TipUse this function when swapping all audio data and broadcast contents to be used for the EV-700.NoteAfter deleting all data on the EV-700's memory card, transfer all audio data and broadcast contents. Make a backup copy of the contents on the memory card, if necessary. (See p. 15, "MAKING A BACKUP COPY OF PRERECORDED AUDIO FILES.") |
| Difference data upload to device: | Transfers the device setting file currently being edited by the EV-700 Setting software or only the altered project files to the connected EV-700.TipWhen you have added audio sources to the audio data and broadcast contents used for the EV-700 or altered a part of the broadcast contents, use this function to reflect only the altered contents to the EV-700. Execution time for this function is less than that for "Upload to device."NoteUse this "Difference data upload to device" only when you have edited the same project as the one used for the EV-700. Performing the Difference data upload using data different from that used for the EV-700 may cause an EV-700's data error, possibly resulting in operation error. |
Exit: Exits the EV-700 Setting software.
4.1.2. Edit
Program copy: Copies the program contents in edit.
Program paste: Pastes the copied program contents to the field with other program number.
4.1.3. Tool
| Connect: | Connects to the last connected EV-700. (See p. 74, "Connecting to the Last Connected EV-700.")When "Connection" is selected first after starting the EV-700 Setting Software, detects the connected devices and connects to the detected EV-700 in the same manner as in the case of "Connection setting." |
| Offline: Disconnects the communication with the EV-700. This item becomes effective only while online with the EV-700. | |
| Connect setting: | Detects the connected devices, then connects to the detected EV-700. (See p. 69, "Detecting and Connecting to the EV-700.") |
4.1.3. Help
Version information: Displays the EV-700 Setting software version number.
4.2. Tool Buttons
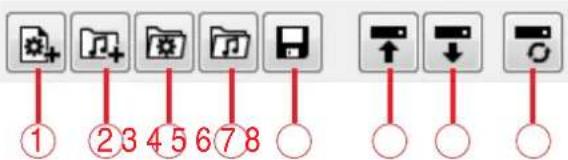
1. Device setting file new creation
Creates a new device setting file.
This action is the same as selecting "File -New Creation -Device setting file" from the menu.
2. Project file new creation
Creates a new project file.
This action is the same as selecting "File -New Creation -Project" from the menu.
3. Open device setting file
Opens the saved device setting file.
This action is the same as selecting "File Open → Device setting file" from the menu.
4. Open project file
Opens the saved project file.
This action is the same as selecting "File Open → Project" from the menu.
5. Save
Overwrites a complete set of files comprising project.
This action is the same as selecting "File Save" from the menu.
6. Upload to device
Transfers the device setting file currently being edited with the EV-700 Setting software or a complete set of files comprising a project to connected EV-700.
This action is the same as selecting "File → Upload to device" from the menu.
Tip
Use this function when swapping all audio data and broadcast contents to be used for the EV-700.
Note
Before transferring all audio data and broadcast contents, delete all data on the EV-700's memory card.
Make a backup copy of the contents on the memory card, if necessary. (See p. 15, "MAKING A BACKUP COPY OF PRERECORDED AUDIO FILES.")
7. Download from device
Acquires the device setting file or a complete set of files comprising a project from the connected EV-700 and displays the setting contents on a PC screen using the EV-700 Setting software.
This action is the same as selecting "File → Download from device →Device setting file" or "File → Download from device →Project" from the menu.
8. Difference data upload to device
Transfers only the altered file(s) of the device setting files or of the project files being edited with the EV-700 Setting software to the connected EV-700.
This action is the same as selecting "File → Difference data upload to device" from the menu.
Tip
When you have added audio sources to the audio data and broadcast contents used for the EV-700 or altered a part of the broadcast contents, use this function to reflect only the altered contents to the EV-700.
Execution time for this function is less than that for "Upload to device."
Note
Use this "Difference data upload to device" only when you have edited the same project as that used for the EV-700.
the Performing the Difference data upload using data different from that used for the EV-700 may cause an EV-700's data error, possibly resulting in operation error.
5. CONNECTING TO THE EV-700
Place the EV-700 in an online state in order to acquire the audio file data or have the EV-700 perform operations like playback in communication with the EV-700 via a network.
Notes
- Use the EV-700 Setting software having the same version number as the unit's firmware. You cannot establish a connection between a PC and the EV-700 when their versions are different.
To confirm the EV-700's firmware version, see the instruction manual supplied with the EV-700.
To confirm the EV-700 Setting software version, select "Help → Version information" from the menu. (See p. 21 or p. 65.)
If both versions are different, update the firmware using the EV-700 Setting Software. The EV-700's firmware version becomes equal to that of the EV-700 Setting Software, enabling communications between them. (See p. 73, "Updating the EV-700's firmware.")
Download the latest version of EV-700 Setting Software from the TOA Products Data download site http://www.toa.products.com/international/.
- When connecting a PC with the EV-700 via a router, directly enter the EV-700's network information. (See p. 71, "Adding an undetectable EV-700.")
5.1. Outline of Connections
The following 3 methods are available for connections.
(1) Detect and connect to the EV-700. (See the next page for the connection flow and p. 69 for connection method.)
(2) Connect to the EV-700 using the network setting of the device setting file. (See p. 74.)
(3) Reconnect with the last connected EV-700. (See p. 74.)
Tips
- Methods (1) and (2) are used to newly connect to the EV-700 or to connect to other EV-700 than the last connected one.
• Method (3) is available only when the Device setting file has been set.
[Connection flow of Method (1)] (See the previous page.)
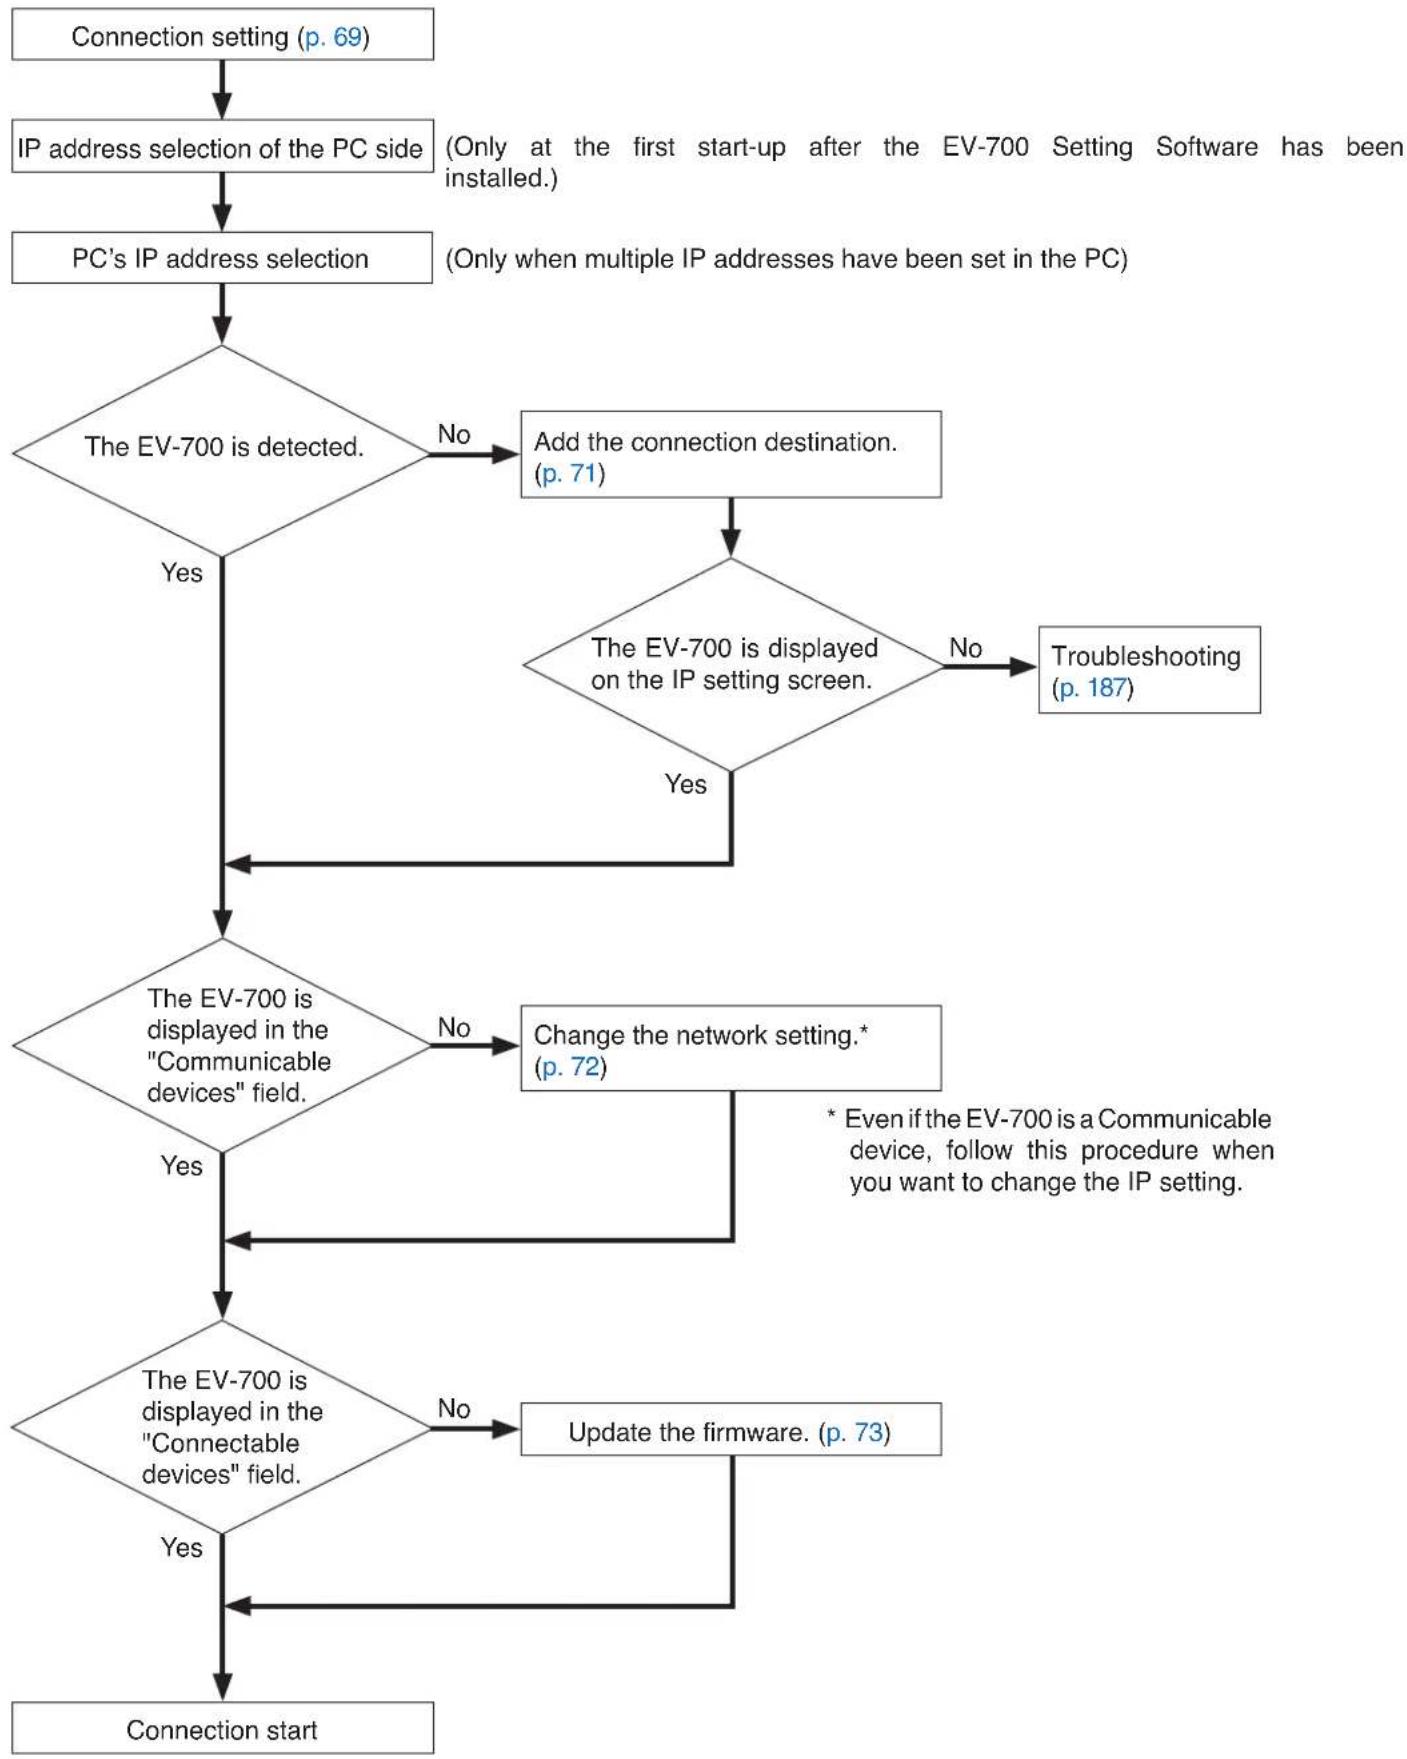
flowchart
graph TD
    A["Connection setting (p. 69)"] --> B["IP address selection of the PC side"]
    B --> C["PC's IP address selection"]
    C --> D{The EV-700 is detected.}
    D -->|No| E["Add the connection destination. (p. 71)"]
    E --> F{The EV-700 is displayed on the IP setting screen.}
    F -->|No| G["Troubleshooting (p. 187)"]
    F -->|Yes| H{The EV-700 is displayed in the "Communicable devices" field.}
    H -->|No| I["Change the network setting.* (p. 72)"]
    I --> J{Even if the EV-700 is a Communicable device, follow this procedure when you want to change the IP setting.}
    J -->|Yes| K{The EV-700 is displayed in the "Connectable devices" field.}
    K -->|No| L["Update the firmware. (p. 73)"]
    K -->|Yes| M["Connection start"]
5.2. Detecting and Connecting to the EV-700
The EV-700 on the network can be automatically detected and connected to the PC following the procedure below.
Step 1. Select "Tool -Connect settings" from the menu.
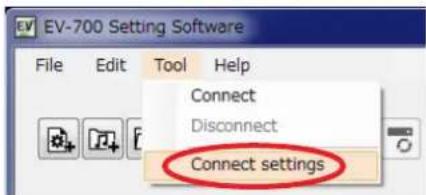
Tip When multiple IP addresses have been set in a PC, the IP address selection screen of the PC appears only at the first start-up after the EV-700 Setting Software has been installed. Select the main IP address to connect to the EV-700, then click the OK button.
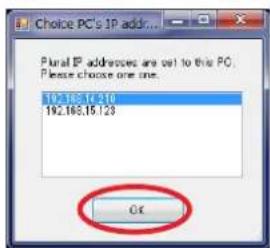
The IP setting screen appears.
Information of the EV-700 on the network is acquired and displayed on the IP setting screen.
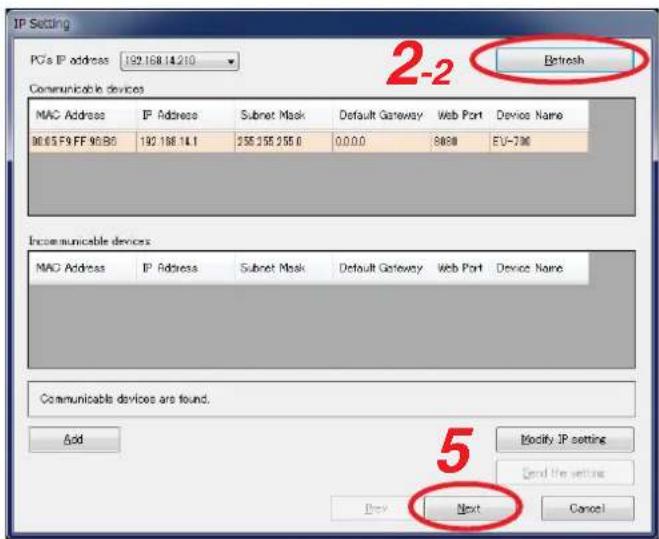
Step 2. (Only when multiple IP addresses have been set in the PC)
Select the PC's IP address.
The IP address used to obtain the EV-700's information can be selected from the list.
2-1. Select the PC's IP address from the PC's IP address list.
2-2. Click the Refresh button.
Information of the EV-700 on the network is reacquired.
2-3. When the EV-700 to be connected is not displayed in the "Communicable devices" field
Incorrect IP address of the PC may be selected. Check the PC's IP address, then retry Steps 2-1 and 2-2 if your selection is wrong.
After confirming the PC's IP address is correct, proceed to Step 3 and after.
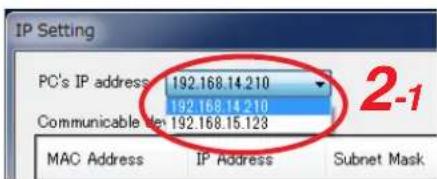
Step 3. When the EV-700 to be connected is not displayed in the "Communicable devices" nor in the "Incommunicable devices" field, add the EV-700. (See p. 71, "Adding an undetectable EV-700.")
Step 4. When the EV-700 to be connected is displayed in the "Incommunicable device" field, change the network setting. (See p. 72, "Changing the network setting.")
Step 5. Click the Next button.
The firmware version confirmation scree appears.
The firmware version information of the EV-700 on the network is acquired and displayed on the firmware version confirmation screen.
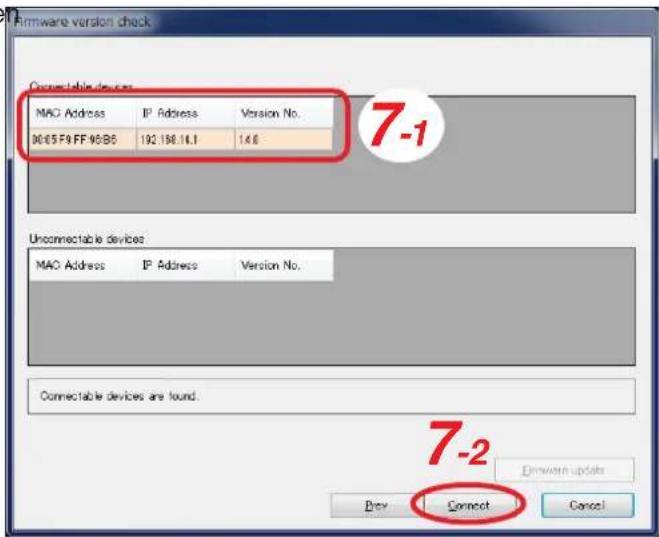
Step 6. When the EV-700 to be connected is displayed in the "Unconnectable devices" field, update the firmware. (See p. 73, "Updating the EV-700's firmware.")
Step 7. Connect to the EV-700.
7-1. Select the EV-700 to be connected from the "Connectable devices" field.
7-2. Click the Connect button.
The PC is connected with the selected EV-700, placing the EV-700 in online state.
5.2.1. Adding an undetectable EV-700
If communications are interrupted because the EV-700 is connected via a router or a firewall on the PC is active, the EV-700 on the network cannot be automatically detected.
To add the undetectable EV-700, follow Steps 1 and 2 of the "Detecting and Connecting to the EV-700" on p. 69, then perform the following operation on the IP setting screen.
Step 1. Click the Add button on the IP setting screen (p. 69).
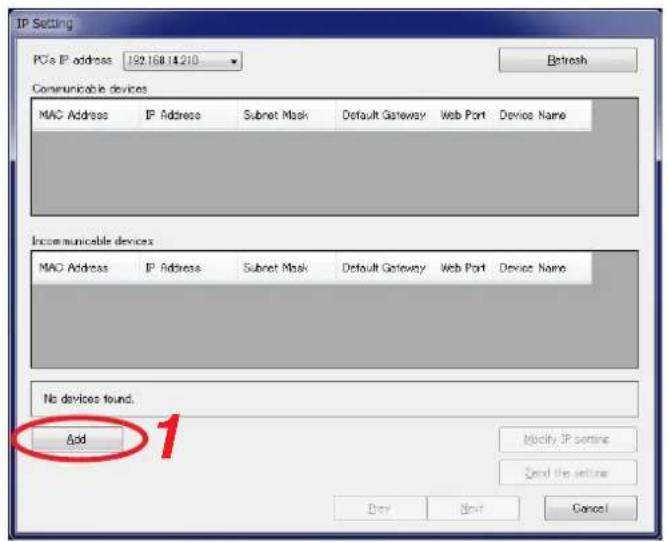
An Add target device dialog appears.
Step 2. Enter the IP address and port number, then click the OK button.
IP Address: Enter the IP address of the EV-700 to be connected with the EV-700 Setting Software.
Port No.: Enter the Port number used for connection with the EV-700 Setting Software. (Default: 60007)
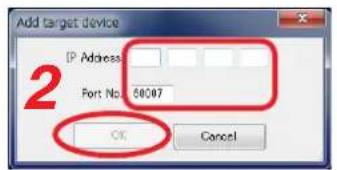
Confirm that the EV-700 is added in the "Communicable devices" field, then proceed to Step 5 on p. 70.
5.2.2. Changing the network setting
To change the EV-700's network setting, follow Steps 1 through 3 of "Detecting and Connecting to the EV-700" on p. 69, then perform the following operation on the IP setting screen.
Step 1. Select the EV-700 from the "Communicable devices" or "Incommunicable devices" field on the IP setting screen (p. 69).
1 1
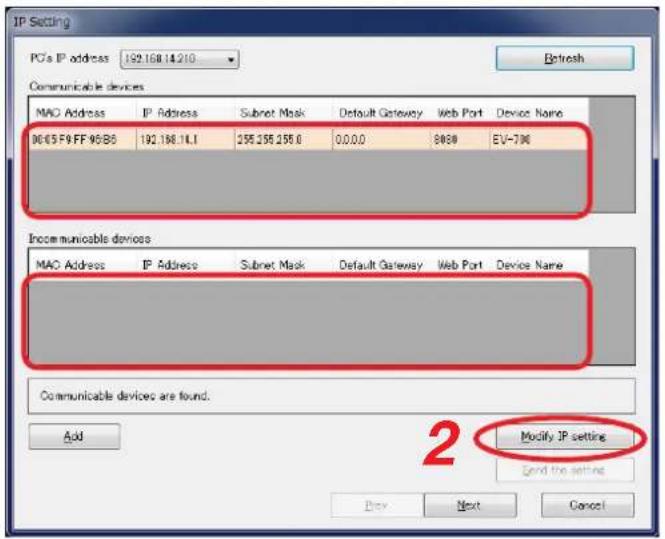
Step 2. Click the Modify IP setting button.
An IP Setting dialog appears.
The IP setting of the selected EV-700 is enabled.
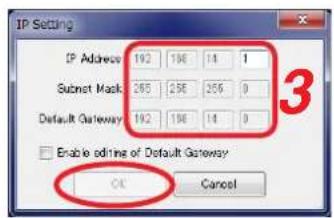
4
Step 3. Edit the IP setting of the selected EV-700.
IP Address: Change the setting value of the EV-700's IP address to be connected with the EV-700 Setting Software.
Subnet Mask: Change the setting value of the EV-700's Subnet mask to be connected with the EV-700 Setting Software.
Default Gateway: Checking the "Enable editing of Default Gateway" checkbox allows edit of the Default gateway. Change the setting value of the EV-700's Default gateway to be connected with the EV-700 Setting Software.
Tip
The values displayed in grayout are not allowed to be changed because connection becomes disabled if changed.
Step 4. Click the OK button.
The [Send the setting] button becomes active.
Step 5. Click the [Send the setting] button.
The edited setting values are transmitted to the EV-700.
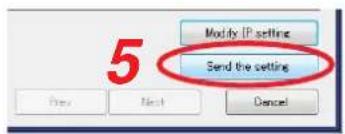
After completion of setting value change, confirm that the EV-700 of which IP setting has been changed is displayed in the "Communicable devices" field, then proceed to Step 5 on p. 70.
5.2.3. Updating the EV-700's firmware
To update the EV-700's firmware, follow Steps 1 through 5 of "Detecting and Connecting to the EV-700" on p. 69, then perform the following operation on the Firmware version confirmation screen.
Step 1. Select the EV-700 of which firmware is to be updated from the "Unconnectable devices" field on the Firmware version confirmation screen (p. 70).
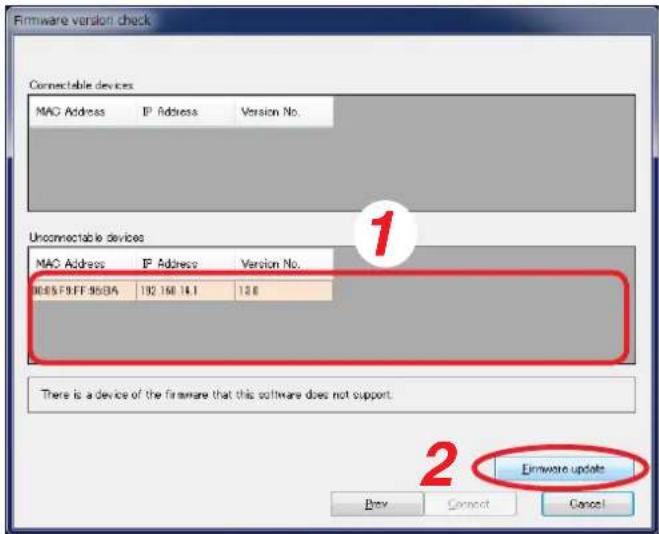
Step 2. Click the Firmware update button.
A Firmware version dialog appears.
Note
Operations other than firmware update such as playback and recording cannot be performed during firmware update.
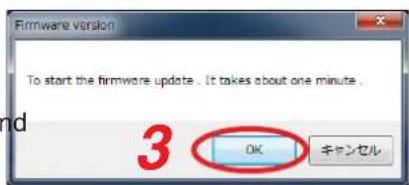
Step 3. Click the OK button.
Firmware of the selected EV-700 is updated and the PC reacquires information after EV-700 is restarted.
Once information has been reacquired, the EV-700 of which firmware has been updated appears in the "Connectable devices" field.
To connect to the EV-700 with updated firmware, proceed to Step 7 on p. 70.
5.3. Making Connections Using the Network Setting of the Device Setting File
Connection to the EV-700 is enabled using the network setting values (in the red frame shown below) of the device setting file by reading the device setting file of the EV-700.
To connect with the EV-700 using the network setting set in the EV-700's device setting file, follow the procedure below.
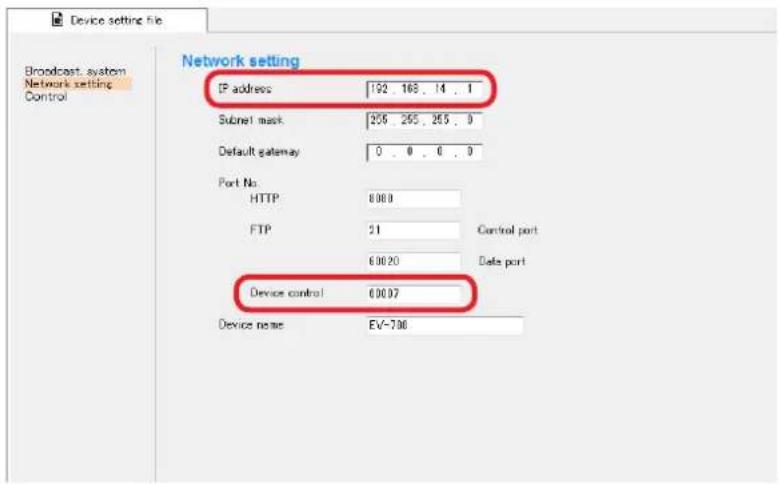
Step 1. Open the setting file.
Display the created device setting file on the setting screen of the EV-700 Setting Software by acquiring it from the EV-700 via a LAN or by reading the data saved in the memory card or the PC. (See p. 129.)
Step 2. Select "Tool → Connection" from the menu.
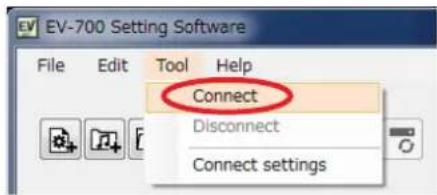
Note
Use the network setting with which the device setting file is opened.
To make connections using the network setting that has been changed after the device setting file was opened, close the setting file once, then follow the procedure above from the beginning.
5.4. Connecting to the Last Connected EV-700
When reconnecting to the EV-700 after it was detected and connected, and then disconnected, follow the procedure below.
Step: Select "Tool Connect" from the menu.
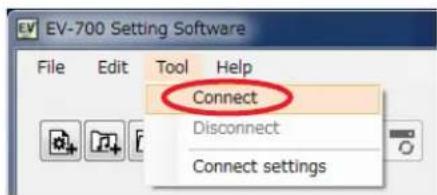
Tip
When "Tool → Connect" is selected first after starting the EV-700 Setting Software, detects the connected devices and connects to the detected EV-700 in the same manner as in the case of "Tool → Connect settings."
See p. 69, "Detecting and Connecting to the EV-700."
But, when the device setting file is opened, make connections using the network setting values.
6. PHRASE AND PROGRAM
The terms "Phrase" and "Program" are used for handling audio sources with the EV-700.
6.1. What is Phrase?
Phrase refers to the audio data (WAV file) recorded on the memory card. A single phrase is created by one-time recording. Up to 32768 pieces of phrase data can be written on the memory card.
"Phrase" used for the EV-700 refers to a WAV file and differs from the Phrase in the general sense.
Despite the name "Phrase," audio data for music and sentences can be recorded as phrases.
6.2. What is Program?
Program consists of the audio data for broadcast created by combining phrases and the program control data such as program audio volume and playback system. Up to 256 programs can be registered.
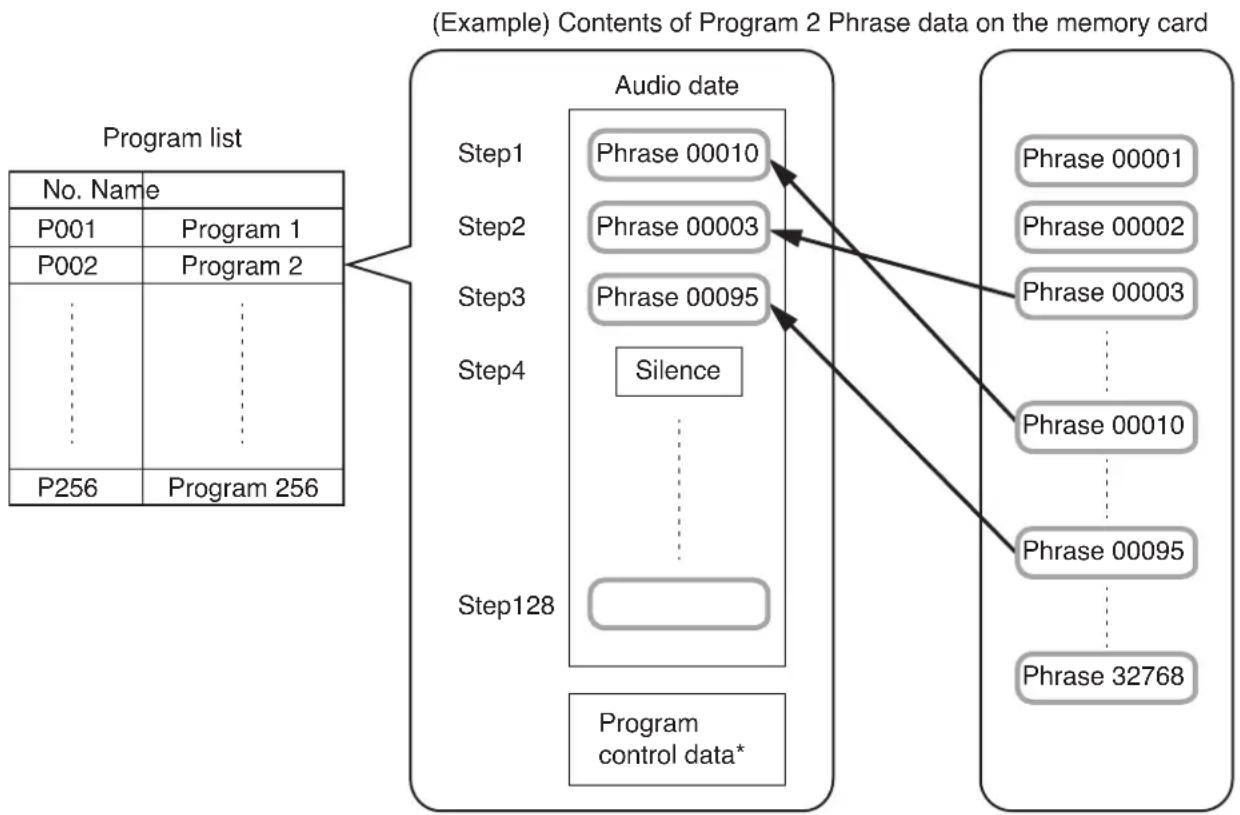
flowchart
graph TD
    A["Program list"] --> B["Step1"]
    A --> C["Step2"]
    A --> D["Step3"]
    A --> E["Step4"]
    B --> F["Audio date"]
    C --> F
    D --> F
    E --> F
    F --> G["Program control data*"]
    G --> H["Step128"]
    H --> I["Step00010"]
    H --> J["Step00003"]
    H --> K["Step00095"]
    H --> L["Silence"]
    G --> M["Step00002"]
    G --> N["Step00003"]
    G --> O["Step00010"]
    G --> P["Step00095"]
    G --> Q["Step32768"]
* See the next page for details.
The Playback order of phrases in a program is referred to as a "Step."
A program is created by using one step or combining 2 or more steps.
One program can contain up to 128 steps of "Phrases" and "Silent phrases."
In addition, data of broadcasting method, referred to as "Program control data", can be set for individual programs.
The following types are available for Program control data.
| Program control data type |
| Program name |
| Output destination (Line output 1 and Line output 2) |
| Playback system (Program playback, Step playback, All phrases playback, and Chime playback) |
| Program audio volume (0 to10) |
| Program playback busy output destination (1 to 8)* |
| AGC (ON/OFF) |
| Priority level (2 to 8) |
| Repeat count |
| Repeat time |
| Repeat interval |
| Busy output during repeat interval |
| Interval (Phrase interval) |
| Busy output during interval |
* When setting, also check the descriptions on p. 81, "Control."
7. TYPES OF EMERGENCY BROADCASTS
There are 2 types for the Emergency broadcasts, "Emergency playback" and "R.E.M. (Recording Endless Message) playback."
• Emergency Playback (Prerecorded Playback)
Allows the audio file for emergency playback prepared in advance to be broadcast preferentially in emergency situations. Priority is given to the emergency playback broadcast even during program playback or microphone announcement.
Output destination, repeat count, and repeat time can be preset using the EV-700 Setting software.
Audio file preparation and Emergency playback/stop can be made at the EV-700 unit or using the EV-Setting software.
This manual describes the method of operations performed using the EV-700 Setting software.
For the operation method performed at the EV-700 unit, see the EV-700 instruction manual supplied with the EV-700 unit.
• R.E.M. Playback (Instant Recording Playback)
Allows you to make a recording through one-touch operation in the event of an emergency and repeatedly broadcast the recorded contents immediately after recording.
Recording starts instantly by closing the rear-mounted Emergency recording control input terminals, and the recorded contents are played repeatedly when the terminals are opened.
Priority is given to the R.E.M. playback broadcast even during program playback or microphone announcement.
Output destination, repeat count, and repeat time can be preset using the EV-700 Setting software.
R.E.M. playback can be performed at the EV-700 unit or using the EV-700 Setting software.
This manual describes the method of operations performed using the EV-700 Setting software.
For the operation method performed at the EV-700 unit, see the EV-700 instruction manual supplied with the EV-700 unit.
Note
Emergency playback cannot be made during broadcasts of R.E.M. playback. Likewise, R.E.M. playback cannot be made during Emergency playback.
Tip
You can start recording for R.E.M. playback again during R.E.M. playback broadcast.
For the priority level settings, see the EV-700 instruction manual supplied with the EV-700 unit.
8. WHAT IS A PROJECT?
8.1. Files Comprising a Project
A collection of the files necessary for the EV-700 to broadcast is referred to as Project.
The files comprising a project are as follows.
Note
Files comprising a project are saved on a memory card.
For the configuration of each file, see the next page.
8.1.1. Project information file (EV-700T)
A file that describes information about the project such as creation date, project creator, and project content.
Also, set the sampling frequency of the audio sources to be used for the project in this information.
Sampling frequency that can be used at the EV-700 is determined depending on the project information setting.
8.1.2. Table file
Defines the broadcast contents and the audio files to be used for broadcasting, and includes the following files.
- Program - Phrase table (EVPRGxxx.xml) (xxx = 000 to 255)
A file that defines the broadcast contents consisting of the broadcast content data created in combination with the phrases, and the program control data such as program audio volume and playback system. - Phrase - Audio file table (EVWRDxxx.xml) (xxx = 000 to 255)
A file that links the phrase set in the "Program - Phrase table" to the Audio file.
The audio file to be used at the time of broadcast is determined by this definition file. - Phrase comment table (EVCMTxxx.xml) (xxx = 000 to 255)
A file to register comments so that you can find what type of audio file is registered in each phrase.
A file that can be used only with the EV-700 Setting software. It is not used at the EV-700. - Program for emergency playback - Phrase table (EVPRG_EMG.xml)
A file that defines the control data such as repeat count and program audio volume at the time of emergency playback. - Program for R.E.M. playback - Phrase table (EVPRG_REM.xml)
A file that defines the control data such as repeat count and program audio volume at the time of R.E.M. playback.
8.1.3. Audio files (WAV file)
Audio sources that are actually broadcast.
Audio files for emergency broadcast and R.E.M. playback are saved with the file name "evemg.wav" and "evrem.wav," respectively.
For the usable audio files, see p. 10.
8.2. File Configuration of the Memory Card
Shown below is the file configuration on the memory card supplied with the EV-700.
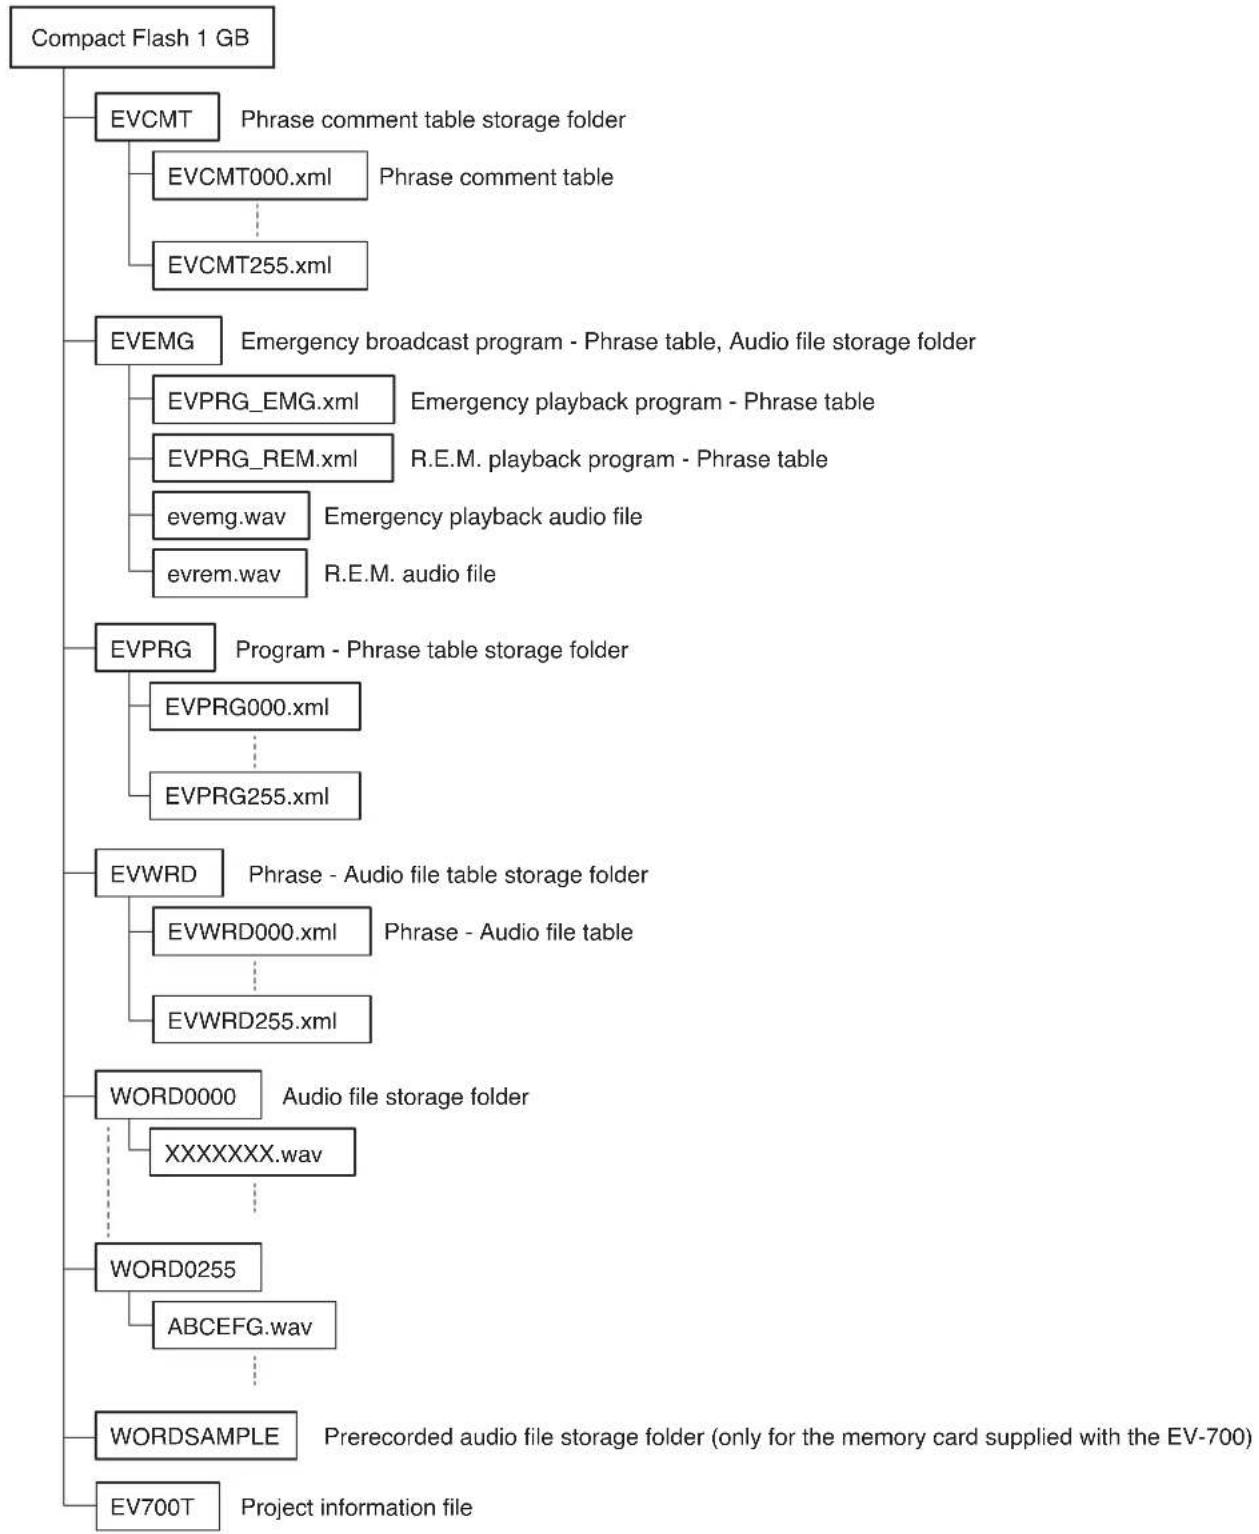
flowchart
graph TD
    A["Compact Flash 1 GB"] --> B["EVCMT"]
    B --> C["EVCMT000.xml"]
    B --> D["EVCMT255.xml"]
    A --> E["EVEMG"]
    E --> F["EVPRG_EMG.xml"]
    E --> G["EVPRG_REM.xml"]
    E --> H["evemg.wav"]
    E --> I["evrem.wav"]
    E --> J["R.E.M. audio file"]
    A --> K["EVPRG"]
    K --> L["EVPRG000.xml"]
    K --> M["EVPRG255.xml"]
    A --> N["EVWRD"]
    N --> O["EVWRD000.xml"]
    N --> P["EVWRD255.xml"]
    A --> Q["WORD0000"]
    Q --> R["XXXXXXXX.wav"]
    A --> S["WORD0255"]
    S --> T["ABCEFG.wav"]
    A --> U["WORDSAMPLE"]
    U --> V["Prerecorded audio file storage folder (only for the memory card supplied with the EV-700)"]
    A --> W["EV700T"]
    W --> X["Project information file"]
A single project is saved to the memory card.
Also, each file comprising a project is automatically put in order and saved in a folder.
Files are saved in a similar configuration when stored into the hard disk of the PC.
Prerecorded audio sources are stored on the memory card supplied with the EV-700.
For the stored Prerecorded audio file list, refer to the Instruction operation manual supplied with the EV-700.
9. WHAT IS THE DEVICE SETTING?
A setting related to the device's operation such as broadcast volume level and IP address settings of the EV-700. Setting change and setting value confirmation can be performed using the EV-700 Setting software.
Device's settings are saved in the EV-700 not into a memory card.
Shown below are setting items.
[Broadcast and system]
Perform settings related to the operations such as broadcast volume level, broadcast priority level, and backup function ON/OFF.
• Whole sound volume
Set the volume level of the audio signals output from the EV-700.
- Delay time
Set the time period after the playback is started until the playback actually begins, which is a waiting time setting until the amplifier starts.
- Broadcast priority level
Set the Broadcast priority levels among the normal broadcast, line input broadcast, and microphone broadcast considering which broadcast takes precedence over which broadcast.
- Backup function
Set whether to operate the system on the original and duplicated memory cards.
• Health check interval
If the EV-700 fails to receive the data communication exceeding the setting value from the EV-700 Setting software, the EV-700 judges that the connection to the Software is lost, terminating the communication connection.
- Keep-alive
Set the start time, notification interval, and number of notifications of the keep-alive that work at the protocol level such as TCP.
- Quick stop
When this function is enabled, program playback, Emergency playback, and R.E.M. playback can be stopped by pressing the Start/Stop key even when the EV-700 is in Lock mode.
[Network]
Perform settings related to the network setting like IP address.
- IP address
Set the EV-700's IP address. - Subnet mask
Set the EV-700's subnet mask. - Default gateway
Set the EV-700's default gateway. - Port number
Set the EV-700's port number. - Device name
Set the EV-700's name.
[Control]
Perform settings related to the contact control.
- Control function
Select the system to designate the program or phrase number at the contact-activated input terminal.
- Type
Set in which condition it is judged that the contact-activated input terminal is activated.
- Operation
Select the type of operation when two or more playbacks are started in the case of playback start stetting or select the stop method in the case of stop activation setting.
- Control output
Set what type of busy signal is output from which channel of the contact control output terminals 1 to 8 when the device performs the following operations.
| Type of busy signal Description | |
| Line output busy | The busy signal is output during audio signal output from the Line outputs 1 and 2. |
| Microphone broadcast busy The busy signal is output during microphone broadcast. | |
| Line input broadcast busy The busy signal is output during line input broadcast. | |
| Recording busy The busy signal is output during recording or during emergency audio source recording. | |
| Delete busy The busy signal is output during deletion or during emergency audio source deletion. | |
| Emergency playback busy | The busy signal is output during emergency playback or during R.E.M. playback broadcast. |
| R.E.M. busy The busy signal is output during R.E.M. playback recording. | |
| Maintenance busy The busy signal is output when the device is placed in the maintenance mode. | |
Besides the control output setting, you can set the control output terminal to which the program playback busy is output for each program in project.
The program playback busy outputs a busy signal during program playback.
10. EDIT WORKFLOW
10.1. Project Edit
10.1.1. Creating a new project and reflecting to the EV-700
Step 1. Create a new project. (See p. 87.)
Step 2. Set the project.
Set or edit the project information. (See p. 88.)
Set or edit the phrase. (See p. 90.)
Set or edit the program. (See p. 95.)
Step 3. Reflect the project setting to the EV-700. (See p. 116.)
Method (1) Method (2)
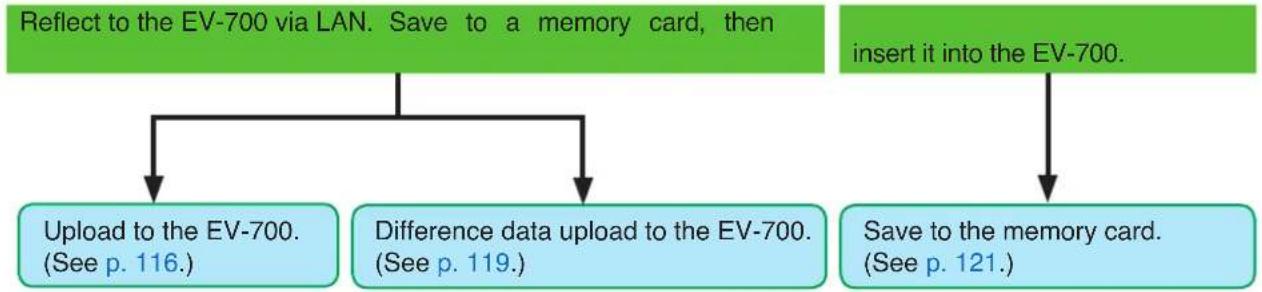
flowchart
graph TD
    A["Reflect to the EV-700 via LAN. Save to a memory card, then"] --> B["Upload to the EV-700.<br>(See p. 116.)"]
    A --> C["Difference data upload to the EV-700.<br>(See p. 119.)"]
    D["insert it into the EV-700."] --> E["Save to the memory card.<br>(See p. 121.)"]
Note
Save the data into the PC.
Select "File → Save in a designated folder" from the menu, then save into the PC. (See p. 64.)
10.1.2. Editing the already created project and reflecting to the EV-700
Step 1. Acquire the project setting data. (See p. 112.)
Method (1) Method (2) Method (3)
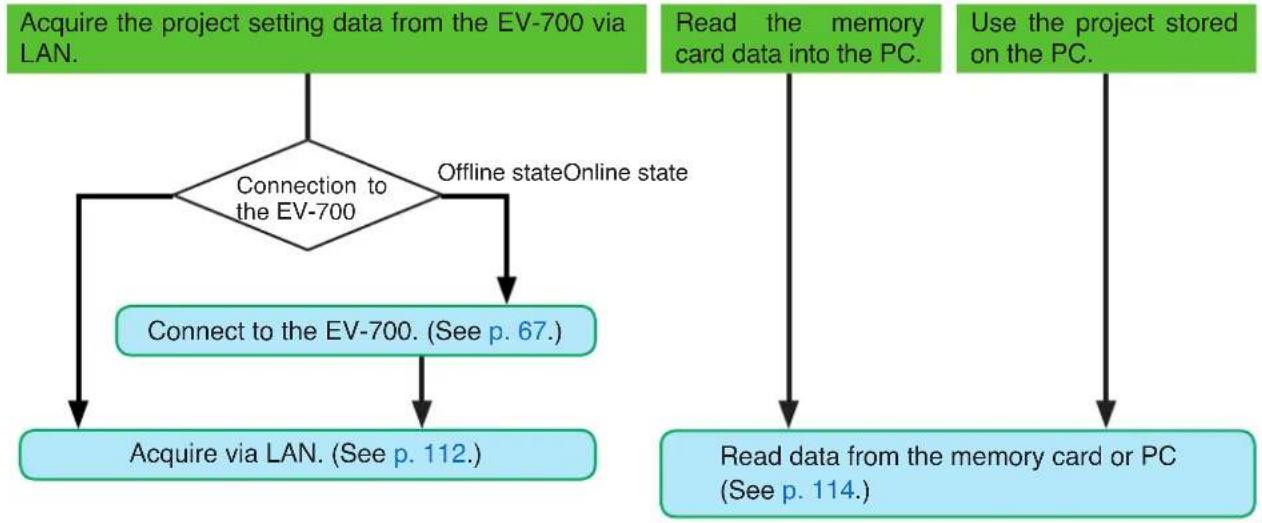
flowchart
graph TD
    A["Acquire the project setting data from the EV-700 via LAN."] --> B{Connection to the EV-700}
    B -->|Offline state Online state| C["Connect to the EV-700. (See p. 67.)"]
    C --> D["Acquire via LAN. (See p. 112.)"]
    E["Read the memory card data into the PC."] --> F["Read data from the memory card or PC (See p. 114.)"]
    F --> G["Use the project stored on the PC."]
Step 2. Edit the project.
Set or edit the project information. (See p. 88.)
Set or edit the phrase. (See p. 90.)
Set or edit the program. (See p. 95.)
Step 3. Reflect the project setting to the EV-700. (See p. 116.)
Method (1) Method (2)
flowchart
graph TD
    A["Reflect to the EV-700 via LAN. Save to a memory card, then"] --> B["Upload to the EV-700.<br>(See p. 116.)"]
    A --> C["Difference data upload to the EV-700.<br>(See p. 119.)"]
    D["insert it into the EV-700."] --> E["Save to the memory card.<br>(See p. 121.)"]
Note
Save the data into the PC.
Select "File → Save in a designated folder" from the menu, then save into the PC. (See p. 64.)
10.2. Editing the Device Setting
10.2.1. Creating a new device setting file and reflecting to the EV-700
Step 1. Create a new device setting file. (See p. 122.)
Step 2. Edit the device setting file.
Perform the broadcast setting and system setting. (See p. 123.)
Perform the network setting. (See p. 125.)
Control setting (See p. 127.)
Step 3. Reflect the edited contents of the device setting file.
Method (1) Method (2)
Reflect to the EV-700 via LAN. Save to a memory card, then insert it into the EV-700.
Upload to the EV-700. (See p. 132.)
Save to the memory card. (See p. 133.)
10.2.2. Editing the already created device setting file and reflecting to the EV-700
Step 1. Acquire the device setting file.
Method (1) Method (2) Method (3)
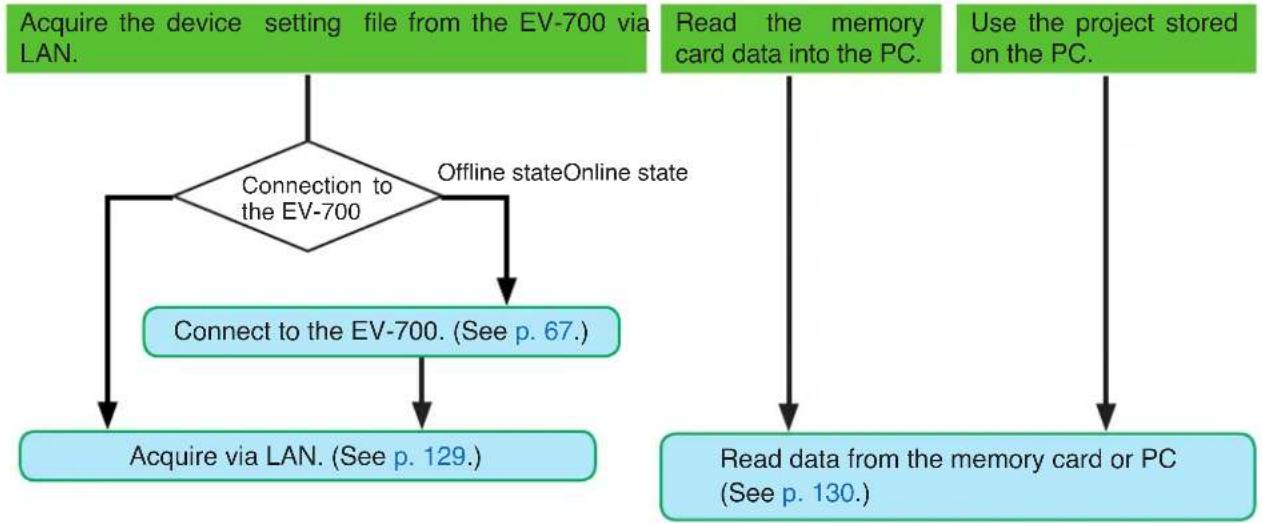
flowchart
graph TD
    A["Acquire the device setting file from the EV-700 via LAN."] --> B{Connection to the EV-700}
    B -->|Offline state Online state| C["Connect to the EV-700. (See p. 67.)"]
    C --> D["Acquire via LAN. (See p. 129.)"]
    E["Read the memory card data into the PC."] --> F["Read data from the memory card or PC (See p. 130.)"]
    F --> G["Use the project stored on the PC."]
Step 2. Edit the device setting file.
Perform the broadcast setting and system setting. (See p. 123.)
Perform the network setting. (See p. 125.)
Control setting (See p. 127.)
Step 3. Reflect the edited contents of the device setting file.
Method (1) Method (2)

flowchart
graph TD
    A["Reflect to the EV-700 via LAN. Save to a memory card, then insert it into the EV-700."] --> B["Upload to the EV-700. (See p. 132.)"]
    C["Save to the memory card. (See p. 133.)"] --> D["End"]
10.3. Confirming the Device Setting File
Step 1. Acquire the device setting data. (See p. 129.)
Method (1) Method (2) Method (3)
Acquire the project setting data from the EV-700 via LAN.
Read the memory card data into the PC.
Use the project stored on the PC.
Tip: The device setting file can be edited.
Step 2. Save the device setting file in csv format. (See p. 134.)
Step 3. Confirm the contents of the device setting file in CSV format. (See p. 135.)
You can confirm the contents of the device setting file saved in CSV format using the Microsoft Excel or a text editor.
11. EDITING THE PROJECT
11.1. Creating a New Project
Step 1. Select "File → New creation → Project" from the menu or click the "Project file new creation" tool button icon.
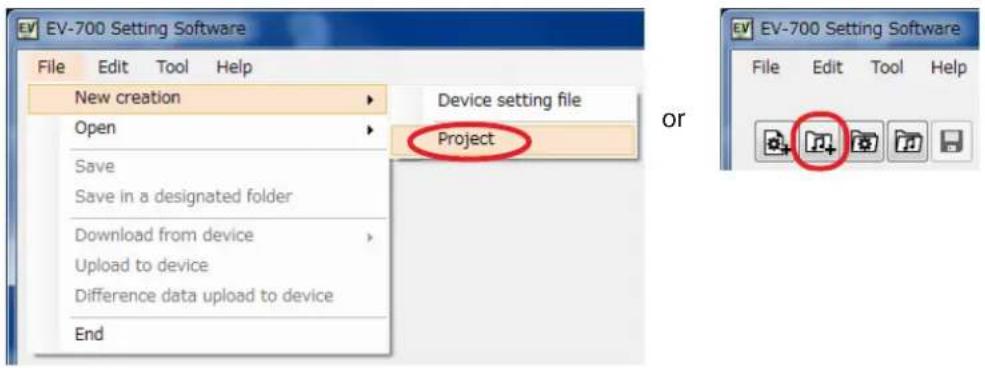
A destination folder selection screen appears.
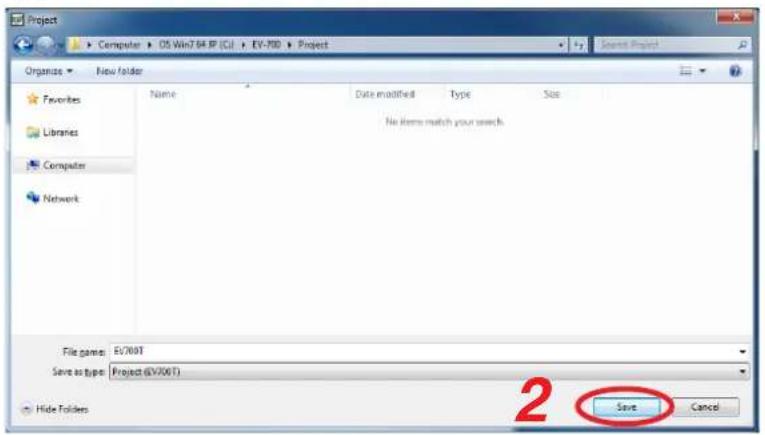
Step 2. Designate the destination folder to be saved, then click the save button. The project creation screen appears.
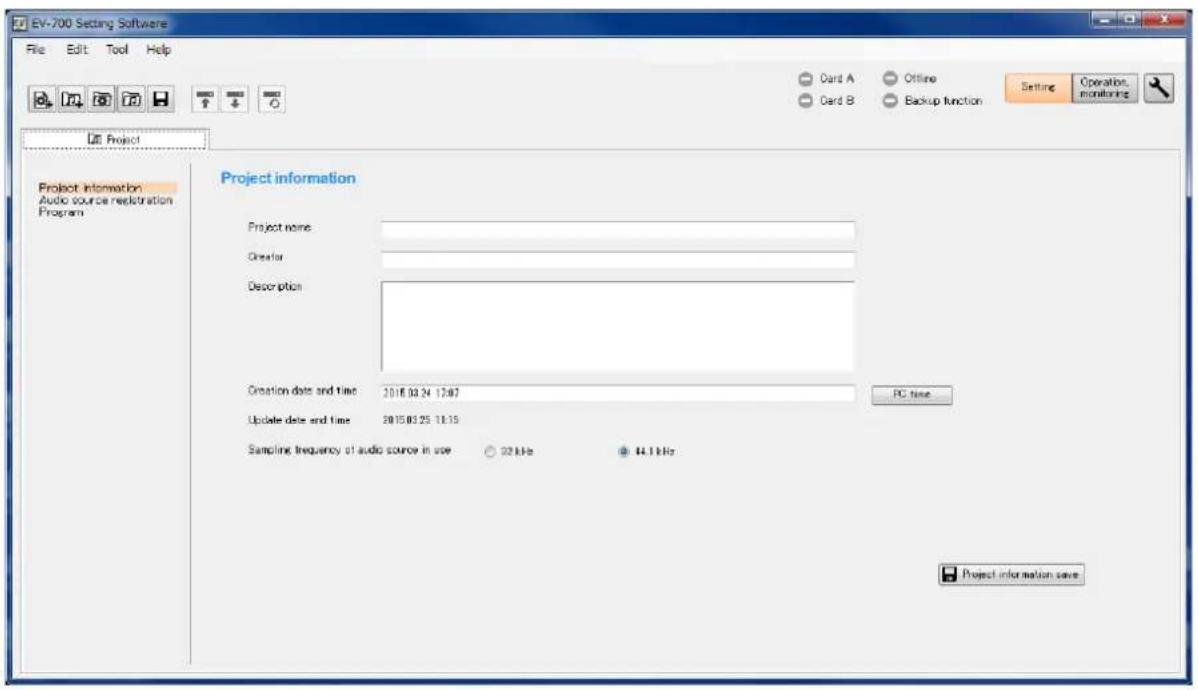
11.2. Setting or Editing the Project Information
11.2.1. Project information screen description
Click the "Project information" from the submenu on the Project creation screen to display the Project information screen.
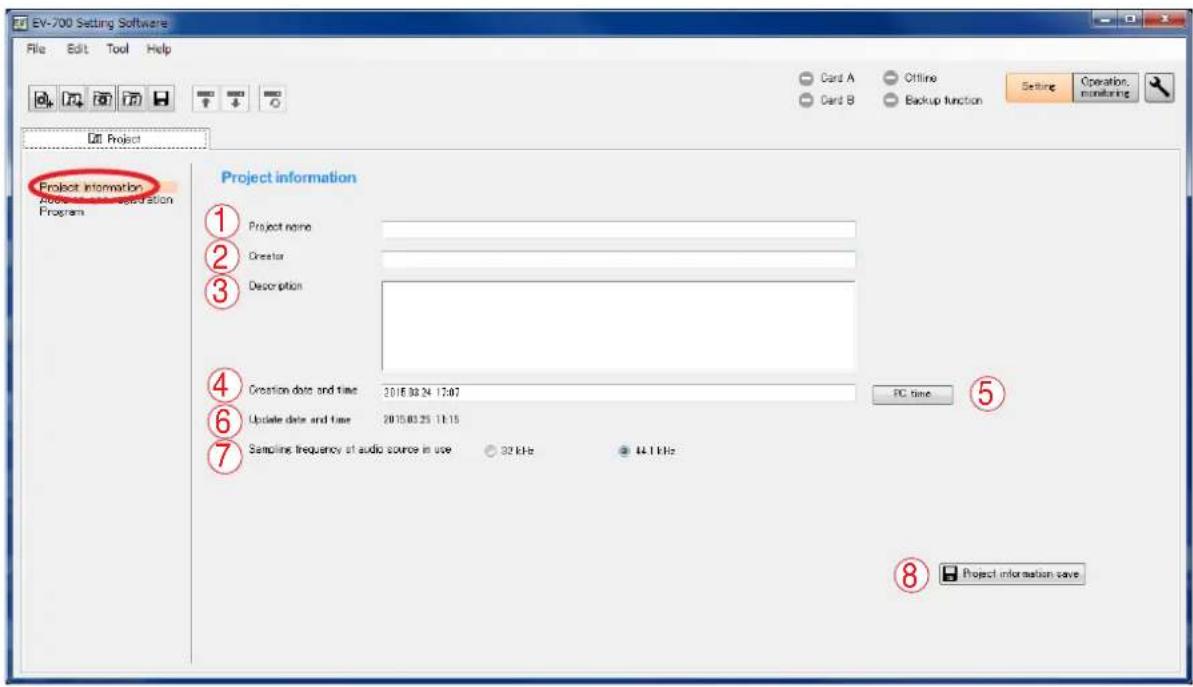
1. Project name
Enter the project name with up to 256 characters.
2. Creator
Enter the creator name with up to 256 characters.
3. Description
Enter the details of the project with up to 256 characters.
Multiple lines can be used for entry.
4. Creation date and time
Set the date and time when the project information was created.
Clicking the PC time button (5) allows the PC time to be input into this field.
5. PC time button
Acquires the PC time and indicates it in the Creation date and time field (4).
6. Update date and time
The date and time are automatically updated when the project file is saved.
7. Sampling frequency of the usage audio source
Selects the sampling frequency of the audio source usable for the project from "32 kHz" or "44.1 kHz." (Default setting: 44.1 kHz)
When recording is made by the EV-700, it is performed with the sampling frequency selected here.
Notes
- If the project information is saved after the sample frequency has been changed, the contents set in "Audio source registration" and "Program" of the Project submenu will be deleted.
Make a backup copy of the project setting data as needed when changing the sample frequency after "Audio source registration" or "Program" has been set in such cases as editing the existing project.
- It is not possible to simultaneously use the Audio files of which sampling frequencies are different.
- If "32 kHz" is selected, the prerecorded audio sources on the supplied memory card cannot be used.
8. Project information save button
Click this button to save the set project information into the project file at the project save destination.
11.2.2. Setting
Step 1. Click on "Project information" from the submenu on the Project creation screen.
The Project information screen appears.
1
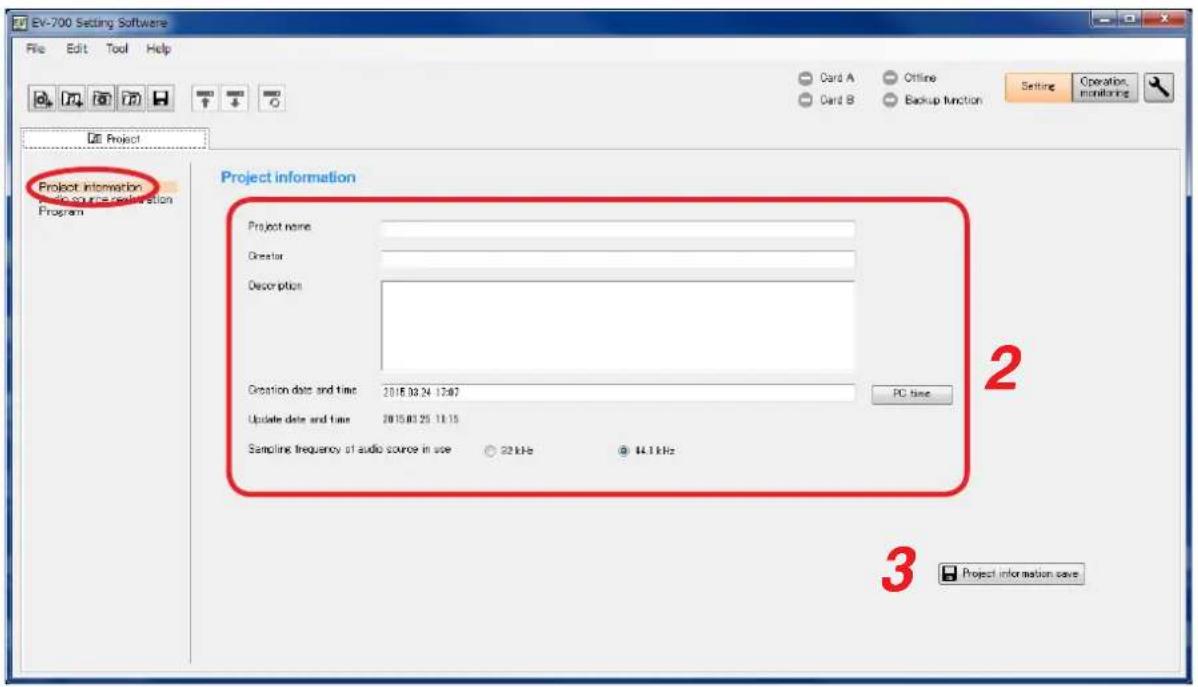
Step 2. Set all the project information shown below.
| Setting item Setting | content |
| Project name Enter with up to 256 characters. | |
| Creator Enter with up to 256 characters. | |
| Description Enter with up to 256 characters. Multiple lines can be used for entry. | |
| Creation date and time | Set the date and time when the project information was created. Clicking the PC time button allows the PC time to be input into this field. |
| Sampling frequency of the usage audio source | Select the sampling frequency of the audio source usable for the project. It is not possible to simultaneously use the Audio files of which sampling frequencies are different. |
Note: The date and time are automatically updated when the project file is saved.
Step 3. Click the Project Information save button.
The project information is saved into the project file at the destination folder.
11.3. Setting or Editing the Phrase
11.3.1. Description of the Audio source registration screen
Click on "Audio source registration" from the submenu on the Project creation screen to display the Audio source registration screen.
The screen is for registering the audio sources used as phrases.
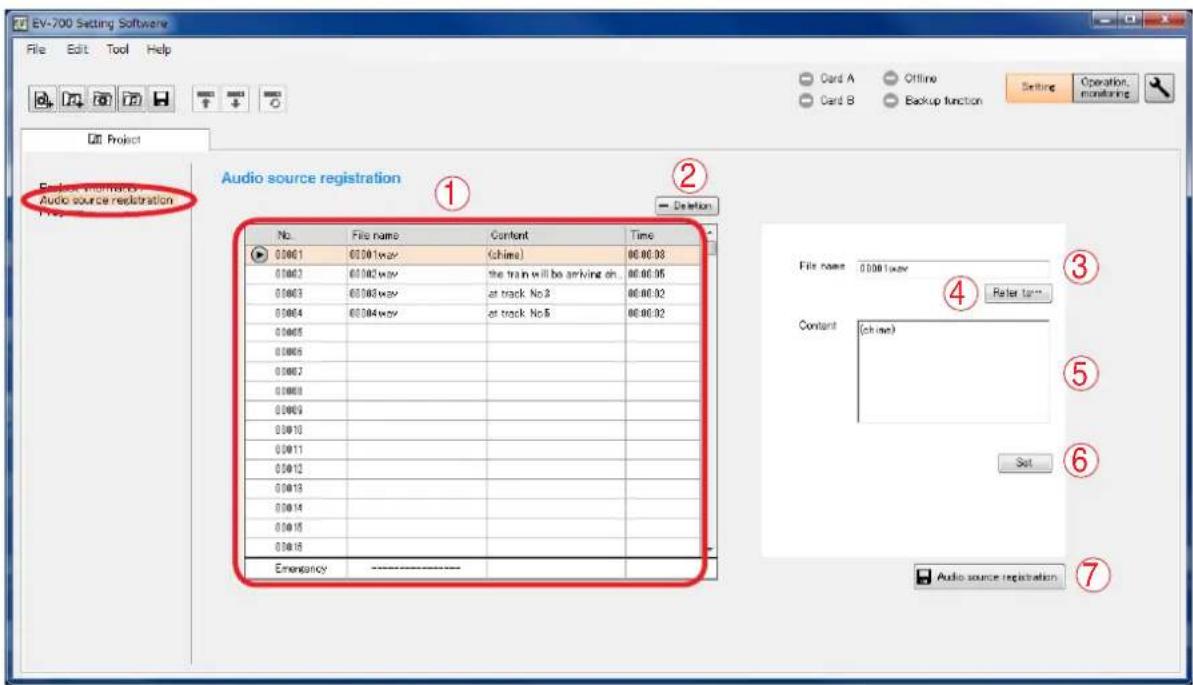
1. Audio source list
Displays the audio source number, file name, comment, and recording time of the audio source registered for use as the EV-700's phrase.
Also displays whether or not the audio source for use as emergency playback is registered. Displays the recording time if registered though the file name is not displayed.
The Play button appears at the left side of the audio source No. only for the selected audio source.
2. Deletion button
Deletes the selected audio source in the Audio source list from registration.
3. File name
Displays the file name of the audio source to registered.
4. "Refer to" button
Selects the WAV file stored in the PC.
5. Comment
Enter the audio source information to be registered with up to 256 characters.
6. Set button
Registers the contents entered in the File name (3) and Comment (5) fields to the audio source No. being selected in the Audio source list, making them displayed.
Note
The audio source for emergency playback can be registered but neither the file name nor comment can be reflected to the display in the Audio source list.
7. Audio source registration button
bSaves the Audio source list into the project file at the project save destination.
11.3.2. Phrase setting
Step 1. Click on "Audio source registration" from the submenu on the Project creation screen.
The audio source registration screen appears.
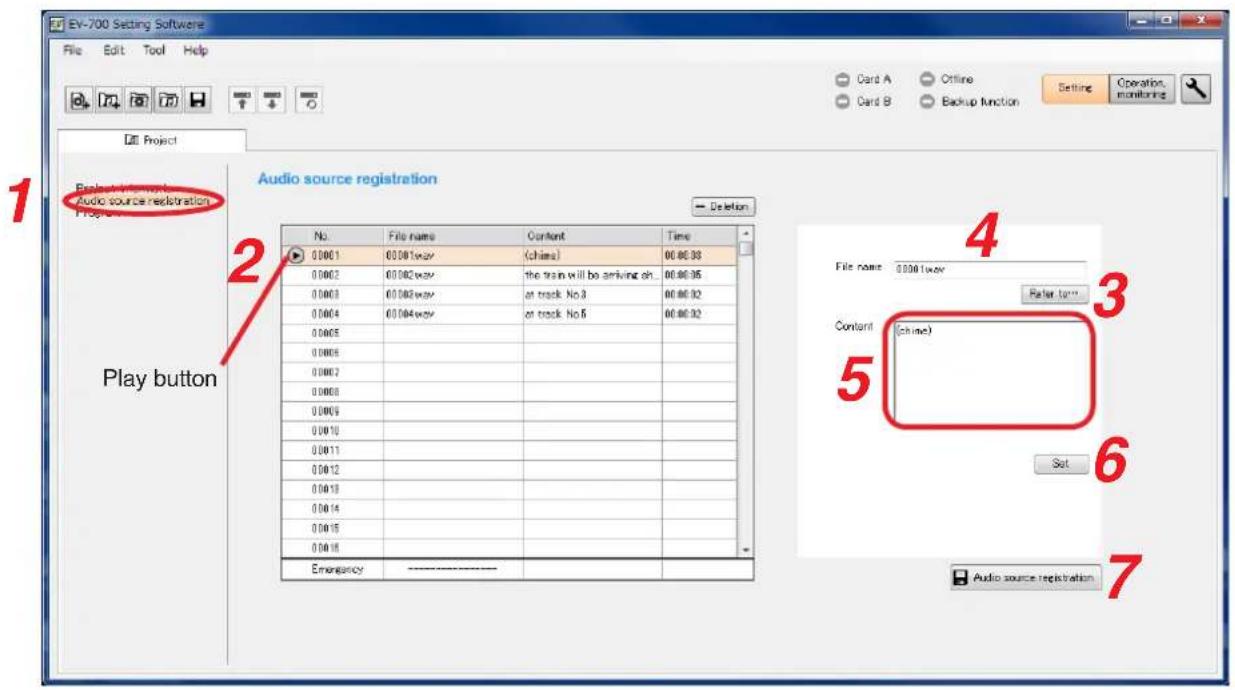
Step 2. Click the Number to be registered in the Audio source list.
Step 3. Click the "Refer to" button.
The WAV file selection screen appears.
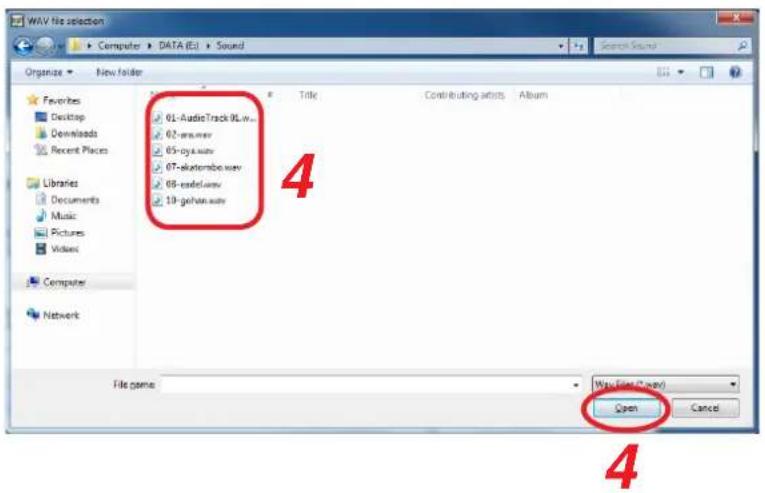
Step 4. Click the audio source to be registered, then click the Open button.
The file name appears in the File name field.
Notes
- The table below shows the condition of the audio sources to be registered.
| File format WAV* | NoteThe EV-700 does not support the WAV of Broadcast Wave Format (BWF). |
| Encoding Linear PCM | |
| Sampling frequency 32 kHz or 44.1 kHzNoteThe sampling frequency of the registerable audio sources is the one set on the Project information screen (see p. 88). | |
| Quantization bit rate 16 bits | |
| Stereo/monaural Monaural* | |
* As for the WAV files of the Broadcast Wave Format (BWF) and those of Stereo, they are registered after converted into the format which can be used in the EV-700.
The original audio file remains intact as the conversion is made after the audio file is copied.
• Audio source with the same name as that already registered cannot be registered.
• Audio file with a file name including 2-byte characters cannot be registered.
Step 5. Enter the information about the audio source in the Content column as needed.
Use up to 256 characters for entry.
Step 6. Click the Set button.
The audio source displayed in the File name field appears in the Audio source list.
When the WAV file of the BWF, the WAV file with the tag information, or the WAV file in stereo format is set, the audio file is converted into the format that enables playback with the EV-700 before displaying it in the audio source list.
When using the WAV file of the BWF or the WAV file with the tag information, the audio file is converted in order to eliminate unnecessary information. As a dialog at right appears, click the OK button to conduct conversion.
Also, when using the WAV file in stereo format, it is converted into a monaural format. As a dialog at right appears, click the OK button to conduct conversion.
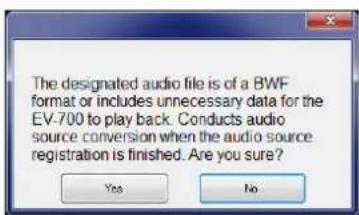
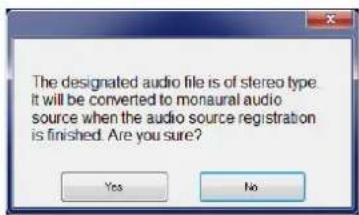
Tip
You can preview the audio source selected in the audio source list using the PC by clicking the Playback button.
Step 7. Click the Audio source registration button.
The altered Audio source list is saved into the project file at the project save destination folder.
Tip
When the audio source that needs be converted exists, a dialog at right appears.
Check the contents, then click the Close button.
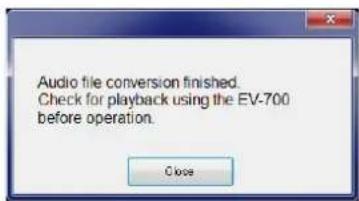
11.3.3. Registering the audio source for emergency playback
Step 1. Click on "Audio source registration" from the submenu on the Project creation screen.
The audio source registration screen appears.
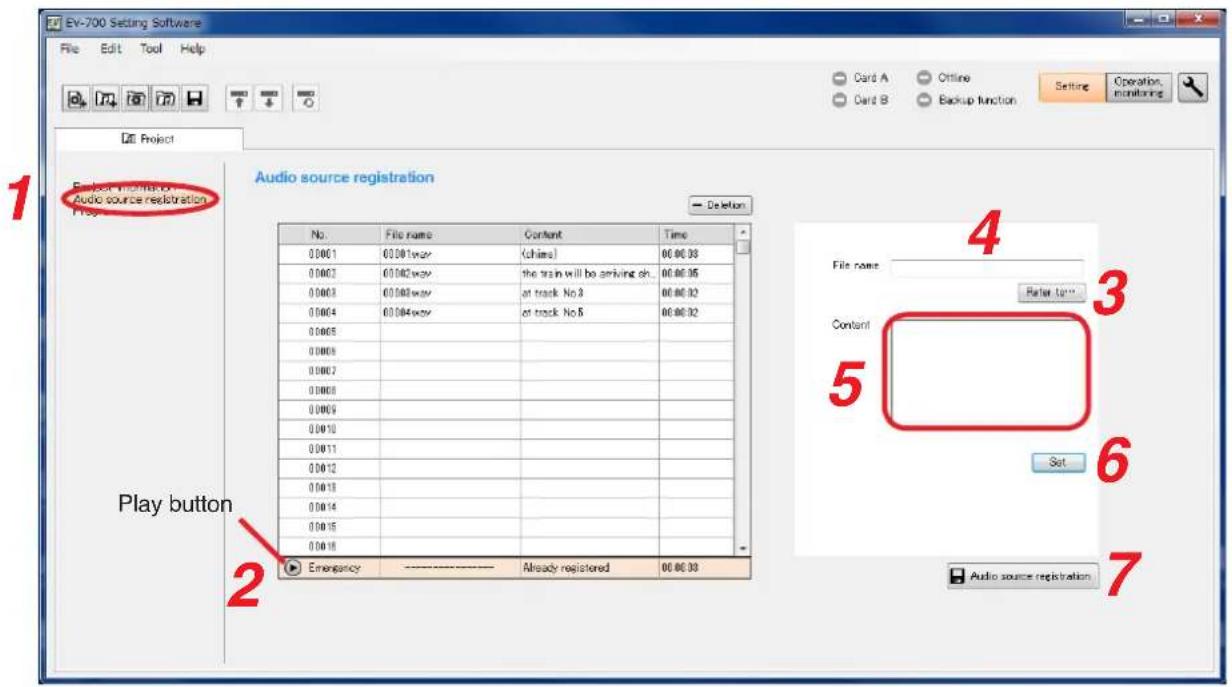
Step 2. Click on "Emergency" in the Audio source list.
Step 3. Click the "Refer to" button.
The WAV file selection screen appears.
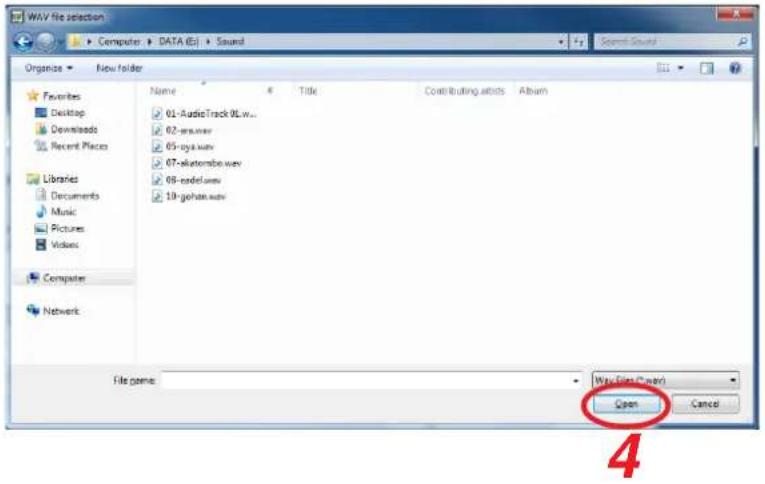
Step 4. Click the audio source to be registered, then click the Open button.
The file name appears in the File name field.
Notes
- The table below shows the condition of the audio sources to be registered.
| File format WAV* | NoteThe EV-700 does not support the WAV of Broadcast Wave Format (BWF). |
| Encoding Linear PCM | |
| Sampling frequency 32 kHz or 44.1 kHzNoteThe sampling frequency of the registerable audio sources is the one set on the Project information screen (see p. 88). | |
| Quantization bit rate 16 bits | |
| Stereo/monaural Monaural* | |
* As for the WAV files of the Broadcast Wave Format (BWF) and those of Stereo, they are registered after converted into the format which can be used in the EV-700.
The original audio file remains intact as the conversion is made after the audio file is copied.
• Audio source with the same name as that already registered cannot be registered.
• Audio file with a file name including 2-byte characters cannot be registered.
Step 5. Enter the information about the audio source in the Content column as needed.
Enter the information with up to 256 characters.
Note
Even when the comment is entered, it is not reflected to the display in the Audio source list.
Step 6. Click the Set button.
The audio source appearing in the File name field will be registered as the audio source for emergency playback.
When the WAV file of the BWF, the WAV file with the tag information, or the WAV file in stereo format is set, the audio file is converted into the format that enables playback with the EV-700 before displaying it in the audio source list.
When using the WAV file of the BWF or the WAV file with the tag information, the audio file is converted in order to eliminate unnecessary information. As a dialog at right appears, click the OK button to conduct conversion.
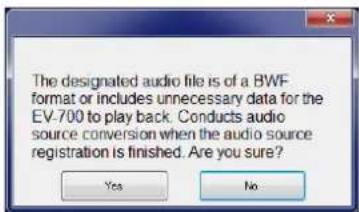
Also, when using the WAV file in stereo format, it is converted into a monaural format. As a dialog at right appears, click the OK button to conduct conversion.
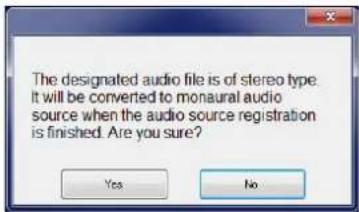
Tip
You can preview the audio source selected in the audio source list using the PC by clicking the Playback button.
Step 7. Click the Audio source registration button.
The altered Audio source list is saved into the project file at the project save destination folder.
Tip
When the audio source that needs be converted exists, a dialog at right appears.
Check the contents, then click the Close button.
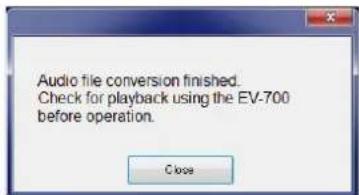
11.4. Setting or Editing the Program
11.4.1. Description of the Program screen
Click on "Program" from the submenu of the Project creation screen to display the Program screen.
[Program screen]
![EV-700 Setting Software File Edit Tool Help Card A Disconnect Card B Backup function Setting Operation. monitoring Project Project Information Project file redemption Program Program name Program1 No Program name P001 Program1 P002 Program2 P003 P004 P005 P006 P007 P008 P009 P010 P011 P012 P013 P014 P015 P016 Emergency playback REM. Program name Program1 Playback system Program playback Repeat count 0 times Repeat interval Record Busy output during repeat interval Stop Total time QD2011 Edit Type Content Playback time 00001 (chime) 0.00008 00002 the train will be arriving shortly 0.00005 00003 at track No 3 0.00002 Priority level 4 Output Output 1 Output 2 Program sound volume [Edit] Automatic gain control (AGC) Program playback busy output 1 2 3 4 5 6 7 8 Program save](/content/2026/05/953756/images/a09a44c71cb5fa6436f36303513f1dd8e18dd07d05988d72e1675c3a4dfdea92.jpg)
Tip: Shown above is a screen example that will appear after the program used for the normal broadcast has been set.
1. Program selection area
An area used to select the program registered for EV-700's broadcast audio source use.
Select one you wish to set from each program used for the normal broadcast and the emergency broadcast program (Emergency playback or R.E.M. playback).
2. Program list
Displays Program No. and Program name of the program registered for normal broadcast use.
If each program is selected, its setting contents appear in the Program setting area (6). (See p. 96.)
3. Emergency playback button
Select this button when setting the program to be used for the emergency playback of the emergency broadcast.
If selected, its setting contents will appear in the Program setting area (6). (See p. 106.)
4. R.E.M. button
Select this button when setting the program to be used for the R.E.M. playback of the emergency broadcast.
If selected, its setting contents will appear in the Program setting area (6). (See p. 109.)
5. Deletion button
Deletes the program selected in the Program list (2) from registration.
6. Program setting area
Displays the setting contents of the program selected in the Program selection area (1).
Setting items differ depending on the type of program.
7. Initial setting button
Deletes the setting contents of the program in edit, then returns the program to the initial status.
8. Program save button
Saves the setting contents of the program in edit into the program.
11.4.2. Description of the program screen (when the program in the Program list is selected)
When you select each program to be used for the normal broadcast from the Program list on the Program screen, the screen below will appear.
[Program screen (when the program in the Program list is selected)]
Program list

scatter
| Point | X | Y | |---|---|---| | 1 | 0.5 | 0.5 | | 2 | 0.6 | 0.7 | | 3 | 0.8 | 0.9 | | 4 | 0.7 | 0.6 | | 5 | 0.6 | 0.5 | | 6 | 0.7 | 0.6 | | 7 | 0.8 | 0.7 | | 8 | 0.9 | 0.8 | | 9 | 0.95 | 0.85 | | 10 | 0.85 | 0.6 | | 11 | 0.8 | 0.5 | | 12 | 0.75 | 0.4 | | 13 | 0.8 | 0.5 | | 14 | 0.85 | 0.5 |Tip: Shown above is a screen example after setting completion.
The table below shows the initial settings of the program.
Setting item Initial setting
Program name None
Playback system Program playback
Repeat count 0
Repeat interval 0 second
Busy output during repeat interval ON
Interval (Phrase interval) —
Busy output during interval —
Step Blank
Priority level 4
Output Output 1 ON
Output 2 ON
Program audio volume level 8
Automatic gain control (AGC) OFF
Program playback busy output CH 1 and CH 2
1. Program name
Enter the program name selected in the Program list with up to 256 characters.
2. Playback system
Select the playback system of the program.
Type: Program playback (Initial setting)
Step playback
All phrases playback
Chime playback
Items of the Detailed setting (3) such as Repeat count and intervals differ depending on the playback system.
(See "Difference in setting items depending on the playback system" shown below.)
[Difference in setting items depending on the playback systems]
| Setting itemPlayback system | Step | Repeat count | Repeat interval | Busy output during repeat interval | Interval (Phrase interval) | Busy output during interval |
| Program playback | — | — | ||||
| Step playback | — | — | — | — | ||
| All phrases playback | — | — | — | |||
| Chime playback | * | — | — | — | — | — |
: Setting item exists. — : No setting item exists.
Note: For the playback systems, see the explanation on p. 100.
* Editable only 1 step
3. Detailed settings of the playback system Tips
The displayed contents differ depending on the playback system (2).
- Repeat count
Sets the number of repetitions of broadcasts.
When set to "0," broadcast is made once only.
Setting range: 0 to 127 times, infinite (initial setting: 0)
- Repeat interval
Sets the repeat interval when the broadcast is repeated.
Setting range: 0 to 50 seconds (in 10-second units), 1 to 99 minutes (in 1-minute units) (Initial setting: 0)
- Busy output during repeat interval
Sets whether to output the busy signal during repeat interval. (Initial setting: ON)
• Interval (Phrase interval)
Sets the broadcast interval between the phrases.
Setting range when the playback system is set to "Step playback":
OFF (infinite), 10 to 50 seconds (in 10-second units), 1 to 99 minutes (in 1-minute units) (Initial setting: OFF)
Setting range when the playback system is set to "All phrases playback":
0 to 5 seconds (in 1-second units) (Initial setting: 0)
- Busy output during interval
Sets whether to output the busy signal during interval. (Initial setting: ON)
4. Step display list
Displays the step information comprising the program.
5. Reverse button
This button is enabled only during the program preview.
If you click this button during playback, the audio source during playback is played from its beginning.
But when you click this button within 2 seconds after the audio source of the 2nd or later step has started its playback, the audio source of the previous step is played from its beginning.
6. Play/Stop button
If you click the Play button, the program in edit is played from its beginning.
The Play button changes to the Stop button during playback. If you click the Stop button, playback stops. Playback in progress mark appears at the left side of the audio source being played.
Playback in progress mark
7. Forward button
This button is enabled only during the program preview.
If you click this button during playback, the audio source of the next step is played from its beginning. But if you click this button while the audio source of the last step is played, the playback stops.
8. Playback total time indication
Indicates the broadcasting time of the program.
9. Edit button
Displays the Step edit screen (see p. 90).
10. Priority level
Sets the priority level of broadcast. The smaller the number, the higher the priority level.
Setting range: 2 (higher priority level) to 8 (lower priority level) (Initial setting: 4)
Note
The priority level 1 (Emergency) cannot be assigned to the program broadcast.
11. Output
Sets the output destination at playback.
Setting range: Output 1, Output 2, (Initial setting: Output 1, Output 2)
12. Program audio volume
Sets the output level of the program broadcast.
Setting range: 0 to 10 (Initial setting: 8)
For the relationship between the setting value and output level, see p. 102. Output level is also displayed beside the setting value.
13. Automatic gain control (AGC)
Sets the Automatic gain control function.
Checking this box activates the automatic gain control function. (Initial setting: OFF)
Tip
If the Automatic gain control (AGC) is set to ON, broadcasts can be made by suppressing the variation in the reproduced audio volume from a small level to a large level.
Check the Automatic gain control checkbox when the audio volumes of the audio sources used for the program fluctuate or the volume level is too small or too large.
Also read the description of the Automatic gain control in the instruction operation manual attached to the EV-700.
14. Program playback busy output
Sets which terminal to output the busy signal during program playback.
(Initial setting: CH1, CH2)
Note
This item is not displayed when the playback system (2) is set to "Chime playback."
[Step edit screen]
A screen that will appear when the Edit button (9) is clicked on the Program screen.
![Step edit Total time 00:00:11 Type Content Playback time 00001 (chime) 00:00:03 00002 the train will be arriving ... 00:00:05 00003 at track No.3 00:00:02 Audio source No. Costent Playback time 00001 (chime) 00:00:03 00002 the train will be a... 00:00:05 00003 at track No.3 00:00:02 00004 at track No.5 00:00:02 00005 00006 00007 00008 00009 00010 00011 00012 00013 Change Silent interval 0 10 60 [seconds] Edit Cancel](/content/2026/05/953756/images/64a9134a67611d4382618e38fc38944f5d8ca1cd3a221e496f47f03fd44407bb.jpg)
Tip: Shown above is a screen example after setting completion.
15. Reverse button
This button is enabled only during program preview.
If you click this button during playback, the audio source during playback is played from its beginning.
But when you click this button within 2 seconds after the audio source of the 2nd or later step has started its playback, the audio source of the previous step is played from its beginning.
16. Play/Stopbutton
If you click the Play button, the program in edit is played from its beginning.
The Play button changes to the Stop button during playback. If you click the Stop button, playback stops.
Playback in progress mark appears at the left side of the audio source being played.
Playback in progress mark
17. Forward button
This button is enabled only during program preview.
If you click this button during playback, the audio source of the next step is played from its beginning. But if you click this button while the audio source of the last step is played, the playback stops.
18. Deletion button
Deletes the audio source item of the selected step or silent item from the list.
19. Playback total time indication
Indicates the broadcasting time of the program.
20. List order up button
Replaces the audio source item or silent item of the selected step with its previous step item. But the list order remains unchanged when the 1st step item is selected.
21. List order down button
Replaces the audio source item or silent item of the selected step with its next step item. But the list order remains unchanged when the last step item is selected.
22. Audio source selection button
When selected, operation of the Audio source selection list (25) becomes active.
23. Step composition Audio file list
Displays the information on the Audio files comprising the steps of the selected program.
24. Changebutton
Replaces the audio source of the selected step with the Audio file being selected in the Audio source selection list (25) or the silent interval set by the Silent interval setting switch (27).
25. Audio source selection list
Displays the information on the audio sources registered in the project.
26. Silent interval selection button
When selected, operation of the silent interval becomes enabled.
27. Silent interval setting switch
Sets the Silent interval period by moving the slide bar.
28. Edit complete button
Saves the set contents into the program, then exits the Step edit screen.
29.Cancelbutton
Cancels the edit state, then closes the Step edit screen.
11.4.3. Editing the program
Step 1. Click "Program" from the submenu on the Project creation screen.
The Program screen appears.
![EV-700 Setting Software File Edit Tool Help Card A Disconnect Card B Backup function Setting Operation Project Project Information Performance registration Program 1 2 3 4 5 6 Program name Program1 Playback system Program playback Repeat count @Times Repeat interval Record Busy output during repeat interval Step Type Content Playback time 00061 (chime) 000003 00062 the train will be arriving shortly 000005 00063 at track No 3 000002 Priority level 4 Output Output 1 Output 2 8 Program sound volume R [ Edit] Automatic gain control (AGO) Program playback busy output 1 2 3 4 5 6 7 8 9 10 11 Emergency playback REM](/content/2026/05/953756/images/fedddf094bbaae2438c5a48246418a5f425dc7887f2ed45253fc93620e15f985.jpg)
Step 2. Click the program you wish to edit in the Program list.
Information of the selected program appears.
Step 3. Enter the Program name.
Enter the name of up to 256 characters.
Note
If the program name field is left blank, the program cannot be saved.
Step 4. Select the playback system.
Select the playback system from the options below.
| Playback system Description | |
| Program playback Plays all the steps registered in the program beginning from the top. | |
| Step playback Plays the steps registered in the program one by one beginning from the top. | |
| All phrases playback | Plays all the registered audio sources. Select the audio source to be first played from the Audio source list. |
| Chime playback Plays | one of the registered audio sources. Select the audio source to be played from the Audio source list. |
The detailed setting items of the selected playback system appear.
Step 5. Set the details of the playback system.
The detailed setting items differ depending on the playback system.
5-1. When set the playback system to "Program playback"
| Playback system | Program playback | Repeat count 0Times |
| Repeat interval 0Second Busy output during repeat interval |
| Setting item | Setting content | Setting range | Initial setting |
| Repeat count Sets the number of repetitions of broadcasts. | 0 to 127 times, infinite 0 | ||
| Repeat interval Sets the repeat interval when broadcast is repeated. | 0 to 50 seconds (in 10-second units), 1 to 99 minutes (in 1-minute units) | 0 | |
| Busy output during repeat interval | Sets whether to output the busy output during repeat interval. | ON, OFF ON | |
5-2. When set the playback system to "Step playback"
| Playback system | Step playback | Interval (phrase interval) | OFF | Busy output during interval |
| Setting item | Setting content | Setting range | Initial setting |
| Interval (Phrase interval) | Sets the broadcast interval between the phrases. | OFF (infinite), 10 to 50 seconds (in 10-second units), 1 to 99 minutes (in 1-minute units) | OFF |
| Busy output during interval | Sets whether to output the busy output during interval. | ON, OFF ON |
Note: If the Interval (phrase interval) is set to OFF, one step is played, then the playback terminates.
5-3. When the playback system is set to "All phrases playback"
| No. | Content | Playback time | |
| 00001 | (chime) | 00:00:03 | |
| 00002 | the train will be arriving shortly | 00:00:05 | |
| 00003 | at track No.3 | 00:00:02 | |
| 00004 | at track No.5 | 00:00:02 | |
| 00005 | |||
| 00006 | |||
| 00007 | |||
| 00008 |
| Setting item | Setting content | Setting range | Initial setting |
| Interval (Phrase interval) | Sets the broadcast interval between the phrases. | 0 to 5 seconds (in 1-second units) | 0 |
| Busy output during interval | Sets whether to output the busy output during interval. | ON, OFF ON |
5-4. When set the playback system to "Chime playback"
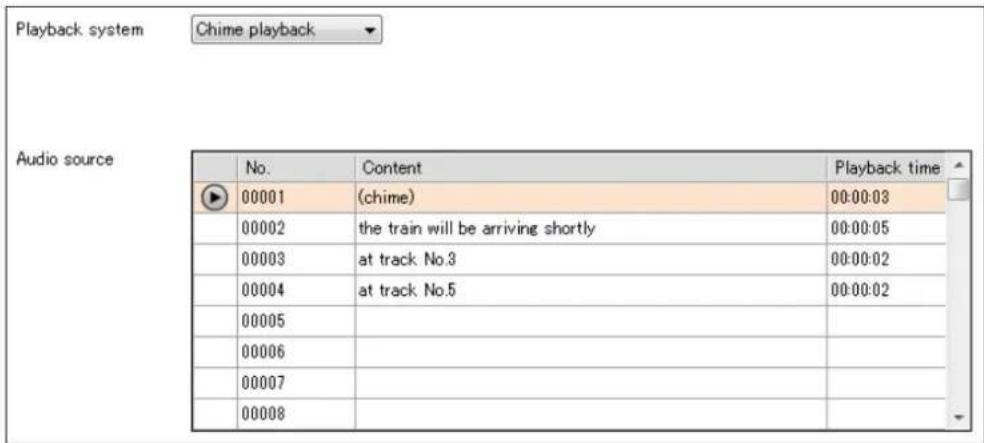
The detailed setting items do not exist.
Step 6. Edit the step.
If you click the Edit button, the Step edit screen appears.
Edit the step on the Step edit screen. (See p. 104, "Editing the step.")
Step 7. Set the priority level.
The smaller the number, the higher the priority level.
| Setting range Initial setting | |
| 2 (high) to 8 (low) 4 | |
Note
The priority level 1 (Emergency) cannot be assigned to the program broadcast.
Step 8. Set the output destination.
Check the Output destination (Output) checkbox.
| Setting item Setting range Initial setting | ||
| Output 1 ON, OFF | ON | |
| Output 2 ON, OFF | ON | |
Step 9. Set the broadcast output level of the program.
| Setting item Setting range Initial setting | ||
| Program sound volume 0 to 10 | 8 | |
| Automatic gain control (AGC) | ON, OFF OFF | |
The table at right shows the relationship between the setting value of the program sound volume and the output level. Output level is also displayed beside the setting value.
| Setting value of Program sound volume | Output level |
| 0 | -60 dB |
| 1 | -30 dB |
| 2 | -24 dB |
| 3 | -18 dB |
| 4 | -12 dB |
| 5 | -9 dB |
| 6 | -6 dB |
| 7 | -3 dB |
| 8 | 0 dB |
| 9 | +3 dB |
| 10 | +6 dB |
Step 10. Set the busy output during program playback. (Except when the playback system is set to "Chime playback")
Check the checkbox for the channel which outputs the busy signal.
| Setting item Setting range Initial setting | ||
| 1, 2 ON, OFF | ON | |
| 3 – 8 ON, OFF | OFF | |
Step 11. Click the Program save button.
A Save dialog appears.
Step 12. Click the Yes button.
The set contents are saved into the project file.
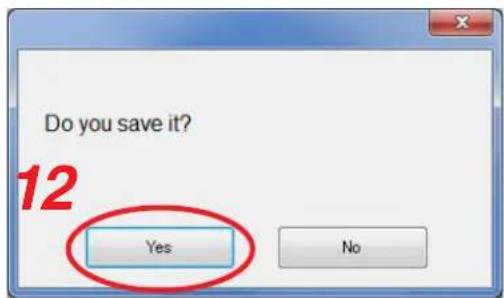
[Editing the step]
Step 1. Click the Edit button on the Program screen.
1
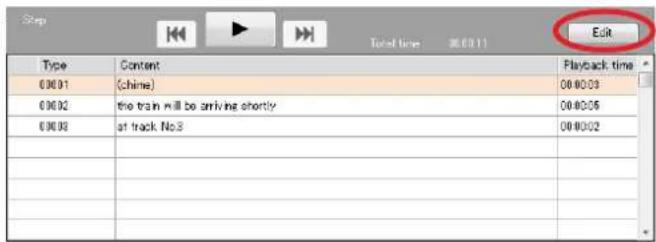
A Step edit screen appears.
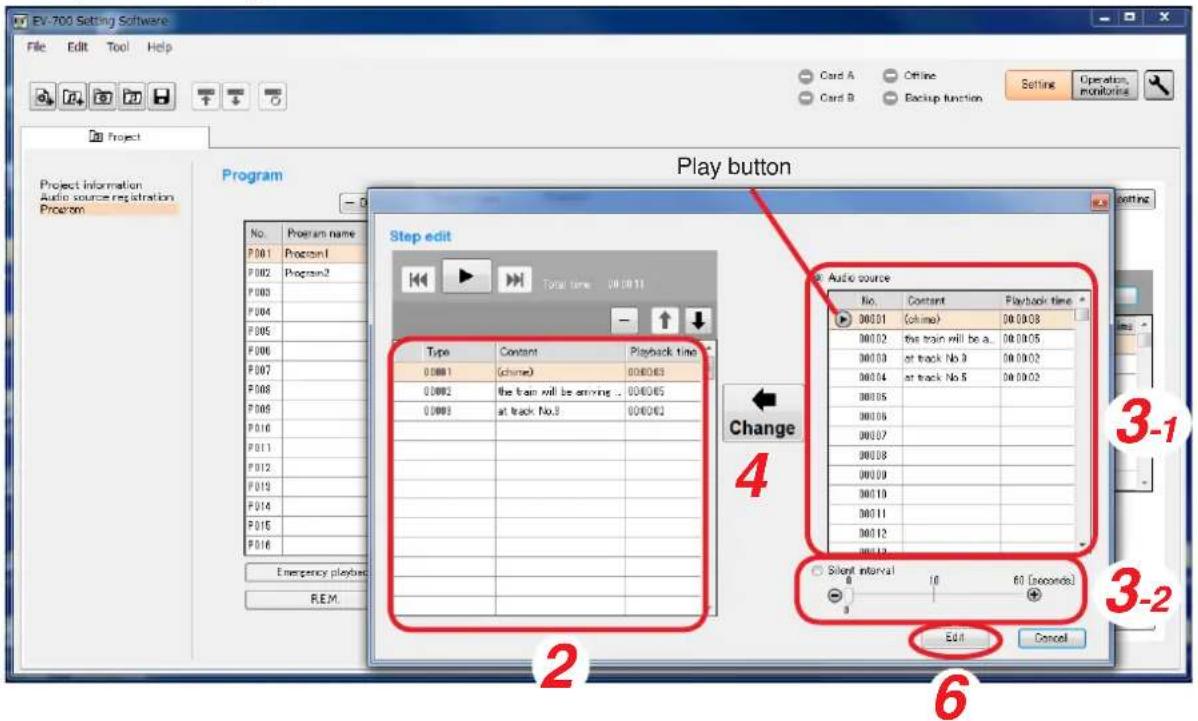
Step 2. Click on the Step number to be edited in the Step list.
Step 3. Set the audio source or silent interval.
3-1. When selecting the audio source
Select the Audio source selection button, then click on the audio source to be used in the Audio source selection list.
Tip
The audio source being selected in the Audio source list can be previewed by the PC if the Play button is clicked.
3-2. When setting the Silent interval
Select the Silent interval selection button, then set the Silent interval period by moving the slide bar.
Step 4. Click the Change button.
The edited contents are reflected to the Step list.
Step 5. Repeat Steps 2 to 4 to set all audio sources of the step numbers to be edited in the same manner.
Step 6. Click the Edit complete button.
The Step edit screen is closed.
Step 7. Click the Program save button. A Save dialog appears.
Step 8. Click the Yes button. The set contents are saved into the project file.
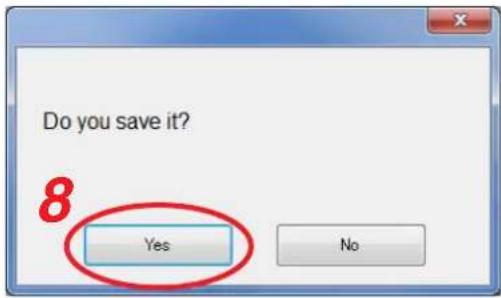
11.4.4. Description of the Program screen (when the Emergency playback button is selected)
When you click the Emergency playback button on the Program screen, the screen below will appear.
[Program screen (when the Emergency playback button is selected)]
![EV-700 Setting Software File Edit Tool Help Card A Disconnect Card B Backup function Setting Operation monitoring Project Information Audio source registration Program 1 2 3 4 5 6 7 8 Program name Emergency playback Repeat count Infinite Repeat time Infinite Repeat interval Second Busy output during repeat interval Audio source Audio source already registered Priority level 1 (emergency) Output Output 1 Output 2 Program sound volume 16 [ 5dB] Automatic gain control (AOC) Emergency playback RE.M. Program save](/content/2026/05/953756/images/eab237a42c0012700068c199b040bf9421fe641ab1f636a105092b1b27a91c97.jpg)
Emergency playback button
Tip: Shown above is a screen example after setting completion.
The table below shows the initial setting of the Emergency playback.
| Setting item Initial setting | |
| Program name Emergency playback | |
| Output Output 1 ON | |
| Output 2 ON | |
| Program audio volume level 10 (Maximum) | |
| AGC ON | |
| Priority level 1 (fixed) | |
| Repeat count Infinite | |
| Repeat time Infinite | |
| Repeat interval 0 second | |
| Busy output during repeat interval | ON |
1. Program name
Enter the emergency playback program name with up to 256 characters. (Initial setting: Emergency playback)
2. Detailed setting of the playback system
Select the details of the playback system.
- Repeat count
Sets the number of repetitions of broadcasts.
When set to "0," broadcast is made only once (not repeated).
Setting range: 0 to 127 times, infinite
(Initial setting: infinite)
- Repeat time
Sets the time that the broadcast is repeated.
Note: It is settable only when the repeat count is set to "Infinite."
Setting range: 5 to 120 minutes (in 5-minute units), infinite (Initial setting: infinite)
- Repeat interval
Sets the repeat interval of the broadcast.
Setting range: 0 to 50 seconds (in 10-second units), 1 to 99 minutes (in 1-minute units) (Initial setting: 0 second)
- Busy output during repeat interval
Sets whether to output the busy signal during Repeat interval. (Initial setting: ON)
3. Audio source registration status indication (Audio source)
Displays the registration status of the audio source for emergency playback ("Audio source not registered" or "Audio source registered"). (See p. 93, "Registering the audio source for emergency playback.")
The Play button becomes active only when the audio source has been registered, enabling the registered audio source to be previewed by the PC.
4. Priority level
Displays the priority level of broadcast.
Priority level of the emergency playback item is fixed to "1" which is the highest priority level. This setting is unchangeable.
5. Output
Sets the output destination at playback.
Setting range: Output 1, Output 2
(Initial setting: Output 1, Output 2)
6. Program sound volume
Sets the output level of the Emergency playback broadcast.
Setting range: 0 to 10 (initial setting: 10)
For the relationship between the setting value and output level, see p. 108. Output level is also displayed beside the setting value.
7. Automatic gain control (AGC)
Sets the Automatic gain control function.
Checking this box causes the Automatic gain control function to be activated. (Initial setting: ON) Tip
If the Automatic gain control (AGC) is set to ON, broadcasts can be made by suppressing the variation in the reproduced sound volume from a small level to a large level.
Check the Automatic gain control checkbox when the sound volumes of the audio sources used for the program are fluctuated or the volume level is too small or too large.
Also read the description of the Automatic gain control in the instruction operation manual attached to the EV-700.
11.4.5. Emergency playback program setting
When you click the Emergency playback button on the Program screen, the screen below will appear.
Step 1. Click "Program" from the submenu on the Project creation screen.
A Program creation screen appears.
![EV-700 Setting Software File Edit Tool Help Card A Disconnect Card B Backup function Setting Operation monitoring Project Information Product source registration Program 1 2 3 4 5 Play button 4 Program name Emergency playback No. Program name P001 Program1 P002 Program2 P003 P004 P005 P006 P007 P008 P009 P010 P011 P012 P013 P014 P015 P016 Emergency playback REM. Initial setting Repeat count Infinite Repeat time Infinite Repeat interval Second Busy output during repeat interval Audio source Audio source already registered Priority level 1 (emergency) Output Output 1 Output 2 Program sound volume 16 [ 6dB] Automatic gain control (A9C) 7 8 Program save](/content/2026/05/953756/images/4cd100ee30b620799c74b3edd9872d7cc83ca31f16651ca49775bdb5467de754.jpg)
Step 2. Click the Emergency playback button.
The screen above appears.
Step 3. Enter the Program name.
"Emergency playback" is entered as the initial setting.
The name can be entered with up to 256 characters.
Note
If the program name field is left blank, the program cannot be saved.
Step 4. Set the details of the playback system.
| Setting item Setting range Initial setting | ||
| Repeat count 0 to 127 times, infinite | Infinite | |
| Repeat time | 5 to 120 minutes (in 5-minute units), infinite | Infinite |
| Repeat interval 0 to 50 seconds (in 10-second units), 1 to 99 minutes (in 1-minute units) | 0 second | |
| Busy output during repeat interval ON, OFF ON | ||
Step 5. Check the audio source.
Check whether the audio source is registered. Registration statuses are displayed as follows.
Registered: Audio source is registered.
Unregistered: Audio source is not registered.
Tips
- When the audio source is registered, it can be previewed by the PC by clicking the Play button.
- If the audio source is not registered, register the audio source. (See p. 93, "Registering the audio source for emergency playback.")
Step 6. Set the output destination.
Check the Output destination checkbox.
| Setting item | Setting range | Initial setting |
| Output 1 | ON, OFF | ON |
| Output 2 | ON, OFF | ON |
The table at right shows the relationship between the setting value of the program sound volume and the output level. Output level is also displayed beside the setting value.
| Setting value of Program sound volume | Output level |
| 0 | -60 dB |
| 1 | -30 dB |
| 2 | -24 dB |
| 3 | -18 dB |
| 4 | -12 dB |
| 5 | -9 dB |
| 6 | -6 dB |
| 7 | -3 dB |
| 8 | 0 dB |
| 9 | +3 dB |
| 10 | +6 dB |
Step 7. Set the sound volume level of the emergency broadcast.
| Setting item | Setting range | Initial setting |
| Program sound volume | 0 to 10 | 10 (maximum) |
| Automatic gain control (AGC) | ON, OFF | ON |
Step 8. Click the Program save button.
A Save dialog appears.
Step 9. Click the Yes button.
The set contents are saved into the project file.
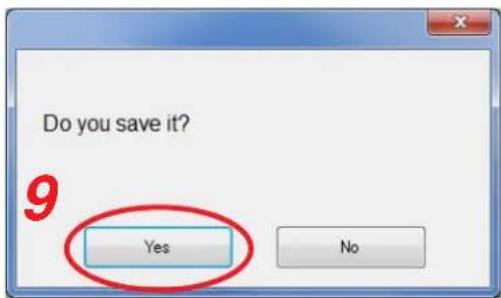
11.4.6. Description of the Program screen (when the R.E.M. button is selected)
When you click the R.E.M. button on the Program screen, a screen below will appear.
[Program screen (when the R.E.M. button is selected)]
![EV-700 Setting Software File Edit Tool Help Card A Disconnect Card B Backup function Setting Operation Project Project Information Source recitation Program 1 2 3 4 5 6 Program name R.E.M. Repeat count Infinite Repeat time Infinite Repeat interval Second Busy output during repeat interval Priority level 1 (emergency) Output Output 1 Output 2 Program sound volume 16 [ 6dB] Automatic gain control (AIC) Emergency playback R.E.M. Program save](/content/2026/05/953756/images/e23535c08d69a4497d77801b54710f93f49c8350c5740c8fafa4ed0ba69631f5.jpg)
R.E.M. button
Tip: Shown above is a screen example after setting completion.
The table below shows the initial setting of the R.E.M. playback.
| Setting item Initial setting | |
| Program name R.E.M. | |
| Output O | Output 1 ON |
| Output 2 ON | |
| Program sound volume level | 10 (Maximum) |
| AGC ON | |
| Priority level 1 (fixed) | |
| Repeat count Infinite | |
| Repeat time Infinite | |
| Repeat interval 0 second | |
| Busy output during repeat interval | ON |
1. Program name
Enter the R.E.M. playback program name with up to 256 characters. (Initial setting: R.E.M.)
2. Detailed setting of the playback system
Select the details of the playback system.
- Repeat count
Sets the number of repetitions of broadcasts.
When set to "0," broadcast is made only once (not repeated).
Setting range: 0 to 127 times, infinite (Initial setting: infinite)
- Repeat time
Sets the time that the broadcast is repeated. It is settable only when the repeat count is set to "Infinite."
Setting range: 5 to 120 minutes (in 5-minute units), infinite (Initial setting: infinite)
- Repeat interval
Sets the repeat interval of the broadcast.
Setting range: Infinite, 0 to 50 seconds (in 10-second units), 1 to 99 minutes (in 1-minute units) (Initial setting: 0 second)
- Busy output during repeat interval
Sets whether to output the busy signal during Repeat interval. (Initial setting: ON)
3. Priority level
Displays the priority level of broadcast.
Priority level of the R.E.M. playback is fixed to "1" which is the highest priority.
The setting is unchangeable.
4. Output
Sets the output destination at playback.
Setting range: Output 1, Output 2
(Initial setting: Output 1, Output 2)
5. Program sound volume
Sets the output level of the R.E.M. playback.
Setting range: 0 to 10 (Initial setting: 10)
For the relationship between the setting value and output level, see p. 111. Output level is also displayed beside the setting value.
6. Automatic gain control (AGC)
Sets the Automatic gain control function.
Checking this box activates the automatic gain control function. (Initial setting: ON)
Tip
If the Automatic gain control (AGC) is set to ON, broadcasts can be made by suppressing the variation in the reproduced sound volume from a small level to a large level.
Check the Automatic gain control checkbox when the audio volumes of the sound sources used for the program fluctuate or the volume level is too small or too large.
Also read the description of the Automatic gain control in the instruction operation manual attached to the EV-700.
11.4.7. R.E.M. playback program setting
Step 1. Click "Program" from the submenu on the Project creation screen.
A Program creation screen appears.
![EV-700 Setting Software File Edit Tool Help Card A Card B Deconnect Backup function Setting Operation monitoring Project Project Information Source registration Program No. Program name P001 Program1 P002 Program2 P003 P004 P005 P006 P007 P008 P009 P010 P011 P012 P013 P014 P015 P016 Emergency playback RE.M. Program name: RE.M. Initial setting Repeat count Infinite Repeat time Infinite Repeat interval Second Busy output during repeat interval Priority level 1 (emergency) Output Output 1 Output 2 Program sound volume 16 [ 5dB] Automatic gain control (AGO) 6 2 Program save](/content/2026/05/953756/images/3eeadb3d32c8037f46dd0b17642d17e37feaaccee9bbfa6757ddf17a780048db.jpg)
Step 2. Click the R.E.M. button.
The screen above appears.
Step 3. Enter the Program name.
"R.E.M." is entered as the initial setting.
Enter the name of up to 256 characters.
Note
If the program name field is left blank, the program cannot be saved.
Step 4. Set the details of the playback system
| Setting item Setting range | Initial setting | |
| Repeat count 0 to 127 times, infinite | Infinite | |
| Repeat time | 5 to 120 minutes (in 5-minute units), infinite | Infinite |
| Repeat interval 0 to 50 seconds (in 10-second units), 1 to 99 minutes (in 1-minute units) | 0 second | |
| Busy output during repeat interval ON, OFF | ON | |
Step 5. Set the output destination.
Check the Output destination checkbox.
| Setting item Setting range Initial setting | ||
| Output 1 ON, OFF | ON | |
| Output 2 ON, OFF | ON | |
Step 6. Set the audio volume of the emergency broadcast.
| Setting item Setting range Initial setting | ||
| Program audio volume 0 to 10 | 10 (maximum) | |
| Automatic gain control (AGC) ON, OFF ON | ||
The table at right shows the relationship between the setting value of the program sound volume and the output level. Output level is also displayed beside the setting value.
| Setting value of Program sound volume | Output level |
| 0 | -60 dB |
| 1 | -30 dB |
| 2 | -24 dB |
| 3 | -18 dB |
| 4 | -12 dB |
| 5 | -9 dB |
| 6 | -6 dB |
| 7 | -3 dB |
| 8 | 0 dB |
| 9 | +3 dB |
| 10 | +6 dB |
Step 7. Click the Program save button.
A Save dialog appears.
Step 8. Click the Yes button.
The set contents are saved into the project file.
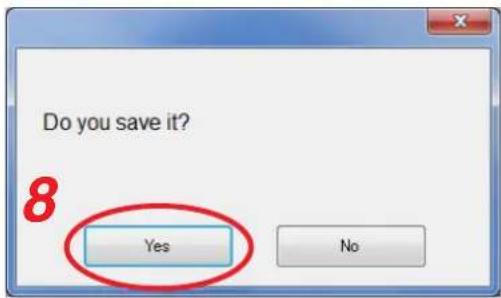
11.5. Editing the Created Project
11.5.1. Acquiring via LAN
Download the setting data of the project from the EV-700 via LAN.
Connect the EV-700 to a PC online in advance. (See p. 67, "CONNECTING TO THE EV-700.")
It takes about 8 minutes to download all audio data and broadcast contents (about 100 MB) contained on the supplied memory card. It may take longer time depending on the network environments.
Step 1. Click the Setting button located at the upper right corner of the Initial screen displayed after the EV-700 Setting software has started.
The setting screen appears.
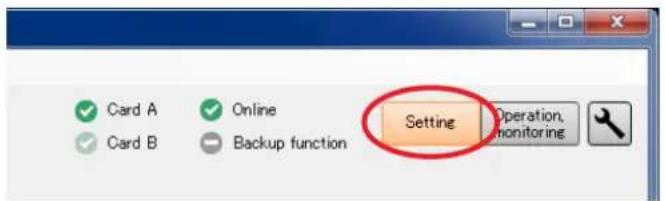
Step 2. Select "File → Download from device → Project" from the menu or click the "Download from device" tool button icon.
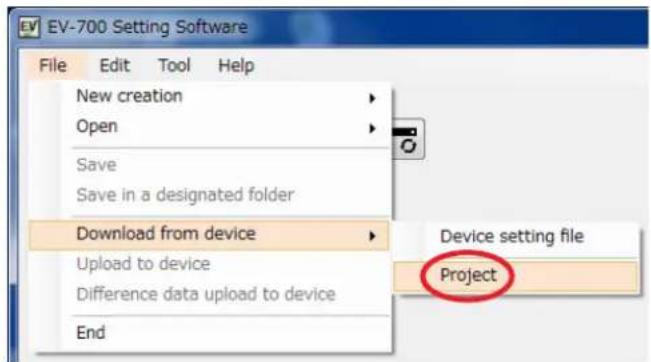
or
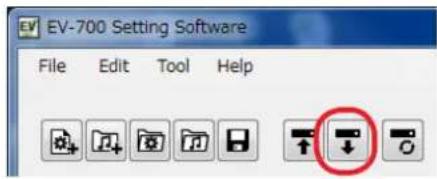
Note
The "Download from device" tool button icon can be used only in the state the device setting file has been read.
The folder selection screen appears.
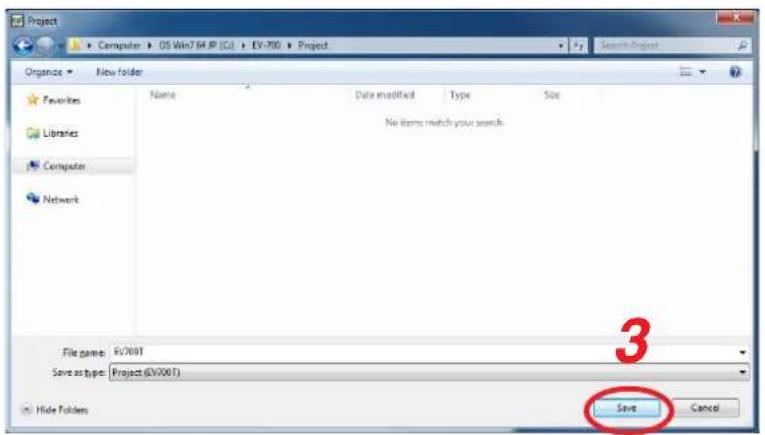
Step 3. Select a folder of download destination, then click the Save button.
Download starts.
Note
If a file to which broadcast contents have been set already exists at the download destination, the Save confirmation screen appears before download starts.
Click the Yes button to overwrite the file, otherwise the No button. If the No button is selected, the download is aborted.
Take care that selecting the Yes button causes the existing file to be overwritten even if the downloaded file is invalid.
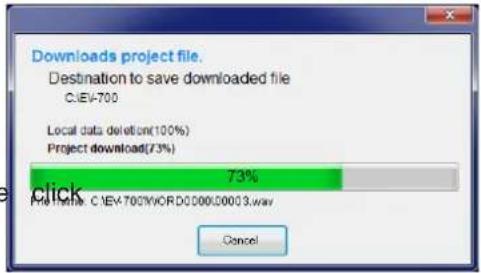
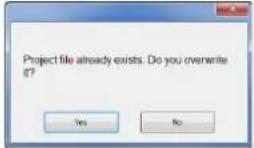
The Download completed screen appears when the download is successfully completed.
Tip
When download failed, its transfer result can be checked in a list. For details, see "When download failed" on the next page.
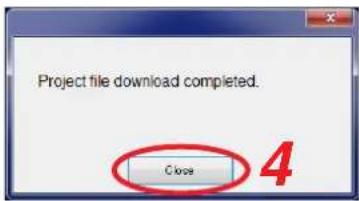
Step 4. Click the Close button.
Broadcast contents of the downloaded project appear in the Broadcast content list on the setting screen.
This screen is called Broadcast content screen.
[Broadcast content screen]
![EV-700 Setting Software File Edit Tool Help Card A Disconnect Card B Backup function Setting Operation Project Project Information Audio source registration Program Program name Program1 No Program name P001 Program1 P002 Program1 P003 P004 P005 P006 P007 P008 P009 P010 P011 P012 P013 P014 P015 P016 Emergency playback RE.M. Program name Program1 Playback system Program playback Repeat count NTimes Repeat interval Second Busy output during repeat interval Step Type Content Playback time 00061 (ohine) 000063 00062 the train will be arriving shortly 000065 00063 at track No 3 000062 Priority level 4 Output Output 1 Output 2 Program sound volume 8 [ Edit] Automatic gain control (AGO) 1 2 3 4 5 6 7 8 Program playback busy output ✓ ✓ ✓ ✓ ✓ ✓ ✓ ✓ ✓ ✓ ✓ ✓ ✓ ✓ ✓ ✓ ✓ ✓ ✓ ✓ ✓ ✓ ✓ ✓ ✓ ✓ ✓ ✓ ✓ ✓ ✓ ✓ ✓ ✓ ✓ ✓ ✓ ✓ ✓ ✓ ✓ ✓ ✓ ✓ ✓ ✓ ✓ ✓ ✓ ✓ ✓ ✓ ✓ ✓ ✓ ✓ ✓ ✓ ✓ ✓ ✓ ✓ ✓ ✓ ✓ ✓ ✓ ✓ ✓ ✓ ✓ ✓ ✓ ✓ ✓ ✓ ✓ ✓ ✓ ✓ ✓ ✓ ✓ ✓ ✓ ✓ ✓ ✓ ✓ ✓ ✓ ✓ ✓ ✓ ✓ ✓ ✓ ✓ ✓ ✓✓✓✓✓✓✓✓✓✓✓✓✓✓✓✓✓✓✓✓✓✓✓✓✓✓✓✓✓✓✓✓✓✓✓✓✓✓✓✓✓✓✓✓✓✓✓✓✓✓✓✓✓✓✓✓✓✓✓✓✓✓✓✓✓✓✓✓✓✓✓✓✓✓✓✓✓✓✓✓✓✓✓✓✓✓✓✓✓✓✓✓✓✓✓✓✓✓✓✓✓√✓✓✓✓✓✓✓✓✓✓✓✓✓✓✓✓✓✓✓✓✓✓✓✓✓✓✓✓✓✓✓✓✓✓✓✓✓✓✓✓✓✓✓✓✓✓✓✓✓✓✓✓✓✓✓✓✓✓✓✓✓✓✓✓✓✓✓✓✓✓✓✓✓✓✓✓✓✓✓✓✓✓✓✓✓✓✓✓✓✓✓✓✓✓✓✓✓✓✓](/content/2026/05/953756/images/798ac1c76b26e888ddcfaf9e8f41c022249e525d9913950549baa2bc6adc456c.jpg)
When download failed
When download from the EV-700 failed due to failures such as communication error, a dialog shown below will appear. Transfer result of the transfer files can be checked in a list.
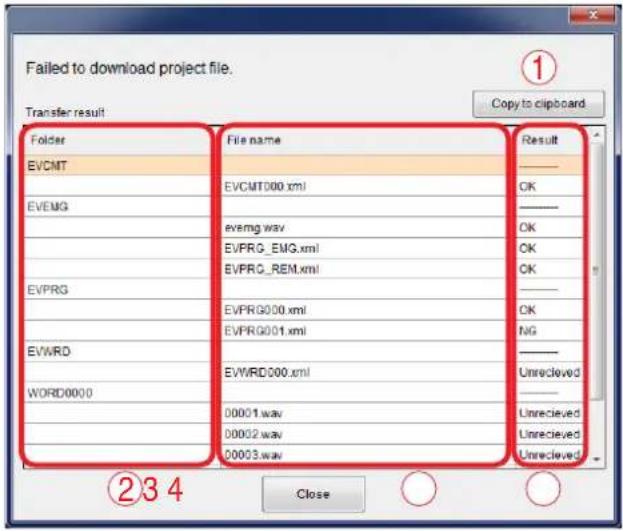
1. [Copy to clipboard] button
Copies the contents of the transfer result to a clipboard in text format with tab delimiters.
2. Folder
Displays the folder names.
When there is no folder, the "/" indication is displayed.
3. File name
Displays the file names in the most recently opened folder.
4. Result
Displays the transfer results for each file.
"OK": Transfer has been completed.
"NG": Transfer failed.
"Unreceived": Transfer files are not received as abnormality occurred before starting transfer.
11.5.2. Reading Data saved on the Memory Card or in the PC
Note
Make sure the data saved in the PC is identical to the one being used for the EV-700 before reading the data saved in the PC.
Uploading to the EV-700 or performing recording operation using the data different from the one being used for the EV-700 causes EV-700's data error, resulting in equipment malfunction.
Step 1. When reading from the memory card, remove the memory card from the EV-700 and insert it into a PC.
Step 2. Click the Setting button located at the upper right corner of the Initial screen displayed after the EV-700 Setting software has started.
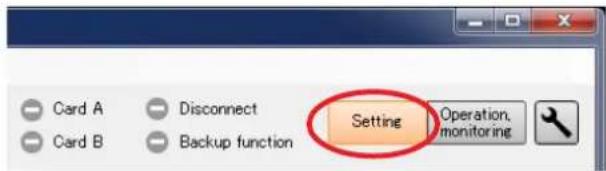
The setting screen appears.
Step 3. Select "File → Open -Project" from the menu or click "Open" tool button icon.
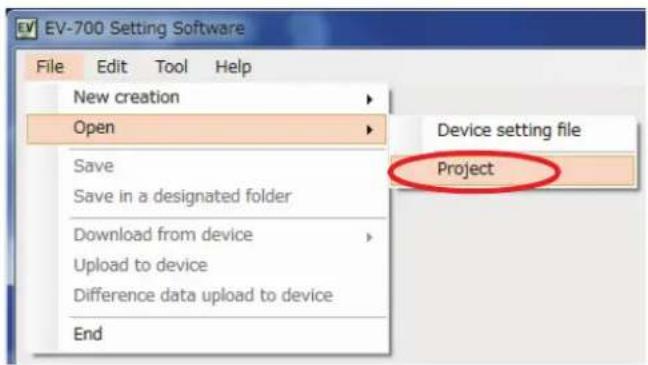
or
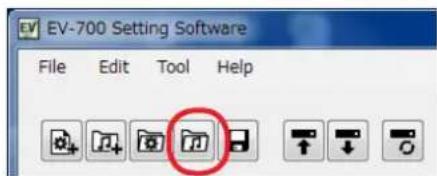
The folder selection screen appears.
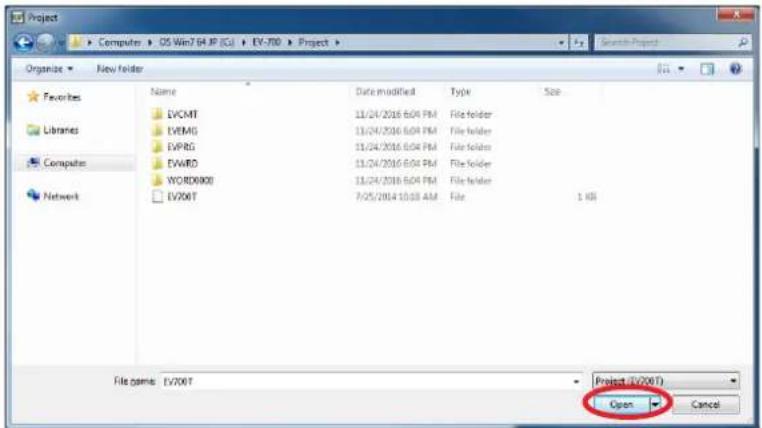
3
Step 4. Select the folder to read, then click the Open button.
Broadcast contents of the selected project appear on the setting screen.
This screen is called Broadcast content screen.
[Broadcast content screen]
![EV-700 Setting Software File Edit Tool Help Card A Disconnect Card B Backup function Setting Operation monitoring Project Project information Audio source resistration Program Program name Program1 No. Program name P001 Program1 P002 Program1 P003 P004 P005 P006 P007 P008 P009 P010 P011 P012 P013 P014 P015 P016 Completion Playback system Program1 Repeat count 0 times Repeat interval 0 Second Busy output during repeat interval Step Type Content Playback time 00001 (chime) 000003 00002 the train will be arriving shortly 000005 00003 at track No 3 000002 Priority level 4 Output Output 1 Output 2 Program sound volume 8 [ 6dB] Automatic gain control (AGC) Program playback busy output 1 2 3 4 5 6 7 8 Emergency playback R.E.M. Program save](/content/2026/05/953756/images/867ab943b8bfd106b806118b90ec1738b0c1706ccfb059829819c4d5a7415a9a.jpg)
11.5.3. Editing
The editing method is the same as that when creating a new project. (See p. 89 for Project information setting, p. 91 for Audio source registration, and p. 100 for Program edit.)
12. REFLECTING THE PROJECT SETTING TO THE EV-700
12.1. Reflecting to the EV-700 via LAN
To reflect the edited contents to the EV-700 via LAN, perform "Upload to device" or "Difference data upload to device."
Connect the EV-700 to a PC online in advance. (See p. 67, "CONNECTING TO THE EV-700.")
Use "Upload to device" when swapping all the audio data and broadcast contents to be used for the EV-700.
Use "Difference data upload to device" to reflect only the altered contents to the EV-700 when you have added audio sources to the audio data and broadcast contents or altered a part of broadcast contents.
Execution time for "Difference data upload to device" is less than that for "Upload to device."
12.1.1. Uploading to the EV-700
Uploading all project files (about 66 MB) on the supplied memory card takes about 7 minutes. It may take longer time depending on the network environments.
Note
Before transferring all audio data and broadcast contents, delete all data on the EV-700's memory card. Make a backup copy of the contents on the memory card if necessary. (See p. 15, "MAKING A BACKUP COPY OF PRERECORDED AUDIO FILES.")
Step 1. Select the Project tab.
A Project creation screen appears.
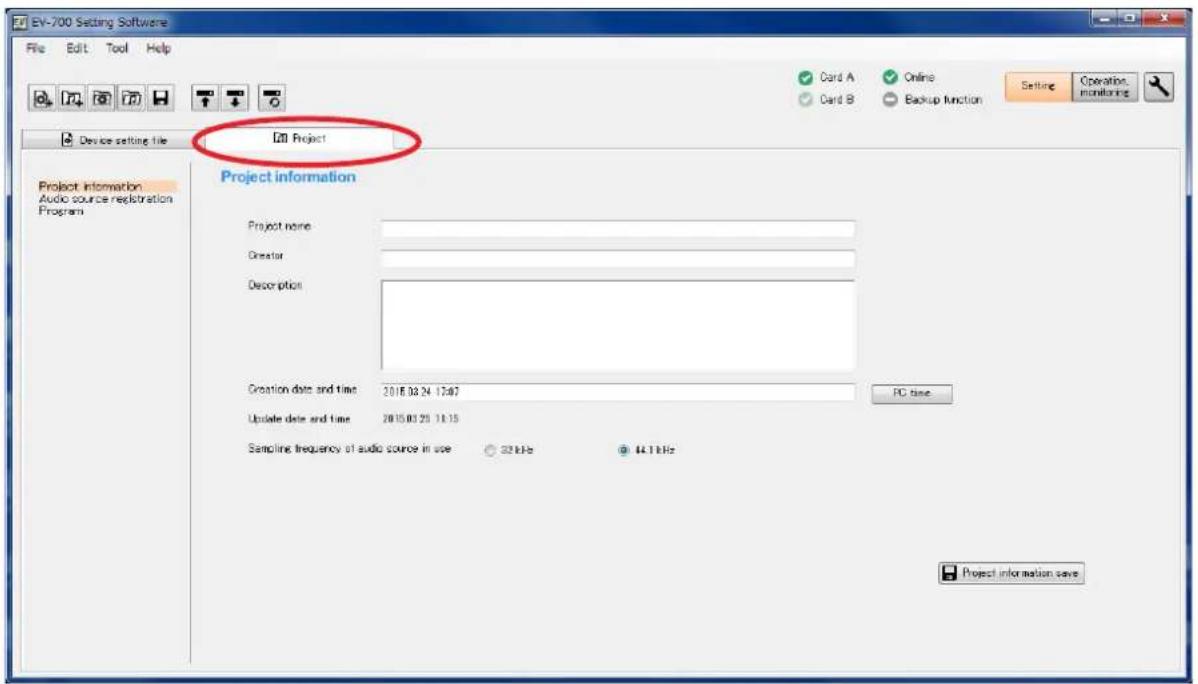
Step 2. Select "File → Upload to device" from the menu or click the "Upload to device" tool button icon.
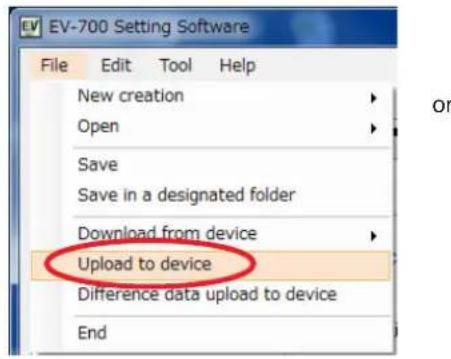
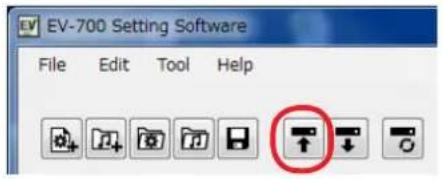
The dialog below appears.
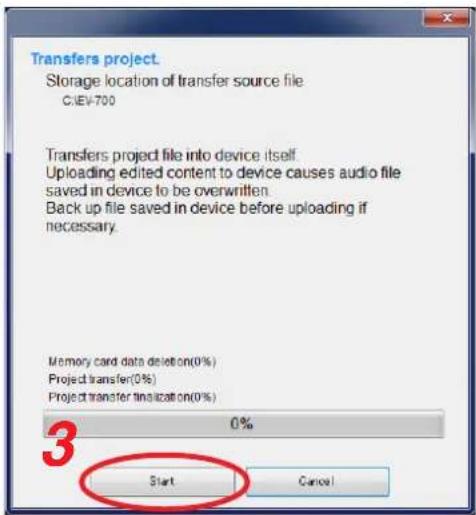
Storage location of the transfer source file appears.
Note
Uploading the edited contents to the EV-700 causes the Audio files saved in the EV-700 to be overwritten. Back up the file saved in the EV-700 before uploading if necessary.
Step 3. Click the Start button.
The Project file is uploaded to the EV-700.
Tip
When upload failed, its transfer result can be checked in a list.
For details, see "When upload failed" on the next page.
When upload failed
When file upload or difference data upload to the EV-700 failed due to irregularities such as communication error, a dialog shown below will appear. Transfer result of the transfer files can be checked in a list.
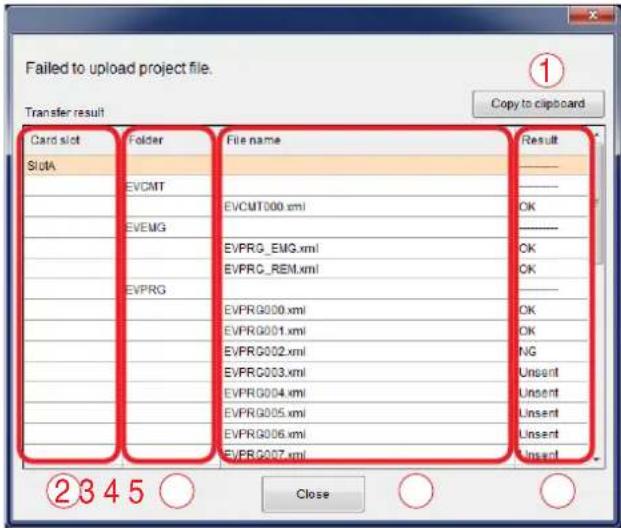
1. [Copy to clipboard] button
Copies the contents of the transfer result to a clipboard in text format with tab delimiters.
2. Card slot
Displays the card slot name of the upload destination.
3. Folder
Displays the folder names.
When there is no folder, the "/" indication is displayed.
4. File name
Displays the file names in the most recently opened folder.
5. Result
Displays the transfer results for each file.
"OK": Transfer has been completed.
"NG": Transfer failed.
"Unsent": Transfer files are not sent as abnormality occurred before starting transfer.
12.1.2. Uploading Difference data to the EV-700
Note
Use this difference data upload function when you have edited the data identical to that used for the EV-700. Uploading the difference data to the EV-700 using the data different from that used for the EV-700 causes EV-700's data error, resulting in equipment malfunction.
Step 1. Select the Project tab.
A Project creation screen appears.
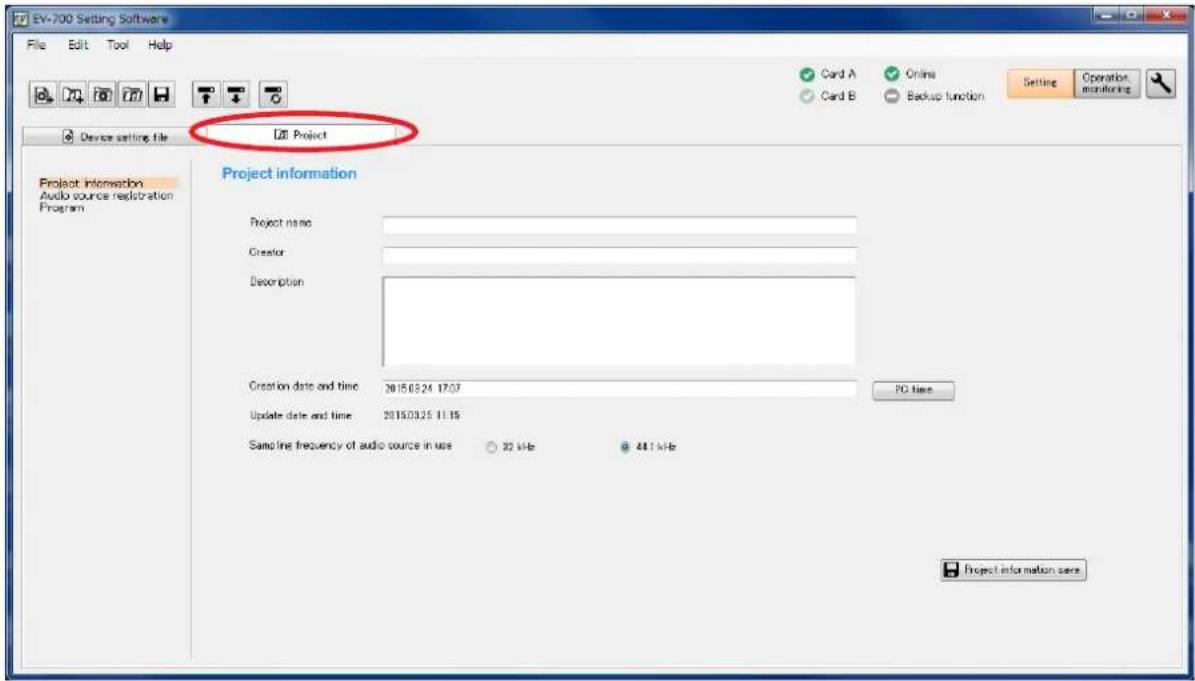
Step 2. Select "File → Difference data upload to device" from the menu or click the "Difference data upload to device" tool button icon.
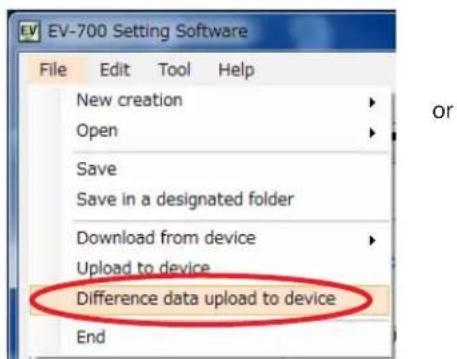
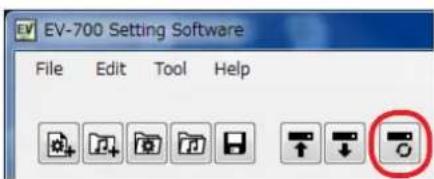
The dialog below appears.
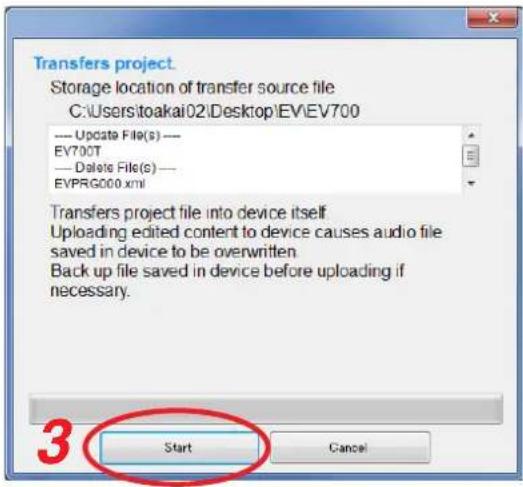
Displayed are the storage location of the transfer source file and the target file list to be updated or deleted at the EV-700.
Note
Uploading the edited contents to the EV-700 causes the Audio files saved in the EV-700 to be overwritten. Back up the file saved in the EV-700 before uploading if necessary.
Step 3. Click the Start button.
The Project file is uploaded to the EV-700.
Tip
When difference data upload failed, its transfer result can be checked in a list.
For details, see "When upload failed" on p. 118.
12.2. Saving to the Memory Card
Step 1. Insert the memory card into the PC.
Step 2. Select "File → Save in a designated folder" from the menu.
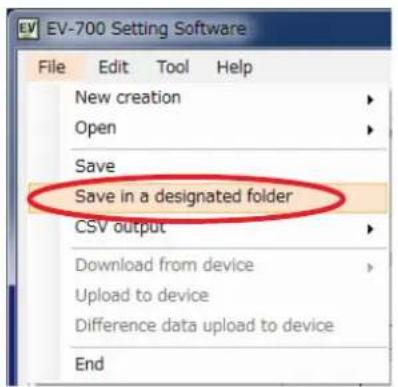
The folder selection screen appears.
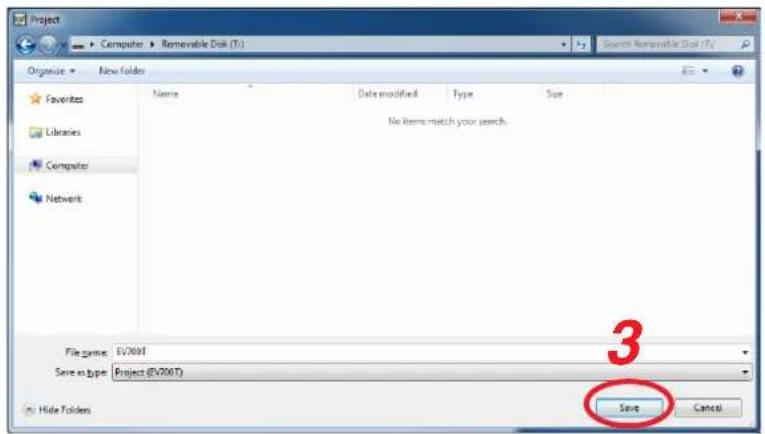
Step 3. Select the memory card inserted in Step 1, then click the Save button.
Step 4. Remove the memory card from the PC, then insert it into the EV-700's Card slot A.
![[Inside the Front cover] Card slot A A O MEMORY CARD B O MAINTENANCE OFF ON RESET EV-700](/content/2026/05/953756/images/826df653453129b36506b1cda202cd5aba1f4ae0f2684daa777cab8244b61ec9.jpg)
13. EDITING THE DEVICE SETTING
13.1. Creating a New Device Setting File
Step 1. Select "File → New creation → Device setting file" from the menu or click the "Device setting file new creation" tool button icon.
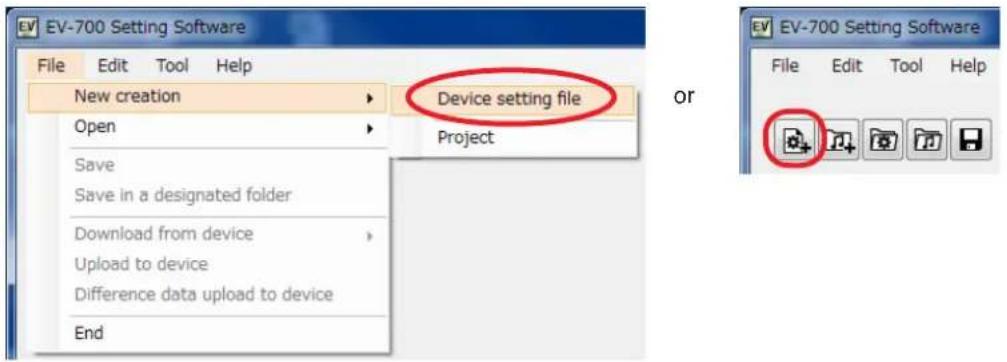
A destination folder selection screen appears.
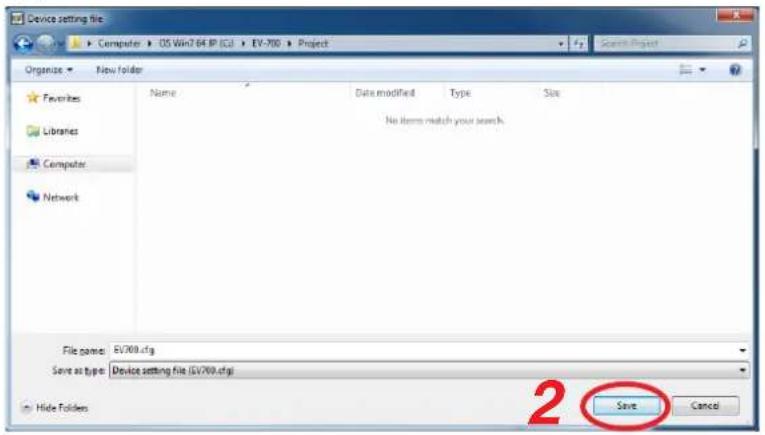
Step 2. Designate the destination folder to be saved, then click the save button.
A Device setting edit screen appears.
![EV-700 Setting Software File Edit Tool Help Card A Online Setting Operation Monitoring Device setting file Broadcast setting Whole sound volume 5 [dB] Delay time 2 [seconds] Broadcast priority level Priority order 1 Microphone broadcast 2 Normal broadcast 3 Line input broadcast System setting Backup function OFF ON To enable backup functions, memory cards with the same contents contained must be inserted into card slots A and B. Health check interval 15 [seconds] Keep-alive Time 20 [seconds] Interval 10 [seconds] Retry 0 Quick stop Disabled Enabled Set whether or not to enable playback, stop by the Start/Stop key while in Lock mode. Device setting save](/content/2026/05/953756/images/76f389d4a8064be11908b609e49c577278b6bfa32cc8046436ea21dc9a280b82.jpg)
13.2. Making the Broadcast Setting and System Setting
13.2.1. Description of the Broadcast and System setting screen
Click on "Broadcast, system" from the submenu on the Device setting edit screen to display the Broadcast and System setting screen.
![EV-700 Setting Software File Edit Tool Help Card A Online Card B Backup function Setting Operation. Device setting file Broadcast system Pre-End-Stop Control Broadcast setting Whole sound volume 6 [bit] Delay time 2 [seconds] Broadcast priority level Priority order 1 Microphone broadcast 2 Normal broadcast 3 Line input broadcast System setting Backup function OFF ON Health check interval 15 [seconds] Keep-time Time 90 [seconds] Interval 10 [seconds] Retry 1 Quick stop Disabled Enabled Set whether or not to enable playback stop by the Start/Stop key while in Lock mode. 8 Device setting save](/content/2026/05/953756/images/ca193e2adfb824eb77c385ec2837cd21675cc4084c1097f0f467d07ff574c8cb.jpg)
1. Whole sound volume
Sets the volume level of the audio signals output from the EV-700.
Setting range: -60 to 0 dB (in 1-dB units) (Initial setting: -6 dB)
2. Delay time
Sets the time period from playback start until playback actually begins, which is a waiting time setting until the amplifier starts.
Setting range: 0 to 99 seconds (in 1-second units) (Initial setting: 2 seconds)
3. Broadcast priority level
Sets the Broadcast priority levels among the normal broadcast, line input broadcast, and microphone broadcast considering which broadcast takes precedence over which broadcast.
Select the type of broadcast, then set the priority order using the Up and Down buttons. Priority level "1" is the highest priority while "3" the lowest priority.
Set the broadcast ON/OFF using the checkbox located at the left side of each item.
When the box is unchecked, broadcast is not made regardless of the broadcast priority setting.
Also, use this broadcast priority level to set which input of the line input and microphone input takes precedence at the time of recording. When the box is unchecked, the audio signals, even if input during recording, are not recorded.
4. Backup function
Sets whether to operate the system by enabling the backup function of the memory card.
For details of the Backup function, read the instruction manual attached to the EV-700.
(Initial setting: OFF)
5. Health check interval
If the EV-700 fails to receive the data communication exceeding the setting value from the EV-700 Setting software, the EV-700 judges that the connection with the Software is lost, terminating the communication connection.
(Set in 1-second units.)
Setting value: 1 to 43200 seconds (1 second to 12 hours) (Initial setting: 15 seconds)
6. Keep-alive
Sets the Time, Interval, and Retry of the keep-alive that work at the protocol level such as TCP. (Set the time and interval in 1-second units.)
| Setting item | Setting range Initial setting | |
| Time 1 second | to 24 hours 30 seconds | |
| Interval 1 second | to 60 seconds | 10 seconds |
| Retry | 1 to 10 times | 3 times |
7. Quick stop
When set to "Enabled," you can stop Normal playback, Emergency playback, or R.E.M. playback by pressing the EV-700's front-mounted Start/Stop
key even in Lock mode.
When set to "Disabled," first place the EV-playback mode through the EV-700's front-mounted menu key operation when in lock mode. Then, you can stop Program playback, Emergency playback, or R.E.M. playback by pressing the Start/Stop key.
8. Device setting save button (Device setting)
Saves the contents of the broadcast and system settings.
13.2.2. Setting
Step 1. Click on "Broadcast, system" from the submenu on the Device setting edit screen.
![EV-700 Setting Software File Edit Tool Help Card A Online Card B Backup function Setting Operation Device setting file 1 Broadcast system Control Broadcast setting Whole sound volume -8 [s0] Delay time 2 [seconds] Broadcast priority level Priority order 1 Microphone broadcast 2 Normal broadcast 3 Line input broadcast 2 System setting Backup function OFF ON To enable boot-up function, memory cards with the same contents contained must be inserted into card slots A and B. Health check interval 15 [seconds] Keep alive Time 30 [seconds] Interval 10 [seconds] Retry 9 Quick stop Disabled Enabled Set whether or not to enable playback stop by the Start/Stop key while in Lock mode 3 Device setting save](/content/2026/05/953756/images/b964054bf61489ede7b479885ad69db9e8d20032b61de17e3a006e8137441f06.jpg)
Step 2. Set each item for the Broadcast and System settings.
Step 3. Click the Device setting save button.
Settings are saved into the device setting file.
13.3. Making the Network Setting
13.3.1. Description of the Network setting screen
Click on "Network setting" from the submenu on the Device setting edit screen to display the Network setting screen.
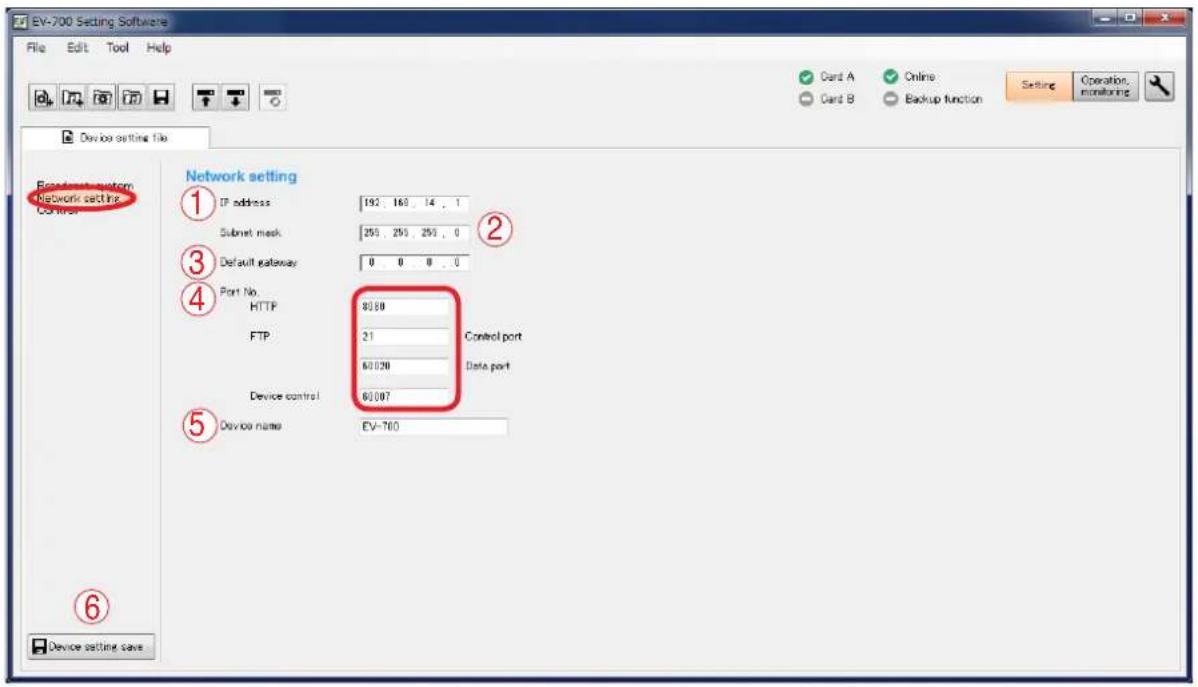
1. IP address
Sets the EV-700's IP address. (Initial setting: 192.168.14.1)
2. Subnet mask
Sets the EV-700's subnet mask. (Initial setting: 255.255.255.0)
3. Default gateway
Sets the EV-700's default gateway. (Initial setting: 0.0.0.0)
4. Port number
Sets the EV-700's port number.
The device control item shows the port numbers used when connecting to the EV-700 Setting software.
| Setting item Setting range Initial setting | ||
| HTTP 1 to 65535 | 8080 | |
| FTP control port | 1 to 65535 21 | |
| FTP data port 1 | to 65535 60020 | |
| Device control 1 | to 65535 60007 | |
Note
No. 60000 cannot be used as it is a port number the EV-700 uses internally.
5. Device name
Set the EV-700's name.
Enter the name with up to 256 characters.
Unusable characters: "* / : <> ? \ I
6. Device setting save button
Saves the contents of the network setting.
Tip
Network setting can also be performed on the maintenance mode screen. (See p. 170.)
13.3.2. Setting
Step 1. Click on "Network setting" from the submenu on the Device setting edit screen.
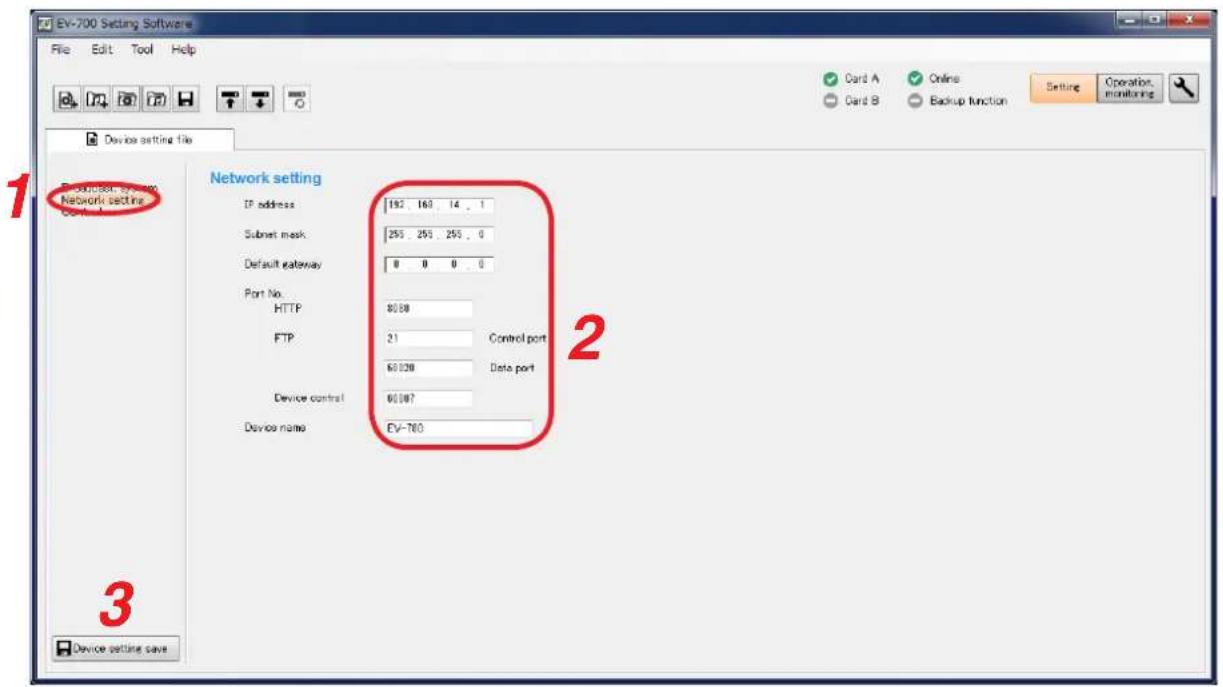
Step 2. Enter each Network setting item.
Step 3. Click the Device setting save button.
The network information is saved to the device setting file.
13.4. Making the Control Setting
13.4.1. Description of the control setting screen
Click on "Control" from the submenu on the Device setting edit screen to display the Control setting screen.
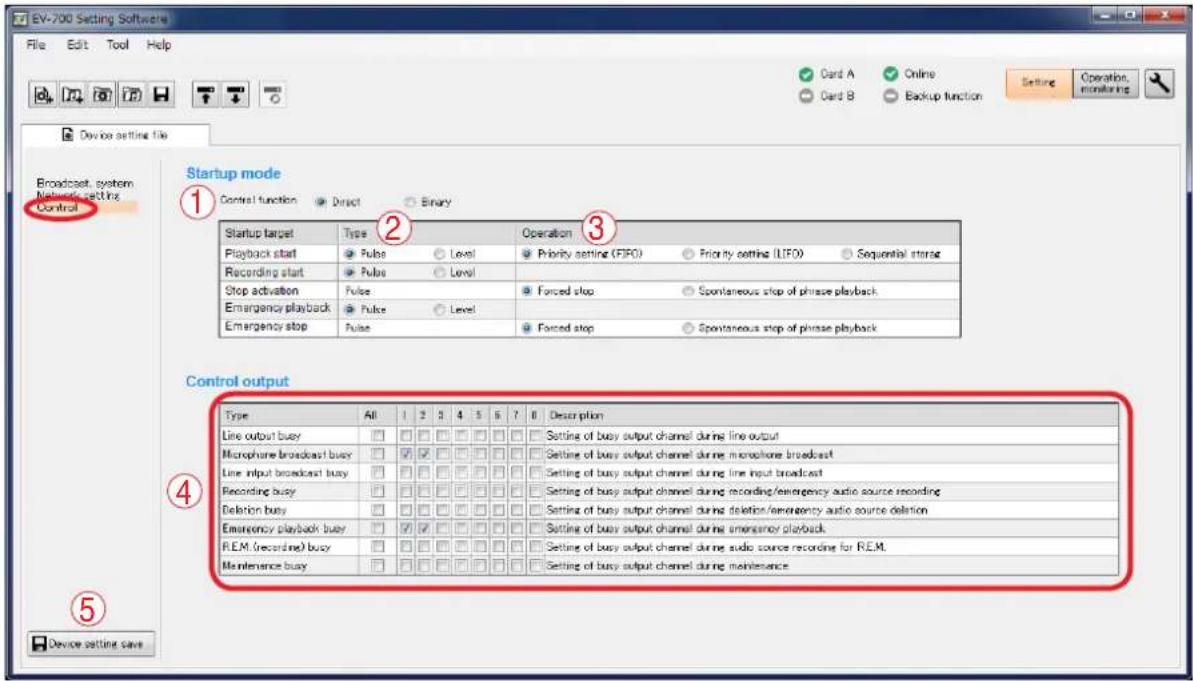
1. Control function
Selects either method of "Direct" or "Binary" to designate the program or phrase number at the Contact-activated input terminal.
Direct: 16 Contact-activated input terminals can be used. The closed terminal number is the designation number.
Binary: 8 Contact-activated input terminals can be used. Number designation is performed depending on which terminals are closed.
For more information about control function, see the instruction manual attached to the EV-700.
2. Type
Set in what condition it is judged that the contact-activated input terminal is activated.
Select either Pulse or Level.
Pulse activation:
Playback or recording is executed when the terminal changes from the open state to closed state, ignoring the terminal state hereafter.
Level activation:
Playback or recording is executed only while the terminal is placed in closed state, and continues until the terminal becomes open.
3. Operation
In the case of playback start, select the playback order when multiple playbacks are started from the Priority setting (FIFO), Priority setting (LIFO), or Sequential storage.
In the case of Stop activation, select the stop method from the Forced stop or Spontaneous stop of phrase playback.
4. Control output
Sets which control output terminal to output each type of busy.
5. Device setting save button (Device setting)
Saves the contents of the control setting.
13.4.2. Setting
Step 1. Click on "Control" from the submenu on the Device setting edit screen.
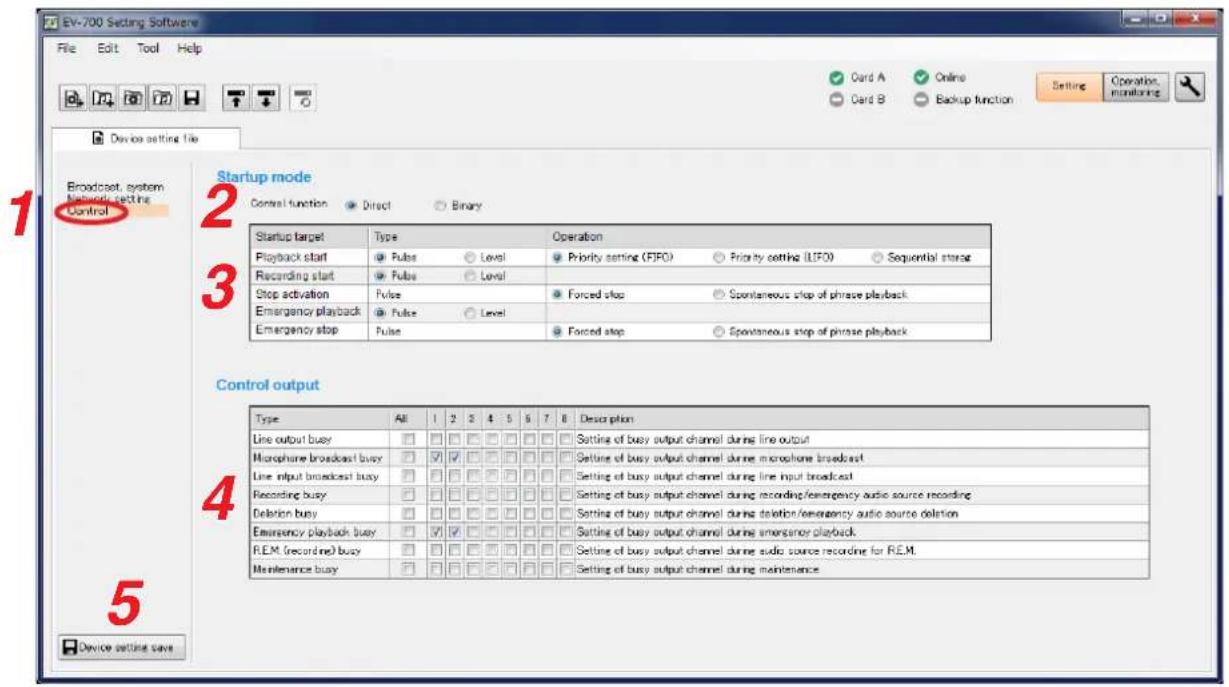
Step 2. Select the start mode from "Direct" or "Binary."
Step 3. Select the input type and operation for each startup target.
Step 4. Set the control output.
Check the checkbox of the control output terminal number which outputs each busy signal.
Step 5. Click the device setting button.
Contents of the control setting are saved to the device setting file.
13.5. Editing the Created Device Setting File
13.5.1. Acquiring via LAN
Download the device setting file from the EV-700 via LAN.
Connect the EV-700 to a PC online in advance. (See p. 67, "CONNECTING TO THE EV-700.")
Step 1. Click the Setting button located at the upper right corner of the Initial screen displayed after the EV-700
Setting software has started.
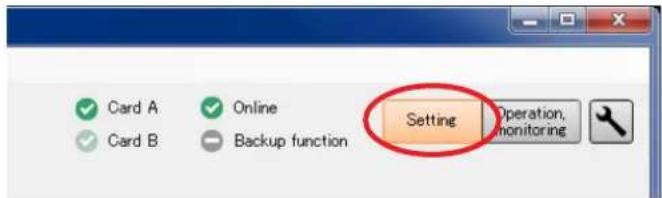
The setting screen appears.
Step 2. Select "File → Download from device → Device setting file" from the menu or click the "Download from device" tool button icon.
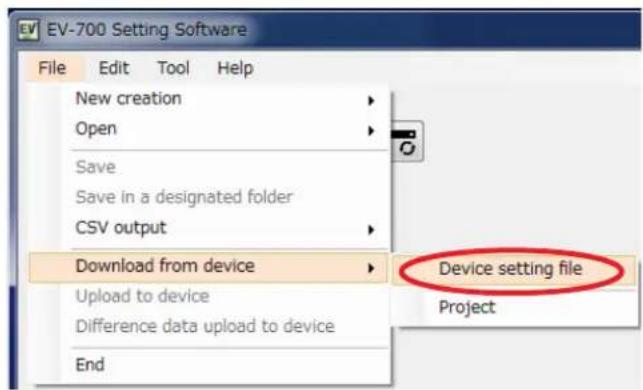
or
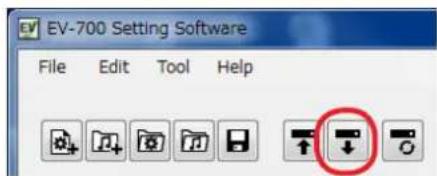
Note
The "Download from device" tool button icon can be used only in the state the device setting file has been read.
The folder selection screen appears.
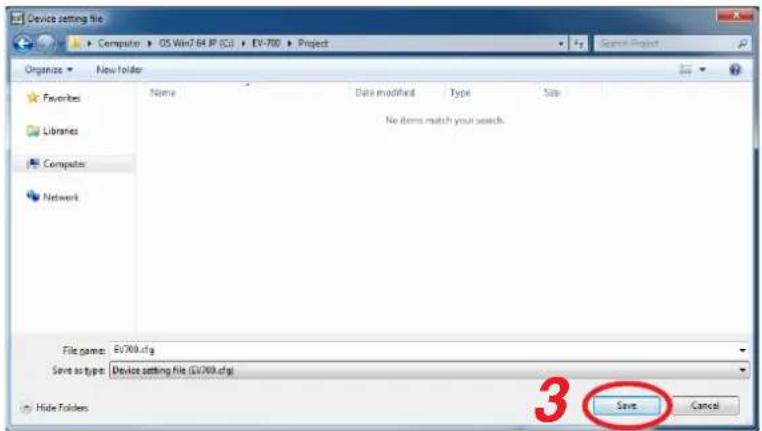
Step 3. Select a folder of download destination, then click the Save button.
Download starts.
Note
If the device setting file already exists at the download destination, the Save confirmation dialog appears before download starts.
Click the Yes button to overwrite the file, otherwise click the No button. If the No button is selected, the download is aborted.
Take care that selecting the Yes button causes the existing file to overwritten even if the downloaded file is invalid.
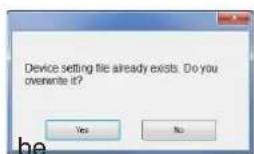
The Download completed screen appears when the download is successfully completed.
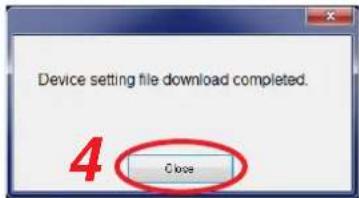
Step 4. Click the Close button.
The setting contents of the downloaded device setting file appear on the Setting screen.
![EV-700 Setting Software File Edit Tool Help Card A Online Setting Operation Monitoring Device setting file Broadcast setting Whole sound volume -5 [dB] Delay time 2 [seconds] Broadcast priority level Priority order 1 Microphone broadcast 2 Normal broadcast 3 Line input broadcast System setting Backup function OFF ON To enable backup function, memory cards with the same contents contained must be inserted into card slots A and B. Health check interval 15 [seconds] Keep-alive Time 30 [seconds] Interval 10 [seconds] Retry 2 Quick stop Disabled Enabled Set whether or not to enable playback stop by the Start/Stop key while in Lock mode. Device setting save](/content/2026/05/953756/images/3ea93ab6a0e06dada22202bc3a8392c666a97e09348d08980470350a69a937d8.jpg)
13.5.2. Reading Data saved on the Memory Card or in the PC
Note
Make sure the data saved in the PC is identical to the one being used for the EV-700 before reading the data saved in the PC.
Uploading to the EV-700 or performing recording operation using the data different from the one being used for the EV-700 causes EV-700's data error, resulting in equipment malfunction.
Step 1. When reading from the memory card, remove the memory card from the EV-700 and insert it into a PC.
Step 2. Click the Setting button located at the upper right corner of the Initial screen displayed after the EV-700 Setting software has started.
The setting screen appears.
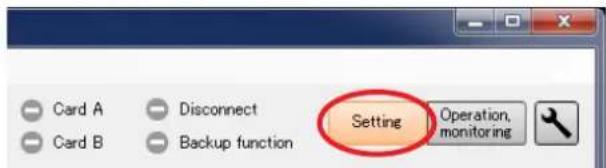
Step 3. Select "File → Open → Device setting file" from the menu or click "Open project file" tool button icon.
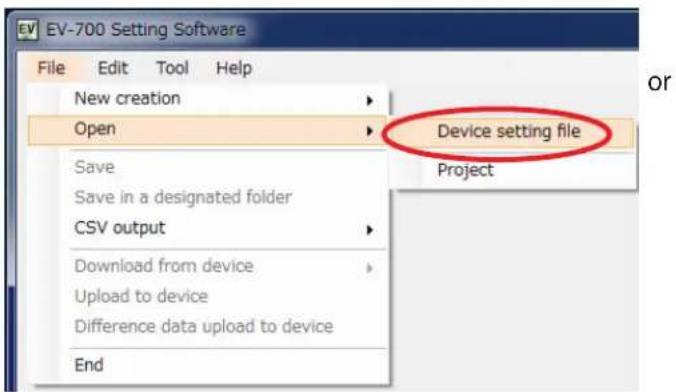
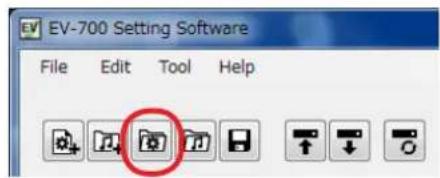
The folder selection screen appears.
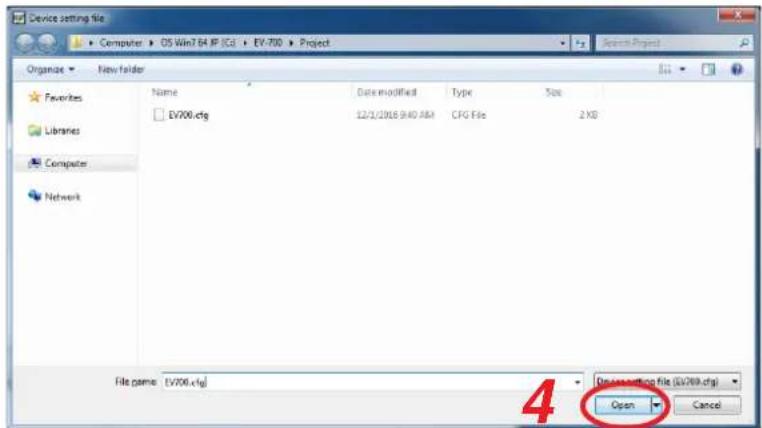
Step 4. Select the folder to read, then click the Open button.
Setting contents of the selected device setting file appear on the setting screen.
![EV-700 Setting Software File Edit Tool Help Card A Online Setting Operation Card B Backup Function Monitoring Device setting file Broadcast setting Whole sound volume 5 [dB] Delay time 2 [seconds] Broadcast priority level Priority order 1 Microphone broadcast 2 Normal broadcast 3 Line input broadcast System setting Backup function OFF ON To enable backup functions, memory cards with the same contents contained must be inserted into card slots A and B. Health check interval 15 [seconds] Keep-alive Time 30 [seconds] Interval 10 [seconds] Retry 3 Quick stop Disabled Enabled Set whether or not to enable playback stop by the Start/Stop key while in Lock mode. Device setting save](/content/2026/05/953756/images/c0c17b5be04b9eca9102028e00622801be0cf33ee4e68bee21f95c0a9ac7b5cd.jpg)
13.5.3. Editing
The method for editing is the same as that for creating a new project.
(See p. 123 for Editing the broadcast setting and streaming setting, p. 125 for Editing the network setting, and p. 127 for Editing the control setting.)
14. REFLECTING THE DEVICE SETTING TO THE EV-700
14.1. Reflecting to the EV-700 via LAN
Step 1. Click the Device setting tab.
![EV-700 Setting Software File Edit Tool Help Card A Online Card B Backup function Setting Operation Device setting like 1 Broadcast setting Broadcast system Network setting Control Whole sound volume -6 [dB] Delay time 2 [seconds] Broadcast priority level Priority order 1 Microphone broadcast 2 Normal broadcast 3 Line input broadcast System setting Backup function OFF ON To enable backup functions, memory cards with the same contents contained must be inserted into card slots A and B. Health check interval 15 [seconds] Keep-alike Time 80 [seconds] Interval 10 [seconds] Retry 9 Quick stop Disabled Enabled Set whether or not to enable playback stop by the Start/Stop key while in Lock mode. Device setting save](/content/2026/05/953756/images/ab6ccdb6f1faf76379f327d3a26be71011175af4dd8ee0cb2f36f2dcfa3d27c7.jpg)
Step 2. Select "File → Upload to device" from the menu or click the "Upload to device" tool button icon.
A screen as shown at right appears.
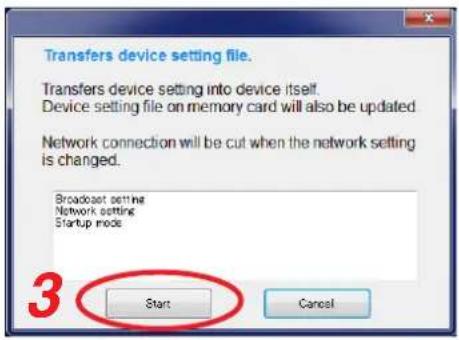
Step 3. Click the Start button.
The device setting is transferred to the EV-700, updating the device setting file on the memory card.
During device setting transmission, a dialog at right appears.
When device setting transmission is complete, a dialog at right appears.
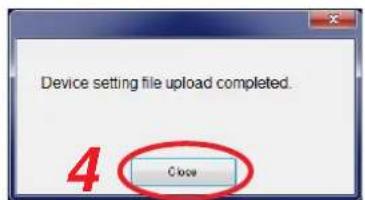
Step 4. Click the Close button.
14.2. Saving to the Memory Card
Step 1. Insert the memory card into the PC.
Step 2. Select "File → Save in a designated folder" from the menu.
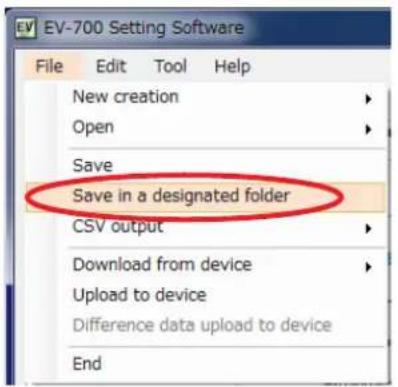
The folder selection screen appears.
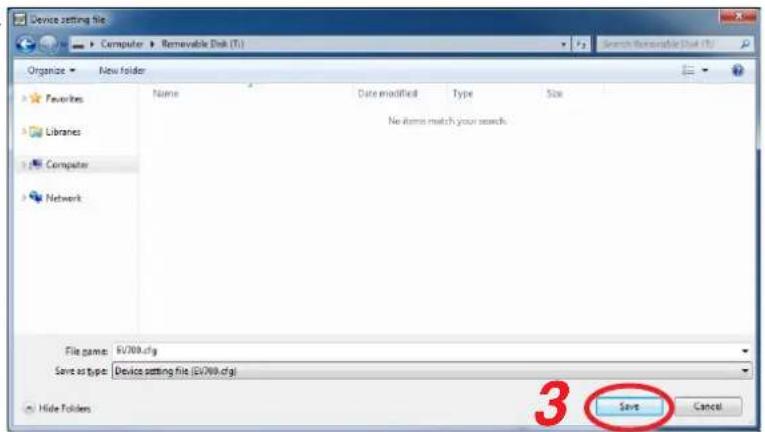
Step 3. Select the memory card inserted in Step 1, then click the Save button.
Step 4. Remove the memory card from the PC, then insert it into the EV-700's Card slot A.
![[Inside the Front cover] Card slot A A B MEMORY CARD MAINTENANCE OFF ON RESET EV-700 TDA](/content/2026/05/953756/images/976d00b74efa2c7cd0f4255392705f0d8ec261e0b019ef4902b6e6de6c69d3e7.jpg)
Step 5. Upload the device setting file from the memory card to the EV-700 by operating the EV-700.
For the setting operation, see the instruction manual attached to the EV-700.
15. SAVING THE DEVICE SETTING FILE IN CSV FORMAT
You can save the contents of the device setting file in CSV format.
Note
The device setting file saved in CSV format cannot be read using the EV-700 Setting Software nor uploaded to the EV-700.
Use this file to confirm the setting contents.
15.1. Saving
Step 1. Select "File → CSV output → Device setting" from the menu.
Tip
"File → CSV output → Device setting" operation is enabled only when the Device setting file tab is selected.
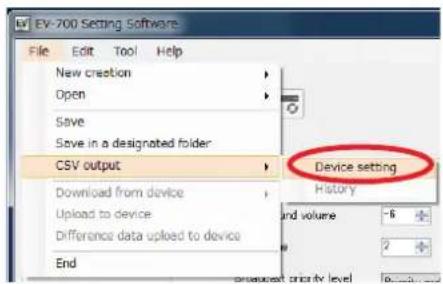
A destination folder selection screen appears.
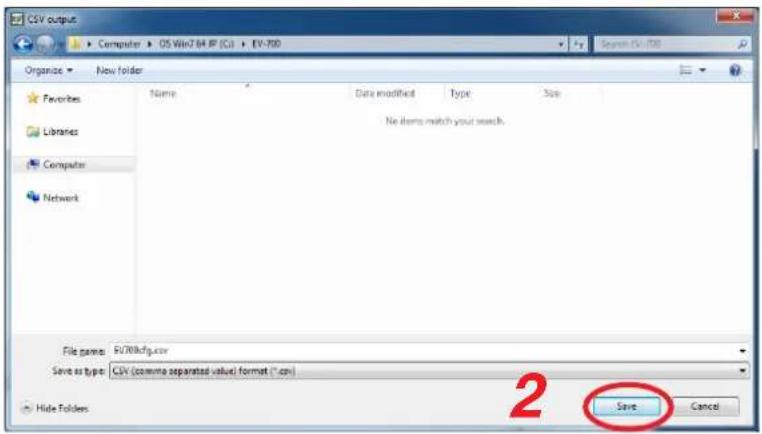
Step 2. Designate the destination folder and file name to be saved, then click the Save button.
A completion dialog appears when the save is complete.
Tip
A default file name is "EV-700cfg.csv."
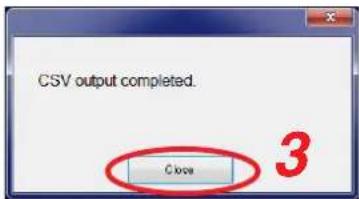
Step 3. Click the Close button.
15.2. Configuration of the Setting File in CSV Format
| A | B | C | D | E | |
| 1 | Broadcast | system | |||
| 2 | Whole sound volume | -6 dB | |||
| 3 | Delay time | 2 Second | |||
| 4 | Broadcast priority level.1 | Microphone broadcast | |||
| 5 | Broadcast priority level.2 | Normal broadcast | |||
| 6 | Broadcast priority level.3 | Line input broadcast | |||
| 7 | Backup function | OFF | |||
| 8 | Health check interval | 15 Second | |||
| 9 | Keep-alive.Time | 30 Second | |||
| 10 | Keep-alive.Interval | 10 Second | |||
| 11 | Keep-alive.Retry | 3 Times | |||
| 12 | Quick stop | Disabled | |||
| 13 | Network setting | ||||
| 14 | IP address | 192.168.14.1 | |||
| 15 | Subnet mask | 255.255.255.0 | |||
| 16 | Default gateway | 0.0.0.0 | |||
| 17 | Port No.:HTTP | 8080 | |||
| 18 | Port No.:FTP(Control port) | 21 | |||
| 19 | Port No.:FTP(Data port) | 60020 | |||
| 20 | Port No.:Device control | 60007 | |||
| 21 | Device name | EV-700 | |||
| 22 | Startup mode | ||||
| 23 | Control function | Direct | |||
| 24 | Playback start | Pulse/Priority setting (FIFO) | |||
| 25 | Recording start | Pulse | |||
| 26 | Stop activation | Forced stop | |||
| 27 | Emergency playback start | Pulse | |||
| 28 | Emergency stop activation | Forced stop | |||
| 29 | Control output | ||||
| 30 | Line output busy | 0 | |||
| 31 | Microphone broadcast busy | 11000000 | |||
| 32 | Line input broadcast busy | 0 | |||
| 33 | Recording busy | 0 | |||
| 34 | Deletion busy | 0 | |||
| 35 | Emergency playback busy | 11000000 | |||
| 36 | R.E.M. (recording) busy | 0 | |||
| 37 | Maintenance busy | 0 | |||
| 38 | |||||
| 39 |
1. Title
Indicates the group name, collective term for setting items.
2. Item name
Indicates the setting item.
3. Setting value
Indicates the current set value for each setting item.
[Descriptions of the broadcast priority levels]
Broadcast priority level 1: A broadcast assigned to 1st priority level Broadcast priority level 2: A broadcast assigned to 2nd priority level Broadcast priority level 3: A broadcast assigned to 3rd priority level
[Setting values of the control output]
| Control output terminal number 1 2 3 4 5 | 6 7 8 | |||||||
| Setting value displayed in the setting file | 1 1 0 0 0 0 0 0 | |||||||
| Busy output (✓: ON, x: OFF) × × × × × | √ | √ |
4. Unit
A unit of setting value. If no unit is given to the setting value, the field is blank.
16.1. Displaying the Device Operation Screen
Connect the EV-700 to a PC online in advance. (See p. 67, "CONNECTING TO THE EV-700.")
Step 1. Click the "Operation, monitoring" button located at the upper right corner of the Initial screen. The Operation and monitoring screen appears.
Step 2. Click the Operation tab.
The Device operation screen appears.
Device status display
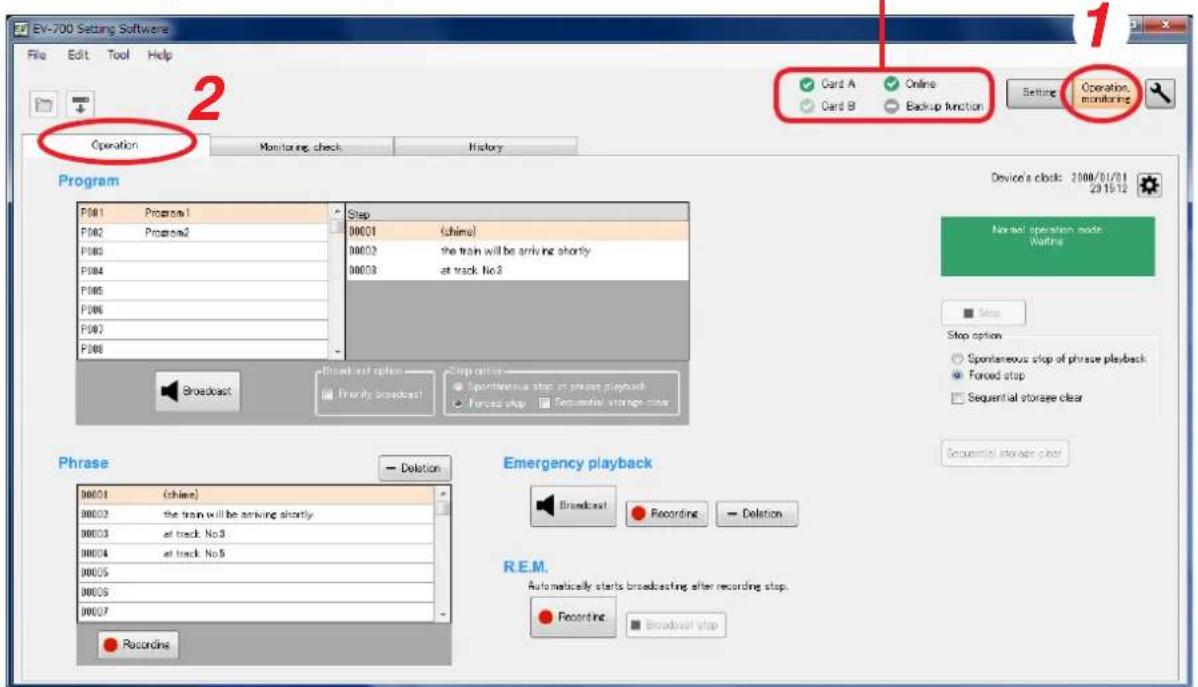
Current operation status of the EV-700 can be confirmed in the Device status display at the upper right of the screen.
| Item Display Status | ||
| Card A Indicates the insertion status of the EV-700's Memory card A. | ||
| ✓ | Card A inserted, operating | |
| ✓ | Card A inserted, standby | |
| × | Card error occurred. | |
| - | Card not inserted. | |
| Card B Indicates the insertion status of the EV-700's Memory card B. | ||
| ✓ | Card B inserted, operating | |
| ✓ | Card B inserted, standby | |
| × | Card error occurred. | |
| - | Card not inserted. | |
| Online Indicate the connection status between the PC and EV-700. | ||
| ✓ | Connecting | |
| - | Disconnecting | |
| Backup function | Indicates the enable/disable status of the backup function of the EV-700's memory card. | |
| ✓ | Backup function: ON (Function valid) | |
| ! | Backup function: ON (Function invalid) | |
| - | Backup function: OFF | |
16.2. Description of the Device Operation Screen
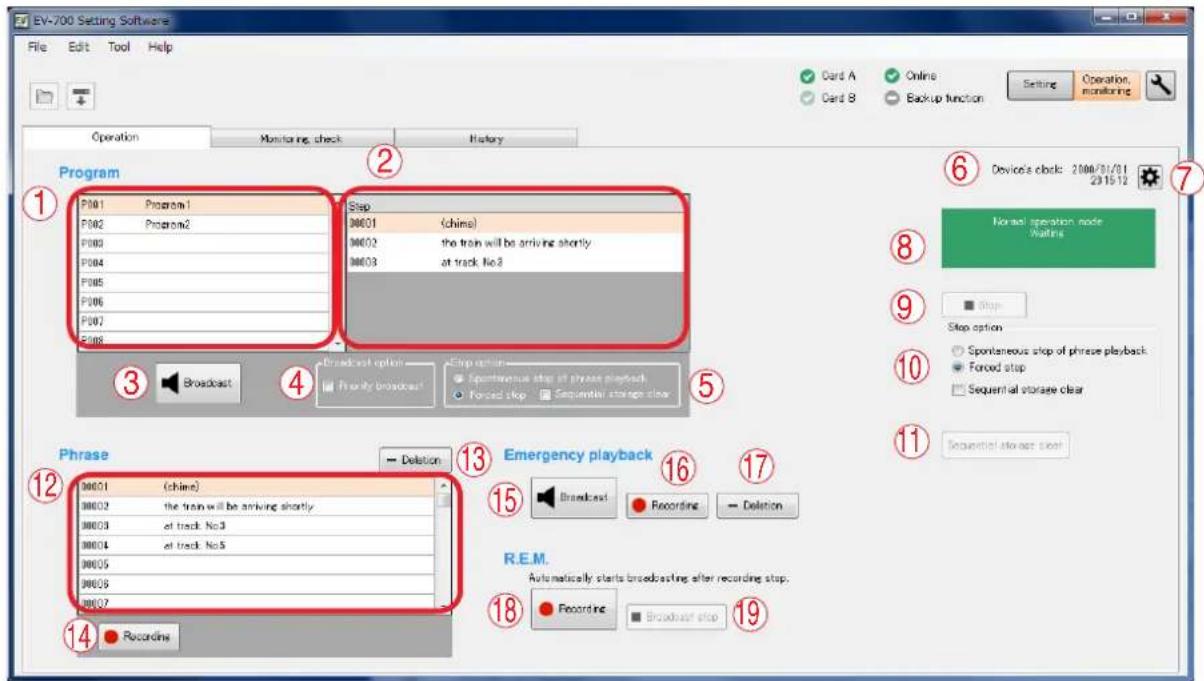
1. Program list display
Displays the Program numbers and Program names.
Edit is not possible.
2. Step display
Displays the step contents of the selected program.
When the audio file is registered in the step, it is displayed as shown below.
Audio file number
When the silent interval is registered in the step, it is displayed as shown below.
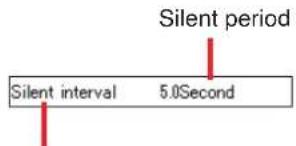
Audio file number
3. Broadcast/Stop button (for program broadcast)
If you click the Broadcast button, the EV-700 plays the selected program.
The Broadcast button changes to the Stop button display during playback.
If you click the Stop button, the selected program broadcast stops.
When stopped, the Stop button turns into the Broadcast button.
4. Broadcast option (for program broadcast)
Sets whether or not to give a priority to the program broadcast made by the PC operation.
Checking this box allows the PC to preferentially make program broadcasts even while the EV-700 is making broadcasts.
When the box is unchecked, the Broadcast button (3) becomes inactive while the EV-700 is making broadcasts, disabling broadcasts from the PC.
5. Stop option (for program broadcast)
Sets the way of operation to stop broadcasts by the Stop button (3).
Select either "Spontaneous stop of phrase playback" or "Forced stop."
Spontaneous stop of phrase playback:
Stops playback at the time when the phrase has been played to the end.
Forced stop:
Stops playback instantly when the Stop button (3) is clicked.
Checking the "Sequential storage clear" box cancels all waiting broadcasts and stops the current broadcast.
6. Device's clock indication
Displays the date and time set to the EV-700.
7. Device's clock setting button
If you click this button, the Clock setting dialog will appear, enabling the EV-700's clock setting.
8. Device status display
Displays the EV-700's state such as the Normal operation mode, Emergency broadcast mode, or Maintenance mode.
When in the Normal operation mode, it additionally displays the state such as on standby or playback in progress. (See p. 139.)
9. Stop button (common to all broadcasts)
Becomes active during broadcast or recording. Stops all broadcasts during playback regardless of the types of broadcasts.
It also can stop the broadcasts started through the EV-700's front panel operation or by means of a contact input.
If clicked, a confirmation dialog will appear before the operation is stopped.
10. Stop option (common to all broadcasts)
Set the way of operation to stop the broadcast by the Stop button (9).
Setting contents are the same as those of the Stop option (5) of the program broadcasts.
11. Sequential storage clear button (common to all broadcasts)
Cancels all waiting broadcasts.
12. Phrase list (for program broadcast)
Displays the audio source numbers and comments of the registered audio sources.
Use this list for phrase recording.
13. Deletion button (for phrase)
Deletes the selected audio source.
If clicked, a confirmation dialog will appear before deletion is executed.
14. Recording button (for phrase)
Click this button when recording audio sources. The recorded audio sources are saved to the EV-700.
[Maximum recordable time]
| Sampling frequency setting | Recording time limit(Total of all audio sources) |
| 44.1 kHz About 3 hours | |
| 32 kHz About 4 hours | |
Note
Recording stops if the memory card becomes full.
15. Broadcast/Stop button (for emergency playback)
If you click the Broadcast button, the EV-700 plays the audio sources registered for the emergency playback.
The Broadcast button changes to the Stop button display during playback.
If you click the Stop button, the broadcast of the audio sources registered for the emergency playback stops.
When stopped, the Stop button turns into the Broadcast button.
16. Recording button (for Emergency playback)
Click this button when recording the audio sources for the emergency playback.
The recorded audio sources are saved to the EV-700.
[Maximum recordable time]
| Sampling frequency setting | Recording time limit(Total of all audio sources) |
| 44.1 kHz About 3 | hours |
| 32 kHz About | 4 hours |
Note
Recording stops if the memory card becomes full.
17. Deletion button (for Emergency playback)
Deletes the audio sources registered for the emergency playback.
If clicked, a confirmation dialog will appear before deletion is executed.
18. Recording button (for R.E.M. playback)
Click this button when recording audio sources for the R.E.M. playback.
The recorded audio sources are saved to the EV-700.
19. Broadcast stop button (for R.E.M. playback)
Stops the R.E.M. playback.
The button becomes active only during the R.E.M. playback.
16.3. Confirming The Current Broadcasting Status Of The EV-700
The EV-700's current operation mode and broadcasting status appear at the upper right of the screen. Broadcast contents are displayed while broadcast is in progress.
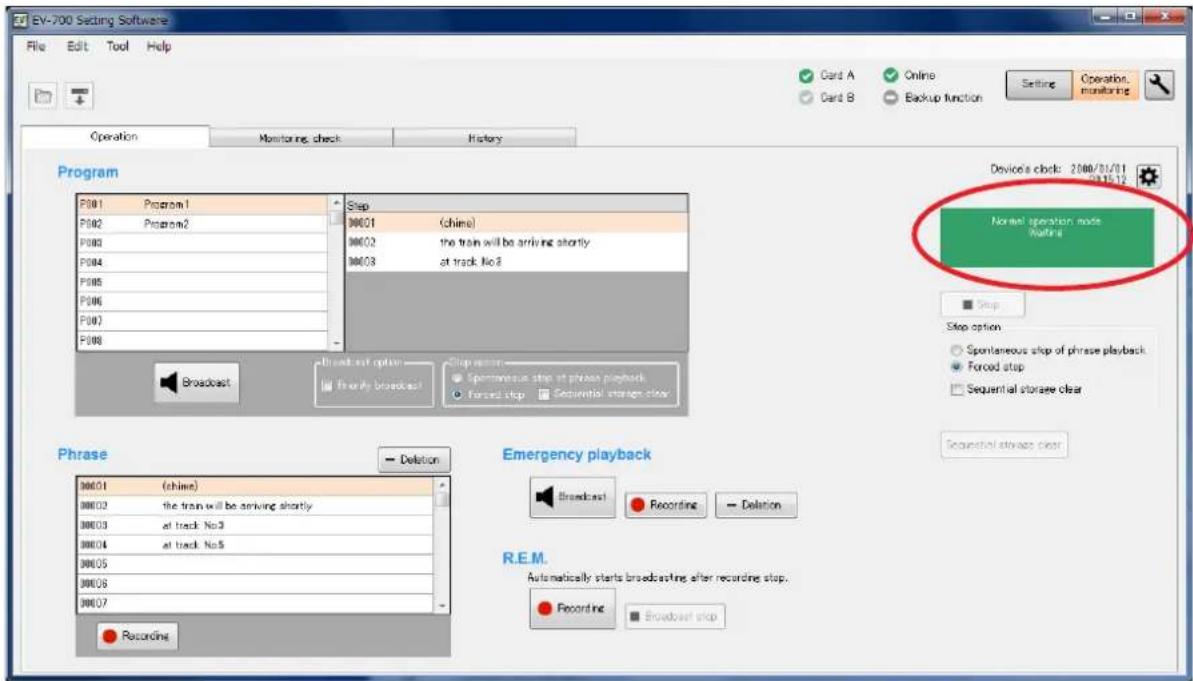
[Operation indication and availability of broadcast]
| Color of display section | Message example appearing in display section | Operation status Availability of broadcast | |
| Green |  | Standby Broadcast can be made instantly. | |
| Orange |  | Broadcast in progress (including Line broadcast and Microphone broadcast), or Monitor playback in progress | By setting the broadcast option, the broadcast currently being made is interrupted, allowing the selected broadcast contents to go through. |
| Russet |  | Recording in progress or deletion in progress | No broadcasts can be made. |
| Red |  | Emergency broadcast in progress | No other broadcasts can be made. |
| Yellow |  | Maintenance in progress No broadcasts can be made. | |
16.4. Starting the Program Broadcast
Step 1. Click the program number to be broadcast in the Program list on the Device operation screen.
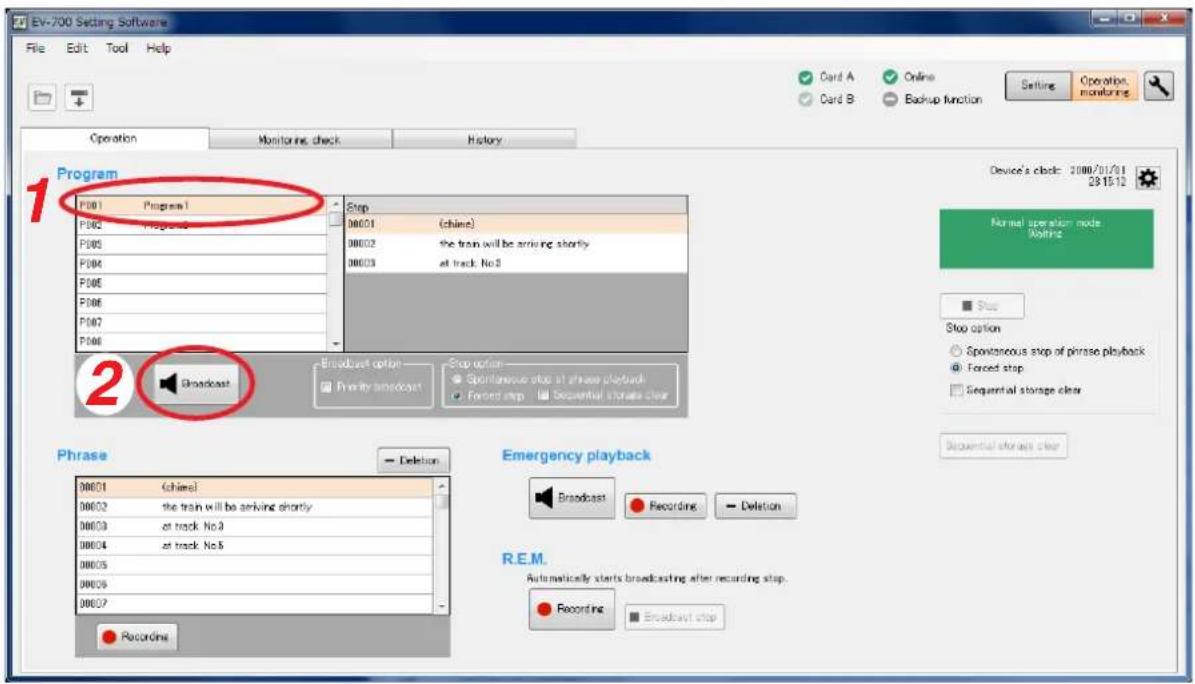
Step 2. Click the Broadcast button.
Tip
While other program is being broadcast, the Broadcast button is inactive. In this case, select any one of the methods shown below to make broadcast.
(1) Click the Broadcast button after the current broadcast ends.
(2) When wishing to give a priority to the designated program broadcast, click the Broadcast button after checking the "Priority broadcast" box of the Broadcast option.
The current broadcast is stopped and the designated program broadcast starts. But note that Emergency broadcast takes precedence while the emergency broadcast is being made.
The Broadcast button changes to the Stop button once broadcast starts.

To interrupt the broadcast, click the Stop button.
Tip
Stop option can be set.
Spontaneous stop of phrase playback:
Stops playback at the time when the phrase has been played to the end.
Forced stop:
Stops playback instantly when the Stop button is clicked.
Sequential storage clear:
Checking the "Sequential storage clear" box cancels all waiting broadcasts and stops the current broadcast.
16.5. Recording an Audio Source for use as the Phrase
A phrase audio source can be recorded and saved to the EV-700.
Sampling frequency of the recorded audio source is identical to that set on the Project information screen (p. 88) of the project.
When recording an audio source from the microphone input, connect a microphone meeting the following specification to the EV-700 in advance.
Microphone input specification: -55 dB (0 dB = 1 V), 600 Ω, unbalanced, 6.3 mm phone jack
When recording an audio source from the line input, connect an audio source equipment meeting the following specification to the EV-700 in advance.
Line input (rear-mounted) specification: -20 dB (0 dB = 1 V), 10 kΩ, unbalanced, removable terminal block
Line input (front-mounted) specification: -29 dB (0 dB = 1 V), 10 kΩ, unbalanced, RCA pin jack
The table below shows the maximum recordable time.
| Sampling frequency setting | Recording time limit (Total of all audio sources) |
| 44.1 kHz About 3 hours | |
| 32 kHz About 4 hours | |
Note
Recording stops if the memory card becomes full.
Step 1. Click the phrase to be recorded on the Device operation screen.
Step 2. Click the Recording button for the phrase.
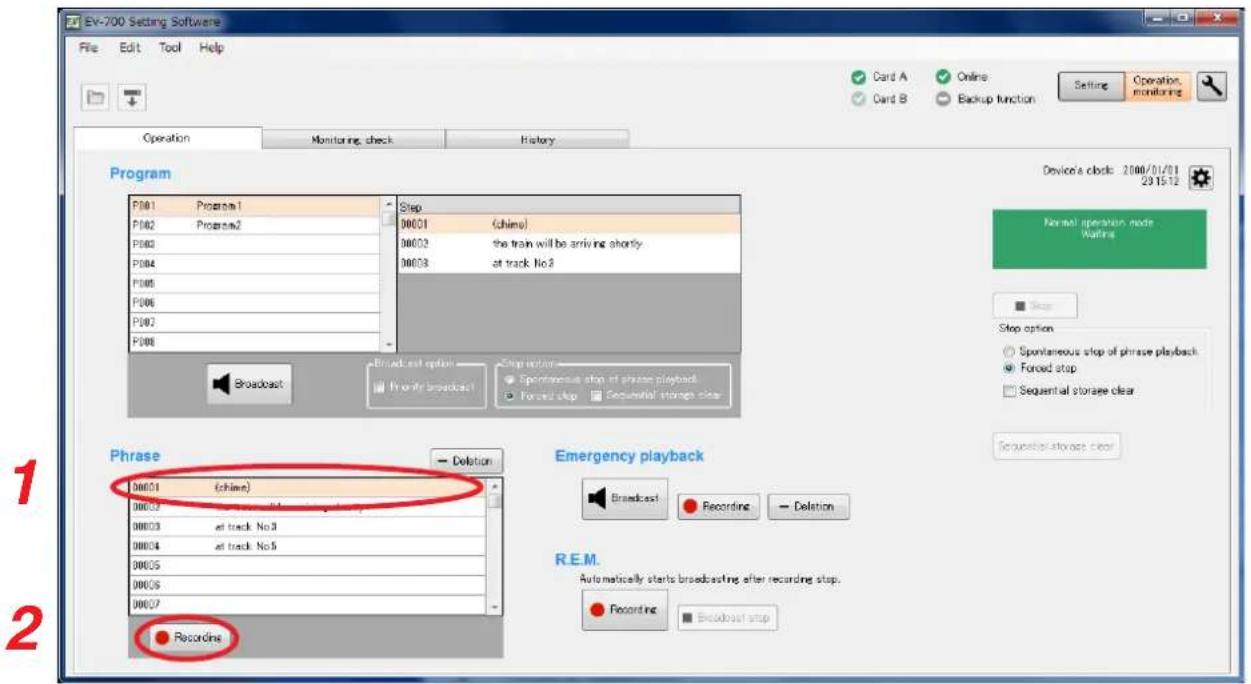
A confirmation dialog appears.
Step 3. Click the Recording start button.
Recording starts at the EV-700.
The Recording stop dialog appears during recording.
Step 4. Speak into the microphone or play the audio source equipment.
Step 5. Click the Recording stop button.
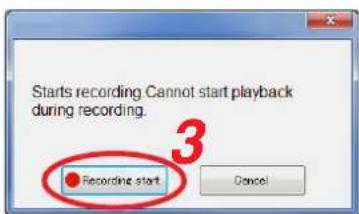
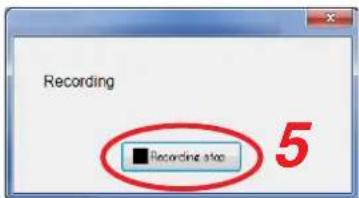
16.6. Deleting the Phrase Audio Source
The audio source registered for the phrase can be deleted.
Step 1. Select the phrase number to be deleted in the Phrase list on the Device operation screen.
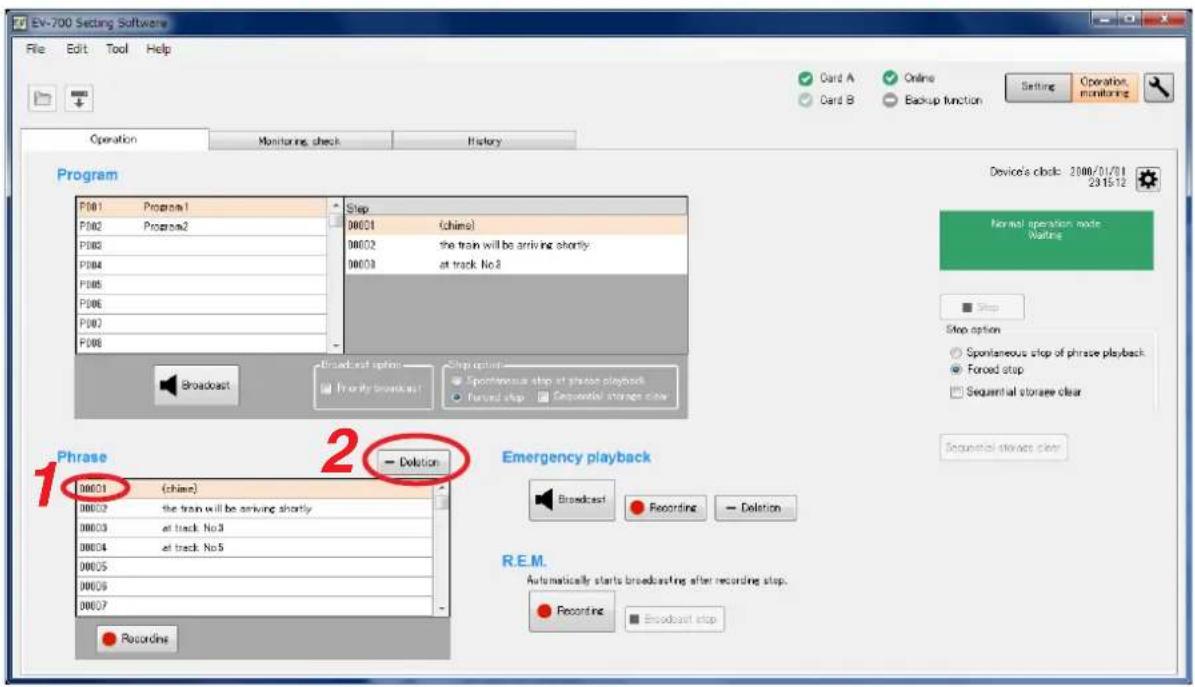
Step 2. Click the Deletion button for the phrase.
A confirmation dialog appears.
Step 3. Click the Yes button.
The audio source of the selected phrase number will be deleted.
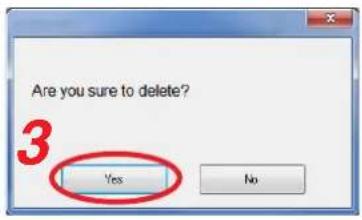
16.7. Starting the Emergency Playback Broadcast
Make the emergency playback broadcast by playing the audio source prerecorded for the emergency playback. This broadcast can be made with the highest priority over other broadcasts such as the program broadcast and microphone broadcast.
Step: Click the Broadcast button for the emergency playback on the Device operation screen.
The audio source recorded for the emergency playback is broadcast.
When the other broadcast is being made, the audio source for the emergency playback goes through by interrupting other broadcast.
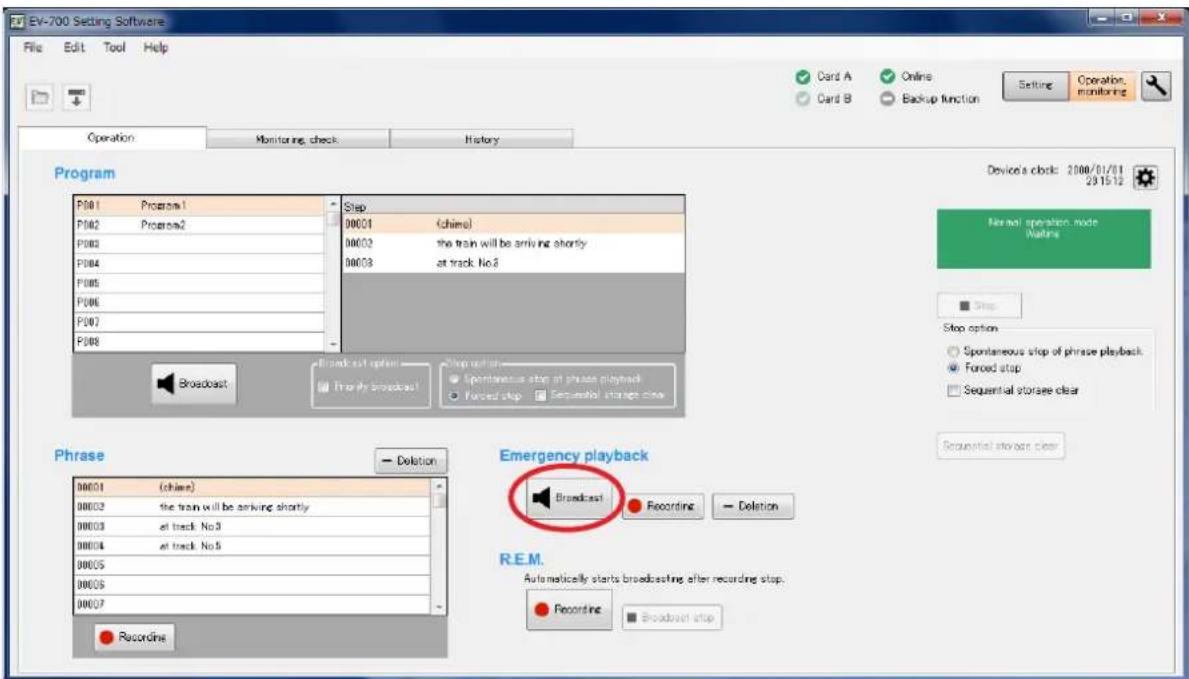
The Broadcast button changes to the Broadcast stop (Stop) button during broadcast. To stop the broadcast, click the Stop button.
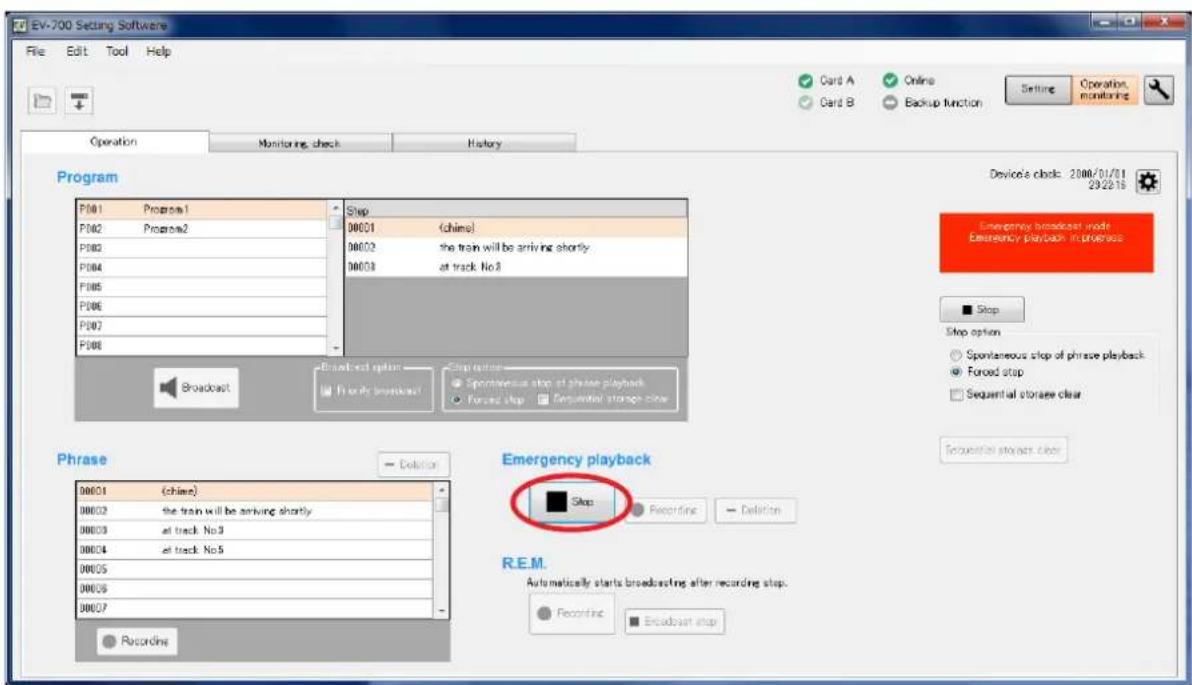
16.8. Recording the Audio Source to be used for the Emergency Playback Broadcast
Prerecord an audio source to be used for the emergency playback broadcast.
Sampling frequency of the recorded audio source is identical to that set on the Project information screen (p. 88) of the project.
When recording an audio source from the microphone input, connect a microphone meeting the following specification to the EV-700 in advance.
Microphone input specification: -55 dB (0 dB = 1 V), 600 Ω, unbalanced, 6.3 mm phone jack
When recording an audio source from the line input, connect an audio source equipment meeting the following specification to the EV-700 in advance.
Line input (rear-mounted) specification: -20 dB (0 dB = 1 V), 10 kΩ, unbalanced, removable terminal block
Line input (front-mounted) specification: -29 dB (0 dB = 1 V), 10 kΩ, unbalanced, RCA pin jack
The table below shows the maximum recordable time.
| Sampling frequency setting | Recording time limit (Total of all audio sources) |
| 44.1 kHz About 3 hours | |
| 32 kHz About 4 hours | |
Note
Recording stops if the memory card becomes full.
Step 1. Click the Recording button for the emergency playback on the Device operation screen.
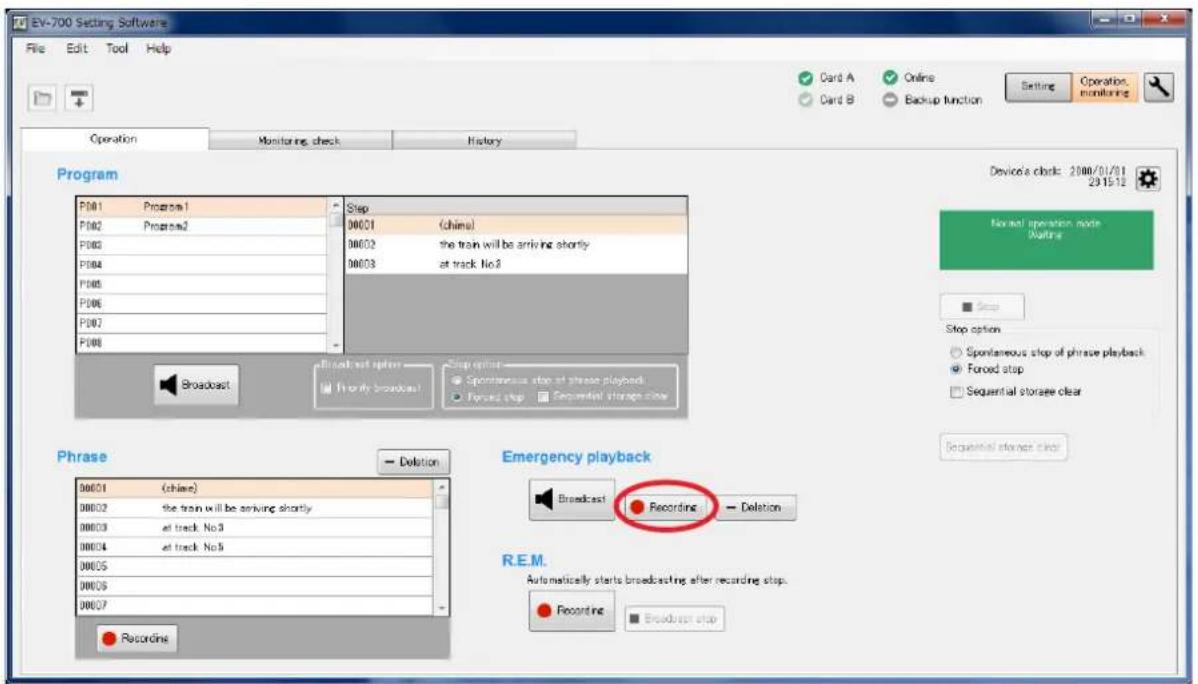
A confirmation dialog appears.
Step 2. Click the Recording start button.
Recording starts at the EV-700.
The Recording stop dialog appears during recording.
Note
You cannot start playback during recording.
Step 3. Speak into the microphone or play the audio source equipment.
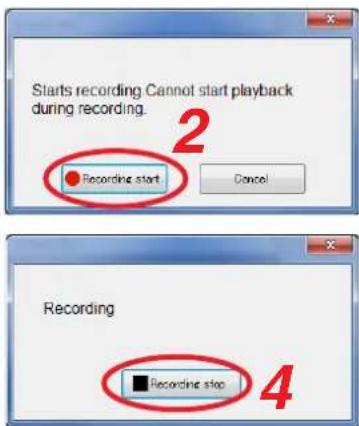
Step 4. Click the Recording stop button.
The audio source to be used for the emergency playback broadcast is saved to the EV-700 and the recording stops.
16.9. Deleting the Audio Source used for the Emergency Playback Broadcast
The audio source registered for the emergency playback broadcast can be deleted.
Step 1. Click the Deletion button for the emergency playback on the Device operation screen.
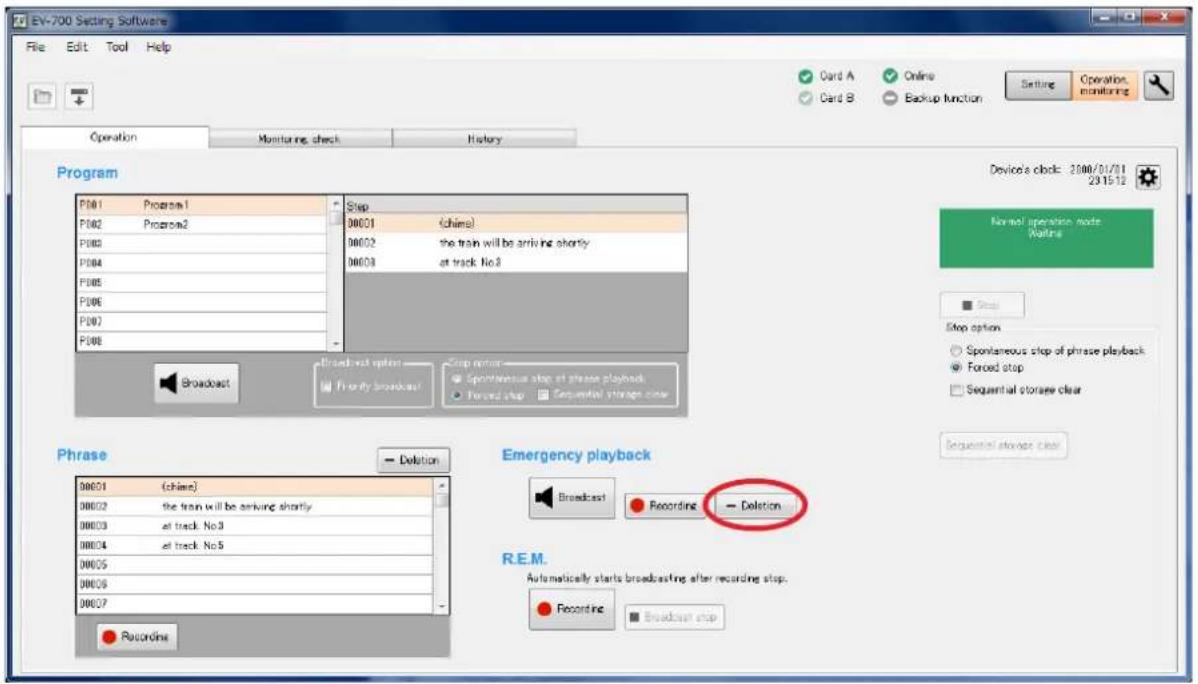
A confirmation dialog appears.
Step 2. Click the Yes button.
The audio source for the emergency playback is deleted at the EV-700.
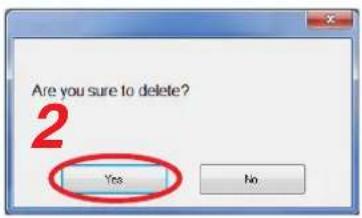
16.10. Starting the R.E.M. Playback
Recorded audio signals can be automatically and repeatedly broadcast instantly after recording completion. Sampling frequency of the recorded audio source is identical to that set on the Project information screen (p. 88) of the project.
When recording an audio source from the microphone input, connect a microphone meeting the following specification to the EV-700 in advance.
Microphone input specification: -55 dB (0 dB = 1 V), 600 Ω, unbalanced, 6.3 mm phone jack
When recording an audio source from the line input, connect an audio source equipment meeting the following specification to the EV-700 in advance.
Line input (rear-mounted) specification: -20 dB (0 dB = 1 V), 10 kΩ, unbalanced, removable terminal block
Line input (front-mounted) specification: -29 dB (0 dB = 1 V), 10 kΩ, unbalanced, RCA pin jack
The table below shows the maximum recordable time.
| Sampling frequency setting | Recording time limit (Total of all audio sources) |
| 44.1 kHz About 3 hours | |
| 32 kHz About 4 hours | |
Notes
• Recording stops if the memory card becomes full.
- Playback of other broadcast cannot be started during recording.
Step 1. Click the Recording button for R.E.M. on the Device operation screen.
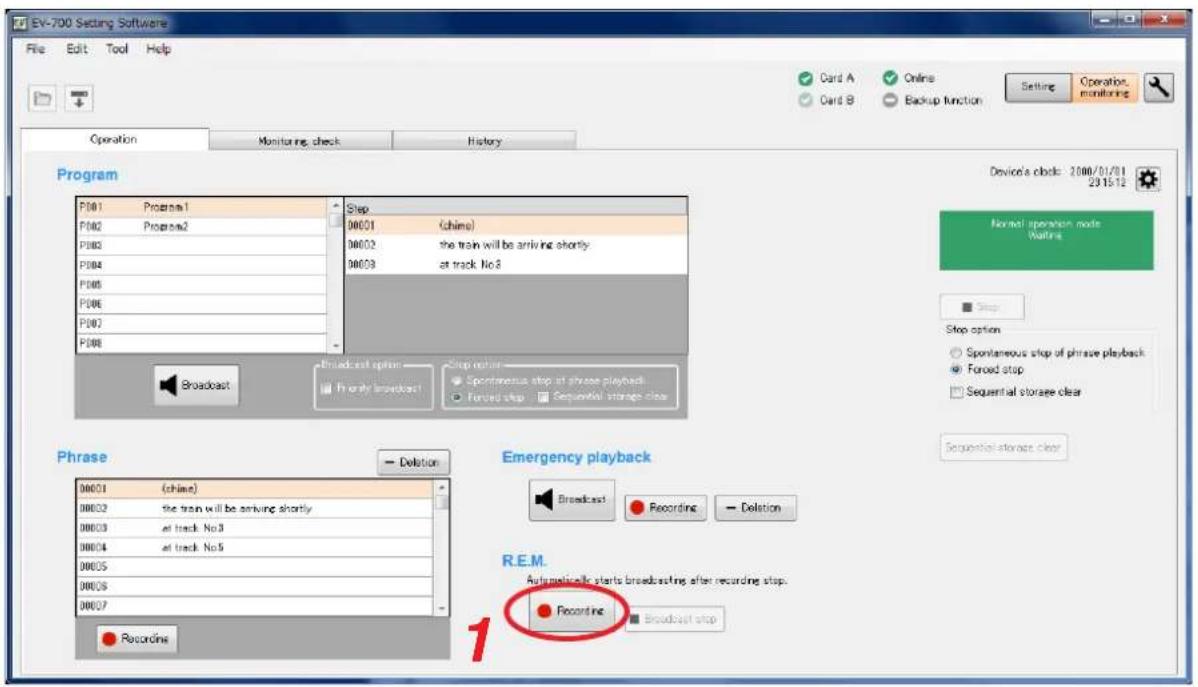
A confirmation dialog appears.
Step 2. Click the Recording start button. Recording starts at the EV-700.
The Recording stop dialog appears during recording.
Step 3. Speak into the microphone or play the audio source equipment.
Step 4. Click the Recording stop button. Broadcast starts with the recorded content. The recorded content is automatically and repeatedly broadcast. The Broadcast stop button becomes active once broadcast starts. To stop the broadcast, click the Stop button.
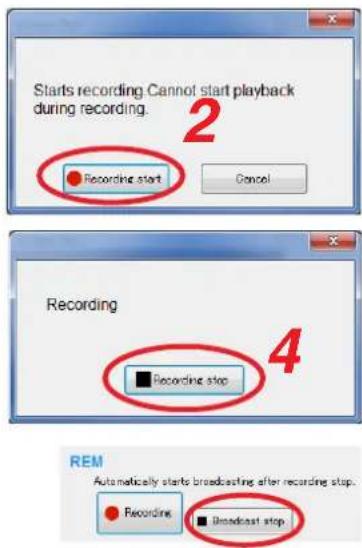
16.11. Stopping Broadcast and Recording
If you click the "Operation, monitoring" button located at the upper right corner of the Initial screen, the Operation and Monitoring screen appears.
By clicking the Stop button located at the upper right corner of the screen, you can stop the broadcast or recording started not only by using the EV-700 Setting software from the PC but also through the EV-700's front panel operation or by way of the contact input.
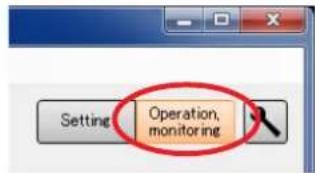
Step 1. Click the Stop button located at the upper right corner of the screen.
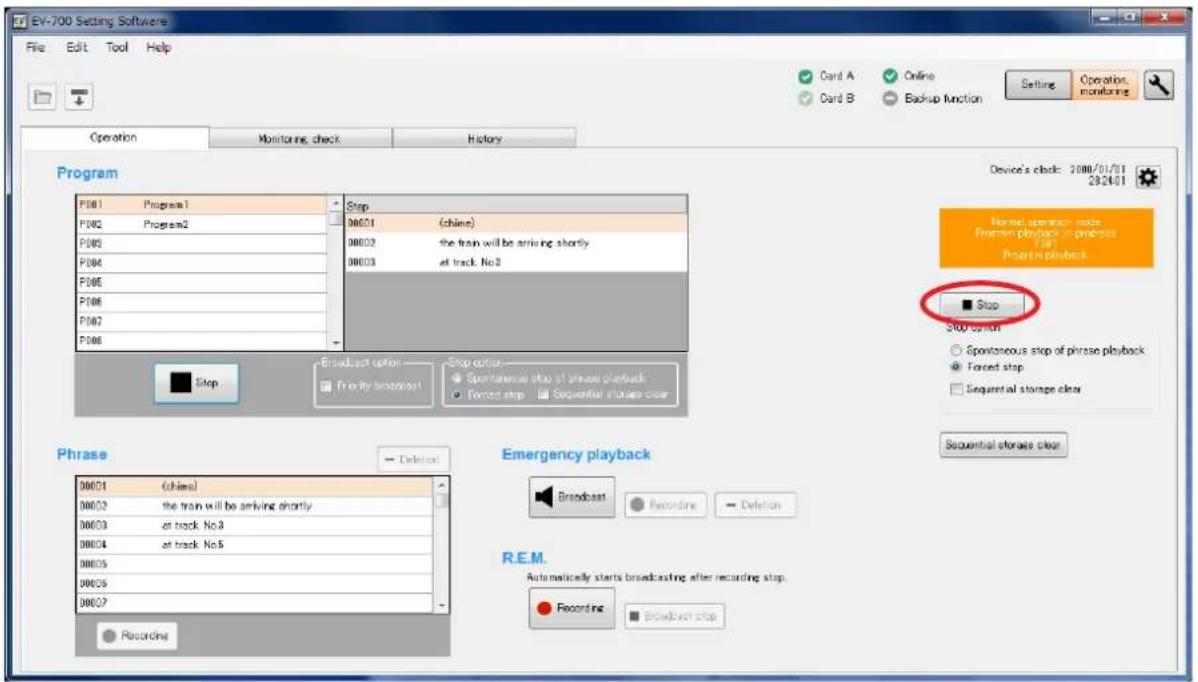
Tip
Stop option can be set.
Spontaneous stop of phrase playback: Stops playback at the time when the phrase has been played to the end.
Forced stop: Stops playback instantly when the Stop button is clicked.
Sequential storage clear: Checking the "Sequential storage clear" box cancels all waiting broadcasts and stops the current broadcast.
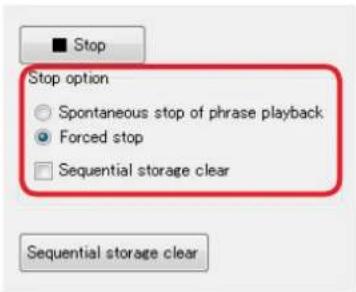
A confirmation dialog appears.
Step 2. Click the Yes button.
Broadcast or recording stops.
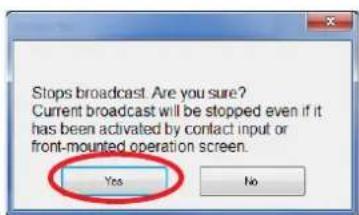
2
16.12. Setting the EV-700's Clock
If you click the "Operation, monitoring" button located at the upper right corner of the Initial screen, the Operation and Monitoring screen appears.
EV-700's clock can be set.
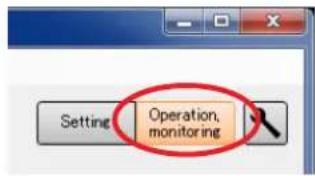
Step 1. Click the Device's clock setting button.
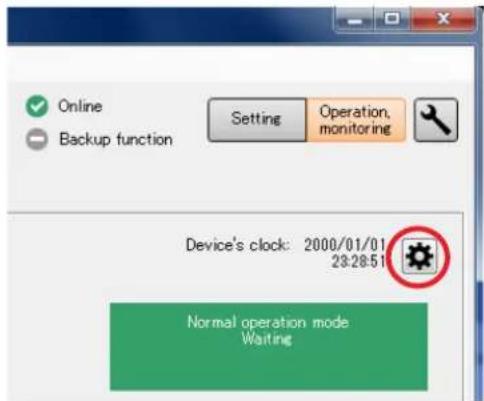
The Device's time setting dialog appears.
Step 2. Set the time.
2-1. When entering the date and time
Enter the date and time with the PC's numeric keys or change figures by clicking the Up and Down buttons located at the right side of each figure, then click Setting button.
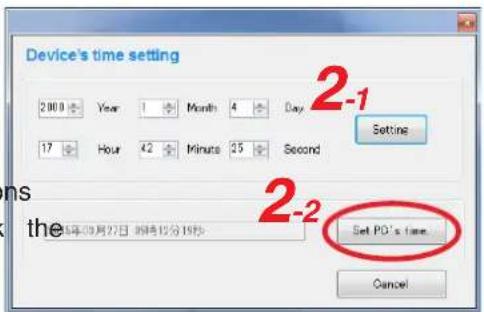
2-2. When acquiring the PC time
Click the "Set PC's time" button.
17.1. Displaying the Monitoring and Check Screen
Connect the EV-700 to a PC online in advance. (See p. 67, "CONNECTING TO THE EV-700.")
Step 1. Click the "Operation, monitoring" button located at the upper right corner of the screen. The Operation and monitoring screen appears.
Step 2. Click the "Monitoring, check" tab.
The Monitoring and check screen appears.
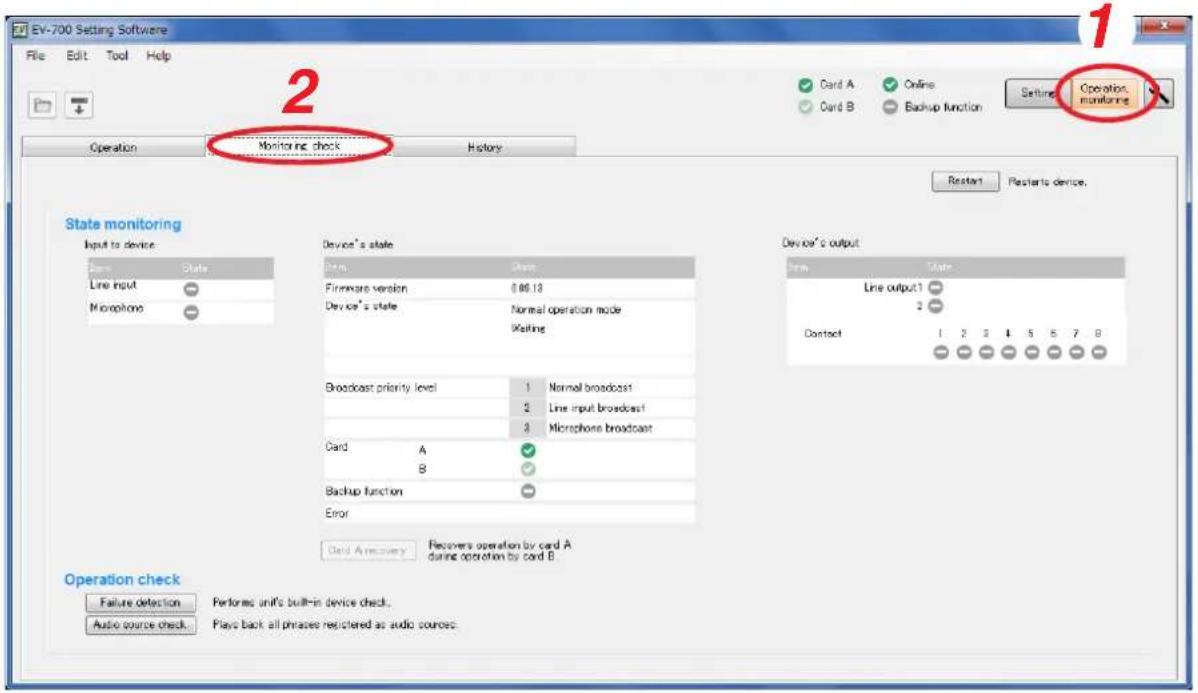
17.2. Description of the Monitoring and Check Screen
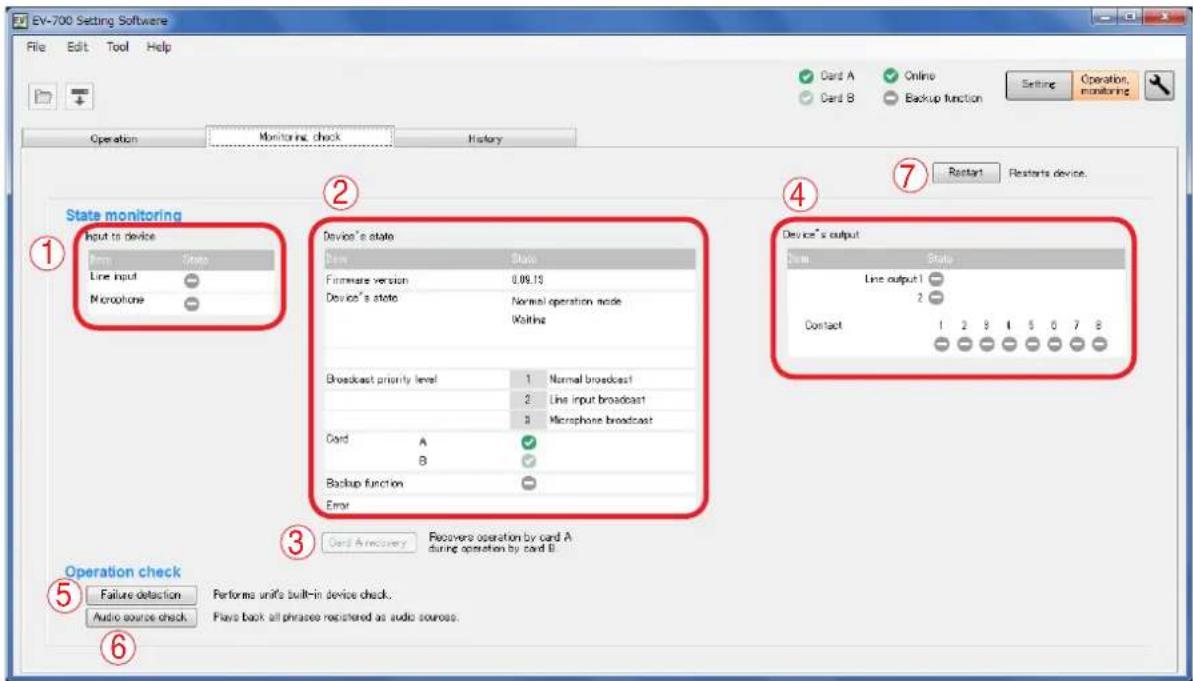
1. Input to device (display only)
| Item Display | State | |
| Line input Displays | input state to the Line input. | |
| Input present | ||
| Input not present | ||
| Microphone input | Displays input state to the Microphone input. | |
| Input present | ||
| Input not present | ||
2. Device's state (display only)
| Item Display Status | ||
| Firmware version Displays the EV-700's firmware version number. | ||
| Device's state | Displays the EV-700's state such as the Normal operation mode, Emergency broadcast mode, or Maintenance mode.Also displays the state such as on standby or playback in progress when in the Normal operation mode. | |
| Broadcast priority level | Displays the normal broadcast, line input broadcast, and microphone broadcast in the descending order of priority level. | |
| Card A and B Displays the state of the EV-700's Memory card A or B. | ||
| ✓ | Card inserted, Operating | |
| ✓ | Card A inserted, Standby | |
| ✗ | Card error occurred. | |
| ⊖ | Card not inserted. | |
| Backup function | Displays the enable/disable state of the backup function of the EV-700's memory card. | |
| ✓ | Backup function: ON (Function valid) | |
| ! | Backup function: ON (Function invalid) | |
| ⊖ | Backup function: OFF | |
| Error Displays the error state of the EV-700. | ||
| ✗ | Error occurred.Displays the error code (see p. 180). | |
3. Card recovery button (Card A)
The button becomes active only when the Card A is loaded and the Card B handles operation. If you click this button, operation returns back to the one using the Card A.
4. Device's output (display only)
| Item Display | State | |
| Line outputs 1 and 2 | Displays output state of the Line output 1 or 2. | |
 | Active | |
| [2406] | Inactive | |
| Contact Displays the output states of the contact outputs 1 through 8. | ||
 | Closed | |
| [6KWW] | Open | |
5. Failure detection button
Operates the EV-700's fault detection function.
6. Audio source confirmation button (Audio)
Plays audio sources of all phrases registered in the EV-700.
7. Restart button
Restarts the EV-700.
17.3. Restarting the EV-700
Connect the EV-700 to a PC online before restarting the EV-700. (See p. 67, "CONNECTING TO THE EV-700.")
Step 1. Click the "Operation, monitoring" button located at the upper right corner of the screen. The Operation and monitoring screen appears.
Step 2. Click the "Monitoring, check" tab.
The Monitoring and check screen appears.
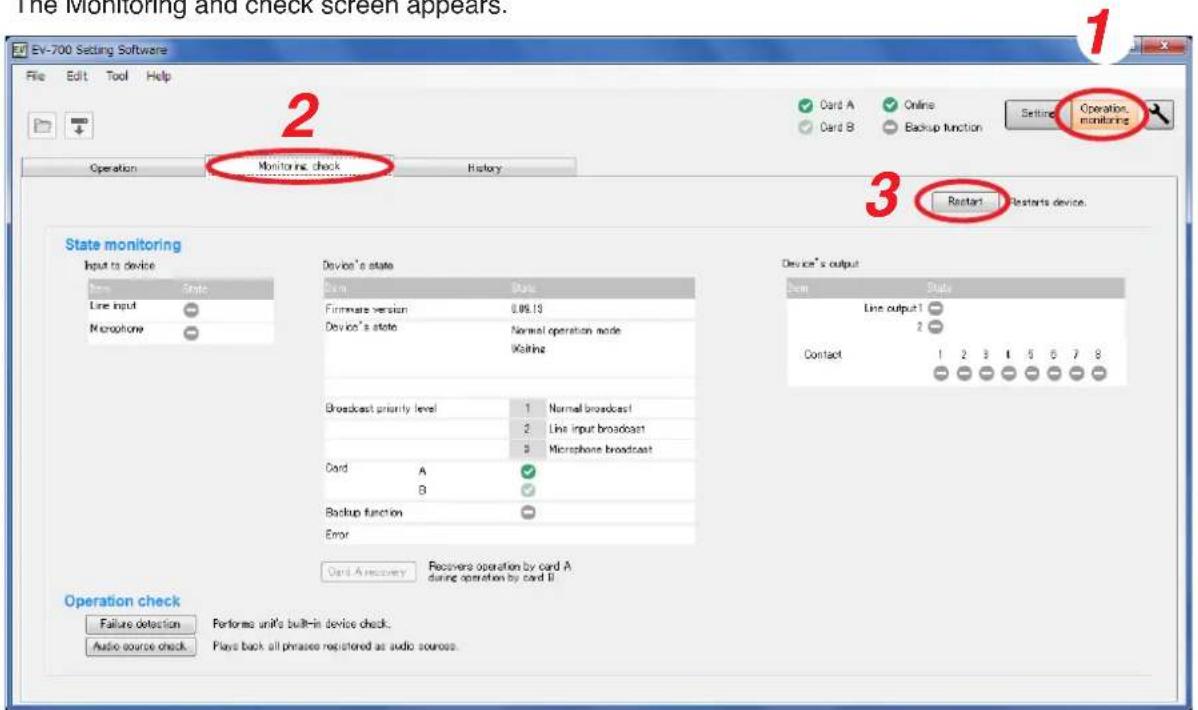
Step 3. Click the Restart button.
A confirmation dialog appears.
Step 4. Click the OK button.
The connected EV-700 restarts.
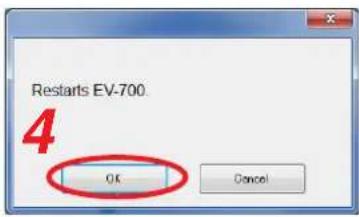
17.4. Returning the EV-700's Operation to That Using the Memory Card A
EV-700's operation can be returned to that using the Memory card A by connecting the EV-700 to a PC online when the EV-700 is operating using the Memory card B. (See p. 67, "CONNECTING TO THE EV-700.")
Step 1. Click the "Operation, monitoring" button located at the upper right corner of the screen. The Operation and monitoring screen appears.
Step 2. Click the "Monitoring, check" tab.
The Monitoring and check screen appears.
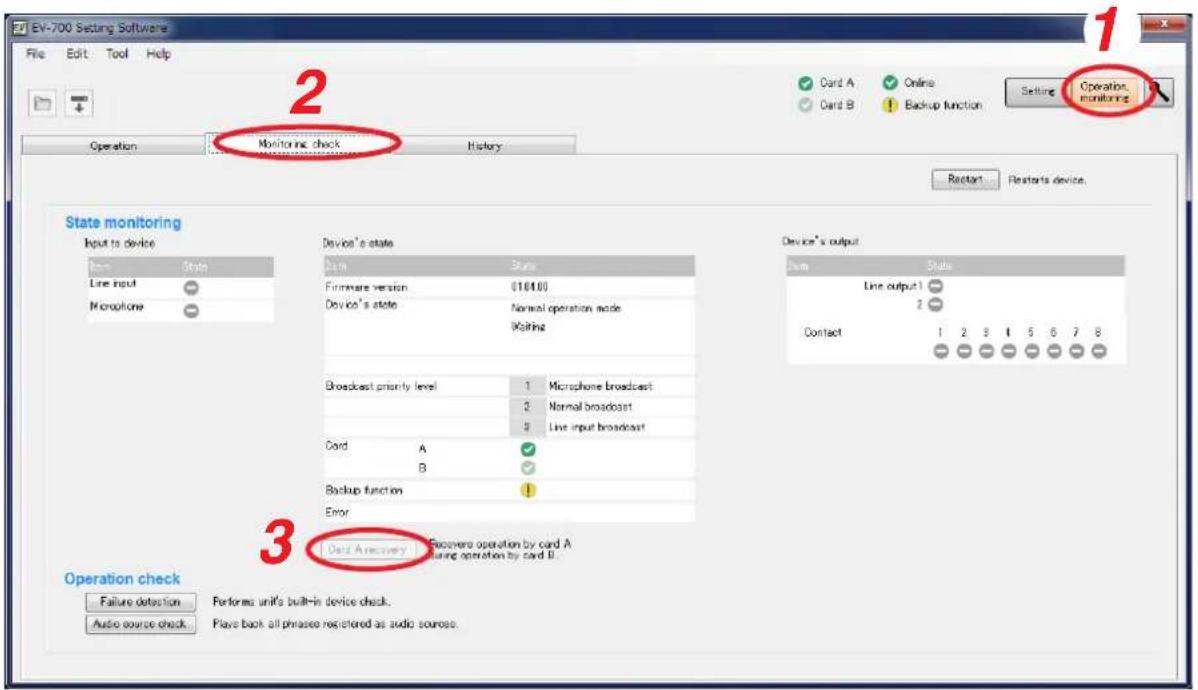
Step 3. Click the Card A recovery button.
Operation of the connected EV-700 switches to that using the Memory card A.
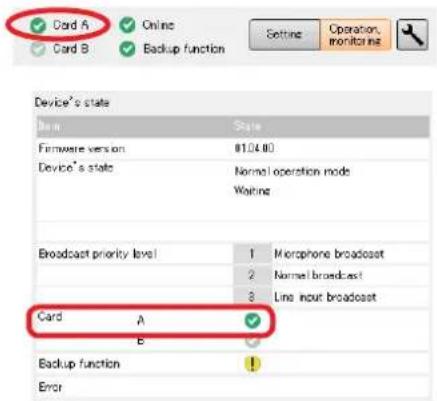
17.5. Executing Failure Detection of the EV-700
Failure detection (EV-700's built-in device check) of the EV-700 can be performed by connecting the EV-700 to a PC online. (See p. 67, "CONNECTING TO THE EV-700.")
Step 1. Click the "Operation, monitoring" button located at the upper right corner of the screen. The Operation and monitoring screen appears.
Step 2. Click the "Monitoring, check" tab.
The Monitoring and check screen appears.
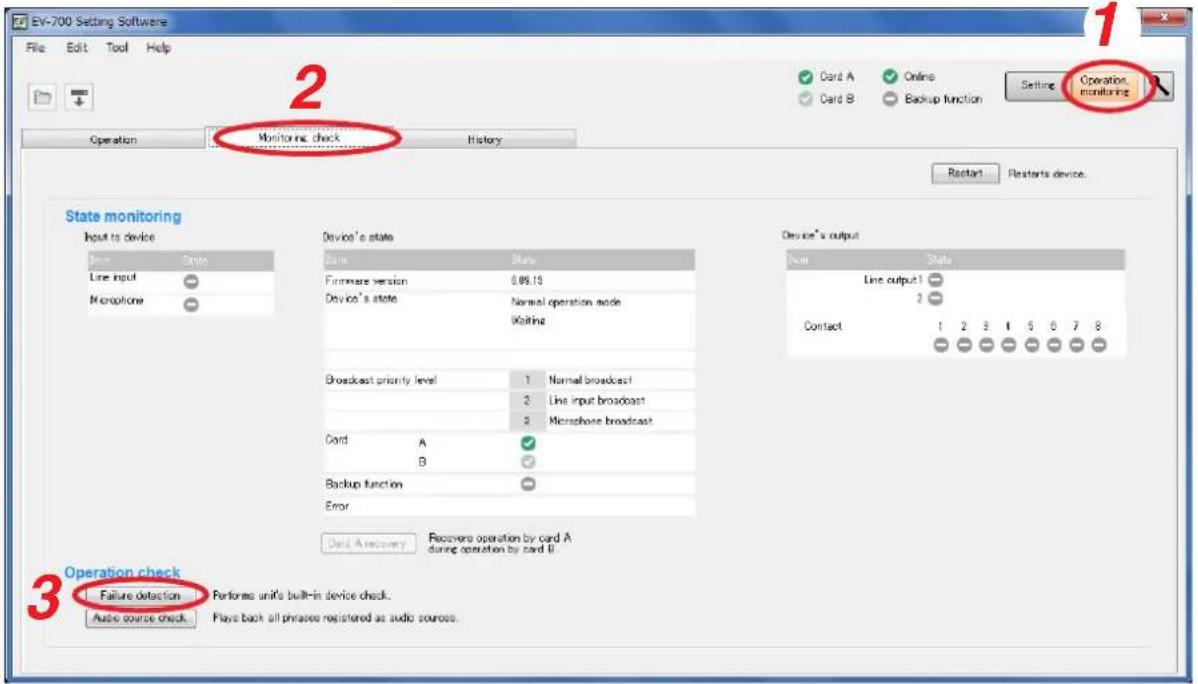
Step 3. Click the Failure detection button.
A confirmation dialog appears.
Step 4. Click the Yes button.
A failure detection start dialog appears, and the failure detection of the connected EV-700 will be executed.
Step 5. Click the Close button.
The dialog closes and the failure detection will start.
The indication "Self-check in progress" appears in the Device's state column.
The display reverts to the screen in Step 2 when the failure detection is completed.
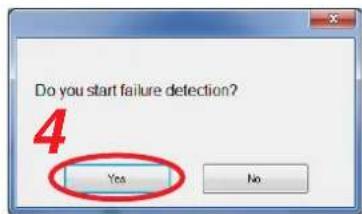
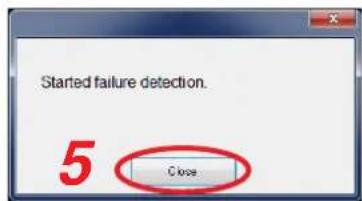
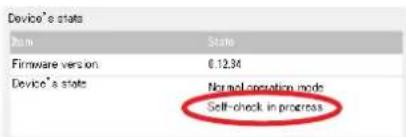
Notes
- You cannot execute the failure detection while other function such as program playback, emergency broadcast, or maintenance is being performed.
- If you perform other function while failure detection is being executed, the failure detection is interrupted. In such cases, retry by clicking the Failure detection button.
17.6. Confirming the Audio Sources Registered in the EV-700
You can confirm the audio sources by playing all phrases registered in the EV-700 after connecting the EV-700 to a PC online. (See p. 67, "CONNECTING TO THE EV-700.")
Step 1. Click the "Operation, monitoring" button located at the upper right corner of the screen. The Operation and monitoring screen appears.
Step 2. Click the "Monitoring, check" tab.
The Monitoring and check screen appears.
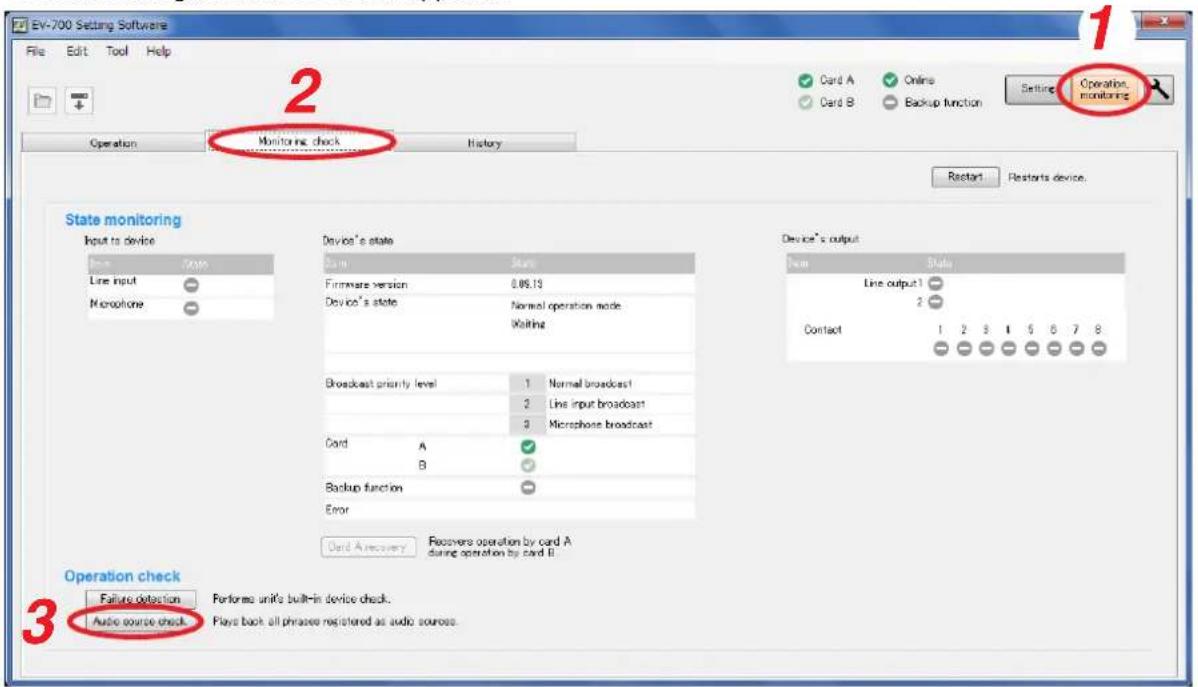
Step 3. Click the Audio source check button. A confirmation dialog appears.
Step 4. Click the Yes button.
An audio source check start dialog appears, and all the phrases registered in the connected EV-700 will be played.
Step 5. Click the Close button.
The dialog closes and the playback of all phrases will start. The indication "File check in progress" appears in the Device's state column.
The display reverts to the screen in Step 2 when the playback of all phrases is completed.
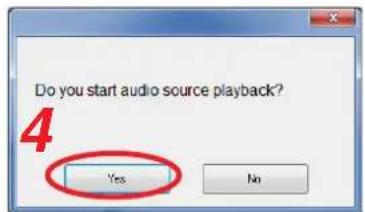
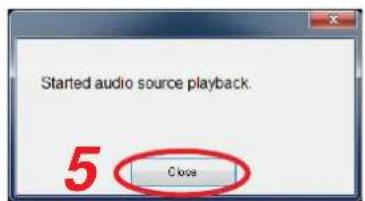
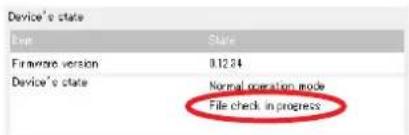
Notes
- You cannot perform the playback of all phrases while other function such as program playback, emergency broadcast, or maintenance is being performed.
- If you perform other function while playback of all phrases is being executed, the playback is interrupted. In such cases, retry by clicking the Audio source check button.
18. CONFIRMING THE EV-700'S OPERATION LOG
Note
When using the operation log, set the EV-700's clock to the right time in advance. (See p. 148, "Setting the EV-700's Clock."
18.1. Reading the History File
The EV-700's operation log can be confirmed by reading the EV-700's history file when the PC and EV-700 are online or by reading the history file saved on the memory card.
18.1.1. Reading the EV-700's history file when the PC and EV-700 are online
Connect the EV-700 to a PC online in advance. (See p. 67, "CONNECTING TO THE EV-700.")
Step 1. Click the "Operation, monitoring" button located at the upper right corner of the screen. The Operation and monitoring screen appears.
Step 2. Click the History tab. The History screen appears.
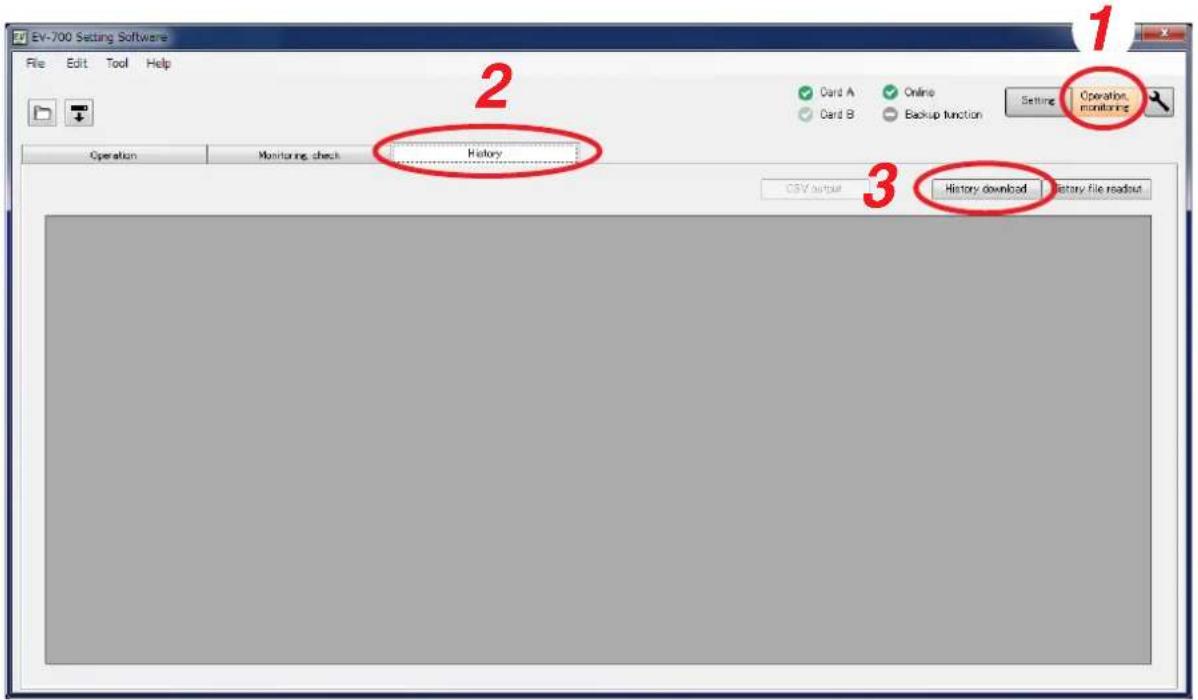
Step 3. Click the History download button. The folder selection screen appears.
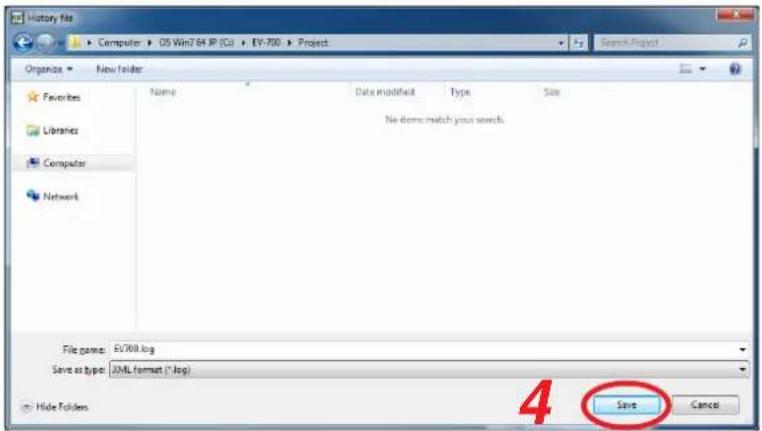
Step 4. Select the folder to read, then click the Save button. Download starts, and the operation log of the EV-700 online with the PC is displayed. (See p. 158, "Description of the History Screen.")
18.1.2. Reading the history file saved on the memory card
Save the history file to the memory card by operating the EV-700, then read the history file on the memory card with the procedures below.
There are 2 kinds of history files: one in XML format and another in CSV format. Both history files can be read.
Step 1. Click the "Operation, monitoring" button located at the upper right corner of the screen.
The Operation and monitoring screen appears.
Step 2. Click the History tab.
The History screen appears.
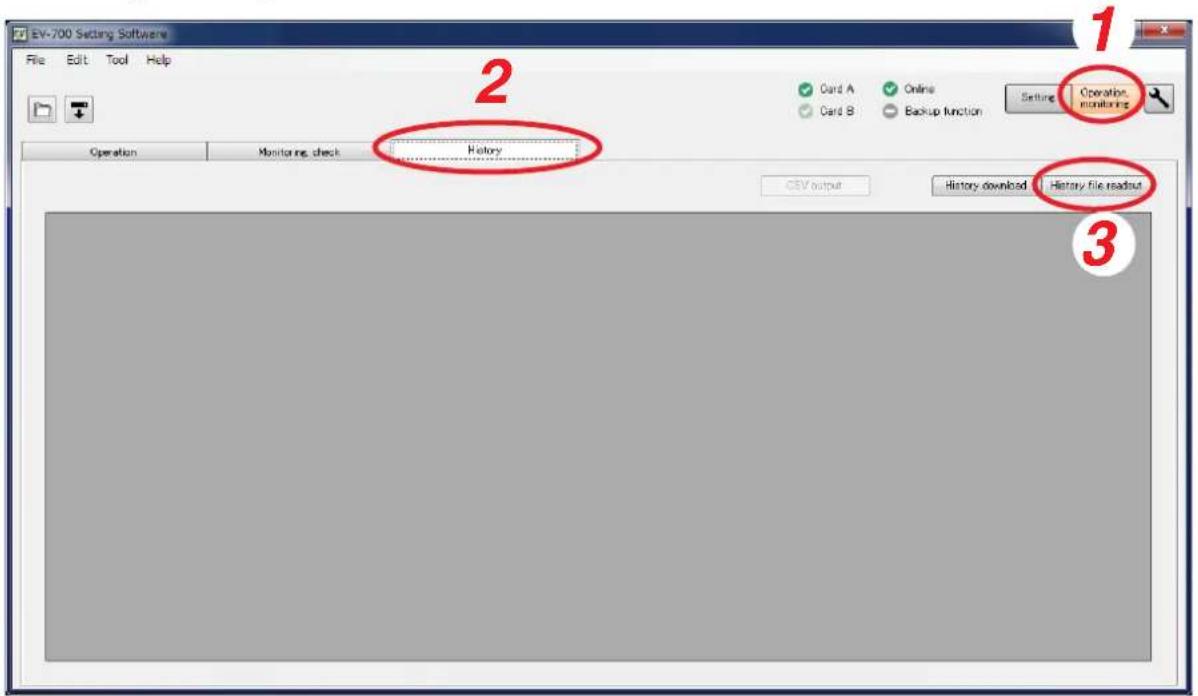
Step 3. Click the "History file readout" button.
A file selection screen appears.
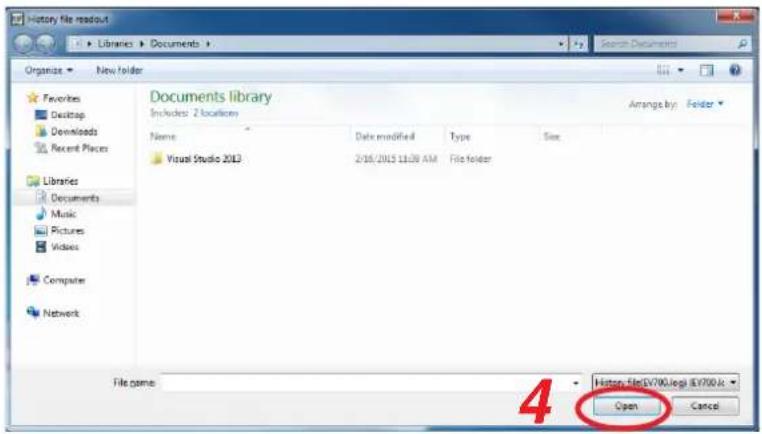
Step 4. Select the history file you wish to read, then click the Open button.
Contents of the designated history file appears. (See p. 158, "Description of the History Screen.")
18.2. Description of the History Screen
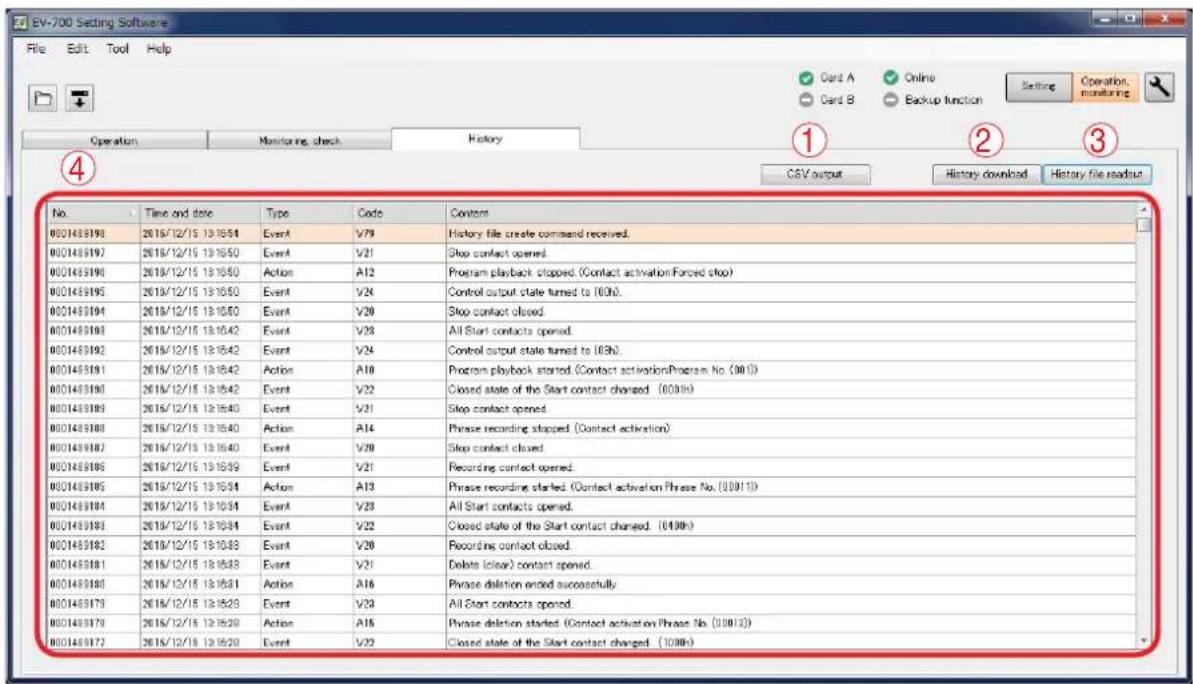
1. CSV output button
Outputs the contents displayed in the History list (4) in CSV format. (See p. 159, "Saving the History in CSV Format.")
2. History download button
Acquires the history files from the EV-700, then displays them in the History list (4).
3. History file readout button
Designate the history file to read, and the designated file appears in the History list (4).
4. History list
Displays the contents of the read history file. It displays the contents in order of recent history. Error history is indicated in red characters. Each item (Time and date, Type, and Code) can be sorted by clicking it.
| Item Display content | |
| Time and date | Displays the date* and time the logs are recorded. |
| Type | Action (See p. 172.)Event (See p. 176.)Error (See p. 180.) |
| Code Displays the history codes. | |
| Content Displays the history contents. | |
* Displayed based on the EV-700's clock time. Set the EV-700's clock to the right time in advance. (See p. 148, "Setting the EV-700's Clock.")
18.3. Saving the History in CSV Format
History contents being displayed on the history screen can be saved in CSV format.
A history file saved in CSV format can be read into the EV-700 Setting Software and its contents can be displayed. (See p. 156, "Reading the History File.")
18.3.1. Saving
Step 1. Click the CSV output button or select "File → CSV output → History" from the menu.
Tip
The CSV output button and "File → CSV output → History" operation in the menu are valid only while the History display screen is being displayed and history is read.
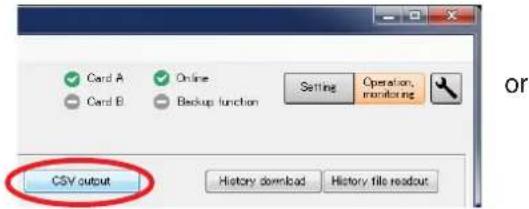
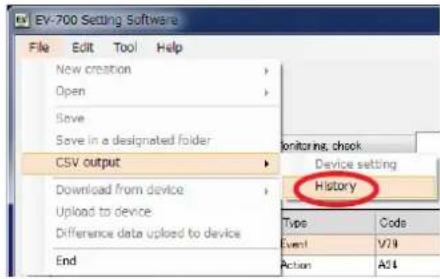
A destination folder selection screen appears.
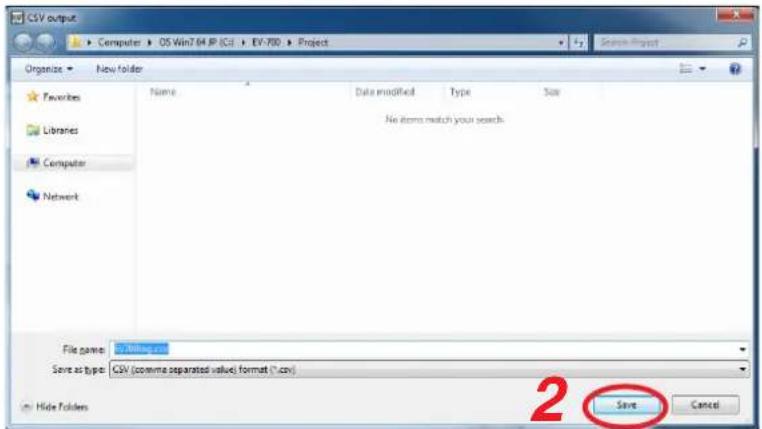
Step 2. Designate the destination folder and file name, then click the Save button.
Tip
The default file name is "EV-700log.csv."
A completion dialog appears when the save is complete.
Step 3. Click the Close button.
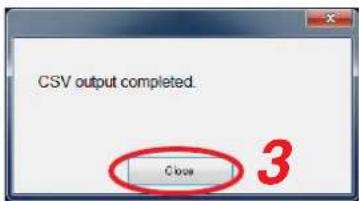
18.3.2. How to see history file in csv format
| A | B | C | D | F | F | |
| 1 | 446938 | 2015/1/20 | 11:46.19 | V79 | History file create command received. | |
| 2 | 446937 | 2015/1/20 | 11:46.11 | A24 | Emergency broadcast stopped. (Command activation:Forced stop) | |
| 3 | 446936 | 2015/1/20 | 11:46.11 | V24 | Control output state turned to (00h). | |
| 4 | 446935 | 2015/1/20 | 11:46.11 | V40 | Emergency broadcast stop command received. | |
| 5 | 446934 | 2015/1/20 | 11:45.57 | V24 | Control output state turned to (03h). | |
| 6 | 446933 | 2015/1/20 | 11:45.57 | A23 | R.E.M. broadcast playback started. (Command activation) | |
| 7 | 446932 | 2015/1/20 | 11:45.57 | V39 | R.E.M. (Playback) start command received. | |
| 8 | 446931 | 2015/1/20 | 11:45.48 | A22 | R.E.M. broadcast recording started. (Command activation) | |
| 9 | 446930 | 2015/1/20 | 11:45.48 | V38 | R.E.M. (Recording) start command received. | |
| 10 | 446929 | 2015/1/20 | 11:45.40 | A14 | Phrase recording stopped. (Command activation) | |
| 11 | 446928 | 2015/1/20 | 11:45.40 | V33 | Phrase recording stop command received. | |
| 12 | 446927 | 2015/1/20 | 11:45.35 | A13 | Phrase recording started. (Command activation:Phrase No. (32768)) | |
| 13 | 446926 | 2015/1/20 | 11:45.35 | V32 | Phrase recording start command received. | |
| 14 | 446925 | 2015/1/20 | 11:45.12 | A12 | Program playback stopped. (Command activation:Forced stop) | |
| 15 | 446924 | 2015/1/20 | 11:45.12 | V24 | Control output state turned to (00h). | |
| 16 | 446923 | 2015/1/20 | 11:45.12 | V31 | Program playback stop command received. | |
| 17 | 446922 | 2015/1/20 | 11:45.07 | V24 | Control output state turned to (03h). | |
| 18 | 446921 | 2015/1/20 | 11:45.07 | A10 | Program playback started. (Command activation:Program No. (002)) | |
| 19 | 446920 | 2015/1/20 | 11:45.07 | V30 | Program playback start command received. | |
| 20 | 446919 | 2015/1/20 | 11:45.02 | A12 | Program playback stopped. (No activation:Spontaneous stop) | |
| 21 | 446918 | 2015/1/20 | 11:45.02 | V24 | Control output state turned to (00h). | |
| 22 | 446917 | 2015/1/20 | 11:44.25 | V24 | Control output state turned to (C3h). | |
| 23 | 446916 | 2015/1/20 | 11:44.25 | A10 | Program playback started. (Command activation:Program No. (001)) | |
| 24 | 446915 | 2015/1/20 | 11:44.25 | V30 | Program playback start command received. |
1. History number
A History control number. The larger the number, the latter history in time. The history number would return to "0000000000" when it reaches an upper limit of "9999999999."
2. Date of history
Date information set to the EV-700 at the timing when history was recorded.
3. Hours, minutes, and seconds of history
Time information set to the EV-700 at the timing when history was recorded.
4. History code
Indicates category of history. History is grouped into 3 categories by a prefix alphabet.
A: Action, V: Event, E: Error
5. History content
Description of history.
19. PERFORMING MAINTENANCE
19.1. Maintenance with the EV-700 Setting Software
Settings initialization, Memory card management, and User information change can be executed on the Maintenance screen of the EV-700 Setting software.
Place the EV-700 and the PC in an online state and click the Maintenance button to display the Maintenance screen, then the EV-700 enters Maintenance mode, lighting the Maintenance indicator.
Note
Operation of the device and broadcast cannot be executed when in Maintenance mode.
When maintenance is complete, display the Operation and monitoring screen or disconnect the PC from the unit in order to terminate the Maintenance mode.
Tip
The EV-700 also enters Maintenance mode by way of the DIP switch setting at the EV-700, allowing you to copy the memory card and initialize the device setting. For details, read the instruction operation manual attached to the EV-700.
19.2. Displaying the Maintenance Screen
Connect the EV-700 to a PC online in advance. (See p. 67, "CONNECTING TO THE EV-700.")
Step: Click the Maintenance icon button located at the upper right of the screen. The Maintenance screen appears.
19.3. Description of the Maintenance Screen
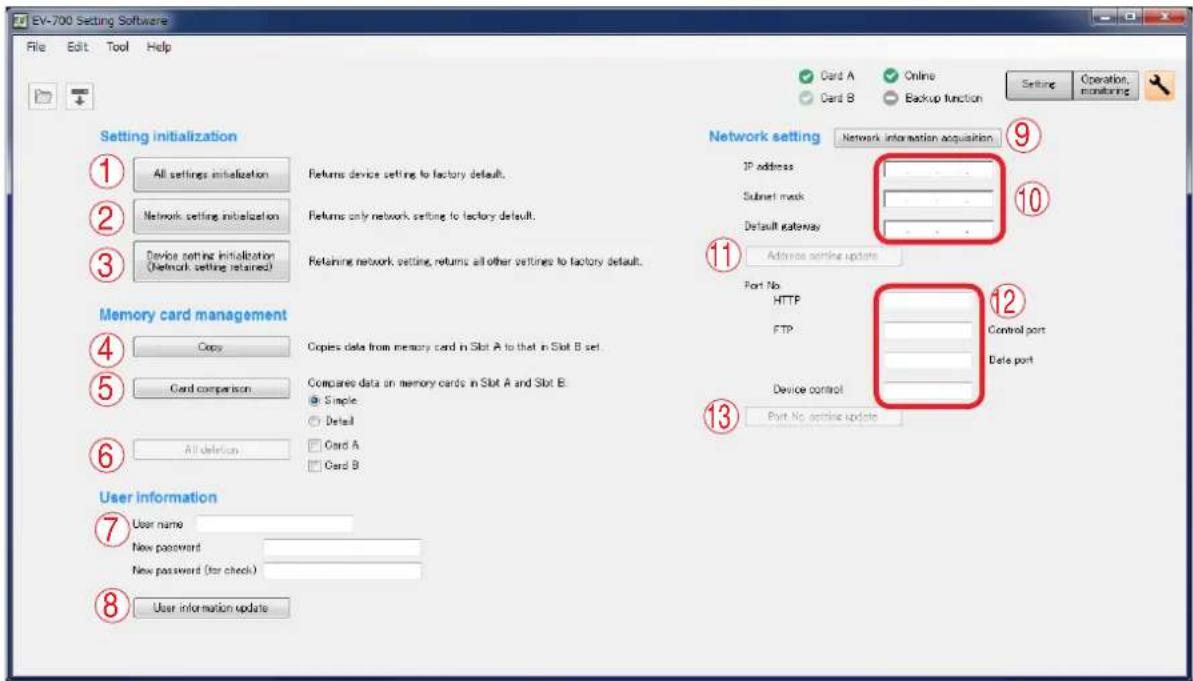
1. All settings initialization button
Returns all device setting items to the initial settings.
2. Network setting initialization button
Returns the Network items (IP address, Subnet mask, Default gateway, and Port number) of the device setting items to the initial settings.
3. Device setting initialization button
Returns all items except the Network ones of the device setting items to the initial settings.
4. Copy button
Copies the data on the Memory card A to the Memory card B.
5. Card comparison button
Checks if the files contained on the Card A exist on the Card B by comparing the contents on the both cards.
Select a method of comparison from "Simple mode" or "Full-function mode."
Simple mode: Compares only the file names.
Full-function mode:
Further checks whether the contents of both files are identical.
6. All deletion button
Deletes all the contents on the checked memory card(s) of the Card A and/or Card B.
7. User information
Enter the User name and Password as the authentication information when establishing connection to the EV-700.
Set each of the User name and Password with up to 256 characters.
Note: Shown below is the initial setting.
User name: EV700
Password: guest
8. User information update button
Updates the EV-700's user information.
9. Network information acquisition button
Acquires the network information of the EV-700 in online state
10. Address setting
Displays IP address, Subnet Mask, and Default gateway of the EV-700.
They can be changed.
11. Address setting update button
Updates IP address, Subnet Mask, and Default gateway.
This button becomes active when all information of the address setting is fully entered.
12. Port number setting
Displays the EV-700's port numbers. They can be changed.
13. Port number setting update button
Updates the port number setting.
This button becomes active when all information of the port number setting is fully entered.
19.4. Initializing the Device Setting
19.4.1. Initializing all the device setting items
All the device setting items can be initialized.
Connect the EV-700 to a PC online in advance. (See p. 67, "CONNECTING TO THE EV-700.")
Step 1. Click the All settings initialization button on the Maintenance screen.
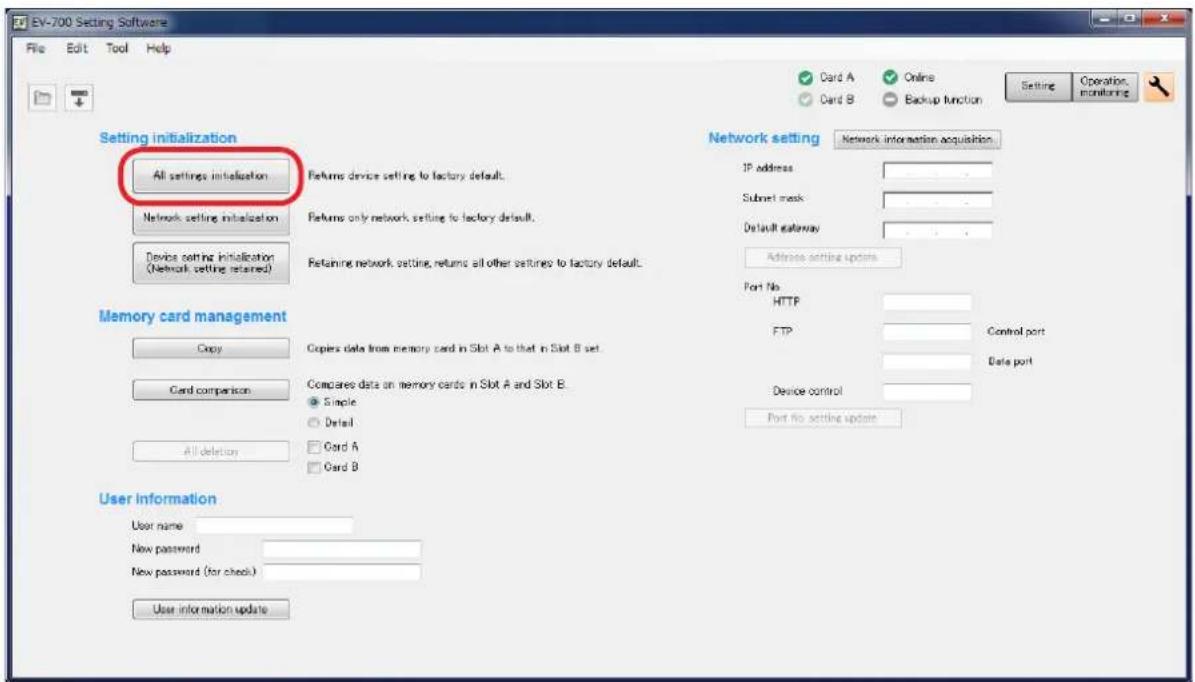
A confirmation dialog appears.
Step 2. Click the Yes button.
All item settings of the connected EV-700's device setting are deleted.
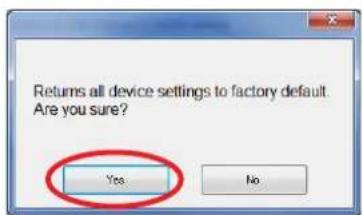
2
19.4.2. Initializing the network setting
Only the network items (IP address, Subnet mask, Default gateway, and Port number) of the device settings can be initialized.
Connect the EV-700 to a PC online in advance. (See p. 67, "CONNECTING TO THE EV-700.")
Step 1. Click the Network setting initialization button on the Maintenance screen.
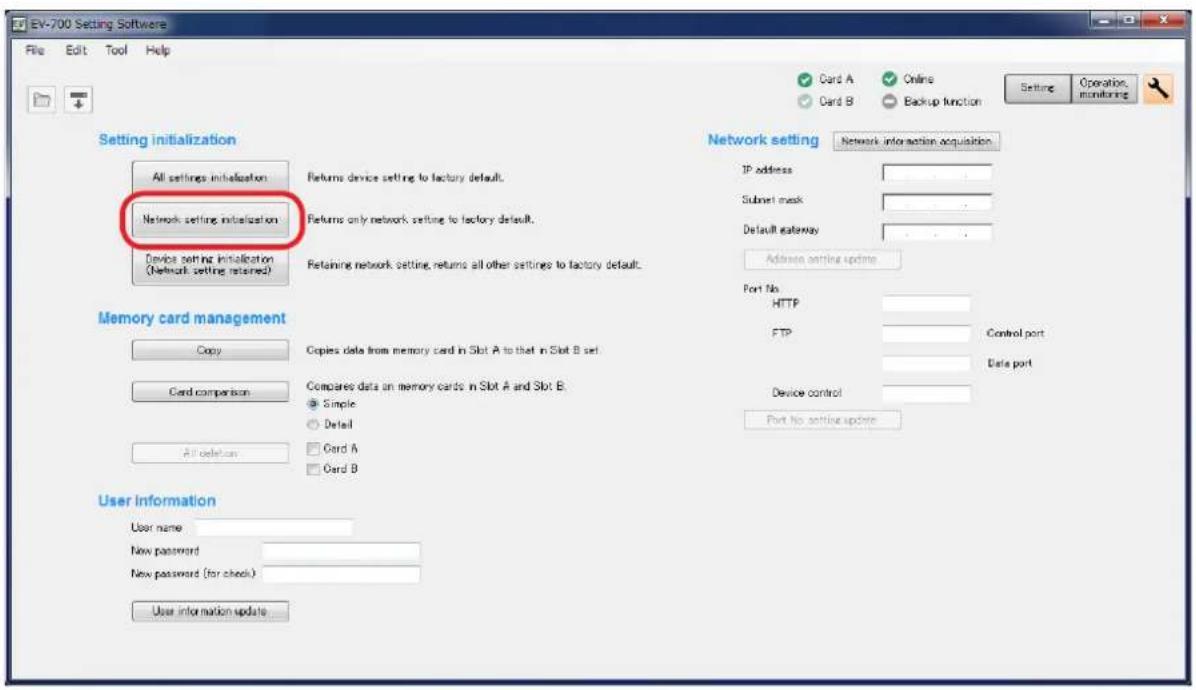
A confirmation dialog appears.
Step 2. Click the Yes button.
All item settings of the connected EV-700's device setting are deleted.
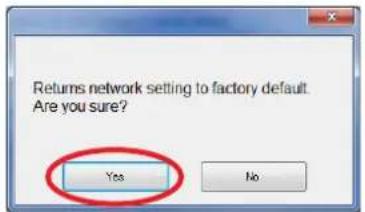
2
19.4.3. Initializing the device setting items except the network setting
All items except the network ones (IP address, Subnet mask, Default gateway, and Port number) of the device settings can be initialized.
Connect the EV-700 to a PC online in advance. (See p. 67, "CONNECTING TO THE EV-700.")
Step 1. Click the Device setting initialization button on the Maintenance screen.
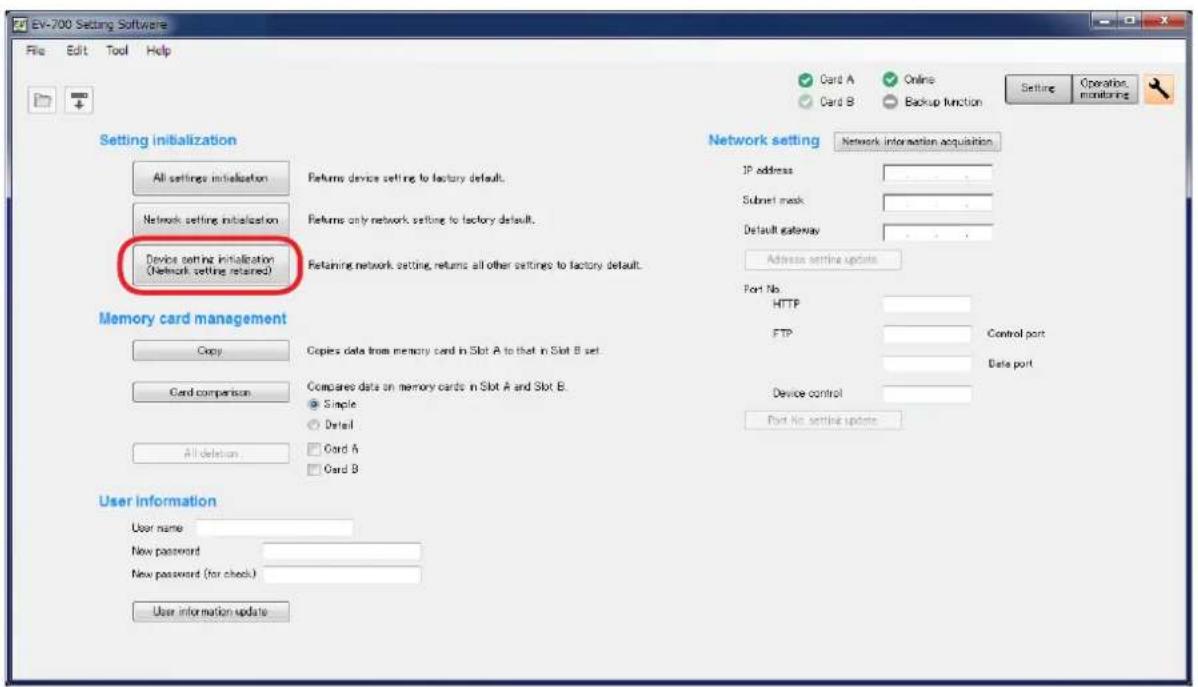
A confirmation dialog appears.
Step 2. Click the Yes button.
All item settings of the connected EV-700's device setting are deleted.
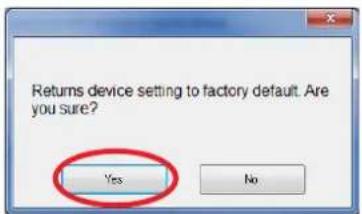
2
19.5. Managing the Memory Card
19.5.1. Copying the data on the memory card
Copy the data on the memory card inserted into the EV-700's Card slot A to the memory card in the Card slot B. Connect the EV-700 to a PC online in advance. (See p. 67, "CONNECTING TO THE EV-700.")
Note
The table below shows the rough time required for copying the memory card.
| Data on the memory card Copying time |
| Prerecorded audio files only About 11 minutes |
| Data size of 1 GB About 37 minutes |
Not the EV-700 Setting software but a PC is recommended to use for copying the data on the memory card. (See p. 15, "Making Backup Copy Using a PC.")
Step 1. Click the Copy button on the Maintenance screen.
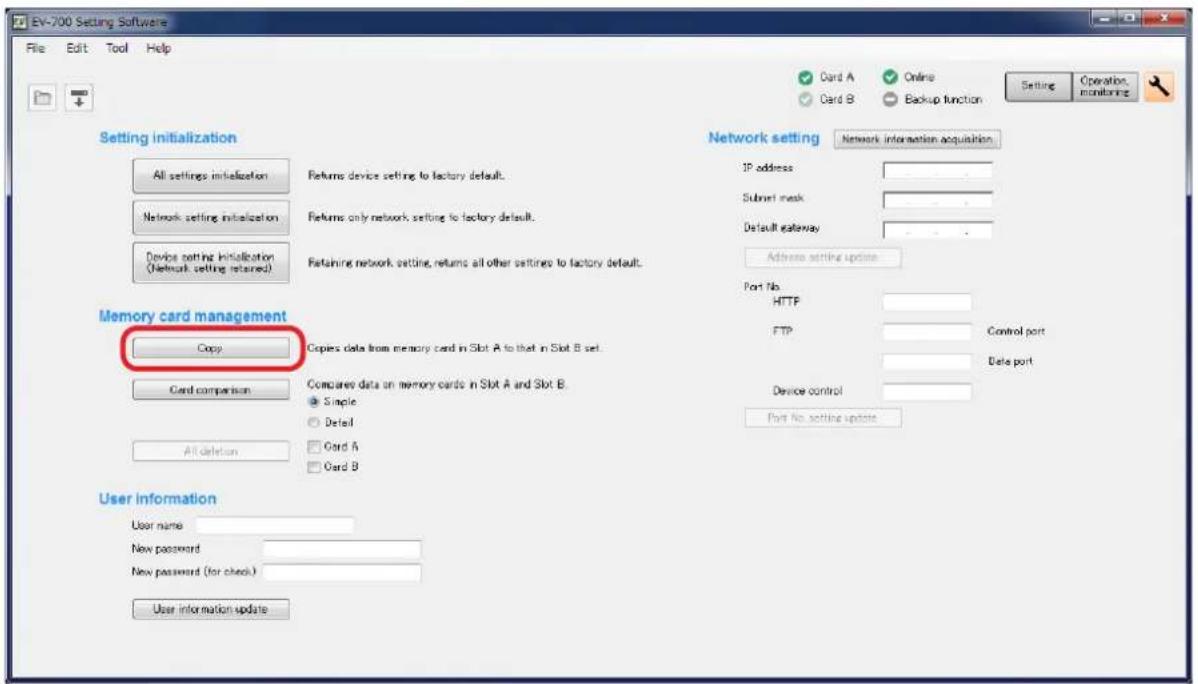
A confirmation dialog appears.
Step 2. Click the Yes button.
A progress dialog appears. Contents on the memory card in the connected EV-700's slot A will be copied to the memory card in the slot B.
A completion dialog appears when the copy has finished.
Step 3. Click the Close button.
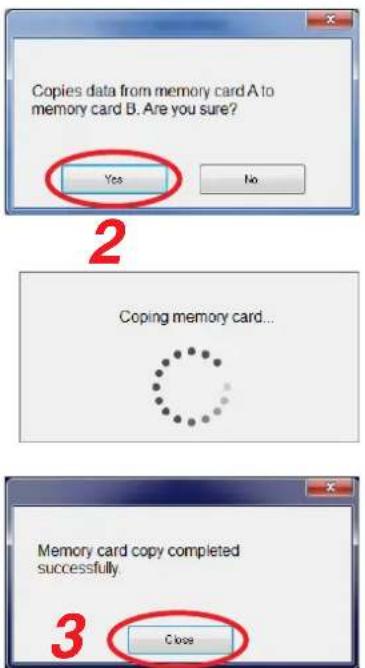
19.5.2. Comparing the contents of both memory cards
Data on the memory card inserted into the EV-700's Card slot A and that into the Card slot B can be compared. Connect the EV-700 to a PC online in advance. (See p. 67, "CONNECTING TO THE EV-700.")
Step 1. Click the Simple mode button or Full-function mode button on the Maintenance screen.
Simple: Compares only the file names.
Detail: Further checks whether or not the contents of both files are identical.
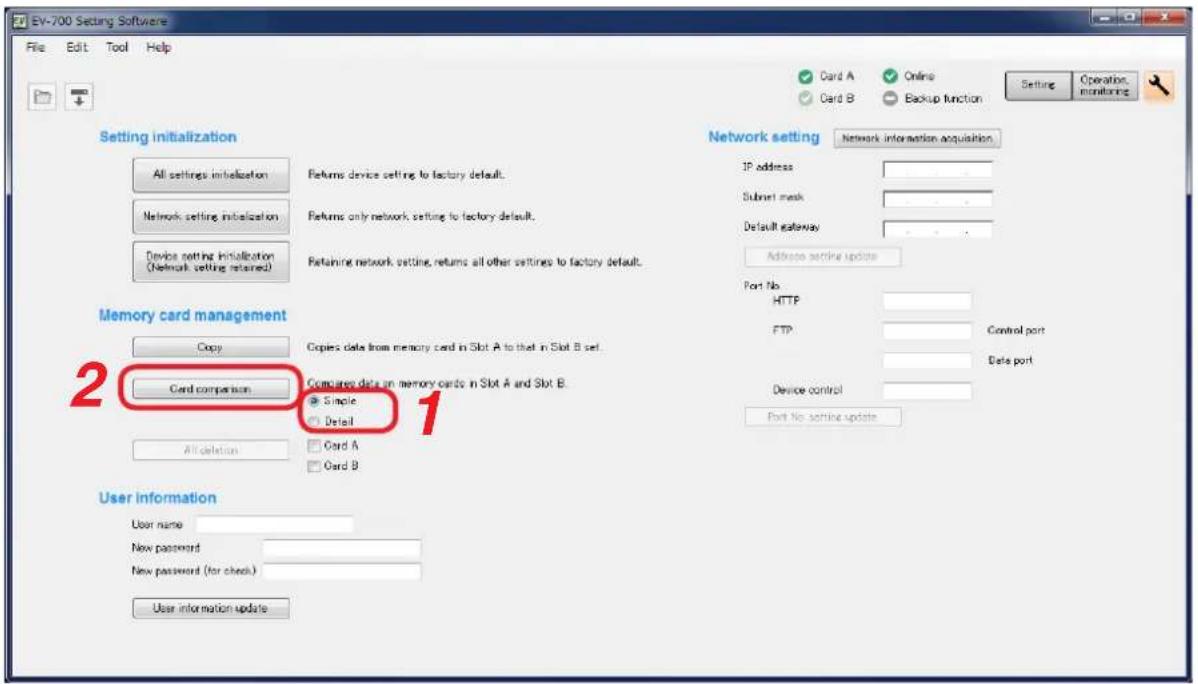
Step 2. Click the Card comparison button.
A confirmation dialog appears.
Step 3. Click the OK button.
A progress dialog appears, then checks if all the files contained on the memory card in the slot A exist on the memory card in the slot B.
A completion dialog appears when the comparison has finished.
Step 4. Click the Close button.
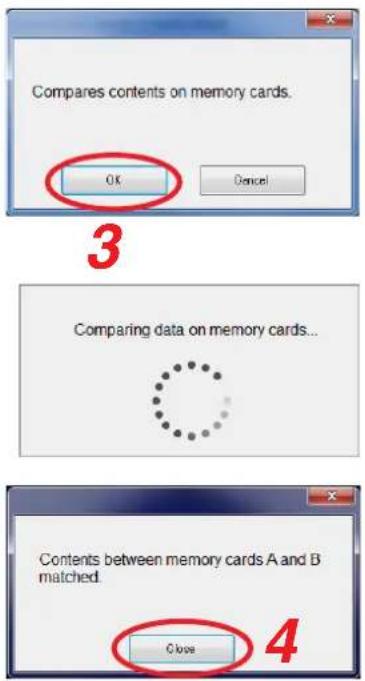
19.5.3. Deleting all the contents on the memory card
Data on the memory card inserted into the EV-700's Card slots A or B can be deleted.
Connect the EV-700 to a PC online in advance. (See p. 67, "CONNECTING TO THE EV-700.")
Step 1. Check the checkbox for "Card A" and/or "Card B" on the Maintenance screen.
Check the checkbox for the card from which you wish to delete data.
You can select either "Card A" or "Card B," or both.
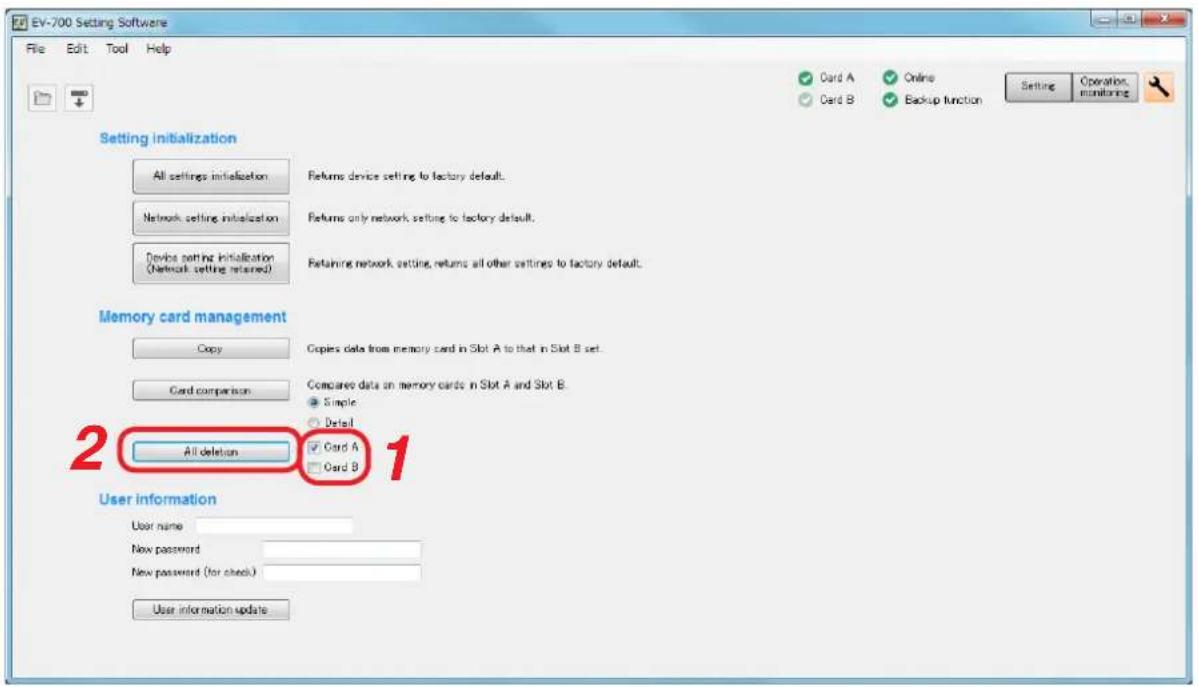
Step 2. Click the All deletion button.
A confirmation dialog appears.
Step 3. Click the OK button.
A progress dialog appears, then all the contents on the selected memory card inserted into the connected EV-700 will be deleted.
A completion dialog appears when the deletion has finished.
Step 4. Click the Close button.
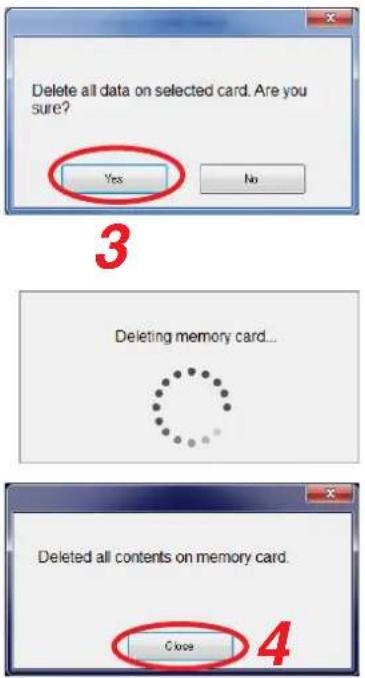
19.6. Changing the User Authentication Information
User name and password required when accessing the EV-700 can be changed.
Connect the EV-700 to a PC online in advance. (See p. 67, "CONNECTING TO THE EV-700.")
Tip: Shown below is the initial setting.
User name: EV700
Password: guest
Step 1. Enter the user information on the Maintenance screen.
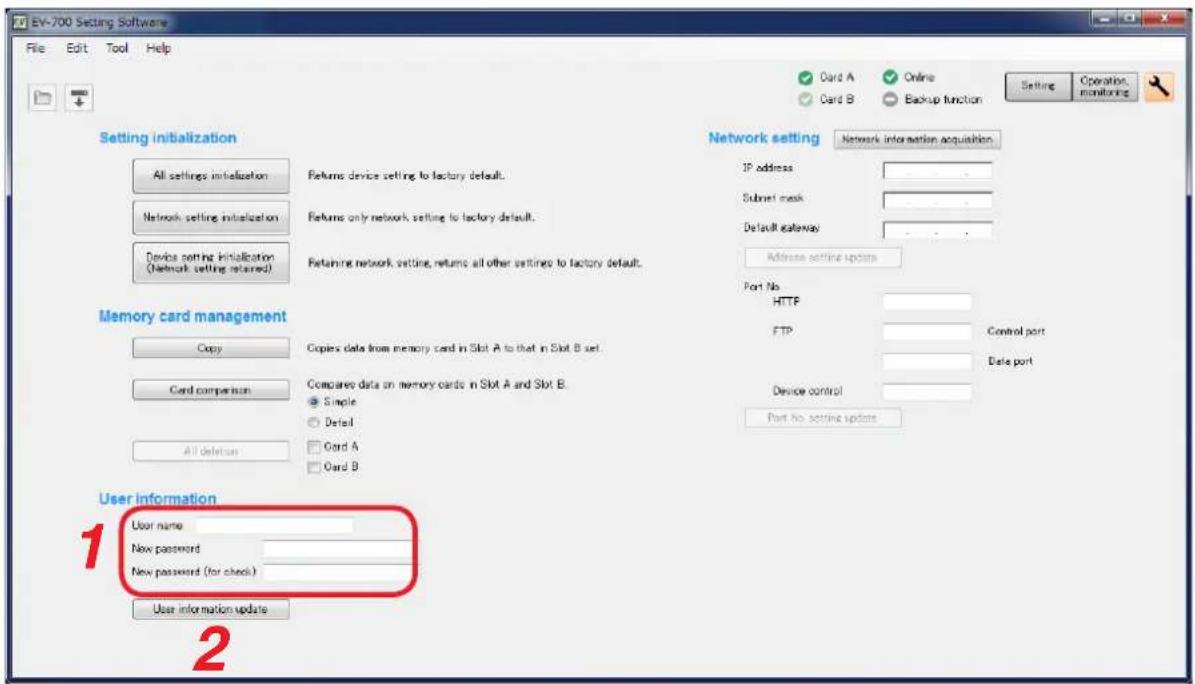
Enter each of the "User name" and "New password" with up to 16 alphanumeric characters except those shown below.
Unusable characters: "* / : <> ? \ |
Enter the same password in the "New password (for check)" field.
Step 2. Click the User information update button.
A confirmation dialog appears.
Step 3. Click the Yes button.
User name and password of the EV-700 in an online state are updated.
After completing the upload, a dialog at right is appears.
Step 4. Click the Close button.
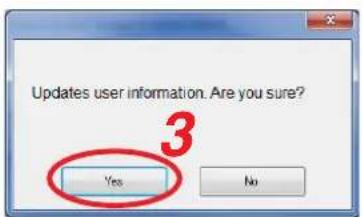
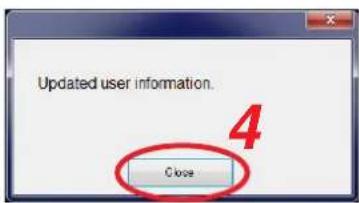
19.7. Making the Network Setting
EV-700's network setting can be changed.
Change the address and port number settings as needed.
19.7.1. When changing the address setting
Change IP address, Subnet Mask, and default Gateway.
Connect the EV-700 to a PC online in advance. (See p. 67, "CONNECTING TO THE EV-700.")
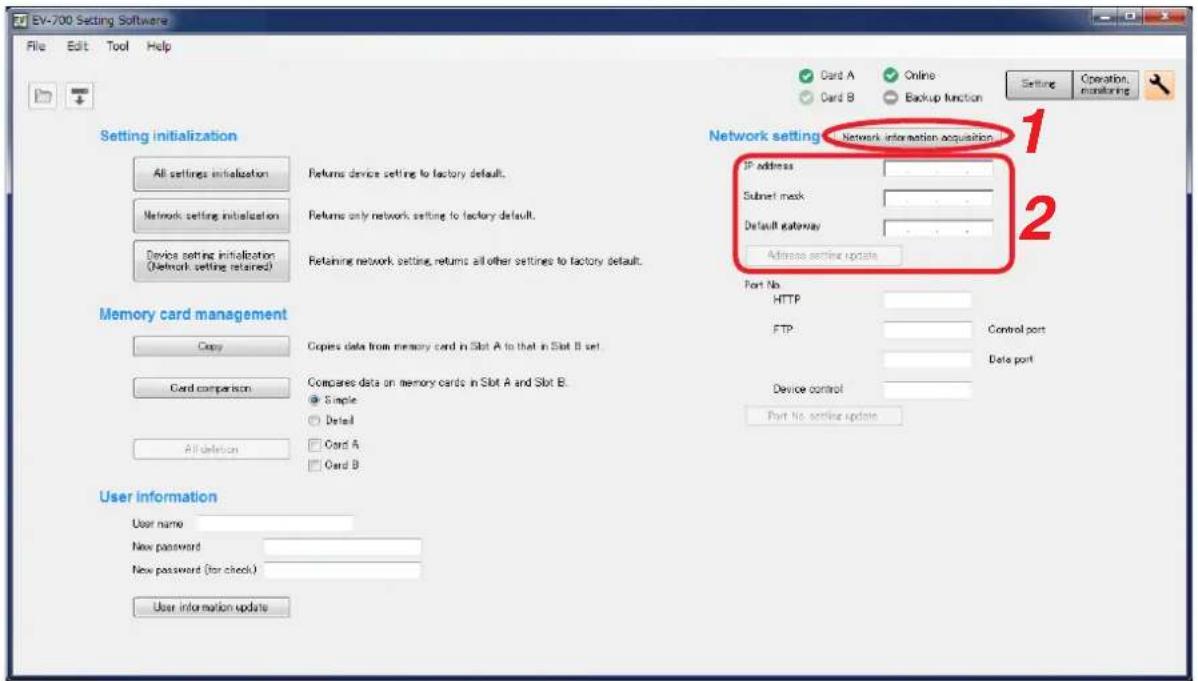
Step 1. Click the Network information acquisition button on the maintenance screen.
The network information of the EV-700 in online state will be acquired.
The acquired information appears in the address setting and port number setting fields.
Step 2. Change the address setting contents, then click the Address setting update button.
A confirmation dialog appears.
Step 3. Click the OK button.
EV-700's address setting is updated, then a dialog at right appears.
Connection with the EV-700 will be cut off.
Step 4. Click the Close button.
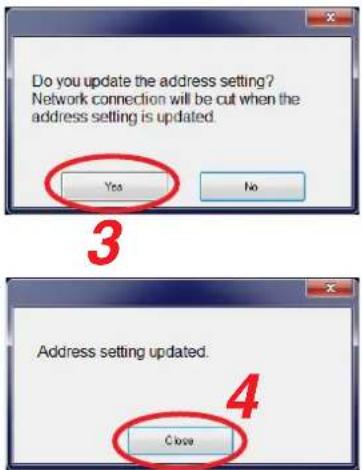
Tip
When changing the port number setting as well, place the EV-700 and PC in online state again, then perform the procedure in "When changing the port number setting" on p. 171.
19.7.2. When changing the port number setting
Change the port number.
Connect the EV-700 to a PC online in advance. (See p. 67, "CONNECTING TO THE EV-700.")
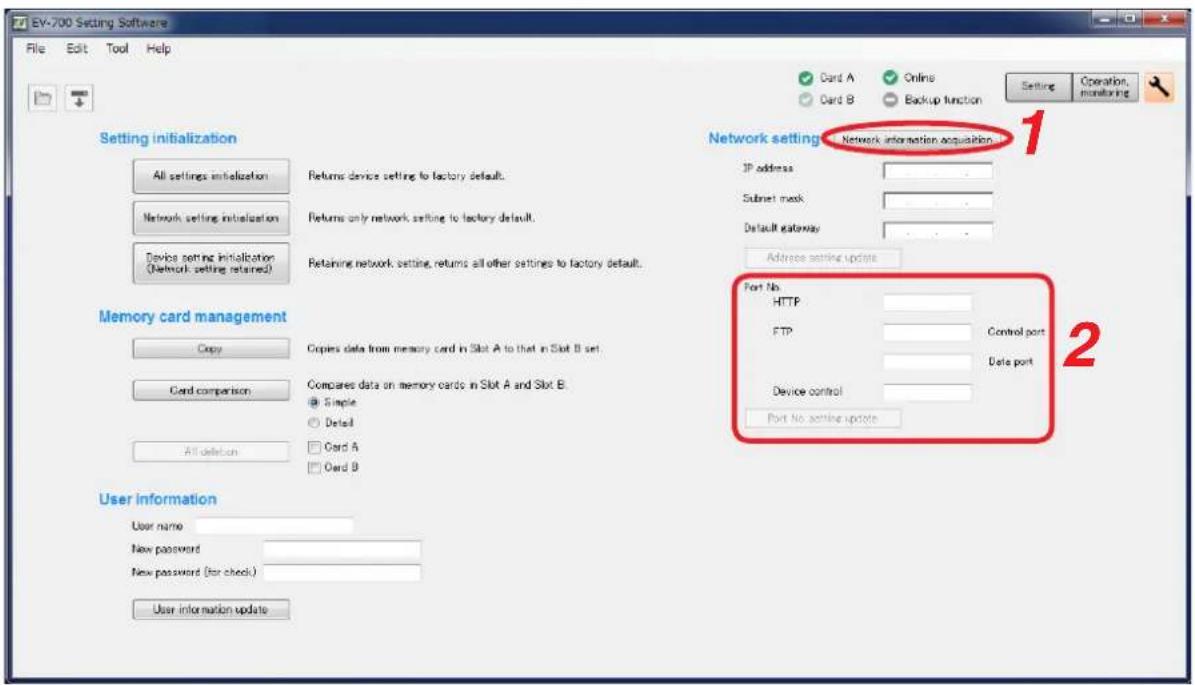
Step 1. Click the Network information acquisition button on the maintenance screen.
The network information of the EV-700 in online state will be acquired.
The acquired information appears in the address setting and port number setting fields.
Step 2. Change the contents of the port number setting, then click the Port number setting update button.
Tip
The table below shows the settable range for each port number.
| Setting item Setting range Initial setting | ||
| HTTP 1 to 65535 | 8080 | |
| FTP control port | 1 to 65535 21 | |
| FTP data port 1 | to 65535 60020 | |
| Device control 1 | to 65535 60007 | |
Note: No. 60000 cannot be used as it is a port number the EV-700 uses internally.
A confirmation dialog appears.
Step 3. Click the OK button.
EV-700's port number setting is updated, then a dialog at right appears.
Connection with the EV-700 will be cut off.
Step 4. Click the Close button.
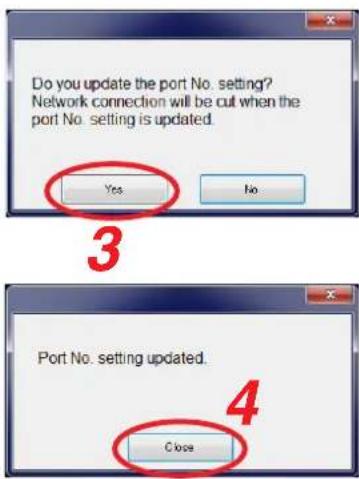
19. HISTORY CODE LIST
19.1. Operation History
| Action code | Action message Display example | |
| A00 Device activated. (Reason for activation:)Optional information: Power ONCommandWEB | Device activated. (Reason for activation: Firmware update) | |
| A01 Software reset. | ||
| A02 | History file created on memory card B (Device memory). | History file created on memory card B. |
| A03 | History file created on memory card A (Device memory). | History file created on memory card A. |
| A04 Setting file retrieved from memory card A. | ||
| A06 Device setting initialized. ()Optional information: All itemsExcept network itemNetwork item | Device setting initialized. (Network item) | |
| A07 | Operation using slot A's (B's) memory card started. | Operation using slot A's memory card started. |
| A10 Program playback started. (::Optional information 2>)Optional information 1: Command activationContact activationKey-operated activationNo activationOptional information 2: Program No. ()EMGAll programs playbackFile check | Example 1)Program playback started. (Command activation: Program No. (002))Example 2)Program playback started. (Contact activation: EMG) | |
| A11 | Program priority playback started. (::Optional information 1>)Optional information 1: Command activationContact activationKey-operated activationOptional information 2: Program No. () | Example 1)Program priority playback started. (Command activation: Program No. (002))Example 2)Program priority playback started. (Contact activation: Program No. (012)) |
| A12 | Program playback stopped. (::Optional information 2>)Optional information 1: Command activationContact activationKey-operated activationNo activationOptional information 2: Spontaneous stopSpontaneous stop of phrase playbackForced stop | Program playback stopped. (Command activation: Spontaneous stop of phrase playback) |
| A13 Phrase recording started. (::Optional information 2>)Optional information 1: Command activationContact activationKey-operated activationOptional information 2: Phrase No. ()EMG | Phrase recording started. (Command activation: Phrase No. (00010)) | |
| A14 Phrase recording stopped. (Optional information: Command activationContact activationKey-operated activation | Phrase recording stopped. (Key-operated activation) | |
| A15 Phrase deletion started. (: | Phrase deletion started. (Key-operated activation) | |
| A16 Phrase deletion ended successfully (abnormally). Phrase deletion ended successfully. | ||
| A17 | Program monitor playback started. (Program No. ()) | Program monitor playback started. (Program No. (00128)) |
| A18 Program monitor playback stopped. | ||
| A19 Phrase monitor playback started. (Phrase No. ()Optional information: 00001 – 32768EMG | Phrase monitor playback started. (Phrase No. (00128)) | |
| A20 Phrase monitor playback stopped. | ||
| A21 Emergency playback started. ()Optional information: Command activationContact activation | Emergency playback started. (Contact activation) | |
| A22 R.E.M. broadcast recording started. ()Optional information: Command activationContact activation | R.E.M. broadcast recording started. (Command activation) | |
| A23 R.E.M. broadcast playback started. ()Optional information: Command activationContact activation | R.E.M. broadcast playback started. (Command activation) | |
| A24 Emergency broadcast stopped. (:Optional information 1>):Optional information 1: Command activationContact activationKey-operated activationNo activationOptional information 2: Spontaneous stopSpontaneous stop of phrase playbackForced stop | Emergency broadcast stopped. (Command activation: Forced stop) | |
| A25 Line input broadcast started. | ||
| A26 Line input broadcast ended. | ||
| A27 Microphone announcement started. | ||
| A28 Microphone announcement ended. | ||
| A29 Maintenance mode started. ()Optional information:Setting changeDIPSW1: All-program playback and adjusting the whole sound volumeDIPSW2: Editing emergency playback audio sourceDIPSW3: Uploading/downloading device setting fileDIPSW4: Copying the memory cardDIPSW5,8: Updating the firmwareDIPSW 6,8: Initializing the device settingsCommand | ||
| A30 Maintenance mode ended. | ||
| A31 Factory inspection mode started. | ||
| A32 Factory inspection mode ended. | ||
| A33 Memory card copy started. | ||
| A34 Memory card copy completed. | ||
| A35 All data erasure on memory card started. | ||
| A36 All data erasure on memory card completed. | ||
| A37 Sequential storage set (, | Sequential storage set (01, 001) | |
| A38 Sequential storage clear | ||
| A39 Firmware update started. | ||
| A40 Firmware update completed. | ||
| A41 Self-check (failure detection) started. | ||
| A42 Self-check (failure detection) completed. | ||
| A50 Whole sound volume set (dB) Whole sound volume set (-20 dB) | ||
| A51 Delay time set. (Sec.) Delay time set. (20 Sec.) | ||
| A52 Program playback broadcast priority set. (Priority:)Priority level: OFF, 1, 2, 3 | Program playback broadcast priority set. (Priority: OFF) | |
| A53 Line input broadcast priority set. (Priority:)Priority level: OFF, 1, 2, 3 | Line input broadcast priority set. (Priority: 1) | |
| A54 Microphone announcement broadcast priority set. (Priority:)Priority level: OFF, 1, 2, 3 | Microphone announcement broadcast priority set. (Priority: 2) | |
| A55 Time set. ()Time: YYYY-MM-DD hh:mm:ss | Time set. (2014-10-10 12:15:45) | |
| A56 Health check time set. ()Health check time set. (43200) | ||
| A57 Health check activated (deactivated). Health check deactivated. | ||
| A58 Playback activation mode set. (,,Optional information 1):Optional information 1: Direct, BinaryOptional information 2: Pulse, LevelOptional information 3: Priority setting (FIFO priority)Priority setting (LIFO priority)Sequential storage | Playback activation mode set. (Binary, Pulse, Sequential storage) | |
| A59 Recording activation mode set. (,,Optional information 2:)Optional information 1: Direct, BinaryOptional information 2: Pulse, Level | Recording activation mode set. (Direct, Pulse) | |
| A60 Stop activation mode set. (,)Optional information: Forced stopSpontaneous stop of phrase playback | Stop activation mode set. (Forced stop) | |
| A61 | Delete/clear activation mode set. (,,Optional information 2:)Optional information 1: Direct, BinaryOptional information 2: Pulse, Level | Delete/clear activation mode set. (Direct, Pulse) |
| A62 Emergency playback activation mode set. (,)Optional information: Pulse, Level | Emergency playback activation mode set. (Pulse) | |
| A63 Emergency stop activation mode set. (,)Optional information: Forced stopSpontaneous stop of phrase playback | Emergency stop activation mode set. (Spontaneous stop of phrase playback) | |
| A64 | IP address set. () | IP address set. (192.168.14.1) |
| A65 | Subnet mask set. () | Subnet mask set. (255.255.255.0) |
| A66 | Default gateway set. () | Default gateway set. (192.168.14.254) |
| A67 TCP/IP port No. set. (,)TCP/IP port No. set. (60007) | ||
| A68 | FTP control port No. set. () | FTP control port No. set. (21) |
| A69 FTP data port No. set. ()FTP data port No. set. (20) | ||
| A70 | HTTP port No. set. () | HTTP port No. set. (8080) |
| A75 Program playback busy output destination set. (*) | Program playback busy output destination set. (32h) | |
| A76 Microphone announcement busy output destination set. (*)(*) | Microphone announcement busy output destination set. (33h) | |
| A77 Line input broadcast busy output destination set. (*)(*) | Line input broadcast busy output destination set. (3Fh) | |
| A78 Recording busy output destination set. (*)(*) | Recording busy output destination set. (3Ah) | |
| A79 | Erasure busy output destination set. (*)(*) | Erasure busy output destination set. (39h) |
| A80 Emergency playback busy output destination set. (*)(*) | Emergency playback busy output destination set. (53h) | |
| A81 Emergency recording busy output destination set. (*)(*) | Emergency recording busy output destination set. (1Fh) | |
| A82 Maintenance busy output destination set. (*)(*) | Maintenance busy output destination set. (21h) | |
| A83 | Backup function activated (deactivated). | Backup function activated. |
| A85 Web login data changed. | ||
| A86 FTP login data changed. | ||
| A87 Quick stop activated (deactivated). Quick stop activated. | ||
* Hexadecimal (HEX) representation for busy output destination setting history
In hexadecimal (HEX) representation column, the Busy output destination setting is displayed in 2-digit hex value (HEX value).
For example, the history "Microphone announcement busy output set. (33h)" means that Nos. 1, 2, 5, and 6 of the control output contacts are set to be closed.
| Control output terminal 8 7 6 5 4 3 2 | 1 | |||||||
| Terminal state (0: Open, 1: Closed) | 0 0 1 1 | 0 0 1 1 | ||||||
| Hexadecimal (HEX) representation | 3 | 3 | ||||||
19.2. Event
| Event code | Event message Display example | |
| V00 Device power turned on. | ||
| V01 Memory card inserted into Slot A (Slot B). Memory card inserted into Slot B. | ||
| V02 Memory card removed from Slot A (Slot B). Memory card removed from Slot B. | ||
| V03 Connected (Disconnected) via TCP/IP. | ||
| V04 Logged in to Web. | ||
| V05 Logged in to FTP. | ||
| V06 Internal clock is initialized. | ||
| V10 Start/Stop key pressed. | ||
| V11 Monitor key pressed. | ||
| V12 Monitor key long-pressed. | ||
| V13 Up and Down keys long-pressed simultaneously. | ||
| V14 DIP SW1 turned on (off). DIPSW1 turned on. | ||
| V15 DIP SW2 turned on (off). DIPSW2 turned off. | ||
| V16 DIP SW3 turned on (off). DIPSW3 turned on. | ||
| V17 DIP SW4 turned on (off). DIPSW4 turned off. | ||
| V18 DIP SW5 turned on (off). DIPSW5 turned on. | ||
| V19 DIP SW6 turned on (off). DIP SW6 turned off. | ||
| V20 Playback contact closed. | ||
| V21 Playback contact opened. | ||
| V22 Closed state of the Start contact changed. ([HEX])* 1 | Start contact closed. (00C0h) | |
| V23 All Start contacts opened. | ||
*1 Hexadecimal (HEX) representation for start contact history
In hexadecimal (HEX) representation column, the start contact state is displayed in 4-digit hex value (HEX value).
For example, the history "Start contact closed. (00C0h)" means that only Nos. 7 and 8 of the start contacts have been placed in closed state as a result of start contact operation.
| Contact start input terminal | 16 | 15 | 14 | 13 | 12 | 11 | 10 | 9 | 8 | 7 | 6 | 5 | 4 | 3 | 2 | 1 |
| Terminal state (0: Open, 1: Closed) | 0 | 0 | 0 | 0 | 0 | 0 | 0 | 0 | 1 | 1 | 0 | 0 | 0 | 0 | 0 | 0 |
| Hexadecimal (HEX) representation | 0 | 0 | C | 0 | ||||||||||||
Note
If one or more start contacts have been closed when the start contact is operated, the history "V22" will be recorded even though operation content is "Open." The history "V23" is recorded when all start contacts are opened.
| Event code | Event message Display example | |
| V24 | Control output state turned to ([HEX]). | Control output state turned to (2Fh).*2 |
| V28 DIPSW7 | turned on (off). DIPSW7 turned on. | |
| V29 DIPSW8 | turned on (off). DIPSW8 turned off. | |
| V30 Program | playback start command received. | |
| V31 Program | playback stop command received. | |
| V32 Phrase | recording start command received. | |
| V33 Phrase | recording stop command received. | |
| V34 Phrase | erase command received. | |
| V35 Program | priority playback start command received. | |
| V36 Sequential storage | clear command received. | |
| V37 Emergency | playback start command received. | |
| V38 R.E.M. | (Recording) start command received. | |
| V39 R.E.M. | (Playback) start command received. | |
| V40 Emergency | broadcast stop command received. | |
| V41 Emergency | playback audio source recording start command received. | |
| V42 Emergency | playback audio source clear start command received. | |
| V46 Software | reset command received. | |
| V47 Whole sound volume setting command received. | ||
| V48 Whole sound volume setting check command received. | ||
| V49 Delay time setting command received. | ||
| V50 Delay time check command received. | ||
| V51 Self-check (failure detection) start command received. | ||
| V52 File check (all phrases playback) start command received. | ||
| V53 Broadcast priority setting command received. | ||
| V55 Date/time setting command received. | ||
| V57 Health check time setting command received. | ||
| V59 Network valid notify command received. | ||
| V60 Activation mode setting command received. | ||
| V62 Network setting command received. | ||
| V64 Port No. setting command received. | ||
| V69 Control-out setting change command received. | ||
| V71 Backup function setting command received. | ||
| V73 Card A recovery command received. | ||
| V74 Setting file create (memory card A) command received. | ||
| V75 Setting file retrieve (memory card A) command received. | ||
| V76 Maintenance start command received. | ||
| V77 Maintenance end command received. | ||
| V78 Setting initialize command received. | ||
| V79 History file create command received. | ||
| V80 Memory card all erase command received. | ||
| V81 Memory card copy start command received. | ||
| V82 Memory card comparison start command received. | ||
| V84 FTP user name and password setting command received. | ||
| V86 WEB user name and password setting command received. | ||
*2 Hexadecimal (HEX) representation for control output contact history
In hexadecimal (HEX) representation column, the control output states are displayed in 2-digit hex value (HEX value).
For example, the history "Control output state turned to (2Fh)." means that Nos. 1, 2, 3, 4, and 6 of the control output contacts have been placed in closed state.
| Contact start output terminal | 8 | 7 | 6 | 5 | 4 | 3 | 2 | 1 |
| Terminal state (0: Open, 1: Closed) | 0 | 0 | 1 | 0 | 1 | 1 | 1 | 1 |
| Hexadecimal (HEX) representation | 2 | F | ||||||
| Event code | Event message Display example | |
| V88 Quick stop function setting command received. | ||
| V89 Quick stop function confirming command received. | ||
APPENDIX
1. ERROR LIST
1.1. Errors Related to the EV-700
When an error occurs in the EV-700, a dialog indicating "Abnormality occurred." shown at right appears.
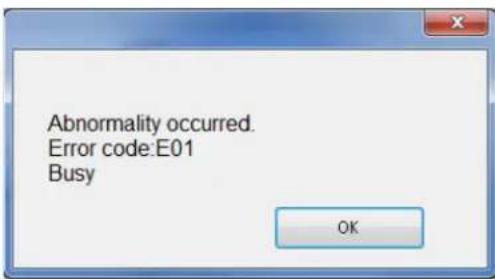
| Error cord | Error display Error description Remedy | |
| P.WAIT Process wait | A different command is received during command processing at the EV-700. Or an instruction command or contact activation command is executed under the condition that it is not accepted because other function is operating, such as when playback is started during recording. | |
| E02 Operation mode error | An instruction command or contact activation command is executed in inexecutable mode such as when playback is started in Maintenance mode. | |
| E03 Emergency broadcast mode error | Command or contact activation executable only in the Emergency broadcast mode is executed.Or, command or contact activation not executable in the Emergency broadcast mode is executed. | |
| E04 Situation error In other cases stated above, an instruction command or contact activation command is executed in the inexecutable state.(Example)Stop instruction is executed by the Playback stop command during program playback made by Level signal input activation at the contact terminal. | ||
| 1,2, 3, 4, 10, 25, 26, 27, 30, 31, 32, 35, 36: | Function inexecutable while in the maintenance mode is executed. | |
| 7: Sequential storage | clear is performed when the program playback is not in progress. | |
| 13, 14: | Attempted to create a log file to the memory card when the backup function is enabled or while in the maintenance mode by the DIP switch. | |
| 18, 21: Program playback is started when the priority level of normal broadcast is set to OFF. | ||
| 20, 28, 29, 33: | Function inexecutable during Level activation is executed. | |
| E10 | Memory card not inserted. | Memory card is not inserted. |
| Error cord | Error display Error description Remedy | |||
| E11 Memory card B not inserted. | Memory card B is not inserted. Insert a memory card into the slot B. | |||
| E12 Memory card full Insufficient | free space on the memory card | Check the memory card, then erase the unnecessary files. | ||
| E13 Memory card format error | Memory card is not formatted (initialized) with FAT16/FAT32. | Reformat the memory card. The memory card format is FAT16 or FAT32. | ||
| E14 No setting file exists. Device | setting file does not exist on the Memory card A or failed to open the device setting file. | Check if the device setting file is stored on the memory card inserted into the slot A. | ||
| E15 No firmware file exists. | Firmware file does not exist on the Memory card B or failed to open the firmware file. | Check if the firmware file for update is stored on the memory card inserted into the slot B. | ||
| E17 | Device setting file write error | Failed to write Device setting file. | Memory card error may occur. Check the memory card error with the PC.If the error still remains, it may be eliminated by reformatting the memory card. But note that all saved data is erased once the card is reformatted. | |
| E18 Memory card copy error | Error occurred in memory card copy process. | |||
| 2, 3, 4, 6, 7: | Failure occurred at the copy source. | |||
| 1, 5: | Failure occurred at the copy destination. | |||
| 8: | When the backup function is set to ON, Memory card in slot A is removed during copy. | |||
| E19 Memory card project error | Project file on the memory card is incomplete or does not exist. | Write the project to the memory card using the EV-700 Setting software. | ||
| E20 | Memory card table file open error | Error occurred when opening the table file. | There may be abnormalities in the project configuration. Check the contents using the EV-700 Setting software.Memory card error may occur. Check the memory card error with the PC.If the error still remains, it may be eliminated by reformatting the memory card. But note that all saved data is erased once the card is reformatted. | |
| E21 | Memory card table file read error | Error occurred when reading the table file. | Memory card error may occur. Check the memory card error with the PC.If the error still remains, it may be eliminated by reformatting the memory card. But note that all saved data is erased once the card is reformatted. | |
| E22 | Table abnormality | Number assigned to the table is out of range. (Except the setting value of the program) | There may be abnormalities in the project setting. Check the setting contents using the EV-700 Setting software. | |
| E23 | Program setting value error | Setting value of the program table is out of range. | ||
| E24 | Table file abnormality | There is a table file in the format not available with the EV-700. | ||
| E25 | Memory card audio file open error | Error occurred when opening the audio file. | There may be abnormalities in the project configuration. Check the contents using the EV-700 Setting software.Memory card error may occur. Check the memory card error with the PC.If the error still remains, it may be eliminated by reformatting the memory card. But note that all saved data is erased once the card is reformatted. | |
| E26 Memory card audio file read error | Error occurred when reading the audio file. | Memory card error may occur. Check the memory card error with the PC.If the error still remains, it may be eliminated by reformatting the memory card. But note that all saved data is erased once the card is reformatted. | ||
| 1, 2, 3, 4, 5, 6: Header read error | ||||
| 7, 8, 9, A, B: Data read error | ||||
| C: Read error (No Card inserted.) | ||||
| E27 Audio file abnormality There | is an audio file in the format not usable at the EV-700.There is an audio file of which sampling frequency is different from that of the project. | There may be abnormalities in the project configuration. Check the contents using the EV-700 Setting software.Memory card error may occur. Check the memory card error with the PC.If the error still remains, it may be eliminated by reformatting the memory card. But note that all saved data is erased once the card is reformatted. | ||
| E28 | Deletion error | Error occurred in deletion process. | Memory card error may occur. Check the memory card error with the PC.If the error still remains, it may be eliminated by reformatting the memory card. But note that all saved data is erased once the card is reformatted. | |
| E29 | Recording error | Error occurred in recording process. | ||
| E30 Memory card mismatch | There is a discrepancy in the contents between the memory cards A and B. | Check the contents on the memory cards A and B. | ||
| E32 Card comparison time out | Session is timed out when comparing the card data. | |||
| E33 | All deletion failed | All deletion of files on the memory card is failed. | Memory card error may occur. Check the memory card error with the PC.If the error still remains, it may be eliminated by reformatting the memory card. But note that all saved data is erased once the card is reformatted. | |
| E34 Firmware file read error | Failed to read firmware file. | |||
| E35 Firmware update failure | Failed to update firmware. | Consult the TOA dealer where the unit was purchased if this error occurred. | ||
| E36 | Invalid firmware file | Firmware file is invalid. | Firmware file error may occur. Consult the TOA dealer.Memory card error may occur. Check the memory card error with the PC.If the error still remains, it may be eliminated by reformatting the memory card. But note that all saved data is erased once the card is reformatted. | |
| E37 | History file open error | Failed to open history file. | Memory card error may occur. Check the memory card error with the PC.If the error still remains, it may be eliminated by reformatting the memory card. But note that all saved data is erased once the card is reformatted. | |
| E38 | History file write error | Failed to write history file. | ||
| E39 | No audio file exists. | No audio file to be played exists. | Write the project to the memory card using the EV-700 Setting Software. | |
| 1: | Failed to open file. | |||
| 2: | Failed to reopen file. | |||
| Error cord | Error display Error description | Remedy | ||
| E40 | Command abnormality | Received command is invalid. | Invalid control data may be transmitted to the EV-700 from the EV-700 Setting software. When an error frequently occurs, consult the TOA dealer where the unit was purchased. | |
| E41 No | program exists. Program | of the designated number does not exist. | ||
| E42 Out-of-range value designated. | Out-of-range value is designated. | |||
| E43 | Sequential storage full | Attempted to execute the 17th sequential storage. | ||
| E44 Priority designation error | Abnormality is detected in the priority level designation. | |||
| E45 Setting value error Attempted | to set abnormal setting values. Abnormal setting value is confirmed by the setting storage memory, setting file, or setting value. | |||
| E46 Command reception timeout | Time-out occurs during the middle of command reception. | Control data may be transmitted to the EV-700 from the EV-700 Setting software at an unintended timing. When an error frequently occurs, consult the TOA dealer where the unit was purchased. | ||
| E47 | Protocol error | Other command is received before responding to the received command. Other command (except the Command control start command and the Command control end command) is received before receiving the Command control start command. | ||
| E51 History storage memory error | History storage memory error is detected. | EV-700's hardware failure may occur. Consult the TOA dealer where the unit was purchased. | ||
| E60 Recording disabled.(Phrase exists.) | Attempted to make recording to the phrase number where a phrase is registered. Attempted to make recording in the state that a file with serial No. 99999 exists. | Make recording by selecting an unregistered phrase number or after a registered phrase has been deleted. Recording is not possible when the serial number of the recorded Audio file reaches 99999. (As the serial number is automatically assigned to the phrase at the time of recording on a day-to-day basis, this error occurs only when the number of recording per day becomes 100000 or more.) | ||
| E61 Deletion disabled.(Phrase not exists.) | Attempted to delete the phrase number to which no phrase is registered. | To delete the phrase, select the desired phrase number to which phrase is registered. | ||
| E70 | Instruction error | Instruction value used inside the EV-700's firmware is abnormal. | The EV-700's firmware may be malfunctioning. Consult the TOA dealer where the unit was purchased. | |
1.2. Errors not Related to the EV-700
Error messages displayed on the EV-700 Setting Software include "Message display at invalid file detection" and "Message display at error detection related to the device setting" besides the errors related to the EV-700.
1.2.1. Message display at invalid file detection
The table below shows the error messages displayed if an invalid file is detected at the registration of phrases using the EV-700 Setting Software.
| Message Invalid file content Remedy | ||
| File name of the audio file includes unusable characters. | Following unusable characters are included in the file name of the file: [ " ], [ * ], [/ ], [: ], [< ], [ > ], [ ? ], [\ \ ], and [ I ]. | Check if the file name of the audio file includes unusable characters. |
| WAV audio file format is not correct. | File format of the WAV audio file irregular. | Check if the file format of the WAV audio file is the correct format. Usable format of the audio file• File format: WAV• Encoding: Linear PCM• Sampling frequency: 32 kHz or 44.1 kHz• Quantization bit rate: 16 bits• Stereo/monaural: Monaural NoteAs for the WAV files of the Broadcast Wave Format (BWF) and those of Stereo, they are registered after converted into the format which can be used in the EV-700. The original audio file remains intact as the conversion is made after the audio file is copied. |
| Data format of the audio file is not a linear PCM. | ||
| Audio file is not of stereo or monaural type. | The number of channels is not of monaural or stereo. | |
| Sampling frequency of the audio file is not 32 kHz or 44.1 kHz. | Sampling frequency is irregular. | |
| Quantization bit rate of the audio file is not 16 bits. | Quantization bit rate is irregular. | |
| Header information of the audio file is abnormal. | Header size error | |
| Sampling frequency of the audio file differs from the sampling setting of the project information. | Sampling frequency differs from the registered one of the project information. | Check if the sampling frequency of audio file is identical to the sampling setting of the project information. |
1.2.2. Messages displayed at error detection related to the device setting
The table below shows the messages displayed if an error is detected when the device setting is edited using the EV-700 Setting Software.
| Message Invalid file content Remedy | ||
| Incorrect setting value[] | Attempted to set out-of-range value or invalid value when editing project or device setting. | Set a correct value. |
| Enter a value in the setting item field.[] | Value is not set in the item displayed in project or device setting edit. | Set a correct value.Unless the program name is entered at the program edit, this error message appears when saving the program. |
| The set address is invalid. | Value not acceptable for address is set in the device setting edit.Or, Address is entered incompletely such as there is a blank in the input box. | Set a correct value. |
| The port number is duplicated. | Same port number is assigned in 2 or more items in the device setting edit. | Set the port number so as not to duplicate. |
| The combination of the setting values is incorrect.[] | Incorrect combination of the Start mode type and operation in the device setting edit. | Set a correct value according to the allowed combination of the start mode type and operation as shown below.[Playback start]Control function: DirectPulse activation /Priority level setting (FIFO)Pulse activation /Priority level setting (LIFO)Pulse activation /Priority level setting (Sequential storage)Level activation /Priority level setting (FIFO)Level activation /Priority level setting (LIFO)Control function: BinaryPulse activation /Priority level setting (FIFO)Pulse activation /Priority level setting (LIFO)Pulse activation /Priority level setting (Sequential storage)Level activation /(Any setting) |
1.2.3. Other errors
| Error message Error description Remedy | ||
| Communication abnormality occurred.Transmission command: xxxReception command: xxx | The EV-700 returned an unexpected response to the transmitted command. | Check if something is wrong with the EV-700. |
| Communication abnormality occurred.Timeout | There is no response to the transmitted command for a specified period. | Check if something is wrong with the EV-700 or network. |
| Failed to connect. Attempted to establish connection to the EV-700 but failed. | · Check destination data. If it is wrong, reacquire the destination data by performing connected device detection.· Check if something is wrong with the network.· Check if abnormality occurred at the EV-700. | |
| Invalid file The downloaded project file or device setting file is in an invalid state such as format error. | Download again. If the error still remains, the original source file cannot be used. Create a new file. | |
| Failed to upload device setting file. | The device setting file upload is not completed. | Not Check if something is wrong with the EV-700 or network. |
| Failed to upload project file. | The project file upload is not completed. | |
| Failed to download device setting file. | The device setting file download is not completed. | |
| Failed to download project file. | The project file download is not completed. | |
| Connect to device. | Attempted to use an online available function in an offline state. | Connect the EV-700 to a PC online, then retry. |
| Project information differs. Do you continue uploading? | There is a discrepancy between the project information saved in the EV-700 and that to be uploaded. | Check again if the project to be uploaded is correct.If it is correct, continue uploading. |
| Audio file already exists. | Attempted to register the file with the same file name as that of the registered audio file. | Register the audio file having a different file name. Or, register the audio file name after changing its name. |
| Selected audio source is currently being used in program, so cannot be deleted. Correct program in advance. | Audio source to be deleted from the audio source list is being used in the program. | Check whether or not the corresponding audio source is registered to the program step. |
| Entered password not correct. Pass word to be changed is not identical to that in the "New password (for check)" filed. | Check the password. | |
| Failed to clear contents of sequential storage. | Abnormality occurred at the EV-700 in sequential storage clear processing. | Check if something is wrong with the EV-700. |
| Recording disabled because unused phrase numbers do not exist. | Attempted to make recording in the state that unused number do not exist in the audio source list. | Delete an unnecessary registered audio source.Audio source registration cannot be changed in the Simple mode. Use the Full-function mode. |
| CSV output failed. Failed to output the file of the device setting data or history data in CSV format. | Check if the output destination drive has free space. | |
| Audio file reading failed. Error occurred in audio file read process when the audio file was registered. | Check again if the designated audio file exists. | |
| Audio file writing failed. Error occurred in audio file write process when the audio file registration was saved. | Check if the project save destination drive has free space. | |
| Data copy to the clipboard failed. Error occurred when copying the upload/download result (on failure) of the project to a clipboard. | Execute a copy to a clipboard again. If an error still occurs, check if abnormality occurred at the PC used. | |
| Cannot access due to memory card error.Aborts download. | Download was stopped because it was judged that the memory card was inaccessible due to the card error at the EV-700. | Check the condition of the EV-700. Or, check if something is wrong with the memory card. |
| No project information exists on the memory card.Aborts download as the project is invalid. | Download was stopped because it was judged that the project was invalid as no project information existed on the memory card. | Check the project contained on the memory card. |
| Designate the project information file (EV700T) in the file name. | Attempted to read or save by designating a file other than the project information file (EV700T) when reading or saving the project. | Designate the project information file (EV700T) when reading or saving the project. |
| Designate the device setting file (EV700.cfg) in the file name. | Attempted to read or save by designating a file name other than EV700.cfg when reading or saving the device setting file. | Designate the file name EV700.cfg when reading or saving the device setting file. |
| There is a unit of firmware that this software does not support. Please update the firmware. | Cannot establish a connection as the EV-700's firmware version differs from that of the EV-700 Setting software. | Use the EV-700 Setting software having the same version number as the unit's firmware.Download the latest versions of the EV-700 firmware and the EV-700 Setting software from the TOA product data download site (http://www.toa-products.com/international/). |
2. TROUBLESHOOTING
| Symptom Check point Remedy | ||
| EV-700 Setting software does not start. | The ".NET Framework Initialization Error" indication is displayed. | Install .Net Framework 4.5 to the PC. |
| The EV-700 cannot be detected. | PC not correctly connected to a network. | Check connection and connect correctly. |
| The firewall of the PC is enabled. | If the firewall of the PC is enabled, communications may be interrupted.Change the firewall setting to remove the block to the EV-700 Setting software. | |
| The EV-700 not correctly connected to a network. | Consult your network administrator of the facilities where the EV-700 is installed, then connect correctly. | |
| PC's IP address not set on the IP setting screen at connection setting. | Correct IP address may not be selected.Select the IP address of the LAN port connected to the same network as the EV-700 is connected from the PC's IP address on the IP setting screen. (See p. 69.)If the IP address is unknown, consult your network administrator of the facilities where the EV-700 is installed. | |
| Cannot establish a connection to the EV-700. | PC not correctly connected to a network. | Check connection and connect correctly. |
| The EV-700 not correctly connected to a network. | Consult your network administrator of the facilities where the EV-700 is installed, then connect correctly. | |
| Right connected device not selected. | Recheck the connected device, then select the right connected device. If it is unknown, consult your network administrator of the facilities where the EV-700 is installed. | |
| Network information required to connect to the EV-700 not identical. | There may be discrepancy between the EV-700's network setting and the network information saved in the EV-700 Setting software.Select "Tool Connect setting" from the menu in the Full-function mode, then set correct network information. | |
| User name and Password not entered correctly. | Enter User name and Password correctly. | |
| Download or upload operation cannot be made. | Not connected to the EV-700. Check the online display at the upper part of the EV-700 Setting software. If not online state, place it in online state. | |
| FTP communication is interrupted. | · Check the firewall setting.· FTP communication must be executed to conduct download/upload. Consult your network administrator of the facilities where the EV-700 is installed. | |
| Program broadcast not stop instantly even by clicking the Stop button during program broadcast. (Full-function mode) | Stop option is set to the "Spontaneous stop of phrase playback." | Change the stop option to the "Forced stop," then perform stop operation. |
| Traceability Information for Europe | |
| Manufacturer:TOA Corporation7-2-1, Minatojima-Nakamachi, Chuo-ku, Kobe, Hyogo, Japan | Authorized representative:TOA Electronics Europe GmbHSuederstrasse 282, 20537 Hamburg, Germany |
URL: http://www.toa.jp/
- DIGITAL ANNOUNCER EV-700
- TABLE OF CONTENTS
- INTRODUCTION 7
- SOFTWARE HANDLING PRECAUTIONS ...... 11
- SOFTWARE SETUP 12
- MAKING A BACKUP COPY OF PRERECORDED AUDIO FILES 15
- SIMPLE MODE
- GENERAL DESCRIPTION OF SIMPLE MODE
- CONNECTION
- CONNECTING TO THE EV-700 23
- SETTING
- EDITING BROADCAST CONTENTS 25
- OPERATION
- MAKING BROADCAST BY OPERATING THE EV-700 ...... 55
- MONITORING
- CONFIRMING THE CURRENT BROADCASTING STATUS OF THE EV-700 56
- FULL-FUNCTION MODE
- GENERAL DESCRIPTION OF FULL-FUNCTION MODE
- GENERAL DESCRIPTION OF SETTINGS
- PHRASE AND PROGRAM 75
- TYPES OF EMERGENCY BROADCASTS 77
- WHAT IS A PROJECT? 78
- WHAT IS THE DEVICE SETTING? 80
- EDIT WORKFLOW 82
- PROJECT SETTING
- EDITING THE PROJECT 87
- REFLECTING THE PROJECT SETTING TO THE EV-700 ... 116
- DEVICE SETTING
- EDITING THE DEVICE SETTING 122
- REFLECTING THE DEVICE SETTING TO THE EV-700 ... 132
- SAVING THE DEVICE SETTING FILE IN CSV FORMAT ... 134
- OPERATING THE EV-700 FROM A PC 136
- MONITORING AND CHECK
- CONFIRMING THE EV-700 OPERATION STATE 149
- OPERATION LOG
- CONFIRMING THE EV-700'S OPERATION LOG .... 156
- MAINTENANCE
- PERFORMING MAINTENANCE 161
- SUPPLEMENTARY
- HISTORY CODE LIST 172
- APPENDIX
- ERROR LIST 180
- TROUBLESHOOTING 187
- Notes
- INTRODUCTION
- General Description
- Features
- Simple mode and Full-function mode
- Functions enabled with the EV-700 Setting software
- System Requirements
- Recommended PC requirements
- Connecting between the PC and the EV-700
- Tip
- Network
- Audio file format
- SOFTWARE HANDLING PRECAUTIONS
- Important
- SOFTWARE SETUP
- Installing the Software
- Note
- Step 1. Double-click the "Setup.exe."
- Step 2. Click the Next button.
- Step 3. Read the Software End User License Agreement, then select "I accept the terms in the license agreement."
- Tips
- I accept the terms in the license agreement
- I go not accept, and then in the code for agreement.
- Step 4. Click the Next button.
- Step 5. If you wish to change the installation destination folder, select the desired folder.
- Step 6. Click the Next button.
- Step 7. Click the Install button.
- Step 8. Click the Finish button.
- File Configuration after Installation
- Uninstalling the Software
- Reinstalling the Software
- MAKING A BACKUP COPY OF PRERECORDED AUDIO FILES
- Making Backup Copy Using a PC
- Making Backup Copy Using the EV-700
- GENERAL DESCRIPTION
- [Functions enabled with the Simple mode]
- STARTING UP IN THE SIMPLE MODE
- EASY-TO-UNDERSTAND GUIDE TO OPERATION IN SIMPLE MODE
- When wishing to add new audio sources to the broadcast contents
- Example: Adding new audio file data to the broadcast contents
- Step 1. Read audio file data and broadcast contents.
- Step 2. Add an audio source.
- Step 3. Reflect the edited contents.
- Tool
- Help
- Tool Buttons
- Opens project file
- Save
- Upload to device
- Download form device
- Difference data upload to device
- CONNECTING TO THE EV-700
- Detecting and Connecting to the EV-700
- Connecting to the Last Connected EV-700
- EDITING BROADCAST CONTENTS
- Workflow
- Acquiring Audio Data and Broadcast Contents
- Acquiring via LAN
- Step 5. Click the Close button.
- [Broadcast content screen]
- When download failed
- [Copy to clipboard] button
- Folder
- File name
- Result
- Reading Data saved on the Memory Card or in the PC
- Editing Broadcast Contents
- Displaying the broadcast content edit screen
- [Broadcast content edit screen description]
- Broadcast number (No.)
- Broadcast name
- Reverse button
- Play/Stop button
- Forward button
- Delete button
- List order up button
- Playback total time display
- List order down button
- Broadcast audio source playback order list
- Broadcast volume level
- Audio source selection button
- Record button
- Audio source selection list
- Silent interval selection button
- Silent interval setting switch
- Change button
- Edited content save button
- Cancel button
- Changing audio sources
- Deleting audio sources
- Step 3. Click the Yes button.
- Step 4. Click the Edit content save button.
- Step 5. Click the Yes button.
- Adding audio sources
- Step 4. Click the Edited content save button.
- Changing the playback order of the audio sources
- Make recording
- Step 4. Click the Recording start button.
- Step 5. Make recording.
- Step 6 To terminate recording, click the Recording stop button.
- Adjusting the audio volume
- Test Listening
- Previewing broadcast contents
- Previewing audio sources
- Reflecting the Edited Contents to the EV-700
- Reflecting to the EV-700 via LAN
- [Uploading to the EV-700]
- Step 2. Click the Start button.
- When upload failed
- Card slot
- Folder
- File name
- Result
- [Uploading Difference data to the EV-700]
- Saving to the memory card
- CONFIRMING THE CURRENT BROADCASTING STATUS OF THE EV-700
- [Functions enabled with the Full-function mode]
- STARTING UP IN THE FULL-FUNCTION MODE
- EASY-TO-UNDERSTAND GUIDE TO OPERATION IN FULL-FUNCTION MODE
- Example of the Project Change
- Contents on the supplied memory card
- Contents to be changed
- Operating procedure
- Step 1. Read the project.
- Step 2. Register the audio source.
- Step 3. Change the Step.
- Step 4. Reflect the project.
- Alteration Example of Device Setting
- Initial settings of Device setting (excerpt)
- Content to be changed
- Operating procedure
- Edit
- Tool
- Device setting file new creation
- Project file new creation
- Open device setting file
- Open project file
- Save
- Upload to device
- Download from device
- Difference data upload to device
- Outline of Connections
- Detecting and Connecting to the EV-700
- Step 5. Click the Next button.
- Step 7. Connect to the EV-700.
- 7-2. Click the Connect button.
- Adding an undetectable EV-700
- Changing the network setting
- 1
- Updating the EV-700's firmware
- Making Connections Using the Network Setting of the Device Setting File
- Step 1. Open the setting file.
- Connecting to the Last Connected EV-700
- PHRASE AND PROGRAM
- What is Phrase?
- What is Program?
- TYPES OF EMERGENCY BROADCASTS
- • Emergency Playback (Prerecorded Playback)
- • R.E.M. Playback (Instant Recording Playback)
- WHAT IS A PROJECT?
- Files Comprising a Project
- Project information file (EV-700T)
- Table file
- Audio files (WAV file)
- File Configuration of the Memory Card
- WHAT IS THE DEVICE SETTING?
- [Broadcast and system]
- [Network]
- [Control]
- EDIT WORKFLOW
- Project Edit
- Editing the already created project and reflecting to the EV-700
- Editing the Device Setting
- Creating a new device setting file and reflecting to the EV-700
- Editing the already created device setting file and reflecting to the EV-700
- Confirming the Device Setting File
- Method (1) Method (2) Method (3)
- EDITING THE PROJECT
- Creating a New Project
- Setting or Editing the Project Information
- Project information screen description
- Project name
- Creator
- Description
- Creation date and time
- PC time button
- Update date and time
- Sampling frequency of the usage audio source
- Project information save button
- Setting
- Setting or Editing the Phrase
- Description of the Audio source registration screen
- Audio source list
- Deletion button
- "Refer to" button
- Comment
- Set button
- Audio source registration button
- Phrase setting
- Registering the audio source for emergency playback
- Setting or Editing the Program
- Description of the Program screen
- Program selection area
- Program list
- Emergency playback button
- R.E.M. button
- Deletion button
- Program setting area
- Initial setting button
- Program save button
- Description of the program screen (when the program in the Program list is selected)
- Program name
- Playback system
- Detailed settings of the playback system Tips
- - Repeat count
- - Repeat interval
- - Busy output during repeat interval
- • Interval (Phrase interval)
- - Busy output during interval
- Step display list
- Reverse button
- Play/Stop button
- Forward button
- Playback total time indication
- Edit button
- Priority level
- Output
- Program audio volume
- Automatic gain control (AGC)
- Program playback busy output
- Reverse button
- Play/Stopbutton
- Forward button
- Deletion button
- Playback total time indication
- List order up button
- List order down button
- Audio source selection button
- Step composition Audio file list
- Changebutton
- Audio source selection list
- Silent interval selection button
- Silent interval setting switch
- Edit complete button
- 29.Cancelbutton
- Editing the program
- [Editing the step]
- Description of the Program screen (when the Emergency playback button is selected)
- Detailed setting of the playback system
- - Repeat time
- Audio source registration status indication (Audio source)
- Priority level
- Output
- Program sound volume
- Automatic gain control (AGC)
- Emergency playback program setting
- Description of the Program screen (when the R.E.M. button is selected)
- Priority level
- Output
- Program sound volume
- Automatic gain control (AGC)
- R.E.M. playback program setting
- Editing the Created Project
- Acquiring via LAN
- Step 4. Click the Close button.
- Reading Data saved on the Memory Card or in the PC
- Editing
- REFLECTING THE PROJECT SETTING TO THE EV-700
- Reflecting to the EV-700 via LAN
- Uploading to the EV-700
- Step 1. Select the Project tab.
- Step 3. Click the Start button.
- Uploading Difference data to the EV-700
- Saving to the Memory Card
- EDITING THE DEVICE SETTING
- Creating a New Device Setting File
- Making the Broadcast Setting and System Setting
- Description of the Broadcast and System setting screen
- Whole sound volume
- Delay time
- Broadcast priority level
- Backup function
- Health check interval
- Keep-alive
- Quick stop
- Device setting save button (Device setting)
- Setting
- Making the Network Setting
- Description of the Network setting screen
- IP address
- Subnet mask
- Default gateway
- Port number
- Device name
- Device setting save button
- Setting
- Making the Control Setting
- Description of the control setting screen
- Control function
- Type
- Operation
- Control output
- Device setting save button (Device setting)
- Setting
- Editing the Created Device Setting File
- Acquiring via LAN
- Reading Data saved on the Memory Card or in the PC
- Editing
- REFLECTING THE DEVICE SETTING TO THE EV-700
- Reflecting to the EV-700 via LAN
- Saving to the Memory Card
- SAVING THE DEVICE SETTING FILE IN CSV FORMAT
- Saving
- Configuration of the Setting File in CSV Format
- Title
- Item name
- Setting value
- [Descriptions of the broadcast priority levels]
- Unit
- Displaying the Device Operation Screen
- Step 2. Click the Operation tab.
- Description of the Device Operation Screen
- Program list display
- Step display
- Broadcast/Stop button (for program broadcast)
- Broadcast option (for program broadcast)
- Stop option (for program broadcast)
- Device's clock indication
- Device's clock setting button
- Device status display
- Stop button (common to all broadcasts)
- Stop option (common to all broadcasts)
- Sequential storage clear button (common to all broadcasts)
- Phrase list (for program broadcast)
- Deletion button (for phrase)
- Recording button (for phrase)
- Broadcast/Stop button (for emergency playback)
- Recording button (for Emergency playback)
- Deletion button (for Emergency playback)
- Recording button (for R.E.M. playback)
- Broadcast stop button (for R.E.M. playback)
- Confirming The Current Broadcasting Status Of The EV-700
- Starting the Program Broadcast
- Step 2. Click the Broadcast button.
- Recording an Audio Source for use as the Phrase
- Deleting the Phrase Audio Source
- Starting the Emergency Playback Broadcast
- Recording the Audio Source to be used for the Emergency Playback Broadcast
- Deleting the Audio Source used for the Emergency Playback Broadcast
- Step 2. Click the Yes button.
- Starting the R.E.M. Playback
- Stopping Broadcast and Recording
- Setting the EV-700's Clock
- Step 2. Set the time.
- 2-1. When entering the date and time
- 2-2. When acquiring the PC time
- Displaying the Monitoring and Check Screen
- Description of the Monitoring and Check Screen
- Input to device (display only)
- Device's state (display only)
- Card recovery button (Card A)
- Device's output (display only)
- Failure detection button
- Audio source confirmation button (Audio)
- Restart button
- Restarting the EV-700
- Returning the EV-700's Operation to That Using the Memory Card A
- Executing Failure Detection of the EV-700
- Confirming the Audio Sources Registered in the EV-700
- CONFIRMING THE EV-700'S OPERATION LOG
- Reading the History File
- Reading the EV-700's history file when the PC and EV-700 are online
- Reading the history file saved on the memory card
- Description of the History Screen
- CSV output button
- History download button
- History file readout button
- History list
- Saving the History in CSV Format
- Saving
- How to see history file in csv format
- History number
- Date of history
- Hours, minutes, and seconds of history
- History code
- History content
- PERFORMING MAINTENANCE
- Maintenance with the EV-700 Setting Software
- Displaying the Maintenance Screen
- Description of the Maintenance Screen
- All settings initialization button
- Network setting initialization button
- Device setting initialization button
- Copy button
- Card comparison button
- All deletion button
- User information
- User information update button
- Network information acquisition button
- Address setting
- Address setting update button
- Port number setting
- Port number setting update button
- Initializing the Device Setting
- Initializing all the device setting items
- Initializing the network setting
- Initializing the device setting items except the network setting
- Managing the Memory Card
- Copying the data on the memory card
- Step 1. Click the Copy button on the Maintenance screen.
- Step 3. Click the Close button.
- Comparing the contents of both memory cards
- Deleting all the contents on the memory card
- Changing the User Authentication Information
- Making the Network Setting
- When changing the address setting
- When changing the port number setting
- HISTORY CODE LIST
- Operation History
- Event
- ERROR LIST
- Errors Related to the EV-700
- Errors not Related to the EV-700
- Message display at invalid file detection
- Messages displayed at error detection related to the device setting
- Other errors
- TROUBLESHOOTING
Brand : TOA
Model : EV-700
Category : Wi-Fi repeater