
Metro CR3502A - Radio Crosley - Free user manual and instructions
Find the device manual for free Metro CR3502A Crosley in PDF.


| Product Type | AM/FM Radio with CD Player and Bluetooth |
| Brand | Crosley |
| Model | Metro CR3502A |
| Dimensions | 366 x 115 x 232 mm |
| Power Source | AC adapter, DC 12V 2A |
| Power Consumption | 24W |
| Output Power | 8W x 2 (16W total) |
| Frequency Range | FM 87.5 – 108.0 MHz |
| Frequency Response | 45Hz – 20KHz |
| Audio Input Sensitivity | 500mV |
| Bluetooth Version | 4.2 |
| Preset Stations | Up to 30 FM stations |
| Playback Media | CD, FM Radio, Bluetooth, Aux In |
| Equalizer Modes | Flat, Rock, Pop, Jazz, Classic |
| Sleep Timer | 15, 30, 45, 60, 90, 120 minutes |
| Clock Format | 12/24 hour selectable |
| Alarm | Wake to FM radio or CD |
| Remote Control | Included |
| Antenna | FM wire antenna |
| Aux Input | 3.5mm jack |
| CD Player | Yes (audio CDs, not MP3) |
| Accessories | Remote control, power adapter, aux cable, FM antenna |
Frequently Asked Questions - Metro CR3502A Crosley
User questions about Metro CR3502A Crosley
0 question about this device. Answer the ones you know or ask your own.
Ask a new question about this device
Download the instructions for your Radio in PDF format for free! Find your manual Metro CR3502A - Crosley and take your electronic device back in hand. On this page are published all the documents necessary for the use of your device. Metro CR3502A by Crosley.
USER MANUAL Metro CR3502A Crosley
Metro Radio CD Player
Instruction Manual
natural_image
Line drawing of a portable electronic device with front panel and control knobs (no text or symbols)Questions, problems, missing parts?
Before returning to the store, call Customer Service
8 a.m. – 6 p.m., EST, Monday – Friday
1-888-CROSLEY
www.crosleyradio.com
Safety Instructions
Read and understand this entire manual before using this product. Keep these instructions for future reference.
- Do not use this product near water.
- This product should be operated only by the type of power source indicated on the marking label or in this instruction manual.
- Do not defeat the safety purpose of the polarized plug. A polarized plug has two blades with one blade wider than the other. This plug will fit into the power outlet only one way. If you are unable to insert the plug fully into the outlet try reversing the plug. If the plug should still fail to fit, contact your electrician.
- Protect the power cord from being walked on or pinched particularly at plugs, convenience receptacles, and the point where they exit from the product.
- Do not overload wall outlets, extension cords, or integral convenience receptacles as this can result in a risk of fire or electric shock.
- Never push objects of any kind into this product through openings as they may touch dangerous voltage points or short-out parts that could result in a fire or electric shock. Never spill liquid of any kind on the product.
- Do not attempt to service this product yourself as opening or removing covers may expose you to dangerous voltage or other hazards. Refer all servicing to qualified service personnel.
- Changes or modifications to this unit not expressly approved by the party responsible for compliance could void the user's authority to operate the equipment.
- Do not use attachments not recommended by the product manufacturer as they may cause hazards.
- A product and cart combination should be moved with care. Quick stops, excessive force, and uneven surfaces may cause the product and cart combination to overturn.
- Slots and openings in the cabinet are provided for ventilation and to ensure reliable operation of the product and to protect it from overheating. Do not block or cover these openings.
- Unplug the product during lightning storm or when unused for long periods of time.
Items in this package
Before throwing away any packaging materials, please check thoroughly and make sure you find the following items that come along with this package:
- Radio
- Remote Control
- Power adapter
- 3.5mm aux in cable
- FM Wire Antenna
Please contact Crosley customer service if there is any accessory missing from the package. Retain the original packaging materials for exchange or return purposes.
Specifications
Power Source AC power adaptor, DC output 12V 2A
Power consumption 24W
Output Power 8W x 2
Frequency Range FM 87.5 – 108.0 MHz
Frequency Response 45Hz – 20KHz
Audio Input Sensitivity 500mV
Dimension 366 x 115 x 232 mm
Note:
- Design and specifications are subject to change without notice.
- To help save power consumption, some models will comply with ERP energy saving standard. When there is no audio input for 20 minutes, their powers will automatically cut-off. To turn power back on and resume playing, you will need to turn off the power and turn it on again.
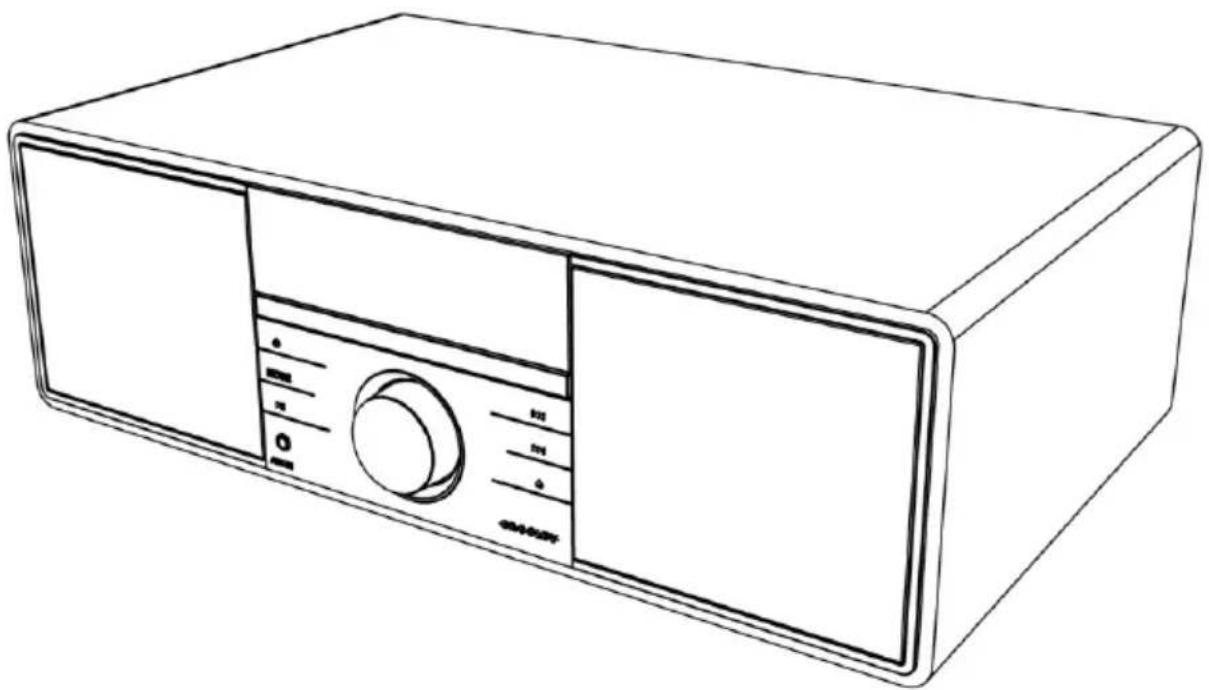
Product Description

- Speakers
- Power Button
- Mode Button
- Play/Pause Button
- Aux In Jack
- Volume Knob
-
LED Display
-
Open/Close Button
- Forward Skip Button
- Backward Skip Button
- CD Tray
- Antenna
- Power Jack
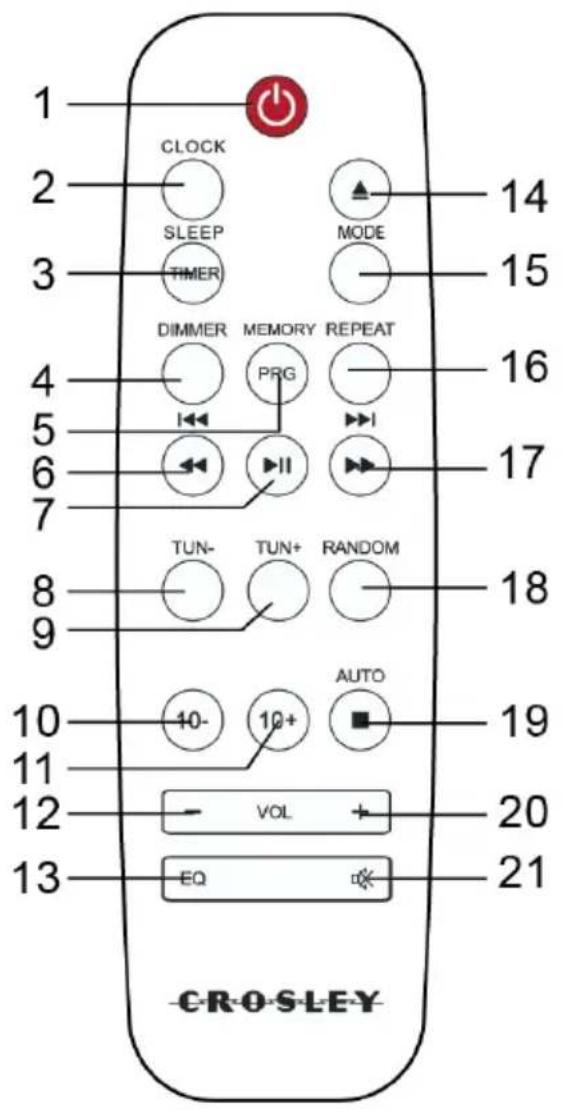
- Power Button
- Clock Button
- Sleep Button
- Dimmer Button
- Program Button
- Backward Skip Button
- Play/Pause Button
- Tuner - Button
- Tuner + Button
- 10 - Button
-
10 + Button
-
Volume Down Button
- EQ Button
- Open/Close Button
- Mode Button
- Repeat Button
- Forward Skip Button
- Random Button
- Auto / Stop Button
- Volume Up Button
- Mute Button
Initial Setup
Essential Setup
- Place the unit on a flat and level surface. The selected location should be stable and free from vibration.
- Connect AC adaptor to the Power Jack of the unit.
- Connect the supplied FM wire antenna to the ANT. socket on the unit.
- Untie the FM Antenna and allow it to hang in a straight line.
Clock Setup
Set the Clock
Manually setting the clock can only be done in STANDBY mode.
Note: Standby mode is the energy saving mode when the unit is plugged in, but not turned on for active functions.
- In STANDBY mode, press and hold the CLOCK button on the remote control.
- Press the 1 button on the remote control to adjust between the 12 or 24 hour setting. Press CLOCK button on the remote control to confirm, and then the hour digits will flash.
- Press the buttons on the remote control or on the unit to adjust the hour digits while flashing. Press CLOCK button on the remote control to confirm, and then the minute digits will flash.
- Press the 1 button on the remote control or on the unit to adjust the minute digits while flashing. Press the CLOCK button on the remote control to confirm.
Note: Unplugging the unit will reset the clock.
Setting the Alarm
- In Standby mode, press and hold the Timer/Sleep button on the remote control until the hour digits flash on the display.
Note: Standby mode is the energy saving mode when the unit is plugged in, but not turned on for active functions. - Press the buttons on the remote control or on the unit to adjust the hour digits, and then press the Timer/Sleep button on the remote control to confirm, the minute digits will flash on the display.
- Press the 1 button on the remote control or on the unit to adjust the minute digits, and then press the Timer/Sleep button on the remote control to confirm, the mode will flash on the display.
- Press the buttons on the remote control or on the unit to select:
- FM (to wake to your selected FM Radio Station)
- CD (to wake to your disc music)
-
Press the Timer/Sleep button on the remote control to confirm, the display will show the volume level.
-
Press the 10 buttons on the remote control or on the unit to adjust the volume, and press the Timer/Sleep button on the remote control to confirm.
Activate and Deactivate the Alarm
- Press the Timer/Sleep button on the remote control to view the alarm settings or deactivate the alarm.
- To deactivate the alarm, press the Timer/Sleep one time.
- To activate the alarm, press the Timer/Sleep one time.
Radio Operation
Tuning in a Station
Tune in radio stations automatically
- Press and hold the Tun - /Tun + buttons, the frequency changes down or up automatically until a station is found.
Tune in radio stations manually
- Press the Tun – /Tun + buttons repeatedly until you find the station you want. Note: The unit is equipped with a FM wire antenna. To FM improve reception, move the wire around until the reception is clear without interferences. Do not connect the wire to any additional antenna.
Auto Scan and Save Preset Station
Press and hold the Auto/Stop button on the remote control to activate automatic programming. All available stations are programmed in the order of waveband reception strength.
Presetting Stations Manually
You can preset up to 30 FM stations.
- Tune in the desired station, then press the Program button on the remote.
- Press the buttons on the remote control select the preset number.
- Press the Program button to store the station.
- Repeat above steps 1 to 3 for each station you want to store in memory with a preset number.
CD Playback Operation
- Press the Mode button on the main unit on the remote control to select CD mode.
- Press the button on the unit or remote to open the CD tray and put the CD in the tray with the labeled side facing up.
- Press the button again to close the tray. If it is a blank CD or an unrecognizable CD, it will show "NO DISC". Playback will start automatically.
- During the playback, press the button on the unit or the remote control to pause or resume play.
- To skip to the next or previous track, press the 1 button on the remote control or on the unit.
- To search fast forward or backward a track, press and hold the buttons on the remote control or on the unit correspondingly until you reach the desired time. Release the button and the playback will resume.
- Press the button if you want to completely stop playback.
Random Playback
Press the Random button on the remote control to switch Random Mode. The selected mode will show on the display.
- RANDOM: Randomly play the song.
- RAND OFF: Shuffle turned off.
Repeat Playback
Press the Repeat button repeatedly on the remote control. The repeat button will show on the display.
- ONE: Repeat current track.
- ALL: Repeat all tracks.
- OFF: Repeat turned off.
Programmed Playback
- Press the button on the remote control.
- Press the PRG button on the remote control.
- Press buttons on the remote control or on the unit to select the track that you want to preset, then press PRG button to confirm.
- Repeat step 3 to program more tracks.
- Press the button to playback programmed tracks.
Note:
- If you want to change the programmed files, press the ■ button two times to clear the current program files.
Bluetooth Operation
- Press the Mode button on the main unit or on the remote control to select BT mode.
- Turn on the Bluetooth feature of your audio device, search for "CROSLEY CR3502A" and pair.
- Once your device is successfully paired with the unit, you will hear a short confirmation sound from the unit.
- Play and stream music from your device to the unit.
Note:
- Enter "0000" for the password if necessary
- Version 4.2
Aux Input Connection
You can connect an audio device to this unit and play your music through its speakers. To do this, connect the 3.5mm auxiliary cable between your audio device and the Aux In Jack of this unit, press the Mode button on the main unit or on the remote control to select AUX IN mode, and start playing.
Other Operation
Select the Equalizer
Press the EQ button on the remote control repeatedly to select:
[Flat] - [Rock] - [Pop] - [Jazz] - [Classic]
Adjust the Brightness
Press the Dimmer button on the remote control to select brightness level.
Set the Sleep Timer
- Press the TIMER/SLEEP button on the remote control repeatedly to select your desired number of minutes. The number of minutes shown will display in this sequence:
120 → 90 → 60 → 45 → 30 → 15 → OFF
- Stop pressing the SLEEP button when your desired number of minutes is displayed. The sleep timer is now set.
- Press the SLEEP button to view the remaining time before switch off.
- To cancel the sleep timer, press the SLEEP button repeatedly until "SLP OFF" shows on the display.
Troubleshooting
There is no power
- Power adapter is not connected correctly.
- No power at the power outlet.
CD does not play
- The CD is blank.
- The CD is placed on the tray incorrectly with the label side facing down.
- The CD has unsupported digital audio files like MP3 and similar types of format.
- The CD has too many scratches or dirty.
FCC Statements
NOTE: This equipment has been tested and found to comply with the limits for a Class B digital device, pursuant to part 15 of the FCC Rules. These limits are designed to provide reasonable protection against harmful interference in a residential installation. This equipment generates uses and can radiate radio frequency energy and, if not installed and used in accordance with the instructions, may cause harmful interference to radio communications. However, there is no guarantee that interference will not occur in a particular installation. If this equipment does cause harmful interference to radio or television reception, which can be determined by turning the equipment off and on, the user is encouraged to try to correct the interference by one or more of the following measures:
- Reorient or relocate the receiving antenna.
- Increase the separation between the equipment and receiver.
- Connect the equipment into an outlet on a circuit different from that to which the receiver is connected.
- Consult the dealer or an experienced radio/TV technician for help.
Changes or modifications not expressly approved by the party responsible for compliance could void the user's authority to operate the equipment.
This device complies with Part 15 of the FCC Rules. Operation is subject to the following two conditions:
- This device may not cause harmful interference, and
- This device must accept any interference received, including interference that may cause undesired operation.
- Metro Radio CD Player
- Instruction Manual
- Safety Instructions
- Items in this package
- Specifications
- Note:
- Initial Setup
- Essential Setup
- Clock Setup
- Set the Clock
- Setting the Alarm
- Activate and Deactivate the Alarm
- Radio Operation
- Tuning in a Station
- Auto Scan and Save Preset Station
- Presetting Stations Manually
- CD Playback Operation
- Random Playback
- Repeat Playback
- Programmed Playback
- Bluetooth Operation
- Aux Input Connection
- Other Operation
- Select the Equalizer
- Adjust the Brightness
- Set the Sleep Timer
- Troubleshooting
- There is no power
- CD does not play
- FCC Statements
Brand : Crosley
Model : Metro CR3502A
Category : Radio