
NX387 - Browser CLARION - Free user manual and instructions
Find the device manual for free NX387 CLARION in PDF.


| Product Type | Car Navigation / Multimedia Receiver |
| Dimensions (W x H x D) | 178 mm x 100 mm x 160 mm (Double DIN) |
| Weight | Approx. 1.5 kg |
| Power Supply | 12V DC (negative ground), 5A fuse |
| Display | 6.2-inch TFT LCD touchscreen, 480x234 pixels |
| Navigation | Built-in GPS, preloaded maps, turn-by-turn voice guidance |
| Audio | AM/FM tuner, CD/DVD player, MP3/WMA playback, 4x50W amplifier |
| Connectivity | Bluetooth hands-free & audio streaming, USB, SD card, AUX input |
| Video Input | Rear view camera input (RCA), parking brake bypass |
| Steering Wheel Control | Compatible with aftermarket adapters |
| Map Updates | SD card based, yearly updates available |
| Languages | Multi-language (English, French, Spanish, etc.) |
| Maintenance | Clean with dry, soft cloth; do not use solvents |
| Safety | Use specified fuse; disconnect battery before installation |
| Spare Parts | Includes: remote control, GPS antenna, mounting kit, wiring harness |
| Repairability | Service by authorized Clarion centers; do not disassemble |
| Certifications | CE, FCC, RoHS |
| Warranty | 1 year limited warranty |
| Accessories Included | Quick start guide, user manual (PDF) |
Frequently Asked Questions - NX387 CLARION
User questions about NX387 CLARION
0 question about this device. Answer the ones you know or ask your own.
Ask a new question about this device
Download the instructions for your Browser in PDF format for free! Find your manual NX387 - CLARION and take your electronic device back in hand. On this page are published all the documents necessary for the use of your device. NX387 by CLARION.
USER MANUAL NX387 CLARION
DVD Multimedia Station With In-built Navigation and
6.2" Touch Panel Control
-
PRECAUTIONS....6
-
CAUTIONS ON HANDLING 7
-
PANEL CONTROLS....9
Functions of Buttons 9
- REMOTE CONTROL 10
Remote Control Functions.... 11
- BASIC OPERATIONS 12
Turning on/off the power 12
Switching Source Modes 12
Home Screen....12
Clock and Indicators Display.... 12
Turning off the Display Monitor 12
Adjusting the Volume....12
Screen Adjustment 13
Mute Function.... 13
Radio Illumination 13
Parking Brake Safety 13
Video Output....13
Reverse Camera View 13
- RADIO MODE OPERATIONS.... 14
Listening to the Radio.... 14
Seek Tuning....14
TP Seek 14
Manual Tuning 14
Autostore 14
Storing Preset Memory....15
Recalling a Preset Station 15
- RDS OPERATIONS.... 15
RDS (Radio Data System).... 15
TA (Traffic Announcement).... 16
Emergency Broadcast 16
PTY (Programme Type).... 16
Volume Setting of TA, Emergency Broadcast, and PTY 17
AF (Alternate Frequency) Function 17
REG (Regional Programme)....17
- CD/USB MODE OPERATION 18
Discs....18
Watching/Listening to a disc 19
Loading a CD....19
Eject the CD....19
USB 19
USB Digital Media Streaming....19
Hot plugging function.... 19
Connecting a USB memory/MTP device 20
Watching/Listening to a track with USB memory device.... 20
Unplug the USB memory/MTP device 20
10. DVD VIDEO PLAYER OPERATIONS....21
Showing DVD video mode screen....21
Playing Video Files in DVD 21
Play/Pause Playback....21
Skip (Search) a Chapter.... 21
Skip (Search) a Title....21
Fast Forward/Fast Backward Operation 21
Repeat Playback 21
Switching Audio....22
Switching Subtitles....22
Switching Angle 22
Zoom Operation 22
11. CD/USB VIDEO OPERATIONS 23
Playing Video Files in CD/USB memory/MTP device.... 23
Play/Pause 23
Switch to Previous/Next File 23
Fast Forward/Fast Backward Operation 23
Repeat Playback 23
Switching Subtitles.... 23
Video File List (Directory) 23
Zoom Operation 23
12. CD/USB/MTP AUDIO OPERATIONS 24
Playing Audio Files in CD/USB memory/MTP device 24
Play/Pause Playback....24
Switch to Previous/Next File or track 24
Fast Forward/Fast Backward Operation 24
Repeat Playback 24
Random Playback 24
Album Artwork 24
Selecting a Track on the Directory View.... 25
Tag Display Function 25
13. CD/USB/MTP PICTURE OPERATIONS 26
Showing CD/USB/MTP Picture Mode Screen.... 26
Play/Pause Playback....26
Switch to Previous/Next File or track 26
Repeat Playback 26
Rotate Operation 26
Effect Operation.... 26
14. iPod/iPhone OPERATIONS 27
Select iPod Mode 27
Play/Pause Playback....27
Switch to Previous/Next Track 27
Fast Forward/Backward 27
Tag Display Function 27
Repeat Play 27
Shuffle Play 27
Selecting a Song from iPod Menu.... 28
Available iPod Categories.... 28
Supported iPod/iPhone Devices 28
15. Bluetooth® AUDIO PLAYER OPERATIONS....29
Select Bluetooth Audio Mode 29
Controlling the Bluetooth Audio Player 29
Playing Music 29
Play/Pause Playback....29
Switch to Previous/Next Track 29
Fast Forward/Backward 29
Tag Display Function 29
16. Bluetooth® TELEPHONE OPERATIONS.... 30
Introduction to Bluetooth® Technology 30
Incoming Call 30
Select Phone Mode 30
Voice Dialer....30
Key Input 31
Phonebook 31
History 32
Bluetooth Settings.... 33
Pairing with an External Device 33
Cancelling Pairing Mode 33
Connecting to a Bluetooth Device.... 33
Disconnecting a Bluetooth Device 34
Deleting a Bluetooth Device 34
Reset Bluetooth Information....34
17. AUX OPERATIONS.... 35
18. VIDEO INPUT/DVB-T2 OPERATIONS.... 35
19. GPS NAVIGATION OPERATIONS.... 35
20. SETTINGS OPERATIONS ...... 36
Select Settings 36
Balance/Fader Adjustment 36
Time Alignment Adjustment 36
Sound Effect Controls 37
Subwoofer Controls.... 37
Graphic Equalizer 37
Clock Adjustment 38
General Settings 38
About 39
21. TROUBLESHOOTING 40
22. ERROR DISPLAY 44
23. SPECIFICATIONS......45
1. FEATURES
• Double Din 6.2" Touch Panel Control
• DVD Video/CD-DA/MP3/WMA/AAC Playback Capability
• Programmable Steering Wheel Remote Control
- Compatible with iPod™/iPhone™ via USB
• Audio/Picture/Video Playback Capability via USB memory/ MTP device
- Built in Bluetooth® Handsfree (HFP), Audio Streaming (A2DP & AVRCP), and Phonebook (PBAP)
• 4ch RCA output with Subwoofer Control
Expanding Systems
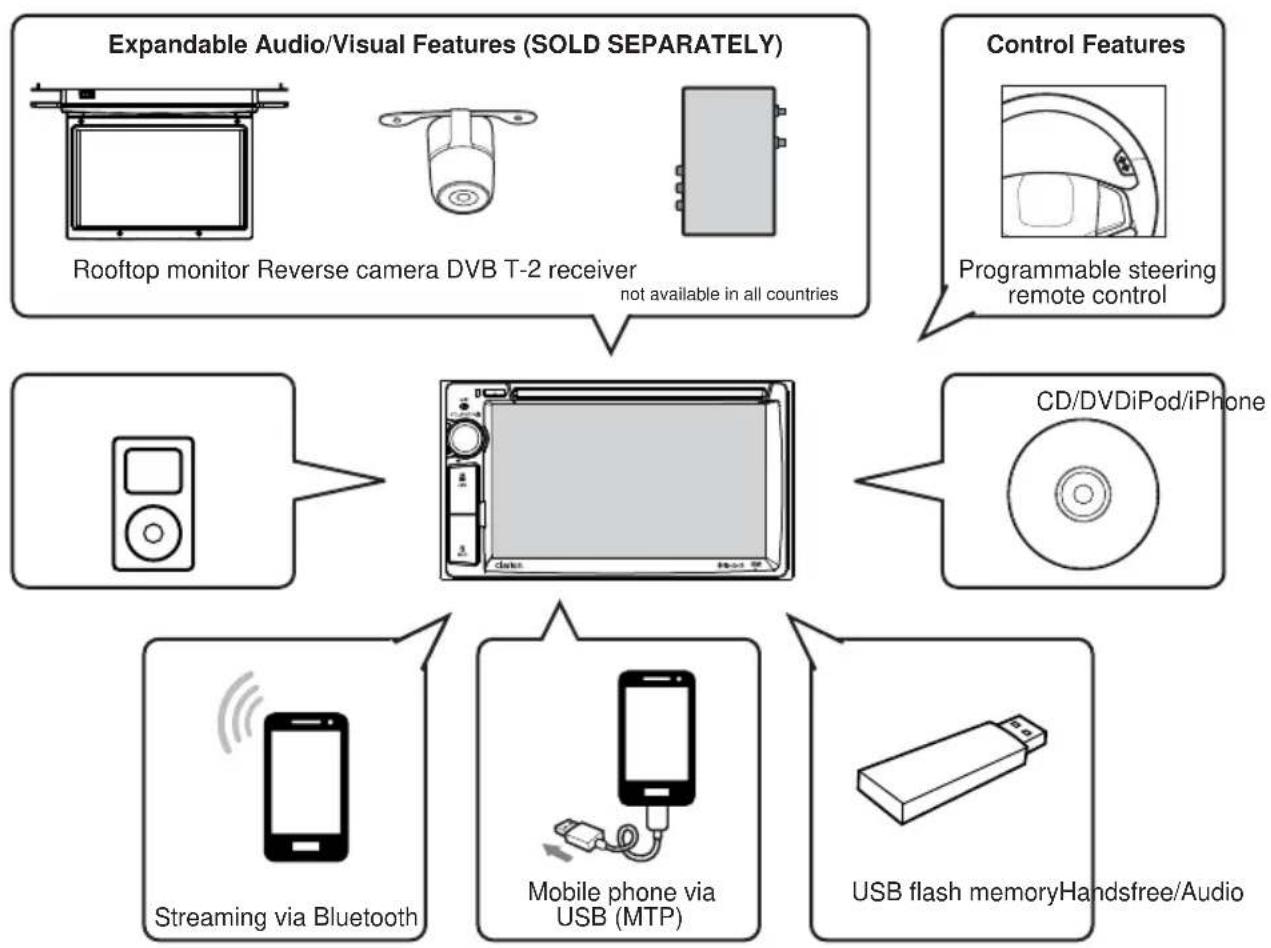
flowchart
graph TD
    A["Expandable Audio/Visual Features (SOLD SEPARATELY)"] --> B["Rooftop monitor Reverse camera DVB T-2 receiver"]
    C["Control Features"] --> D["Programmable steering remote control"]
    B --> E["CD/DVDiPod/iPhone"]
    D --> E
    E --> F["Streaming via Bluetooth"]
    E --> G["Mobile phone via USB (MTP)"]
    E --> H["USB flash memoryHandsfree/Audio"]
Note:
● The items listed outside of the unit are the commercial products generally sold.
2. PRECAUTIONS
WARNING
- For your safety, the driver should not watch any video sources and/or operate the controls while driving. Please note that watching and operating any video sources while driving is prohibited by law in some countries. Also, while driving, keep the volume to a level at which external sounds can be heard.
- Do not disassemble or modify this unit. It may cause an accident, fire, or electric shock.
- Do not use this unit when a trouble exists, such as no screen content appears or no sound is audible. It may cause an accident, fire, or electric shock. For that case, consult your authorized dealer or a nearest Clarion service center.
- In case of a problem, such as any material has entered in the unit, the unit gets wet, or smoke or strange smells come out of the unit, etc., stop using this unit immediately, and consult your authorized dealer or a nearest Clarion service center.
Using it in that condition may cause an accident fire, or electric shock.
- Use a fuse with the same specification only when replacing the fuse.
Using a fuse with a different specification may cause a fire. - For the installation of this unit or a change in the installation, ask your authorized dealer or a nearest Clarion service center for safety. Professional skills and experience are requires to do so.
- As the driver, you alone are responsible for your driving safety.
- In order to avoid a traffic accident, do not operate the system while driving.
- In order to avoid a traffic accident, operate the system only when the vehicle is stopped at a safe place and the parking brake is on.
- The software may contain inaccurate or incomplete information due to the passage of time, changing circumstances, and the sources of information used. Please respect current traffic conditions and regulations at all times while driving.
-
Keep the amount of time spent viewing the screen while driving to a strict minimum.
-
When the inside of the car is very cold and the player is used soon after switching on the heater, moisture may form on the disc (DVD/ CD) or the optical parts of the player and proper playback may not be possible. If moisture forms on the disc (DVD/CD), wipe it off with a soft cloth. If moisture forms on the optical parts of the player, do not use the player for about one hour. The condensation will disappear naturally allowing normal operation.
- Driving on extremely bumpy roads which cause severe vibration may cause the sound to skip.
- This unit uses a precision mechanism. Even in the event that trouble arises, never open the case, disassemble the unit, or lubricate the rotating parts.
- This navigation system should not be used to replace your own judgment. No itinerary suggested by this navigation system should ever override any highway regulations, your own judgment, or a knowledge of safe driving practice. Do not follow the navigation system's suggested itinerary if it would cause you to perform a dangerous or illegal act, place you in a dangerous situation, or take you into an area you consider unsafe.
- The advice provided by the navigation system is to be regarded as a suggestion only. There may be times when the navigation system displays the vehicle's location incorrectly, fails to suggest the shortest route, or fails to direct you to your desired destination. In such instances, rely on your own driving judgment, taking into account the driving conditions at the time.
- Do not use the navigation system to locate emergency services. The database does not contain a complete listing of emergency services. Please show discretion and ask for directions in such instances.
- The navigation system does not provide, nor represent in any way information on: traffic and highway regulations; technical aspects of the vehicle weight, height, width, load and speed limits; road conditions including grade, percentage of incline and surface conditions; obstacles such as the height and width of bridges and tunnels; and other current driving or road conditions. Always rely on your own judgment when driving a car, taking into account current driving conditions.
3. CAUTIONS ON HANDLING
Operation Panel
For a longer service life, be sure to read the following cautions.
- The operation panel will operate properly in a temperature range of 0^ to 60^ .
- Do not allow any liquids on the set from drinks, umbrellas etc. Doing so may damage the internal circuitry.
- Do not disassemble or modify the set in any way. Doing so may result in damage.
- Subjecting the operation panel to shocks may result in breakage, deformation or other damage.
- Do not let cigarettes burn the display.
-
If a problem should occur, have the set inspected at your store of purchase.
-
The remote control unit may not work if the remote control sensor is exposed to direct sunlight.
- In extremely cold weather, the display movement may slow down and the display may darken, but this is not a malfunction. The display will work normally when the temperature increases.
- Small black and shiny spots inside the liquid crystal panel are normal for LCD products.
USB Port
- The USB memory sticks must be recognized as "USB mass storage class" to work properly. Some models may not operate correctly.
When the memorized data is lost or damaged by any chance, Clarion shall not be liable for any damage.
When using an USB memory stick, we recommend that you backup your data stored on it before by using a personal computer etc.
- Data files may be broken when using USB memory sticks in the following situation: When disconnecting the USB memory stick or turning the power off during writing or reading data. When affected by static electricity or electric noise. Connect/disconnect the USB memory stick when it is not accessed.
- Connecting with the computer is not covered.
Cleaning
- Cleaning the cabinet
- Use a soft, dry cloth and gently wipe off the dirt. For tough dirt, apply some neutral detergent diluted in water to a soft cloth, wipe off the dirt gently, and then wipe again with a dry cloth.
Do not use benzene, thinner, car cleaner, etc., as these substances may damage the cabinet or cause the paint to peel. Also, leaving rubber or plastic products in contact with the cabinet for long periods of time may cause
stains.
- Cleaning the liquid crystal panel
- The liquid crystal panel tends to collect dust, so wipe it off occasionally with a soft cloth. The surface is easily scratched, so do not rub it with hard objects.
Handling Disc
- Handling
- New discs may have some roughness around the edges. If such discs are used, the player may not work or the sound may skip. Use a ball-point pen or the like to remove any roughness from the edge of the disc.
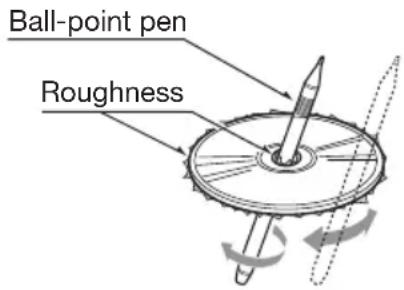
Never stick labels on the surface of the disc or mark the surface with a pencil or pen.
- Never play a disc with any cellophane tape or other glue on it or with peeling off marks. If you try to play such a disc, you may not be able to get it back out of the DVD player or it may damage the DVD player.
- Do not use discs that have large scratches, cracked, etc. Use of such discs may cause missoperation or damage.
- To remove a disc from its storage case, press down on the center of the case and lift the disc out, holding it carefully by the edges.
- Do not use commercially available disc protection sheets or discs equipped with stabilizers, etc. These may damage the disc or cause breakdown of the internal mechanism.
- Storage
- Do not expose discs to direct sunlight or any heat source.
- Do not expose discs to excess humidity or dust.
- Do not expose discs to direct heat from heaters.
- Cleaning
- To remove fingermarks and dust, use a soft cloth and wipe in a straight line from the center of the disc to the circumference.
- Do not use any solvents, such as commercially available cleaners, anti-static spray, or thinner to clean discs.
- After using special disc cleaner, let the disc dry off well before playing it.
- On Discs
- Never turn off the power and remove the unit from the car with a disc loaded.
CAUTION
For your safety, the driver should not insert or eject a disc, opening the operation panel while driving.
About the registered marks, etc.
- “Made for iPod” and “Made for iPhone” mean that an electronic accessory has been designed to connect specifically to iPod or iPhone, respectively, and has been certified by the developer to meet Apple performance standards.
Apple is not responsible for the operation of this device or its compliance with safety and regulatory standards.
Please note that the use of this accessory with iPod or iPhone may affect wireless performance.
iPhone, iPod, iPod Nano and iPod touch are trademarks of Apple Inc., registered in the U.S. and other countries.
• Copyright 2015 Google Inc.
Font used in this product is Licensed under the Apache License, Version 2.0 (the "License"); you may not use this file except in compliance with the License. You may obtain a copy of the License at
http://www.apache.org/licenses/LICENSE-2.0
Unless required by applicable law or agreed to in writing, software distributed under the License is distributed on an "AS IS" BASIS, WITHOUT WARRANTIES OR CONDITIONS OF ANY KIND, either express or implied.
See the License for the specific language governing per-
missions and limitations under the License.
- The Bluetooth® word mark and logos are registered trademarks owned by the Bluetooth SIG, Inc. and any use of such marks by Clarion Malaysia Sdn. Bhd. is under license. Other trademarks and trade names are those of their respective owners.
- This product incorporates copyright protection technology that is protected by U.S. patents and other intellectual property rights. Use of this copyright protection technology must be authorized by Rovi Corporation, and is intended for home and other limited viewing uses only unless otherwise authorized by Rovi Corporation. Reverse engineering and disassembly are prohibited.
- Dolby® and the double-D symbols are registered trademarks of Dolby Laboratories.
- microSDHC Logo is a trademark of SD-3C, LLC. Note:
- Reverse engineering or disassembly is prohibited.
4. PANEL CONTROLS
Main Unit
![CD/DVD slot Touch screen IR sensor Microphone MIC VOL/SRC/ [○]/[VOLUME]/[SRC] RESET hole USB port microSD memory card slot clarion Bluetooth](/content/2026/05/953549/images/7c77359e0bd3a54d94f23a42288958446d3cb4dd0ed92d25467f6a33ac972181.jpg)
Names of the Buttons and Their Functions
CD/DVD slot
- CD insertion slot.
IR Sensor
- Receiver for remote control unit (operating range: 30° in all directions).
button
- Eject a CD/DVD when it is loaded in the unit.
[∅]/[VOLUME]/[SRC]
- Press the knob to turn on power.
- Press the knob when the unit is turned on to display Home Screen; press again to return to current source.
- Press and hold the knob to turn off the power.
- Rotate the knob left or right to decrease or increase the volume.
RESET Button
- Reboot the system. Note: When the RESET button is pressed, all saved memory in the unit are cleared.
USB port
• USB mass storage device/MTP/iPod/iPhone insertion.
AUX inputs (rear)
• 3.5mm Auxiliary jack insertion
• Steering wheel remote control insertion.
Video/ DVB-T2 input (rear)
- Composite video connection (CVBS) jack insertion.
microSD memory card slot
- For memory card with navigation maps.
Touch screen
• Resistive touch screen display.
Microphone
- For handsfree.
5. REMOTE CONTROL
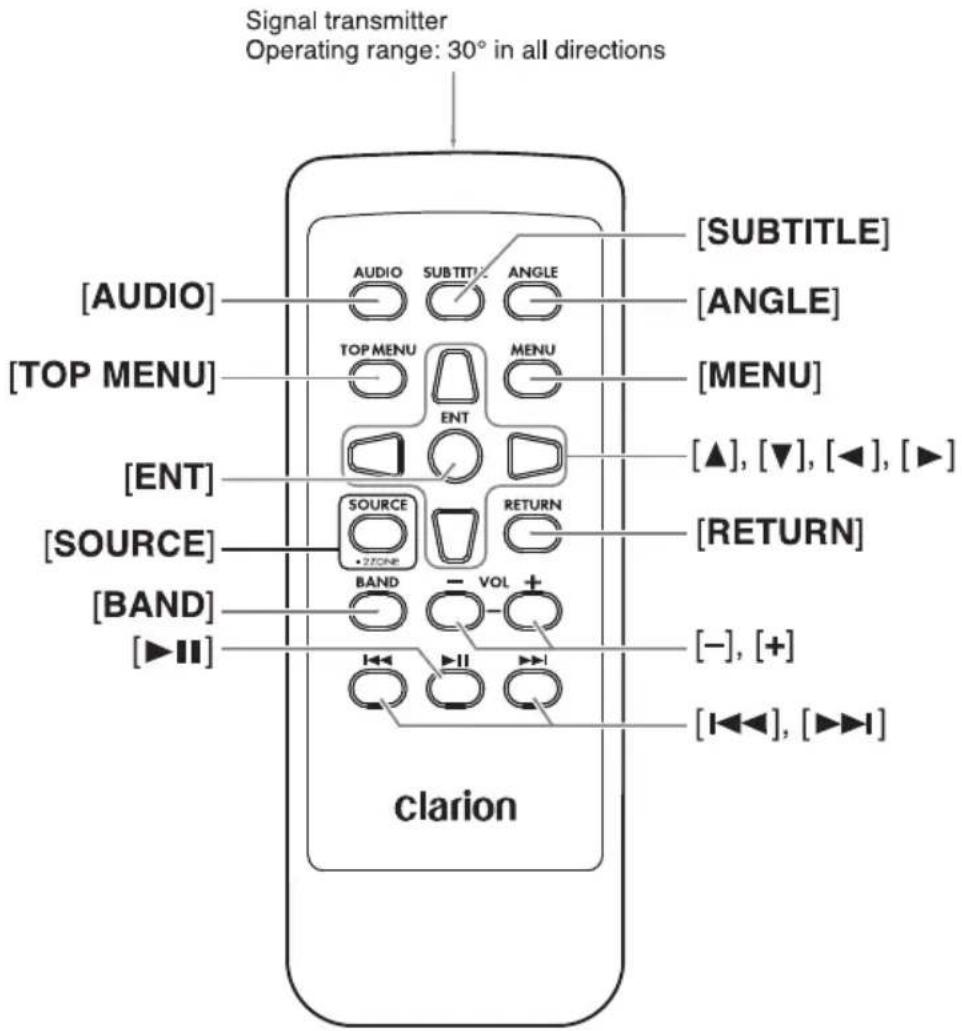
flowchart
graph TD
    A["Signal transmitter"] --> B["Operating range: 30° in all directions"]
    B --> C["[AUDIO"]]
    B --> D["[TOP MENU"]]
    B --> E["[ENT"]]
    B --> F["[SOURCE"]]
    B --> G["[BAND"]]
    B --> H["[▶I"]]
    C --> I["AUDIO"]
    C --> J["SUBTITLE"]
    C --> K["ANGLE"]
    D --> L["TOP MENU"]
    D --> M["ENT"]
    D --> N["MENU"]
    E --> O["SOURCE"]
    E --> P["RETURN"]
    F --> Q["BAND"]
    F --> R["VOL"]
    G --> S["▶I"]
    H --> T["▶I"]
    I --> U["[SUBTITLE"]]
    I --> V["ANGLE"]
    J --> W["[MENU"]]
    K --> X["[▲"], [▼], [◀], [▶]]
    L --> Y["RETURN"]
    M --> Z["▶+"]
    N --> AA["▶+"]
    O --> AB["▶+"]
    P --> AC["▶+"]
    Q --> AD["▶+"]
    R --> AE["▶+"]
    S --> AF["▶+"]
    T --> AG["▶+"]
    U --> AH["clarion"]
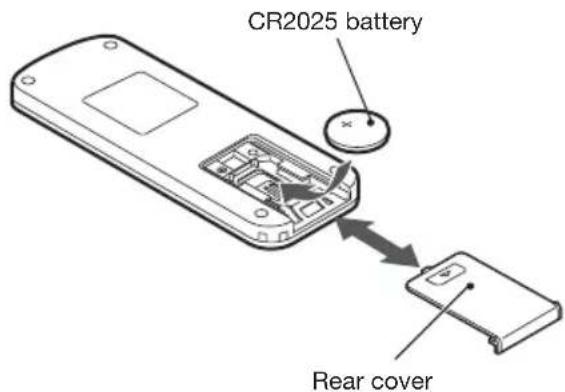
Inserting the Battery
- Turn over the remote control unit.
- Press the retention tab and pull out the battery tray and remove the old battery.
- Insert the new CR2025 battery and slide the battery tray back in the remote control the same direction that you removed it. Please ensure the tray is inserted in the correct direction.
Notes:
- Misuse may result in rupture of the battery, producing leakage of fluid and resulting in personal injury or damage to surrounding materials. Always follow these safety precautions:
- Use only the designated battery.
- When replacing the battery, insert properly, with +/- polarities oriented correctly.
- Do not subject battery to heat, or dispose of in fire or water. Do not attempt to disassemble the battery.
- Dispose of used batteries properly.
Remote Control Functions
Note:
The wireless remote control operation may not be optimal in direct sunlight.
| • | modeButton |
| [ SRC ] | • Press this button to switch to the next source item on the Home Screen.• Press this button to power on when the unit is power off.• Press this button for more than 1 second to power off unit when the unit is power on. |
| [ TOP MENU ] | Press this button to enter/exit the Home Screen. |
| [ RETURN ] | • Press this button in CD/USB/MTP directory view to return to the previous layer.• Press this button in iPod Menu to return to the previous layer.• Press this button during Settings to exit Settings and return to the current mode. |
| [ MENU ] | • Press this button in Radio mode to enter/exit PTY Selection Menu (PTY must be turned on).• Press this button in CD/USB/MTP mode to enter/exit the directory view.• Press this button in iPod mode to enter/exit the iPod Menu. |
| [ BAND ] | • Press this button in Radio mode to switch to the next band. |
| [ VOL+ / - ] | • Increase/decrease volume (not available in Phone mode). |
| [ ENT ] | • Press this button to select the highlighted button. |
| [▲], [▼] | • Press these buttons in Radio mode to go to the next/previous page in the PTY Selection Menu.• Press these buttons in CD/USB/MTP mode to go to the next/previous page in the directory view.• Press these buttons in iPod mode to go to the next/previous page in the iPod Menu.• Press these buttons to access the top/bottom portions of the screen in Phone mode and Settings. |
| [◀], [▶] | Press these buttons to go to the next/previous tab/button on the touch screen. |
| [◀◀], [▶▶] | • Press these buttons in Radio mode to go to the next/previous preset channel.• Press these buttons in CD/DVD/USB/MTP/iPod/Bluetooth Audio modes to go to the next/previous track/chapter/picture/video.• Press these buttons for more than 1 second in CD/DVD/USB/MTP/iPod/Bluetooth Audio modes to perform fast-forward/fast-backward. |
| [▶ II ] | • Press the button in CD/DVD/USB/MTP/iPod/Bluetooth Audio modes switch between pause and playback. |
| [ AUDID ] | • Press the button in DVD video to toggle available audio. |
| [ SUBTITLE ] | • Press the button in CD/DVD/USB/MTP video to toggle available subtitles. |
| [ ANGLE ] | • Press the button in DVD video to toggle available angles. |
6. BASIC OPERATIONS
Turning on/off the power
Note:
- Be careful about using this unit for a long time without running the engine. If you drain the car's battery too much, you may not be able to start the engine and this can reduce the service life of the battery.
- Press the [⏻] knob to turn on the power.
- It automatically remembers its last source mode and will automatically switch to display that mode.
- Press the [⏻] button for more than 1 second to turn off the power of the unit.
Switching Source Modes
- Press the [HOME] button to access the Home Screen.
- When the Home Screen is displayed, press the [HOME] button to exit the Home Screen.
Home Screen
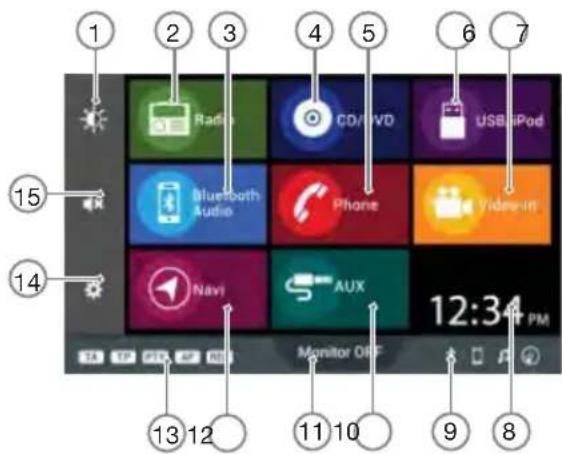
- Brightness button.
- Radio mode button.
- Bluetooth Audio mode button.
- CD/DVD mode button.
- Phone mode button.
- USB/iPod mode button.
- Video-in/DVB-T2 mode button.
- Clock display.
- Bluetooth indicators.
- AUX mode button.
- Monitor OFF button.
- Navi button.
- RDS indicators.
- Settings button.
- Mute button.
Clock and Indicators Display
The clock is displayed on the top right corner of the touch screen. To adjust the clock, refer to "Settings Operations".
The RDS indicators are displayed on the top right corner of the touch screen, below the clock display. To adjust RDS settings, refer to "RDS Operations".
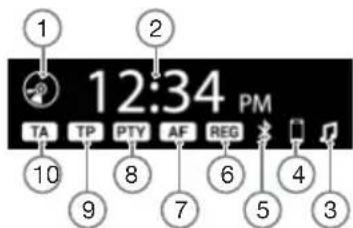
- CD/DVD indicator. Lights up when a CD/DVD is inserted into the unit.
- Clock Display.
- Bluetooth A2DP indicator. Lights up when A2DP profile is connected to the unit.
- Bluetooth HFP indicator. Lights up when HFP profile is connected to the unit.
- Bluetooth indicator. Lights up when Bluetooth is connected to the unit.
- REG indicator.
- AF indicator.
- PTY indicator.
- TP indicator.
- TA indicator.
Note:
- The Home Screen indicator bar has the same indicator images but in a different arrangement and layout.
Turning off the Display Monitor
- On the Home Screen, press the button to turn off the display monitor. The screen will be blank, while the audio is still heard in the background.
- Press the [⏻] button, or any area on the blank screen, for the display to restore.
Note:
- The [SOURCE] button on the remote control and steering remote control can also restore the display.
Adjusting the Volume
Turning the [VOLUME] knob clockwise increases the volume; turning it counter-clockwise decreases the volume. The volume will be displayed in overlapping the touch screen for 4 seconds. Press any area of the touch screen to immediately cancel the volume display.
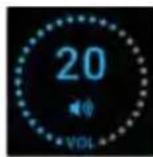
* The volume level is from 0 (minimum) to 33 (maximum). The factory default setting for this volume is "13".
Screen Adjustment
Press the 📄 button to toggle the brightness of the touch screen in the following sequence:
Default → Bright → Dim Default...
The screen brightness can be adjusted further in Settings. For more details, refer to the Screen Adjustment tab in Settings.
Mute Function
Press the Button on the left hand display, when available, to activate the mute function. Press the button again to release mute.
Note:
• The 30 button is not available during Settings.
Radio Illumination
The radio illumination can be dimmed using the vehicle illumination dimming switch.
Parking Brake Safety
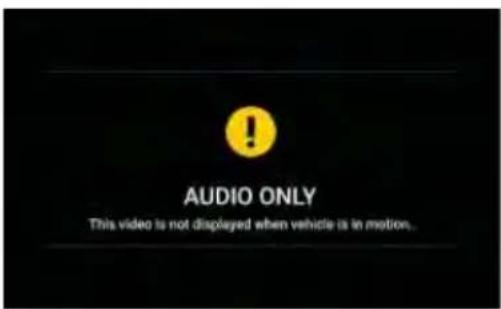
The video at the unit can only be displayed when the parking brake is enabled (when the car is parked). The audio portion of the video can still be played, but a blank screen will be displayed in place of the video display.
Video Output
If an external monitor is connected to the head unit, passengers in the back seat can watch the video separately.
Note:
- The external monitor can only mirror videos from Disc/USB that are being played on the unit.
- Mirrored videos can be displayed even if the parking brake is disabled (when the car is driving).
- HDCP enabled video cannot be displayed through video output.
Reverse Camera View
- When the vehicle is set to reverse gear, the unit will display the reverse camera view.
- All video display will be disabled and audio will be muted during reverse camera view.
- The system will return to the previous display after the reverse gear is released.
7. RADIO MODE OPERATIONS
Listening to the Radio
- Press the button on the Home Screen to select Radio mode. The display will change accordingly.
- Press the [FM1/FM2/FM3/AM] button to select one of the designated bands such as FM1, FM2, FM3 or AM. Each time the button is pressed, the display will change in the following order:
FM1 → FM2 → FM3 AM FM1...
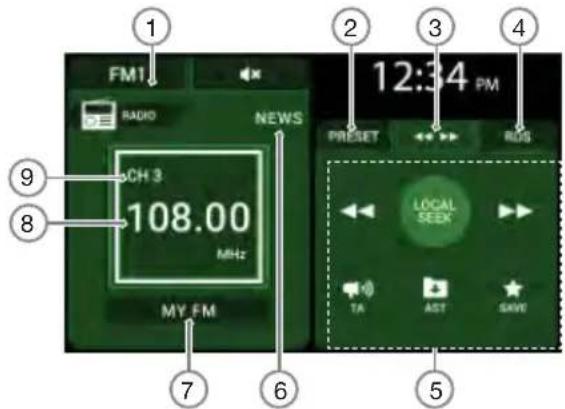
- FM1/FM2/FM3/AM Button
- PRESET Tab
- SEEK Tab
- RDS Tab
- Tab Controls
- PTY Name Display
- Station Name Display
- Frequency Display
- Channel Display
Seek Tuning
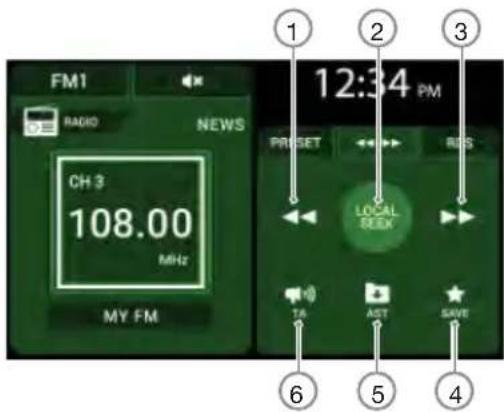
- Seek Down Button
- DX/LO/MANU Button
- Seek Up Button
- Save Button
- Autostore Button
-
TA Button
-
Press the button to select the SEEK Tab. The tab controls will change accordingly.
- Press the [DX/LOC/MANU] button to select the seek mode. The button display will change accordingly.
Every time the [DX/LOC/MANU] button is pressed, the display will change:
DX SEEK → LOCAL SEEK → MANUAL SEEK → DX SEEK...
Notes:
• There are 2 types of seek tuning: DX Seek and LOCAL Seek.
- DX Seek can automatically tune in to receivable broadcast stations; LOCAL Seek can tune in to only broadcast stations with good reception sensitivity.
- Press the button to perform search in the direction of higher frequencies.
- Press the ◀ button to perform search in the direction of lower frequencies.
TP Seek
- Press the tab to select the SEEK Tab. The tab controls will change accordingly.
- When "TP" is not lit, if you press the button, "TA" in the display lights up and the unit automatically searches for a TP station.
- If a TP station is not received, the unit continues the search operation. Press the CANCEL button to stop the TP station searching.
Note:
- For more details, refer to "RDS Operations".
Manual Tuning
- Press the button to select the SEEK Tab. The tab controls will change accordingly.
- Press the [DX/LOC/MANU] button to select the MANUAL Seek mode.
Note:
- Manual Seek allows for manual tuning to any frequency regardless of broadcast.
- Press the button to perform a single step in the direction of higher frequencies.
- Press and hold the ➞ button to continuously search for higher frequencies.
- Press the ← button to perform a single step in the direction of lower frequencies.
- Press and hold the 📁 button to continuously search for lower frequencies.
Autostore
Auto store is a function for storing up to 6 stations that are automatically tuned in sequentially. If 6 receivable stations cannot be found then the remaining memory locations will retain the previous station selections.
- Press the <<>> button to select the SEEK Tab. The tab controls display will change accordingly.
- Press the [FM1/FM2/FM3/AM] button to select the desired band.
- Press the button to begin auto store. The 6 stations with the strongest reception are stored automatically into the preset channels.
Storing Preset Memory
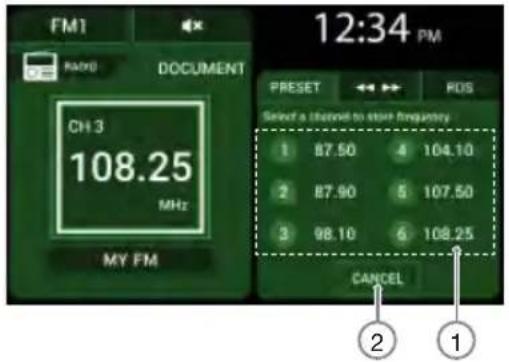
- Preset Channel Buttons.
- Cancel Button.
Preset memory function can store up to 24 stations: Six stations each for FM1, FM2, FM3 and AM.
Note:
- The present memory will be reset a few hours after disconnecting the vehicle battery.
- Press the [FM1/FM2/FM3/AM] button to select the desired band.
- Press the / button to tune into a desired station.
- Press the 🧑 button to store the current frequency.
- Press the CANCEL button to cancel the storing process.
- Press one of the 6 [PRESET] buttons to store the current station into the preset memory. The tab controls display will return to the previous layout.
Recalling a Preset Station
- Press the button to select the PRESET Tab. The tab controls will change accordingly.
- A total of 24 preset positions (6-FM1, 6-FM2, 6-FM3, 6-AM) exists to store individual radio stations in memory. Pressing the corresponding [PRESET] button recalls the stored radio frequency.
8. RDS OPERATIONS
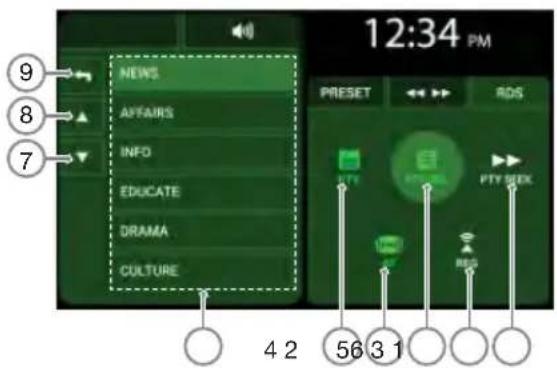
- PTY Seek Button
2 REG Button
3 PTY Selection Button
4 AF Button
5 PTY Button
6 PTY List
7 Page Down Button
8 Page Up Button
9 Return Button
RDS (Radio Data System)
Press the RDS button to select the RDS Tab. The tab controls will change accordingly.
This unit has a built-in RDS decoder system that supports broadcast stations transmitting RDS data.
This system can display the name of the broadcast station being received (PS) and can automatically switch to the broadcast station with the best reception as you move long distances (AF switching).
Also, if a traffic announcement or programme type is broadcast from an RDS station, no matter what mode you are in, this broadcast is received. Additionally, if EON information is received, this information enables automatic switching of other preset stations on the same network and interruption of the station being received with traffic information from other stations (TP). This function is not available in some areas.
When using the RDS function, always set the radio to FM mode.
The RDS feature consists of:
• AF : Alternative Frequency
• PS : Programme Service Name
• PTY : Programme Type
• EON : Enhanced Other Network
• TP : Traffic Programme
• TA : Traffic Announcement
* RDS interrupt does not function during AM radio reception.
* When set receives RDS signal, and can read PS data, PS appears in the display.
RDS Operations
TA (Traffic Announcement)
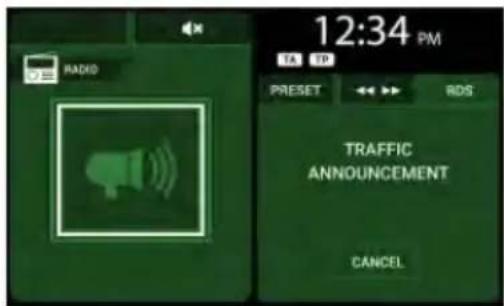
In the TA standby mode, when a traffic announcement broadcast starts, the traffic announcement broadcast is received as top priority regardless of the source mode so you can listen to it. Traffic programme (TP) automatic tuning is also possible.
* This function can only be used when "TP" is lit in the display. When "TP" is lit, this means that the Radio Data System broadcast station being received has traffic announcement programmes.
- Turning on TA
-
Press the button to select the SEEK Tab. The tab controls will change accordingly.
-
If you press the button when "TP" only is lit in the display, "TA" and "TP" will light up in the display and the unit is set to TA standby mode until a traffic announce-ment is broadcast.
-
When a traffic announcement broadcast starts, the display will change.
- Turning off TA
-
Press the right to select the SEEK Tab. The right display will change accordingly.
-
During TA standby mode, press the button. The "TA" indicator in the display goes off and TA standby mode is cancelled.
-
If "TP" is not lit, press the button to search for a TP station.
- Cancelling TA Interrupt
- If you press the CNTN in while a traffic announcement broadcast is being received, the traffic announcement broadcast reception is cancelled and the unit returns to the TA standby mode.
• Searching for a TP station
-
When "TP" is not lit, if you press the "TON," "TA" in the display lights up and the unit automatically searches for a TP station.
-
If a TP station is not received, the unit continues the search operation. Press the CANCEL button to stop the TP station searching.
Emergency Broadcast
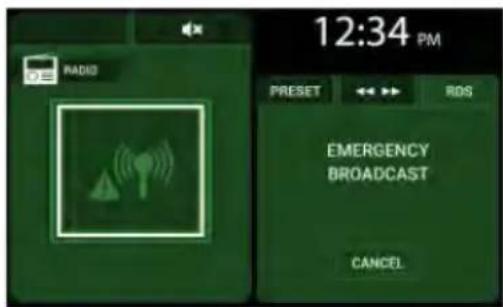
If an emergency broadcast is received, all the source mode operations are stopped. The display will change accordingly.
- If you press the CANCEL button while an emergency broadcast is being received, the emergency broadcast reception is cancelled and the unit returns to the previous mode.
PTY (Programme Type)
This function enables you to listen to a broadcast of the selected programme type even if the unit is on a source mode other than radio.
• Some countries do not have PTY broadcast.
- During TA standby mode, a TP station has priority over a PTY broadcast station.
- Turning on PTY
-
Press the RDS button to select the RDS Tab. The tab controls will change accordingly.
-
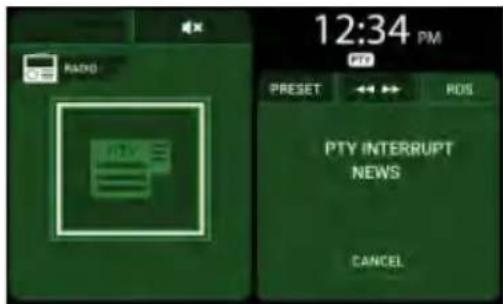
If you press the PTY button, "PTY" in the display lights up and PTY standby mode is turned on. When the selected PTY broadcast starts, the display will change and the PTY item name appears in the display
- Turning off PTY
-
Press the RDS button to select the RDS Tab. The tab controls will change accordingly.
-
During PTY standby mode, press the PTY button. The "PTY" indicator in the display goes off and PTY standby mode is cancelled.
- Cancelling PTY Interrupt
- If you press the button while a PTY interrupt is being received, the PTY interrupt is cancelled and the unit returns to the PTY standby mode.
- Selecting PTY
-
Press the RDS button to select the RDS Tab. The tab controls will change accordingly.
-
During PTY standby mode, press the button to enter the PTY Selection Menu. The left display will change accordingly.
-
There are 29 PTY items that can be selected.
• Searching for a PTY Station
| PTY item | |
| ENGLISH | CONTENTS |
| NEWS | News |
| AFFAIRS | Today's events |
| INFO | Information |
| SPORT | Sports |
| EDUCATE | Education |
| DRAMA | Drama |
| CULTURE | Culture |
| SCIENCE | Science |
| VARIED | Variety |
| POP_M | Pop music |
| ROCK_M | Rock music |
| EASY_M | Easy music |
| LIGHT_M | Light music |
| CLASSICS | Classics |
| OTHER_M | Other music |
| WEATHER | Weather |
| FINANCE | Finance |
| CHILDREN | For children |
| SOCIAL | Social |
| RELIGION | Religion |
| PHONE_IN | Phone in |
| TRAVEL | Travel |
| LEISURE | Leisure |
| JAZZ | Jazz |
| COUNTRY | Country |
| NATION_M | Nation music |
| OLDIES | Oldies |
| FOLK_M | Folk music |
| DOCUMENT | Documentaries |
- Press the RDS button to select the RDS Tab. The tab controls will change accordingly.
- During PTY standby mode, press the button to search for a PTY broadcast in the direction of a higher frequency.
- If no station with the selected PTY broadcast can be received, the unit returns to the previous receiving station.
Volume Setting of TA, Emergency
Broadcast, and PTY
The volume for TA, emergency broadcast, and PTY interrupts can be set during their respective interrupts.
• The factory default setting is "15".
During TA, emergency broadcast or PTY interrupt, turn the [VOLUME] rotary knob to set the volume to the desired level (0 to 33).
- When the interrupt ends, volume returns to the level it had before interrupt.
AF (Alternate Frequency) Function
The AF function switches to a different frequency on the same network in order to maintain optimum reception.
- Press the RDS button to select the RDS Tab. The tab controls will change accordingly.
- Press the button and "AF" lights up in the display screen. AF function is turned on.
- When AF function is turned on, press the button and the "AF" on the display screen is turned off. AF function is turned off.
When the REG function is ON, the optimum regional station can be received. When this function is OFF, if the regional station area switches as you drive, a regional station for that region is received.
- Press the RDS button to select the RDS Tab. The tab controls will change accordingly.
- Press the button and "REG" lights up in the display screen. REG function is turned on.
- When REG function is turned on, press the button and the "REG" on the display screen is turned off. REG function is turned off.
Notes:
- This function is disabled when a national station such as BBC R2 is being received.
- The REG function ON/OFF setting is only valid when the AF function is ON.
9. CD/USB MODE OPERATION
Discs
playable discs
This DVD video player can play the following discs.
playable discs



CD TEXTDVD videofidiscanAutdie played.
- Entering File and Folder Names
If the file name and folder name contains the character other than code character list might cause the file and folder names displayed incorrectly.
Picture File extensions
Always add a file extension ".JPEG" or ".JPG" to picture file by using single byte letters. If you add a picture file extension other than specified or forget to add the file extension, if of disc can Autdie O'Dyed.
Precautions when Creating MP3 files
- Usable sampling rates and bit rates:
- MP3 : Sampling rate 8 kHz-48 kHz, Bit rate 16 kbps-320 kbps/VBR
- WMA : Sampling rate 8 kHz-48 kHz, Bit rate 16 kbps-320 kbps/VBR
- AAC : Sampling rate 8 kHz-48 kHz, Bit rate 16 kbps-320 kbps/VBR
- File extensions
- Always add a file extension ".MP3" or ".mp3" to a MP3 file, and ".WMA" or ".wma" to a WMA and ".M4A" or ".m4a" to a AAC file extension by using single byte letters. If you add a file extension other than specified or forget to add the file extension, the file cannot be played. In addition, if you use upper case and lower case letters (capital and small letters) mixed for file extensions, normal play may not be possible.
- Audio files other than MP3/WMA/AAC data cannot be played.
- Playing files with a format not supported will be skipped.
- File and disc not supported
Files and discs with following extensions are not supported: *.AAC, *DLF, *.M3U, *.PLS, *.MP3 PRO files, files with DRM, open session discs.
To disable DRM (Digital Rights Management)
When using Windows Media Player 10/11, click on TOOL OPTIONS RIP MUSIC tab, then under Rip settings, unclick the check box for COPY PROTECT MUSIC. Then, reconstruct files.
Notes:
- Personally constructed WMA files are used at your own responsibility.
- Disabling DRM can be done if the file is ripped from CD.
• Logical format (File system)
- When writing an MP3/WMA/AAC file on a disc, please select "ISO9660 level 1 or level 2 (without including expansion format)" as the writing software format. Normal playback may not be possible if the disc is recorded on another format.
- The folder name and file name can be displayed as the title during MP3/WMA/AAC play.
playable video files
This system can play video files stored in the disc/USB memory/MTP device.
\*.avi files
- Format: Xvid
• Resolution: 720*480/576
• Audio format: WMA/PCM/LPCM/AAC LC/MPEG Audio(MP1/2/3)
\*.mp4 files
- Format: Xvid
• Resolution: 720*480/576
• Audio format: WMA/PCM/LPCM/AAC LC/MPEG-Audio(MP1/2/3)
\*.mpg/mpeg files
- Format: MPEG-1/MPEG-2
• Resolution: 720*480/576
• Audio format: Dolby Digital (AC3)/LPCM/MPEG-Audio(MP1/2/3)
\*.vob files
- Format: MPEG-1/MPEG-2
• Resolution: 720*480/576
• Audio format: Dolby Digital (AC3)
\*.dat files
- Format: MPEG-1
• Resolution: 720*480/576 - Audio format: Dolby Digital (AC3)/LPCM/MPEG-Audio(MP1/2/3)
File extensions
Always add a file extension ".avi" or ".AVI", ".mp4" or ".MP4", ".MPG" or ".mpg", ".MPEG" or ".mpeg", ".VOB" or ".vob", ".DAT" or ".dat" to video file by using single byte letters. If you add a video file extension other than specified or forget to add the file extension, the file cannot be played.
About CD
• Logical format (File system)
| Mode | CD |
| File System | ISO 9660 Level 1, 2, Romeo or Joliet |

CAUTION
- Do not try to put your hand or fingers in the disc insertion slot. Also never insert foreign objects into the slot.
- Do not insert discs where adhesive comes out from cellophane tape or a rental CD label, or discs with marks where cellophane tape or rental CD labels were removed. It may be impossible to extract these discs from the unit and they may cause the unit to break down.
Notes:
• Some CDs recorded on CD-R/RW mode may not be usable.
- PBC toggle function for VCD is not supported in this unit.
Note on region numbers
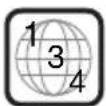
- The DVD video system assigns a region number to DVD video players and DVD discs by sales area. DVD video players sold in Asia can play back DVD discs with the region number "ALL", "4" or any combination of numbers that also incorporate a "4".
- The DVD video region number is marked on the disc jacket as shown below.


Watching/Listening to a disc
If a disc has been loaded, press the [HOME] button to select CD/DVD mode.
Notes:
- When CDDA disc or DVD is loaded, the play mode is automatically engaged.
- When CDMP3 disc is inserted for the first time, the system will go to directory display.
- If you reinsert the same disc, the system will resume playback.
Loading a CD
Insert a CD into the center of the CD insertion slot with the labeled side facing up. The CD will begin reading and will start playing.
Notes:
- Do not insert another disc forcefully.
- Discs not bearing the logo mark and CD-ROMs cannot be played by this unit.
- Some CDs recorded in CD-R/CD-RW mode may not be usable.
- 8cm compact disc is not supported. Do not attempt to insert the disc into the CD slot.
Eject the CD
Press the L button, then the disc will be ejected. The unit will direct return to Tuner mode.
Notes:
- If you force a CD into CD slot before auto reloading, this can damage the CD.
- If a CD (12 cm) is left in the ejected position for 15 seconds, the CD is automatically reloaded (Auto reload).
- If you leave the ejected CD without removing it, it will be drawn into the unit automatically after about 15 seconds.
USB
This system can play audio files (MP3/WMA/AAC) stored in an USB memory which is recognized as "USB Mass Storage Class device". You can use your USB memory as an audio device by simple copying desired audio files into it.
| Mode | USB |
| File System | FAT16, FAT 32 |
Note:
- This system will not operate or may operate improperly with some USB memory.
- Files protected with any DRM cannot be played.
- About USB memory device
- USB is an acronym for Universal Serial Bus, and refers to an external bus standard supporting data rates of 12 Mbps.
- This unit is compatible with USB 1.1/2.0/3.0 with maximum data transfer rates of 12 Mbps.
- USB memory devices that can be played by connecting to the unit's USB cable are limited to those recognized as "USB mass storage class devices"; operation is not guaranteed with all USB memory devices.
- Devices compatible with "USB Mass Storage Class" can be used merely by connecting to the host device, without need for special drivers or application software.
- Consult the manufacturer of your USB memory device for information regarding whether it is supported by "USB Mass Storage Class" standards.
• To prevent the accidental loss of data, always back up important data on your computer. - This unit does not support connections to a computer. In addition, connections made through a USB hub device are also not supported.
- When a USB memory device is composed of two or more drives, only the first drive will be detected.
- USB memory devices with security functions cannot be played.
- The order in which tracks are recorded may differ depending on the USB memory device connected (the actual playback order may not be the same as that indicated on your computer's display).
USB Digital Media Streaming
This unit supports USB Digital Media Streaming. USB Digital Media Streaming is a function used to play music files transmitted using Media Transfer Protocol (MTP).
Hot plugging function
This unit has the ability to recognize the changes of connecting and disconnecting an USB memory/MTP device.
Connecting a USB memory/MTP device
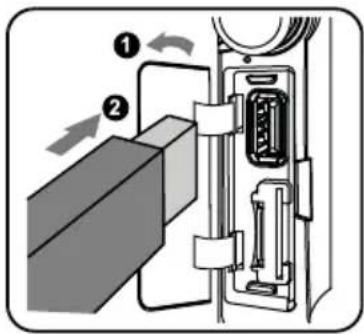
- Connect the USB memory/MTP device into the port with the correct direction.
- Always insert the USB memory/MTP device fully into the port. Incomplete connections may cause the USB memory/MTP device not be recognized.
- Depending on the number of tracks recorded, some amount of time may be required until all tracks are read into the unit. It will take some time to read the USB memory/MTP device before playback begins.
- USB memory/MTP devices may have different shape depends on brands. Some USB memory/MTP devices may not be able to plug into the port due to the shape design. Please use an extension cable instead.
- Please reconnect the USB memory/MTP device when it cannot be detected properly.
Notes:
- Do not forcibly connect the USB memory device to the port with incorrect direction as this will damage the USB memory device as well as the USB slot.
Watching/Listening to a track with USB memory/MTP device
- If a USB memory/MTP device have been inserted, press the [HOME] button to select the USB/iPod mode.
Notes:
- When USB memory/MTP device is first time loaded, the system will go to directory display.
- If you reconnect the same device that you disconnected last, the system will playback where it left off.

CAUTION
- For safety driving purpose, avoid inserting the USB memory/MTP device directly into the USB port.
- Please use an USB extension cable instead for USB connection.
• Always backup and save important data on your computer.
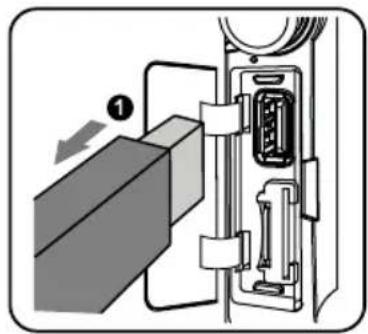
Unplug the USB memory/MTP device
natural_image
Diagram of a door panel with a switch and internal components, showing no text or symbols- Remove the USB memory/MTP device from the USB slot during playback, system will direct return to Tuner mode.
- Remove the USB memory/MTP device from the USB slot during reading, system will show "NO DEVICE".
Notes:
- If the device has no supported files, "NO FILE" is displayed.
- If you reconnect the same device that you disconnected last, the system will resume the last playback position.
10. DVD VIDEO PLAYER OPERATIONS
Showing DVD video mode screen
After disc is loaded, the play mode is automatically engaged.
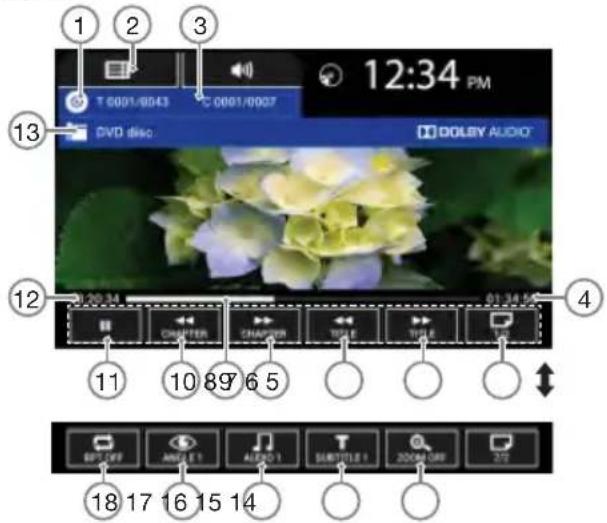
- Current Mode Display
- Directory Button
- Title Chapter Display
- Total Playtime
- Toggle Page Button
- Next Title Button
- Previous Title Button
- Next Chapter/ Fast Forward Button
- Playtime Progress Bar
- Previous Chapter/ Fast Backward Button
- Play/ Pause Button
- Current Playtime
- Directory Path Display (DVD)
- Zoom Operation Button
- Subtitle Switching Button
- Audio Channel Switching Button
- Angle Switching Button
- Repeat Button
Playing Video Files in DVD
- If a video file is playing, touch the screen to display the Operation buttons.
- The display will return to the playback screen if you do not touch the screen for 5 seconds.
- During DVD menu, you can directly select the option from DVD menu by pressing the option on the screen.
Play/Pause Playback
- Press the button to pause during playback.
- Press the ▶ button to resume playback.
Skip (Search) a Chapter
Press CHAPTER or CHAPTER button during playback. Chapters are skipped down or up from current locations, as many times as the button is pressed, and playback start.
Skip (Search) a Title
Press 📄 or 📋 button during playback. Title are skipped down or up from current locations, as many times as the button is pressed, and playback start.
Fast Forward/Fast Backward Operation
Press ▶ or ▶ button and hold more than 1 second to start fast backward or fast forward during playback. Release the button will continue playing with normal speed.
Note:
- The fast forward and fast backward speed may differ depending on the disc.
Repeat Playback
- Press the button to select the repeat status for playback. The text will change accordingly.
- Every time the 📞 button is pressed, the text will change as:
RPT OFF → CH.RPT → TITLE RPT → RPT OFF
• CH.RPT (Chapter Repeat)
The current playing chapter will be played repeatedly. The button will be displayed as "CH.RPT".
• TITLE RPT (Title Repeat)
The current playing title will be played repeatedly. The button will be displayed as "TITLE RPT"
• RPT OFF (Repeat Off)
Disengage the unit from repeat play. During repeat off-mode, the button will be displayed as "RPT OFF".
Switching Audio
On discs which have two or more audio language options, you can switch among the audio languages during play-back.
- Showing the button menu, press the 📂 button during playback.
- Each time you press the button, you can switch among the audio languages.
- It may take time to switch among audio.
- Depending on the disc, up to 9 kinds of audios may be recorded. For details, see the mark of the disc: 📄 Indicates that 8 audios have been recorded).
- When the power is turned on and when the disc is changed to a new one, the language has not been recorded on disc. The language is specified on the disc.
- Depending on the disc, switching may be completely impossible or impossible on some scenes.
Switching Subtitles
On discs which have two or more subtitle language options, you can switch among the subtitle languages during play-back.
- Showing the button menu, press the T button to select a subtitle during playback. Each time you press the button, you can switch among subtitle.
It may take time to switch among subtitles. Depending on the disc, up to 32 kinds of subtitles may be recorded. For details, see the mark of the disc: (indicates that 8 kinds of subtitles have been recorded).
Depending on the disc, switching may be completely impossible or impossible on some scenes. - To turn off subtitles, repeat pressing the T button until subtitles are turned off.
Switching Angle
On DVD discs which video recorded in two or more angles, you can switch among the angles during playback.
- Showing the button menu, press the 📄 button to select an angle during playback. Each time you press the button, you can switch among angle.
- It may take time to switch among angles. Depending on the disc, up to 9 angles may be recorded. For details, see the mark of the discs: (indicates that 2 angles have been recorded).
- Depending on the disc, angles may switch smoothly or switch with a momentary still image.
- Depending on the disc, switching may be completely impossible or impossible on some scenes.
- Depending on the disc, scenes recorded in two or more angles may be played back.
Zoom Operation
- Press the button to zoom the picture. The text will change accordingly.
- Every time the 🔒 button is pressed, the text will change as:

11. CD/USB VIDEO OPERATIONS
- This system can play video files (AVI/MP4, etc.) stored on disc/USB.
Playing Video Files in CD/USB memory/MTP device
- If the video is playing, touch the screen of the playing video to display Operation buttons.
- The display will return to the playback screen if you do not touch the screen for 5 seconds.
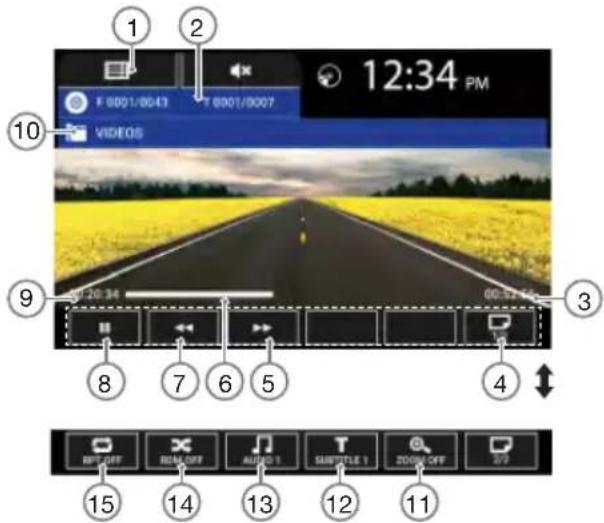
- Directory Button
- Folder Track Display
- Total Playtime
- Toggle Page Button
- Next Video/ Fast Forward Button
- Playtime Progress Bar
- Previous Video/ Fast Backward Button
- Play/ Pause Button
- Current Time
- Directory Path Display
- Zoom Operation Button
- Subtitle Switching Button
- Audio Channel Switching Button
- Random Button
- Repeat Button
Play/Pause
- Press the button to pause during playback.
- Press the ▶ button to resume playback.
Switch to Previous/Next File
- Press or button during playback to play previous/next file.
Fast Forward/Fast Backward Operation
- Press for and hold more than 1 second to start fast backward or fast forward during playback. Release the button will continue playing with normal speed.
- When fast forward reach the end of the video, the fast forward will be cancelled and go to next video.
- When fast backward reach the beginning of the video, the fast backward will be cancelled and restart the video.
Note:
- The fast forward and fast backward speed may differ depending on the media device.
Repeat Playback
- Press the button to select the repeat status for playback. The text will change accordingly.
- Every time the button is pressed, the text will change as:
RPT OFF → VIDEO RPT → FLD RPT RPT OFF
• VIDEO RPT (Video Repeat)
The current video will be repeated after finish playing.
• FLD RPT (Folder Repeat)
The video in current folder will be played repeatedly. The button will be displayed as "FLD RPT"
• RPT OFF (Repeat Off)
Disengage the unit from repeat play. During repeat off mode, the button will be displayed as "RPT OFF".
Switching Subtitles
Some video files will have two or more subtitles have been recorded; you can switch among these subtitles during playback.
- Press the button in button menu to select a subtitle during playback.
- Each time you press the button, you can switch among subtitles.
- It may take time to switching among subtitles.
Depending on the disc, switching may be impossible.
Video File List (Directory)
Showing the button menu, press the button to display video files list screen. Video file list opera tions in almost same as cd audio mode. Please refer to CD Audio Operations.
Zoom Operation
- Press the button to zoom the picture. The text will change accordingly.
- Every time the 🔒 button is pressed, the text will change as:
OFF → ZOOM 2x → ZOOM 3x ZOOM 4x ZOOM 5x → ZOOM 1/2x → ZOOM 1/3x ZOOM 1/4x OFF
12. CD/USB/MTP AUDIO OPERATIONS
Playing Audio Files in CD/USB memory/MTP device
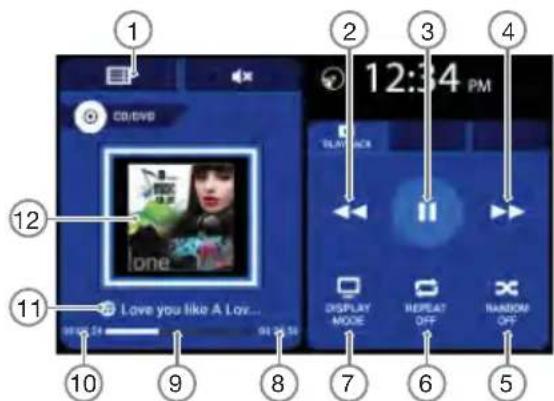
- Directory Button
- Previous Track/ Fast Backward Button
- Play/Pause Button
- Next Track/ Fast Forward Button
- Random Button
- Repeat Button
- Toggle Display Button
- Total Playtime
- Playtime Progress Bar
- Current Playtime
- Track Title Display
- Album Art Display (default image for song has no album art)
Play/Pause Playback
- Press the button to pause during playback.
- Press the ▶ button to resume playback.
Switch to Previous/Next File or track
Press or button during playback to play previous/next file.
Fast Forward/Fast Backward Operation
- Press or button and hold more than 1 second to start fast backward or fast forward during playback. Release the button will continue playing with normal speed.
- When fast forward reach the end of the track, the fast forward will be cancelled and go to next track.
- When fast backward reach the beginning of the track, the fast backward will be cancelled and restart the track.
Note:
- The fast forward and fast backward speed may differ depending on the media device.
Repeat Playback
- Press the button to select the repeat status for playback. The text will change accordingly.
- Every time the button is pressed, the text will change as:
REPEAT OFF → TRACK REPEAT → BOLDER RE- PEAT → REPEAT OFF
- TRACK REPEAT
The current track will be played repeatedly. The button will be displayed as "TRACK REPEAT".
• FOLDER REPEAT
The track in current folder will be played repeatedly. The button will be displayed as "FOLDER REPEAT".
- REPEAT OFF
Disengage the unit from repeat play. During repeat off mode, the button will be displayed as "REPEAT OFF".
Random Playback
- Press the button to randomly play the track during playback.
- Press this button again to turn off the feature.
- Every time the ✗ button is pressed, the text will change as:
RANDOM OFF → RANDOM ON → RANDOM OFF
Notes:
- Repeat and Random can be turn on together. The behaviors are as below:
• TRACK REPEAT + RANDOM ON
The tracks will be played randomly.
• FOLDER REPEAT + RANDOM ON
The track in the current folder will be played randomly.
Album Artwork
If current audio file contains album art image, the picture will be displayed in this area.
Selecting a Track on the Directory View
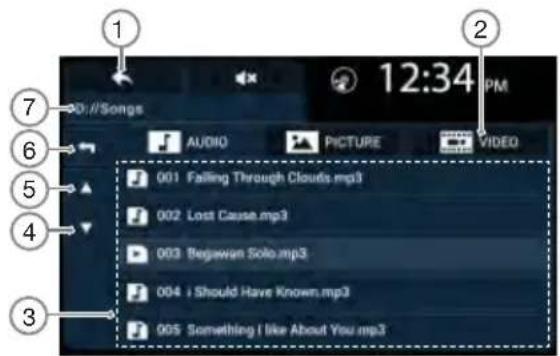
- Exit Directory Button
- Media Files Selection Tab
- Folder/Track List
- Page Down Button
- Page Up Button
- Return Button
- Directory Path Display
This function allows you to select tracks from a directory view.
- Press the button to enter directory view.
- Press the track title on the display list. The selected track will start playing.
- When the desired track is not displayed, press ▲ and ▼ to flick the track list up and down.
- When the desired track is in the other folder, press the folder title on the display list to enter the folder.
- Press ← to go to previous level of folder.
Tag Display Function
- Each time the button is pressed, the display is toggled in the following order:
(Album Art + Song Title) ↔ (Song Title + Album Name + Artist Name + File Name + Folder Name)
13. CD/USB/MTP PICTURE OPERATIONS
Showing CD/USB/MTP Picture Mode Screen
After disc is loaded or USB memory/MTP is inserted, go to directory and select picture from Picture tab to start slide show.
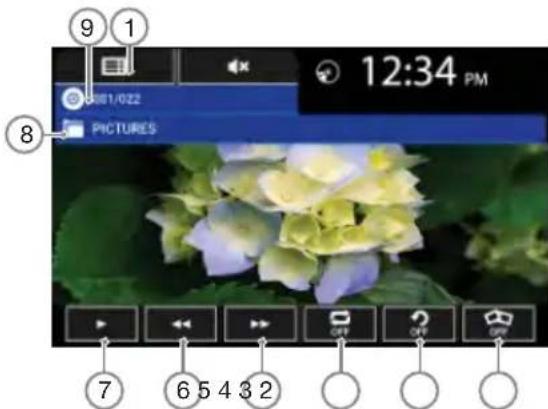
- Directory Button
- Effect Mode Toggle Button
- Rotate Operation Button
- Repeat Button
- Next Picture Button
- Previous Picture Button
- Play/ Pause Button
- Directory Path Display
- Picture Number Display
Play/Pause Playback
- Press the button to start slide show.
- Press the ☐ button again to stop the slide show.
Switch to Previous/Next File or track
Press or button during playback to play previous/next file.
Repeat Playback
- Press the button to select the repeat status for playback. The text will change accordingly.
- Every time the button is pressed, the text will change as:
OFF → D RPT OFF
• FLD RPT (Folder Repeat)
The pictures in current folder will be played repeatedly. The button will be displayed as "FLD RPT".
- OFF (Repeat Off)
Disengage the unit from repeat play. During repeat off mode, the button will be displayed as "OFF".
Rotate Operation
- Press the button to rotate the picture. The text will change accordingly.
- Every time the 📋 button is pressed, the text will change as:
- Press the button to enable the effect playback mode. The button will be displayed as "EFFECT".
- Disengage the unit from effect playback mode by press the button again. The button will be displayed as "OFF".
14. iPod/iPhone OPERATIONS
This section describes operations when connected to an Apple iPod/iPhone via the USB slot.
Notes:
- Read the iPod user manual for operation conditions.
- The unit may not operate properly with unsupported devices or unsupported versions.
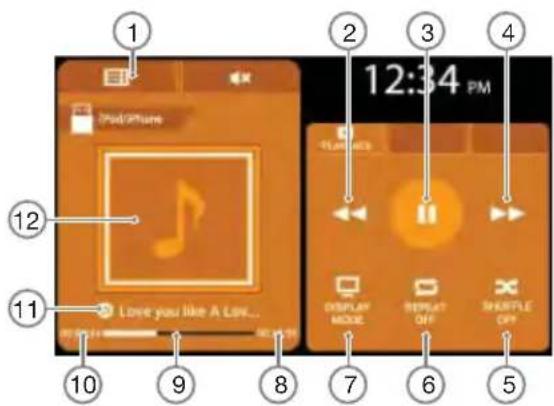
- iPod Menu Button
- Previous Track/ Fast Backward Button
- Play/Pause Button
- Next Track/ Fast Forward Button
- Shuffle Button
- Repeat Button
- Toggle Display Button
- Total Playtime
- Playtime Progress Bar Display
- Current Playtime
- Track Title Display
- Album Art Display
Select iPod Mode
- Connect your iPod to the USB connector to the front panel. The system will automatically detect the connected device and switch to iPod mode and start playback after a while.
- When iPod is already connected.
- Press the button on the Home Screen to select USB/iPod mode. The display will change accordingly.
- System will start playback from the last played track of the iPod.
Play/Pause Playback
- Press the button to pause during playback.
- Press the ▶ button to resume playback.
Switch to Previous/Next Track
Press or during playback to play previous/next file.
Fast Forward/Backward
Long press the or button to start fast backward or fast forward during playback. Releasing the button will resume playback at normal speed.
Note:
- The fast forward and fast backward speed may differ depending on the iPod.
Tag Display Function
Each time the button is pressed, the display is toggled in the following order:
(Album Art + Song Title) (Song Title + Album Name + Artist Name)
Repeat Play
- Press the button to select the repeat status for playback. The text will change accordingly.
- Every time the 📄 button is pressed, the text will change as:
REPEAT OFF → TRACK REPEAT → ALL REPEAT → REPEAT OFF...
- TRACK REPEAT
Has the same behaviour as the ONE TRACK REPEAT status of iPod. The button will be displayed as "TRK RPT".
- ALL REPEAT
Has the same behaviour as the ALL REPEAT status of iPod. The button will be displayed as "ALL RPT".
- REPEAT OFF
In this status, none of the tracks are repeated. The button will be displayed as "RPT OFF".
Note:
- Repeat Play for Audiobooks and Podcasts may not be available depending on the device.
Shuffle Play
- Press the button to select the shuffle status for playback. The text will change accordingly.
- Every time the ✗ button is pressed, the text will change as:
SHUFFLE OFF → SHUFFLE ON →SHUFFLE OFF...
- SHUFFLE ON
Shuffle On is equivalent to Shuffle Songs in the iPod. The button will be displayed as "SHUFFLE ON".
- SHUFFLE OFF
Shuffle play is turned off. The button will be displayed as "SHUFFLE OFF".
Note:
- Shuffle Play for Audiobooks and Podcasts may not be available depending on the device.
iPod/iPhone Operations
Selecting a Song from iPod Menu
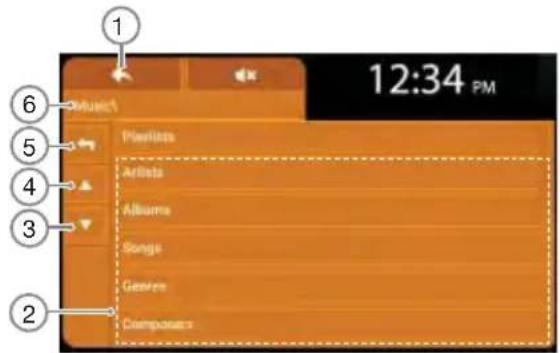
- Exit iPod Menu Button.
- Category/Track List.
- Page Down Button.
- Page Up Button.
- Return Button.
-
iPod Music Directory Display.
-
Press the button to enter iPod Menu. The left display will change accordingly.
- Press the ▲ / buttons to browse the categories.
- Select the desired category to go to the next level; press the ➕ button to return to the previous level of the selected category. Repeat steps 2 and 3 until the last level (song list).
- Press the ▲ / buttons to browse the list of songs.
- Select the desired song at the last level of the category to play the track. iPod Menu will be exited automatically.
- Press the ↗ button to go to the previous category.
- Press the button to exit iPod Menu.
Available iPod Categories
Playlists
Artists
Albums
Songs
Genres
Composers
Audiobooks*
Podcasts*
* Availability depends on iPod
Supported iPod/iPhone Devices
Supported iPod/iPhone and compatible software version:
| iPod/ iPhone | Compatible Version |
| iPhone 6S Plus | iOS 9.2.1 |
| iPhone 6S | iOS 9.2.1 |
| iPhone 6 Plus | iOS 9.2.1 |
| iPhone 6 | iOS 9.2.1 |
| iPhone 5s | iOS 9.2.1 |
| iPhone 5c | iOS 9.2.1 |
| iPhone 5 | iOS 9.2.1 |
| iPhone 4s | iOS 9.2.1 |
| iPod Touch 6th Gen | iOS 9.2.1 |
| iPod Touch 5th Gen | iOS 9.2.1 |
| iPod Nano 7th Gen | 1.0.3 |
* The supported devices above were tested with the respective versions listed in the table. Other versions of the same devices may not work properly.
15. Bluetooth® AUDIO PLAYER OPERATIONS
Some Bluetooth mobile phones have audio features, and some portable audio players support the Bluetooth feature. These devices will be called as "Bluetooth audio players" in this manual. This system can play audio data stored in a Bluetooth audio player.
Notes:
- This system will not operate properly with some Bluetooth audio players.
Selecting a Song from iPod Menu
Press the button to select the Bluetooth Audio mode.
- When the connection with Bluetooth audio player has been established, the icon is displayed under the clock
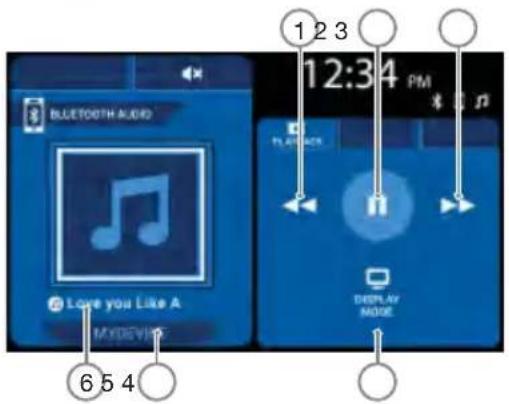
- Previous Track/ Fast Backward Button
- Play/Pause Button
- Next Track/ Fast Forward Button
- Toggle Display Button
- Device Name Display
- Track Title Display
Controlling the Bluetooth Audio Player
Notes:
- Occasionally, depending on the environment, playback sounds may be fragmented, or switch noises may be generated.
Playing Music
After the connection with a Bluetooth audio player is established, the play mode is automatically engaged.
- When playback is not started for some devices, press the button manually.
Play/Pause Playback
- Press the button during playback.
- To resume playback, press the ▶ button.
Switch to Previous/Next Track
- Press the / button during playback to play previous/next file
Fast Forward/Backward
- Press and hold the 🎨 button to start fast backward or fast forward during playback. Releasing the button will resume playback at normal speed.
Notes:
- The fast forward and fast backward speed may differ depending on the Bluetooth audio players.
- The fast forward and fast backward function may not be available depending on the Bluetooth audio players.
Tag Display Function
- Each time the button is pressed, the display is toggled in the following order:
(Song Title) ←(Song Title + Album Name + Artist Name)
Notes:
• Each tags information will be displayed in maximum 16 characters.
● Device name will be displayed in maximum 8 characters.
16. Bluetooth® TELEPHONE OPERATIONS
Bluetooth® wireless technology is a radio technology that connects devices, such as mobile phones and headsets, without wires or cords over a short distance of approximately 10 meters (approximately 33 feet). Get more information at www.bluetooth.com.
• Hands-free Profile (HFP)
Allows user to perform hands-free operation with the connected mobile phone.
• Advanced Audio Distribution Profile (A2DP)
Allows CD quality stereo music to be streamed from external audio player to this unit wirelessly.
• Audio/Video Remote Control Profile (AVRCP)
Allows user to control some basic playback functions of external audio player via this unit.
• Phonebook Access Profile (PBAP)
Allows exchange of mobile phone information such as caller ID, call history and list of contacts.
Notes:
- Please check your phone's specification for supported profiles or consult with the nearest service centre for your phone compatibilities.
Incoming Call
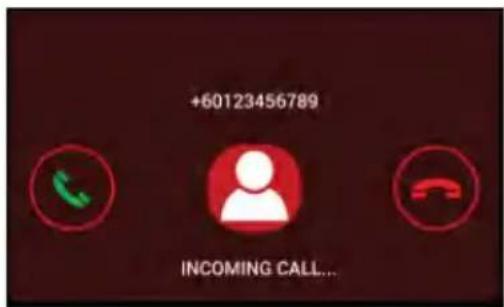
Notes:
3rd party calls and call waiting functions are not supported. The condition is dependent on mobile phone.
Whenever the unit is operating, when an incoming call arrives, the unit will be muted automatically and the ring tone is reproduced through your car's speaker.
The unit will temporarily switch to Phone mode and caller ID will be displayed.
Notes:
- Car stereo will be automatically set as the default speaker output during an incoming call.
- Caller ID display is dependent on mobile phone and network provider.
Answering a call
User can answer an incoming call directly from the car stereo.
- Press the button to pick up an incoming call.
- The display switches to Phone mode.
Notes:
During incoming call, caller ID will be displayed. Talk time will start counting as long as conversation is in progress at head unit.
Rejecting a call
This function allows you to reject an incoming call via the car stereo.
- Press the button to reject an incoming call.
- Display returns to previous mode.
Ending a call
This function allows you to end a call conversation via the car stereo.
- During an ongoing call conversation, press the button to end the call.
- Display returns to previous mode.
Select Phone Mode
- Press the button on the Home Screen. The display will change accordingly.
- Audio and volume adjustment are not available in this mode.
- Press one of the top buttons to select a specific setting category.
- Press the button to exit Phone mode and return to access the Home Screen.
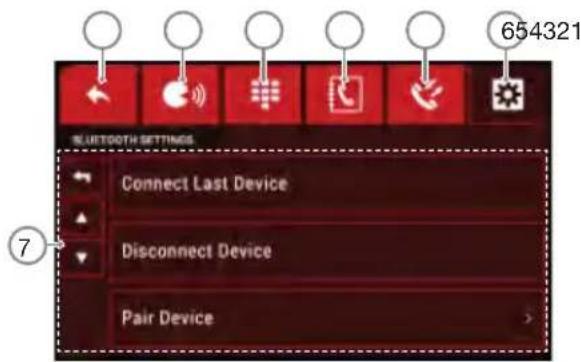
- Return Button
- Voicedial Tab
- Key input Tab
- Phonebook Tab
- History Tab
- Bluetooth Settings Tab
- Tab display. Differs with each selected tab.
Voice Dialer
Note: This function is dependent on Bluetooth connected phone.
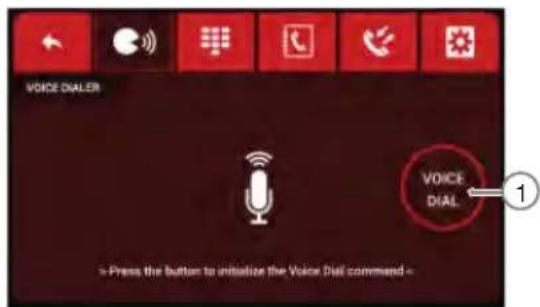
- Voicedial Button
• Performing Voice Dialing
- Press the tab to display the Voice dialer screen.
- Press the 📄 button to activate voice dialing feature of the connected phone.
Bluetooth® Telephone Operations
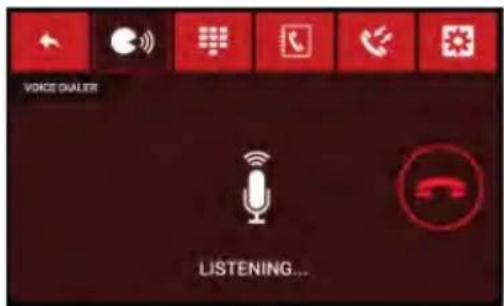
- Press 📄 button to cancel the voice dialing.
Key Input
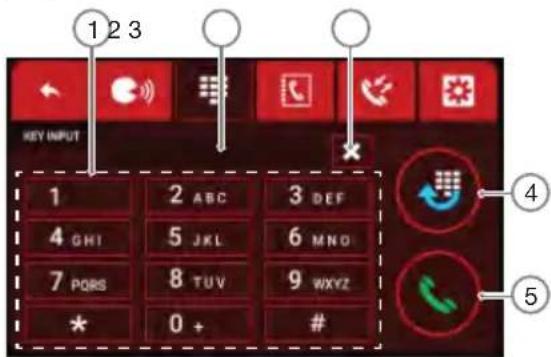
- Keypad
- Numbers Display
- Delete Button
- Redial Button
- Call Button
• Making a Call Using Key Pad
- Press the 📋 tab in the top menu to select Key Input. The display will change accordingly.
- Enter the telephone number by using the key pad displayed on the screen.
- Press the ✗ button to delete the inputted numbers one by one.
- Press and hold the ✗ button to delete all inputted numbers.
- Press the button to call the entered number.
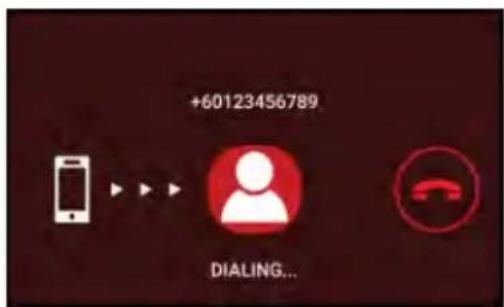
- The following Telephone interrupt screen is displayed during phone call.
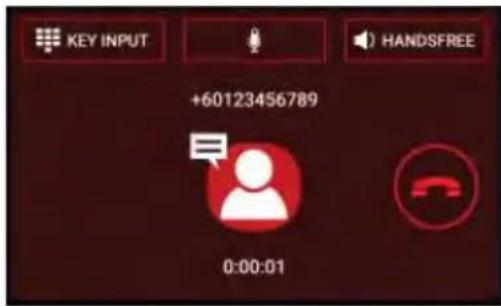
- Press the 📄 🐎🐎 button to talk by using the mobile phone and cancelling the hands-free function (Private Mode). To return to the hands-free mode, Press the 📄 🐎🐎 button again.
- Press the 🖱 button to mute the microphone. The voice from another side can be heard but the other side cannot hear the voice from here.
- Press the button to show the keypad. Press again to hide the keypad.
- When the call is finished, press the 📄 button to hang up.
- Press the 📋 button to call the last called number.
Notes:
- Depending on the mobile phone, the Telephone Interrupt screen may be cancelled and the connection with this system may be disconnected when entering Private mode.
- The maximum key input is 18 numbers. Input after 18 numbers will be ignored.
Phonebook
You can use the Phonebook data obtained from the device to make a call from this unit.
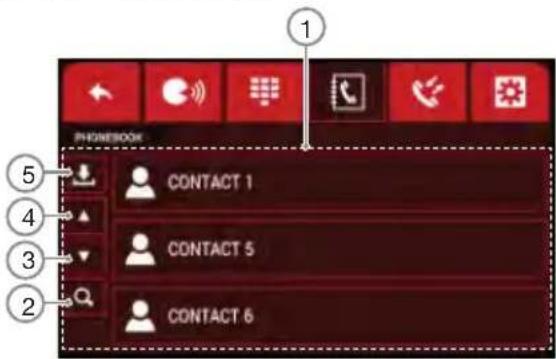
- Contacts List
- Alphabetical Search Button
- Page Down Button
- Page Up Button
- Download Contacts Button
Notes:
- Only contacts stored in the memory of the phone will be synchronized in the unit's memory.
- The synchronization is limited to 240 numbers for the paired phone.
- This unit only supports VCARD 3.0 device. Device with other version of VCARD might not work properly.
Bluetooth® Telephone Operations
- Download Contacts
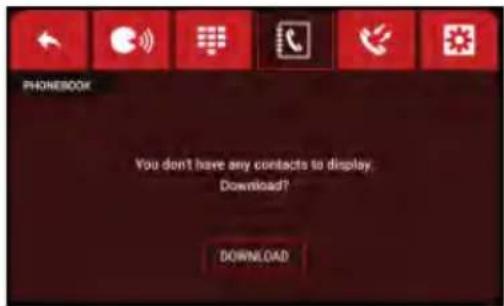
- Press the DOWNLOAD button to download the contacts.
- Press the CANCEL button to cancel the downloading process.
Notes:
- Before downloading the phonebook, make sure that the device is connected to the unit. Refer to "Connecting to a Bluetooth Device".
- When the downloading process is being interrupted or cancelled, unit will only show the contacts which are already downloaded.
• Making a Call Using the Phonebook
- Press the 📁 tab in the top menu to select Phonebook. The display will change accordingly.
- Press the ↓ button to download the contact list manually.
Notes:
- Upon selecting download Phonebook manually, all existing contact information will be erased and replaced with the new downloaded contacts.
- Press ▲ put ▼ to browse the list.
- Press and hold ▲ / ▼ button to continuously browse the list.
- Press the desired name button to view the contacts stored in the contact.
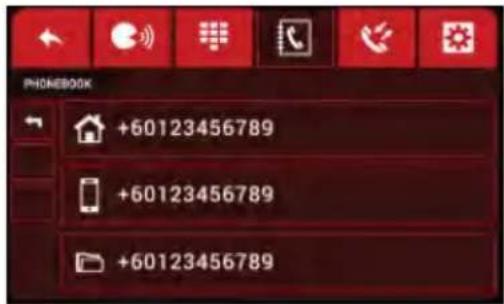
• Maximum 3 phone numbers per contact will be shown in this unit.
6. Press the desired contact number button to call the number.
7. Press the button to return to the contacts list.
- Alphabetic Search
- Press the 🔒 button to display the keypad.
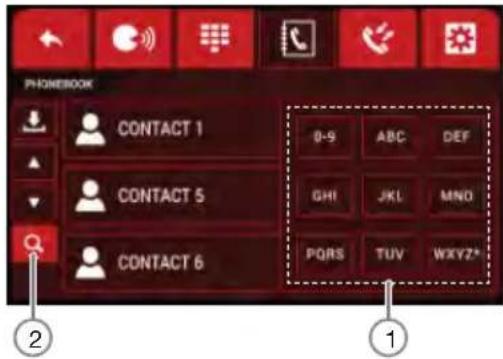
- Searching Keypad Button
- Hide Button
- Press the button on searching keypad to search the contacts list.
- Press the same button on searching keypad again to search for next characters of the button.
- Press the 🔒 button to hide the keypad.
Notes:
• The search function only search for the first character of the contacts.
- If the characters cannot be found, it will search and display the following alphabet.
History
The system will memorize the Dialed/Received/Missed calls record data in the memory. The data can be used to make a call from this unit.
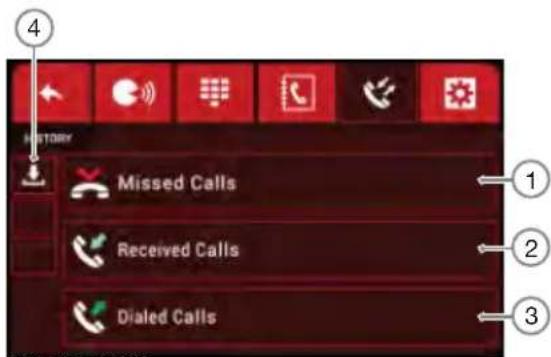
- Missed Calls
- Received Calls
- Dialed Calls
- Download History Button
• Making a Call Using the History Tab
- Press the 📋 tab in the top menu to select History. The display will change accordingly.
- Press the button to download the History manually.
Notes:
- Upon selecting download History manually, all existing call log information will be erased and replaced with the new downloaded History.
- Press the category button to view the numbers in selected category.
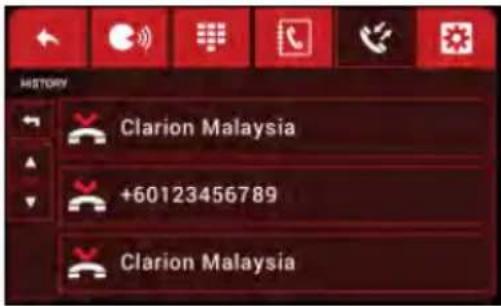
- Press ▲ / ▼ button to browse the list.
- Press the desired contact number button to call the number.
- Press the button to return to the History list.
Notes:
- The History list will be downloaded and updated automatically when switching to tab.
- Maximum 6 phone numbers per category will be downloaded in this unit.
Bluetooth Settings
Press the tab in the top menu to select Bluetooth Settings. The display will change accordingly
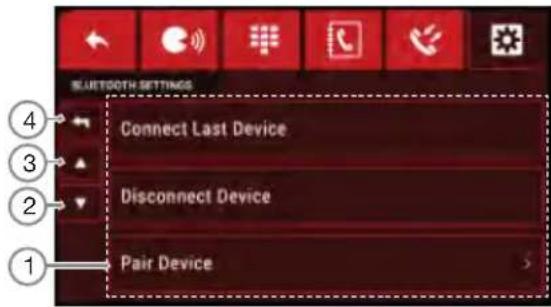
- Bluetooth Settings List
- Page Down Button
- Page Up Button
- Back Button
• Navigating Bluetooth Settings
- Press the ▲ / ● buttons to browse the list of Bluetooth operations:
- Connect Last Device
- Disconnect Device
- Pair Device
- Unpair Device
- Reset Bluetooth
- Press the item in the list to select the desired operation.
Pairing with an External Device
- In the Bluetooth Settings tab, select "Pair Device" to enter Pairing mode.
- Activate Bluetooth on your device and search for "CLARION" on the device. Select "CLARION" to begin pairing.
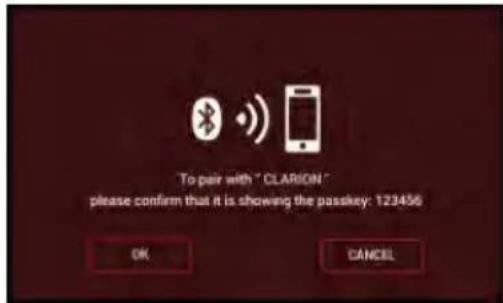
- If the device supports Simple Secure Pairing (SSP), both device and head unit will display the same random 6 digits pairing code.
- Confirm the pairing code on the head unit and the device. Only the same pairing code will be authenticated and paired successfully.
- The unit can pair with a maximum of 5 devices simultaneously.
Notes:
- If the device does not support SSP, the device may require the user to enter the passkey "0000", depending on the device. Please check the owner's manual of your device for further details.
- Please make sure your device supports HFP or A2DP/AVRCP profiles.
Cancelling Pairing Mode
During Pairing mode, press the Cancel to cancel Pairing mode. The display will return to the Bluetooth Settings tab.
Connecting to a Bluetooth Device
• Automatic Connection
The unit will automatically connect to the paired device after pairing. However, some devices will not allow automatic connection to the device after pairing; please use the device to manually connect to the unit. A connection can be established at any source mode. If the connection is unsuccessful, automatic connection will stop.
• Automatic Connection
- In the Bluetooth Settings tab, select "Connect Last Device" to attempt to connect to the last connected device.
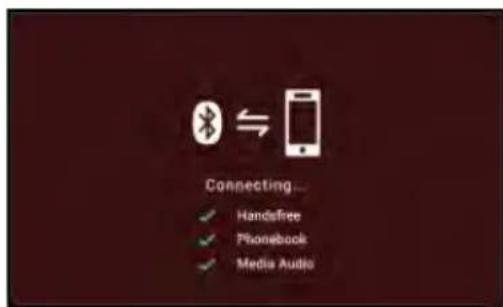
- If the device is within range, a connection will be established.
- If no device is detected, the display will return to the Bluetooth Settings tab.
Bluetooth® Telephone Operations
Notes:
- When the unit has successfully connected to a mobile phone, the unit will attempt to connect to the phonebook of the mobile phone. The process may take up to a few seconds.
- When connected to a device, any further connection attempts by other devices are rejected until the current device is disconnected.
- The same device may connect as both HFP and A2DP/AVRCP. This normally happens to mobile phone with wireless music streaming capability.
Disconnecting a Bluetooth Device
-
In the Bluetooth Settings tab, select "Disconnect Device" to disconnect the current device. A confirmation screen will be displayed on the unit.
-
Press OK to confirm, or Cancel the process.
Notes:
- User can use the device to manually disconnect from the unit.
Deleting a Bluetooth Device
- In the Bluetooth Settings tab, select "Unpair Device" to delete a paired device. The display will change accordingly.
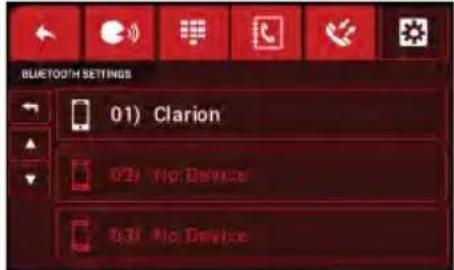
- Press the ▲ / ▼ buttons to browse the list of paired devices.
- Press the device name to delete the paired device. A confirmation screen will be displayed on the unit.
- Press OK to confirm, or Cancel the process.
- To delete all devices simultaneously, select "Unpair All Devices".
Notes:
- All device information will be erased from the unit upon deleting.
Reset Bluetooth Information
-
Select "Reset Bluetooth" in the Bluetooth Settings tab. A confirmation screen will be displayed on the unit.
-
Press OK to confirm, or to cancel the process.
Notes:
- All pairing information will be deleted.
17. AUX OPERATIONS
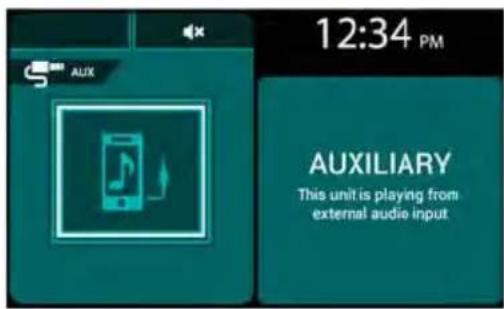
This system has AUX input at the front panel where you can listen to sounds and music from external devices connected to this unit.
- Connect the external music player to the AUX input.
- Press the button in the Home Screen and select the AUX mode to access the AUX function.
Notes:
- Use only 3.5mm stereo jack for the AUX input.
18. VIDEO INPUT/DVB-T2 OPERATIONS
- When an external DVB-T2 receiver is connected to the unit, press the button on the Home Screen to select DVB-T2 mode, to view digital television broadcast.
Notes:
• DVB-T2 content availability may vary depending on country/region.
- For detailed operations, please refer to the user manual of the DVB-T2 receiver.
- When the DVB-T2 receiver is not connected to the unit, press the button on the Home Screen to select Video-in mode, to view videos from external devices.
Notes:
- Use a composite video connection (CVBS) jack for the video input.
19. GPS NAVIGATION OPERATIONS
- Press the button on the Home Screen. On the Navigation selection menu, select GPS to enable the navigation display.
Notes:
- Navigation selection menu is the default screen upon first access.
- Follow the on-screen input instructions to select your destination.
- Press the button on the Home Screen return to the previous display of the current mode.
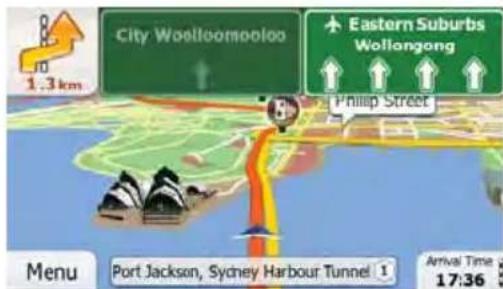
20. SETTINGS OPERATIONS
Select Settings
- Press the button on the Home Screen. The display will change accordingly.
- The audio of the current mode can be heard in the background. Audio volume will still be adjustable.
- Press one of the top buttons to select a specific setting category.
- Press the button to exit Settings and return to the previous mode.
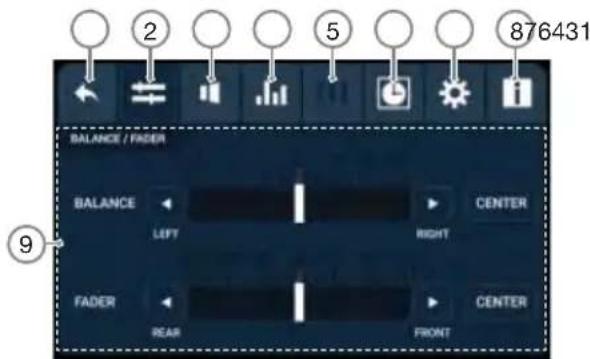
- Return Button
- Balance/Fader Tab
- Time Alignment Tab
- Sound Effect and Subwoofer Tab
- Graphic Equalizer Tab
- Clock Adjustment Tab
- General Settings Tab
- About Tab
- Adjustment Display. Differs with each adjustment category
Balance/Fader Adjustment
Press the button in the top menu to select the Balance/Fader tab. The display will change accordingly.
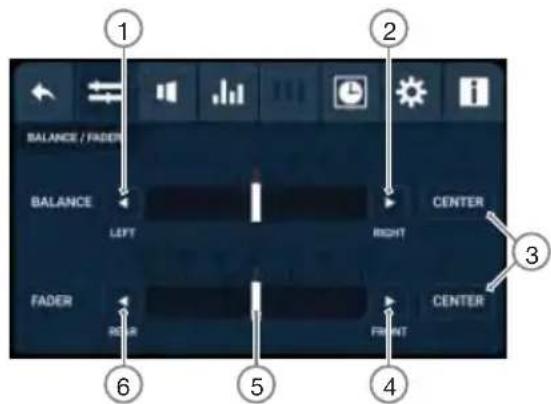
- Left Button
- Right Button
- Center Buttons
- Front Button
- Pointer Display
- Rear Button
- Adjusting the Balance
- The adjustment range for balance is L12 to R12.
- Press the button to emphasize the sound from the right speakers.
- Press the button to emphasize the sound from the left speakers.
- Press the CENTER button to reset the balance to "CENTER".
- Adjusting the Fader
- The adjustment range for balance is R12 to F12.
- Pressing the button emphasizes the sound from the front speakers.
- Pressing the button emphasizes the sound from the rear speakers.
- Press the CENTER button to reset the fader to "CENTER".
Note:
• This feature is not available in Phone mode.
Time Alignment Adjustment
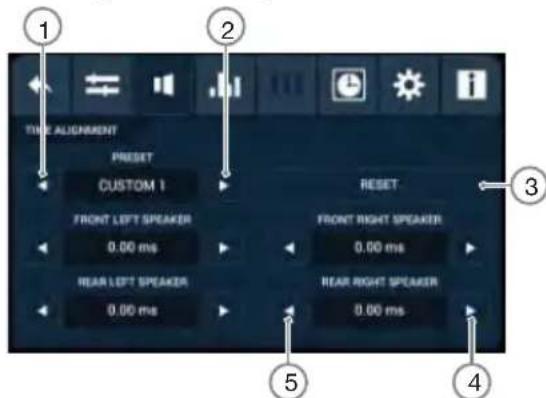
1) Previous Preset
2) Next Preset
3) Reset Button
4) Increase Delay Button
5) Decrease Delay Button
- Press the button in the top menu to select the Time Alignment tab. The display will change accordingly.
Note:
- The time alignment is adjustable for all four speakers with a range 0 – 10 milliseconds for each speaker, and 0 – 20 milliseconds (ms) in total across all speakers.
-
A total of 2 custom categories (Custom 1, Custom 2) are available for adjustment.
-
Press the 📁 buttons at the Preset area to select the desired category.
- Press the button to increase the time delay from a speaker by 0.05 milliseconds (ms).
- Press the ▶ button to decrease the time delay from a speaker by 0.05 milliseconds (ms).
- Press the button to reset the time alignment on all speakers to "0".
Note:
• This feature is not available in Phone mode.
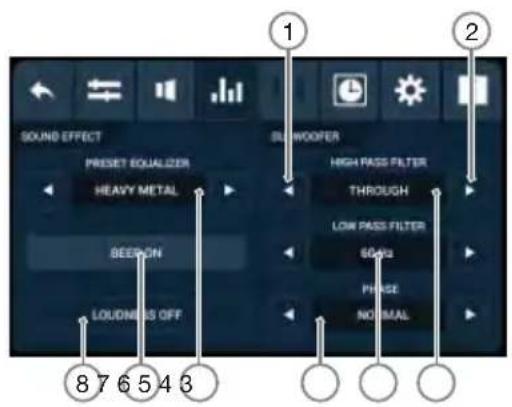
Sound Effect Controls
- Previous Item/Decrease Value Button
- Next Item/Increase Value Button
- Subwoofer High Pass Filter Control
- Subwoofer Low Pass Filter Control
- Subwoofer Phase Control
- Preset Equalizer Control
- Beep Button
- Loudness Button
Press the button in the top menu to select the Sound Effect tab. The display will change accordingly.
- Preset Equalizer
- Press the ▶ button to select the next preset tone.
- Press the button to select the previous preset tone.
- The ascending order of the available preset tones is:
FLAT→POP ROCK CLASSIC HIP-HOP DANCE → HEAVY METAL → CUSTOM 1 (not preset) CUSTOM 2 (not preset) → FLAT...
Notes:
- CUSTOM 1 and CUSTOM 2 allow manual adjustment of the audio via a graphic equalizer.
- Beep Function
The beep function produces a beep sound whenever any button with a valid operation is pressed.
- Press the BEEP button to toggle the beep function on or off. The button display will change accordingly.
- Loudness Function
The loudness function amplifies the audio on the unit.
- Press the LIONESS button to toggle the loudness function on or off. The button display will change accordingly.
Subwoofer Controls
• High Pass and Low Pass Filters
- Press the ▶ button to select a higher frequency value.
- Press the ▶ button to select a lower frequency value.
- The ascending order of the phase options are:
THROUGH 30 Hz 90 Hz 120 Hz THROUGH...
• Phase Selection
- Press the ▶ button to select the next phase option.
- Press the button to select the previous phase option.
- The ascending order of the available phases is:
NORMAL → REVERSE NORMAL...
Note:
- This feature is not available in Phone mode.
Graphic Equalizer
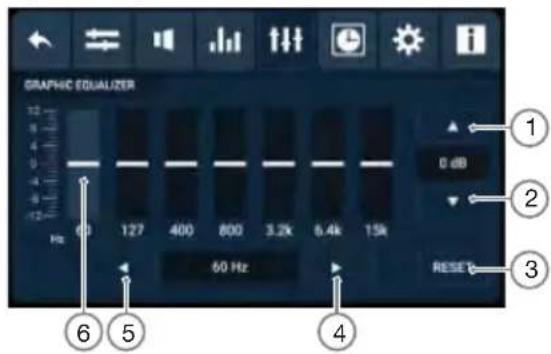
- Increase Gain Button
- Decrease Gain Button
- Reset Button
- Next Band Button
- Previous Band Button
-
Gain Pointer Display
-
Press the button at the top menu. The display will change accordingly.
Notes:
- Graphic equalizer is only available if the CUSTOM preset tone is selected.
- A series of 7 frequency bands are available for customization. The default gain for each band is 0. Each band has an adjustable range of -12 to 12.
- Press the / buttons to select a frequency band to adjust the audio gain.
- At each band, press the ▲ but is to increase or decrease the audio gain.
Note:
• This feature is not available in Phone mode.
Settings Operations
Clock Adjustment
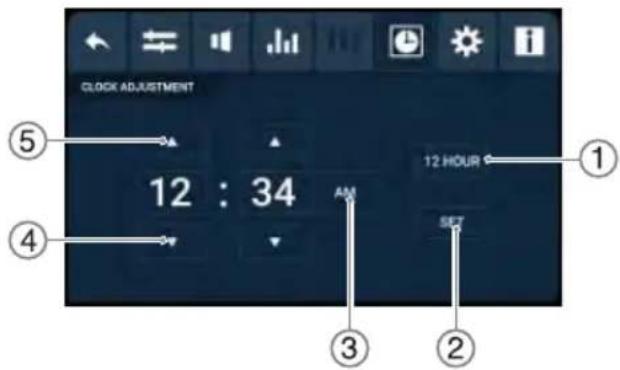
- 12-Hour/24-Hour Button.
- Set Clock Button.
- AM/PM Button.
- Hour/Minute Decrease Button.
-
Hour/Minute Increase Button.
-
Press the button at the top menu. The display will change accordingly.
- Press the ▲ / ▼ buttons to increase or decrease the Hour/Minute of the clock.
- Press the 12-Hour to change the clock format to 12-Hour or 24-Hour display. The button display will change accordingly.
- Press the AM button to change the clock format to AM or PM. The button display will change accordingly.
Note:
• The AM button is only available in 12-Hour clock display.
General Settings
- Press the 📄 ton at the top menu. The display will change accordingly.
- Select the one of the listed items to perform customization of general settings.
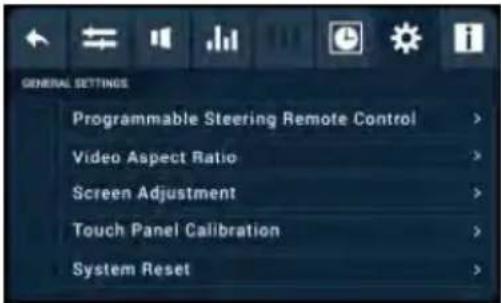
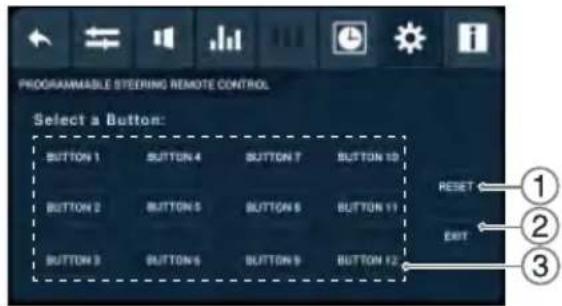
- Reset Button.
- Exit Button.
- Programmable Buttons.
• Programmable Steering Remote Control
- Select "Programmable Steering Remote Control" on the General Settings menu. A series of 12 virtual buttons are available for key function allocation on the unit.
Note:
- A universal remote steering controller has to be connected to the rear of the unit.
-
Press the 1550 ton to erase all stored functions in the steering remote control.
-
Press the CANCEL button to return to the previous display.
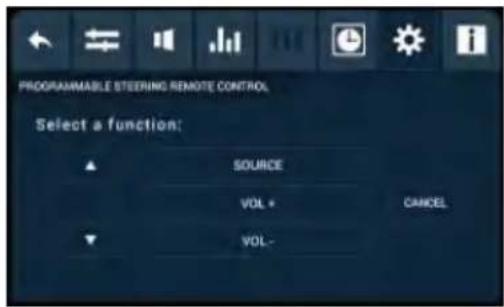
- Press the ▲ / ▼ buttons to increase or decrease the Hour/Minute of the clock.
- Select a button on the touch screen to assign a key function to it.
- Select one of the 17 functions available to be stored into the selected button:
- Source/Power
• Volume Up
• Volume Down
- Pause/Play
- Next
- Previous
- Right
- Left
- Enter
• Page Up
- Page Down
- Band
Settings Operations
- Call – press to answer incoming calls
• End – end a telephone call conversation
• Voicedial – activate the Voicedialer - Call/End – combination of Call and End functions
- Mute - mute/unmute audio
Note:
- Apart from Call, End, Voicedial and Call/End, the operation of each function is the same as the button functions of the remote control. For further details, refer to "Remote Control Operations".
- Press and hold the physical button on the steering remote control to program the function. The button can be released once the unit returns to the button display. The assigned button now has the programmed function.
- Press the EXIT button to cancel the storing process and to return to the previous display.
• Video Aspect Ratio
- Select Video Aspect Ratio on the General Settings menu. The display will change accordingly:
• 16:9
• 4:3 Pan Scan
- Letterbox
- Select the one of the listed items to select a ratio for video play. The default ratio is "16:9".
- Select "CANCEL" to return to the previous display.
- Touch Panel Calibration
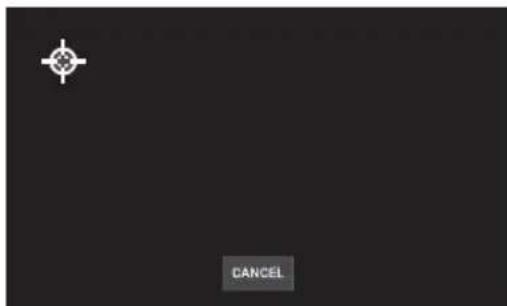
- Select Touch Panel Calibration on the General Settings menu. The display will change accordingly.
- Press the target buttons in the order displayed on the unit.
- Press the OK button to save calibration adjustment.
- Press the CANCEL button during the calibration process to cancel progress and return to the previous display.
- Screen Adjustment
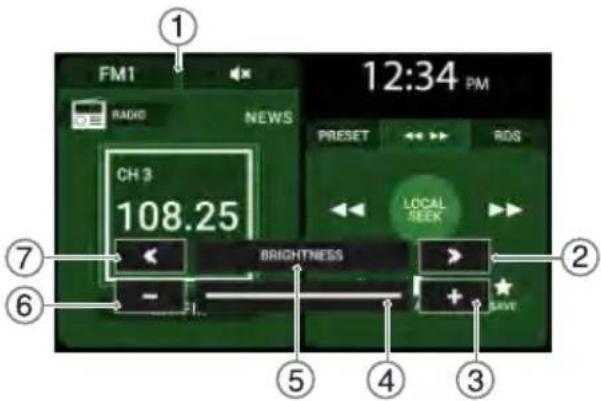
- Current Mode Layout
- Next Category Button
- Increase Effect Button
- Progress Bar Display
- Category Name Display
- Decrease Effect Button
-
Previous Category Button
-
Select Screen Adjustment on the General Settings menu. The display will change according to the current mode display.
- Press the / buttons to select the screen adjustment category in the following order:
Brightness → Contrast → Saturation → Brightness...
- Press the - / + buttons to adjust the screen setting.
- System Reset
- Select System Reset in the General Settings menu.
- Select "OK" to confirm system reset.
- Press "CANCEL" to return to previous display.
Notes:
• The system will restart after resetting.
- All previous settings on the unit will be reset.
About
- Press the button at the top menu. The display will change accordingly.
- Press the ▲ / buttons navigate the pages of the About tab to view the unit information.
21. TROUBLESHOOTING
GENERAL
| Problem Cause Measure | ||
| Power does not turn on. (No sound is produced.) | Fuse is blown. Replace with a fuse | of the same amperage. If the fuse blows again, consult your store of purchase. |
| Incorrect wiring. Consult your installation center. | ||
| Nothing happens when buttons are pressed.Display is not accurate. | The microprocessor has malfunctioned due to noise, etc. | Press the reset button with a thin rod.Note:* When the Reset button is pressed, frequencies of radio stations, titles, etc. stored in memory are cleared. |
| The remote control unit does not work. | Direct rays of the sun fall on the light-receptive part of the remote control unit. | When direct rays of the sun fall on the light-receptive part of the remote control unit, it may not work. |
| The battery of the remote control unit is dead or there is no battery in the remote control unit. | Check the battery of the remote control unit. | |
DVD PLAYER
| Problem Cause Measure | ||
| Disc cannot be loaded. A disc is a | ready loaded. Eject the disc before | loading the new one. |
| There is foreign matter already in the disc slot. | Remove the foreign matter, or consult a service station. | |
| Sound skips or is noisy. | Disc is dirty. | Clean the disc with a soft cloth. |
| Disc is heavily scratched or warped. | Replace with a disc in good condition. | |
| Sound is bad directly after power is turned on. | Condensation may form on the internal lens when the car is parked in a humid place. | Let dry for about 1 hour with the power on. |
| Video images are not displayed. The parking brake is not engaged. | Check that the parking brake is engaged. | |
USB DEVICE
| Problem Cause Measure | ||
| USB device cannot be inserted. The USB device has been inserted with wrong direction. | Reversing the connection direction of the USB device, try it again. | |
| USB device is not recognized. The USB device is damaged. Disconnect the USB device and reconnect. If the device is still not recognized, try replacing with a different USB device. | ||
| No sound heard with the display “NO FILE” shown. | No MP3/WMA file is stored in the USB device. | Store these files properly in the USB device. |
| Sound skips or is noisy. MP3/WMA files are not encoded properly. | Use MP3/WMA files encoded properly. | |
| Video images are not displayed. The parking brake is not engaged. | Check that the parking brake is engaged. | |
| Use a file with supported video codec. | ||
| Video is played without audio. Audio codec is not supported. | Use a video file with supported audio codec. | |
| Music is muted and skips to the next file. | Music file format is not supported. | Use a supported file format. |
| Picture/video returns to directory after “CURRENT FILE NOT SUPPORTED” display. | Picture/video file format is not supported. | Use a supported file format. |
| Audio is muted and Fast Forward temporarily. | The file is corrupted. | The head unit will automatically Fast Forward through the corrupted portion of the file. |
Bluetooth Audio
| Problem Cause Measure | ||
| Cannot perform remote control for audio streaming. | AVRCP is not connected. Disconnect and connect the device again. Pair the device again if necessary. | |
| Audio streaming is choppy when using the connected phone. | This is due to excessive Bluetooth activity on a low bandwidth link. Some mobile phones will face this problem. | It is advisable not to use the mobile phone while the audio is streaming. |
Phone
| Problem Cause Measure | ||
| System is not able to receive and make calls after being paired. | Bluetooth connection is not established yet.The unit will take several seconds to establish the connection after pairing.Some devices will not connect automatically after pairing. | Use the device to connect manually or enter Phone mode and manually reconnect to the last connected device. |
| Power off the unit and pair the device again after deleting it from Phone mode. | ||
| If the problem persists, try turning off the power on the device and perform a new pairing operation. | ||
| Consult the nearest service centre regarding device compatibility. | ||
| The device cannot be connected. | The device pairing information may have been deleted from the unit. | Perform the measures above. |
| The relevant profile is not selected on the device. | When selecting available profiles, select a profile with the hands-free feature. Otherwise, pair the device again after deleting it from Phone mode. | |
| Caller's voice sounds distorted or is intermittent. | Volume is too loud (depends on the car environment, speakers and microphone) and half-duplex mode is automatically triggered. | Try reducing the telephone volume level. |
| Caller reports poor voice quality at remote end. | ||
| Difficulties with pairing and connecting with a device during another Bluetooth operation such as audio streaming. | This is due to excessive Bluetooth activity on a low bandwidth link. This may result in difficulties with pairing and connecting. | Disconnect all devices. Try pairing with the device, and connecting manually later. |
| There is no sound output during conversation. | Bluetooth communication link is lost. | Disconnect and reconnect the device.If the problem persists, pair the device again after deleting it from Phone mode. |
| The unit display is frozen at call conversation, after the phone call has ended. | The unit received an incorrect response from the device. | Turn off the power of the device, then turn it on again. |
| Bluetooth is connected but unable to make calls. | Handsfree (HFP) may not be connected. | Make sure Handsfree (HFP) is connected by checking the display indication.Connect HFP from the device if allowed; otherwise try disconnecting and reconnecting the device again. |
TFT SCREEN
| Problem Cause Measure | ||
| The image is not displayed. The parking brake is not engaged. | Check that the parking brake is engaged. | |
| The display is dark. The Brightness control is too low. | Adjust the Brightness properly. | |
| The headlight of the vehicle is lit. The display is made dark at night to prevent the glare (When the headlight of the vehicle is lit in the daytime, the display gets dark). Adjust the Brightness properly. | ||
22. ERROR DISPLAY
| P/IC | Display Cause Measure | ||
| DVD/CD MP3/WMA/AACUSB/MT | LOAD ERROR A disc is caught inside the CD deck and is not ejected. | This is a failure of CD deck's mechanism.Consult your nearest service dealers. | |
| DISC ERROR A disc cannot be played due to scratches, etc. | Replace with a non-scratched, non-warped-disc. | ||
| A disc is loaded upside-down inside the CD deck and does not play. | |||
| NO FILE No supported file in the CD Use a CD with files. | |||
| CURRENT FILE NOT SUPPORTED | An unsupported file is being played on the head unit. | Use a CD with supported file formats. | |
| REGION CODE ERROR DVD | is not support in your country. | Use a CD with correct region code. | |
| DEVICE ERROR The connected device is not supported. | If the device is frozen, disconnect it, and reconnect it again. | ||
| Connect a proper device. | |||
| An error occurred when controlling the device. | |||
| The device is connected via the USB Hub. | |||
| OVER CURRENT Over-current or data error is detected. | Turn off the ignition switch, disconnect the device, restart the engine and reconnect it again. If the device is still not recognized, try replacing with a different device. | ||
| NO FILE No files in the device. Use a device with files. | |||
| CURRENT FILE NOT SUPPORTED | An unsupported file is being played on the head unit. | Use a device with supported file formats. | |
| Bluetooth Audio | NO BLUETOOTH DEVICE A2 | DP is not connected to the unit. | Disconnect and reconnect the device to the unit. |
| DVB-T2 Video input | NO VIDEO SIGNAL DVB-T2 | receiver is not connected to the unit.Video input is not connected to the unit. | Connect the receiver/input to the unit. |
23. SPECIFICATIONS
FM tuner
Frequency Range : 87.50 \~ 108.00 MHz
Usable Sensitivity : <10 dB
Stereo Separation (1 kHz) : >20 dB
Frequency Response (±3dB) : 100 \~ 7000 Hz
AM tuner
Frequency Range : 531 \~ 1602 kHz
Usable Sensitivity : <34 dB
CD/DVD player
System : Digital Versatile Disc System with CDDA capable
Usable Discs : DVD video disc, Compact disc
Frequency Response : 17 \~ 20 000 Hz
Signal-to-Noise Ratio : >70 dB
Harmonic Distortion : <0.3%
Front USB port
Specification : USB 2.0
File system : FAT16, FAT32
playable audio format : MP3 (.mp3), WMA (.wma), AAC (.m4a)
playable video format : AVI (.avi), MP4 (.mp4), MPG (.mpg, .mpeg), VOB (.vob), DAT (.dat)
playable image format : JPEG (.jpeg)
Rear USB port (Charging only)
Specification : USB 2.0
Charging Power : 1.5A
iPod/ iPhone
Refer to "Supported iPod/iPhone Devices".
Screen
Screen size : 6.2 inch
Resolution : 800 x 480
Touch type : TFT Active Matrix Display
Bluetooth® wireless technology
Version : Bluetooth® 3.0
Frequency Range : 2.40 \~ 2.4835 GHz, ISM band
RF Power : Class 2 (2.5 mW)
Profiles : HFP 1.6, A2DP 1.2, AVRCP 1.5, PBAP 1.1
Operating Temperature : -20°C \~ +60°C
Telephone Operation : Noise reduction, echo cancellation, full duplex telephony, wideband speech
General
Power Source Voltage : 10.8 V \~ 15.6 V
Current Consumption : Less than 15A
Weight of the Main Unit : 1.66 kg
Dimensions of the Main Unit : 178.0 mm Width X 100.0 mm Height X 155.5 mm Depth
Maximum Power Output : 200 W (50 W x 4ch)
Operating Temperature : -20°C \~ +70°C
- DVD VIDEO PLAYER OPERATIONS....21
- CD/USB VIDEO OPERATIONS 23
- CD/USB/MTP AUDIO OPERATIONS 24
- CD/USB/MTP PICTURE OPERATIONS 26
- iPod/iPhone OPERATIONS 27
- Bluetooth® AUDIO PLAYER OPERATIONS....29
- Bluetooth® TELEPHONE OPERATIONS.... 30
- AUX OPERATIONS.... 35
- VIDEO INPUT/DVB-T2 OPERATIONS.... 35
- GPS NAVIGATION OPERATIONS.... 35
- SETTINGS OPERATIONS ...... 36
- TROUBLESHOOTING 40
- ERROR DISPLAY 44
- SPECIFICATIONS......45
- FEATURES
- PRECAUTIONS
- WARNING
- CAUTIONS ON HANDLING
- Operation Panel
- USB Port
- Cleaning
- - Cleaning the cabinet
- - Cleaning the liquid crystal panel
- Handling Disc
- - Handling
- - Storage
- - Cleaning
- - On Discs
- CAUTION
- About the registered marks, etc.
- PANEL CONTROLS
- Main Unit
- Names of the Buttons and Their Functions
- CD/DVD slot
- IR Sensor
- button
- [∅]/[VOLUME]/[SRC]
- RESET Button
- AUX inputs (rear)
- Video/ DVB-T2 input (rear)
- microSD memory card slot
- Touch screen
- Microphone
- REMOTE CONTROL
- Inserting the Battery
- Notes:
- Remote Control Functions
- Note:
- BASIC OPERATIONS
- Turning on/off the power
- Switching Source Modes
- Clock and Indicators Display
- Turning off the Display Monitor
- Adjusting the Volume
- Screen Adjustment
- Mute Function
- Radio Illumination
- Parking Brake Safety
- Video Output
- Reverse Camera View
- RADIO MODE OPERATIONS
- Listening to the Radio
- DX SEEK → LOCAL SEEK → MANUAL SEEK → DX SEEK...
- TP Seek
- Manual Tuning
- Autostore
- Storing Preset Memory
- Recalling a Preset Station
- RDS OPERATIONS
- RDS (Radio Data System)
- RDS Operations
- TA (Traffic Announcement)
- - Turning on TA
- - Turning off TA
- - Cancelling TA Interrupt
- • Searching for a TP station
- Emergency Broadcast
- PTY (Programme Type)
- - Turning on PTY
- - Turning off PTY
- - Selecting PTY
- • Searching for a PTY Station
- Volume Setting of TA, Emergency
- Broadcast, and PTY
- AF (Alternate Frequency) Function
- CD/USB MODE OPERATION
- Discs
- playable discs
- - Entering File and Folder Names
- Picture File extensions
- Precautions when Creating MP3 files
- - Usable sampling rates and bit rates:
- - File extensions
- - File and disc not supported
- To disable DRM (Digital Rights Management)
- • Logical format (File system)
- playable video files
- \*.avi files
- \*.mp4 files
- \*.mpg/mpeg files
- \*.vob files
- \*.dat files
- File extensions
- About CD
- Note on region numbers
- Watching/Listening to a disc
- Loading a CD
- Eject the CD
- USB
- - About USB memory device
- USB Digital Media Streaming
- Hot plugging function
- Connecting a USB memory/MTP device
- Watching/Listening to a track with USB memory/MTP device
- Unplug the USB memory/MTP device
- DVD VIDEO PLAYER OPERATIONS
- Showing DVD video mode screen
- Playing Video Files in DVD
- Play/Pause Playback
- Skip (Search) a Chapter
- Skip (Search) a Title
- Fast Forward/Fast Backward Operation
- Repeat Playback
- Switching Audio
- Switching Subtitles
- Switching Angle
- Zoom Operation
- CD/USB VIDEO OPERATIONS
- Playing Video Files in CD/USB memory/MTP device
- Play/Pause
- Switch to Previous/Next File
- • VIDEO RPT (Video Repeat)
- • FLD RPT (Folder Repeat)
- • RPT OFF (Repeat Off)
- Video File List (Directory)
- CD/USB/MTP AUDIO OPERATIONS
- Playing Audio Files in CD/USB memory/MTP device
- Switch to Previous/Next File or track
- - TRACK REPEAT
- • FOLDER REPEAT
- - REPEAT OFF
- Random Playback
- Album Artwork
- Selecting a Track on the Directory View
- Tag Display Function
- CD/USB/MTP PICTURE OPERATIONS
- Showing CD/USB/MTP Picture Mode Screen
- Rotate Operation
- iPod/iPhone OPERATIONS
- Select iPod Mode
- Switch to Previous/Next Track
- Fast Forward/Backward
- Repeat Play
- - ALL REPEAT
- Shuffle Play
- - SHUFFLE ON
- - SHUFFLE OFF
- iPod/iPhone Operations
- Selecting a Song from iPod Menu
- Available iPod Categories
- Supported iPod/iPhone Devices
- Bluetooth® AUDIO PLAYER OPERATIONS
- Controlling the Bluetooth Audio Player
- Playing Music
- Bluetooth® TELEPHONE OPERATIONS
- • Hands-free Profile (HFP)
- • Advanced Audio Distribution Profile (A2DP)
- • Audio/Video Remote Control Profile (AVRCP)
- • Phonebook Access Profile (PBAP)
- Incoming Call
- Answering a call
- Rejecting a call
- Ending a call
- Select Phone Mode
- Voice Dialer
- • Performing Voice Dialing
- Bluetooth® Telephone Operations
- Key Input
- Phonebook
- - Download Contacts
- • Making a Call Using the Phonebook
- - Alphabetic Search
- History
- • Making a Call Using the History Tab
- Bluetooth Settings
- • Navigating Bluetooth Settings
- Pairing with an External Device
- Cancelling Pairing Mode
- Connecting to a Bluetooth Device
- • Automatic Connection
- Disconnecting a Bluetooth Device
- Deleting a Bluetooth Device
- Reset Bluetooth Information
- AUX OPERATIONS
- VIDEO INPUT/DVB-T2 OPERATIONS
- GPS NAVIGATION OPERATIONS
- SETTINGS OPERATIONS
- Select Settings
- Balance/Fader Adjustment
- Time Alignment Adjustment
- Sound Effect Controls
- - Beep Function
- - Loudness Function
- Subwoofer Controls
- Graphic Equalizer
- Settings Operations
- Clock Adjustment
- General Settings
- • Programmable Steering Remote Control
- • Video Aspect Ratio
- - Touch Panel Calibration
- - Screen Adjustment
- - System Reset
- About
- TROUBLESHOOTING
- ERROR DISPLAY
- SPECIFICATIONS
- FM tuner
- AM tuner
- CD/DVD player
- Front USB port
- Rear USB port (Charging only)
- iPod/ iPhone
- Screen
- Bluetooth® wireless technology
- General
Brand : CLARION
Model : NX387
Category : Browser