
6 - Hi-Fi System Juke Audio - Free user manual and instructions
Find the device manual for free 6 Juke Audio in PDF.


| Product Type | Hi-Fi System |
| Brand | Juke Audio |
| Model | 6 |
| Dimensions (W x H x D) | 430 x 140 x 320 mm |
| Weight | 8 kg |
| Power Consumption | 150 W |
| Power Supply | AC 110-240V, 50/60Hz |
| Audio Inputs | AUX, Bluetooth, USB |
| Audio Outputs | Speaker terminals (4-8 ohms), Headphone jack |
| Supported Media | CD, CD-R/RW, MP3 via USB |
| Tuner | FM/AM with 30 presets |
| Bluetooth Version | 5.0 |
| Remote Control | Included (CR2025 battery) |
| Display | LCD with backlight |
| Equalizer Presets | Rock, Pop, Jazz, Classic, Flat |
| Cleaning Instructions | Use a soft, dry cloth. Do not use solvents. |
| Safety Warnings | Do not expose to water or moisture. Keep ventilation slots clear. |
| Spare Parts | Contact Juke Audio support or authorized service centers. |
| Repair Information | Refer to user manual or qualified technician. |
Frequently Asked Questions - 6 Juke Audio
User questions about 6 Juke Audio
0 question about this device. Answer the ones you know or ask your own.
Ask a new question about this device
Download the instructions for your Hi-Fi System in PDF format for free! Find your manual 6 - Juke Audio and take your electronic device back in hand. On this page are published all the documents necessary for the use of your device. 6 by Juke Audio.
USER MANUAL 6 Juke Audio
Thank you for your business! We are excited to welcome you to the Juke Audio family and want to ensure your installation and listening experience is seamless. Please scan the QR code below with your smartphone for step-by-step instructions, tips, and videos. We've also included a brief summary below.

Installation Summary
- Connect the speaker wires to Juke's green connectors

natural_image
Black electronic device with multiple ports and wiring (no visible text or symbols)- Connect Juke to your router via Ethernet (or Wi-Fi if Ethernet isn't available)
- Go to "ADMINISTRATOR SETTINGS" in Juke's web interface (the password is Admin) to name your zones and configure other features
- Spotify users (paid Spotify plan required) can select "Edit Sources," and set one or more to Spotify Connect
- Android users with sources besides Spotify: download the AirMusic app to stream to Juke using Airplay just like you would from an Apple device
Streaming Summary (once Juke and your phone are on the same network)
On an Apple device:
- Select one of the 4 Airplay sources (Juke1, Juke2, etc.) and play from any app
- Go to Juke.local in Safari (not other browsers) to access Juke's interface
- Select "CHOOSE WHERE TO LISTEN" and tap each zone you want to turn on
On an Android device:
- Type Juke's IP address into your browser. If you don't know Juke's IP address, download a free app called Fing and scan for devices to find Juke
Full instructions can be found at jukeaudio.com/instructions
We hope you find the installation process straightforward, but we're more than happy to help if you have any issues or questions. Please call us at 1-877-390-JUKE or email us at email@jukeaudio.com
JUKE
AUDIO
Multi-Room
Streaming Amplifier
Table of Contents
Product Overview 03
Specs.... 03
Installation 04
Rack or Table-Top 04
Wiring 04
Getting on the Network 06
Hard-Wired Ethernet Connection 06
Wireless connection....06
Networking Tips 07
Accessing the Juke Web App 08
Saving A Shortcut.... 08
Configuring 09
Editing Zone Names 09
Adjusting Inputs.... 09
Editing Zone Volumes....09
Playing Audio 10
Apple Airplay 10
Spotify Connect 11
USB.... 11
Getting Audio From TV to Juke 12
Apple TV 12
Hard Wired Connection.... 12
Add-Ons 13
Additional Volume 13
Adding on Zones 14
Adding a Subwoofer to Juke 14
Amazon Alexa Voice Commands with Juke 15
Streaming to Juke from Android via AirMusic.... 17
Troubleshooting 19
Networking Requirements.... 19
Speaker Wire Connections 20
Filing a Support Request.... 20
Safety Instructions 21
Product Overview
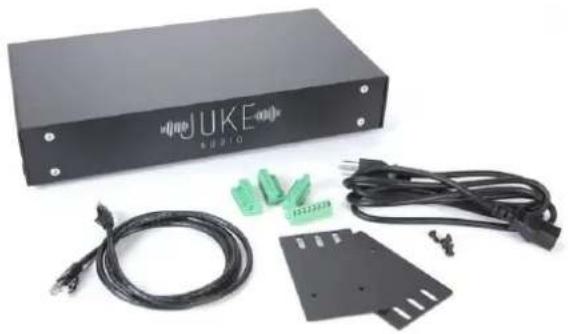
The Juke Audio multi-room streaming amplifier is an all-in-one solution for powering and wirelessly controlling pre-wired architectural speakers across an entire home or building. Through this guide, we'll explain the simple steps of connecting speaker wires to the Juke, getting the unit onto the local network, and streaming content from Wi-Fi enabled devices and wired analog inputs.
natural_image
Black electronic device labeled 'JUKE AUDIO' with external cables and connectors (no visible text beyond branding)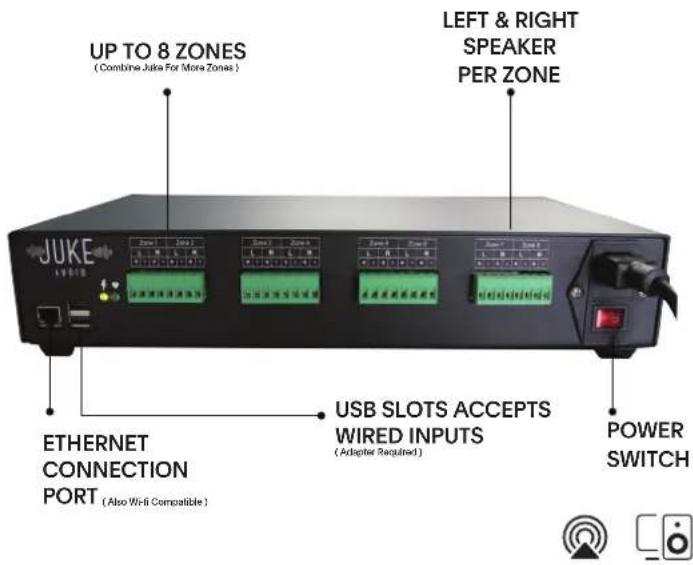
Specs
| Zones | The Juke-8 covers 8 zones (16 channels) and the Juke-6 covers 6 zones (12 channels). |
| Output | 40 watts per channel at 8 Ohm speaker impedance (stable down to 2 ohms) |
| Dimensions 15" wide x 8" deep x 3" tall – 2U in a rack | |
| Number of Inputs | 4 different devices can connect simultaneously |
| Wireless Inputs Airplay, Airplay2, Spotify Connect, Audiocast (via adapter) | |
Wired Inputs 2 USB ports for accepting wired RCA inputs via digital USB adapter
Installation
The Juke can be installed in one of two locations:
Rack or Table-Top

-
Placed onto a shelf or a flat surface. For best performance, do not rest any other equipment on top of it or place the unit in a location that might cause the unit to run hot
-
Mounted into a 19" equipment rack using the optional rack ears that come with the shipment. There are two aluminum plates that attach to the Juke with the 4 screws provided and are used to screw the unit into the rack.
Wiring
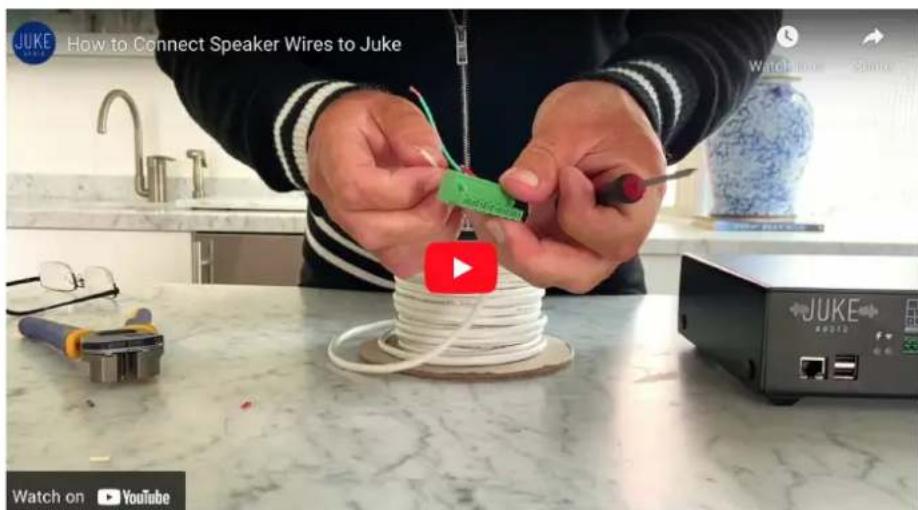
Next connect the speaker wiring. This may require a wire stripper, a small screwdriver, and scissors:

natural_image
Three different types of metal crimping tools laid out on a marble surface: two with yellow and blue handles, one with black wire, and one with metallic scissors (no text or symbols visible)Tools required (not included): wire strippers, scissors and small blade screwdriver

natural_image
Close-up of a thin, metallic tool tip with a textured surface (no visible text or symbols)Cut a small amount of the insulation covering the speaker wires
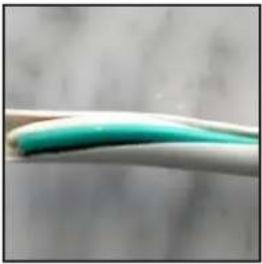
natural_image
Close-up of a white cable with a cyan insulation sheath against a blurred background (no text or symbols visible)Peal back the insulation to expose 2 or 3 inches of wire
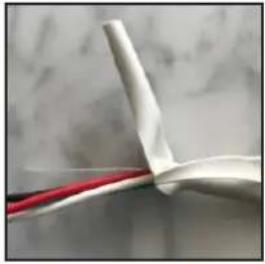
natural_image
Close-up of a white plastic component with red wires attached, against a blurred background (no text or symbols visible)Peal it like a banana Cut off the excess insulation

natural_image
Close-up of a white cable with three colored wires (black, red, green) inserted vertically (no text or symbols visible)he excess insulation

Strip about 1/4 inch of insulation from each wire
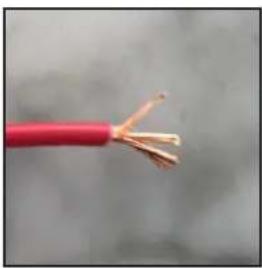
natural_image
Close-up of a red electrical cable with exposed copper wires (no text or symbols)Fan out the wire strands Twist the wire strands and make sure none are sticking out
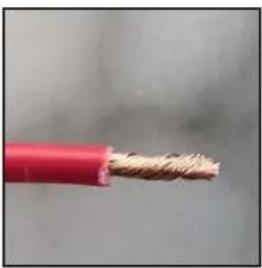
natural_image
Close-up of a red and brown electrical cable with visible twisted insulation (no text or symbols)st the wire strands and make sure none are sticking out
natural_image
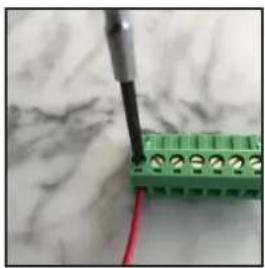
Close-up of a green terminal block with red wires against a marble background (no visible text or symbols)Insert each wire in the terminal block and tighten the screw
natural_image
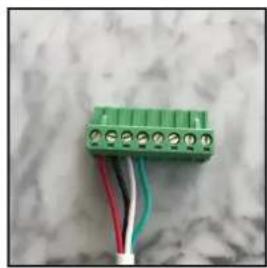
Close-up of a green terminal block with three colored wires (red, blue, white) against a marble background (no text or symbols visible)Repeat the steps for the remaining wires

natural_image
Close-up of a green terminal connector with red and teal wires, mounted on a white cable against a marble background (no text or symbols visible)Repeat the steps for the remaining wires

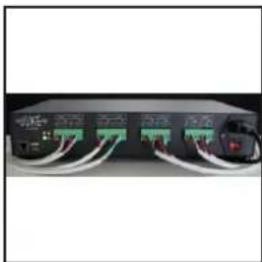
Plug each connector firmly into the Juke until it locks in place
natural_image
Front view of a network switch or server rack with multiple ports and cables (no visible text or labels)Repeat these steps for all of the zones
Each of Juke's zone outputs has a positive and negative connector for a left speaker, and the same for a right speaker (4 connectors in total: left positive, left negative, right positive and right negative). In typical applications, a single speaker is connected to each terminal pair such that each zone has a left and right speaker. However, up to two of Juke's eight zones can power four speakers: two left, and two right, as long as each speaker connected in that zone is 8 Ohms.
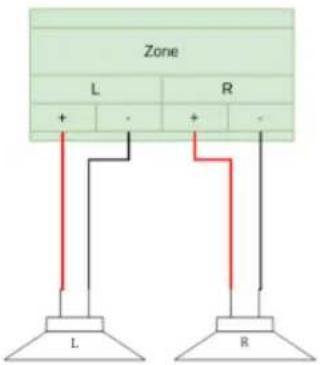
Standard Wiring - 2 speakers (L+R) run in parallel per zone

flowchart
graph TD
    A["Zone"] --> B["L"]
    A --> C["R"]
    B --> D["L1"]
    B --> E["L2"]
    C --> F["R1"]
    C --> G["R2"]
    D --> H["+"]
    E --> I["-"]
    F --> J["+"]
    G --> K["-"]
Doubling Up a Zone – 4 speakers into one zone (must be 80hm speakers and can only be done on 2 zones per Juke)
Getting on the Network
Juke can be connected to your network either through a hard-wired ethernet connection or wirelessly over Wi-Fi as well. Whenever possible, we recommend a hard-wired connection for most stable performance.
Hard-Wired Ethernet Connection
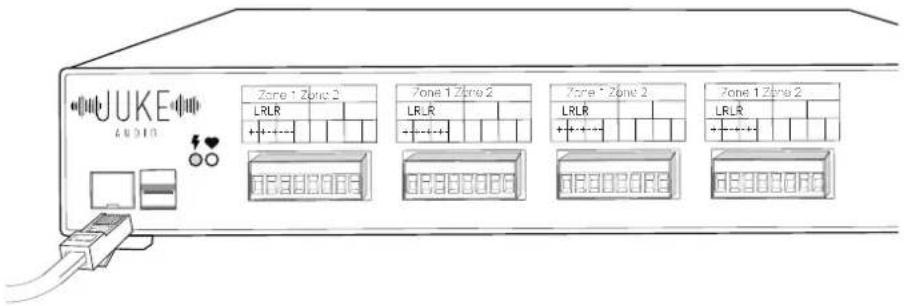
If available, it is preferable to connect Juke to your network via Ethernet. Note: make sure to connect Juke to the LAN port on your main router. Juke must be on the same network as the devices (e.g. your phone or tablet) you wish to control it with. If you plug Juke into a port on your cable modem, but your home network is provided by a different router, you won't be able to access Juke. If connected via Ethernet, please skip the next section since there is no need to configure a wireless connection.
Wireless connection
If Juke is within approximately 10 to 15 feet of an access point, you can use its internal Wi-Fi. Otherwise, if the distance is greater, we recommend either connecting Juke to a TP-Link N300 with an ethernet cord, or connecting this Wi-Fi USB adapter directly into one of Juke's USB ports.
Steps:
-
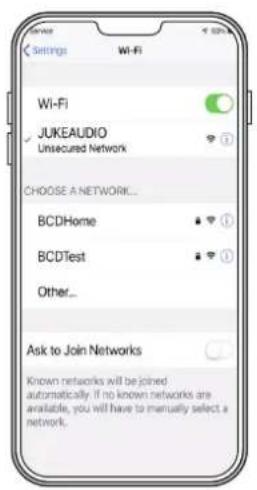
Go to your settings then Wi-Fi to see your available networks. Disconnect from your local network and connect to the "JukeAudio" Wi-Fi.
-
If on Apple: Go to safari and type in Juke.local as a URL
-
If On Android / PC: Go to your internet browser and type in 10.0.0.5
-
Go to Admin settings and type in the password "Admin"
-
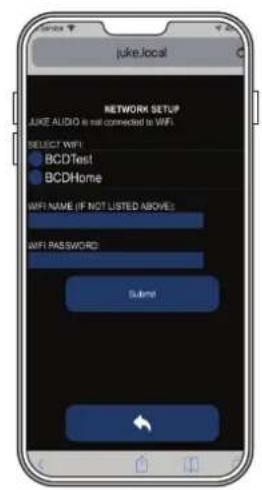
Go to Network Set- Up and type in the credentials for your Wi-Fi and hit submit
-
Then, reconnect your device to your Wi-Fi network. (This will likely happen automatically because Juke stops acting as an access point once it's on your network.)
-
Wait a minute, hit refresh in your browser, and you're done!
Networking Tips
All communication between your devices and Juke will be done over the network, and it is therefore very important to ensure a stable connection between the Juke, the router, and any device looking to stream to Juke. Most networks should work normally as is but if you are experiencing problems, here are a few criteria that need to be enabled within your network settings to ensure proper communication:
- Select IPV4, not IPV6
- Disable 5 GHz
- Make sure security is WPA2, not WPA3
- Make sure things like IGMP snooping disable
Accessing the Juke Web App
Once you have merged the Juke onto your network you'll be able to access the web app from any device connected to that same network.
On Apple product: type in Juke.local into the web browser of Safari
On Android / PC: type in the IP address assigned to Juke by your router into your web browser. (Note: the IP address will no longer be 10.0.0.5 after you've connected your Juke to your network.) The assigned IP can be located by going to jukeaudio.com/lookup/ and typing in the serial number which can be found on the underside of the unit. If it fails to find your device, then please revert back to the first two networking steps.
Please note: The IP address of your Juke may change if there is a power outage. See troubleshooting tab for instructions on reserving an IP address for Juke so it does not change.
Saving A Shortcut
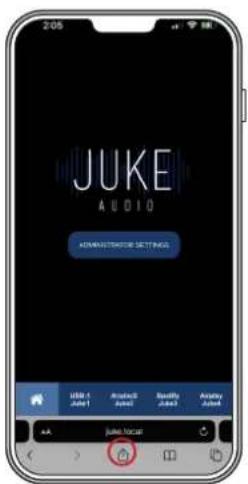
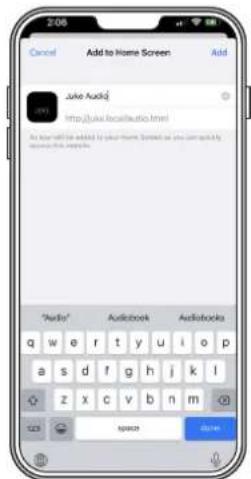
We recommend saving a shortcut to this webpage on the home screen of your device for easier access. In order to do so with Apple, you can hit the square with the arrow coming out of it in Safari, on Android tap the three dots in the upper right hand corner to save the shortcut Wait a minute, hit refresh in your browser, and you're done!

Configuring

All the Juke device configuration can be done in the Administrator settings of the Juke web app. The password to this is preset to "Admin" with a Capital A but can be changed inside of the Admin settings. See troubleshooting section of this guide for how to reset the password.
Editing Zone Names

When Juke is first installed, the zones are numbered. You will want to give them names that you recognize (e.g. kitchen, deck, master bedroom, etc.).
In the blue boxes on the right, enter the names for the zones, and click Submit.
Adjusting Inputs
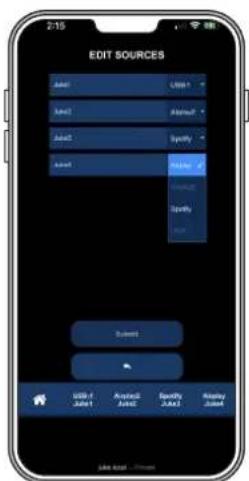
Juke supports 4 simultaneous audio inputs. All of which are set to Airplay by default, but can be adjusted to Airplay2, Spotify Connect (especially important for Android), or a connected analog input to Juke's USB port via the DigitNow adapter (see full info in USB portion of the using tab).
Editing Zone Volumes
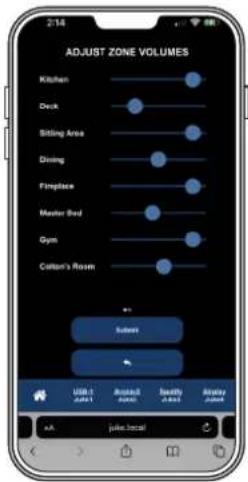
While using Juke, you typically control the volume with your device the way you normally do (e.g. by using the volume buttons on your phone) or adjusting the volume slider directly from the input itself within Apple Music, Pandora, etc. However, you may want to adjust the relative volumes of the zones to make certain areas quieter or louder than the rest. To do so, go to the edit zone volumes tab, drag the sliders to the desired levels, and click Submit.
Playing Audio
From the home screen of the Juke web app, you will see your 4 available inputs listed at the bottom of the page. Tapping on any of them will turn that input light blue to signify that is the input you are now controlling.
You can then turn any combination of zones on for that selected input, e.g., every zone, just a couple, or none. A zone will be light blue to signify that it's been turned on. Please note that you can not have a zone turned on for multiple inputs at one time.
Once you have the zones turned on for your desired input, it is time to leave the Juke web app and begin playing the music directly from the app or device of your choice. The options are as follows:
Apple Airplay
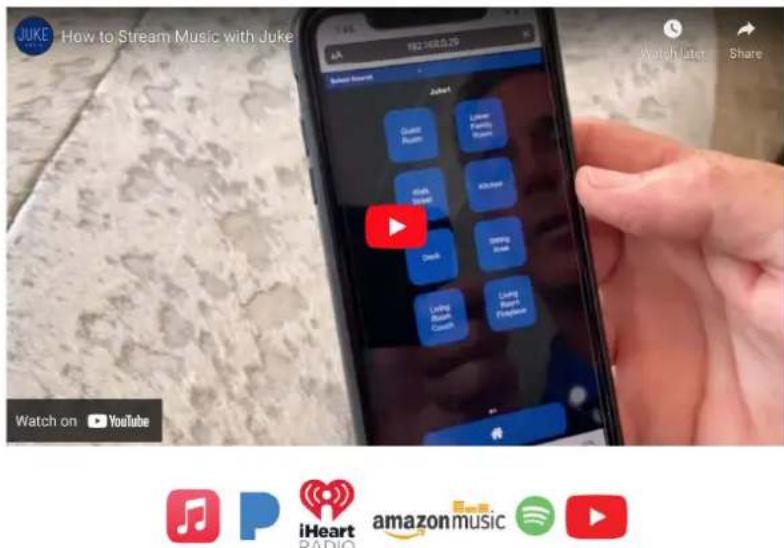
Stream any content or app of your choosing that you can access on an Apple product, e.g, iPhone, iPad, AppleTV, etc. directly to Juke. This provides unlimited options from the apps you can choose – AppleMusic, Pandora, Amazon Music, Spotify, etc.
How to access: There are different ways to connect to Juke's Airplays. For example, on older iOS devices, swipe up from the bottom edge of any screen. On iPhone X or later, or iPad with iOS 12 or later, swipe down from the upper-right corner of the screen.
You can follow the pictures or watch the video tutorial
-
Click on the Airplay icon in the top right corner.
-
Click on one of the Jukes airplay inputs that you have
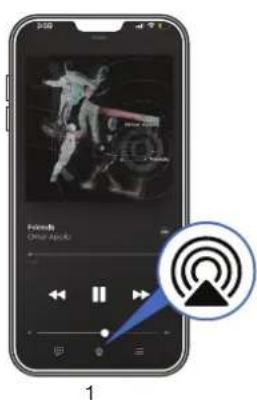

zones turned on for and then begin playing your music.
Note: One of Juke's 4 inputs can be adjusted to Airplay2. The advantages of this over original Airplay is the ability to stream to Juke and other Airplay2 enabled devices together, and also not have the music stop when a phone call comes in.
Spotify Connect
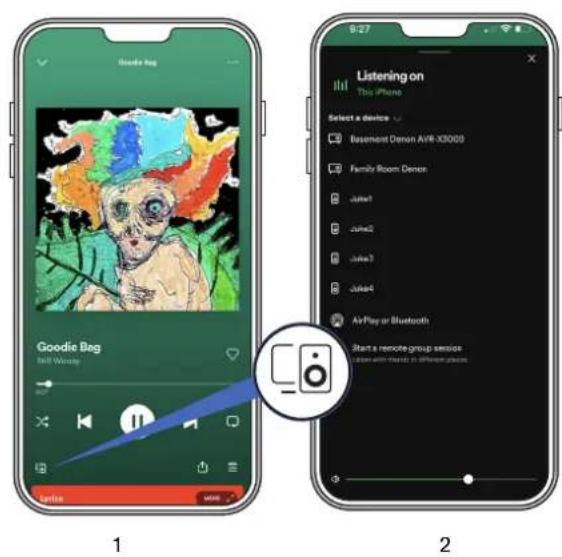
Stream directly from your premium Spotify account to Juke. This serves as a terrific option for users looking to stream from their Android and computers, and has an added benefit of the music not stopping when a phone call comes in.
How to Access:
-
Launch the Spotify app on your device. Click on the "Devices Available" icon (shown on the lower-left above).
-
Select one of the Jukes from the list of available devices.
Note: Apple users can stream Spotify to Juke using Spotify Connect (as described above), or via Airplay. One advantage of using Spotify Connect is that your music will not be interrupted when you receive phone calls. With Spotify Connect, when using the volume buttons on your device, make sure that you are in the Spotify app, otherwise you might be controlling something other than Juke (e.g. your phone volume).
USB
If you have an analog device connected to Juke via the USB to RCA Digitnow adapter, then you'll be able to edit one of the four inputs to be a USB input.
Once that has been configured, you'll go to that input in the bottom of the screen and turn the zones on for the connected USB and begin playing audio directly from that device. The volume output can be controlled with the slider at the top of the screen. However, keep in mind that the output level set on the connected device will also impact the volume as well.
Example of USB inputs:
AudioCast for Android: This is a separate dongle piece that gives Android users great flexibility to stream from inputs such as Pandora, iHeartRadio, and TuneIn. See information on how to purchase and use the product here
Surround Sound Receiver: If you have a main media room / theater that you'd like to power with a separate surround sound receiver, you can do so, and then connect the receiver to the Juke USB as an input when you want to play audio from that receiver to other areas of the house.

Getting Audio From TV to Juke

Apple TV

To do so you must connect your AppleTV to Airplay. This can be done by holding down the TV icon on your AppleTV remote and selecting the Airplay input that you have your selected zones turned on for. (Note: YouTube TV does not yet support this feature)
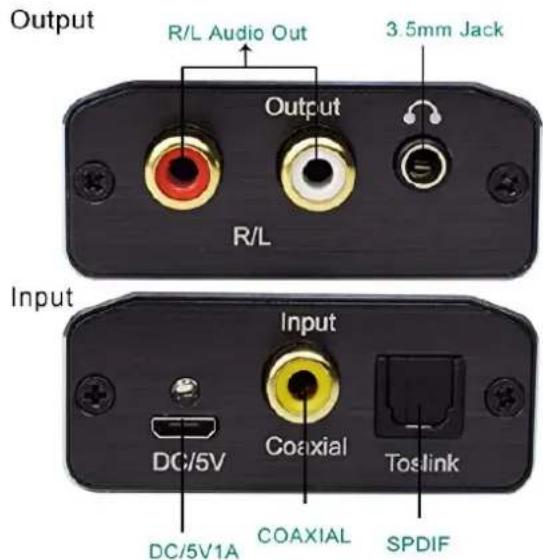
Hard Wired Connection
Another option is to run a hardwired connection directly from your TV or cable box back to the Juke. This can be done via the utilization of the USB adapter into a Juke and then an RCA to Optical converter into your TV with a male to male RCA cable in-between the two adapters.
Add-Ons

Additional Volume
If you're seeking more volume from your Juke there are few different options. The most seamless option is to utilize 4 ohm speakers when possible as that will give twice the loudness of an 8 ohm speaker. Some outdoor speakers even have a switch that takes them from 8 ohm to 4 ohm speakers.
An alternative is to utilize a third party amplifier to drive additional power, essentially making Juke a pre-amp in a specific zone. This can be done in two different ways:
1. Installation if Speakers are Connected in Parallel
If Juke is powering speakers in a zone, and you also want the line-level device to play concurrently, the following part is required:
| Part Description Amazon ASIN Number | Amazon Link Approximate Price | |
| PAC SNI-35 Variable | B001EAWS3W Speaker-level to line | $9.77 |
| LOC Line Out Converter | level converter | |
Connect the 4 wires of the PAC in parallel with the speaker wires connected to Juke's green connector (the correct order from left to right is: white, white with a black stripe, grey, grey with a black stripe) for that zone and connect the RCA jacks to the line-inputs on the third-party device. You can adjust the volume of the PAC with the rotary dials on the end, but mostly likely the default setting will work well and there is no need to make an adjustment. That's it!
2. Installation if Speakers are Not Connected in Parallel
If you wish to stream via Juke to a third-party device but you want the option of playing that device without also playing to speakers connected directly to Juke for that zone, another step is required. In addition to the Pac part listed above, you need to add a resistor across the positive and negative terminals of Juke's left and right outputs for that zone. (This makes Juke think that speakers are connected to that zone, otherwise it won't play.) This requires the following part:
| Part Description Amazon ASIN Number | Amazon Link Approximate Price | |
| MULTICOMP | B005T86UNY Resistors $9.88 | |
| MC14709 RESISTOR, WIREWOUND, 50 OHM, 5W, 1% | ||
To do this, insert the wires for a resistor to the positive (+) and negative (-) terminals for Juke's left output terminal (i.e. in parallel with the wires going to the PAC part). Do the same for the right output terminals using a second resistor. Tighten the 4 screws to secure the wires and resistors. Here is what the resistors looks like:

natural_image
Three blue cylindrical resistors with black leads, arranged vertically on white lines (no text or symbols visible)'v
And here is what they look like applied to the terminal block in parallel with the PAC device (the brown wires are for grounding, which can be ignored, so just apply electricians tape to the ends):

natural_image
Electronic device with green connector and wires, no visible text or symbols on the device bodyPac part
Adding on Zones
The Juke-6 can be upgraded via a premium software upgrade available on our website to enable the 7th and 8th zone of the unit. In situations where more than 8 zones are required, you can combine our units together to reach more zones. As long as the Jukes are connected to the same network, they will recognize each other and pair wirelessly, allowing you to stream across the zones together. (12 zones, 16 zones, etc.)
Adding a Subwoofer to Juke
Juke provides zone outputs that power speakers in each zone. To add a powered subwoofer to a zone, connect an adapter in parallel with either the left or right speaker in the room where a subwoofer will be used. The adapter converts the speaker voltage to line-level so that it can be connected to the input of a powered subwoofer.
Instructions:
- Buy two inexpensive items on Amazon or elsewhere (the Rockford Fosgate part converts the speaker-level signal to line-level, and the Boss part ensures that there is no ground-loop noise):
a. Rockford Fosgate RFI2SW High Level RCA Input Plug. The Amazon ASIN number is B009B8EJYU, and the price is about \$9.77. Here is the Amazon link: Speaker-level to line-level converter
b. BOSS Audio Systems Ground Loop Isolator B25N noise Filter for Car Audio Systems. The Amazon ASIN number is B000LP4RMG, and the price is about \$7.80. Here is the Amazon link: Ground loop isolator
-
Connect two of the four bare wires of the Rockford Fosgate part to two of Juke's speaker terminals for the zone where the powered subwoofer is located (you can use the left channel, but either should be fine). Please note that this adapter must be connected in parallel with a speaker. If no speaker is connected, Juke senses this and will not provide an output.
-
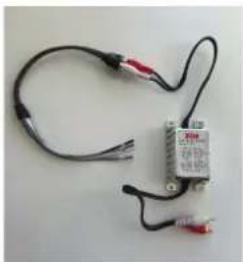
Plug the corresponding RCA connector of the Rockford Fosgate part into a connector on the Boss part, then connect the same color RCA connector to the RCA input on the powered subwoofer.
Here is what the Rockford Fosgate and Boss parts look like when connected together (this shows both the left and right channels being connected, but only one is necessary):
natural_image
Electrical component with black wires and red connectors, no visible text or symbolsHere is what the wires from the Rockford Fosgate part look like when they are connected in parallel with the left speaker for a zone:
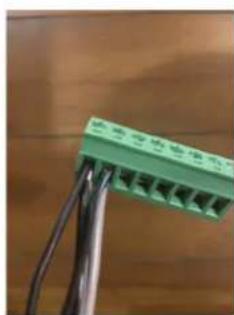
natural_image
Close-up of a green terminal connector with multiple pins, mounted on a metal rod against a wooden background (no visible text or symbols)Amazon Alexa Voice Commands with Juke
Summary
This brief guide explains the steps of how to pair Amazon Echo devices with the Juke Audio amplifier in order to send audio content via voice commands to Juke's connected speakers.
The wired connection
The first step will be to run a hard-wired connection between Juke and an Amazon Echo device in the same way that is required with other analog inputs into Juke. This requires the USB Digitnow Converter which will plug into the USB port on the Juke and the audio jack on the other side of the converter will plug into the Echo.
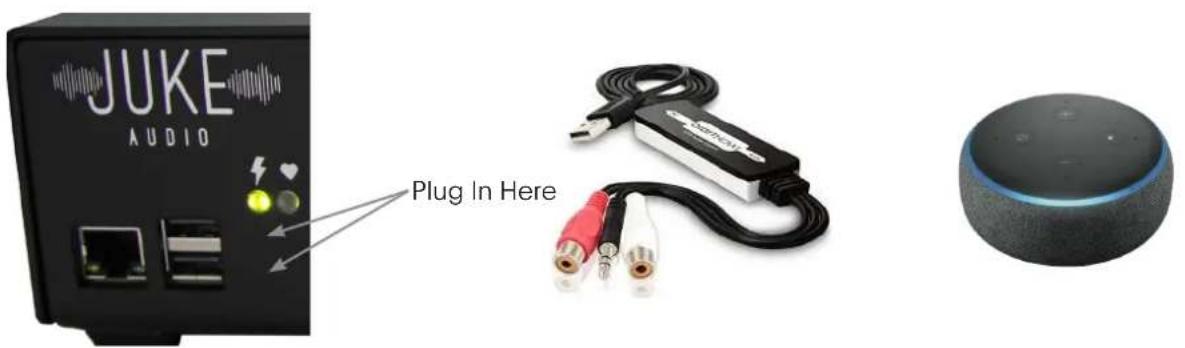
Configuring in the Juke web App
Once you've connected the device to the USB port on the Juke, you must then configure one of the inputs in the administrator settings of the Juke Web App to be USB. Note: The USB option will only appear once you have the adapter connected into the Juke
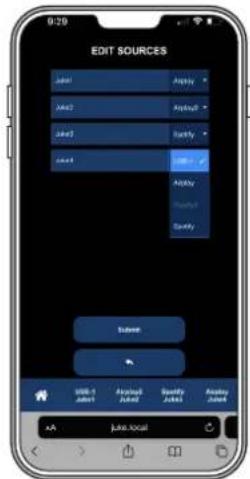
Configuring your Alexa Devices
First download the Amazon Alexa App in Apple's App store or the Google Play store
Once in the app, hit the "more" tab seen in the bottom right. Then hit add device at the top of the screen to set up your connected devices. Within the setup ensure that all your Alexa devices are on the same Wi-Fi so they can communicate with each other. Each device can be given a specific room name, and in the case of the echo that you connected to Juke, it would make sense to be called "Juke" "Juke Room" "Closet" or any other name of your choosing.

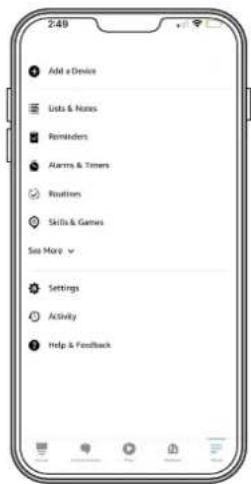
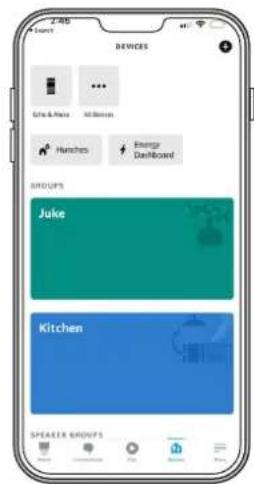
Sending Voice Commands
Once you have your devices configured, you can then issue a voice command to any of the Alexa devices across your house and have it send audio to the Alexa device hard-wired to the Juke which in turn will then send it to the connected speakers.
The voice command you'll say is "Play music in the (name of the room you assigned to the device wired to the Juke" In my picture for example, it would be "Play music in the Juke"
Volume and Zone Control
Within side of the Juke web app, you'll need to make sure you have the zones turned on for the USB input. In the picture below, you'll see that I have the Fireplace, Dining, and Deck turned on for the USB input, and therefore those will be the zones that start playing audio when I send a voice command to that connected Alexa Device.
You'll also be able to control the volume with the slider listed at the top of the screen.

However, keep in mind that the volume buttons on the echo connected to the Juke will also greatly impact the volume as well.
Streaming to Juke from Android via AirMusic
Summary
This brief guide explains the steps of how to steam to Juke from an Android device via an app called AirMusic that mimics the same functionality of streaming via Airplay on an Apple Product. This can be used to stream nearly all major streaming services.
Download the App
In the Google Play, you can download the AirMusic app. Note there is a free version that works temporarily, but the full time version required is \$5.
![AirMusic - stream your music! [ROOTI/Android 10+] AirMusic - stream all audio to everyone Universal Open Developer contact About this app I am all audio from any app to every receiver - with just download Music & Audio 4.2+ Just online Everyone © UK+ Downloads Settings and reviews](/content/2026/05/953333/images/29c046f3a2d76af78eb7b2a8c708b433ee8741777da5dd77295f02823c5b6d8c.jpg)
Select an Input
Once in the app, you will see all your available Airplay Inputs. If you have all of Juke's 4 inputs set to Airplay, and have not yet changed the names of them, you will see them listed as "Juke1, Juke2, Juke3, Juke4". Click on the Airplay input you're looking to stream to, and a unique benefit of AirMusic, is that it will allow you to select multiple airplay inputs and play to them concurrently. Once connected, a green check will appear next to the selected input to signify that your device's audio will now be sent to that input.
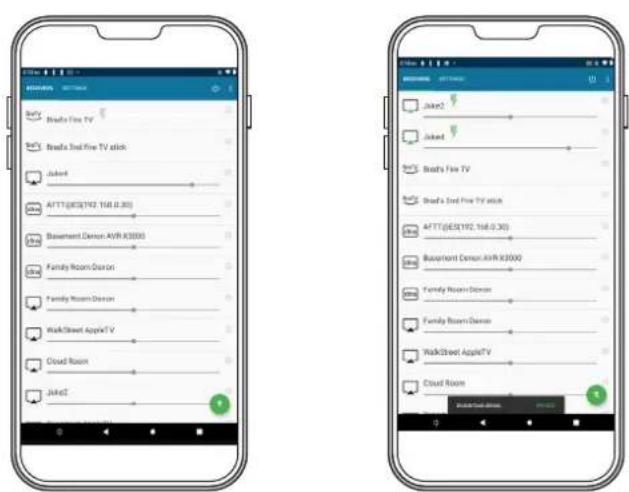
The volume slider seen above for each input will serve as the master volume.
Turning the Zones On
Inside of the Juke web app, you must turn the zones for the input(s) that you just connected to in the AirMusic app. This is done in the same way it is for any of Juke's other Airplay inputs.
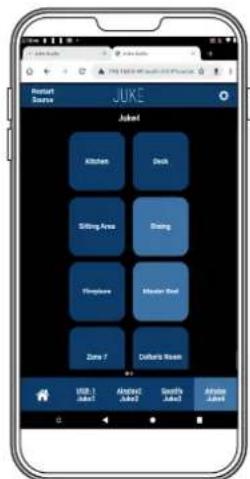
Song Playing and Volume Control
The final step is to go to your music app of choice (Tidal, Amazon Music, etc.) and beginning playing your music. It's important to note that the audio will also play out of your Android device, unless you use the volume buttons on the side of the device to turn the volume done. Since the music will be playing out of the connected Juke speakers as well, you'll almost always want to have the audio muted on your device. The volume slider seen in the below picture is for what comes out of your device but the volume sliders on the inputs in the AirMusic app is what will control the volume coming out of the speakers.
![Kiss Me More [Explicit] Make Eat The: 50% - Make Cough of POST](/content/2026/05/953333/images/06f24738c6f65ca4cdd170c96617aff3995ff52d14ea42543f23d04a8ebda01f.jpg)
Troubleshooting

If you are experiencing any issues with your unit, the first step is to check the two indicator lights on the Juke. When the unit is in working condition, the heartbeat light should be blinking, and when the unit is connected to the network, the lighting bolt light should be firmly on. If you are experiencing any issues with your unit, the first step is to try cycling the power on the Juke as well as restarting your device. If the problems persist, then please follow the below sections for troubleshooting and/or file a support ticket with us at jukeaudio.com/support
Networking Requirements
Not able to access the Juke web app and/or see the wireless inputs during installation:
- Check to make sure your device is on the same network that you have the Juke connected to. Note: Different subnets and guest networks can be an issue in this scenario
- If hard wired – Juke must be plugged into the ethernet port on your router directly, not the LAN of your cable modem
- Router must have multicasting enabled
- Router must have mdns enabled
- Router must not block known multi-cast addresses
- Network switches should have IGMP snooping disabled
- The 2.4 and 5 GHz wi-fi should have the same SSID
All these configurations can be done within your network settings. Most networking equipment companies will have tech support lines you can call to help enable ensure these settings are enabled for your network.
The power went off and now the Juke web app is not accessible via the IP address
If the power to the unit shuts off, the IP address assigned to the Juke by your router can change. If using a non-Apple product, this will mean you'll need to relocate the new IP address in order to access the Juke web app. You can do so by go to jukeaudio.com/lookup/ and typing in your serial number.
If you'd like to reserve an IP address for Juke so it does not change, see the next section
How to Reserve an IP address for Juke
The exact approach depends on your router so you will need to check its manual. Once you've logged into your router, address reservation is usually in a tab called LAN Setup (or something similar). Within that, there should be a function called "Address Reservation" (or something similar). From there, select ADD, and it should show a list of all the devices on your network (usually this is called the "Address Reservation Table" or something like that). Find Juke in the list, select it, and then click Add. Note the IP address (e.g. the 4 numbers separated by three periods, such as 192.168.1.7). Now you don't need to worry about it getting changed by the router in the future.
Back on your Android, type that address into the browser (e.g. Chrome). The interface should come right up. However, so that you don't have to enter this each time, you'll want to create a shortcut on the Android home screen. How to do that depends on what browser you use. For Chrome, you do this by hitting the three dots near the top right and selecting "Add to Home Screen" from the list of options. Just name it "Juke" and hit Add.
Connection Dropping Out Intermittently
If Juke is connected wirelessly over Wi-Fi and you are experiencing intermittent dropouts in your audio when trying to stream, it is likely a cause of poor signal strength. To help alleviate this we recommend either connecting Juke to a TP-Link N300 with an ethernet cord, or connecting this Wi-Fi USB adapter directly into one of Juke's USB ports.
Speaker Wire Connections
Not Getting Output in a Zone
The order that the speaker wiring goes into Juke must be + - + -, which can be different from othersystems. If you are not experiencing audioinaspecificzone, it's important to check your wiring and make sure that is the order you have it in. While it can be wired differently in certain scenarios, the common color coordination is red (+), black (-), white (+), green (-). Refer back to install portion of this guide for detailed information on how to connect the wire to the green terminals on Juke.
If retrofitting from an older system with in-wall volume controls, it is important to ensure those are turned with the volume up as those will still function if in between the Juke and where the speakers are installed.
Indicator Lights

natural_image
Simple black-and-white icons representing lightning, heart, and circle shapes (no text or symbols)Juke has two indicator lights on the unit that demonstrate the condition of the unit. When the Juke is in good health, the lightning bolt icon should remain lit and the heartbeat light should begin blinking repeatedly a minute or so after the power switch is turned on.
Forgot Admin Password
Out of the box the administrator password is set to "Admin". If the password is changed and you'd like to reset it back, go to juke.local/reset.php and click on 'Password Reset'. For android users, you'll need to use your IP address instead of juke.local. For security reasons, you'll need to input the serial number or wireless mac address for your Juke and reboot it within 60 seconds of resetting (otherwise the changes will not be applied). The serial number can be found on the bottom side of your Juke.
Can't access Juke.Local
If you cannot access juke via juke.local, try jukeaudio.local or the IP address directly. If you can reach the IP address but not juke.local, then the network is failing to route multicast/mdns traffic.
Filing a Support Request
If you have reviewed this guide and are still experiencing issues, then we recommend you to file a support ticket for our team to review. You can do so by going to https://jukeaudio.com/support/ Please make your ticket as detailed as possible to ensure our team has all the information necessary to diagnose the issue and determine a resolution
Safety Instructions

To avoid bodily harm, understand and follow these safety precautions before operating the Juke Audio 6/8 Zone Amplifier:
- To reduce the risk of fire or electrical shock: Do not use this device near water.
2.Do not expose the device to dripping or splashing of any liquids.
3.Do not place objects filled with liquids near the device.
4.Do not expose this device to rain or moisture.
-
Clean only with dry cloth.
-
Install in accordance with the manufacturer's instructions.
7.Do not install near any heat sources such as radiators, heat registers, stoves, or other apparatus (including other amplifiers) that produce heat.
8.Do not bypass the safety purpose of the polarized or grounding-type plug. A polarized plug has two blades with one wider than the other. A grounding type plug has two blades and a third grounding prong. The wide blade or the third prong are provided for your safety. If the provided plug does not fit into your outlet, consult an electrician for replacement of the obsolete outlet
-
This device should be operated only from the type of power source indicated on the marking label. If you are not sure of the type of power supply to your home, consult your product dealer or local power company.
-
Do not modify the plug provided under any circumstances. Its design is intended for your safety and should not be modified to accommodate an outlet. If the provided plug does not fit into your outlet, consult an electrician for replacement of the obsolete outlet.
-
Do not place this product on an unstable card, stand, tripod, bracket, or table. The product may fall, causing serious injury to a child or adult, and serious damage to the product.
-
Equipment must be connected to a Mains socket outlet with a protective earthing connection.
13.Only use attachments/accessories specified by the manufacturer.
-
Protect the power cord from being walked on or pinched, particularly at plugs, convenience receptacles, and the point where they exit from the apparatus.
-
Use only with the cart, stand, tripod, bracket, or table specified by the manufacturer, or sold with the apparatus. When a cart is used, use caution when moving the cart/apparatus combination to avoid injury from tip-over
16.Unplug this apparatus during lightning storms or when unused for long periods of time.

- Installation Summary
- Streaming Summary (once Juke and your phone are on the same network)
- Full instructions can be found at jukeaudio.com/instructions
- JUKE
- Multi-Room
- Streaming Amplifier
- Table of Contents
- Product Overview 03
- Specs.... 03
- Installation 04
- Getting on the Network 06
- Accessing the Juke Web App 08
- Configuring 09
- Playing Audio 10
- Add-Ons 13
- Troubleshooting 19
- Safety Instructions 21
- Product Overview
- Specs
- Installation
- Rack or Table-Top
- Wiring
- Getting on the Network
- Hard-Wired Ethernet Connection
- Wireless connection
- Steps:
- Networking Tips
- Accessing the Juke Web App
- Saving A Shortcut
- Configuring
- Editing Zone Names
- Adjusting Inputs
- Editing Zone Volumes
- Playing Audio
- Apple Airplay
- Spotify Connect
- How to Access:
- USB
- Example of USB inputs:
- Getting Audio From TV to Juke
- Apple TV
- Hard Wired Connection
- Add-Ons
- Additional Volume
- Installation if Speakers are Connected in Parallel
- Installation if Speakers are Not Connected in Parallel
- Adding on Zones
- Adding a Subwoofer to Juke
- Instructions:
- Amazon Alexa Voice Commands with Juke
- Summary
- The wired connection
- Configuring in the Juke web App
- Configuring your Alexa Devices
- Sending Voice Commands
- Volume and Zone Control
- Streaming to Juke from Android via AirMusic
- Download the App
- Select an Input
- Turning the Zones On
- Song Playing and Volume Control
- Troubleshooting
- Networking Requirements
- Not able to access the Juke web app and/or see the wireless inputs during installation:
- The power went off and now the Juke web app is not accessible via the IP address
- How to Reserve an IP address for Juke
- Connection Dropping Out Intermittently
- Speaker Wire Connections
- Not Getting Output in a Zone
- Indicator Lights
- Forgot Admin Password
- Can't access Juke.Local
- Filing a Support Request
- Safety Instructions
Brand : Juke Audio
Model : 6
Category : Hi-Fi System