
MGV520B - Pregnant BOSS - Free user manual and instructions
Find the device manual for free MGV520B BOSS in PDF.


| Product Type | Marine Gauge Radio with Integrated 4-Channel Amplifier |
| Power Output | 60 W x 4 (Max) |
| Speaker Impedance | 4 - 8 Ω |
| Frequency Response | 20 Hz - 20 kHz |
| Signal-to-Noise Ratio | > 65 dB |
| Bluetooth Version | 5.0 |
| Bluetooth Profiles | A2DP, AVRCP |
| Bluetooth Range | Up to 33 ft / 10 m (line of sight) |
| USB Compatibility | Type A, USB 2.0 (High-Speed) |
| USB File System | FAT32 |
| Maximum USB Storage | 32 GB |
| Audio Playback (USB) | MP3 |
| Display | 3" TFT LCD Color Display |
| Ingress Protection | IPX6 (Water Resistant / Dustproof) |
| Power Supply | 12 VDC |
| Current Consumption | 15 A (Max) |
| Fuse Rating | ATO Type, 15 A |
| Weight | 2.29 lbs / 1.04 kg |
| FM Tuner Frequency Range | 87.5 – 107.9 MHz (USA) / 87.5 – 108 MHz (Europe) |
| AM Tuner Frequency Range | 530 – 1710 kHz (USA) / 522 – 1620 kHz (Europe) |
| Pre-amp Outputs | 2V RMS (Front, Rear, Subwoofer Mono) |
| RCA Input Sensitivity | 500 mV |
| Operating Temperature | -4 to 140°F / -20 to 60°C |
Frequently Asked Questions - MGV520B BOSS
User questions about MGV520B BOSS
0 question about this device. Answer the ones you know or ask your own.
Ask a new question about this device
Download the instructions for your Pregnant in PDF format for free! Find your manual MGV520B - BOSS and take your electronic device back in hand. On this page are published all the documents necessary for the use of your device. MGV520B by BOSS.
USER MANUAL MGV520B BOSS
Thank you for purchasing this 3055 AU#MATE gauge radio!
Please read the instructions carefully, so you will know how to operate your product properly. After you have finished reading the instructions, keep this document in a safe place for future reference.
Table of Contents
Introduction....2
Package Contents 2
Important 2
Control Panel....4
Mounting 5
Wiring 6
Turn On/Off....8
Use Home Menu....8
Set Clock 9
Adjust/Mute Volume....9
Reset The Unit....9
Listen To Radio....9
Bluetooth 11
Music/Movie/Photo From USB 12
AV Input....13
Output Audio....14
Accessory Power Control 14
Screen Illumination Control 14
Use Rear/Front Camera 14
Audio Settings 15
Preference Settings....16
Specifications 17
Troubleshooting....19
Introduction
This product is designed as a marine gauge radio with an integrated four-channel amplifier. You can stream audio from a mobile phone to this product via Bluetooth. You can also play music/movie/photo files stored in a USB flash drive, and music from an external device (e.g. a CD player) can be played via RCA inputs.
The product can retain your customized settings (e.g. radio, volume and sound presets) when the source power is disconnected or lost.
You can output audio from this product to an external amplifier or powered speakers through RCA outputs.
Package Contents
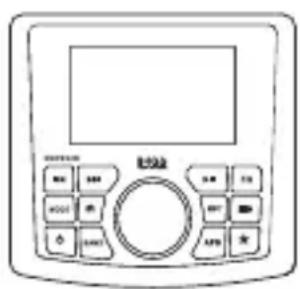
(1) (2) (3) (4)
- Marine gauge radio
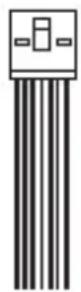
- Wiring harness
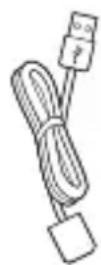
- USB cable
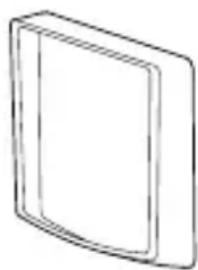
- Trim plate
natural_image
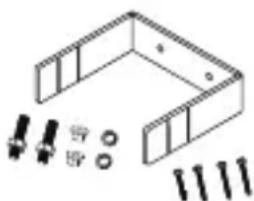
Simple line drawing of a rectangular frame with rounded corners (no text or symbols)- Mounting kit
(1x U-bracket, 2x hex bolts, 2x flange nuts, 2x washer, 4x screws) - User manual and warranty
natural_image
Technical line drawing of a U-shaped structural frame with bolt, washer, and bolts (no text or symbols)(5)
(6)
Important
Read and understand all instructions before you use your product. If you do not follow the instructions in this manual, we are not responsible for injury or damage resulting from improper handling. This will also void the warranty.
Important safety precautions
- Be sure to observe the following guidelines:
- Do not increase speaker volume so high that you cannot hear what is around you.
- Use caution or temporarily discontinue use in potentially hazardous situations.
- Do not operate mobile video equipment while driving a motorized vehicle – safe driving and safety consideration of others should always be your highest priority.
- Start volume at a low setting then gradually increase the volume until you can hear it comfortably, without sound distortion or ear discomfort.
- In the event of smoke, strange noise or odor emitted from the product or any other abnormal operational signs appearing on the product, disconnect the product from the power supply. Discontinue use and contact your dealer or our technical support. Using the product in this condition may result in permanent damage to the system.
- Servicing must only be carried out by a technician. Contact our technical support for any service questions.
Installation precautions
- WARNING: Always consult a professional installer.
- Installation must be performed by a professional. Contact our technical support for any installation questions.
- Use only installation parts provided with the product.
- Before installation, disconnect the negative terminal of the vehicle battery to prevent damage to the product, fire, and/or possible injury.
- If extending the power cable which connects to the vehicle battery, we recommend to run the extended cable to the battery through a fuse (not included) with at least 15A.
- Ground cable should be as short as possible. Connect the ground cable to metal parts of your vehicle, or to the battery if your vehicle does not have a grounded chassis frame. Make sure the metal surface to which the ground cable connects is scraped clean from rust and dirt. The ground cable must be firmly fastened with a screw or bolt. If extending the ground cable, make sure to use a high quality cable with proper gauge rating.
- Replace the old fuse with the new one of the same type and rating.
- Observe the safety and operating instructions of the devices which are connected to the product.
Care for your product
- Do not use abrasive cleaning materials on the display or bezel.
- This product is water resistant against splashing water. Do not submerge the product in water under any circumstances.
Care of the environment
Do not throw away the product with normal household waste at the end of its life. Follow your local laws when disposing of electronic products. By doing this, you help preserve the environment.
Control Panel
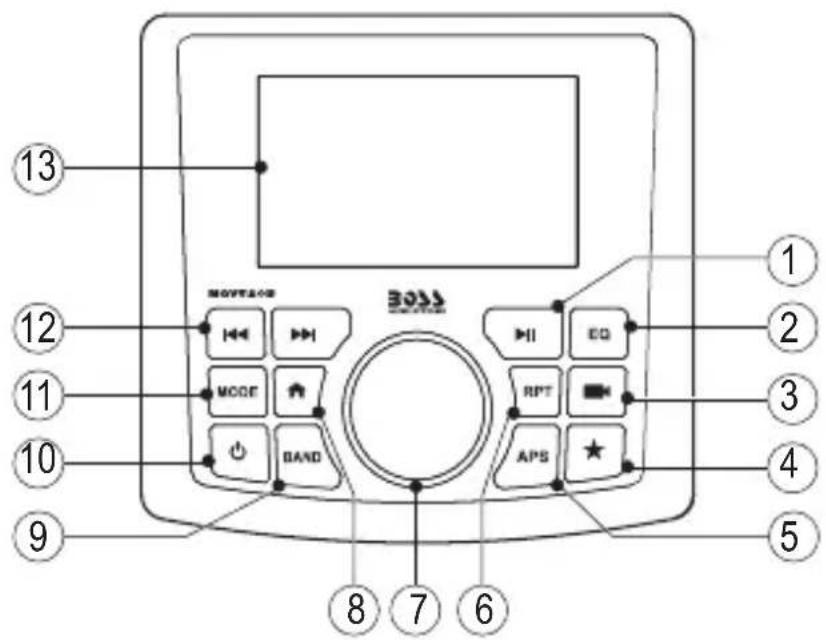
1 ▶ II
- In USB/Bluetooth mode, start, pause or resume play.
2 EQ
- Select a preset sound mode (a preset equalizer setting).
3
- Switch to camera mode.
4 ★
- Turn on or off external accessory power.
5 APS
• In radio mode, press to tune to a radio station.
- In radio mode, press and hold to auto search and store radio stations in FM or AM band.
6 RPT
- During USB playback, turn on or off repeat mode.
7 Function knob
- In media play mode, press to access audio menu or rotate to adjust volume.
- In a menu, press to confirm a selection or rotate to navigate the menu.
8
- Press to access or exit the home menu.
9 BAND
• In radio mode, press to select a FM or AM band.
- In USB mode, press and hold to access music/movie/photo folders; press to select music/movie/photo folders.
- In Bluetooth mode, press to disconnect Bluetooth connection.
10
- Press to turn on the unit; press and hold to turn off the unit.
- In media play mode, press to mute or restore volume.
11 MODE
- Select a mode: radio, USB, Bluetooth, AV input.
12 |/◄◄►►|
- In USB/Bluetooth mode, select the previous/next media file.
- During USB playback, press and hold to fast search.
- In radio mode, select a preset radio statoin; press and hold to enter auto search or manual tuning mode.
13 LCD display
Mounting

See the section "Installation precautions" on page 2.
Use only installation parts provided with the product. Using other mounting methods may void the warranty.
Before you drill or cut any holes, investigate your vessel's layout very carefully.
Take special care when you work near the fuel tank, fuel lines, hydraulic lines and electrical wiring.
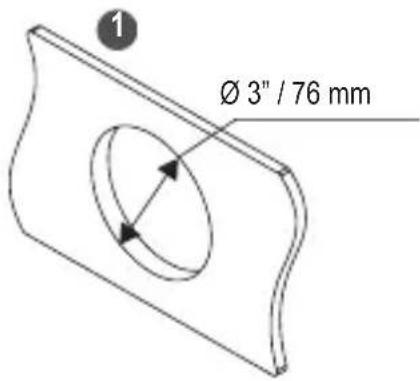
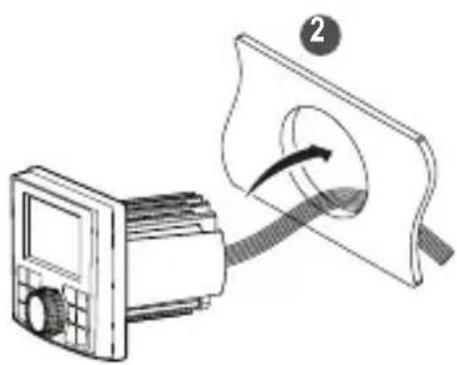
- Cut a mounting hole ( 3" / 76 mm) in the dashboard.
- Slip the unit through the mounting hole in the dashboard.
natural_image
Diagram showing a device connected to a screen with an arrow indicating direction (no text or symbols present)- You can have two options to fasten the unit.
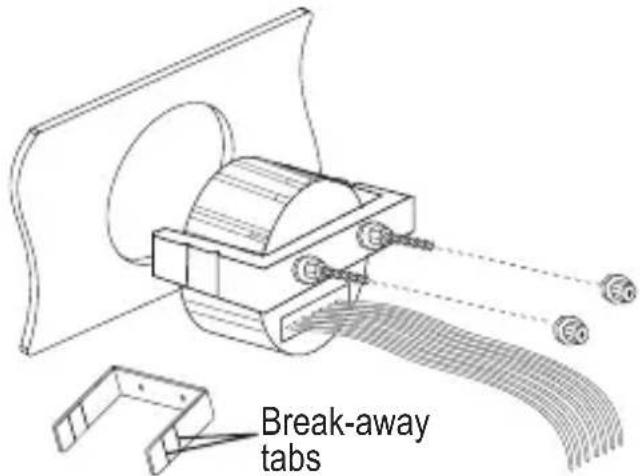
Option 1: Mounting bracket
Fasten the unit from behind the dashboard using the supplied mounting bracket and two hex bolts and flange nuts.
If needed, cut off one or two break-away tabs on the bracket to shorten the bracket for firm fastening to the dashboard.
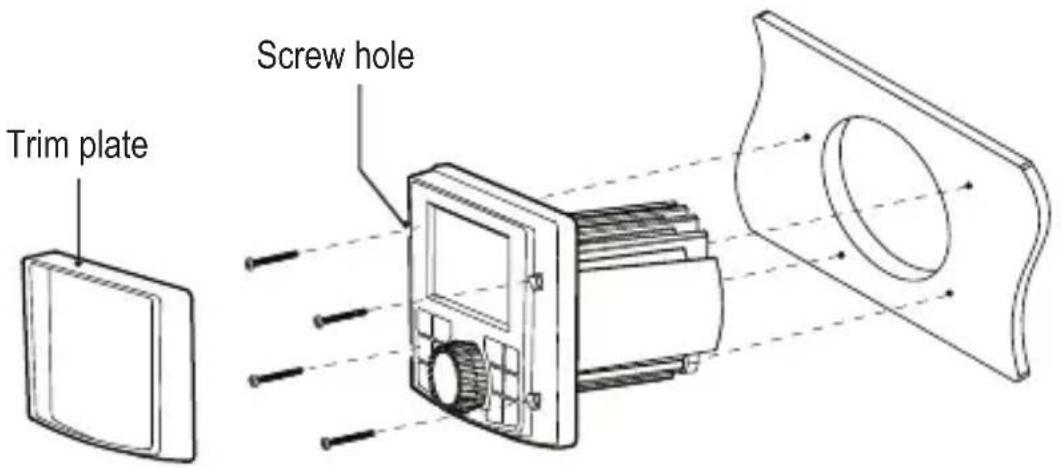
Option 2: Screw holes on the unit
Fasten the unit in front of the dashboard through four screw holes on the front panel of the unit. Remove the trim plate to access four screw holes in the panel. After the installation completes, replace the trim plate.
Wiring

See the section "Installation precautions" on page 2.
Disconnect the negative terminal of the vehicle battery prior to wiring.
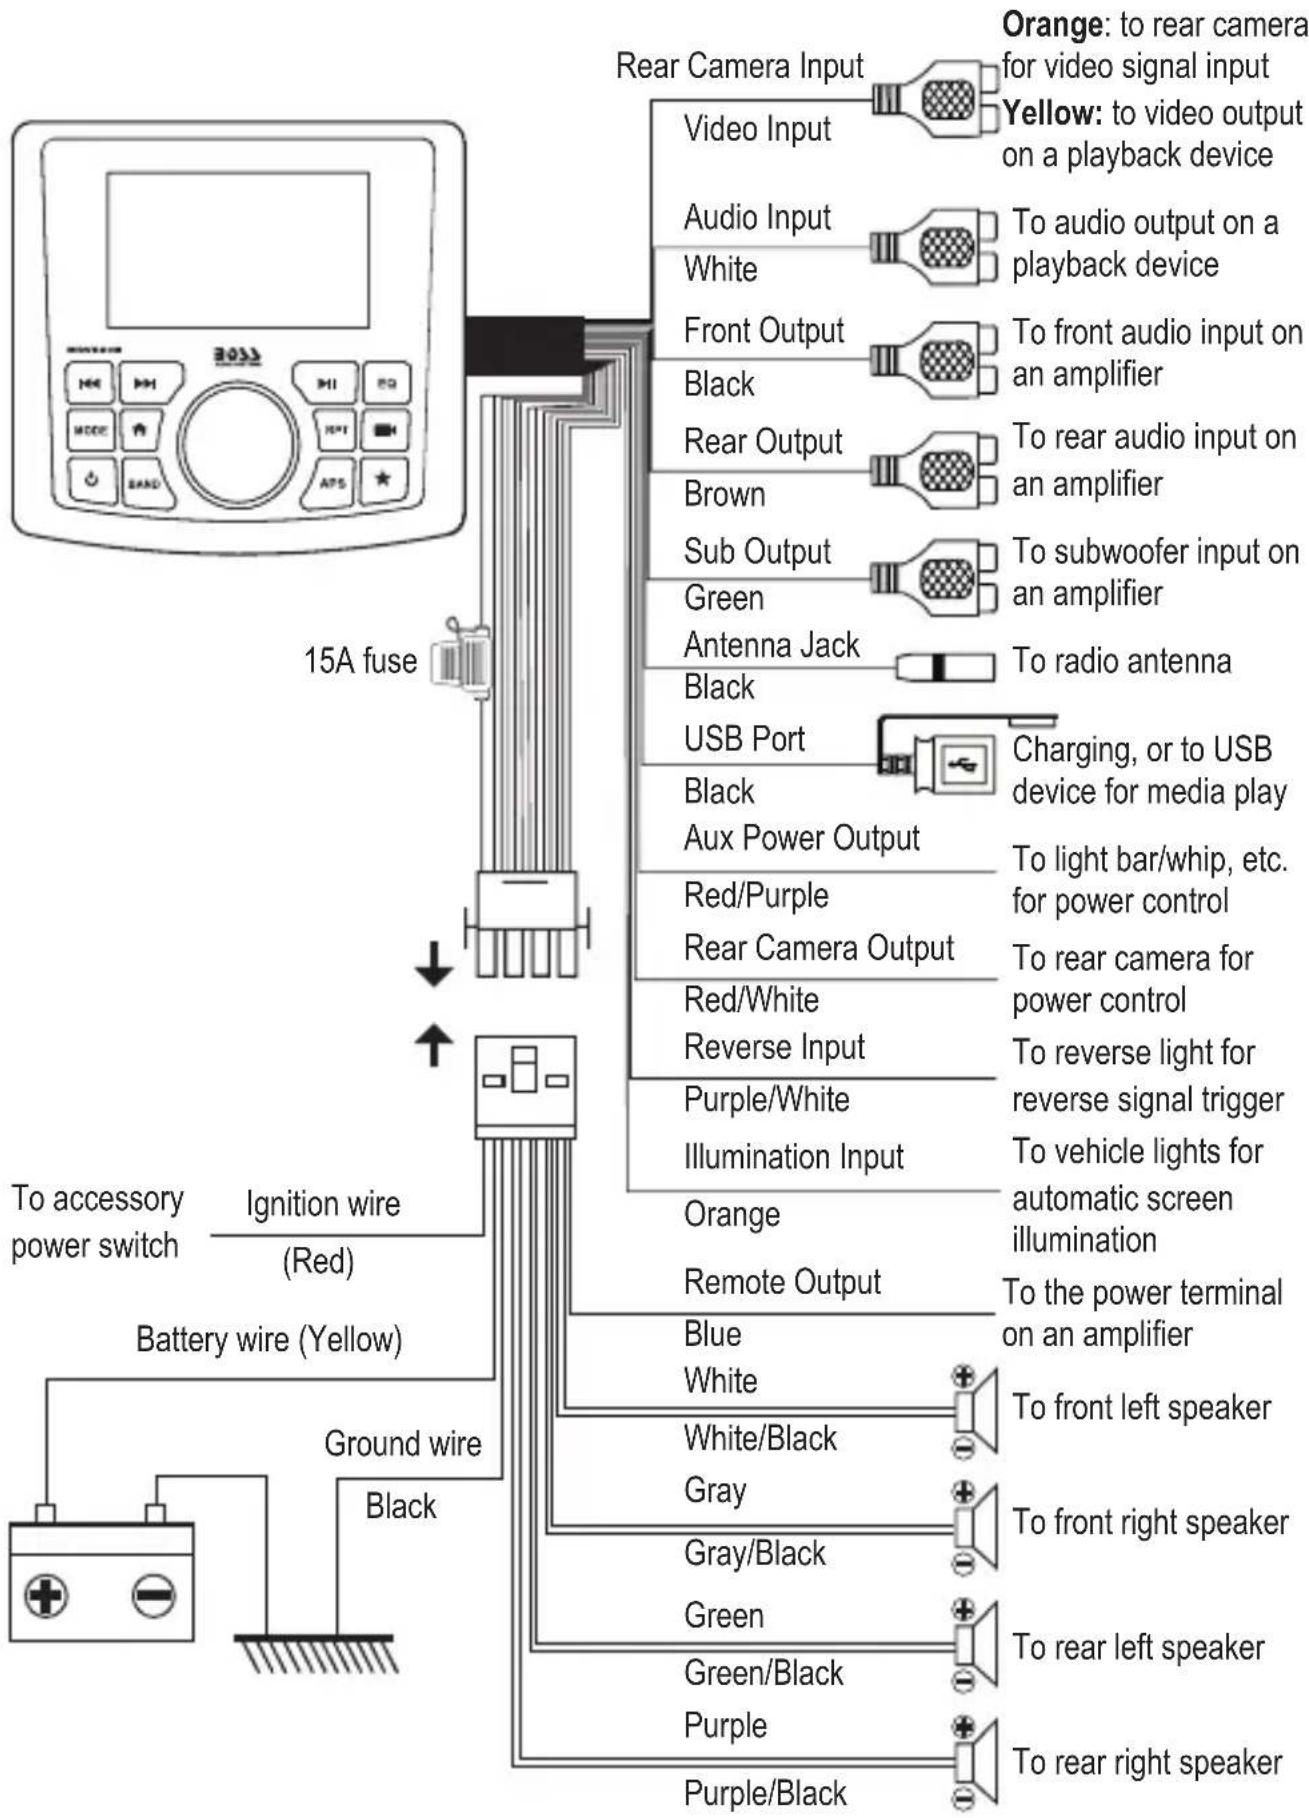
Connect the unit to a 12VDC battery and negative ground only.
Connect speaker wires to speakers with 4 - 8 Ω .
Never ground or short the speaker wires.
Insulate all bare wires and unconnected wires with electrical tape.
Turn On/Off
- To turn on the unit, press

- When turned on, the unit switches to the last selected mode. Startup volume level is the one when the unit was previously turned off.
• To turn off the unit, press and hold

- When turned off, clock is displayed if clock display is enabled.
Use Home Menu
The home menu allows you to quickly access all modes and adjust preference settings of the unit.
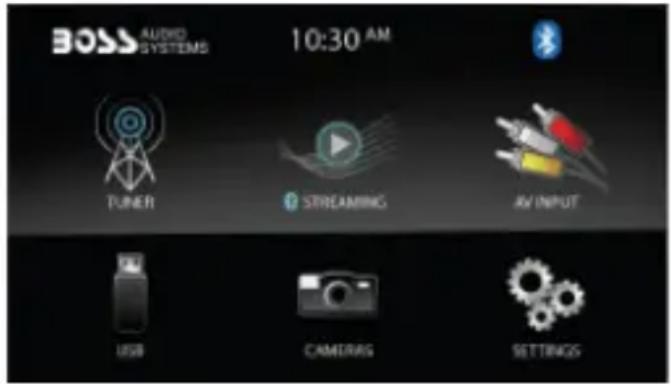
- In power-on, press 📋The home menu is displayed.
-
Rotate the function knob to select an item/icon on the home menu. Then press the function knob to access sub-menu.
-
“TUNER” icon: switch the unit to radio mode.
- "STREAMING icon": switch the unit to Bluetooth mode for audio streaming.
- “AV INPUT”/ “AUX IN” icon”: switch the unit to audio/video input from an external playback device.
When video input is enabled, "AV INPUT" icon is displayed. When video input is disabled, "AUX IN" icon is displayed. To enable or disable video input, press and go to "SETTINGS" > "Camera".
- “USB” icon: switch the unit to USB mode for audio/video/photo playback.
- “CAMERA icon”: switch the unit to live from your rear camera.
- “SETTINGS” icon: access to adjust preference settings of the unit.
Set Clock
- In power-on, press ↑ access the home menu.
- Rotate the function knob to select the "SETTINGS" icon, then press the function knob to access the settings options.
- Rotate the function knob to select an option; press the function knob to confirm the selection.
Select and set "Time Format" and "Time" respectively.
- "Time Format": set 12 or 24 hour display.
- "Time": set hours and minutes.
- After clock is set, press to exit the settings.
Adjust/Mute Volume
- To increase or decrease volume, rotate the function knob in media play mode.
- To mute or restore volume, press in media play mode.
- To increase or decrease volume, rotate the function knob in media play mode. - To mute or restore volume, press in media play mode.
Reset The Unit
If the unit fails to operate properly, reset the unit. After resetting, all the settings will restore to the default.
- In power-on, press ↗ access the home menu.
- Rotate the function knob to select the "SETTINGS" icon, then press the function knob to access the settings options.
- Rotate the function knob to select "Factory Data Reset", and press the function knob to confirm the reset option.
Listen To Radio
You can listen to FM and AM radio, and store the radio stations. The stored radio stations will be retained if the source power is disconnected or lost.
Select A Radio Band
-
Press once or more MODE to access radio mode. Or in the home menu (press 🔒), use the function knob to select the "TUNER" icon.
-
Press repeatedly BAND to select FM1, FM2, FM3, AM1 or AM2.
Tune To A Radio Station
Option 1
- In radio mode, press APS. The unit will find a station with strong reception.
- While searching a radio station, "AUTO" is displayed. If an FM radio station with stereo signal is reached, the icon will be displayed.
Option 2
-
In radio mode, press and hold I/◄◄ ►►
-
When "AUTO" is displayed, press briefly ◀◀◀/▶▶. The unit will find a station with strong reception.
- If an FM radio station with stereo signal is reached, the Ⓞicon will be displayed.
To tune to a weak station
- When listening to a station, press and hold ◀◀◀ ▶▶▶
- When "AUTO" is displayed, press and hold I/▶▶▶▶▶▶▶▶▶▶▶▶▶▶▶▶▶▶▶▶▶▶▶▶▶▶▶▶▶▶▶▶▶▶▶▶▶▶▶▶▶▶▶▶▶▶▶▶▶▶▶▶▶▶▶▶▶▶▶▶▶▶▶▶▶▶▶▶▶▶▶▶▶▶▶▶▶▶▶▶▶▶▶▶▶▶▶▶▶▶▶▶▶▶▶▶▶▶▶▶>
- When "MANUAL" is displayed, press briefly and repeatedly |◀◀/▶▶| to search by frequency step until you find a desired station with acceptable reception.
Store Radio Stations Automatically
Each radio band (FM1/FM2/FM3/AM1/AM2/) can store six radio stations.
- In radio mode, press BAND to select FM or AM band.
-
Press and hold APS for two seconds to start searching radio stations.
-
All FM or AM stations will be searched and stored in FM or AM bands.
- The stored radio stations will be displayed in the radio list on the display.
Store Radio Stations Manually
Each radio band (FM1/FM2/FM3/AM1/AM2) can store six radio stations.
-
Select a radio band and tune to a radio station.
-
Press and hold the function knob for two seconds to activate program mode.
-
When "Save to preset 1" is displayed, press |◀◀/▶▶| to allocate a number (1-6) to this radio station. Press and hold the function knob again to confirm.
- The preset radio station will be displayed in the allocated position of the radio list on the display.
- If there are three seconds of button inactivity, program mode will automatically exit without programming the radio station.
- Repeat the steps above to store more radio stations.
Select A Stored Radio Station
Each radio band (FM1/FM2/FM3/AM1/AM2) can store six radio stations.
- Select a radio band.
- Press |◀◀/▶▶| to select a stored radio station from the radio list on the display.
- If an FM radio station is broadcast with stereo, the Ⓐicon is displayed.
Bluetooth
Pair With A Mobile Phone
Before you can stream music from your mobile device to the unit, you must pair the unit with your mobile device through Bluetooth.
-
Press repeatedly MODE to access Bluetooth mode. Or in the home menu (press 🔒), use the function knob to select the "STREAMING" icon.
-
On your mobile device, enable Bluetooth then select "Boss Audio MGV520B" to pair the unit with your mobile device. If prompted for password, input "0000" on your mobile device.
- When the unit connects to your mobile device, the ⚙icon is displayed.
- The unit automatically connects the last paired device each time the two are powered on. To connect a second Bluetooth device, you have to disconnect (press BAND) the currently connected device then repeat the steps above to pair with a second device.
Playback Control
- When the unit connects to your mobile device, you can then play audio files from your mobile device. Music will be streamed to the unit.
- For best sound performance, set the volume of your mobile device to maximum, then adjust the volume through volume control on the unit.
- Note: If there is distortion heard, you may need to turn the volume of the mobile device down a level or two.
2. Control playback as follows.
• To pause or resume playback, press ▶ II
- To select the previous or next music file, press ◄◀◀ ▶▶▶
- During playback, the display shows the music title and artist.
- If there is an incoming call during playback, the music will automatically pause and resume after the call ends.
Music/Movie/Photo From USB
This unit can play music, movie and photo files stored in a USB flash drive.
- Insert a USB storage device to the USB port on the unit. Use the supplied USB extension cable if found needed.
- The unit will automatically switch to USB mode. The first music file from the USB device will play automatically.
- To select USB mode, press repeatedly MODE. Or in the home menu (press 🔒), use the function knob to select the "USB" icon.
- If a USB flash drive is not inserted or has no playable media, USB mode can not be selected.
Access Music/Video/Photo Folders
- In USB mode, press and hold BAND.
- Playback stops and the Music/Movie/Photo folders are displayed.
- To select Music, Movie or Photo folder, press briefly BAND.
- To select a file, rotate the function knob (or press |◀)◀▶▶
- To play the selected file, press the function knob.
Music Playback
- To pause or resume playback, press .▶II
- To select the previous/next music file, press /|◀◀▶▶
- To search fast backward or forward, press and hold /|◀◀▶▶
- To play the current track repeatedly, press RPT. When the repeat mode is activated, is displayed. To cancel the repeat mode, press RPT again.
Movie Playback
- To pause or resume playback, press .▶II
- To select the previous/next movie file, press /|◀◀ ▶▶▶
- To search fast backward or forward, press and hold /I.
Photo Display
• To select a photo, press /|◀◀▶▶▶
AV Input
You can play audio and/or video from a playback device (e.g. a CD/DVD player or VCR).
Note: If only audio or video cable connection is made, only audio or video will be played on the unit.
- Using an audio/video cable with RCA plugs (not included), connect a playback device with RCA audio outputs to the RCA inputs on the unit.
The RCA jacks (red/white) labelled "Audio Input" are designed for audio input.
The RCA jack (Yellow, not orange) labelled "Video Input" is designed for video input.
- Press repeatedly MODE to access AV Input or AUX IN mode. Or in the home menu (press), use the function knob to select the "AV INPUT" or "AUX IN" icon.
To play video, make sure video input is enabled and the "AV INPUT" icon is displayed in the home menu. If video input is disabled, the "AUX IN" icon is displayed in the home menu.
To enable video input, press and go to "SETTINGS" > "Camera" then select "Disable".
-
Start playback on the connected device. Audio and/or video will play on the unit.
-
For best sound performance, set the volume of the connected device to maximum.
- Note: If there is distortion heard, you may need to turn the volume of the connected device down a level or two.
Output Audio
You can output audio from the unit to an external amplifier or powered speakers.
-
Using audio cables with RCA plugs (not included), connect the RCA audio outputs labelled "Front Output", "Rear Output" and "Sub Output" on the unit to the corresponding RCA audio inputs on your amplifier or powered speakers.
-
Start playback on the unit and audio will be output to the connected device.
Accessory Power Control
The unit comes with an accessory power switch which can turn on or off a connected accessory (not included, e.g. a light bar or LED whip).
- Connect the red/purple wire (labelled "Aux Power Output") from the unit to an accessory.
- When the unit is powered on, press ★ on the front panel to turn on or off the connected accessory.
- When accessory power is on, the ★ icon is displayed in the top of the screen.
Screen Illumination Control
The unit comes with an illumination wire which is used for screen illumination control.
- Connect the orange wire (labelled "Illumination Input") from the unit to your vehicle lights. When the vehicle lights are on, the unit's screen will be automatically illuminated.
Use Rear/Front Camera
WARNING: Never rely solely on the rear view camera when reversing your vehicle. Always check your surroundings before reversing your vehicle.
- Connect a rear or front camera (not included) to the unit. See the installation manual of your camera for more details.
- Video signal input
Using the "Rear Camera Input" wire with RCA jack (Orange, not yellow), display live
view from the rear camera.
Using the "Video Input" wire with RCA jack (Yellow, not orange), display live view from the front camera
Note: You need to enable front camera input. In the home menu (press ), go to "SETTINGS" > "Camera" and select "Enable".
• Power supply to the camera
Using the "Rear Camera Output" wire (red/white), power the rear camera.
Using the "Aux Power Output" wire (red/purple), power the front camera. Press on the front panel to turn on or off the front camera.

- Reverse trigger signal
Using the "Reverse Input" wire (purple/white), switch on the camera only when the vehicle is put in reverse gear.
- Switch the unit to camera mode.
Press to access the home menu, then use the function knob to select the "Camera" icon. Or press quickly access camera mode.
Audio Settings
This section helps you change the sound settings of this unit.
- In media play mode, press the function knob to access the audio menu.
- When audio menu is displayed, rotate the function knob to navigate the menu.
Rotate the function knob to make selection or adjust values. Press the function knob to enter a sub-option or confirm the selection.
-
After the settings is made, the menu will automatically exit five seconds of button inactivity.
-
BAS: Change output level for bass sound.
- TRE: Change output level for treble sound.
• BAL: Adjust left-to-right speaker output balance. - FAD: Adjust front-to-rear speaker output balance.
- EQ: Select a preset sound mode (a preset equalizer setting) or turn off the preset.
-
LOUD: Enable or disable loudness function. Enabling will boost output level of low and high frequencies.
-
SUB VOL: Change output level of your subwoofer.
- SUB FILTER: Select a cutoff frequency for your subwoofer (80Hz, 120Hz or 160Hz). The subwoofer will reproduce sound of the frequencies below the selected frequency.
- SYSTEM TONE: Enable or disable beep tone every time you press a button.
- ST: Enable or disable stereo FM reception. Disable to improve reception when FM signal is weak.
- LOC: Enable or disable local FM reception. Disable when most FM stations are weak. Enabling will receive only strong FM signal.
Preference Settings
This section helps you change the preference settings of this unit.
- In power-on, press ↗ access the home menu.
- Rotate the function knob to select the "SETTINGS" icon, then press the function knob to access the settings options.
- Rotate the function knob to select an option; press the function knob to confirm the selection.
- Language: Select a menu language (English or Spanish).
• Radio Area: Select the region (America or Europe) you are in to receive radio signal.
• Time Format: Select 12 or 24 hour display.
• Time: Set minutes and hours. - Clock ScrenSaver: Enable or disable clock display when the unit is turned off.
- Camera: Enable or disable front camera input. When enabled, video input is disabled, and vice versa.
- Camera Select Source: Select "Camera 1" (rear camera) or "Camera 2" (front camera) to display live view when pressing the front panel. To enable camera selection, make sure front camera input is enabled.
- Set Select as Favorite: Enable or disable selection of a default camera.
- Backlight: Adjust screen brightness.
- Factory Data Reset: Reset to the factory settings.
- System Info: Display the current hardware and software version of the unit.
Specifications
Audio
Output power....60 W x 4 (Max)
Speaker impedance....4 - 8 Ω
Frequency response....20 Hz - 20 kHz
Signal-to-noise ratio.....>65 dB
RCA input sensitivity....500 mV
Pre-amp outputs....2V RMS
Full range for front, rear, and subwoofer (mono)
FM Tuner
Frequency range 87.5 – 107.9 MHz (USA)
87.5 – 108 MHz (Europe)
Frequency step....200 kHz (USA)
50 kHz (Europe)
Usable sensitivity....12 dB (S/N=30dB)
Stereo separation .... >25 dB
AM Tuner
Frequency range ....530 – 1710 kHz (USA)
522 – 1620 kHz (Europe)
Frequency step....10 kHz (USA)
9 kHz (Europe)
Usable sensitivity....40 dB (S/N=20dB)
Bluetooth
Bluetooth version....5.0
Bluetooth profiles....A2DP, AVRCP
Bluetooth frequency.... 2402 - 2480 MHz
Transmission power.... <4 dBm
Transmission distance.... Up to 33 ft /10 m (line of sight)
USB
Compatibility....Type A, USB 2.0 (High-Speed)
File system ......FAT32
USB storage supported .... 32GB (Max)
Audio playback....MP3
USB charging ....5VDC, 1A (not for mobile device playback)
General
Power supply....12VDC
Current consumption 15A (Max)
Fuse.... ATO type, 15A
Screen 3" TFT LCD color display
Ingress protection....IPX6 (water resistant / dustproof)
Operating temperature ....-4 to 140°F / -20 to 60°C
Storage temperature....-4 to 140°F / -20 to 60°C
Unit weight....2.29 lbs / 1.04 kg
Dimension Drawings
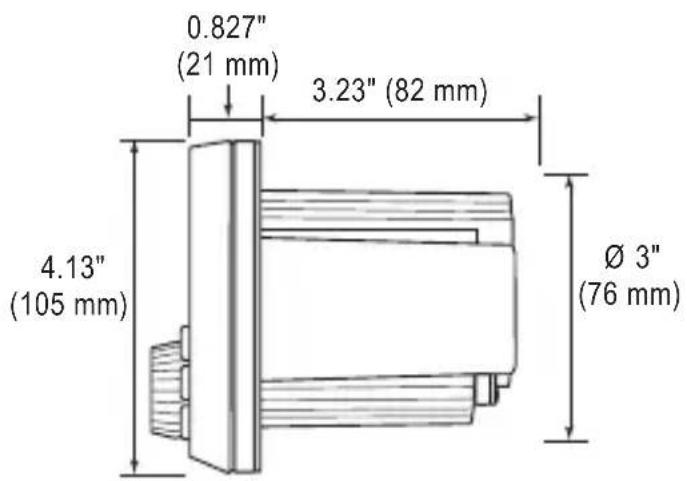
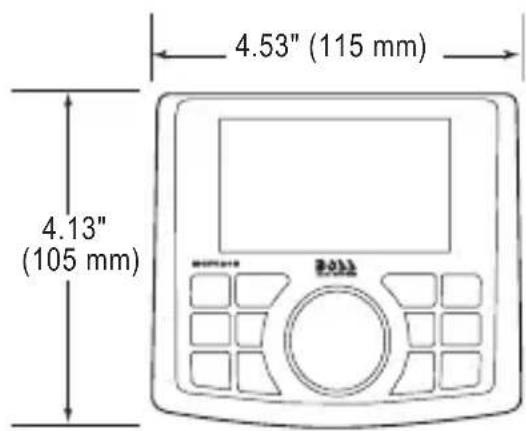
Specifications are subject to change without notice.
Troubleshooting
If you have problems using this product, check the following points before you request service. If you still have a problem, contact our technical support.
| Problem Solution | |
| No power Check that power supply is securely and properly connected (see “Wiring” on page 6). | |
| No sound Volume is muted or playback is paused. Adjust volume or check playback status. | |
| Too high startup volume The unit memorizes the last shutdown volume as the startup volume. Adjust the volume lower when turning off the unit. | |
| Too low/high volume despite using the function knob | Check that the audio settings are correctly set (e.g. EQ, bass, treble, balance, fader settings, etc.). |
| Poor radio reception Make sure | an antenna is connected to the unit. |
| Fine tune the radio station (see “Tune To A Radio Station” on page 10). | |
| USB not playable Files are not playable, or the USB device is not compatible with the unit. | |
| Cannot connect through Bluetooth | Bluetooth function on the device is disabled. Enable the device's Bluetooth. |
| Make sure the device is within Bluetooth range. | |
| The unit is already connected with another Bluetooth device. Disconnect the current Bluetooth connection. | |
| Audio quality from Bluetooth connection is poor. | Move the device closer to the unit, or remove obstacles or sources of interference that are affecting Bluetooth reception |
| No camera view when pressing | Check that rear camera (“CAMERA 1”) or front camera (“CAMERA 2”) is correctly connected. |
| Make sure you have set rear camera (“CAMERA 1”) or front camera (“CAMERA 2”) as quick access. In the home menu (press 📋) go to “SETTINGS” > “Camera Select Source” then select “CAMERA 1” or “CAMERA 2”. | |
| No response Reset the unit (see “Reset The Unit” on page 9). | |
BOSS Audio Systems
3451 Lunar Court - Oxnard, CA 93030
www.bossaudio.com
805-751-4853 Customer Service
Tech Support: www.bossaudio.com/support


0622
iPod* and iPhone* are trademarks of Apple, Inc. registered in the U.S. and other countries.
BOSS Audio Systems is not affiliated with Apple, Inc.
The Bluetooth* word mark and logos are registered trademarks owned by Bluetooth SIG, Inc. and any use of such marks by BOSS Audio Systems is under license. Other trademarks and trade names are those of their respective owners.
- Thank you for purchasing this 3055 AU#MATE gauge radio!
- Table of Contents
- Introduction
- Package Contents
- Important
- Important safety precautions
- Installation precautions
- Care for your product
- Care of the environment
- Control Panel
- ▶ II
- EQ
- 3
- ★
- APS
- RPT
- Function knob
- 8
- BAND
- 10
- MODE
- |/◄◄►►|
- LCD display
- Mounting
- Option 1: Mounting bracket
- Option 2: Screw holes on the unit
- Wiring
- Turn On/Off
- Use Home Menu
- Set Clock
- Adjust/Mute Volume
- Reset The Unit
- Listen To Radio
- Select A Radio Band
- Tune To A Radio Station
- Option 1
- Option 2
- To tune to a weak station
- Store Radio Stations Automatically
- Store Radio Stations Manually
- Select A Stored Radio Station
- Bluetooth
- Pair With A Mobile Phone
- Playback Control
- Control playback as follows.
- Music/Movie/Photo From USB
- Access Music/Video/Photo Folders
- Music Playback
- Movie Playback
- Photo Display
- AV Input
- Output Audio
- Accessory Power Control
- Screen Illumination Control
- Use Rear/Front Camera
- Audio Settings
- Preference Settings
- Specifications
- Audio
- FM Tuner
- AM Tuner
- USB
- General
- Dimension Drawings
- Troubleshooting
- 0622
Brand : BOSS
Model : MGV520B
Category : Pregnant