MWOOTR30 - Microwave ZLine - Free user manual and instructions
Find the device manual for free MWOOTR30 ZLine in PDF.


| Product Type | Over-the-Range Microwave Oven |
| Brand | ZLine |
| Model | MWOOTR30 |
| Installation Type | Built-in under cabinet, suitable above gas and electric cooking equipment |
| Venting Options | Outside Top Exhaust (Vertical), Outside Back Exhaust (Horizontal), Recirculating (Non-Vented Ductless) |
| Weight | 63–85 lb (28.5–38.5 kg) unit; additional oven load up to 50 lb (22.7 kg); total up to 113–135 lb (51.3–61.2 kg) |
| Mounting Space Width | 30 inches (76.2 cm) |
| Minimum Height from Cooktop | 30 inches (76.2 cm) from cooking surface to bottom of cabinet |
| Maximum Cabinet Depth | 13 inches (33 cm) including doors (otherwise require spacer) |
| Electrical Requirements | 15-20 amp dedicated circuit, 120 V, 60 Hz, grounded 3-prong outlet |
| Power Levels | 11 power levels (100% down to 0%) |
| Convection Temperatures | 10 settings from 100°F to 450°F |
| Cooktop Light | 3 settings (High/Low/Off) |
| Vent Fan Speeds | 2-speed (High/Low) |
| Sensor Functions | Sensor Cook, Sensor Reheat, Auto Defrost (Meat/Poultry/Fish) |
| One-Touch Cooking | Popcorn, Vegetables, Snacks, Melt/Soften |
| Display | Digital clock and cooking indicator |
| Included Accessories | Glass turntable, turntable ring, grease filters (2), exhaust adaptor, charcoal filter (for some models), convection wire rack, shelf |
| Safety Features | Door safety interlocks, child lock, auto shut-off, grounded plug |
| Maintenance | Clean door and sealing surfaces with mild soap; replace grease filters regularly; replace charcoal filter if applicable |
Frequently Asked Questions - MWOOTR30 ZLine
User questions about MWOOTR30 ZLine
0 question about this device. Answer the ones you know or ask your own.
Ask a new question about this device
Download the instructions for your Microwave in PDF format for free! Find your manual MWOOTR30 - ZLine and take your electronic device back in hand. On this page are published all the documents necessary for the use of your device. MWOOTR30 by ZLine.
USER MANUAL MWOOTR30 ZLine
natural_image
Stylized flame illustration in yellow and orange tones (no text or symbols)This product can expose you to chemicals including nickel, which is known to the State of California to cause cancer, and birth defects or other reproductive harm. For more information go to www.P65Warnings.ca.gov.
Even though the materials used in all ZLINE Kitchen and Bath products conform to all federal government regulations and all national product standards, California's Prop 65 requires all businesses to provide a "clear and reasonable warning" if one or more listed chemicals may be present in the product, even if that chemical is present in trace quantities

ZLINE
CONTENTS
PRECAUTIONS 1
IMPORTANT SAFETY INSTRUCTIONS 2
ELECTRICAL REQUIREMENTS 4
PARTS AND TOOLS 6
INSTALLATION 9
● RADIO INTERFERENCE 29
UTENSILS 30
DIFFERENT MATERIALS IN THE MICROWAVE 31
- SETTING UP YOUR OVEN
OPERATION 33
TROUBLESHOOTING 49
PRECAUTIONS
Do not attempt to operate this oven with the door open since open-door operation can result in harmful exposure to microwave energy. It is important not to defeat or tamper with the safety interlocks.
Do not place any object between the oven front face and the door or allow soil or cleaner residue to accumulate on sealing surfaces.
Do not operate the oven if it is damaged. It is particularly important that the oven door closes properly and that there is no damage to the:
Door (bent or not closing)
Hinges and Latches (broken or loosened)
Door seals and sealing surfaces (wear and tear)
When using electrical appliances basic safety precautions should be followed, including the following:
To reduce the risk of burns, electric shock, fire, personal injury, or exposure to excessive microwave energy, read all instructions before using the appliance.
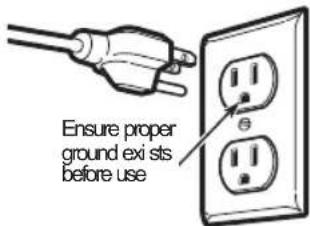
This appliance must be grounded or connected to a properly grounded outlet. Install this appliance only in accordance with the provided installation instructions.
Some products such as whole eggs and sealed containers (i.e. closed glass jars) should not be heated in this oven.
Use this appliance only for its intended use as described in the manual. Do not use corrosive chemicals or vapors in this appliance. This type of oven is specifically designed to heat, cook, or dry food.
- Close supervision is necessary when used by children.
Do not operate this appliance if it has a damaged cord or plug, if it is not working properly, or if the entire unit has been damaged.
This appliance should be serviced only by qualified service personnel.
Do not cover or block any openings on the appliance.
Do not store this appliance outdoors. Do not use this product near water - for example, near a kitchen sink, in a wet basement, near a swimming pool, or similar locations.
Do not immerse cord or plug in water.
- Keep cord away from heated surface.
Do not let cord hang over edge of table or counter.
When cleaning surfaces of door and oven that comes together on closing the door, use only mild, nonabrasive soaps, or detergents applied with a sponge or soft cloth.
To reduce the risk of fire in the oven cavity:
Do not overcook food. Carefully attend appliance when paper, plastic, or other combustible materials are placed inside the oven to facilitate cooking.
Remove wire twist-ties from paper or plastic bag before placing bag in oven. If material inside of the oven ignite, keep oven door closed, turn oven off, and disconnect the power cord, or shut off power at the fuse or circuit breaker panel.
Do not use the cavity for storage purposes. Do not leave paper products, cooking utensils, or food in the cavity when not in use.
- Liquids and other foods must not be heated in sealed containers since they are liable to explode.
IMPORTANT SAFETY INSTRUCTIONS
To reduce the risk of injury to persons
Do not overheat the liquid.
Stir the liquid both before and halfway through heating it.
Do not use straight-sided containers with narrow necks.
After heating, allow the container to stand in the microwave oven for a short time before removing the container.
Use extreme care when inserting a spoon or other utensil into the container.
Do not operate any heating or cooking appliance beneath, over, or near the appliance. It is okay to use the microwave above another heating appliance.
Suitable for use above both gas and electric cooking equipment.
Do not mount over sink.
Do not store anything directly on top of the appliance surface when the appliance is in operation.
- Clean ventilation hoods frequently - Grease should not be allowed to accumulate on hood or filter.
Use care when cleaning the vent-hood filter. Corrosive cleaning agents may damage the filter.
Improper use of the grounding can result in a risk of electric shock.
Electric Shock Hazard
Consult a qualified electrician if the grounding instructions are not completely understood or if doubt exists as to whether the appliance is properly grounded. If it is necessary to use an extension cord, use only a 3-wire extension cord that has a 3-blade grounded plug and 3-slot receptacle that will accept the plug on the appliance. The marked rating of the extension cord shall be equal to or greater than the electrical rating of the appliance.
A short power supply cord is provided to reduce the risks resulting from becoming entangled in or tripping over a longer cord. Longer cord sets or extension cords are available and may be used if care is exercised in their use.
If a long cord or extension cord is used:
The marked electrical rating of the cord set or extension cord should be at least as great as the electrical rating of the appliance.
The extension cord must be a grounding-type 3-wire cord.
The longer cord should be arranged so that it will not drape over the counter top or tabletop where it can be pulled on by children or tripped over unintentionally.
- Touching some of the internal components can cause serious personal injury or death. Do not disassemble this appliance.
Do not plug this unit into an outlet until it is properly installed and grounded.
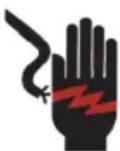
This product requires a three-prong grounded outlet. The installer must perform a ground continuity check on the power outlet box before beginning the installation to ensure that the outlet box is properly grounded. If not properly grounded, or if the outlet box does not meet electrical requirements noted, a qualified electrician should be employed to correct any deficiencies.
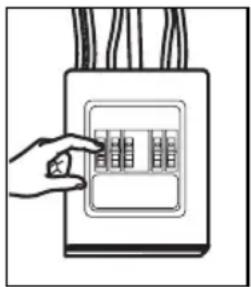
For personal safety, remove house fuse or open circuit breaker before beginning installation to avoid severe or fatal shock injury. Figure 1
For personal safety, the mounting surface must be capable of supporting the cabinet load, in addition to the added weight of this 63–85 pound (28.5–38.5 kg) product, plus additional oven loads of up to 50 pounds (22.7 kg) or a total weight of 113–135 pounds (51.3–61.2 kg).
For personal safety, this product cannot be installed in cabinet arrangements such as an island or a peninsula. It must be mounted to BOTH a top cabinet AND a wall.
IMPORTANT – PLEASE READ CAREFULLY. FOR PERSONAL SAFETY, THIS APPLIANCE MUST BE PROPERLY GROUNDED TO AVOID SEVERE OR FATAL SHOCK.
The power cord of this appliance is equipped with a three-prong (grounding) plug which mates with a standard three-prong (grounding) wall receptacle to minimize the possibility of electric shock hazard from this appliance. Figure 2
You should have the wall receptacle and circuit checked by a qualified electrician to make sure the receptacle is properly grounded.
Where a standard two-prong wall receptacle is encountered, it is very important to have it replaced with a properly grounded three-prong wall receptacle, installed by a qualified electrician.
DO NOT UNDER ANY CIRCUMSTANCES, CUT, DEFORM OR REMOVE ANY OF THE PRONGS FROM THE POWER CORD. DO NOT USE WITH AN EXTENSION CORD.
natural_image
Illustration of a hand inserting a component into an electrical box (no text or symbols visible)Figure 1
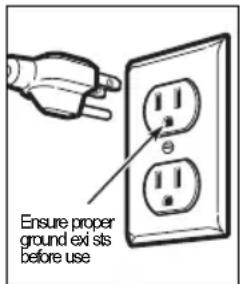
Figure 2
PARTS AND TOOLS
Before starting on the installation, prepare all the necessary tools and parts required to install the microwave. This will save installation time and simplify the installation process.
PARTS INCLUDED
HA RDWA RE PA CKET
| PA RT QUANTITY | ||
 | Wood Screws 2 ( 14 " × 2 " ) | |
 | Toggle Bolts (and wing nuts) ( 316 " × 3 " ) | 2 |
 | Self -Aligning Machine Screws ( 14 " -28 × 3 14 " ) | 3 |
 | Nylon Grommet(for metal cabinet s) | 1 |
You will find the installation hardware contained in a packet with the unit. Check to make sure you have all these parts.
NOTE: Some extra parts are included.
PARTS INCLUDED (CONT.) ADDITIONAL PARTS
| PART | QUANTITY | |
 | CabinetTop Template | 1 |
 | Rear Wall Template | 1 |
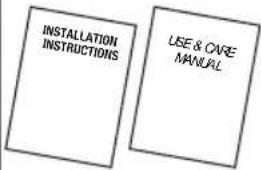 | Installation Instructions | 1 |
| Use & Care Manual | 1 | |
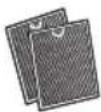 | Separately Packed Grease Filters | 2 |
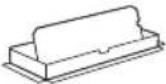 | Exhaust adaptor | 1 |
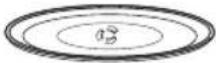 | Glass Tray | 1 |
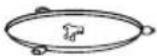 | Trumble Ring | 1 |
For some model s 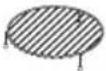 | Convection wire rack | 1 |
For some model s 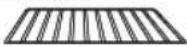 | Shelf | 1 |
For some model s 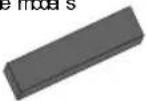 | PureAir@ Microwave Filter | 1 |
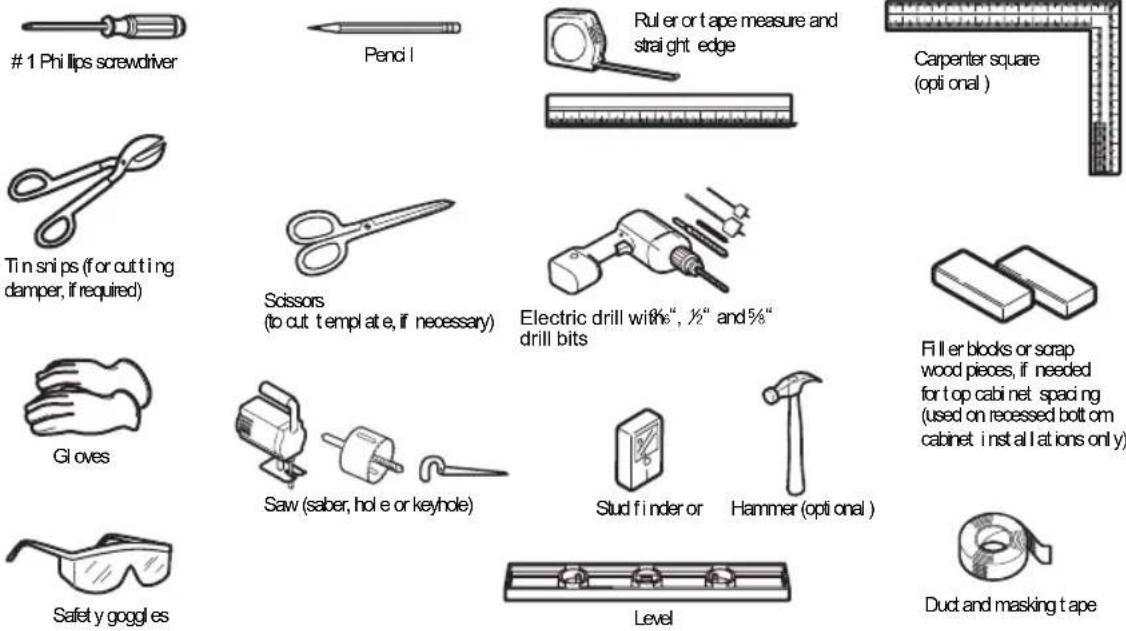
TOOLS YOU WILL NEED
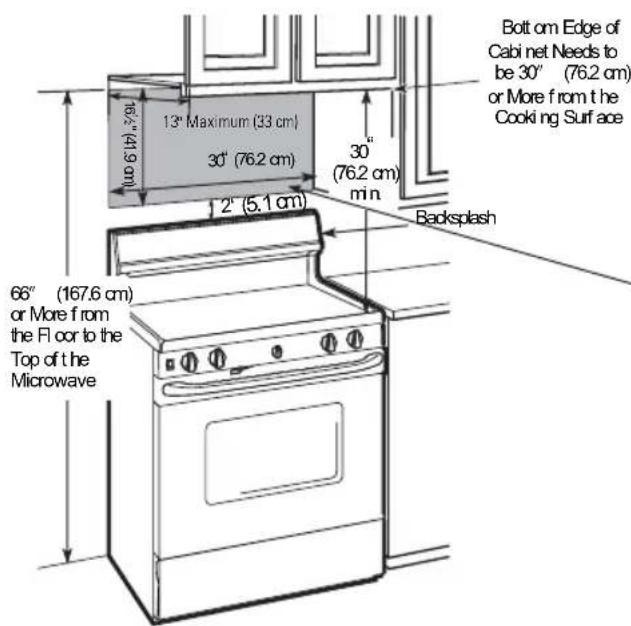
MOUNTING SPACE
NOTES
• The space between the cabin et s must be 30" (76.2 cm) wide and free of obstruction
- If you are going to vent your microwave oven to the outside, see Hood Exhaust Section for exhaust duct preparation.
- When installing the microwave oven beneath smooth, flat cabinets, be careful to follow the instructions on the top cabinet template for power cord clearance.
- Asaguideto installation, see page 25 for Mounting Template Information.
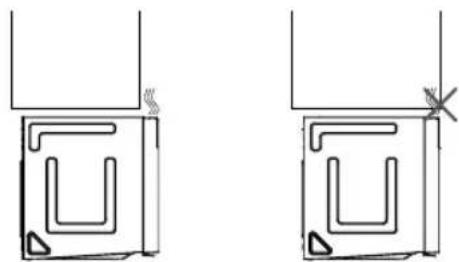
- If the cabinet depth including the cabinet doors is more than 13" then the unit must be spaced out from wall using adequate materials supporting 150 lbs to allow proper top vent air exhaust/ intake.
natural_image
Pure technical line drawing of two mechanical components with no text or symbolsUSERS MANUAL
1 PLACEMENT OF THE MOUNTING PLATE
A. REMOVING THE M ICROWAVE OVEN FROM THE CARTON/REMOVING THE MOUNTING PLATE
1 Remove the top cover board, installation instructions, use and care, exhaust adapter, turntable ring, shelf, filters, glass tray and the small hardware bag. Do not remove the Styrofoam protecting the front of the oven.
Top Cover Board
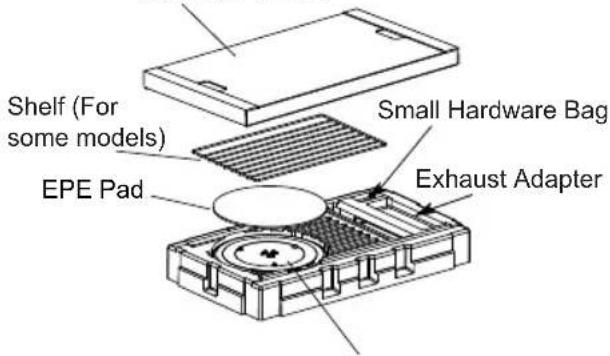
Filters and Turntable Ring below glass tray
2 Fold back all 4 cart on flap s fully again st cart on sides. Then car efully roll the oven and cart on over onto the top side. The oven should be resting in the Styrofoam.
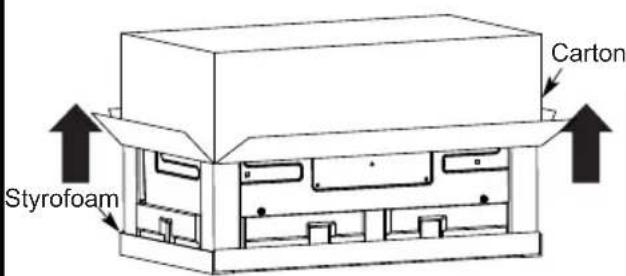
3 Pull the carton up and off the oven.
4 Cut the middle of the outer protective plastic bag to remove the mounting plate
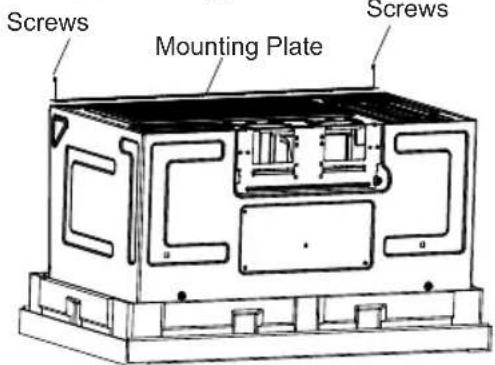
5 Remove the screws from each end of the mounting plate. This plate will be used as the rear wall template and for mounting. Reinstall the screws into the holes where they were removed.
B. FINDING THE WALL STUDS
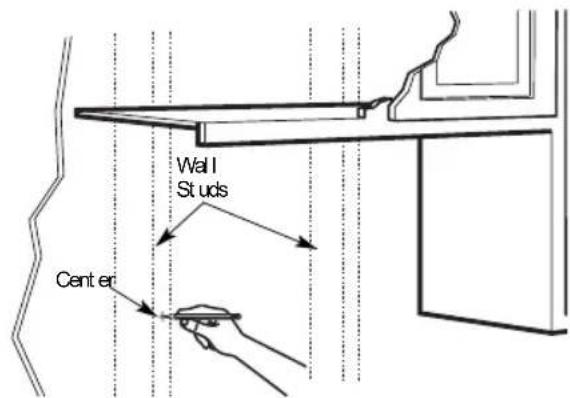
1 Find the studs, using one of the following methods:
A. Stud finder - a magnetic device which locatesnails.
B. Use a hammer to tap lightly across the mounting surface to find a solid sound. This will indicate a stud location.
2 After locating the stud(s), find the center by probing the wall with a small nail to find the edges of the stud. Then place a mark half way between the edges. The center of any adjacent studsshould be 16" (40.6 cm) or 24" (61 cm) from this mark.
3 Draw a line down the center of the studs. THE MICROWAVE MUST BE CONNECTED TO AT LEAST ONE WALL STUD.
C. DETERMINING WALL PLATE LOCATION UNDER YOUR CABINET
Plate position-beneath flat bottom cabinet
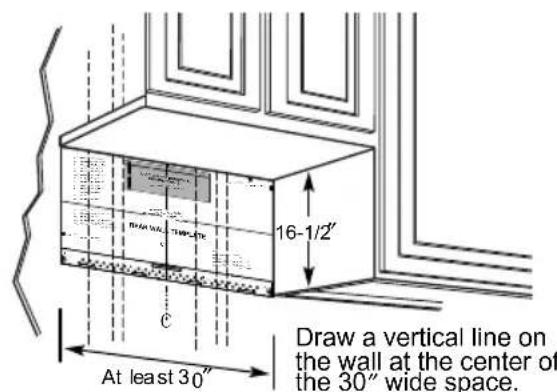
Tape the Rear Wall Template onto the wall matching the centerline and touching the bottom of the cabinet.
Plate position-beneath framed recessed cabinet bottom
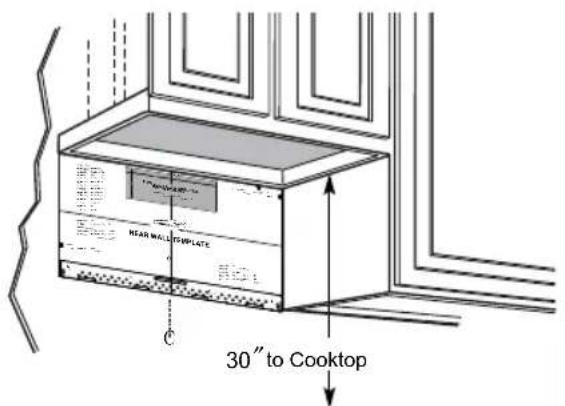
Draw a vertical line on the wall at the center of the 30" space.
Tape the Rear Wall Template onto the wall matching the centerline and touching the bottom cabinet frame.
Plate position-beneat h recessed bottom cabinet with front overhang
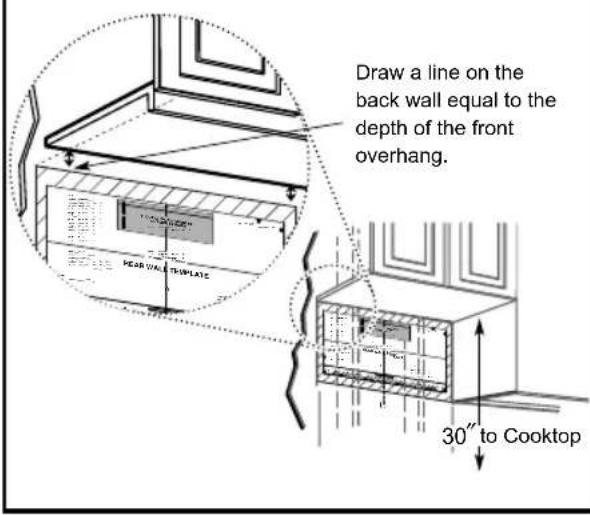
Your cabinets may have decorative trim that interferes with the microwave installation. Remove the decorative trim to install the microwave properly and to make it level.
THE M ICROWAVE M UST BE LEV EL.
Use a level to make sure the cabinet bottom is level. If the cabinets have a front overhang only, with no back or side frame, install the mounting plate down the same distance as the front overhang depth. This will keep the microwave level.
1 Measure the inside depth of the front overhang.
2 Draw a horizontal line on the back wall an equal distance below the cabinet bottom as the inside depth of the front overhang.
3 For this type of installation with front overhang only, align the mounting tabs with this horizontal line, not touching the cabinet bottom as described in Step D.
D. ALIGNING THE WALL PLATE
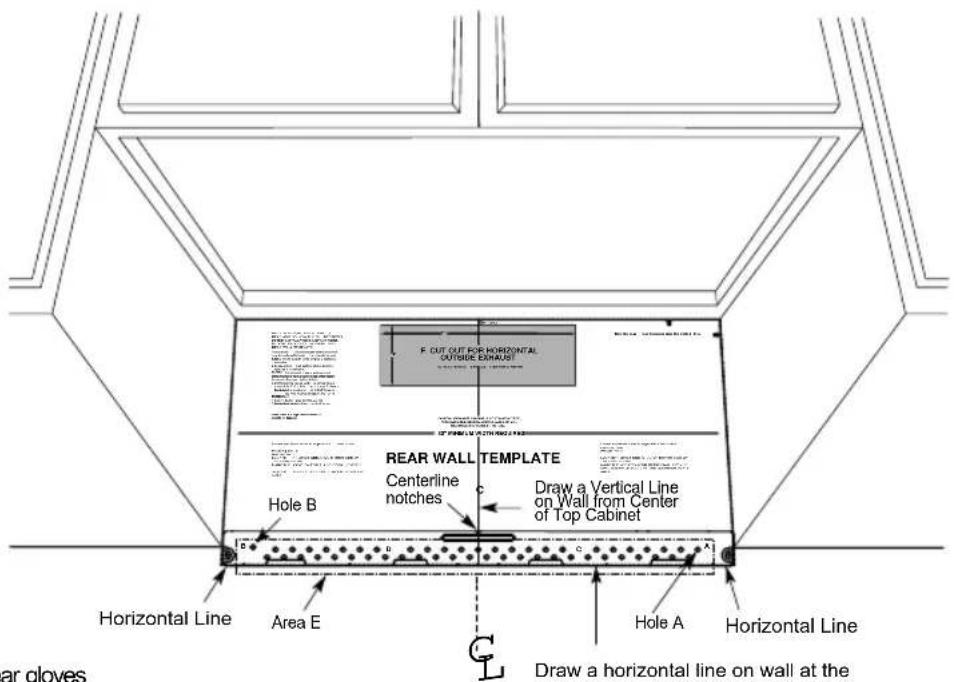
CAUTION: Wear gloves to avoid cutting fingerson sharpedges.
Draw a horizontal line on wall at the bottom of "Rear Wall Template".
1 Draw a vertical line on the wall at the center of the 30" wide space.
2 Draw a horizontal line on the wall at the bottom of "Rear Wall Template".
3 Find a wall stud in area "E" of mounting plate Refer to section 1B. Finding the wall studs.
4 For attaching the mounting plate into stud drill a 3/16" hole into wood stud. Drill a 5/8" hole for toggle bolt in 1 other location (Hole A or Hole B) NOTE: DO NOT MOUNT THE PLATE AT THIS TIME.
NOTE: Holes A and B are inside area E. If neither of Holes A and B are not in a stud, find a stud somewhere in area E and draw a circle to line up with the stud. It is important to have at least one wood screw mounted firmly in a stud to support the weight of the microwave. Set the mounting plate aside.
2 | INSTALLATION TYPES (Choose A, B or C)
This microwave oven is designed for adaptation to the following three types of ventilation:
A. Outside Top Exhaust (Vertical Duct)
B. Outside Back Exhaust (H horizontal Duct)
C. Recirculating (Non-Vented Ductless)
NOTE: Thismicrowave is shipped assembled for Recirculating. Select type of ventilation required for your installation and proceed to that section.
A OUTSIDE TOP EXHAUST (VERTICAL DUCT)
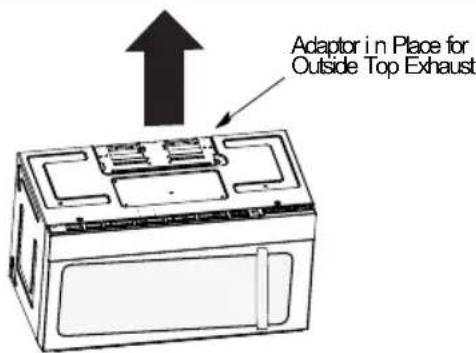
See page 112 21
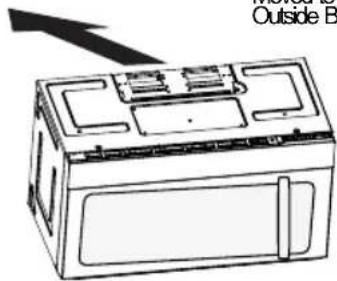
B OUTSIDE BACK EXHAUST (HORIZONTAL DUCT)
natural_image
Line drawing of a refrigerator with a door and front panel, no text or symbols presentSee page
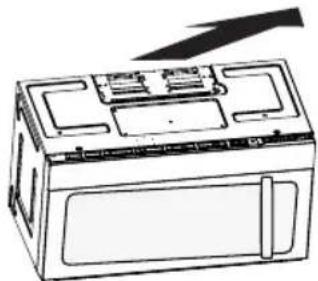
C RECIRCU LATIN G (NON-VENTED DUCTLESS)
natural_image
Line drawing of a microwave oven with internal compartments and a handle (no text or symbols)See page 206
Models are shipped for recirculating exhaust. Some models have a disposable charcoal filter installed to help remove smoke and odors.
NOTE: Read the next two pages only if you plan to vent your exhaust to the outside. If you plan to recirculate the air back into the room, proceed to page 20.
INSTALLATION INSTRUCTIONS FOR EXTERNAL EXHAUST DUCTING
NOTE: If you need to install ducts, note that the total duct length of 314 x 10" (8.2 x 25.4 cm) rectangular or 5" (127 cm) di ameter / 6" (15.2 cm) diameter round duct should not exceed 120 equivalent feet (36.5 m).
Outside ventilation requires an EXTERNAL EXHAUST DUCT. Read the following carefully.
NOTE: It is important that venting be installed using the most direct route and with as few elbows as possible.
This en sur es clear vent i ng of exhaust and h el ps pr event blockages. Also, make sure dampers swing freely and nothing is blocking the ducts.
Exhaust connection:
The exhaust adapt or has been designed to mate with a standard 10^4 x 10" (8.2 x 25.4 cm) rectangular duct.
If a round duct is required, a rectangular-to-round
transition adaptor must be used.A 5" (12.7cm)/ 6" (15.2cm)
diameter duct is acceptable to use.
Maximum duct length:
For satisfactory air movement, the total duct length of 314 " x 10" (8.2 x 25.4 cm) rectangular or 5" (12.7 cm) di ameter / 6" (15.2 cm) diameter round duct should not exceed 120 equi valent feet (36.5 m).
Elbows, transit ions, wall and roof caps, etc., present additional resistance to airflow and are equivalent to a section of straight duct which is longer than their actual physical size. When calculating the total duct length, add the equivalent lengths of all transitions and adaptors plus the length of all straight duct sections. The chart below shows you how to calculate total equivalent t ductwork length using the approximate feet of equivalent length of some typical ducts.
| DUCT PIECES LENGTH x USED | EQUIVALENT NUMBER EQUIVALENT= LENGTH | ||
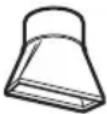 | Rectangular-to-Round Transition Adapt or* | 5 Ft. (1.5 m) x ( ) = | Ft. or m |
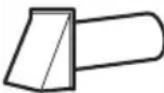 | Wall Cap | 40 Ft. (12.2 m) x ( ) = | Ft. or m |
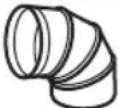 | 90° Elbow | 10 Ft. (3 m) x ( ) = | Ft. or m |
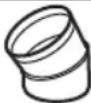 | 45° Elbow | 5 Ft. (1.5 m) x ( ) = | Ft. or m |
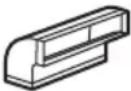 | 90° Elbow | 25 Ft. (7.6 m) x ( ) = | Ft. or m |
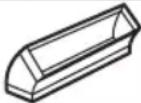 | 45° Elbow | 5 Ft. (1.5 m) x ( ) = | Ft. or m |
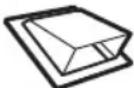 | Roof Cap | 24 Ft. (7.3 m) x ( ) = | Ft. or m |
| (Z36A) | Straight Duct 6" (15.2 cm) Round or 31⁄4" x 10" (8.2 x 25.4 cm Rectangular) | 1 Ft. (0.3 m) x ( ) = | Ft. or m |
| Total Ductwork = Ft. or m | |||
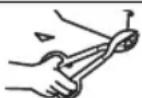
* IMPORTANT: If a rectangular-to-round transition adaptor is used, the bottom corners of the damper will have to be cut to fit, using the tin snips, in order to allow free movement of the damper.
Equi valen t l enths of duct pieces are based on act ual tests and r ef lect r equir em ent s for good ven ti ng per for m ance with any vent hood.
EXTERNAL EXHAUST DUCTING
OUTSIDE TOP EXHAUST (EXAMPLE ONLY)
The following chart describes an example of one possible ductwork installation.
| DUCT PIECES LENGTH x | EQUIVALENT NUMBER EQUIVALENT USED = LENGTH | ||
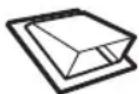 | Roof Cap 24 Ft (7.3 m) x (1) | = 24 Ft (7.3 m) | |
| 12 Ft (3.6 m) Straight Duct (6" / 15.2 cm Round) | 12 Ft (3.6 m) x (1) = 12 Ft (3.6 m) | ||
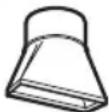 | Rectangular-to-Round Transition on Adapt or* | 5 Ft. (1.5 m) x (1) = | 5 Ft. (1.5 m) |
| Equivalent lengths of duct pieces are based on actual tests and reflect requirements for good venting performance with any vent hood. Tot al Length = | 41 Ft. (12.4 m) | ||
* IMPORTANT: If a rectangular-to-round transition adaptor is used, the bottom corners of the damper will have to be cut to fit, using the tin snips, in order to allow free movement of the damper.
OUTSIDE BACK EXHAUST (EXAMPLE ONLY)
The following chart describes an example of one possible ductwork installation.
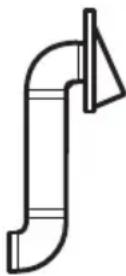 | DUCT PIECES | EQUIVALENT NUMBER EQUIVALENT LENGTH* x USED = LENGTH | ||||
| Wall Cap | 40 R. (12.2 m) | x | (1) | = 40 R. (12.2 m) | ||
| 3 R. Straight Duct (31⁄4" x 10" / 8.2 x 25.4 cm Rectangular) | 3 R. (0.9 m) | x | (1) | = 3 R. (0.9 m) | ||
| 90° Elbow | 10 R. (3 m) | x | (2) | = 20 R. (6 m) | ||
| Equivalent lengths of duct pieces are based on actual tests and reflect requirements for good venting performance with any vent hood. | 63 Ft. (19.1 m) | |||||
| DUCT PIECES | EQUIVALENT NUMBER EQUIVALENT LENGTH* x USED = LENGTH | ||||
| Wall Cap | 40 Ft. (12.2 m) | x | (1) | = 40 Ft. (12.2 m) | |
| 3 Ft. Straight Duct (3 14 " x 10" / 8.2 x 25.4 cm Rectangular) | 3 Ft. (0.9 m) | x | (1) | = 3 Ft. (0.9 m) | |
| 90° Elbow | 10 Ft. (3 m) | x | (2) | = 20 Ft. (6 m) | |
| Equivalent lengths of duct pieces are based on actual tests and reflect requirements for good venting performance with any vent hood. | 63 Ft. (19.1 m) | ||||
NOTE: For back exhaust, care should be taken to align exhaust with space between studs, or wall should be prepared at the time it is constructed by leaving enough space between the wall studs to accommodate exhaust.
A | OUTSIDE TOP EXHAUST (Vertical Duct)
INSTALLATION OVERVIEW
A1. Attach Mounting Plate to Wall
A2. Prepare Top Cabin et
A3. Adapting Microwave Blower for Outside Top Exhaust
A4. Check Damper Operation
A5. Mount Microwave Oven
A6. Adjust Exhaust Adaptor
A7. Connect Ductwork
I M PORTANT NO T ES:
- Make sure the screws for the blower motor and blower plate are securely tigh tened when they are reinstalled. This will help to prevent excessive vibration.
• Make sure the motor wiring has been properly routed and secured, and that the wires are not pinched.
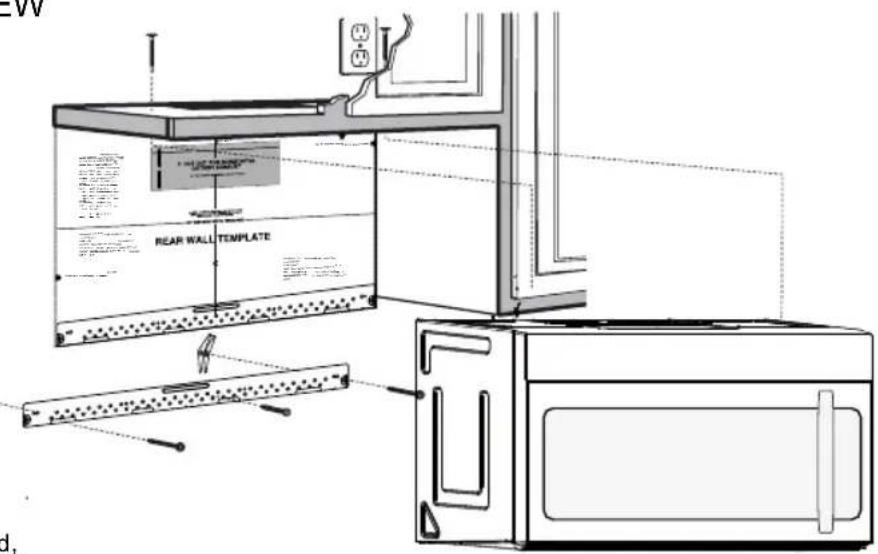
A1. ATTACH THE MOUNTING PLATE TO THE WALL
natural_image
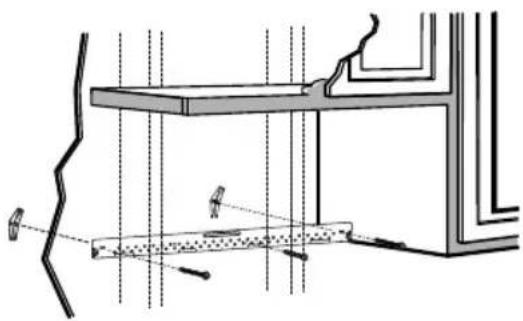
Architectural cross-section diagram showing structural layers and window connections (no text or labels)Attach the plate to the wall using toggle bolts.
At least one wood screw must be used to attach the plate to a wall stud.
1 Remove the toggle wings from the bolts.
2 Insert the bolts into the mounting plate through the holes designated to go into drywall and reattach the toggle wings 10" (19 mm) onto each bolt.
To use toggle bolts:
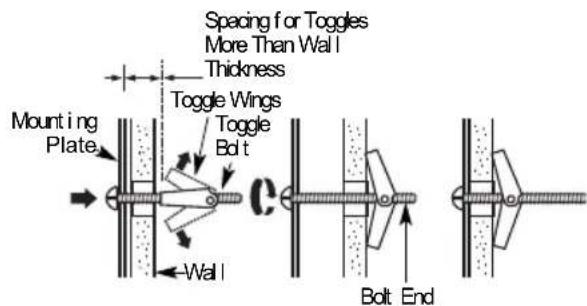
3 Place the mounting plate against the wall and insert the toggle wings into the holes in the wall to mount the plate.
NOTE: Before tightening toggle bolts and wood screw, make sure the bottom of the mounting plate touch the bottom of the cabinet when pushed flush against the wall and that the plate is properly centered under the cabinet.
CAUTION: Be careful to avoid pinching fingers between the back of the mounting plate and the wall.
4 Tighten all bolts. Pull the plate away from the wall to help tighten the bolts.
A2. USE TOP CABINET TEMPLATE FOR PREPARATION OF TOP CABINET
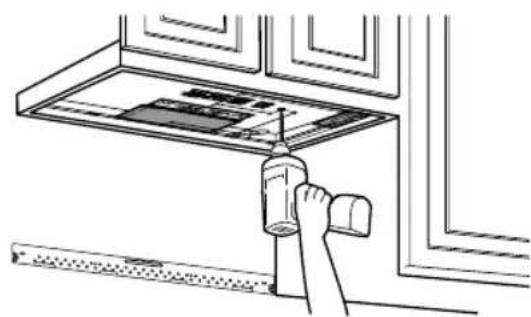
You need to drill holes for the top support screws, a hole large enough for the power cord to fit through, and a cutout large enough for the exhaust adaptor.
natural_image
Line drawing of a hand using a tool to clean or install a wall-mounted device (no text or symbols visible)- Read the instructions on the TOP CABINET TEMPLATE.
- Tape it under neath the top cabin et.
- Drill the holes, following the instructions on the TOP CABINET TEMPLATE.
CAUTION: Wear safety goggles when drilling holes in the cabinet bottom.
A3. ADAPTING MICROWAVE BLOWER FOR OUTSIDE TOP EXHAUST
1 Place the microwave in its upright position, with the top of the unit facing up.
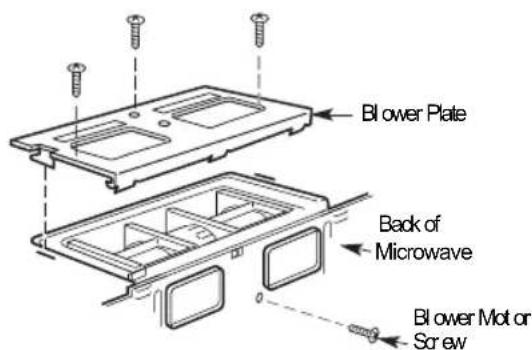
Remove the screw that holds the blower plate to the mirowave. Remove and save the screw holding the blower motor to the microwave.
2 Carefully pull out the blower unit. The wires will extend far enough to allow you to adjust the blower unit.
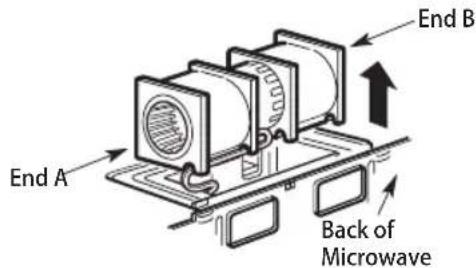
3 Roll the blower unit 90° so that fan blade openings are facing out the top of the microwave. Before Rotation After Rotation
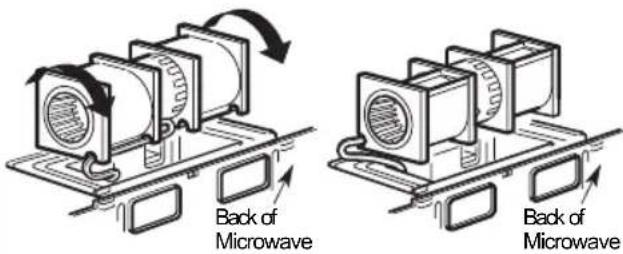
4 Place the blower unit back into the opening.
AFTER: Fan Blade Openings Facing Top
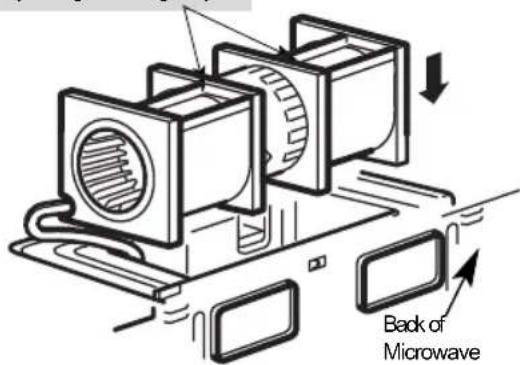
CAUTI ON: Do not pull or stretch the blower unit wiring. Make sure the wires are not pinched, and that they are properly secured.
A3. ADAPTING MICROWAVE BLOWER FOR OUTSIDE TOP EXHAUST
5 Secure blower unit to microwave with the screw removed in Step 1. Make sure the screw is tight.
6 Replace blower plate with the screw removed in Step 1. Make sure the screw is tight.
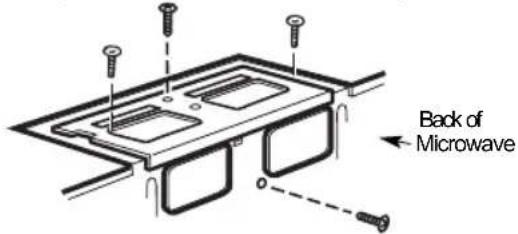
7 Attach the exhaust adaptor to the top of the blower plate by sliding it into the guide of the blower plate.
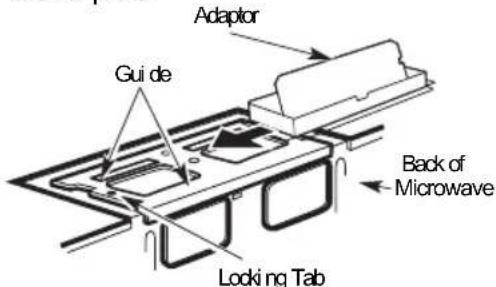
Push in securely until it is in the locktags. Take care to assure that the damper hirise installed so that the damper swings freely.
- Make sure tape securing damper is removed and damper pivots easily before mounting microwave.
- You will need to make adjustments to assure proper alignment with your house exhaust duct after the microwave is installed.
natural_image
Three-panel line drawing showing a person carrying a box, another holding a box, and a third handling a box (no text or symbols)FOR EASIER INSTALLATION AND PERSONAL SAFETY, WE RECOM MEND TH AT TWO PEO PLE INSTALL THIS MICROWAVE OVEN.
IMPORTANT: Do not grip or use the handle or heat shield during installation. Do not remove the cardboard spacer s between t he heat shield and door.
NOTE: If your cabinet is metal, use the n ylon gr ommet around the power cord hole to prevent cutting of the cord.
NOTE: We recommend using filler blocks if the cabinet front hangs below the cabinet bottom shelf.
IMPORTANT: If filler blocks are not used, case damage may occur from over tightening screws.
NOTE: When mounting the mi cr owave oven, t hr ead power cord through hole in bottom of top cabinet. Keep it tight throughout Steps 1–3. Do not pinch cord or lift oven by pulling cord.
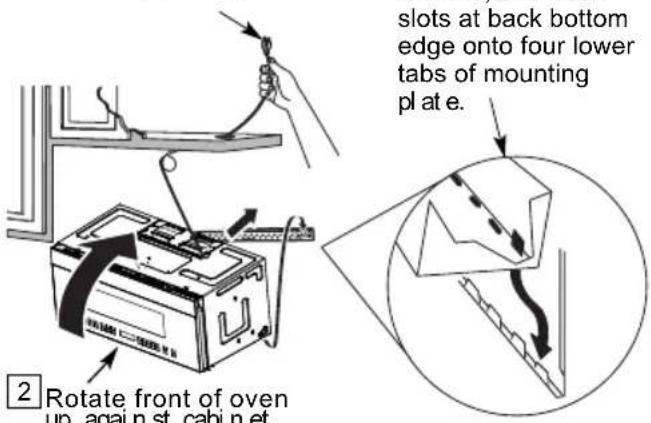
2 Rotate front of oven up again st cabin et bottom.
3 Insert a self-aligning screw through top center cabinet hole. Temporarily secure the oven by turning the screw at least two full turns after the reads have engaged. (It will be completely tightened later.) Be sure to keep power cord tight. Be careful not to pinch the cord, especially when mounting flush to bottom of cabinet.
4 Attach the microwave oven to the top cabinet.
5 Insert 2 self-aligning screws through outer top cabinet holes. Turn two full turns on each screw.
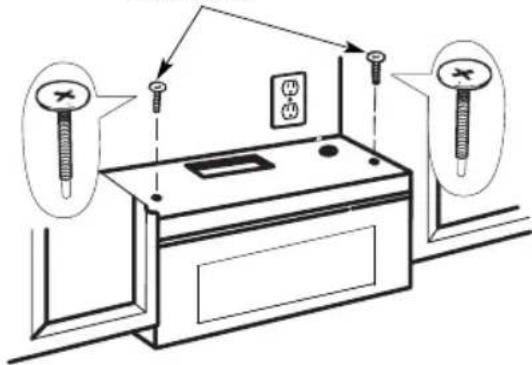
7 Tighten the outer two screws to the top of the microwave oven. (While tightening screws, hold the microwave oven in place against the wall and the top cabinet.)
natural_image
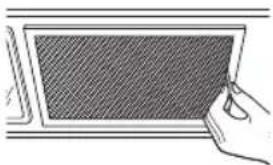
Hand holding a rectangular panel with a textured fill, no visible text or symbols8 In st all gr ease filter s. See the U se &&& and Car e packed with the microwave.
A6. ADJUST THE EXHAUST ADAPTOR
Open the top cabinet and adjust the exhaust adaptor to connect to the house duct.
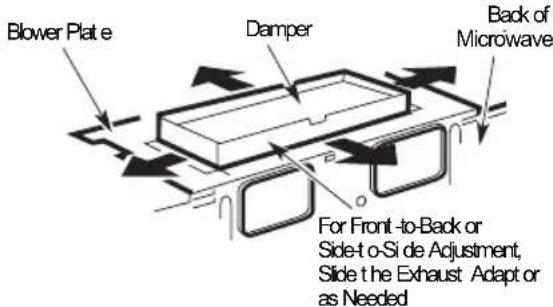
A7. CONNECTING DUCTWORK
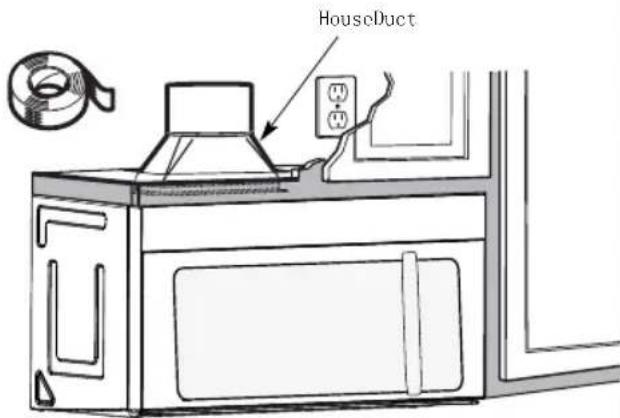
1 Extend the house duct down to connect to the exh au st adapt or.
2 Seal exhaust duct joints using a tape for high temperature applications.
B | OUTSIDE BACK EXHAUST (Horizontal Duct)
INSTALLATION OVERVIEW
B1. Prepare Rear Wall
B2. Remove BI ower Plate
B3. Attach Mounting Plate to Wall
B4. Prepare e Top Cabin et
B5. Adjust Blower
B6. Mount the Mi cr owave O ven
I MPO RTANT NO T ES:
- Make sure the screws for the blower motor and blower plate are secure by tightened when they are reinstalled. This will help to prevent excessive vibration.
• Make sure the motor wiring has been properly routed and secured, and that the wires are not pinched.
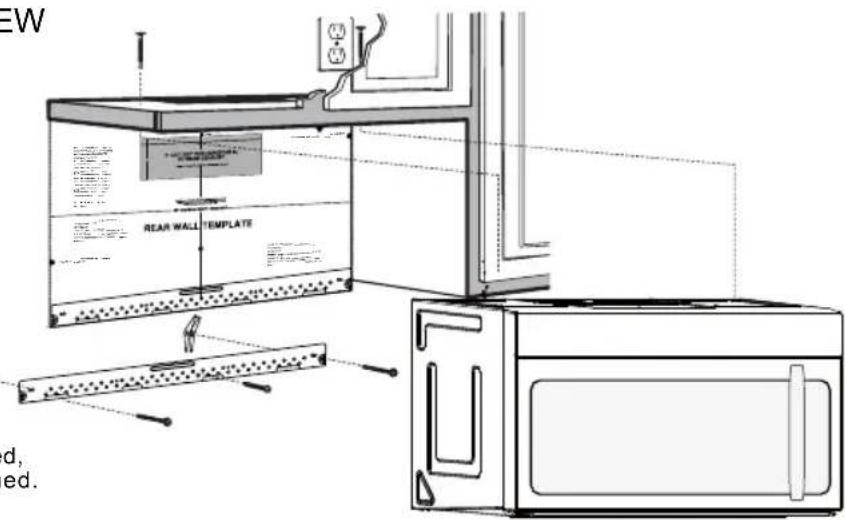
B1. PREPARING THE REAR WALL FOR OUTSIDE BACK EXHAUST
You need to cut an opening in the rear wall for outside exhaust.
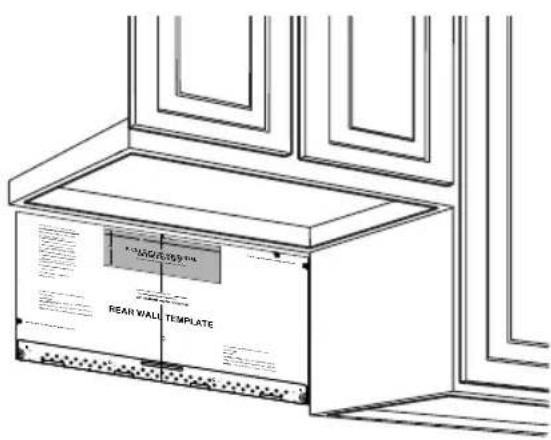
- Read the instructions on the REAR WALL TEMPLATE.
- Tape it to therear wall.
- Cut the opening, following the instructions of the REAR WALL TEM PL ATE.
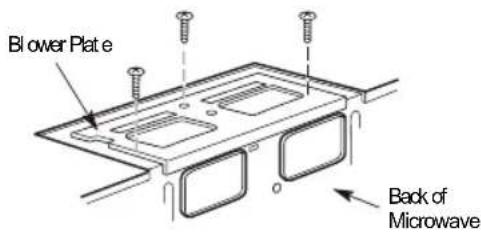
B2. REMOVE BLOWER PLATE
Remove and save the screw that holds the blower plate to the microwave. Lift off the blower plate.
B | OUTSIDE BACK EXHAUST (Horizontal Duct)
INSTALLATION OVERVIEW
B1. Prepare Rear Wall
B2. Remove Blower Plate
B3. Attach Mounting Plate to Wall
B4. Prepare e Top Cabin et
B5. Adjust Blower
B6. Mount the Mi cr owave O ven
I MPO RTANT NO T ES:
- Make sure the screws for the blower motor and blower plate are secure by tightened when they are reinstalled. This will help to prevent excessive vibration.
- Make sure the motor wiring has been properly routed and secured, and that the wires are not pinched.
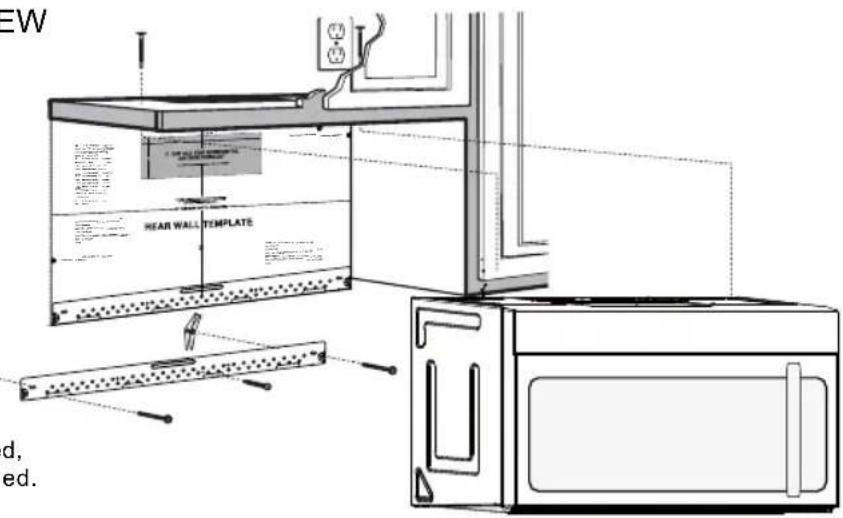
B1. PREPARING THE REAR WALL FOR OUTSIDE BACK EXHAUST
You need to cut an opening in the rear wall for outside exhaust.
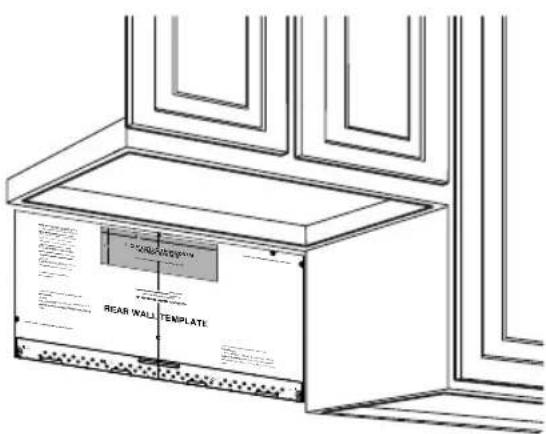
- Read the instructions on the REAR WALL TEMPLATE.
- Tape it to therear wall.
- Cut the opening, following the instructions of the REAR WALL TEM PL ATE.
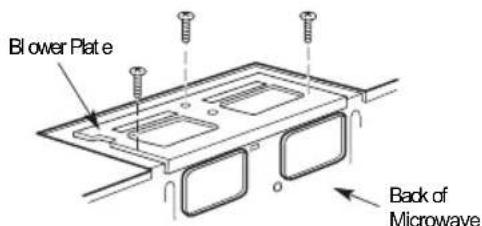
B2. REMOVE BLOWER PLATE
Remove and save the screw that holds the blower plate to the microwave. Lift off the blower plate.
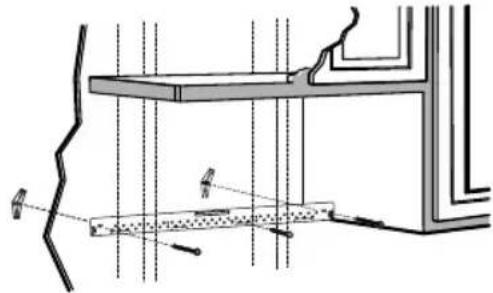
B3. ATTACH THE MOUNTING PLATE TO THE WALL
natural_image
Technical line drawing of a structural assembly with beams and supports (no text or symbols)Attach the plate to the wall using toggle bolts. At least one wood screw must be used to attach the plate to a wall stud.
1 Remove the toggle wings from the bolts.
2 Insert the bolts into the mounting plate through the holes designated to go into drywall and reattach the toggle wings to 34 " (19 mm) onto each bolt.
To use toggle bolts:
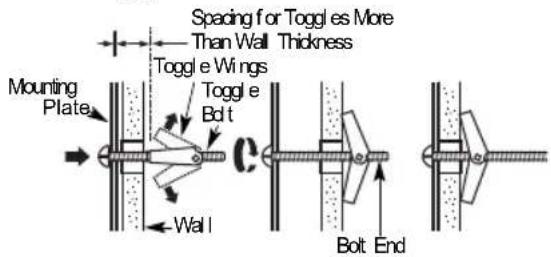
3 Place the mounting plate against the wall and insert the toggle wings into the holes in the wall to mount the plate.
NOTE: Before tightening toggle bolts and wood screw, make sure the bottom of the mounting plate touch the bottom of the cabinet when pushed flush against the wall and that the plate is properly centered under the cabinet.
CAUTION: Be careful to avoid pinching fingers between the back of the mounting plate and the wall.
4 Tighten all bolts. Pull the plate away from the wall to help tighten the bolts.
B4. USE TOP CABINET TEM PLATE FOR PREPARATION OF TOP CABINET
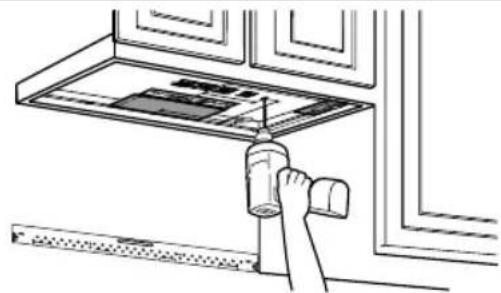
You need to drill holes for the top support screws and a hole large enough for the power cord to fit through.
natural_image
Line drawing of a hand using a tool to adjust or install a wall-mounted device (no text or symbols present)- Read the instructions on the TOP CABINET TEMPLATE.
- Tape it under neath the top cabin et.
- Drill the holes, following the instructions on the TOPCABINET TEMPLATE.
CAUTION: Wear safety goggles when drilling holes in the cabinet bottom.
B5. ADAPTING M ICROWAVE BLOWER FOR OUTSIDE BACK EXHAUST
1 Remove and save screw that holds blower motor to microwave.
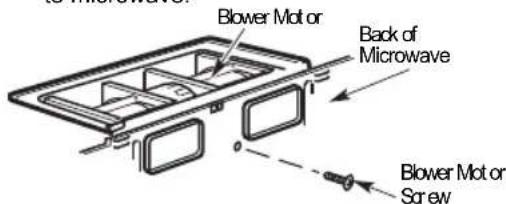
2 Carefully pull out the blower unit. The wires will extend far enough to allow you to adjust the blower unit.
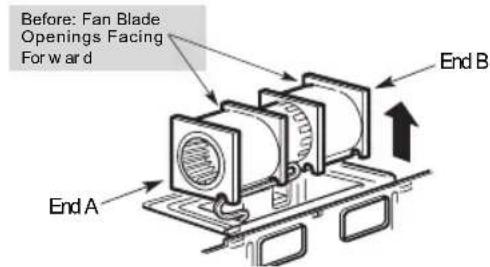
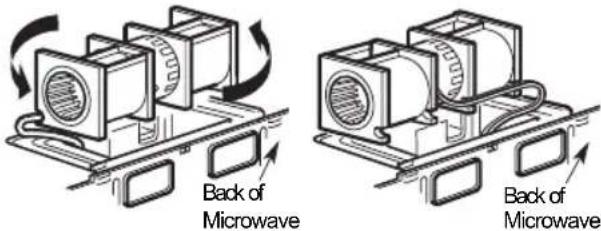
3 Roll the blower unit 90° Before Rotation
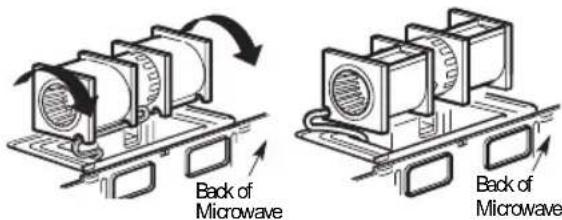
Before Rotation After Rotation
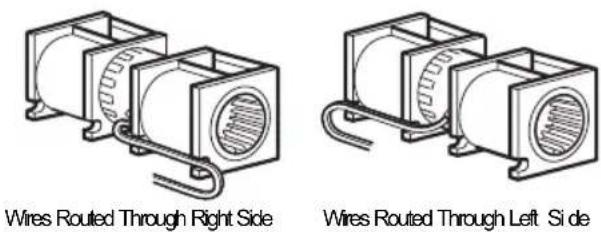
5 Gen tly r remove the wi r es from the grooves. Rerout e the wi r es th r ough gr ooves on other si de of the blower unit.
Before Rerouting After Rerouting
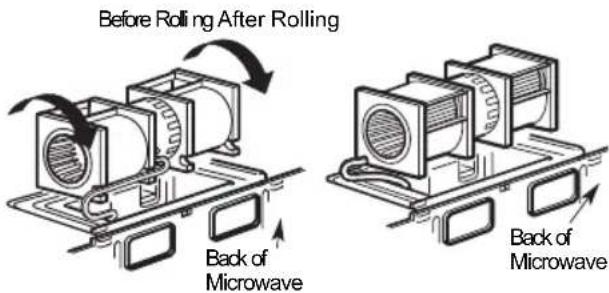
6 Roll the blower unit 90° so that fan blade openings are facing out the back of the mi or owave.
7 Remove the knockout plates in the back of the unit with snips. (For some models) Knockout Plates:
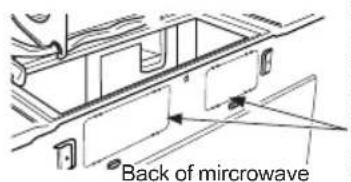
Knockout Plates: Snip all 4 webs on each knockout panel and remove the metal knockouts for rear airflow. Please take care to remove any sharp edges created from removing the knockout plates.
8 Place the blower unit back into the opening.
AFTER: Fan Blade Openings Facing Back
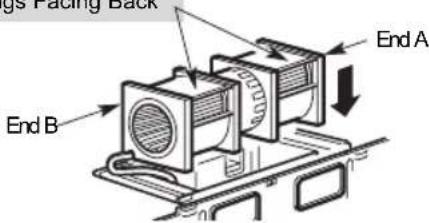
CAUTION: Do not pull or stretch the blower unit wiring. Make sure the wires are not pinched, and that they are properly secured.
NOTE: The blower unit exhaust openings should match exhaust openings on rear of microwave oven.
9 Secure the blower unit to the microwave with the original screw.
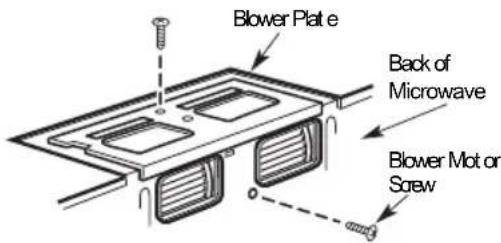
10 Replace the blower plate in the same position as before with the screw. Make sure the screw is tight.
11 Attach the exhaust adaptor to the rear of the oven by sliding it into the guides at the top center of the back of the oven.
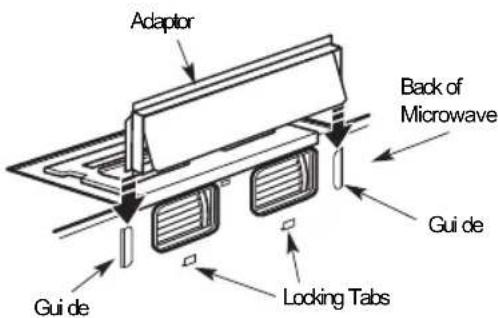
Push in securely until it is in the lower locking tabs. Take care to assure that the damper hinge is installed so that it is at the top and that the damper swings freely.
B6. MOUNT THE M ICROWAVE OV EN
natural_image
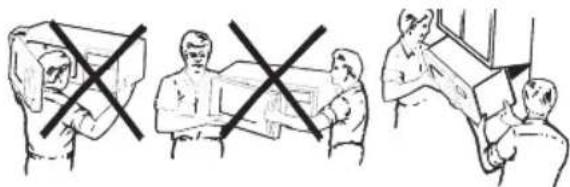
Three-panel line drawing showing a person handling boxes and another with crossed-out boxes, no text or symbols present.FOR EASIER INSTALLATION AND PERSONAL SAFETY, WE RECOMM END TH AT TWO PEOPLE INSTALL THIS MICROWAVE OVEN.
IMPORTANT: Do not grip or use the handle or heat shield during installation. Do not remove the car dboar d spacer s between the heat shield and door.
NOTE: If your cabinet is metal, use the n ylon gr ommet around the power cord h o l e t o pr event cutting of the cord.
NOTE: We recommend using filler blocks if the cabinet front hangs below the cabinet bottom shelf.
IMPORTANT: If filler blocks are not used, case damage may occur from over tightening screws.
NOTE: When mounting the mi cr owave oven, thread
power cord through hole in bottom of top cabinet. Keep it tight throughout Steps
1–3. Do not pinch cord or lift oven by pulling cord.
1 Lift microwave, tilt it forward, and hook slots at back bottom edge onto four lower tabs of mounting plate.
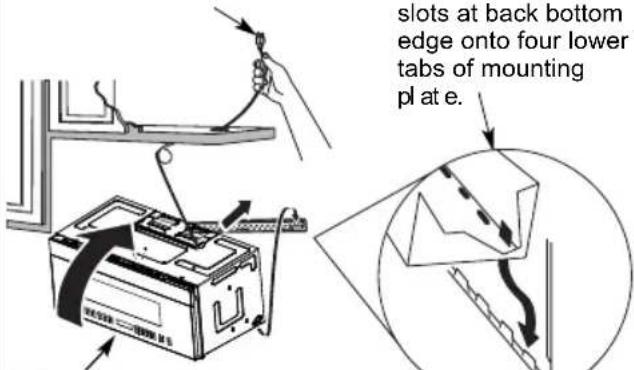
2 Rotate front of oven up again n st cabi net bottom.
3 Insert a self-aligning screw through top center cabinet hole. Temporarily secure the oven by turning the screw at least two full turns after the threads have engaged. (It will be completely tightened later.) Be sure to keep power cord tight. Be careful not to pinch the cord, especially when mounting flush to bottom of cabinet.
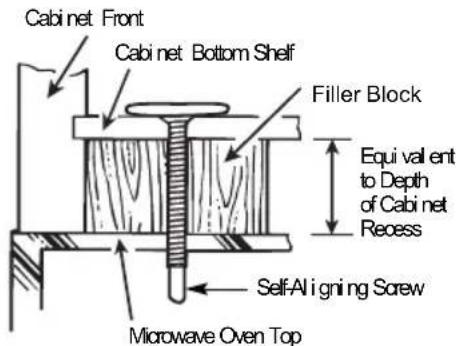
4 Attach the microwave oven to the top cabinet.
5 Insert 2 self-aligning screws through outer top cabinet holes. Turn two full turns on each screw.
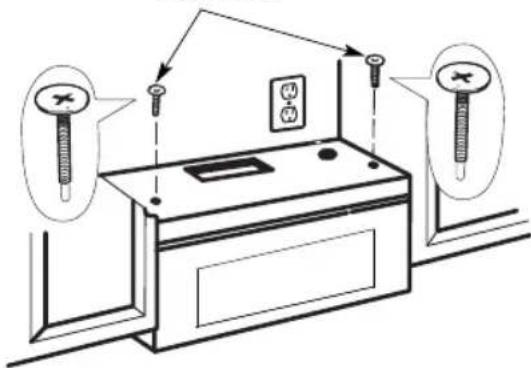
7 Tighten the outer two screws to the top of the microwave oven. (While tightening screws, hold the microwave oven in place against the wall and the top cabinet.)
natural_image
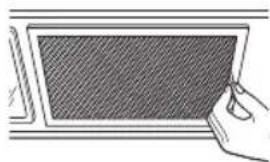
Illustration of a hand holding a rectangular device with a mesh screen (no text or symbols visible)8 In stall grease filter s. See the U se &&& and Car e packed with t h e microwave.
C | RECIRCULATING (Non-Vent ed Ductless)
INSTALLATION OVERVIEW
C1. Attach Mounting Plate to Wall
C2. Prepare e Top Cabi net
C3. Check Blower Plate
C4. Mount the Microwave Oven
C5. Install or change Charcoal Filter
I M PORTAN T NO T ES:
- Make sure the screws for the blower motor and blower plate are securely tightened when they are re installed. This will help to prevent excessive vibration.
• Make sure the motor wiring has been properly routed and secured, and that the wires are not pinched.
natural_image
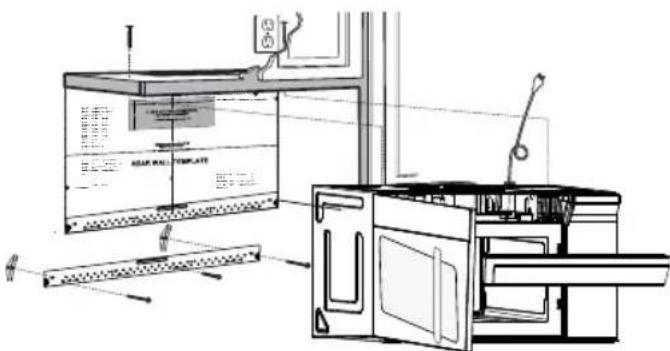
Technical line drawing of a kitchen appliance setup with a rack, oven, and door (no text or symbols)C1. ATTACH THE MOUNTING PLATE TO THE WALL
natural_image
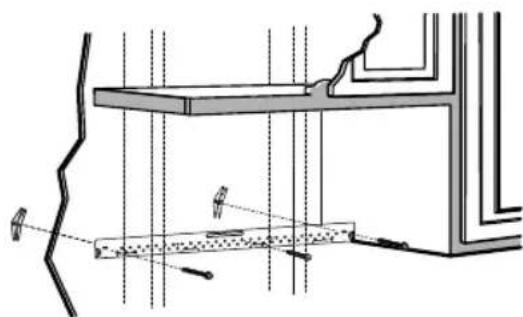
Architectural cross-section diagram showing structural layers and window connections (no text or labels)Attach the plate to the wall using toggle bolts. At least one wood screw must be used to attach the plate to a wall stud.
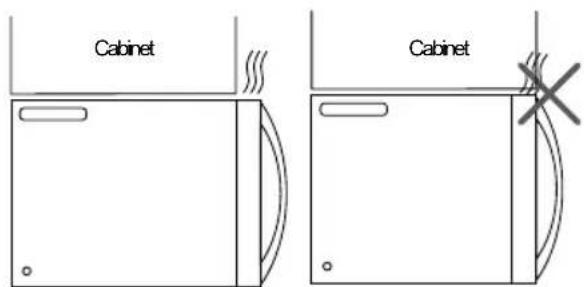
NO T E: If the cabinet depth including the cabinet doors is more than 13""" then the unit must be spaced out from wall using adequate materials supporting 150 lbs to allow proper top vent air exhaust/ intake.
1 Remove the toggle wings from the bolts.
2 Insert the bolts into the mounting plate through the holes designated to go into drywall and reattach the toggle wings 16" (19 mm) onto each bolt.
To use toggle bolts:
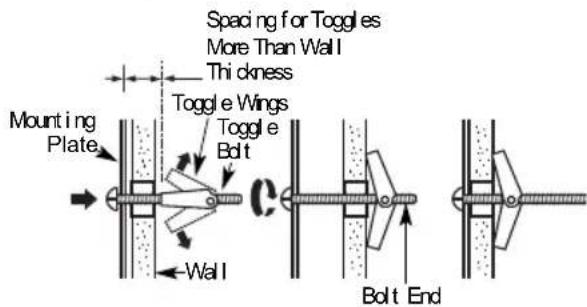
3 Place the mounting plate against the wall and insert the toggle wings into the holes in the wall to mount the plate.
NOTE: Before tightening toggle bolts and wood screw, make sure the bottom of the mounting plate touch the bottom of the cabinet when pushed flush against the wall and that the plate is properly centered under the cabin et.
CAUTION: Be careful to avoid pinching fingers between the back of the mounting plate and the wall.
4 Tighten all bolts. Pull the plate away from the wall to help tighten the bolts.
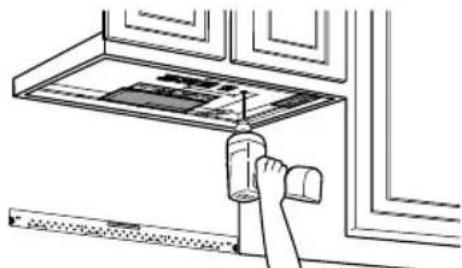
C2. USE TOP CABINET TEM PLATE FOR PREPARATION OF TOP CABINET
You need to drill holes for the top support screws and a hole large enough for the power cord to fit through.
natural_image
Line drawing of a hand holding a spray bottle over a kitchen appliance (no text or symbols)- Read the instructions on the TOP CABINET TEMPLATE.
- Tape it under neath the top cabin et.
NOTE: Adjust top template accordingly if the microwave is being spaced out from the wall due to cabinet depth (including cabinet doors) of more th a 13""".
- Drill the holes, following the instructions on the TOP CABINET TEMPLATE.
CAUTION: Wear safety goggles when drilling holes in the cabinet bottom.
C3. CHECK BLOWER PLATE
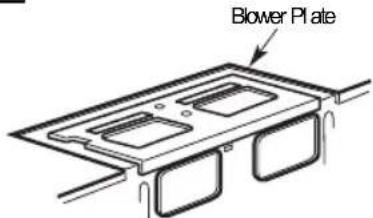
- Place the microwave in its upright position, with top of the unit facing up.
- Check to see that the blower plate is correctly installed on the unit.
he
natural_image
Illustration of three scenes showing people in different settings with crossed-out X marks (no text or symbols)FOR EASIER INSTALLATION AND PERSONAL SAFETY, WE RECOMMEND TH AT TWO PEOPLE INSTALL THIS MICROWAVE OVEN.
IMPORTANT: Do not grip or use the handle or heat shield during installation. Do not remove the cardboard spacer s between the heat shield and door.
NOTE: If your cabinet is metal, use the n ylon gr ommet around the power cord h o l e t o pre event cutting of the cord.
NOTE: We recommend using filler blocks if the cabinet front hangs below the cabinet bottom shelf. IMPORTANT: If filler blocks are not used, case damage may occur from overtightening screws.
NOTE: When mounting the mi cr owave oven, thread power cord through hole in bottom of top cabinet. Keep it tight throughout Steps
1–3. Do not pinch cord or lift oven by pulling cord.
1 Lift microwave, tilt it forward, and hook slots at back bottom edge onto four lower tabs of mounting pl at e.
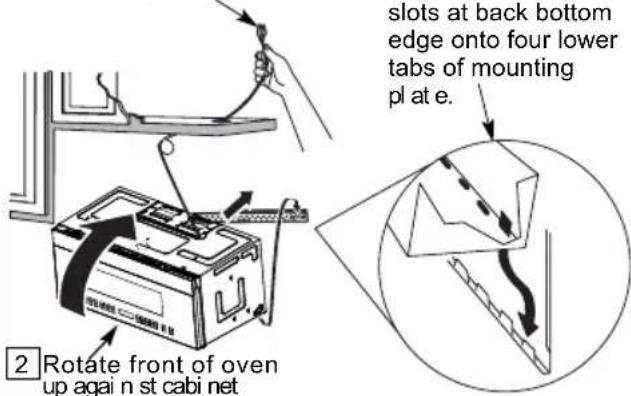
2 Rotate front of oven up again n st cabi net bottom.
3 Insert a self-aligning screw through top center cabinet hole. Temporarily secure the oven by turning the screw at least two full turns after the threads have engaged. (It will be completely tightened later.) Be sure to keep power cord tight. Be careful not to pinch the cord, especially when mounting flush to bottom of cabinet. Cabinet Front
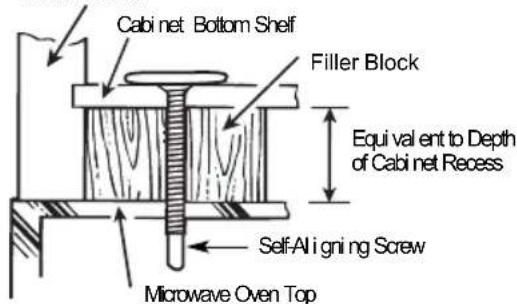
4 Attach the microwave oven to the top cabinet.
5 Insert 2 self-aligning screws through outer top cabinet holes. Turn two full turns on each screw.
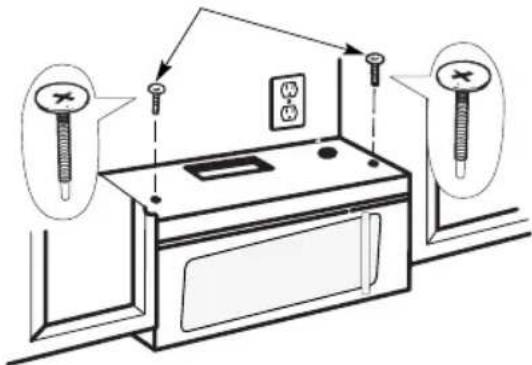
7 Tighten the outer two screws to the top of the microwave oven. (While tightening screws, hold the microwave oven in place again st the wall and the top cabinet.)
natural_image
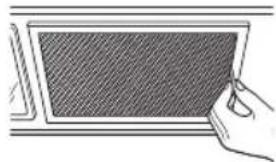
Illustration of a hand holding a tablet with a stylus, no text or symbols present8 In stall grease filters. See the Use &&&and Care packed with the microwave.
C5. INSTALLING OR CHANGE THE CHARCOAL FILTER (Some Models)
NOTE: The charcoal filter is factory installed in some models. Refer to the Use and Care to see if yours is factory installed and for replacement information.
For models without the recirculation filter access door, follow these steps to replace or install a charcoal filter.
1 Unplug microwave oven or disconnect power.
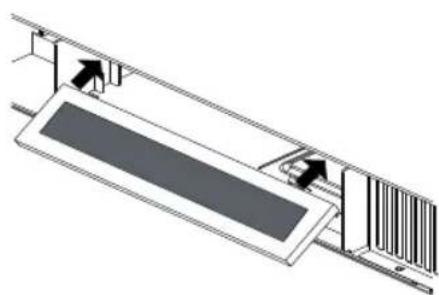
2 Open the mi or owave door and r remove the two vent mounting screws ;located on top of the microwave using a #1 Phillips screwdriver.
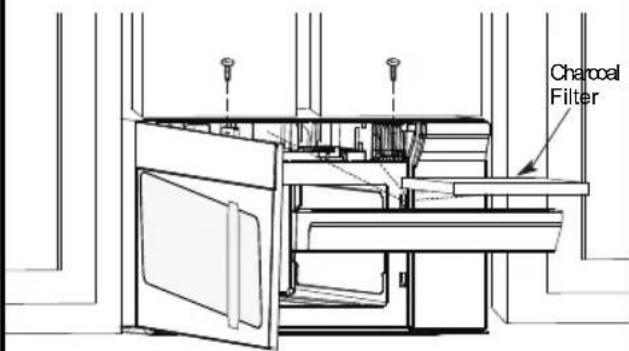
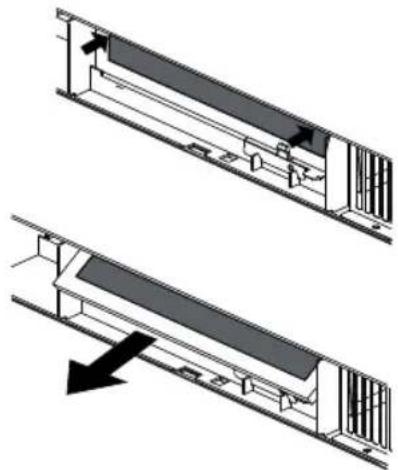
3 Remove the charcoal filter by pushing the top of the filter inwards, then pull it forward out from the unit.
natural_image
Technical diagram showing two views of a mechanical assembly with no visible text or symbols4 Slide the top of the new charcoal filter into the top of the filter cavity.
natural_image
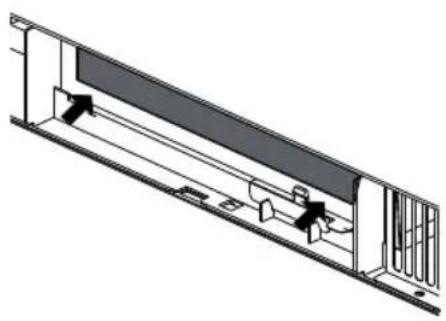
Technical diagram of a mechanical assembly with no visible text or symbols5 Press the bottom of charcoal filter to place it into the correct position.
natural_image
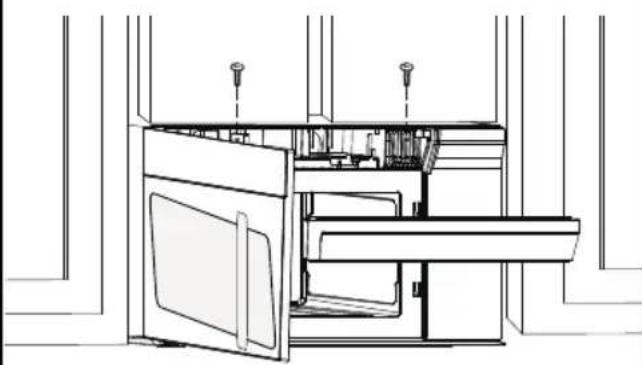
Technical line drawing of a mechanical assembly with no visible text or symbols6 Reinstall the vent by sliding the bottom of the vent into place. Push the vent top into position and slide right into place. Replace the two vent mounting screws located on top of the microwave using a #1 Phillips screwdriver.
natural_image
Technical line drawing of a cabinet interior with doors and fixtures (no text or symbols)7 Close the microwave door. Plug in microwave oven or reconnect power.
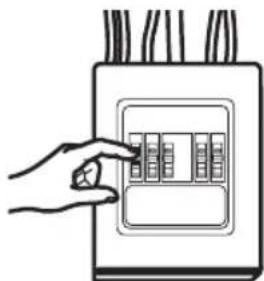
- Make sure the mi cr owave oven has been installed according to instructions.
- Replace house f use or turn breaker back on.
natural_image
Hand holding a hand pointing at an electrical meter panel (no text or symbols visible)-
Remove all packing material from the microwave oven.
-
Read the words make
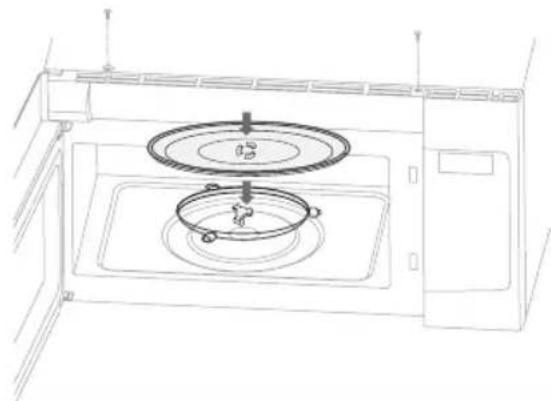
- Install turntablering and glass tray in cavity.
natural_image
Line drawing of a microwave oven with two circular chambers and a central fan (no text or symbols)- KEEP INSTALLATION INSTRUCTIONS FOR THE LOCAL INSPECTOR'S USE.
- Plug power cord into a separate and dedicated 15- to 20-amp electrical outlet.
- FILL OUT PRODUCT REGISTRATION CARD AN SEND IN.
RADIO INTERFERENCE
Operation of the microwave oven may cause interference to your radio, TV, or similar equipment.
When there is interference, it may be reduced or eliminated by taking the following measures:
Clean door and sealing surface of the oven.
Reorient the receiving antenna of radio or television.
Relocate the microwave oven with respect to the receiver.
Move the microwave oven away from the receiver.
Plug the microwave oven into a different outlet so that microwave oven and receiver are on different branch circuits.
CAUTION: Personal Injury Hazard
Tightly-closed utensils could explode. Closed containers should be opened and plastic pouches should be pierced before cooking.
There may be certain non-metallic utensils that are not safe to use for microwaving. If in doubt, you can test the utensil in question by following the procedure below.
Utensil Test:
Fill a microwave-safe container with 1 cup of cold water (250ml) along with the utensil in question.
Cook on maximum power for 1 minute.
Carefully feel the utensil. If the empty utensil is warm, do not use it for microwave cooking.
Do not exceed 1 minute cooking time.
Materials you can use in microwave oven
| Utensils | Remarks |
| Browning dish | Follow manufacturer* instructions. The bottom of browning dish must be at least 3/16 inch (5mm) above the turntable. Incorrect usage may cause the turntable to break. |
| Dinnerware | Microwave-safe only. Follow manufacturer's instructions. Do not use cracked or chipped dishes. |
| Glass jars | Always remove lid. Use only to heat food until just warm. Most glass jars are not heat resistant and may break. |
| Glassware | Heat-resistant oven glassware only. Make sure there is no metallic trim. Do not use cracked or chipped dishes. |
| Oven cooking bags | Follow manufacturer* instructions. Do not close with metal tie. Make slits to allow steam to escape. |
| Paper plates and cups | Use for short*erm cooking/warming only. Do not leave oven unattended while cooking. |
| Paper towels | Use to cover food for reheating and absorbing fat. Use with supervision for a short-term cooking only. |
Materials you can use in microwave oven
Utensils Remarks
| Plastic | Microwave-safe only. Follow the manufacturer* instructions. Should be labeled "Microwave Safe". Some plastic containers soften, as the food inside gets hot. "Boiling bags" and tightly closed plastic bags should be slit, pierced or vented as directed by package. |
| Plastic wrap | Microwave-safe only. Use to cover food during cooking to retain moisture. Do not allow plastic wrap to touch food. |
| Thermometers | Microwave-safe only (meat and candy thermometers). |
| Wax paper | Use as a cover to prevent splattering and retain moisture. |
Materials to be avoided in microwave oven
| Utensils | Remarks |
| Aluminum tray | May cause arcing. Transfer food into microwave-safe dish. |
| Food carton with metal handle | May cause arcing. Transfer food into microwave-safe dish. |
| Metal or metal-trimmed utensils | Metal shields the food from microwave energy. Metal trim may cause arcing. |
| Metal twist ties | May cause arcing and could cause a fire in the oven. |
| Paper bags | May cause a fire in the oven. |
| Plastic foam | Plastic foam may melt or contaminate the liquid inside when exposed to high temperature. |
| Wood | Wood will dry out when used in the microwave oven and may split or crack. |
Remove the oven and all materials from the carton and oven cavity. Your oven comes with the following accessories:
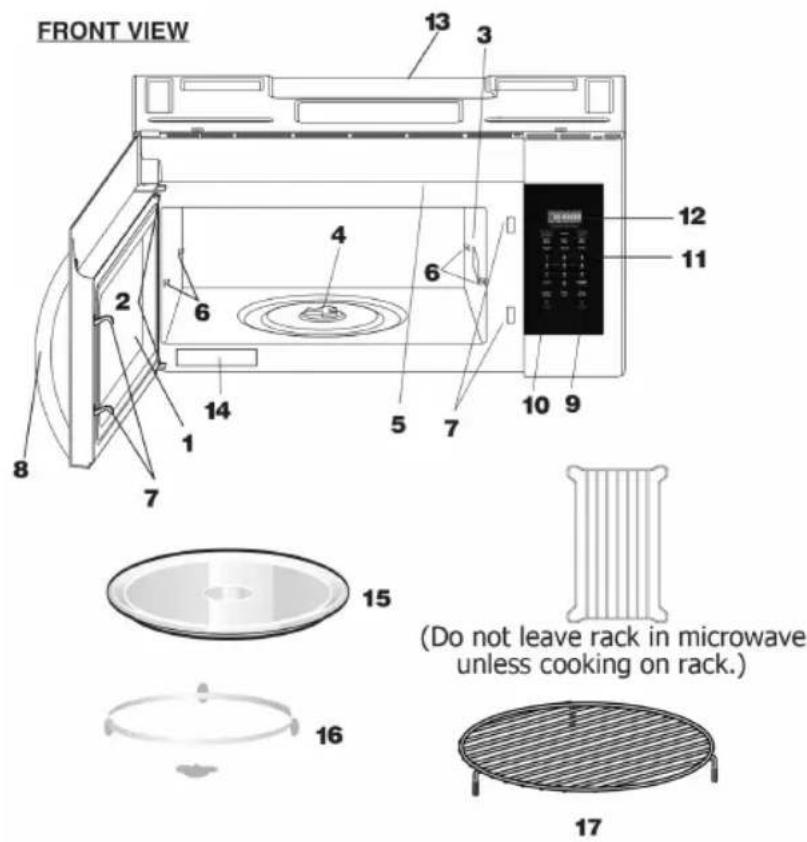
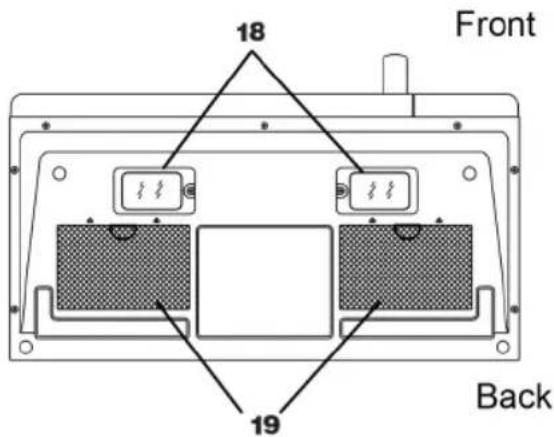
BOTTOM VIEW
- Microwave Oven Door
- Door Hinges
- Waveguide Cover
(DO NOT REMOVE)
4. Turntable motor shaft
5. Microwave oven light
6. Rack holders
7. Safety door latches
8. Handle
9. Light Button
10. Vent button
11. Control Panel
12. Display Panel
13. Ventilation
14. Menu label
15. Removable Turntable Plate
16. Removable Turntable Support
17. Rack for 2-level cooking/reheating
18. Light cover/Filter Access Door
19. Grease Filters
Using Vent Fan
The pad controls the 2-speed vent fan. If the vent fan is OFF, the first touch of the vent pad will turn the fan from HIGH > LOW > OFF
Using Cooktop Light
The pad controls the cooktop light. If the light is OFF, the first touch of the light pad will turn the light from HIGH > LOW > OFF
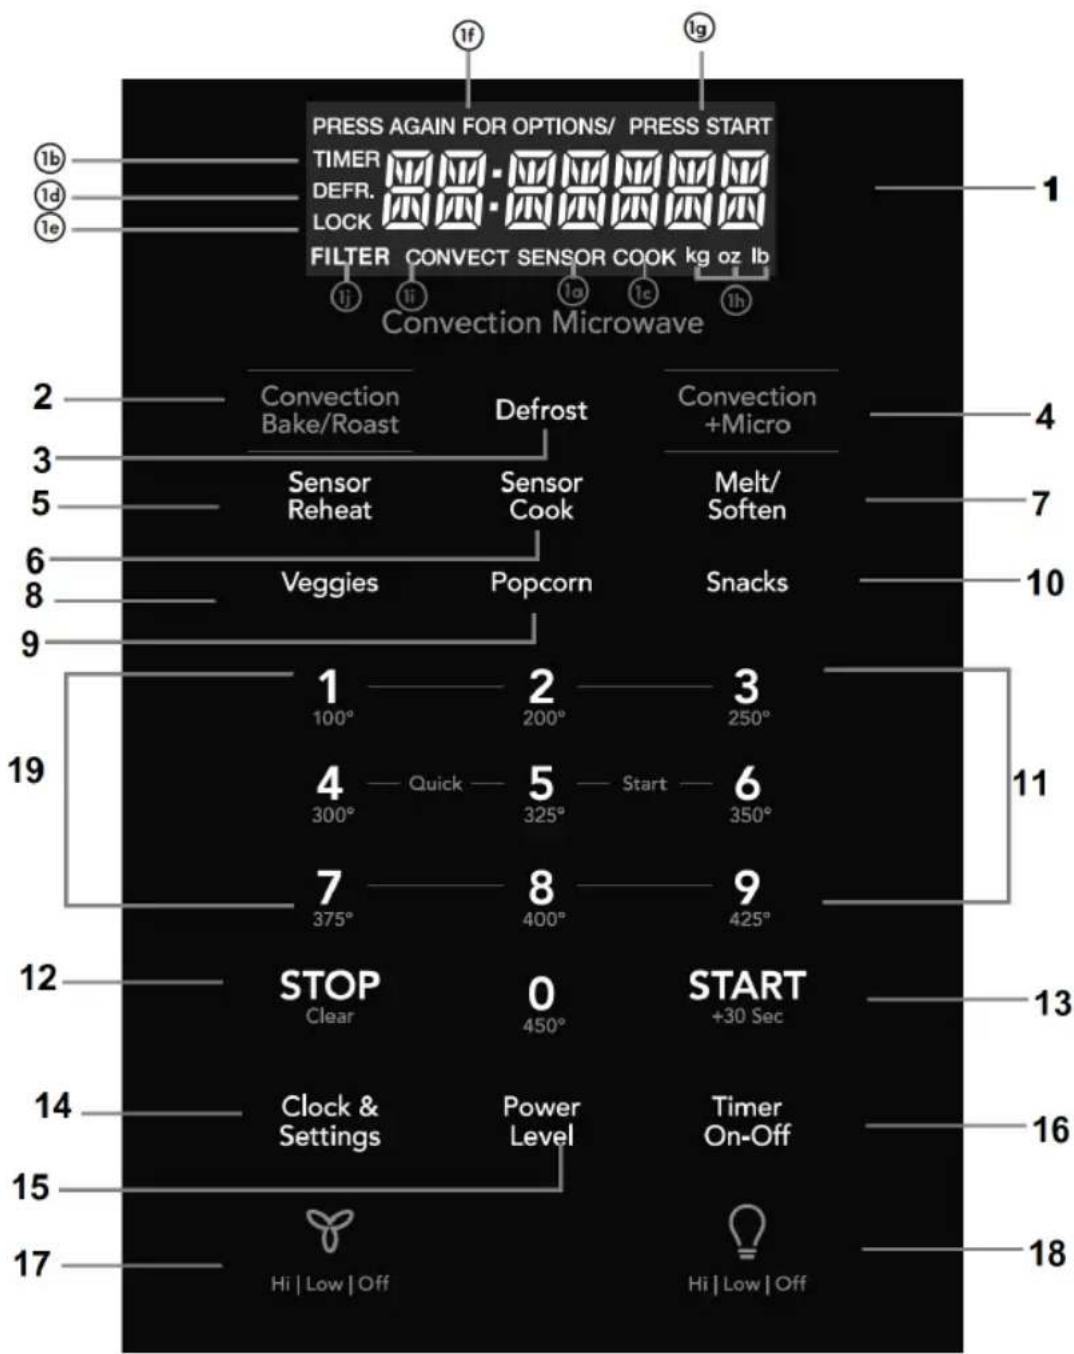
- Display - features as a clock and indicator that show time, cooking time settings, cook power, sensor, quantities, weights, and cooking functions
1a. SENSOR - when using sensor cook
1b. TIMER - when timer is being set or running
1c. COOK - starting microwave cooking
1d. DEFR - defrosting food
1e. LOCK - control lock
1f. PRESS AGAIN FOR OPTIONS - additional options are available
1g. PRESS START - before a valid function
1h. KG, OZ, LB - when choosing weight
1i. CONVECT - when choosing convect
1j. FILTER - replace filter
-
Convection Bake/Roast
-
Defrost
-
Convection + Micro
-
Sensor Reheat (4 settings)
-
Sensor Cook
-
Melt/Soften
-
Veggies
-
Popcorn
-
Snacks
-
Numerical Pads
-
Stop/Clear
-
Start (+30 seconds)
-
Clock & Settings
-
Power Level (11 power levels)
-
Timer (On-Off)
-
Exhaust (High/Low/Off) - use to turn the exhaust fan off, or to adjust speed
-
Surface Light - press to activate and adjust brightness of lights
-
Quick start (9 instant key settings)
ONE TOUCH COOKING
Popcorn:
The microwave oven lets you pop 3.3, 3.0, 1.75 oz bags of commercially packaged microwave popcorn. Pop only one package at a time. If you are using a microwave popcorn popper, follow manufacturer's instructions.
Touch POPCORN.
- Press again for options
- Press START
Vegetables:
The microwave can cook potatoes, frozen vegetables, and fresh vegetables.
- Touch VEGGIES
- Press again for options
- Press START
| FOOD AMOUNT | PROCEDURE | |
| Potato 1-4 pieces | Cooking times | are based on an average 8 oz. potato.Pierce with forks in several places. Place on paper towel on turntable. Press the VEGGIES pad one time for potato. After cooking, remove from oven and let stand for 5 minutes |
| Fresh Vegetables• Broccoli• Brussels Sprouts• Cabbage• Cauliflower• Spinach• Zucchini• Carrots• Corn on cob• Green beans• Winter Squash | 2 cups | Wash and place in casserole. Don’t add water if the vegetables have been washed. Cover with lid for tender vegetables. Use plastic wrap for tender-crisp vegetables. Press VEGGIES twice. After cooking, stir. Let stand for 2-5 mins.Place in casserole. Add 1-4 tbsp. water. Cover with lid for tender vegetables. Use plastic wrap cover for tender crisp vegetables. Press VEGGIES twice for fresh vegetables. After cooking, stir, if possible. Let stand, covered, for 2-5 minutes. |
| FrozenVegetables | 2 cups | Don’t add water if the vegetables have been washed. Press VEGGIES three times. After cooking, stir and let stand, covered, for 3 mins. |
ONE TOUCH COOKING
Snack:
Snack Menu is for cooking/heating foods for a short amount of time.
- Touch SNACKS
- Press again to cycle through the menu.
• CHOCOLATE CHIP COOKIES - FROZEN MW PIZZA
- HOT DOGS
• FROZEN KID'S MEAL - MEAL IN A CUP
-
SOUP
-
Press START
-
Press the numerical pad to choose the portions.
-
Press START
Melt/Soften:
The oven uses lower power to melt and soften items
- Touch MELT/SOFTEN.
- Press again to cycle through the menu:
- BUTTER
- CHOCOLATE
- ICE CREAM
-
CREAM CHEESE
-
Press START
-
Press the number keys to set the weight.
-
Press START
CONVECTION COOKING
There are ten temperatures of convection:
- 100F
- 200F
- 250F
- 300F
- 325F
- 350F
- 375F
- 400F
- 425F
- 450F
Convection cooking uses a heating element to raise the temperature of the air inside the oven. Any oven temperature from 100F to 450F may be set. A fan gently circulates this heated air throughout the oven, over and around the food.
Because the heated air is kept constantly moving, not permitting a layer of cooler air to develop around the food, some foods cook faster than in regular oven cooking.
For best results, always use the round wire rack when convecting cooking. Reduce package/recipe temperature 25F for baked goods. The round wire rack is required for good air circulation and even browning.
USING CONVECTION WITH PREHEATING
- Press Convection Bake/Roast once (PREHEAT ENTER TEMP)
- Press the number on the keypad on the desired temperature (see below number. ex: 375F, press 7...)
- Press START and the oven will PREHEAT
- Temperature will show on the display, once it's done preheating. Open the door when it's done.
- Place the food in the oven and press the number keys to set the cooking time.
- Press START
USING CONVECTION WITHOUT PREHEATING
- Press Convection Bake/Roast twice (BAKE ROAST ENTER TEMP)
- Press the number on the keypad on the desired temperature (see below number. ex: 375F, press 7...)
- Press START
- Place the food in the oven and press the number keys to set the cooking time.
- Press START
MICROWAVE + CONVECTION COMBINATION
- Press Convection + Micro (BAKE 325 °F)
- Press START
- Place the food in the oven and press the number keys to set the cooking time.
- Press START
COOKWARE TIPS
- Use the round wire rack during convection baking.
• Always preheat the oven before convection baking. - Avoid opening the oven door during cooking - each time the door is opened, the oven loses heat and this will cause uneven baking.
- Metal pans are recommended for all types of baked products, but especially where browning or crusting is important.
- Dark or dull finish metal pans are best for bread and pies because they absorb heat and produce crisper crust.
- Shiny aluminum pans are best for cakes, cookies, or muffins.
- Glass/glass ceramic casserole or baking dishes are best suited for egg and cheese recipes.
- FOR COMBINATION COOKING, use glass or glass ceramic containers. Be sure not to use items with metal trim as it may cause arcing (sparking) with oven wall or oven shelf, damaging the cookware, the shelf, or the oven.
- FOR COMBINATION COOKING, use glass or glass ceramic containers. Be sure not to use items with metal trim as it may cause arcing (sparking) with oven wall or oven shelf, damaging the cookware, the shelf, or the oven.
SENSOR COOKING
Sensor cooking has an electronic controlled sensor that detects the vapor (moisture and humidity) emitted from the food as it heats. The sensor adjusts the cooking times and power level for various foods and quantities automatically.
BEFORE USING SENSOR COOKING
- Be sure the exterior of the cooking container and the interior of the oven are dry. Wipe off any moisture with a dry cloth or paper towel.
- The oven works with foods at normal storage temperature. For example, popcorn would be at room temperature.
- More or less food than the quantity listed in the chart should be cooked following the guidelines in any microwave cookbook.
- During the first part of SENSOR COOKING, food name will appear in the display. Do not open the oven door or press the STOP/CLEAR pad during this part of the cycle as it will interrupt the process. When the sensor detects the vapor emitted from the food, remainder of cooking time will appear. Door maybe opened when remaining cooking time appears in the display. Stir or season food as desired.
- If the sensor does not detect vapor properly when popping popcorn, the oven will turn off and the correct time of day will display. It will also show an ERROR CODE and the oven will turn off.
- Check food for temperature after cooking. If additional time is needed, continue to cook manually
COVERING FOODS
Some cooks cook better when covered. Use
- Casserole lid
- Plastic wrap
- Wax Paper
Be careful when removing any covering to allow steam to escape away from you.
SENSOR COOK MENU:
- Touch SENSOR COOK.
- Press again to cycle through the menu:
- Bacon
- Frozen Dinner
- Rice
- Frozen Breakfast
-
Frozen Pizza
-
Press START
USING SENSOR REHEAT
- Touch SENSOR REHEAT
- Press again to cycle through the menu:
- Beverage
- Pizza
- Soup Sauce
-
Casserole
-
Press START
AUTO DEFROST
The auto defrost feature provides with the best defrosting method for frozen foods. The cooking guide will show you which defrost sequence is recommended for the food you are defrosting.
USING AUTO DEFROST
- Touch AUTO DEFROST
- Press again to cycle through the menu:
- Meat
- Poultry
- Fish
- Press START
- Press the number keys to set the weight
- Press START
For added convenience, the AUTO DEFROST includes a built-in beep mechanism that reminds you to check, turn over, separate, or rearrange the food in order to get the best defrost results. Three different defrosting levels are provided: (available is 0.1-6 lbs)
- MEAT
- POULTRY
- FISH
MANUAL DEFROST
You can defrost any frozen food, either raw or previously cooked, by using power level for 30%. For either raw or previously cooked frozen food, the rule of thumb is approximately 4 minutes per pound. For example, defrost 4 minutes for 1 pound of frozen spaghetti sauce. Always stop the oven periodically to remove or separate the portions that are defrosted. If food is not defrosted at the end of the estimated defrosting time, program the oven in 1 minute increments on power level 30% until totally defrosted. When using plastic containers from the freezer, defrost only long enough to remove from the plastic in order to place in a microwave-safe dish.
OPERATING TIPS
- For best results, remove fish, shell fish, meat and poultry from its original closed paper or plastic package (wrapper). Otherwise, the wrap will hold steam and juice close to the food, which can cause the outer surface of the food to cook.
- For best results, roll your ground meat into a ball before freezing. During the DEFROST cycle, the microwave will signal when its time to turn the meat over. Scrape off any excess frost from the meat and continue defrosting.
- Place food in a shallow container or on a microwave roasting rack to catch the drips.
- The weight to enter is the net weight in pounds and tenths of pounds (the weight of the food minus the container).
- Before starting, make sure to remove any and all metal twist-ties that often come with frozen food bags, and replace with strings or elastic bands.
- Open containers, such as cartons, before placing in the oven.
• Always slit or pierce plastic pouches/packaging. - Bend plastic pouches of food to ensure even defrosting.
- Always underestimate defrosting time. If defrosted food is still icy in the center, return it to the microwave oven for more defrosting.
- The length of defrosting time varies according to how solidly the food is frozen.
- The shape of the package affects how quickly food will defrost. Shallow packages will defrost more quickly than a deep block.
- As food begins to defrost, separate the pieces. Separated pieces defrost more easily.
- Use small pieces of aluminum foil to shield parts of food, such as chicken wings, leg tips, fish tails, or areas that start to get warm. Make sure that the foil does not touch the sides, top, bottom of the oven. The foil can damage the oven lining.
• For better results, let food stand after defrosting. - Turn over food during defrosting or standing time. Break apart and remove food as required.
- The rack allows several foods to be cooked or reheated at one time. However, for the best cooking and reheating, use Turntable ON function and cook with SENSOR COOKING or AUTO COOKING without the rack. When the rack is used, set time and power level manually. Allow plenty of space around and between the dishes. Pay close attention to the cooking and reheating progress. Reposition the foods and reverse them from the rack to turntable and/or stir them at least once during any cooking or reheating time. After cooking or reheating, stir if possible. Using a lower power level will assist in better cooking and reheating uniformity.
CLOCK & SETTINGS
The microwave oven has settings that allow you to customize the operation for your convenience. Below are functions showing the various settings. Touch the CLOCK & SETTINGS to cycle through the menu.
- Clock
- Control Lock
- Power Save
- Volume: Low/Medium/High/Off
- Pure Air Filter Reset/Off
- Language
- Weight LB/KG
- Demo
SETTING THE CLOCK
The clock can be disabled when the microwave is first plugged in and the STOP/CLEAR is selected. To re-enable the clock:
- Press CLOCK & SETTINGS
- Enter the time using the number pad
- Press START
TIME COOKING
- Press the number on the keypad for the desired time (ex: 5 minutes and 30 seconds, press 5 3 0)
- Press START
INTERRUPTING COOKING
You can stop the oven during a cycle by opening the door. The oven stops heating and the fan turns off, but the light stays on.
- To restart cooking, close the door and Touch START
- If you do not want to continue cooking, open the door and touch STOP
This is a time saving pad that will automatically start cooking 2 seconds after selected.
Numeric key
1, 2, 3.....or 9 can be touched for a 1 minute, 2 minutes or 9 minutes automatic start cooking feature.
1. Press the number on the keypad for the desired time (ex: 2 minutes, press 2)
2. Press START
Note: "Food" will be displayed if a quick start cooking cycle or +30 sec key is not selected within 5 minutes of placing food in the microwave. You must open then close the door again to clear "Food" from the display.
SETTING TIMED COOKING WITH POWER LEVEL
This feature lets you program a specific cook time and power. For best results, there are 11 power level settings in addition to HIGH (100%) power.
- Press the number on the keypad for the desired time (ex: 5 minutes and 30 seconds, press 5 3 0)
- Press POWER LEVEL
- Press START
| PRESS POWER LEVEL PAD NUMBER OF TIMES FOR DESIRED POWER | APPROXIMATE PERCENTAGE OF POWER | COMMON WORDS FOR POWER LEVELS | |
| POWER LEVEL x 1 | 100% | High | |
| POWER LEVEL x 2 | 90% | ||
| POWER LEVEL x 3 | 80% | ||
| POWER LEVEL x 4 | 70% | Medium High | |
| POWER LEVEL x 5 | 60% | ||
| POWER LEVEL x 6 | 50% | Medium | |
| POWER LEVEL x 7 | 40% | ||
| POWER LEVEL x 8 | 30% | Med Low/Defrost | |
| POWER LEVEL x 9 | 20% | ||
| POWER LEVEL x 10 | 10% | Low | |
| POWER LEVEL x 11 | 0% | ||
SETTING TWO-STAGE COOKING
For best results, some recipes call for different power levels during a cook cycle. You can program your oven for two power level stages during the cooking cycle. Suppose you want to set a 2-stage cook cycle. The first stage is a 3 minute cook time at 80% cook power then a 7 minute cook time at 50% cook power.
- Press the numbers on the keypad to set cook time for the first stage. (ex: 3 minutes, press 300)
- Press POWER LEVEL three times
- Press the numbers on the keypad to set cook time for the second stage. (ex: 7 minutes, press 700)
- Press POWER LEVEL six times
- Press START
SETTING CONTROL LOCK
- Press CLOCK & SETTINGS two times to get to CONTROL LOCK
- Press START
- To turn off, touch the CLOCK & SETTINGS and touch START
SETTING POWER SAVE ON/OFF
- Press CLOCK & SETTINGS three times to get to POWER SAVE OFF
- Press START to toggle between ON & OFF
Audible signals are available to guide you when setting and using your oven.
• A programming tone will sound each time you touch a pad
- Three tones signal the end of a kitchen timer countdown
• Three tones signal the end of a cooking cycle
- To adjust, press CLOCK & SETTINGS four times to get to VOLUME ON
- Keep pressing to cycle through the options: ON, OFF, LOW, MED, HIGH
- To set, press START
SETTING FILTER RESET/FILTER OFF
Select FILTER RESET to turn off "FILTER" icon and reset to remind in 6 months; if you want to turn off "FILTER" icon notification and not remind at all, select FILTER OFF and press START
- Press CLOCK & SETTINGS and cycle through until you get to FILTER RESET
- Press START to toggle between FILTER RESET/OFF
SETTING LANGUAGE
There are two languages available: ENGLISH and FRENCH
- Press CLOCK & SETTINGS and cycle through until you get to FRENCH
- Press START to toggle between ENGLISH and FRANCAIS
SETTING WEIGHT TO LB/KG
There are two weight units available: LB/KG
- Press CLOCK & SETTINGS and cycle through until you get to LB/KG
- Press START to toggle between KG to LB
SETTING DEMO MODE ON/OFF
When DEMO mode is on, programming functions will work in a rapid countdown mode with no cooking power
- Press CLOCK & SETTINGS and cycle through until you get to DEMO OFF
- Press START to toggle between ON and OFF
SETTING KITCHEN TIMER
The microwave oven can be used as a kitchen timer. Set up from 99 minutes to 99 seconds. The kitchen timer can be used while the microwave oven is running.
- The timer will not stop if the door is open. To cancel the timer, press TIMER ON-OFF
- Press TIMER ON-OFF
- Use the number keypad for the time to count down to
- Press TIMER ON-OFF to start counting down
OPERATION
USING VENT FAN
The pad controls the 2-speed vent fan. The vent fan will go from HIGH, LOW, OFF.
- Press the VENT icon
- To turn off, cycle through the options until the fan is off.
If the temperature from the range or cooktop below the oven gets too hot, the vent fan will automatically turn on to protect the oven. It may stay on up to an hour to cool the oven.
When this occurs, the vent pad will not turn the fan off.
USING COOKTOP LIGHT
The pad controls the 3-setting cooktop light. The vent fan will go from HIGH, LOW, OFF.
- Press the LIGHT icon
- To turn off, cycle through the options until the fan is off.
TROUBLESHOOTING
Check your problem by using the chart below and try the solutions for each problem. If the microwave oven still does not work properly, contact the nearest authorized service center.
| Trouble Possible Cause Possible Remedy | ||
| Oven won't start | Electrical cord is unplugged. Door is open. Wrong operation is set. | Plug into the outlet. Close the door and retry. Check instructions. |
| Arcing or sparking | Materials to be avoided in microwave oven were used. The oven is operated when empty. Spilled food remains in cavity. | Use microwave-safe cookware only. Do not operate with oven empty. Clean cavity with wet towel. |
| Unevenly cooked food | Materials to be avoided in microwave oven were used. Food is not defrosted completely. Cooking time, power level is not suitable. Food is not turned or stirred. | Use microwave-safe cookware only. Completely defrost food. Use correct cooking time, power level. Turn or stir food. |
| Overcooked foods | Cooking time and/or power level is not suitable. | Use correct cooking time and/or power level. |
| Undercooked food | Materials to be avoided in microwave were used. Oven ventilation ports are restricted. Cooking time and/or power level is not suitable. Food is not turned or stirred. | Use correct cooking time and/or power level. Check to see that oven ventilation ports are not restricted. Use correct cooking time and/or power level. Turn or stir food. |
| Improper Defrosting | Materials to be avoided in microwave were used. Cooking time, power level is not suitable. Food is not turned or stirred. | Use microwave-safe cookware only. Use correct cooking time, power level. Turn or stir food. |

ZLINE
KITCHEN AND BATH
Three Locations:
350 Parr Circle
Reno, NV 89512
916 Delaware Avenue
Marysville, OH 43040
319 Rowland Mill Road
Briceton, TN 38317
www.zlinekitchen.com
1-614-777-5004

- ZLINE
- CONTENTS
- PRECAUTIONS
- IMPORTANT SAFETY INSTRUCTIONS
- Electric Shock Hazard
- PARTS AND TOOLS
- PARTS INCLUDED
- NOTES
- USERS MANUAL
- PLACEMENT OF THE MOUNTING PLATE
- DETERMINING WALL PLATE LOCATION UNDER YOUR CABINET
- THE M ICROWAVE M UST BE LEV EL.
- | INSTALLATION TYPES (Choose A, B or C)
- A OUTSIDE TOP EXHAUST (VERTICAL DUCT)
- B OUTSIDE BACK EXHAUST (HORIZONTAL DUCT)
- C RECIRCU LATIN G (NON-VENTED DUCTLESS)
- INSTALLATION INSTRUCTIONS FOR EXTERNAL EXHAUST DUCTING
- Exhaust connection:
- Maximum duct length:
- EXTERNAL EXHAUST DUCTING
- OUTSIDE TOP EXHAUST (EXAMPLE ONLY)
- OUTSIDE BACK EXHAUST (EXAMPLE ONLY)
- A | OUTSIDE TOP EXHAUST (Vertical Duct)
- INSTALLATION OVERVIEW
- A1. ATTACH THE MOUNTING PLATE TO THE WALL
- A2. USE TOP CABINET TEMPLATE FOR PREPARATION OF TOP CABINET
- A3. ADAPTING MICROWAVE BLOWER FOR OUTSIDE TOP EXHAUST
- A6. ADJUST THE EXHAUST ADAPTOR
- A7. CONNECTING DUCTWORK
- B | OUTSIDE BACK EXHAUST (Horizontal Duct)
- B1. PREPARING THE REAR WALL FOR OUTSIDE BACK EXHAUST
- B2. REMOVE BLOWER PLATE
- I MPO RTANT NO T ES:
- B4. USE TOP CABINET TEM PLATE FOR PREPARATION OF TOP CABINET
- B5. ADAPTING M ICROWAVE BLOWER FOR OUTSIDE BACK EXHAUST
- B6. MOUNT THE M ICROWAVE OV EN
- C | RECIRCULATING (Non-Vent ed Ductless)
- C1. ATTACH THE MOUNTING PLATE TO THE WALL
- C2. USE TOP CABINET TEM PLATE FOR PREPARATION OF TOP CABINET
- C3. CHECK BLOWER PLATE
- C5. INSTALLING OR CHANGE THE CHARCOAL FILTER (Some Models)
- RADIO INTERFERENCE
- Using Vent Fan
- Using Cooktop Light
- ONE TOUCH COOKING
- Popcorn:
- Vegetables:
- Snack:
- Melt/Soften:
- CONVECTION COOKING
- USING CONVECTION WITH PREHEATING
- USING CONVECTION WITHOUT PREHEATING
- MICROWAVE + CONVECTION COMBINATION
- COOKWARE TIPS
- SENSOR COOKING
- BEFORE USING SENSOR COOKING
- COVERING FOODS
- SENSOR COOK MENU:
- USING SENSOR REHEAT
- AUTO DEFROST
- USING AUTO DEFROST
- MANUAL DEFROST
- OPERATING TIPS
- CLOCK & SETTINGS
- SETTING THE CLOCK
- TIME COOKING
- INTERRUPTING COOKING
- SETTING TIMED COOKING WITH POWER LEVEL
- SETTING TWO-STAGE COOKING
- SETTING CONTROL LOCK
- SETTING POWER SAVE ON/OFF
- SETTING FILTER RESET/FILTER OFF
- SETTING LANGUAGE
- SETTING WEIGHT TO LB/KG
- SETTING DEMO MODE ON/OFF
- SETTING KITCHEN TIMER
- OPERATION
- TROUBLESHOOTING
- KITCHEN AND BATH
Brand : ZLine
Model : MWOOTR30
Category : Microwave