
NetworkAIR 1000 AP7003 - Air Conditioning APC - Free user manual and instructions
Find the device manual for free NetworkAIR 1000 AP7003 APC in PDF.


| Product Type | Portable Air Conditioner |
| Brand | APC |
| Model | NetworkAIR 1000 AP7003 |
| Cooling Capacity | 7,200 BTU/h |
| Power Source | 115 V, 60 Hz |
| Rated Current | 6.2 A |
| Rated Input (Cooling) | 692 W |
| Rated Input (Dehumidify) | 660 W |
| Dimensions (W x D x H) | 12.85 x 16.25 x 30.75 in (326 x 415 x 788 mm) |
| Net Weight | 74 lbs (34 kg) |
| Shipping Weight | 99 lb (45 kg) |
| Compressor Type | Rotary |
| Refrigerant | HCFC R22 |
| Airflow | 170 CFM |
| Sound Level | 51.5 dB |
| Dehumidification Capacity | 0.26 gal/hr max (1.3 L/hr) |
| Condensate Tank Capacity | 3.5 qt (3.3 L) |
| Timer Range | Up to 18 hours (auto shut-off/on) |
| Operating Modes | Cool, Dehumidify, Fan |
| Fan Speeds | High, Medium, Low |
| Air Filter | Washable, clean every 2 weeks |
| Exhaust Kit Included | Ceiling adapter, duct, flanges |
| Control Panel | Electronic with LCD display |
| Safety Features | Automatic compressor stop when tank full; grounded plug |
| Warranty | 1 year limited |
Frequently Asked Questions - NetworkAIR 1000 AP7003 APC
User questions about NetworkAIR 1000 AP7003 APC
0 question about this device. Answer the ones you know or ask your own.
Ask a new question about this device
Download the instructions for your Air Conditioning in PDF format for free! Find your manual NetworkAIR 1000 AP7003 - APC and take your electronic device back in hand. On this page are published all the documents necessary for the use of your device. NetworkAIR 1000 AP7003 by APC.
USER MANUAL NetworkAIR 1000 AP7003 APC
Warning • Read these instructions carefully before using this air conditioner.

- This air conditioner is designed for indoor use only. The temperature range for the cooling mode is 61^ to 86^ .
- To reduce the risk of fire or electric shock, do not expose the unit to rain or moisture. Do not open the cabinet while the unit is connected a power source. Dangerous voltage is present. Have repairs performed by certified HVAC technicians.
- Never use or store gasoline or other flammable vapor or liquid near the unit.
- This air conditioner has no ventilator for taking in fresh air from outdoors. You must open doors or windows frequently when you use gas or oil heating appliances in the same room, which consume a lot of oxygen from the air. Otherwise, there is a risk of suffocation in extreme cases.
- Do not use an adapter plug or extension cord.
- Do not use near gas appliances, open flames (fireplaces) or in the vicinity of flammable liquids.
Caution • Do not operate this unit if it has a damaged cord or

plug, or if it is not working properly, or had been dropped or damaged in any manner.
- To protect against risk of electrical shock, do not immerse unit, cord or plug in water or any other liquid.
- Do not cut or remove the third (ground) prong from the power cord plug.
- If the plug gets hot, call a qualified electrician.
- Close supervision is required when the unit is used near children.
- Do not stick anything into the air outlet of the air conditioner.
- Do not use in a room with poor air circulation.
- Do not expose to direct sunlight.
- Do not use the unit near water.
General Information ....1
About NetworkAIR 1000 1
Inventory 1
Front View 2
Back View 2
Control Panel 3
LCD Indicators 4
Installation ....5
Warnings 5
Set up the unit 5
Check components 6
Power the unit 6
Operation 7
Power 7
Cooling 7
Dehumidify 7
Fan 7
Louver 7
Timer 8
Installing the Exhaust Kit 9
Drainage 11
Methods of Draining 11
Condensate Tank 11
Emptying the tank 12
The drainage tube 13
Maintaining the Unit 14
Clean the air filter 14
Clean the cabinet 14
Clean the condensate tank regularly 15
Storing the Unit 16
Troubleshooting 17
Try this first 17
If problems persist 19
Warranty Information 20
Limited warranty 20
Warranty limitations 20
Specifications 21
General Information
About NetworkAIR 1000
APC's NetworkAIR 1000 is a portable, compact, air-conditioner designed for spot-cooling, emergency-cooling, and after-hours cooling of server closets, data centers, conference rooms, home offices, or rooms housing heat-sensitive equipment.
The NetworkAIR 1000 provides 7,200 BTU (7,500 BTU for AP7004) of cooling power. It automatically adjusts room temperature, and reduces moisture while filtering the air. Additional features of NetworkAIR 1000 include:
• Electronic control panel with LCD display
• Automatic turn-on/shut-off timer
• Automatic swing louvers for even air distribution in the room
- Ceiling exhaust kit
- Quiet, high-efficiency rotary compressor
Inventory NetworkAIR 1000 is shipped with the items shown below:
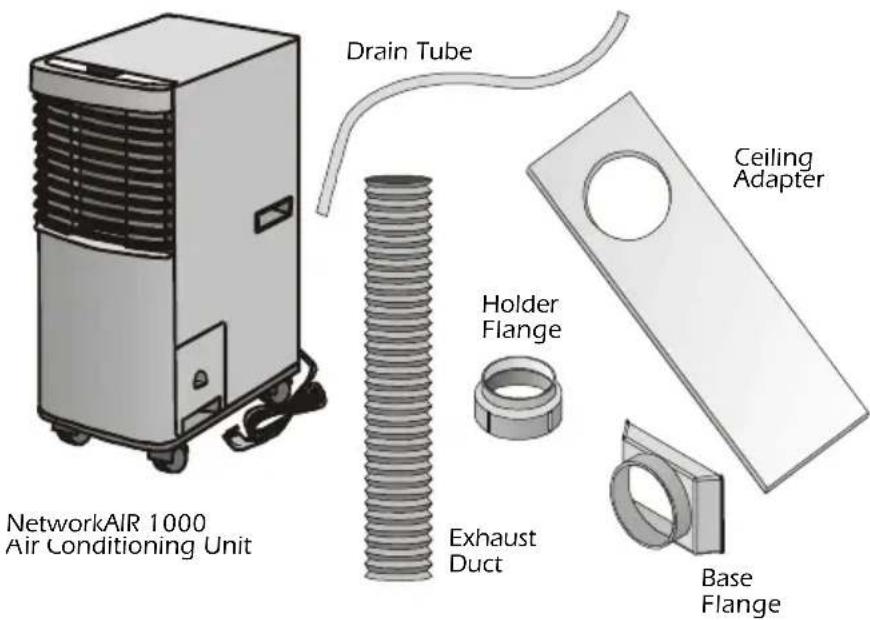
General Information continued
Front View
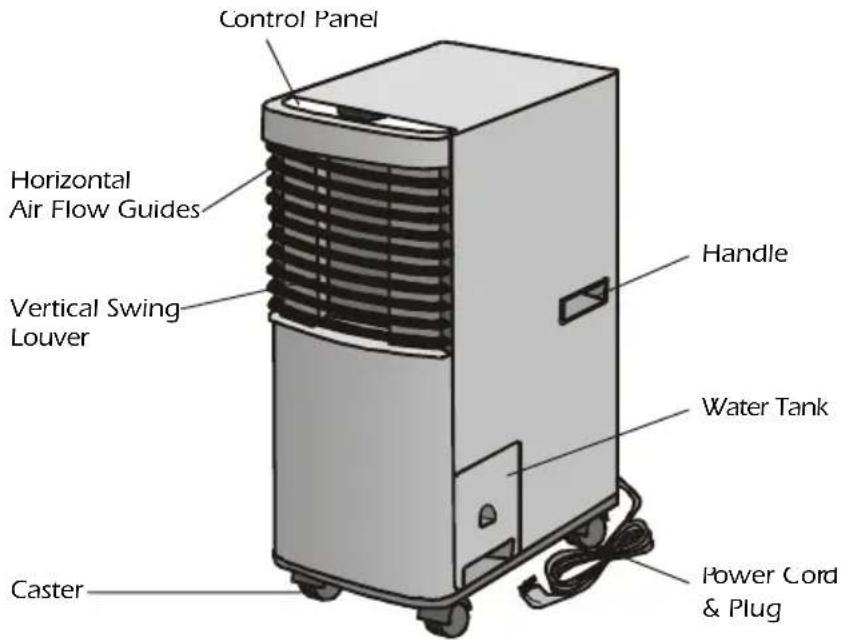
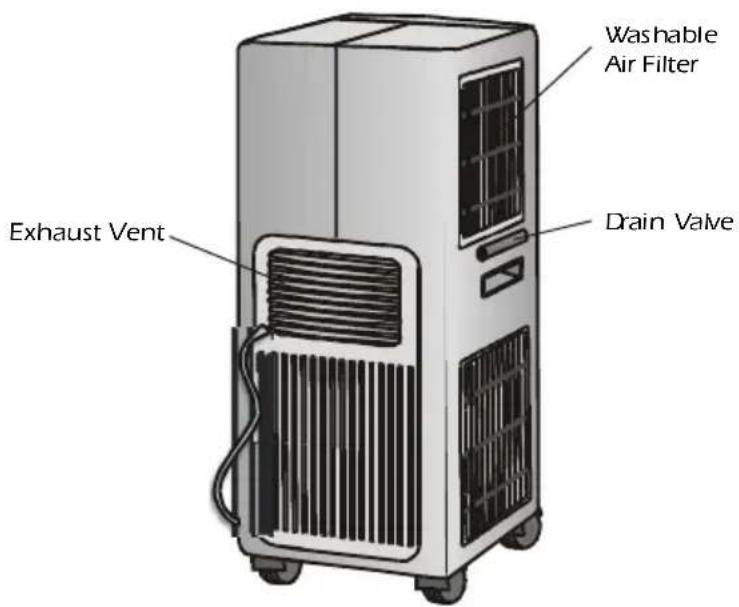
Back View
Control Panel
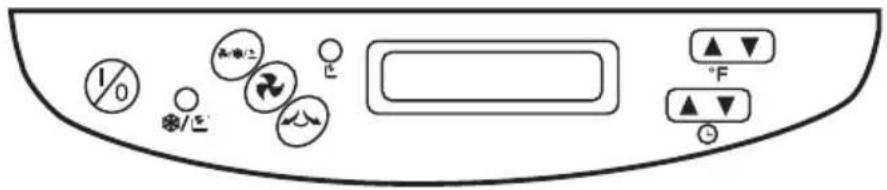
 | Power | Turns the unit on and off. |
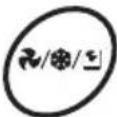 | Mode | Sets the desired operating mode: fan, cooling, or dehumidifying. |
 | Fan Speed | Sets desired fan speed: high, medium or low. |
 | Louver | Directs the air distribution. |
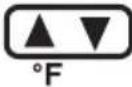 | Temperature | Sets the desired temperature (61°–86°F). |
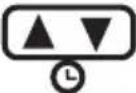 | Timer | Programs the timer for unattended shutoff (up to 18 hours for AP7003, 24 hours for AP7004). |
 | Compressor indicator | Indicates that the compressor is running when in cooling or dehumidifying mode. |
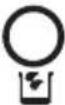 | Tank Full indicator | Indicates with flashing light and buzzer that the condensate tank is full or has not been positioned correctly. |
 | LCD Display | Displays information about different modes and settings. |
LCD Indicators
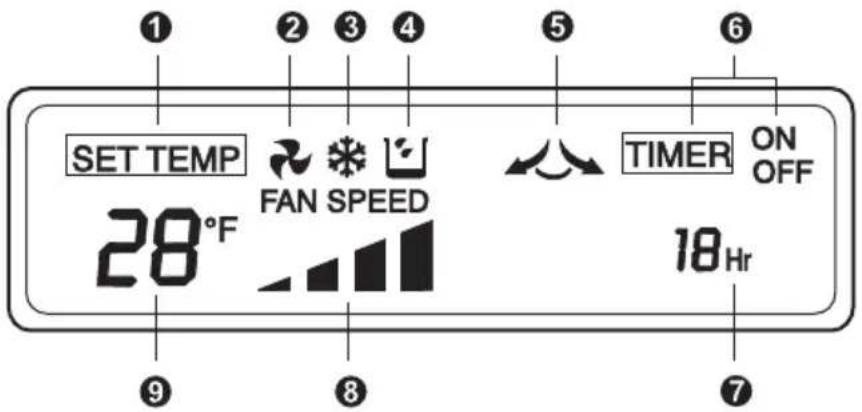
① Temperature
② Fan Mode
③ Cooling Mode
④ Dehumidify Mode
⑤ Louver On
⑥ Timer On/Off
⑦ Timer Setting
⑧ Fan Speed
⑨ Set Temperature
Note: Temperature is shown in Celsius on the AP7004.
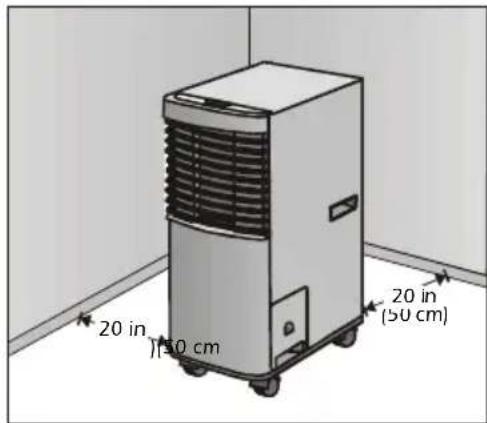
Warnings Use the unit on a flat surface where the air outlets are unobstructed.

Do not place the unit less that 20 inches (50 cm) away from any wall or obstacle.
Do not install this air conditioner where there are fumes or flammable gases, or in an extremely humid space such as a green house.
Set up the unit 1. Unpack the unit and the accessory kit. Slip the bands off the unit—do not cut the bands.
- Inspect the unit and the accessories for damage.
Caution: If you find shipping damage, do not operate the unit. If you have shipping damage, keep all packaging for inspection by the shipper and call APC Customer Support at a number listed on the back cover of this manual.
Note: This unit should not be placed on its side. If it does get tipped, place the unit upright on a flat, solid surface and keep it in this position for a minimum of two hours before operating.
Check components
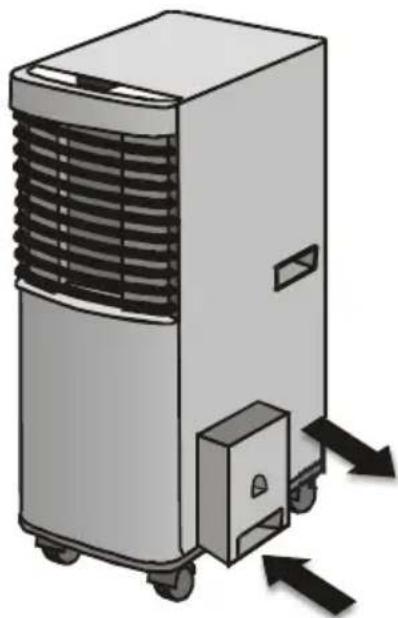
- Check that the condensate tank on the side of the unit is in place and is properly seated. If the tank is not installed properly, the unit will not operate.
natural_image
Illustration of a portable air purifier with cooling fans and directional arrows indicating airflow or ventilation (no text or symbols)- Open the air filter cover on the left side of the unit and check that the air filter is clean.
natural_image
Illustration of a desktop computer tower with a cooling fan and directional arrow indicating cooling (no text or symbols)Power the unit 1. Plug the unit into a wall outlet. Wait two seconds for the unit to beep.
Note: The unit has a 6-foot power cord. Do not plug the unit into an extension cord.
- Turn the unit on by pressing the Power button on the control panel.
Power Turn the unit on or off by pressing the Power button.
Cooling
- To select the Cooling mode, press the Mode button until the cooling mode indicator appears in the LCD window.
- Set the fan speed by pressing the Fan Speed button. The fan speed indicator in the LCD window will display what speed has been selected - high, medium or low.
- Set the temperature by pressing the Temperature button up or down arrow. The LCD window will display the current temperature selected.
Dehumidify
- To select the Dehumidify mode, press the Mode button until the dehumidify mode indicator appears in the LCD window.
- Check that the condensate tank is empty and is properly seated.
- Do not use the exhaust duct.
Note: Fan speed cannot be adjusted when in Dehumidify mode.
Fan • To select the Fan Mode, press the Mode button

until the fan icon appears in the LCD window.
- Set the fan speed by pressing the Fan Speed button 📄. The fan speed indicator in the LCD window will display what speed has been selected - high, medium or low.
Louver
Press the Louver button Ⓜ to automatically provide even air distribution. The louver on indicator ⚡ will appear in the LCD window when this mode is on.
Note: You can direct the airflow to an even more specific area by adjusting the manual louvers.
Continued on next page
Timer Your portable air conditioner has a timer feature that allows the unit to shut off or turn on automatically in a preset number of hours.
- Set Timer On mode
a. Make sure mode (cool, dehumidify or fan), temperature, and fan options are on the desired setting.
b. Turn the unit off.
c. Press the Timer button and the LCD window will display Timer On.
d. Press the time up or down buttons to increase or decrease the amount of time. The timer will automatically turn the unit on after the number of hours shown in the LCD window.
- Set Timer Off mode
a. Make sure the power is on.
b. Press the Timer button and the LCD window will display Timer Off.
c. Use the time up or down buttons to increase or decrease the amount of time. The timer will automatically turn the unit off after the number of hours shown in the LCD window.
Installing the Exhaust Kit
Installing into ceiling plenum
For this installation you will need the following:
• The ceiling adapter
• The holder flange
• The exhaust duct
- The base flange
Note: There should be about 12 to 15 inches of open space above the ceiling adapter opening so that exhaust air is not blocked
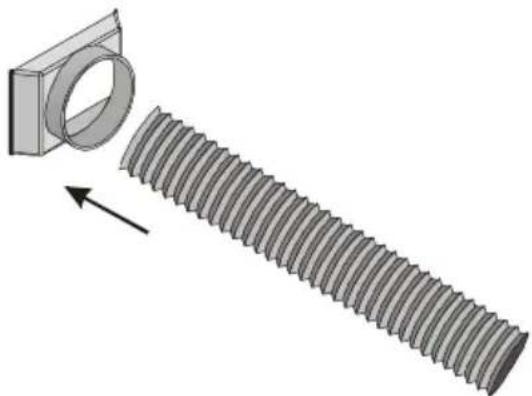
- The exhaust duct is 8.5 feet long. Insert about 6 inches of one end of the exhaust duct into the round hole in the ceiling adapter.
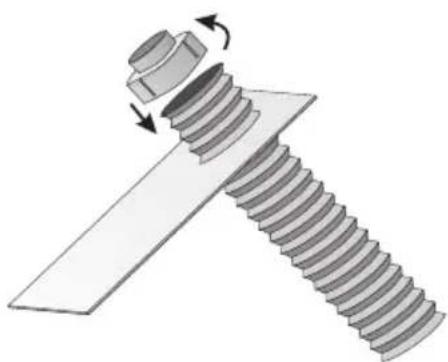
- Extend the 6 inches of the exhaust duct you have just inserted and screw the holder flange as far as it will go onto the exhaust duct.
natural_image
Mechanical diagram showing a bolt being inserted into a flat plate with a hex nut (no text or symbols)- Slide the ceiling tile out of the way about 10 to 12 inches.
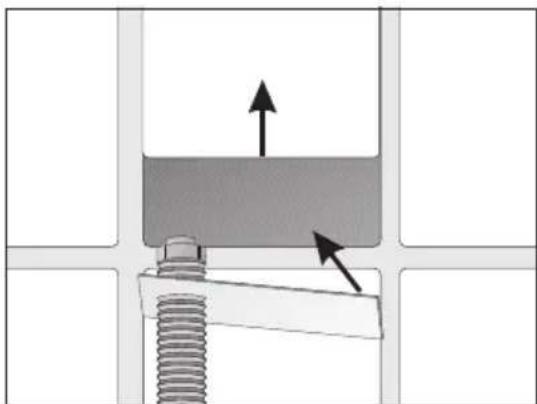
- Put the ceiling adapter into the ceiling tile grid.
natural_image
Diagram of a mechanical assembly with a bolt and spring, showing directional arrows (no text or labels)Continued on next page
Installing the Exhaust Kit continued
Installing into ceiling plenum, continued
-
For permanent installation, cut five inches off the ceiling tile so that the tile will lay flat in the grid.
-
For temporary installations, slide the ceiling tile tight against the ceiling adapter.
-
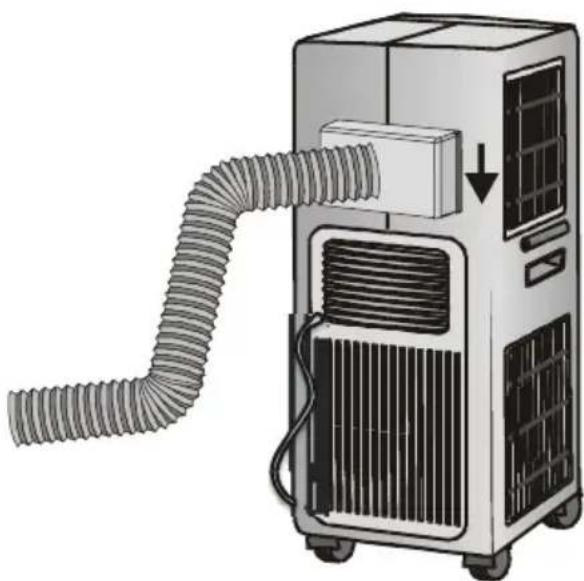
Screw the other end of the exhaust duct into the base flange
natural_image
3D illustration of a bolt and nut assembly with directional arrow (no text or symbols)- Slide the base flange onto the exhaust vent on the back of the unit
natural_image
Illustration of a portable air conditioner unit with coiled tubing and ventilation slots (no text or symbols)Drainage
Methods of Draining
The NetworkAIR 1000 has two methods of disposing of the condensation. The first is a condensate tank that can be manually emptied. The second method is to attach a drain hose to the unit so the water will run to a floor drain.
Condensate Tank
The condensation will drain into the condensate tank when the unit is in the Cooling or Dehumidifying mode. The Tank Full indicator will flash on the control panel and the unit will beep several times when the tank is full or has been removed from the unit.
For safety reasons, the compressor stops at this time. The fan will continue to operate at the same speed. However, if the tank is not emptied or reinserted within three minutes, the fan will stop.
Caution: Do not remove the tank when the unit is in use. Always turn off the unit before removing the tank. Periodically inspect and clean the drain valve to prevent clogging.
Continued on next page
Emptying the tank
To manually drain the tank:
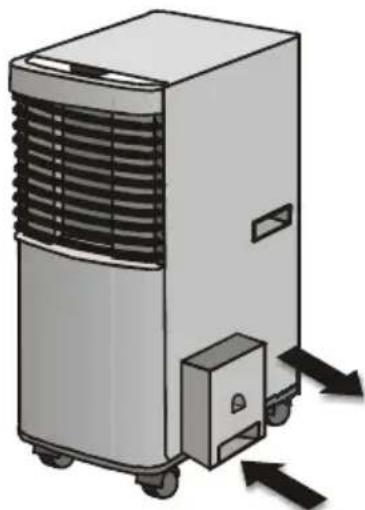
- Turn off the unit.
- Using the handle, slowly remove the tank from the side of the unit.
natural_image
Illustration of a portable air conditioner unit with cooling fins and directional arrows indicating airflow or ventilation (no text or symbols)- Pour out any condensation accumulated in the tank.
- Wipe up any condensation that may have drained off the evaporator coil.
- Replace the tank in the unit.
- Turn the power on and make sure tank is properly seated (the unit will beep and Tank Full indicator will flash if tank is not properly positioned).
- Allow the fan to run for an additional three minutes after emptying the tank to dry out the moisture in the evaporator coil.
Continued on next page
The drainage tube
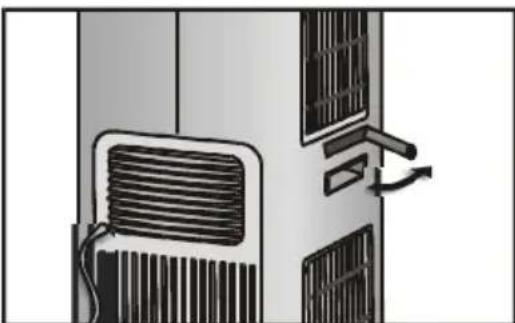
- Slide out the drain valve from the left side of the unit.
natural_image
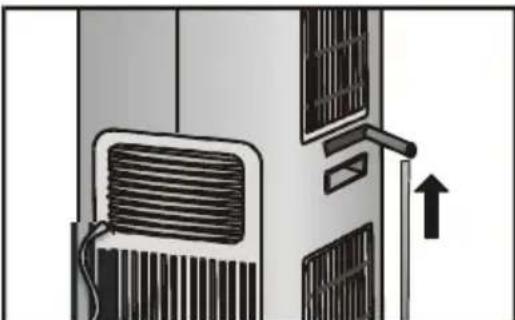
Diagram of a wall-mounted air conditioner unit with ventilation grilles and airflow indicators (no text or labels)- Attach the drainage tube to the drain valve.
natural_image
Diagram of a wall-mounted air conditioner unit with ventilation grilles and airflow direction indicator (no text or symbols)- Route the tubing downward so that condensate flows properly into a floor drain or condensate line below the unit.
Note: Condensation will drip through the drain valve if it is open. Make sure there is a hose attached to the it and a floor drain or condensate line below the unit whenever the drain valve is open.
Maintaining the Unit
Clean the air filter
APC recommends cleaning your air filter at least after every two weeks of use. Keeping your air filter clean will maximize the performance and life of this product.
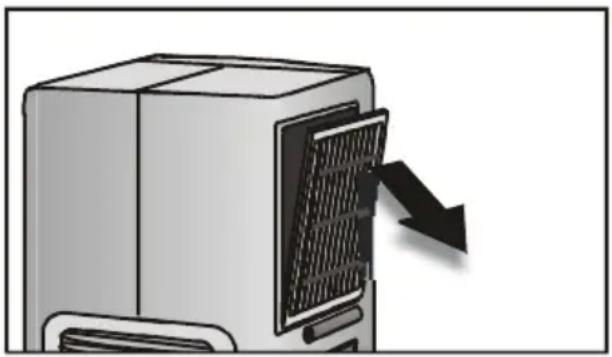
- Turn off the unit and unplug it from its electrical outlet.
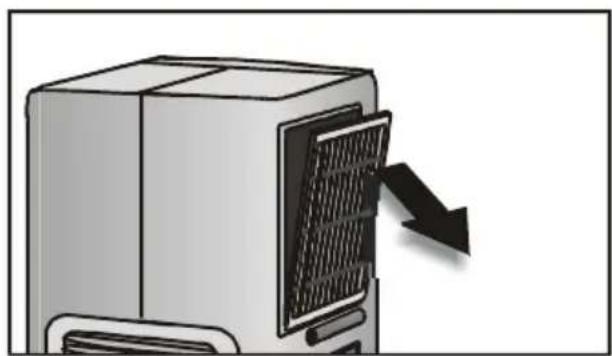
- Open the air filter on the left side of the unit.
natural_image
Illustration of a desktop computer tower with a black arrow pointing to its side panel (no text or symbols present)- Remove the air filter from the cover.
- Wash air filter with a neutral detergent and warm water and let it air dry.
- Reinsert the filter into the cover.
Clean the cabinet
Turn off the unit and unplug it from its electrical outlet. Clean the surface of the cabinet with warm water and a neutral, non-abrasive detergent. Ensure all detergent is wiped from the surface and rinse with clear water to remove residue.
Caution: Do not clean the surface with thinners, alcohol, polishing powder, alkaline detergent, acid, or an abrasive brush. Using these items will damage the cabinet.
Continued on next page
Maintaining the Unit continued
Clean the condensate tank regularly
- Turn off the unit and unplug it from its electrical outlet
- Using the handle, slowly remove the condensate tank from the side of the unit.
- Pour out any condensation accumulated in the tank.
- Clean the inside of the tank with a solution of warm water and mild detergent to avoid the growth of mold and mildew.
- Replace the tank in the unit.
- Turn the power on and make sure tank is properly seated (unit will beep and Tank Full indicator will flash if tank is not properly positioned).
- Allow the fan to run for an additional three minutes after emptying the tank to dry out the moisture in the evaporator coil.
Continued on next page
Storing the Unit The following precautions must be taken when storing the unit for extended periods of time:
- Turn off unit.
- Clean the air filter and allow to air dry before replacing in unit.
- Empty the condensate tank.
- Remove the stopper from the water drain pipe and drain until empty. Reinsert the water drain pipe into the unit.
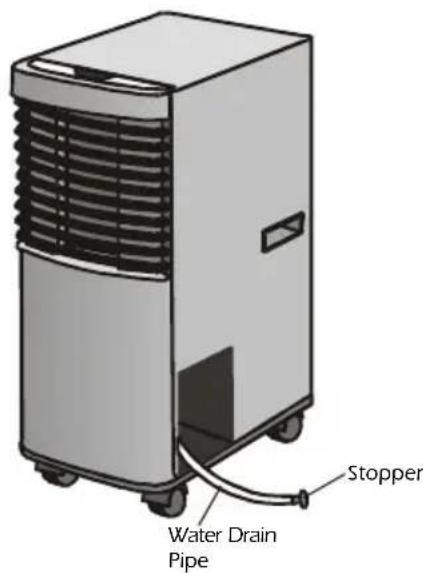
- Replace the tank.
- Turn the unit on and allow the fan to run three minutes after emptying the tank to dry out the moisture in the evaporator coil.
- Turn power off. Power cable must be disconnected from power outlet and neatly rolled.
- Store the unit in a dry place.
Try this first
| Problem Cause Suggestion | ||
| Unit does not work | Unit is not plugged in. | Securely plug receptacle into the wall. |
| Main power is off. | Check fuse or circuit breaker | |
| Condensate tank is full. Indicator light is on. | Empty tank. | |
| Poor cooling performance. | Air exhaust or intake blocked. | Clear all objects away from air grills, move away from wall. |
| Air filter is dirty. Clean air filter. | ||
| Temperature is set too high. | Lower set temperature. | |
| Fan speed is too low. | Increase fan speed. | |
| Noise or vibration. | Surface is not level. | Place unit on a level surface, away from obstructions. |
| Unit starts and stops. | Air exhaust is not attached properly or is curved too much. | Check installation of air exhaust hose. |
Try this first, continued
| Problem | Cause | Suggestion |
| Water is leaking from unit. | Drain tube is clogged. | Remove blockage. |
| Condensate tank is improperly seated. | Reposition tank. | |
| Surface not level. | Place unit on a level surface away from obstructions. | |
| Damaged condensate tank. | Replace tank. | |
| Stopper on water drain pipe is loose. | Make sure the stopper on the water drain pipe is securely in place. | |
| Unit has been moved. | When moving the unit, empty the condensate tank first and keep unit upright at all times. |
If problems persist
For problems not covered in the troubleshooting chart, or if the problem persists, follow this procedure:
- Note the serial number and date of purchase of the NetworkAIR 1000. Contact Customer Support at a phone number or address on the back cover of this manual.
- Be prepared to provide a description of the problem. A technician will help solve the problem over the phone, if possible, or will give you a return material authorization (RMA) number.
- If the unit is under warranty, repairs or replacement is free of charge. If the warranty has expired, there will be a charge for repair or replacement.
- Pack the unit carefully to avoid damage in transit. Damage sustained in transit is not covered under the warranty. Enclose a letter in the package with your name, address, RMA number, a copy of the sales receipt, daytime phone number, and check (if applicable).
- Mark the RMA number clearly on the outside of the shipping carton. The factory will not accept any materials without this marking.
- Return the unit by insured, prepaid carrier to the address provided by the Customer Support technician.
Warranty Information
Limited warranty
American Power Conversion (APC) warrants the NetworkAir 1000 to be free from defects in materials and workmanship for a period of one year from the date of purchase. Its obligation under this warranty is limited to repairing or replacing, at its own sole option, any such defective products. This warranty does not apply to equipment that has been damaged by accident, negligence, or misapplication or has been altered or modified in any way. This warranty applies only to the original purchaser.
Warranty limitations
Except as provided herein, American Power Conversion makes no warranties, express or implied, including warranties of merchantability and fitness for a particular purpose.
Some jurisdictions do not permit limitation or exclusion of implied warranties; therefore, the aforesaid limitation(s) or exclusion(s) may not apply to the purchaser.
Except as provided above, in no event will APC be liable for direct, indirect, special, incidental, or consequential damages arising out of the use of this product, even if advised of the possibility of such damage.
Specifically, APC is not liable for any costs, such as lost profits or revenue, loss of equipment, loss of use of equipment, loss of software, loss of data, costs of substitutes, claims by third parties, or otherwise. This warranty gives you specific legal rights and you may also have other rights, which vary according to jurisdiction.
Specifications
| Item Specification | ||
| AP7003 | AP7004 | |
| Electrical | ||
| Power source 115 V; 60 Hz 2 | 30 V; 50 Hz | |
| Rated current 6.2 A 3.6 A | ||
| Rated input | Cooling 692 WDehumidify 660 W | Cooling 860 WDehumidify 820 W |
| Physical | ||
| Condensate Tank capacity 3.5 | qt (3.3 L) 3.5 qt (3.3 L) | |
| Physical dimensions | 12.85×16.250×30.75 in(326×415×788 mm) | 12.85×16.25×30.75 in(326×415×788 mm) |
| Net weight (unit only) 74 lbs | (34 kg) 74 lbs (34 kg) | |
| Shipping weight 99 lb (45 kg) | 99 lb (45 kg) | |
| HVAC | ||
| Compressor type Rotary Rotary | ||
| Refrigerant HCFC R22 | R407c | |
| Output | ||
| Cooling capacity 7,200 | BTU/h | 7,500 BTU/h |
| Airflow | 170 CFM | 290 CFM |
| Sound level | 51.5 dB | 52.2 dB |
| Dehumidifier value | .26 gal/hr max(1.3 L/hr) | .34 gal/hr max(1.25 L/hr) |
APC Worldwide Customer Support
Customer support for this or any other APC product is available at no charge in any of the following ways:
- Visit the APC Web site to find answers to frequently asked questions (FAQs), to access documents in the APC knowledge base, and to submit customer support requests.
- http://www.apc.com (Corporate Headquarters)
Connect by links to APC Web pages for specific countries and regions, each of which provides customer support information.
- http://www.apc.com/ support/
Submit customer support requests.
- Contact an APC Customer Support center by telephone or e-mail.
- Regional centers:
| APC Headquarters (U.S. and Canada) | (1) (800) 800-4272 (toll free) |
| Latin America | (1) (401) 789-5735 (United States) apctchla@apc.com |
| Europe, Middle East, Africa | (353) (91) 702020 (Ireland) apceurtech@apc.com |
| Japan | (03) 5434-2021 jsupport@apc.com |
- Local, country-specific centers: go to http://www.apc.com/support/contact for contact information.
- Contact the APC representative or other distributor from whom you purchased your APC product for information on how to obtain local customer support.
Entire contents copyright © 2001 American Power Conversion. All rights reserved. Reproduction in whole or in part without permission is prohibited. APC, the APC logo, and NetworkAIR are trademarks or registered trademarks of American Power Conversion Corporation. All other trademarks, product names, and corporate names are the property of their respective owners and are used for informational purposes only.
- General Information ....1
- Installation ....5
- Operation 7
- Installing the Exhaust Kit 9
- Drainage 11
- Maintaining the Unit 14
- Troubleshooting 17
- Warranty Information 20
- Specifications 21
- General Information
- About NetworkAIR 1000
- General Information continued
- Control Panel
- Check components
- Cooling
- Dehumidify
- Louver
- Installing the Exhaust Kit
- Installing into ceiling plenum
- Installing the Exhaust Kit continued
- Drainage
- Methods of Draining
- Condensate Tank
- Emptying the tank
- Maintaining the Unit
- Clean the air filter
- Clean the cabinet
- Maintaining the Unit continued
- Clean the condensate tank regularly
- If problems persist
- Warranty Information
- Limited warranty
- Warranty limitations
- Specifications
- APC Worldwide Customer Support
Brand : APC
Model : NetworkAIR 1000 AP7003
Category : Air Conditioning