
Echelon DCV24DL - Security Camera Digimerge - Free user manual and instructions
Find the device manual for free Echelon DCV24DL Digimerge in PDF.


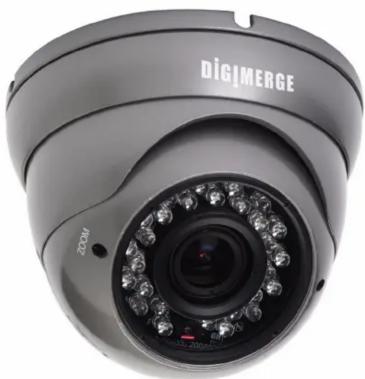
| Product Type | Weatherproof Varifocal IR Dome Security Camera |
| Model | Digimerge Echelon DCV24DL |
| Image Sensor | 1/3" Sony Super HAD II |
| Horizontal Resolution | 600 TVL |
| Video Format | NTSC (768 x 494 pixels) |
| Lens Type | 2.8-12mm Varifocal, F1.4 |
| Horizontal Field of View | 30° to 88° |
| Minimum Illumination | 0.3 Lux (color, IR off) / 0 Lux (IR on) |
| IR Night Vision Range | 66 ft (20 m) with 28 IR LEDs |
| Video Output | 1.0 Vpp composite, 75 ohm, BNC female |
| Sync System | Internal, 2:1 interlace |
| Shutter Speed | 1/60 to 1/100,000 sec (AES) |
| Signal-to-Noise Ratio | >50 dB (AGC off) |
| Power Requirement | 12V DC or 24V AC ±10% |
| Power Consumption | 450 mA (12V DC) / 320 mA (24V AC) |
| Weatherproof Rating | IP66 (not for submersion) |
| Mounting | 3-axis design for wall or ceiling |
| Operating Temperature | -4°F to 122°F (-20°C to 50°C) |
| Dimensions (Diameter x Height) | 120 mm x 102 mm (4.8" x 4.1") |
| Weight | 0.7 kg (1.6 lbs) |
| Additional Features | Advanced Digital Noise Reduction (DNR), Sony Super HAD II, varifocal lens |
| Maintenance | Clean dome cover with soft cloth; no user-serviceable parts inside |
| Safety | Use UL/CSA approved regulated power supply; test before final mounting |
Frequently Asked Questions - Echelon DCV24DL Digimerge
User questions about Echelon DCV24DL Digimerge
0 question about this device. Answer the ones you know or ask your own.
Ask a new question about this device
Download the instructions for your Security Camera in PDF format for free! Find your manual Echelon DCV24DL - Digimerge and take your electronic device back in hand. On this page are published all the documents necessary for the use of your device. Echelon DCV24DL by Digimerge.
USER MANUAL Echelon DCV24DL Digimerge
Camera Specifications
Specifications:
| Image Sensor | 1/3" Sony Super HADTM II |
| Video Format / Pixels | NTSC: 768 (H) x 494 (V) |
| Horizontal Resolution | 600 TVL |
| Sync. & Scan. Systems | Internal; 2:1 Interlace |
| S/N Ratio | →50dB (AGC off) |
| Iris & Shutter Speed AES: 1/60 ~ 1/100,000 sec. | |
| Minimum Illumination | 0.3 LUX @ F2.0 (IR Off)0 LUX (IR LEDs ON) |
| IR Range | 66ft (20m); 28 LED's |
| Video Output | Comp. 1.0 Vpp @ 75ohm |
| Lens Focal Length / Type | 2.8-12mm F1.4 / Varifocal |
| FOV (horizontal) | 30 - 88 degrees |
| Termination | Video: BNC Female |
| Power Requirement 12V DC / 24V AC ±10% | |
| Power Consumption | 12V 450mA24V 320mA |
| Operating Temp. | -4°F ~ 122°F |
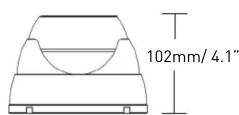
| Dimensions | Height: 102mm / 4.1"Diameter: 120mm / 4.8" |
| Weight | 0.7kg / 1.6lbs |
Dimensions:
120mm/4.8"

VISIT
www.digimerge.com
Digimerge Technologies Inc.
Copyright © 2011 Digimerge Technologies Inc.
As our products are subject to continuous improvement,
Digimerge reserves the right to modify product design, specifications and prices, without notice and without incurring any obligation. E&OE

MODEL: DCV24DL
natural_image
Close-up of a black DigiMERGE surveillance camera with LED display and control buttons (no readable text beyond branding)QUICK START GUIDE
English Version 2.0

www.digimerge.com
Copyright © 2011 Digimerge Technology Inc.
Contents Installing the camera

1 x Weatherproof Varifocal IR Dome Camera

4 x Mounting screws
WARNING - A REGULATED UL/CSA APPROVED 12V DC / 24V AC power supply is REQUIRED for use with this camera. Use of a non-regulated, non-conforming power supply can damage this product and will void the warranty.
Features
• Sony Super HAD™ II / 600TVL
- Advanced Digital Noise Reduction (DNR)*
- 66 ft (20m) IR Night Vision Range**
• 2.8 - 12mm Varifocal Lens
• IP66 Weatherproof rating***
• 3-Axis Design for Wall/Ceiling Mounting
• 12V DC / 24V AC
*Default Setting
** IR Illumination range under ideal conditions. Objects at or beyond this range may be partially or completely obscured, depending on the camera application.
*** Not recommended for submersion in water
ATTENTION - Test the camera prior to selecting a permanent mounting location by temporarily connecting the cameras and cables to the DVR or Observation System.
PRECAUTIONS
- Use an appropriate low voltage power cable to prevent fire or electrical shock.
- Make sure to install the camera in an area that can support the camera weight.
- There are no user serviceable parts inside the camera. Please do not disassemble the camera.
-
Do not clean the lens cover with an abrasive cleaning material. Please use a soft cloth to clean the lens cover.
-
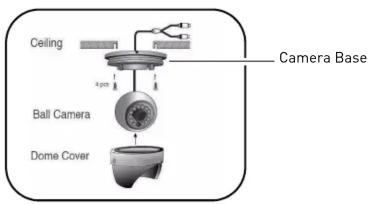
Rotate the camera base counter clockwise to separate it from the ball camera and dome cover.
-
Mount the camera base to the wall or ceiling using the included screws.

natural_image
Close-up of a mechanical component with arrows indicating direction and screw holes (no text or symbols)-
Feed the BNC/power termination cable through the camera base. Connect video and power cable as described in next section 'Setting up the camera'.
-
Position the dome cover over the camera and screw it clockwise half way onto the camera base.
-
Move the ball camera to the desired position and while holding it firmly in place, screw the dome cover firmly in place so it does not move during process of securing dome cover to camera base
Setting up the camera
- Connect the BNC connector of the camera to the video cable.
- DC Power—Power adaptor: Connect a 12V DC Power Adaptor (not included) to the camera. Plug the Power Adaptor into a local power outlet.
- D C P oPower Pigtail (not included): Connect a Power Pigtail to the camera. Connect the terminating wires of the cable directly to the DC power source.
NOTE: The Power Pigtail is a non-polarity input. You can connect the wires to either the positive or negative ports of the DC power source. - A C P Connect arPower Pigtail (not included) to the camera. Connect the terminating wires of the cable directly to the 24V AC power source. Note: If the onscreen display is blurry, you may need to set the Monitor Impedence switch to 75 ohms.
- Use a screwdriver to adjust the Focus and Zoom control screws on the camera if necessary.

Brand : Digimerge
Model : Echelon DCV24DL
Category : Security Camera