
KV-DR305W - Dash cam JVC - Free user manual and instructions
Find the device manual for free KV-DR305W JVC in PDF.


| Product Type | Dash Cam |
| Brand | JVC |
| Model | KV-DR305W |
| Recording Resolution | Full HD 1920x1080p |
| Field of View | 140° wide angle |
| Frame Rate | 30 fps |
| Storage Media | microSD card (up to 32GB, Class 10) |
| G-Sensor | Built-in for collision detection |
| Loop Recording | Yes, automatically overwrites oldest files |
| Parking Mode | Motion detection and impact recording |
| GPS | Built-in for speed and location logging |
| Display | 2.7-inch LCD screen |
| Night Vision | Low-light enhancement with WDR |
| Audio Recording | Built-in microphone |
| Power Supply | 12V car cigarette lighter adapter (included) |
| Battery | Built-in lithium-ion (250 mAh) for parking mode |
| Dimensions | 65 x 55 x 30 mm (L x W x H) |
| Weight | 85 g (without mount) |
| Mounting | Suction cup windshield mount |
| Operating Temperature | -10°C to 60°C |
| Interface | USB 2.0 (for data transfer and charging) |
| Maintenance & Cleaning | Use a soft, dry cloth to clean lens and body. Avoid harsh chemicals. |
| Safety & Warnings | Do not expose to direct sunlight or high heat. Use only approved accessories. |
| Spare Parts & Repairability | Contact JVC support for parts. Not user-repairable. |
| General Information | Comes with user manual, suction mount, and car charger. |
Frequently Asked Questions - KV-DR305W JVC
User questions about KV-DR305W JVC
0 question about this device. Answer the ones you know or ask your own.
Ask a new question about this device
Download the instructions for your Dash cam in PDF format for free! Find your manual KV-DR305W - JVC and take your electronic device back in hand. On this page are published all the documents necessary for the use of your device. KV-DR305W by JVC.
USER MANUAL KV-DR305W JVC
This equipment may generate or use radio frequency energy. Changes or modifications to this equipment may cause harmful interference unless the modifications are expressly approved in the instruction manual. The user could lose the authority to operate this equipment if an unauthorized change or modification is made.
FCC NOTE
This equipment has been tested and found to comply with the limits for a Class B digital device, pursuant to Part 15 of the FCC Rules. These limits are designed to provide reasonable protection against harmful interference in a residential installation.
This equipment may cause harmful interference to radio communications, if it is not installed and used in accordance with the instructions. However, there is no guarantee that interference will not occur in a particular installation. If this equipment does cause harmful interference to radio or television reception, which can be determined by turning the equipment off and on, the user is encouraged to try to correct the interference by one or more of the following measures:
Reorient or relocate the receiving antenna.
Increase the separation between the equipment and receiver.
Connect the equipment into an outlet on a circuit different from that to which the receiver is connected.
Consult the dealer or an experienced radio/TV technician for help.
FCC COMPLIANCE NOTICE
DASHBOARD CAMERA, MODEL KV-DR305W WITH CAR BATTERY ADAPTOR
THIS DEVICE COMPLIES WITH PART 15 OF THE FCC RULES. OPERATION IS SUBJECT TO THE FOLLOWING TWO CONDITIONS:
(1) THIS DEVISE MAY NOT CAUSE HARMFUL INTERFERENCE, AND
(2) THIS DEVISE MUST ACCEPT ANY INTERFERENCE RECEIVED, INCLUDING INTERFERENCE THAT MAY CAUSE UNDESIRED OPERATION.
JVCKENWOOD USA CORPORATION
PO BOX 22745 LONG BEACH, CA 90801-5745 PHONE: 1-800-252-5722
CAN ICES-3(B) / NMB-3(B)
Complies with IMDA Standards DB02771
Getting to Know Your Device
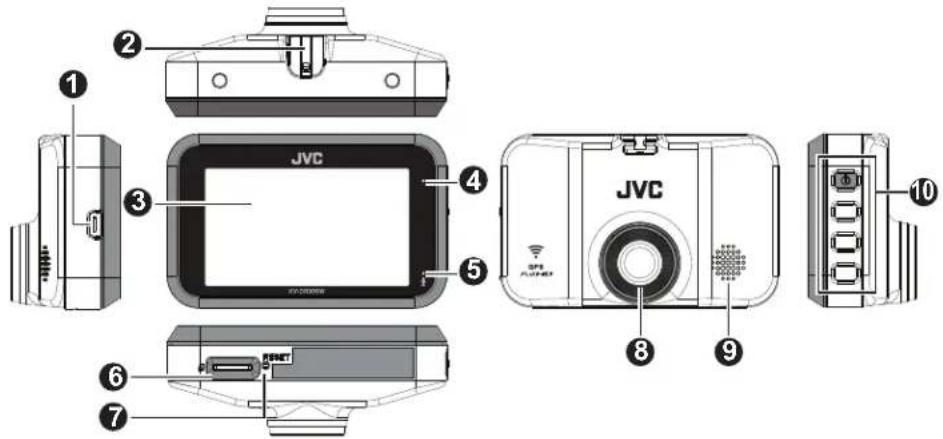
1 Mini-USB connector
② Device mount socket
③ LCD screen
4 System indicator
⑤ Microphone
⑥ Memory card slot
⑦ Reset button
⑧ Camera lens
⑨ Speaker
10 Power button
Function keys

How to install
- Make sure that your car is parked on level ground. Use a commercially available cleaning cloth to wipe off any dirt or grease from the location you are mounting the device. Follow the instructions below to securely mount your device in a vehicle.
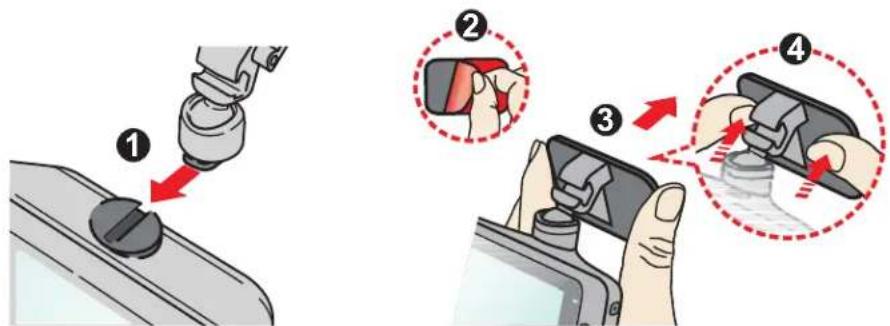
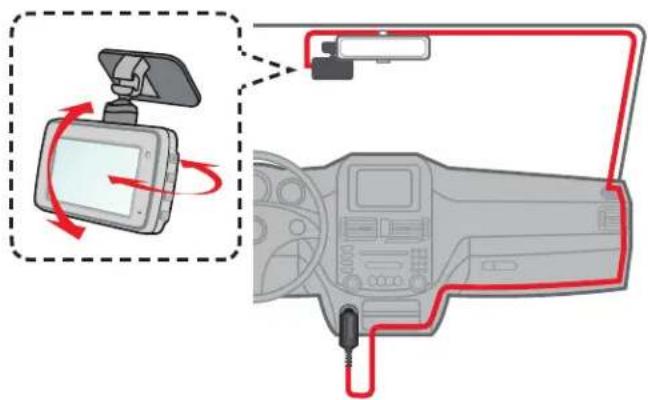
- Adjust the lens angle. When adjusting the angle of mounting, make sure that the camera's view is parallel with the level ground and the ground/sky ratio is close to 6/4.
- Connect the cables. Route the cables through the top ceiling and the A-pillar so that it does not interfere with driving. Make sure that the cable installation does not interfere with the vehicle's airbags or other safety features.
Using a Memory Card
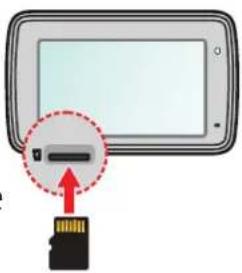
You must insert a memory card before you can start recording. You should use separate MicroSD cards for recording and for regular data storage.
Hold the card (MicroSD) by the edges and gently insert it into the slot as shown in the illustration.
To remove a card, gently push the top edge of the card inwards to release it and pull it out of the slot.
Formatting a Card
To format a memory card (all data will be erased), press Format.
Note:
• DO NOT apply pressure to the centre of the memory card.
- The manufacturer does not guarantee the product's compatibility with memory cards from all manufacturers.
- Before you start recording, please format the memory card to avoid malfunction caused by files not created by the device.
- Turn the device off before removing the memory card.
Turning the Device On
Complete the installation according to the instructions in the "Using your device in a vehicle" section. Once the vehicle engine is started, the device automatically turns on. The System indicator glows in green when the device is powered.
Power Button
Press and hold the Power button for 2 seconds to manually turn the device on and off.
Shutting down the Device
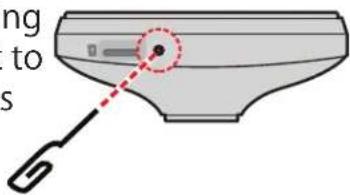
Occasionally, you may need to perform a hardware reset when the device stops responding or if it appears to be "frozen" or unresponsive. To shut down the device, press and hold the Power button until the system powers off.
If the system does not shut down by keeping the Power button pressed, you can force it to shut down by inserting a small rod (such as a straightened paperclip) into the Shutdown button on the device.
Function Keys
The device provides 4 function keys to control the corresponding icons displayed on the LCD screen. The keys' functions may vary on different screens.
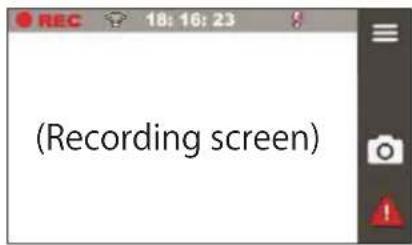
Open the Menu screen. (No Function) Take a photo. Manually start an event recording.
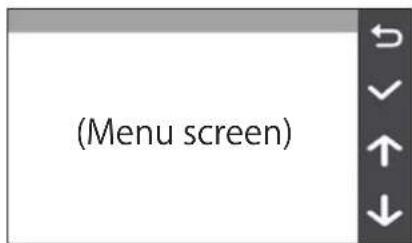
Act as the BACK button. Act as the ENTER button. Move to the previous option. Move to the next option.
System Icons
Various system icons on the status bar at the top of the screen provide the status information of your device. The display icons will vary depending on your device model and state.
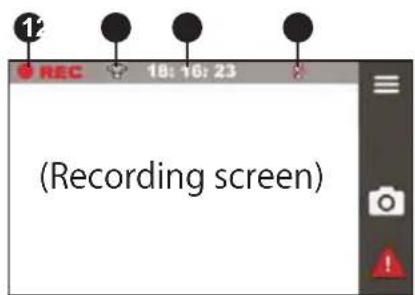
1 Recording indicator
② Wireless LAN status
③ Time display
4 Microphone status
Setting the Date and Time
To make sure that the date and time of your recordings are correct, check the settings before you begin recording.
- Press to access the Settings Menu.
- Select System > Date/Time.
- Use + / -
press → and repeat the step until all fields have been changed. - When done, press √
Recording in Driving Mode
Continuous Recording
By default, the system will automatically begin continuous recording shortly after start-up. The System indicator flashes in green and amber alternately while the recording is in progress.
The recording may be divided into several video clips; recoding will not stop between video clips. When your memory card fills up with continuous recordings, it will automatically record over the oldest existing files in this category.
When continuous recording is in progress, you can manually stop recording by pressing ⏚. Press ← to
return to the recording screen, the system will start continuous recording automatically.
The continuous recordings can be found in the "Video" category for file playback.
Event Recording
By default, if an event happens such as a sudden impact, high speed driving, an aggressive turn or an accidental crash during continuous recording, the G sensor will prompt the device to start recording the event.
Note:
You can change the sensitivity level of the G sensor by selecting □ > Video Recording > G-Sensor Sensitivity
If you want to manually start an event recording while continuous recording is in progress, press the Event button ( ).
The event recording will save moments before and moments event. When your memory card fills up with event recordings, it will record over the oldest existing files in this category
The event recordings can be found in the "Event" category for file playback.
Camera Mode
The device allows you to take a photo. Do one of the following:
- If the recording is in progress, press to take a photo.
- Press ➞ Camera >
The photos can be found in the "Photo" category for file playback.
Playback Mode
To select a video or photo for playback:
- Press File Playback .
- Select the desired type.
- Select the desired file from the list and then press √ to start playback.
- During playback, you can:
- While playing videos
- Press / to play the previous/next video; press and hold the buttons to fast rewind/forward the video.
- Press ← to return to the list.
- Press ⋯ to display the pop-up menu to select:
Play / Pause: Start or pauses the playback.
Move to Event: Move the file to the "Event" category.
Transfer to phone: Upload the selected video to your smartphone.
Delete: Delete the file.
- While viewing photos
- Press ← → to display the previous/next photo.
- Press ← to return to the list.
- Press ... to display the pop-up menu to select:
Transfer to phone: Upload the selected photo to your smartphone.
Delete: Delete the file.
Getting Connected
JVC DVR Link
The JVC DVR Link app is an integrated application that allows you to view, share and back up the videos recorded on a dashboard camera via wireless LAN. Search for "JVC DVR Link" in Apple App Store or in Google Play Store to download the app for free.
Note:
- The JVC DVR Link app is compatible with iOS 9.0 (and above) and Android 5.0 (and above) devices. JVCKENWOOD does not guarantee the product's compatibility with smartphones from all manufacturers.
- App Store is a service mark of Apple Inc., registered in the U.S. and other countries.
IOS is a trademark or registered trademark of Cisco in the U.S. and other countries and is used under license.
Android and Google Play are trademarks of Google LLC.
Setting up a Wireless Connection
On your device, select ≡ > Wireless LAN > On to enable the wireless LAN mode. Once enabled, the wireless LAN setting screen displays the SSID and password of the device.
On your smartphone, follow the steps to set up the wireless connection.
- Enable the wireless LAN function on the smartphone.
- Open the JVC DVR Link app and follow the on-screen instructions to set up the connection.
Open the wireless LAN setting of the smartphone to display the detected devices. From the list, select the device you want to connect to and then enter the password.
The next time you use your smartphone to connect to the device, you will not be prompted to enter the password again unless you reset your phone to the factory default settings.
Note: The instructions about operating the smartphone are for reference only. The actual setting options and methods may vary depending on your phone type/model and the app version.
You can check the wireless connection status by the icon on the device.
 | The device is connected to the smartphone and paired with the JVC DVR Link app. |
 | The device is not connected to the smartphone. |
 | The device is connected to the smartphone but not paired with the JVC DVR Link app yet. |
Once connected, the event recordings will be automatically transferred to your smartphone via the JVC DVR Link app.
System Settings
Note: Not all setting items and options are available for all models. To customise the system settings, press

File Playback
Play the recorded videos and photos.
Camera
Press to enter Camera mode.
Wireless LAN
Enable or disable wireless LAN.
Sound Recording
Set if you want to include sounds in the recordings.
Video Recording
- Video Clip Length: Sets the length of each video clip for a continuous recording.
- WDR: Enables the Wide Dynamic Range (WDR) function to improve the device's image quality under high-contrast lighting conditions.
- EV: Sets the exposure level to adjust the brightness of the image.
- Frequency: Sets the frequency for the camera to avoid problems caused by artificial light sources that are not constant.
- G-Sensor Sensitivity: Sets the sensitivity level of the G sensor that triggers the event recording during continuous recording.
• Text stamp: Displays customisable text information.
System
• Date/Time: Set the system date and time.
• System Sound: Enable or disable system notification sounds.
• Volume: Adjust the volume level.
- LCD Standby
• Always On: Keep the LCD on.
- HUD: Turn off the LCD (in specified time) but still displays the time during recording.
- 10 sec / 1 min / 3 min: Set the timer for the LCD to turn off automatically after recording starts.
- Storage Allocation: The system provides 3 memory configurations to store the videos and photos. Select the proper configuration based on your usage.
- Restore to Defaults: Restore the system settings to the factory defaults.
• Version: Display the software information.
Format
Format a memory card. (All data will be erased.)
Using the PC Application
JVC ROUTE WATCHER is a PC application for displaying video recorded with the device.
System Requirements for JVC ROUTE WATCHER
OS : Microsoft Windows 10, Windows 8.1, Windows 7* (except for the Windows 10 Mobile, Windows RT) *Windows 7 Service Pack 1 must be installed.
OS : Apple Mac OS X 10.11 (El Capitan) or later
Microsoft, and Windows are registered trademark or trademark of Microsoft Corporation in the US and other countries. Macintosh, Mac are trademarks of Apple Inc., registered in the U.S. and other countries.
Installing the Software
Install the software in a computer environment in which you have administrator's rights.
1 Download the installer from https://www.jvc.net/car/app/
2 Install according to the on-screen instructions
Specifications
Screen size
2.7 inches color TFT
Operating voltage
DC 5.0V
Current Consumption
480mA (Max.1A)
G-sensor
Built-in
Collision sensitivity
0.5G to 3G (0.5G step)
Image sensor
1/2.7 Color CMOS sensor
Number of Pixel
2M Pixels (1920x1080)
Angles of view
Horizontal : 98°
Vertical : 52°
Diagonal : 114°
Lens
F2.0
Operating temperature
-10^ to +60^
Recording resolution
1920 x 1080 Full HD (Max.2.0M)
Frame rate
30fps
Recording preservation timing
Continuous / Event
Recording Mode
1 / 3 / 5 min.
Video format
H.264 (MP4)
Picture format
JPEG (Max.1920 x 1080)
Recording media
microSDHC card 4GB to 32GB
Class 10 or above
USB Port
mini USB-B type
Wi-Fi
2.4GHz 802.11 b/g/n
Dimensions WxHxD (Main unit)
3-1/4" × 2-1/16" × 1-1/4"
(83 × 52 × 32 mm)
Weight (Main unit)
3.1oz (87g)
Accessories
Car charger cord (3.5 m) x 1
Mounting bracket (double-sided tape) x 1
16GB micro SD card x 1
This device has been tested and meets applicable limits for Radio Frequency (RF) exposure. This equipment should be installed and operated with minimum distance 20 cm between the radiator & your body.
This device contains license-exempt transmitter(s)/receiver(s) that comply with Innovation, Science and Economic Development Canada's license-exempt RSS(s). Operation is subject to the following two conditions: (1) This device may not cause interference. (2) This device must accept any interference, including interference that may cause undesired operation of the device.
The specifications and design are subject to change due to technological developments.
• The microSDHC logo is a trademark of SD-3C LLC.
Precautions and Notices
Precautions and Notices
- Warning! Do not operate the device while driving. Using this product does not change the requirement for a driver to take full responsibility for his or her behavior. This responsibility includes observing all traffic rules and regulations in order to avoid accidents, personal injury or property damage.
- For your own safety, do not operate the controls of the product while driving.
- A window mount is needed when using the recorder in a car. Make sure that you place the recorder in an appropriate place, so as not to obstruct the driver's view or deployment of airbags.
- Make sure that no object is blocking the camera lens and no reflective material is placed near the lens. Please keep the lens clean.
- If the car's windscreen is tinted with a coating, it may impact the recording quality.
- Connect the charger to a proper power source. The voltage requirements are found on the product case and/or packaging.
- Do not use the charger if the cord becomes damaged.
- Do not attempt to service the unit. There are no serviceable parts inside. Replace the unit if it is damaged or exposed to excess moisture.
Caring for Your Device
- Taking good care of your device will ensure trouble-free operation and reduce the risk of damage.
- Keep your device away from excessive moisture and extreme temperatures.
- Avoid exposing your device to direct sunlight or strong ultraviolet light for extended periods of time.
- Do not place anything on top of your device or drop objects on your device.
- Do not drop your device or subject it to severe shock.
- Do not subject your device to sudden and severe temperature changes. This could cause moisture condensation inside the unit, which could damage your device. In the event of moisture condensation, allow the device to dry out completely before use.
- The screen surface can easily be scratched. Avoid touching it with sharp objects. Nonadhesive generic screen protectors designed
specifically for use on portable devices with LCD panels may be used to help protect the screen from minor scratches.
- Never clean your device with it powered on. Use a soft, lint-free cloth to wipe the screen and the exterior of your device.
- Do not use paper towels to clean the screen.
- Never attempt to disassemble, repair or make any modifications to your device. Disassembly, modification or any attempt at repair could cause damage to your device and even bodily injury or property damage and will void any warranty.
- Do not store or carry flammable liquids, gases or explosive materials in the same compartment as your device, its parts or accessories.
- To discourage theft, do not leave the device and accessories in plain view in an unattended vehicle.
• Overheating may damage the device.
Cleaning the Device
- When the device is dirty, wipe it with a dry silicone cloth or other soft cloth. If the device is very dirty, remove the dirt with a cloth with neutral cleaner on it and then wipe off the cleaner. Wiping the device with a hard cloth or using using a volatile substance such as thinner or alcohol may cause scratches, deformation, deterioration, or other damage.
- When the lens is dirty, gently wipe it with a dampened with water. Rubbing the lens strongly with a dry cloth may cause scratches.
Precautions for Installation
- Install the device in a position where it will not block the front view of the driver (position where hidden by the rear-view mirror).
• Install the device so that it is within the wiping range of the wiper. - Install the device in a position where it will not interfere with the movement of the rear-view mirror.
- Take care not to install the device over the vehicle inspection sticker or other sticker.
- Take care not to install the device where it will interfere with driving or airbag operation.
- When installing the device in a vehicle equipped with a driving support system, check the instruction manual of the vehicle and then select an installation location that will not interfere with the driving support system.
- If the device is installed incorrectly, event recording may not
work correctly. Refer to "How to Install" for the loosening of fixing knob, installation orientation, installation angle, and other information and then install the device correctly.
- Do not install the device near a digital terrestrial antenna or an electrical component. Doing so may television receiver sensitivity or cause flickering and noise.
- Use a commercially available cleaning cloth or the like to wipe off all dirt and grease on the mounting surface and then fix the mount base in place. If the device is re-affixed or mounted using, for example, general-purpose double-sided tape, the adhesion strength may weaken and cause the device to fall.
- After mounting the device, leave it for 24 hours before use to enable the mounting strength of the mount bracket to improve. Failing to do so may result in the adhesion of the mount bracket becoming weak and the device falling.
- Fix the cord in place with tape or the like so that it does not interfere with driving.
Precautions for Use
- Do not block the camera lens, get dirt on it, or place a reflective object near it.
- When LED traffic lights are recorded, video in which they appear to be flickering or flashing may be recorded. JVCKENWOOD assumes no responsibility with regard to the distinguishing or recording of traffic lights.
- If coating is used on the windshield of the vehicle, recording quality may be affected.
- There is no guarantee that the device can record video in all conditions.
Others
About software
This device includes the software owned by following third parties. Following condition of the license is applicable to each software.
Konatu Font
Copyright (c) 2012 MASUDA mitiya
Applicable license :M IT License
libupnp
Copyright (c) 2000-2003 Intel Corporation
Applicable license :B SD 3-Clause "New" or "Revised" License
Applicable condition of license for third party software
MIT License
Permission is hereby granted, free of charge, to any person obtaining a copy of this software and associated documentation files (the
"Software"), to deal in the Software without restriction, including without limitation the rights to use, copy, modify, merge, publish, distribute, sublicense, and/or sell copies of the Software, and to permit persons to whom the Software is furnished to do so, subject to the following conditions:
The above copyright notice and this permission notice shall be included in all copies or substantial portions of the Software. THE SOFTWARE IS PROVIDED "AS IS", WITHOUT WARRANTY OF ANY KIND, EXPRESS OR IMPLIED, INCLUDING BUT NOT LIMITED TO THE WARRANTIES OF MERCHANTABILITY, FITNESS FOR A PARTICULAR PURPOSE AND NONINFRINGEMENT. IN NO EVENT SHALL THE AUTHORS OR COPYRIGHT HOLDERS BE LIABLE FOR ANY CLAIM, DAMAGES OR OTHER LIABILITY, WHETHER IN AN ACTION OF CONTRACT, TORT OR OTHERWISE, ARISING FROM, OUT OF OR IN CONNECTION WITH THE SOFTWARE OR THE USE OR OTHER DEALINGS IN THE SOFTWARE.
BSD 3-Clause "New" or "Revised" License
* Redistribution and use in source and binary forms, with or without
* modification, are permitted provided that the following conditions are met:
* \begin{itemize}
* \item Redistributions of source code must retain the above copyright notice,
* this list of conditions and the following disclaimer.
* \item Redistributions in binary form must reproduce the above copyright
* notice, this list of conditions and the following disclaimer in the
* documentation and/or other materials provided with the distribution.
* \item Neither name of Intel Corporation nor the names of its contributors
* may be used to endorse or promote products derived from this software
* without specific prior written permission.
* \end{itemize}
* THIS SOFTWARE IS PROVIDED BY THE COPYRIGHT HOLDERS AND CONTRIBUTORS
* "AS IS" AND ANY EXPRESS OR IMPLIED WARRANTIES, INCLUDING, BUT NOT
* LIMITED TO, THE IMPLIED WARRANTIES OF MERCHANTABILITY AND FITNESS FOR
* A PARTICULAR PURPOSE ARE DISCLAIMED. IN NO EVENT SHALL INTEL OR
* CONTRIBUTORS BE LIABLE FOR ANY DIRECT, INDIRECT, INCIDENTAL, SPECIAL,
* EXEMPLARY, OR CONSEQUENTIAL DAMAGES (INCLUDING, BUT NOT LIMITED TO,
* PROCUREMENT OF SUBSTITUTE GOODS OR SERVICES; LOSS OF USE, DATA, OR
* PROFITS; OR BUSINESS INTERRUPTION) HOWEVER CAUSED AND ON ANY THEORY
* OF LIABILITY, WHETHER IN CONTRACT, STRICT LIABILITY, OR TORT (INCLUDING
* NEGLIGENCE OR OTHERWISE) ARISING IN ANY WAY OUT OF THE USE OF THIS
* SOFTWARE, EVEN IF ADVISED OF THE POSSIBILITY OF SUCH DAMAGE.
*/
If You Notice a Problem with the Device
Reset the device. Turn off the power by pressing the reset button on the back of the device with the tip of a thin paperclip. Press the power button once again to turn the device on again.
SD Cards
Cards supported by this device
| Standard microSDHC | |
| Capacity 4 GB to 32 GB | |
| Speed class Class 10 or above | |
| File system FAT32 |
Precautions for Using SD cards
- When using a commercially available SD card, also check the instructions supplied with the SD card.
- Be sure to format (initialize) an SD card with the device before use.
- SD cards have a product lifespan, such as the number of times that writing can be performed. It is recommended to replace the SD card with a new one regularly depending on the usage conditions.
- When inserting and removing an SD card, confirm the orientation, do not bend it, and do not apply a strong force or impact to it.
- Do not directly touch the contact part with a hand or metal. The stored data may be damaged or lost due to static electricity.
- Be sure to back up (copy) the required files in the SD card to a PC or other device. The saved data may be lost due conditions of the SD card. Please note that JVCKENWOOD cannot compensate for any damages arising from the loss of saved files.
- Format the memory card periodically.
- Do not remove the memory card while recording or during playback because it may corrupt the data on the memory card.
- The device may not operate normally if you use an SD card that was used by another device, such as a computer or digital camera. Format the memory card in the device.
- Depending on the specifications of the memory card, the reading and writing speeds for the device's data may differ.
to the usage
U.S.A.
JVCKENWOOD USA Corporation
TO OUR VALUED CUSTOMER
THANK YOU FOR PURCHASING THIS JVC PRODUCT. WE WANT TO HELP YOU ACHIEVE A PERFECT EXPERIENCE.
NEED HELP ON HOW TO HOOK UP? NEED ASSISTANCE ON HOW TO OPERATE? NEED TO LOCATE A JVC SERVICE CENTER? LIKE TO PURCHASE ACCESSORIES?
JVC IS HERE TO HELP! TOLL FREE: 1 (800)252-5722 http://www.us.jvckenwood.com
Remember to retain your Bill of Sale for Warranty Service. Do not attempt to service the product yourself
Caution
To prevent electrical shock, do not open the cabinet. There are no user serviceable parts inside. Please refer to qualified service personnel for repairs.
PRODUCT REGISTRATION
We suggest that you register your product since it will enable us to contact you directly if it is ever necessary to correct a safety related condition in your product. You can register at http://www.us.jvckenwood.com Please note that failure to register does not diminish any of your rights during the warranty period.
BT-50004-1 (15/11)

LIMITED WARRANTY
ONLY FOR PRODUCT PURCHASED IN U.S.A.

5618N6690001 ROU
JVCKENWOOD USA Corporation warrants this product and all parts thereof, except as set forth below ONLY TO THE ORIGINAL RETAIL PURCHASER to be FREE FROM DEFECTIVE MATERIALS AND WORKMANSHIP from the date of original purchase for the period shown below. ("The Warranty Period")
PARTS 2 YRS / LABOR 2 YRS : Car audio ARSENAL series PARTS 1 YR / LABOR 1 YR : All other car audio products
THIS LIMITED WARRANTY IS VALID ONLY IN THE FIFTY (50) UNITED STATES, THE DISTRICT OF COLUMBIA AND IN THE COMMONWEALTH OF PUERTO RICO.
WHAT WE WILL DO:
If this product is found to be defective within the warranty period, JVC will repair or replace defective parts with new or rebuilt equivalents at no charge to the original owner. Such repair and replacement services shall be rendered by JVC during normal business hours at JVC authorized service centers. Parts used for replacement are warranted only for the remainder of the Warranty Period. All products may be brought to a JVC authorized service center on a carry-in basis.
WHAT YOU MUST DO FOR WARRANTY SERVICE:
Please do not return your product to the retailer. Instead, return your product to the JVC authorized service center nearest you. If shipping the product to the service center, please be sure to package it carefully, preferably in the original packaging, and include a brief description of the problem(s) and a copy of the proof of purchase to verify purchase date. Please call 1-800-252-5722 to locate the nearest JVC authorized service center. Service locations can also be obtained from our website http://www.us.jvckenwood.com
If you have any questions concerning your JVC Product, please contact our Customer Care Center at 800-252-5722
WHAT IS NOT COVERED:
This limited warranty provided by JVC does not cover
1. Products which have been subject to abuse, accident, alteration, modification, tampering, negligence, misuse, faulty installation, lack of reasonable care, or if repaired or serviced by anyone other than a service facility authorized by JVC to render such service, or if affixed to any attachment not provided with the products, or if the model or serial number has been altered, tampered with, defaced or removed;
2. Initial installation, installation and removal from cabinets of mounting systems.
3. Operational adjustments covered in the Owner's Manual, normal maintenance, video and audio head cleaning;
4. Damage that occurs in shipment, due to act of God, and cosmetic damage;
5. Signal reception problems and failures due to line power surge
6. User Removal Memory Devices/Video Pick-up Tubes/CCD Image Sensors are covered for 90 days from the date of purchase.
7. Accessories
8. Batteries (except that Rechargeable Batteries are covered for 90 days from the date of purchase):
9. Products used for commercial purposes, including, but not limited to rental.
10. Loss of data resultant from malfunction of hard drive or other data storage device:
There are no express warranties except as listed above.
THE DURATION OF ANY IMPLIED WARRANTIES, INCLUDING THE IMPLIED WARRANTY OF MERCHANTABILITY, IS LIMITED TO THE DURATION OF THE EXPRESS WARRANTY HEREIN. JVG SHALL NOT BE LIABLE FOR ANY LOSS OF USE OF THE PRODUCT, INCONVENIENCE, OR ANY OTHER DAMAGES, WHETHER DIRECT, INCIDENTAL OR CONSEQUENTIAL (INCLUDING, WITHOUT LIMITATION, DAMAGE TO TAPES, RECORDS OR DISCS) RESULTING FROM THE USE OF THIS PRODUCT, OR ARISING OUT OF ANY BREACH OF THIS WARRANTY. ALL EXPRESS AND IMPLIED WARRANTIES, INCLUDING THE WARRANTIES OF MERCHANTABILITY AND FITNESS FOR PARTICULAR PURPOSE. ARE LIMITED TO THE WARRANTY PERIOD SET FORTH ABOVE.
Some states do not allow the exclusion of incidental or consequential damages or limitations on how long an implied warranty lasts; so these limitations or exclusions may not apply to you. This warranty gives you specific legal rights and you may also have other rights which vary from state to state.
JVCKENWOOD USA Corporation
PO Box 22745, 2201 East Dominguez Street, Long Beach, CA90801-5745 http://www.us.jvckenwood.com
REFURBISHED PRODUCTS CARRY A SEPARATE WARRANTY, THIS WARRANTY DOES NOT APPLY FOR DETAIL OF REFURBISHED PRODUCT WARRANTY. PLEASE REFER TO THE REFURBISHED PRODUCT WARRANTY INFORMATION PACKAGED WITH EACH REFURBISHED PRODUCT
For customer use:
Enter below the Model No. and Serial No. which is located either on the rear, bottom or side of the cabinet. Retain this information for future reference.
Model No
Purchase date
Serial No.
Name of dealer
CANADA
JVCKENWOOD CANADA INC.

WARRANTY
Warranty applies only to PRODUCT distributed in Canada by JVCKENWOOD CANADA INC.
JVCKENWOOD CANADA INC. (hereafter called "JVC") gives the following express warranty for each new JVC product distributed in Canada by JVC and sold by an authorized JVC dealer. JVC warrants that this JVC product is free, under normal use and maintenance, from any defects in material and workmanship subject to the following terms and conditions:
- To Obtain Warranty Service:
(a) JVC product requiring service must be presented together with proof of purchase.
(b) The JVC product must be brought in for service to an authorized JVC Service Centre.
- Limitation:
This Warranty shall not apply to
(a) Repair or replacement of any cabinets, batteries, plates, connection cords, antennas, dust covers, knots; speaker grills, speaker cones, projection screens, projection screen savers, and all accessories.
(b) Any defects caused or repairs required as a result of misuse, abusive operation, negligence, improper use and/or insufficient care.
(c) Any defect caused or repairs required as a result of not following the instructions in the operation manual.
(d) Any JVC product tampered with, adjusted or repaired by any party other than JVC or authorized JVC Service Centre personnel
(ii). Any JVC products on which the serial number has been defaced, modified or removed.
(f) Maintenance, cleaning or periodic check-up
(g) Conversion to foreign or domestic voltage or frequency. (h) Any JVC product without the Canadian Electrical Safety Regulations ID.
(i) Any JVC products used for commercial or institutional, rental, or display purposes. Parts .... 1 year (except video head - 90 days) Labour .... 90 days
(i) Any JVC product which has been resold and no longer owned by the original purchaser.
(k) Product purchased from "outside Canada", "bankruptcy" or "liquidator".
(i) Any defects caused by fire, flood, lightning, power surge, or other events beyond the control of JVC.
(m) FOR AUTO PRODUCTS
Warranty does not cover elimination of car static or electrical interferences, cleaning of head, adjustments, or labour cost for the removal or reinstallation of the unit for repair.
- Standards:
If any defects should be found in a JVC product within the applicable terms, necessary repairs shall be made at no cost to the purchaser for parts or labour when JVC acknowledges that such defects are due to faulty material or workmanship.
- Exclusion of All Other Express Warranties:
This warranty constitutes the entire express warranty given by JVC for JVC products and no dealer or service centre personnel or his, its or their agent or employee is, or are authorized to extend or enlarge this warranty on behalf of JVC.
- Disclaimer of Consequential Damage:
To the extent the law permits JVC disclaims any responsibility for loss of time or use of its product, transportation costs, or any other indirect, incidental or consequential damage or inconvenience.
WARRANTY TERM (VALID FROM THE DATE OF PURCHASE)
| Product | Parts(Years) | Labour(Years) |
| Projection TV In-Home ServiceColour TV In-Home (25" and above)D-ILA Rear Projection In-Home ServiceLCD TV In-Home Service (25" and above) | 1 | 1 |
| * In-Home service to be provided where available.Where it is not available, the purchaser must assume the responsibility and expense for the proper packing, shipment and all costs associated with the delivery of the equipment to and from the closest JVC Authorized Service Centre. | ||
| Receivers and Home Speakers purchasedseparately. Front Projection and CarAudio "ARSENAL" Series | 2 | 2 |
| AC Adapters, Remote controls,Headphones, Microphones and Projectorlamps | 90 days | 90 days |
| Wood Cone Speakers | 5 | 5 |
| All Other Categories | 1 | 1 |
JVCKENWOOD CANADA INC.
6070 Kestrel Road, Mississauga, Ontario: L5T 1S8 Canada
TEL: (905) 670-3381 FAX: (905)670-7244 Service toll free #: 1-800-964-2650
http://www.jvc.ca E-mail: service@jvc.ca
Product Registration
We suggest that you register your product since it will enable us to contact you directly if it is ever necessary to correct a safety related condition in your product. You can register at http://www.jvc.ca/www/Support/Warranty.aspx
For customer use:
Enter below the Model No. and Serial No. which is located either on the rear, bottom or side of the cabinet. Retain this information for future reference.
Model No.
Purchase date:
Serial No.
Name of dealer:
GARANTIE
(m)POUR LES PRODUITS D'AUTOMOBILE
- FCC NOTE
- FCC COMPLIANCE NOTICE
- Getting to Know Your Device
- How to install
- Using a Memory Card
- Formatting a Card
- Note:
- Turning the Device On
- Power Button
- Shutting down the Device
- Function Keys
- System Icons
- Setting the Date and Time
- Recording in Driving Mode
- Continuous Recording
- Event Recording
- Camera Mode
- Playback Mode
- Getting Connected
- JVC DVR Link
- Setting up a Wireless Connection
- System Settings
- File Playback
- Camera
- Wireless LAN
- Sound Recording
- Video Recording
- System
- Format
- Using the PC Application
- System Requirements for JVC ROUTE WATCHER
- Installing the Software
- Specifications
- Screen size
- Operating voltage
- Current Consumption
- G-sensor
- Collision sensitivity
- Image sensor
- Number of Pixel
- Angles of view
- Lens
- Operating temperature
- Recording resolution
- Frame rate
- Recording preservation timing
- Recording Mode
- Video format
- Picture format
- Recording media
- USB Port
- Wi-Fi
- Dimensions WxHxD (Main unit)
- Weight (Main unit)
- Accessories
- Precautions and Notices
- Caring for Your Device
- Cleaning the Device
- Precautions for Installation
- Precautions for Use
- Others
- About software
- Applicable condition of license for third party software
- MIT License
- BSD 3-Clause "New" or "Revised" License
- If You Notice a Problem with the Device
- SD Cards
- Precautions for Using SD cards
- TO OUR VALUED CUSTOMER
- Caution
- PRODUCT REGISTRATION
- LIMITED WARRANTY
- WHAT WE WILL DO:
- WHAT YOU MUST DO FOR WARRANTY SERVICE:
- WHAT IS NOT COVERED:
- JVCKENWOOD USA Corporation
- For customer use:
- WARRANTY
- JVCKENWOOD CANADA INC.
- GARANTIE
Brand : JVC
Model : KV-DR305W
Category : Dash cam