
HOIL7 - Heating Heller - Free user manual and instructions
Find the device manual for free HOIL7 Heller in PDF.


| Product Type | Oil-Filled Radiator |
| Brand | Heller |
| Model | HOIL7 |
| Power Rating | 1500W |
| Voltage | 220-240V ~ |
| Frequency | 50/60Hz |
| Number of Fins | 7 |
| Heat Settings | Low (600W), Medium (900W), High (1500W) |
| Thermostat Control | Adjustable thermostat with dial |
| Indicator Light | Yes, glows when heating |
| Safety Features | Tip-over switch, overheat protection |
| Assembly Required | Yes, attach castors with U-bolt and wing nuts |
| Portability | Equipped with castors for easy movement |
| Cleaning | Wipe with damp cloth, unplug and cool before cleaning |
| Warranty | Refer to purchase receipt; service by GAF Control (Sales) Pty Ltd |
| Minimum Room Area | At least 4 m² |
| Indoor Use Only | Yes, not for outdoor use |
Frequently Asked Questions - HOIL7 Heller
User questions about HOIL7 Heller
0 question about this device. Answer the ones you know or ask your own.
Ask a new question about this device
Download the instructions for your Heating in PDF format for free! Find your manual HOIL7 - Heller and take your electronic device back in hand. On this page are published all the documents necessary for the use of your device. HOIL7 by Heller.
USER MANUAL HOIL7 Heller
natural_image
Exterior view of a silver water heater with control panel and wheels (no visible text or symbols)HOIL5

natural_image
Exterior view of a silver oil-water heater with control panel and wheels (no visible text or symbols)HOIL7

natural_image
Exterior view of a silver multi-axle heat sink with cooling fans and control panel (no visible text or symbols)HOIL9

natural_image
Exterior view of a silver oil shaver with control panel and wheels (no visible text or symbols)HOIL11

natural_image
Exterior view of a silver water heater with control panel and wheels (no visible text or symbols)HOIL11T

natural_image
Exterior view of a silver oil resistance heater with control panel and wheels (no visible text or symbols)HOIL11FT
READ & SAVE THESE INSTRUCTIONS
IMPORTANT
Read and follow the instructions in this user manual even if you feel you are familiar with the product, and find a place to keep it handy for future reference.
For your convenience record the complete model number (located on the product identification plate) and the date you received the product, together with your purchase receipt and attach to the warranty and service information. Retain in the event that warranty service is required.
NOTE: The rating of this product (as marked on the product identification plate) is based on specific loading tests. Normal use or the use of other recommended attachments may draw significantly less power.
IMPORTANT SAFEGUARDS
When using any electrically powered product, basic safety precautions should always be followed, including the following:
PLEASE READ ALL INSTRUCTIONS CAREFULLY BEFORE USING THIS PRODUCT
WARNING!: - to reduce the risk of fire, electrical shock or injury to persons or property:
- Carefully read all instructions before operating your new product for the first time and save for future reference.
- Remove and safely discard any packaging material and promotional labels before using the appliance for the first time.
- To eliminate a choking hazard for young children, remove and safely discard the protective cover fitted to the plug of this appliance.
- Always operate the product from a power source of the same voltage, frequency and rating as indicated on the product identification plate.
- This appliance is not intended for use by persons (including children) with reduced physical, sensory or mental capabilities, or lack of experience and knowledge, unless they have been given supervision or instruction concerning use of the appliance by a person responsible for their safety.
- Close supervision is necessary when the product is used by or near children or invalids. Children should be supervised to ensure that they do not play with the appliance.
- This product must not be located immediately below a socket outlet, and should not be used in the immediate vicinity of water, such as bathtubs, washbowls, swimming pools etc. where the likelihood of immersion or splashing could occur.
- WARNING: In order to avoid overheating, do not cover the heater, or operate in close proximity to curtains, etc. Check air inlets and outlets from time to time for accumulated dust.
• Children should be supervised to ensure that they do not play with the appliance. - Do not operate the radiator with a damaged cord or plug, or after the product malfunctions, or is dropped or appears damaged in any way. Do not tamper with the radiator or attempt to open the end panels. Return the complete unit to the place of purchase for inspection, repair or replacement.
- Use the radiator only in the upright position. The heater must not be located immediately below a socket-outlet. Do not immerse in liquid when cleaning.
- Keep the radiator away from flammable liquids and gases.
- Keep the radiator away from wet areas. Do not use this heater in the immediate surroundings of a bath, a shower or a swimming pool.
• In order to avoid overheating, do not cover the heater. Do not use it to dry clothes. -
Always keep the radiator well away from curtains, furniture and flammable materials. Ensure at all times there is an unrestricted airflow around the radiator.
• Always disconnect the plug from the wall socket when the radiator is not in use. -
Do not position the radiator immediately below a socket-outlet.
• Do not leave the heater running unattended. - Do not use the appliance other than its intended use.
- Do not immerse or expose the product or flexible cord to rain, moisture or any other liquid.
- Switch off and unplug from outlet when the product is not in use and before cleaning. Always allow the unit to cool down first before cleaning or storing it away.
- To avoid personal injuries or property damage, do not insert any body parts (e.g. finder) or objects through the air inlet or outlet openings when the heater is operating.
• This product is intended for normal domestic/household use only.
• Always disconnect the heater when moving it from one location to another. - The use of attachments or accessories not recommended or sold by the product distributor may cause personal or property hazards or injuries.
- The surfaces of the heater are very hot during operation. Avoid contact with the wind outlet. Use handles and knobs if necessary.
- Do not twist or wrap the power cord around the appliance as this may cause the insulation to weaken and split, particularly where it enters the unit.
- Use of an extension cord is not recommended. However, if it is absolutely necessary ensure the cord is short as possible (long cords coiled up can overheat and cause tripping accidents).
- Do not use the appliance on the same socket or electric circuit with other electrical appliances so as to prevent the circuit from being overloaded, which will cause fire. Please do not prolong the power cords by yourself or use movable socket.
- Ensure the cord is fully extended before use and accommodate it so that it is not in touch with any part of the heater.
- Do not use the heater in areas such as garages where petrol or other flammable substances are used or stored. Do not use the heater when flammable sprays, solvents and glues are in use.
- Keep combustible materials such as furniture, pillows, bedding, clothes and curtains at least 50cm from sides of heater.
- Ensure heater is not blocked and there are spacing of at least 50cm around its sides and 120cm from the front or heat outlet.
- Avoid touching the heater body whilst the heater is on. Do not move the appliance while it is functioning in order to avoid overheating with the additional risk of fire.
- Do not use the heater to dry your laundry. Never obstruct the intake and outlet grilles (danger of overheating).
- When the appliance is used in portable version, do not place it up against the walls, furniture, curtains, etc.
• The appliance must not be positioned directly underneath a fixed power point. - Do not use the appliance while it is cooling down, in order to avoid overheating with the attendant risk of fire.
- Do not use the appliance in rooms less than 4m^2 area.
• CAUTION: Surfaces are hot during use. Please use handle or knob - The installation of a residual current device (safety switch) is recommended to provide additional safety protection when using electrical appliances. It is advisable that a safety switch with a rated residual operating current not exceeding 30mA be installed in the electrical circuit supplying the appliance. See your electrician for professional advice.
READ AND SAVE THESE INSTRUCTIONS FOR FUTURE REFERENCE
BEFORE FIRST USE
Read and follow the instructions in this user manual even if you feel you are familiar with the product, and find a place to keep it handy for future reference.
For your convenience record the complete model number (located on the product identification plate) and the date you received the product, together with your purchase receipt and attach to the warranty and service information. Retain in the event that warranty service is required.
NOTE: The rating of this product (as marked on the product identification plate) is based on specific loading tests. Normal use or the use of other recommended attachments may draw significantly less power.
INSTALLATION & LOCATION
The appliance requires no installation; it should be used solely as a portable appliance.
NOTE: Portable appliances are not suitable for use in a bathroom. The Appliance should be placed with a minimum distance of 1 metre away from flammable objects (e.g. curtains), walls or other structures.
ASSEMBLY INSTRUCTIONS
- Fix the wheels in the brackets with the screw .Refer to fig.1 .
Turn the radiator upside down. Place the castors between the last two panels on either end. Face the wheels up towards you and attach by means of the U-bolt and wing nuts supplied. Slide the U-bolt under the radiator frame and attach to the castor brackets. Refer to figs 2 and 3. - On the HOIL5 models, note the correct position of the anti-topple castors. The wings on the brackets must be pointing outwards, away from the radiator. Refer to fig.4. On the HOIL7 models, Refer to fig.5
- Turn the radiator upright before switching on.

natural_image
Simple line drawing of a mechanical component with dashed alignment lines and circular endpoints (no text or symbols)Fig. 1

natural_image
Pure mechanical diagram showing a U-shaped tube with two spherical ends and a vertical dashed line indicating a measurement or connection point (no text or symbols)Fig. 2

natural_image
Diagram of a mechanical or electrical component with multiple vertical channels and mounting features (no text or symbols)Fig. 3

natural_image
Technical line drawing of a mechanical assembly with no visible text or symbolsFig. 4
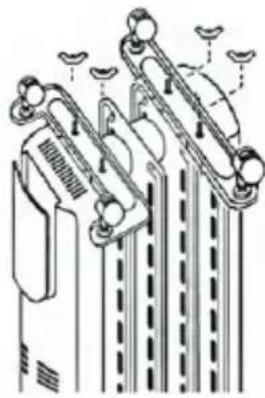
natural_image
Technical line drawing of a mechanical device with multiple ports and structural supports (no text or symbols)Fig. 5
OPERATIONS
-
Turn the thermostat in a clockwise direction to the maximum position and set both switches to ON. The indicator light will glow. This will set the column heater to HI, producing the maximum amount of heat possible and will reduce the amount of time it takes to initially warm up the room. For units fitted with timer, check timer settings as per instructions below. The timer must be set before the unit will operate, or the timer bypass switch must be set to "I" to bypass the timer. NOTE: If the timer bypass switch is set to "O" then the heater will not operate. The Heat switches will not operate.
-
A range of heat settings is available. Switch position I for minimum heat settings (approx 40% max). Position II for intermediate heat settings (approx 60% max). Position I and II for maximum heat settings. (Position 0 switches the unit OFF)
-
As the room warms up, you may wish to decrease the heat level or simply maintain a comfortable room temperature. To do this, turn the thermostat down to lower number. The heat will cycle on and off to maintain the desired room temperature. Turn one of the heat switches off to conserve the power. This will set the heat elements to low or medium, but will increase the amount of time it takes to reheat. On really cold days this may not be practical, as heat losses can exceed the heat generated by our column heater. Larger rooms and open space areas may also find the medium heat setting ineffective.
You will need to experiment with this column heater to establish the exact setting required for any particular room or space. The table shows power consumption for all switching combinations.
Power Consumption
| Model | Switch 1 | Switch 2 | Switches 1 & 2 |
| HOIL5 (1000W) | 400 Watt | 600 Watt | 1000 Watt |
| HOIL7 (1500W) | 600 Watt | 900 Watt | 1500 Watt |
| HOIL9 (2000W) | 800 Watt | 1200 Watt | 2000 Watt |
| HOIL11 (2400W) | 1000 Watt | 1400 Watt | 2400 Watt |
| HOIL11T (2400W) | 1000 Watt | 1400 Watt | 2400 Watt |
| HOIL11FT (2400W) Fan heater off | 800 Watt | 1200 Watt | 2000 Watt |
| HOIL11FT (2400W) Fan heater on | 1200 Watt | 1600 Watt | 2400 Watt |
Timer Instructions (ONLY APPLICABLE FOR MODEL NO. HOIL11T & HOIL11FT)
The timer face consists of a moveable numbered band with moveable pins and a fixed centre plate. When the moveable pins are slid towards the centre plate the timer is OFF and when slid towards the outer numbered band the timer is ON. Each pin corresponds to 15 minutes operation. A switch is fitted to bypass the timer if required.
- Rotate the timer dial until the current time is opposite the pointer.
- Slide the pins corresponding to the required ON time towards the outer numbered band.
- The pins corresponding to the required OFF time are slid towards the inner band.
- To operate under timer control, slide the bypass switch to the "∅" position.
- To bypass the timer, slide the bypass switch to the "I" position.
- To disconnect power to the heater slide the bypass switch to "O"
EXAMPLE:
Suppose it is now at 7:00AM. Rotate the timer until "7" is opposite to the pointer (i.e. Position A).
For operation between 8:00AM and 3:00PM, slide the bypass switch to "☐", all the pins between "8" and "15" are slid towards the outer band and those between "15" and "8" are slid towards the inner band.

natural_image
Close-up of a circular electronic device with red and white bands, no visible text or symbolsNOTE:
For correct timer operation the radiator must be connected to the power supply and the power switched on. The second hand will indicate when power is connected.
Fan heater(Only Applicable for model No.HOIL11FT):
Fan heater power is 400W. If you want to fasten the speed of heating efficiency when the oil heater on work, you can just push the fan heater switch in one time to open the fan heater, the room temperature will be raised in high speed. Push the fan heater switch again, the fan heater will be off immediately.
In every power level, the fan heater can work if you open it with the switch.
Tip Over Switch
This radiator is fitted with a safety tip-over which will disconnect the power to the element in the event that the heater is knocked over. If this should occur, the heater should be put upright in the correct position, switched off and allowed to rest for approximately 10mins before being switched on again.
HINTS & TIPS
- Do not overheat your home, in winter the temperature of a heated room should be between 18-21°C
- Choose the right size heater for the room that you wish to heat.
• Zone off the unoccupied rooms by closing doors, and curtains to limit heat loss.
• Use draft stoppers where possible, to keep the cold air from filtering in under doors. - Avoid placing items, or sitting too close to the heater for optimal air flow.
CLEANING & MAINTENANCE
The heater requires regular cleaning to ensure trouble free operation:
• Unplug the heater from the mains supply before cleaning.
- Ensure that the heater has been allowed to cool before cleaning.
• Use a damp cloth (not wet) to wipe the exterior of the heater to remove dust and dirt.
- Do not allow any water or other liquid to enter the housing or control panel.
- Ensure the heater is dry before plugging back into the mains supply.
CAUTION: Do not use harsh detergents, chemical cleaners or solvents as they may damage the surface finish of the heater.

Warning: In order to avoid overheating, do not cover the heater.
WARNING - Fabric, clothing or other flammable materials may ignite if placed against or in close proximity to the heater. No flammable materials should be placed within 120cm of the front or heat outlet and 50cm of sides or rear of the heater. Do not cover the heater. This appliance is for indoor use only. Do not use outdoors.
IMPORTANT NOTE
This heater is filled with a precise quantity of special oil. Repairs requiring opening of the oil container are only to be made by the manufacturer or his service agent who should be contacted if there is an oil leak. When disposing of the heater, follow the regulations concerning the disposal of oil.
If the supply cord is damaged, it must be replaced by the manufacturer, its service agent or similarly qualified persons in order to avoid a hazard.
SPECIFICATIONS
| Model | Product Description | Voltage | Frequency | Wattage |
| HOIL5 | OIL HEATER 5 FIN 1000W | 220-240Vac | 50/60Hz | 1000W |
| HOIL7 | OIL HEATER 7 FIN 1500W | 220-240Vac | 50/60Hz | 1500W |
| HOIL9 | OIL HEATER 9 FIN 2000W | 220-240Vac | 50/60Hz | 2000W |
| HOIL11 | OIL HEATER 11 FIN 2400W | 220-240Vac | 50/60Hz | 2000W-2400W |
| HOIL11T | OIL HEATER 11 FIN 2400W WITH TIMER | 220-240Vac | 50/60Hz | 2000W-2400W |
| HOIL11FT | OIL HEATER 11 FIN 2400W WITH TIMER AND FAN HEATER | 220-240Vac | 50/60Hz | 2000W-2400W |
CUSTOMER SERVICE
Australian Customer Service
GAF Control (Sales) Pty Ltd
P.O Box 19
Altona North, Victoria, 3025
Phone: 1300 659 489
Hours: 9am-5pm (EST) Mon-Fri
www.gafcontrol.com.au
*This product may vary slightly to the product illustrated due to ongoing product development.
- IMPORTANT
- IMPORTANT SAFEGUARDS
- READ AND SAVE THESE INSTRUCTIONS FOR FUTURE REFERENCE
- BEFORE FIRST USE
- INSTALLATION & LOCATION
- ASSEMBLY INSTRUCTIONS
- OPERATIONS
- Timer Instructions (ONLY APPLICABLE FOR MODEL NO. HOIL11T & HOIL11FT)
- EXAMPLE:
- NOTE:
- Tip Over Switch
- HINTS & TIPS
- CLEANING & MAINTENANCE
- IMPORTANT NOTE
- CUSTOMER SERVICE
Brand : Heller
Model : HOIL7
Category : Heating