
Instant Up Single Ensuite - Tent COLEMAN - Free user manual and instructions
Find the device manual for free Instant Up Single Ensuite COLEMAN in PDF.


| Product Type | Tent |
| Brand | Coleman |
| Model | Instant Up Single Ensuite |
| Capacity | 1 person (single) |
| Setup Time | Fast setup with pre-attached poles (Instant Up) |
| Pole Material | FRP (Fiberglass Reinforced Plastic) |
| Flammability | Meets CPAI-84 standards |
| Included Accessories | Rainfly, ground pegs, guylines |
| Ventilation | Mesh door and windows for airflow |
| Storage Instructions | Dry thoroughly before storage; store in cool, dry place |
| Cleaning Instructions | Brush off dirt; avoid prolonged sun exposure |
| Water Resistance | Rainfly included; condensation is normal, not leakage |
| Recommended Use | Camping, outdoor shelter |
| Country of Origin | Manufactured for Coleman Australia |
| Warranty | Contact customer service for warranty information |
Frequently Asked Questions - Instant Up Single Ensuite COLEMAN
User questions about Instant Up Single Ensuite COLEMAN
0 question about this device. Answer the ones you know or ask your own.
Ask a new question about this device
Download the instructions for your Tent in PDF format for free! Find your manual Instant Up Single Ensuite - COLEMAN and take your electronic device back in hand. On this page are published all the documents necessary for the use of your device. Instant Up Single Ensuite by COLEMAN.
USER MANUAL Instant Up Single Ensuite COLEMAN
- Read all instructions before set up.
- Set up tent prior to first camping trip to become familiar with the setup and disassembly procedures.
- Select a level site clear of rocks, branches, and other hard or sharp objects, to install your tent.
⚠ WARNING: Keep clear of overhead power lines.
- Do not set up your tent under trees because of potential lightning strikes or falling tree limbs in inclement weather.
- NOTICE: Secure product with all ground pegs, guylines and rainfly attachments for optimal performance and to prevent property damage or personal injury.
- For best results in windy conditions, position narrow end of tent into the wind.
- Two people recommended for setup.
Things You Should Know
- Condensation is normal and IS NOT LEAKAGE. It can be minimized by providing good ventilation.
- Tree limbs, tree sap, bird droppings, or moisture steadily dripping off tree limbs can cause damage to the tent fabric and its coating.
- Do not store tents without drying it off thoroughly and brushing off caked dirt.
• Store in a cool, dry place. - Pegs should be removed by pulling on the peg itself. NEVER PULL ON THE TENT TO REMOVE PEGS AS THIS COULD RESULT IN PROPERTY DAMAGE OR PERSONAL INJURY.
- Prolonged exposure to the sun can seriously damage material and/or cause it to become discolored.
⚠ WARNING: KEEP ALL FLAME AND HEAT SOURCES AWAY FROM THIS TENT FABRIC.
This tent meets the flammability requirements of CPAI-84. The fabric may burn if left in continuous contact with any flame source. The application of any foreign substance to the tent fabric may render the flame-resistant properties ineffective.
Newell Australia Pty Ltd
Level 3, 35 Dalmore Drive
Caribbean Park
Victoria 3179
ABN: 68 075 071 233
Australia
Email: customerservice@colemanaust.com.au
www.colemanaustralia.com.au
© 2020 & TM The Coleman Company, Inc.
All rights reserved.

We would love to hear from you
1800 224 350
4010068216 (ECN20071970-A)
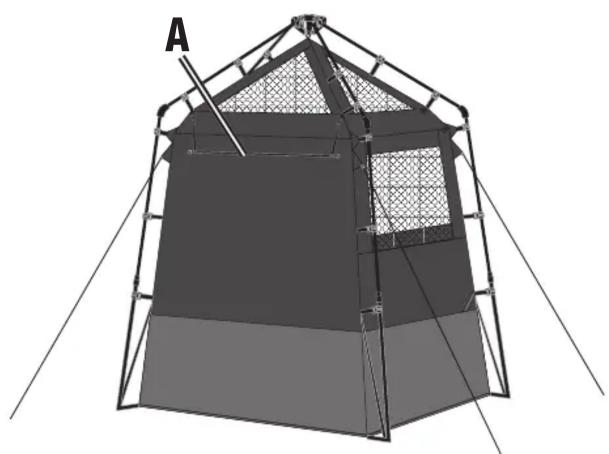
Pole List
A.
FRP pole ......x 1

natural_image
3D diagram of a tent structure with labeled component 'A' (no text or symbols beyond label)Back view of tent without rainfly

natural_image
3D rendering of a modular tent structure with arched top and lattice windows (no text or symbols)Front view of tent without rainfly
natural_image
3D rendering of a simple tent with a gable, showing front, side, and interior panels (no text or symbols)Complete tent with rainfly
How to Pack

natural_image
Abstract 3D geometric diagram with shaded triangular regions and a central arrow (no text or symbols)


natural_image
Simple line drawing of a house with arrows indicating airflow or movement, no text or symbols present.-
Unzip door and windows to let air escape and fold the inner tent
-
Fold rainfly to length of pole and use poles to roll folded rainfall.
-
Place in Cool, dry place3. Pack
How to Set Up and Disassemble
1 LAYOUT & POSITIONING OF TENT

natural_image
Diagram showing a 3D object before and after transformation, with no visible text or symbols2 RAISE THE TENT
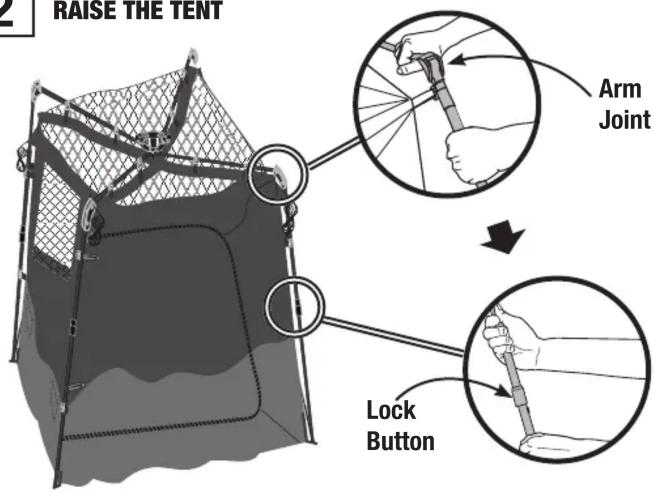
3 VERIFY CONNECTIONS BETWEEN TENT AND FRAME POLES INSTALL TOWEL RACK

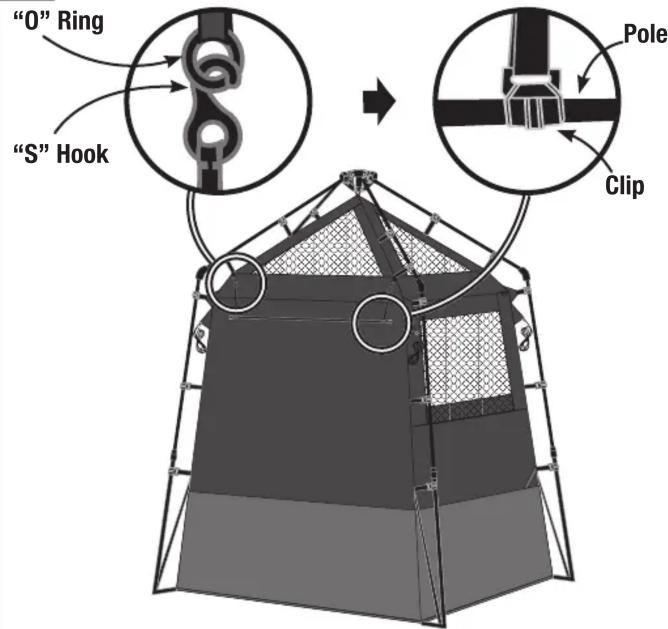
5 ATTACH RAINFLY STAKE DOWN AND GUY OUT TENT
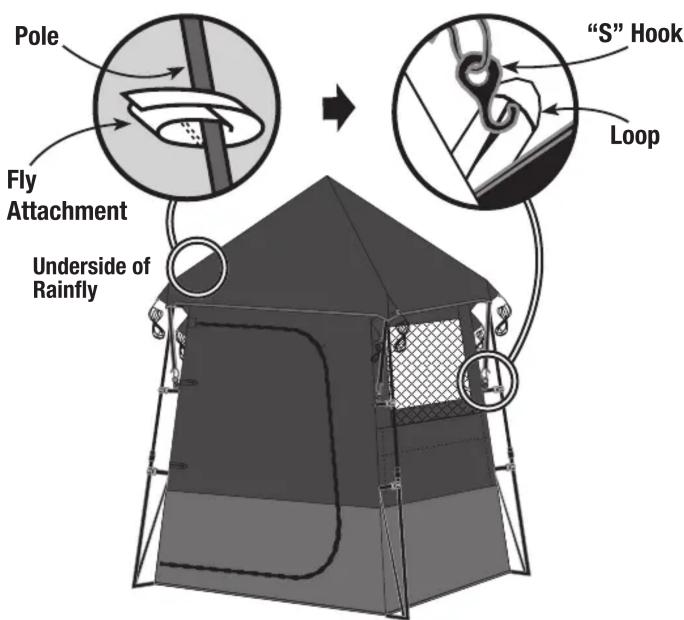
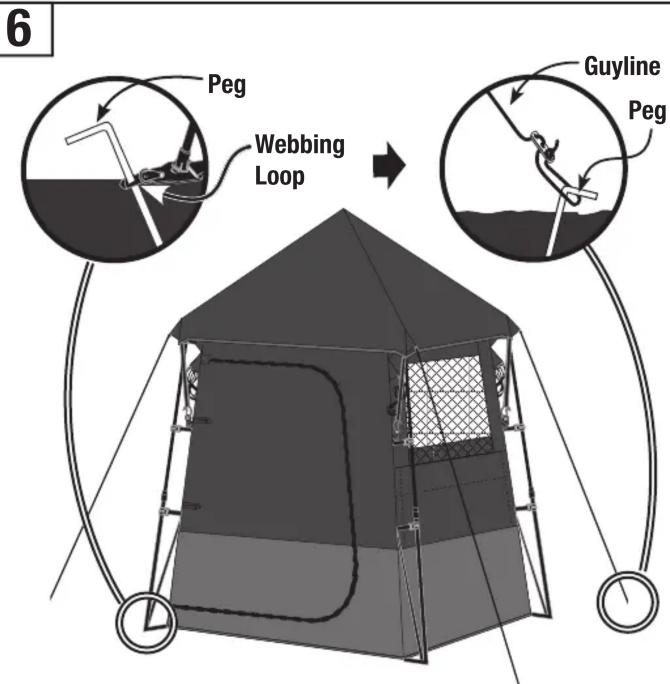
7 DISASSEMBLY
To take down the tent, follow the previous steps and illustrations in the reverse order.



Brand : COLEMAN
Model : Instant Up Single Ensuite
Category : Tent