
NUC 9 Pro - Desktop computer INTEL - Free user manual and instructions
Find the device manual for free NUC 9 Pro INTEL in PDF.


| Product Type | Desktop Computer (Mini PC) |
| Model Numbers | NUC9VXQNX, NUC9V7QNX, NUC9i9QNX, NUC9i7QNX, NUC9i5QNX |
| Processor Options | Intel Core i9, i7, i5 or Intel Xeon (varies by model) |
| Memory Type | DDR4 SO-DIMM, 1.2V low voltage (1.35V via XMP on i9/i7/i5 SKUs) |
| Memory Slots | 2 (260-pin) |
| Maximum Memory | 64 GB (non-ECC); ECC supported only on NUC9VXQNX |
| Memory Speed | 2666 MHz |
| Storage Options | Dual M.2 42/80 mm and single 110 mm SSD; additional 2.5" SATA SSD/HDD |
| Graphics | Integrated Intel Graphics (dependent on processor) |
| Operating System Support | Windows 10/11, Linux (community supported) |
| Power Supply | External power adapter, 19V DC, 230W |
| Power Connector | C13 type (power cord sold separately or included per region) |
| Dimensions (Approx.) | 238 x 216 x 96 mm (9.37 x 8.5 x 3.78 inches) |
| Weight (Approx.) | 1.5 kg (3.3 lbs) without accessories |
| Chassis Material | Metal and plastic |
| Cleaning Instructions | Use a dry, soft cloth. Avoid liquids and abrasive cleaners. |
| Safety Precautions | Disconnect power before opening; handle components with ESD protection; avoid sharp edges. |
| Spare Parts & Repairability | Contact Intel support or authorized resellers for spare parts. User-replaceable: memory, M.2 SSD, 2.5" drive. |
| General Information | Compact, professional-grade mini PC suitable for business, content creation, and light gaming. |
Frequently Asked Questions - NUC 9 Pro INTEL
User questions about NUC 9 Pro INTEL
0 question about this device. Answer the ones you know or ask your own.
Ask a new question about this device
Download the instructions for your Desktop computer in PDF format for free! Find your manual NUC 9 Pro - INTEL and take your electronic device back in hand. On this page are published all the documents necessary for the use of your device. NUC 9 Pro by INTEL.
USER MANUAL NUC 9 Pro INTEL
Intel® NUC kit NUC9VXQNX
Intel® NUC kit NUC9V7QNX
Intel® NUC kit NUC9i9QNX
Intel® NUC kit NUC9i7QNX
Intel® NUC kit NUC9i5QNX
User Guide
You may not use or facilitate the use of this document in connection with any infringement or other legal analysis concerning Intel products described herein. You agree to grant Intel a non-exclusive, royalty-free license to any patent claim thereafter drafted which includes subject matter disclosed herein.
No license (express or implied, by estoppel or otherwise) to any intellectual property rights is granted by this document.
All information provided here is subject to change without notice. Contact your Intel representative to obtain the latest Intel product specifications and roadmaps.
The products described may contain design defects or errors known as errata which may cause the product to deviate from published specifications. Current characterized errata are available on request.
Copies of documents which have an order number and are referenced in this document may be obtained by calling 1-800-548-4725 or by visiting: http://www.intel.com/design/literature.htm.
Intel technologies' features and benefits depend on system configuration and may require enabled hardware, software or service activation. Performance varies depending on system configuration. No computer system can be absolutely secure.
Intel and the Intel logo are trademarks of Intel Corporation or its subsidiaries in the U.S. and/or other countries.
*Other names and brands may be claimed as the property of others.
Copyright © 2019, Intel Corporation. All rights reserved.
Contents
1.0 Introduction 5
1.1 Before You Begin....5
1.2 Installation Precautions....6
1.3 Observe Safety and Regulatory Requirements....6
2.0 Open the Chassis....7
3.0 System Memory....10
4.0 Change the M.2 SSD....13
5.0 Install a 2.5" SSD or Hard Drive....15
6.0 Close the Chassis....16
7.0 Connect Power....20
8.0 Install an Operating System....22
9.0 Install the Latest Device Drivers and Software 23
Revision History
| Date | Revision | Description |
| 1.0 | Initial release. |
1.0 Introduction
This User Guide provides step-by-step installation instructions for these products:
- Intel® NUC kit NUC9VXQNX
- Intel® NUC kit NUC9V7QNX
- Intel® NUC kit NUC9i9QNX
- Intel® NUC kit NUC9i7QNX
- Intel® NUC kit NUC9i5QNX
1.1 Before You Begin

CAUTIONS
The steps in this guide assume you're familiar with computer terminology and with the safety practices and regulatory compliance required for using and modifying computer equipment.
Disconnect the computer from its power source and from any network before performing any of the steps described in this guide.
Failure to disconnect power, telecommunications links, or networks before you open the computer or perform any procedures can result in personal injury or equipment damage. Some circuitry on the board can continue to operate even though the front panel power button is off.
Follow these guidelines before you begin:
• Always follow the steps in each procedure in the correct order.
- Create a log to record information about your computer, such as model, serial numbers, installed options, and configuration information.
- Electrostatic discharge (ESD) can damage components. Perform the procedures described in this chapter only at an ESD workstation using an antistatic wrist strap and a conductive foam pad. If such a station isn't available, you can provide some ESD protection by wearing an antistatic wrist strap and attaching it to a metal part of the computer chassis.
1.2 Installation Precautions
When you install and test the Intel NUC, observe all warnings and cautions in the installation instructions.
To avoid injury, be careful of:
- Sharp pins on connectors
- Sharp pins on circuit boards
- Rough edges and sharp corners on the chassis
• Hot components (such as SSDs, processors, voltage regulators, and heat sinks)
• Damage to wires that could cause a short circuit
Observe all warnings and cautions that instruct you to refer computer servicing to qualified technical personnel.
1.3 Observe Safety and Regulatory Requirements
If you don't follow these instructions, you increase your safety risk and the possibility of noncompliance with regional laws and regulations.
2.0 Open the Chassis
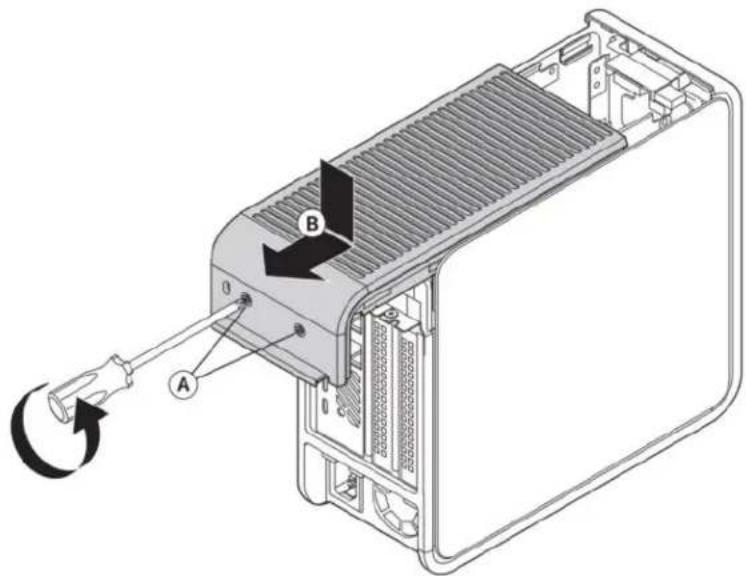
- Unscrew the two top screws on the rear side of the chassis and shift the cover:
- Remove the left side panel:
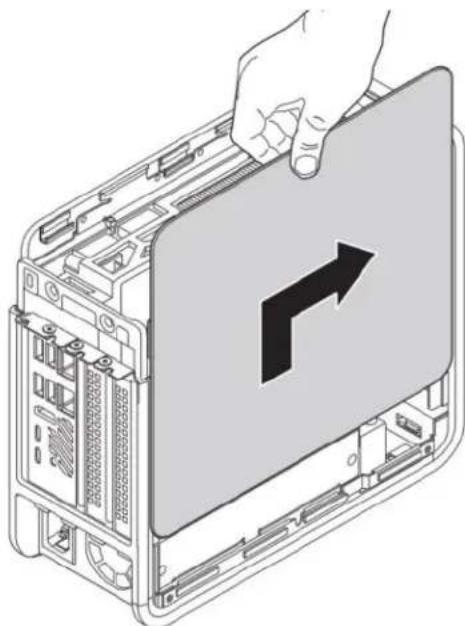
natural_image
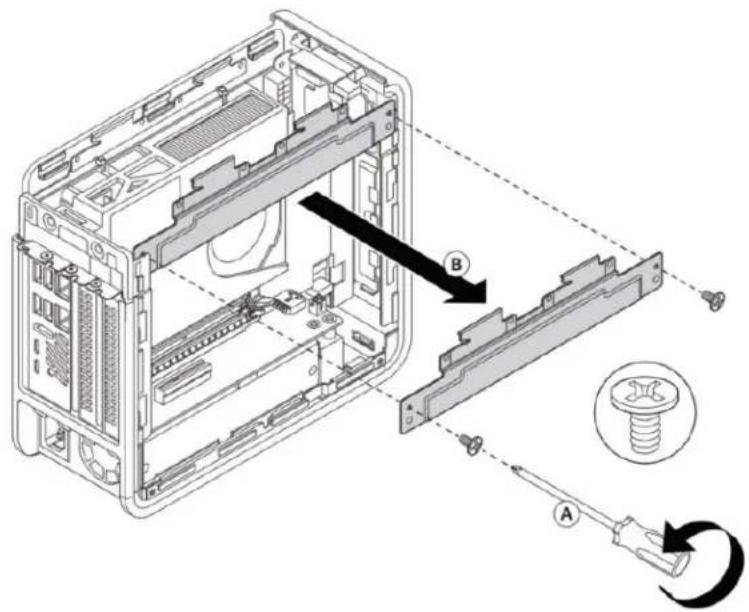
Illustration of a computer tower case with a hand inserting a folder into the cover (no text or symbols)- Remove the cross bar bracket:
- Fold the air guide back:
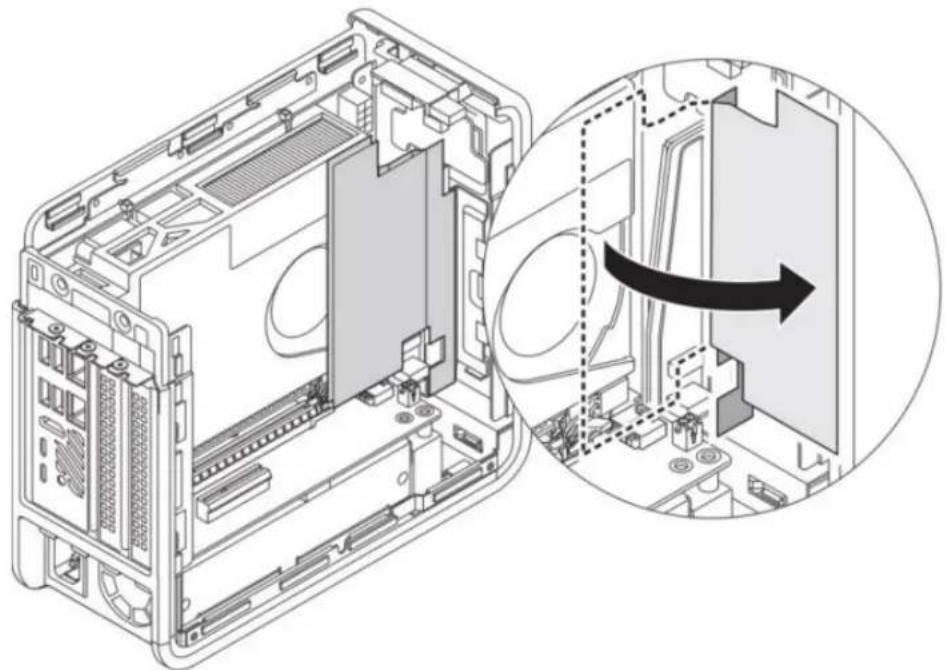
natural_image
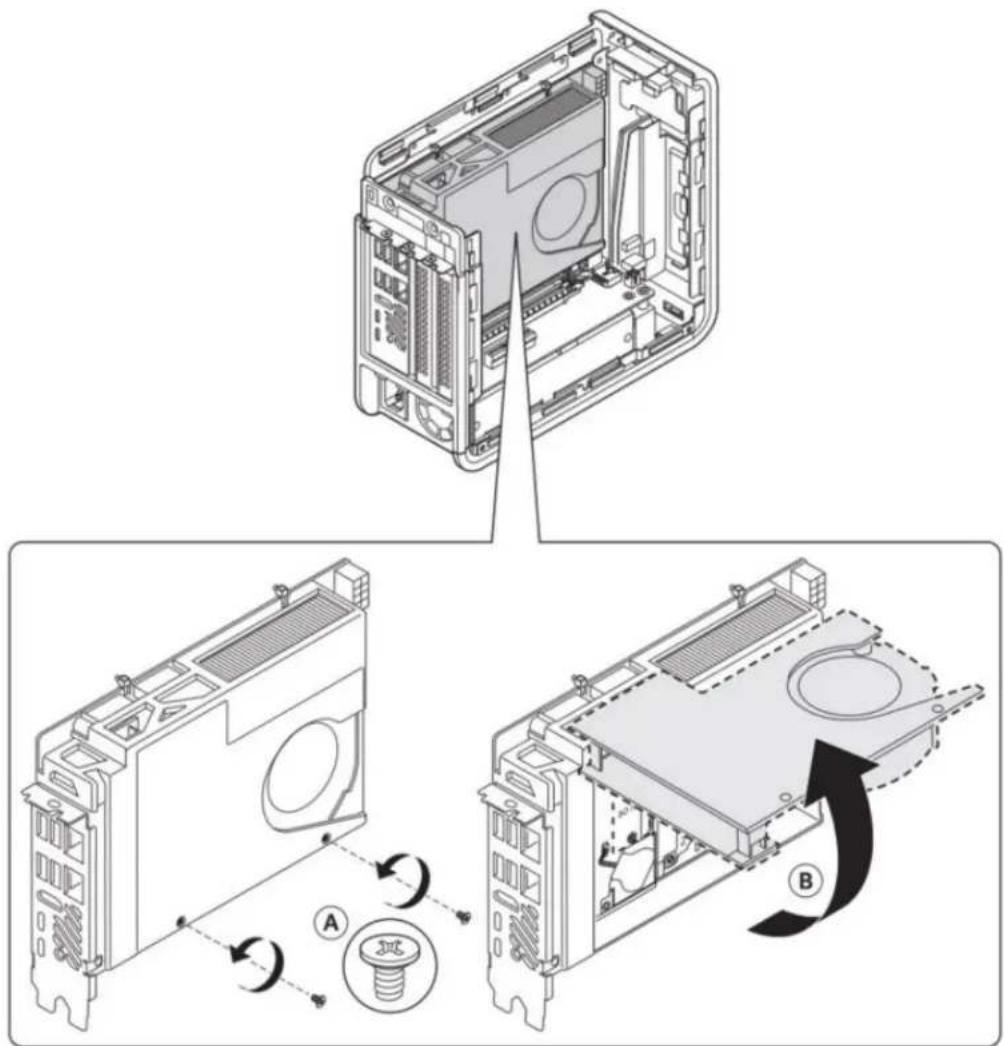
Technical illustration of an internal server chassis showing internal components and a magnified view of the internal structure (no text or symbols present)- Unscrew the two bottom screws and open the NUC door:
3.0 System Memory
Intel® NUC kit NUC9VXQNX, NUC9V7QNX, NUC9i9QNX, NUC9i7QNX and NUC9i5QNX have two 260-pin DDR4 SO-DIMM sockets. Be sure to select memory modules that meet these requirements:
• 1.2V low voltage memory
1.35V via XMP support – NUC9i9QNX, NUC9i7QNX and NUC9i5QNX SKUs Only
• 2666 MHz SO-DIMMs
• Max capacity - 64GB
- Non-ECC
- ECC supported by the NUC9VXQNX only
Find compatible memory modules in the Intel Product Compatibility Tool
- NUC9VXQNX
- NUC9V7QNX
- NUC9i9QNX
- NUC9i7QNX
- NUC9i5QNX
| NOTE | If you plan to install only one memory module, install it in the lower memory socket. |
To install memory, follow these steps:
- Observe the precautions in "Before You Begin" on page 5.
- Turn off all peripheral devices connected to the computer. Turn off the computer and disconnect the power cord.
- Remove the computer's bottom chassis cover.
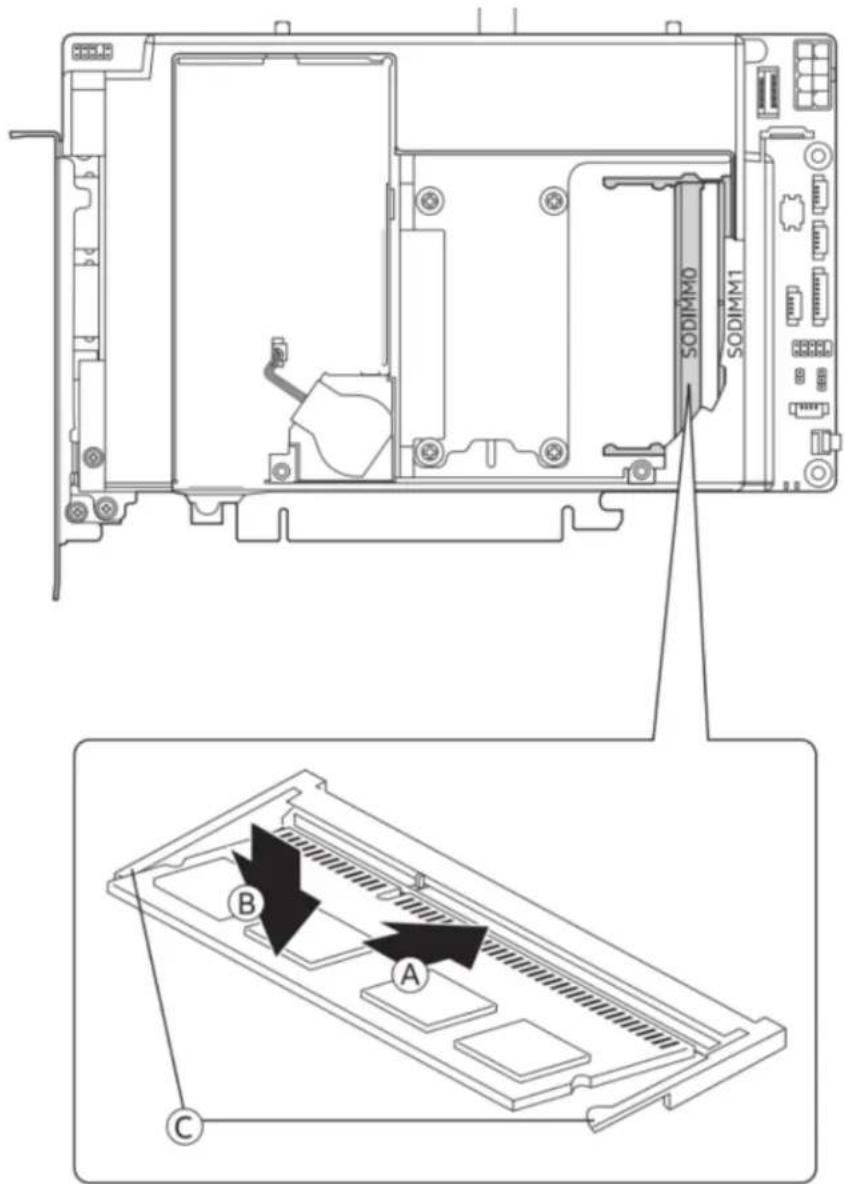
- Align the small space at the bottom edge of the memory module with the key in the socket.
- Insert the bottom edge of the module at a 45-degree angle into the socket (A).
- When the module is inserted, push down on the outer edge of module until the retaining clips snap into place (B). Make sure the clips are firmly in place (C).
To remove a SO-DIMM, follow these steps:
- Observe the precautions in "Before You Begin" on page 5.
- Turn off all peripheral devices connected to the computer. Turn off the computer and disconnect the power cord.
- Remove the computer's bottom chassis cover.
- Gently spread the retaining clips at each end of the memory socket, which causes the module to pop out of the socket (C).
- Holding the module by the edges, lift it away from the socket, and store it in an anti-static package.
- Reinstall and reconnect any parts you removed or disconnected to reach the memory sockets.
- Replace the computer's cover and reconnect the power cord.
4.0 Change the M.2 SSD
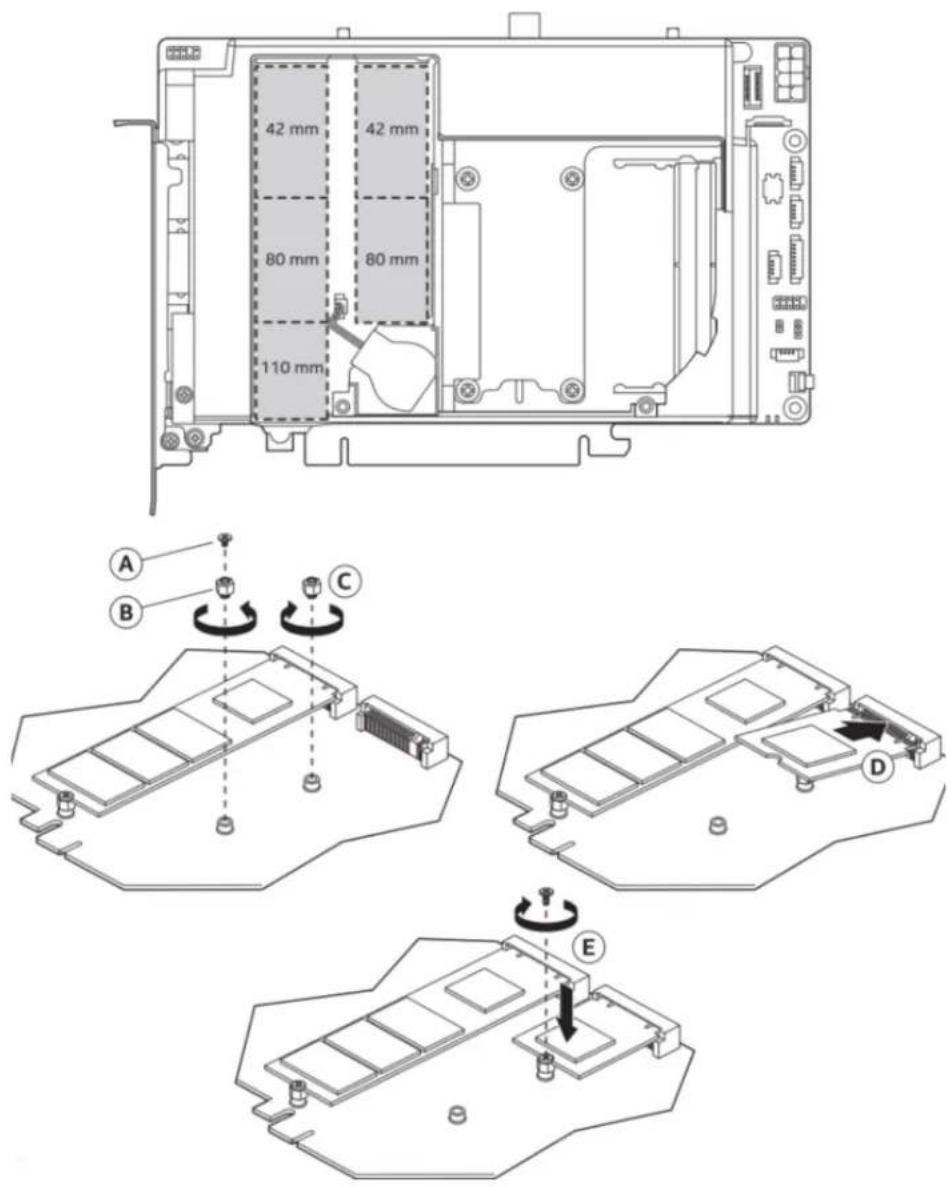
Intel® NUC kit NUC9VXQNX, NUC9V7QNX, NUC9i9QNX, NUC9i7QNX and NUC9i5QNX support dual 42, 80 and single 110mm SSDs.
There are no pre-installed SSD available out of the box for the above SKUs.
Find compatible M.2 SSDs in the Intel Product Compatibility Tool:
- NUC9VXQNX
- NUC9V7QNX
- NUC9i9QNX
- NUC9i7QNX
- NUC9i5QNX
To install a different M.2 SSD:
- Remove the small silver screw from the 110mm, 80mm or 42mm metal standoff on the board (A).
- Remove the pre-installed SSD from the connector if there are any.
- Make sure there is the metal standoff in the right position, depending on the length of the SSD you are going to install (B or C)
- Align the space at the bottom of the new M.2 SSD to the key on the connector (D).
- Secure the card to the standoff with the small silver screw (E).
5.0 Install a 2.5" SSD or Hard Drive
Intel® NUC kit NUC9VXQNX, NUC9V7QNX, NUC9i9QNX, NUC9i7QNX and NUC9i5QNX support an additional 2.5" Solid State Drive (SSD) or Hard Disk Drive (HDD).
Find compatible 2.5" drives in the Intel Product Compatibility Tool:
- NUC9VXQNX
- NUC9V7QNX
- NUC9i9QNX
- NUC9i7QNX
- NUC9i5QNX
6.0 Close the Chassis
After all components have been installed, close the Intel NUC chassis. Intel recommends this be done by hand with a screwdriver to avoid over-tightening and possibly damaging the screws.
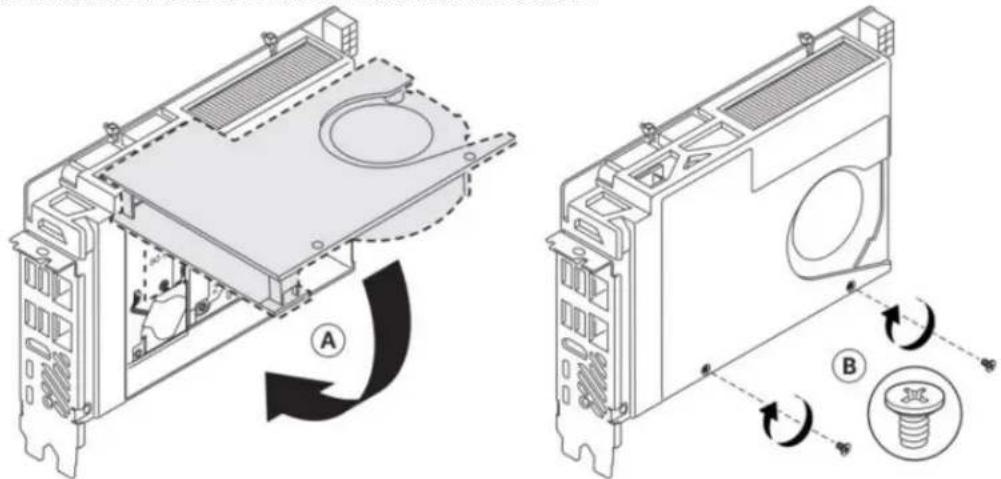
- Close the NUC door and connect two bottom screws:
- Fold the air guide into place:
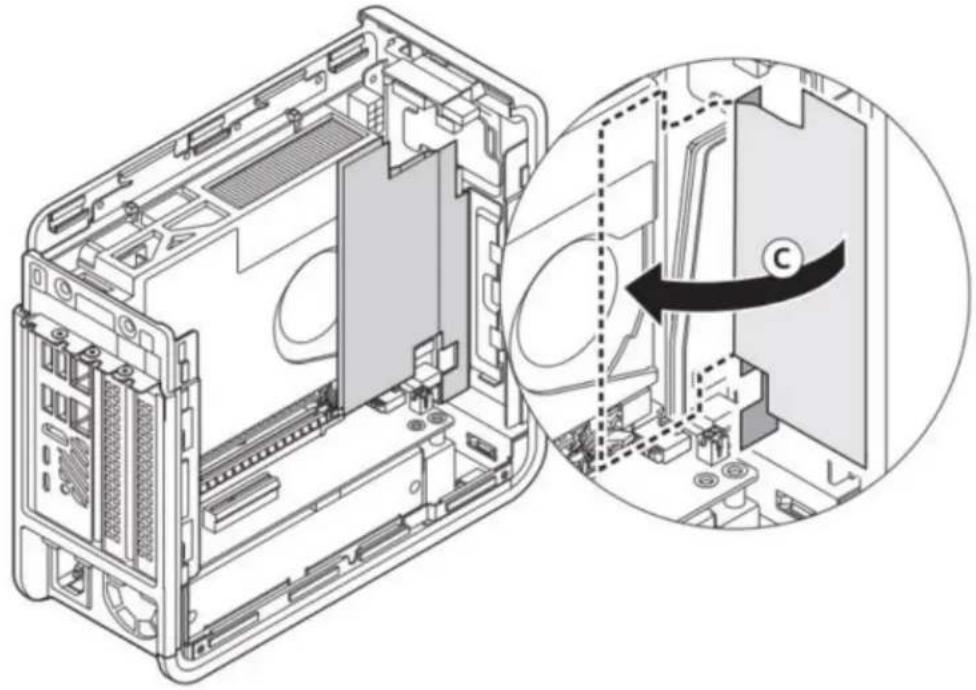
natural_image
Technical diagram of an internal server or computer chassis showing internal components and a magnified view of the interior space (no text or symbols present)- Install cross bar bracket:
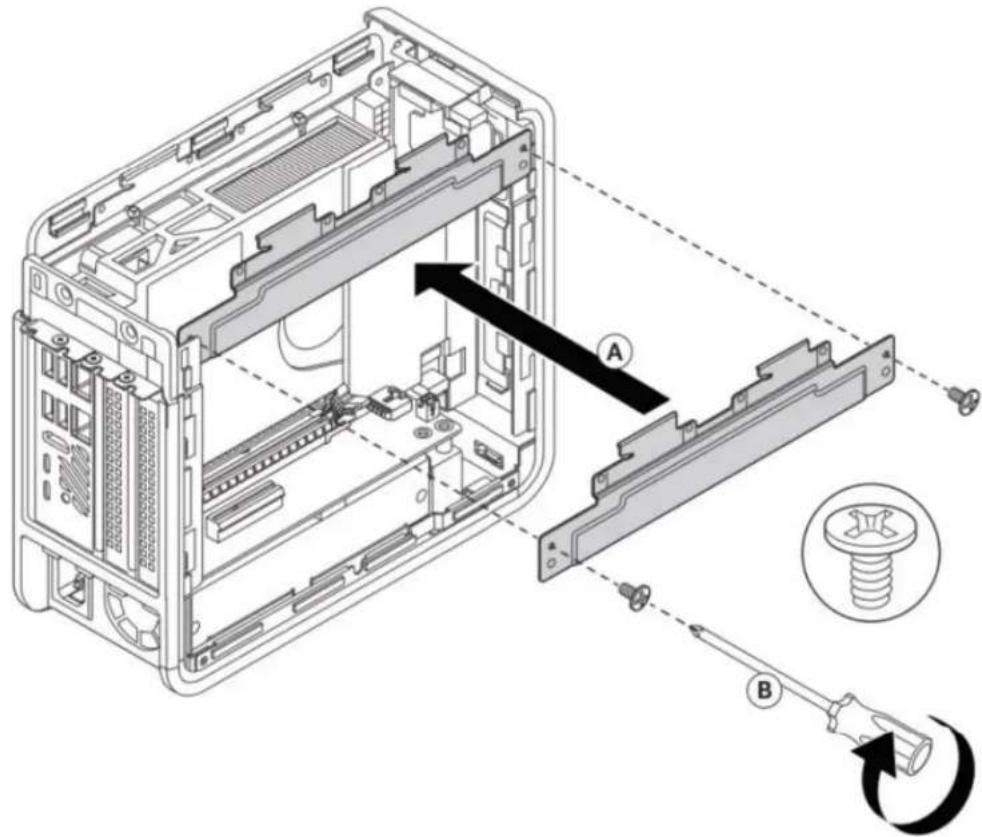
- Install the left side panel:
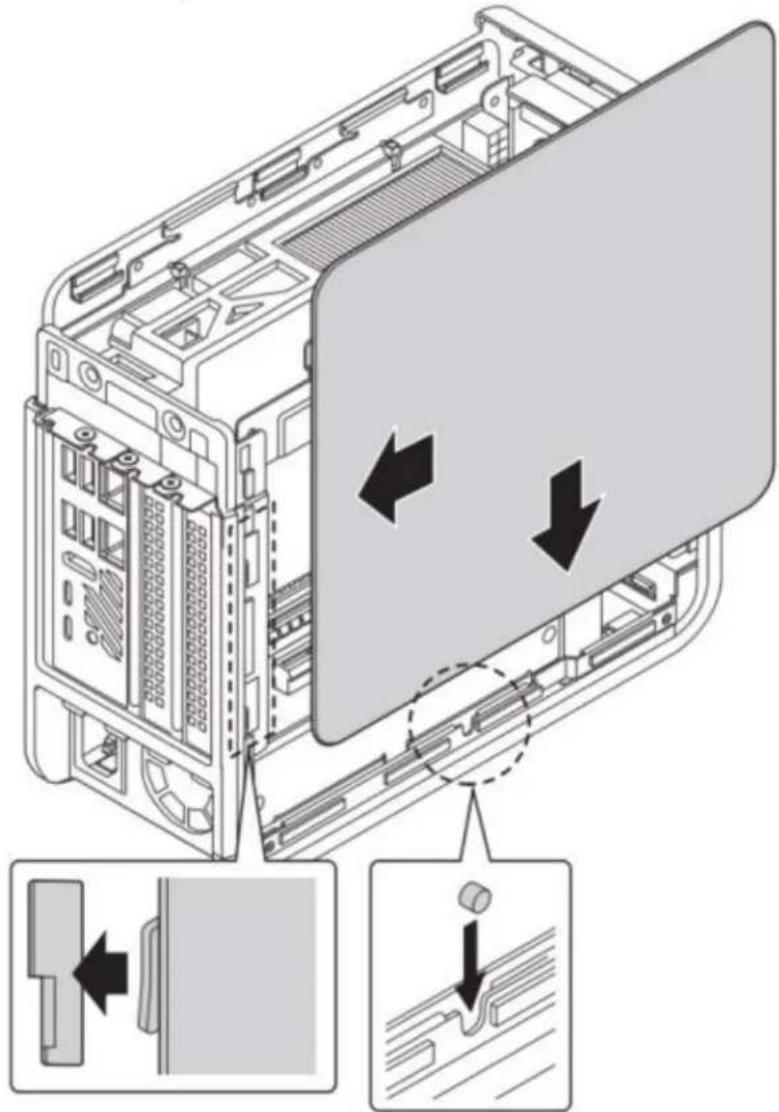
- Install the top cover and apply the power cable:
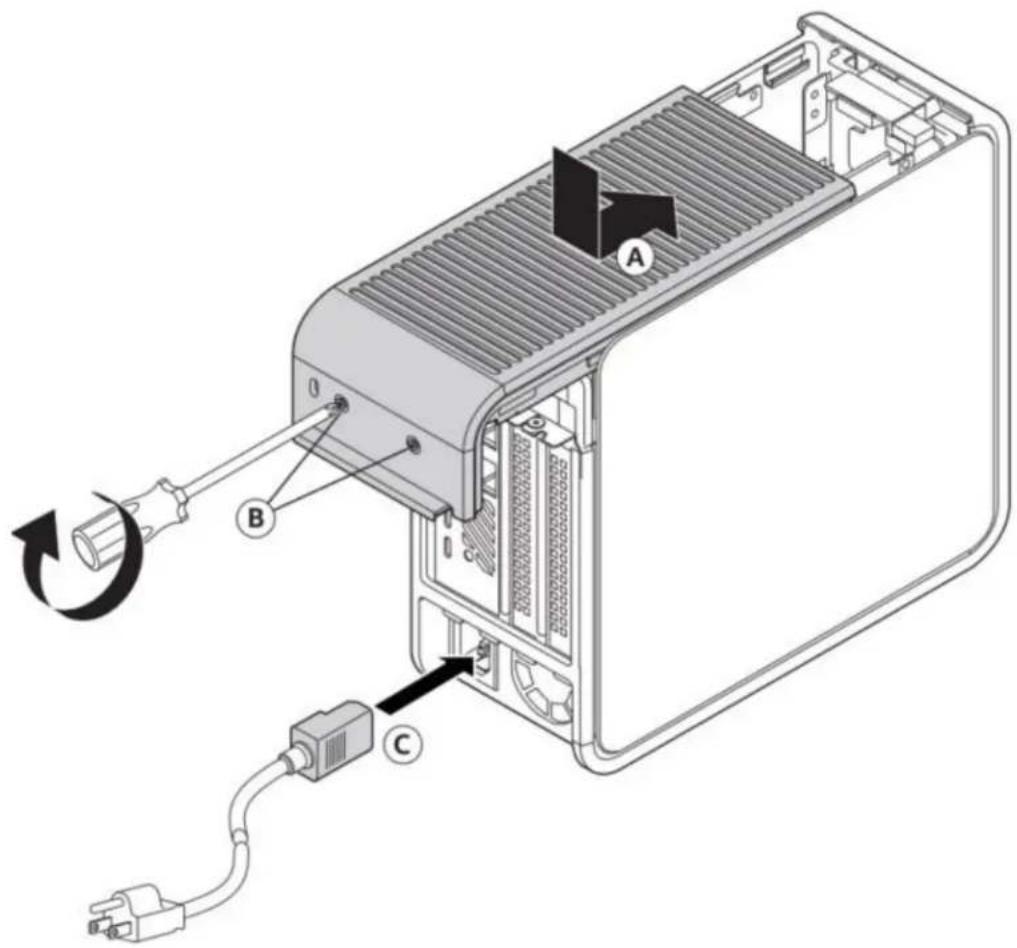
7.0 Connect Power
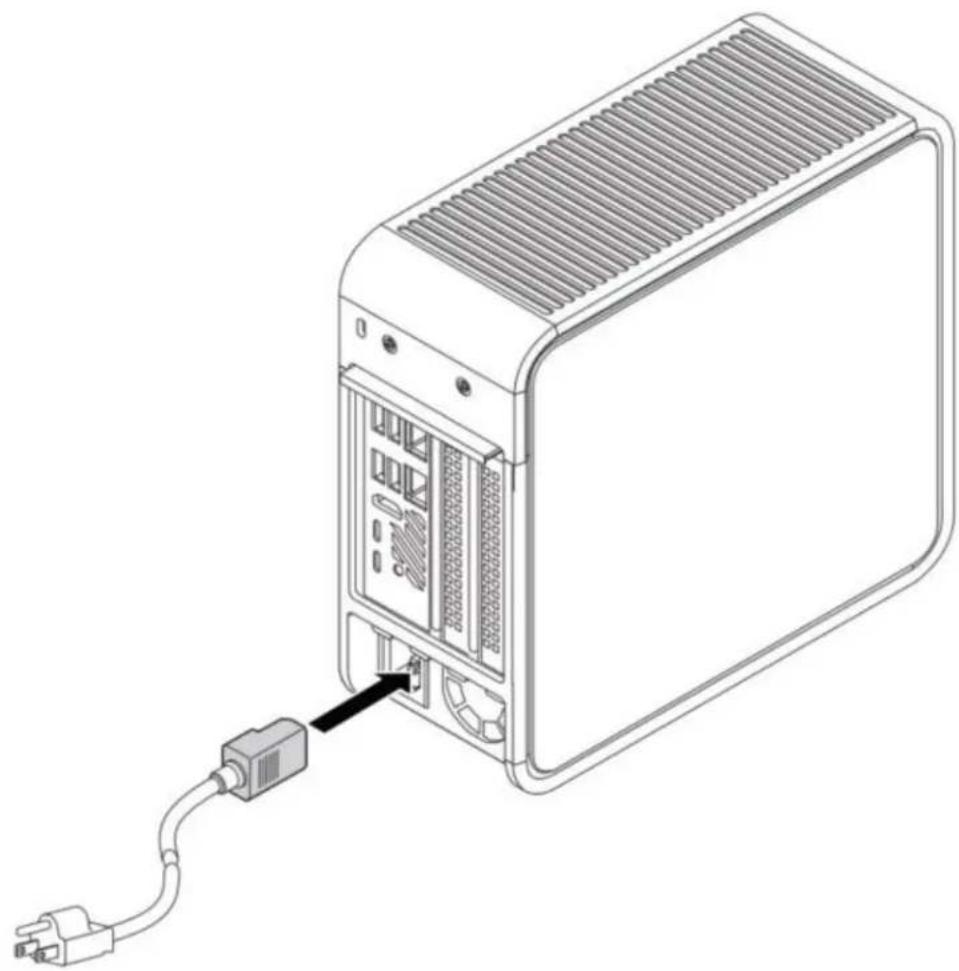
Each Intel NUC model includes either a region-specific AC power cord or no AC power cord.
| Product codes | Power cord type |
| BKNUC9VXQNXBKNUC9V7QNXBXNUC9i9QNXBXNUC9i7QNXBXNUC9i5QNX | No power cord included. An AC power cord needs to be purchased separately. The connector on the power adapter is a C13 type connector.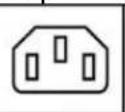 C13 C13 |
| BKNUC9VXQNX1BKNUC9V7QNX1BXNUC9i9QNX1BXNUC9i7QNX1BXNUC9i5QNX1 | US power cord included. |
| BKNUC9VXQNX2BKNUC9V7QNX2BXNUC9i9QNX2BXNUC9i7QNX2BXNUC9i5QNX2 | EU power cord included. |
| BKNUC9VXQNX3BKNUC9V7QNX3BXNUC9i9QNX3BXNUC9i7QNX3BXNUC9i5QNX3 | UK power cord included. |
| BKNUC9VXQNX4BKNUC9V7QNX4BXNUC9i9QNX4BXNUC9i7QNX4BXNUC9i5QNX4 | Australia/New Zealand power cord included. |
| BKNUC9VXQNX6BKNUC9V7QNX6BXNUC9i9QNX6BXNUC9i7QNX6BXNUC9i5QNX6 | China power cord included. |

natural_image
Line drawing of a server rack with an attached cable and power outlet (no text or symbols)8.0 Install an Operating System
See Supported Operating Systems for a list of Intel-validated Windows* operating systems.
The Intel Product Compatibility Tool lists versions of Linux* that have been reported as compatible by Intel NUC owners. If you need assistance with Linux on your Intel NUC, check the distribution's website and forums for peer assistance.
Refer to Operating System Installation for system requirements and installation steps.
9.0 Install the Latest Device Drivers and Software
Here are the options for keeping device drivers current:
-
Allow the Intel® Driver & Support Assistant (Intel® DSA) to detect out-of-date drivers
• Manually download drivers, BIOS, and software from Download Center: -
NUC9VXQNX
- NUC9V7QNX
- NUC9i9QNX
- NUC9i7QNX
- NUC9i5QNX
The following device drivers and software are available.
- Intel® Chipset Device Software
- Intel® Graphics
- Intel® Management Engine
- Intel® Gigabit Ethernet
- Intel® Wireless
- Intel® Bluetooth
• Realtek* High Definition Audio - Intel® Rapid Storage Technology
- Thunderbolt® Networking Driver
- Contents
- Introduction 5
- Open the Chassis....7
- System Memory....10
- Change the M.2 SSD....13
- Install a 2.5" SSD or Hard Drive....15
- Close the Chassis....16
- Connect Power....20
- Install an Operating System....22
- Install the Latest Device Drivers and Software 23
- Revision History
- Introduction
- Before You Begin
- CAUTIONS
- Installation Precautions
- Observe Safety and Regulatory Requirements
- Open the Chassis
- System Memory
- To install memory, follow these steps:
- To remove a SO-DIMM, follow these steps:
- Change the M.2 SSD
- There are no pre-installed SSD available out of the box for the above SKUs.
- Install a 2.5" SSD or Hard Drive
- Close the Chassis
- Connect Power
- Install an Operating System
- Install the Latest Device Drivers and Software
Brand : INTEL
Model : NUC 9 Pro
Category : Desktop computer