SD-9241SS - Dishwasher SPT - Free user manual and instructions
Find the device manual for free SD-9241SS SPT in PDF.


| Product Type | Portable / Countertop Dishwasher |
| Brand | SPT |
| Model | SD-9241SS |
| Power Supply | 110V, 60Hz |
| Required Fuse | 15A Time Delay Fuse or Circuit Breaker |
| Number of Wash Programs | 6 (All-in-1, Heavy, Normal, Light, Rinse, Speed) |
| Delay Start | 1 - 24 hours |
| Rinse Aid Indicator | Yes (low level warning light) |
| Tub Material | Stainless Steel |
| Water Consumption | 1.9 - 4.6 gallons per cycle (varies by program) |
| Energy Consumption | 0.05 - 0.6 kWh per cycle (varies by program) |
| Filter System | Main, Coarse, and Fine filters |
| Spray Arms | 2 (upper and lower) |
| Faucet Adapter | Quick Connect, compatible with male/female threads |
| Hose Length | 3 feet (inlet and drain) |
| Net Weight | Approximately 50 lbs |
Frequently Asked Questions - SD-9241SS SPT
User questions about SD-9241SS SPT
0 question about this device. Answer the ones you know or ask your own.
Ask a new question about this device
Download the instructions for your Dishwasher in PDF format for free! Find your manual SD-9241SS - SPT and take your electronic device back in hand. On this page are published all the documents necessary for the use of your device. SD-9241SS by SPT.
USER MANUAL SD-9241SS SPT
Safety Instructions....2
Grounding Instructions
Electrical Connection
Proper Use
Parts Identification....3
Dishwasher Features
Faucet Adapter Assembly
Installation....4 - 5
Unpacking
Positioning
Electrical Requirements
Connecting the Dishwasher
Disconnecting the Dishwasher
Operating Instructions....6 - 10
Control Panel
Loading the Dishwasher
Detergent Dispenser
Rinse Aid Dispenser
Wash Cycle Table
Starting a Wash Cycle
Changing the Wash Program
How to Use the All-in-1 Program
Maintenance....11 - 12
Cleaning Instructions
Protect Against Freezing
Keeping the Dishwasher in Shape
Troubleshooting....13 - 14
This electric dishwasher has the common characteristics of other house-hold dishwashers, as well as these unique specialties:

Time delay feature
Allows you to program the operation to begin at a later time, between 1 to 24 hours. Program to run during off-peak hours helps reduce electricity cost.

Error alarm
Fault codes display would inform the user of abnormal status of the machine.

Rinse aid Warning Indicator
When the rinse aid is running low, a refill reminder will be displayed on the panel. This ensures the machine continues to operate at optimum performance.

Stainless steel tub

6 wash programs
Choose from 6 wash cycles, based on load and soiled level: All-in-1, Hea vy, Normal, Light, Rinse and Speed.

NOTE:
The manufacturer, following a policy of constant development and up-dating of the product, may make modifications without giving prior notice.
IMPORTANT SAFETY INFORMATION READ ALL INSTRUCTIONS BEFORE USING
WARNING!
When using your dishwasher, follow the below basic precautions including the following:

GROUNDING INSTRUCTIONS
This appliance must be grounded. In the event of a malfunction or breakdown, grounding will reduce the risk of electric shock by providing a path of least resistance of electric current. This appliance is equipped with a cord having an equipment-grounding conductor and a grounding plug. The plug must be plugged into an appropriate outlet that is installed and grounded in accordance with all local codes and ordinances.
WARNING! Improper connection of the equipment-grounding conductor can result in risk of electric shock. Check with a qualified electrician or service representative if you are in doubt whether the appliance is properly grounded. Do not modify the plug provided with the appliance. If it does not fit the outlet, have a proper outlet installed by a qualified electrician.

About Electrical Connection
DO NOT USE AN EXTENSION CORD OR AN ADAPTER PLUG WITH THE APPLIANCE. DO NOT, UNDER ANY CIRCUMSTANCES, CUT OR REMOVE THE THIRD GROUNDING PRONG. This dishwasher is designed for operation on an adequately wired individual 110V, 60Hz. Use required fuse 15 amps. Fuse electrical supply is required - copper wire only. Time delay fuse or circuit breaker recommended and provide separate circuit serving only this appliance.
WARNING! PROPER USE
■ Do not abuse, sit on, or stand on the door or dish rack of the dishwasher.
■ Do not touch the heating element during or immediately after use.
■ Do not wash plastic items unless they are marked dishwasher safe or the equivalent. For plastic items not so marked, check the manufactures recommendations.
■ Use only detergent and rinse additives designed for an automatic dishwasher. Never use soap, laundry detergent, or hand washing detergent in your dishwasher. Keep these products out of children's reach.
- Keep child away from detergent and rinse aid, keep child away from the open door of the dishwasher, there could still be some detergent left inside.
■ The door should not be left in the open position since this could present a tripping hazards.
■ During installation, the power supply must not be excessively or dangerously bent or flattened.
■ Do not tamper with controls.
■ The appliance is not intended for use by young children or infirm persons without supervision.
■ Dishwasher detergents are strongly alkaline, they can be extremely dangerous if swallowed. Avoid contact with skin and eyes and keep children away from the dishwasher when the door is open.
■ Do not operate your dishwasher unless all enclosure panels are properly in place. Open the door very carefully if the dishwasher is operating, there is a risk of water squirting out.
■ Do not place any heavy objects of stand on the door when it is open. The appliance could tip forward.
■ When loading items to be washed:
1) Locate sharp items so that they are not likely to damage the door seal;
2) Load sharp knives with the handles up to reduce the risk of cut-type injuries.
■ When using your dishwasher, you should prevent plastic item from contacting with heating element.
If the supply cord is damaged, it must be replaced by the manufacturer or its service agent or a similarly qualified person in order to avoid a hazard.
■ Please dispose of packing materials properly.
■ Use the dishwasher only for its intended function.
■ Remove the door to the washing compartment when removing an old dishwasher from service or discarding it.
■ Young children should be supervised to ensure that they do not play with the appliance.
■ Check that the detergent receptable is empty after completion of the e wash cycle.
READ AND FOLLOW THIS SAFETY INFORMATION CAREFULLY
SAVE THESE INSTRUCTIONS
IMPORTANT!
To get the best performance from your dishwasher, read all operating instructions before using it for the first time.
Dishwasher Features
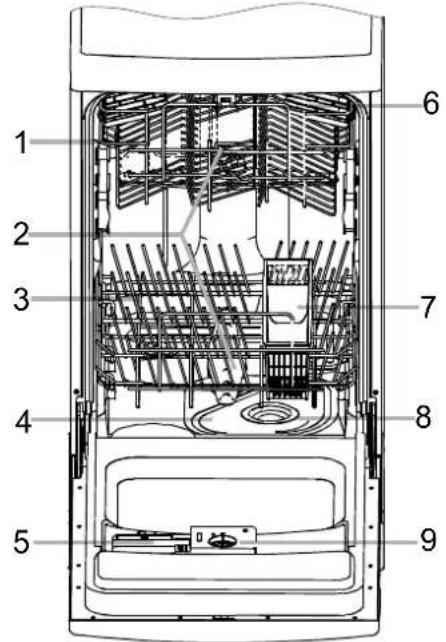
Front View (Door Open)
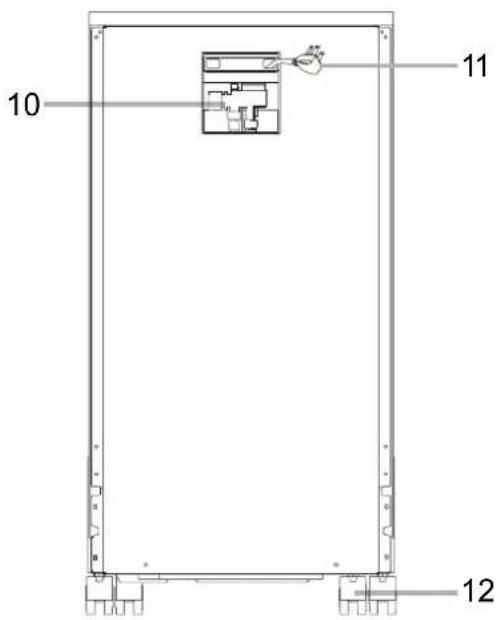
Back View
1 Upper Basket
4 Main Filter
7 Silverware Basket
10 Faucet Adapter Assembly (Quick Connect)
2 Sp ray Arms
5 Detergent Dispenser
8 Coarse Filter
11 Power Cord
3 Lower Basket
6 Cup Shelf
9 Rinse Aid Di spenser
12 Caster
FAUCET ADAPTER ASSEMBLY (QUICK CONNECT)
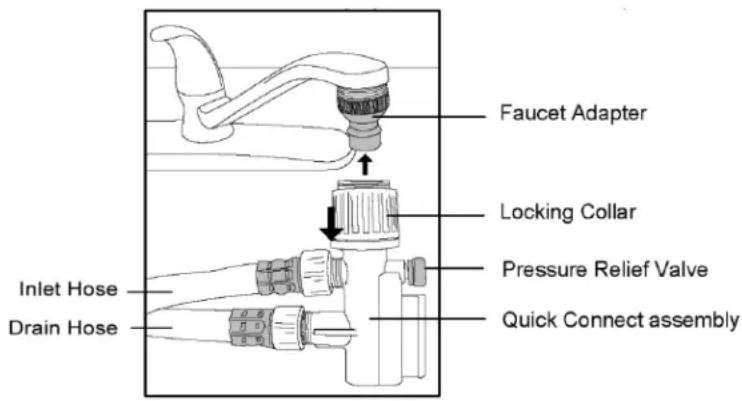
Your dishwasher comes equipped with a Faucet Adapter Assembly (#10 above) The faucet adapter is to be installed on the faucet. This adapter is located on the back of the dishwasher. The faucet adapter is compatible with faucets inclusive of either male (outside) or female (inside) threaded faucet connections.
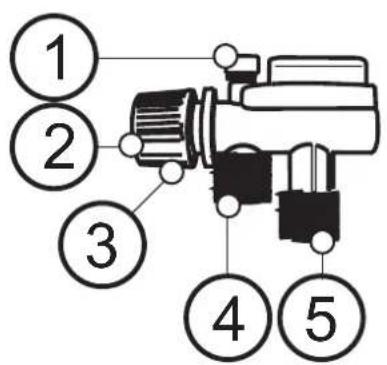
- Pressure relief valve
- Faucet adapter connection
- Locking collar
- Inlet hose connection
- Drain hose connection
INSTALLATION
A Attention:
The installation of the pipes and electrical equipments should be done by professionals.

Warning
Electrical Shock Hazard Disconnect electrical power before installing dishwasher.
Failure to do so can result in death or electrical shock.
Unpacking
Have at least two people to move and install the dishwasher to prevent personal injuries. Remove all packaging materials: shipping tape, foam pieces, etc. before use. Do not use sharp instruments, rubbing alcohol, flammable fluids or abrasive cleaners. Check and make sure all parts necessary for installation are included. If parts are missing, please contact Sunpentown at 1-800-330-0388. The dishwasher must be placed on a level and flat surface that can support the weight when the dishwasher is fully loaded.
Positioning
The dishwasher is equipped with water supply and drain hoses that can be positioned to the right or the left to facilitate proper installation. Make sure water supply/faucet connection is within reach of the hose assembly (3 ft).
Electrical Requirements
Read all safety precautions listed at the beginning of the manual. Make sure the electrical outlet is within reach of the power supply cord. It is recommended to not use receptacles that can be turned on/off by a switch or pull chain.
Refer to the rating label and be sure the voltage and frequency corresponds to the power supply. Use a dedicated circuit that is rated for 10 amps.
The dishwasher is equipped with a power supply cord with a 3-prong grounding plug. The cord must be plugged into a mating 3-pronged wall receptacle. If a mating wall receptacle is not available, it is the personal responsibility of the customer to have a properly grounded, 3-pring wall receptacle installed by a certified electrician.

WARNING!
· DO NOT use an extension cord or an adapter plug with this appliance.
· DO NOT, under any circumstances, cut or remove the ground-prong.
- Improper connection of the connection of the equipment grounding conductor can result in electric shock.
- Check with a qualified electrician or service representative if you are in doubt whether the appliance is properly grounded.
Connecting the Dishwasher
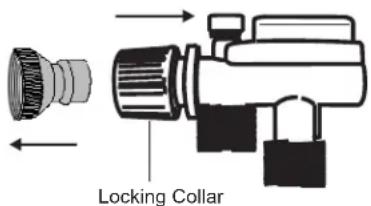
Remove the Faucet Adapter by pulling back the locking collar on the Quick Connect; while pulling the Faucet Adapter in the opposite direction.
natural_image
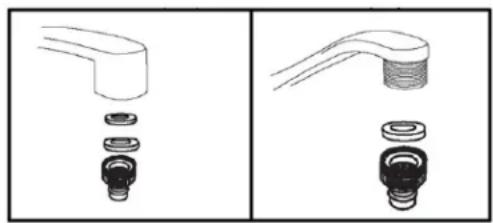
Two technical illustrations showing a pipe fitting with internal components, no text or symbols present.The Faucet Adapter is compatible with either female (inside) or male (outside) threaded faucet connections:
- If your faucet is "female" type, both rubber washers must be installed inside the faucet adapter.
- If your faucet is "male" type, use only one rubber washer. Remove the second rubber washer.
Installing Quick Connect to faucet
-
Screw the Faucet Adapter onto (or into) the faucet. Check for leaks (use Teflon or plumbers tape to eliminate any leaks if necessary).
-
Attach the Quick Connect assembly onto the Faucet Adapter - pull down on the locking collar, while pushing the Quick Connect upwards onto the Faucet Adapter.
-
Release the locking collar when the Quick Connect Assembly snap onto the Faucet Adapter. Verify connection is secure.
-
Slowing turn on water and check for any signs of water leak. If leak is located, immediately turn off the water supply and repair leak.
IMPORTANT
- Once you turn on the water supply (even if turned off immediately), the inlet hose will be pressurized.
- To relieve the water pressure (make sure water supply is turned off), press and hold the red pressure relief button on the Quick Connect until the flow of water stops.
WARNING
Failure to relieve water pressure before disconnecting the Quick Connect may result in back-pressure over-spray. The temperature of incoming water may be very hot, and back-pressure over-spray can cause severe burns and/or scalding.
Disconnecting the Dishwasher
- Turn off water supply at the faucet.
- Disconnect the power supply cord.
- Release water pressure: press and hold the red Pressure Relief Valve until flow of water stops.
- Disconnect the Quick Connect by pulling down on the locking collar and release from Faucet Adapter.
OPERATING INSTRUCTIONS
Control Panel
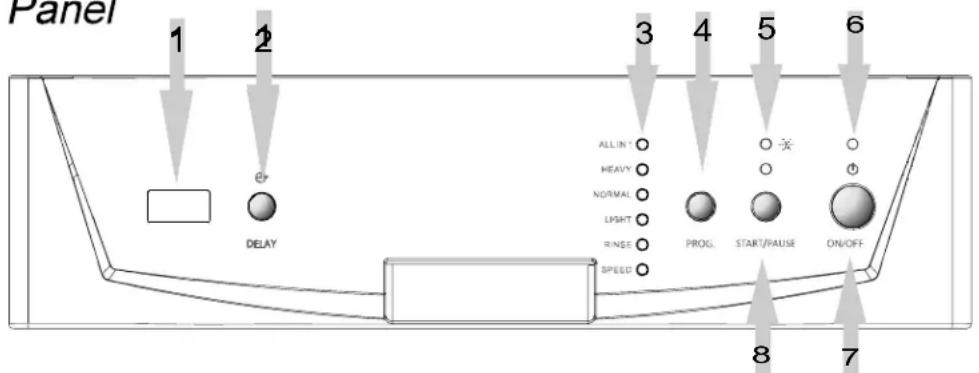
1 Display window: Program remaining time, delay time, running indicator, fault codes and etc.
2 Delay Button: Press to program delay start.
3 Program indicator light ts: Indicates the selected wash cycle.
4 Wash Program Selector: Press to select one of the six programs.
5 Rinse aid low warning light.
6 Power r indicator light.
7 Power switch: To turn on/off the power supply.
8 Star t /Pause button: To start the selected washing program or pause the washing program when the machine is working.
Loading the Dishwasher
For best performance of the dishwasher, follow these loading guidelines. Features and appearance of racks and silverware baskets may vary from your model.
The following items are not suitable for wash in the dishwasher:
- Cutlery with wooden, horn china or mother-of-pearl handles and wooden platters
- Plastic items that are not heat resistant
- Older cutlery with glued parts, bonded cutlery items or dishes
- Pewter or copper items
- Crystal glass
- Steel items subject to rusting
- Very small items as they may fall out the basket
- Items made from synthetic fibers
Items of limited suitability:
- Silver and aluminum - tends to discolor after washing
- Glazed patterns may fade
CUTLERY BASKET
Flatware should be placed in the cutlery basket with handles at the bottom. Knives and other sharp utensils should be placed with handles up, but make sure the tips do not extend through the bottom. If the rack has side baskets, spoons should be loaded individually into slots. Longer utensils should be placed horizontally at the front of the upper rack.
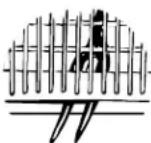
▲ WARNING!
Do not let any item extend through bottom.
UPPER RACK
The upper rack is designed to hold more delicate and lighter dishware such as glasses, coffee and tea cups and saucers, as well as plates, small bowls and shallow pans (as long as they are not too dirty). Position the dishes and cookware so that they do not get moved by the spray of water. The upper rack can be lifted (or lowered) by removing and placing the rack into different rails. This makes room for either rack to accommodate different size items.
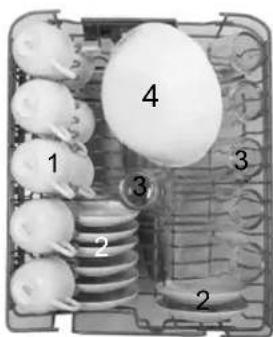
1 Cups
2 Saucer
3 Glasses
LOWER RACK
We recommend placing large items which are most difficult to clean into the lower rack: pots, pans, lids, serving dishes and bowls, as shown in the figure below. It is preferable to place serving dishes and lids on the side of the racks in order to avoid blocking the rotation of the top spray arm.
Pots, serving bowls, etc, must always be placed top down.
- Deep pots should be slanted to allow water to flow out.
The bottom rack feature fold down tine rows to accommodate larger pots and pans.
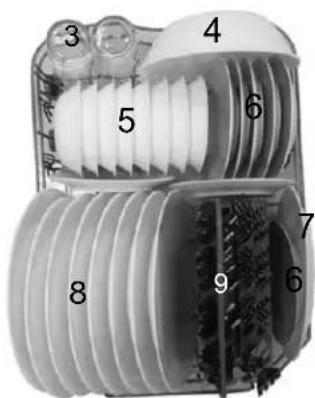
4 Serving bowl
5 Fruit bowl
6 Bread and butter plates
7 Serving plate
8 Dinner plates
9 Silverware basket
FOR BEST PERFORMANCE
- Scrape off food particles before loading.
- Soften remnant of burnt food in pans
- Place cups, glasses, bowls, pots/pans face down.
- Curved items, or those with recesses, should be loaded at a slant so water can furn off.
- Allow sufficient space between items to allow water and detergent to reach each surface.
- Ensure glasses and stemware are secure and balanced.
- Ensure breakable items are not sitting on metal cutlery which can chip the dishes.
- Do not overload the dishwasher.
WARNING
- To prevent damage, do not remove glass and cutlery from the dishwasher immediately after end of a program. Allow the dishware to return to room temperature
Detergent Dispenser
To prevent formation of deposits, do not add too much detergent. This dishwasher has specially designed water softener.
This unit uses less detergent and rinse aid than most conventional dishwashers. In general, only one tablespoon of detergent is needed for a normal wash load. Add more detergent as needed for heavily soiled loads. The amount of detergent can also vary due to differences in water hardness. To determine the water hardness in your area, contact your local water utility company. The harder the water, the more detergent may be needed. Remember, you should adjust the amount of detergent by small amounts until you find the correct amount.
The dispenser must be refilled before the start of each wash cycle and always add detergent just before starting the dishwasher, otherwise it could get damp and not dissolve properly.
Use only detergent specifically made for use with dishwashers.
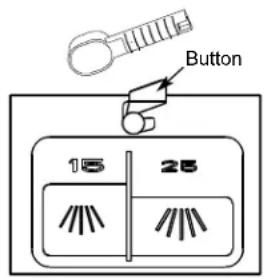
▲WARNING!
Dishwasher detergent is corrosive!
Removing Hard Water Spots
To remove hard water spots, try the following:
■ Remove all metal dishware, such as cutlery, pans, etc., from the di shwasher.
Do not add detergent.
Pour two cups of vinegar into a bowl and set the bowl face up on the lower rack of the dishwasher.
- Run the dishes through a normal wash program. If this doesn't work, try the same process with 1 / 4 cup of citric acid crystals instead of vinegar.
Take care to keep it out of reach of children.
Rinse Aid Dispenser
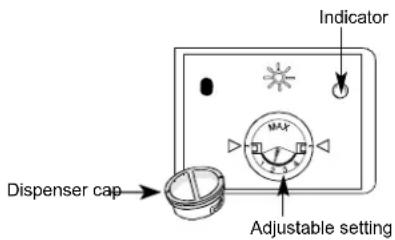
To open the dispenser, turn the cap to the "open" (left) arrow and lift it out.
■ Pour the rinse aid into the dispenser, being careful not to overfill.
■ To replace, align cap with open arrow and turn clockwise to close
The rinse aid is released during the final rinse to prevent water from forming droplets on your dishes that can leave spots and streaks. It also improves drying by allowing water to "sheet" off the dishes.
- Your dishwashers are designed to use liquid rinse aids. The rinse aid dispenser is located inside the door next to the detergent dispenser. To fill the dispenser, open the cap and pour the rinse aid into the dispenser until the level indicator turns completely black. The dispenser holds about 100ml of liquid rinse aid.
- Be careful not to overfill the dispenser, because this could cause over sudsing. Wipe away any spills with a damp cloth.
- Don't forget to replace the cap before you close the dishwasher door.
If you have soft water, you may not need rinse aid for it may cause a white film to develop on your dishes.
Adjusting Rinse Aid Dispenser
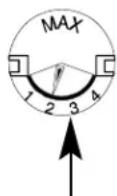
Adjustable setting
A measured amount of rinse aid is released during the final rinse. As with detergent, the amount of rinse aid needed for your dishes depends on the hardness of the water in your area. Too much rinse aid can result in lather of foaming and cause cloudiness or steaks on your dishes. If the water in your area is very soft, you may not need rinse aid. If you do, you can dilute the rinse aid with an equal amount of water.
The rinse aid dispenser has four settings. Always start with the dispenser set on "2". If spots and poor drying are problems, increase the amount of rinse aid dispensed by removing the dispenser lid and rotating the dial to "3". If the dishes still are not drying properly or are spotted, adjust the dial to "4". Refill when the Rinse Aid Warning Light illuminates.
WASH CYCLE TABLE
| Program | Cycle Selection Information | Description of Cycle | Detergent pre/main | Running time(min) | Energy (Kwh) | Water (gal) | Rinse Ald |
| All in 1 | For all soiled loads, such as pots, pans, casserole dishes and dishes that have been sitting with dried food on them for a while. | Pre-washPre-washwash (136°F) Rinse (154°F) Drying. | All in1 | 130 | 0.6 | 3.7 | |
| [2TWY]Heavy | For the heaviest soiled loads, such as pots, pans, casserole dishes and dishes that have been sitting with dried food on them for a while. | Pre-washPre-wash (122°F)Wash (136°F) Rinse Rinse (149°F) Drying | 18g | 135 | 0.58 | 4.6 | |
| [20XC]Normal (AHAM) | For normally soiled loads, such as plates, glasses and lightly soiled pans. standard daily cycle. | Pre-washWash (136°F) Rinse Rinse (149°F) Drying | 18g | 115 | 0.545 | 3.65 | |
 Light Light | For lightly soiled loads, such as plates, glasses, bow ls and lightly soiled pans. | Pre-washWash (122°F) Rinse Rinse (140°F) Drying | 18g | 100 | 0.43 | 3.67 | |
| [602Y]Rinse | For dishes that just need a qui ck rinse. | Pre-WashPre-Wash | 25 | 0.05 | 1.9 | ||
 Speed Speed | A shorter wash for lightly soiled loads. | Pre-WashWash (122°F) Rinse (131°F) Drying | 18g. | 65 | 0.32 | 2.75 |
Starting a wash cycle:
Once the dishwasher is loaded, follow these instructions to start the wash cycle:
- Ensure the dishwasher is properly connected to power supply.
- Ensure the water supply is properly connected and is turned on to full pressure.
- Add detergent and check Rinse Aid is full.
- Close the door and press the ON/OFF button to turn on the dishwasher.
- Press the PROG button to select desired program: All-in-1 -> Heavy -> Normal -> Light -> Rinse -> Speed.
- If you wish delay the start time, press the DELAY button to set (1 to 24 hours)
- Press the START/PAUSE button to begin the wash cycle.
Changing the Wash Program
You can change the wash program if the unit just started and only ran for a short time. Otherwise, detergent may have been released and water drained. If this is the case, the detergent dispenser must be refilled.
Open the door slightly, press and hold the PROG button for 3 seconds. Press PROG button again to select desired mode. Close the door.
Forgot to Add a Dish?
A forgotten dish can be added any time before the detergent cups opens:
- Open the door slightly to pause the cycle.
- After the spray arm stops spinning, you can open the door completely.
- Add forgotten dishes.
- Close the door and dishwasher will resume operation after 10 seconds.
At the End of the Wash Cycle
When wash cycle has finished, the dishwasher will buzz for 8 seconds.
- Turn the unit off by pressing the ON/OFF button.
- Shut off water supply and open the door.
- Leave the door ajar and wait for a few minutes before unloading. This will allow the dishes to cool and assist in the drying process. Dishes that are still hot are more susceptible to breakage.
WARNING!
It is dangerous to open the door when washing, because the hot water may scald you.
How To Use The All in1 Program
Your dishwasher has an "All-in-1 Program" which needs no rinse aid but an "All-in-1" tablet.

NOTE: Only the All in1 program can be used with All in1 tablets. If you use All in1 tablets with other programs, The appliance will not achieve a good performance.
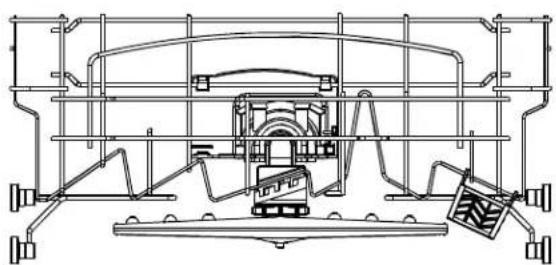
- The figure below shows how to hang the All-in-1 tablet container on the upper basket.
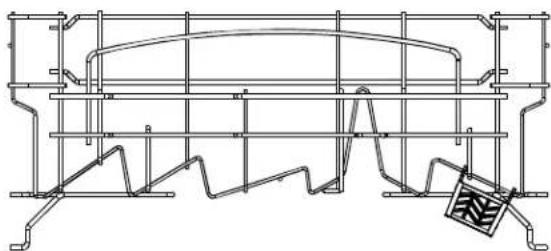
natural_image
Technical line drawing of a structural frame with supports and internal ribs (no text or symbols)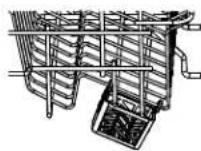
- Rotate the upper sprayer and change the location of the container to ensure the upper sprayer is not obstructed by the All-i n-1 tablet container. Refer to the figure below for reference.
natural_image
Technical line drawing of a mechanical assembly with no visible text or symbols- Put the All in1 tablet into the container, then start the All in1 program.
Filter System
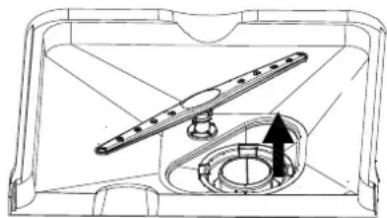
For your convenience, the drain pump and filtering system are placed within easy reach inside the tub. There are three components of the filter system: Main Filter, Coarse Filter and Fine filter:
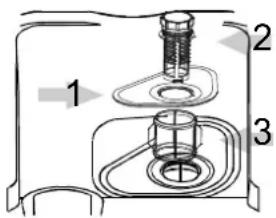
1. Main Filter
Food and soil particles trapped by this filter are pulverized by a special jet on the lower spray arm and washed down the drain.
2. Coarse Filter
Larger items, such as pieces of bone, that could block the drain are trapped here. To remove items caught in this filter, gently squeeze the tabs on the top and lift out.
3. Fine Filter
This filter holds soil and food residue in the cylindrical base and prevents it from being redeposited on the dishes.
Cleaning the Filters
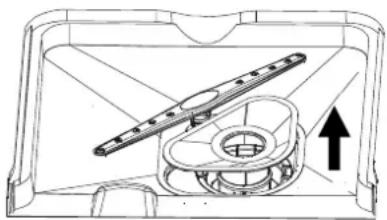
The filters efficiently removes food particles so the wash water can be recycled during a wash cycle. For best performance and results, the filter assembly must be cleaned regularly. Remove the filter assembly per instructions below and rinse clean under running water. Use a soft cleaning brush or old toothbrush to clean the Coarse and Fine Filters. Reassemble in reverse order.
1
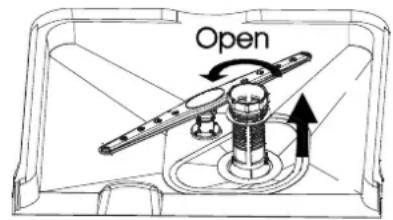
Step 1: Turn the filter counterclockwise and lift upwards
2
natural_image
Technical line drawing of a mechanical component with an arrow indicating upward motion (no text or symbols)3
natural_image
Technical line drawing of a mechanical assembly with no visible text or symbolsStep 2: Lift the Main Filter Step 3: Lift the Fine Filter
WARNING!
- Inspect filters after each use.
- When cleaning, do not knock or bang the filters to remove residues. This could contort the filters and reduce performance of the dishwasher.
- Never run the dishwasher without filter assembly in place.
- Improper placement of the filter or damaged filter may reduce the unit's performance and may cause damage to dishes and/or utensils.
- The entire filter assembly should be cleaned at least once a week.
Cleaning the Spray Arm
It is necessary to clean the spray arms regularly for hard water chemicals will clog the spray arm jets and bearings. To remove the spray arm, screw off the nut to take out the washer on top of the spray arm and remove arm. Wash with soapy and warm water and use a soft brush to clean the jets. Carefully reinstall making sure the rotary movement is not impeded.
Cleaning the Dishwasher
The control panel can be cleaned by using a slightly dampened cloth. Dry thoroughly with a soft towel.
The exterior can be wiped with a towel and mild detergent solution. Wipe clean and follow with a good appliance polish wax.
Never use sharp objects, scouring pads or harsh cleaners on any part of the dishwasher.
Protect Against Freezing
If your dishwasher is left in an unheated place during the winter months, please follow these procedures after each wash:
- Turn off the dishwasher.
- Turn off water supply and disconnect water inlet hose from the water valve.
- Drain water from the inlet hose and water valve (use a pan to catch the water).
- Reconnect the water inlet hose to water valve.
- Remove the plastic sump cover in the bottom of tub and use a sponge (or towel) to soak up water in the sump
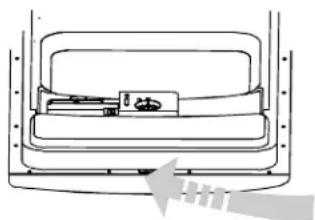
Cleaning the Door
natural_image
Diagram of a vehicle seat frame with a hand pointing to the side panel (no text or symbols)Use only a soft damp cloth with warm water to clean the edge around the door. To avoid penetration of water into the door lock and electrical components, do not use a spray cleaner of any kind.
WARNING: Abrasive agents and some paper towels may scratch or leave marks on the surface.
Keeping Your Dishwasher in Shape
After Every Wash
Turn off the water supply and leave door slightly open so moisture and odors are not trapped inside.
Remove the Plug
Before cleaning or performing maintenance, always remove the plug from the socket. Do not take risks.
No Solvents or Abrasive Cleaning
Never use abrasive cleaners or solvents to clean the dishwasher. Use only a dampened soft towel with warm water. To remove spots or stains on the interior surface, you may use a cloth dampened with water and a little white vinegar.
Clean Filters Regularly
Clean the filters regularly to prevent clogs and odors.
Clean the Door Seals
Food that gets trapped in the seals may cause odor to form. Periodic cleaning with a damp sponge will prevent this from occurring.
Moving the Dishwasher
If the dishwasher must be moved, try to keep it in the upright position. If absolutely necessary, it can be positioned on its back.
Storage or Vacation Time
It is recommended you run a wash cycle with the dishwasher empty. Disconnect from power and turn off water supply. Remove any remaining water in the sump area with a sponge. Leave the door slightly open. This will help the door seal to last longer and prevent odors from forming inside the dishwasher.
User-Maintenance Instructions
Before Calling for service...
Troubleshooting Tips
Review the charts on the following pages may make you be free of calling for service.
| Problem | Possible Causes | What To Do |
| Dishwasher doesn t run | Fuse blown, or the circuit breaker tripped | Replace fuse or reset circuit breaker. Remove any other appliances sharing the same circuit with the dishwasher |
| Power supply is not turned on | Make sure the dishwasher is turned on and the door is closed securely.Make sure the power cord is properly plugged into the wall socket. | |
| Water pressure is low | Check that the water supply is connected properly and the water is turned on. | |
| Noise | Some audible sounds are normal | Sound from soft food shredding action and detergent cup opening. |
| Utensils are not secure in the baskets or something small has dropped into the basket | To ensure everything is secured in the dishwasher. | |
| Motor hums | Dishwasher has not been used regularly. If you do not use it often, remember to set it to fill and pump out every week, which will help keep the seal moist. | |
| Suds in the tub | Improper detergent | Use only dishwasher detergent to avoid suds.When this occurs, open the dishwasher and let suds evaporate. Add 1 gallon of cold water to the tub. Close and latch the dishwasher, then Start the wash cycle to drain out the water . Repeat if necessary. |
| Spilled rinse agent Always wipe up rinse agent spills immediately. | ||
| Stained tub interior | Detergent with colorant was used | Make sure that the detergent is one without colorant. |
| Dishes are not dried | Rinse agent dispenser is empty | Make sure that the rinse agent dispense is filled. |
| Dishes and flatware not clean | Improper program | Select stronger program |
| Improper rack loading | Make sure that the action of the detergent dispenser and spray arms are not blocked by large dishware. | |
| Spots and filming on glasses and flatware | 1 Extremely hard water2 Low inlet temperature3 Overloading the dishwasher4 Improper loading5 Old or damp powder detergent6 Empty rinse agent dispenser7 Incorrect dosage of detergent | To remove spots from glassware:- Take out all metal utensils out of the dishwasher.- Do not add detergent.- Choose the longest cycle.- Start the dishwasher and allow it to run for about 18 to 22 minutes, then it will be in the main wash.Open the door to pour 2 cups of white vinegar into the bottom of the dishwasher.Close the door and let the dishwasher complete the cycle. If the vinegar does not work: Repeat as above, except use 1/4 cup (60 ml)of citric acid crystals instead of vinegar. |
User-Maintenance Instructions Before calling for service...
| Problem | Possible Causes | What To Do |
| Cloudiness on glassware | Combination of soft water and too much detergent | Use less detergent if you have soft water and select a shorter cycle to wash the glassware and to get them clean. |
| Yellow or brown film on inside surfaces | Tea or coffee stains using a solution of 1/2 cup of bleach and 3 cups warm water to remove the stains by hand.⚠ WARNINGYou have to wait for 20 minutes after a cycle to let the heating elements cool down before cleaning interior; to preven scalding. | |
| Iron deposits in water can cause an overall film | You have to call a water softener company for a special filter. | |
| White film on inside surface | Hard water minerals To clean the interior, use a damp sponge with dishwasher detergent and wear rubber gloves. Never use any other cleaner than dishwasher detergent for the risk of foaming or suds. | |
| Detergent cup lid won't latch | Dial is not in OFF position | Turn the Dial OFF position and slide the door latch to the left. |
| Detergent left in dispenser cups | Dishes block detergent cups | Re-load the dishes properly. |
| Steam | Normal phenomenon | There is some steam coming through the vent by the door latch during drying and water draining. |
| Black or gray marks on dishes | Aluminum utensils have rubbed against dishes | Use a mild abrasive cleaner to eliminate those marks. |
| Water standing in the bottom of the tub | This is normal A small amount of clean water around the outlet on the tub bottom at the back of the tub keeps the water seal lubricated. | |
| Dishwasher leaks | Overfill dispenser or rinse aid spills | Be careful not to overfill the rinse aid dispenser. Spilled rinse aid could cause oversuding and lead to overflowing. Wipe away any spills with a damp cloth. |
| Dishwasher isn t level | Make sure the dishwasher is level. | |
ERROR CODES
| When unit experiences malfunction, the appliance will display error codes | ||
| Codes | Meanings | Possible Causes |
| E1 | Long inlet time. | Faucets is not opened, or water intake is restricted,or water pressure is too low. |
| E3 | Long heating time,unit not reaching the required temperature | Malfunction of temperature sensor or of heating element. |
SPT®
Your Guarantee
If this product is found to be faulty as a result of faulty materials or workmanship within one year from date of purchase, it will be repaired free of charge.
This guarantee is subject to the following terms:
· Sunpentown must be notified of the fault.
· Proof of purchase must be presented to Sunpentown's nominated representative.
· The warranty will be void if the product if modified, misused or repaired by an unauthorized person.
· The warranty after repair will not be extended beyond the original one-year period.
- All replacement parts will be new or reconditioned.
- Parts, which are replaced, become the property of Sunpentown.
· The warranty applies for the use of the product in the USA only.
What is NOT COVERED:
- Warranty does not include freight charges.
- Damage due to installation error, product abuse and/or misuse.
- Incidental or consequential damage caused by possible defects with this product.
· Labor cost incurred for the installation and/or removal of a possible defective unit. - Damage to product caused by improper power supply voltage, accident, fire, floods or acts of nature.
- Failure of product resulting from unauthorized modifications to the product.
- Improper installation or failure to perform the necessary maintenance.
· Normal wear and tear on parts or replacement of parts designed to be replaced. - Damage to personal property from use of product.
- Replacement or repair of household fuses, circuit breakers, wiring or plumbing.
This GUARANTEE is in addition to your Statutory Rights
SUNPENTOWN INTERNATIONAL INC. 14625 Clark Ave. City of Industry, CA 91745
Tel: 800-330-0388 service@sunpentown.com
www.sunpentown.com
- Safety Instructions....2
- Parts Identification....3
- Installation....4 - 5
- Operating Instructions....6 - 10
- Maintenance....11 - 12
- Troubleshooting....13 - 14
- Time delay feature
- Error alarm
- Rinse aid Warning Indicator
- Stainless steel tub
- wash programs
- NOTE:
- IMPORTANT SAFETY INFORMATION READ ALL INSTRUCTIONS BEFORE USING
- WARNING!
- GROUNDING INSTRUCTIONS
- About Electrical Connection
- WARNING! PROPER USE
- READ AND FOLLOW THIS SAFETY INFORMATION CAREFULLY
- SAVE THESE INSTRUCTIONS
- IMPORTANT!
- FAUCET ADAPTER ASSEMBLY (QUICK CONNECT)
- INSTALLATION
- A Attention:
- Warning
- Unpacking
- Positioning
- Electrical Requirements
- Connecting the Dishwasher
- IMPORTANT
- Disconnecting the Dishwasher
- OPERATING INSTRUCTIONS
- Loading the Dishwasher
- CUTLERY BASKET
- UPPER RACK
- LOWER RACK
- FOR BEST PERFORMANCE
- Detergent Dispenser
- ▲WARNING!
- Removing Hard Water Spots
- Rinse Aid Dispenser
- Adjusting Rinse Aid Dispenser
- Starting a wash cycle:
- Changing the Wash Program
- Forgot to Add a Dish?
- At the End of the Wash Cycle
- How To Use The All in1 Program
- Filter System
- Main Filter
- Coarse Filter
- Fine Filter
- Cleaning the Filters
- Cleaning the Spray Arm
- Cleaning the Dishwasher
- Protect Against Freezing
- Cleaning the Door
- Keeping Your Dishwasher in Shape
- After Every Wash
- Remove the Plug
- No Solvents or Abrasive Cleaning
- Clean Filters Regularly
- Clean the Door Seals
- Moving the Dishwasher
- Storage or Vacation Time
- User-Maintenance Instructions
- Before Calling for service...
- SPT®
- Your Guarantee
Brand : SPT
Model : SD-9241SS
Category : Dishwasher