
1511-TLXB - Television POLAROID - Free user manual and instructions
Find the device manual for free 1511-TLXB POLAROID in PDF.


| Product Type | 15.4" HD Widescreen LCD Television |
| Brand | Polaroid |
| Model | 1511-TLXB |
| Screen Size | 15.4 inches (diagonal) |
| Display Type | TFT LCD |
| Brightness | 200 cd/m² |
| Contrast Ratio | 400:1 |
| Max Resolution | 1280 x 800 |
| Tuner | Built-in ATSC (HD digital) tuner |
| Inputs | Composite, S-Video, Component (YPbPr), HDMI, VGA (PC), PC Audio, RF (antenna/cable) |
| Outputs | Coaxial (SPDIF), Headphone, Audio L/R |
| Power Source | AC 100-240V, 50/60 Hz, 1.2A |
| Power Consumption | 50 W (typical), < 5 W (standby) |
| Weight | 31.97 lb (approx. 14.5 kg) |
| Dimensions (W x H x D) | 15.2 x 13.5 x 5.2 inches (386 x 343 x 132 mm) |
| Stand Included | Yes, detachable |
| Remote Control | Included with AAA batteries |
| Video Features | 2D Digital Noise Reduction, Film-Mode Detection, Multiple Picture Modes (Vivid, Hi-Bright, Cinema, Sport, User) |
| Audio Features | Dolby Digital, Sound Effects (Surround, Live, etc.), MTS (SAP/Stereo/Mono) |
| Cleaning Instructions | Unplug before cleaning; use only a soft dry cloth; never use liquid or aerosol cleaners |
| Safety Warnings | Do not remove cover; no user-serviceable parts; avoid water; use grounded outlet; keep ventilation open |
| Spare Parts / Repair | Contact Polaroid support; remote, stand available as accessories; refer servicing to qualified personnel |
Frequently Asked Questions - 1511-TLXB POLAROID
User questions about 1511-TLXB POLAROID
0 question about this device. Answer the ones you know or ask your own.
Ask a new question about this device
Download the instructions for your Television in PDF format for free! Find your manual 1511-TLXB - POLAROID and take your electronic device back in hand. On this page are published all the documents necessary for the use of your device. 1511-TLXB by POLAROID.
USER MANUAL 1511-TLXB POLAROID
15.4" HD Widescreen LCD Television
1511-TLXB
Polaroid
©2006 by Polaroid All rights reserved.
"Polaroid" and "Polaroid and Pixel" are trademarks of Polaroid Corporation, Waltham, MA, USA. Changes are periodically made to this document. Changes, technical inaccuracies, and typographic errors will be corrected in subsequent editions. For service, support and warranty information, visit www.polaroid.com.

This product contains electrical or electronic materials. The presence of these materials may, if not disposed of properly, have potential adverse effects on the environment and human health. Presence of this label on the product means it should not be disposed of as unsorted waste and must be collected separately. As a consumer, you are responsible for ensuring that this product is disposed of properly. To find out how to properly dispose of this product, please go to www.polaroid.com and click on "Company" or call the customer service number for your country listed in the instruction manual.
DOLBY DIGITAL
Manufactured under license from Dolby Laboratories. "Dolby" and the double-D symbol are trademarks of Dolby Laboratories. Confidential unpublished works. © 1992 -1997 Dolby Laboratories, Inc. All rights reserved.
HDMI TM
This TV incorporates High-Definition Multimedia Interface (HDM ™ ) technology. HDMI, the HDMI logo and High-Definition Multimedia Interface are trademarks or registered trademarks of HDMI Licensing LLC.
Federal Communications Commission Statement
This equipment has been tested and found to comply with the limits of a class B digital device, pursuant to Part 15 of the FCC Rules. These limits are designed to provide reasonable protection against harmful interference in a residential installation. This equipment generates, uses and can radiate radio frequency energy and, if not installed and used in accordance with the instructions, may cause harmful interference to radio communications. However, there is no guarantee that interference will not occur in a particular installation. If this equipment does cause harmful interference to radio or television reception, which can be determined by turning the equipment off and on, the user is encouraged to try to correct the interference by one or more of the following measures:
- Reorient/Relocate the receiving antenna.
- Increase the separation between the equipment and receiver.
- Connect the equipment into an outlet on a circuit which is different from what the receiver is connected to.
- Consult the dealer or an experienced radio/TV technician for help.

Changes or modifications not expressly approved by the manufacturer responsible for compliance could void the user authority to operate the equipment.
FCC

ENGL

Warnings and Precautions
To prevent any injuries, the following safety precautions should be observed in the installation, use, servicing and maintenance of this equipment. Before operating this equipment, please read this manual completely, and keep it nearby for future reference.

WARNING
This symbol is intended to alert the user to avoid the risk of electric shock. This equipment must not be disassembled by anyone except qualified service personnel.

CAUTION
This symbol is intended to alert the user to the presence of important operating and maintenance instructions in the literature accompanying the appliance.

To reduce the risk of fire or electric shock, do not expose this equipment to rain or moisture.
• TO REDUCE THE RISK OF ELECTRIC SHOCK,
- DO NOT REMOVE COVER (OR BACK).
- NO USER-SERVICEABLE PARTS INSIDE.
- REFER SERVICING TO QUALIFIED SERVICE PERSONNEL.

Use of controls, adjustments or performance of procedures other than those specified herein may result in hazardous radiation exposure.
Important Safety Instructions
| This symbol indicates caution points. | |
| This symbol indicates actions that should not be done. | |
| This symbol indicates actions that must be performed. | |
| Do not place the equipment on any uneven or unstable carts, stands, tables, shelves etc.The equipment may fall, causing serious injury to children or adults and serious damage tothe equipment itself.Use only a cart or stand recommended by the manufacturer. This equipment andrecommended cart or stand should be handled with care. Quick stops, excessive force, anduneven surfaces may cause the equipment and cart/stand to overturn. | |
| Do not disable the 3-wire grounding type plug. The grounding pin on the 3-prong plug is animportant feature. Removing the grounding pin will increase the risk of damaging theequipment.If you can not fit the plug into the electrical outlet, contact an electrician to install a groundingoutlet.Always operate this equipment from the type of power source indicated on the rear of theserial/model plate.Never overload wall outlets and extensions. |

- Use and handle the power cord with care. Do not place any heavy objects on the AC power cord.
- Do not pull the AC power cord. Do not handle the AC power cord with a wet hand.
- Do not touch the power cord and antenna cable during lightning.
- Remove the plug from the wall outlet, if the equipment will not be used for a long period of time.
- Do not place, use or handle this equipment near water.
- Never expose the equipment to liquid, rain, or moisture. Seek for service if any of the above is spilled into the equipment.
- Do not expose the equipment to extreme temperature or to direct sunlight, as the equipment may heat up and suffer damage.
- Do not install the equipment near any heat sources such as radiators, heat registers, stoves, or any other apparatus that might produce heat.
- Do not attempt to service the equipment yourself.
- Opening and removing the covers may expose you to dangerous voltage or other hazards and may void your warranty. Refer service to qualified personnel.
- Do not place or drop any other objects on top.
- Do not insert anything into the ventilation holes of your equipment. Inserting any metal or flammable objects may result to fire or electric shock.
- Protect the power cord from being walked on or pinchrd particularly at plugs, convenience receptacles, and the point where they exit from the apparatus.
- Do not place the equipment on uneven or unstable carts, stands, tables, shelves etc. The equipment may fall, causing serious injury to children or adults and serious damage to the equipment itself. Always place the equipment on the floor or on a surface that is sturdy, level, stable and strong enough to support the weight of the equipment.
- Do not block any ventilating openings. Leave an open space around the equipment. Never place the equipment: on a bed, sofa, rug, or any other similar surfaces; too close to drapes/curtains/walls, in a bookcase, built-in cabinet, or any other similar places that may cause poor ventilation.
- Unplug this apparatus during lightning storms or when unused for long periods of time.
- Refer all servicing to qualified service personnel. Servicing is required when the apparatus has been damaged in any way, such as power-supply cord or plug is damaged, liquid has been spilled or objects have fallen into the apparatus, the apparatus has been exposed to rain or moisture, does not operate normally, or has been dropped.

- Always remove the power cord from the outlet before cleaning the equipment.
- Never use liquid or aerosol cleaners on the equipment. Clean only with a soft dry cloth.
- Only use attachments/accessories specified by the manufacturer.

Antenna Safety Instructions
If an outdoor antenna is connected, follow the precautions below:

- An outdoor antenna should not be located in any area where it could come in contact with overhead power lines, or any other electric light or power circuits.
- When installing an outdoor antenna system, extreme caution should be taken to prevent contact with power lines. Direct contact with power lines may be fatal and should be avoided at all costs.
Section 810 of National Electrical Code (NEC) provides information with respect to proper grounding of the mast and supporting structure, grounding of the lead-in wire to an antenna discharge unit, size of grounding conductors, location of antenna discharge unit, connection to grounding electrodes, and requirements for the grounding electrode.
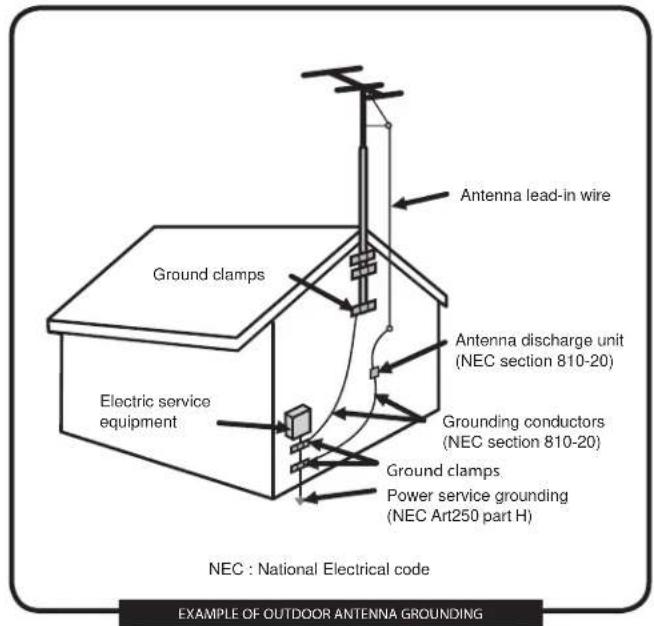
TABLE OF CONTENTS
■ Federal Communications Commission Statement....1
■ Warnings and Precautions
Important Safety Instructions....2
Antenna Safety Instructions.... 4
■ Chapter 1 Introducing the LCD TV
Key Features 6
Package Contents 7
Setting Your LCD TV....8
Your LCD TV....10
Your Remote Control 12
■ Chapter 2 Installing the LCD TV
Connecting a TV Cable or an Antenna 14
Connecting an A/V Device with Composite Connector 19
Connecting an A/V Device with S-Video Connector 20
Connecting an A/V Device with Component(YPbPr) Connector.... 21
Connecting an AV Equipment with HDMI Connector.... 22
Connecting an AV Equipment with DVI Connector 23
Connecting a PC....24
Connecting an Audio Receiver or a Dolby Digital 5.1 Sound System....25
■ Chapter 3 Using The Features
Wide Screen Viewing....30
Using the Program Guide....27
Operating the Menu....28
Customizing the VIDEO Settings....29
Customizing the AUDIO Settings....32
Customizing the TV Settings....34
Customizing the SETUP Settings 36
Using the Program Block Settings....39
■ Specifications 44
Chapter 1 Introducing the LCD TV
Key Features
Various Audio/Video terminals for external equipment connection
- 1 composite VIDEO input terminal
- 1 S-VIDEO terminals
- 1 sets of component Video input terminals
- 1 PC(VGA IN)/PC AUDIO IN input terminals
- 1 HDMI input terminal
- 1 set of Audio(L/R) output terminals for composite C-VIDEO/S-VIDEO
- 1 COAXIAL output terminal
- 1 Headphone terminal
The built-in TV tuner to receive HD ATSC signal
- This function allows the reception of HD broadcasting without the addition of a set top box.
High Definition Multimedia Interface (HDMI)
- High Definition Multimedia Interface (HDMI) is a small, user-friendly interconnect that can carry up to 5 Gbps of combined video and audio in a single cable. This system eliminates the cost, complexity and confusion of multiple cables used to connect current A/V systems.
HDTV Component Video Inputs
- Offers the best video quality for DVD(1080i, 720p) and digital set-top-box (1080i, 720p) connections.
2D Digital Noise Reduction
- This function can digitally reduce image noise to provide better picture quality.
Film-Mode Detection
- This function can automatically detect content derived from film and adjust the interlacer's frame matching to provide a more natural-looking, clearer image of the moving picture.
Package Contents
Make sure all of the following contents are included.
LCD TV
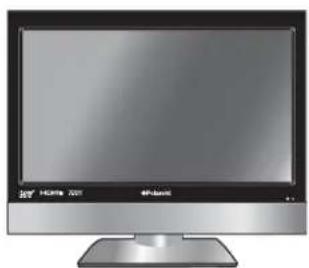
natural_image
Front view of a flat-screen computer monitor (no visible text or symbols on the screen body)AAA Batteries x 2
☑ VIDEO Cable☑ Remote☑ Component Cable


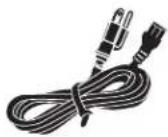
Power Cord
☑ AUDIO Cable ☑ Warranty Card

User's Manual
Quick Start Guide
These items are all you need to set up and operate the LCD TV in its basic configuration.

Make sure all of the above contents are included in the package. If you are missing any items, please contact the Polaroid customer service department.
Setting Up Your LCD TV
How to install the TV Stand
Follow the instructions below to install the TV stand:
1
Open the box, and make sure all necessary parts are in the box. The package contains:

2
Cover an even stable surface with a soft cloth. Place the LCD TV unit face-down on the cloth. Fit the stand onto the bottom of the LCD TV unit as shown:

natural_image
3D rendering of a mechanical component with a metallic clip and rectangular body (no text or symbols visible)Then push until stand into the LCD TV's stand socket.
3

natural_image
Illustration of a device being placed into a grid panel, showing the top portion being folded (no text or symbols present)How to setup the TV
Use a supplied antenna cable to connect the VHF/UHF signal to the LCD TV's ANT. terminal (refer to page 15-18).
2 Connect the AC power cord at the back of the TV and connect the power cord to wall outlet.
3 Insert the 2 batteries supplied in remote control.
Step1 Slide the back cover up to open the battery compartment of the remote control.

natural_image
Black rectangular electronic component with a small white symbol on its side (no text or labels visible)Step2 Insert two AAA size batteries. Make sure to match the (+) and (-) ends of the batteries with the (+) and (-) ends indicated in the battery compartment. Slide the cover back into place.

natural_image
Pure technical diagram of a mechanical component with no visible text, numbers, or symbols
Do not use caustic cleaners (porcelain, stainless steel, toilet, or oven cleaner etc.) on the remote, as it may suffer damage.
4 Connect other an external AV device (refer to page 19-25).
Your LCD TV
Front/Left /Right Side View and Controls

Rear View and Jacks

ENGLISH

Your Remote Control
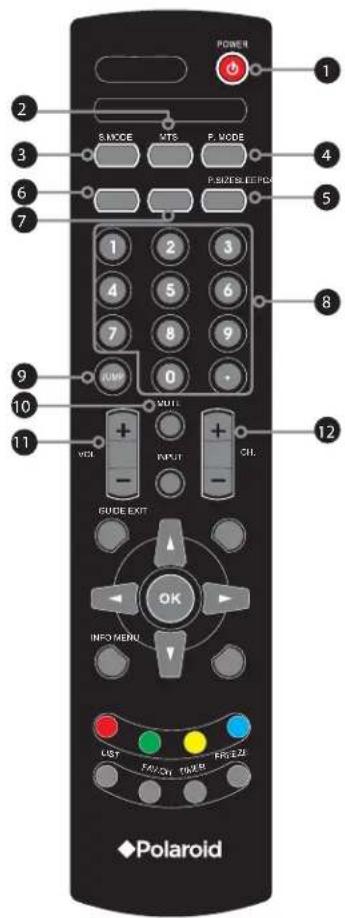
| 1 | Turns the LCD TV on and off. | |
| 2 | MTS Cycles through the multi-channels TV sound(MTS) options: SAP/MONO/STEREO | |
| 3 | S.MODE Selects sound effect options: Surround/Live/Dance/Techno/Classic/Soft/Rock/Pop/Off. | |
| 4 | P.MODE Selects picture mode: Vivid/Hi-Bright/Cinema/Sport/User | |
| 5 | P.SIZE Cycles through Wide mode settings :NORMAL /FULL/WIDE/ZOOM | |
| 6 | CAPTION Cycles through the Closed Caption:Analog Closed Caption:CC1/CC2/CC3/CC4/TT1/TT2/TT3/TT4/OffDigital Closed Caption:Service1/Service2/Service3/Service4/Service5/Service6/Off | |
| 7 | SLEEP Cycles through the LCD TV sleep timer:OFF/10/20/30/40/50/60/90/120 mins | |
| 8 | 0-9 Select and switch to a channel by using 0-9 buttons. | |
| In HDTV mode, use with 0-9 andbuttons to select a digital channels. | ||
| 9 | JUMP Returns to previously selected channel. | |
| 10 | MUTE Mutes and restores the audio | |
| 11 | VOL.+- Increases and decreases volume. | |
| 12 | CH.+- Scans up and down the channels | |
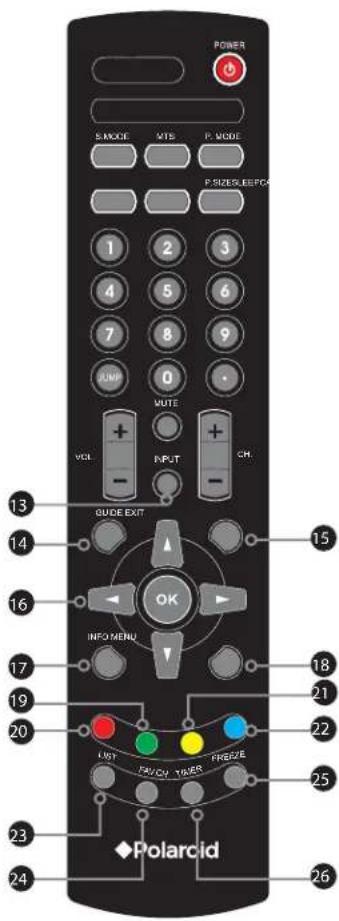

INPUT
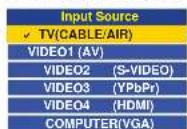
Pressing INPUT displays the source list, use ▲▼ to select the video equipment connected to the video inputs of your LCD TV : TV/VIDEO1/VIDEO2/VIDEO3/VIDEO4/COMPUTER


GUIDE Displays the Program Guide on the screen. Pressing again to turn GUIDE off.

EXIT Exits the OSD menu.

▲▼▶◀ Cycles through OSD options and OK selects individual menu items. OK confirms option settings.

INFO Pressing repeatedly displays a variety of information such as the current channel and the input source.

MENU Displays the OSD menu on the screen.

GREEN In Program Guide, press to select first program of next day.

RED In Program Guide, press to select first program of previous day.

YELLOW In Program Guide, press to view previous page of detailed program description.

BLUE In Program Guide, press to view next page of detailed program description.

LIST Displays the received channel list


FAV.CH Pressing FAV.CH display favorite channels.

FREEZE In TV mode, pressing FREEZE to freeze the current picture, press again to restore the picture.

TIMER Displays the current time on the screen.

Eff ective range:
The remote can control the LCD TV from up to 5m away, if pointed directly at the receiver.
Chapter 2 Installing the LCD TV
Refer to the owner's manual of any external equipment to be connected.
When connecting any external equipment, do not connect any AC power cords to wall outlets until all other connections are completed.
Connecting a TV Cable or an Antenna
Antenna Connection
The antenna requirements for good color TV reception are more important than those for a black s white TV reception. For this reason, a good quality outdoor antenna is strongly recommended. The following is a brief explanation of the type of connection that is provided with the various antenna systems.
■ A 75-ohm system is generally a round cable (not included) with F-type connector that can easily be attached to a terminal without tools.

A 300-ohm system is a fl at twin-lead cable (not included) that can be attached to a 75-ohm terminal through a 300-75-ohm adapter (not included).

Use one of the following two diagrams when connecting an outdoor antenna.
A: Shows how to use a VHF/UHF combination outdoor antenna.
B: Shows how to use a separate VHF and/or UHF outdoor antenna.
A. Combination VHF/UHF antenna

HS179N3
B. Separate VHF and/or UHF antennas

Cable TV (CATV) Connection
This reminder is provided to call the CATV system installer's attention to Article 820-40 of the National Electrical Code (NEC) that provides guidelines for proper grounding and, in particular, specifies that the cable ground shall be connected to the grounding system of the building accurately, or as close to the point of cable entry as possible. Use of this TV for other than private viewing of programs broadcasted on UHF, VHF or transmitted by cable companies for the use of the general public may require authorization from the broadcast/cable company, and/or program owner.
A 75-ohm coaxial cable connector is built into the set for easy hookup. When connecting the 75-ohm coaxial cable to the set, connect the 75-ohm cable into the ANT. terminal.
■ Some cable TV companies offer premium pay channels. Since the signals of these premium pay channels are scrambled, a cable TV converter/descrambler is generally provided to the subscriber by the cable TV company.
This converter/descrambler is necessary for normal viewing of scrambled channels. (Set your TV to channel 3 or 4, typically one of these channels is used. If this is unknown, consult your cable TV company.)
For more specific instructions on installing cable TV, consult your cable TV company. One possible method of connecting the converter/descrambler provided by your cable TV company is shown in the diagram below.

flowchart
graph LR
    A["VHF/UHF IN"] --> B["RF switch (not included)"]
    B --> C["A"]
    B --> D["B"]
    C --> E["2 set signal splitter (not included)"]
    D --> E
    E --> F["Cable TV Line"]
    G["Cable TV converter/descrambler (not included)"] --> E

■ The RF switch (not included) is required to provide two inputs (A and B). Setting the RF switch to position A allows viewing of all unscrambled channels by using the TV channel keys.
■ Setting the RF switch to position B allows viewing of all scrambled channels via the converter/descrambler by using the converter channel keys.
Use a supplied antenna cable to connect the TV signal to the LCD TV's TV CABLE terminal.

ENGLISH
2 Connect the AC power cord at the back of the TV and connect the power cord to wall outlet.
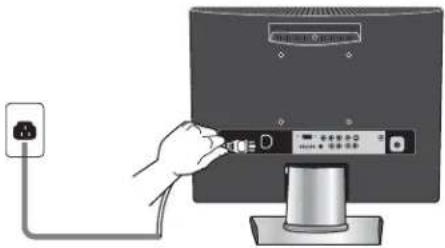
3 Press the button on the remote to turn on the LCD TV.

Always disconnect the LCD TV from the main voltage when the LCD TV will not be used for a long period of time. The POWER button on the front panel is only used for switching the LCD TV into standby, it does not disconnect the device from the main voltage. To completely disconnect the main voltage, please remove the power plug from the socket.

Press the button on the remote to turn on the LCD TV.

Press the Input button on the remote to display the Input List. Use the ▲▼ buttons to select TV and press the OK button.

Press the MENU button on the remote control to display the Main menu, and use the ◀▶ buttons to select the TV.


Press the ▼ button to select Channel Scan, and press the OK button. The Channel Scan automatically creates a list of receivable channels. Press the MENU button at any time to interrupt the memorization process.(the list cannot be created if interrupted)


The Channel Scanning will create a list of receivable channels for the current input (antenna or cable). You will be required to run Channel Scanning for each RF input to create a list of available channels from both inputs.

Press the OK button to display the received channel list, then press ▲▼ to select a channel. Or, use the • with 0-9 buttons to select digital channel( for example 9.1)
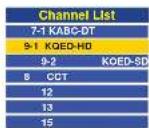

The digital main channel might include many subchannels (for example 9-1, 9-2...) that are showing program at the same time.
Connecting an A/V Device with Composite Connector

flowchart
graph TD
    A["Rear of TV"] --> B["PCVGA IN"]
    B --> C["PC AUDIO IN"]
    C --> D["AV Cable"]
    D --> E["AUDIO Cable"]
    E --> F["SOLED BOX"]
    F --> G["SATELLITE RECEIVER"]
    G --> H["TV CABLE BOX"]
    H --> I["TV CABLE PLAYER"]
    I --> J["VCR"]
    J --> K["GAME CONSOLE"]
    J --> L["CAMERA"]
    G --> M["Satellite antenna cable"]
    style A fill:#f9f,stroke:#333
    style B fill:#ccf,stroke:#333
    style C fill:#cfc,stroke:#333
    style D fill:#fcc,stroke:#333
    style E fill:#cff,stroke:#333
    style F fill:#ffc,stroke:#333
    style G fill:#cfc,stroke:#333
    style H fill:#fcc,stroke:#333
    style I fill:#ffc,stroke:#333
    style J fill:#cfc,stroke:#333
    style K fill:#fcc,stroke:#333
    style L fill:#cfc,stroke:#333
    style M fill:#fcc,stroke:#333
Use a composite cable to connect the external A/V device's composite video/audio jacks to the LCD TV's VIDEO IN jacks.
2 Connect all AC power sources, before turning on the power switch of the LCD TV or other connected equipment.
3 Press the button on the remote to turn on the LCD TV.
4 To view the A/V device's with component input, press the INPUT button on the remote to select VIDEO1.
Not all A/V devices have the ability to connect to a TV. Please check your A/V devices user guide for compatibility.
Connecting an A/V Device with S-Video Connector

flowchart
graph TD
    A["Rear of TV"] --> B["Home/In"]
    B --> C["PCVCA IN"]
    B --> D["PC AUDIO IN"]
    C --> E["PGX 1000"]
    D --> F["PGX 1000"]
    E --> G["PGX 1000"]
    F --> H["PGX 1000"]
    G --> I["PGX 1000"]
    H --> J["PGX 1000"]
    I --> K["PGX 1000"]
    J --> L["PGX 1000"]
    K --> M["PGX 1000"]
    L --> N["PGX 1000"]
    M --> O["PGX 1000"]
    N --> P["PGX 1000"]
    O --> Q["SATellite receiver"]
    P --> R["SATellite antenna cable"]
    Q --> S["Satellite monitor"]
    R --> T["Satellite monitor"]
    U["AUDIO Cable"] --> V["S-VIDEO Cable"]
    W["GAME CONSOLE"] --> X["VCR"]
    X --> Y["DVD PLAYER"]
    Y --> Z["TV CABLE BOX"]
Use an audio cable to connect the external A/V device's audio output jacks to the LCD TV's audio inputs. Use a S-Video cable to connect the external A/V device's S-Video output jack to the LCD TV's S-Video IN input jack.
2 Connect all AC power sources, before turning on the power switch of the LCD TV or other connected equipment.
3 Press the button on the remote to turn on the LCD TV.
4 To view the A/V device's with component input, press the INPUT button on the remote repeatedly to select VIDEO2.
Connecting an A/V Device with Component(YPbPr) Connector

flowchart
graph TD
    A["Rear of TV"] --> B["TV Cable Box"]
    B --> C["SATELLITE RECEIVER"]
    C --> D["Satellite antenna cable"]
    D --> E["COMPONENT Cable"]
    E --> F["AUDIO Cable"]
    F --> G["TV Cable Box"]
    G --> H["Computer"]
    H --> I["Game Console"]
    H --> J["CAMERA"]
    H --> K["VCR"]
    H --> L["DVD PLAYER"]
    H --> M["Radio"]
Not all A/V device have the ability to connect to a TV. Please check your A/V device user guide for compatibility.
Use a component cable to connect the external A/V device's component output jacks to the LCD TV's YPbPr IN input jacks. Use an audio cable to connect the external A/V device's component audio jacks to the LCD TV's audio input jacks.
2 Connect all AC power sources, before turning on the power switch of the LCD TV or other connected equipment.
3 Press the ⏻ button on the remote to turn on the LCD TV.
4 To view the A/V device's with component input, press the INPUT button on the remote repeatedly to select VIDEO3.
The component video jacks on your A/V device are sometimes labeled YPbPr, or YCbCr. For an explanation of component video, see your A/V device's user guide:
Connecting an AV Equipment with HDMI Connector
Rear of TV
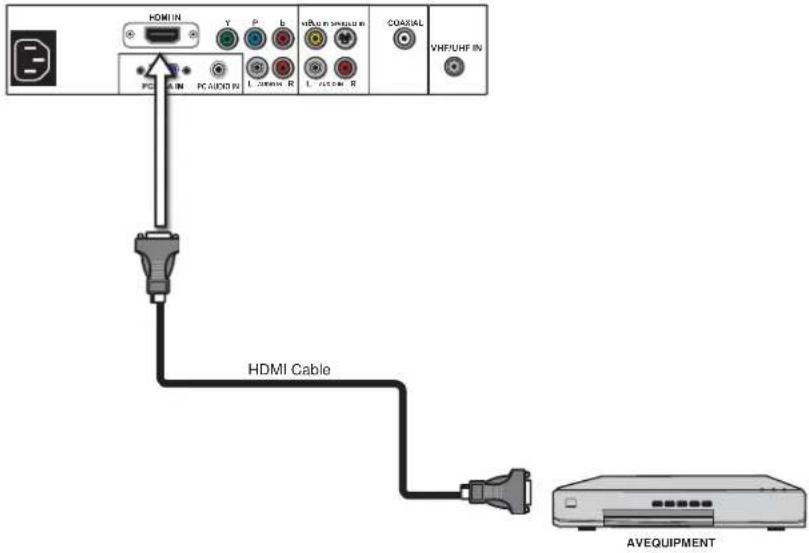
Use a HDMI cable to connect the AV equipment's HDMI output jack to the LCD TV's HDMI IN jacks.
2 Connect all AC power sources, before turning on the power switch of the LCD TV or other connected equipment.
3 Press the button on the remote to turn on the LCD TV.
4 Press the Input button on the remote to select VIDEO4.

The HDMI connector provides both video and audio signals, it's not necessary to connect the audio cable.
Connecting an AV Equipment with DVI Connector
Rear of TV

flowchart
graph TD
    A["Device"] --> B["USB Cable"]
    B --> C["Coaxial Cable"]
    C --> D["AVEQUIPMENT"]
    B --> E["ACOAL Cable"]
    E --> F["ACOAL Audio Cable"]
    F --> G["ACOAL Audio Cable"]
    style A fill:#f9f,stroke:#333
    style D fill:#ccf,stroke:#333
    style E fill:#cfc,stroke:#333
    style F fill:#fcc,stroke:#333
    style G fill:#cff,stroke:#333
ENGLISH
Use a HDMI-to-DVI cable to connect the AV equipment's DVI output jack to the LCD TV's HDMI IN jacks. Use an audio cable to connect the AV equipment's audio output jacks to LCD TV's HDMI AUDIO jacks.
2 Connect all AC power sources, before turning on the power switch of the LCD TV or other connected equipment.
3 Press the button on the remote to turn on the LCD TV.
4 Press the Input button on the remote to select VIDEO4.
If the LCD TV is connected to AV equipment's DVI connector, you will need an HDMI-to-DVI cable or an HDMI adapter(not supplied) and an audio cable.
Connecting a PC
Rear of TV

1 Use a D-SUB cable to connect the PC's D-SUB output jack to the LCD TV's VGA input jack. Use an audio cable to connect the PC's audio output jacks to LCD TV's.
2 Connect all AC power sources, before turning on the power switch of the LCD TV or other connected equipment.
3 Press the button on the remote to turn on the LCD TV.
4 Press the INPUT button on the remote to select COMPUTER.
Connecting an Audio Receiver or a Dolby Digital 5.1 Sound System
For better sound quality, you may want to use a Home Theater/Stereo System.
NOTE: If you have a Home Theater/Stereo System that you would like to use with your new Polaroid TV, we recommend that you do NOT use your TV's audio output for this connection.
For the best sound quality, our product testing has shown that you should connect your Home Theater/Stereo System directly to your A/V device. I.E. You should connect your Home Theater/Stereo System to your DVD player, Cable/Satellite box or other AV equipment.
Although not recommended, if you prefer to use the TV audio output to make this connection to your Home Stereo System, please follow the instructions below.

Use an audio cable to connect the audio receiver's audio LINE IN jacks to LCD TV's SPDIF OUT jacks.
2 Connect all AC power sources, before turning on the power switch of the LCD TV or other connected equipment.
3 Press the button on the remote to turn on the LCD TV.
Chapter 3
USING THE FEATURES
Wide Screen Viewing
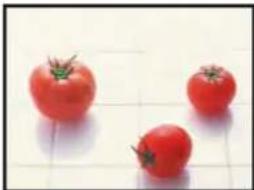
Wide Screen function allows viewing of 4:3/16:9 images in wide screen mode, cycling through the following wide screen settings. Press the P.SIZE button repeatedly to select the screen format you want.

NORMAL
Displays at 4:3 aspect ratio

NORMAL is not available when you are watching 720p, 1080i, or 1080p source.

natural_image
Three red tomatoes on a tiled surface, no text or symbols visible
FULL
Stretches the image vertically and horizontally to keeps the image size consistent in the center of the screen and stretches the sides
natural_image
Three red tomatoes on a tiled surface (no text or symbols visible)
WIDE
Stretches the image vertically and horizontally to fill the screen at 1:1.85 aspect ratio

natural_image
Three red tomatoes on a tiled surface (no text or symbols visible)
ZOOM
Stretches the image vertically and horizontally to fill the screen at 1:2.35 aspect ratio

natural_image
Close-up of three red tomatoes on a white surface (no text or symbols visible)Using the Program Guide
The Program Guide feature brings all sorts of information to your screen, such as program title, program duration, time remaining, rating information, closed caption, availability, etc.

With the LCD TV connected to a television programming source, press the INPUT button on the remote control and use the ▲▼ buttons to select TV and press the OK button.

Press the GUIDE button on the remote control, the Program Guide will appear on the screen:


Press the ◀▶ button to select the channel.

Press the ▲▼ button to select the program from a list, the Program Guide provides introduction about the current program being shown on each channel. Program information in the guide is provided by the broadcasters. It may sometimes include only the channel number, without a program title or description.
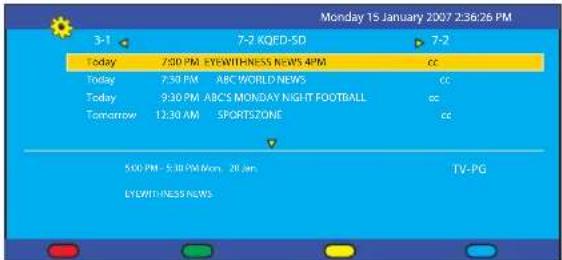

- RED In Program Guide, press to select first program of previous day.
- GREEN In Program Guide, press to select first program of next day.
YELLOW In Program Guide, press to view previous page of detailed program description.
BLUE In Program Guide, press to view next page of detailed program description.

Press the GUIDE button again on the remote control to exit the Program Guide.
Operating the Menu

Press the button to turn the LCD TV on.

Press the MENU button on the remote control, the on-screen menu will appear on the screen. Use the ◀▶ buttons to select your main menu option.
VIDEO MENU:
Allows you to make adjustments to your picture settings.
- If the signal source is TV/VIDEO/S-VIDEO/YPbPr/HDMI, the VIDEO MENU appears as:
- If the signal source is VGA, the VIDEO MENU appears as:


AUDIO MENU:
Allows you to customize the audio options and effects.
- If the signal source is VIDEO/S-VIDEO/YPbPr/HDMI/VGA, the AUDIO MENU appears as:
- If the signal source is TV, the AUDIO MENU appears as:


TV MENU:
Allows you to edit and label channels.

SETUP MENU:
Allows you to set up a variety of features: Language, Closed Caption, factory reset, Parental Control sleep timer.
- If the signal source is TV/VIDOE/S-VIDEO/YPbPr, the SETUP MENU appears as:
- If the signal source is HDMI/VGA, the SETUP MENU appears as:


Use the ▲▼ buttons to highlight the option of the sub-menu, and press the OK button. While in adjustment mode, and use the ◀▶ buttons to change the value of the item.

Press the EXIT button to exit the menu.
Customizing the VIDEO Settings

Press the button to turn the LCD TV on.

Press the MENU button on the remote control to display the Main menu, and use the ◀▶ buttons to select the VIDEO.

Use the ▲▼buttons to highlight an individual VIDEO option, use the ◀▶ buttons to change the setting, and press the MENU to exit the menu
- If the signal source is TV/VIDEO/S-VIDEO/YPbPr/HDMI, the VIDEO MENU appears as:
- If the signal source is VGA, the VIDEO MENU appears as:


The VIDEO menu includes the following options:
Picture Mode Cycles among display types: Vivid/Hi-Bright/Cinema/Sport/User
Contrast Controls the difference between the brightest and darkest regions of the picture
Brightness Controls the overall brightness of the picture
Saturation Controls the color intensity
Hue Controls the difference between the green and red regions of the picture
Sharpness Increase this setting to see crisp edges in the picture; decrease it for soft edges
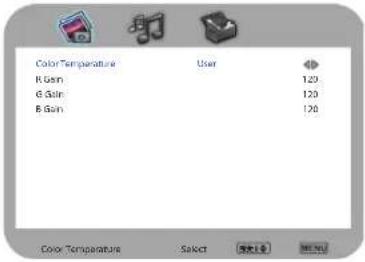
Color
temperature Adjusts color components independently to achieve a warm or cool effect: Cool/Middle/Warm/User
- Warm: Increases red tint
- Middle: Increases natural tint
- Cool: Increases blue tint
- User: Allows the user to adjust red, green and blue color component levels independently.
Noise Reduction
Select to reduce the noise level of connected equipment: Off/Low/Strong/Medium.
VGA
Press the OK button to enter the VGA Setting:

• Auto Adjust Press the OK button to automatically adjust the display settings to optimize performance based on the VGA mode
• H. Position Adjusts the position of the picture left and right in the window
• V. Position Adjusts the position of the picture up and down in the window
- Clock Controls the width of the picture based on the VGA mode
• Phase Controls the signal phase, which can improve focus clarity and image stability based on the VGA mode
Customizing the AUDIO Settings

Press the button to turn the LCD TV on.

Press the MENU button on the remote control to display the Main menu, and use the ◀▶ buttons to select the AUDIO.

Use the ▲▼buttons to highlight an individual AUDIO option, use the ◀▶ buttons to change the setting, and press the MENU to exit the menu
- If the signal source is VIDEO/S-VIDEO/YPbPr/HDMI/VGA, the AUDIO MENU appears as:
- If the signal source is TV, the AUDIO MENU appears as:

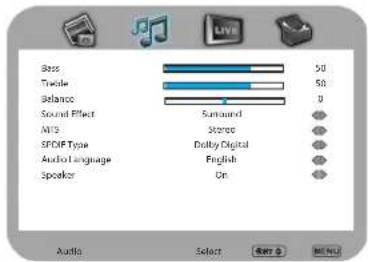

The AUDIO menu includes the following options:
Bass Controls the relative intensity of lower-pitched sounds
Treble Controls the relative intensity of higher pitched sounds
Balance Adjusts the relative volume of the speakers in a multiple speaker system
Sound Effect Allows selection of an audio-enhancement technique from among the following options: Surround/Live/Dance/Techno/Classic/Soft/Rock/POP/Off
MTS Allows you to listen to high-fidelity stereo sound while watching TV
- Stereo: Use separate audio tracks for left and right speakers, if available
- SAP: You can enjoy a second audio program from the speakers while watching a scene in the original program
- Mono: Allows mono output (useful when stereo is noisy or inconsistent)
SPDIF Type Allows to selection of the digital sound format: PCM/OFF/Dolby Digital
- PCM:
The external audio system is connected to the AUDIO OUT (L/R) of the LCD TV
- Dolby Digital:
Select for surround sound (for stereo programs only)
- OFF:
Select OFF to turn off the external audio system
Audio Language Allows to select the audio language: English/Spanish/French.
Speaker Allows to select to turn on or off the TV speakers.
Customizing the TV Settings

Press the button to turn the LCD TV on.

Press the MENU button on the remote control to display the Main menu, and use the ◀▶ buttons to select the TV.

Use the ▲▼buttons to highlight an individual TV option, use the ◀▶ buttons changes the setting, and press the MENU exits the menu.


The TV menu includes the following options:
| Channel Scan | Press the OK button, the Channel Scanning automatically creates a list of receivable channels. |
| Tuner Mode | Allows selection between CATV cable and antenna signal sources: · AIR Choose this setting if you are receiving TV channels with an antenna (over the air) · Cable Choose this setting if you are receiving TV channels with a CATV (cable TV) |
| Channel Skip | Allows addition/removal of channels on the channel list. ➊ Press the OK button to display the Channel Skip menu: 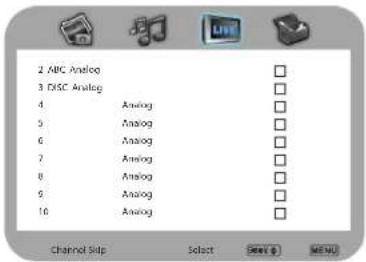 |
② Press the ▼ button to select the desired channel, and press the OK button repeatedly to select show (☑) or hide(☐)
Favorite List
① Select Favorite List from the TV option and press the OK button. The Favorite List menu appears:
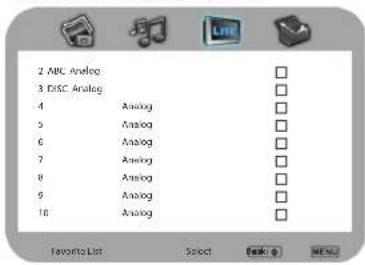
② Press the ▼ button to select the desired channel, and press the OK button repeatedly to select show (☑) or hide(☐)
Time Zone Allows selection of regional TV systems of USA: Eastern Time/Indiana/Central time/Mountain Time/Arizona/Pacific Time/Alaska/Hawaii
Customizing the SETUP Settings

Press the button to turn the LCD TV on.

Press the MENU button on the remote control to display the Main menu, and use the ◀▶ buttons to select the SETUP.

Use the ▲▼buttons to highlight an individual SETUP option, use the ◀▶ buttons to change the setting, and press the MENU to exit the menu.
- If the signal source is TV/VIDOE/S-VIDEO/YPbPr, the SETUP MENU appears as:
- If the signal source is HDMI/VGA, the SETUP MENU appears as:
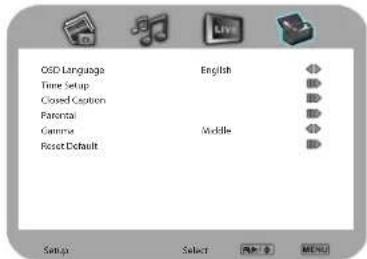
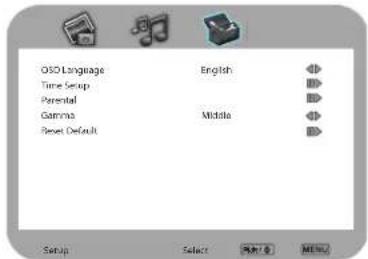

The SETUP menu includes the following options:
OSD Language Selects to display all on-screen menus in your language of choice: English/French/Spanish
Closed
Caption Allows to select from analog or digital closed caption modes and press the OK button. The Closed Captain list appears:
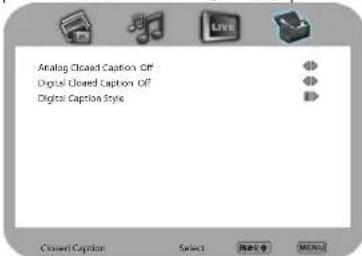
① Analog Closed Caption:
Press the ◀▶ buttons to select the basic analog closed caption options: OFF/CC1/CC2/CC3/CC4
- CC1 /CC2 /CC3 /CC4; Display a printed version of the dialog and sound effects of the program being viewed
- T1/T2: Display station information presented using either half or the whole screen
- T3/T4: Extended Data Services. For example: Network name, program name, program length, etc.
② Digital Closed Caption:
Press the ◀▶buttons to select the digital closed caption options: Service1/Service2/Service3/Service4/Service5/Service6/OFF
Note: The setting here will be applied to each DTV channel
③ Caption Style:
Press OK button to customize the settings for digital closed caption option:

Parental
The Parental Control can be set up to the TV to block Channel, Video Source and to change password.
① Use the ▼ button to select the Parental, and press the OK to display the Parental menu
② Use the Program Block function, must enter a four-digit password. The factory password is 0000
③ The Parental list appears:
Program Block
Allows to setup the TV and MPAA Rating Lock options (refer to "Using the Program Block Setting").

- Channel Block
Allows to block digital channels.

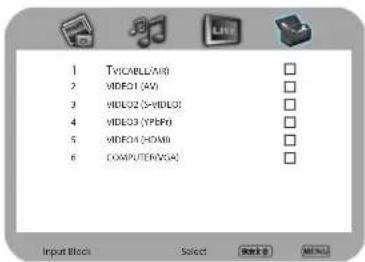
■ Input Block
Selects to block a Input source signal
- Change Password
Selects to change your password
Gamma
Allows adjustment of the display's gamma correction, which if netunes both brightness and red/green/blue ratios: On/Off/Middle.
Reset Default
Press the OK button to restore factory settings
Using the Program Block Settings

Press the MENU button on the remote control to display the Main menu, and use the ◀▶ buttons to select the SETUP.

Use the ▼buttons to highlight Parental, and press the OK button.
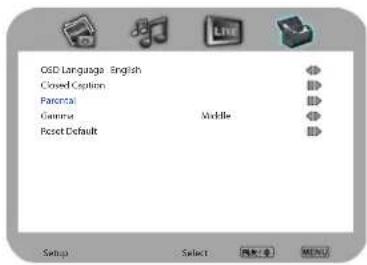

Use the Parental function, must enter a four-digit password. The factory password is 0000.


Use the ▼ button to select the Program Block, and press the OK to display the Program Block menu.
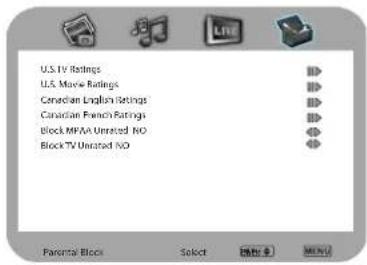

The Parental block menu includes the following options:
| U.S. TV Ratings | Selects to activate the TV Rating programs. |
| Canadian English Ratings | Selects to activate the English Rating programs of Canada. |
| Canadian French Ratings | Selects to activate the French Rating programs of Canada |
| U.S. Movie Ratings | Selects to activate the MPAA Rating programs |
Block MPAA Unrated · YES:
Block all movies that are broadcast without a MPAA rating.
NO:
Allows all movies that are broadcast without a MPAA rating
Block TV None Rating
- YES:
Block all movies that are broadcast without a TV rating.
NO:
Allows all movies that are broadcast without a TV rating.
U.S. TV Ratings
The U.S.TV Rating has 2 rating methods: Content-Based Rating and Age-Based Rating. The U.S.TV Rating includes the following options:

AGE-BASED
| RATING | DESCRIPTION |
| TV-Y | All children |
| TV-Y7 | Directed to children age 7 and older |
| TV-G | General Audience |
| TV-PG | Parental Guidance suggested |
| TV-14 | Parents strongly cautioned |
| TV-MA | Mature Audience only |
CONTENT-BASED
| RATING | DESCRIPTION |
| FV Fantasy violence | |
| D | Suggestive dialogue |
| L | Strong language |
| S | Sexual situations |
| V | Violence |
| ALL | All contents are blocked |
| CONTENT-BASED | ||||||
| FVDLSV | ||||||
| AGE-BASED | TV-Y | |||||
| TV-Y7 | √ | |||||
| TV-G | ||||||
| TV-PG | √ | √ | √ | √ | ||
| TV-14 | √ | √ | √ | √ | ||
| TV-MA | √ | √ | √ | |||
√ : To block programs by both content and age.
Use the ◀▶ ▲▼ buttons to select the rating you want and press the OK button repeatedly to select BLOCK ☑r UNBLOCK . □
Canadian English Ratings
The Canadian English Ratings includes the following options:
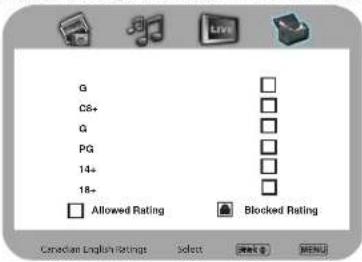
RATING
DESCRIPTION
| G | All children |
| C8+ | Children 8 years and older |
| G | General programming |
| PG | Parental guidance |
| 14+ | Viewers 14 and older |
| 18- | Adult programming |
Use the ◀▶▲▼ buttons to select the rating you want and press the OK button repeatedly to select BLOCK ▼ UNBLOCK . □
Canadian English Ratings
The Canadian English Ratings includes the following options:
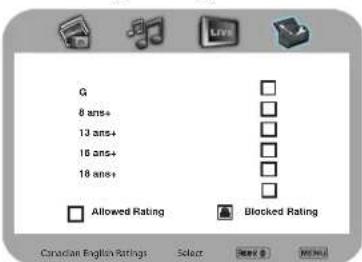
RATING
DESCRIPTION
| G | General programming | |
| 8 | ans+ | Not recommended for ages under 8 |
| 13 | ans+ | Not recommended for ages under 13 |
| 16 | ans+ | Not recommended for ages under 16 |
18 ans+ Programming restricted to adults.
Use the ◀▶ ▲▼ buttons to select the rating you want and press the OK button repeatedly to select BLOCK ☐ UNBLOCK . □
U.S. Movie Ratings
The U.S. Movie Ratings is used for original movies rated by the Motion Picture Association of America(MPAA) as broadcasted on cable TV and not edited for television.
The U.S. Movie Ratings includes the following options:

RATING
DESCRIPTION
| G | General Audiences. Movie is appropriate for all ages |
| PGviewers | Parental Guidance Suggested. May contain material not suited for younger |
| PG-13 | Contains content that may not be appropriate for viewers under the age of 13 |
| R | Restricted. Contains adult content, no one under 17 admitted without parent |
| NC-17 | No one 17 and under admitted |
| X | No one 17 and under admitted |
Use the ▶▶▲▼ buttons to select the rating you want and press the OK button repeatedly to select BLOCK ☑ UNBLOCK . □
SPECIFICATIONS
| LCD Panel Panel | Size 15.4" TFT LCD 19" TFT | LCD | |
| Brightness 200 300 | |||
| Contrast Ratio 400:1 850:1 | |||
| Max. Resolution 1280x800 1400x900 | |||
| Input Connector V | DEO/AUDIO IN(L/R) 1 1 | ||
| S-VIDEO/AUDIO IN(L/R) 1 1 | |||
| YPbPr/AUDIO IN(L/R) 1 1 | |||
| PC(VGA IN)/PC AUDIO IN | 1 1 | ||
| HDMI | 1 1 | ||
| COAXIAL OUT | 1 1 | ||
| HEADPHONE | 1 1 | ||
| VHF/UHF IN | 1 1 | ||
| Power Source | AC100~240V, 50/60HZ, 1.2A | AC100~240V, 50/60HZ, 1.2A | |
| Power Consumption | 50 W, standby < 5 W | 65 W, standby < 5 W | |
| Dimension | 15.2 w x 13.5 h x 5.2 d inch 18 | w x 15.9 h x 5.2 d inch | |
| WEIGHT | 31.97 LB | 39.5 LB | |
20070205
- DOLBY DIGITAL
- HDMI TM
- Federal Communications Commission Statement
- Warnings and Precautions
- Antenna Safety Instructions
- TABLE OF CONTENTS
- Chapter 1 Introducing the LCD TV
- Key Features
- Package Contents
- Setting Up Your LCD TV
- How to install the TV Stand
- How to setup the TV
- Your LCD TV
- Your Remote Control
- Chapter 2 Installing the LCD TV
- Connecting a TV Cable or an Antenna
- Antenna Connection
- Cable TV (CATV) Connection
- Connecting an A/V Device with Composite Connector
- Connecting an A/V Device with S-Video Connector
- Connecting an A/V Device with Component(YPbPr) Connector
- Connecting an AV Equipment with HDMI Connector
- Connecting an AV Equipment with DVI Connector
- Connecting a PC
- Connecting an Audio Receiver or a Dolby Digital 5.1 Sound System
- Chapter 3
- USING THE FEATURES
- Wide Screen Viewing
- NORMAL
- FULL
- WIDE
- ZOOM
- Using the Program Guide
- Operating the Menu
- VIDEO MENU:
- AUDIO MENU:
- TV MENU:
- SETUP MENU:
- Customizing the VIDEO Settings
- Customizing the AUDIO Settings
- - PCM:
- - Dolby Digital:
- - OFF:
- Customizing the TV Settings
- Customizing the SETUP Settings
- ① Analog Closed Caption:
- ② Digital Closed Caption:
- Using the Program Block Settings
- U.S. TV Ratings
- Canadian English Ratings
- U.S. Movie Ratings
Brand : POLAROID
Model : 1511-TLXB
Category : Television