
RTD300 - Home Theater RCA - Free user manual and instructions
Find the device manual for free RTD300 RCA in PDF.


| Product Type | Home Theater System |
| Brand | RCA |
| Model | RTD300 |
| Disc Playback | DVD, CD, MP3, JPEG |
| Supported Disc Formats | DVD-Video, DVD-R/RW, CD-R/RW |
| Audio Output | Stereo, Dolby Digital, DTS |
| Speaker Configuration | 5.1 channel surround sound |
| Speaker Power (Total) | Approx. 500W RMS (100W x 5 + 100W subwoofer) |
| Subwoofer Type | Active (built-in amplifier), 6.5 inch driver |
| Front Speaker Drivers | 3 inch full-range |
| Surround Speaker Drivers | 3 inch full-range |
| Center Speaker Drivers | 3 inch full-range |
| Video Outputs | Composite, Component, HDMI (if available) |
| Audio Inputs | Analog audio (RCA), Digital optical (if available) |
| Radio Tuner | FM/AM with preset stations |
| Remote Control | Included, infrared (IR) |
| Power Consumption | Approx. 150W (operating), <1W (standby) |
| Power Supply | AC 120V, 60Hz (US standard) |
| Dimensions (Main Unit) | 17.0 x 3.5 x 12.0 inches (430 x 90 x 305 mm) |
| Weight (Main Unit) | Approx. 8.8 lbs (4.0 kg) |
| Dimensions (Speakers each) | 4.0 x 6.0 x 4.5 inches (102 x 152 x 114 mm) |
| Weight (Speakers each) | Approx. 1.5 lbs (0.68 kg) |
| Dimensions (Subwoofer) | 8.5 x 14.0 x 12.0 inches (216 x 356 x 305 mm) |
| Weight (Subwoofer) | Approx. 12 lbs (5.4 kg) |
Frequently Asked Questions - RTD300 RCA
User questions about RTD300 RCA
0 question about this device. Answer the ones you know or ask your own.
Ask a new question about this device
Download the instructions for your Home Theater in PDF format for free! Find your manual RTD300 - RCA and take your electronic device back in hand. On this page are published all the documents necessary for the use of your device. RTD300 by RCA.
USER MANUAL RTD300 RCA
© 2 003 Thomson Inc.
Trademark(s) ® Registered
Marca(s) Registrada(s)
Marque(s) Deposée
55814590 (EN/F/E)
www.rca.com
www.rca.com/LatinAmerica
Printed in China / Impreso en China
REA
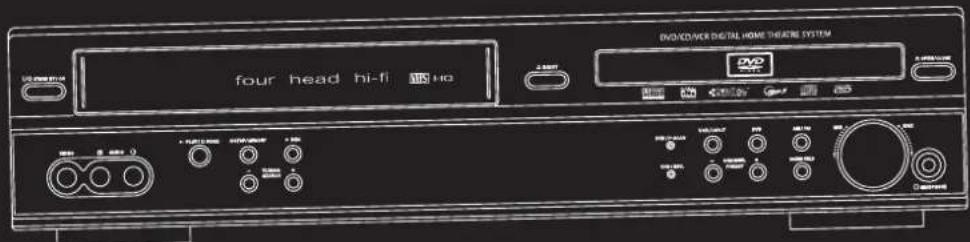
RTD300
It is important to read this instruction book prior to using your new product for the first time. Es importante leer este manual antes de usar por vez primera su euipo.
FCC Information
This device complies with Part 15 of the FCC Rules. Operation is subject to the following two conditions:
(1) This device may not cause harmful interference, and (2) this device must accept any interference received, including interference that may cause undesired operation.
In accordance with FCC requirements, changes or modifications not expressly approved by Thomson Inc. could void the user's authority to operate this product.
This device generates and uses radio frequency (RF) energy, and if not installed and used properly, this equipment may cause interference to radio and television reception.
If this equipment does cause interference to radio or television reception (which you can determine by unplugging the unit), try to correct the interference by one or more of the following measures:
- Re-orient the receiving antenna (that is, the antenna for the radio or television that is "receiving" the interference).
- Move the unit away from the equipment that is receiving interference.
- Plug the unit into a different wall outlet so that the unit and the equipment receiving interference are on different branch circuits.
If these measures do not eliminate the interference, please consult your dealer or an experienced radio/television technician for additional suggestions. Also, the Federal Communications Commission has prepared a helpful booklet, "How To Identify and Resolve Radio TV Interference Problems." This booklet is available from the U.S. Government Printing Office, Washington, DC 20402. Please specify stock number 004-000-00345-4 when ordering copies.
This product complies with DHHS Rules 21 CFR Subchapter J. Applicable at the date of manufacture.
Technical Specification
Product: DVD + VCR Home Theatre System
Brand: RCA
Model: RTD300
Electrical current consumption
Power Supply: 120V - 60Hz
Power consumption: 95 Watts
IMPORTER
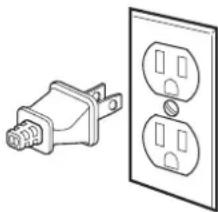
The AC power plug is polarized (one blade is wider than the other) and only fits into AC power outlets one way. If the plug won't go into the outlet completely, turn the plug over and try to insert it the other way. If it still
natural_image
Illustration of an electrical outlet with two socket covers (no text or symbols)won't fit, contact a qualified electrician to change the outlet, or use a different one. Do not attempt to bypass this safety feature.
CAUTION: TO PREVENT ELECTRIC SHOCK, MATCH WIDE BLADE OF PLUG TO WIDE SLOT, FULLY INSERT.
For Your Records
In the event that service should be required, you may need both the model number and the serial number. In the space below, record the date and place of purchase, and the serial number:
Model No.
Remote Control No.
Date of Purchase
Place of Purchase
Serial No.
Service Information
This product should be serviced only by those specially trained in appropriate servicing techniques. For instructions on how to obtain service, refer to the warranty included in this Guide.
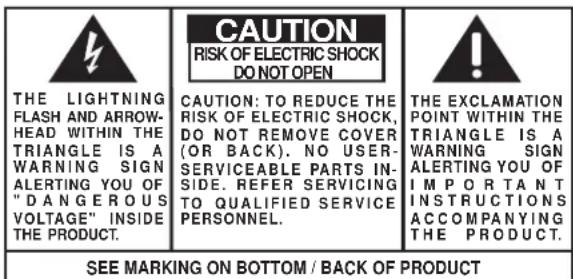
WARNING: TO PREVENT FIRE OR ELECTRICAL SHOCK HAZARD, DO NOT EXPOSE THIS PRODUCT TO RAIN OR MOISTURE.
Contents
Product Information
FCC Information
Contents 1
Identification of Controls 2
Remote Control 5
Installation
Connecting with TV 7
FM/AM Antenna connection 8
Speaker system connection 9
Connecting with Other Video Equipment ..... 10
Output Select 11
Clock Set 12
VCR Operation
Memorizing TV Channels 13
VCR Playback 15
Using advanced features 16
Hi-Fi Stereo Playback (Hi-Fi Model only) ...... 20
DVD Setup
DVD initial setting
LANGUAGE Setup 21
DISPLAY Setup 22
AUDIO Setup.... 24
RATINGS Setup 26
DVD Operation
DVD Playback 28
Playing a desired scene 30
Confirming the current PLAY mode on screen .. 34
AUDIO language, SUBTITLE language
and 3D AUDIO 36
ZOOM, Multi Angle and Digest play 37
About mp3 discs . 38
Displaying menus in a disc. 39
Recording
Recording 40
Timer Recordings 42
Watching and Recording Cable TV 45
Radio Operation
Presetting the radio stations 46
Listening to the radio 47
Speaker Setup
Speaker Setup for enjoying the surround sound
effect 48
Delay Time Setting 50
Setting the sound level 52
More Information
About DVD 53
Basic information about VCR and Videotape .... 55
Troubleshooting Tips (DVD) 56
Troubleshooting Tips (VCR) 57
Specifications 59
Care & maintenance 60
Warranty
Limited Warranty (U.S.) 61
Limited Warranty (Canada) 62
Identification of Controls
Front panel
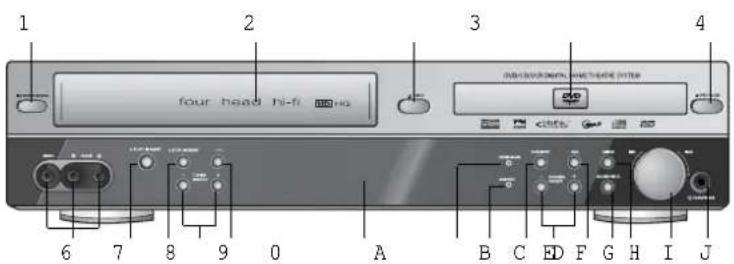
5
1 Power (STANDBY/ON) button Powers the device on/off when AC power supply is connected.
2 Videotape deck Insert the desired video tape here.
3 Eject button Ejects the tape.
4 Disc tray
5 Open/Close Tray button Opens and closes disc tray. Place a disc on the disc tray with the label side up.
6 Video / Audio input 3 jack Connect a cable to the video/audio out jacks on a camcorder, another VCR, or another audio visual source.
7 Playback/PAUSE button Plays videotape or disc. Press this button during playback to pause playback or recording modes.
8 Stop/MEMORY button Stops the current DVD or VCR functions. Stores radio stations.
9 Tuning & Search -/+ Search- (◀◀): Rewinds the currently videotape in VCR mode. Search backwards at different speeds (x2, x4, x8, etc.) in DVD mode. Searches backwards when activated during video tape playback.
Search+ (▶▶): Fast forwards the current video tape in VCR mode. Search forward at different speeds (x2, x4, x8, etc.) in DVD mode. Searches forward when activated during video tape and DVD playback.
Tuning -/+ : Scans all available radio stations.
; Record button In VCR mode, starts recording of a TV program or program from another sources (except DVD).
A Operation Display Window Displays device operations. For more information, see "Operation Display Window" on the next page.
B DVD/P-SCAN indicator The indicator lights in green in DVD mode. The indicator lights in red in P-Scan mode.
C VHS/REC indicator Illuminate in VCR mode.
D VCR/OUTPUT button Selects among VCR mode and other output modes.
E Channel & Preset -/+ Selects the preset TV broadcasting channel or preset radio stations.
F DVD button Selects DVD mode.
G SOUND FIELD button Adjusts the Sound Fields and Graphic Equalizer.
H AM/FM button Selects RADIO mode.
I Volume control Adjusts the sound level from the speakers connected to the unit.
J Headphone jack
Operation Display Window
EN
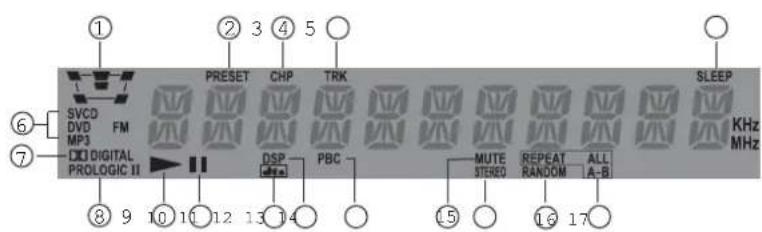
11 Speaker setup indicator
22 Memorised TV broadcasting channel or radio stations
33 Chapter indicator
44 Track indicator
5.5 Sleep time indicator
68 Playback disc indicator
77 Dolby Digital indicator
88 Prologic II indicator
99Playback indicator
00 Pause indicator
AA DTS indicator
BB DSP indicator
CC PBC (Playback Control) indicator
DD FM Stereo indicator
EE Mute indicator
FF Random playback indicator
Go Repeat playback indicator
Rear Panel
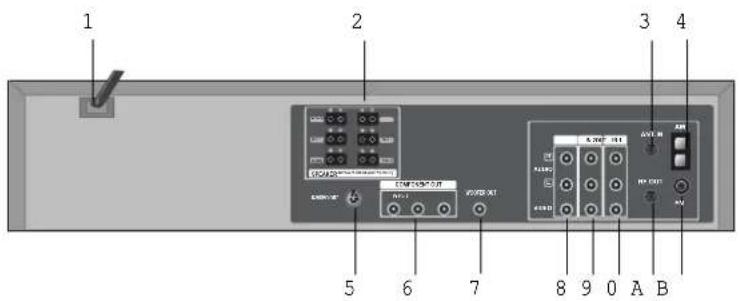
11 Power Cord
Jack for supplying power to the unit. Connect to a wall outlet.
22 Analog 5.1 Speaker Out Jack
Connect each of the speaker wires to the satellite speakers.
Speaker cords, 1 for each speaker, are needed for connection.
When connecting the speakers, make sure the polarities ("+" side of the speaker wire to "+" on the receiver) of speaker wires and terminals are matched.
33 Connection to Antenna Cable
Connect a coaxial cable from your cable wall outlet or antenna to the ANT IN jack on the back of your DVD/VCR unit.
4 AM Antenna Jack
55S-Video Output Jack (DVD only)
66COMPONENT (Progressive) Out Jack (DVD only)
To obtain better screen quality, connect the unit to a TV or monitor with a COMPONENT(480i or 480p) input.
Note: VCR signal is only available from Composite Video Out jack and RF Out. You must always connect these to the TV in order to set up and use your unit.
77 Subwoofer Pre-Output Jack
Connect an active subwoofer to improve bass performance especially in a large room.
88 A/V Output Jack
99A/V Input 2 Jack
; A/V Input 1 Jack
AAConnection to TV
Required connection for VCR operation. Connect on end of the RF cable to the RF Out Jack on the back of the unit and the other end to the ANT IN jack on the back of your TV.
BB FM Antenna Jack
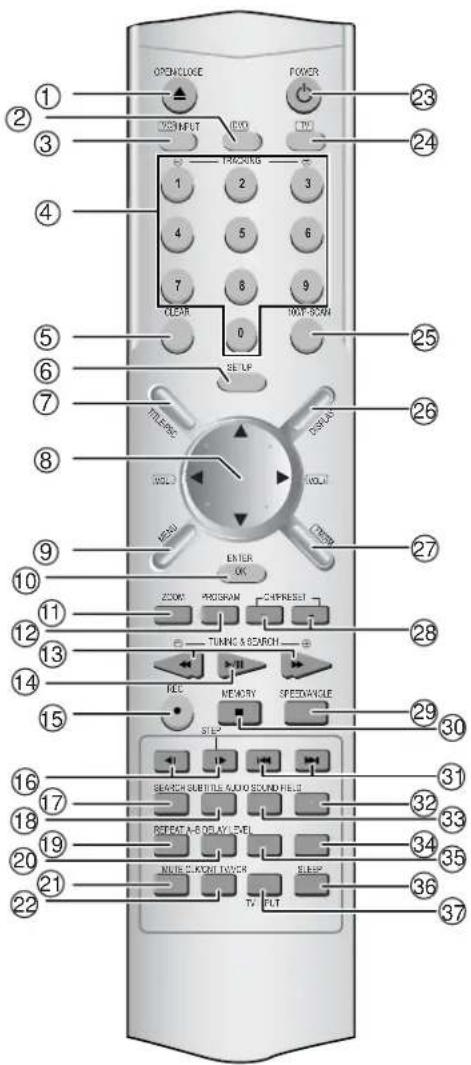
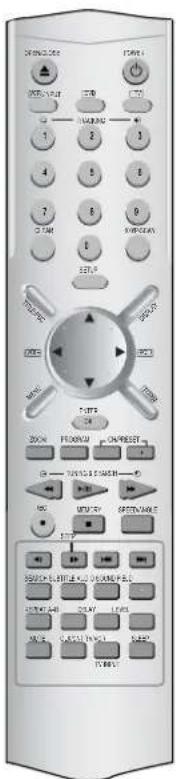
Remote Control

Child Lock!!! (VCR mode)
Press the power [ ⏻ ] button on the remote control for about 8 seconds. No buttons on the front panel and the remote control can be operated now and the Lock indicator ("LOCK") will be displayed on the window display. To release child lock, press the power [ ⏻ ] button on the remote control for about 8 seconds.
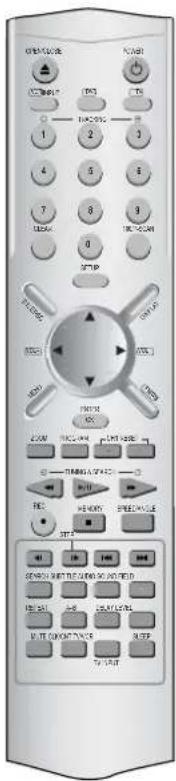
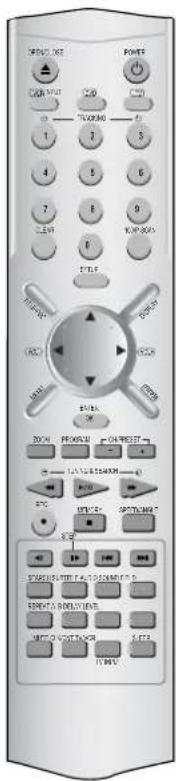
1 [DVD] Open/Close button, [VCR] Eject button
2 DVD SELECT button
3 VCR SELECT button
4 [DVD, VCR] Number button, [VCR] Tracking -/+ button
5 CLEAR button
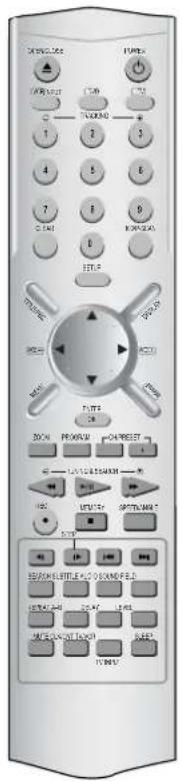
6 SETUP button
7 [DVD] Title /PBC button
8 [DVD, VCR] Use to highlight a selection on the menu and adjust certain settings, [RADIO] Adjust the volume
9 [DVD] Menu button
0 ENTER (Confirm selections on a menu screen) button
A [DVD] ZOOM button
B [VCR] TIMER RECORDING button, [DVD] program button
C [DVD, VCR] Forward / Reverse Search button, [RADIO] Scan all available radio stations
D Play/Pause button
E [VCR] Record button
F STEP FORWARD/REVERSE button
G [DVD] Chapter/Title/Time Search button
H [DVD] Subtitle Select button, [RADIO] Switch between AM or FM button
I [DVD] Repeat Playback button
J [DVD] REPEAT a defined period from A to B button
K SOUND MUTE button
L [DVD, VCR] Clock/Counter button
M Power button
N TV SELECT button
○ 100/P-SCAN button
[VCR] Used to enter three digit numbers.
[DVD] Switches to P-Scan mode.
P [DVD, VCR] OSD Display button
Q [RADIO] FM/AM Select button
R [VCR] Channel Up/Down button, [RADIO] Tune to the presetted stations
S [DVD] Angle, [VCR] Record Speed button
T Stop/MEMORY (Enter the number of a selected chapter, track, station or channel) button
U [DVD] PREVIOUS (move to the previous chapter or track) / Next (Move to the next chapter or track) button, [VCR] Frame Advance button in pause mode
V [DVD] SOUND FIELD button
W [DVD] AUDIO Language Select, [VCR] AUDIO Select button, [RADIO] Set FM Mode to Stereo or Mono sound
X [DVD] Sound LEVEL button
Y [DVD] DELAY button
z sleep button
[ TV/VCR Select, TV INPUT button
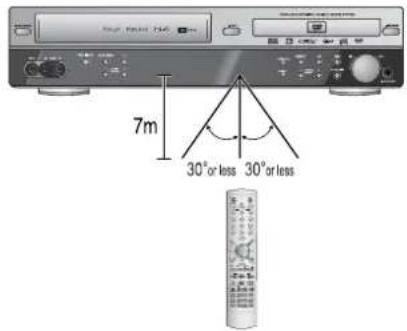
Instructions in using remote control
- Operate the remote control within 7m from the unit.
- Do not press 2(two) buttons at the same time.
• K eep the unit away from humid and dusty areas.
Accessories
Remote Control 2 Batteries RF cable
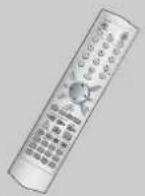
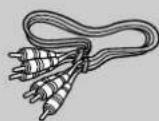
Audio/Video (Composite) Cable
Owner's Manual/Warranty/Safety Leaflet/Quick Connection Guide

AM antenna FM antenna
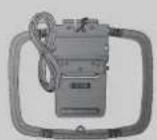
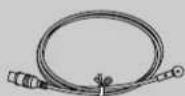
6 Speaker Cables:
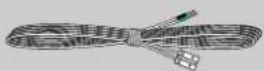
• 1 X green/black wire for center speaker
• 1 X red/black wire for front right speaker
• 1 X white/black wire for front left speaker
• 1 X purple/black wire for subwoofer
• 1 X blue/black wire for rear left speaker
• 1 X gray/black wire for rear right speaker
Unpacking The Speakers
- one set of speakers including 1 set of left and right front speakers, 1 centre speaker, 1 subwoofer and 1 set of left and right rear speakers.
Front Speakers
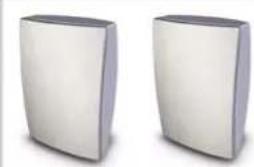
natural_image
Two white rectangular electronic devices with rounded surfaces, isolated on white background (no text or symbols)Center Speakers
Subwoofer
Rear Speakers
(Surround Sound)
To purchase accessories not supplied with the unit, contact your nearest dealer or service center. Owner's manual and warranty are not sold additionally.
Connecting with TV
■ During initial setup, the RF output channel for video is set to CH 3. This setting can be changed from the "Channel SET" screen in VCR operation (refer to page 13).
■ To see the picture from this unit, set your TV to CH3 once the RF cable is connected.
Various methods in connecting with TV
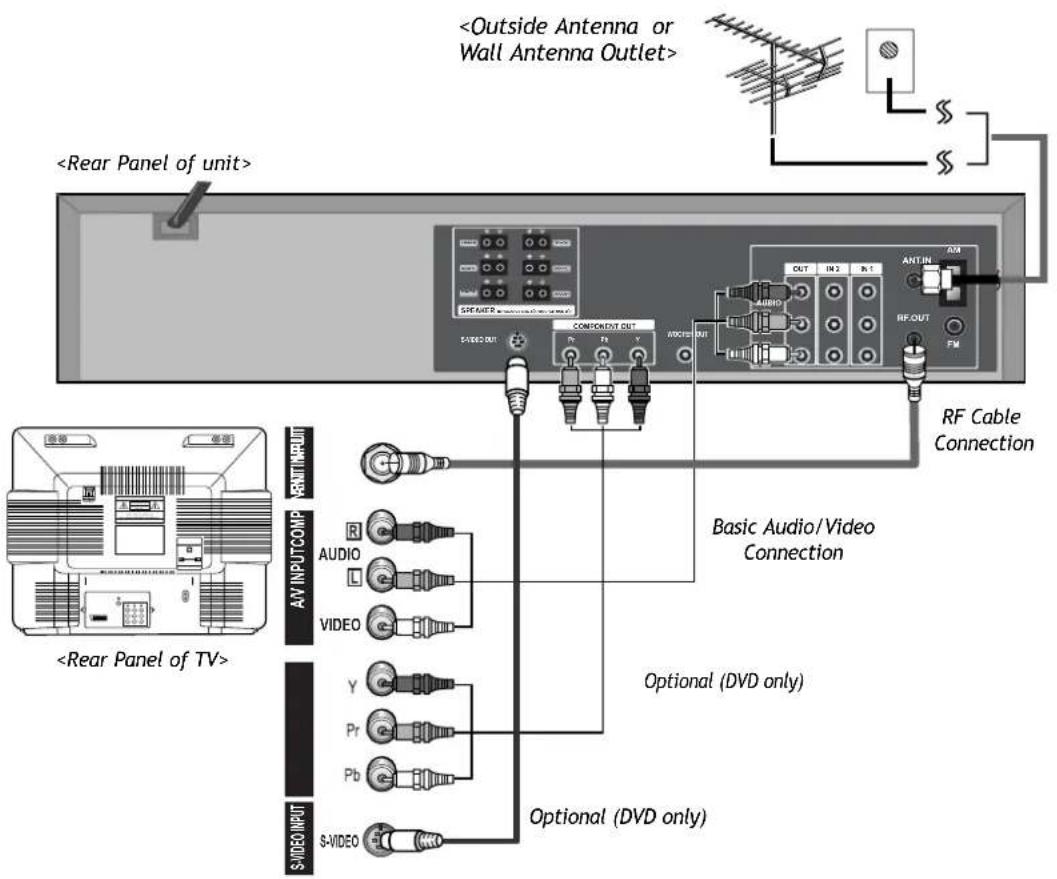
Audio connection
Connect the Audio cables (red and white) from the Audio/Video (composite) cable to the Audio Jack on the back of the DVD-Video player and the TV. Match the colour between the cable and the jacks when making the connections. Connect the left (white) and right (red) audio cables to the AUDIO OUT L(white) and R (red) jack on the DVD-Video player and the AUDIO IN jacks on the TV.
Video Connection
With the yellow cable (Video Cable) from the Audio/Video Composite Cable, connect the Video Out (yellow) jack on the DVD-Video player to the Video IN jack on the TV.
Connect the TV to the DVD-Video player with the RF cable provided with the unit. Plug one end of the RF cable into the "RF OUT" jack on the rear panel of the DVD-Video and the other end to the "ANT. IN" jack on the TV.
Optional (DVD only): If your TV has component video jacks, connect the component video cables (not supplied) to the Component Out (DVD only) jacks (Pb, Pr and Y) on the back of the DVD/Video player and the TV by matching the colours between the cables and the jacks. This connection provides better quality picture than composite video type.
Optional(DVD only): If your TV has a S-Video jack, use a S-Video cable (not supplied) to enjoy higher quality pictures. Connect a S-Video cable to the S-Video Out jack on the back of the DVD-Video and the S-Video jack on the back of the TV.
Note: Be sure to change the TV input on your TV when switching between DVD and Video mode.
FM/AM Antenna connection
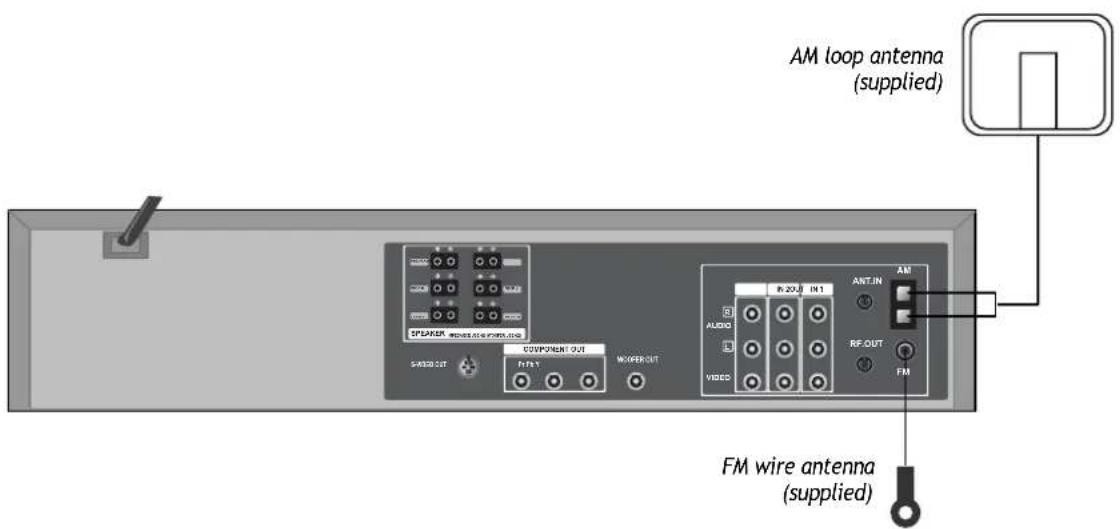
To listen to radio broadcast, connect the FM and AM antenna supplied with your unit.
- Connect the AM loop antenna to the AM antenna connector.
- Connect the supplied FM wire antenna to the FM antenna connector on the back of the DVD-Video player or connect a coaxial 75 cable (not supplied) to the wall socket and to the FM antenna connector.

To prevent interference, keep the AM loop antenna away from DVD Receivers and other components that causes interference.
• If the FM wire antenna is connected, be sure to fully extend and keep it as horizontal as possible.
Speaker system connection
Connect the speakers using the supplied speaker cords by matching the colors of the terminals and those of the cords. To obtain the best possible surround sound, adjust the speaker parameters (distance, level, etc.)
EN
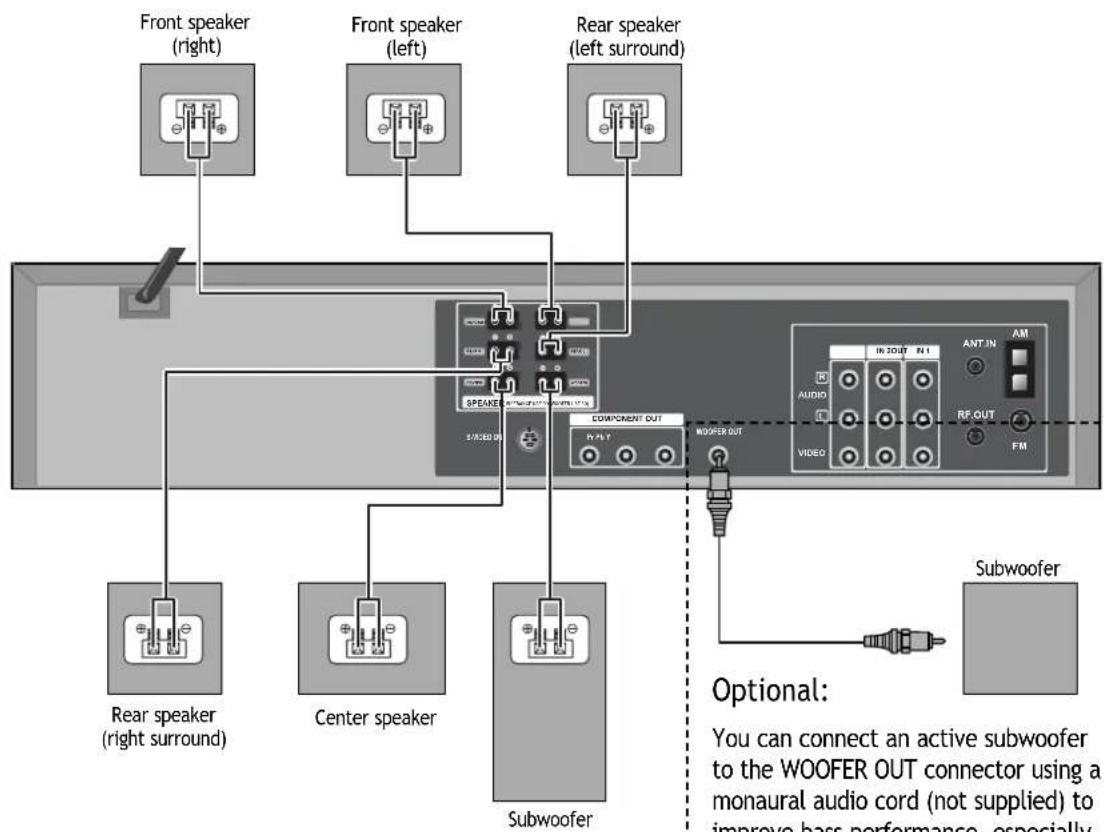
Optional:
You can connect an active subwoofer to the WOOFER OUT connector using a monaural audio cord (not supplied) to improve bass performance, especially in a large room. When you connect an active subwoofer, disconnect the woofer from the WOOFER speaker connector.

- Be sure to match the speaker cord to the appropriate terminal on the component: + to + and - to -. If the cords are reversed, the sound will be distorted and will lack bass.
- If you use front speakers with low maximum input rating, adjust the volume carefully to avoid excessive output on the speakers.
- Do not disassemble the front cover of supplied speaker.
Connecting with Other Equipment
■ You can connect a wide variety of audio/video equipment to your DVD-Video system including: an additional VCR, Laser Disc Player, DVD Player, Camcorder, Satellite Receiver or Video Game. Since all of these devices use essentially the same connections, they will be described together.
Connection with other audio/video equipment
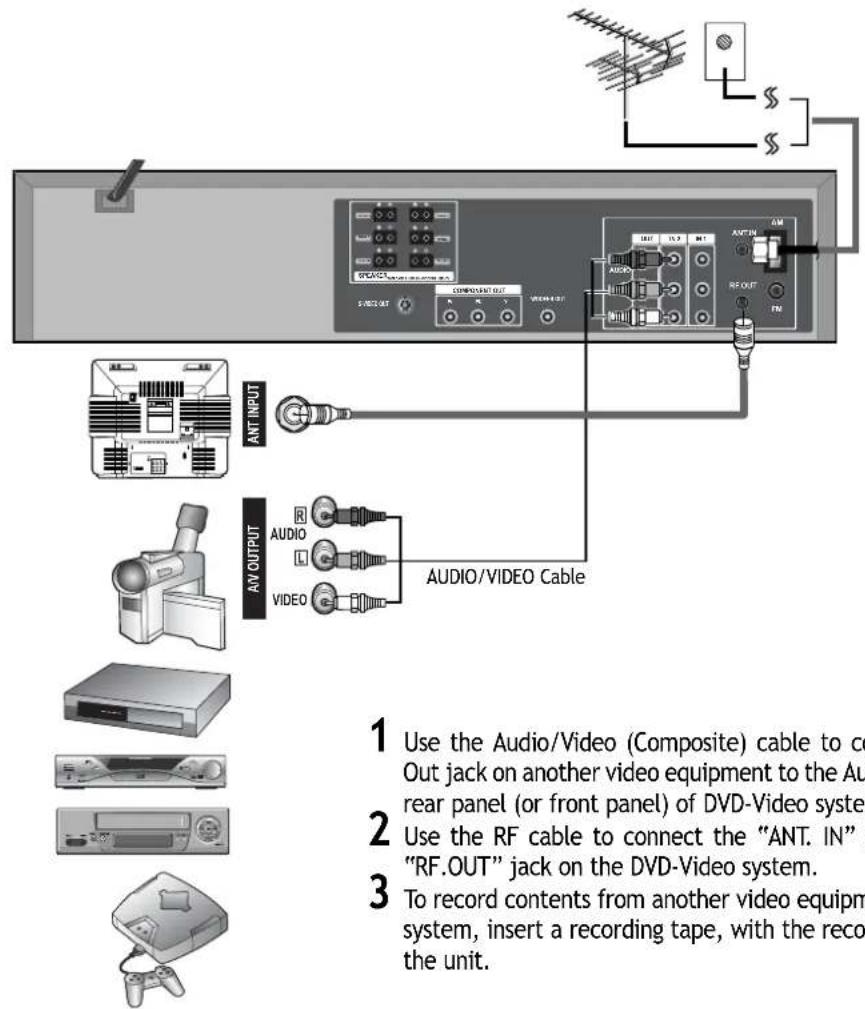
How to Copy (Edit) Tape from Other Video Equipment
1 Turn on the unit.
2 Press the [VCR INPUT] button on the remote control to select among "VIDEO 1", "VIDEO 2" or "VIDEO 3" on the TV screen. Select the one that pertains to the video equipment that you want to record.
3 Press [PLAY] on the additional video equipment that you want to record.
4 Press the [REC] button on the unit to begin recording contents from the selected video equipment.
5 Press the [Pause] button on the unit to stop recording temporarily. Press again to resume.
(Caution) If the unit remains in pause mode for more than 5 minutes, it will stop automatically to protect the tape from being damaged.
Output Select
To Select DVD
EN
Press the [DVD] button.
Press [DVD] to select DVD mode, the DVD indicator lights on the front panel. The remote control can then be used to access DVD functions.
To Select VCR
Press the [VCR] button.
Press the [VCR] button to select VCR mode. The VHS indicator lights on the front panel. The remote control will operate VCR functions.
To Select Watch Modes or External Input
Press the [VCR INPUT] button.
To toggle and select VCR PLAYBACK, BROADCASTING RECEPTION or EXTERNAL INPUT, press the [VCR INPUT] button repeatedly.
Clock Set
■ Set TV to your selected channel (CH3 or CH4) or the AV input you have chosen.
■ Press [VCR] on the remote control to select VCR mode and follow the procedures below.
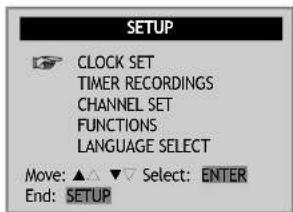
1 Press the [SETUP] button to view SETUP menu.
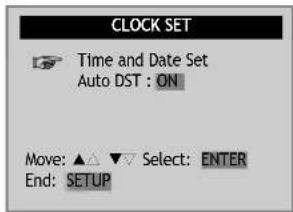
With the cursor 📋 at CLOCK SET, press [ENTER] to view CLOCK SET menu.
From the CLOCK SET menu, select Time and Date Set by pressing the [ENTER] button.
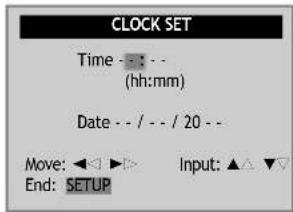
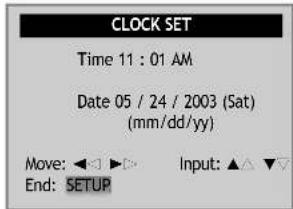
2 Set the current date and time with the [▲,▼,◀,▶] buttons or the [NUMBER] button.
For DATE SET, follow the order of Month / Day / Year ; for TIME SET, follow the order of Hour / Minute.
3 When CLOCK SET is complete, press the [SETUP] button.
Memorizing TV Channels
To Memorize Channels Automatically
EN
1 Press the [SETUP] button.
Press the [▼] button to move the cursor down to CHANNEL SET. Press [ENTER] to view CHANNEL SET menu.
SETUP
CLOCK SET
TIMER RECORDINGS
CHANNEL SET
FUNCTIONS
LANGUAGE SELECT
Select "AUTO CHANNEL SEARCH".
With the cursor at AUTO CHANNEL SEARCH, press [ENTER] to select the type of signal you have.
Select "Detect Automatically" with the [▼] button.
Press [ENTER] and the auto channel search starts.
Channel number changes successively from 01 to 125, while only broadcasting channels are memorized automatically. When the Automatic Channel Set process is completed, the first memorized channel is displayed.
CHANNEL SET
Auto Channel Search Add/Remove Channel Signal Type: CABLE Channel Change: CH3
AUTO CHANNEL SEARCH
What type of signal are you using?
Cable TV
Antenna
Detect Automatically
AUTO CHANNEL SEARCH
Now scanning channel 11
Check the memorized channels.
To check the memorized channels, press [CH up or down] on the remote control.
To Memorize Channels Manually
■ To add additional channels without affecting your existing stored channels, follow the steps below:
1 Press the [SETUP] button and select "CHANNEL SET".
Select "Add/Remove Channels".
CHANNEL SET
Auto Channel Search Add/Remove Channel Signal Type: CABLE Channel Change: CH3
Select and store a channel.
Press the [NUMBER] buttons on the remote control to select the desired channel to store. Press [▶] to change "REMOVED" into "ADDED".
ADD/REMOVE CHANNELS
Channel 02 is now ADDED.
Check the memorized channel.
To check the stored channels, press [CH up or down] on the remote control.
To Delete Channels Manually
■ Follow the procedures below to delete stored channels.
1 Press the [SETUP] button and select "CHANNEL SET". Select "Add/Remove Channels".
2 Select the channel to delete.
Use the [NUMBER] buttons on the remote control to enter the channel to delete.
Press the [▶] button to select "ADDED" or press the [◀] button to select "REMOVED" under the channel number.
3 To make sure the selected channel has been deleted, press [CH up or down] on the remote control.
ADD/REMOVE CHANNELS
Channel 02 is now ADDED.
Selecting cable or antenna viewing
■ You can set the viewing mode on your VCR, choose either CABLE (cable system connection) or ANTENNA (antenna connection).
To set the viewing mode:
From the CHANNEL SET menu, press [▼] to move the cursor down to SIGNAL TYPE. Press [ENTER] to toggle between CABLE and ANTENNA.
When the desired viewing mode is displayed, press [SETUP] twice to exit.
CHANNEL SET
Auto Channel Search Add/Remove Channel
Signal Type: CABLE Channel Change: CH3
To Set Output Channel
Press the [SETUP] button and select "CHANNEL SET". Select "Channel Change".
Press [ENTER] to set the exclusive video channel (CH3 or CH4).
CHANNEL SET
Auto Channel Search Add/Remove Channels
Signal Type: CABLE
Channel Change: CH3
VCR Playback

This DVD/Video system is equipped with an auto-detector that can detect contamination on tape heads.
If the tape head is contaminated, a notice shows on the display.
If this occurs, rub the heads with a head-cleaner. (Refer to "How to use a head-cleaner" for details.)
1 Press the [ 🔊 ] button to power on the unit. Press the [VCR] button on the remote control to select VCR mode.
2 Insert the desired tape.
3 To start playback, press the [PLAY] button. If the picture jumps or is in poor quality, adjust the tracking manually with the [TRACKING + or -] button.
4 To stop playback, press the [■] button. To pause playback, press the [PLAY/PAUSE] button in playback mode. Press again to resume.
5 Press the [EJECT] button on the front panel or the [OPEN/CLOSE] button on the remote control to eject the tape.
Various Playback Methods
■ For fast forward or fast reverse playback, press [▶▶] or [◀◀] during Playback.
■ For a still picture, press [PLAY] during playback to watch the desired screen in pause mode.
■ For slow-motion playback, press the [ ] button in play mode to watch the desired screen in the slow forward playback.
* NOTE: VCR does not support Slow Reverse Playback.
■ If you want to watch a series of screens one by one, (FRAME ADVANCE) press the [▶] button repeatedly in Pause mode. Each time you press this button, the next frame is displayed.
To Adjust Display
This product includes an Automatic Tracking function that adjusts the display automatically for clearer pictures. (During automatic display adjustment, "Adjusting Display" is displayed on the TV screen.)
Manual adjustments can also be used to improve the following:
- poor picture in Playback mode,
- streaks on the upper or lower part of the screen during slow motion playback,
- the picture jitters in pause mode.
Use the [TRACKING + or -] buttons on the remote control to manually adjust the display.
Using advanced features
Play the tape automatically
This feature allows the VCR to automatically start playback when a tape (with it's safety tab removed) is inserted.
1 Press the [SETUP] button to display the SETUP menu.
Move the cursor down to select "FUNCTIONS" with the [▼] button. The FUNCTION menu is displayed.
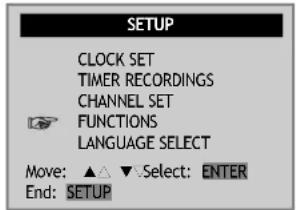
2 Move the cursor to "AutoPlay" and press [ENTER] to select between ON and OFF.
- Select ON if you want a tape with its safety tab removed to start playing automatically when the tape is inserted.
- Select OFF if you do not want a tape with its safety tab removed to start playing automatically.
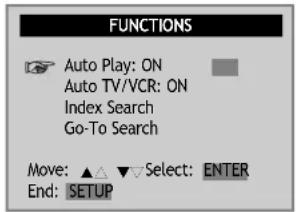
Switch the VCR to TV or VCR mode automatically
This feature controls whether the TV/VCR changes to VCR mode automatically when the VCR is turned on. The purpose of this switch is to avoid interference between an incoming antennal signal and the output of your VCR.
Press the [SETUP] button to display the SETUP menu.
Move the cursor down to "FUNCTIONS" using the [▼] button and press [ENTER] to display the "FUNCTIONS" menu.
2 Move the cursor down to select "Auto TV/VCR" and press [ENTER] to select between ON and OFF.
- Select ON if you want the VCR to switch to VCR mode when the VCR is turned on or when a cassette is inserted. This cuts off other incoming signals that may cause interference.
Note: This is only applicable if you have connected the RF cable to the ANT.IN jack on your TV and RF OUT jacks on your VCR. Your VCR must also be set to channel 3 on your TV.
- Select OFF if you want the VCR to remain in TV mode. This is useful if you watch your VCR on the TV's video input and you don't want your antenna/cable signal interrupted by the VCR.
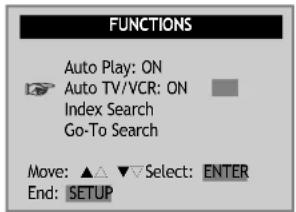
Searching a cassette tape for programs (indexing)
■ When you record a programs, the VCR places an index mark at the start of each recording. To search for an index mark:

- If two
recordings overlap, the index mark for the second program will be erased. Therefore, when you use the index feature to find the second program, the VCR will skip over it.
- If you record multiple programs in one recording session, the VCR will only find the index mark that was placed on the video cassette tape when the recording session began.
1 Press the [SETUP] button to display the SETUP menu.
Select "FUNCTIONS" from the SETUP menu and press [ENTER] to display the "FUNCTIONS" menu.
2 Select "Index Search" from the "FUNCTIONS" menu and press [ENTER] to show the INDEX SEARCH menu.
To search through a certain number of index marks, enter the number of marks you want to search with the number buttons (the entry must be a two digit number).
Press [CLEAR] on the remote control to correct an entry.
or
Press REW to search backward or FF to search forward. The VCR will locate your index mark and begin playback. If you did not enter a specific index number, the VCR will locate the next index mark and begin playback. Press STOP to stop index searching.
FUNCTIONS
![RCA RTD300 - Select "Index Search" from the "FUNCTIONS" menu and press [ENTER] to show the INDEX SEARCH menu. - 1](/content/2026/05/951381/images/810b99c158ccc1043e195f49f693e22491664ffd9806ab5821a0d049afb04a70.jpg)
INDEX SEARCH
Press REW or FF to begin searching
Enter a specific index number
End: SETUP
Searching with the tape counter (go- to search)
■ You can mark a segment of the video cassette with the tape counter that will help you easily locate the segment later.

Some index marks may be missed by the CR :
• A mark too close to your current location on the tape.
- The mark at the beginning of a recorded segment of five minutes or less.
- The first index mark on the tape when you start at the beginning of the tape.
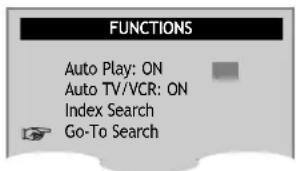
1 Press the [SETUP] button and select "FUNCTIONS" from the SETUP menu. The FUNCTIONS menu is displayed.
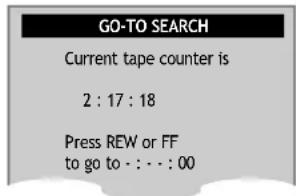
2 Select "Go-To Search" from the "FUNCTIONS menu.
The tape counter is displayed on the screen. Input the tape counter you want to go to and press REW or FF. The VCR will search for the time counter you want.
Marking a tape for zero search
1 Use PLAY, REW, or FF to reach for the point on the tape where you want to mark as 0:00:00.
2 Press the [DISPLAY] button to display the tape counter on the screen.
3 Press [CLEAR] to reset the tape counter to 0:00:00.
4 You can continue to play the tape or perform other functions with the VCR.
Display (O.S.D)
1 Press the [DISPLAY] button once to display the tape counter, clock and status mode on the TV screen.
2 Press the [DISPLAY] button the second time and only the tape counter remains on the screen.
3 Press the[DISPLAY] button the third time and the tape counter also disappears from the screen and to return to the original display.
Daylight-Saving Time
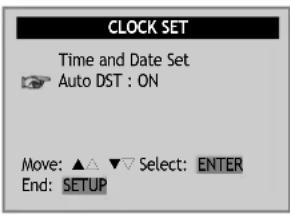
1 Press the [SETUP] button and select "CLOCK SET" from the SETUP menu.
Move the cursor down to "Auto DST" with the[▼] button.
2 Press [ENTER] to switch between ON and OFF.
- Select ON if you want the VCR's clock to automatically adjust to daylight-saving time.
- Select OFF if you do not want the VCR's clock to adjust to daylight-saving time.
SPRING Forward ; Fall Backward
In the Spring, daylight-saving time begins on the first Sunday in April. Because the clock automatically changes from 2:00 AM to 3:00 AM (forward one hour), remember to include the extra hour for timer recording falling within this time frame.
In the Autumn, daylight-saving time ends on the last Sunday in October.
The VCR clock automatically changes from 2:00 AM to 1:00 AM (back one hour).
Therefore, it can affect your recording length.
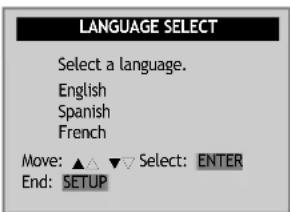
Changing the on-screen menu language
- You may select the language of the VCR's menu: English, Spanish, or French.
1 Press the [SETUP] button and select "LANGUAGE SELECT" from the "SETUP" menu.
The "LANGUAGE SELECT" menu is displayed.
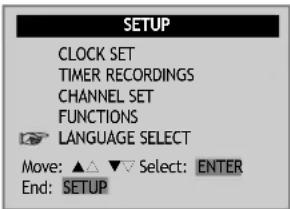
2 Select among English, Spanish or French by pressing the [▲] or [▼] buttons.
Press [ENTER] to confirm your selection.
Hi-Fi Stereo Playback (Hi-Fi Model only)
Playing a tape in Hi-Fi high-quality
- Press the [AUDIO] button repeatedly to select among playback qualities.
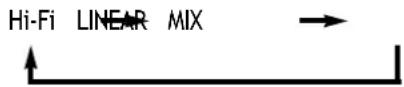
- "Hi-Fi" signal lights up at the top of a screen.
- If the Hi-Fi sound on the tape is not stable (background noise), select LINEAR to reduce them.
Forced Mono
- Programs are broadcasted in mono or stereo sound, or with a SAP.
- Press [AUDIO] repeatedly to select among STEREO, MONO and SAP.
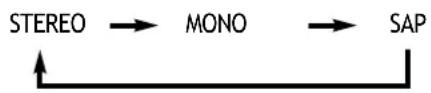
flowchart
graph LR
    A["STEREO"] --> B["MONO"]
    B --> C["SAP"]
- In some cases, the receiving conditions may be poor when receiving stereo or SAP (Secondary Audio Programs) broadcasting. This may causes frequent interference or the volume may become uncontrollable.
- Press [AUDIO] in stereo or SAP mode to select mono sound. To return to stereo sound, either press the [AUDIO] button again or reselect the channel.
Recording Stereo or Secondary Audio Programs (SAP)

- When recording a stereo signal, the recording is in Hi-Fi mode.
- SAP is only available for areas with such station services.

- The following guidelines will help you decide on the best method for recording programs. Choose:
- Select Stereo reception for normal recordings and for recording stereo broadcasting television.
- Select Mono reception if the stereo signal is weak or when there is interference.
- Select SAP reception to record a second audio program. An example of a SAP is a program that is broadcasted in English, but has a Spanish SAP.
- You can only record stereo and SAPs if the program is broadcasted in stereo or has SAP. Consult a television guide for program broadcasting information.
DVD initial setting
LANGUAGE Setup
■ A user can set OSD language, Audio, Subtitle and Disc Menu.

"OSD" stands for Screen Display".

Only those languages ilable on the disc appear as one of language options.
1 In STOP or RESUME STOP mode, press the [SETUP] button to display the DVD "SETUP" menu.
2 Select "Language" from the top menu bar with the [◀] or [▶] buttons.
Press the [▲] or [▼] buttons to select among "Audio" (dialogue language), "Subtitle" (subtitle language), "DVD Menu" (disc menu) and "OSD Language" (on-screen menu language).
press [ENTER] to display language options for the selected category.
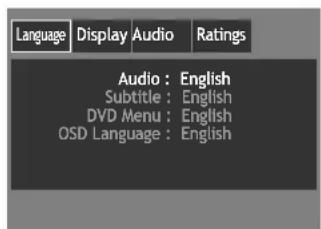
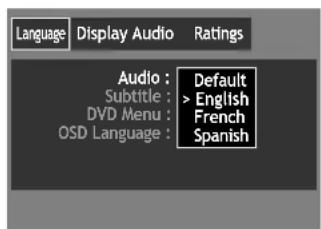
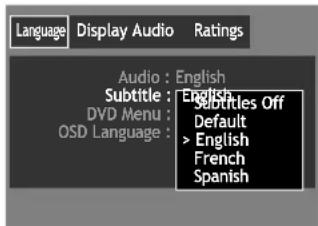
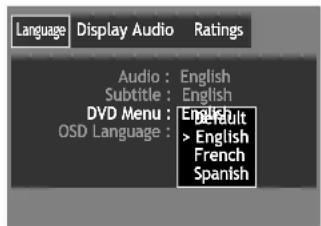
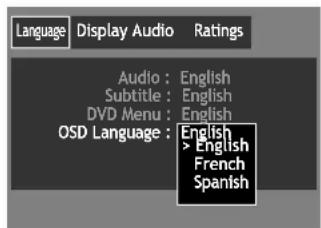
3 Press the [▲] or [▼] buttons to move the cursor to the preferred language and press [ENTER] to confirm.
Note: If the selected language is not available on a disc, the disc's default language will be chosen instead.
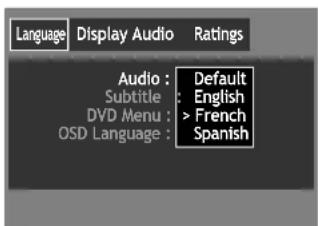
DISPLAY Setup
■ A user can set up a connected TV condition and screen.
1 In STOP or RESUME STOP mode, press the [SETUP] button to display the DVD SETUP menu.
Press the [◀] or [▶] buttons to select "Display" from the top menu bar.
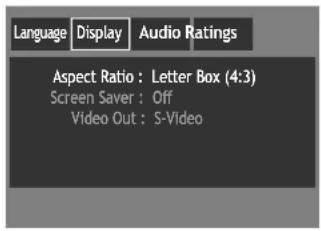
2 Press the [▲] or [▼] buttons to select among Display settings. Press [ENTER] to show the options available for each display setting.
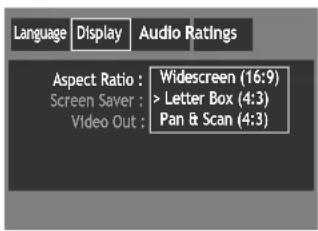
3 Select among display setting options using the [▲] or [▼] buttons. Press [ENTER] to confirm your selection.
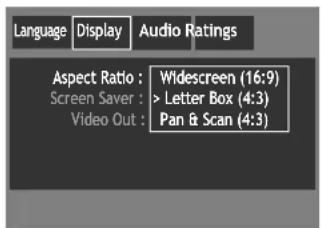
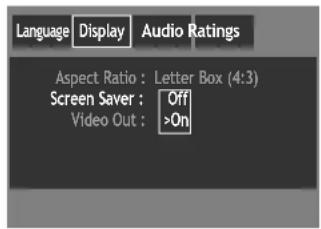
Aspect Ratio:
- Letterbox (4:3) - The movies will be played in their original (height to width ratio) aspect ratio. The entire frame of the movie can be seen on the TV screen but black bars may show on the top and bottom of the screen.
- Widescreen 16:9 - Only choose this setting if your TV is a widescreen TV or Images may appear distorted.
- P an & Scan (4:3) - Only the center of the original screen will be shown on the TV screen.
DVD initial setting
Screen Saver:
- On - If a screen remains on the TV display for a period of time, the TV can be damaged. Set the screen saver to On and the screensaver will start automatically if the unit remains in resume stop, stop or pause status for about 5 minutes. The DVD logo moves continuously on the screen.
- Off - Turns off the screen saver feature.
EN

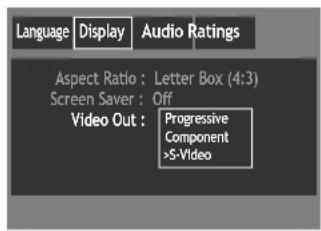
You can also select and deselect progressive scan by pressing and holding the P-SCAN button on the remote control.
Video Out:
- Progressive - Select Progressive to activate progressive scan.
- Component - Select Component you have connected the Component Out jacks.
- S-Video - Select S-Video if you have made a S-Video connection and want to set it as the output format.
AUDIO Setup
■ Audio settings can be adjusted to match the speakers connected with the unit.
1 In STOP or Resume STOP mode, press the [SETUP] button to display the DVD setup menu.
Press the [◀] or [▶] buttons to select "Audio" from the top menu bar.
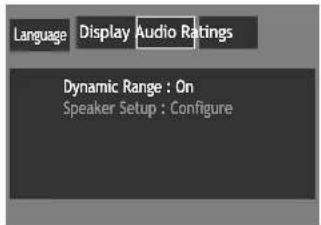
2 To adjust volume range, select "Dynamic Range" from the "Audio" menu using the [▲] or [▼] buttons.
Press [ENTER] to display Dynamic Range options.
- Off: The volume range is the same as what is recorded on the disc (default).
- On : The volume range is compressed to make loud sound softer and soft sound louder.
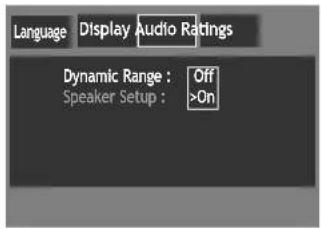
3 Press [▲] or [▼] to make your selection and [ENTER] to confirm.
![RCA RTD300 - Press [▲] or [▼] to make your selection and [ENTER] to confirm. - 1](/content/2026/05/951381/images/d91f9c1286b33ea25f59fd1b70d0c8fbf6a5a2619dedc5a4820df3fe199ef5eb.jpg)
Do not adjust
Speaker Type and speaker Distance settings if you are using the speakers provided with this unit.
Adjust the speaker settings only if you have upgraded your speakers.
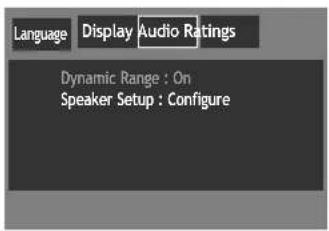
4 To adjust speaker settings to match the DVD/VCR player, select "Speaker Setup" from the "Audio" menu using the [▲] or [▼] button.
Press [ENTER] to display the "Speaker Setup" screen.
DVD initial setting
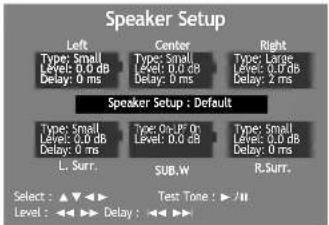
5 To select among the speakers (LEFT, CENTER, RIGHT, L.SURR., SUB.W and R.SURR), press the [▲], [▼], [◀], or [▶] buttons.
EN
6 To adjust the Level setting for the speaker you have selected above, press the [◀◀] or [▶▶] buttons.
To adjust the Delay setting for the speaker you have selected above, press the [◀◀] or [▶▶▶] buttons.
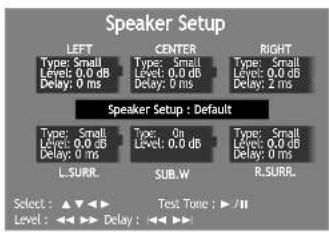
Note: For additional speaker setting information, refer for to Speaker Setup on page 48.
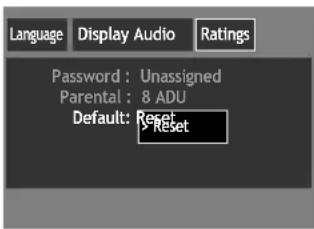
RATINGS Setup
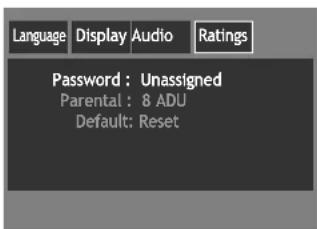
- Parental Control restricts the type of discs that can be played on the DVD/VCR according to their ratings. Discs that do not fall within the rating limits can not be played unless the rating password is entered.
1 In STOP or RESUME STOP mode, press the [SETUP] button to display the DVD Setup menu.
Press the [◀] or [▶] buttons to select "Ratings" from the top menu bar.
The Ratings menu is displayed.
![RCA RTD300 - In STOP or RESUME STOP mode, press the [SETUP] button to display the DVD Setup menu. - 2](/content/2026/05/951381/images/413207d51f0b532d43a53ae2831d1a607422081a709c00436b331e5d7261c3e3.jpg)
The initial password is 3308.
In case you forget newly-input password, you can use 3308 as a password.
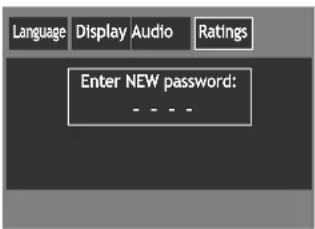
2 To enter a password for ratings setup, press the [▲] or [▼] buttons to select "Password" from the Ratings menu and press [ENTER].
Enter a NEW password screen appears. Enter a 4 digit password with the number buttons on the remote control.
You will be prompted to enter your new password again for confirmation.
![RCA RTD300 - To enter a password for ratings setup, press the [▲] or [▼] buttons to select "Password" from the Ratings menu and press [ENTER]. - 2](/content/2026/05/951381/images/2023d768072b4dab5f339dd9171b19a8d2d1716dc0697c55f426bdfe79ac8e3d.jpg)
"Parental Lock" can only be vated if:
- A password has been set and the unit is in Lock mode. - the disc has a rating assigned.
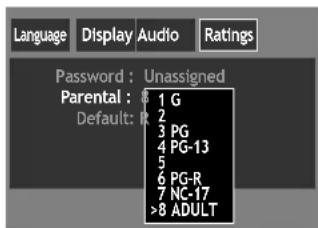
3 To setup rating limits, select "Parental" from the Ratings menu by pressing the [▲] or [▼] buttons.
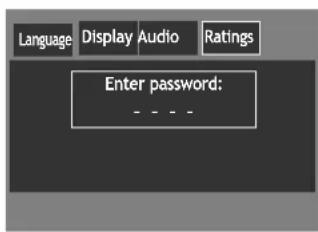
Press the [ENTER] button. You will be asked to enter the password if a password has been assigned.
The rating list appears on the screen.
There are 8 rating levels: from 1 (suitable for general audience) to 8 (for mature audience only).
DVD initial setting
4 Press [▲] or [▼] buttons to move the cursor to the rating level where you find is acceptable. A password is required to play discs with ratings higher then the level selected.
EN
5 To return to DVD settings, select Default from the Ratings menu by pressing the [▲] or [▼] buttons and select Reset.
DVD Playback
DVD initial setting
1 Press the [button] button to turn on the unit. Press the [DVD] button to select DVD mode.
2 Press the [OPEN/CLOSE] button to open the disc tray. Place a disc firmly on the disc tray with the labelled side facing upwards. Insert the disc and press the [OPEN/CLOSE] button to close the tray. The disc tray is closed and after checking the disc's condition, Playback or Stop function starts to operate.
For playback, press the [PLAY/PAUSE] button.
• In the case of DVD,
DVD menus and titles are displayed on the TV screen.
- In the case of S-VCD and VCD2.0
the menus are displayed on TV screen and it is converted into PBC (Playback Back Control) mode.
- In the case of CD, VCD1.1 and mp3, the disc plays in the order of its track numbers.
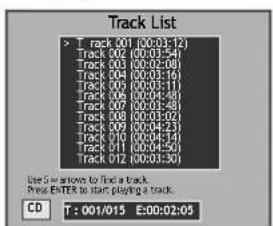
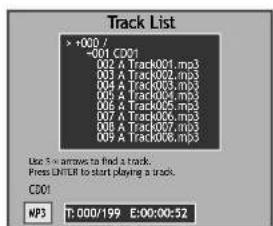
- CD - - mp3 -
4 To stop playback, press the [77] button. To pause playback, press the [PLAY/PAUSE] button in playback mode. Press again to resume playback.
5 Press the [OPEN/CLOSE] button to open and close the disc tray to remove the disc.
DVD initial setting
Various Playback Methods
EN
■ For fast forward or fast reverse playback, press the [▶▶] or [◀◀] button during playback.
- Fast reverse playback may be unavailable for some DVDs.
- Unavailable for mp3 discs.
■ For slow forward or slow reverse playback, press the [◀◀] or [▶▶] buttons in pause mode. You can watch the desired screen in the slow motion.
- Slow reverse playback is not available for video CDs. The Ⓧ indicator appears.
■ For a still picture, press the [PAUSE] button in Playback mode to watch the desired screen in Pause status.
Playing a desired scene
To skip scenes in a disc
DVD, VCD, VCD2.0, CD, MP3
During playback, press the [NEXT ▶▶▶] button to skip to the next chapter (or track).
The screen advances to the next chapter (or track) and starts playback.
During playback, press the [◀◀PREV] button to skip to the previous chapter (or track).
The screen moves to the previous chapter (or track) and starts playback.
Directly moving to a desired title (DVD)
DVD
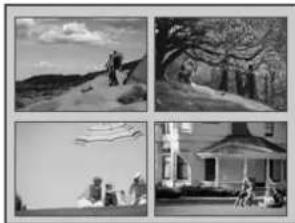
■ Some movie discs may contain multiple titles. If the disc has a movie title menu included on it, the [TITLE] button can be used to select the movie title. Details of operation may differ depending on the disc used.
- Selecting a title may not be available on some DVD discs.
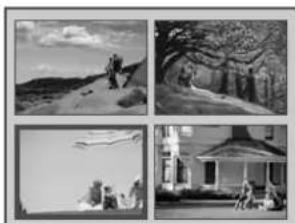
1 Press the [TITLE/PBC] or [MENU] button. A list of the titles on the disc is displayed. For VCD discs, the menu screen will appear only when the disc has PBC function and PBC ON is activated.
natural_image
Four-panel black-and-white photo collage showing rural landscapes, a tree, a small building, and people (no text or symbols)2 Select the desired title with the [▲], [▼], [◀], or [▶] buttons and press [ENTER] to start playing the selected title.
natural_image
Four-panel black-and-white photo collage showing rural landscapes, a building with trees, and outdoor scenes (no visible text or symbols)
Playing a desired scene
Playing a programmed order
DVD, VCD, CD
EN
1
In stop mode, press the [PROGRAM] button.
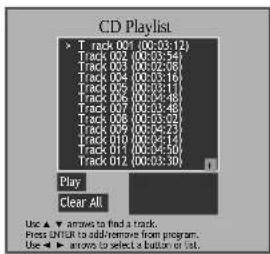
The CD Playlist screen appears. Use the [▲] or [▼] buttons to move the cursor to the track you want to add to the playlist.
Press the [ENTER] button to add it to the Playlist. The track will be displayed on the bottom right box.
Press the [◀] or [▶] buttons to select "Play" and press [ENTER] to begin program playback.
Press the [◀] or [▶] buttons to select "Clear All" and press [ENTER] to clear CD Playlist.
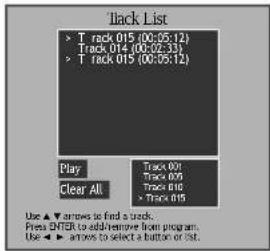
2
After creating the playlist, press the[PLAY] button.
Then, titles and chapters (track) are played in the above-programmed order.
To exit from Program Play mode, press the [SETUP] button in Program menu screen.
Repeating a defined period
DVD, VCD, CD, MP3
Press the [REPEAT] button in playback mode and select the repeat period by using the [ ▲]or [ ▼]buttons.
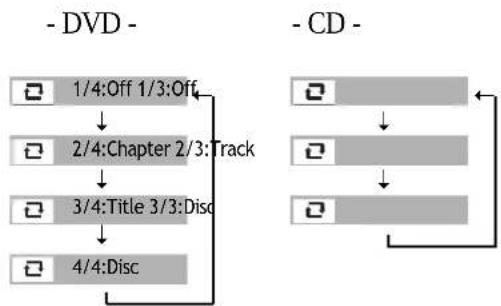
flowchart
graph TD
    A["1/4:Off 1/3:Off"] --> B["2/4:Chapter 2/3:Track"]
    B --> C["3/4:Title 3/3:Disc"]
    C --> D["4/4:Disc"]
    E["DVD -"] --> A
    F["CD -"] --> G[" "]
    G --> H[" "]
    H --> I[" "]
    I --> J[" "]

• Chapter : Plays the current chapter repeatedly.
• Title : Plays the current title repeatedly.
• Track : Plays the current track repeatedly.
• Disc : Plays the current disc repeatedly.
• Random : Tracks on the disc will be playback in random order.
• Off : Cancel repeat playback mode.
Playing a desired scene
Repeating a defined period from A to B
DVD, VCD, CD
■ Repeating a defined segment on the disc from A to B.

A mp3 disc can
not be repeated from A to B.
1 At the point where you want to start the repeat playback, press the [A-B] button.
The repeat AB icon appears on the screen and repeat playback start position (A) is set.
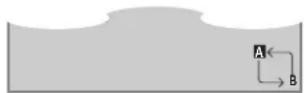
2 At the point where you want to end the repeat playback, press the [A-B] button again.
The repeat playback end position (B) is set and a defined segment from A to B will be played repeatedly.
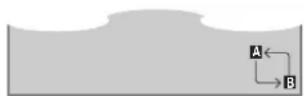
3 To cancel repeat playback mode and return to normal playback, press the [A-B] button.
Searching DVD with a title number, a chapter number or a time
DVD
- Press the [SEARCH] button. The display shows the total number of titles, chapters and the duration of the movie.
1 To search with a title number, select the title window with the [◀] or [▶] buttons.
Enter the title number to be searched using the [NUMBER] buttons or the [▲] or [▼] buttons.
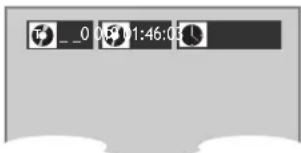
2 To search with a chapter number, select the chapter window with the [◀] or [▶] buttons.
Enter the chapter number to be searched using the [NUMBER] buttons or the [▲] or [▼] buttons.
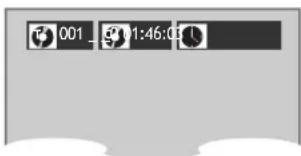
Playing a desired scene
3 To search with a time, select the time window with the [◀] or [▶] buttons.
Enter the time to be searched using the [NUMBER] buttons.
4 When the entry is complete, press the [ENTER] button.
PLAY starts from the selected position.
Searching VCD and CD with a track number or time
VCD, CD
- Press the [SEARCH] button. The display shows the track number and time.
1 To search with a track number, select the track number window with the [◀] or [▶] buttons.
Enter the track number to be searched using the [NUMBER] buttons or the [▲] or [▼] buttons.
If PBC OFF is selected, the screen to the right appears. Enter the track number to be searched using the [NUMBER] buttons.
2 If you want to search with a track time, press the [◀] or [▶] buttons to highlight the track elapse time box.
If PBC OFF is selected, the screen to the right appears. The display shows the current track elapse time and the total disc time. Enter the track time to be searched using the [NUMBER] buttons.
3 After entering the track number or the track time to be searched, press the [ENTER] button.
Playback starts from the selected position.
Confirming the current PLAY mode on screen
Confirming the current DVD disc mode
DVD
1 During playback, press the [DISPLAY] button.
The display shows the current title, current chapter and time elapsed.
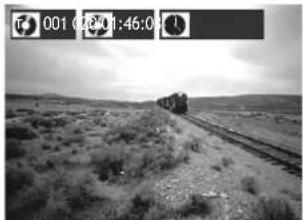
natural_image
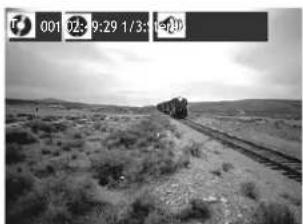
Black-and-white photo of a train traveling through a barren, hilly landscape with sparse vegetation (no visible text or symbols)2 Press the [DISPLAY] button again. The current audio selection is displayed.
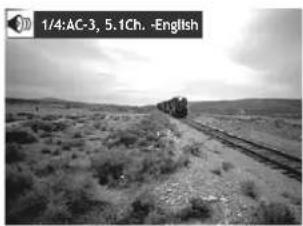
natural_image
Black-and-white landscape photo of a train traveling through a dry, sparse landscape with no visible text or symbols.3 Press the [DISPLAY] button the third time.
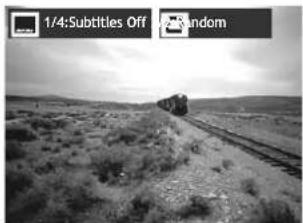
The display shows the subtitle language selected and the repeat playback mode.
To exit from Display mode, press the [DISPLAY] button again.
natural_image
Black-and-white photo of a train traveling through a desert landscape with no visible text or symbols.Confirming the current VCD, CD disc mode
VCD, DVD
During playback, press the [DISPLAY] button.
The display shows the current track number, audio selection, repeat playback mode and the time elapsed. To exit Display mode, press the [DISPLAY] button again.
natural_image
Black-and-white photo of a train traveling through a desert landscape with sparse vegetation (no visible text or symbols)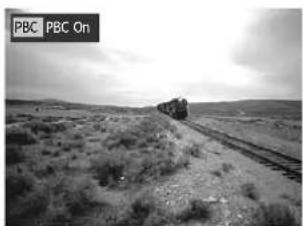
natural_image
Black-and-white photo of a train traveling on a barren, hilly landscape under cloudy sky (no visible text or symbols)Confirming the current PLAY mode on screen
Confirming the current mp3 disc mode
MP3
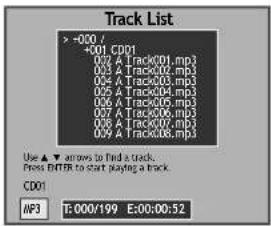
The Track List appears automatically in Playback mode.
The display shows mp3 File information on the disc including mp3 File names and directory lists.
With the [▲] or [▼] buttons, move the cursor to the mp3 music File. To play mp3 File, press the [ENTER] button.
AUDIO language, SUBTITLE language and 3D AUDIO
Selecting an audio language
DVD
■ The user may select an audio language and subtitle language if a disc includes Multiple languages.

Certain discs
may not support audio select or subtitle select.
Press the [AUDIO] button to display audio information available on the DVD disc.
If a DVD disc includes audio information, press the [▲] or [▼] buttons to select the desired audio language. Press the [AUDIO] button to confirm your selection. (English (ENG), French (FRE), Spanish (SPA), etc.).
![RCA RTD300 - Press the [AUDIO] button to display audio information available on the DVD disc. - 1](/content/2026/05/951381/images/1b72adac6929ef11673f27c06678348f629e04a1de684ecaa47e9120f38603c2.jpg)
1/4:AC-3, 5.1Ch. English
Selecting a subtitle language
DVD
Press the [SUBTITLE] button to display subtitle information available on the DVD disc.
If a DVD disc includes subtitle information, press the [▲] or [▼] buttons to select the desired subtitle language. Press the [SUBTITLE] button to confirm your selection. (English (ENG), French (FRE), Spanish (SPA), etc.).
![RCA RTD300 - Press the [SUBTITLE] button to display subtitle information available on the DVD disc. - 1](/content/2026/05/951381/images/eade928dd9ca5522fab8a2f258200dfa16d4cb327f3d4ee2b68ca7bcf316d4b8.jpg)
1/4:Subtitles Off
Selecting Sound Fields
DVD, VCD, CD
■ Sound Fields and Graphics Equalizer can be set to create digital sound effects that resemble sounds in a real environment. Different modes will give you different feel of size and type of listening environment.
To toggle among sound field selections, press the [SOUND FIELD] button repeatedly in playback mode.
DVD mode
DVD (only for 2CH): OFF → PROLOGIC II → MOVIE → MUSIC → MATRIX → OFF...
VCD CD, mp3 : OFF → PROLOGIC II → MOVIE → MUSIC → MATRIX → CLASSIC → HALL → THEATER → OFF...
- That function is ineffective to a DVD disc supporting 5.1 Audio channel & DTS.
VCR mode
OFF→PROLOGIC II→MOVIE→MUSIC→MATRIX→CLASSIC→HALL→THEATER→OFF...
RADIO mode
OFF→PROLOGIC II→MOVIE→MUSIC→MATRIX→CLASSIC→HALL→THEATER→OFF...
ZOOM, Multi Angle and Digest play
Using the zoom function
VCD, DVD
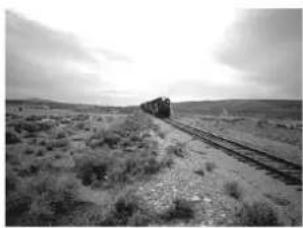
■ A picture can be magnified by about 2, 4 or 8 times the actual size.
In playback or still mode, press the [ZOOM] button repeatedly until the picture magnifies to the desired level.
The picture is magnified 2 times (X2) → 4 times (X4) → 8 times (X8) → OFF.
To view other sections of the current picture, press the [▲], [▼], [◀] or [▶] button.
natural_image
Black-and-white landscape photo of a train traveling through a dry, open landscape under a cloudy sky (no visible text or symbols)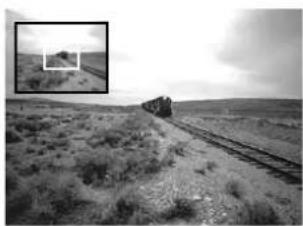
natural_image
Black-and-white landscape photo of a train traveling on a grassy hillside, with an inset showing a distant tree (no text or symbols visible)Different Angle
DVD
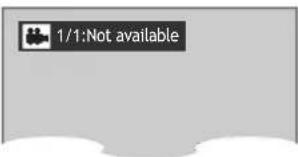
■ If a DVD disc includes multi angle information, a scene can be viewed in multiple angles.
Press the [ANGLE] button to display angle information available on the DVD disc.
If a DVD disc includes multi angle information, press the [▲] or [▼] buttons to select the desired angle. Press the [ANGLE] button to confirm your selection.
The angle screen appears on the display to show the current angle number and the total number of angles available.
If this feature is not available on the DVD disc, "Not available" is displayed.
About mp3 discs
Playing a disc containing mp3 files
mp3
This unit is compatible with mp3 files recorded on CD-R and CD-RW discs.
MP3
1 Turn on your television and select the channel assigned to this DVD player.
2 Press the DVD open [OPEN/CLOSE] button, the disc tray opens.
3 Place a mp3 disc on the disc tray with the label side up.
4 Press the DVD open [OPEN/CLOSE] button, the disc tray closes.
5 Wait while the unit loads the disc and displays the directory structure on the screen.
6 Press the [▲] or [▼] navigation buttons on the remote control to select the file you want to listen to, then press the [ENTER] button to select the file for playback.
■ Play and Pause
Press the [PLAY/PAUSE] button to start playback and pause playback.
■ Search for a track
The [SEARCH] button works on CD audio only.
■ To stop playback
Press the [STOP ■] button.
■ To skip to the next or previous file
- Press the [NEXT ▶▶] button on the remote control during playback to skip to the beginning of the next file.
- Press the [ ◀◀◀ PREV] button on the remote control during playback to skip to the beginning of the previous file.
■ To select a track
Input the track number using the numeric buttons to select and play the desired song.

The ability of this unit to read mp3 discs is dependent on the followings:
• The Bit Rate must be within 64-256 kbps.
- The maximum number of directories should not exceed 32.
- The maximum depth level of directories should not exceed 4.
- File names must incorporate the "mp3" file extension. EXAMPLE: *****. mp3 where each * is a letter or number.
- Use only letters and/or numbers in file names. If special characters are used, the file and/or folder names may not be displayed correctly on the on-screen display.
- The CD-R or CD-RW discs should be written using the 'disc at once' method.
• The disc should use ISO 9660 format.
Displaying menus in a disc
To display menus on a disc
DVD, VCD2.0
■ If a disc includes menus, follow the steps below:
EN
1 Press the [TITLE/PBC] or [MENU] button to display menus on a disc.
- Menus may vary from disc to disc.
- For VCD2.0, select PBC ON mode by pressing the [TITLE/PBC] button.
* This function is not available for CD and VCD1.1.
2 Move the cursor to the desired item with arrow [▲], [▼], [◀] or [▶] buttons and press [ENTER] or [PLAY] to select the item.
Recording
To Record With VCR
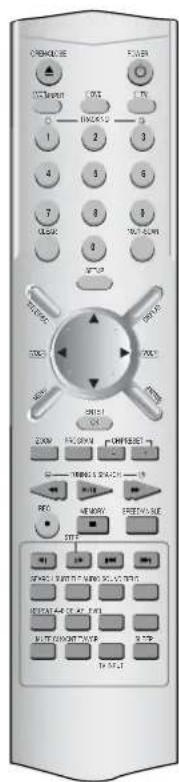
1 Press the [ ] button to turn the unit on.
- Press the [VCR] button on the remote control to select VCR mode.
- Turn on the TV and select Ch 3, or press the [INPUT] button on your TV set to select External Input mode.
2 Insert a recordable tape into the VCR cassette deck.
Insert a tape with its recording tab attached.
3 With the [CHANNEL], [NUMBER] and [INPUT] buttons, select the desired broadcasting channel or external input unit to record.
4 Select the desired speed (SP or SLP) with [SPEED] button.
5 Press the [REC] button to start recording.
6 To pause recording, press the [PAUSE] button.
When the unit remains in pause mode for 5 minutes, the recording is stopped automatically.
7 To stop recording, press the [STOP] button.
To Enjoy Another TV Channel or DVD during recording
1 To watch another TV channel while recording, press the [TV/VCR] button. Change the TV channel with the [CHANNEL] buttons on your TV.
2 To play DVD during video recording, insert a DVD disc.
Load the desired DVD disc into the disc compartment, press the [DVD] button to select DVD OUTPUT mode and press the [PLAY] button.
To Record From DVD To Videotape during DVD playback
EN
1 Press the [DVD] button on the remote control to select DVD mode.
Insert the desired DVD disc.
If the DVD disc has copyright protection, you will not be able to record the DVD.
Insert a recordable tape.
2 Play the DVD disc and press the [REC] button.
DVD starts playback and VCR starts recording.
3 To stop recording, press the [■] button.
Recording automatically stops when DVD playback is finished or the VHS tape has reached the end.
This product incorporates copyright protection technology that is protected by method claims of certain U.S. patents and other intellectual property rights owned by Macrovision Corporation and other rights owners.
Use of this copyright protection technology must be authorized by Macrovision Corporation, and is intended for home and other limited viewing uses only unless otherwise authorized by Macrovision Corporation.
Reverse engineering or disassembly is prohibited.
One Touch timer Recording (OTR)
■ To start recording the current TV program while it is being watched, follow the procedures below. The recording time increases by 30 minutes every time [REC] is pressed.
1 First, follow the steps 1 to 4 in "Recording With VCR".
2 Press the [REC] button repeatedly to select recording options. See the "Recording Times Table" below.
Once ...... continuous recording until you press the STOP button
Twice ...... recording for 30 mins from current time
3 (times)..... recording for 1 hour
: : :
9......recording for 4 hours
10 ......returns to continuous recording (Pressing [REC] once)
3 To stop recording, press and hold the [STOP] button more than 5 seconds.
Timer Recordings
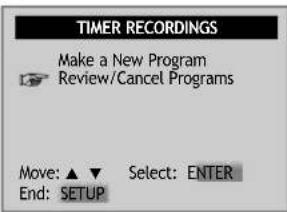
TIMER RECORDINGS
■ Turn on the TV.
■ Make sure that current time is set correctly on the DVD/VCR.
■ Insert a recordable tape with its safety tab in place.
■ Prior to the setting, press the [VCR] button select VCR mode.
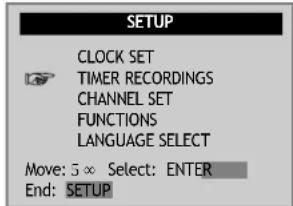
1 Press the [SETUP] button and select "TIMER RECORDINGS" from the SETUP menu.
Move the cursor 📋 to "TIMER RECORDINGS" with [∞] and press the [ENTER] button.
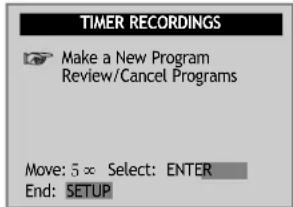
2 Press the [5:] or [∞] buttons to select "Make a New Program".
Press the [ENTER] button to select "Make a new Program".
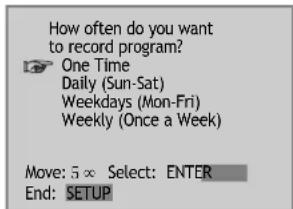
3 Select how often you want the program to be recorded.
Move the cursor 📋 to the desired recording type with the [∞] button and press [ENTER] to select. For Timer Recording method details, see "Various TIMER REC" on page 44.
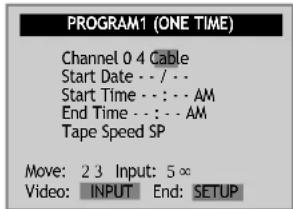
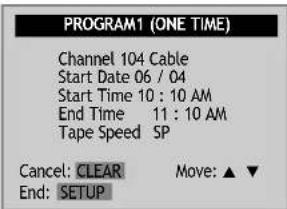
4 Select the broadcasting channel to be recorded with [NUMBER] buttons.
** If Converter Box and video are connected to the Video/Audio terminal, set to "EXTERNAL INPUT" on TIMER REC CH by using the "INPUT" button.
When ■ moves to "Cable", select between "Cable" and "Antenna" with the [∞] or [5:] button
5 Set the date and time for recording. Select the date, start time and end time for recording with the [NUMBER] buttons.
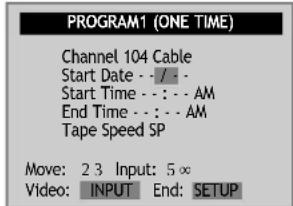
Timer Recordings

If a recordable tape is not inserted in Stop mode under Power ON, "Waiting for TIMER RECORDINGS. Insert a recordable tape" message is displayed on the center of screen for all changes or output conversions incurred during TIMER RECORDINGS SET.
6
Set proper recording speed.
Select SP or SLP with the [▼] or [▲] buttons.
For more information on recording speed, see "Using video cassette" on page 44.
7
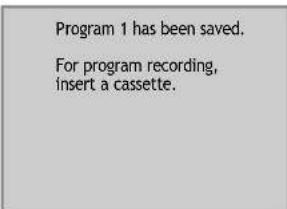
Press the [SETUP] button to save settings.
"Program # has been saved. For program recording, insert a cassette...." message is displayed.
On the reserved time, TIMER RECORDINGS starts to operate.
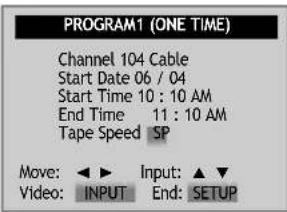
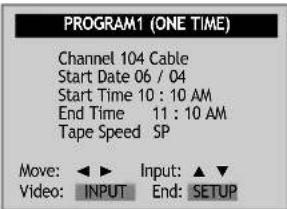
To Confirm or Cancel TIMER RECORDINGS
1
Select "Review/Cancel Programs" from the "TIMER RECORDINGS" menu with the [▼] or [▲] buttons and press [ENTER].
Recording details are displayed.
2
To change timer recording settings, use the the [▼] or [▲] buttons to move to the setting you want to change and re-enter the new details.
To erase, press the [CLEAR] button on the position of the details to delete.
Timer Program Setting
Press the [PROGRAM] button in VCR mode.
You can set the Timer Program.
Before timer program setting, clock must be set to the correct time and video mode must be selected.
Various TIMER RECORDINGS
One Time : The TIMER RECORDINGS setting will only be activated at the specified time once.
Daily : The TIMER RECORDINGS of the desired program will be recorded daily from Sunday to Saturday.
Weekday : TIMER RECORDINGS is activated at the same time from Monday to Friday.
Weekly : TIMER RECORDINGS is activated weekly at the same time and day as specified in the program.
Using video cassettes
Before you play or record on a video cassette tape, be certain to read this information on proper care and use of video cassettes.
Only use video cassettes that bear the VHS mark: VHS.
There are four types of video cassettes: T-60, T-90, T-120, and T-160. The amount you can record on a tape is dependent upon the tape speed at which you record. The table below lists the recording time(hours:minutes) for each tape type according to recording speed.
Tape Type SP Mode (Standard Play) SLP Mode (Extended Play)
T-60 1:00 3:00
T-90 1:30 4:30
T-120 2:00 6:00
T-160 2:40 8:00
Protecting video cassettes from accidental erasure
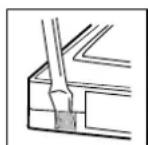
Cassettes have a safety tab to prevent erasure. Break off the safety tab with a screw driver. If you wish to record on a cassette without a safety tab, cover the hole with cellophane tape.
Inserting video cassettes
Firmly insert the cassette into the cassette compartment with the label side up. An inverted cassette cannot be inserted.
Removing video cassettes
Press [EJECT] on the front panel and the VCR will eject the tape. Pull the cassette out gently.

- Audio-visual material may include works of copyright which must not be recorded without authorization of the copyright owner.
- If you insert a video cassette without a safety tab into the unit:After setting the timer recording program," will blink on the display panel in power off mode and the unit will automatically eject the cassette. In power on mode, the unit will playback automatically.
- If you insert a video cassette with a safety tab into the unit: After setting the timer recording program, the unit will enter stand-by mode in power off mode.
- Do not attempt to pull out the video cassette once the unit begins to load the video cassette.
- Do not insert fingers or any foreign objects beyond the door flaps of the cassette compartment; this could lead to injury or equipment damage.
- Do not attempt to insert a video cassette if the unit is unplugged.
Watching and Recording Cable TV
To Watch and Record Cable TV Simultaneously
EN
1 Power on the converter and select the channel to watch or to record. Power on the DVD-video and set the channel of the DVD-video to the converter-connected channel (CH03/04/EXTERNAL INPUT). Power on the TV and set the channel to the video-connected channel (CH03/04/VCR).
2 Simultaneous Recording and Watching The CH selected on the converter is displayed on TV screen. Press the [REC] button on the DVD-Video to record the CH selected on the converter, and press the [REC] button more than 2 times to select One Touch timer Recording (OTR).
TIMER RECORDINGS of Cable TV
1 Reserve VCR. Follow the procedures under "Timer Recording" on page 42. CH3 (or CH4, EXTERNAL INPUT) where the converter-connected channel is set should be entered as the video channel. Enter the date and time of the cable program for TIMER RECORDINGS.
2 Adjust Converter. Set converter to the cable TV channel to be recorded. For example, to record CH48, select CH48 with the CONVERTER CHANNEL SELECT buttons. If TIMER RECORDING is set to record converter channel, it is available of reservation.
3 Complete Reservation. When the converter is turned on, video powers on automatically and starts recording at the reserved time. ** It is not possible to watch one cable TV program while recording another program simultaneously. (e.g. Record NBC program while watching CNN program). (Owing to mechanical features of converter, it is unavailable of simultaneous reception of two channels.)
Presetting the radio stations
■ 50 preset stations are available for storing FM and AM stations. Before tuning, make sure that you have turned the volume down to its minimum.
1 Press the [FM/AM] button until the FM or AM indicator appears in the display window.
Press the [FM/AM] button repeatedly to select between FM and AM frequencies.
2 Press and hold the [TUNING - or +] buttons for about two seconds until the frequency indication starts to change, then release.
Scanning stops when the DVD Receiver has tuned to a station.
3 Press the [MEMORY] button. A preset number shows on the display.
4 Press the [PRESET - or +] button to select the preset number you want.
5 Press the [MEMORY] button again. The station is stored.
Tune to a station with a weak signal
Press the [TUNING - or +] button repeatedly in step 2 to tune to the station manually.
To clear all the memorized stations
Press and hold the [MEMORY] button for about three seconds. "CLEAR ALL" appears on the display window. Press the [MEMORY] button again and the preset stations will be cleared.
Listening to the radio
■ To set preset radio stations first, see "Presetting radio stations" on the previous page.
EN
1 Press the [FM/AM] button until the AM or FM indicator appears on the display window.
The last received station is tuned in.
2 Press the [PRESET - or +] buttons repeatedly to select the preset station you want.
3 Adjust the volume by rotating the VOLUME knob on the front panel or pressing the [VOL-] or [VOL +] buttons repeatedly until the desired volume level is reached.
To turn off the radio
Press POWER to turn the unit off or select another function mode (DVD, VCR, VIDEO 1 or VIDEO 2).
To listen to non-preset radio stations
- Use manual or automatic tuning in step 2.
- For manual tuning, press the [TUNING - or +] buttons repeatedly.
- For automatic tuning, press and hold the [TUNING - or +] buttons for about two seconds.
Speaker Setup for enjoying the surround sound effect
Surround Sound Audio Components
DTS Digital Surround, Dolby Digital and Dolby Pro Logic technologies can be used to enjoy 3-dimensional sound effects with video image. We recommend you use the following devices.
• Hi-Fi Stereo VCR to play the program sources.
• Large screen TV monitor for a high-quality video image.
- Use the program sources (e.g. LD, DVD, VIDEO TAPE etc.) labeled with DTS Digital Surround ( ) or Dolby Digital Surround ( or ) Dolby Pro Logic Surround.
Manufactured under license from Dolby Laboratories. "Dolby", "Pro Logic", and the double-D symbol are trademarks of Dolby Laboratories. Confidential Unpublished works. Copyright 1992-1997 Dolby Laboratories. All rights reserved.
Manufactured under license from Digital Theater Systems, Inc. US Pat. No. 5,451,942 and other worldwide patents issued and pending. "DTS" and "DTS Digital Surround" are trademarks of Digital Theater Systems, Inc. Copyright 1996, 2000 Digital Theater Systems, Inc. All rights reserved.
Room features affecting sound
If the room is made of concrete and hard materials like wood walls, you will not hear the ultimate surround effects. The walls of the room must have the appropriate absorption factor and be able to "reflect" the sound for the proper effect. If the room has too much sound reflection, try repositioning the furniture. You may also need to hang curtains etc. to absorb more of the sound - experiment with the room's acoustics.
Speaker Setup for enjoying the surround sound effect
Speaker Positioning
EN
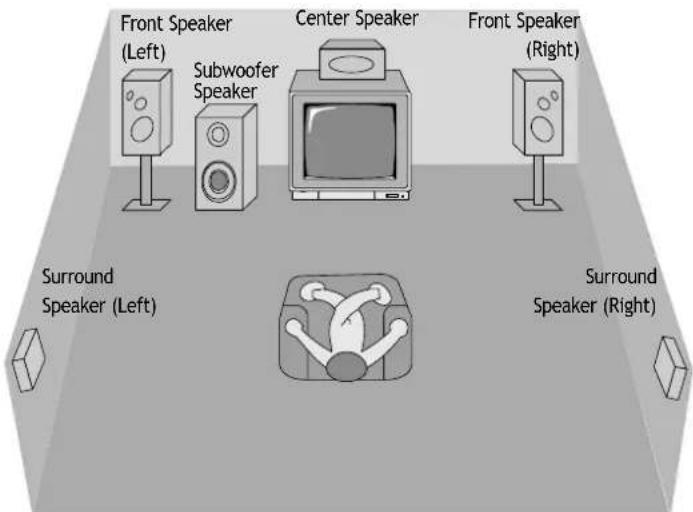
A typical speaker setup uses 6 speakers: 2 front speakers, a center speaker, 2 rear speakers, and a subwoofer. Add a sub-woofer to hear excellent bass sound, DTS digital surround or Dolby Digital surround. Set up a listening position; a couch or chairs, etc. as shown in the speaker positioning example.
- Front speakers
We recommend that the height of the tweeters of the front speakers be at the same height as the listener's ears, to the left and right of the TV. See speaker positioning example for speaker placement.
- Center speaker
Ideally, the center speaker and front speakers would be positioned at the same height. Place the center speaker above or below the television.
• Rear speakers (Surround)
Place left and right surround speakers behind the listening area. These speakers help recreate sound motion and atmosphere; required for surround playback. For optimum sound effects, do not place the rear speakers too far behind the listening position. Install them at or above the height of the listener's ears. It is also
effective to point the rear speakers toward a wall or ceiling, to further dis-perse the sound.
If the room is small and the listeners area is near the rear wall, set the rear speakers opposite each other about 2 - 3 feet higher than the listeners' ears.
- Subwoofer
Place it an appropriate position. (See speaker positioning example.)
Speaker Positioning Example
Notes
- We recommend that you use magnetic shielded speakers for the front left/right speakers and center speaker to prevent video noise from appearing on the TV picture.
- Use speakers in your setup that have similar tonal characteristics.
Delay Time Setting
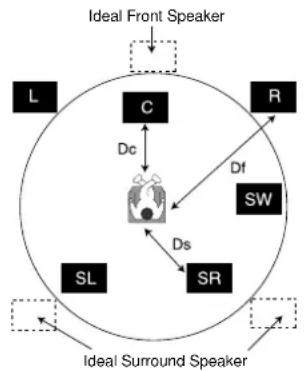
In Dolby Digital or Dolby Pro Logic mode it is assumed that the time it takes the sound from each speaker to reach the listener, is the same. But if the time interval from the center or rear left and right speakers to the
listener is closer than the time interval from the listener to the front
left and right speaker, the sound of center or rear left and right speaker will reach the listener first; instead of the sound of the front speakers. (It is desirable that the sound from the front speakers reach the listener first.)
Dolby Digital and Dolby Pro Logic modes provide speaker time delay adjustments to resolve this problem; you can manually set the delay time of the center or rear left and right speakers so that the sound from all speakers will arrive simultaneously to the listener.
flowchart
graph TD
    A["Ideal Front Speaker"] --> B["C"]
    B --> C["SW"]
    C --> D["SR"]
    D --> E["SL"]
    E --> F["Dc"]
    F --> G["R"]
    G --> H["Sw"]
    H --> I["Df"]
    I --> J["Ds"]
    J --> K["Ideal Surround Speaker"]
    style A fill:#000,stroke:#fff,color:#fff
    style B fill:#000,stroke:#fff,color:#fff
    style C fill:#000,stroke:#fff,color:#fff
    style D fill:#000,stroke:#fff,color:#fff
    style E fill:#000,stroke:#fff,color:#fff
    style F fill:#000,stroke:#fff,color:#fff
    style G fill:#000,stroke:#fff,color:#fff
    style H fill:#000,stroke:#fff,color:#fff
    style I fill:#000,stroke:#fff,color:#fff
    style J fill:#000,stroke:#fff,color:#fff
    style K fill:#000,stroke:#fff,color:#fff
Delay Time Setting
The interval from the speakers to the listener. If the distance from the listener to each speaker is the same in the Dolby Digital and Dolby Pro Logic mode, the delay time of each speaker is as follows.
In Dolby Digital mode
Center delay time : 0ms, Rear delay time: 5ms
In Dolby Pro Logic mode
Center delay time : (no setting), Rear delay time : 15-30ms
If the rear delay time is set in Dolby Digital mode, in the Dolby Pro Logic mode the delay time will be set automatically. The delay time is 1 msec per foot.
If the center and rear speakers are further than the front speakers from the listener, the delay time will be set at minimum.
Surround delay time setting
If the distance of DS is equal to or longer than the DF in the left figure, set the Surround Delay Time as 0ms. Otherwise, change the setting according to the specifications below.
Ex) If the distance from front speakers to the listener is 10 ft. and from rear speakers from the listener is 5 ft., in the Dolby Digital mode the rear delay time is 5 msec.
10 ft. (DF) - 5 ft. (DS) = 5 ft. (B)
5 ft. (B) = 5 ft. / 1 ft. = 5msec
Center delay time setting (Dolby Digital mode only)
If the distance of DF is equal to the distance of DC in the left figure, set the Center Delay Time as 0ms. Otherwise, change the setting according to the specifications below.
Ex) If the distance from the front speakers to the listener is 10 ft. and from the center speaker to the listener is 8 ft., the center delay time is 2msec.
10 ft. (DF) - 8 ft. (DC) = 2 ft. (A)
2 ft. (A) / 1 ft. = 2msec
Setting the delay time in the Dolby Digital and Dolby Pro Logic modes
EN
1 Press the [DELAY] button. The current surround delay time appears in the display window.
2 Press the [DELAY] button to select the desired speaker to set. Each time you press the [DELAY] button, it changes in the following order: FL (Front Left) → CT (Center) → FR (Front Right) → SR (Surround Right) → SL (Surround Left)
3 Press the [▲ or ▼] buttons to change the delay time.
4 Repeat steps 2-3 to adjust the sound Delay of the other channels.
Setting the sound level
Setting the sound level of the desired channel

To adjust the
volume of all the speakers at one time, use the VOLUME control.
1 Press the [LEVEL] button. The LEVEL indicator appears on the display.
2 Press the [LEVEL] button to select the desired speaker to set. Each time you press the [LEVEL] button, it changes in the following order; FL (Front Left) → CT (Center) → FR (Front Right) → SR (Surround Right) → SL (Surround Left) → WF (Subwoofer)
3 Press the [▲/or ▼] buttons to adjust the sound level of the selected channel.
4 Repeat steps 2-3 to adjust the sound level of the other channels.
Setting the Balance between each channel by using the test tone
In Dolby Digital and Dolby Pro Logic mode use the test tone function to adjust the sound balance of the speakers from the listener's position in DVD initial setup mode. (Refer to "Audio Setup" on page 24)
1 Select test tone mode by pressing the [TEST TONE] button.
A short (hiss) noise can be heard in the speakers one by one for 2 seconds in the following order; FL (Front Left) → C (Center) → FR (Front Right) → SL (Surround Left) → SW (Subwoofer) → SR (Surround Right)
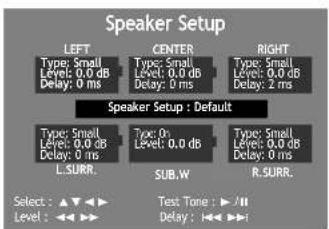
2 Adjust the sound level the same way as described in "Setting the sound level of the desired channel" above, so that all the speaker's sound level is same from the listener's position.
If you adjust the sound level when operating the test tone, it will be paused in the current speaker channel.
About DVD
playable Disc
• DVD, Video CD (Version 1.1, 2.0), S-VCD and Audio CD
| Disc type Playable Restriction | ||
| DVD Possible Region number 1 or Region number All | ||
| Video CD Possible Version 1.0/1.1/2.0, SVCD/CVD | ||
| CD Possible PCM | ||
| CD-G Possible Only Audio playback | ||
| CD-ROM Possible mp3 File | ||
| CD-R Possible Video-CD/CD/CD-ROM (mp3 File) | ||
| CD-RW Possible Video-CD/CD/CD-ROM (mp3 File) | ||
| DVD-R Possible DVD Video | ||
| DVD-RW Possible DVD Video | ||
| DVD+RW Possible DVD Video | ||
| DVD-ROM | Impossible | |
| DVD-RAM | Impossible | |
| Photo CD | Impossible | |
REGION MANAGEMENT INFORMATION
This unit is designed and manufactured to respond to the Region Management information that is recorded on a DVD disc. The region number of this player is "1". If the region number described on the DVD discs does not correspond to the Region number of this player, the player will not play this disc. This player will play DVD discs made for "ALL" regions. Therefore, this player will play DVD discs marked with labels containing the region number "1" or "ALL".

(Region 1) (Region ALL)

Terms related with DVD
DVD A DVD (abbreviation of Digital Versatile Disc or Digital Video Disc) can include 135 minutes of video information. And for audio, it can hold up to 8 kinds of languages and 32 kinds of subtitle languages. By using MPEG-2 video compression and digital 3D surround sound, DVD realizes high-defined screen and quality sound like a movie theater.
CDDA A CDDA (abbreviation of Compact disc digital audio) is a music disc that is currently used.
mp3 Audio compression format that enables audio files to be stored and transferred on a computer with a relatively small file size. It enables you to enjoy CD quality music. (Short for MPEG-1 Layer 3)
PBC This is recorded on a Video CD 2.0, Video CD 3.0, SVCD and CVD. The scenes or information to be viewed (or listened to) can be selected interactively with the TV monitor by looking at the menu shown on the TV monitor. It stands for PlayBack Control.
| CHAPTER | It means the information recorded in a DVD. A title in a DVD is divided into many tracks, of which a track is called as a chapter. A certain scene of a screen can be quickly searched with the chapter number. |
| TITLE | It means the information recorded in a DVD. A DVD can be divided into many titles. |
| TRACK | It means the information recorded in a video CD and audio CD. A disc consists of many a track, for which a user can search a certain position. |
| dts | Digital Theatre System is a 5.1 -channel surround sound system, which is widely used in movie theatres around the world. It enables the bit rate to be increased to provide good sound quality. "DTS" and "DTS Digital Out" are trademarks of Digital Theater Systems, Inc. |
| Multi Angle | Some DVD discs contain the various scenes that have been simultaneously shot from a number of different angles. |
| PCM | Linear PCM is a signal-recording format used in a CD, while CD is recorded in 44.1kHz/16bit, a DVD is recorded in 48KHz/16bit up to 96KHz/24bit. |
| Dolby Digital | Dolby Digital enables the delivery of mono through 5.1-channel audio at data rates from 32 kbps to 640 kbps, thus offering flexibility and economical performance as well as uncompromised sound quality. |
| Bitstream | Digital audio data that is decoded into an analog signal for subsequent output to speakers. |
| Lt/Rt It indicates L/R of Dolby Digital 2CH Downmix output. | |
| Downmix | DOWNMIX is reproducing the proper audio when audio format recorded on a disc differs from the output audio channel configuration. For example, with just one stereo speaker system you can hear full 5.1 channel audio. |
| S-VIDEO | The S-VIDEO output separates the color (C) and luminance (Y) signals before transmitting them to the TV set in order to achieve a sharper picture. So this must be selected from the menu to enable the S-VIDEO output to function. |
| COMPONENT | It is called color difference signal and is a technology to divide and transmit Luminance (Y) signal B-Y (Pb) and R-Y (Pr) color difference (progressive scan) signal. This technology supplies clearer and more vivid picture than composite video type. |
Handling Disc
- T o keep a disc clean condition, please do not touch a side containing play information.
- Do not attach a bit of paper or sticky tape on it.
- Do not expose a disc to a direct sunlight or electric heating systems.
• After using it, please keep a disc in a case.

Cleaning Disc
- Before using it, please rub it from center toward outside with clean clothes.
- Do not use any type of solvent such as thinner, benzol (benzene), commercial cleaning goods or antistatic sprays.
Basic information about VCR and Videotape
Terms related with VCR
AFT Automatic fine tuning, a circuit that automatically adjusts TV reception to optimum condition. CABLE Cable television.
Index Search A feature of this VCR that automatically records an index each time recording begins. It helps you locate a particular segment of the tape quickly and easily.
SLP Super Long Play, an intermediate tape recording speed that combines most of the picture/audio quality obtainable at the standard recording speed with some of the tape economy of Extended Play.
OSD On-screen display of information pertinent to the features of the VCR.
OTR One-touch recording, a feature that allows you to record the program you're watching by pressing the REC key. Each press of the key increases the recording time by 30 minutes, up to four hours.
RF Radio frequency, the composite audio/video signal supplied to a TV receiver (or other video component) by an antenna or cable system.
Safety tab The plastic tab at the back of a video tape cassette which, when removed, prevents accidental erasure of a recording.
SP Standard play, the recording speed to use when the best picture quality is of prime importance (and when total recording time is not).
What is dew condensation symptom?
- If a VCR is moved from a cool place to a warm and damp place or a place facing a direct cool wind from air-conditioner...and others, temperature varies sharply, which makes dew on head drums of VCR.
If dew condensation occurs,
1 First, turn it on for one or two hours before using it.
2 Do not use it because it may develop troubles of a VCR or videotape.
How to use a head cleaner
- In case of a old or contaminated videotape, screen may not be clean from the contamination of VCR heads. Please remove contaminants using a head-cleaner like below order.
1 Insert a head-cleaner into VCR.
2 P press [PLAY] for 5 seconds, and then press [FF] for about 10 seconds.

3 Eject a head-cleaner from VCR.
- If the screen is not clean yet, please repeat the above 2 or 3 times more.
- A head-cleaner is not for sale. Please ask it for the nearest agent.
- In case a user ask the removal of contaminants of us, the user should pay extra charges.
Troubleshooting Tips (DVD)
Symptom Checks
| The player does not play. | > Check the DVD's region code matches that of the unit. Region code 1 or All.> The disc is inserted with the label side facing upwards.> If it is a CD-ROM for PC or DVD-ROM, it does not work. |
| No sound comes through. | > Sound is mute in "Slow-motion" playback or during "PAUSE" mode.(There is no sound in abnormal speed play)> Make sure all cables are securely inserted into the appropriate jacks.> Check the operative condition of theTV or amplifier.> From the SETUP menu, check the "AUDIO" items. |
| A disc is playing but screen does not appear or poor screen appears. | > Make sure the TV is turned on.> Make sure connections are made correctly.> The unit may be in "PAUSE" mode.> A disc is contaminated or may be damaged. |
| Sound is irregular. | > Check the connection with Dolby Digital amplifier.> Make sure all cables are securely inserted into the appropriate jacks.> Some contaminants may be in the connection terminal. |
| R emote control does not work. | > Check the distance between the remote control and the unit.> Remove any obstacles between the unit and the remote.> Battery may be weak or exhausted.> Make sure you have selected the correct mode. e.g. when you operate DVD, press the [DVD] button to select DVD mode.> Unplug the power plug and plug it in again. |
| Dolby Digital sound does not work. | > Dolby Digital sound can only work with Dolby Digital amplifier.> Check for a "Dolby Digital " mark on your DVD.> Check to make sure connection is correct. |
| [AUDIO] or [SUBTITLE] button does not work. | > The DVD disc does not include language information. |
| [ANGLE] button does not work while a DVD is playing. | > "ANGLE" only works if the DVDs disc contains multi angle scenes Not all scenes have multiple angles. |
| "MENU" does not appear while a DVD is playing. | > Check the distance between the remote control and the unit.> Remove any obstacles between the unit and the remote.> Please check if the battery in the remote control is exhausted.> The DVD may not contain menu information. |
| Screen is unstable or appears only in black and white. (or Subtitle shakes) | > The disc may be contaminated or may be damaged.> If you playback a DVD disc of PAL system whose region code is "ALL", the playback screen may shake. |
| mp3 (CD-R) file name appears with strange letters. | > The unit only display mp3 file names in Alphabets (A-Z, a-z), numbers (0-9), special symbols on the keyboard (-, 1, @, #, $....) and has a maximum of 10 letters.> The letters except above case will be displayed like "----". |
| Any mp3 (CD-R) file isn't displayed. | > If the surface of the disk is damaged, the file display and playback may be impossible. |
Troubleshooting Tips (VCR)
Symptom Checks
| • " P ower On" does not work. | ▸ Make sure the power plug is plugged into an electrical outlet. |
| • It does not work even in "Power On" mode. | ▸ Make sure a videotape is inserted.▸ Try unplugging the power plug and plugging it back in again. |
| • A videotape is not inputted in. | ▸ Make sure the power plug is plugged into an electrical outlet.▸ Make sure a videotape is inserted.▸ Make sure the videotape is inserted in correctly (the side with the transparent window should be facing upwards)▸ Have you inserted a videotape again just after the tape was ejected?Try it again after fully ejecting it.▸ When a videotape is forced to be ejected, the tape may not be inserted. In this case, pull out an outlet, and then push the tape smoothly. |
| • The videotape is ejected after it is inserted. | ▸ A safe mode to protect the videotape is operated automatically. Pull out the tape and insert it again. |
| • A videotape can not be ejected. | ▸ If the product has been in use for a long time, a videotape may not be ejected because the film might be stretched. In this case, pull out the power plug for about 10minutes and then press the [▲] button. |
| • A channel on video and a play screen does not appear. | ▸ Check your antenna's connection.▸ TV channel should be fixed on video channel (3 or 4).▸ Check to see if your antenna signal is weak. If it is, connect a frequency amplifier to the device.▸ Press the[TV/VCR] button and "VCR" is displayed on the display panel. |
| • Noise (screen noise) appears on screen. | ▸ While in no use of VCR, was it turned on?▸ Are you watching another channel while recording?▸ Select TV by pressing the [TV/VCR] button on remote control. |
| • Noise appears on screen after recording. | ▸ Some noise or blot may appear at the beginning of the videotape or in resume "PAUSE"mode, which are not breakdown. |
| • There is noise during playback. | ▸ Press [TRACKING + / -] for better screen. Videotape may be poor so try another one. |
| • Sound and screen are irregular.• There is sound but screen does not appear.• Screen is irregular and stripes appears.• The "Screen Error" message is displayed on the screen. | ▸ Use a head-cleaner to clean VCR heads. VCR heads may be contaminated. |
| • While recording and playing, the top of screen extremely waves. | ▸ VCR signals are not stable like TV signals, the screen may be unstable or curved while playing. To fix this problem, use horizontal adjustment. |
| • A screen is not clear. | ▸ If the videotape is recorded on another product or old one, streaks may appear on the screen.▸ Try to adjust the screen with the [TRACKING+/-] buttons.▸ Try to use a head-cleaner. |
| • The screen is unstable in pause mode or the screen is no clear in slow motion playback. | ▸ Try to use a head-cleaner.▸ Try to adjust the screen with the [TRACKING+/-] buttons. |
Troubleshooting Tips (VCR)
Symptom Checks
| • Can not record a TV program. | ▸ Check whether a channel is fixed on video. If not, you have to turn it into "TV" by pressing the [VCR INPUT] button.▸ Check the timer recording information to make sure it is correct.▸ Make sure RF cables inputted antenna connection is correctly.▸ Does a CH number selected in display section appear?▸ Make sure the safety tab on the tape is not broken. (If it is, use scotch-tape to tape it)▸ Check whether the screen is displayed in VCR Only Channel. Press the [VCR INPUT] button on the remote control to adjust "General Broadcast" condition.▸ Make sure the RF cable is connected to the "ANT.IN" terminal. |
| • Once [REC] is pressed, the videotape is ejected automatically. | ▸ Make sure the clock is right.▸ Make sure the timer recording info is right.▸ Make sure the safety tab on the tape is not broken. (If it is, use scotch-tape to tape it) |
| • Can not record Cable TV with timer reording. | ▸ Make sure the cable data output code connection is correct.▸ Were a converter manufacturer setup and output channel right?▸ Did you enter a password? (Please cancel it.)▸ Make sure the player is turned on. |
| • In spite of pressing [CHANNEL], a channel can not be set. | ▸ You may not memorize channels.▸ Please check your channel setting or press a number button. |
| • While duplicating, screen is not clear and is distorted. | ▸ Some tapes or discs are copyright protected by the manufacturer. These tapes cannot be duplicated in a good condition. |
| • remote control does not work. | ▸ Battery may be weak or exhausted.▸ A receiver of remote control may be different with a sender. |
| • Buttons on remote control do not work. | ▸ If the videotape is positioned at the beginning, "VISS REW" and "REW" do not work.▸ If the videotape is positioned at the end, "FF", "VISS FF", "PLAY" and "REC" does not work.▸ Please check whether another button is pressed. |
| • VISS index search does not work. | ▸ Are you playing a tape that is not recorded in this recorder? (Try to record it with the recorder.)▸ You may have started recording in "REC-PAUSE" mode. Start recording in stop mode only. |
| • Cable broadcasting can not be selected. | ▸ Select "CABLE" not "NETWORK" from the "CHANNEL SETTING". |
Specifications
| Power AC 120V, 60Hz | |
| Consumed electricity 95W (supplementary 4W) | |
| Weight 6.45kg | |
| Dimension (WxHxD) 430mm x 91mm x 370mm | |
| Operative temperature +5°C-35°C | |
| Installation condition Horizontal / Relative humidity under 80% | |
| Received channels VHF: 2-13 CH / UHF: 14-69 CH / Cable: 1-125 | |
| Signal type NTSC COLOR | |
| Antenna Input/output | U/V-mixed: 75Ω unbalanced |
| VIDEO input 1.0 Vp-p unbalanced, RCA JACK | |
| AUDIO input -8.8dBm, RCA JACK | |
| VHF output 3 or 4 CH | |
| Playable tape Very high dense tapes with VHS marks | |
| Playable disc DVD, VIDEO-CD, CD (12mm), CD (8mm), MP3, CD-R, CD-RW | |
| Tape speed SP: 33.35mm/s, SLP: 11.12mm/s | |
| Playtime | SP: 2hrs, SLP: 6hrs (use of T-120 tape) |
| Clock display 12 hrs AM/PM | |
| Time Recording | 8 programs a year |
EN
Care and Maintenance
Disconnect the audio system from the power source before performing any maintenance.
Cleaning
Clean the exterior of the system using a soft dust cloth.
The player
CAUTION! This system operates with a laser. It must be opened by only a qualified technician.
- Never move the player during playback.
- Never put more than one discs on a tray or put a disc slipping out of the guide area.
Handling discs
- Do not touch the signal surfaces.
- Hold discs by the edges, or by one edge and the hole.
- Do not affix labels or adhesive tapes to the label surfaces.
- Do not scratch or damage the label. Discs rotate at high speeds inside the player.
- Do not use damaged (cracked or warped) discs.
Cleaning discs
- Dirty discs can cause poor sound and visual quality. Always keep discs clean by wiping them gently with a soft cloth from the inner edge toward the outer perimeter. Never wipe the disc in a circular motion since circular scratches are likely to occur and could cause noise during playback.
- If a disc becomes dirty, wet a soft cloth in water, wring it out well, wipe the dirt away gently, and then remove any water drops with a dry cloth.
- Do not use record cleaning sprays or antistatic agents on discs. Also, never clean discs with benzene, thinner, or other volatile solvents which may cause damage to disc surface
Disc lens care
- When your disc lens gets dirty it can also cause the system to output poor sound and visual quality. To clean the lens you will need to purchase a disc lens cleaner which can maintain the output sound and visual quality of your system. For instructions on cleaning the disc lens, refer to the ones accompanying the lens cleaner.
Important battery information
- Remove the batteries to avoid leakage if you do not use your remote control for more than one month.
- Discard leaky batteries immediately as leaking batteries may cause skin burns or other personal injuries.
- Dispose of batteries in the proper manner, according to provincial and local regulations.
- Any battery may leak electrolyte if mixed with a different
battery type, if inserted incorrectly, if all batteries are not replaced at the same time, if disposed of in fire, or if an attempt is made to charge a battery not intended to be recharged.
Safety precautions
- Never open the cabinet under any circumstances. Any repairs or internal adjustments should be made only by a trained technician.
- Never operate this product with the cabinet removed.
- Do not touch the player with wet hands. If any liquid enters the player cabinet, take the player to a trained technician for inspection.
- This player uses a laser to read the data on the disc. The laser mechanism corresponds to the cartridge and stylus of a record player. Although this product incorporates a laser pick-up lens, it is completely safe when operated according to directions.
- Discs rotate at high speed inside the player. Do not use damaged, warped, or cracked discs.
- Do not touch the pick-up lens which is located inside the disc compartment. Also, to keep dust from collecting on the pick-up lens do not leave the compartment door open for an extended period of time. If the lens becomes dirty, clean it with a soft brush, or use an air blower brush designed for camera lenses.
- The apparatus shall not be exposed to dripping and splashing.
Headset safety
- Do not play your headset at a high volume. Hearing experts warn against extended high-volume play.
- If you experience a ringing in your ears, reduce volume or discontinue use.
- You should use extreme caution or temporarily discontinue use in potentially hazardous situations.
- Even if your headset is an open-air type designed to let you hear outside sounds, don't turn up the volume so high that you are unable to hear what is around you.
Don't infringe
This product should only be used for the purposes for which it is sold, that is, entertainment, violating no copyright law. Any attempts to use this product for which it is not intended is unlawful and therefore not condoned by Thomson.
The descriptions and characteristics given in this document are given as a general indication and not as a guarantee. In order to provide the highest quality product possible, we reserve the right to make any improvement or modification without prior notice. The English version serves as the final reference on all products and operational details should any discrepancies arise in other languages.
Limited warranty (U.S.)
What your warranty covers:
• Defects in materials or workmanship.
For how long after your purchase:
• One year from date of purchase for labor and parts
- The warranty period for rental units begins with the first rental or 45 days from date of shipment to the rental firm, whichever comes first.
What we will do:
- Pay any Authorized RCA Audio Service Center the labor charges to repair your unit.
- Pay any Authorized RCA Audio Service Center for the new or, at our option, refurbished replacement parts required to repair your unit.
How you get service:
• Take your unit to any Authorized RCA Audio Service Center. To identify your nearest Authorized RCA Audio Service Center, ask your dealer, look in the Yellow Pages, or call 1-800-336-1900.
• Show the Authorized Service Center Representative your evidence of purchase date or first rental.
- Pick up your unit when repairs are completed.
• Proof of purchase in the form of a bill of sale or receipted invoice which is evidence that the product is within the
warranty period must be presented to obtain warranty service. For rental firms, proof of first rental is also required.
What your warranty does not cover:
- Customer instruction. (Your Owner's Manual describes how to install, adjust, and operate your unit. Any additional information should be obtained from your dealer.)
• Installation and related adjustments.
• Signal reception problems not caused by your unit.
• Damage from misuse or neglect. - Cleaning of audio heads.
- Batteries.
- A unit that has been modified or incorporated into other products or is used for institutional or other commercial
purposes.
• A unit purchased or serviced outside the U.S.A.
- Acts of nature, such as but not limited to lightning damage.
Product Registration:
- Please complete and mail the Product Registration Card packed with your product. It will make it easier to contact you should it ever be necessary. The return of the card is not required for warranty coverage.
Limitation of Warranty:
- THE WARRANTY STATED ABOVE IS THE ONLY WARRANTY APPLICABLE TO THIS PRODUCT. ALL OTHER WARRANTIES, EXPRESS OR IMPLIED (INCLUDING ALL IMPLIED WARRANTIES OF
MERCHANTABILITY OR FITNESS FOR A PARTICULAR PURPOSE) ARE HEREBY DISCLAIMED. NO VERBAL OR WRITTEN INFORMATION GIVEN BY THOMSON INC., ITS AGENTS OR EMPLOYEES SHALL CREATE A GUARANTY OR IN ANY WAY INCREASE THE SCOPE OF THIS
WARRANTY.
- REPAIR OR REPLACEMENT AS PROVIDED UNDER THIS WARRANTY IS THE EXCLUSIVE REMEDY OF THE CONSUMER. THOMSON INC. SHALL NOT BE LIABLE FOR INCIDENTAL OR CONSEQUENTIAL DAMAGES RESULTING FROM THE USE OF THIS PRODUCT OR ARISING OUT OF ANY BREACH OF ANY EXPRESS OR IMPLIED WARRANTY ON THIS PRODUCT. THIS DISCLAIMER OF WARRANTIES AND LIMITED WARRANTY ARE GOVERNED BY THE LAWS OF THE STATE OF
INDIANA. EXCEPT TO THE EXTENT PROHIBITED BY APPLICABLE LAW, ANY IMPLIED WARRANTY OF MERCHANTABILITY OR FITNESS FOR A PARTICULAR PURPOSE ON THIS PRODUCT IS LIMITED TO THE APPLICABLE WARRANTY PERIOD SET FORTH ABOVE.
How State Law relates to warranty:
- Some states do not allow the exclusion nor limitation of incidental or consequential damages, or limitations on how long an implied warranty lasts, so the above limitations or exclusions may not apply to you.
- This warranty gives you specific legal rights, and you also may have other rights that vary from state to state.
If you purchased your unit outside the United States:
- This warranty does not apply. Contact your dealer for warranty information.
Service calls which do not involve defective materials or workmanship are not covered by this warranty. Costs of such service calls are the sole responsibility of the purchaser.
Limited warranty (Canada)
What your warranty covers:
• Defects in materials or workmanship.
For how long after your purchase:
• One year from date of purchase for labor and parts
- The warranty period for rental units begins with the first rental or 45 days from date of shipment to the rental firm, whichever comes first.
What we will do:
- Pay any Authorized RCA Audio Service Center the labor charges to repair your unit.
- Pay any Authorized RCA Audio Service Center for the new or, at our option, refurbished replacement parts required to repair your unit.
How you get service:
• Take your unit to any Authorized RCA Audio Service Center. To identify your nearest Authorized RCA Audio Service Center, ask your dealer, look in the Yellow Pages, or call 1-800-336-1900.
• Show the Authorized Service Center Representative your evidence of purchase date or first rental.
- Pick up your unit when repairs are completed.
• Proof of purchase in the form of a bill of sale or receipted invoice which is evidence that the product is within the warranty period must be presented to obtain warranty service. For rental firms, proof of first rental is also required.
What your warranty does not cover:
- Customer instruction. (Your Owner's Manual describes how to install, adjust, and operate your unit. Any additional information should be obtained from your dealer.)
• Installation and related adjustments.
• Signal reception problems not caused by your unit.
• Damage from misuse or neglect.
- Cleaning of audio heads.
- Batteries.
- A unit that has been modified or incorporated into other products or is used for institutional or other commercial purposes.
- A unit purchased or serviced outside Canada.
- Acts of nature, such as but not limited to lightning damage.
Product Registration:
- Please complete and mail the Product Registration Card packed with your product. It will make it easier to contact you should it ever be necessary. The return of the card is not required for warranty coverage.
Limitation of Warranty:
- THE WARRANTY STATED ABOVE IS THE ONLY WARRANTY APPLICABLE TO THIS PRODUCT. NO VERBAL OR WRITTEN INFORMATION GIVEN BY THOMSON MULTIMEDIA LTD., ITS AGENTS OR EMPLOYEES SHALL CREATE A GUARANTY OR IN ANY WAY INCREASE THE SCOPE OF THIS WARRANTY.
- REPAIR OR REPLACEMENT AS PROVIDED UNDER THIS WARRANTY IS THE EXCLUSIVE REMEDY OF THE CONSUMER. THOMSON MULTIMEDIA LTD. SHALL NOT BE LIABLE FOR INCIDENTAL OR CONSEQUENTIAL DAMAGES RESULTING FROM THE USE OF THIS PRODUCT. EXCEPT TO THE EXTENT PROHIBITED BY APPLICABLE PROVINCIAL LAW, ANY IMPLIED WARRANTY OF MERCHANTABILITY OR FITNESS FOR A PARTICULAR PURPOSE ON THIS PRODUCT IS LIMITED TO THE APPLICABLE WARRANTY PERIOD SET FORTH ABOVE.
How Provincial Laws relates to warranty:
- This warranty gives you specific legal rights which are in addition to statutory warranties that may vary from Province to Province.
If you purchased your unit outside Canada:
- This warranty does not apply. Contact your dealer for warranty information.
Service calls which do not involve defective materials or workmanship are not covered by this warranty. Costs of such service calls are the sole responsibility of the purchaser.
- REA
- RTD300
- FCC Information
- Technical Specification
- Electrical current consumption
- IMPORTER
- CAUTION: TO PREVENT ELECTRIC SHOCK, MATCH WIDE BLADE OF PLUG TO WIDE SLOT, FULLY INSERT.
- For Your Records
- Service Information
- Contents
- Product Information
- Installation
- VCR Operation
- DVD Setup
- DVD Operation
- Recording
- Radio Operation
- Speaker Setup
- More Information
- Warranty
- Identification of Controls
- Front panel
- Operation Display Window
- Rear Panel
- Power Cord
- Analog 5.1 Speaker Out Jack
- Connection to Antenna Cable
- AM Antenna Jack
- 66COMPONENT (Progressive) Out Jack (DVD only)
- Subwoofer Pre-Output Jack
- A/V Output Jack
- 99A/V Input 2 Jack
- ; A/V Input 1 Jack
- AAConnection to TV
- BB FM Antenna Jack
- Remote Control
- Child Lock!!! (VCR mode)
- Instructions in using remote control
- Accessories
- Unpacking The Speakers
- Connecting with TV
- Various methods in connecting with TV
- Audio connection
- Video Connection
- FM/AM Antenna connection
- Speaker system connection
- Optional:
- Connecting with Other Equipment
- How to Copy (Edit) Tape from Other Video Equipment
- Output Select
- To Select DVD
- To Select VCR
- To Select Watch Modes or External Input
- Clock Set
- Press the [SETUP] button to view SETUP menu.
- Set the current date and time with the [▲,▼,◀,▶] buttons or the [NUMBER] button.
- When CLOCK SET is complete, press the [SETUP] button.
- Memorizing TV Channels
- To Memorize Channels Automatically
- EN
- Press the [SETUP] button.
- SETUP
- Select "AUTO CHANNEL SEARCH".
- Select "Detect Automatically" with the [▼] button.
- CHANNEL SET
- AUTO CHANNEL SEARCH
- Check the memorized channels.
- To Memorize Channels Manually
- Press the [SETUP] button and select "CHANNEL SET".
- Select and store a channel.
- ADD/REMOVE CHANNELS
- Check the memorized channel.
- To Delete Channels Manually
- Selecting cable or antenna viewing
- To Set Output Channel
- VCR Playback
- Various Playback Methods
- To Adjust Display
- Using advanced features
- Play the tape automatically
- Press the [SETUP] button to display the SETUP menu.
- Move the cursor to "AutoPlay" and press [ENTER] to select between ON and OFF.
- Switch the VCR to TV or VCR mode automatically
- Press the [SETUP] button to display the SETUP menu.
- Move the cursor down to select "Auto TV/VCR" and press [ENTER] to select between ON and OFF.
- Searching a cassette tape for programs (indexing)
- Select "Index Search" from the "FUNCTIONS" menu and press [ENTER] to show the INDEX SEARCH menu.
- Searching with the tape counter (go- to search)
- Marking a tape for zero search
- Display (O.S.D)
- Daylight-Saving Time
- Press the [SETUP] button and select "CLOCK SET" from the SETUP menu.
- Press [ENTER] to switch between ON and OFF.
- SPRING Forward ; Fall Backward
- Changing the on-screen menu language
- Press the [SETUP] button and select "LANGUAGE SELECT" from the "SETUP" menu.
- Select among English, Spanish or French by pressing the [▲] or [▼] buttons.
- Hi-Fi Stereo Playback (Hi-Fi Model only)
- Playing a tape in Hi-Fi high-quality
- Forced Mono
- Recording Stereo or Secondary Audio Programs (SAP)
- DVD initial setting
- LANGUAGE Setup
- DISPLAY Setup
- Aspect Ratio:
- Screen Saver:
- Video Out:
- AUDIO Setup
- In STOP or Resume STOP mode, press the [SETUP] button to display the DVD setup menu.
- To adjust volume range, select "Dynamic Range" from the "Audio" menu using the [▲] or [▼] buttons.
- Press [▲] or [▼] to make your selection and [ENTER] to confirm.
- To adjust speaker settings to match the DVD/VCR player, select "Speaker Setup" from the "Audio" menu using the [▲] or [▼] button.
- RATINGS Setup
- To enter a password for ratings setup, press the [▲] or [▼] buttons to select "Password" from the Ratings menu and press [ENTER].
- To setup rating limits, select "Parental" from the Ratings menu by pressing the [▲] or [▼] buttons.
- DVD Playback
- For playback, press the [PLAY/PAUSE] button.
- Playing a desired scene
- To skip scenes in a disc
- Directly moving to a desired title (DVD)
- Playing a programmed order
- 1
- 2
- Repeating a defined period
- Repeating a defined period from A to B
- Searching DVD with a title number, a chapter number or a time
- Searching VCD and CD with a track number or time
- Confirming the current PLAY mode on screen
- Confirming the current DVD disc mode
- Confirming the current VCD, CD disc mode
- Confirming the current mp3 disc mode
- The Track List appears automatically in Playback mode.
- AUDIO language, SUBTITLE language and 3D AUDIO
- Selecting an audio language
- Press the [AUDIO] button to display audio information available on the DVD disc.
- Selecting a subtitle language
- Press the [SUBTITLE] button to display subtitle information available on the DVD disc.
- Selecting Sound Fields
- ZOOM, Multi Angle and Digest play
- Using the zoom function
- Different Angle
- About mp3 discs
- Playing a disc containing mp3 files
- MP3
- Displaying menus in a disc
- To display menus on a disc
- Press the [TITLE/PBC] or [MENU] button to display menus on a disc.
- Move the cursor to the desired item with arrow [▲], [▼], [◀] or [▶] buttons and press [ENTER] or [PLAY] to select the item.
- To Record With VCR
- Press the [ ] button to turn the unit on.
- Insert a recordable tape into the VCR cassette deck.
- With the [CHANNEL], [NUMBER] and [INPUT] buttons, select the desired broadcasting channel or external input unit to record.
- Select the desired speed (SP or SLP) with [SPEED] button.
- Press the [REC] button to start recording.
- To pause recording, press the [PAUSE] button.
- To stop recording, press the [STOP] button.
- To Enjoy Another TV Channel or DVD during recording
- To Record From DVD To Videotape during DVD playback
- One Touch timer Recording (OTR)
- Timer Recordings
- Press the [SETUP] button and select "TIMER RECORDINGS" from the SETUP menu.
- Press the [5:] or [∞] buttons to select "Make a New Program".
- Select how often you want the program to be recorded.
- Select the broadcasting channel to be recorded with [NUMBER] buttons.
- Set the date and time for recording. Select the date, start time and end time for recording with the [NUMBER] buttons.
- 6
- Set proper recording speed.
- 7
- Press the [SETUP] button to save settings.
- To Confirm or Cancel TIMER RECORDINGS
- Timer Program Setting
- Various TIMER RECORDINGS
- Using video cassettes
- Protecting video cassettes from accidental erasure
- Inserting video cassettes
- Removing video cassettes
- Watching and Recording Cable TV
- To Watch and Record Cable TV Simultaneously
- TIMER RECORDINGS of Cable TV
- Presetting the radio stations
- Tune to a station with a weak signal
- To clear all the memorized stations
- Listening to the radio
- To turn off the radio
- To listen to non-preset radio stations
- Speaker Setup for enjoying the surround sound effect
- Surround Sound Audio Components
- Room features affecting sound
- Speaker Positioning
- - Front speakers
- - Center speaker
- • Rear speakers (Surround)
- - Subwoofer
- Notes
- Delay Time Setting
- In Dolby Digital mode
- In Dolby Pro Logic mode
- Surround delay time setting
- Setting the delay time in the Dolby Digital and Dolby Pro Logic modes
- Setting the sound level
- Setting the sound level of the desired channel
- Setting the Balance between each channel by using the test tone
- About DVD
- playable Disc
- REGION MANAGEMENT INFORMATION
- Terms related with DVD
- Handling Disc
- Cleaning Disc
- Basic information about VCR and Videotape
- Terms related with VCR
- What is dew condensation symptom?
- How to use a head cleaner
- Troubleshooting Tips (DVD)
- Troubleshooting Tips (VCR)
- Specifications
- Care and Maintenance
- Cleaning
- The player
- Handling discs
- Cleaning discs
- Disc lens care
- Important battery information
- Safety precautions
- Headset safety
- Don't infringe
- Limited warranty (U.S.)
- What your warranty covers:
- For how long after your purchase:
- What we will do:
- How you get service:
- What your warranty does not cover:
- purposes.
- Product Registration:
- Limitation of Warranty:
- WARRANTY.
- How State Law relates to warranty:
- If you purchased your unit outside the United States:
- Limited warranty (Canada)
- How Provincial Laws relates to warranty:
- If you purchased your unit outside Canada:
Brand : RCA
Model : RTD300
Category : Home Theater