DX-P7DVD11 - Portable DVD Player Dynex - Free user manual and instructions
Find the device manual for free DX-P7DVD11 Dynex in PDF.


| Product Type | Portable DVD Player |
| Brand | Dynex |
| Model | DX-P7DVD11 |
| Screen Size | 7 inches (diagonal) |
| Display Resolution | 480 x 234 pixels |
| Disc Compatibility | DVD, DVD±R/RW, CD, CD-R/RW |
| Playback Formats | DVD-Video, CD-DA, MP3, JPEG, DivX |
| Power Input | DC 9V-12V, 1.5A |
| Battery Type | Rechargeable lithium-ion (built-in) |
| Battery Life | Up to 3 hours |
| Dimensions (W x D x H) | 200 x 160 x 40 mm (7.9 x 6.3 x 1.6 in) |
| Weight | 1.2 kg (2.6 lb) |
| Video Output | Composite AV (RCA) |
| Audio Output | Stereo headphone jack (3.5 mm), built-in speakers |
| Inputs | AV input (RCA), USB 2.0, SD card slot |
| Region Code | Region 1 (NTSC) |
| Care Instructions | Wipe screen and body with soft, dry cloth; avoid liquids |
| Safety Warnings | Do not disassemble; keep away from moisture and heat sources |
| Included Accessories | Remote control, AC adapter, car adapter, AV cable, user manual |
| Repairability | Not user-serviceable; contact Dynex support for service |
Frequently Asked Questions - DX-P7DVD11 Dynex
User questions about DX-P7DVD11 Dynex
0 question about this device. Answer the ones you know or ask your own.
Ask a new question about this device
Download the instructions for your Portable DVD Player in PDF format for free! Find your manual DX-P7DVD11 - Dynex and take your electronic device back in hand. On this page are published all the documents necessary for the use of your device. DX-P7DVD11 by Dynex.
USER MANUAL DX-P7DVD11 Dynex
7" and 9" Portable DVD Players
DX-P7DVD11 and DX-P9DVD11
DX-P7DVD11 and DX-P9DVD11
Contents
Welcome....3
Important safety instructions ....3
Features 5
Setting up your player . . . . . . . . . . . . . . . . . . . . . . . . . . . . . . . . . . . . . . . . . . . . . . . . . . . 6
Using your player....10
Troubleshooting....14
Maintaining 15
Specifications 16
Legal notices 16
90-day limited warranty .....17
Welcome
Congratulations on your purchase of a high-quality Dynex product. Your DX-P7DVD11 or DX-P9DVD11 represents the state of the art in personal DVD player design and is designed for reliable and trouble-free performance.
Important safety instructions
1 Read these instructions.
2 Keep these instructions.
3 Heed all warnings.
4 Follow all instructions.
5 Do not use this apparatus near water.
6 Clean only with a dry cloth.
7 Do not block any ventilation openings. Install in accordance with the manufacturer's instructions.
8 Do not use near any heat sources such as radiators, heat registers, stoves, or other apparatus (including amplifiers) that produce heat.
9 Protect the power cord from being walked on or pinched particularly at plugs, convenience receptacles, and the point where they exit from the apparatus.
10 Only use attachments/accessories specified by the manufacturer.
11 Unplug this apparatus during lightning storms or when unused for long periods of time.
12 Refer all servicing to qualified service personnel. Servicing is required when the apparatus has been damaged in any way, such as power-supply cord or plug is damaged, liquid has been spilled or objects have fallen into the apparatus, the apparatus has been exposed to rain or moisture, does not operate normally, or has been dropped.
13 To reduce the risk of fire or electric shock, do not expose this device to rain, moisture, dripping, or splashing, and no objects filled with liquids, such as vases, shall be placed on it.
14 The wall plug is the disconnecting device. The plug must remain readily operable.
15 Batteries should not be exposed to excessive heat such as sunshine, fire, or the like.
Caution: Danger of explosion if battery is incorrectly replaced. Replace only with the same or equivalent type.
This unit contains a low-power laser device.
This Class B digital apparatus complies with Canadian ICES-003.


Discs
- This unit can play DVDs and Audio CDs (including CD-R and CD-RW).
- This unit is designed and manufactured to respond to the Region Management Information that is encoded on DVDs. If the region number printed on the DVD does not correspond to the region number of this unit, it cannot play that disc.
• The region number of this unit is 1. - Do not use irregularly shaped discs, such as heart-shaped or star-shaped discs, because they may cause your player to malfunction.
- Do not stick paper, tape, or glue on a disc.
- Do not expose a disc to direct sunlight or heat sources.
- Do not touch the surface of a disc. Handle a disc by its edge.
- Clean a disc by wiping the disc from the center out with a cleaning cloth.
- Remove a disc from your player and store it in its case after playing.
- Some playback operations of discs may be intentionally limited by software producers. Because your player plays discs according to the disc contents the software producers designed, some playback features may not be available. Also refer to the instructions supplied with the discs.

Features
Note: For illustration purposes, the DX-P7DVD11 is shown in all examples. 7 is very similar in all features.
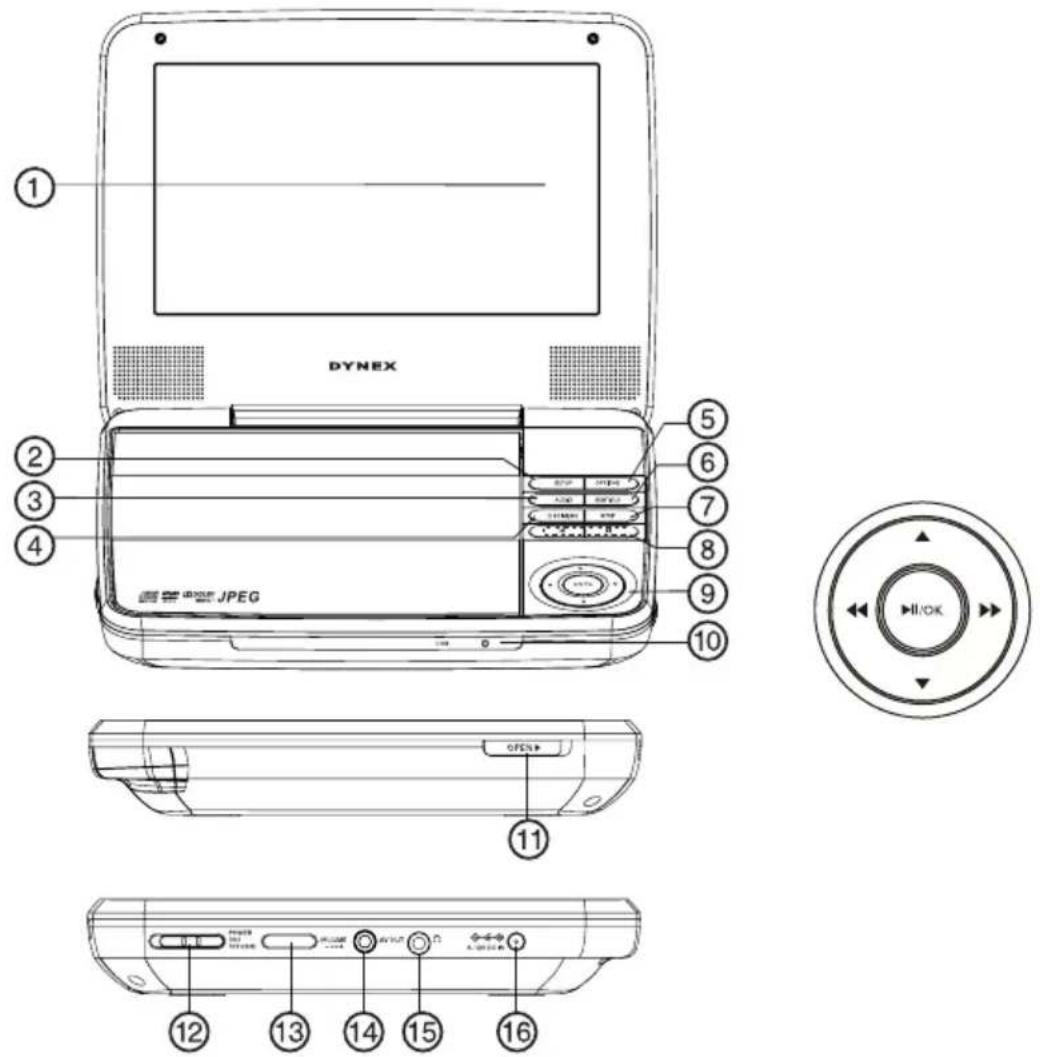
| # | C o m p o n e n t | |
| 1 LCD screen Displays the picture. | ||
| 2 | SETUP button | Press to access or exit the SETUP menu. |
| 3 AUDIO button Press to select the audio language on a DVD. | ||
| 4 | DISC MENU button | Press to access or exit the disc menu on a DVD. |
| 5 | OPTIONS button | Press to access playback options for the current DVD or CD. |
| 6 SUBTITLE button Press to select the DVD subtitle language. | ||
| 7 STOP button Press to stop playback. | ||
| 8 | / / buttons | Press to go to the previous or next title, chapter, or track. |
D
| # Component Description | ||
| 9 | ◀◀, ▶▶, ▼ , ▲ or ▶11/OK | During playback, press the right and left double-arrow keys to fast forward or fast reverse the disc.Press ▶11/OK to play or pause playback.When using the setup menus, press the arrow keys to navigate and the ▶11/OK button to confirm an entry or selection. |
| 10 | CHR/⏻ | Charging and power indicator.Lights red when the battery is charging. Red LED turns off when battery is charged. |
| 11 OPEN switch Slide towards you to open the disc door. | ||
| 12 POWER ON/OFF (CHR) switch | Slide away from you to turn your player on. Slide towards you to turn your player off and charge the battery. | |
| 13 Volume control Rotate to increase or decrease the volume. | ||
| 14 | AV OUT jack | Plug an A/V device, such as a TV, into this jack. |
| 15 | ○ (headphone) jack | Plug headphones into this jack. When headphones are plugged in, sound does not come out of your player's speakers. |
| 16 | DC IN jack | Connect the AC power adapter or the car power adapter to this jack. |
Setting up your player
Package contents
Your box should contain:
- DVD player with 7" (DX-P7DVD11) or 9" (DX-P9DVD11) LCD monitor
• Wall power adapter (AC adapter) - Car adapter
- A / V c a b l e
- Quick Setup Guide
Connecting to AC power
Warning: The AC adaptor is used to disconnect this device from AC power. It should not be obstructed OR should be easily accessible during use. To completely disconnect the power, unplug the AC adaptor from the AC power outlet.
Cautions:
- The AC power adapter included with this unit is for its use only. Do not use it with other equipment.
- When the unit is not going to be used for long time, disconnect the AC power adapter from the wall outlet.
- When the AC power adapter is plugged in, the apparatus is not completely disconnected from the main power supply, even when the power is turned off.
To connect to AC power:
1 Plug one end of the AC power adapter into the DC IN jack on the side of your player.
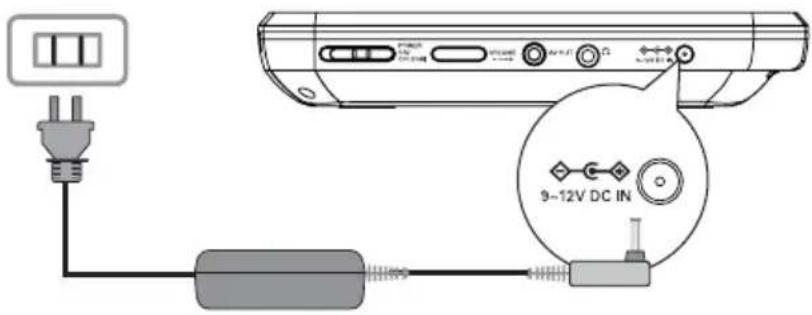
2 Plug the other end of the adapter into an AC wall outlet.
Charging and using the built-in battery
Your DVD player has a built-in, non-replaceable, rechargeable battery. Charge the built-in battery before using it for the first time. Complete charging typically takes approximately 4-5 hours. The charging light goes out when the built-in battery is fully charged.
Warnings:
- Batteries should not be exposed to excessive heat such as sunshine, fire, or the like.
Notes:
- During playback, when the battery low icon 📋 appears on the screen, the built-in battery power is low and your player should be recharged.
- While using the built-in battery, the ambient temperature should be 41^ (5°C) to 95^ (35°C).
- To get the longest service life of the built-in battery, charge at indoor-temperature.
- The built-in battery in this device may present a risk of fire or chemical burn if mistreated. Do not disassemble, heat above 212^ (100°C), or incinerate.
- The unit should not be exposed to excessive heat such as sunshine, fire, or the like.
- When discarding the unit, environmental problems must be considered and local rules or laws governing the disposal of such products must be strictly followed.
To charge and use the built-in battery:
1 Turn off the player. The battery charges only when the player is turned off.
2 Connect the supplied AC power adapter to the DC IN jack on the player, then plug the adapter into an AC power outlet.
When the battery is charging, the battery charge indicator lights red. When the battery is fully charged, the charge light turns off.
3 Unplug the AC power adapter when the battery is fully charged, then you can use your player with the built-in battery.
Connecting to a 12V car power outlet
The 12V car power adapter lets you use your DVD player in vehicles that have a 12V, negative ground electrical system.
Cautions:
- Do not use in 24V vehicles or you could damage your DVD player.
- Use the provided 12V car power adapter only. Use with other car power adapters could damage the unit.
- The 12V car power adapter included with this DVD player is for its use only. Do not use it with other equipment.
- In the interest of traffic safety, do not operate this unit or view videos while driving a vehicle.
- Make sure the unit is securely fastened to prevent it from falling or flying through the air in the event of an accident.
- When the inside of the cigarette lighter socket is dirty with ashes or dust, the plug section may become hot due to poor contact. Be sure to clean the cigarette lighter socket before use. Make sure the ignition key is off when you clean the socket. Clean the socket with a dry cloth.
- After use, disconnect the 12V car power adapter from both the DVD player and the cigarette lighter socket.
To connect to a 12V car power outlet:
1 Plug one end of the car power adapter into the DC IN jack on the side of your player.

2 Plug the other end of the adapter into a 12V car power outlet or car cigarette lighter socket.
3 Turn off your player. The red charge indicator turns on.
Connecting headphones
To connect headphones:
- Plug headphones (not included) into the ⏻ (headphone) jack. When headphones are plugged into the ⏻ (headphone) jack, no sound comes from the built-in speakers.

Connecting a TV or monitor
If your TV has audio/video inputs, you can connect your DVD player to your TV using standard Audio/Video cables so you can watch DVDs or view photos on the TV or monitor.
To connect a TV or monitor:
1 Plug the end of an A/V cable (included) into the AV OUT jack on your player.
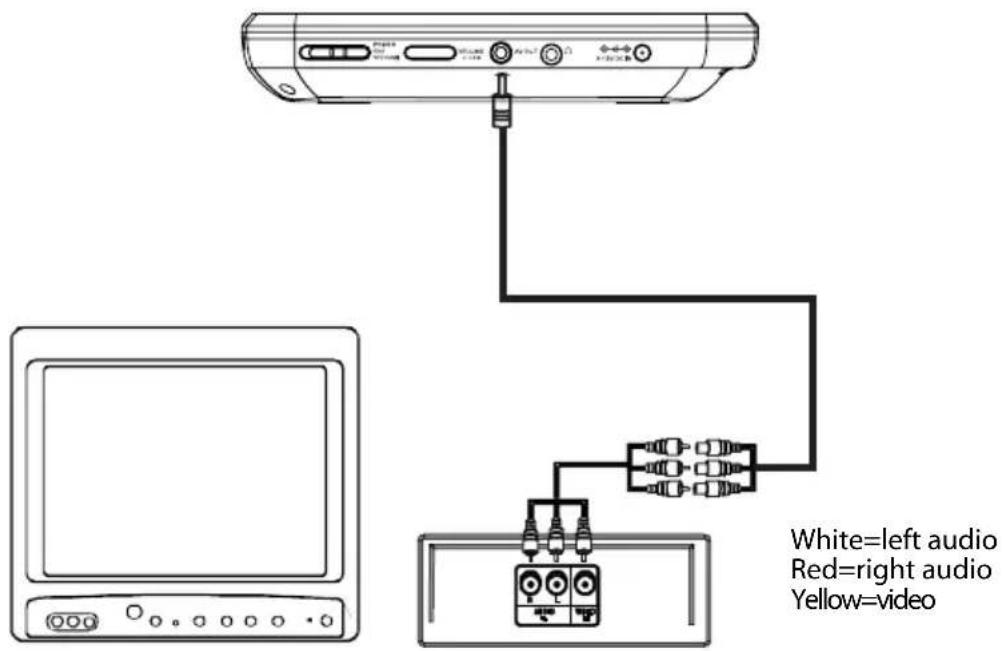
2 Plug the connectors on an A/V cable (not included) into the connectors on the other end of the supplied A/V cable. Make sure that the colors on the connectors match.
3 Plug the other end of the A/V cable into the A/V jacks on the TV or monitor. Match the white connector to the left audio jack (white), the red connector to the right audio jack (red), and the yellow connector to the video jack (yellow).
Using your player
Turning on your player
To turn on your player:
1 Slide the ON/OFF switch on the side of your player to the ON position.
2 The start-up picture (DVD VIDEO) appears on the screen.
3 After use, slide the ON/OFF switch to the OFF position.
Playing a DVD or audio CD
Notes:
- Most DVDs and your player have region codes that help control illegal distribution of DVDs. The region code for your player is 1. You can only play DVDs with a region code of 1 or ALL. The region code for a DVD is printed on the DVD or the DVD packaging.
- This owner's manual explains the basic instructions for operating this unit. Some DVDs are produced in a manner that allows specific or limited operation during playback. Therefore, this unit may not respond to all operating commands. THIS IS NOT A DEFECT. Please refer to the instructions accompanying the specific DVD in question for more information about the options available on that DVD.
- “” may appear on the screen during operation. A “” means the desired operation is not permitted by the unit or disc.
To play a disc:
1 Make sure that your player is connected to power or that the battery is charged.
2 Slide the ON/OFF switch on the side of your player away from you to turn your player on.
3 Slide the OPEN switch on the side of your player towards you to open the disc door. The disc door opens.
4 Place a disc, label side up, in the disc tray, then close the tray. The disc starts playing automatically. If playback does not begin automatically, press ▶11/OK on the player.
Controlling DVD or audio CD playback
To control disc playback:
- Press STOP once to stop playback. Your player remembers where you stopped. If you press ▶11/OK, your player starts playing at the point where you stopped.
- Press STOP twice to stop playback. If you press ▶11/OK, your player starts playing at the beginning of the disc.
Note: When playing an audio CD, press STOP twice to stop playback and return the player to the beginning of the CD.
- During playback, press ▶11/OK to pause playback. Press this button again to resume playback.
- Press to fast-forward on the disc. Each time you press this button, the fast-forward speed changes from 2 to 4 to 8 to 16 to 32 times the normal speed. To resume normal playback, press OK.
- Press to fast-reverse on the disc. Each time you press this button, the fast-reverse speed changes from 2 to 4 to 8 to 16 to 32 times the normal speed. To resume normal playback, press OK.
- Press to go to the next title, chapter, or track.
- Press to go to the previous title, chapter, or track.
Adjusting the volume
To adjust the volume:
- Rotate the volume control on the right side of your player.
Changing the audio
On some DVDs, the sound is recorded in two or more formats. Follow the directions below to select the preferred language and sound system.
To change the audio:
- Press the AUDIO button repeatedly to cycle through the available audio formats. For example, if the current audio format is 1/3, pressing AUDIO advances it to 2/3.
Notes:
- If only one audio format is recorded on the DVD, the number does not change.
- Some DVDs let you change audio selections using the disc menu only. If this is the case, press the MENU button and choose the appropriate language on the disc menu.
Selecting the subtitle
To select the subtitle:
1 While a DVD is playing, press the SUBTITLE button repeatedly to cycle through the available subtitle languages.
2 To turn subtitles off, press the SUBTITLE button repeatedly until "Subtitle Off" is displayed.
Notes:
- Some DVDs are set to display subtitles automatically, and you cannot turn them off even if you set the subtitle function to off.
- During some scenes, the subtitles may not appear immediately after you select your desired scene.
- The number of subtitle languages recorded differs depending on the disc. If only one language is recorded, the language does not change.
- This function can only be used for discs on which subtitles have been recorded in multiple languages.
- Some DVDs allow you to change subtitles using the disc menu only. If this is the case, press the MENU button and choose the appropriate subtitle on the disc menu.
Opening the DVD main menu
To open the DVD menu:
- During playback, press DISC MENU. If the DVD has a main menu, the menu opens. Note: Contents of DVD main menus vary from DVD to DVD. Some DVDs only let you start playback from the main menu.
Setting Play options
To set Play options:
1 During playback, press the OPTIONS button on the top of your player. You can set the following options:
- For DVDs:
• Audio - Subtitle
- Repeat
- Time Disp.
- For audio CDs:
- Repeat Track
- Repeat All
- Repeat at Off
2 Follow the on-screen instructions.
Using the Setup menu
Your player has a Setup menu you can use to adjust settings for your player.
To use the Setup menu:
1 Press SETUP on the top of your player. The General Setup Page opens.

2 Press or to select the menu page you want.
3 Press ▼ or ▲ to select an option, then press ◀◀ or ▶▶ to change the setting.
4 To go to a previous menu, press.
5 Repeat Step 2 through Step 4 to select other menu pages.
Setup menu pages
| Page Options | |
| General Setup PageSelect the following options: | |
| OSD Language Select the on-screen display language. Options include:English, French, or Spanish. | |
| Screen Saver Activate or deactivate the screen saver. | |
| Resume Select whether to start play from the point where it was last stopped. | |
| Angle Mark Select the display angle options. | |
| Video Setup PageSelect the following options: | |
| Brightness Increase or decrease the screen brightness. | |
| Contrast Adjust the white and black areas of the picture. | |
| LCD Display Select the aspect ratio of the picture. You can select:Wide Screen-Wide-screen images are shown on the screen, with a black band on the top and bottom.4:3-Black bars (known as pillar boxes) are placed on the sides of a 4:3 image when displayed on a widescreen panel.Movie Expansion-Displays the video image full-screen on your player. | |
| Password Setup Page Change the password (default is 3308). | |
| Prefer (preference) PageSelect the following options: | |
| Audio Select the audio playback language (if optional languages are available). | |
| Subtitle Select the subtitle language. | |
| Disc Menu Select the disc menu language (if optional languages are available). | |
| Parental | Select the parental control level. The rating you select and all higher ratings are blocked. You can select:KID SAFE(All children)G(General audiences)PG(Parental guidance suggested)PG-13(Parents strongly cautioned)P-GR(Parents very strongly cautioned)R(Restricted)NC-17(No one under 17)ADULT(Adults only) (factory default) |
| Default | Reset all settings back to the factory default. |
Troubleshooting
| Problem Solution | |
| No power • Make sure that the AC power adapter is plugged in and connected.• Make sure that your player is turned on. | |
| No sound or distorted sound. • Adjust the volume.• Make sure that all cables are inserted correctly into the appropriate jacks.• Make sure that your player is not paused.• Make sure that your player is not in fast forward or fast reverse mode.• Make sure that your player is not too hot. Let it cool for 30 minutes, then try it again.• Make sure that the headphones are not plugged in. | |
| Cannot fast-forward or fast-reverse through a movie. | • You cannot fast-forward through opening credits and warning information at the beginning of a movie.• Some DVDs do not allow rapid scanning or skipping of titles or chapters. |
| The ion appears on the screen. | The action you tried cannot be done because:• The DVD software does not allow it.• The DVD does not support the feature (for example the Subtitle feature).• The feature is not available at the current point on the DVD.• You entered a title or chapter number that is out of range. |
| Picture is distorted. • During fast-forwarding or fast-reversing, distortion is normal.• The DVD may be damaged. Try another DVD. | |
| Disc does not play. • Make sure that the disc is inserted with the label side up.• Make sure that the disc is compatible with your player. Your player can play DVDs and audio CDs. | |
| Play starts, then stops immediately. | • Make sure that the region code for a DVD matches the region code for your player. Your player's region code is 1. The DVD's region code is on the DVD or the DVD packaging.• Make sure that the disc is not dirty.• If condensation has formed inside your player, let your player dry out. |
Maintaining
Cleaning your player
Clean the outside of your player with a clean cloth, slightly dampened with water.
Caution: Do not use liquid cleaners or aerosol cleaners because they may damage your player.
Handling discs
• To keep a disc clean, do not touch the play side (non-label side) of the disc.
- Do not attach paper or tape to the disc.


- Keep the disc away from direct sunlight or heat sources.
- Store the disc in a disc case after playback.
Cleaning discs
- Before playback, wipe the disc outwards from the center with a clean cloth.
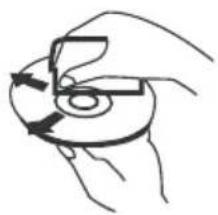
natural_image
Hand holding a CD or DVD disc with arrows indicating rotation (no text or symbols)Specifications
Specifications subject to change without notice.
| Compatible discs DVDs and CDs | |
| Signal system NTSC | |
| LCD DX-P7DVD11 - 7 inches | DX-P9DVD11 - 9 inches |
| Frequency response 20 Hz to 20 kHz | |
| Audio S/N Better than 60 dB | |
| Laser Semiconductor | |
| Wave length 650 nm/795 nm | |
| Power source DC 9 V-12 V | |
| Operating temperature 41° to 95°F (5° to 35°C) | |
| Weight DX-P7DVD11 - 1.54 lbs. (0.7 kg)DX-P9DVD11 - 2.42 lbs. (1.1 kg) | |
| Dimensions (W × D × H) | DX-P7DVD11 - 7.67 x 6.06 x 1.46 inches(195 x 154 x 37 mm)DX-P9DVD11 - 9.45 x 7.01 x 1.857 inches(240 x 178 x 40 mm) |
| Battery | Li-polymer |
Legal notices
FCC Part 15
This device complies with Part 15 of the FCC Rules. Operation of this product is subject to the following two conditions: (1) this device may not cause harmful interference, and (2) this device must accept any interference received, including interference that may cause undesired operation.
This equipment has been tested and found to comply within the limits for a class B digital device, pursuant to Part 15 of the FCC Rules. These limits are designed to provide reasonable protection against harmful interference in a residential installation. This equipment generates, uses, and can radiate radio frequency energy and, if not installed and used in accordance with the instructions, may cause harmful interference to radio communications. However, there is no guarantee that interference will not occur in a particular installation. If this equipment does cause harmful interference to radio or television reception, which can be determined by turning the equipment off and on, the user is encouraged to try to correct the interference by one or more of the following measures:
- Reorient or relocate the receiving antenna.
- Increase the separation between the equipment and receiver.
- Connect the equipment into an outlet on a circuit different from that to which the receiver is connected.
- Consult the dealer or an experienced radio/TV technician for help.
FCC warning
Changes or modifications not expressly approved by the party responsible for compliance with the FCC Rules could void the user's authority to operate this equipment.
90-day limited warranty
Dynex Products ("Dynex") warrants to you, the original purchaser of this new DX-P7DVD11 or DX-P9DVD11 ("Product"), that the Product shall be free of defects in the original manufacture of the material or workmanship for a period of 90 days from the date of your purchase of the Product ("Warranty Period"). This Product must be purchased from an authorized dealer of Dynex brand products and packaged with this warranty statement. This warranty does not cover refurbished Product. If you notify Dynex during the Warranty Period of a defect covered by this warranty that requires service, terms of this warranty apply.
How long does the coverage last?
The Warranty Period lasts for 90 days from the date you purchased the Product. The purchase date is printed on the receipt you received with the product.
What does this warranty cover?
During the Warranty Period, if the original manufacture of the material or workmanship of the Product is determined to be defective by an authorized Dynex repair center or store personnel, Dynex will (at its sole option): (1) repair the Product with new or rebuilt parts; or (2) replace the Product at no charge with new or rebuilt comparable products or parts. Products and parts replaced under this warranty become the property of Dynex and are not returned to you. If service of Products and parts are required after the Warranty Period expires, you must pay all labor and parts charges. This warranty lasts as long as you own your Dynex Product during the Warranty Period. Warranty coverage terminates if you sell or otherwise transfer the Product.
How to obtain warranty service?
If you purchased the Product at a retail store location, take your original receipt and the Product to the store you purchased it from. Make sure that you place the Product in its original packaging or packaging that provides the same amount of protection as the original packaging. If you purchased the Product from an online web site, mail your original receipt and the Product to the address listed on the web site. Make sure that you put the Product in its original packaging or packaging that provides the same amount of protection as the original packaging.
To obtain in-home warranty service for a television with a screen 25 inches or larger, call 1-888-BESTBUY. Call agents will diagnose and correct the issue over the phone or will have an Dynex-approved repair person dispatched to your home.
Where is the warranty valid?
This warranty is valid only to the original purchaser of the Product in the United States, Canada, and Mexico.
What does the warranty not cover?
This warranty does not cover:
- Customer instruction
- Installation
- Setup adjustments
- Cosmetic damage
- Damage due to acts of God, such as lightning strikes
- Accident
- Misuse
- Abuse
- Negligence
- Commercial use
- Modification of any part of the Product
- Plasma display panel damaged by static (non-moving) images applied for lengthy periods (burn-in).
This warranty also does not cover:
- Damage due to incorrect operation or maintenance
- Connection to an incorrect voltage supply
- Attempted repair by anyone other than a facility authorized by Dynex to service the Product
- Products sold as is or with all faults
- Consumables, such as fuses or batteries
- Products where the factory applied serial number has been altered or removed
REPAIR REPLACEMENT AS PROVIDED UNDER THIS WARRANTY IS YOUR EXCLUSIVE REMEDY. DYNEX SHALL NOT BE LIABLE FOR ANY INCIDENTAL OR CONSEQUENTIAL DAMAGES FOR THE BREACH OF ANY EXPRESS OR IMPLIED WARRANTY ON THIS PRODUCT, INCLUDING, BUT NOT LIMITED TO, LOST DATA, LOSS OF USE OF YOUR PRODUCT, LOST BUSINESS OR LOST PROFITS. DYNEX PRODUCTS MAKES NO OTHER EXPRESS WARRANTIES WITH RESPECT TO THE PRODUCT, ALL EXPRESS AND IMPLIED WARRANTIES FOR THE PRODUCT, INCLUDING, BUT NOT LIMITED TO, ANY IMPLIED WARRANTIES OF AND CONDITIONS OF MERCHANTABILITY AND FITNESS FOR A PARTICULAR PURPOSE, ARE LIMITED IN DURATION TO THE WARRANTY PERIOD SET FORTH ABOVE AND NO WARRANTIES, WHETHER EXPRESS OR IMPLIED, WILL APPLY AFTER THE WARRANTY PERIOD. SOME STATES, PROVINCES AND JURISDICTIONS DO NOT ALLOW LIMITATIONS ON HOW LONG AN IMPLIED WARRANTY LASTS, SO THE ABOVE LIMITATION MAY NOT APPLY TO YOU. THIS WARRANTY GIVES YOU SPECIFIC LEGAL RIGHTS, AND YOU MAY ALSO HAVE OTHER RIGHTS, WHICH VARY FROM STATE TO STATE OR PROVINCE TO PROVINCE.
Contact Dynex:
For customer service please call 1-800-305-2204
www.dynexproducts.com
Distributed by Best Buy Purchasing, LLC
7601 Penn Avenue South, Richfield, Minnesota, U.S.A. 55423-3645
© 2011 BBY Solutions, Inc.
All rights reserved. DYNEX is a trademark of BBY Solutions, Inc. Registered in some countries. All other products and brand names are trademarks of their respective owners.
DYNEX™
www.dynexproducts.com (800) 305-2204
© 2011 BBY Solutions, Inc. All rights reserved.
DYNEX is a trademark of BBY Solutions, Inc. Registered in some countries.
All other products and brand names are trademarks of their respective owners.
Distributed by Best Buy Purchasing, LLC
7601 Penn Ave. South, Richfield, MN 55423 U.S.A.
11-0455
ENGLISH
- 7" and 9" Portable DVD Players
- DX-P7DVD11 and DX-P9DVD11
- Contents
- Welcome
- Important safety instructions
- Discs
- Features
- Setting up your player
- Package contents
- Connecting to AC power
- Cautions:
- To connect to AC power:
- Charging and using the built-in battery
- Warnings:
- Notes:
- To charge and use the built-in battery:
- Connecting to a 12V car power outlet
- To connect to a 12V car power outlet:
- Connecting headphones
- To connect headphones:
- Connecting a TV or monitor
- To connect a TV or monitor:
- Using your player
- Turning on your player
- To turn on your player:
- Playing a DVD or audio CD
- To play a disc:
- Controlling DVD or audio CD playback
- To control disc playback:
- Adjusting the volume
- To adjust the volume:
- Changing the audio
- To change the audio:
- Selecting the subtitle
- To select the subtitle:
- Opening the DVD main menu
- To open the DVD menu:
- Setting Play options
- To set Play options:
- Using the Setup menu
- To use the Setup menu:
- Troubleshooting
- Maintaining
- Cleaning your player
- Handling discs
- Cleaning discs
- Specifications
- Legal notices
- FCC Part 15
- FCC warning
- 90-day limited warranty
- How long does the coverage last?
- What does this warranty cover?
- How to obtain warranty service?
- Where is the warranty valid?
- What does the warranty not cover?
- DYNEX™
Brand : Dynex
Model : DX-P7DVD11
Category : Portable DVD Player