
SDVD8739 - DVD player SYLVANIA - Free user manual and instructions
Find the device manual for free SDVD8739 SYLVANIA in PDF.


| Product Type | Portable DVD Player |
| Brand | Sylvania |
| Model | SDVD8739 |
| Screen Size | 7 inches LCD |
| Disc Compatibility | DVD, VCD, CD, MP3, MPEG4, JPEG |
| Signal System | PAL / NTSC |
| Power Supply | DC 9-12V |
| Power Consumption | 10 W |
| Weight (Monitor) | 0.36 kg |
| Weight (DVD Player) | 0.7 kg |
| Dimensions (Monitor) | 212 x 166.5 x 25 mm |
| Dimensions (DVD Player) | 212 x 167 x 40 mm |
| Audio Output | 1.4 Vrms / 10 kOhm |
| Video Output | 1 Vp-p / 75 Ohm |
| Frequency Response | 20 Hz - 20 kHz |
| Audio S/N Ratio | Better than 80 dB |
| Dynamic Range | Better than 85 dB |
| Laser Wavelength | 650 nm / 795 nm |
| Operating Temperature | 0°C to 40°C |
| Accessories Included | Remote Control, AC/DC Adapter, Car Adapter, AV Cable, Earphones, Straps |
| USB / SD Card Support | Yes (SD/MMC, USB) |
| OSD Languages | English, French, German, Italian |
| Parental Control | Yes (default password: 8888) |
| Mounting Options | Headrest straps for car installation |
Frequently Asked Questions - SDVD8739 SYLVANIA
User questions about SDVD8739 SYLVANIA
0 question about this device. Answer the ones you know or ask your own.
Ask a new question about this device
Download the instructions for your DVD player in PDF format for free! Find your manual SDVD8739 - SYLVANIA and take your electronic device back in hand. On this page are published all the documents necessary for the use of your device. SDVD8739 by SYLVANIA.
USER MANUAL SDVD8739 SYLVANIA
natural_image
Two black-framed digital TV stands with a white abstract wave graphic on screen (no text or symbols visible)USER'S MANUAL

Table Of Contents
Safety Precaution 1
Package 3
Main Features 3
Main Unit Controls 4
System Connection 6
The Remote Control 11
Basic operation 13
System Setup 22
Specification 26
Troubleshooting 27
Safety Precaution
Thank you for choosing our portable DVD player.
The unit applies the latest state of art electronics and is designed for use at home, in hotels and in offices etc for relaxation. The compact size makes carrying easier as well as installation. Please read the manual carefully prior to use and keep it well for later consultation.
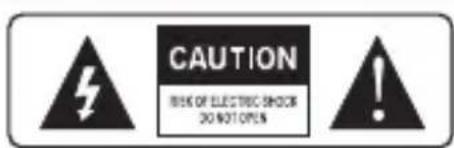
The light flash with arrowhead symbol, within an equilateral triangle, is intended to alert the user to the presence of uninsulated "dangerous voltage" within product's enclosure that may be of sufficient magnitude to constitute a risk of electric shock.

The exclamation point within an equilateral triangle is intended to alert the user to the presence of important operation and servicing instructions in the literature accompanying the appliance.
Warning: To reduce the risk of fire or electric shock, do not expose this apparatus to rain or moisture.
1) Please read the instruction manual carefully and follow all the requirements of safe operation to operate the device.
2) Do not use this unit near water. Do not place over the unit any container with liquid inside.
3) Do not install near any heat sources such as radiators, heat registers, stoves, or other apparatus (including amplifiers) that produce heat.
4) Unplug this unit during lightning storms or when unused for long time.
5) About Cleaning: Unplug the system, use only wet cloth to clean. Do not use liquid detergent or aerosol.
6) Only use accessories specified by the manufacturer.
7) Refer all servicing to qualified service personnel, servicing is required when the unit has been damaged in any way, such as power supply cord or plug is damaged, liquid has been spilled or objects have fallen into the unit, exposed to moisture, does not operate normally. Don't try to repair the machine by yourself because of the danger of high voltage and electric shock.
8) Do not use irregular shaped discs such as heart or star-shaped discs as they may cause the unit to malfunction.
This device complies with Part 15 of the FCC Rules. Operation is subject to the following two conditions: (1) This device may not cause harmful interference, and (2) This device must accept any interference received, including interference that may cause undesired operation.
Warning: Changes or modifications to this unit not expressly approved by the party responsible for compliance could void the user's authority to operate the equipment.
NOTE: This equipment has been tested and found to comply with the limits for a Class B digital device, pursuant to Part 15 of the FCC Rules. These limits are designed to provide reasonable protection against harmful interference in a residential installation. This equipment generates, uses and can radiate radio frequency energy and, if not installed and used in accordance with the instructions, may cause harmful interference to radio communications.
However, there is no guarantee that interference will not occur in a particular installation. If this equipment does cause harmful interference to radio or television reception, which can be determined by turning the equipment off and on, the user is encouraged to try to correct the interference by one or more of the following measures:
Reorient or relocate the receiving antenna.
Increase the separation between the equipment and receiver.
Connect the equipment into an outlet on a circuit different from that to which the receiver is connected.
Consult the dealer or an experienced radio/TV technician for help.
| 7" LCD Monitor & DVD Player | 1 |
| Remote Control with battery | 1 |
| DC+Audio/Video Cable | 1 |
| AC/DC Power Adapter | 1 |
| Cigarette Lighter Adapter | 1 |
| User Manual | 1 |
| Earphone | 2 |
| Mounting Straps | 2 |
Main Features
• High brightness color 7" LCD screen
- Compatible with disc of DVD, VCD, MP3, MPEG4, CD, JPEG, etc.
• Built-in stereo speaker
• Support PAL/NTSC system
- Support Multi-language OSD, speed forward/backward, repeat function
- Zoom in/out function
Main Unit Controls
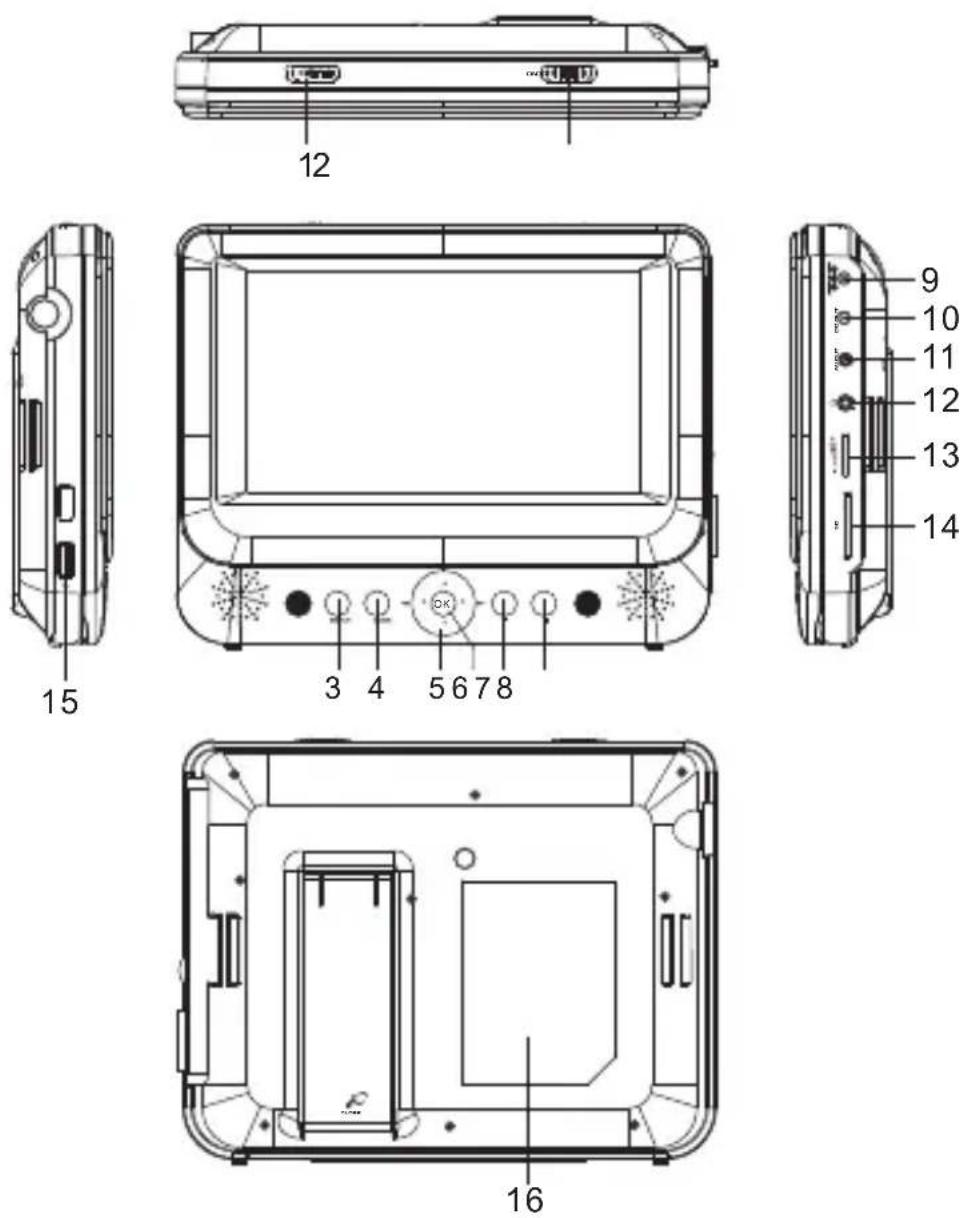
- Open knob
- Power ON/OFF switch
- SETUP button
- MODE button
- ▲▼◀▶
6.OK button (Function same as "ENTER" on Remote control) - Play/Pause
-
STOP button
-
DC IN 9-12V
- DC OUT
- AV OUT
- Earphone jack
- Volume knob
- SD card slot
- USB Port
- Rating Label Position
Monitor View
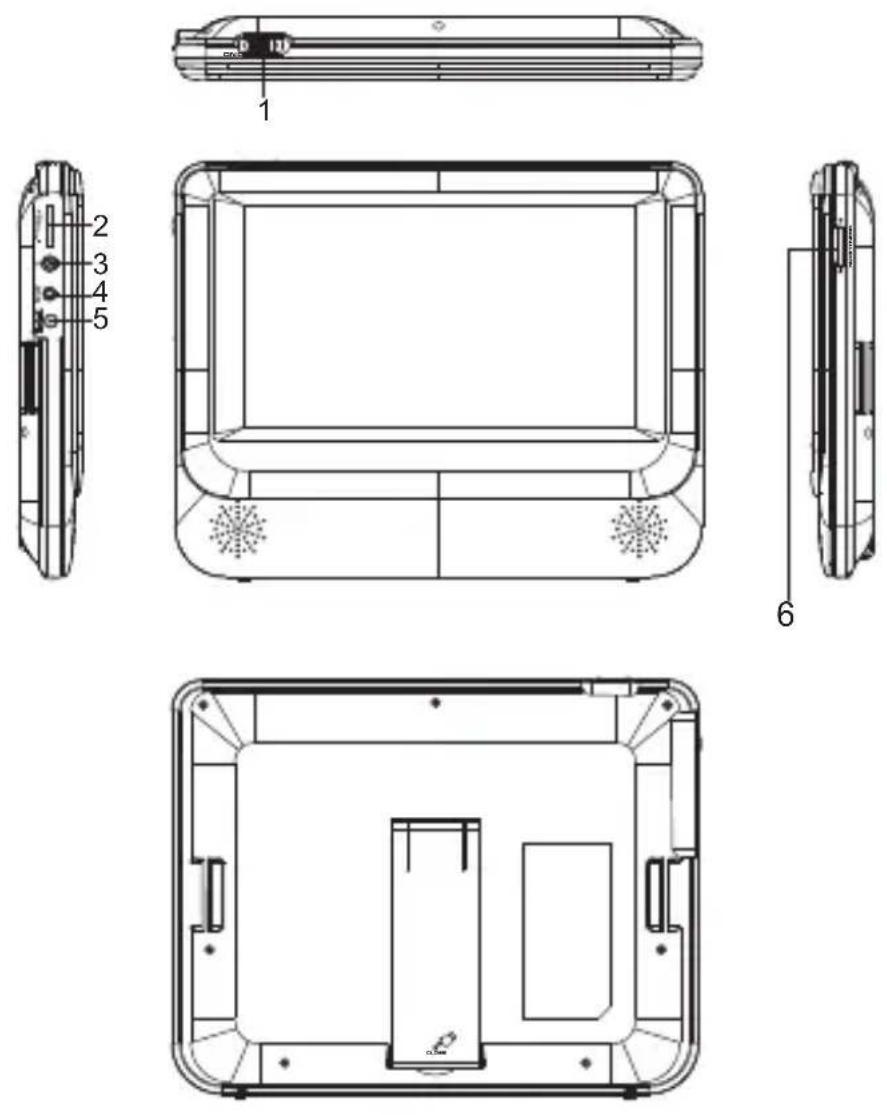
- Power ON/OFF
- Volume knob
-
Earphone jack
-
AV IN
- DC IN 9-12V
- Brightness Knob
System Connection
Powering And Installation
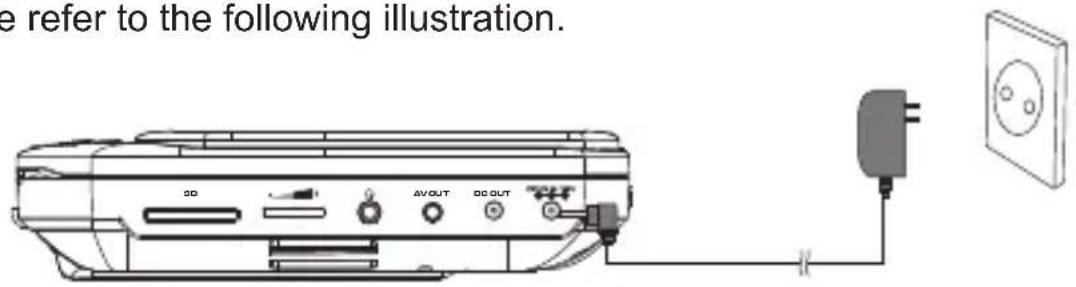
Plug one end of the AC/DC power adaptor into the DC IN9-12V jack on the right of the machine, then plug the other end into the AC power receptacle.
Please refer to the following illustration.
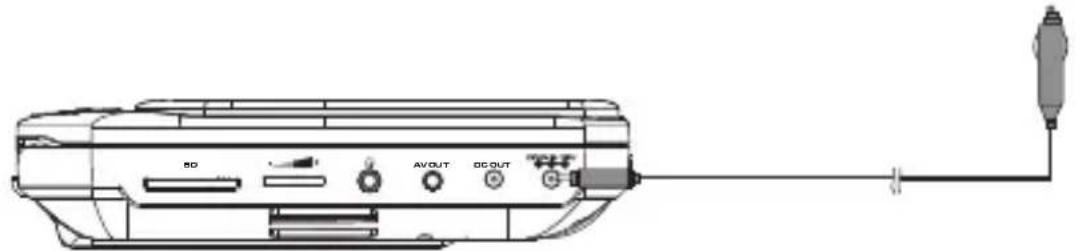
If using car cigarette lighter adaptor to connect to the power: Plug one end of the cigarette lighter adaptor into the DC IN 9-12V jack on the unit, plug the other end into the car cigarette lighter socket. See illustration below.
natural_image
Line drawing of a portable electronic device with ports labeled BO, AVOUT, and OGOUT, connected to a cable (no text or symbols beyond labels)Note :
- Car cigarette lighter adaptor is available to use only when the car cigarette lighter with DC 12V negative grounding.
- The mains plug is used as the disconnect device, the disconnect device should remain readily operable.
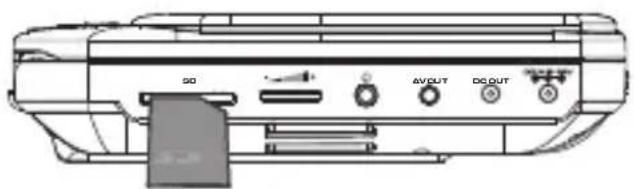
Using SD/MMC card
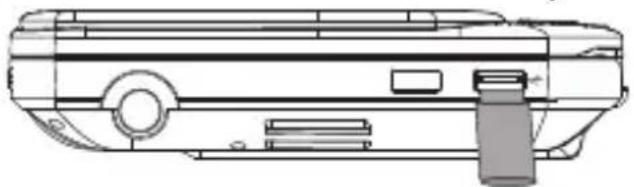
Upon using an SD or MMC card, insert it into the corresponding slot flatly with label side upward until you hear a click.
Using USB
Upon using an USB, insert it into the USB slot directly.
natural_image
Technical line drawing of a mechanical component or housing (no text or symbols visible)Connecting To The Monitor
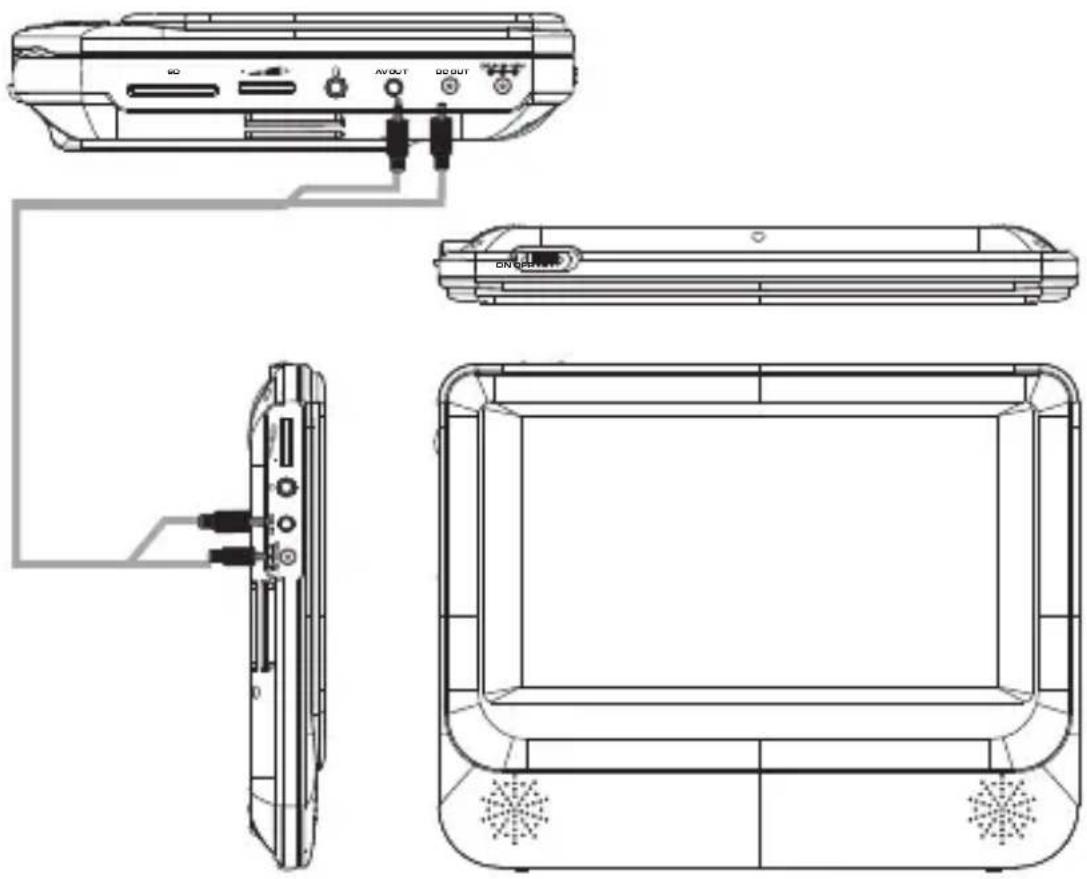
The unit can also be connected to the external LCD monitor.
Connect the unit to power by AC/DC adapter or cigarette lighter adapter.
Then connect the unit DC OUT jack to DC IN 9-12V Jack of the LCD Monitor by a DC/AV cable. Also use this DC/AV cable to connect the AV OUT jack of the unit to AV IN jack of the Monitor.
Please refer to the illustration below.
natural_image
Technical line drawing of a portable air conditioner unit showing front, side, and top views with labeled ports (no text or symbols beyond labels)Note: You're advised to supply both units the power by the cigarette lighter adapter only. The AC/DC adapter is used to supply power of one unit only and as the charger to charge the main unit if it's with built-in battery.
In Car Installation
- Fit the straps to the DVD Player / Monitor as required.
Please install the units with strap A (long) and strap B (short) together.

natural_image
Two horizontal bars labeled A and B, each with a segmented bar (no text or symbols on the bars themselves)Turn the player around so the backs are facing you.
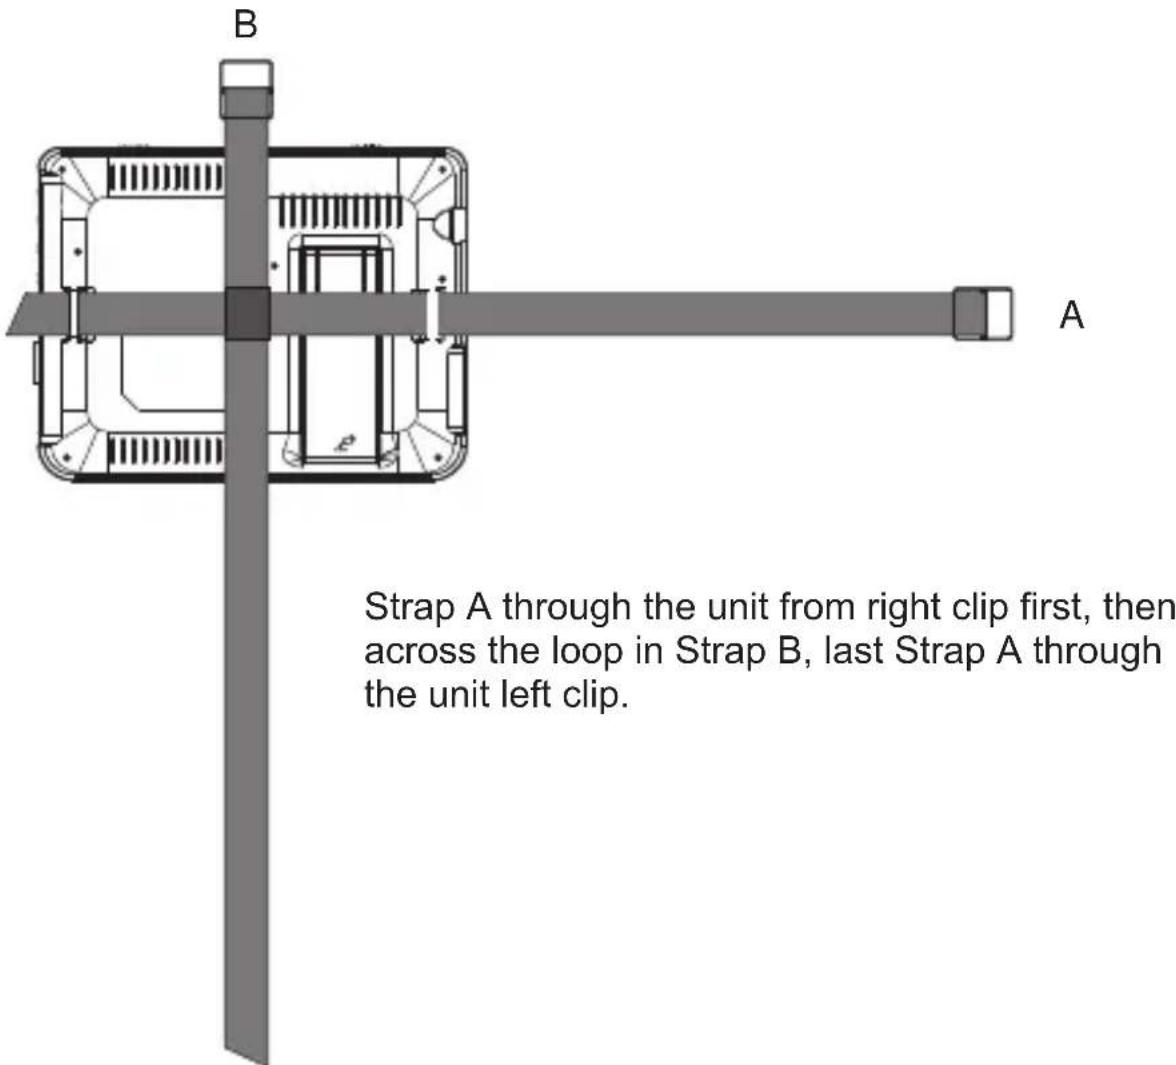
- Fitting the straps to the headrest.
a. Fitting the straps to the headrest.
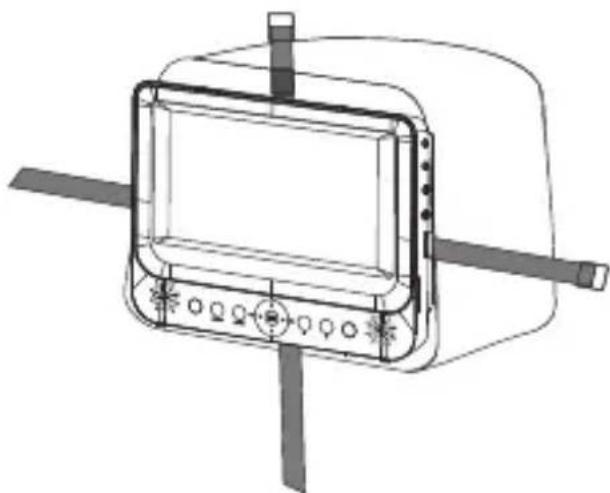
natural_image
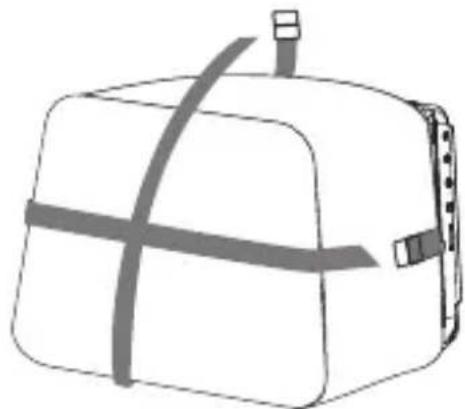
Technical line drawing of a portable electronic device with control panel and antenna (no text or symbols)Fit the straps around the headrest and engage the 2 trident clips. Ensure clips are securely fastened.
natural_image
Simple line drawing of a rectangular device with a horizontal bar and connectors (no text or symbols)Pull the straps tight using the adjustment. Tuck the loose ends into the strap tidy.
NOTE:
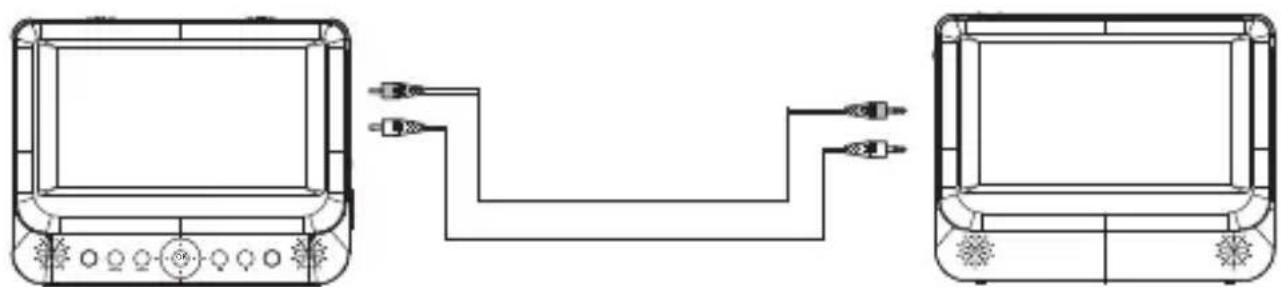
Be sure to complete the installation then use SDVD8739 in the car. For SDVD8739 installation is recommended that the DVD Player is on the LEFT headrest, to ensure a neat cable run to the monitor, as shown below:
natural_image
Line drawing of two electronic devices connected by a cable, showing front and side views with no text or symbols.Connecting With External Speaker
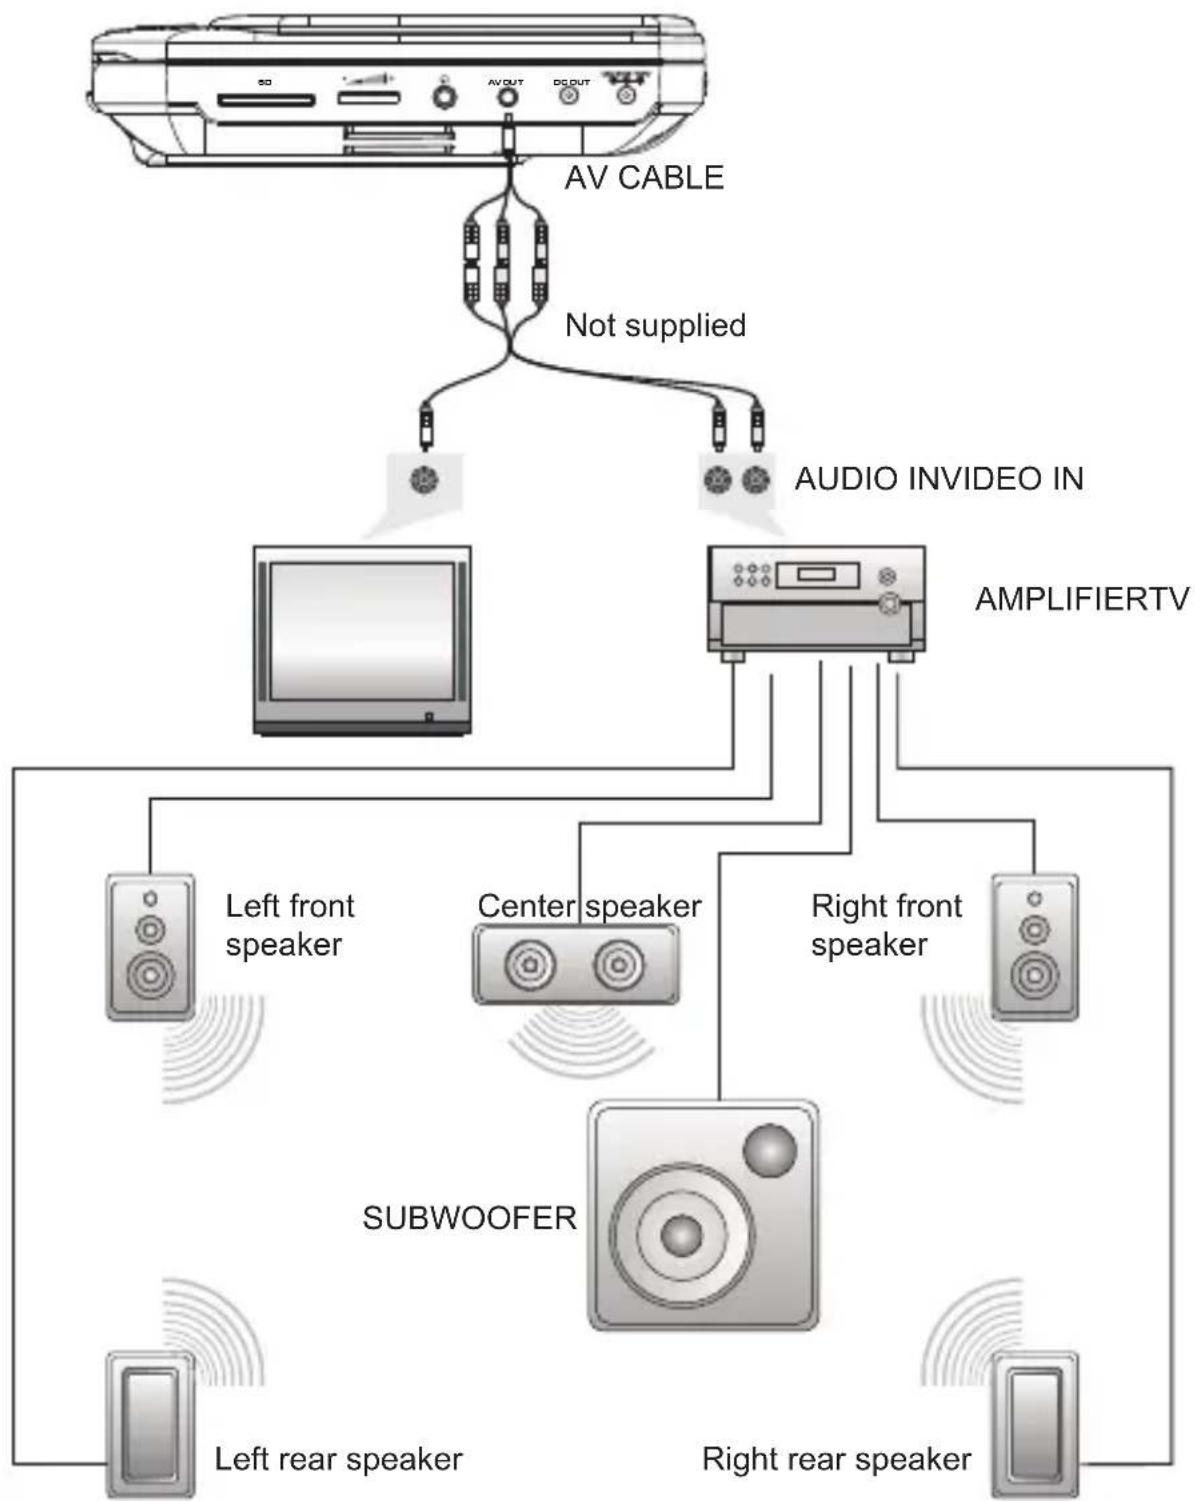
The unit can be connected with external speaker. Please see the following illustration.
flowchart
graph TD
    A["AV CABLE"] --> B["Not supplied"]
    A --> C["AUDIO INVIDEO IN"]
    C --> D["AMPLIFIERTV"]
    D --> E["Left front speaker"]
    D --> F["Center speaker"]
    D --> G["Right front speaker"]
    E --> H["Subwoofer"]
    F --> H
    G --> H
    H --> I["Left rear speaker"]
    H --> J["Right rear speaker"]
Note:
There is no 5.1 channel in the unit, however, after connecting to APM it is available to output audio in 5.1 channel.
The Remote Control
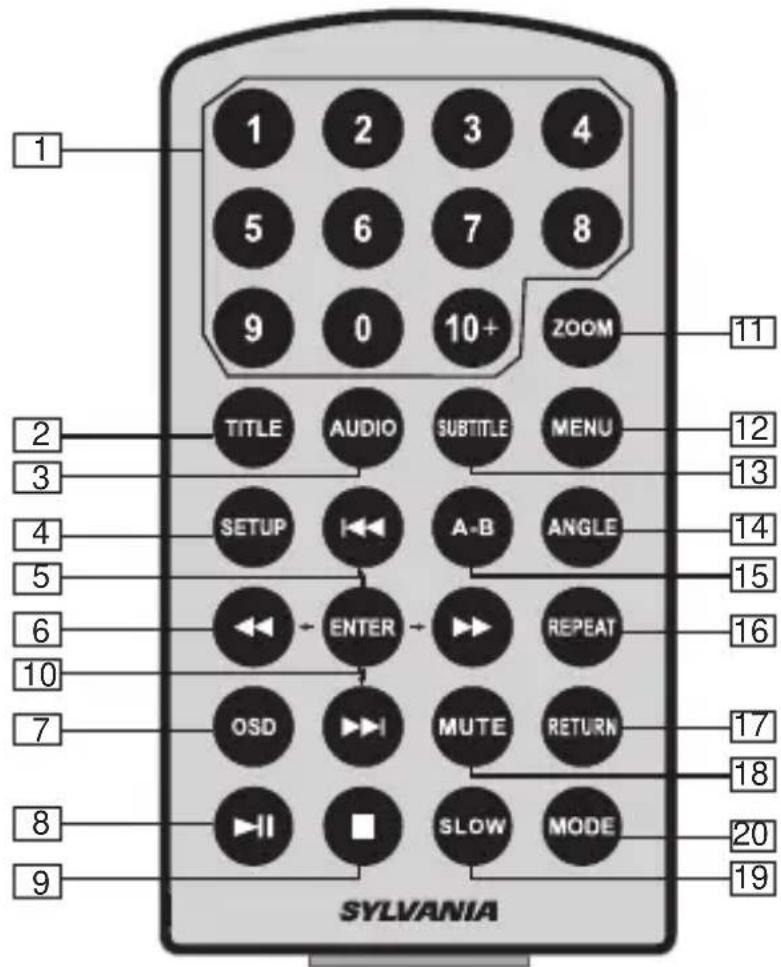
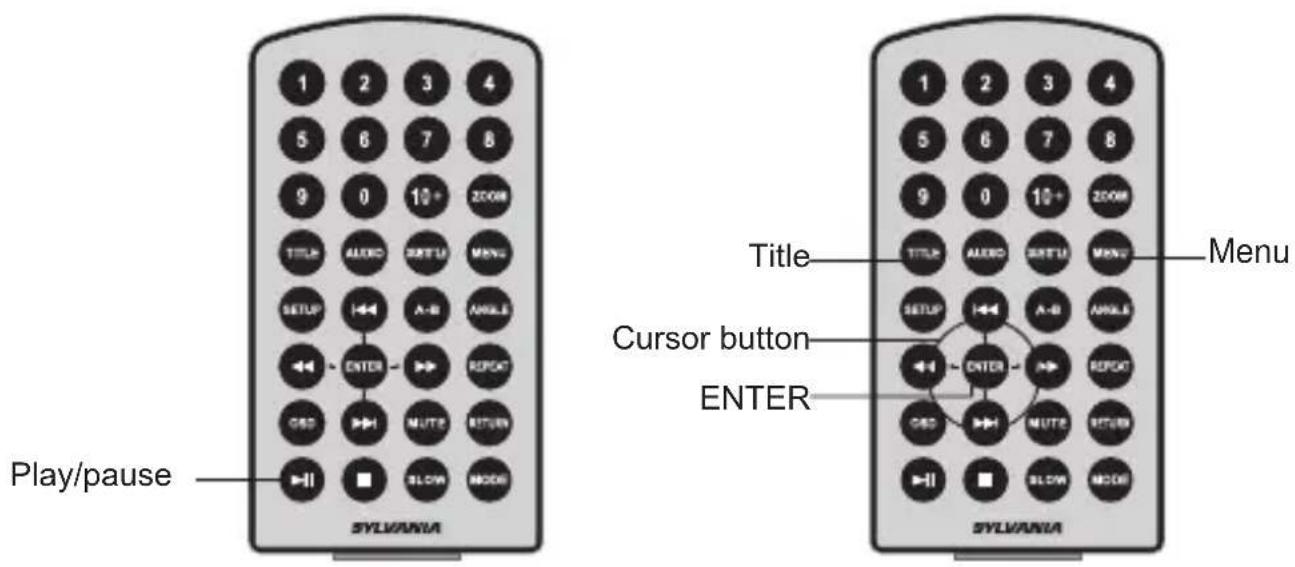
- Number button
- TITLE (To display title information)
- AUDIO (To select audio language)
-
SETUP (To go to or exit setup menu)
-
<</▶ Previous/Next button (To go to previous/ next chapter or scene during playing)
-
◀◀ / ▶▶ Fast forward/ backward button (To scan forward/backward at 2, 4, 8, 16, or 32 times )
-
OSD (To display disc information during playing such as elapsed and remaining time)
-
▶ Play / pause
-
■ STOP ( Press once to stop playback, then press ▶ to resume playback from the point where you stopped; press stop button twice to stop playback completely.)
-
ENTER (To confirm)
-
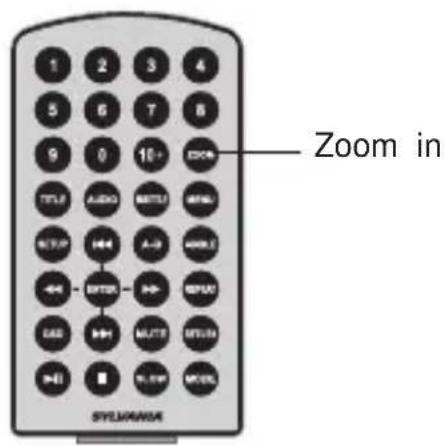
ZOOM (To zoom in the image during playback)
-
MENU (To enter or exit menu root)
-
SUBTITLE (To select subtitle language when playing DVD disc)
-
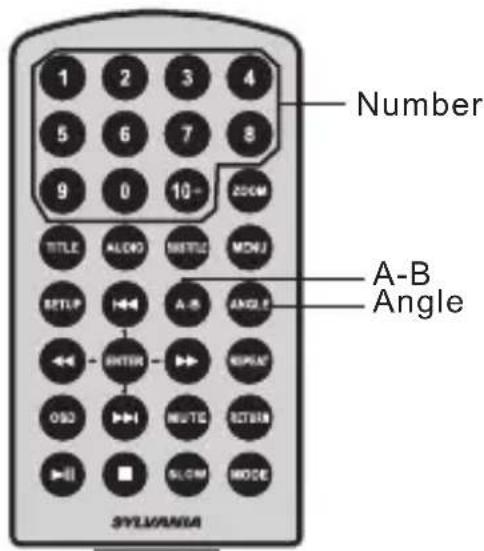
ANGLE (To change viewing angle when playing disc with multi-angle)
-
A-B (Repeat a specific portion from point A to B, press it again to cancel repeat playing)
-
REPEAT (To repeat playing title, chapter or track)
-
RETURN (To return to the main menu)
-
MUTE (To turn mute)
-
SLOW
-
MODE
The Use Of Remote Control
Please put the battery into the remote control as per illustration below.
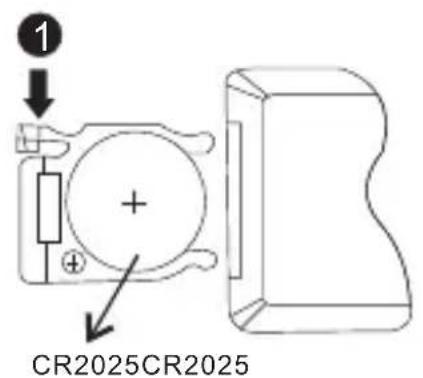
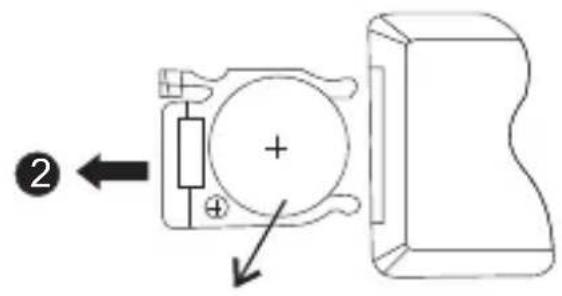
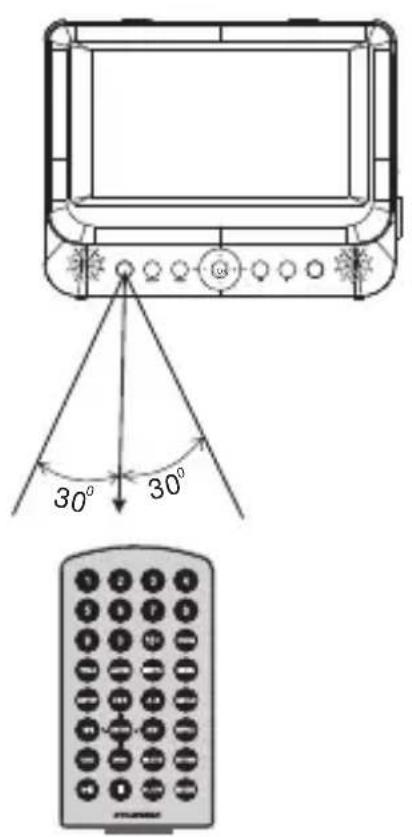
When using remote control, make sure the infrared window is pointed to infrared receiving window of the machine. The distance between machine and remote control must be within 3 metres. Please refer to the following illustration.
Notice
- To avoid falling off or place near damp environment.
- To avoid infrared receiving window of the unit being under direct sunlight.
- Please use a new battery to replace old one if the remote control doesn't work.
Basic Operation

Playing disc of DVD, MPEG4, SVCD, VCD, CD, MP3.
- In the Source Mode, you can press "◀◀", "▶◀", to select and "ENTER" key to enter the source you want.
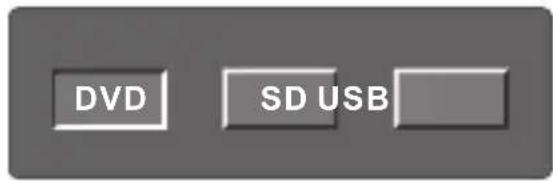
- Open the disc door and insert a disc into the door with the label side facing up.
- Close the disc door. The unit will load the disc and start playing.
- Press "■" to once to stop playback; then press "▶II" to resume playback from the point where you stopped; press "■" twice to stop playback completely).
- During playback, press "▶" to pause: press it again to resume playback.
- When the playing is finished, please turn off the power by sliding ON/OFF switch to OFF.
- For some DVD disc with Title or Chapter menu, press "MENU" button to enter menu page, and use "◀◀▶◀◀▶◀" to select. Press ENTER to confirm.
Note:
Please do not disconnect USB devices or plug out SD/MMC cards while they are working with the unit. Functional failure may occur in case of wrong operations.
Fast Forward And Fast Backward

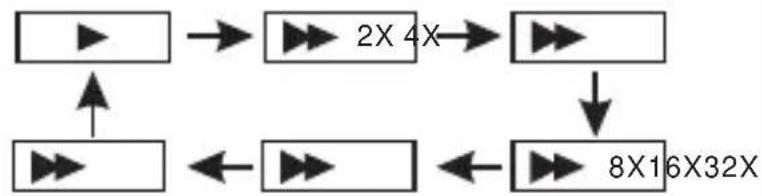
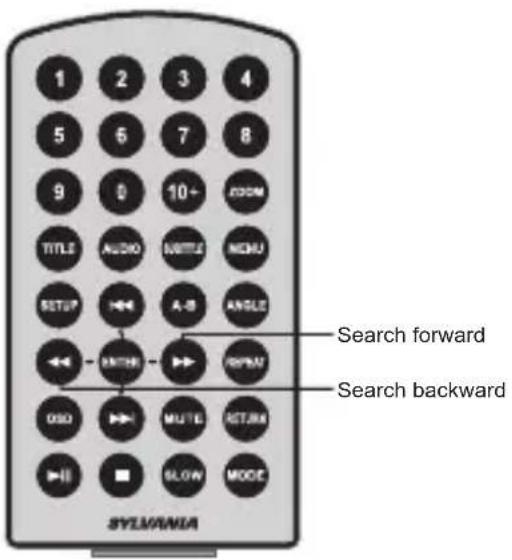
When playing disc of DVD, MPEG4, SVCD, VCD, CD, the unit can search forward or backward.
- Press "▶", the unit will search forward. Press it repeatedly, the unit will play at 2, 4, 8, 16, 32 times of speed.
flowchart
graph TD
    A["Input"] --> B["2X 4X"]
    B --> C["Output"]
    D["Input"] --> E["8X16X32X"]
    E --> F["Output"]
    G["Input"] --> H["2X 4X"]
    H --> I["Output"]
    J["Input"] --> K["8X16X32X"]
    K --> L["Output"]
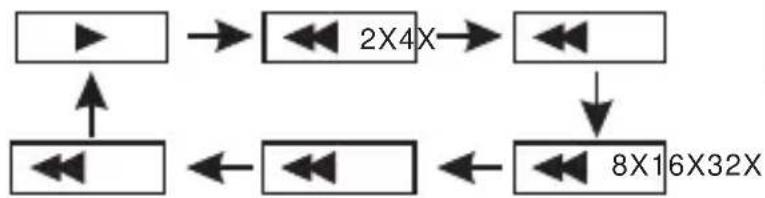
- Press "◀", the unit will search backward. Press it repeatedly, the unit will play at 2, 4, 8, 16, 32 times of speed.
flowchart
graph TD
    A["Input Block"] --> B["2X4X"]
    B --> C["Output Block"]
    C --> D["8X16X32X"]
    D --> E["Output Block"]
    E --> F["Output Block"]
    F --> G["Output Block"]
    G --> H["Output Block"]
    H --> I["Output Block"]
    I --> J["Output Block"]
    J --> K["Output Block"]
    K --> L["Output Block"]
    L --> M["Output Block"]
    M --> N["Output Block"]
    N --> O["Output Block"]
    O --> P["Output Block"]
    P --> Q["Output Block"]
    Q --> R["Output Block"]
    R --> S["Output Block"]
    S --> T["Output Block"]
    T --> U["Output Block"]
    U --> V["Output Block"]
    V --> W["Output Block"]
    W --> X["Output Block"]
    X --> Y["Output Block"]
    Y --> Z["Output Block"]
Repeat Playing

When playing disc of DVD, MPEG4, SVCD, VCD, CD, user can repeat playing one chapter, title or all the whole disc.
For DVD disc, press "repeat" button, user can repeat playing one Chapter; press it again to repeat playing Title; press it the third time to repeat playing the whole disc.

flowchart
graph LR
    A["Chapter"] --> B["Title All"]
    B --> C["Repeat off"]
For MP3 disc, press "repeat" to repeat playing present file; press it again to repeat playing the folder; press it the third time to cancel repeat playing.

flowchart
graph LR
    A["Repeat one"] --> B["Repeat folder"]
    B --> C["Repeat off"]
Repeat Playing Of Favorite Scene

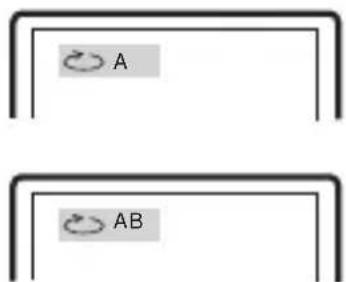
When playing disc of DVD, MPEG4, SVCD, VCD, CD, MP3, user can repeatedly play a specific section. During playback, press "A-B" button at a point A, then press this button again in point B, the unit will automatically repeat playing the part between A-B.
flowchart
graph TD
    A["A"] --> B["AB"]
Press it the third time, the unit will return to normal playback.
Select Angle
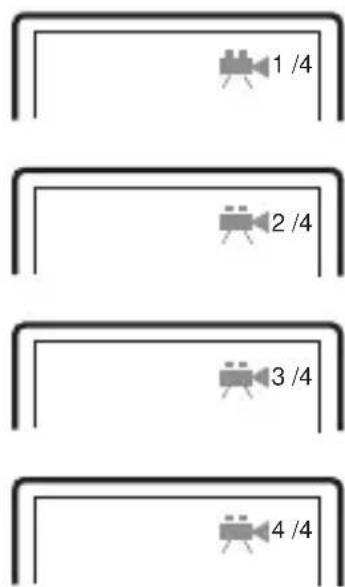
During playing DVD disc with multi-angle, press "Angle", button, the followings will be displayed on screen.
Press number buttons to select the angle you desire.
To return to normal playing, please press "Angle" the unit will play the disc in the default angle.
Note
The function is available only for discs with multi-angle.
Zoom in/out
When playing disc of JPEG user can zoom in or zoom out the image.
During playback, press Zoom button, the image will be enlarged; press it again the image will be enlarged again; press it fifth time, the image will zoom out, press it repeatedly and the image will return to normal status.

When playing disc of DVD, VCD user can zoom in/out the image.
During playback, press Zoom button, the image will be enlarged; press it again the image will be enlarged again; press it fourth time the image will zoom out, press it repeatedly and the image will return to normal status.
When the image is enlarged, user can press
◀◀◀▶ to move the image.
Playing JPEG File In Data Disc
- Place a JPEG disc into the tray, the unit will start reading and play.
- Press "MENU" to browse JPEG files.
- Press "◀◀◀◀" to select a JPEG file and press "ENTER" button to confirm. Note: you can press MENU to return to the folder list. Press "▶◀◀" or "ENTER" to preview the file selected
- Press "◀◀" to rotate the picture counter-clockwise, Press "▶◀" to rotate the picture clockwise. Press "▶◀◀" to reverse the picture horizontally and press "◀◀◀" to reverse the picture vertically.
- Press OSD button when viewing pictures, you can select different refresh mode as follows:
① from top to bottom
② from bottom to top
③ from left side to right side
④ from right side to left side
⑤ from left top to right bottom
⑥ from right top to left bottom
⑦ from left bottom to right top
⑧ from right bottom to left top
⑨ from horizontal center to both sides
⑩ from vertical center to both sides
⑪ From top and bottom to center.
⑫ from right and left to center.
⑬ from four window's top side to bottom side.
⑭ from four window's left side to right side.
^15 From 4 edges to center.
-
During viewing files, "∅" may appear when pressing "Angle" or "Subtitle" or "Audio" or "A-B" or "Title" etc; in this situation these options are unavailable to operate.
-
When viewing JPEG files, press " ■ ", pictures will be displayed in thumbnail mode, press ◀◀ ▶◀ ▶◀ or "ENTER" button to select one picture to view.
Playing MP3 Files In Data Disc
- Place MP3 disc into the disc door. Press "◀◀/▶◀" or "ENTER" button to choose a MP3 file; Press "▶II" or "ENTER" button to play the file selected.
SD/MMC/USB Main Menu
natural_image
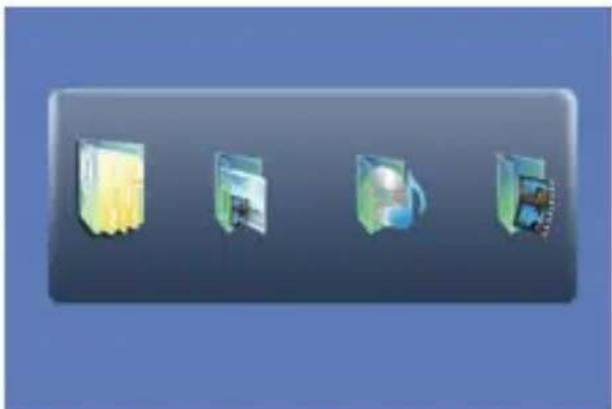
Four stylized folder icons in a row against a blue gradient background (no text or symbols)After Enter the SD/MMC or USB, the system will show Main Menu which includes 4 Function ICONS. You can select them by "◀◀▶◀" and press "ENTER" key to confirm.
natural_image
Illustration of a green folder with yellow doors and a small key symbol on the cover (no text or labels)Browser Mode
Detail explanation please refer to P19
natural_image
Illustration of a transparent container with a small image frame inside, set against a blue sky background (no text or symbols)Photo Mode
Detail explanation please refer to P19-20

natural_image
Icon of a CD inside a green box with a blue musical note symbol (no text or symbols)Music Mode
Detail explanation please refer to P21
natural_image
Illustration of a film strip with three embedded images (no text or symbols visible)Movie Mode
Detail explanation please refer to P21
Note: Media cards formatted in exFAT file system not supported.
Browser Mode
In the Browser Mode ,the system will show the list of file and folder.
"◀◀", "▶◀", "ENTER" key: select and play
"►": Enter the folder
"◀": Quit the folder
Note : if you want to return to the Main Menu , first, the system must be in List of file and folder status, and you can press "RETURN" KEY to return to the Main Menu.
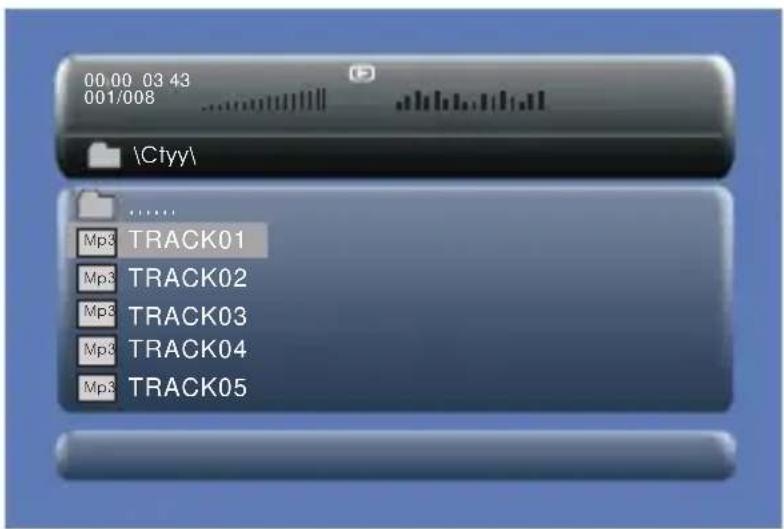
Photo Mode
natural_image
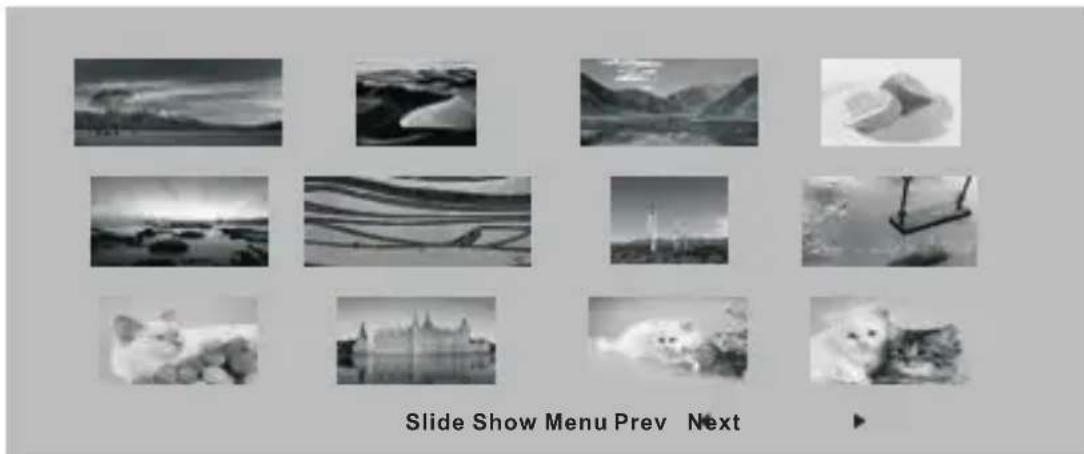
Grid of grayscale landscape photos including mountains, waves, a castle, and a cat under a slide menu (no text or symbols on images)In the Photo Mode, the System will show the thumbnail Mode first.
"◀◀", "▶◀", "◀◀", "▶◀", "ENTER": select and play.
Slide Show : play the JPEG
Menu : Enter the Help Menu.
Prev : Page Up.
Next : Page Down.
When playing JPEG :
- To rotate the picture counter-clockwise, press "◀◀ "; Press "▶▶" to rotate the picture clockwise.
- Press OSD button when viewing pictures, you can select different refresh mode as follows:
① from top to bottom
② from bottom to top
③ from left side to right side
④ from right side to left side
⑤ from left top to right bottom
⑥ from right top to left bottom
⑦ from left bottom to right top
⑧ from right bottom to left top
⑨ from horizontal center to both sides
⑩ from vertical center to both sides
⑪ from top and bottom to center.
⑫ from right and left to center.
13 from four window's top side to bottom side.
14 from four window's left side to right side.
⑮ From 4 edges to center.
-
During viewing files, " Ⓧ" may appear when pressing " Angle " or "Subtitle" or "Audio" or "A-B" or "Title" etc; in this situation these options are unavailable to operate.
-
When viewing JPG files, press " ■" or "RETURN" key, pictures will be displayed in thumbnail mode, press "◀◀▶▶◀◀▶▶" or "ENTER" button to select one picture to view.
Note: If want to return the Main Menu, you can Press "Return" key in the thumbnail mode.
Music Mode
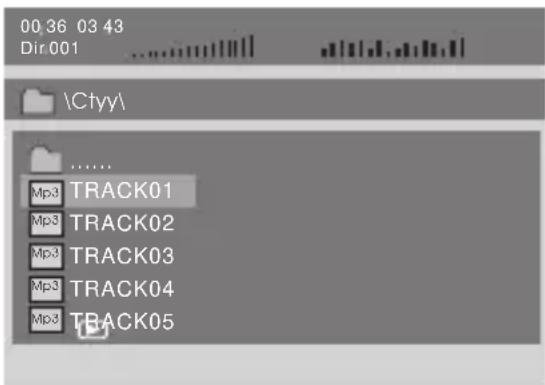
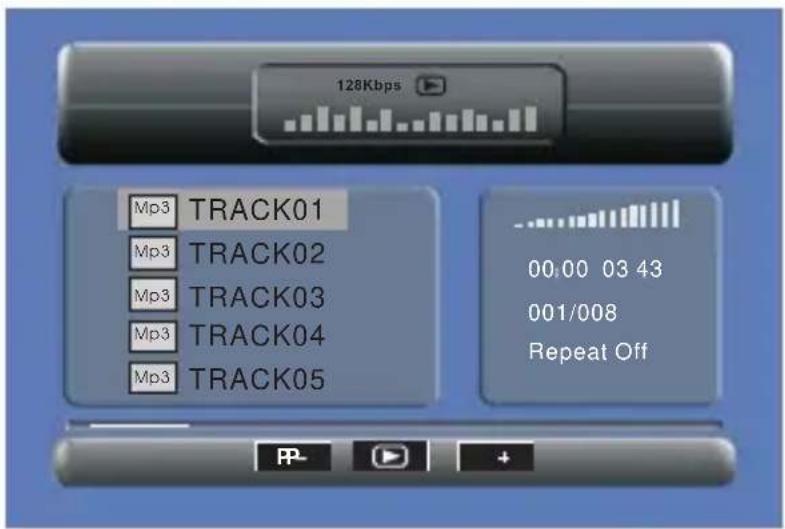
In the Music Mode, the system will show the list of music file, like MP3 and so on.
Press "◀◀", "▶◀", "ENTER", select and play.
Press "◀◀/▶◀" to fastward/backward MP3 during playing.
Press "◀/▶" to select the bottom function when in "stop" status.
Page-: Page Up.
: Play
Page+: Page Down
Note: Press "Return" Key to Return to the Main Menu
Movie Mode
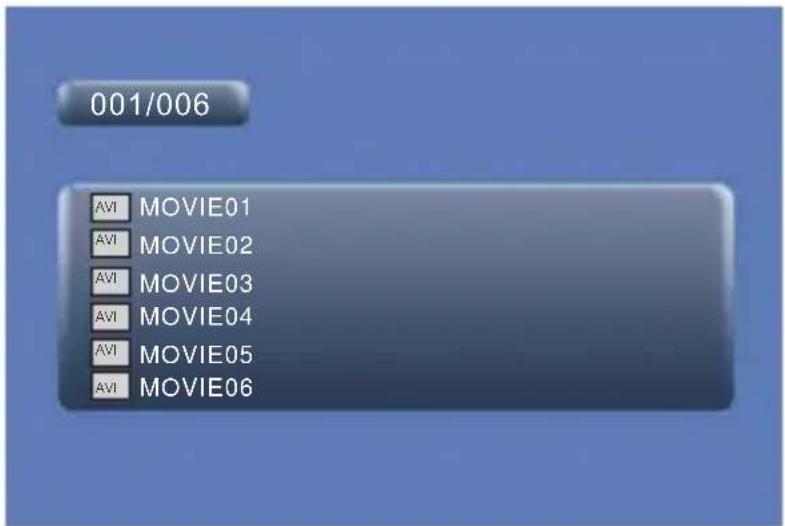
In the Movie Mode, the system will show the list of Movie file, like AVI and so on.
"◀◀", "▶◀", "ENTER" Key : Select and Play.
When playing movie you can press "MENU" and "Return" Key to back to the list of movie file status. And if you want to Return to the Main Menu, Please Press "Return" key in list of Movie file status.
CD Ripping
During playing the CD/HDCD disc, you can enter CD Ripping function. By pressing subtitle button, DVD player will be able to change the CD format into MP3 format, and then store it in the USB.
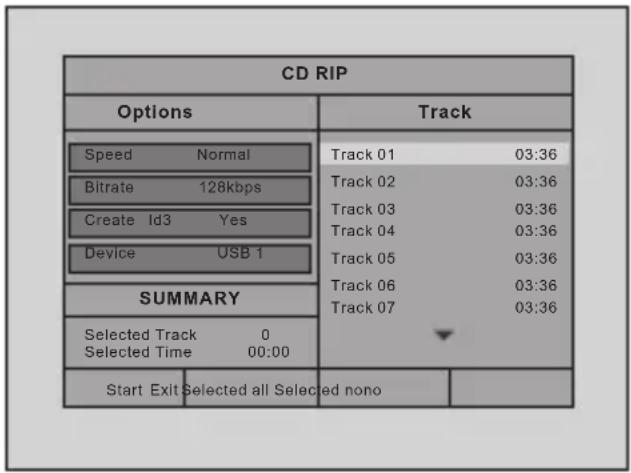
Speed: In this item, you can set the rip speed: Normal or Fast.
Bitrate: In this item, you can set the bitrate. It has 6 choices, 96 Kbps, 112Kbps, 128Kbps, 196Kbps, 256Kbps and 320 Kbps.
Create ID3: In this item, you can create ID3.
Device: This item indicates whether USB is connected with DVD player.
Exit: Exit to the previous menu.
Select all: Select all the files in the disc for changing and storing.
Select none: Remove all the files in the disc.
Start: Move the cursor to the item and press Enter button, the changing begins.
flowchart
graph TD
    A["CD RIP"] --> B["Ripping"]
    A --> C["Selected track"]
    B --> D["Track Progress"]
    D --> E["Total Progress"]
    E --> F["Cancel"]
    F --> G["SUMMARY"]
    G --> H["Now ripping\nTrack 01/01"]
    H --> I["9% Track 01"]
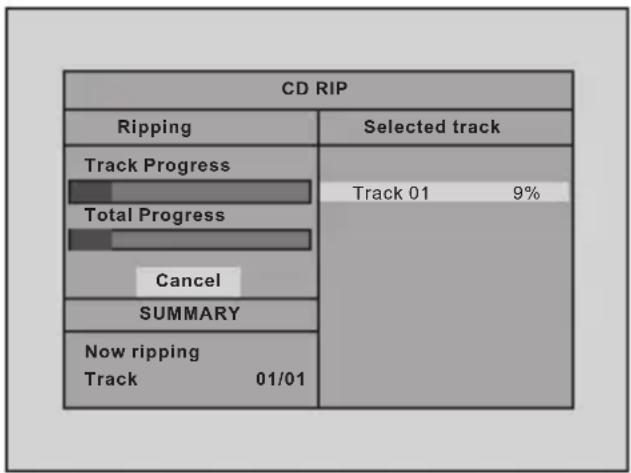
During the changing, you can select CANCEL to stop the changing.
System Setup
| Setup Menu -- Main Page General Setup Video Setup Preference Setup | Press "Setup" button, the main menu will be displayed on the screen In the General Setup Page, Press ➤ button to highlight this item. Press ENTER button to access. Press ➕ ➕ ➕ button to select the setting. Press ENTER button to confirm your selection. Press ← button to exit. |
General Setup Page
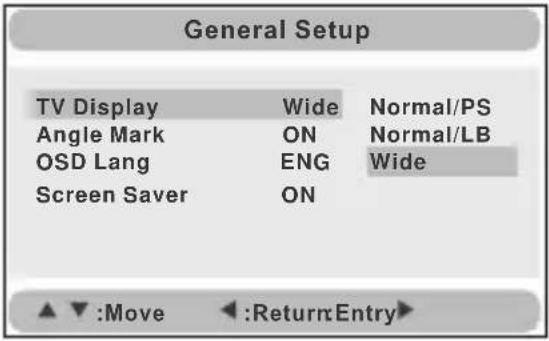 | TV display:Enter this option, user can set screen display format (Nomal/PS, Nomal/LB, Wide)The default is "Wide".Note:☆ The function depends on the display ratio with which the DVD disc is recorded.☆ Please choose "Wide(16:9)" when using a 16:9 wide screen TV set. |
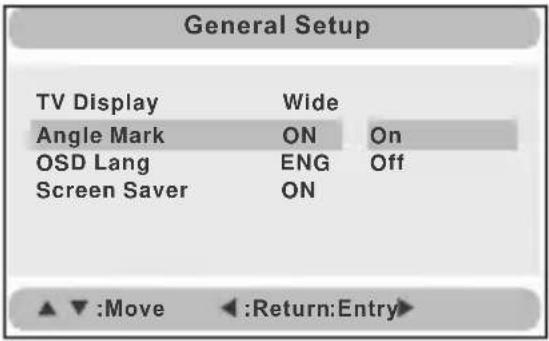 | Angle Mark:Enter this option to set the angle during playback.Optional setting: ON,OFF.The default is: ON. |
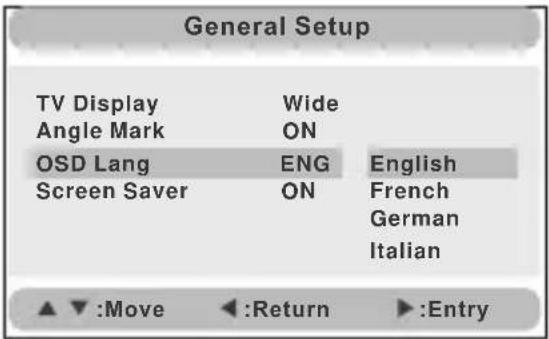 | OSD Language:In the option user can set OSD menu language (English, French, German, Italian).The default: English. |
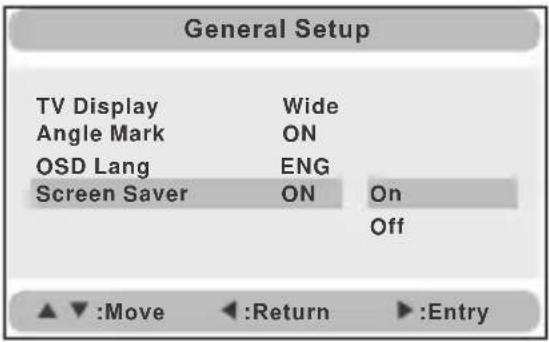 | Screen Saver:Enter this option to set whether to activate the screen saver function.The default is ON. |
Video Setup Page
| Video SetupTV Type NTSC PALQuality NTSCPanel Quality▲▼:Move◄:Return►:Entry | TV Type:Enter this option to select TV type (PAL, NTSC)The default is NTSC. |
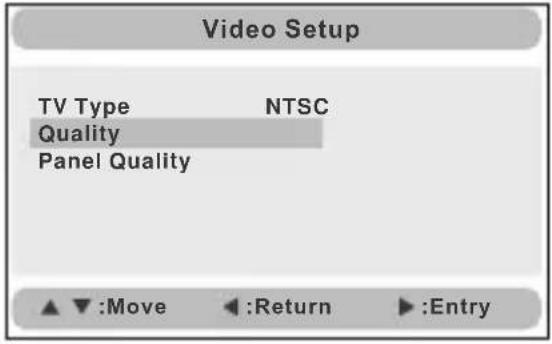 | Set the Video Quality of AV OUT |
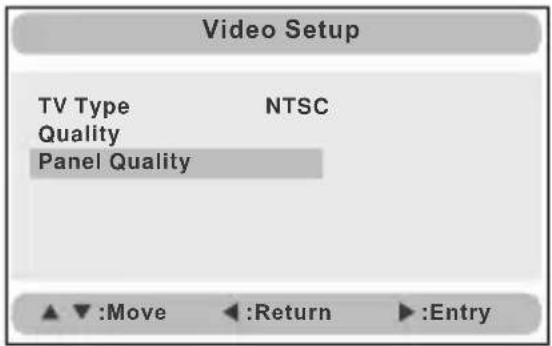 | Set the Video Quality of PANEL |
Preference Page
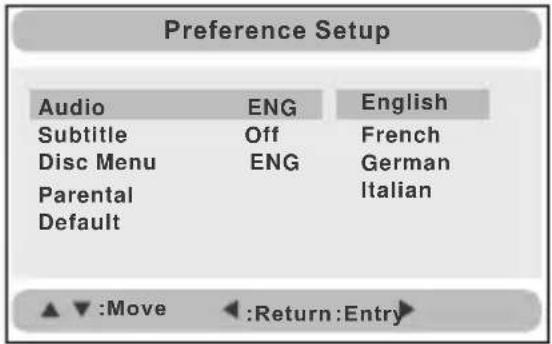 | Audio:Enter this option,user can select preferred audio language for DVDs.The default is English.Note:☆ The audio language depend on the material on each disc.☆ User can also change the audio language durin g play back by pressing the Audio button. |
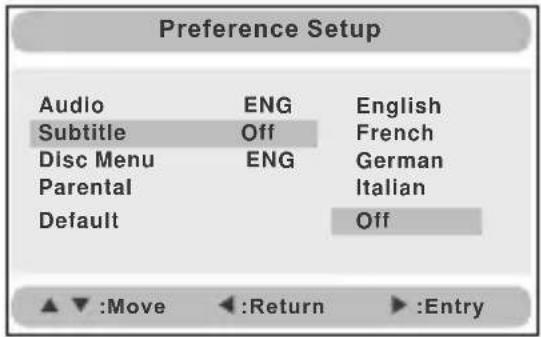 | Subtitle:Select your preferred language to show the subtitles on the screen.The default is OFF.The subtitle languages depend on the information available on each disc, You can also change the subtitle language during playback by press the SUBTITLE button. |
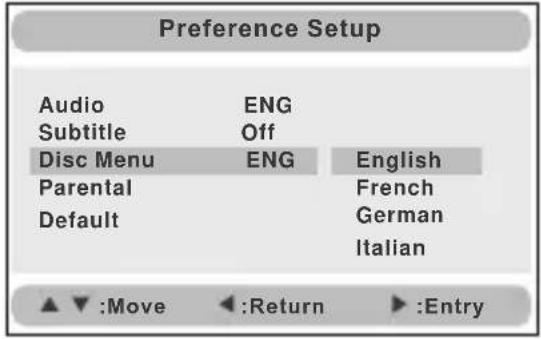 | Disc Menu:This function allows you to choose the menu language stored on the disc.The default is English.Note:the disc menu languages depend on the information available on the disc. |
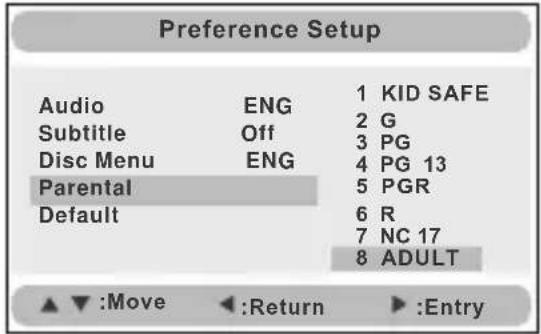 | Parental:Enter this option to set the parental control level to some unsuitable disc scenes being watched by the children.Optional parental control levels: KID SAFE, G, PG,PG 13,PGR, R, NC17, ADULT.The default is ADULT.The default password:8888. |
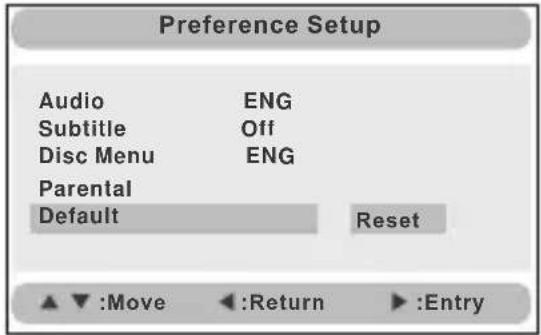 | Default:Select this item and press "ENUTER"to reset. |
Specification
Compatible disc: DVD/VCD/CD/MP3/MPEG4
Signal system: PAL/NTSC
Panel size: 7 inch
Frequency response: 20 Hz to 20 kHz
Video output: 1 Vp-p/75 Ohm, unbalanced
Audio output: 1.4Vrms/10kOhm
Audio S/N: Better than 80 dB
Dynamic range: Better than 85 dB
Laser: Semiconductor Laser, Wave Length: 650 nm/795 nm
Power source: DC 9-12V
Power consumption: 10 W
Operating temperature: 0\~40°C
Weight(Monitor/DVD Player): 0.36 / 0.7 kgs
Dimensions (Monitor/DVD Player)(W x D x H):
212x166.5x25mm / 212x 167x 40 mm
Troubleshooting
| PROBLEM | SOLUTION |
| No sound or distorted sound | Make sure the machine is connected properly.Make sure all cables are securely inserted into the appropriate jacks. |
| Can't advance through a movie | You can't advance through the opening credits and warning information that appears at the beginning of movies because the disc is programmed to prohibit that action. |
| The icon Ⓧ appears on screen | The feature or action cannot be completed at this time because:1. The disc's software restricts it.2. The disc's software doesn't support the feature (e.g., angles)3. The feature is not available at the moment.4. You've requested a title or chapter number that is out of range. |
| Picture is distorted | The disc might be damaged. Try another disc;It is normal for some distortion to appear during forward or reverse scan. |
| No forward or reverse scan | Some discs have sections that prohibit rapid scanning or chapter skip;If you try to skip through the warning information and credits at the beginning of a movie, you won't be able to. This part of the movie is often programmed to prohibit skipping through it. |
If at any time in the future you should need to dispose of this product please note that waste electrical products should not be disposed of with household waste. Please recycle where facilities exist. Check with your Local Authority or retailer for recycling advice. (Waste Electrical and Electronic equipment Directive)
Owing to continuous improvement, no prior notice will be given regarding changes on above feature and spec.
- Table Of Contents
- Safety Precaution
- Warning: To reduce the risk of fire or electric shock, do not expose this apparatus to rain or moisture.
- Main Features
- Main Unit Controls
- Monitor View
- System Connection
- Powering And Installation
- Note :
- Using SD/MMC card
- Using USB
- Connecting To The Monitor
- In Car Installation
- NOTE:
- Connecting With External Speaker
- The Remote Control
- The Use Of Remote Control
- Notice
- Basic Operation
- Fast Forward And Fast Backward
- Repeat Playing
- Repeat Playing Of Favorite Scene
- Select Angle
- Note
- Zoom in/out
- Playing JPEG File In Data Disc
- Playing MP3 Files In Data Disc
- SD/MMC/USB Main Menu
- Browser Mode
- Photo Mode
- When playing JPEG :
- Music Mode
- Movie Mode
- CD Ripping
- System Setup
- General Setup Page
- Video Setup Page
- Preference Page
- Specification
- Troubleshooting
Brand : SYLVANIA
Model : SDVD8739
Category : DVD player