USER MANUAL WP-8003 LG
Washing Machine OWNER'S MANUAL
MODEL : WP-9030/9031/9220
WP-9032/9033/770/9224
WP-951S/1020/1021S
WP-1220/1221S
WP-9521/9526S
WP-9250/9251/9256
WP-90050/92082
Please read this manual carefully before operating your set. Retain it for future reference.
Record model number and serial number of the set.
See the label attached on the back cover and quote this information to your dealer when you require service.
This washing machine is designed and manufactured for household use only.
CONTENTS
IMPORTANT INSTRUCTIONS ----5
SAFETY MEASURE 6
PARTS IDENTIFICATION ----7\~8
INSTALLATION----9\~10
PREPARATIONS BEFORE WASHING 11
HOW TO WASH----12
HOW TO RINSE----13\~14
HOW TO SPIN----14
AFTER FINISHING 14
REFERENCE----15
CARE AND MAINTENANCE----16\~17
TROUBLESHOOTING GUIDE 17
SPECIFICATIONS 18
IMPORTANT INSTRUCTIONS
- Before operating machine read the instruction manual carefully.
- Always keep the machine on the floor level.
- During operation machine should be kept perpendicular to the slope of the floor to avoid motion.
- Before operating properly earth the machine, to avoid electric shock.
- When not in use take the power cord out from the socket.
- During spinning and drain check that drain hose is lowered.
- Before putting clothes in the Wash Tub check the pockets thoroughly for Coins, Keys and other objects.
- Transfer the clothes from Wash Tub to Spin Dryer Basket one by one.
- In case you notice excessive vibration or abnormal noise during spinning, immediately open the Spin Dryer Cover and rearrange the laundry evenly.
- In case of any doubt contact the nearest service center or Dealer.
SAFETY MEASURE
Manufacturer is not responsible for accidents caused by the user as a result of not following the user's guide.
| WARNING |
| In OperationDo not insert the hand inside the spin dryer basket while the machine is in operation.(Do not let children climb on the machine or climb into the tub. Injury may occur) |  | Installation AreaAvoid area exposed to snow, rain, or where humidity is high. It may cause electric shock.  |
| Switch AreaAvoid watering on the switch area. It may cause electric shock or fire. |  | Electric OutletAvoid connecting several electr devices to single outlet. It may cause fire.  |
Volatile MaterialDo not use volatile material such as Benzene;  Gasoline, bug killer. Do not leave strong alkaline substance such as bleach inside the tub. Damage on plastic surface and rubber parts may occur. Gasoline, bug killer. Do not leave strong alkaline substance such as bleach inside the tub. Damage on plastic surface and rubber parts may occur. | HeatAvoid electric heater, candle light, cigarette light, bug smoker, etc. near the machine. It may ignite or deform plastic part  |
| Power CordIf the power supply cord is damaged, it must only be replaced by a repair shop appointed by the manufacturer, because special purpose tools are required. |
| Hot WaterAvoid using hot water over 50°C. It may deform plastic parts or cause malfunction. |  | InstallationInstall the washing machine on a horizontal support. Otherwise, it may cause vibration and noise  |
| Power CordDo not treat the power supply cord with your wet hand |  | Plug out the power supply cord, when cleaning or not using the washing machine for a long time.  |
PARTS IDENTIFICATION
Control Panel
WP-9030
WP-9031
WP-9220
WP-90050

WP-9032
WP-9033
WP-770
WP-9224

WP-951S
WP-1020
WP-1021S
WP-1220
WP-1221S
WP-9521
WP-9526S
WP-9250
WP-9251
WP-9256
WP-92082

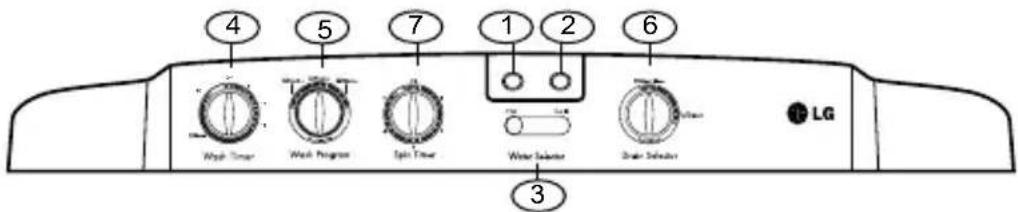
- Hot water inlet
Select this inlet when opting for hot water wash.
- Cold Water inlet
Select this inlet when opting cold water wash.
- Water Selector
Select "WASH" to supply water for washing and rinsing and "SPIN" for spin shower rinse.
-
Wash Timer
Select the desired time for soaking, washing or rinsing.
(Soaking facility is not available in WP-770/9030/9031/
WP-9220/9224/9521/9032/1020/1220/9250/9251/90050/92082)
-
Wash Selector
Set the Selector to "GENTLE", "NORMAL", "STRONG" according to kinds and quantity of the laundry.
-
Drain Selector
Select "WASH RINSE" for washing and rinsing, and "DRAIN" to drain the water from the tub.
- Spin Timer
Select the desired time for spinning. The max. limit is 5 min. Don't rotate the knob more than prescribed limit.
(Please do not match this figure with model as it may be different from your model. These are schematic diagrams only.)
PARTS IDENTIFICATION

(Please do not match this figure with model as it may be different from your model. These are schematic diagrams only.)
Wash Timer (Only for WP-9033/951S/1021S/1221S/9526S/9256 exists with soak option)

Wash Timer
The wash timer can be used for SOAK, WASH and RINSE operations. Following combinations can be selected.
a) Soak + Wash : Select the desired soak time by setting the timer between 15\~40 min. Then total wash time will be selected soak time + 15 min. of wash time.
b) Wash/Rinse : Any Wash/Rinse time 1\~15 min. can be selected by setting the timer between 1\~15 min.
Washing will take place for the set period, then machine stops automatically.
Soak Function
a) Soaking is provided for better cleaning of clothes as detergent water goes to inner pores of clothes resulting dirt removal in better way.
b) Soak time by default will be 25 min. so total time of cycle will be Soak + Wash time (25 min. + wash time)
c) In soak option, machine operates for 1.5 min. & remains off for 5 min. This cycle continues for selected soak time.
INSTALLATION
Installation area
- Select flat and firm floor.
- Incorrect installation may cause severe noise and break down.



- Maintain more than 10 cm gap between the side of drain hose and the wall.

- The base openings must not be obstructed by carpeting when the washing machine is installed on a carpeted floor.
Drain Hose Installation
- Drain Hose is installed at back side of the washing machine.

- Don't remove Drain Hose.

Notes
- Be sure to re-route the hose so that it is not kinked or has sharp bends which will prevent proper drainage.
● The level of the drain should be slightly lower than the lowest part of the washing machine in order to ensure proper and complete drainage.
- Use only new hose set provided with the machine.


Connecting the earth wire
● Install the earth wire to prevent short-circuit due to leaking current and electric shock.
- It is attached at the back of the washer. Connect it to the metal water pipe. If the water pipe is made of plastic, it does not have the earth effect.
● Never connect the earth wire to the gas pipe, lightning arrester, telephone connector etc.

★ WARNING : This appliance must be earthed .
Other earthing method
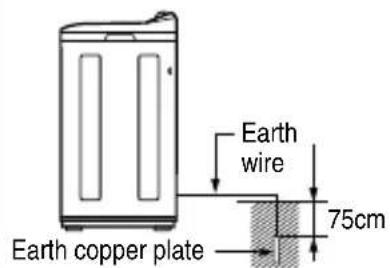
- After connecting the earth wire to the earth copper plate, bury it at least 75 cm deep under the wet ground.
- Connect to the earthing-only outlet.

- When installing it in an area where earthing is not possible, purchase a short-circuit breaker (15mA at operation, 7.5mA at idle) and connect it to the outlet.

Connecting the power plug
- Insert the power plug into the outlet.
- Before connecting the power plug, check if the voltage setting of the machine matches the outlet voltage.
- If AC outlet with ground terminal is used, grounding is not needed. If not, never forget earthing (earthing method above).

PREPARATION BEFORE WASHING
Preparation
■ Connect the water supply hose to the water supply inlet.
■ Set the supply selector lever to "WASH" for washing and rinsing to "SPIN" for interim spin rinse.
- Note : The water Selector lever should not be placed near the center (as shown in Fig. (A) otherwise water flows to the wash and spin tub simultaneously).


(Fig. A)
- Lay down the drain hose. Keep the drain hose flip ped down while washing is in process
Before washing
1 Check the washing instruc-tions labels on the clothing to be washed.

2 Remove any objects from the pockets of the clothing. Object left in the pockets may damage the clothing or washing machine (especially cause clogging of the drain hose).

3 After separating an oiled or dyed laundry, wash.

HOW TO WASH
1 Set the drain selector to "WA SH • R IN SE" position.

DRAIN SELECTOR
2 Set the water selector to "WASH".

WATER SELECTOR
3 Open the water tap and fill water in the wash tub about halfway to the desired water level.

HOW TO WASH
4 Put the appropriate amount of detergent and the laundry into the wash tub. And add water to the desired water level.

- Refer to TABLES for REFERENCE on page 15.
5 Select the wash selector to "GENTLE", "NORMAL" "STRONG" according to kinds and quantity of the laundry.
(Not available in
WP-9030/9031/9220/90050)

WASH SELECTOR
- Refer to TABLES for REFERENCE on page 15.
6 Set the desired wash time.

WASH TIMER
(For WP-9033/
WP-951S/1021S
WP-1221S/9526S
WP-9256)

WASH TIMER
(For WP-9030/9031/9032/
WP-770/1020/1220
WP-9250/9251)
WP-9521/9220/9224
WP-90050/92082
- Refer to TABLE for REFERENCE on page 15 for information on how to select the appropriate washing time.
7 When washing is finished, select the drain selector to "DRAIN" position and drain the water out.

DRAIN SELECTOR
8 Spinning in the spin dryer basket :
- Put the laundry into the spin dryer basket.
- Put the laundry down lightly.
- Place the safety cover horizontally on the laundry.
- Set the desired spin time with the spin timer.

Interim spin rinse
■ Interim spin rinse prior to regular rinsing will remove sudsy water from the laundry and improve rinsing efficiency.
1 After washingPut the laundry into the spin dryer basket.Place the safety cover hori-zontally on the laundry. | 2 Set the water selector to "SPIN". WATER SELECTOR WATER SELECTOR | 3 Allow the water to flow appropriately.4 Turn off the water supply, close the safety cover-2 and spin dryer cover. |
5 Set the desired spin time with the spin timer. | 6 After spinningPut the laundry into the wash tub and rinse. |  |
Economical water supply rinse
■ This course allows you to save water as this course is to rinse after feeding appropriate water to the tub.
1 Set the drain selector to “WASH ● RINSE” position and feed appropriate water to the tub.  Water Selector Drain Selector Spin Timer Water Selector Drain Selector Spin Timer | 2 Set the rinse time with the wash timer.  WASH TIMER (For WP-9033/ WP-951S/1021S WP-1221S/9526S WP-9256) WASH TIMER (For WP-9030/9031/9032/ WP-770/1020/1220 WP-9250/9251)WP-9521/9220/9224WP-90050/92082 WASH TIMER (For WP-9033/ WP-951S/1021S WP-1221S/9526S WP-9256) WASH TIMER (For WP-9030/9031/9032/ WP-770/1020/1220 WP-9250/9251)WP-9521/9220/9224WP-90050/92082 | 3 Put the laundry into the spin dryer basket and set the spin time with the spin timer.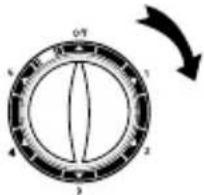 |
| 4 Put the laundry into the wash tub and repeat 1 to 3 course |
HOW TO RINSE
Continuous water supply rinse
■ The course is to rinse while feeding water continuously
1 Set the drain selector to "WASH • RINSE position.

Water Selector Drain Selector

2 Put the laundry into the wash tub and open the water faucet.

3 Set the rinse time with the wash timer and feed water continuously


WASH TIMER
(For WP-9033/
WP-951S/1021S
WP-1221S/9526S
WP-9256)
WASH TIMER
(For WP-9030/9031/9032/
WP-770/1020/1220
WP-9250/9251)
WP-9521/9220/9224
WP-90050/92082
HOW TO SPIN
- Put the laundry evenly into the spin dryer basket.
- Put the laundry down lightly.
- Place the safety cover horizontally on the top of the laundry.
- Close the spin dryer cover.
- Set the spin timer according to the following table.

Safety cover

SPIN TIME GUIDE
| Type of clothing | Spin Time |
| Thin fabrics (synthetic fabrics, mixed fabrics) | 1 minute |
| Sweaters (synthetic fabrics) | 1~3 minutes |
| Cotton underwear | 3~5 minutes |
| Sheets, towels | 5 minutes |
- If the spin dryer basket is off-balance and vibrates excessively, stop the spinning, rearrange the clothes evenly, and then resume spinning.
- If the spinning fail to stop when the spin dryer cover is opened, the brake is out of order. Immediately stop using the machine and request repair service.

CAUTION : For woollen clothes, spin for 1 min. only for clothes protection.
AFTER FINISHING
- Remove the laundry from the spin dryer basket and close the spin dryer cover
- If there is water in the wash tub, set the drain selector to "DRAIN" in order to drain it out.
- Disconnect the power cord from the electrical outlet.
- Clean the washing machine. (Refer to CARE AND MAINTENANCE on page 16\~17).

REFERENCE
TABLE 1. WEIGHT GUIDE FOR CLOTHES
| Type of Clothing | Type of Fabric | Weight Per Piece |
| Under shirt | Cotton | 150 g |
| Handkerchief | Cotton | 50 g |
| Bath towel | Cotton | 300 g |
| Shirt | Mixed fabric | 200 g |
| Socks (1 pair) | Mixed fabric | 50 g |
| Pajama (shirt and pants) | Cotton | 500 g |
| Winter undershirt | Woollen | 600 g |
| Workclothes | Mixed fabric | 800 g |
| Blouse | Mixed fabric | 200 g |
TABLE 2. GUIDE FOR WASHING **(A=WP-9030/9031/9220/90050)
| Type of Fabric | Wash Time | Water Level | Amount of Water (Ltr.) | Amount of Detergent(gms) |
| A** | B** | A** | B** |
| Synthetics, Silk, Woolen, Knits | 2~5 min. | L | 40 | 47 | 45~49 | 45~49 |
| M | 45 | 54 | 51~55 | 51~55 |
| H | 50 | 62 | 56~60 | 56~66 |
| Cotton, Linen | 5~10 min. | L | 40 | 47 | 45~49 | 45~49 |
| M | 45 | 54 | 51~55 | 51~55 |
| H | 50 | 62 | 56~60 | 56~66 |
| Very soiled cotton and linen | 10~15 min. | L | 40 | 47 | 45~49 | 45~49 |
| M | 45 | 54 | 51~55 | 51~55 |
| H | 50 | 62 | 56~60 | 56~66 |
TABLE 3. GUIDE FOR WASHING (WITHOUT SOAK) **(A=WP-9032/770/9521/9224/9250/9251/92082 C=WP-1020/1220)
| Type of Fabric | Wash Selector | Wash Time | Water Level | Amount of Water (Ltr) | Amount of Detergent (gms) |
| A** | B** | C** | A** | B** | C** |
| Woollen, Knits | Gentle | ~5 min. | H | 50 | 62 | 66 | 60~66 | 56~66 | 60~72 |
| Synthetics, Silk | GENTLE | 8~12 min. | L | 40 | 47 | 51 | 45~51 | 45~49 | 45~51 |
| M | 45 | 54 | 58 | 54~58 | 51~55 | 54~58 |
| H | 50 | 62 | 66 | 60~66 | 56~66 | 60~72 |
| Cotton, Linen | NORMAL | 12~15 min. | L | 40 | 47 | 51 | 45~51 | 45~49 | 45~51 |
| M | 45 | 54 | 58 | 54~58 | 51~55 | 54~58 |
| H | 50 | 62 | 66 | 60~68 | 56~66 | 60~72 |
| Very soiled cotton and linen | STRONG | 12~15 min. | L | 40 | 47 | 51 | 45~51 | 45~49 | 45~51 |
| M | 45 | 54 | 58 | 54~58 | 51~55 | 54~58 |
| H | 50 | 62 | 66 | 60~66 | 56~66 | 60~72. |
TABLE 4. GUIDE FOR WASHING (WITH SOAK) ** (A=WP-9033/9526S/9256 C=WP-951S/1021S/1221S)
| Type of Fabric | Wash Selector | Wash Time | Water Level | Amount of Water (Ltr) | Amount of Detergent (gms) |
| A** | B** | C** | A** | B** | C** |
| Soiled | Soak-Gentle | 15+15 min. | L | 40 | 47 | 51 | 45~51 | 45~51 | 45~51 |
| Synthetics, Silk | M | 45 | 54 | 58 | 54~58 | 54~58 | 54~58 |
| H | 50 | 62 | 66 | 60~66 | 60~66 | 60~72 |
| Soiled | Soak-Normal | 20+15 min. | L | 40 | 47 | 51 | 45~51 | 45~51 | 45~51 |
| Cotton, Linen | M | 45 | 54 | 58 | 54~58 | 54~58 | 54~58 |
| H | 50 | 62 | 66 | 60~66 | 60~66 | 60~72 |
| Worst Condition | Soak-Strong | 25+15 min. | L | 40 | 47 | 51 | 45~51 | 45~51 | 45~51 |
| Very soiled cotton and linen | M | 45 | 54 | 58 | 54~58 | 54~58 | 54~58 |
| H | 50 | 62 | 66 | 60~66 | 60~66 | 60~72 |
Notes :
- Amount of laundry is a weight of dry laundry.
• Detergent is a general synthetic detergent.

CAUTION : Fill in wash to height 20mm above the level you desire. When washing will start water level will automatically come to level you desire.
- Be sure to disconnect the power cord from the electric outlet before starting care and maintenance.
Washing machine
■ If the washing machine itself becomes dirty
- The washing machine can be cleaned with a mild liquid detergent. Never use abrasive cleaner or chemicals such as benzene or thinner to clean the washing machine, because these materials will damage both the painted surfaces and the plastic parts.
Pulsator
If a button or some other object gets caught in the pulsator.
- Take out the pulsator cap with “-” type driver. (Fig. a)
- Use a screwdriver to loosen the screw in the center of the pulsator and lift the pulsator straight up in order to remove the button or other object. (Fig.b)
- Replace the pulsator and tighten the screw.
- Replace the pulsator cap.
Fig. a
Fig. b
Overflow filter & Rotation filter-C
1 2 3
Lift up the area A of the overflow filter.
Take out the rotation filter-C by pulling in direction shown.
Pull the overflow filter forward from the wash tub in the direction of the arrow.
Turn the net over and rinse in water.
456
Use a brush or your hand to remove all of the lints which has adhered to the overflow filter.
Insert the overflow filter back into the wash tub.
Insert the rotation filter-C back into the overflow filter.
If only rotation filter-C need washing, proceed the process 1 > 3 > 6 on the upper figure.
CARE AND MAINTENANCE
Spin dryer basket
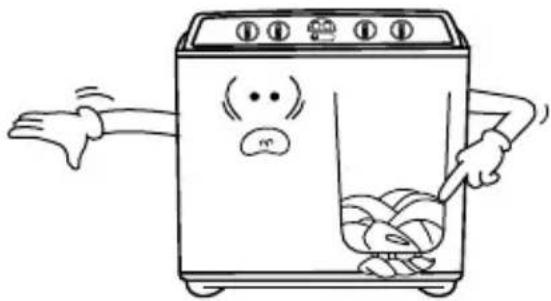
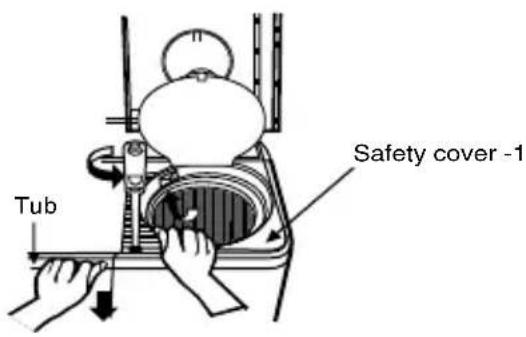
■ If clothing becomes trapped between the spin dryer basket and the spin tub.
- Unscrew the screw at the left corner in the safety cover-1.
- Take hold of the front of the safety cover-1
- Pull the tub by the other hand.
- Pull the safety cover-1 upward.
- Remove the article of clothing.
- Close the safety cover-1, pressing down on it so that it fits securely into the spin tub.
- Tighten the screw at the left corner in the safety cover-1.
TROUBLESHOOTING GUIDE
Before requesting service
| Troubles Checking points |
| Motor does not operate | Is the power cord firmly plugged in?Is a household fuse blown?Is the timer turned to a suitable point except "OFF"?Is the wash selector set to a suitable position except "OFF" ? (wash motor)Is the "START/PAUSE" button pressed? |
| Spin dryer basket does not operate | Is there any cloth dropped between the basket and tub?Is the spin dryer cover closed? |
| Water does not enter washer | Is the water faucet hooked up?Is the water faucet frozen? |
| No draining | Is the drain hose laid down?Is the drain hose twisted?Is the threshold higher? |
![graph TD A["Door S/W"] -->|BK| B["SPIN TIMER"] B --> C["BY"] C --> D["BK(BK,BL)"] D --> E["WH:RD(8R)"] E --> F["GN:GN(YL)"] F --> G["WASH TIMER"] G --> H["T1"] H --> I["BUZZER WH"] I --> J["BY"] J --> K["RD WASH MOTOR"] K --> L["BY"] L --> M["SPIN MOTOR"] M --> N["BY"] N --> O["WASH TIMER"] O --> P[…](/content/2026/05/951137/images/44bb1dbe4418cacaef97f6600fdc1b57a0d036afb01086ee54caf42c00e6c655.jpg)
For WP-9030/9031/9032/770
WP-9220/9224
WP-1020/1220
WP-9250/9251/9521/92082
![graph TD A["Door S/W"] --> B["OR/WH"] B --> C["SPIN TIMER"] C --> D["BY"] D --> E["BK/BK/BL/BL"] E --> F["SPIN MOTOR"] F --> G["BY"] G --> H["WASH MOTOR"] H --> I["BUZZER"] I --> J["T1"] J --> K["T2"] K --> L["T3"] L --> M["T4"] M --> N["T5"] N --> O["WL"] O --> P["WH"] P --> Q["RD"] Q --> R["WASH M…](/content/2026/05/951137/images/9c756177c6dfb9da50f77f71f82d7addf18a87ed519149cbe5227c710c0b7b84.jpg)
For WP-9033/951S
WP-1021S/1221S/
WP-9256/9526S
![graph TD A["GO(NYL/GN)"] --> B["SPIN MOTOR"] B --> C["BY BK/YL"] C --> D["OR/WH"] D --> E["WASH TIMER"] E --> F["BY BK"] F --> G["SPIN TIMER"] G --> H["BY BK/YL"] H --> I["BY RD"] I --> J["WASH MOTOR"] J --> K["BY BK/YL"] K --> L["BY RD"] L --> M["BY WASH TIMER"] M --> N["BY BK/YL"] N --> O["BY WASH…](/content/2026/05/951137/images/42c77c4db8d4e617821d82a9e8b755e63e4d5884b98b66abafc8f20816bd3aa5.jpg)
For WP-9030/9031/90050
(Without Buzzer)
SPECIFICATIONS
WP-9030/9031/9032/9033/770/9220/9224/90050
| Power Source | On Specification Label |
| Water level | High : 50 l |
| Water Pressure | Less than 1,00kPa (1kgf/cm2) |
| Dimensions | 775 x 467 x 941 mm (W x D x H) |
| Weight (net) | 27.0 kg |
WP-951S/1020/1021S/1220*/1221S*
| Power Source | On Specification Label |
| Water level | High : 66 l |
| Water Pressure | Less than 100kPa (1kgf/cm2) |
| Dimensions | 810 x 490 x 991 mm (W x D x H) |
| Weight (net) | 30.5 kg |
| *Dimensions | 810 x 490 x 1001 mm (W x D x H) |
| *Weight (net) | 31.0 kg |
WP-9521/9526S/9250/9251/9256/92082
| Power Source | On Specification Label |
| Water level | High : 50 l |
| Water Pressure | Less than 100kPa ( 1kgf/cm2 ) |
| Dimensions | 775 x 467 x 964 mm (W x D x H) |
| Weight (net) | 28.0 kg |

LG Electronics