
INFDSP4425 - Hi-Fi System INFINITY - Free user manual and instructions
Find the device manual for free INFDSP4425 INFINITY in PDF.


| Product Type | Hi-Fi System |
| Brand | Infinity |
| Model | INFDSP4425 |
| Dimensions (W x H x D) | 300 x 200 x 250 mm |
| Weight | 5.0 kg |
| Power Supply | AC 100-240V, 50/60Hz |
| Power Output | 2 x 20W RMS |
| Speaker Configuration | 2-way bass reflex |
| Playback Media | CD, CD-R/RW, MP3 |
| Radio Tuner | FM/AM, 30 presets |
| Connectivity | Bluetooth 5.0, USB, AUX, Headphone out |
| Remote Control | Yes, included |
| Display | LED, white text |
| Alarm / Sleep Timer | Yes, programmable |
| Equalizer | Preset modes: Rock, Pop, Classic, Jazz |
| Maintenance | Clean with dry lint-free cloth. Avoid solvents. |
| Safety | Do not expose to rain or moisture. Unplug during severe storms. |
| Spare Parts / Repairability | Contact Infinity support for service. Repairability score: 6/10 |
Frequently Asked Questions - INFDSP4425 INFINITY
User questions about INFDSP4425 INFINITY
0 question about this device. Answer the ones you know or ask your own.
Ask a new question about this device
Download the instructions for your Hi-Fi System in PDF format for free! Find your manual INFDSP4425 - INFINITY and take your electronic device back in hand. On this page are published all the documents necessary for the use of your device. INFDSP4425 by INFINITY.
USER MANUAL INFDSP4425 INFINITY
natural_image
Line drawing of an hourglass-shaped object with internal vertical lines and a small protrusion at the base (no text or symbols)Owner's Manual
EN
Mode d'emploi
FR
Your product has been designed to provide you the performance and ease of operation you expect from Infinity. Take time to read this manual before operating or installing your amplifier. This manual describes general installation guidelines and operation instructions. Please note that proper installation of mobile audio components requires qualified experience with mechanical and electrical procedures. If you do not have the knowledge and tools to perform this installation, we strongly recommend consulting an authorized Infinity dealer about your installation options.
EN
TABLE OF CONTENTS
PRODUCT DESCRIPTION....2
WHAT'S IN THE BOX 2
INSTALLATION AND WIRING 2
SETTING THE SOUND 4
SPECIFICATIONS....6
TROUBLESHOOTING 6
PRODUCT DESCRIPTION
The Infinity DSP Amplifier is an audio processor for fine-tuning of aftermarket audio systems. It is a self-contained audio system with 4-channel powered audio outputs and 2-channel preamp outputs, an easy-to-use tuning interface a novice can understand, and detailed tuning capabilities to satisfy even experienced installers. With a USB connection to access the tuning interface using a Windows PC, you can control fully variable crossovers, selectable 0-to-48 dB slopes, time delay, 31-band parametric or graphic EQ adjustment, assignable input-to-output mixer with input channel summing, channel gain, master volume control, clipping indicator to ensure the audio output is not distorted, and ability to save up to 10 presets.
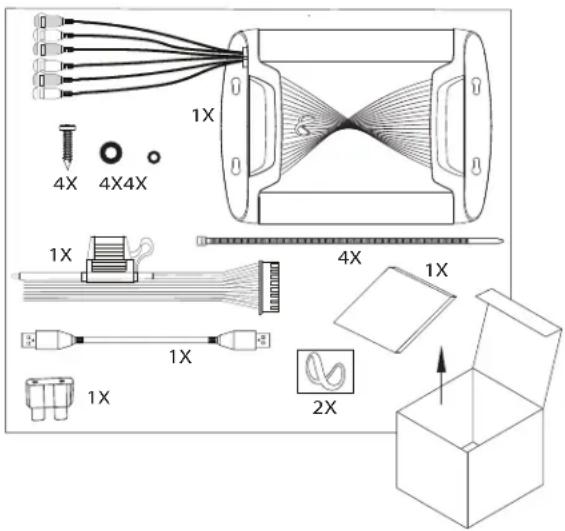
WHAT'S IN THE BOX
1x amplifier 4x tie wraps 1x power/speaker
cable
Stainless steel
1x spare fuse 1x USB to PC cable
mounting hardware
2x Infinity stickers 1x owner's manual
INSTALLATION AND WIRING
IMPORTANT: Disconnect the vehicle's negative (-) battery terminal before beginning the installation.
- Wear protective eyewear when using tools.
- Choose a safe mounting location. Check clearances on both sides of the location. Be sure that screws will not puncture brake or fuel lines or wiring harnesses, and that wire routing will not interfere with vehicle operation. Use caution when drilling or cutting.
- When making electrical connections, make sure they are secure and properly insulated.
-
Do not mount the amplifier with the heat sink facing downward, as this interferes with cooling.
-
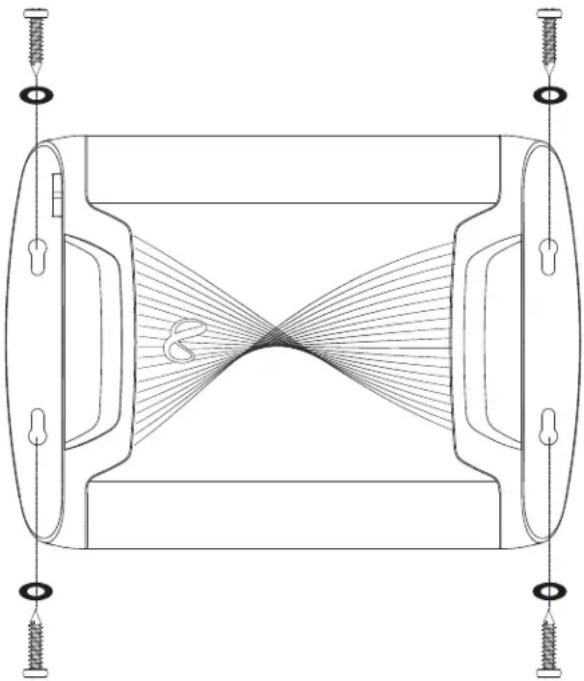
Using the amplifier as a template, mark the locations of the holes on the mounting surface.
- Drill pilot holes in the mounting surface.
- Attach the amplifier to the mounting surface with the included sheet metal screws and washers.
natural_image
Technical line drawing of a symmetrical mechanical component with internal flow lines and mounting holes (no text or symbols)Power and Ground Connections
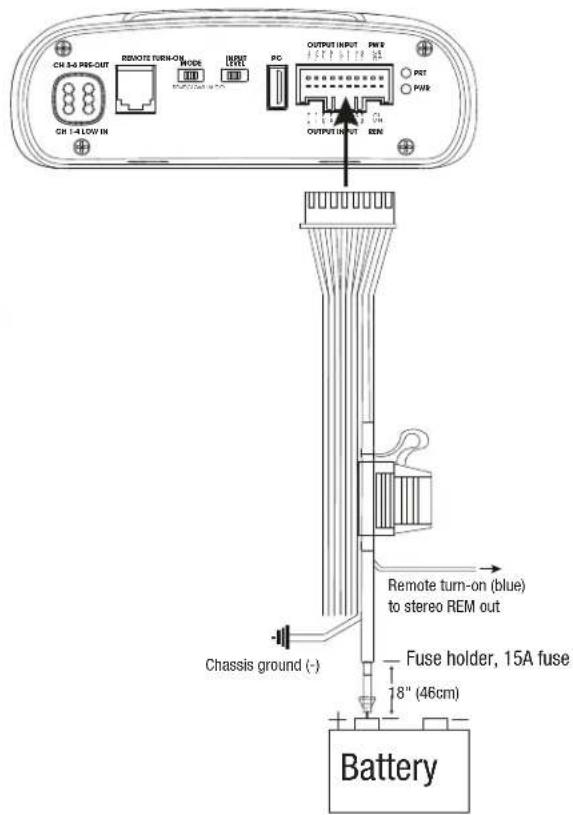
- Power: Connect the yellow +12V power wire to the positive terminal of the vehicle's battery. Make sure the 15A fuse and fuse holder are within 18" (457mm) of the battery.
- Ground: Connect the black GND wire to the negative terminal of the vehicle's battery, or to the vehicle's chassis near the battery with a screw. NOTE: If possible, remove any paint from the chassis for best contact. It is recommended to use a star washer below the ring connector for a secure connection.
- Remote-In: Connect the red remote turn-on wire to the "Remote Out" lead of the source unit, if using low-level signal inputs with an aftermarket stereo. NOTE: If you are using high-level signal inputs (your vehicle's speaker wires), you can choose to have the 12-volt DC offset feature turn the amplifier on when you turn on the vehicle power, or the audio-sensing feature turn on the amplifier when it detects audio signal. In either case, you will not have to connect the remote turn-on wire and can tape or cap it off to prevent the introduction of noise.
- Remote-Out: Connect the blue remote-out wire to external devices that require 12V turn-on after the Infinity INFDSP4425. This connection will allow turn-on of 12V devices after the amplifier wakes from turn-on by 12V remote-in, DC offset or audio signal sensing input.
- When all connections are made, plug the harness into the amplifier.
Power/Protect indicators
The power light will illuminate in green when the amplifier is getting power and playing. The protect light will illuminate in red if the amp enters protect mode in the event of conditions such as over/under voltage, amplifier output circuit failure, or excessive heat.
EN
Signal input
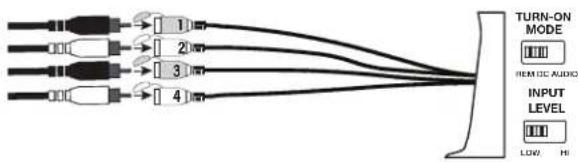
- Line-level inputs: If your source unit offers front and rear preamp outputs, connect them to the front and rear line-level inputs on the wire harness using RCA patch cables.
Note: when using low-level signals and remote turn-on lead, set the "Turn-on Mode" switch to "REM" and the "Input Level" switch to "LOW".
flowchart
graph LR
    A["1"] --> B["2"]
    C["3"] --> D["4"]
    E["4"] --> B["2"]
    F["4"] --> D["4"]
    B --> G["TURN-ON MODE"]
    D --> G["TURN-ON MODE"]
    G --> H["REMO DC AUDIO"]
    G --> I["INPUT LEVEL"]
    G --> J["LOW HI"]
- High-level inputs: If your audio system's source unit does not have line-level outputs, connect the speaker output wires of your source unit to the high-level input wires of the amplifier harness.
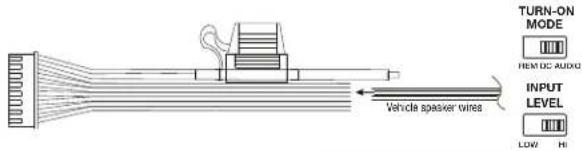
| Wire color High-level input | |
| Orange Front left + | |
| Orange/Black Front left - | |
| Blue Front right + | |
| Blue/Black Front right - | |
| Red | Rear left + |
| Red/Black | Rear left - |
| Yellow | Rear right + |
| Yellow/Black | Rear right - |
NOTE: When using high-level signals, set the "Turn-on Mode" switch to "DC" (to turn on when it receives battery power) or "AUDIO" (to turn on when it senses signal from your source unit), and the "Input Level" switch to "HI".
Speaker Output Connections
Connect your speakers to the wires of the speaker output wiring harness, observing proper polarity: connect each positive (+) lead to the appropriate positive (+) speaker terminal, and negative (-) lead to the appropriate negative (-) speaker terminal. Then plug the speaker output wiring harness into the DSP Amplifier.
IMPORTANT: None of the speaker output channels can be bridged.
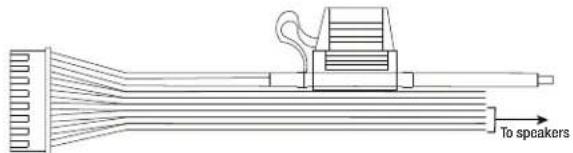
| Wire color | Output channel |
| White | Front left + |
| White/Black | Front left - |
| Gray | Front right + |
| Gray/Black | Front right - |
| Green | Rear left + |
| Green/Black | Rear left - |
| Purple | Rear right + |
| Purple/Black | Rear right - |
Connecting a second amplifier (sold separately)
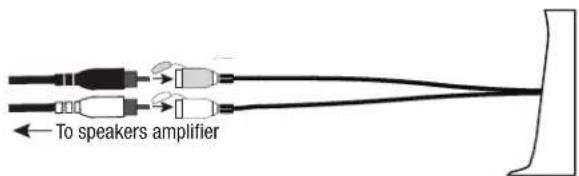
To incorporate more power into your system, you can send a second amplifier a full-range audio signal using the preamp outputs of the INFDSP4425. Use an RCA patch cable to connect the preamp outputs to the preamp inputs of the second amplifier.
Connecting the remote bass level control (sold separately)
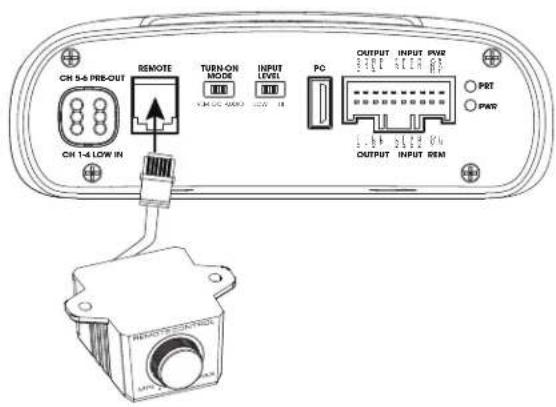
The INFDSP4425 is compatible with the optional Infinity RBC remote bass level controller, available at your local Infinity dealer. To connect it, plug into the appropriate input on the control panel of the INFDSP4425. Mount the remote in a convenient location, such as under the dash, using sheet metal screws.
SETTING THE SOUND
Download the tuning software from Infinity.com
- Connect to internet with your Windows PC or laptop and go to Infinity.comxxxx and download the Graphic User Interface for the INFDSP4425 Amplifier.
- Complete the software installation setup wizard before you connect your computer to your Infinity DSP Amplifier.
- Double-click "Infinity DSP software" from its saved location.
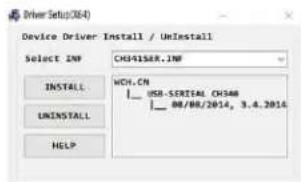
- Double-click "USB driver" and click install
NOTE: Make sure to allow it to make changes to your computer if your anti-virus software requests it.
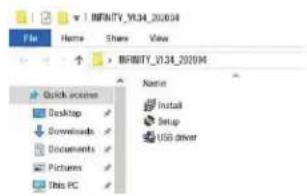
- Double-click "setup.exe".
NOTE: Make sure to allow it to make changes to your computer if your anti-virus software requests it.
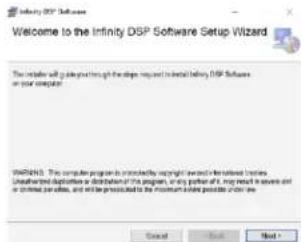
- Click "Next" in the Infinity DSP Software Setup Wizard.
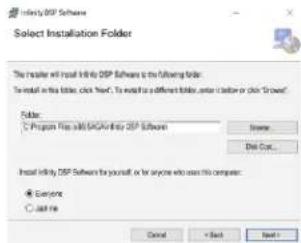
- Select preferred installation folder, or click "next" to choose the default location.
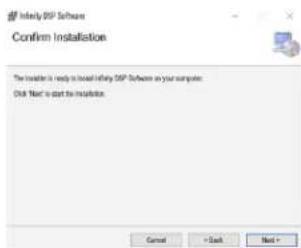
- Click "Next" to confirm installation. Again, make sure that your anti-virus protection allows installation to be completed.
- Sit back and wait while software installation completes...
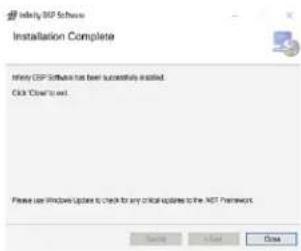
- Installation Complete! Close setup wizard and continue to next section. You should see this icon on your computer screen.

EN
Connecting Infinity DSP Amplifier to your Windows PC
- Connect your Windows PC to the INFDSP4425 with the included USB cable.
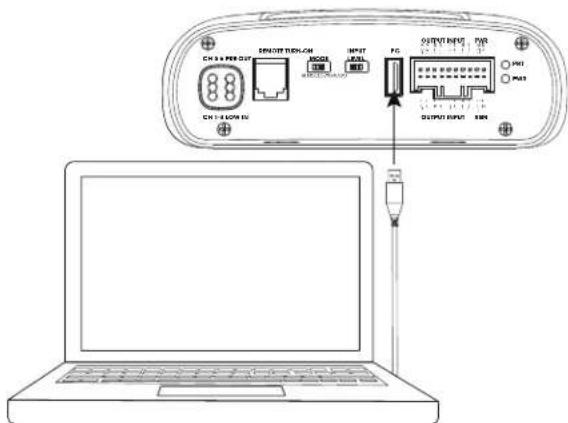
- Make sure to turn your audio source down to a low volume level before powering your Infinity DSP Amplifier.
- Activate/power your audio system and make sure all parts are operating.
NOTE: The INFDSP4425 will come with pre-flashed EQ profile that will act as "EQ Off" or preset 1.
- With your PC connected to the Infinity DSP Amplifier, double-click Infinity software icon on your PC and open DSP tuning software.

NOTE: If the software appears with a window showing "No Comm Port Available", close the software, disconnect the USB cable from your computer, and return to step 4. Otherwise, proceed to step 5. The DSP software will function when not connected to the amplifier if you would like to familiarize yourself with the software and create a pre-configured audio system setup.
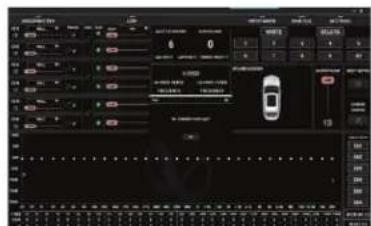
- Connection complete! Continue on to Tuning Procedure...
User Interface Functions
EN
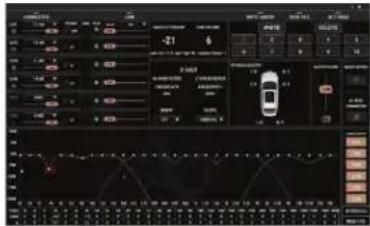
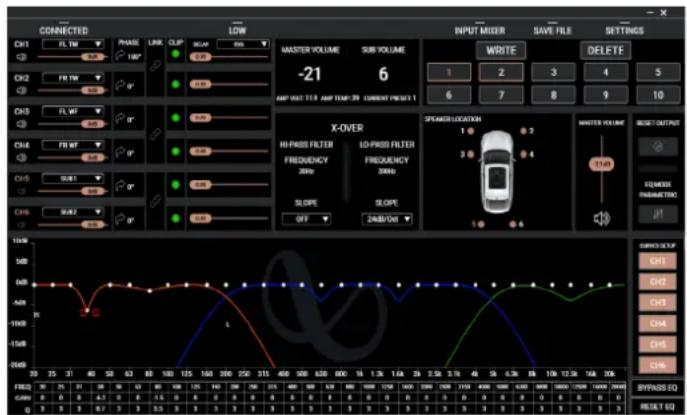
The Infinity tuning software features the following controls:
- Connected and Disconnected. With this feature, you can determine if the amplifier is communicating with your Windows PC.
- Low and High. With this feature, you can determine if the amplifier is set to lo-level input or hi-level input on the amplifier control panel.
- Assign speaker locations to channels. With this feature, you can designate the type of speaker and location in the car each output channel of the DSP is connected to.
- Individual channel volume control and muting. You can raise and lower the relative volume level of each channel individually to ensure perfect level-matching and output.
- 0°/180° phase adjustment. You can set the phase of each channel individually for balanced, dynamic performance.
- Linking of paired channels. You can link paired channels to apply volume and tone controls evenly.
- Clipping indicator. Each channel features a clipping indicator to let you know if 10% or greater distortion is present. If it is, lower the volume level of the clipping channel until the indicator turns off. For best results, measure with a 100Hz and 1kHz @ 0dB sine wave.
- Time delay. With time delay, you can adjust the focal point of the sound field to your desired location in the car. The closer a speaker is to your desired focal-point location, the longer its delay should be. To adjust, drag the slider to the right to increase the delay, and to the left to decrease it.
- Information display. This display shows you the following statistics:
a. The master volume value
b. The current subwoofer volume level for channel 5 or 6, and adjustable from -30dB to +6dB when using the remote bass control.
c. The voltage the amplifier is reading at the power input
d. The amplifier's current operating temperature
e. Your current system configuration.
-
X-OVER. You can adjust the crossover points of the high-pass and low-pass crossovers for each channel to maximize the performance efficiency of each speaker connected to the DSP Amplifier. The selectable crossover slope for each channel can be set to 0/6/12/18/24/30/36/42/48dB.
-
Speaker location view. This shows which amplifier channels are in use, and the locations of the corresponding speakers in the vehicle.
- Master Volume. You can raise or lower the volume of the entire system, or mute the entire system. Drag the slider up to raise the volume, and down to lower it. Click the speaker icon to mute the audio system.
- Write/Delete. "Write" lets you save up to 10 preferred audio settings as presets, which you can apply to the amplifier. Click "write", then click a preset number to save a preset. Click "delete", then click a preset number to delete a preset.
- Input Mixer. The Input Mixer feature lets you assign the audio signal from an input channel to a specific output channel. You can also sum the signals of multiple input channels and apply the resulting signal to a specific output channel, usually to allow a speaker to play the widest range of frequencies possible when using speaker-level input signals.
EXAMPLE: If you have connected a tweeter (high-frequency response only) to input channel 1 and a midrange speaker (midrange-frequency response only) to channel 2, you can sum the signals of each of these inputs, and assign the new, full-range signal to a full-range speaker you have connected to output channel 1.
- Save File. This allows you to save saving a preferred audio system configuration to a folder on your computer for use later. It also allows you to retrieve a previous configuration from your computer and apply it to your connected amplifier.
- Settings. You can control the following options in the "Settings" menu:
a. Language selection for the software: choose from English, Spanish, French, Chinese, and Japanese
b. Power settings for delaying the amplifier turn-on/off should your vehicle require either option
c. Firmware upgrades and resetting the software to original factory settings
- Reset Output. This button lets you reset the type of speaker, and location in the vehicle, of each output channel.
- EQ Mode. This lets you choose either a 31 band parametric or graphic EQ to adjust for each channel.
- Parametric or Graphic EQ. You can apply custom EQ curves to each channel you have connected. To increase the level of a given frequency, drag the slider up. To lower it, drag the slider down.
- EQ Setup. This EQ setup feature lets you click to select the channels to which you want to apply EQ curves.
NOTE: The FREQ, GAIN, and Q fields shows the values of the changes made by moving the EQ sliders. Only Gain is adjustable when in Graphic EQ Mode. Frequency, Gain, and Q are all adjustable in Parametric EQ Mode. These adjustments can be made using the sliders or entering specific values in the F, G, and Q fields.
- Bypass EQ and Restore EQ. "Bypass EQ" allow you to return your EQ settings to flat so you can hear the differences made during your tuning. "Restore EQ" returns all EQ adjustments to the previous settings.
- Reset EQ - This button returns the EQ to factory settings.
SPECIFICATIONS
• RMS Power Output (Watts x Channel) @ 4-ohm: 25W x 4
• RMS Power Output (Watts x Channel) @ 2-ohm: 35W x 4
• Amplifier Class: Class A/B
• Battery Voltage Range (Volts): 8V to 16V
- Selectable Turn-on Modes: 12V, Audio Signal Sense, DC Offset, 12V remote output
• LED Indicator: red/green
• Frequency Response: 10Hz to 22kHz @ -3dB
• Signal-to-Noise Ratio: >80dB
• Signal-to-Noise Ratio (CEA-2006): 68dB
• THD+N @ 4-ohm: <10%
- Input Sensitivity, selectable: High-level or low-level
- Input Sensitivity - Low Level: 680mV to 6V
- Input Sensitivity - High Level: 1.6V to 15V
• Channel 5 & 6 pre-out voltage: 4V
- Variable Crossovers: All Channels: HPF, LPF, Band-pass w/ selectable 0 to 48dB slope
• Gain, variable: All Channels with PC
- Subwoofer level, variable: Channels 5 & 6 in PC software or using accessory remote control from -30dB to +6dB
- Fuse Rating: 15A
• Minimum Recommended Power/Ground Wire Gauge: 8awg
- Speaker Level Inputs: Yes
- Remote Bass Control: Yes, Infinity RBC sold separately
• Length: 9-3/8" (237.5mm)
• Width: 5-11/16" (144mm)
• Height: 1-15/16" (49.5mm)
• Weight: Approx. 1000g
• Protection: DC, OVP, UVP, OCP, OTP
TROUBLESHOOTING
No audio and POWER INDICATOR is off.
- No voltage at BATT+ and/or REM terminals, or bad or no ground connection. Check voltages at amplifier terminals with VOM.
No audio and PROTECT INDICATOR flashes
- DC voltage on amplifier output. Amplifier may need service; see enclosed warranty card for service information.
No audio and PROTECT and POWER INDICATORS flash.
- Voltage less than 9V on BATT+ connection. Check vehicle charging system.
No audio and PROTECT INDICATOR is on.
- Amplifier is overheated. Make sure amplifier cooling is not blocked at mounting location. Verify that speaker-system impedance is within specified limits. Or, there may be voltage greater than 16V (or less than 8V) on BATT+ connection. Check vehicle charging system.
Amplifier fuse keeps blowing.
- The wiring is connected incorrectly or there is a short circuit. Review installation precautions and procedures. Check wiring connections.
Distorted audio.
- Gain is not set properly. Check Individual Channel Volume and/or Mater Volume settings. Check speaker wires for shorts or grounds. Amplifier or source unit may be defective.
Distorted audio and PROTECT INDICATOR flashes.
- Short circuit in speaker or wire. Remove speaker leads one at a time to locate shorted speaker or wire, and repair.
Music lacks dynamics or "punch."
- Speakers are not connected properly. Use 0°/180° phase adjustment, and check speaker connections at amplifier and speaker.
Infinity by HARMAN®
natural_image
X-ray image of a smartphone showing internal components and body structure (no text or symbols)Engineered for the ultimate sound experience.
Infinity DSP Amplifier is an audio processor for fine-tuning of aftermarket audio systems. It is a self-contained audio system with 4-channel audio inputs, 4-channel powered audio outputs, 2-channel pre-amp outputs, easy to use tuning interface and detailed tuning capabilities to satisfy any enthusiast. With a USB connection to access the tuning interface using a Windows PC, you can control fully variable crossovers, selectable 0-to-48dB slopes, time delay, 31-band parametric or graphic EQ adjustment, assignable input to output mixer with input channel summing, channel gain, master volume control, clipping indicator to ensure the audio output is not distorted and ability to save up to 10 presets.
Features
▶ Small footprint, All-in-One Class A/B Amplifier with DSP Control
▶ Everything You Need to Get Started
▶ Simple Tuning Interface with Complex Features
▶ Versatile Connectivity
▶ Convenient Bass Control
▶ Conformal Coated PCB
▶ Harman Standard Reliability Testing
▶ Infinity Industrial Design
Small footprint, All-in-One Class A/B Amplifier with DSP Control
Infinity DSP Amplifier has everything you need to create a professional sound quality audio system with the ability to mount your amplifier in tight spaces.
Everything You Need to Get Started
Infinity DSP Amplifier has everything you need to create an audio system, or expand your existing one, plus the ability to add more power by using it as a line driver when you are ready for your next power upgrade.
Simple Tuning Interface with Complex Features
Easy-to-use tuning interface anyone can understand, learn and control with enough horsepower to satisfy experienced installers. The Windows PC user interface includes variable crossover control, 0-to-48dB selectable slopes, 31-band parametric or graphic EQ adjustment, time delay in 0.2ms, output clipping indicator, assignable input to output mixer with input channel summing, output channel gain, master volume control, clipping indicator and ability to save up to 10 presets.
Versatile Connectivity
Balanced differential inputs to provide you with the best sound quality & noise rejection, and accepts RCA or speaker-level inputs so it will integrate into almost any system. Plus, all wire connections are conveniently labeled to make installation a cinch.
Convenient Bass Control
Wired remote control (sold separately) allows for quick adjustment of low frequency output with -30 to +6dB adjustment directly from the driver's seat.
Conformal Coated PCB
Your Infinity DSP Amplifier is engineered to withstand harsh conditions present in a wide variety of applications, using conformal coated circuit boards to ensure flawless power delivery, year after year.
Harman Standard Reliability Testing
Infinity is one of the greatest audio brands in the world. This is not a coincidence given the arduous testing and quality control. We take our craft seriously and want every consumer to have a world class experience that lasts and lasts.
Infinity Industrial Design
At Infinity, we take pride in our iconic design heritage. Our design team took great care to ensure that your Infinity DSP Amplifier will look amazing mounted wherever your music takes you. The smooth curve of the amplifier body, angular end cap design, and five-line staff with Infinity logo all tie together with our classic, current and future design language while concentrating on the design of your lifestyle.
What's in the Box:
DSP Amplifier
Wiring Harness
USB Tuning Cable
Mounting hardware
Spare fuse
4x wire ties
2x Infinity sticker
Quick Start Guide
Specifications:
Max Power: 200W peak
▶ RMS Power Output @ 4Ω: 25W x 4, <10% THD+N
Full-Range Pre-Amp Outputs: 2-channel
▶ Variable crossovers with hi-pass, lo-pass, band-pass capability & adjustable 0-to-48dB slopes
▶ Selectable EQ adjustment: Parametric or Graphic
▶ Selectable 12V/Signal Sense/DC Offset turn-on modes, with 12V remote output
▶ Frequency Response 10Hz to 22kHz @ -3dB
▶ Signal-to-Noise Ratio: >80dB @ 4Ω
Subwoofer Level Control -30dB to +6dB (sold separately)
▶ Fuse Rating: 15A
▶ Operating Voltage: 8V to 16V
- EN
- TABLE OF CONTENTS
- PRODUCT DESCRIPTION
- WHAT'S IN THE BOX
- INSTALLATION AND WIRING
- Power and Ground Connections
- Power/Protect indicators
- Signal input
- Speaker Output Connections
- Connecting a second amplifier (sold separately)
- Connecting the remote bass level control (sold separately)
- SETTING THE SOUND
- Download the tuning software from Infinity.com
- Connecting Infinity DSP Amplifier to your Windows PC
- User Interface Functions
- SPECIFICATIONS
- TROUBLESHOOTING
- No audio and POWER INDICATOR is off.
- No audio and PROTECT INDICATOR flashes
- No audio and PROTECT and POWER INDICATORS flash.
- No audio and PROTECT INDICATOR is on.
- Amplifier fuse keeps blowing.
- Distorted audio.
- Distorted audio and PROTECT INDICATOR flashes.
- Music lacks dynamics or "punch."
- Infinity by HARMAN®
- Engineered for the ultimate sound experience.
- Features
- Small footprint, All-in-One Class A/B Amplifier with DSP Control
- Everything You Need to Get Started
- Simple Tuning Interface with Complex Features
- Versatile Connectivity
- Convenient Bass Control
- Conformal Coated PCB
- Harman Standard Reliability Testing
- Infinity Industrial Design
- What's in the Box:
- Specifications:
Brand : INFINITY
Model : INFDSP4425
Category : Hi-Fi System