
Road Scout - Detector COBRA - Free user manual and instructions
Find the device manual for free Road Scout COBRA in PDF.


| Product Type | Radar/Laser Detector |
| Brand | Cobra |
| Model | Road Scout |
| Dimensions (approximate) | 4.5 x 2.5 x 1.0 inches |
| Weight (approximate) | 5 ounces |
| Power Source | 12V DC via cigarette lighter adapter |
| Display | Digital display with signal strength and band indicators |
| Bands Detected | X, K, Ka, Laser, POP |
| Audio Alerts | Voice alerts with selectable language |
| Mute Function | Yes, with auto mute option |
| Driving Modes | City, Highway, and Auto |
| Display Dimming | Auto dim based on ambient light |
| VG-2 Immunity | Yes (undetectable to radar detector detectors) |
| Red Light Camera Alerts | Yes (via built-in database, if applicable) |
| Mounting | Windshield suction cup mount included |
| Cable | Coiled 12V power cord with straight plug |
| Maintenance | Clean with soft, dry cloth; avoid liquids |
| Safety | Use only in areas where radar detectors are legal |
| Spare Parts | Not sold separately; non-serviceable unit |
| Repairability | Not user-serviceable; contact Cobra support |
| Warranty | 1 year limited warranty |
Frequently Asked Questions - Road Scout COBRA
User questions about Road Scout COBRA
0 question about this device. Answer the ones you know or ask your own.
Ask a new question about this device
Download the instructions for your Detector in PDF format for free! Find your manual Road Scout - COBRA and take your electronic device back in hand. On this page are published all the documents necessary for the use of your device. Road Scout by COBRA.
USER MANUAL Road Scout COBRA
The Cobra Road Scout combines the peace of mind of a dash cam with the meaningful alerts of a radar/laser detector. Videos recorded store location, date and time to tell your side of the story. Automatic speed-based filtering intelligently reduces false alerts.
- Road Scout's HD Performance accurately identifies real threats sooner than other detectors, and with threat direction arrows, provides you with location information about these threats.
- Updatable IVT Filter™ automatically reduces false alerts from moving In-Vehicle Technology sources such as collision avoidance systems and adaptive cruise control.
- Road Scout features a customizable display that intuitively displays threat information and device status at a glance.
- Access to the DEFENDER Database, which warns you of verified speed traps, speed cameras, and red light cameras.
- Built in Bluetooth® technology gives you access to iRadar.
This real-time ticket-protection network warns you of upcoming alerts received and reported by other users in the area, and gives you access to local speed limit data for over-speed alerts.

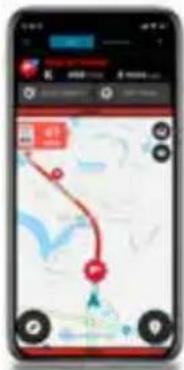
2 - IN - 1 PROTECTION
Installation
Your new detector comes with our latest EZ Mag Mount™. Simply slide the detector onto the mounting bracket fully and that's it. To remove the detector from the mount, simply pull the detector off the mount.
Mounting Tips:
- Center of windshield between driver and passenger.
- Ensure clear view of road ahead and sky above.
- Avoid windshield wipers and heavily tinted areas.
To mount the detector in your vehicle:
1 Remove backing from EZ Mag Mount.
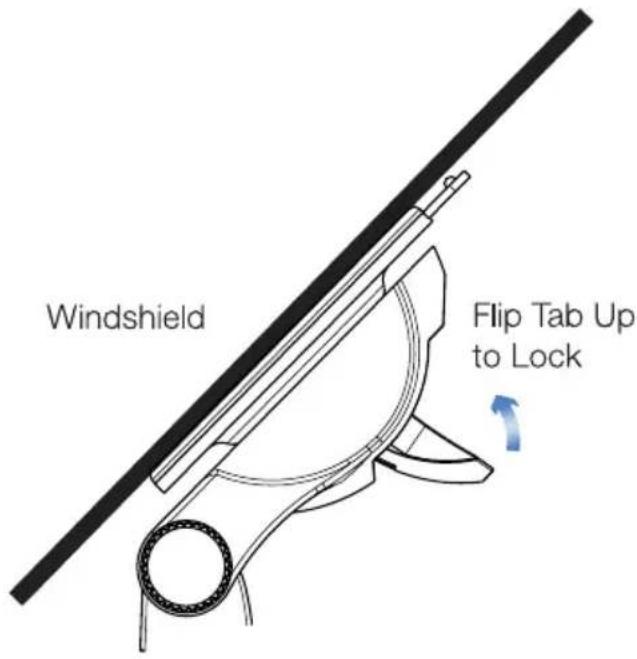
2 Firmly press EZ Mag Mount onto windshield and flip locking clamp to secure.
3 Tilt the display end of the detector slightly upward and engage with the mounting bracket. The EZ Mag Mount™ magnet holds the detector firmly in place.
4 To adjust view, loosen thumb wheel and adjust angle of mounting bracket. Tighten thumb wheel to secure.
5 To remove the detector, simply lift the display end of the detector upward. The detector will release from the mount.
6 To remove mount from windshield, release locking clamp and pull tab on top of EZ Mag Mount.
EZ Mag Mount Care Instructions:
To clean your EZ Mag Mount, simply rinse under warm water, gently wipe off any debris and allow to air dry.
Attach EZ Mag Mount™ to Road Scout
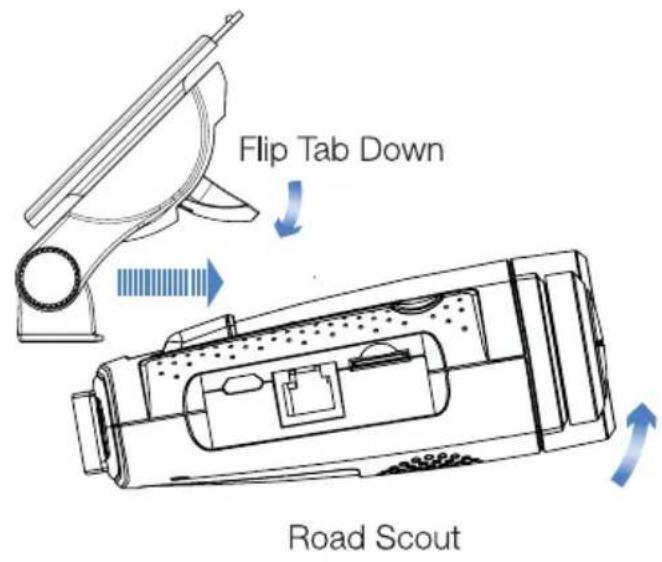
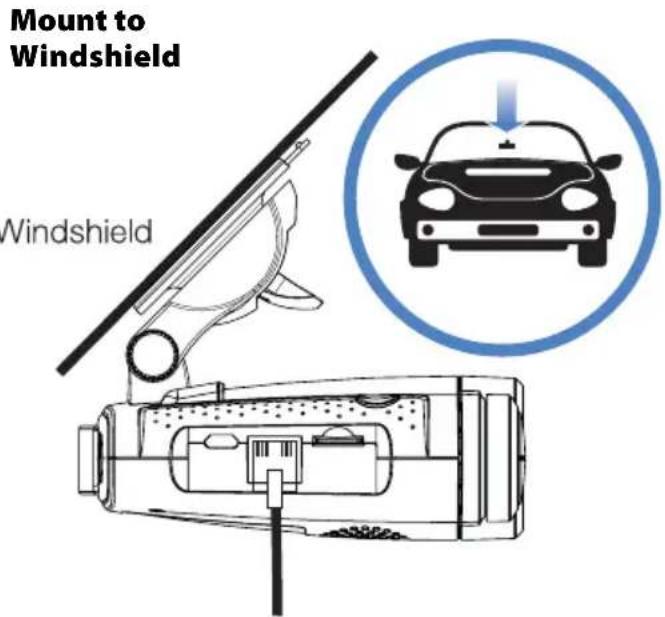
Lock Mount
Connect detector to your smartphone via Bluetooth®
1 Power on Road Scout.
2 Install and run the Cobra iRadar app on your smartphone.
3 In the iRadar app, press the Settings button then select "Devices".
4 Select "Road Scout" from the list.
5 Road Scout will display "Connected" when it has paired. Press the Settings button then Home to return to the Map screen.
Note: the first time you run the app, you will be prompted to register a new account.
natural_image
Red square app icon with white stylized 'S' logo and black horizontal lines below (no text or symbols)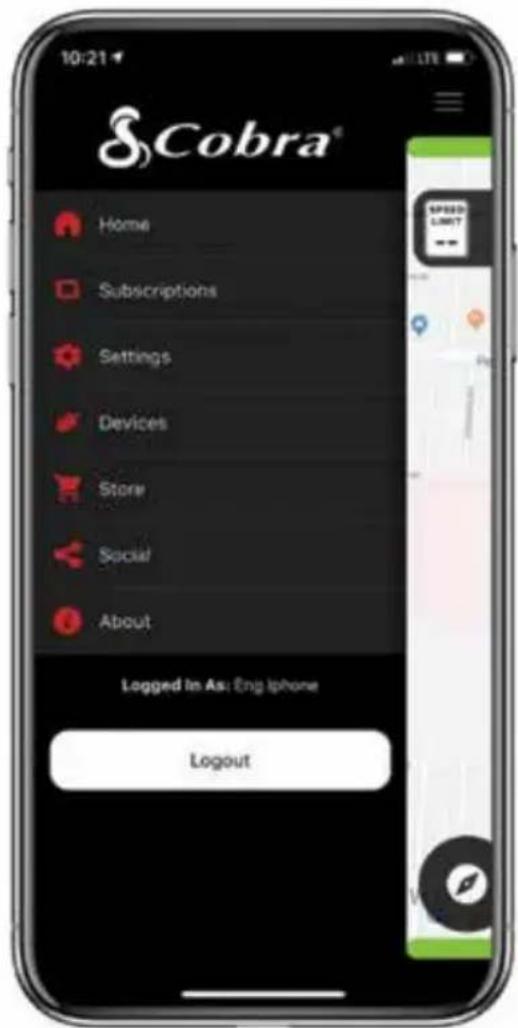
Controls & Features
Using Road Scout
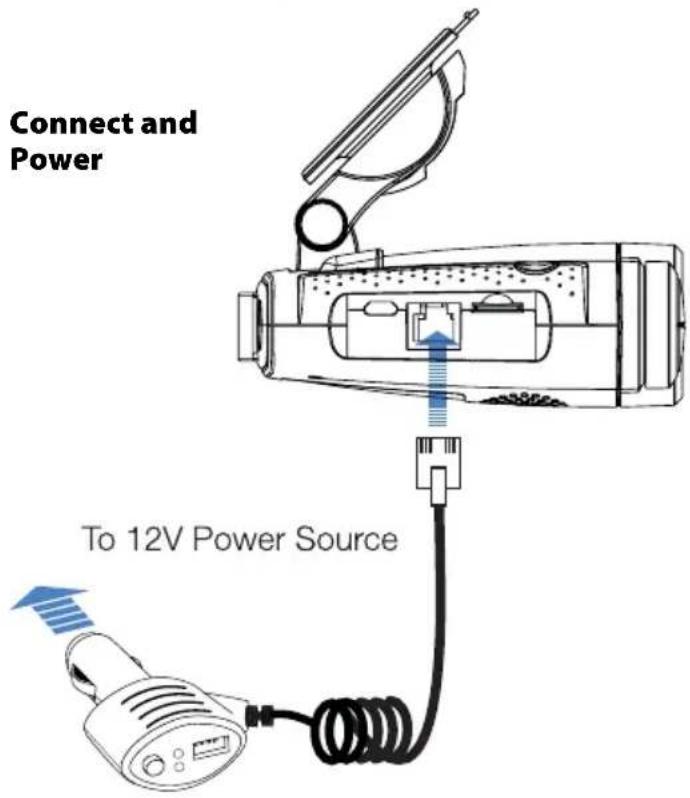
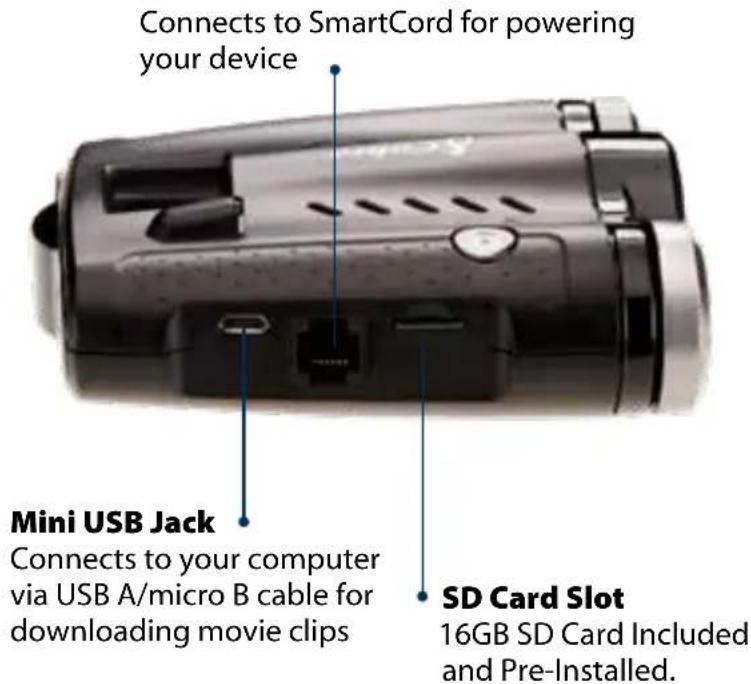
1 Plug small end of SmartCord into modular jack on Road Scout and large end of SmartCord into your car's lighter/accessory socket.
2 Road Scout should power on automatically. If not, press the device's power button.
NOTE: You can easily access and customize all of your Settings and Preferences by pressing and holding the SEN and BRT buttons. See Settings and Preferences for details.
Modular Jack
Using SmartCord USB
- Mute Button:
- Press to mute the audio for a specific alert.
- Press three times to lock out a false alert.
- Press twice while receiving a locked-out alert to unlock.
-
When connected to iRadar press and hold the mute button on unit or cord to manually report to other users a verified X or K-band alert, or a police officer observing traffic.
-
Alert Light: Blinks red when receiving a laser alert.
- Power Light: Lights green when device is powered on.
- USB Charging Port: Charge smartphones, tablets and other USB-charged devices.
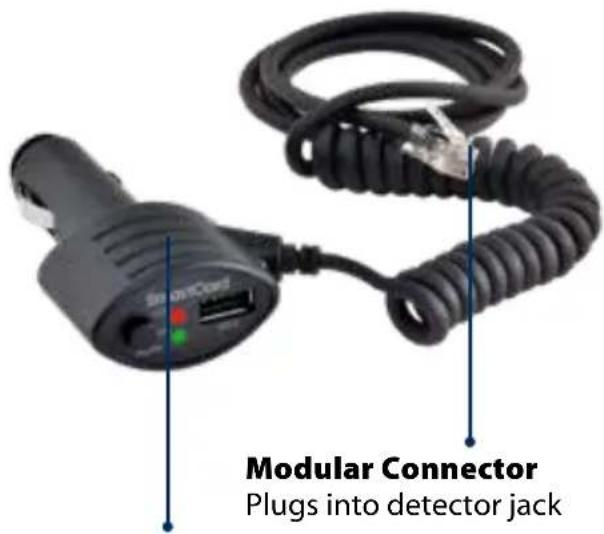
Smartcord USB Adapter
Connects to lighter/accessory socket
Controls
&
Features
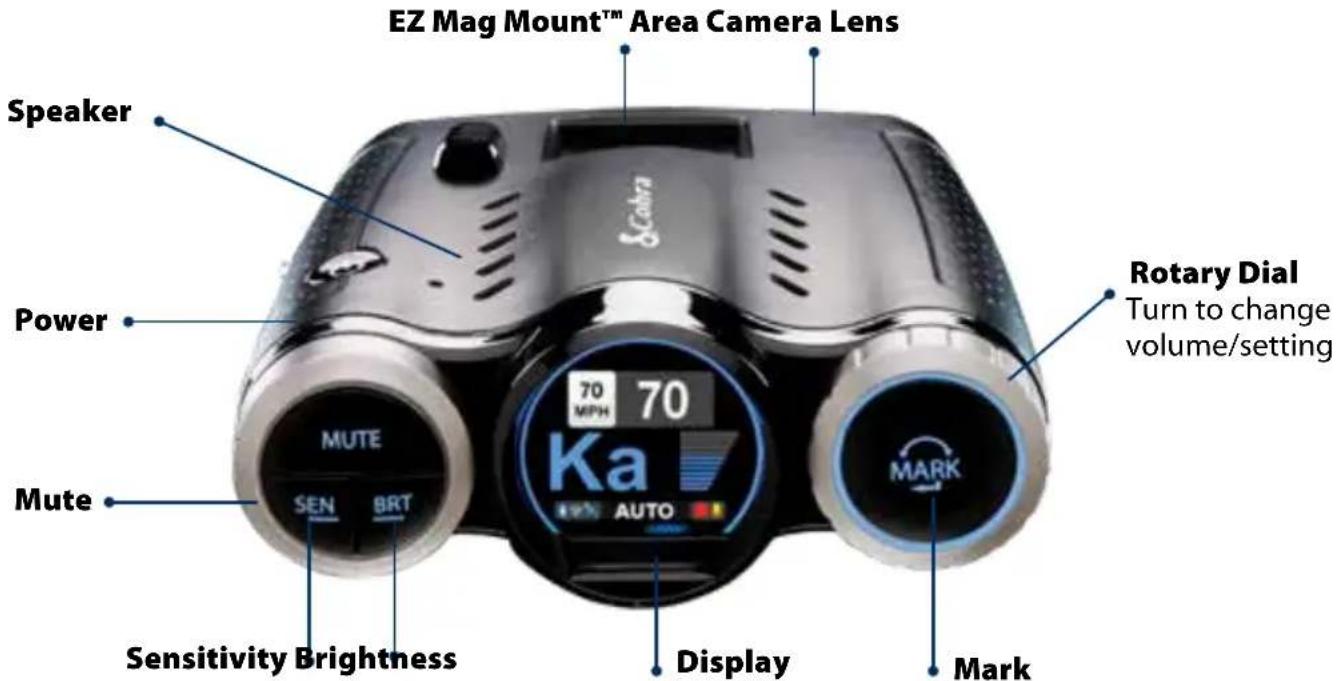
Power
Press to power on. Hold for two seconds to power off.
SEN
Press SEN to adjust the X and K band radar detection sensitivity/range. Auto = speed adjusted. The slower you travel, the shorter the X and K band detection range. At 50 mph and above, X and K detection range is at maximum. Ka band detection range is always at maximum, regardless of the SEN setting.
MUTE
To silence an alert, press the MUTE button during the alert. Once the radar or laser encounter has passed, the mute will disengage, and the audio will return to your preset level. You can also silence an alert by pressing the SmartCord MUTE button.
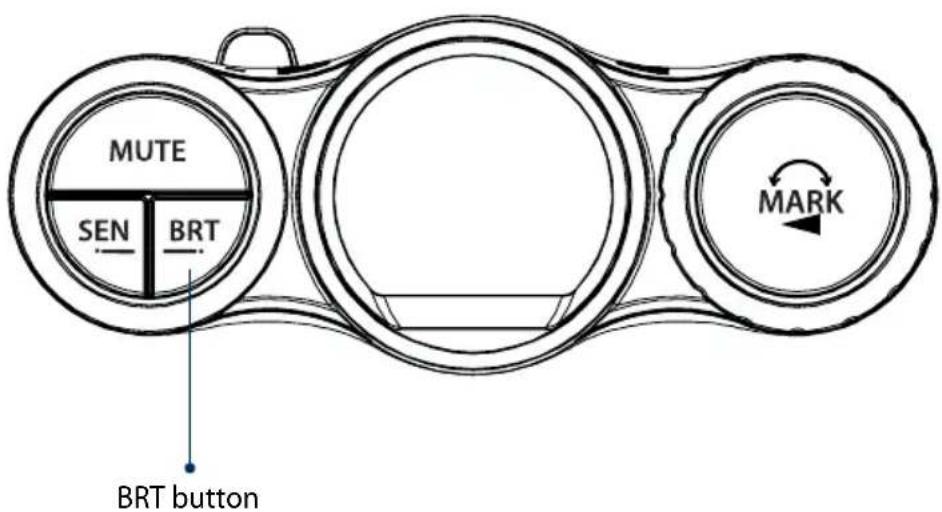
BRT
Brightness. Press to adjust the display brightness.
MARK
To mark a location for future alerts:
- Press MARK twice
- Rotate the Volume/Selector Ring to select the type of marker
- Press MARK again to confirm
To unmark a location alert, press MARK twice while receiving a marker alert.
To start an emergency recording, hold MARK until Road Scout states "Emergency Recording On". The recording will automatically stop according to the Loop Clip Time setting.
Rotary Dial
Rotate to adjust volume. When in the Menu or using MARK, rotate to change the setting.
Display
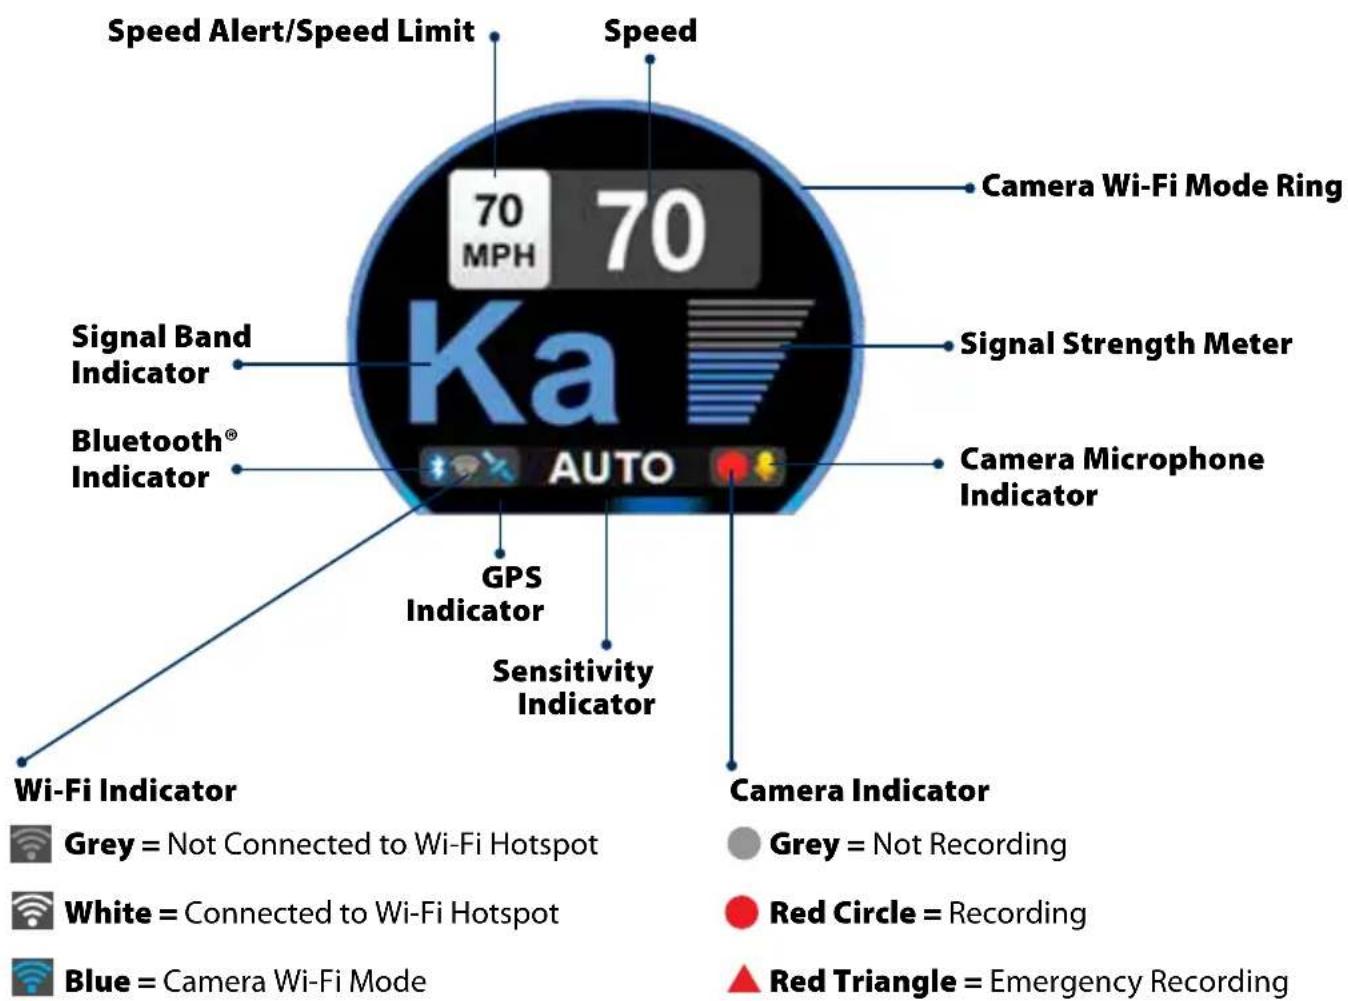
Signal Band Indicator
Displays the type alert:
- X Band (commonly false alerts)
- K band (used by police radar and false alerts)
- Ka band (almost always police radar)
- Laser (almost always police)
Signal Strength Meter
Displays the signal strength, or how close, the alert is. The more alert bars displayed, the stronger the signal strength.
Sensitivity Indicator
Displays the selected radar sensitivity mode (see Controls & Features for more information).
Bluetooth® Indicator
Bluetooth icon appears when Road Scout is connected to device via Bluetooth.
Wi-Fi Indicator
Displays Wi-Fi status.
GPS Indicator
Satellite icon appears when Road Scout is receiving GPS satellite data.
Speed Alert/Speed Limit
When area is black and OSP is displayed, alerts when the Speed Alert setting is exceeded. When the area is white and the MPH/KPH is displayed, indicates speed limit.
“- -” indicates speed limit data is not available.
Speed
Displays current speed. When Speed Display is off, displays the vehicle voltage.
Camera Wi-Fi Mode Ring
Displayed when Road Scout is in Camera Wi-Fi mode (default setting).
Camera Indicator
Displays status of the dash cam.
Camera Microphone Indicator
Microphone icon appears when audio recording is enabled.
Menu
The Menu is used to adjust settings. The menu is divided into Radar and CAM (Camera) categories.
To enter the Menu:
- Hold SEN and BRT buttons until MENU is displayed.
To navigate the Menu:
- The selected Menu item is displayed in white text.
- Rotate the Volume Ring to change the selected (white) Menu item.
- Press the MARK button to set the selected Menu item.
To restore factory default settings:
- Hold the Power, SEN and BRT buttons while powering on the Road Scout.
- Press MARK button when prompted.
Radar Menu
User Mode
- Standard
In this mode, you can access and customize all settings (factory default).
- Simple
In this mode, you can access and customize Units (English or metric) and display color only. All other settings are set to the factory defaults.
Scanning Bar
Turn the scanning bar on the display off or on (factory default is on).
Display Color
The display graphics can be changed to blue, green, red or orange to match the instrument lighting of your vehicle (factory default is blue).
Alert Ring
Turn the Alert Ring around the MARK button off or on. The Alert Light glows during an alert (factory default is on).
Speed Display
Turn current speed display off or on (factory default is on). When Speed Display is off, the vehicle voltage is displayed.
Speed Mute
Select the Speed Mute speed. For all alerts received while traveling below the specified speed, the Road Scout will sound a simple double-beep alert (factory default is 20 mph).
Speed Alert
When you exceed the set speed, the background for your current speed will change to red and a voice prompt will announce "over speed" (factory default is 70 mph).
Over Speed Limit
Note: this setting only applies when Road Scout is connected to a Wi-Fi hotspot.
When the speed limit is exceeded by the set speed, the background for your current speed will change to red and a voice prompt will announce “over speed”. When the speed limit is not available Road Scout uses your Speed Alert setting (factory default is Speed Limit).
Frequency Display
Displays the frequency of the currently displayed radar alert (factory default is Off).
AutoMute
Automatically reduces the volume of an alert several seconds after the beginning of the alert (factory default is on).
Units
Units for distance and speed (factory default is English).
Language
Language for voice and text (factory default is English).
Voice
Turn off and on voice announcements for alerts and settings (factory default is on).
Radar Menu
GPS Filter
Toggles GPS off and on. GPS Filtering enables you to store and lock out, or ignore, fixed location false alerts in Road Scout's memory. Common sources of fixed location false alerts are storefront automatic door openers and motion sensors. To store a false alert location, press MUTE three times during an alert. Subsequent alerts to this signal will be muted and displayed in grey (factory default is on).
Note that GPS Filter will not lock out moving false alerts commonly caused by vehicle blind spot monitoring and collision avoidance systems.
Auto Power
Automatically turns off Road Scout after the set time period. This is especially useful if your vehicle has a constant-on lighter outlet (factory default is 4 Hours).
Band Settings
The band settings menu allows you to toggle off and on Radar bands, K and Ka narrow band segments, Laser, and TSR filtering.
WARNING: Do not turn off any bands or narrow band segments unless you are absolutely certain there are no traffic radar guns using that specific band or narrow band in your area.
To navigate Band Settings, select Modify, then repeatedly press MARK to cycle through all of the band settings. Use the Rotary Dial to turn off and on a band setting.
To exit Band Settings, select Exit or simply wait a few seconds.
Disabling K band allows you to select K Narrow segments 1-4.
K Narrow 1 23.950 - 24.050 GHz
K Narrow 2 24.050 - 24.110 GHz
K Narrow 3 24.110 - 24.176 GHz
K Narrow 4 24.176 - 24.250 GHz
Disabling Ka band allows you to select Ka Narrow segments 1-7.
Ka Narrow 1 33.400 - 33.700 GHz
Ka Narrow 2 33.700 - 33.900 GHz
Ka Narrow 3 33.900 - 34.600 GHz
Ka Narrow 4 34.600 - 34.800 GHz
Ka Narrow 5 34.800 - 35.400 GHz
Ka Narrow 6 35.400 - 35.600 GHz
Ka Narrow 7 35.600 - 36.000 GHz
Location Settings
The Location Settings menu allows you to toggle off and on each type of location based alert.
To navigate Location Settings, select Modify, then repeatedly press MARK to cycle through the location settings. Use the Rotary Dial to turn off and on a location setting.
To exit Location Settings, select Exit or simply wait a few seconds.
Bluetooth®
Turn off and on Bluetooth communication (factory default is on).
Wi-Fi
Turn off and on Wi-Fi communication (factory default is on).
Delete User Locations
Press MARK to delete all locations you have saved.
Delete Lockouts
Press MARK to delete all false alert lockouts you have saved (see GPS Filter for more information about lockouts).
Version Information
Press MARK to display software versions. Use the Rotary Dial to cycle through the various components software versions.
Update
Requires iRadar mode Wi-Fi connection to a hotspot with internet access.
Forces Road Scout to check for Database and Firmware software updates.
Press MARK to restore all Radar Menu settings to factory defaults.
Software Updates
Road Scout's red light and speed camera database and firmware are updated by connecting Road Scout to a Wi-Fi hotspot with internet access.
Once connected, Road Scout will check for available updates. If an update is available, Road Scout will prompt you to install the update. If you refuse to perform the update, or if the prompt times out, Road Scout will check again when it connects to a Wi-Fi hotspot.
Importantly note that Defender database updates require first registering Road Scout to activate the included 90 day Defender subscription. Defender subscriptions are available at Cobra.com.
Camera Menu
Recording
Turns off and on recording (factory default is on).
Microphone
Turns off and on the microphone for audio recording (factory default is on).
Loop Clip Time
Sets the duration of movie clips. Clips can be set in 1, 3, or 5 minute lengths (factory default is 3 minutes).
G-Sensor
Road Scout includes a built in G-Sensor which allows the device to determine when the car has been in a collision. If a collision is detected, Road Scout automatically locks the recording being made at the time of the accident. You can use this setting to set the sensitivity of the G-Sensor from 1-3 or turn it off. Level 1 is the easiest to activate and may lock files due to smaller bumps causing the SD card to fill up quickly with protected files. Level 3 is the hardest to activate the G-sensor (factory default is Level 2).
Cobra Watermark
Turn off or on placing a Cobra watermark on saved movie clips (factory default is on).
Date/Time Stamp
Turn off and on placing a date and time stamp on movie clips (factory default is on).
Press MARK to restore all Camera Menu settings to factory defaults.
Format SD Card
Press MARK to format the SD card.
Importantly, be aware that this will erase all content on the SD card including locked SOS movie clips.
Setup Camera
Press MARK to enter the Camera Setup menu, then repeatedly press MARK to cycle through all of the camera setup options.
- Select the correct Time Zone for your location.
- Select Standard Time or Daylight Saving Time.
- Aim Camera. Use the Rotary Dial to display the camera's footage on the screen to properly aim the camera.
Dash Cam Instructions
View and Edit Videos on Your Smartphone
Install and run the Cobra Drive HD your smartphone

app on
1 Once you have installed the Cobra Drive HD App, follow the steps below to connect the Road Scout to your smartphone:
2 Press and hold the BRT button until "CAMERA" appears on the display. If "iRADAR" appears, press and hold BRT again.
3 On your smartphone: Go to the Wi-Fi menu in your smartphone's settings and select network SSID: "Road Scout"; if a password is required, enter "12345678".
Note: make sure this step is done on your smartphone settings, not on the app.
4 After your smartphone Wi-Fi is connected to the Road Scout, launch the Drive HD App.
Live view from the dash cam will be available on the Drive HD screen on your smartphone, as well as a full control menu.
You're all set!
View and Edit Videos on Your Computer
The Drive HD Dash Cam Player allows you to view, edit and share video clips
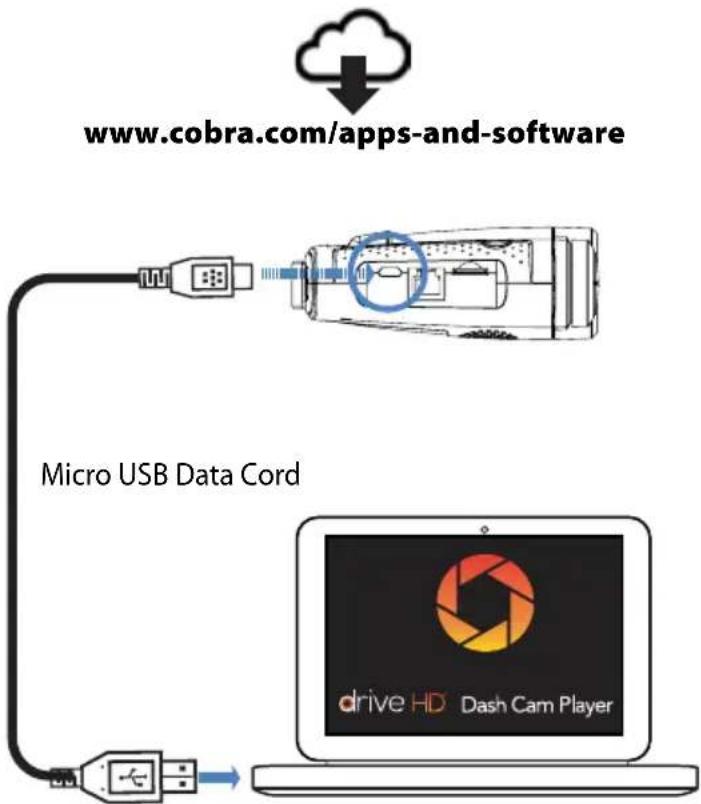
flowchart
graph TD
    A["Cloud"] --> B["Micro USB Data Cord"]
    B --> C["Drive HD Dash Cam Player"]
Radar Detector Advanced Connectivity Mode
Connected car users (vehicle Wi-Fi hotspot required)
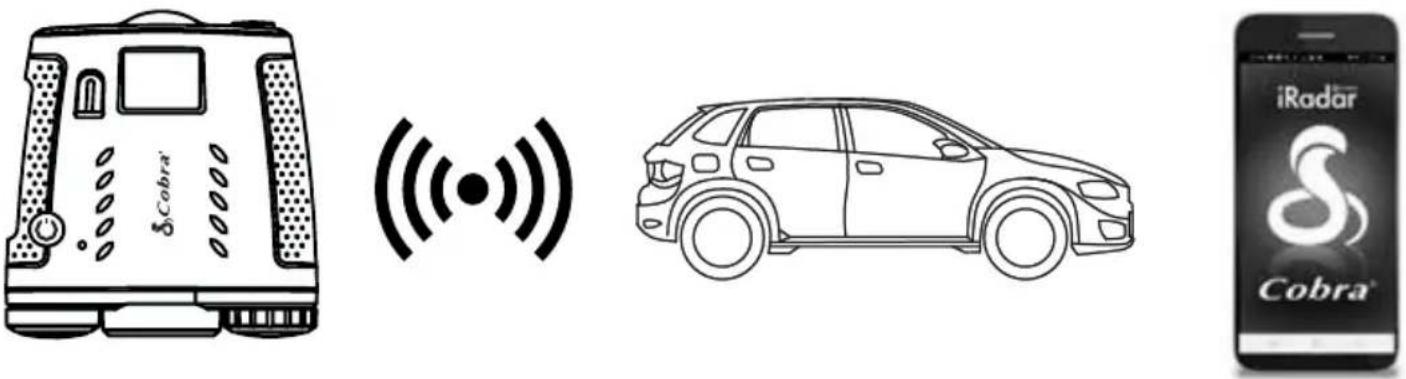
Road Scout can connect to your car's Wi-Fi (if available) for quick in-car convenient software and database updates in real time that keeps your detector accurate and precise, minimizing false alerts and improving detection.
You'll also get exclusive iRadar Community alerts without having to launch the app on your smartphone.
Connecting Road Scout to Wi-Fi
Note: Road Scout only supports 2.4 GHz Wi-Fi (802.11 b/g/n).
1 Connect Road Scout to your smartphone via Bluetooth using the directions on page 5.
2 Press and hold the BRT button until "iRADAR" appears on the display. If "CAMERA" appears, press and hold BRT again.
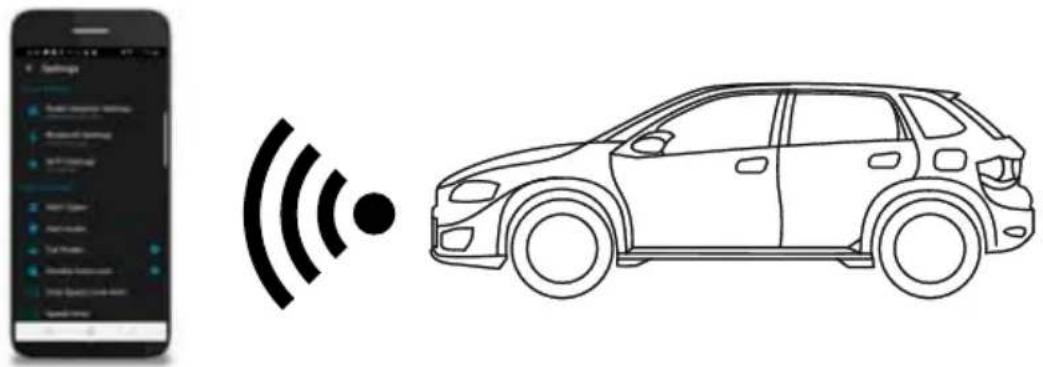
3 Connect your smartphone to your car's Wi-Fi (or make sure it is connected), through the phone's SETTINGS.
4 In the iRadar app, go to Wi-Fi Settings > Connect to Wi-Fi > enter your car's hotspot password and press JOIN.
After successfully connecting to Wi-Fi, the Wi-Fi icon will change to white.
Your phone will share the car's hotspot SSID and password with your Road Scout so the Road Scout can connect directly to the hotspot.
Troubleshooting
Road Scout does not seem to detect radar consistently at long ranges
If you are using AUTO sensitivity mode, be aware that AUTO mode changes Road Scout's X and K radar detection range based on your speed. The slower you are traveling, the shorter the detection range of X and K radar. Select HIGH sensitivity mode to always detect radar at maximum distances.
Because Ka radar is primarily used by police, Road Scout always detects Ka band radar at maximum range.
I cannot get my phone to find Road Scout's Wi-Fi in camera mode
On Road Scout, make sure you have Camera Wi-Fi mode enabled. When in Camera Wi-Fi mode, a ring surrounds the display (see the Display illustration on page 9). If there is no ring around the display, hold the BRT button until "CAMERA" Wi-Fi Mode" is announced.
You may also be in an area with alot of Wi-Fi interference. Try enabling Airplane mode on your phone then check the Wi-Fi menu on your phone again.
I am connected to my car's Wi-Fi hotspot but I am not receiving speed limits or Live alerts
On Road Scout, make sure the Wi-Fi icon is white and there is not a ring around the display. This indicates Road Scout is in iRadar Wi-Fi mode, and you are connected to a hotspot (see Display illustration on page 9).
Make sure your Wi-Fi hotspot has internet connectivity. Internet connectivity is required to receive speed limits, alerts and software updates.
Make sure that you have an iRadar account. An account is included at no charge with your Road Scout. To check this, open the iRadar app on your smartphone then go to Menu>Subscriptions. The Subscriptions screen should show an expiration date in the future. If it does not, connect Road Scout to your smartphone via Bluetooth as described on page X. After Road Scout is connected, go back to the Subscriptions screen and verify a future date is shown. If it is, then Road Scout should now receive speed limits and Live alerts.
If you continue to not receive speed limits or Live alerts, please contact Cobra customer service at 1-800-964-3138.
Contact Us
800.964.3138 · Cobra.com
Cobra Electronics Corporation 6500 W. Cortland St., Chicago, IL 60707
Cobra One Year Limited Warranty
What this warranty covers: Cobra USA, Inc. ("Cobra") warrants your Product against all defects in materials and workmanship.
For how long: One (1) year from the date of original purchase from an authorized Cobra dealer.
What we will do: If a breach of warranty occurs, Cobra, at its discretion, will either repair or replace your Product free of charge.
What we will not do: Cobra will not pay shipping charges that you incur for sending your Product to us.
What you must do to maintain this warranty: Show original proof of purchase or receipt from an authorized Cobra dealer.
Warranty exclusions: This warranty does not apply to your product under any of the following conditions: 1. The serial number has been removed or modified. 2. Your product has been subjected to misuse or damage (including water damage, physical abuse, and/or improper installation). 3. Your product has been modified in any way. 4. Your receipt or proof-of-purchase is from a non-authorized dealer or internet auction site, including E-bay, U-bid, or other non-authorized resellers. 5. You are not the original purchaser of the Product from an authorized dealer or did not receive it as a gift from the original purchaser of the Product from an authorized dealer.
To obtain service: 1. Contact Cobra (1-800-964-3138) to obtain a Return Authorization Number. 2. Properly pack your Product and include: your name, complete return address, written description of the problem with your Product, daytime telephone number, and a copy of the original proof of purchase or receipt. 3. Label the outside of the package clearly with your Return Authorization Number. Ship the Product pre-paid (insured, for your protection) to: Cobra Electronics Corp., 6500 W. Cortland St., Chicago, IL 60707.
LIMITATION OF WARRANTY: The obligations set forth above are Cobra' sole obligations and your exclusive remedy. Cobra makes no other express warranty. Any implied warranty of merchantability or fitness for a particular purpose that may be applicable to the Product is limited in duration to the duration of this warranty. Some States do not allow limitations on how long an implied warranty lasts, so the above limitation may not apply to you. Cobra SHALL NOT BE LIABLE FOR CONSEQUENTIAL, SPECIAL OR INCIDENTAL DAMAGES INCLUDING, WITHOUT LIMITATION, DAMAGES ARISING OUT OF THE USE, MISUSE OR MOUNTING OF THE PRODUCT. Some States do not allow the exclusion or limitation of incidental or consequential damages, so the above limitation or exclusion may not apply to you. Cobra is not responsible for products lost in shipment between the owner and our service center.
Other legal rights: This warranty gives you specific legal rights, and you may also have other rights which vary from State to State.
©2019 Cobra ^® , iRadar ^® , and SmartShield ^® are trademarks of Cobra USA, Inc.. Manufactured in the Philippines.
Features, specifications and prices subject to change without notice.
FCC NOTE: Modifications not expressly approved by the manufacturer could void the user's FCC granted authority to operate the equipment.
FCC ID: BBORDCAM
This device complies with part 15 of the FCC rules. Operation is subject to the following two conditions: (1) This device may not cause harmful interference, and (2) this device must accept any interference received including interference that may cause undesired operation.
- Installation
- Mounting Tips:
- To mount the detector in your vehicle:
- EZ Mag Mount Care Instructions:
- Connect detector to your smartphone via Bluetooth®
- Controls & Features
- Using Road Scout
- Using SmartCord USB
- - Mute Button:
- Controls
- &
- Features
- Power
- SEN
- MUTE
- BRT
- MARK
- Rotary Dial
- Display
- Signal Band Indicator
- Signal Strength Meter
- Sensitivity Indicator
- Bluetooth® Indicator
- Wi-Fi Indicator
- GPS Indicator
- Speed Alert/Speed Limit
- Speed
- Camera Wi-Fi Mode Ring
- Camera Indicator
- Camera Microphone Indicator
- Menu
- To enter the Menu:
- To navigate the Menu:
- To restore factory default settings:
- Radar Menu
- User Mode
- - Standard
- - Simple
- Scanning Bar
- Display Color
- Alert Ring
- Speed Display
- Speed Mute
- Speed Alert
- Over Speed Limit
- Frequency Display
- AutoMute
- Units
- Language
- Voice
- GPS Filter
- Auto Power
- Band Settings
- Location Settings
- Bluetooth®
- Wi-Fi
- Delete User Locations
- Delete Lockouts
- Version Information
- Update
- Software Updates
- Camera Menu
- Recording
- Microphone
- Loop Clip Time
- G-Sensor
- Cobra Watermark
- Date/Time Stamp
- Format SD Card
- Setup Camera
- Dash Cam Instructions
- View and Edit Videos on Your Smartphone
- Install and run the Cobra Drive HD your smartphone
- You're all set!
- View and Edit Videos on Your Computer
- Radar Detector Advanced Connectivity Mode
- Connected car users (vehicle Wi-Fi hotspot required)
- Connecting Road Scout to Wi-Fi
- Troubleshooting
- Road Scout does not seem to detect radar consistently at long ranges
- I cannot get my phone to find Road Scout's Wi-Fi in camera mode
- I am connected to my car's Wi-Fi hotspot but I am not receiving speed limits or Live alerts
- Contact Us
- · Cobra.com
- Cobra One Year Limited Warranty
Brand : COBRA
Model : Road Scout
Category : Detector