
P2030 - Smartphone PANTECH - Free user manual and instructions
Find the device manual for free P2030 PANTECH in PDF.


| Product Type | Smartphone |
| Brand | Pantech |
| Model | P2030 |
| Dimensions | 120 x 60 x 12 mm |
| Weight | 130 g |
| Battery Capacity | 1500 mAh |
| Operating System | Android 2.3 (Gingerbread) |
| Display Size | 3.5 inches |
| Display Resolution | 480 x 320 pixels |
| Camera (Rear) | 3 MP |
| Internal Storage | 512 MB |
| RAM | 256 MB |
| Connectivity | Wi-Fi 802.11 b/g, Bluetooth 2.1, microUSB 2.0 |
| Main Functions | Calling, SMS, MMS, Internet browsing, Camera, Music player, Video playback |
| Maintenance | Clean with a soft, dry cloth |
| Safety Precautions | Avoid exposure to moisture and extreme temperatures |
| Spare Parts | Replacement battery available |
| Repairability | Battery user-replaceable |
| General Information | Released in 2011, typical budget smartphone features |
Frequently Asked Questions - P2030 PANTECH
User questions about P2030 PANTECH
0 question about this device. Answer the ones you know or ask your own.
Ask a new question about this device
Download the instructions for your Smartphone in PDF format for free! Find your manual P2030 - PANTECH and take your electronic device back in hand. On this page are published all the documents necessary for the use of your device. P2030 by PANTECH.
USER MANUAL P2030 PANTECH
Some of the contents in this manual may differ from your phone depending on the software of the phone. Actual color may vary.
Your phone is designed to make it easy for you to access a wide variety of content. For your protection, we want you to be aware that some applications that you enable may involve the location of your phone being shared. For applications available through AT&T, we offer privacy controls that let you decide how an application may use the location of your phone and other phones on your account. However, the AT&T privacy tools do not apply to applications available outside of AT&T. Please review the terms and conditions and the associated privacy policy for each location-based service to learn how location information will be used and protected. In addition, your AT&T phone may be used to access the Internet and to download, and/or purchase goods, applications, and services from AT&T or elsewhere from third parties. AT&T provides tools for you to control access to the Internet and certain Internet content. These controls may not be available for certain devices which bypass AT&T controls.
Service provided by AT&T Mobility, Portions © 2011 AT&T Intellectual Property. All rights reserved. AT&T, the AT&T logo and all other AT&T marks contained herein are trademarks of AT&T Intellectual Property and/or AT&T affiliated companies. All other marks contained herein are the property of their respective owners.
Thank you for choosing the Pantech P2030. The Pantech P2030 has many features designed to enhance your mobile experience. From its EZ to read menus, to its sleek, stylish design, we know you will enjoy the entire P2030 experience.
This User Guide contains important and useful information that will maximize your familiarity with all that the Pantech P2030 has to offer.
Specifications
Design
Clamshell phone with internal and external display
Displays
• 260K Colors TFT LCD with 2.2" internal display
- 65K Colors CSTN LCD with 1.38" external display
- 7 lines for text in basic mode with 16 point font
- Two soft keys and four-way scroll and pressing 📄
Melodies
MIDI, i-Melody, MP3, AMR, WAV, AAC, AAC+, WMA
Camera
Integrated 1.3M CMOS Camera
• Resolution up to 1280 x 1024 (1.3M pixels)
• 3GP Video recording/playing up to 15f/s (QVGA size)
- Self-timer function (5 seconds or 10 seconds)
• Photo album and video album
Dimensions & Weight
Weight: 102 g (with standard battery) Dimensions: 99 mm x 51.2 mm x 18.8 mm
Power Management (Performance)
| Battery Type | Capacity | Standby Time | Talk Time |
| Standard Lithium-Ion (Li-ion) | Up to 920mAh | Up to 250 hours | Up to 3 hours |
Operating Frequency
• GSM 850Mhz, GSM 900Mhz, DCS 1800Mhz, and PCS 1900Mhz networks in North America, South America, Europe, Africa, and Asia-Pacific where these networks are supported
• Automatic band switching
Specifications 2
Phone overview 8
Using Shortcuts....10
Menu overview....11
Quick & Easy 14
SIM card and battery 17
Turning the phone on/off ..... 20
Essential display indications .....20
Setting the phone mode .....23
Entering text 24
EZ quick call keys 26
PC Suite 27
Memory card 28
Memo 32
Breeze Mode
1. Calls and address book
Making, receiving and ending
a call 34
Options during a call ....36
Checking all calls 39
Speed dialing 42
Using address book 43
Using your headset 45
Service and fixed dialing number ...46
2. Messaging
Receiving messages....48
Creating and sending text
messages 49
Creating multimedia messages ....49
Managing messaging memory ...55
Email 56
3. Multimedia
Camera 58
Photo album 64
Video album 66
4. Useful Features
Calendar....70
Alarm clock 71
Pill Reminder....72
User Guide 73
Calculator 74
Tip calculator 74
Stop watch 75
Say a Command 75
Readout Mode 77
5. Connectivity
Bluetooth 80
Using Mobile Web 82
6. Settings
Phone status 84
Sounds & alerts 84
Display settings....85
Voice command setting .....85
Advanced Mode
1. Calls and address book
Making, receiving and ending
a call 88
Call settings 93
Checking all calls....93
Speed dialing 96
Using address book 97
Using your headset 99
Service and fixed dialing
number 100
Caller identification ....101
2. Messaging
Receiving messages.....104
Creating and sending text
messages 106
Creating multimedia
messages 107
Message templates
Message settings 113
Managing messaging memory ..115
Email 117
Using instant messenger.....117
3. Multimedia
Camera 120
Photo album 126
Video album 128
Audio album 130
Music player 132
Music player settings.....137
Media player 138
Other files 140
Managing memory 140
Playing games 141
AppCenter 141
4. Useful Features
Calendar....144
Alarm clock 145
Pill Reminder....146
User Guide 147
Calculator....148
Tip calculator 148
Stop watch 149
Notepad and voice memo .....149
World time 151
Converter 151
Timer....152
Say a Command....152
Readout Mode 154
5. Connectivity
Bluetooth 156
Using Mobile Web 159
Using the web browser .....159
Setting profiles 161
6. Settings
Language....164
Time and date 164
Voice command setting .....164
Sounds and alerts ....165
Display settings....165
Security 167
Updating software 168
Reset 169
- Contents
TTY 170
Appendix
Alert message 174
Troubleshooting checklist .....175
Safety information 178
Safety precautions 179
About the battery usage .....181
FCC Hearing-Aid Compatibility
(HAC) regulations for wireless
devices....185
FCC Regulatory Compliance ..188
Warranty 193
Speaker Phone & Noise Cancel ....199
Dynamic Noise Suppression
from Audience 200
earSmart™ technology .....201
Phone overview
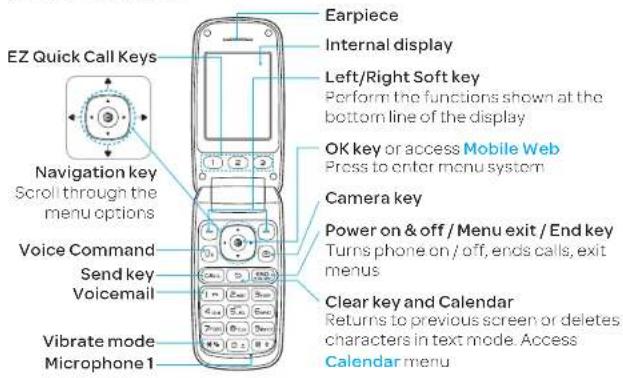
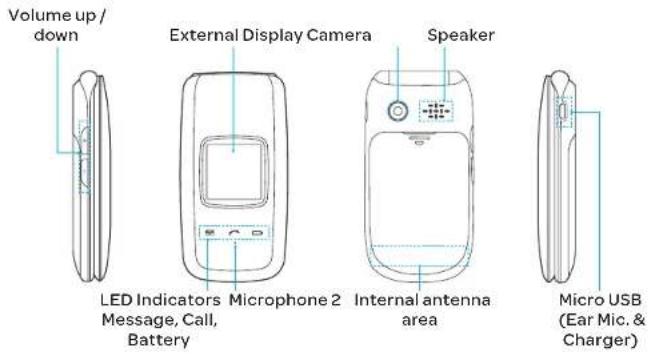
note: Holding the device by the internal antenna area might affect the quality of all calls.
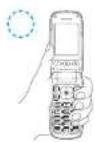
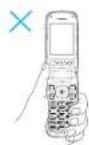
note: The phone has integrated advanced noise suppression technology. To ensure voice quality, please do not cover microphone entries as indicated.
Using Shortcuts
Numbered menu items, such as menus, sub-menus, and options can be quickly accessed by using their shortcut numbers.
In Menu mode, Main Menus can be accessed by pressing the number keys (1 to #) corresponding to their location on the screen.
Example: Accessing the Phone Mode menu.
-
Select Menu.
-
Press 6 van for Settings.
- Press 6 _vss for Phone Mode.
- Press the ▲/▼ scroll key to select the mode.
note: The steps may vary by mode and this manual provides instructions for both Breeze Mode and Advanced Mode respectively.
Menu overview
| Breeze mode menu | Messaging | AT&T Services | Settings |
| Inbox | Say a Command | Phone Status | |
| Address Book | Create Message | AT&T Navigator | Sounds & Alerts |
| Contacts | Sent Messages | My Cast Weather | Bluetooth |
| Groups | Voice Mail | Mobile Web | Font Size |
| Favorites | Mobile Email | Games & Apps | Wallpaper |
| Settings | Camera | My Account | Phone Mode |
| Fixed Dial Numbers | Take a Picture | Tools | Voice Command Setting |
| My Phone Number | Record a Video | Calendar | |
| My Pictures | Alarm Clock | ||
| My Videos | Pill Reminder | ||
| Service Numbers | User Guide | ||
| Calculator | |||
| Tip Calculator | |||
| SIM dependent | Stop Watch |
Advanced mode menu


Address
Book
Contacts
Groups
Favorites
Settings
Fixed Dial
Numbe
Drafts
My Phone
Number
Service
Numbers
Templates
Used Space
IM
Mobile
Email
Mobile
Web
AppCenter AT&T GPS
A T & T
Navigator
Shop GPS
AT&T
FamilyMap
Where
AllSport GPS


YPmobile My Stuff
Applications
Audio
Games
Picture
Video
Tools
Other Files
Used Space
AT&T Music
Music Player
Shop Music
AT&T Radio
Shazam
-
-
-
-
my AT&T Settings
Phone Mode
Profiles
Display
"Call
Phone
Network Phone
Connections
Connectivity
'Security
nAT&T
Software
Update
Reset
11Y
Phone
Information
^1 SIM dependent ^2 Network dependent
Quick & Easy
| Keys Functions | |
| Perform the functions shown at the bottom line of the display by using these soft keys. | |
 | Scroll through the menu options in Menu mode. In standby mode,Left Scroll: Access Mobile Email menuRight Scroll: Access IM menuUp Scroll: Access Create Message menuDown Scroll: Access Address Book menu |
| [ ] | Select a menu function or store user-input information, such as names. Also use this key for confirmation.Launch the Mobile Web directly if pressed in standby mode. |
| [ ] | Delete characters in text mode, or return to previous menu.Open Calendar view if pressed quickly in standby mode. |
| Keys Functions | |
| CALL | Make or receive a call. Show the recent call list in standby mode. Re-dial the last call number if pressed and held in standby mode. |
| END | Complete the current call. Turn on/off the phone if pressed and held. Cancel user input and return to standby mode while in Menu mode. |
| 1_m | Quickly connect to the voice mail server if pressed and held in standby mode. |
| 0_s - 9_mo | Enters numbers, letters or special characters. Go to the dial screen if pressed in standby mode. Assigns the number as a speed dial when it is pressed and held. |
| X+ | Enter or exit from vibrate mode if pressed and held in standby mode. Show the symbol input screen if pressed in text input mode.Enter the + sign prefix for international dialing if pressed and held.Enter the space character in text input mode. |
| Change various text input modes if pressed at the text-editing screen. | |
| Adjust the earpiece volume while making a call.Control the Ringtone volume, vibrate mode and silent all mode in standby.Mute the ringtone of an incoming call.Reject the incoming call if pressed and held when you receive an incoming call. | |
| Turn camera capture mode on.Work as a camera shutter in capture mode. | |
| Turn the Voice Commands on. | |
SIM card and battery
About your SIM card
When you subscribe to your network operator, you receive a SIM (Subscriber Identity Module) card containing your registration information, PIN code, etc. Like a credit card, it should be kept secure and handled carefully. Do not bend, scratch or expose it to moisture. Avoid static electricity. To avoid corrupting your SIM card's memory, always switch off your phone before removing or inserting your SIM card.
About your battery
Your phone uses a Li-Ion battery. Make sure to use an authorized battery and charger only. For more details, please inquire at your nearest dealer. note: Your phone is powered by a Lithium Ion (Li-Ion) battery. This means that, unlike other forms of battery technology, you can recharge your battery while some charge remains without reducing your phone's autonomy due to the "battery memory effect" inherent in those technologies.
Installing/removing SIM card and battery
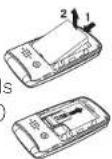
- Remove the battery cover from the unit. To fit the battery cover, put it on the guide rail and push up.
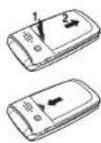
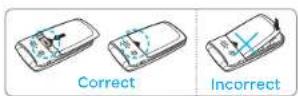
- Insert the SIM card into the slot. The gold contacts of the SIM card should go against the metal contacts of the phone.
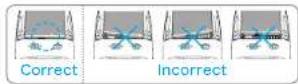
Put the contacts of the battery into the hole located at the bottom of the unit and then insert and press the upper side of the battery until you hear the "click". Make sure you align the gold contacts at the
battery end with contacts on the phone. If the contacts at the battery are not properly aligned, damage could occur to the phone and the battery.
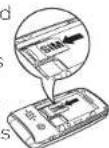
- To remove the battery, push the bottom of the battery to upwards (1) and remove (2) the battery. Push the SIM card
- Getting started
in the arrow direction as shown.
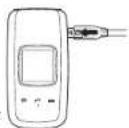
To charge your battery
- To charge, connect the charger adapter as shown right.
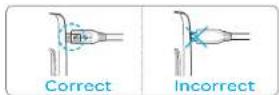
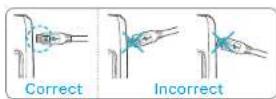
- To remove the adapter connecting, pull the adapter away as shown right.
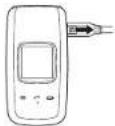
Turning the phone on/off
To turn on
- Press and hold 📄️.
To turn off
- Press and hold [END].
Essential display indications
| Signal strength. The greater the number of bars, the stronger the signal. When network is in searching mode is displayed. | |
| Flight mode is active. | |
| A call is being made. When you are in no service area is displayed. | |
| Call forwarding is active. | |
| Incoming calls set to ring only (Normal). | |
| Incoming calls set to Vibrate and Ring. |
- Getting started
| Incoming calls set to Vibrate Only. | |
| Incoming calls set to Silent. | |
| Received one or more text messages. | |
| Received one or more multimedia messages. | |
| Received one or more WAP push messages. | |
| Received one or more other messages. | |
| Received one or more voice messages. | |
| Inbox is full. |
| A message is being sent. | |
| A message is being received. | |
| An alarm is set. | |
| Bluetooth is active. | |
| Bluetooth hands-free headset is connected. | |
| Bluetooth A2DP headset is connected. | |
| Bluetooth hands-free + A2DP headset is connected. | |
| Data transfer via Bluetooth. | |
| Headset is connected. | |
| USB is connected. | |
| External memory card is inserted. | |
| An error occurred on the external memory card. | |
| TTY is active. | |
| Pill Reminder is set. | |
| An EDGE signal is available. It is displayed when there is an active EDGE session | |
| A GPRS signal is available. It is displayed when there is an active GPRS session. | |
| A 3G signal is available. It is displayed when there is an active 3G session. |
| WAP is connected. When the security is setis displayed. | |
| Battery strength. When the battery charge is lowis displayed. | |
| Available, Away, Invisible Status of AIM | |
| Online, Away, Busy, Offline Status of MSN | |
| Available, Busy, Invisible Status of YAHOO | |
| You have received one or more IM messages |
- Getting started
Setting the phone mode
Your phone has two customized modes, Breeze and Advanced. The default is set to Breeze mode which provides EZ access to the functions used most frequently. In the Breeze mode, you can view an abbreviated menu: Address Book, Messaging, Camera, AT&T Services, Tools and Settings. The Advanced Mode allows access to all menu items.
Breeze Mode Advanced
Mode
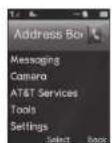
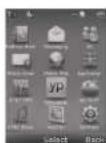
To change the phone mode
- Select Menu > Settings >
Phone Mode.
- Select Breeze Mode or
Advanced Mode.
Assigning the menu
You can set the most commonly used menu in Shortcuts in standby mode.
- Select Shortcuts in standby mode > Unassigned.
- Select Add
- Select the menu and sub menu.
- Select Save.
Entering text
You can enter text with multi-tap, predictive, numeric or symbol.
Useful keys
| * * | Display symbols. |
| O * | Adding a space. |
| Press to toggle from initial caps to all caps, to lower case, or to numeric entries.Press to change the text entry functions from ABC mode to predictive mode, or number mode.ABC ModeabcABC(lower case / initial caps / all caps)Predictive ModeabAbAB(lower case / initial caps / all caps)Number Mode123 |
- Getting started
Key characters by language
Each of the following keys will scroll through these sequential options listed by language.
| Key English French Spanish | |||
| 1._ | , - ? ! / * : | ||
| 2._ | abc ç à à á ̃ç | ||
| 3._ | def é è é | ||
| 4._ | ghíf | ||
| 5._ | jkl | ||
| 6._ | mno ð h ó ñ | ||
| 7._ | pqrs 8 | ||
| 8._ | tuv ú ß j ß | ||
| 9._ | wxyz | ||
ABC mode
Press the key labeled with the target letter once for the first letter; press it twice for the second letter, and so on.
- Press change the mode as multi-tap.
- Press 2ns to 9ns to input text repeatedly. To write the letter "C", press 2ns 3 times. To write number 2, press 2ns 4 times.
Predictive mode (T9)
The predictive mode automatically compares your keystrokes with an internal linguistic dictionary to determine
the correct word. It will display the most commonly used first. To save a word not listed in phone's dictionary, select Options > Predictive Settings > My Words.
- Press # change the mode to predictive.
- Press 2 to 9 to input text. For example, to write 'hello', press 4 to 3 to 5 to 5 to 6.
Number mode
You can input numbers in this mode.
-
Press # change the mode to 123.
-
Press 1_w to 9_wx and 0_s to input numbers.
Symbol mode
You can input symbols.
- Press ✦ to view the symbols.
- Press ▲/▼/◄/► to select a symbol and select Insert.
EZ quick call keys
Getting in touch with those you call most is now as EZ as 1-2-3. Note: The following direction is an example with using Ⓙ key. The usage of Ⓔ and Ⓗ keys will be same as the following.
To assign a contact to Quick Call
- Press ①.
- Select Quick Call > Assign.
- Select a contact > Select.
To make a call using one touch key
- Press ①.
- Select Call.
To send a message using one touch key
- Press ①.
- Select Options > Send Message.
PC Suite
PC suite is a Windows-based PC program that allows you to easily manage personal data and multimedia files by connecting your Phone to a PC. The PC suite application can be downloaded at http://www.pantechusa.com.
System requirements
- Microsoft Windows 2000 or XP family and Vista 32 bit - At least 300MB of free disk space
• Interface devices such as USB or Bluetooth for the connection with the phone
PC Suite features
- Contact Manager
- PC Sync
- Message Manager
- File Manager
• MMS PC Composer - Internet Access
Memory card
You can use a microSD card as a memory card. It gives you more space to save pictures, videos, music, etc.
Inserting a memory card
- Remove the battery cover and the battery from the unit.
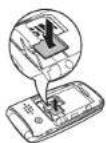
- Unlock the microSD card slot by carefully sliding it up. The metal cover should now be easily lifted up.
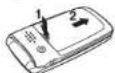
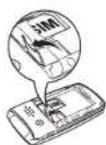
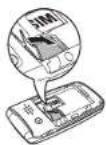
- Insert the micro SD card into the slot. The gold contacts of the microSD card should go against the metal contacts of
- Close the metal cover and slide down to lock the microSD card in place. The icon will be displayed when the phone is turn
Using a memory card
You can save, move and delete the files in your phone and external memory card. You can also move and copy the files to computer from your phone.
To copy a file to the memory card
- Select a file > Options > Copy to External Memory.
- To copy the file back to the phone, select Options > Copy to Phone.
To move a file to the memory card
- Select a file > Options > Move to External Memory.
- To move the file back to the phone, select Options > Move to Phone.
To delete a file from the memory card
- Select a file from the card > Options > Delete.
In Advanced Mode, you have access to all of the features of P2030 including the features provided by Breeze Mode.
To move the file from the card to the computer
- Connect the data cable with mobile and the computer.
- Select Menu > Settings > Connectivity.
- Select Select USB Mode.
- Select Music Player, Mass Storage or Ask on Connection.
- Follow the instructions on your computer screen.
note: Select Music Player when you want to add music to the playlist in your device. When you select Ask on Connection, it will ask you to select either the Music Player or Mass Storage every time you connect your device with your computer.
Resetting a memory card
- Select Menu > Settings > Reset.
- Enter the password > select External Memory Reset.
note: The default password is '1234'.
- Getting started
Memo
P2030
1
Calls and address book
Making, receiving and ending a call
Options during a call
Checking all calls
Speed dialing
Using address book
Using your headset
Service and fixed dialing number
Making, receiving and ending a call
Making a call
- Enter the area code and phone number.
- Press CALL
Answering a call
- Press CALL or select Accept.
Ending a call
- Press END
Once the call is completed, a call summary is displayed.
Rejecting a call
Press 📄 or select Ignore.
Making a call using the call list
Your phone logs up to 20 dialed, received and missed call numbers.
- Press CALL to display the recent calls list.
- Select All Calls, Missed Calls, Received Calls, Dialed Calls or Call Ranking by pressing ◀/▶.
- Select a number.
- Press call to dial the selected number.
note: To redial the last number, press and hold 📄 in standby mode.
Breeze Mode - Calls and address book
Making a call during a call
- Enter the phone number or select Options > View Contacts.
- Press call to dial the second call.
The first call is automatically put on hold.
Switching between two calls
- Select Options > Swap.
Making an international call
-
Press and hold □ for the international prefix until the '+', character appears.
-
Type the country code, area code, and phone number.
- Press CALL.
Making an emergency call
- You can make emergency calls even if your phone does not have a SIM card.
- Press Emergency Number, or select SOS if your phone does not have a SIM card.
- Press CALL.
Replying to a missed call
-
Press call to display the calls list.
-
Select Missed Calls by pressing ◀/▶.
- Select a number to call by pressing ▲/▼.
- Press CALL
Answering a second call
- Press 📄. The first call is automatically put on hold.
- Press ☑ to end the second call. The call on hold is automatically reconnected.
note: For answering a second call, you
should activate Call Waiting in advance.
(Select Menu > Settings > Call > Call
Waiting > Activate in Advanced Mode.)
Options during a call
Microphone off and on
Switching your phone's microphone off
- Select Options > Mute [@].
Switching your phone's microphone back on
- Select Options > Unmute.
Talking on speaker
- Select [▶].
Removing background noise
You can eliminate background noise from conversations and improve the voice quality of
Breeze Mode - Calls and address book
communications by setting Noise Suppression to On.
- Select Options> Noise Suppression.
Putting a call on hold and returning"
Putting a call on hold
- Select Options > Hold or press CALL.
Returning to a held call
- Select Options > Unhold or press call again.
Multi-party calls
You can talk with more than one person or have a conference call.
Making a multi-party call
- Call the first participant.
- Call the second participant. The first call is automatically put on hold.
- Select Options > Join.
Having a private conversation with one participant
- Select Options > Split.
- Select a participant > Select.
Removing one participant from a multi-party call
- Select Options > End.
- Select the number associated with the call you wish to end or End All to end all calls.
Searching for a number in address book during a call
- Select Options > View Contacts.
- Select a number, and then press CALL.
Searching for a name or group in address book
Enter the first letters of the name for Name Search. The entries are displayed starting with the first entry matching your input.
Finding a name manually in address book
- Press ▲/▼.
Viewing the details of highlighted entry in address book
- Select Select.
For details on address book, see page 43.
Reading a message during a call
- Select Options > View Message.
- Select a conversation > Open.
- Select a message > View.
Sending a message during a call
- Select Options > Send Message.
For details on creating a text message, see page 49.
Mobile Web ^n
- Select Options > Mobile Web.
Viewing the calendar during a call
- Select Options > View Calendar.
Making a note during a call
- Select Options > Notepad.
Voice recording
- Select Options > Voice Recording.
Checking all calls
You can view information about all calls simply by pressing CALL. For more options for all, missed, received, dialed calls, and call
ranking, select an entry and Options.
Viewing missed calls
- Select Shortcuts in standby mode.
- Select Recent Calls > Missed Calls.
Viewing received calls
- Select Shortcuts in standby mode.
- Select Recent Calls > Received Calls.
Viewing dialed calls
-
Select Shortcuts in standby mode.
-
Select Recent Calls > Dialed Calls.
Viewing call rankings
- Select Shortcuts in standby mode.
- Select Recent Calls > Call Ranking.
Deleting call logs
- Select Shortcuts in standby mode.
- Select Recent Calls > Delete Call Logs.
- Select All Calls, Missed Calls, Received Calls, or Dialed Calls.
note: If no logs exist, the message "No Call Exist" appears.
Viewing call time
- Select Shortcuts in standby mode.
- Select Recent Calls > Call Time.
- Last Call, Received Calls, Dialed Calls, and Total Calls are displayed.
Resetting all call times
- Select Shortcuts in standby mode.
- Select Recent Calls > Call Time.
Breeze Mode - Calls and address book
- Select Reset > Yes.
note: The default password is '1234'
Viewing data transmitted information
- Select Shortcuts in standby mode.
-
Select Recent Calls > Packet Counter.
-
Current Info: You can view transmitted data in the current session, in Kilobytes. Sent, Received and Total information are also available.
• Last Info: You can view Sent, Received, Total and
Duration transmitted in previous sessions, in Kilobytes.
• Total Info: You can view all Sent, Received, Total and Duration transmitted data in Kilobytes.
- Clear Logs: The default password is '1234'.
Speed dialing
You can dial quickly using speed dialing. Up to 8 phone numbers can be programmed using numbers 2 to 9.
1 .. : Voice mail
☐: Prefix for international call
Setting speed dial
- Select Menu > Address Book > Settings.
-
Select Speed Dial > an empty entry and select Add.
-
Select a contact > Select.
Changing speed dial contact
- Select Menu > Address Book > Settings.
- Select Speed Dial and select a number.
- Select Change.
- Select Select > Yes.
Removing from speed dial
- Select Menu > Address Book > Settings.
- Select Speed Dial and select a number.
- Select Remove > Yes.
Using address book
You can save names, phone numbers, and information on the SIM or phone. Number of entries can depend on the capacity of the SIM card.
Adding a contact
- Select Menu > Address Book > Contacts > Options > Add
New Contact.
- Select Phone or SIM.
- Input the fields.
- Select Save.
Viewing the contact list
- Press ▼ or select Menu >
Address Book > Contacts.
Searching for a phone
number
- Press ▼ or select Menu >
Address Book > Contacts. - Input the first letter or two of the person's name and scroll with ▲/▼.
- Breeze Mode - Calls and address book
- Select Select to view detail information.
- To update information, select Options > Edit Contact.
Calling from contact list
- Press ▼ or select Menu > Address Book > Contacts.
- Select a contact to call.
- Press 📄
Sending a contact
- Press ▼ or select Menu > Address Book > Contacts.
- Select a contact > Options > Send Contact Info > All Contact Info, Personal
Contact, or Business Contact.
- You can send the contact using Message or Bluetooth.
Deleting a contact
- Press ▼ or select Menu > Address Book > Contacts.
- Select a contact > Options > Delete > Yes.
Making groups
- Press ▼, ▶ or select Menu > Address Book > Groups.
- Select Options > Add New Group.
- Select Phone or SIM.
For a 2G SIM card, this step is not needed.
- Enter a group name and select Save.
Editing groups
- Press ▼, ▶ or select Menu > Address Book > Groups.
- Select a group > Options > Add New Group, Rename Group, or Delete Group.
Adding to favorites or
groups
- Press ▼ or select Menu > Address Book > Contacts.
-
Select a contact > Options > Add to.
-
Select Favorites or Groups.
Using your headset
You can make or receive a call using your headset. When you connect your headset to the jack, the button on the headset works as follows.
note: You must use the headset designed for this device. It is an optional item. Not all headset will have a button.
While in standby mode
- Press the button once to list recent calls.
- Press the button twice to redial the last call.
-
-
-
-
-
-
-
-
-
-
-
-
-
-
-
-
-
-
-
-
-
-
-
-
-
-
-
While the phone is closed
- Press the button once to receive an incoming call.
- Press and hold the button once to end the call.
Service and fixed dialing number
Calling your service numbers'
You can see the service number to reach the service provider.
- Select Menu > Address Book > Service Numbers.
- Select a number and press CALL.
Viewing fixed dialing number list
Fixed dialing number is a service that limits your access to specific numbers in the address book list recorded on the SIM. Input the PIN2 to set up or cancel this service.
1. Select Menu > Address Book > Fixed Dial Numbers.
note: PIN2 must be correctly entered within 3 attempts. If you input incorrect code three times in a row, the PIN2 code will be blocked. If the PIN2 code is blocked, please contact your service provider. Your PIN2 code is supplied with the SIM card.
P2030
2
Messaging
Receiving messages Creating and sending text messages Creating multimedia messages Managing messaging memory Email
Receiving messages
Viewing a new message
- Select View.
Reading a message from the inbox
- Select Menu > Messaging > Inbox.
- Select a received message > View.
Saving the contact information from a received message
-
Select a received message > View.
-
Select Options > Save.
- Select New Contact or Update Contact.
Saving the object in a received multimedia message
- Open a multimedia message.
- Select an object.
- Select Options > Use > Save.
It will be saved in one of the categories in the My Stuff folder. For details on Photo album, see page 64.
Listening to voice messages
- Press and hold 1·s or select Menu > Messaging > Voice Mail.
It will automatically call the voice mail center.
Creating and sending text messages
Sending a text message
- Press ▲ or select Menu > Messaging > Create Message.
- Enter a message.
- Select Send to and a contact
- Breeze Mode - Messaging
to send the message and select Select.
- Select Send.
Replying to a message
- Select a message > Reply or select a message > Options > Reply.
Creating multimedia messages
You can create and send multimedia messages. Capacity is 100KB, 300KB or 600KB. An error message will alert you once the message exceeds the capacity.
Adding a saved picture to the message
- Press ▲ or select Menu > Messaging > Create Message.
- Enter a message.
- Select Insert > Picture > Picture > Camera.
- Scroll to the saved picture and select Select.
- To preview the message, select Options > Preview > Current or Whole Message.
-
To edit the text message, press ▲/▼ to select the text box and edit your message.
-
Select Send to > a contact > Select > Send.
Adding a new picture to the message
- Press ▲ or select Menu > Messaging > Create Message.
- Enter a message.
- Select Insert > Take New Picture.
- Focus on the object.
- Press or
- To preview the message, select Options >Preview >Current or Whole Message.
To go back to text editor page, select Stop.
- To edit the text message, press ▲/▼ to select the text box and edit your message.
- Select Send to >a contact >Select >Send.
For details on taking a picture, see page 60.
Adding a saved video to the message
- Press ▲ or select Menu > Messaging > Create Message.
- Enter a message.
- Select Insert > Video > Video.
- Breeze Mode - Messaging
- Scroll to the saved video clip and select Select.
- To preview the message, select Options > Preview > Current or Whole Message. To go back to text editor page, select Stop.
- To edit the text message, press ▲/▼ to select the text box and edit your message.
- Select Send to > a contact > Select > Send.
Adding a new video to the message
- Press ▲ or select Menu > Messaging > Create Message.
- Enter a message.
- Select Insert > Record New Video.
- Focus on the object.
- Press 🎨 or 📄, or select Options > Record.
- To stop and save the recording, select Stop.
- To preview the message, select Options >Preview >Current or Whole Message.
To go back to text editor page, select Stop.
-
To edit the text message, press ▲/▼ to select the text box and edit your message.
-
Select Send to > a contact > Select > Send.
For details on recording a video, see page 62.
Adding a recorded voice memo to the message
- Press ▲ or select Menu > Messaging > Create Message.
-
Enter a message.
-
Select Insert > Sound > Audio > My Voice.
- Scroll to the saved audio clip and select Select.
- To preview the message, select Options > Preview > Current or Whole Message.
- Select Pause to stop listening the voice memo. Select Stop to go back to text editor page.
- To edit the text message, press ▲/▼ to select the text box and edit your message.
- Select Send to > a contact > Select > Send.
- Breeze Mode - Messaging
Adding a new voice memo to the message
- Press ▲ or select Menu > Messaging > Create Message.
- Enter a message.
- Select Insert > Record New Sound.
- Select Record to record the sound.
- To stop and save the recording, select Stop.
-
To preview the message, select Options > Preview > Current or Whole Message.
-
Select Pause to stop listening the voice memo. Select Stop to go back to text editor page.
- To edit the text message, press ▲/▼ to select the text box and edit your message.
- Select Send to > a contact > Select > Send.
For details on Recording a voice memo, see page 150.
Adding other files to the message
- Press ▲ or select Menu > Messaging > Create Message.
-
Enter a message.
-
Select Insert > Other Files > Other Files.
- Select a file > Select.
- To preview the message, select Options > Preview > Current or Whole Message. To go back to text editor page, select Stop.
- To edit the text message, press ▲/▼ to select the text box and edit your message.
- Select Send to > a contact > Select > Send.
Managing messaging memory
Up to 200 messages can be stored in the phone memory, additional messages will be saved to the SIM card. When the message box is full, the messages full icon will appear. All messages share memory.
Icon Descriptions
| Text message is full (SIM and phone messages). |
- Breeze Mode - Messaging
Deleting a message in the inbox
- Select a message > Options > Delete > Yes.
Deleting multiple messages in the inbox
- Select Options > Delete > Multiple.
- Select Select or Deselect to select or deselect the message.
- Select Options > Delete > Yes.
You can receive emails from your service provider.
Receiving an email
- Press ◀ or select Menu > Messaging > Mobile Email.
- Select an email.
- Select Select.
P2030
3
Multimedia
Camera Photo album Video album
Camera
You can take pictures and record movies using the built-in camera. The photos and video clips can be saved and sent via multimedia messages, Online Locker, or Bluetooth.
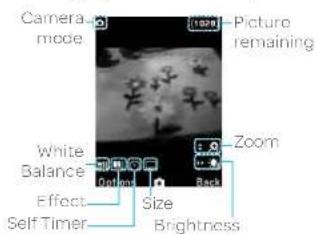
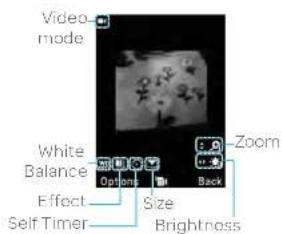
note: When you set the photo size to 1280 x 1024, the zoom function is not available.
- Breeze Mode - Multimedia
Setting camera settings
- Press ☑ in standby mode or select Menu > Camera > Take a Picture.
- Select Options > Settings to change settings prior to taking a picture.
Camera options
| Icon Name Descriptions | ||
| White Balance | Auto (Day Light Tungsten Fluorescent) | |
| Effect | Normal (Sepia Negative) B&W ( | |
| Icon | Name Descriptions | |
| Self Timer | Off (5 secs)(10 secs) | |
| Size | 1280x1024(1024x768(640x480(320x240(240x320( | |
| Advanced | Picture Quality, Save Location, Shutter Sound, Timer Sound | |
Video camera options
| Icon Name Descriptions | |
| WE | White BalanceAuto (Day LightTungston)Fluorescent |
| Normal SepiaNegativeB&W | |
| Self TimerOff (5 secs10 secs) | |
| Size176x144(MMS)176x144(320x240) | |
| AdvancedVideo Quality,Sound Recording,Save Location,Timer Sound | |
Zoom in and out
- Press ▲/▼.
It ranges from 1x to 4x.
Increasing or decreasing the brightness
- Press ◀/▶
It ranges from -2 to +2.
Taking a picture
- Press ☑ in standby mode or select Menu > Camera > Take a Picture.
- Focus on the object.
- Press 🎨 or Ⓗ, or select Options > Capture.
Changing to video camera mode
- Press ☑ in standby mode or select Menu > Camera > Take a Picture.
- Select Options while camera mode is activated.
- Select Video Camera Mode. In camera mode, press and hold ☐ to change to video camera mode.
- Focus on the object.
- Press 📋 or 🔒, or select Options > Record.
- Select Stop to stop recording.
- Breeze Mode - Multimedia
Viewing the taken picture
- Press ☑ in standby mode or select Menu > Camera > Take a Picture.
- Select Options > Photo Album.
- Select a picture > View.
After taking pictures
| To Press | |
| Send using a multimedia message | Options > Send > as Multimedia Message |
| Send using Online Locker | Options > Send > Send to Online Locker |
To Press
Send using Options > Send > via
Bluetooth Bluetooth
Set as Options > Set as >
wallpaper Wallpaper
Options > Set as >
Caller ID
Delete Options > Delete
Rename Options > Rename
View photo
information Options > Properties
Recording a video
- Select Menu > Camera >
Record a Video
- Focus on the object.
3 Press 📋 or 🔒, or select
Options > Record.
- Select Stop to stop recording.
- Select Options > Play to play the video clip.
- Press → to go back to preview mode.
Changing to camera mode
- Select Menu > Camera >
Record a Video
-
Select Options while video mode is activated.
-
Select Camera Mode.
In video camera mode, press an hold® to change to camera mode.
For details on taking a picture, see page 60.
Viewing the recorded video clip
- Select Menu > Camera > Record a Video.
- Select Options > Video Album.
- Select the video clip > Play.
After recording video clips
To Press
| Send using a multimedia message | Options > Send > as Multimedia Message |
| Send using Online Locker | Options > Send > Send to Online Locker |
| Send using Bluetooth | Options > Send > via Bluetooth |
- Breeze Mode - Multimedia
To Press
| View recorded video clip | Options > Play |
Delete Options > Delete
| Rename Options > Rename |
| View video clip information | Options > Properties |
During recording a video clip
To Press
| Receivean incoming call | or |
| Pause and recordcontinuously | Pause |
| Stop recording | Stop |
Photo album
The My Pictures menu allows you to view all the pictures you have taken, save selected images to your phone or an external memory card and share the photos with others. JPEG format is supported, and other formats are saved in the Picture folder. Note: To access Picture, select Menu > My Stuff > Picture in Advanced mode.
Viewing the saved pictures
- Select Menu > Camera > My Pictures.
- Select a picture > View.
Setting as wallpaper in the display
- Select Menu > Camera > My Pictures.
- Select a picture.
- Select Options > Set as > Wallpaper.
Setting as caller identification Deleting multiple pictures
- Select Menu > Camera > My Pictures.
- Select a picture.
- Select Options > Set as > Caller ID.
Sending pictures using multimedia message
- Select Menu > Camera > My Pictures.
- Select a picture.
- Select Options > Send > as Multimedia Message.
For details on creating multimedia messages, see page 49.
- Breeze Mode - Multimedia
- Select Menu > Camera > My Pictures.
- Select Options > Multiple Select.
- Select Select to select more than one picture.
- Select Deselect to cancel your selection.
- Select Options > Delete.
Viewing a file information
- Select Menu > Camera > My Pictures.
- Select a picture.
- Select Options > Properties.
Video album
The My Videos menu allows you to play, send, save and delete videos. The supported formats are MP4, WMA, 3GP and 3G2.
Playing the saved video clips
- Select Menu > Camera > My Videos.
- Select a video clip.
- Select Play.
Using video player controls
To Press
| Pause / Play |
| Rewind Hold ▲ |
| Fast forward Hold ▼ |
| Control Side key up or down |
| volume or ◀/▶ |
Sending a video clip using multimedia message
- Select Menu > Camera > My Videos.
- Select a video clip.
- Select Options > Send > as Multimedia Message.
For details on creating multimedia messages, see page 49.
- Breeze Mode - Multimedia
Sending a video clip using Online Locker
- Select Menu > Camera > My Videos.
- Select a video clip.
- Select Options > Send > Send to Online Locker.
Sending a video clip via Bluetooth
- Select Menu > Camera > My Videos.
- Select a video clip.
- Select Options > Send > via Bluetooth.
Deleting multiple video clips
- Select Menu > Camera > My Videos.
- Select Options > Multiple Select.
- Select Select to select more than one picture.
- Select Deselect to cancel your selection.
- Select Options > Delete.
Memo
P2030
4
Useful Features
Calendar
Alarm clock
Pill Reminder
User Guide
Calculator
Tip calculator
Stop watch
Say a command
Readout Mode
Calendar
Calendar helps you manage your schedule including your time for calls or special days. You can set a reminder on any given date with this function.
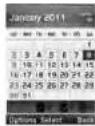
Viewing calendar
- Select Menu > Tools > Calendar.
note: You can also access Calendar by pressing ☐ in standby mode. View by Month is default setting for Calendar.
In the monthly view
To Press
Move to ◀ for Previous
another day ▶ for Next
Move to ▲ for Previous
another week ▼ for Next
View others Side key down for
Previous
Side key up for Next
Creating a new event
-
Select a day and select Options > New Event.
-
Select Appointment, Task or Note.
-
Input the event and select Save.
note: You can create events for dates from 01/01/2000 to 12/31/2099.
Alarm clock
Setting an alarm
-
Select Menu > Tools > Alarm Clock.
-
Select Create New for new alarm.
-
Set the Cycle, Time, Alarm Sound, Alarm Alert Type, Alarm Volume, Snooze and Power Alarm.
-
Select Save.
- Breeze Mode - Useful features
Editing existing alarms
-
Select Menu > Tools > Alarm Clock.
-
Select an alarm > Edit or select Options to access following: Create New, Delete and Delete All.
Setting a simple alarm
-
Select Menu > Tools > Alarm Clock.
-
Select Simple Alarm and select Edit.
-
Set the alarm schedule and select Save.
Pill Reminder
Pill Reminder sets your schedule to take pill, and alarm pop-up will appear on the setting time.
You can select to accept the reminder or have the reminder pop-up again after 15 minutes.
Creating a new pill reminder
-
Select Menu > Tools > Pill Reminder > Create New.
-
Select Take and then, take a picture.
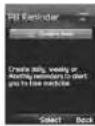
For details on taking picture, see page 60.
3.Input Name and Dosage.
-
Select Time > Create.
-
Set a desired time > OK > Back.
-
Select Period > Begins.
-
Set the beginning time of the dosage on the calendar.
-
Select Reminders and set the reminding period.
-
Select Daily, Every 2 days, or Monthly. When selecting Every 2 days, you can set desired days for period.
10.Enter more information.
- Select Save.
Checking Today's Pill Reminder
-
Select Menu > Tools > Pill Reminder > Options > Today's Pill.
-
Scroll and select a pill reminder item to check the detail.
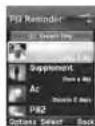
Editing a pill reminder
-
Select Menu > Tools > Pill Reminder.
-
Select a pill reminder > Edit.
-
Edit Name, Dosage, Time, Period or More Information.
- Breeze Mode - Useful features
- Select Save.
Deleting reminders
-
Select Menu > Tools > Pill Reminder.
-
Select a pill reminder> Options > Delete or Delete All.
User Guide
User Guide helps users to learn how to use the phone easily in itself.
-
Select Menu > Tools > User Guide.
-
Select a function to check in detail.
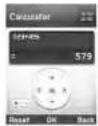
Calculator
- Select Menu > Tools > Calculator.
- Input the numbers with the numeric keypad and enter the operators with
◀/▶/▲/▼/≡ to calculate.
- Press Ⓞ to use the decimal point.
- Press → to cancel your input.
- Select Reset to reset.
Tip calculator
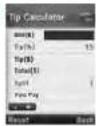
- Select Menu > Tools
Tip Calculator.
- Enter the values for all the variable fields (Bill(\$).
Tip(%), Split) and then the corresponding calculation fields (Tip(\$), Total(\$), You Pay) are updated automatically.
- Press ☒ to use the decimal point.
- Select Reset to reset.
Stop watch
- Select Menu > Tools
Stop Watch.
- Select Start to start.
- Select Stop to stop
- Select Continue to restart or select Reset to clear.
- To check split times, select Mode > Split Time Mode.
- To check lap times, select Mode > Lap Time Mode.
note: In Basic Mode, when you exit the stop watch menu, or become idle, the stop watch will continue running and will be indicated by a clock icon. You can
- Breeze Mode - Useful features
access the stop watch by re-entering the stop watch menu.
Say a Command
Your phone is equipped with an Advanced Voice Command (AVC) feature. This feature allows you to make calls or use the phone functions by simply using your voice. All you have to do is talk into the phone and then the phone will recognize your voice and complete tasks by itself.
- In standby mode, simply press Ⓞ to access Say a Command.
-
-
-
-
-
-
-
-
-
-
-
-
-
-
-
-
-
-
-
-
-
-
-
-
-
-
-
-
-
-
-
-
-
-
-
-
-
-
-
-
-
-
-
-
-
-
-
-
-
-
-
-
-
-
-
m = 311
m = 311
m = 311
m = 311
m = 311
m = 311
m = 311
m = 311
m = 311
[Non-Text]
[Non-Text]
[Non-Text]
[Non-Text]
[Non-Text]
[Non-Text]
[Non-Text]
[Non-Text]
[Non-Text]
[Non-Text]
[Non-Text]
[Non-Text]
[Non-Text]
[Non-Text]
[Non-Text]
[Non-Text]
[Non-Text]
[Non-Text]
[Non-Text]
[Non-Text]
[Non-Text]
[Non-Text]
[Non-Text]
[Non-Text]
[Non-Text]
[Non-Text]
[Non-Text]
[Non-Text]
[Non-Text]
[Non-Text]
[Non-Text]
[Non-Text]
[Non-Text]
[Non-Text]
[Non-Text]
[Non-Text]
[Non-Text]
[Non-Text]
[Non-Text]
[Non-Text]
[Non-Text]
[Non-Text]
[Non-Text]
[Non-Text]
[Non-Text]
[Non-Text]
[Non-Text]
[Non-Text]
[Non-Text]
[Non-Text]
[Non-Text]
[Non-Text]
[Non-Text]
[Non-Text]
[Non-Text]
[Non-Text]
[Non-Text]
[Non-Text]
[Non-Text]
[Non-Text]
[Non-Text]
[Non-Text]
[Non-Text]
[Non-Text]
[Non-Text]
[Non-Text]
[Non-Text]
[Non-Text]
[Non-Text]
[Non-Text]
[Non-Text]
[Non-Text]
[Non-Text]
[Non-Text]
[Non-Text]
[Non-Text]
[Non-Text]
[Non-Text]
[Non-Text]
[Non-Text]
[Non-Text]
[Non-Text]
[Non-Text]
[Non-Text]
[Non-Text]
[Non-Text]
[Non-Text]
[Non-Text]
[Non-Text]
[Non-Text]
[Non-Text]
[Non-Text]
[Non-Text]
[Non-Text]
[Non-Text]
[Non-Text]
[Non-Text]
[Non-Text]
[Non-Text]
[Non-Text]
[Non-Text]
[Non-Text]
[Non-Text]
[Non-Text]
[Non-Text]
[Non-Text]
[Non-Text]
[Non-Text]
[Non-Text]
[Non-Text]
[Non-Text]
[Non-Text]
[Non-Text]
[Non-Text]
[Non-Text]
[Non-Text]
[Non-Text]
[Non-Text]
[Non-Text]
[Non-Text]
[Non-Text]
[Non-Text]
Or select Menu > AT&T Services > Say a Command.
- At the voice prompt, say a command and simply follow the voice prompts.
The following list shows available voice commands.
Call
Send Message
Contact
Go To
- Specifications
- Design
- Displays
- Melodies
- Camera
- Dimensions & Weight
- Operating Frequency
- Breeze Mode
- Calls and address book
- Messaging
- Multimedia
- Useful Features
- Connectivity
- Settings
- Advanced Mode
- Appendix
- Using Shortcuts
- Example: Accessing the Phone Mode menu.
- SIM card and battery
- About your SIM card
- About your battery
- Installing/removing SIM card and battery
- - Getting started
- To charge your battery
- Turning the phone on/off
- Setting the phone mode
- To change the phone mode
- Assigning the menu
- Entering text
- Key characters by language
- ABC mode
- Predictive mode (T9)
- Number mode
- Symbol mode
- EZ quick call keys
- To assign a contact to Quick Call
- To make a call using one touch key
- To send a message using one touch key
- PC Suite
- System requirements
- PC Suite features
- Memory card
- Inserting a memory card
- Using a memory card
- To copy a file to the memory card
- To move a file to the memory card
- To delete a file from the memory card
- To move the file from the card to the computer
- Resetting a memory card
- Making, receiving and ending a call
- Making a call
- Answering a call
- Ending a call
- Rejecting a call
- Making a call using the call list
- Breeze Mode - Calls and address book
- Making a call during a call
- Switching between two calls
- Making an international call
- Making an emergency call
- Replying to a missed call
- Answering a second call
- Options during a call
- Microphone off and on
- Switching your phone's microphone off
- Switching your phone's microphone back on
- Talking on speaker
- Removing background noise
- Putting a call on hold and returning"
- Putting a call on hold
- Returning to a held call
- Multi-party calls
- Making a multi-party call
- Having a private conversation with one participant
- Removing one participant from a multi-party call
- Searching for a number in address book during a call
- Searching for a name or group in address book
- Finding a name manually in address book
- Viewing the details of highlighted entry in address book
- Reading a message during a call
- Sending a message during a call
- Mobile Web n
- Viewing the calendar during a call
- Making a note during a call
- Voice recording
- Checking all calls
- Viewing missed calls
- Viewing received calls
- Viewing dialed calls
- Viewing call rankings
- Deleting call logs
- Viewing call time
- Resetting all call times
- Viewing data transmitted information
- Speed dialing
- Setting speed dial
- Changing speed dial contact
- Removing from speed dial
- Using address book
- Adding a contact
- New Contact.
- Viewing the contact list
- Searching for a phone
- number
- - Breeze Mode - Calls and address book
- Calling from contact list
- Sending a contact
- Contact, or Business Contact.
- Deleting a contact
- Making groups
- Editing groups
- Adding to favorites or
- groups
- Using your headset
- While in standby mode
- -
- While the phone is closed
- Service and fixed dialing number
- Calling your service numbers'
- Viewing fixed dialing number list
- Select Menu > Address Book > Fixed Dial Numbers.
- Messaging
- Receiving messages
- Creating and sending text messages
- Creating multimedia messages
- Adding a saved picture to the message
- Adding a new picture to the message
- Adding a saved video to the message
- - Breeze Mode - Messaging
- Adding a new video to the message
- Adding a recorded voice memo to the message
- Adding a new voice memo to the message
- Adding other files to the message
- Managing messaging memory
- Deleting a message in the inbox
- Deleting multiple messages in the inbox
- Receiving an email
- - Breeze Mode - Multimedia
- Setting camera settings
- Zoom in and out
- Increasing or decreasing the brightness
- Taking a picture
- Changing to video camera mode
- Viewing the taken picture
- Changing to camera mode
- Viewing the recorded video clip
- After recording video clips
- During recording a video clip
- Photo album
- Viewing the saved pictures
- Setting as wallpaper in the display
- Setting as caller identification Deleting multiple pictures
- Sending pictures using multimedia message
- Viewing a file information
- Video album
- Playing the saved video clips
- Using video player controls
- Sending a video clip using multimedia message
- Sending a video clip using Online Locker
- Sending a video clip via Bluetooth
- Deleting multiple video clips
- 4
- Useful Features
- Calendar
- Viewing calendar
- In the monthly view
- To Press
- Creating a new event
- Alarm clock
- Setting an alarm
- - Breeze Mode - Useful features
- Editing existing alarms
- Setting a simple alarm
- Pill Reminder
- Creating a new pill reminder
- Checking Today's Pill Reminder
- Editing a pill reminder
- Deleting reminders
- User Guide
- Calculator
- Tip calculator
- Stop watch
- Say a Command
- Or select Menu > AT&T Services > Say a Command.
- Readout Mode
- To turn on Readout Mode
- Bluetooth
- Activating Bluetooth
- Adding a device
- Sending files
- Receiving files
- Setting the visibility
- Naming the phone
- Using Mobile Web
- Accessing Mobile Web
- Phone status
- Sounds & alerts
- Display settings
- Setting the font size
- Setting the wallpaper
- Voice command setting
- Advanced Mode - Calls and address book
- Putting a call on hold and returning ®
- Multi-party calls ®
- • Advanced Mode - Calls and address book
- Mobile Web
- Call settings
- Answering with any key press
- Setting auto redial
- Searching for a phone number
- Adding to favorites or groups
- Caller identification
- Viewing a new message
- Reading a message from the conversation
- Saving the contact information from a received message
- Saving the object in a received multimedia message
- Listening to voice messages
- Launching URL in the message
- • Advanced Mode - Messaging
- Saving connection settings using Configuration message
- Sending a text message
- Finding all sent messages 1. Select Menu > Messaging > Conversations.
- Replying to a message
- Message templates
- Adding the message as a template
- Sending a message with template
- Message settings
- Setting text message
- Setting profiles for multimedia message
- Setting sending options for multimedia message
- Setting receiving options for multimedia message
- Setting receiving options for voice message
- Setting default edit mode
- Setting auto delete old message
- Moving a message to SIM
- Viewing memory space information
- Using instant messenger
- Starting an instant
- messenger
- Viewing the conversation log
- 3
- Multimedia
- with Advanced Mode
- Advanced Mode - Multimedia
- Setting as caller identification
- • Advanced Mode - Multimedia
- Deleting multiple pictures
- Audio album
- Listening to the recorded sound
- Setting as a ring tone
- Moving or copying multiple sound to External Memory
- Sending sound file using multimedia message
- Music player
- Adding music from Windows Media Player™
- Playing music
- Making a playlist
- Using a playlist
- Listening music with Bluetooth headset
- Viewing a music file information
- Setting as ring tone
- Deleting music
- Shopping music
- Listening the radio
- Using music identification
- Music player settings
- Shuffling music
- Repeating music
- Setting equalizer
- Auto Full Screen
- Removing
- Media player
- Playing the video clip
- Playing the audio file
- Setting Mobile Video
- Other files
- Viewing the list of the files
- Managing memory
- Viewing memory status
- Playing games
- Shop games
- AppCenter
- Shopping Applications
- Shopping Tones
- Shopping Games
- Shopping Wallpapers
- Shopping Videos
- Advanced Mode - Useful features
- Notepad and voice memo
- Using a notepad
- Recording a voice memo
- Listening the recorded sound
- World time
- Converter
- Timer
- Advanced Mode - Connectivity
- Using the web browser
- Accessing browser
- - Advanced Mode - Connectivity
- Using bookmarks
- Adding bookmarks
- Entering web address
- Viewing history
- Setting advanced options
- Managing private data
- Viewing certificates
- Viewing download status
- Setting profiles
- Adding profiles
- Editing profiles
- Viewing profiles
- Deleting profiles
- Language
- Time and date
- Sounds and alerts
- • Advanced Mode - Settings
- Setting the home screen
- Setting the menu type
- Setting the color theme
- Setting font style
- Setting the brightness
- Setting the backlight timer
- Security
- Locking the phone
- Select.
- Locking the PIN
- Changing PIN 2
- Setting fixed dialing number
- Updating software
- To update the software
- To view the version of software
- Reset
- Resetting the phone
- Clearing the phone
- Resetting the external memory
- TTY
- Setting teletypewriter
- Alert message
- When the "Insert SIM Card" message appears:
- When the "Messages full" message appears:
- When the "Phone and SIM messages is full. Delete
- When the "Enter PIN1" message appears:
- Troubleshooting checklist
- When the other party cannot hear you speaking:
- When battery lifetime is shorter than usual:
- When your mobile phone does not turn on:
- When you are unable to send a message:
- - Appendix
- When you are unable to make a call:
- When you are unable to charge the battery:
- Your battery may have not been connected to the charger properly. Check the connector.
- When you are unable to select a certain function:
- Safety information
- Safety precautions
- FCC Hearing-Aid Compatibility (HAC) regulations for wireless devices
- FCC Regulatory Compliance
- Statement according to FCC part 15.105
- Statement according to FCC part 15.21
- RF exposure FCC
- Health and Safety Information FCC
- Warranty
- Protect Your Warranty
- Month Limited Warranty
- This Warranty does not apply to:
- Other Warranty Program
- Speaker Phone & Noise Cancel
- Dynamic Noise Suppression from Audience
- How Does It Work?
- earSmart™ technology
- environment.
- Memo
Brand : PANTECH
Model : P2030
Category : Smartphone