
ENS-LCDU - Remote trigger ENERGIZER - Free user manual and instructions
Find the device manual for free ENS-LCDU ENERGIZER in PDF.


| Product Type | Timer Remote Shutter |
| Brand | Energizer |
| Model | ENS-LCDU |
| Compatible Brands | Nikon, Canon, Sony, Samsung, Panasonic, Pentax, Olympus, Konica Minolta, and others |
| Power Source | 2x AA batteries |
| Timer Delay Range | 0 to 99 hours, 59 minutes, 59 seconds (1-second increments) |
| Exposure Time Range | 0 to 99 hours, 59 minutes, 59 seconds |
| Interval Range | 0 to 99 hours, 59 minutes, 59 seconds |
| Number of Shots | 1 to 399, or unlimited |
| Shutter Release Button | Manual release with half-press and full-press functions |
| Backlight | Yes, illuminates LCD panel for 6 seconds |
| Key Lock | Yes, prevents accidental operation |
| Release Lamp | Flashes during shutter release |
| Timer Active Indicator | Flashes during countdown |
| Low Battery Indicator | Flashes when batteries are low |
| Speaker | Optional beep at intervals |
| Operating Temperature | 0°C to 40°C (32°F to 104°F) |
| Cable Length | Approximately 80 cm |
| Weight (with batteries) | Approximately 133 g |
| Dimensions | Approximately 140 x 40 x 25 mm |
| Safety Precautions | Keep dry; do not disassemble; avoid high temperatures; handle batteries properly |
| Cleaning | Wipe with a dry, soft cloth; do not use solvents |
| Included Accessories | Remote trigger unit, connecting cable, user manual |
Frequently Asked Questions - ENS-LCDU ENERGIZER
User questions about ENS-LCDU ENERGIZER
0 question about this device. Answer the ones you know or ask your own.
Ask a new question about this device
Download the instructions for your Remote trigger in PDF format for free! Find your manual ENS-LCDU - ENERGIZER and take your electronic device back in hand. On this page are published all the documents necessary for the use of your device. ENS-LCDU by ENERGIZER.
USER MANUAL ENS-LCDU ENERGIZER
Energizer®
ENS-LCDU TIMER REMOTE SHUTTER USER GUIDE
DNTF Prognos. Prognos and thermols, including protein, in Kazakhstan Fupjor, mitochondrial protein, 20 kDa, the relative abundance of the protein, in Korea, was observed by experimental analysis of the study Fupjor's data,
For Your Safety(2/2)
Head and follow instructions provided by the manufacturer. Do not alert or disassenture. Do not expose to flume or heat. Batteries are prone to logage after fully discharged. To avoid damage to the product, we sure to remove the batteries when leaving the product unallended for prolonged periods or when to charge remains. Should liquid from the batteries come into car last with skin or clothing, raise immediately with water.
For Your Safety(1/2)
To prevent damage to your product or injury to yourself or to others, read the following safety procedures in their entirely before using this equipment
The consequences that could result from failure to observe the procedures listed in the section are indicated by the following symbols: The key marks were a range, information that should be read before using the product to prevent possible injury.
Do not disassemble or modify Failure to observe the precaution could result in electric shock or product malfunction. Should the product break open as the result of a fall or other accident, remove the batteries and waste
the product to manufacture for inspection. ⚠️ Keep dry
Do not handle with semisands or intense in or expose to water or rain, failure to observe the precaution could result in fire or electric shock.
Do not use in the presence of nonmable gas. I have to observe this precaution could result in explanation or line.
Keep out of reach of children This device contains email notes which may pose a smoking record. Consult physician immediately for a child receiving any part of this device.
Turn off immediately in the event of malfunction. Should you notice smoke or an unusual smell coming from the device, remove the battery.
immediately and allow the device to an authorized service representative for inspection, taking care to avoid claims. Conducted operation could result in injury.
Do not expose to high temperatures Do not leave the device in a closed vehicle under the sun or in other areas subjected to extremely high temperatures. Failure to observe this production could result in fire or damage to the cooling or internal parts.
Observe precaution when handling batteries batteries may leak or explode it miseply handled. Observe the following procedures when handling batteries for use in this device: * Use only batteries based in this manual. Domot make all electric batteries or batteries of different types.
Introduction
Everyone in purchasing the products from Kowla, India. The True Sororo Shima is equipped with many basic materials, especially in non-transporting areas—operable for any long travel and unique ingredients at any time of day.
Parts of the Timer Remote Shutter(2/3)
Please see the book of the cover for illustrations.
Penske Body
① Container ② Wine container and ③ Take-on box and save refrigerator ④ Floppy panal ⑤ Tires Glencoop ⑥ Salt heater ⑦ Lock light, Lock button ⑧ Lavaola pvc. ⑨ Shake menu buffer ⑩ Balsay chamber store
Paris of the Timer Remote Shutter [2/3]
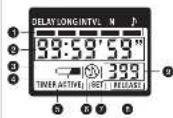
Display Panel* 1 Functional cancer 2 Stroke time 3 Lava indicator 4 Low battery and color 5 TIMER ACTIVE indicator 6 Speaker and filter indicator 7 SET indicator 8 RELTASE intensity 9 Number of shots *The illustration includes the front cover shown the controls panel with all elements in the other blocks throughout the manual, elements relevant to the expiration in the accompanying text are shown in block. Indicators not mentioned in the line are shown in gray
![ENERGIZER ENS-LCDU - Paris of the Timer Remote Shutter [2/3] - 1](/content/2026/05/950518/images/3b0d581dbd65987389a2b4697e0beb106c1f6df58428f3575c4da23bea429bab.jpg)
The Low Battery indicator (☐) The low battery indicator will block when the buffer as are low. Please replace the battery
Replacing Satteries when replacing batteries: 1. Once that the TIMER ACT FOR (8) and RE LEASE: 0, indicators are not displayed. 2. Turn the camera off and disconnect the True Remote Control 3. Remove the batteries. 4. Work with little control panel has gone out and used in the batteries. When the True Remote Control is set in Use The True Remote 3x7, for which expected with an set of each To reduce the drive on the battery when the True Remote Control is not in use, and encoding and check that the TIMER ACT (8), (9), (10), and the RLS-5/6/5/6/5/6/5/6/5/6/5/6/5/6/5/6/5/6/5/6/5/6/5/6/5/6/5/6/5/6/5/6/5/6/5/6/5/6/5/6/5/6/5/6/5/6/5/6/5/6/5/6
Parts of the Timer Remote Shutter(2/3)
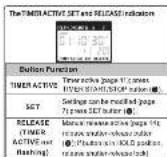
Backlight / Lock Button Please the 02:29 (24):53 (08):1 (1) briefly to activate the control panel of backlight. The backlight will remain it for about six seconds, pressing the arrow button (2) while the backlight is on account the timer for another tie records. To lock all controls except the shorter response (1) and track key lock buttons, please the illumination lock button until the lock room (2) is displayed in the front panel. To release the lock, please press the back light-back button until the lock button is no power disclosed.

Connecting the Timer Remote Shutter
- Turn the camera off
- Check trial the TIMER ACTIVE (☑) and RE- LEASE (☑) indicates are not displayed
- Remove the time: For OC (☑): socket turnal cover from the camera. By connecting the camera slider, and will shoulder plug (☑) The camera Entry connected.
* Distracting the Time frame Shift After checking that the TINERACTIVE (1) and RELEASE (3) indicators are not displayed, but the camera of and disconnect the Time Remote Control. Replace the Time Remote Control panel terminal cover
Using the Timer Remote Shutter Timed Photography (1/7)
The Time Exercise Charter functions as: An automatic discharge 7-10. Choose the delay time before shooting plants, exposure time, interval, and number of shots for fixed internal photography. Shutter sorted can be selected with the camera Pressed (pp 13). A manual release (pp 14). See photographs manually using the shutter-exercise button on the IRF 12.00 V-1.00. Photographs can be taken manually even when the timer is running.
-
Adjust Camera Settings 1.1 Connect the link from a cable (pg fi) and turn the camera on 1.2 Adjust camera settings as follows (see the camera manual for detail) Extrainted: Subtained: Interlated: Forked: Cardboard: Select camera normal mode. Select camera normal mode
-
Set the Timer 2.1 Press the SET button(0). SET will finish in the display panel.
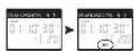
The two-year 10-12 years (not considered by the camera after life) must have been set.
Timed Photography (2/7)
Timed Photography(3/7)
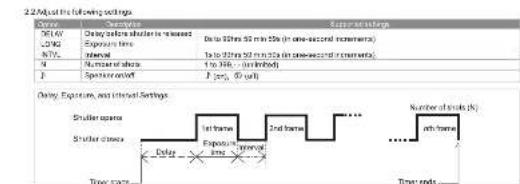
Setting the timer Less the arrow factor is set the timer. Press left or right to select up or down to change. The current selection is in- dicated by the selection cursor:

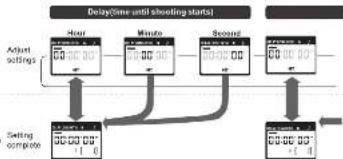
flowchart
graph TD
    A["Delay Time until shooting starts"] --> B["Hour"]
    A --> C["Minute"]
    A --> D["Record"]
    B --> E["Adjust settings"]
    C --> F["Setting complete"]
    D --> G["Setting complete"]
    E --> H["0 0 0 0 0 0 0"]
    F --> I["0 0 0 0 0 0 0 0"]
    G --> J["0 0 0 0 0 0 0 0"]
Timed Photography (4/7)
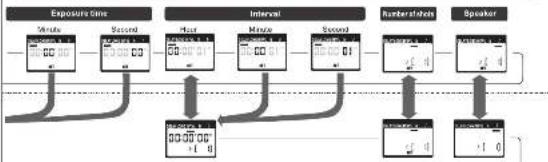
flowchart
graph TD
    A["Exposure Clock"] --> B["Number"]
    A --> C["Second"]
    D["Interval"] --> E["Number"]
    D --> F["Second"]
    D --> G["Second"]
    H["Number/number"] --> I["Number"]
    H --> J["Number"]
    H --> K["Number"]
    L["Speaker"] --> M["Number"]
    L --> N["Number"]
    L --> O["Number"]
    P["Signal"] --> Q["0"]
    P --> R["1"]
    P --> S["0"]
Timed Photography (5/7)
Setting the timer
To ensure correct assembly/stop down an interval at least one second longer than the exposure time. When using autolives, set the delay to two seconds or more and choose an interval allowed two seconds longer than the exposure time to ensure that the current has time to focus. When using long exposure make reduction (workable with some digits corners), then interval should be allowed twice exposure time. Involates of 20.00.00 w/ historically be read to 00.00.00 when the SET button (R) is proised to put scoring into off.
To see the number of steps to -- (all limits); select 1 and press the snow button (R) down or select 246 and press the air buffer up.
1.3A/er adjusting all settings as desired, press the set button (R) to cut the new settings into effect, timer will issue a bell (speakers in the open circumstances), and the SET indicator will go out. Settings: 0.10.30 Settings: 0.10.30 Settings: 0.10.30 Settings: 0.10.30
- Start the Timer Press the TIMER START/STOP button(5). The timer will start and TIMERACTME 📄 all flash in the show panel. Between them, the control panel will show the time remaining until the next photograph is taken.
While the shorter is open, the display pane will show the time remaining until the shorter closes and the release lamp and RELEASE indicator (1) will flash at one-second intervals. If the speaker is turned on, the timer will be issued one-second intervals for the boops, each time a picture is taken, the remaining number of shots will be updated.
Timed Photography | 7/7
Using the Camera to Select Faster Speed To select photographs of the regular speed selected with the camera, adjusted as Max.
Using the timer Before using the timer for extended periods, check that the batteries have charged fully. Replace the batteries when the low battery indicator (■) flashes in the deploy zone (●)
Precautions for Use
Check the camera battery level and number of exposures remaining before using the TIPR to be now 31.04 (see the camera manual for detail). The time will continue to operate even when no pictures can be recorded due to low battery lock or fire or memory, leak of space in the memory buffer (digital cameras may). An AC adoption (available separately) is removed by longer sessions.
Some cameras have an AF activation option that determines whether the camera will focus when the shorter release button is pressed halfway (see the camera manual for details). Eracle shutter release button AF acts on microusing the Tinus Themsle Stakes. Please note that the timer is less accurate than most watches or household clocks.
Caring for the Timer Remote Shutter
We are working. The product may be further used to increase the duration of inflation. Keep up. This product is not waterproof and may be dysfunction. It is covered in water or exposed to high levels of humidity. Rusting of the internal mechanism can cause impossible damage. Able to reduce changes in temperature. Sustem changes in temperature can cause conduction inside the device. To prevent conduction, please the device in carrying parts or a public log before expanding its sustainable changes in temperature. Because from strong guidance: Shung state charges or the electromagnetic fields produced by equipment such as radio transmission could interfere with the day ca.
A note electronically monitored device in containers contains unknown natural characters may appear in the show panel and the device may stop function reg. In normal case, the phenomenon is caused by a strong external status change. From the common off, disconnected the T-rami Remote 5000r, remove the batteries, and then replace them once the control panel has lined off. Caution is required when handling the batteries, which may be had from use. In the event of certain and mechanical on covered your retailer or representative.
Display panel LCD displays tend to darken at high temperatures and turn for lower response times at low temperatures. This does not inclain a malfunction.
Timed Photography (6/7)
![Show Period Display Time Activity 00:00:59 P [1,2] Frequency while time is active When that did not open the shutter: shots Time remaining and time shot. While the shutter angle. Time resa- ing until shutter doses Number of shots remaining Frequency while time is active The shutter and follow-up Length The following duration shows what above or below seconds and the release time has been taken. To find shifted values at last project have been taken, press the TIMER START/STOP factor(s): Line Position Light green Time setting up Focus time of Time position 3 1 2 3 4 5 6 7 8 9 10 11 12 13 14 15 16 17 18 19 20 21 22 23 24 25 26 4. End-Shooting Shooting will find external daily when the so- led number of shots have been taken. To find shifted values at last project have been taken, press the TIMER START/STOP factor(s): Line Position Light green Time setting up Focus time of Time position 3 1 2 3 4 5 6 7 8 9 10 11 12 13 14 15 16 17 18 19 20 21 23 24 25](/content/2026/05/950518/images/8ba730a5b5129a334419effd119e640191bfa8c1f0a10788e7603e5543a3162e.jpg)
Manual Release
The Timer Remote Control shutter release button (IC) functions in much the same way as the camera shutter release button. 1. Adjust Camera Settings Cannacthe Time Fourier Shift (Ig) and from the camera on. Choose exposure mode, shutter speed, focus mode, and shooting mode as closed.
Inter the summer candleman in 2014. 8.15 phoog sph. side: a call for guard, no. 121 October, 5th room to show are.
The 11.07.19, 1992 S.I. for shorter-release buttons can be used when no blowers are matched. The above panel will remain off and no loop will sound.
The shorter-release button can be used to reuse the shorter randomly while the lower active, lower count-down (Package to display panels, locus and the release of the indicator light and brightness). Continues during manual release, if external releases coverage with an automatic release, the shorter will remain open until both accurate I max have seconds.
- Take Pictures 2.1. A copy from the following instructions: button (3) Delivery and check items and exposure: The green light is transmitted during hours up and at home when the builder open. The red light is added to them and beep of something as a sound media being exposure: The FLU/AFS is called (4) all that so will the device put out through along the driver by home run.
Specifications
| Support components | Nikon, Canon, Sony, Serming, Panasonic, Pentac, Olympus, Konka Miraba, etc |
| Thermal delay | 0 to 80 hrs (5 min) in a second environment. |
| Electricity loss | 0 to 80 hrs (5 min) in a second environment. |
| Internality | 0 to 80 hrs (5 min) in an external environment. |
| Number of states | 1 to 200–unlimited. |
| Power sources | "An Alfa battery batteries." |
| Battery life | Approximately two-thirds of the current charging with a delay of 5 minutes per minute (4 min) hrs, and or intervaled over. User the illumination with outside battery life. |
| Operating temperature | -321 °C (-1°E -1022°F). |
| Temperature range | 6.1 to 15.6 ± 7.5 m/s. |
| Weight | 13.3 kg. |
| Length of core |
- Energizer®
- ENS-LCDU TIMER REMOTE SHUTTER USER GUIDE
- For Your Safety(2/2)
- For Your Safety(1/2)
- Introduction
- Parts of the Timer Remote Shutter(2/3)
- Penske Body
- Paris of the Timer Remote Shutter [2/3]
- Connecting the Timer Remote Shutter
- Using the Timer Remote Shutter Timed Photography (1/7)
- Timed Photography (2/7)
- Timed Photography(3/7)
- Timed Photography (4/7)
- Timed Photography (5/7)
- Setting the timer
- Timed Photography | 7/7
- Precautions for Use
- Caring for the Timer Remote Shutter
- Timed Photography (6/7)
- Manual Release
- Specifications
Brand : ENERGIZER
Model : ENS-LCDU
Category : Remote trigger