
CDP-S150 - Piano CASIO - Free user manual and instructions
Find the device manual for free CDP-S150 CASIO in PDF.


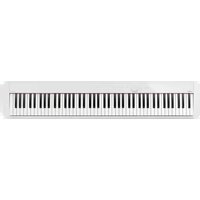
| Type of Product | Digital Piano |
| Brand | Casio |
| Model | CDP-S150 |
| Number of Keys | 88 |
| Key Action | Scaled Hammer Action II |
| Touch Sensitivity | 3 levels + fixed |
| Maximum Polyphony | 64 notes |
| Built-in Tones | 10 |
| Digital Effects | Reverb (4 types), Chorus (4 types) |
| Metronome | Yes (0-9 beats, tempo range) |
| Pedals | 1 included (SP-3), optional 3-pedal unit |
| Number of Pedals | 3 (optional) |
| Speaker System | 2 x 8W |
| Built-in Songs | 10 demo songs |
| Connectivity | USB-MIDI, Phones/Output (stereo mini jack), Pedal jack |
| Power Supply | AC adapter (AD-A12150LW) or 6 AA batteries |
| Power Consumption | 8W (with AC adapter) |
| Dimensions (W x D x H) | 1322 x 232 x 99 mm (52 x 9.1 x 3.9 in) |
| Weight | 10.5 kg (23.1 lbs) |
| Included Accessories | AC adapter, sustain pedal (SP-3), music stand, manual |
| Maintenance | Wipe with a dry, soft cloth. Avoid solvents. |
| Storage Temperature | -10°C to 50°C |
| Repairability | Contact authorized Casio service centers for repairs. Spare parts available. |
Frequently Asked Questions - CDP-S150 CASIO
User questions about CDP-S150 CASIO
0 question about this device. Answer the ones you know or ask your own.
Ask a new question about this device
Download the instructions for your Piano in PDF format for free! Find your manual CDP-S150 - CASIO and take your electronic device back in hand. On this page are published all the documents necessary for the use of your device. CDP-S150 by CASIO.
USER MANUAL CDP-S150 CASIO
Preparing a Power Supply Turning Power On or Off Connecting a Pedal Using Headphones



Selecting a Tone Splitting the Keyboard for Duet Play
Changing the Pitch in Semitone Steps (Transpose)
Fine Tuning a Pitch (Tuning)



Listening to Demo Play Using Effects Linking with a Smart Device
(APP Function)
Contents
Overview and Setup EN-2
General Guide..... EN-2
Preparing a Power Supply .... EN-3
Turning Power On or Off .... EN-5
Returning the Digital Piano to Its Factory Default Settings .... EN-6
Connecting a Pedal. EN-6
Using Headphones ..... EN-7
Digital Piano Operation EN-8
Listening to Demo Play ..... EN-8
Demo Song List. EN-8
Selecting a Tone ...... EN-8
Using Effects..... EN-10
Using the Metronome ..... EN-11
Splitting the Keyboard for Duet Play ..... EN-12
Recording and Play Back ..... EN-14
Linking with a Smart Device (APP Function) .... EN-16
Configuring Settings EN-16
Changing the Keyboard Touch Response ..... EN-16
Changing the Pitch in Semitone Steps (Transpose).... EN-17
Fine Tuning a Pitch (Tuning). EN-18
Selecting a Scale ...... EN-19
Changing the Beep Setting ..... EN-20
Configuring MIDI Settings ..... EN-21
Connecting External Devices EN-22
Connecting to Audio Equipment ..... EN-22
Connecting a Computer ..... EN-23
Reference EN-24
Troubleshooting EN-24
Product Specifications..... EN-26
Tone List.... EN-27
Keyboard Function List ..... EN-28
MIDI Implementation Chart
Included and Optional Accessories
Use only accessories that are specified for use with this Digital Piano.
Use of unauthorized accessories creates the risk of fire, electric shock, and personal injury.
NOTE
- You can get information about accessories that are sold separately for this product from the CASIO catalog available from your retailer, and from the CASIO website at the URL or QR code below. https://support.casio.com/global/en/emi/manual/CDP-S150/

- Any reproduction of the contents of this manual, either in part or its entirety, is prohibited. Except for your own, personal use, any other use of the contents of this manual without the consent of CASIO is prohibited under copyright laws.
• IN NO EVENT SHALL CASIO BE LIABLE FOR ANY DAMAGES WHATSOEVER (INCLUDING, WITHOUT LIMITATION, DAMAGES FOR LOSS OF PROFITS, BUSINESS INTERRUPTION, LOSS OF INFORMATION) ARISING OUT OF THE USE OF OR INABILITY TO USE THIS MANUAL OR PRODUCT, EVEN IF CASIO HAS BEEN ADVISED OF THE POSSIBILITY OF SUCH DAMAGES. - The contents of this manual are subject to change without notice.
- The actual appearance of the product may be different from that shown in the illustrations in this User's Guide.
- Company and product names used in this manual may be registered trademarks of others.
Overview and Setup
General Guide
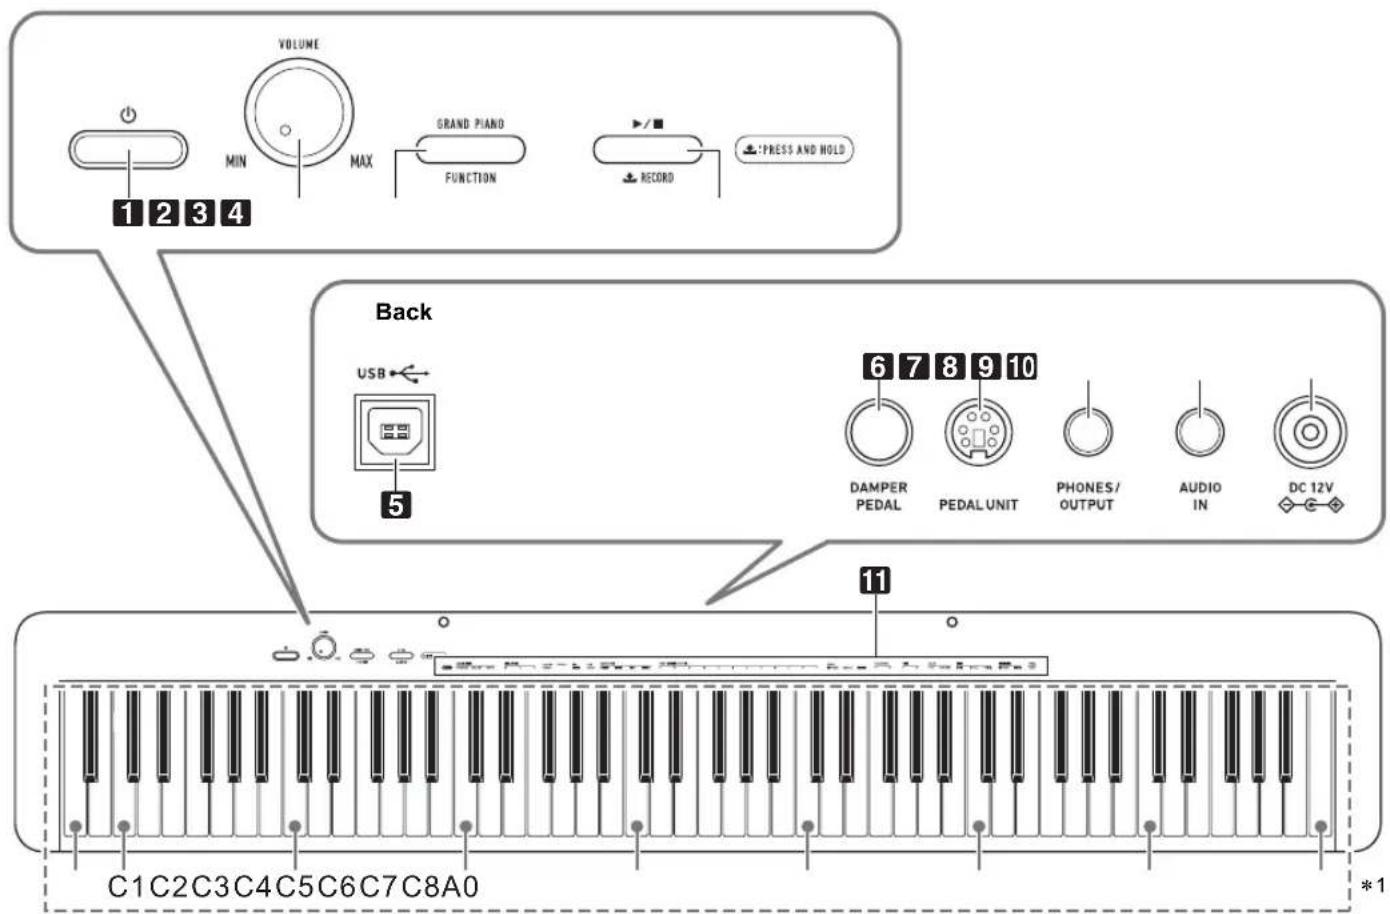
- Some of the button names shown here include the ↓ mark. This indicates that you need to long-press the button to perform its operation.
1 ⏻ (Power) button
2VOLUME knob
3 GRAND PIANO, FUNCTION button
4 ▶/■ , ↓ RECORD button
5USB port
6 DAMPER PEDAL jack
7 PEDAL UNIT jack
8 PHONES/OUTPUT jack
9 AUDIO IN jack
10DC 12V terminal
11 Functions assigned to keys* 2
\*1 Keyboard note names and pitches
The keyboard note names and pitches used in this manual follow the international standard. Middle C is C4, the lowest C is C1, and the highest C is C8. The illustration below (C4 through C5) shows keyboard key note names.

\*2 Functions assigned to keys
While holding down the 3 FUNCTION button, you can use these keys to change settings, such as the currently selected tone, etc. Most of the functions that can be changed using keyboard keys are marked above the keyboard. For example, tone names assigned to the TONE setting keys (C3 to A3) are marked above the keys.

NOTE
- Note that some assigned functions are not marked above the keys. For information about all of the functions that are assigned to keyboard keys, refer to the "Keyboard Function List" (page EN-28).
■Preparing the Music Stand

Preparing a Power Supply
Your Digital Piano uses an AC adaptor for power.
NOTE
- Though this Digital Piano supports battery operation, use of an AC adaptor is generally recommended.
■Using the AC Adaptor
Make sure that you use only the AC adaptor specified for this Digital Piano. Use of a different type of AC adaptor can cause malfunction.
Specified AC Adaptor: AD-A12150LW
IMPORTANT!
- Never connect the AC adaptor (JEITA Standard, with unified polarity plug) that comes with this Digital Piano to any other device besides this Digital Piano. Doing so creates the risk of malfunction.
- Be sure to turn off Digital Piano power before connecting or disconnecting the AC adaptor.
- The AC adaptor will become warm to the touch after very long use. This is normal and does not indicate malfunction.
- Note the important precautions below to avoid damage to the power cord.
During Use
- Never pull on the cord with excessive force.
- Never repeatedly pull on the cord.
- Never twist the cord at the base of the plug or connector.
During Movement
- Before moving the Digital Piano, be sure to unplug the AC adaptor from the power outlet.
During Storage
- Loop and bundle the power cord, but never wind it around the AC adaptor.
- Never insert metal, pencils, or any other objects into the product's DC12V terminal. Doing so creates the risk of accident.
- Do not try to use the power cord that comes with the product with another device.
- Plug the AC adaptor into a power outlet that is close to the Digital Piano. This lets you immediately unplug from the power outlet should any problem occur.
- The AC adaptor is intended for indoor use only. Do not leave it in a location where it can become wet. Also, do not place a vase or any other container of liquid on the AC adaptor.
- Make sure that the AC adaptor does not become covered with a newspaper, table cloth, curtain, or any other type of fabric.
- If you do not plan to use the Digital Piano for a long time, unplug the AC adaptor from the power outlet.
- The AC adaptor cannot be repaired. If your AC adaptor malfunctions or becomes damaged, you need to purchase a new one.
- AC Adaptor Usage Environment Temperature: 0 to 40°C Humidity: 10% to 90%RH
- Output Polarity: ◇—●—⊕
■Using Batteries

IMPORTANT!
- Be sure to turn off power before loading batteries.
- It is up to you to prepare six commercially available alkaline batteries.
- Note the precautions below while the Digital Piano is turned upside down to load batteries.
- Take care to avoid injury due to pinching your fingers under the Digital Piano.
- Do not allow the Digital Piano to tip over or otherwise be subjected to strong impact. Impact can damage the volume knob and keyboard keys.
- Open the battery cover on the bottom of the Digital Piano.

natural_image
Pure mechanical assembly diagram showing two blocks with upward arrows, no text or symbols present- Load six AA-size batteries into the battery compartment.
Make sure the positive ⊕ and negative ⊖ ends of the batteries are facing as marked on the Digital Piano.
- Insert the tabs of the battery cover into the holes along the side of the battery compartment, and close the cover.

■Low Battery Indication
Low batteries are indicated by the 1 (Power) button lamp flashing. When this happens, replace batteries.

IMPORTANT!
- Using the Digital Piano while batteries are very low can cause it to turn off suddenly. This can cause data stored in Digital Piano memory to be corrupted or lost.
Turning Power On or Off
1. Press the 1 ⏻(Power) button to turn on Digital Piano power.

- The power lamp lights and the Digital Piano powers up. The power up operation takes a few seconds.
- Use 2 VOLUME to adjust volume.

2. To turn off the Digital Piano, hold down the ⏻(Power) button until the power lamp goes out.

NOTE
- Pressing the 1 ⏻(Power) button to turn off power actually puts the Digital Piano into a standby state. Minute amounts of current continue to flow within the Digital Piano in the standby state. If you do not plan to use the Digital Piano for a long time or if there is a lightning storm in your area, be sure to unplug the AC adaptor from the power outlet.
- Turning off power causes the Digital Piano settings to return to their initial defaults. The tuning setting (page EN-19) and recorded data (page EN-14), however, is retained.
Auto Power Off
This Digital Piano is designed to turn off automatically to avoid wasting power after no operation is performed for a preset amount of time. The Auto Power Off trigger time is about four hours when power is being supplied by the AC adaptor, or six minutes under battery power.
- You can use the procedure below to enable or disable Auto Power Off.
■To enable or disable Auto Power Off
1. While holding down 3 FUNCTION, press the B6 (Auto Power Off) keyboard key.

• Each press of the B6 keyboard key causes a short beep to sound. A low beep sounds when Auto Power Off is disabled, and a high beep sounds when it is enabled.
2. After the setting is the way you want, release 3FUNCTION.
Returning the Digital Piano to Its Factory Default Settings
Perform the procedure below when you want to return the Digital Piano's stored data and settings to their initial factory defaults.
1. While holding down 3 FUNCTION, perform steps (1) and (2) below.

(1) Press the E7 (Factory Reset) keyboard key.
• This will cause a short beep to sound.
- Performing step (2) below will initialize the Digital Piano and return it to its factory default settings. If you want to cancel initialization at this point, release 3 FUNCTION.
(2) Press the G7 (Execute) keyboard key.
- This causes a short and then long beep to sound, indicating that the operation is complete and that initialization has started.
- The initialization operations takes some time to complete.
• After settings are returned to their initial factory defaults, Digital Piano power will turn off automatically.
2. Release 3FUNCTION.
Connecting a Pedal
DAMPER PEDAL Jack
Connect the supplied pedal (SP-3) to the 6 DAMPER PEDAL jack.
Back
6 DAMPER PEDAL jack (Standard jack (6.3mm))
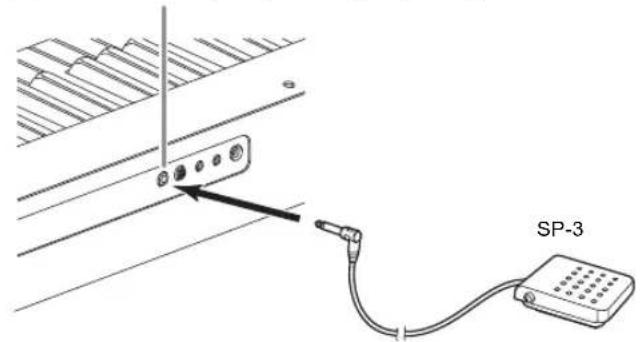
This pedal functions as a damper pedal under initial Digital Piano default settings. To change it to a different function, see "To change the functions assigned to pedals" (page EN-7).
PEDAL UNIT Jack
You can connect the optionally available 3-Pedal Unit (SP-34) to the 7 PEDAL UNIT jack on the back of the Digital Piano. You can then use the pedals for expression that is similar to that available on an acoustic piano.
■SP-34 Pedal Functions
●Damper Pedal
Pressing the damper pedal while playing will cause the notes you play to reverberate. The SP-34 pedal also supports half-pedal operation, so pressing the pedal part way applies only a partial damper effect.
●Soft Pedal
Pressing this pedal suppresses notes played on the keyboard after the pedal was pressed, and makes them sound softer.
●Sostenuto Pedal
Only the notes of the keys that are depressed when this pedal is pressed are sustained, even if the keyboard keys are released, until the pedal is released.

NOTE
- A separately available pedal unit can be used at the same time as the pedal that comes with the Digital Piano.
■To change the functions assigned to pedals
1. While holding down 3 FUNCTION, perform procedure (A) or (B) below.
![C1C2C3C4C5C6C7C8 [+] key (E♭4) [-] key (D4) [1] (F4) to [5] (A4) keys 1 2 3 4 5 PEDAL TYPE key (E6)](/content/2026/05/950347/images/0d052fe24da97cc4e0d4784a746acfffdf718afa4325abb2a938d52b00bd8aba.jpg)
(A) Press the PEDAL TYPE (E6) keyboard key.
• Each press changes the setting. The setting that is selected by a key press will be indicated by the number of beeps that sound.
| Beeps/Setting | Provided Pedal Function | Pedal Unit Functions |
| 1 Damper Left: Soft | Center: SostenutoRight: Damper | |
| 2 Metronome start/stop | ||
| 3 3FUNCTION button operation | ||
| 4 Recording standby enter/exit | ||
| 5 3FUNCTION button operation | Left: Recording standby enter/exitCenter: Metronome start/stopRight: Damper | |
- You can also cycle back or forward through the above settings using the [-] (D4) and [+] (E♭4) keyboard keys.
- To return to the initial default setting (1), hold down the [-] (D4) and [+] (Eb4) keyboard keys at the same time until a long beep sounds.
(B) Press the PEDAL TYPE keyboard key (E6), and then press a keyboard key in the range of [1] (F4) through [5] (A4).
- This will cause a short and then long beep to sound, indicating that the operation is complete and that the pedal setting (1 to 5 as shown in the table above) corresponding to the key you pressed is now enabled.
- Pressing a keyboard key outside the range of setting keys will cause a high and then low beep to sound, indicating that the setting was not changed.
2. Release 3 FUNCTION.
Using Headphones
Using headphones cuts off output from the built-in speakers, which means you can practice playing even late at night without disturbing others.
- Be sure to turn down the volume level before connecting headphones.

NOTE
• Headphones do not come with the Digital Piano.
- Use commercially available headphones. See page EN-1 for information about options.
IMPORTANT!
- Do not listen to very high volume output over headphones for long period. Doing so creates the risk of hearing damage.
- If you are using headphones that require an adaptor plug, make sure you do not leave the adaptor plugged in when you unplug the headphones. If you do, nothing will sound from the speakers when you play.
Digital Piano Operation
Listening to Demo Play
flowchart
graph TD
    A["GRAND PIANO FUNCTION"] --> B["DEMO key (B2)"]
    B --> C["DEMO key (D4)"]
    C --> D["DEMO key (Eb4)"]
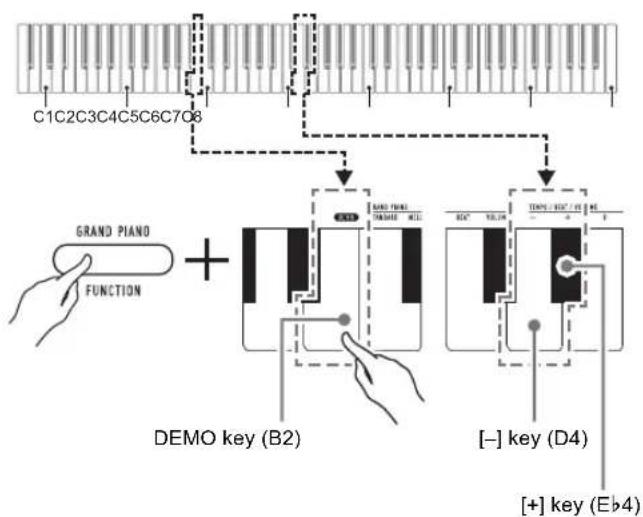
1. While holding down Ⓔ FUNCTION, press the DEMO (B2) keyboard key.
This starts playback of the two demo songs.
- For demo song play, the Digital Piano setup is changed automatically to optimize it for the demo song being played.
- To toggle between demo songs during playback, hold down 3 FUNCTION and press the [-] (D4) or [+] (Eb4) keyboard key.
• Demo song play will repeat until you perform the operation in step 2 below.
2. To stop demo song play, press 3 FUNCTION or 4 ▶/■.
NOTE
- If Auto Power Off is enabled, power will turn off automatically at the applicable trigger time after a period of non-use, even if demo play is being performed. You can disable Auto Power Off, if you want, by performing the operation under "To enable or disable Auto Power Off" (page EN-5).
Demo Song List
| Song No. Song Name Tone Name | ||
| 1 Prélude[Suite bergamasque] | GRAND PIANO STANDARD | |
| 2 Original ELEC.PIANO 1 | ||
Selecting a Tone
The Digital Piano has 10 built-in tones. In addition to using a single tone, you can also select two different tones and sound them together.
Use the Tone keyboard keys (C3 through A3) to select a tone.

NOTE
- For information about tone names, refer to the "Tone List" (page EN-27) and "Keyboard Function List" (page EN-28).
Selecting the GRAND PIANO STANDARD Tone
Press 3 GRAND PIANO. You can also select the GRAND PIANO STANDARD tone using the operation under "To select a single tone" (page EN-9).

NOTE
- The GRAND PIANO STANDARD tone is the default tone when the Digital Piano is turned on.
To select a single tone
1. While holding down 3 FUNCTION, press one of the Tone keyboard keys (C3 through A3).
- To select HARPSICHORD, for example, hold down 3FUNCTION and press the HARPSICHORD keyboard key (F#3). A short beep will sound to confirm the setting.

2. Release 3FUNCTION.
To layer two tones
1. While holding down 3 FUNCTION, press the Tone keyboard keys (C3 through A3) of the first tone and then the second tone you want to layer.
- To layer HARPSICHORD and STRINGS, for example, hold down 3 FUNCTION and press the HARPSICHORD keyboard key (F#3), and then the STRINGS key (G3). - Pressing the first keyboard key for the first tone will cause a short beep to sound, and press the key for the second tone will cause a short and then long beep to sound, indicating that the tones whose keys you pressed have been layered.

2. Release 3 FUNCTION.
- Now pressing a single keyboard key will sound both the HARPSICHORD and STRINGS tones at the same time.
NOTE
- To cancel tone layering, perform the procedure under "To select a single tone" (page EN-9). Or you could press 3 GRAND PIANO, which changes the keyboard tone to GRAND PIANO STANDARD only.
Using Effects
Your Digital Piano has a number of effects that change the reverberation of notes (reverb), and effects that make note deeper and more expansive (chorus).

flowchart
graph TD
    A["C1C2C3C4C5C6C7"] --> B["CHORUS key (E5)"]
    C["C8"] --> D["REVERB key (Eb5)"]
    B --> E["[+"] key (Eb4)]
    D --> F["[0"] (E4) to["4"] (Ab4) keys]
    E --> G["0"]
    F --> H["1"]
    F --> I["2"]
    F --> J["3"]
    F --> K["4"]
    G --> L["0"]
    H --> M["1"]
    I --> N["3"]
    J --> O["4"]
    K --> P["5"]
    L --> Q["7"]
    M --> R["8"]
    N --> S["9"]
    O --> T["10"]
    P --> U["11"]
    Q --> V["12"]
    R --> W["13"]
    S --> X["14"]
    T --> Y["15"]
    U --> Z["16"]
    V --> AA["17"]
    W --> AB["18"]
    X --> AC["19"]
    Y --> AD["20"]
    Z --> AE["21"]
■To add reverb to notes
1. While holding down 3 FUNCTION button, perform procedure (A) or (B) below.
(A) Press the REVERB keyboard key (Eb5) to cycle through available settings.
• Each press changes the setting. Beeps will sound indicating the setting selected by a key press, as described below.
1 time low: Reverb off.
1 to 4 times high: Number of beeps indicates the reverb type selected. Four high beeps indicate that Virtual Hall* is selected.
*Acoustic effect that creates the feel of playing in a classic concert hall.
- You can also change the setting by pressing the keyboard [+] key (E♭4) or [-] key (D4).
- To return to the initial default setting, hold down the keyboard [+] (Eb4) and [-] (D4) keys at the same time until a long beep sounds.
(B) Press the REVERB keyboard key (Eb5), and then press a keyboard key within the range of [0] (E4: OFF) to [4] (Ab4: Virtual Hall).
- This will cause a short and then long beep to sound, indicating that the operation is complete and that the reverb setting that corresponds to the key you pressed is now enabled.
- Pressing a keyboard key outside the range of setting keys will cause a high and then low beep to sound, indicating that the setting was not changed.
2. Release 3 FUNCTION.
■To add the chorus effect to notes
1. While holding down the 3 FUNCTION button, perform procedure (A) or (B) below.
(A) Press the CHORUS keyboard key (E5) to cycle through available settings.
• Each press changes the setting. Beeps will sound indicating the setting selected by a key press, as described below.
1 time low: Chorus off.
1 to 4 times high: Number of beeps indicates the chorus type selected.
- You can also change the setting by pressing the keyboard [+] key (E♭4) or [-] key (D4).
- To return to the initial default setting, hold down the keyboard [+] (Eb4) and [-] (D4) keys at the same time until a long beep sounds.
(B) Press the CHORUS keyboard key (E5), and then press a keyboard key within the range of [0] (E4: OFF) to [4] (Ab4: Chorus 4).
- This will cause a short and then long beep to sound, indicating that the operation is complete and that the chorus setting that corresponds to the key you pressed is now enabled.
- Pressing a keyboard key outside the range of setting keys will cause a high and then low beep to sound, indicating that the setting was not changed.
2. Release 3 FUNCTION.
Using the Metronome
The metronome sounds a regular tone to mark time. Use the metronome when you want to practice playing at a regular tempo.
![C1C2C3C4C5C6C7C8 METRONOME 0 TOMES (E4) to [9] (C#5) keys [+] key (Eb4) [-] key (D4) METRONOME VOLUME key (C#4) METRONOME BEAT key (C4) METRONOME TEMPO key (B3)](/content/2026/05/950347/images/c8dd1ce43690aca72bccfc4f996c5c60ca41dcb7202d68ceb137b4fb13ba86a0.jpg)
METRONOME ON/OFF key (Bb3)
NOTE
- Metronome settings (beat, tempo, volume) can be changed while the metronome is sounding or stopped.
■To start or stop the metronome
- While holding down 3 FUNCTION, press the METRONOME ON/OFF keyboard key (Bb3).
■To change the metronome beat
1. While holding down 3 FUNCTION, perform steps (1) and (2) below.
(1) Press the METRONOME BEAT keyboard key (C4).
(2) Press a keyboard key within the range of [0] (E4) to [9] (C#5) to specify the beat you want.
| Setting Description | |
| 0 All beats unaccented. | |
| 1 All beats accented. | |
| 2-9(Default: 4) | Specifies beats per measure value from 2 to 9. An accent sounds on the first beat only. |
- You can also raise or lower the beat by pressing the keyboard [+] key (E♭4) or [-] key (D4). If a key operation would cause the setting to exceed its upper or lower maximum limit, a high and then low beep will sound to indicate that the setting cannot be changed further.
- To return to the initial default setting, hold down the keyboard [+] (Eb4) and [-] (D4) keys at the same time until a long beep sounds.
2. Release 3 FUNCTION.
■To change the metronome tempo
NOTE
- You can specify a metronome tempo in the range of 20 to 255 beats per minute (bpm). Always input three digits. To specify a two-digit value, input zero (0) for the unused leading digit.
1. While holding down 3 FUNCTION, perform steps (1) and (2) below.
(1) Press the METRONOME TEMPO keyboard key (B3).
(2) Use the [0] (E4) through [9] (C#5) keyboard keys to input the three-digit tempo value.
For example, to specify a tempo of 80 bpm, press keyboard keys in the following sequence: [0] (E4) → [8] (C5) → [0] (E4). Inputting the third and final digit will cause a short and then long beep to sound, indicating that the value you input was applied.
- You can also raise or lower the tempo by pressing the keyboard [+] key (Eb4) or [-] key (D4).
- To return to the initial default setting (120 bpm), hold down the keyboard [+] (Eb4) and [-] (D4) keys at the same time until a long beep sounds.
2. Release 3 FUNCTION.
■To adjust the metronome volume
NOTE
- You can adjust the metronome value within the range of 0 (muted) and 42 (maximum). Always input two digits. To specify a one-digit value, input zero (0) for the unused leading digit.
1. While holding down 3 FUNCTION, perform steps (1) and (2) below.
(1) Press the METRONOME VOLUME keyboard key (C#4).
(2) Use the [0] (E4) through [9] (C#5) keyboard keys to input a two-digit volume value.
For example, to specify a volume value of 8, press keyboard keys in the following sequence: [0] (E4) → [8] (C5). Inputting the second and final digit will cause a short and then long beep to sound, indicating that the value you input was applied.
- You can also raise or lower the volume by pressing the keyboard [+] key (Eb4) or [-] key (D4).
- To return to the initial default setting (36), hold down the keyboard [+] (E♭4) and [-] (D4) keys at the same time until a long beep sounds.
2. Release 3FUNCTION.
Splitting the Keyboard for Duet Play
You can split the keyboard in the center for duet play so the left and right sides have the same ranges.
The Duet Mode is the perfect way to conduct lessons, with the teacher playing on the left side as the student playing the same song on the right side.
Keyboard

Pedal Operation when Playing a Duet
●Optional SP-34 Pedal Unit
The left pedal operates as the left side damper pedal, while the right pedal is the right side damper pedal.

NOTE
- Only the damper pedal for the right side keyboard supports half-pedal operations.
●Supplied SP-3 Pedal
To use the SP-3 Pedal as the right keyboard damper pedal, connect it to the 6 DAMPER PEDAL jack.
• Half-pedal operation is not supported in this case.
■To play a duet
1. While holding down 3 FUNCTION, press the DUET TYPE (B5) keyboard key.

• Each press changes the setting. A beep will sound indicating the setting selected by a key press.
| Beeps Duet Mode Description | |
| 1 low Off (default) Duet Mode off. | |
| 1 high On Duet Mode on. | |
| 2 high Pan You can configure the piano to output the left side keyboard notes from the left speaker and the right side keyboard notes from the right speaker while in the Duet Mode. | |
2. After confirming that the Duet Mode setting is the way you want, release 3 FUNCTION.
3. Select a tone and perform the song you want.
NOTE
- Entering the Duet Mode causes the Digital Piano to be configured automatically with settings that are optimal for duet play.
- Some settings become fixed and cannot be changed while in the Duet Mode.
■Changing the Octaves of the duet keyboards
You can change the ranges of the left and right keyboards in octave units from their initial default settings. This comes in handy, for example, if the initial default range is not enough when one person is playing the left hand part and another person is playing the right hand part.
1. While holding down the 3 FUNCTION button, perform steps (1) and (2) below.
(1) To change the register of the left keyboard, press the DUET L OCT. keyboard key (C6).
(2) Within the range of the left keyboard, press the C key where you want middle C (C4) to be located.
• This will cause a short and then long beep to sound, indicating that the operation is complete.
- Pressing a keyboard key outside the applicable will cause two low beeps to sound, indicating that the setting was not changed.
Example
Pressing the leftmost C key of the keyboard will configure the range shown below.

2. Release 3 FUNCTION.
NOTE
• To change the register of the right keyboard, perform the same operation as in steps 1-(1) and 1-(2), above.
(1) Press the DUET R OCT. (C#6) keyboard key.
(2) Within the range of the right keyboard, press the C key where you want middle C (C4) to be located.
Recording and Play Back
You can store the notes you play in Digital Piano memory for later playback.
●Memory Capacity
- You can record approximately 2,500 notes in Digital Piano memory.
- The 4 RECORD button lamp will flash at high speed when memory runs low.
- Recording stops automatically if the number of notes in memory exceeds the maximum.
●Recorded Data
- Keyboard play
- Keyboard tone (including layered tone)
- Pedal operations
- Reverb and chorus settings
- Tempo setting
- Transpose setting
- Duet Mode setting (Off, On, Pan), duet keyboard registers
NOTE
- Digital Piano settings cannot be changed while recording is in progress.
●Recording Data Storage
- Starting a new recording deletes any data that was previously recorded in memory.
- If power to the Digital Piano is cut off while recording is in progress, everything you recorded up to that point will be deleted. Take care so power is not turned off accidentally during recording operations.
IMPORTANT!
- CASIO COMPUTER CO., LTD. takes no responsibility for any damages, lost profits, or claims by third parties arising from the deletion of recorded data due to malfunction, repair, or for any other reason.
■To record keyboard play
1. Long-press 4 RECORD until the button's LED starts to flash.

Flashing
- The flashing 4 RECORD button LED indicates that the Digital Piano is in record standby.
- To exit record standby, long-press 4 RECORD again until the LED goes out.
2. To start recording, play something on the keyboard, press the pedal, or press 4 ▶/■.
- During recording, the LED stops flashing and remains lit.
3. To finish recording, press 4▶/■.
The LED will turn off after the recording save operation is complete (which may take a little time).
■To play back a recorded performance
1. Press 4▶/■.
This starts playback of what you recorded.
NOTE
- During playback of a recorded song the 4 RECORD button LED flashes at the tempo of the recording.
2. To stop playback, press 4 ▶/■ again.
- Playback will stop automatically when the end of the recording is reached.
■To change the reverb and chorus settings of a recorded performance
1. Perform one of the operations below to select the reverb or chorus effect you want to apply to the recorded performance.
"To add reverb to notes" (page EN-10)
"To add the chorus effect to notes" (page EN-10)
2. While holding down the 3 FUNCTION button, perform steps (1) and (2) below.
flowchart
graph TD
    A["GRAND PIANO FUNCTION"] --> B["RECORDER SETTING KEY (D6)"]
    B --> C["G7 (Execute) key"]
    style A fill:#f9f,stroke:#333
    style B fill:#ccf,stroke:#333
    style C fill:#cfc,stroke:#333
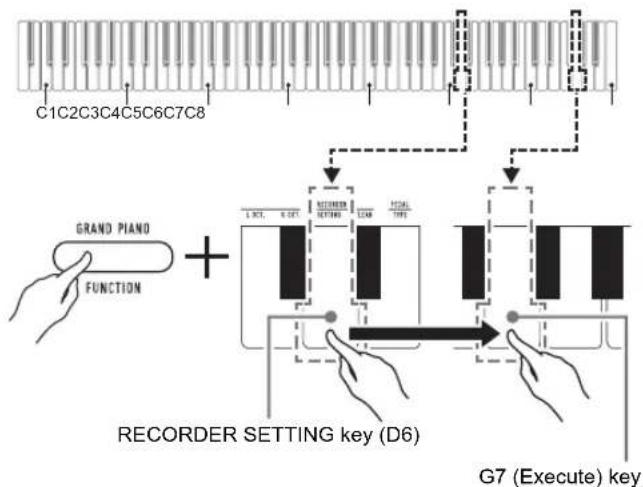
(1) Press the RECORDER SETTING (D6) keyboard key.
• This causes a short beep to sound.
- Note that performing step (2) below will change the setting of the previously recorded data. If you want to cancel the setting change operation at this point, release 3 FUNCTION.
(2) Press the G7 (Execute) keyboard key
• This will cause a short and then long beep to sound, indicating that the operation is complete.
3. Release 3 FUNCTION.
■To delete a recorded performance
1. While holding down the 3 FUNCTION button, perform steps (1) and (2) below.

(1) Press the RECORDER CLEAR (Eb6) keyboard key.
• This causes a short beep to sound.
- Note that performing step (2) below will delete the previously recorded data. If you want to cancel the delete operation at this point, release
3 FUNCTION.
(2) Press the G7 (Execute) keyboard key
- This will cause a short and then long beep to sound, indicating that the operation is complete.
2. Release 3 FUNCTION.
Linking with a Smart Device (APP Function)
After you link the Digital Piano with a smartphone, tablet, or other smart device, you can control the Digital Piano with the linked smart device (Piano Remote Controller).
■To download the smart device app
Download the Chordana Play for Piano app from the CASIO website and install it on the smart device.
https://support.casio.com/global/en/emi/manual/CDP-S150/

■To link to a smart device
After installing the Chordana Play for Piano app on a smart device, use a commercially available USB cable to connect the smart device's USB port with the Digital Piano's USB port. After connecting the smart device to the Digital Piano, use the smart device app to perform operations. For details about operations, refer to the user documentation of the app.
Configuring Settings
Changing the Keyboard Touch Response
You can select from among four Touch Response settings, which determine how Digital Piano volume changes in accordance with how strongly keyboard keys are pressed.

flowchart
graph TD
    A["C1C2C3C4C5C6C7C8"] --> B["TOURS / EBIT 1"]
    B --> C["0"]
    B --> D["1"]
    B --> E["2"]
    B --> F["3"]
    B --> G["4"]
    B --> H["5"]
    B --> I["TOUCH RESPONSE"]
    I --> J["DOCK"]
    I --> K["COOK"]
    L["+"] key (Eb4) --> M["0"]
    N["−"] key (D4) --> O["0"]
    P["TOUCH RESPONSE key (D5)"] --> Q["0"]
    R["TOUCH RESPONSE"] --> S["0"]
■To change the Touch Response setting
1. While holding down 3 FUNCTION, perform procedure (A) or (B) below.
(A) Press the TOUCH RESPONSE keyboard key (D5).
• Each press changes the setting. A beep will sound indicating the setting selected by a key press.
| Beep Setting Description | ||
| Once low Off | Touch Response | is turned off.Sound volume is fixed,regardless of key press speed. |
| Once high Light | Strong sound | even with light pressure |
| Twice high Normal (Default) | Normal Touch Response | |
| Three times high | Heavy Normal | sound, even with strong pressure |
- You can also change the setting by pressing the keyboard [+] key (Eb4) or [-] key (D4).
- To return to the initial default setting, hold down the keyboard [+] (Eb4) and [-] (D4) keys at the same time until a long beep sounds.
(B) Press the TOUCH RESPONSE keyboard key (D5), and then press a keyboard key within the range of [0] (E4: OFF) to [3] (G4: Heavy).
- This will cause a short and then long beep to sound, indicating that the operation is complete and that the touch response setting that corresponds to the key you pressed is now enabled.
- Pressing a keyboard key outside the range of setting keys will cause a high and then low beep to sound, indicating that the setting was not changed.
2. Release 3FUNCTION.
Changing the Pitch in Semitone Steps (Transpose)
The transpose feature lets you raise or lower the overall pitch of the Digital Piano in semitone steps. You can use this feature to raise or lower the keyboard key and to play a piece in a key that is more comfortable for you, or to adjust to a key that better matches a vocalist, etc.
You can change the transpose setting within the range of -12 semitones to 0 to +12 semitones.
flowchart
graph TD
    A["C1C2C3C4C5"] --> B["0"]
    C["C6"] --> D["1"]
    E["C7C8"] --> F["2"]
    G["+"] key (Eb4) --> H["3"]
    I["TRANSPOSE- key (F5)"] --> J["4"]
    K["TRANSPOSE+ key (F#5)"] --> L["6"]
    M["0"] --> N["7"]
    O["9"] --> P["8"]
    Q["0"] --> R["1"]
    S["1"] --> T["2"]
    U["2"] --> V["3"]
    W["3"] --> X["4"]
    Y["4"] --> Z["5"]
    AA["5"] --> AB["6"]
    AC["6"] --> AD["7"]
    AE["7"] --> AF["8"]
■To change the transpose setting in semitone steps
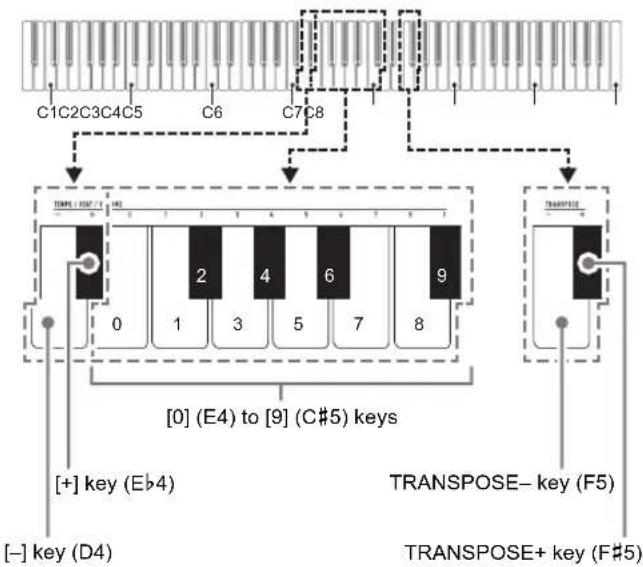
- While holding down 3 FUNCTION, press the TRANSPOSE- keyboard key (F5) to lower the pitch by one semitone or the TRANSPOSE+ keyboard key (F#5) to raise it by one semitone.
• Each press of the keyboard key causes a short high tone to sound. A low tone will sound when a key press causes the transpose setting to become zero (0).
- If a key operation would cause the setting to exceed its upper or lower maximum limit, a high and then low beep will sound to indicate that the setting cannot be changed further.
- You can also raise or lower the setting value by pressing the keyboard [+] key (Eb4) or [-] key (D4).
- To return to zero (0), hold down the keyboard TRANSPOSE–(F5) and TRANSPOSE+ (F#5) keys at the same time until a long beep sounds.
2. Release 3 FUNCTION.
■To use a value to specify the transpose setting
NOTE
- While the setting value is within the range of 0 to +12 semitones, you can use the procedure below to directly input a desired setting value.
1. While holding down 3 FUNCTION, perform steps (1) and (2) below.
(1) Press the TRANSPOSE- keyboard key (F5) or the TRANSPOSE+ keyboard key (F#5).
(2) Use the [0] (E4) through [9] (C#5) keyboard keys to input a two-digit transpose value.
For example, to specify a setting 8 semitones, press keyboard keys in the following sequence: [0] (E4) → [8] (C5). Inputting the second and final digit will cause a short and then long beep to sound, indicating that the value you input was applied.
2. Release 3FUNCTION.
Fine Tuning a Pitch (Tuning)
The tuning feature specifies the frequency of the A4 note. You can set a frequency within the range of 415.5 to 465.9 Hz. The initial default setting is 440.0 Hz.
The setting you configure is retained even if you turn off the Digital Piano.
flowchart
graph TD
    A["C1C2C3C4C5C6C7C8"] --> B["TUNE- key (E4)"]
    A --> C["TUNE"]
    B --> D["[+"] key (Eb4)]
    B --> E["[-"] key (D4)]
    C --> F["TUNE+ key (Ab5)"]
    D --> G["[0"] (E4) to["9"] (C#5) keys]
    E --> H["TUNE- key (G5)"]
■To change the tuning setting
1. While holding down 3 FUNCTION, perform steps (1) through (3) below.
NOTE
- If a key operation during steps (1) through (3) would cause the setting to exceed its upper or lower maximum limit, a high and then low beep will sound to indicate that the setting cannot be changed further.
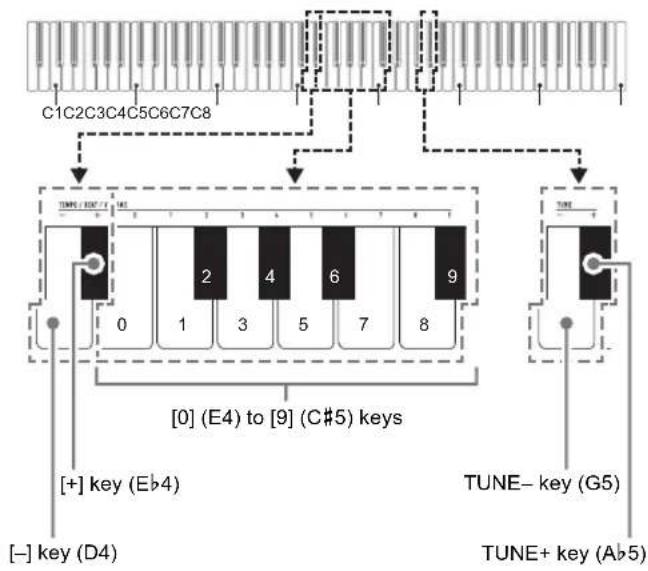
(1) Press the TUNE–keyboard key (G5) or the TUNE+keyboard key (Ab5).
- Pressing the TUNE– key (G5) will lower the current pitch setting by 0.1 Hz, while pressing TUNE+ (Ab5) will raise it by 0.1 Hz.
- If you just want to fine tune the current pitch setting, go directly to step (3) below.
(2) To input a pitch value, use the [0] (E4) through [9] (C#5) keyboard keys to input an integer that specifies the frequency (Hz) of the A4 note.
- For example, to specify a frequency of 442 Hz, press keyboard keys in the following sequence: [4] (Ab4) → [4] (Ab4) → [2] (F#4). Inputting the third and final digit will cause a short and then long beep to sound, indicating that the value you input was applied.
- You can specify a value in the range of 416 through 465 Hz.
(3) To fine tune by 0.1 Hz increments, press the TUNE-keyboard key (G5) to lower the pitch by 0.1 Hz or the TUNE+ keyboard key (Ab5) to raise the pitch by 0.1 Hz.
• Each press of the keyboard key causes a beep to sound. The beep becomes higher whenever a key operation causes the setting value to become an integer.
- You can specify a value in the range of 415.5 through 465.9 Hz.
- To return to the initial default setting, hold down the keyboard TUNE–(G5) and TUNE+ (Ab5) keys at the same time until a long beep sounds.
2. Release 3FUNCTION.
Selecting a Scale
You can change the scale (tuning system) of the keyboard from standard equal temperament to another tuning that is more suitable for playing Indian music, Arabic music, classical pieces, etc.
- When you select any temperament other than "Equal", you must also configure a base note setting.
- For details about temperament, refer to a book that covers music theory.
![C1C2C3C4C5C6C7C8 [0] (E4) to [9] (C#5) keys [+] key (E♭4) SCALE TYPE key (A5) [−] key (D4) SCALE BASE NOTE key (B♭5)](/content/2026/05/950347/images/7bb973d9b5a649873413ff57ba0e852c3e90289f00e13fed40a5c5d314f2d6be.jpg)
■To select the temperament of keyboard play
1. While holding down the 3 FUNCTION button, perform steps (1) and (2) below.
(1) Press the SCALE TYPE (A5) keyboard key.
(2) Use the [0] (E4) through [9] (C#5) keyboard keys to input a two-digit scale number.
| No. | Scale Name |
| 01 | Equal |
| 02 | Pure Major |
| 03 | Pure Minor |
| 04 | Pythagorean |
| 05 | Kirnberger 3 |
| 06 | Werckmeister |
| 07 | Mean-Tone |
| 08 | Rast |
| 09 | Bayati |
| 10 | Hijaz |
| 11 | Saba |
| 12 | Dashti |
| 13 | Chahargah |
| 14 | Segah |
| 15 | Gurjari Todi |
| 16 | Chandrakauns |
| 17 | Charukeshi |
For example, to select the "Bayati" scale, press [0] (E4) and then [9] (C#5). Inputting the second and final digit will cause a short and then long beep to sound, indicating that the value you input was applied.
- You can also raise or lower the scale number using the [-] (D4) and [+] (E♭4) keyboard keys.
- To return to the initial default setting (equal temperament), hold down the keyboard [-] (D4) and [+] (Eb4) keys at the same time until a long beep sounds.
2. Release 3 FUNCTION.
■To specify the base note of the scale
1. While holding down the 3 FUNCTION button, perform steps (1) and (2) below.
(1) Press the SCALE BASE NOTE (B♭5) keyboard key.
(2) Play the keyboard key of the note you want to specify as the base note.
- For example, to specify F as the base note, you would press keyboard key F5 (or F4 or F6).
- Specifying a base note will cause a short and then long beep to sound, indicating that your setting was applied.
2. Release 3 FUNCTION.
Changing the Beep Setting
You can use the 3 FUNCTION button operation below to toggle the beep tone between enabled and disabled.
1. While holding down 3 FUNCTION, press the B7 (Beep) keyboard key.

• Each press of the B7 keyboard key will cause a short beep to sound. A low beep sounds when the key operation disables the beep, while a high beep sounds when the key operation enables the beep.
2. After the setting is the way you want, press 3FUNCTION.
Configuring MIDI Settings
Keyboard Channel
This setting specifies a channel from 1 through 16 as the MIDI channel that can be used for sending data to an external device (Default: Ch 1).
Local Control
When this setting is turned off, performance information (MIDI data) is sent from the Digital Piano, but no Digital Piano sound is output. This setting is for when you only want to send MIDI data to an external device (Default: On).
![C1C2C3C4C5C6C7C8 [+] key (Eb4) G6 (Keyboard Channel) key [-] key (D4) A6 (Local Control) key [0] (E4) to [9] (C#5) keys](/content/2026/05/950347/images/bb821c6ec54e8775178014017321aee20944e86d7cefe7666b43faffa6e1585e.jpg)
■To change the Keyboard Channel
1. While holding down 3 FUNCTION, perform steps (1) and (2) below.
(1) Press the G6 (Keyboard Channel) keyboard key.
(2) Use the [0] (E4) through [9] (C#5) keyboard keys to input a two-digit keyboard channel number.
For example, to specify a keyboard channel 8, press keyboard keys in the following sequence: [0] (E4) → [8] (C5). Inputting the second and final digit will cause a short and then long beep to sound, indicating that the value you input was applied.
- You can also raise or lower the channel number by pressing the keyboard [+] key (Eb4) or [-] key (D4).
- To return to the initial default setting, hold down the keyboard [+] (Eb4) and [-] (D4) keys at the same time until a long beep sounds.
2. Release 3 FUNCTION.
■To toggle Local Control between on and off
- While holding down Ⓔ FUNCTION, press the A6 (Local Control) keyboard key.
• Each press of the A6 keyboard key will cause a short beep to sound. A low beep sounds when the key operation turns off Local Control, while a high beep sounds when the key operation turns on Local Control. - After the setting is the way you want, press 3FUNCTION.
Connecting External Devices
Connecting to Audio Equipment
This Digital Piano can be connected to commercially available stereo, amplifier, or recording equipment, to a portable audio player or other equipment.
■Outputting Keyboard Notes to Audio Equipment
Connection requires commercially available connecting cords, supplied by you.
- The connecting cords should have a stereo mini plug on one end and a plug that matches the configuration of the external device on the other end.

IMPORTANT!
- Turn off the external device when making connections. After connecting, turn down the Digital Piano and external device volume levels whenever turning power on or off.
• After connecting, turn on the Digital Piano and then the external device. - If keyboard notes are distorted when they are sounded from external audio equipment, lower the Digital Piano's volume setting.
Digital Piano 8 PHONES/OUTPUT jack (Stereo mini jack (3.5mm))

■Playing an External Device from the Digital Piano Connection requires commercially available connecting cords, supplied by you.
- The connecting cords should have a 3-pole stereo mini plug on one end and a plug that matches the configuration of the external device on the other end.
- When sounding audio on the Digital Piano that is input from an external device, use the external device to adjust the volume level. You cannot adjust the volume level on the Digital Piano.

IMPORTANT!
- Turn off the Digital Piano when making connections. After connecting, turn down the Digital Piano and external device volume levels whenever turning power on or off.
• After connecting, turn on the external device and then the Digital Piano. - If external device notes that sound through the Digital Piano speakers are distorted, lower the external device's volume level setting.
Digital Piano 9 AUDIO IN jack (Stereo mini jack (3.5mm))

Connecting a Computer
You can connect the Digital Piano to a computer and exchange MIDI data between them. You can send play data from the Digital Piano to music software running on your computer, or you can send MIDI data from your computer to the Digital Piano for playback.
■Minimum Computer System Requirements
The minimum computer system requirements for sending and receiving MIDI data are shown below. Check to make sure that your computer complies with these requirements before connecting the Digital Piano to it.
●Operating System
Windows 7 *1
Windows 8.1 *2
Windows 10 *3
*3Windows 10 (32-bit, 64-bit)
●USB port

IMPORTANT!
- Never connect to a computer that does not conform to the above requirements. Doing so can cause problems with your computer.

NOTE
- For the latest news about supported operating systems, visit the website at the URL or QR code below. https://support.casio.com/global/en/emi/manual/CDP-S150/

■To connect the Digital Piano to your computer

IMPORTANT!
- Make sure you follow the steps of the procedure below exactly. Connecting incorrectly can make data send and receive impossible.
1. Turn off the Digital Piano and then start up your computer.
- Do not start up the music software on your computer yet!
2. After starting up your computer, use a commercially available USB cable to connect it to the Digital Piano.
- Use a USB 2.0 or 1.1 A-B connector type USB cable.
3. Turn on the Digital Piano.
- If this is the first time you are connecting the Digital Piano to your computer, the driver software required to send and receive data will be installed on your computer automatically.
4. Start up commercially available music software on your computer.
5. Configure the music software settings to select "CASIO USB-MIDI" as the MIDI device.
- For information about how to select the MIDI device, see the user documentation that comes with the music software you are using.

IMPORTANT!
- Be sure to turn on the Digital Piano first before starting up your computer's music software.

NOTE
- Once you are able to connect successfully, there is no problem with leaving the USB cable connected when you turn off or turn on your computer and/or Digital Piano.
- For detailed specifications and connections that apply to MIDI data send and receive by this Digital Piano, see the latest support information provided by the website at the URL or QR code below. https://support.casio.com/global/en/emi/manual/CDP-S150/

- For information about MIDI settings, see "Configuring MIDI Settings" (page EN-21).
Troubleshooting
| Symptom Action | |
| Included Accessories | |
| I can't find something that should be here. | Carefully check inside all of the packing materials. |
| Power Requirements | |
| Power will not turned on. • Check the AC adaptor or make sure that the batteries are facing correctly (page EN-3).• Replace the batteries with new ones or switch over to AC adaptor power (page EN-3). | |
| Power does not turn on when I press the 1(Power) button. | Press 1(Power) firmly and completely to turn on power. |
| The Digital Piano outputs a loud sound and then suddenly powers down. | Replace the batteries with new ones or switch over to AC adaptor power (page EN-3). |
| The Digital Piano suddenly turns off after some time when power is left on. | Auto Power off (page EN-5) may have been triggered. Press the 1(Power) button to turn power back on. |
| Sound | |
| Nothing happens when I press any keyboard key. | • Adjust the volume setting (page EN-5).• Check if something is plugged into 8 PHONES/OUTPUT jack on the back of the Digital Piano.• Turn power off and then back on to initialize all Digital Piano settings (page EN-5). |
| The metronome does not sound. | • Check and adjust the metronome volume setting (page EN-12).• Turn power off and then back on to initialize all Digital Piano settings (page EN-5). |
| Notes keep sounding, without stopping. | • Turn power off and then back on to initialize all Digital Piano settings (page EN-5).• Replace the batteries with new ones or switch over to AC adaptor power (page EN-3). |
| Some notes are cut off while they are playing. | Notes are cut off whenever the number of notes being sounded exceeds the maximum polyphony value of 64 (32 for some tones). This does not indicate malfunction. |
| The volume or tone setting I made has changed. | • Adjust the volume setting (page EN-5).• Turn power off and then back on to initialize all Digital Piano settings (page EN-5).• Replace the batteries with new ones or switch over to AC adaptor power (page EN-3). |
| Output volume does not change even though I change my keyboard touch. | • Change the Touch Response setting (page EN-16).• Turn power off and then back on to initialize all Digital Piano settings (page EN-5). |
| In certain keyboard ranges, the volume and tone quality sound are slightly different from those in other keyboard ranges. | This is due to system limitations. It does not indicate malfunction. |
| The pitch of the notes does not match other accompanying instruments or sounds strange when played along with other instruments. | • Check and adjust the transpose (page EN-17) and tuning settings (page EN-18).• Turn power off and then back on to initialize all Digital Piano settings (page EN-5). |
| The reverb of notes seems to change suddenly. | • Check and adjust the reverb setting (page EN-10).• Turn power off and then back on to initialize all Digital Piano settings (page EN-5). |
| Computer Connection | |
| I can't exchange data between the Digital Piano and a computer. | Check to make sure that the USB cable is connected to the Digital Piano and computer, and that the device is selected correctly with your computer's music software settings (page EN-23).Turn off the Digital Piano and then exit the music software on your computer. Next, turn the Digital Piano back on and then restart the music software on your computer. |
Product Specifications
| Model CDP-S150BK | |
| Keyboard 88-key piano keyboard, with Touch Response | |
| Maximum Polyphony 64 notes | |
| Tones 10, Layer | |
| Effects Reverb (4 types), Chorus (4 types) | |
| Metronome • Beat bell: 0 (Off), 1 to 9 (beats)• Tempo Range: 20 to 255 | |
| Duet Adjustable tone range (-2 to +1 octaves) | |
| Demo Songs 2 | |
| Recorder • Functions: Real-time recording, playback• Number of Song: 1• Capacity: Approximately 2,500 notes total• Recorded Data Protection: Built-in flash memory | |
| Pedals | Damper (Soft and sostenuto pedal operations enabled by the optional SP-34 Pedal Unit.) |
| Other Functions • Touch Response: 3 types, Off• Transpose: -12 to 0 to 12 semitones• Tuning: A4 = 415.5 Hz to 465.9 Hz (Initial Default: 440.0 Hz), variable in 0.1 Hz steps• Scale Tuning (Temperament): Equal + 16 other types | |
| MIDI 16-channel multi-timbre receive | |
| Inputs/Outputs | • PHONES/OUTPUT jack: Stereo mini jack (3.5mm)Output Voltage: 1.2V (RMS) MAX• Power: 12V DC• AUDIO IN jack: Stereo mini jack (3.5mm)Input impedance: 10kΩInput voltage: 200mV• USB port: TYPE B• DAMPER PEDAL jack: Standard jack (6.3mm)• PEDAL UNIT jack: Special jack |
| Speakers | 12cm × 6cm (Oval) × 2 (Output 8W + 8W) |
| Power Supply | 2-way |
| Batteries | 6 AA-size alkaline batteries |
| Battery Life Approximately 13 hours continuous operation on alkaline batteries | |
| AC Adaptor | AD-A12150LW |
| Auto Power Off | Approximately 4 hours (AC Adaptor) / 6 minutes (batteries) after last operation; can be disabled. |
| Power Consumption | 12V --- 8W |
| Dimensions | 132.2 (W) × 23.2 (D) × 9.9 (H) cm (52 1/16 × 9 1/8 × 3 7/8 inch) |
| Weight Approximately 10.5kg (23.1 lbs) (without batteries) | |
- Specifications and designs are subject to change without notice.
Tone List
| Tone Name | Program Change | Bank Select MSB |
| GRAND PIANO STANDARD 0 0 | ||
| GRAND PIANO MELLOW 1 0 | ||
| GRAND PIANO BRIGHT 2 0 | ||
| ELEC.PIANO 1 3 0 | ||
| ELEC.PIANO 2 4 0 | ||
| ELEC.PIANO 3 5 0 | ||
| HARPSICHORD 6 0 | ||
| STRINGS 7 0 | ||
| PIPE ORGAN 8 0 | ||
| JAZZ ORGAN 9 0 |
Keyboard Function List
| A0 | Note name | Assigned function (marked above the keyboard key) | |
| B2 Demo (DEMO) | |||
| C1 | C3 Grand Piano (GRAND PIANO) Standard (STANDARD) | ||
| C#3 Grand Piano (GRAND PIANO) Mellow (MELLOW) | |||
| D3 Grand Piano (GRAND PIANO) Bright (BRIGHT) | |||
| E#3 Elec. Piano (ELEC. PIANO) 1 | |||
| E3 Elec. Piano (ELEC. PIANO) 2 | |||
| F3 Elec. Piano (ELEC. PIANO) 3 | |||
| F#3 Harpsichord (HARPSICHORD) | |||
| C2 | G3 Strings (STRINGS) | ||
| Ab3 Pipe Organ (PIPE ORGAN) | |||
| A3 Jazz Organ (JAZZ ORGAN) | |||
| B#3 Metronome (METRONOME) On/Off (ON/OFF) | |||
| B3 Tempo (TEMPO) | |||
| C4 Beat (BEAT) | |||
| C#4 Volume (VOLUME) | |||
| C3 | D4 Tempo/Beat/Volume (TEMPO/BEAT/VOLUME) - | ||
| Eb4 + | |||
| E4 0 | |||
| F4 1 | |||
| F#4 2 | |||
| G4 3 | |||
| Ab4 4 | |||
| A4 5 | |||
| B#4 6 | |||
| B4 7 | |||
| C5 8 | |||
| C#5 9 | |||
| D5 Touch Response (TOUCH RESPONSE) | |||
| Eb5 Reverb (REVERB) | |||
| E5 Chorus (CHORUS) | |||
| C5 | F5 Transpose (TRANSPOSE) - | ||
| F#5 + | |||
| G5 Tune (TUNE) - | |||
| Ab5 + | |||
| A5 Scale (SCALE) Type (TYPE) | |||
| B#5 Base Note (BASE NOTE) | |||
| B5 Duet (DUET) Type (TYPE) | |||
| C6 | C6 Left keyboard octave (L OCT.) | ||
| C#6 Right keyboard octave (R OCT.) | |||
| D6 Recorder (RECORDER) Setting (SETTING) | |||
| Eb6 Clear (CLEAR) | |||
| E6 Pedal (PEDAL) Type (TYPE) | |||
| The functions below are not marked above the keyboard keys. | |||
| C7 | G6 Keyboard Channel | ||
| A6 Local Control | |||
| B6 Auto Power Off | |||
| E7 Factory Reset | |||
| G7 Execute | |||
| C8 | B7 Beep | ||
Model: CDP-S150 Version : 1.0
MIDI Implementation Chart
| Function Transmitted | Recognized Remarks | |||
| Basic Channel | Default Changed | 1 1 - 16 | 1 - 16 1 - 16 | |
| Mode | Default Messages Altered | Mode 3 X * * * * * * * | Mode 3 X * * * * * * * | |
| Note Number | True voice | 21 - 108 * * * * * * * | 0 - 127 0 - 127 *1 | |
| Velocity | Note ON Note OFF | O 9nH v = 1 - 127 O 8nH v = 64 | O 9nH v = 1 - 127 O 9nH v = 0, 8nH v =** | **: no relation |
| After Touch | Key's Ch's | X X | X O | |
| Pitch Bender | X | O | ||
| Control Change | 0 1 5 6, 38 7 10 11 64 65 6667 | O X X *2 *4 X X X X O X *3X *3 | O O O O *2 O O O O O OO | Bank select Modulation Portamento Time Data entry LSB/MSB Volume Pan Expression Hold 1 Portamento Switch SostenutoSoft pedal |
| 71 | X | O | Filter resonance | |
| 72 | X | O | Release time | |
| 73 | X | O | Attack time | |
| 74 | X | O | Brightness | |
| 84 | X | O | Portamento Control | |
| 91 | X | O | Reverb send level | |
| 93 | X *4 | O | Chorus send level | |
| 100, 101 | X *2 *4 | O *2 | RPN LSB/MSB | |
| Program Change | True # | O | O | |
| * * * * * * * | 0 - 127 | |||
| Exclusive | O *2 | O *2 | ||
| System Common | Song Pos | X | X | |
| Song Sel | X | X | ||
| Tune | X | X | ||
| System Real Time | Clock | X | X | |
| Commands | X | X | ||
| Aux Messages | All sound off | X | O | |
| Reset all controller | X | O | ||
| Local ON/OFF | X | X | ||
| All notes OFF | X | O | ||
| Active Sense | X | O | ||
| System Reset | X | X | ||
| Remarks | *1: Depends on tone.*2: For details about RPN and system exclusive messages, see MIDI Implementation athttps://support.casio.com/global/en/emi/manual/CDP-S150/*3: O when the optionally available pedal unit is connected.*4: Output along with certain operations. | |||
Mode 1 : OMNI ON, POLY Mode 2 : OMNI ON, MONO O : Yes Mode 3 : OMNI OFF, POLY Mode 4 : OMNI OFF, MONO X : No
CASIO®



- Contents
- Overview and Setup EN-2
- Digital Piano Operation EN-8
- Configuring Settings EN-16
- Connecting External Devices EN-22
- Reference EN-24
- MIDI Implementation Chart
- Included and Optional Accessories
- NOTE
- Overview and Setup
- General Guide
- \*1 Keyboard note names and pitches
- \*2 Functions assigned to keys
- ■Preparing the Music Stand
- Preparing a Power Supply
- ■Using the AC Adaptor
- Specified AC Adaptor: AD-A12150LW
- IMPORTANT!
- During Use
- During Movement
- During Storage
- ■Using Batteries
- ■Low Battery Indication
- Turning Power On or Off
- Press the 1 ⏻(Power) button to turn on Digital Piano power.
- To turn off the Digital Piano, hold down the ⏻(Power) button until the power lamp goes out.
- Auto Power Off
- ■To enable or disable Auto Power Off
- While holding down 3 FUNCTION, press the B6 (Auto Power Off) keyboard key.
- After the setting is the way you want, release 3FUNCTION.
- Returning the Digital Piano to Its Factory Default Settings
- While holding down 3 FUNCTION, perform steps (1) and (2) below.
- Release 3FUNCTION.
- Connecting a Pedal
- DAMPER PEDAL Jack
- PEDAL UNIT Jack
- ■SP-34 Pedal Functions
- ●Damper Pedal
- ●Soft Pedal
- ●Sostenuto Pedal
- ■To change the functions assigned to pedals
- While holding down 3 FUNCTION, perform procedure (A) or (B) below.
- Release 3 FUNCTION.
- Using Headphones
- Digital Piano Operation
- Listening to Demo Play
- While holding down Ⓔ FUNCTION, press the DEMO (B2) keyboard key.
- To stop demo song play, press 3 FUNCTION or 4 ▶/■.
- Demo Song List
- Selecting a Tone
- Selecting the GRAND PIANO STANDARD Tone
- To select a single tone
- While holding down 3 FUNCTION, press one of the Tone keyboard keys (C3 through A3).
- To layer two tones
- While holding down 3 FUNCTION, press the Tone keyboard keys (C3 through A3) of the first tone and then the second tone you want to layer.
- Using Effects
- ■To add reverb to notes
- While holding down 3 FUNCTION button, perform procedure (A) or (B) below.
- ■To add the chorus effect to notes
- While holding down the 3 FUNCTION button, perform procedure (A) or (B) below.
- Using the Metronome
- ■To start or stop the metronome
- ■To change the metronome beat
- ■To change the metronome tempo
- ■To adjust the metronome volume
- Splitting the Keyboard for Duet Play
- Pedal Operation when Playing a Duet
- ●Optional SP-34 Pedal Unit
- ●Supplied SP-3 Pedal
- ■To play a duet
- While holding down 3 FUNCTION, press the DUET TYPE (B5) keyboard key.
- After confirming that the Duet Mode setting is the way you want, release 3 FUNCTION.
- Select a tone and perform the song you want.
- ■Changing the Octaves of the duet keyboards
- While holding down the 3 FUNCTION button, perform steps (1) and (2) below.
- Example
- Recording and Play Back
- ●Memory Capacity
- ●Recorded Data
- ●Recording Data Storage
- ■To record keyboard play
- Long-press 4 RECORD until the button's LED starts to flash.
- To start recording, play something on the keyboard, press the pedal, or press 4 ▶/■.
- To finish recording, press 4▶/■.
- ■To play back a recorded performance
- Press 4▶/■.
- To stop playback, press 4 ▶/■ again.
- ■To change the reverb and chorus settings of a recorded performance
- Perform one of the operations below to select the reverb or chorus effect you want to apply to the recorded performance.
- While holding down the 3 FUNCTION button, perform steps (1) and (2) below.
- Release 3 FUNCTION.
- ■To delete a recorded performance
- FUNCTION.
- Linking with a Smart Device (APP Function)
- ■To download the smart device app
- ■To link to a smart device
- Configuring Settings
- Changing the Keyboard Touch Response
- ■To change the Touch Response setting
- Changing the Pitch in Semitone Steps (Transpose)
- ■To change the transpose setting in semitone steps
- ■To use a value to specify the transpose setting
- Fine Tuning a Pitch (Tuning)
- ■To change the tuning setting
- While holding down 3 FUNCTION, perform steps (1) through (3) below.
- Selecting a Scale
- ■To select the temperament of keyboard play
- ■To specify the base note of the scale
- Changing the Beep Setting
- While holding down 3 FUNCTION, press the B7 (Beep) keyboard key.
- After the setting is the way you want, press 3FUNCTION.
- Configuring MIDI Settings
- Keyboard Channel
- Local Control
- ■To change the Keyboard Channel
- ■To toggle Local Control between on and off
- Connecting External Devices
- Connecting to Audio Equipment
- ■Outputting Keyboard Notes to Audio Equipment
- Connecting a Computer
- ■Minimum Computer System Requirements
- ●Operating System
- ●USB port
- ■To connect the Digital Piano to your computer
- Turn off the Digital Piano and then start up your computer.
- After starting up your computer, use a commercially available USB cable to connect it to the Digital Piano.
- Turn on the Digital Piano.
- Start up commercially available music software on your computer.
- Configure the music software settings to select "CASIO USB-MIDI" as the MIDI device.
- CASIO®
Brand : CASIO
Model : CDP-S150
Category : Piano