
Photo-Meter LX - Luxmeter QUANTUM - Free user manual and instructions
Find the device manual for free Photo-Meter LX QUANTUM in PDF.


| Product Type | Luxmeter (Light Meter) |
| Brand | Quantum |
| Model | Photo-Meter LX |
| Measurement Range | 0.1 – 200,000 lux |
| Resolution | 0.1 lux (≤2000 lux), 1 lux (>2000 lux) |
| Accuracy | ±3% of reading ±10 digits |
| Sampling Rate | 2.5 times per second |
| Display | LCD with backlight, 4-digit |
| Functions | Auto/manual range, data hold, max/min, zero adjust, low battery indication |
| Sensor Type | Silicon photodiode with spectral filter |
| Power Supply | 1 x 9V battery (6F22 or equivalent) |
| Dimensions | 150 x 70 x 30 mm (5.9 x 2.8 x 1.2 in) |
| Weight | Approximately 200 g (7.1 oz) including battery |
| Operating Temperature | 0°C to 40°C (32°F to 104°F) |
| Storage Temperature | -10°C to 60°C (14°F to 140°F) |
| Humidity | <80% RH non-condensing |
| Maintenance | Clean casing with a dry cloth; keep sensor lens clean |
| Safety | Do not expose to moisture or extreme temperatures; remove battery if not used for long periods |
| Spare Parts / Repairability | Battery accessible; no user-serviceable parts inside. Contact Quantum service for repairs. |
| Included Accessories | 9V battery, protective case, user manual |
| Certifications | CE, RoHS |
Frequently Asked Questions - Photo-Meter LX QUANTUM
User questions about Photo-Meter LX QUANTUM
0 question about this device. Answer the ones you know or ask your own.
Ask a new question about this device
Download the instructions for your Luxmeter in PDF format for free! Find your manual Photo-Meter LX - QUANTUM and take your electronic device back in hand. On this page are published all the documents necessary for the use of your device. Photo-Meter LX by QUANTUM.
USER MANUAL Photo-Meter LX QUANTUM
models PME, PMEX, PML, PMLX
OPERATING INSTRUCTIONS
1. MODEL DESIGNATIONS
PME: Photometer for general measurements. Measures in footcandles.
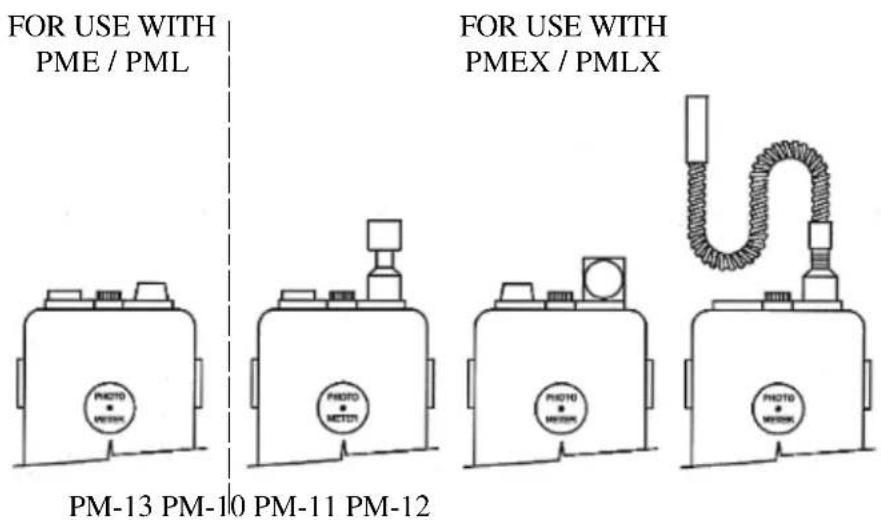
Optional accessory available: Luminance Receptor PM13 calibrated for footlamberts.
PML: Photometer for general survey measurements. Measures in lux.
Optional accessory available: Luminance Receptor PM13 calibrated for nits (candela/m²).
PMEX: Precision photometer for scientific measurements. Color corrected to the C.I.E photopic response. Pre-calibrated for foot-candles and footlamberts.
Optional accessories available: Rotating Illuminance Receptor PM11, Rigid Fiber Optic Probe PM10, and Flexible Fiber Optic Probe PM12.
PMLX: Precision photometer for scientific measurements. Color corrected to the C.I.E photopic response. Pre-calibrated for lux and nits (candela/m²).
Optional accessories available: Rotating Illuminance Receptor PM11 for lux, Rigid Fiber Optic Probe PM10 for nits, and Flexible Fiber Optic Probe PM12 for nits.
2. MEASURE CONTROL
The Measure control is located on the right side of Photo-Meter. Press and hold the Measure control to take a reading. Release the control to store the reading in memory and display it for a few seconds.
If the display shows only three dash lines, the light intensity is out of range. The Range control is on the left side of Photo-Meter. Press it repeatedly, while holding Measure, until numbers appear in the display.

Over Range Typical Reading
The display will stay lit for a few seconds, after releasing Measure, with the last reading frozen in the display.
3. RANGE CONTROL
The Range button on the left side of Photo-Meter sets the readout range on the digital display. Each time the Range button is pressed the meter switches to the next higher range. At the highest range, the next Range button press switches to the lowest (most sensitive) range.
The table below illustrates how to cycle through the ranges. Each arrow signifies the action when Range is depressed.
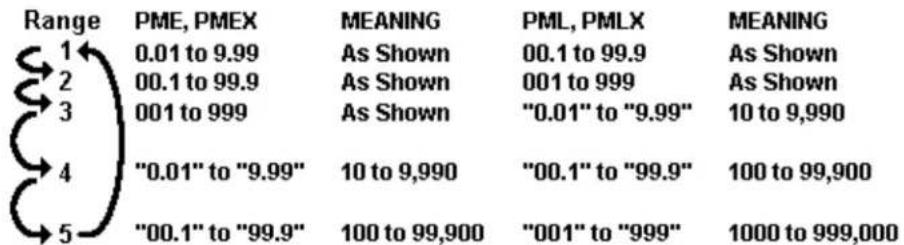
The quotes ("xxx") indicate a fast blinking display. When that occurs, multiply the display number by 1000 for the correct reading. For example, a blinking "6.43" signifies a reading of 6,430.
The units of measurement are indicated by the turret tabs, as read from the front of the Photo-Meter.
4. MEASURING MODE
For Models PMEX, PMLX:
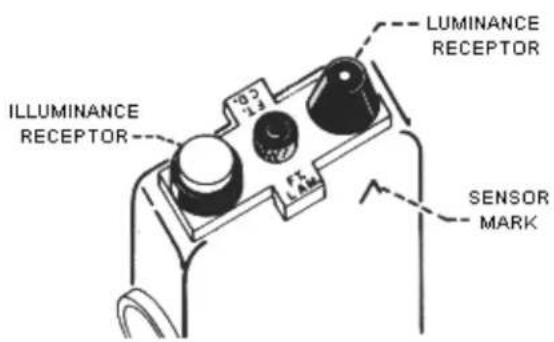
The turret on top of the instrument may be set for illuminance or luminance measurements. To change the mode of measurement lift off the turret, rotate it 180^ , and press it back into place.
The turret has two labels on tabs that identify the mode of measurement. The tab next to the front of the instrument is the current mode. Model PMEX can be set for foot-candles or foot-Lamberts. Model PMLX can be set for lux or nits (candela/m ^2 ).
For Models PME, PML:
These models come with a single mode turret calibrated for illuminance: PME: foot-candles; PML: lux. They may be calibrated also for luminance measurements using Luminance Receptor PM13 as an optional accessory. Factory re-calibration is required.
5. MEASURE TECHNIQUE
Illuminance - foot-candles or lux
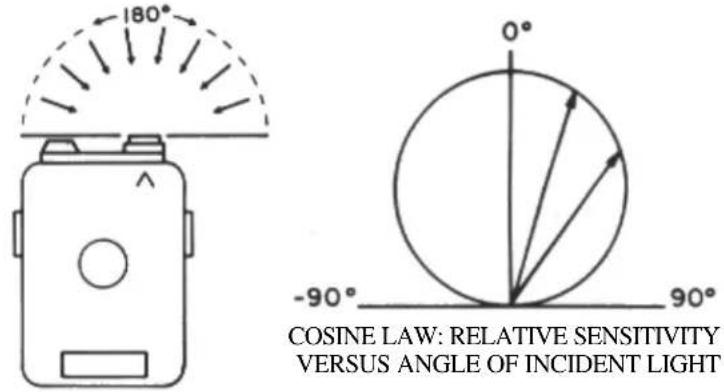
This is the amount of light energy incident upon a plane. The plane is defined by the geometric plane of the white disc on the turret. Light sources within the (180°) hemisphere in front of the white disc will be sensed according to the cosine law.
For best accuracy do not block light sources in the 180^ hemisphere. The orientation of the white disc is designed to minimize the effect of the operator's presence on the measurement.
Luminance - foot-lamberts or nits (candela/m²)
Luminance is the photometric brightness of sources or light reflected from objects. Photo-Meters read the overall luminance in approximately a 25^ field of view, as shown.
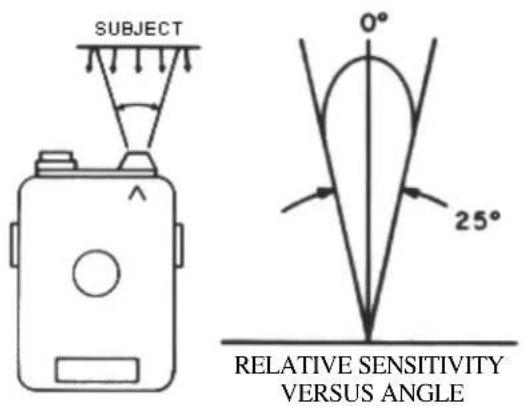
When attempting luminance readings avoid casting shadows upon the subjects when those are reflecting objects (i.e., not light sources).
6. MISCELLANEOUS
Photo-Meters are very sensitive instruments that respond to slight changes in illumination. This is especially true when measuring fluorescent lights.
Fluorescent illumination varies in brightness at twice the rate of the AC line frequency (60 Hz). This variation is not apparent to the human eye, but it will be apparent in readings with Photo-Meters. A slight drift in the reading of the instruments might indicate the condition of fluorescent illumination. The average of the highest
and lowest reading is the effective light value.
Conversion factors are shown below for other units of measurement.
lux = footcandles x 10.8
footcandles = lux x .093
cd / m^2 (nit) = footlamberts x 3.43
footlamberts = cd/m ^2 x .392
To determine candlepower (luminous intensity) of a light source, measure footcandles at a known distance from the source. Preferably, the distance (d) should be 10 times (or more) greater than the size of the source. Then multiply the square of the distance by footcandles to obtain candlepower in candela. candlepower = ft.cd. x d ^2 .
The amount of candela calculated above is the intensity of light emitted in the direction of the measurement position. It is sometimes called beam candlepower.
Electric lamps are frequently specified in terms of lumens output. This figure is not so useful as beam candlepower for predicting footcandles at the area of interest, since the beam pattern of the lamp is usually not known. Also, lamp housings, reflectors, and lenses can have a great effect on beam candlepower. For detailed definitions of the terms of light measurement you may consult the various books available, including RCA's Electro-Optics Handbook, RCA, Harrison, N.J. 07029, especially Section 2.
7. BATTERIES
When the batteries are low the display will light a marker above the 2nd and 3rd display digits.
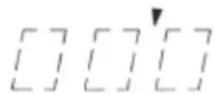
To change batteries, loosen the battery door screw with a coin. Handle the new batteries with tissue paper to avoid corrosion of the contacts. Replace with type A-76 button cells, or alternate types MS-76, 10L14, RW42, 357.
If the instrument will not operate, clean all batteries and contacts inside the instrument. Be careful to use a clean cloth or paper. Observe battery polarity.
8. OPTIONAL ACCESSORIES
All optional adapters must be calibrated to the Photo-Meter with which they will be used. Therefore, when ordering accessories the Photo-Meter must be returned to Quantum for re-calibration.
The appropriate accessories are listed in Section 1 with each model type. Costs and delivery time for accessories may be obtained by contacting us:
Quantum Instruments Inc.
1075 Stewart Ave.
Garden City, NY 11530
Tel: 516 222 6000
Fax: 516 222 0569
Email: QuantRep@qtm.com
Web: www.qtm.com
Brand : QUANTUM
Model : Photo-Meter LX
Category : Luxmeter