Overdrive Plus - Hard Drive AudioControl - Free user manual and instructions
Find the device manual for free Overdrive Plus AudioControl in PDF.


| Product Type | High-Gain Pre-amp Line Driver |
| Brand | AudioControl |
| Model | Overdrive Plus |
| Dimensions | 5.00" x 4.25" x 1.25" (127 x 108 x 32 mm) |
| Weight | 2 lbs (0.9 kg) |
| Power Supply | 14.4 VDC, PWM switching converter, 150 mA draw |
| Recommended Fuse | 1 Amp |
| Maximum Output | 9.5 V RMS (13 V peak) |
| Input Gain Range | 0–24 dB |
| Total Harmonic Distortion (THD) | 0.005% |
| Signal-to-Noise Ratio | >110 dB |
| Frequency Response | 10 Hz – 100 kHz (±1 dB) |
| Input Impedance | 20 kΩ |
| Output Impedance | 45 Ω |
| Ground Isolation | Selectable via jumpers (fully isolated, 200 Ω, or direct ground) |
| Remote Level Control Input | Yes, for optional Dash Control (sold separately) |
| Output Voltage Indicators | 1 V and 8 V LEDs |
| Warranty | 5 years (dealer install) / 1 year (self-install) |
| Country of Origin | USA |
Frequently Asked Questions - Overdrive Plus AudioControl
User questions about Overdrive Plus AudioControl
0 question about this device. Answer the ones you know or ask your own.
Ask a new question about this device
Download the instructions for your Hard Drive in PDF format for free! Find your manual Overdrive Plus - AudioControl and take your electronic device back in hand. On this page are published all the documents necessary for the use of your device. Overdrive Plus by AudioControl.
USER MANUAL Overdrive Plus AudioControl
Owner's Enjoyment Manual
Congratulations!
You have just purchased a high-performance autosound product, the AudioControl OVERDRIVE PLUS Line Driver. The OVERDRIVE PLUS will allow you to utilize every last bit of performance and sound quality that you’ve always strived for from your vehicle’s sound system. In addition, your new OVERDRIVE PLUS provides you with an input to accept an optional dash mounted remote level control. The OVERDRIVE PLUS can now be both a line driver and a remote volume/bass control. Find a nice dry spot well away from the rainforest drizzle, and take in the clean air along with this Enjoyment Manual for the OVERDRIVE PLUS Line Driver.
Key Features of the OVERDRIVE PLUS:
• High signal voltage capability: 9.5 volts RMS output
- 24 dB of gain
- Input for optional Dash Control for remote level
- Ultra-low distortion, ultra-quiet operation
- Low noise, high current output circuitry
• High-headroom PWM switching power supply
- Selectable ground isolation
• Voltage indicator LEDs
AudioControl®
making good sound better®
Features
High-Voltage Line Driver
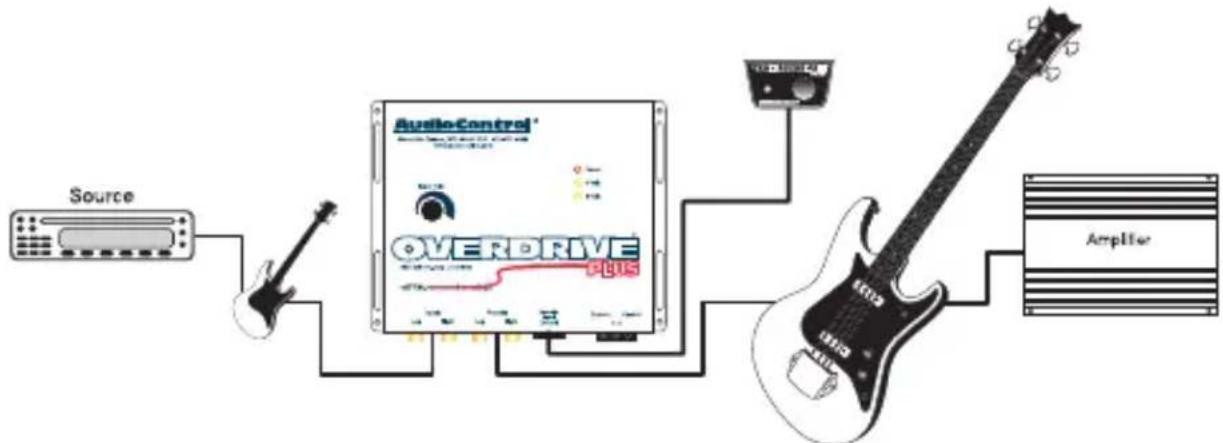
The OVERDRIVE PLUS is a line driver that takes the input voltage of a high performance source unit and increases it (up to 13 volts peak). It then delivers this punched up signal to the amplifier for more lifelike sound with less noise, less distortion and more dynamic range. In short: it makes music played on your system sound more like live music.
flowchart
graph LR
    A["Source"] --> B["Audio Control"]
    B --> C["Overdrive Unit"]
    C --> D["AmpHise"]
    D --> E["Amplifier"]
Input for Optional Dash Control
An optional dash control (sold separately) can be plugged into the OVERDRIVE PLUS to allow you to adjust the output gain remotely. You can use this to have a remote system volume control or to have a remote amp volume control.
Low Noise / High Current Output Circuitry
Driving long lengths of cable can present a nasty capacitive load to the source that has to drive them. The OVERDRIVE PLUS's low-impedance, high-current output circuitry can easily handle long cable runs without their associated problems.
Output Voltage Indicators
Setting voltage levels for best signal-to-noise performance can be a real pain — especially when you have to get out the old digital voltmeter and find a way to make those probes stay put while you try to read the dancing LCD display. With the OVERDRIVE PLUS’s voltage indicator LEDs, we remove some of the pain. The first LED indicates that you are in the OVERDRIVE PLUS’s comfortable working range. The second LED lets you know you are over 8 Volts and better make sure your amp can take that much input.
Remember: At full gain, this unit has enough output to “overdrive”, no pun intended, many amps. The LEDs read voltage not sound and are only used to warn you of potential clipping issues. If you get plenty of volume without lighting the LED’s … Don’t Worry! It just means you’re not clipping and you have lots of Headroom in the signal.
Selectable Ground Isolation
Avoiding ground loops and grounding-related noises are of paramount importance in any installation. For this reason we have provided a flexible scheme of isolating grounds.
AudioControl's Bulletproof Reliability
That's right, your AudioControl OVERDRIVE PLUS comes with a full 5 year parts and labor warranty when it is installed by an authorized United States AudioControl dealer. These seasoned pros have the training and the equipment to take care of the job quickly. Keep in mind that if you or your friends are “good with electronics” and you choose to install it yourselves, your OVERDRIVE PLUS still has a 1 year parts and labor warranty. To activate your warranty, simply go on-line to www.audiocontrol.com. Click “Mobile Audio” then “Warranty Registration” and fill in the blanks. Or, you can go directly to http://audiocontrolregistration.com to register.
Also, save your invoice or sales slip as proof of purchase. Not only are these necessary for warranty purposes, they are also important if the unforeseen disappearance of your OVERDRIVE PLUS should happen while you are socializing at the local espresso and salmon bar. Insurance companies have very little imagination.
AudioControl Sound Quality
Yes, when all is said and done, this is the most important feature we offer. Amazing AudioControl Sound Quality. Our mantra is right there with our logo: making good sound better. We believe every car system should sound just like a live concert and your new OVERDRIVE PLUS has been built to do just that.
A Guided Tour of the OVERDRIVE PLUS
The Outside
1) Inputs: The AudioControl OVERDRIVE PLUS inputs get their signals directly from the main source unit/head unit. AudioControl's high impedance input design means you get less noise and fewer ground loops.
2) Input Gain Control: Used to increase the amount of signal to your downstream signal processors or amplifiers. With this control you can get up to 24dB of gain or 13 volts peak (9.5 volts RMS) to your signal processor or amplifier inputs. If your head unit's maximum output is only 500mV, the OVERDRIVE PLUS will be able to squirt out 8 volts RMS into the rest of your system. Even if your head unit's output is as little as 250mV, you can still get 4 volts RMS out of the OVERDRIVE PLUS Line Driver. However, be careful about over driving your average non-AudioControl crossover or amplifier. Many can't handle more than about 2 volts input without clipping (AudioControl units can take the full output of the OVERDRIVE PLUS). If in doubt, check with the manufacturer.
3) Outputs: Next to the inputs are the outputs, which should be connected to the next component in your system. This could be an equalizer, crossover, amplifier, or virtually any other electronic gadget you may have in your system. If you connect the outputs to any AudioControl component, you can rest assured it can handle the hot signal voltage from the OVERDRIVE PLUS.
Output status LEDs
4) Power: If you see this one lighted, pat yourself on the back for properly connecting the power terminal.
5) Signal LEDs 8 volts: When this light flickers while music is playing, you're pushing the limit — nearing the redline — entering the danger zone. You still have headroom in the OVERDRIVE PLUS but you need to make sure your amp can handle the input voltage without clipping. Check your amplifier specs. Try backing off on the Gain Control until it stops flickering.
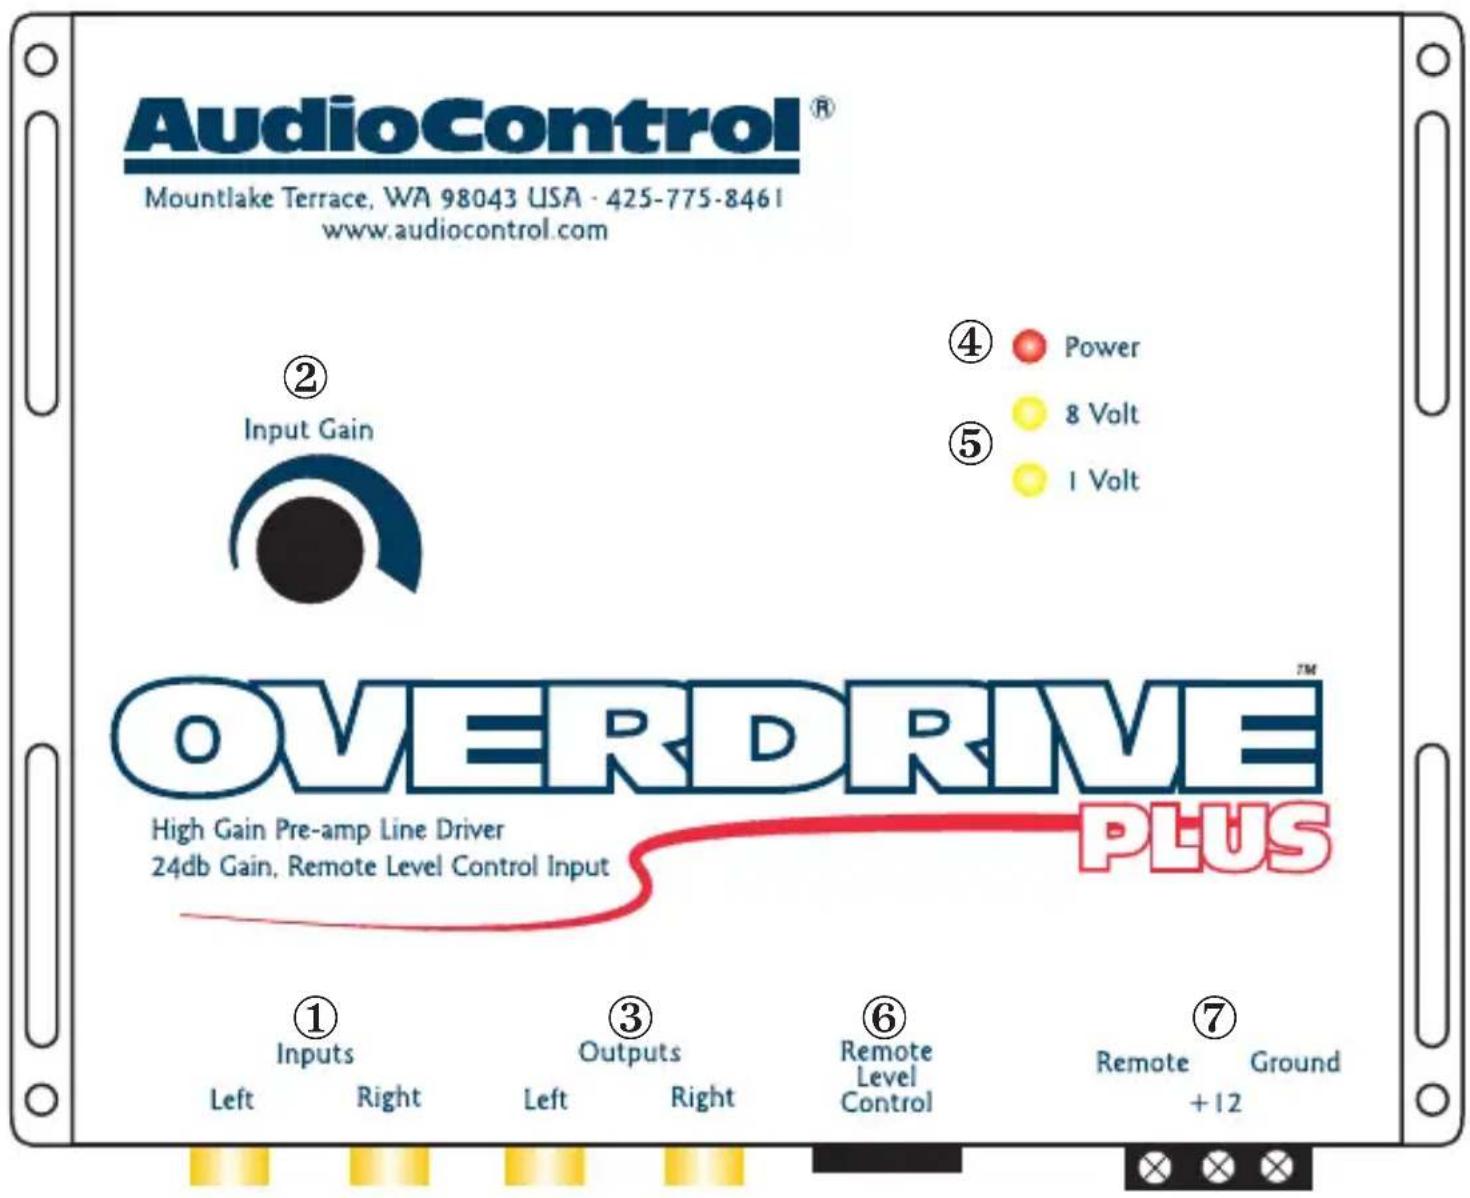
1 Volt: This light will tell you when the signal level is at 1 volt. Most head units will give you enough juice to light this one. You’ll most likely want at least the 1 volt light to flicker, more if the rest of your components can handle it. Any AudioControl component that you connect after the OVERDRIVE PLUS won’t mind the 8 volt RMS light flickering. Go ahead. Light it up!
6) Remote Level Control (sold separately): The port allows you to plug an optional dash mounted remote level control. Now you can have a separate system volume control or if the OVERDRIVE PLUS is driving just your bass amp, you can have a separate bass control for the system.
7) Power Connector: This convenient little connector allows you to hook up all the power and turn-on wires for your OVERDRIVE PLUS Line Driver in the convenience of a well-lighted area and then plug them in by feel all at once in your trunk's cavernous darkness. Screws on top of the connector should face up. But if you put the plug in upside down, nothing will be damaged, the OVERDRIVE Plus just will not power up!
The Inside
8) Ground Isolation Jumpers: OK, we all know there are installation rules to follow for best results. Power and signal wires should be on opposite sides of the car. All units should be tied to a single ground... Yes that includes the head unit, you know the factory ground sucks...it's tied to the headlight dimmer. But, even when we follow all the rules, bad things do happen on occasion. Should alternator whine rear its ugly head during the installation, we have provided some alternate power supply
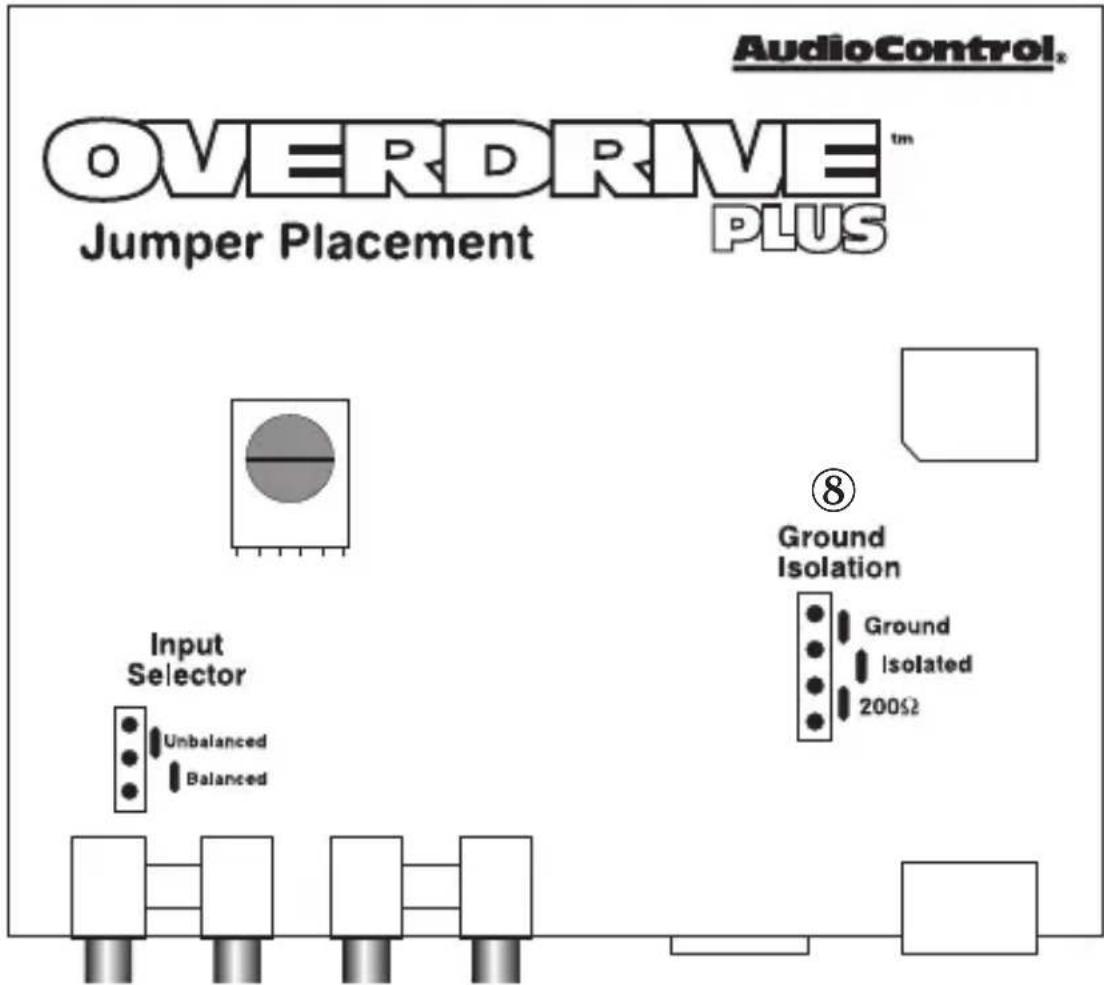
grounding choices. Experiment with different settings if you run into this problem. To change the settings, turn system power OFF, move the black jumper from the center two pins (fully isolated) to either the top two pins (ground) or the bottom two pins (200Ω).
Short course in Signal-to-Noise Ratio and Level Matching
Signal-to-noise ratio is the difference between the signal level and the noise floor of an electronic component. The higher the signal, the better. Since you really can’t reduce the noise floor, signal-to-noise ratio can be readily improved by raising the signal level. It’s best to get the signal level up at the beginning of the signal path. The signal-to-noise ratio will only be as good as the noisiest component. Which is why it’s important to have a quiet head unit. This “weakest link” theory is the basic idea behind setting levels in your car’s system. And that’s why AudioControl provides gain in its signal processors.
Level Matching is about making sure you run just the right amount of signal into an electronic component. If you send too much, you’ll experience the not-so-joyous sound of clipping. At the same time, you want the highest possible signal levels for best signal-to-noise ratio. Since all AudioControl products are capable of high-voltage input and output, it is important that you MATCH the input voltage of your components. Most crossovers and amplifiers can handle up to about 2 volts before they clip. AudioControl signal processors can all put out at least 7.5 volts RMS, and can take in 9 volts RMS. LED voltage indicators on many of our products make it a snap to set levels! Want to learn more about level setting? Check out the video in the support section of the Mobile Audio pages at www.audiocontrol.com Also available there, is Tech Note 1006 for those more technically minded.
Installation Examples and Hookup Diagrams
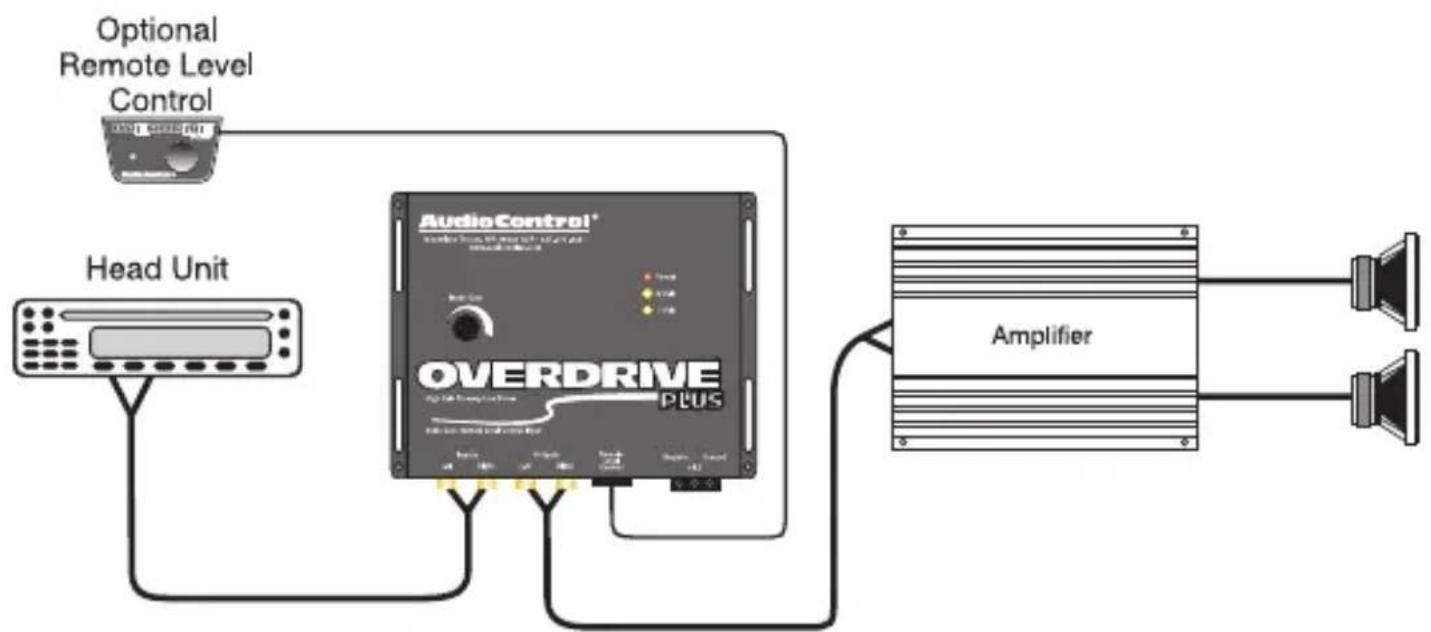
Basic 2 channel system with maximum dynamic range
flowchart
graph TD
    A["Head Unit"] --> B["AudioControl®"]
    B --> C["Amplifier"]
    D["Optional Remote Level Control"] --> B
    style A fill:#f9f,stroke:#333
    style B fill:#ccf,stroke:#333
    style C fill:#cfc,stroke:#333
    style D fill:#fcc,stroke:#333
2 Channel equalized system with active crossover / equalizer
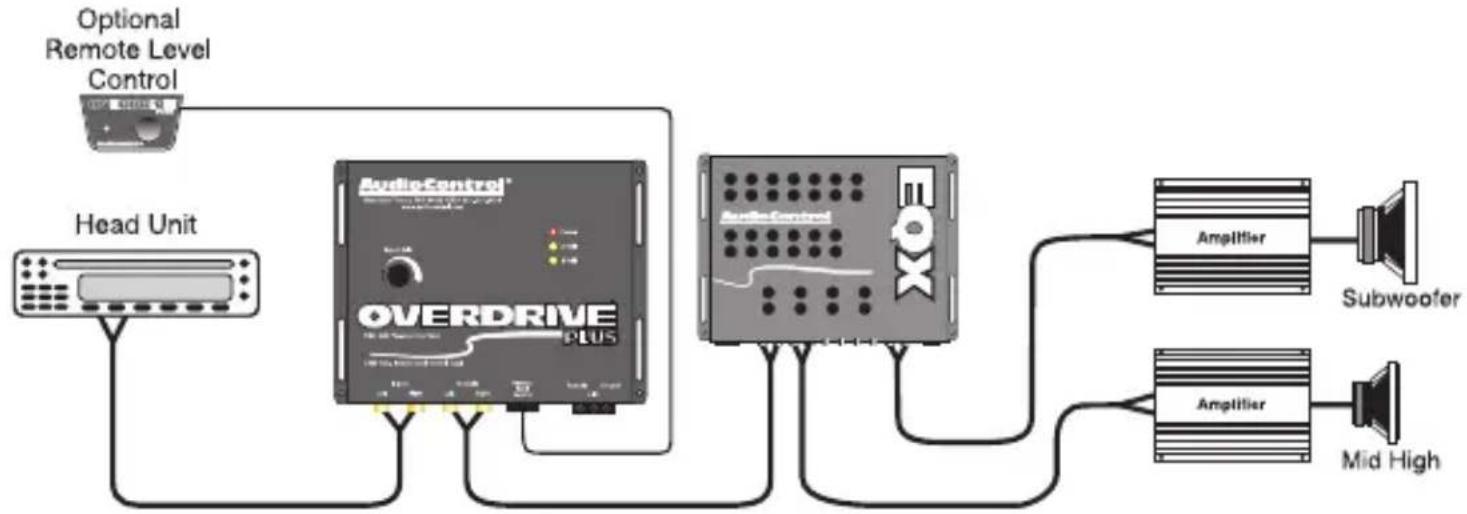
flowchart
graph LR
    A["Optional Remote Level Control"] --> B["Head Unit"]
    B --> C["OverDrive Plus"]
    C --> D["AudioControl"]
    D --> E["Amplifier"]
    E --> F["Subwoofer"]
    C --> G["Amplifier"]
    G --> H["Mid High"]
Maximum bass system with The Epicenter Plus and active crossover
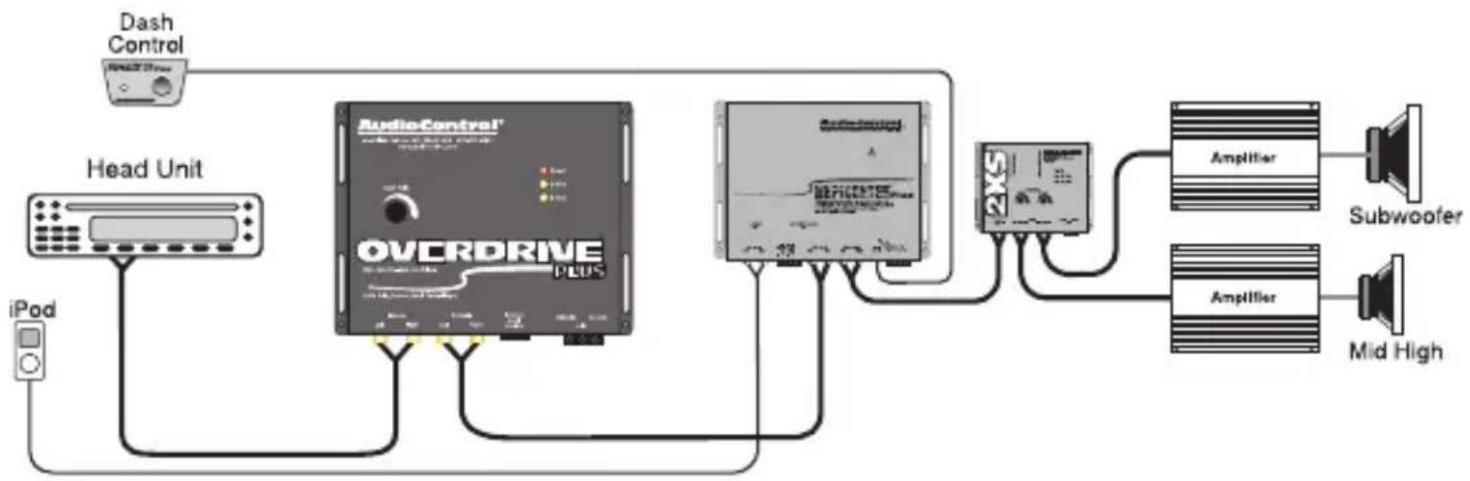
flowchart
graph LR
    A["iPod"] --> B["Head Unit"]
    B --> C["AudioControl®<br>OVERDRIVE PLUS"]
    C --> D["2XS"]
    D --> E["Amplifier"]
    E --> F["Subwoofer"]
    D --> G["Amplifier"]
    G --> H["Mid High"]
    I["Dash Control"] --> C
Dash Control (Purchased Separately)
Placement And Mounting
The dash control may be mounted under the dash using its own bracket or through a custom hole in the dash. It should be within reach of the driver and in a spot where the LED is plainly visible.
Bracket Installation
The dash control mounts with two screws, which attach to the underside of the dashboard.
Slide under the dash and place the dash control in its mounting position, mark the two mounting holes, drill pilot holes, and secure with two screws.
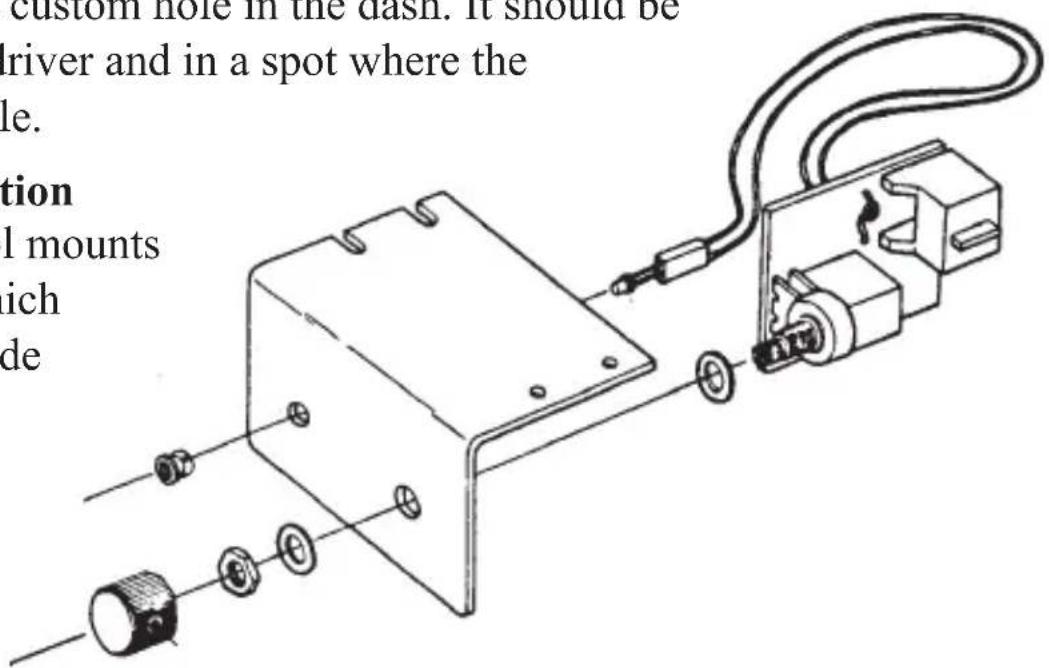
Dash Control Assembly
Custom Installation
For that custom, finished look, the dash control can be flush mounted directly on the dash-board (or anywhere else). Referencing the figure above, disassemble the dash control from the mounting bracket. Start by pushing the LED from its holder followed by removing the circuit board and rotary control from the bracket. Drill a 9/32 hole in the dashboard for the control along with a 1/8 hole for the lock tab and a 13/64 hole for the LED holder. Reassemble the dash control components on the dashboard.
Installation Precautions/Hints
Do not mount the OVERDRIVE PLUS Line Driver where it will be exposed to outside elements or extreme temperatures. Avoid areas of severe vibration or shock, and never drill into a car panel without knowing what's behind the panel. Think safety at all times.
- Mounting the OVERDRIVE PLUS as close to the head unit as possible sends the maximum signal down the wire so you hear more music and less noise.
- Use high quality, 100% shielded audio cables.
- Plan on a single-point ground scheme so all components, including the head unit, connect to a common ground point. Clean off all paint to bare metal at the ground point and use a star washer. Use no less than 14 gauge wire for the power and ground connections.
Set-up
Review the Level Matching section on page 7 of this manual. Level matching is what will allow you to get all the performance your OVER-DRIVE PLUS is capable of.
- Turn down your amp gains to their minimum setting, as well as the gains of any other components coming after the OVERDRIVE PLUS. Then you can run a higher signal (better signal to noise) into the amplifiers. Don’t worry, your amps will still go to full output with the signal they get from the OVERDRIVE PLUS.
- Adjust the OVERDRIVE PLUS for the maximum output that the next component in the chain can handle. The Tech Videos and Tech Notes in the support section of www.audiocontrol.com will take you through the level matching procedure. Note: Make certain that whatever component you put after the OVERDRIVE PLUS can withstand the output voltage you dial up. The inputs of many crossovers and amplifiers will clip around 2 volts. All AudioControl products can handle inputs of 9 volt RMS.
Blatant Plug
The OVERDRIVE PLUS Line Driver is part of the AudioControl Performance Match Series of products. The Performance Match products will extract killer performance from your car stereo system.
There are real world barriers to good autosound such as the fact that doors and trunks rarely make good speaker boxes. AudioControl Performance Match products like the Concert Series 2XSTM and 6XSTM crossovers; the Concert Series analog and digital equalizers; and The Epicenter bass maximizer will help you overcome those barriers. AudioControl components make it easy to adjust or “voice” components to the specific acoustics and hostile elements of your stereo system whether it’s a sleek Honda or stylish Escalade. The result is, as one warranty card stated, “A dream come true.”
And now a word from the legal department...
The WARRANTY
People are scared of warranties. Lots of fine print, lots of noncooperation, months of waiting around. Well, don’t be scared of this warranty. It’s designed to make you rave about us to your friends. It’s a warranty that looks out for you and helps you resist the temptation to have your friend “who’s good with electronics” try to repair your AudioControl OVERDRIVE PLUS. So go ahead and read this warranty, then enjoy your new component for a few days before sending in the warranty card and comments.
“Conditional” doesn’t mean anything ominous. The Federal Trade Commission tells all manufacturers to use the term to indicate that certain conditions have to be met before they’ll honor the warranty. If you honor these conditions, we will warrant all materials and workmanship on your OVERDRIVE PLUS for five years from the date you bought it, if installed by an authorized AudioControl dealer, and will fix or replace it, at our option, during that time.
Here are the conditions that make this warranty conditional:
- We need to know that you bought your product from an authorized AudioControl dealer. So go to www.audiocontrol.com or audiocontrolregistration.com right away, and register your OVERDRIVE PLUS.
- You must keep your sales receipt for proof of purchase, showing when and from whom the unit was bought. We're not the only ones who require this, so it's a good habit to get into with any major purchase.
-
Your OVERDRIVE PLUS must have originally been purchased from an authorized AudioControl dealer. You do not have to be the original owner, but you do need a copy of the original sales slip.
-
You cannot let anybody who isn't (A) the AudioControl factory; (B) somebody authorized in writing by AudioControl to service your OVERDRIVE PLUS. If anyone other than (A) or (B) messes with your OVERDRIVE PLUS, that voids your warranty.
-
The warranty is also void if the serial number is altered or removed, or if the OVERDRIVE PLUS has been used improperly. Now these sound like big loopholes, but here is all we mean by it.
Unwarranted abuse is (A) physical damage (don’t use the OVER-DRIVE PLUS for a jack stand); (B) improper connections (120 volts into the power jack can fry the poor thing); (C) sadistic things. This is the best mobile product we know how to build, but if you mount it to the front bumper of your car, something will go wrong.
- If an authorized United States AudioControl dealer installs your OVERDRIVE PLUS, the warranty is five years, otherwise the warranty is one year.
Assuming you conform to 1 through 6, and it really isn't all that hard to do, we get the option of fixing your old unit or replacing it with a new one.
Validate your warranty: Visit http://audiocontrolregistration.com to register your OVERDRIVE PLUS
Legalese Section
This is the only warranty given by AudioControl. This warranty gives you specific legal rights, which vary from state to state.
Promises of how well your OVERDRIVE PLUS will work are not implied by this warranty. Other than what we’ve covered in this warranty, we have no obligation, express or implied. Also, we will not be obligated for direct or indirect consequential damage to your system caused by hooking up the AudioControl OVERDRIVE PLUS.
Failure to send in a properly completed warranty card, negates any service claims.
OVERDRIVE
PLUS
Specifications
All specifications are measured at 14.4 VDC (standard automotive voltage) As technology advances, AudioControl reserves the right to continuously change our specifications, like our weather.
Maximum input/output level 9.5Vrms/13V peak
Optional Dash Remote +0dB / -90dB
Frequency response 10Hz-100kHz;±1dB
Total harmonic distortion 0.005%
Signal to Noise ratio ....>110dB
Input Impedance.... 20 Kohms
Output Impedance 45ohms
Input gain 0-24dB
Power supply ...... transformer isolated PWM DC/DC converter
Power draw 150mA
Recommended fuse rating 1 Amp
Size....5.00" x 4.25" x 1.25"
Weight 2 lbs
Input Ground Isolation Jumpers...... Yes
Country of origin .... USA
©2010, AudioControl, a division of Electronic Engineering and Manufacturing, Inc. All rights reserved.
AudioControl, Making Good Sound Better, Performance Match, The Epicenter, and OVER-DRIVE PLUS are all trademarks of Electronic Engineering and Manufacturing, Inc.
This literature was conceived, designed, and written under the protective canopy of the lush, green, misty rain forest on a drizzly, gray overcast day at our home in the Pacific Northwest.
AudioControl®
22410 70th Avenue West • Mountlake Terrace, WA 98043 USA 425-775-8461 • Fax 425-778-3166 • www.audiocontrol.com
P/N 913-104-0
- Owner's Enjoyment Manual
- Congratulations!
- Key Features of the OVERDRIVE PLUS:
- AudioControl®
- Features
- High-Voltage Line Driver
- Input for Optional Dash Control
- Low Noise / High Current Output Circuitry
- Output Voltage Indicators
- Selectable Ground Isolation
- AudioControl's Bulletproof Reliability
- AudioControl Sound Quality
- A Guided Tour of the OVERDRIVE PLUS
- The Outside
- Output status LEDs
- The Inside
- Short course in Signal-to-Noise Ratio and Level Matching
- Installation Examples and Hookup Diagrams
- Basic 2 channel system with maximum dynamic range
- Channel equalized system with active crossover / equalizer
- Maximum bass system with The Epicenter Plus and active crossover
- Dash Control (Purchased Separately)
- Placement And Mounting
- Bracket Installation
- Custom Installation
- Installation Precautions/Hints
- Set-up
- Blatant Plug
- The WARRANTY
- Legalese Section
- OVERDRIVE
- PLUS
- Specifications
Brand : AudioControl
Model : Overdrive Plus
Category : Hard Drive