
iON8024-CT - Snow blower Sun Joe - Free user manual and instructions
Find the device manual for free iON8024-CT Sun Joe in PDF.


| Product Type | Cordless Dual-Stage Snow Blower |
| Brand | Sun Joe |
| Model | iON8024-CT |
| Battery Voltage | 80 V DC (2 x 40 V in series) |
| Battery Capacity | 6.0 Ah each (batteries sold separately) |
| Motor | 2500 W Brushless |
| Clearing Width | 24 in. (61 cm) |
| Depth of Snow Cut | 13 in. (33 cm) |
| Throw Distance (Max) | 32 ft (10 m) |
| Plowing Capacity (Max) | 1000 lbs/min (454 kg/min) |
| Drive System | Self-propelled with 3 forward speeds, 1 reverse, and XPORT transport mode |
| Auger | 2 serrated steel blades |
| Discharge Chute Rotation | 180° auto-rotate |
| LED Lights | 2 x 3 watt headlights (adjustable) |
| Tire Size | 13 in. (33 cm) inflatable |
| Tire Pressure | 20 psi |
| Weight (without batteries) | 92.5 lbs (41.9 kg) |
| Weight (with batteries) | 97.8 lbs (44.3 kg) |
| Charging Time | 4.5 hours (iBAT40XR) or 5 hours (iBAT40XRP) with iCHRG40-DPC charger |
| Run Time (Max) | 40 min (iBAT40XR) or 50 min (iBAT40XRP) |
| Compatible Batteries | iBAT40XR, iBAT40XRP (sold separately) |
| Compatible Chargers | iCHRG40, iCHRG40-DPC (sold separately) |
| Safety Features | Safety key, safety switch, dual triggers, chute clean-out tool, skid shoes |
| Warranty | 2 years limited (residential use) |
Frequently Asked Questions - iON8024-CT Sun Joe
User questions about iON8024-CT Sun Joe
0 question about this device. Answer the ones you know or ask your own.
Ask a new question about this device
Download the instructions for your Snow blower in PDF format for free! Find your manual iON8024-CT - Sun Joe and take your electronic device back in hand. On this page are published all the documents necessary for the use of your device. iON8024-CT by Sun Joe.
USER MANUAL iON8024-CT Sun Joe
All Operators Must Read These Instructions Before Use
Read all instructions when using cordless snow blowers. Basic safety precautions should always be followed to reduce the risk of fire, electric shock, and personal injury.
General Safety Rules
Notice the personal safety alert symbol ⚠️ used in this manual to draw your attention to a WARNING given along with the particular operating instruction. This means that the operation requires special ATTENTION, CAUTION, and AWARENESS.
- Keep work area clean and well lit – Cluttered, dark areas invite accidents.
- Keep bystanders away – All bystanders and pets should be kept a safe distance away from the work area.
- Dress properly – Do not wear loose clothing or jewelry. They can get caught in moving parts. Protective rubber gloves and non-slip footwear are recommended when working outdoors.
- Use the right product – Do not use this machine for any job except that for which it is intended.
- CAUTION! – Exercise caution to avoid slipping or falling. Wear protective footwear that will protect your feet and improve your footing on slippery surfaces.
- Use safety glasses – Also use safety footwear, snug-fitting clothing, protective gloves, hearing and head protection.
- Do not force the snow blower – Use the snow blower at the rate for which it was designed to ensure optimal performance and safe operation.
- Stay alert – Watch what you are doing. Use common sense. Do not operate the snow blower when you are tired or under the influence of alcohol or drugs.
- Do not overreach – Keep proper footing and balance at all times.
- Store indoors – When not in use, the snow blower should be kept dry and stored out of the reach of children in a high or locked place.
- Maintain snow blower with care – Follow instructions for lubricating and changing accessories.
⚠ WARNING! Always disengage both triggers, press down the safety switch, turn off and remove the key from the switch, and disconnect the battery packs; wait for all movement to stop before making any adjustments, inspecting, servicing, changing accessories, cleaning the snow blower, or when any other dangerous conditions present. Any such operation should be performed after revolving parts inside the snow blower stop completely. Such preventive safety measures reduce the risk of starting the power tool accidentally.
⚠ WARNING! When replacing any parts, you must strictly observe the instructions and procedures described in this user manual. Special care should be paid to any rubber parts, since these parts may increase the engine load and decrease its mechanical power if damaged.
⚠ WARNING! If you notice that the snow blower is not running properly or hear abnormal sounds from the engine when it is in use, immediately stop the machine, disconnect the battery packs, and contact Snow Joe® + Sun Joe® customer service center at 1-866-SNOWJOE (1-866-766-9563).
- Surfaces – This snow blower is intended for use on paved surfaces. Do not use on gravel, stone or other unpaved surfaces unless the snow blower is adjusted for such surfaces according to the instructions given in the operator's manual.
- Moving parts present risks – Keep your face, hair, clothing, hands, and feet away from moving parts. All guards and safety attachments must be installed properly before using the unit. Shut off and disconnect the battery packs before touching any parts other than the handles and switch.
- Avoid unintentional starting – Make sure the safety switch and the power switch are in the off position before inserting the battery packs in the unit. Do not carry the snow blower with the safety switch and the triggers engaged.
- Do not overreach – Maintain proper footing and balance at all times. Place heels firmly on the ground and tightly grasp the handle grips. Watch for uneven surfaces and do not overreach. In case you fall or collide with the snow blower, inspect the unit for any damages or cracks. When stepping backwards, be careful to avoid obstacles beneath your feet or behind you to avoid falling.
⚠ WARNING! If the snow blower strikes any object, follow these steps:
i) Stop the snow blower, remove key and remove the battery packs.
ii) Inspect for damage.
iii) Repair any damage before restarting and operating the snow blower.
Battery + Charger Safety Instructions
NOTE: This unit is a core tool. The battery and the charger are not included. They must be purchased separately. Model iON8024-CT is compatible with the following batteries (models iBAT40XR and iBAT40XRP) and chargers (models iCHRG40 and iCHRG40-DPC). See page 23 for more information.
We pay a great deal of attention to the design of every battery pack to ensure that we supply you with batteries that are safe, durable and have a high energy density. The battery cells have a wide range of safety devices. Each individual cell is initially formatted and its electrical characteristic curves are recorded. This data is then used exclusively to be able to assemble the best possible battery packs.
Despite all the safety precautions, caution must always be exercised when handling batteries. The following points must be obeyed at all times to ensure safe use. Safe use can only be guaranteed if undamaged cells are used. Incorrect handling of the battery pack can cause cell damage.
IMPORTANT! Analyses confirm that incorrect use and poor care of high-performance batteries are the main factors responsible for personal and/or product damage.
⚠ WARNING! Use only approved replacement batteries; other batteries may damage the cordless snow blower and cause it to malfunction, which can lead to serious personal injury.
CAUTION! To reduce the risk of injury, charge the EcoSharp® PRO iBAT40XRP lithium-ion battery packs only in its designated lithium-ion charger, the iCHRG40-DPC or iCHRG40. Other types of chargers present risk of fire, personal injury and damage. Do not wire a battery pack to a power supply plug or car cigarette lighter. Such misuse will permanently disable or damage the battery pack.
- Avoid dangerous environments – Do not charge the battery pack in rain, snow or in damp or wet locations. Do not use the battery pack or charger in the presence of explosive atmospheres (gaseous fumes, dust or flammable materials) because sparks may be generated when inserting or removing the battery pack, which could lead to a fire.
- Charge in a well-ventilated area – Do not block the charger vents. Keep them clear to allow for proper ventilation. Do not allow smoking or open flames near a charging battery pack. Vented gases may explode.
NOTE: The safe temperature range for the battery is -4^ (-20°C) to 113^ (45°C). Do not charge the battery outside in freezing weather; charge it at room temperature.
- Maintain charger cord – When unplugging the charger, pull the plug, not the cord, from the receptacle to reduce the risk of damage to the electrical plug and cord. Never carry the charger by its cord or yank it by the cord to disconnect it from the receptacle. Keep the cord away from heat, oil and sharp edges. Make sure the cord will not be stepped
on, tripped over or subjected to damage or stress when the charger is in use. Do not use the charger with a damaged cord or plug. Replace a damaged charger immediately.
- Do not use an extension cord unless it is absolutely necessary – Using the wrong, damaged or improperly wired extension cord poses a risk of fire and electric shock. If an extension cord must be used, plug the charger into a properly wired 16 gauge or larger extension cord with the female plug matching the male plug on the charger. Make sure that the extension cord is in good electrical condition.
- Charger iCHRG40 or iCHRG40-DPC is rated for 120 volt AC only – The charger must be plugged into an appropriate receptacle.
- Use only recommended attachments – Use of an attachment not recommended or sold by the battery charger or battery pack manufacturer may result in risk of fire, electric shock or personal injury.
- Unplug charger when not in use – Make sure to remove battery packs from unplugged chargers.
⚠ WARNING! To reduce the risk of electric shock, always unplug the charger before performing any cleaning or maintenance. Do not allow water to flow into the charger. Use a Ground Fault Circuit Interrupter (GFCI) to reduce shock hazards.
- Do not burn or incinerate battery packs – Battery packs may explode, causing personal injury or damage. Toxic fumes and materials are created when battery packs are burned.
- Do not crush, drop or damage battery packs – Do not use the battery pack or charger if they have sustained a sharp blow, been dropped, run over or have been damaged in any way (i.e. pierced with a nail, hit with a hammer, stepped on, etc.).
- Do not disassemble – Incorrect reassembly may pose a serious risk of electric shock, fire or exposure to toxic battery chemicals. If the battery or charger are damaged, contact an authorized Snow Joe ^ + Sun Joe ^ dealer or call the Snow Joe ^ + Sun Joe ^ customer service center at 1-866-SNOWJOE (1-866-766-9563) for assistance.
- Battery chemicals cause serious burns – Never let a damaged battery pack contact the skin, eyes or mouth. If a damaged battery pack leaks battery chemicals, use rubber or neoprene gloves to safely dispose of it. If skin is exposed to battery fluids, wash the affected area with soap and water and rinse with vinegar. If eyes are exposed to battery chemicals, immediately flush with water for 20 minutes and seek medical attention. Remove and dispose of contaminated clothing.
- Do not short circuit – A battery pack will short circuit if a metal object makes a connection between the positive and negative contacts on the battery pack. Do not place a battery pack near anything that may cause a short circuit, such as paper clips, coins, keys, screws, nails and other metallic objects. A short-circuited battery pack poses a risk of fire and severe personal injury.
- Store your battery packs and charger in a cool, dry place – Do not store the battery packs or charger where temperatures may exceed 104°F (40°C), such as in direct sunlight or inside a vehicle or metal building during the summer.
Information about the battery
NOTE: Model iON8024-CT is compatible with the following battery packs (sold separately): iBAT40XR or iBAT40XRP. The battery packs ship partially charged, and must be charged completely before you use the tool for the first time.
-
The battery packs supplied with your cordless snow blower are only partially charged. The battery packs have to be charged completely before you use the tool for the first time.
-
For optimum battery performance, avoid low discharge cycles by charging the battery packs frequently.
-
Store the battery packs in a cool place, ideally at 59°F (15°C) and charged to at least 40%.
-
Lithium-ion batteries are subject to a natural aging process. The battery pack must be replaced at the latest when its capacity falls to just 80% of its capacity when new. Weakened cells in an aged battery pack are no longer capable of meeting the high power requirements needed for the proper operation of your snow blower, and therefore pose a safety risk.
-
Do not throw battery packs into an open fire as this poses a risk of explosion.
-
Do not ignite the battery pack or expose it to fire.
-
Do not exhaustively discharge batteries. Exhaustive discharge will damage the battery cells. The most common cause of exhaustive discharge is lengthy storage or non-use of partially discharged batteries. Stop working as soon as the performance of the battery falls noticeably or the electronic protection system triggers. Place the battery pack in storage only after it has been fully charged.
-
Protect batteries and the tool from overloads. Overloads will quickly result in overheating and cell damage inside the battery housing even if this overheating is not apparent externally.
-
Avoid damage and shocks. Immediately replace batteries that have been dropped from a height of more than one meter or those that have been exposed to violent shocks, even if the housing of the battery pack appears to be undamaged. The battery cells inside the battery may have suffered serious damage. In such instances, please read the waste disposal information for proper battery disposal.
-
If the battery pack suffers overloading and overheating, the integrated protective cutoff will switch off the equipment for safety reasons.
IMPORTANT! Do not press the ON/OFF switch any more if the protective cut-off has been activated. This may damage the battery pack.
- Use only original battery packs. The use of other batteries poses a fire risk and may result in injuries or an explosion.
Information about the charger and the charging process
-
Please check the data marked on the rating plate of the battery charger (sold separately). Be sure to connect the battery charger to a power supply with the voltage marked on the rating plate. Never connect it to a different mains voltage.
-
Protect the battery charger and its cord from damage. Keep the charger and its cord away from heat, oil and sharp edges. Have damaged cords repaired without delay by a qualified technician at an authorized Snow Joe ^® + Sun Joe ^® dealer or call the Snow Joe ^® + Sun Joe ^® customer service center at 1-866-SNOWJOE (1-866-766-9563).
-
Electrical plugs must match the outlet. Never modify the plug in any way. Do not use any adapter plugs with grounded appliances. Unmodified plugs and matching outlets will reduce the risk of electric shock.
-
Keep the battery charger, battery pack(s) and the cordless tool out of the reach of children.
-
Do not use the supplied battery charger to charge other cordless tools.
-
During periods of heavy use, the battery pack will become warm. Allow the battery pack to cool to room temperature before inserting it into the charger to recharge.
-
Do not overcharge batteries. Do not exceed the maximum charging times. These charging times only apply to discharged batteries. Frequent insertion of a charged or partially charged battery pack will result in overcharging and cell damage. Do not leave batteries in the charger for days on end.
-
Never use or charge batteries if you suspect that it has been more than 12 months since the last time they were charged. There is a high probability that the battery pack has already suffered dangerous damage (exhaustive discharge).
-
Charging batteries at a temperature below 50^ F ( 10^ C) will cause chemical damage to the cells and may cause a fire.
-
Do not use batteries that have been exposed to heat during the charging process, as the battery cells may have suffered dangerous damage.
-
Do not use batteries that have suffered curvature or deformation during the charging process or those that exhibit other atypical symptoms (gassing, hissing, cracking, etc.)
-
Never fully discharge the battery pack (maximum recommended depth of discharge is 80%). A complete discharge of the battery pack will lead to premature aging of the battery cells.
Protection from environmental influences
-
Wear suitable work clothes. Wear safety goggles.
-
Protect your cordless tool and the battery charger from moisture and rain. Moisture and rain can cause dangerous cell damage.
-
Do not use the cordless tool or the battery charger near vapors and flammable liquids.
- Use the battery charger only in dry conditions and at an ambient temperature of 50-104°F (10-40°C).
- Do not keep the battery charger in places where the temperature is liable to reach over 104^ F ( 40^ C). In particular, do not leave the battery charger in a car that is parked in the sunshine.
- Protect batteries from overheating. Overloads, overcharging and exposure to direct sunlight will result in overheating and cell damage. Never charge or work with batteries that have been overheated – replace them immediately, if possible.
- Store the charger and your cordless tool only in dry locations with an ambient temperature of 50-104°F (10-40°C). Store your lithium-ion battery pack in a cool, dry place at a temperature of 50-68°F (10-20°C). Protect the battery pack, charger and cordless tool from humidity and direct sunlight. Only place fully charged batteries in storage (charged to at least 40%).
- Prevent the lithium-ion battery pack from freezing. Battery packs that were stored below 32^ F ( 0^ C) for more than 60 minutes must be discarded.
- When handling batteries, be wary of electrostatic charge. Electrostatic discharges can damage the electronic protection system and the battery cells. Avoid electrostatic charging and never touch the battery poles.
Additional Safety Instructions Safety Instructions for Walk-Behind Snow Blowers
WARNING! Rotating impeller can cause serious injury. Never attempt to unclog or clean unit while auger is running.
- Read the operator's manual carefully – Learn your snow blower's applications and limitations as well as the specific potential hazards related to this machine. Do not use this machine for any purpose other than the one for which it was designed. Failure to adhere to these precautions may cause mechanical defaults, serious damage, or personal injury.
Understand:
- How to operate all controls.
- The functions of all controls.
- How to STOP in an emergency.
- Preliminary unit inspection – Thoroughly inspect the unit before use. Make sure all the parts are secure and installed correctly. If you notice any abnormalities, do not use the machine until it has been properly repaired. Always perform a test run the first time you use the snow blower or after replacing parts to ensure that the unit is functioning properly.
- Preliminary area inspection – Clear the area to be plowed before each use. Remove all objects such as rocks, broken glass, nails, wire, or string, which can be thrown by or
become entangled in the snow blower. Keep the area of operation clear of all persons, children, and pets.
- Excessive force – The snow blower was designed to respond at a certain rate for various snow conditions for optimal safety and performance. Do not force it; keep the applied pressure constant throughout its operation.
- Malfunctioning switch – Do not use the snow blower if the switch does not turn it on and off. Any appliance that cannot be controlled by the switch is not safe to use and must be repaired.
- Hitting an object – If the snow blower accidentally strikes an object, first stop the snow blower motor and remove the key and battery packs; next, inspect for damage; finally, repair or replace any damaged part before restarting and operating the snow blower.
- Discharge chute safety – Never direct the snow discharge chute at the operator, at bystanders, at vehicles, or at windows. The discharged snow, which may contain foreign objects accidentally picked up by the snow blower, can cause serious damage and personal injury. Do not use your hands to unclog the discharge chute. Stop the motor, remove the key and battery packs before removing debris.
- Hand-held operating position – Operation of the snow blower in the hand-held position is unsafe.
- Abnormal operation – If you find that the snow blower is not running properly or hear abnormal sounds from the engine, immediately stop the machine, remove the key and battery packs, and contact an authorized Snow Joe® + Sun Joe® dealer or call the Snow Joe® + Sun Joe® customer service center at 1-866-SNOWJOE (1-866-766-9563) for assistance.
- Noise control – When using the snow blower, respect the local laws and regulations regarding noise control and environmental protection. To avoid noise disturbance, you should carefully decide upon an appropriate operation time and consider the surrounding conditions.
- When work is completed – Remove the battery packs from the snow blower when not in use, when changing accessories, and before performing any maintenance task.
- Store safely – Store the snow blower indoors in a dry area between uses. Keep in a locked area, where children and unauthorized users cannot gain access. Never store the snow blower with the battery packs installed. It may cause damage and injury.
- Maintain for safety and longevity – Check for misalignment or binding of moving parts, breakage of parts, and any other conditions that may affect the unit's operation. If damaged, repair or replace the damaged part before use. Use only those replacement parts made for your model. When replacing any parts, you must strictly observe the instructions and procedures described in this manual. Special care should be paid to any rubber parts, since these parts may increase the engine load and decrease its mechanical power if damaged.
-
Tip over hazard – DO NOT operate near drop-offs, ditches, or embankments. Unit can suddenly turn over if a wheel is over the edge of a cliff or ditch, or if an edge caves in.
-
Always back up slowly – Do not operate in reverse unless absolutely necessary. Always look down and behind before and while backing.
- Travelling – Disengage auger drive when travelling from one work area to another.
- Skid shoes – Adjust skid shoes to clear gravel or crushed rock surfaces safely.
- Prevent unauthorized use – Never leave snow blower unattended with key in. Always stop the motor, remove the key and battery packs to prevent unauthorized use.
- Check all controls frequently – Check both triggers and safety switch frequently. Adjust and service as required. All motion of drive wheels and auger/impeller must stop quickly when triggers are released.
- Avoid steep slopes – DO NOT operate on steep slopes. DO NOT clear snow across the face of slopes. Keep all movement on slopes slow and gradual. DO NOT make sudden changes in speed or direction. Use a slow speed to avoid stops or shifts on slopes. Avoid starting or stopping on a slope.
- Keep all hardware properly tightened – Check shear bolts frequently.
Electrical Safety
- Electrical plugs must match the outlet – Never modify the plug in any way. Do not use any adapter plugs with grounded appliances. Unmodified plugs and matching outlets will reduce the risk of electric shock.
- Avoid accidental starting – Make sure the safety switch is off and the triggers are disengaged before inserting the battery packs into the unit. Do not transport the snow blower with the safety switch and the triggers engaged.
Safety Symbols
The following table depicts and describes safety symbols that may appear on this product. Read, understand and follow all instructions on the machine before attempting to assemble and operate.
| Symbols SymbolsDescriptions Descriptions | |||
 | READ THE OPERATOR'S MANUAL(S) – Read, understand and follow all instructions in the user manual(s) before attempting to assemble and operate. |  | WARNING! Do not expose the unit to rain or wet conditions. Keep dry. |
 | SAFETY ALERT – Indicates a precaution, a warning or a danger. | 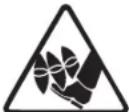 | DANGER! Cutting/dismemberment hazard - Keep feet away from the rotating auger. |
 | Wear hearing protection.Wear eye protection.Wear breathing protection. | 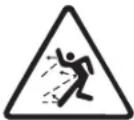 | CAUTION! Beware of stones and other foreign objects that could be thrown from the appliance. |
 | Keep hands, feet and clothing away from the rotating auger to avoid injury. |  | The rotating part will continuously run for several seconds after you turn off the machine. |
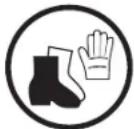 | Wear protective gloves and non-slip footwear when using the machine and handling debris. |  | Keep bystanders and children a safe distance (at least 33 ft/10 m) away from the work area. |
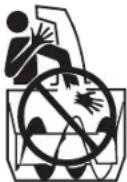 | Do not use hands to unclog chute. | 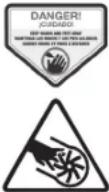 | DANGER! Cutting/dismemberment hazard – Keep hands away from the rotating auger. Do not use hands to unclog rotor housing. Stop motor before removing debris. |
 | WARNING! Always turn the machine OFF and remove the safety key before conducting inspection, cleaning and maintenance. |  | Indoor use only. Only use battery charger indoors. |
Know Your Cordless Snow Blower
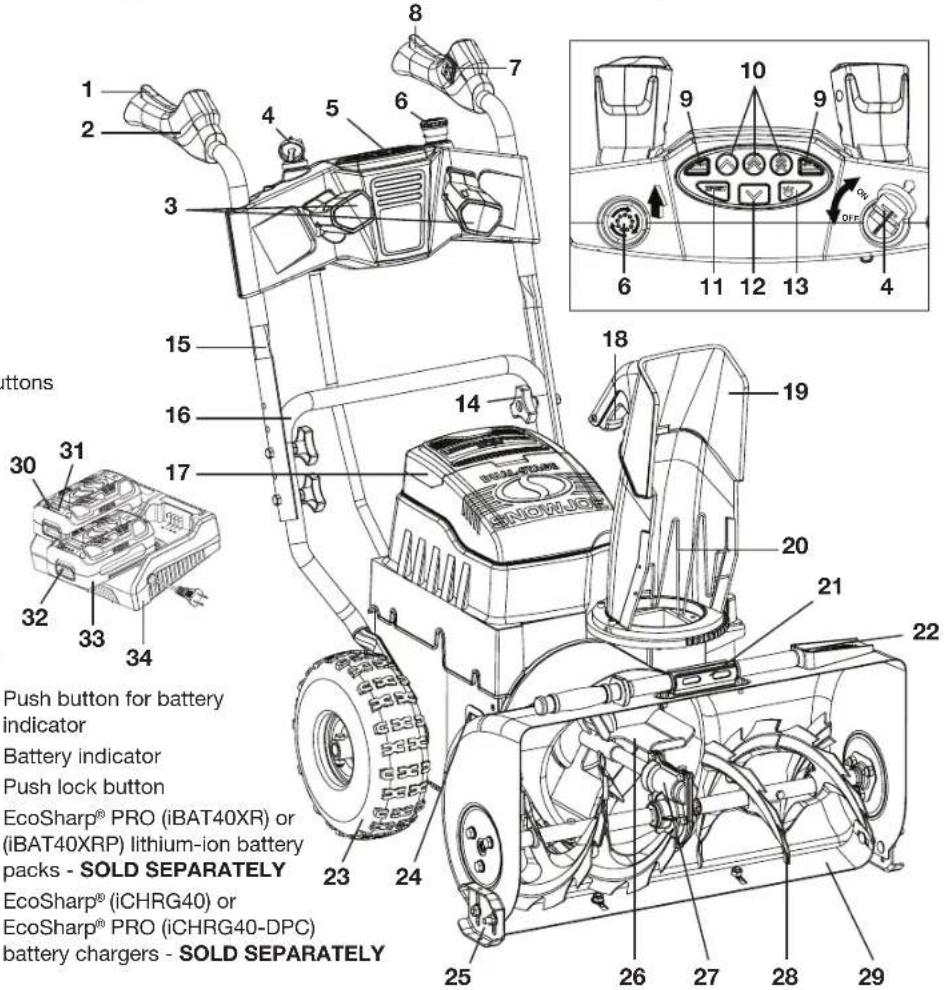
Read the owner's manual and safety rules carefully before operating your cordless snow blower. Compare the illustration below to the actual unit in order to familiarize yourself with the location of the various controls and adjustments. Save this manual for future reference.
- Auger trigger
- Handle grip
- LED lights (2)
- Safety key/Power switch
- Control panel
- Safety switch
- Chute control switch
- Drive trigger
- Battery light indicators
- Forward speed selector buttons
- Transport button
- Reverse button
- LED light button
- Handle knob + bolt (4)
- Upper handle assembly
- Lower handle
- Battery compartment
- Chute deflector trigger
- Discharge chute deflector
- Discharge chute
- Mounting clip
- Chute clean-out tool
- Wheel (2)
- LED window (2)
- Skid shoe (2)
- Impeller
- Auger gearcase
- Auger
- Scraper blade
Technical Data
| Battery Voltage* 80 V D.C. (2 x 40 V in Series) | Stages | Dual stage | |
| Battery Capacity 6.0 Ah (each) | Drive Type | Self-propelled | |
| Charging Time 4.5 hours (for full charge) | Drive System 3 forward speeds, | ||
| (using iBAT40XR with iCHRG40-DPC1) | 1 reverse speed, | ||
| 5 hours (for full charge) | 1 XPORT speed | ||
| (using iBAT40XRP with iCHRG40-DPC1) | Type of Snow | Light, fluffy | |
| Run Time (Max) 40 mins (using 2 | iBAT40XR batteries1) | Tire Size | 13 in. (33 cm) inflatable |
| 50 mins (using 2 | iBAT40XRP batteries1) | Tire Pressure | 20 psi |
| No Load Speed 140 rpm (2.33 Hz) | Directional Control | 180° auto-rotate chute | |
| Auger 2 serrated steel blades | LED Light | 3 watt (each) | |
| Motor 2500 W Brushless | Weight (snow blower alone) | 92.5 lbs (41.9 kg) | |
| Clearing Width 24 in. (61 cm) | Weight | 97.8 lbs (44.3 kg) | |
| Depth of Snow Cut 13 in. (33 cm) | (snow blower with batteries installed) | ||
| Throw Distance (Max) 32 ft (10 m) | |||
| Plowing Capacity (Max) 1000 lbs/min (454 kg/min) | |||
*Initial no-load voltage, when fully charged, peaks at 80 volts; nominal voltage under typical load is 72 volts.
^† Sold separately
Unpacking
Carton Contents:
- Cordless snow blower with lower handle
• Upper handle assembly - Safety key (2)
- Handle knob (4) + bolt (4)
- Discharge chute assembly
- Chute clean-out tool
- Chute nuts (4)
• Shear bolt (2) + gasket (2) + nut (2) (Extras) - Hex key
-
Manual with registration card
-
Carefully remove the cordless snow blower and check to see that all of the above items are supplied.
- Inspect the product carefully to make sure no breakage or damage occurred during shipping. If you find damaged or missing parts, DO NOT return the unit to the store. Please call the Snow Joe ^® + Sun Joe ^® customer service center at 1-866-SNOWJOE (1-866-766-9563).
NOTE: Do not discard the shipping carton and packaging material until you are ready to use the cordless snow blower. The packaging is made of recyclable materials. Properly dispose of these materials in accordance with local regulations or save the packaging for long-term product storage.
IMPORTANT! The equipment and packaging material are not toys. Do not let children play with plastic bags, foils or small parts. These items can be swallowed and pose a suffocation risk!
Assembly
⚠ WARNING! To avoid serious personal injury, read and understand all safety instructions provided.
WARNING! Unpacking and assembly should be completed on a flat and stable surface, with adequate space for moving the machine and its packaging.
Tools and supplies required:
- Hex key (included)
- Tire gauge
Assembling the Handles
⚠ WARNING! Observe the lower rear area of the snow blower and be careful not to damage cable sleeve when rotating the handle upward.
- Rotate the handlebars into operating position.
- Slightly spread the upper handle assembly down over the lower handle until it slides into position (Fig. 1).
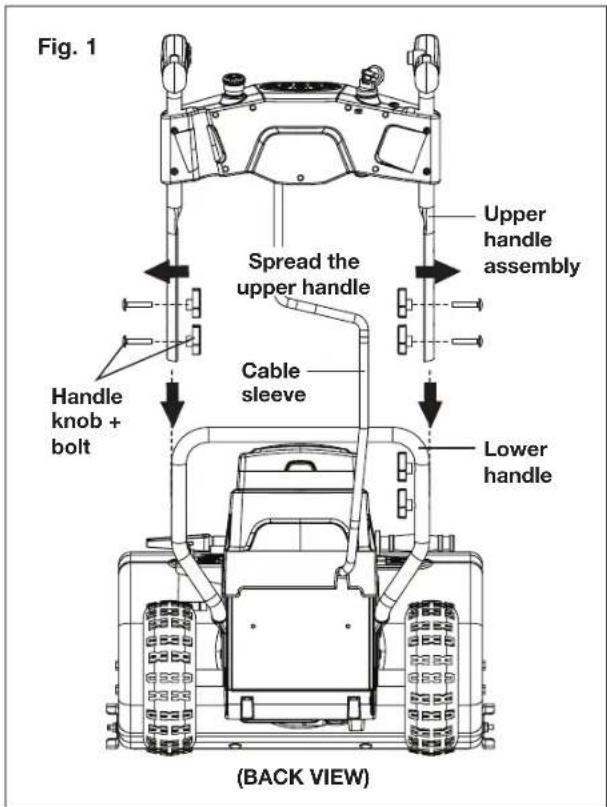
- Adjust upper handle assembly to the optimal position by aligning the double bolt holes at the desired height. Secure the connection using the 4 handle knobs and bolts, and tighten on each side (Fig. 2).

Discharge Chute Assembly
- Use the hex key to remove the 4 nuts from the gear plate. Keep them on the side (Fig. 3).

-
Place the discharge chute assembly onto the gear plate, aligning the 4 holes in the gear plate, and push down until the chute is flush and flat against the housing (Fig. 4).
-
Using the 4 nuts, secure the discharge chute assembly to the gear plate (Fig. 4).
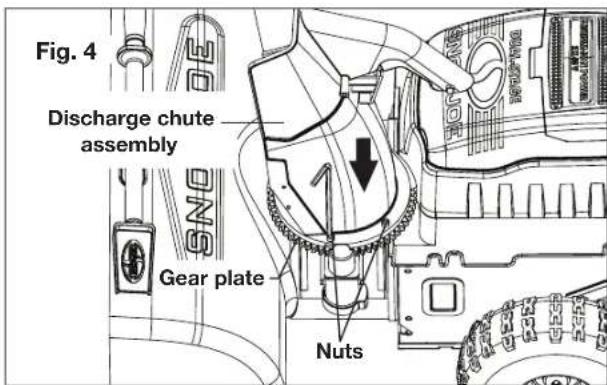
- Press the chute deflector trigger to raise or lower the chute deflector to the desired height of the snow stream (Fig. 5).

Chute Clean-Out Tool
The chute clean-out tool is fastened to the top of the auger housing with a mounting clip (Fig. 6).

Skid Shoes Adjustment
Position the skid shoes based on surface conditions. Adjust upward for hard-packed snow. Adjust downward when operating on gravel or crushed rock surfaces.
The snow blower skid shoes are adjusted at the factory for shipping purposes. Adjust them downward, if desired, prior to operating the snow blower.
WARNING! It is not recommended that you operate this snow blower on gravel as it can easily pick up and throw loose gravel, causing personal injury or damage to the snow blower and surrounding property.
-
For close snow removal on a smooth surface, raise skid shoes higher on the auger housing. Allow 1/8 in. (3 mm) between scraper blade and hard, smooth surface(s).
-
Use a middle or lower position when the area to be cleared is uneven, such as a gravel driveway. Allow 1-1/4 in. (30 mm) between scraper blade and uneven or gravel surfaces.
NOTE: If you choose to operate the snow blower on a gravel surface, keep the skid shoes in position for maximum clearance between the ground and the scraper blade.
To adjust the skid shoes:
- Loosen the 4 hex nuts (2 on each side). Move skid shoes to desired position (Fig. 7).
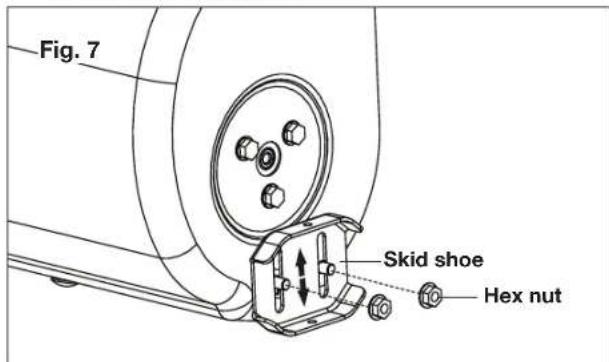
- Make certain the entire bottom surface of skid shoe is against the ground to avoid uneven wear on the skid shoes.
- Retighten hex nuts securely.
Battery Pack Operation
The equipment is powered by a lithium-ion batteries. The battery packs are completely sealed and maintenance free.
Battery Charge Level Indicator
The battery packs are equipped with a push button for checking the charge level. Simply press the push button to read off the battery charge level from the LEDs of the battery indicator:
- All 3 level monitoring LEDs are lit: Battery charge level is high.
- 2 level monitoring LEDs are lit: Battery charge level is decreasing. Stop work as soon as possible.
- 1 level monitoring LED is lit: Battery is flat. Stop work IMMEDIATELY and charge the battery. Otherwise the battery's service life will be greatly shortened.
| Light IndicatorsLights | |
| Charge level button | |
| The battery is at 30% capacity and requires charging | |
| The battery is at 60% capacity and requires charging soon | |
| The battery is at full capacity |
NOTE: If the charge level button does not appear to be working, place the battery pack on the charger and charge as needed.
NOTE: Immediately after using the battery pack, the charge level button may display a lower charge than it will if checked a few minutes later. The battery cells “recover” some of their charge after resting.
Charger Operation
WARNING! Charge only EcoSharp® PRO iBAT40XRP lithium-ion battery packs in compatible EcoSharp® iCHRG40-DPC lithium-ion dual port charger or iCHRG40 lithium-ion battery charger (sold separately). Other types of batteries may cause personal injury and damage.
To reduce the risk of electric shock, do not allow water to flow into the charger's AC/DC plug.
When to Charge the EcoSharp® PRO iBAT40XRP Lithium-Ion Battery
NOTE: The EcoSharp® PRO iBAT40XRP lithium-ion battery packs do not develop a "memory" when charged after only a partial discharge. Therefore, it is not necessary to run down the battery pack before placing it into the charger.
- Use the battery charge indicator lights to determine when to charge your EcoSharp® PRO iBAT40XRP lithium-ion battery pack.
- You can "top-off" your battery pack's charge before starting a big job or after a long day of use.
Charging the Battery Packs
- Check that the mains voltage is the same as that marked on the rating plate of the dual port battery charger. Then, insert the charger's plug into the electrical wall outlet. When you plug in the charger, the top green light will illuminate and stay green (Fig. 8).

- Place the battery packs into the dual port charger by sliding the packs as shown to lock it into position. When you insert the batteries into the charger, the bottom red light will illuminate to indicate that the battery is charging (Fig. 9).
- When the bottom light turns green, the battery is fully charged (Fig. 9).

NOTE: If the top light remains green while the bottom light alternately flashes red and green, this indicates a temperature abnormality (i.e. that the battery pack is either too hot or too cold). If there is only a red blinking light, this indicates that something is wrong with the battery. Contact Snow Joe ^® + Sun Joe ^® customer service center at 1-866-SNOW-JOE (1-866-766-9563) for assistance.

- A fully discharged pack with an internal temperature in the normal range will fully charge in 5 hours (between 32°F/0°C and 113°F/45°C). Heavily cycled battery packs may take longer to charge completely.
- If the charging light indicator alternately blinks red and green or the light indicator does not come on at all, check that the battery pack is fully seated into the bay. Remove the pack and reinsert. If the problem persists, contact the Snow Joe® + Sun Joe® customer service center at 1-866-SNOWJOE (1-866-766-9563) for assistance.
- When charging is complete, remove the battery from the charger by pulling the push lock button and sliding the battery backward to unlock it from the charger (Fig. 10).

- Timely recharging of the battery will help prolong the battery's life. You must recharge the battery pack when you notice a drop in the equipment's power.
IMPORTANT! Never allow the battery pack to become fully discharged as this will cause irreversible damage to the battery.
Charging a Hot or Cold Battery Pack
A red and green flashing indicator light on the charger indicates that the battery pack temperature is outside the charging range. Once the pack is within the acceptable range, normal charging will take place and the red light will be continuous. Hot or cold battery packs may take longer to charge.
| Lithium-Ion Charging Status | ||
| Battery Pack Temperature | Red Charger Indicator Light | Charging Status |
| Too hot Flashing Not charging | ||
| Normal range Continuous Normal charging | ||
| Too cold Flashing Not charging | ||
Controls + Features
⚠ WARNING! AVOID INJURY. Read and understand the entire safety section before proceeding.
Snow blower controls and features are described below and illustrated on page 7.
Control Panel (Fig. 11)
- Forward Button – There are 3 forward speeds. Press for a slowest speed and press ⏰ for a fastest speed.
- Reverse Button - Press ▼ reverse button to control reverse travel.
IMPORTANT! DO NOT change motion from forward to reverse with trigger engaged.
-
LED Light Button – Press 🤨 to utilize the LED lights for nighttime snow removal.
-
Battery Light Indicators -

- XPORT button - Press XPORT for rapid return when the job is done.
NOTE: The auger will not engage when in either REVERSE or XPORT mode.

LED Headlights (Fig. 12)
Two LED headlights are located on the front panel. To activate the LED lights:
- Press the LED light button on the control panel.
- The LED lights can be independently adjusted by moving either up or down to desired angle, as shown.

NOTE: After you have finished using your snow blower, remember to turn OFF the light switch.
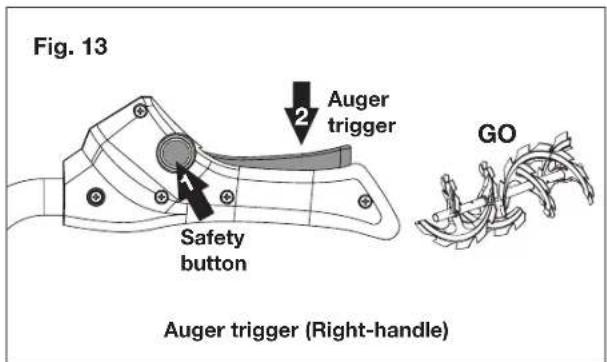
Auger Trigger (Right-Handle) (Fig. 13)
- Press the safety button, then squeeze the auger trigger against the right-handle to engage the auger and start snow throwing action.
- Release auger trigger to stop.
Drive Trigger (Left-Handle) (Fig. 1)
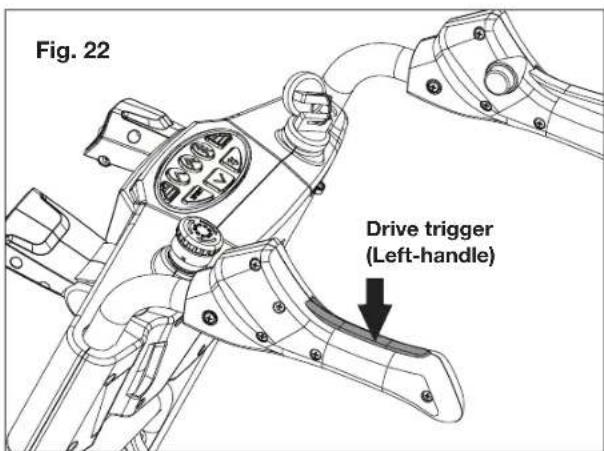
Squeeze the drive trigger against the left-handle to engage the wheel drive for propelling unit. Forward speed will vary according to snow depth and moisture content. Release trigger to stop movement.
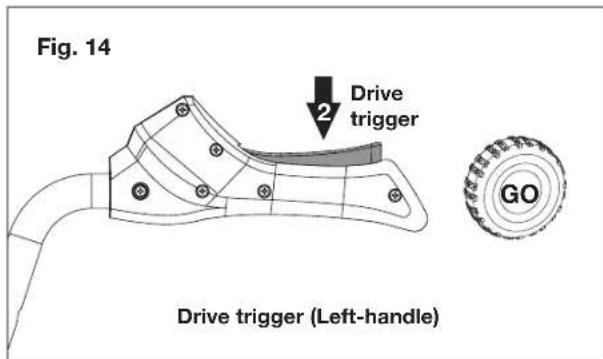
NOTE: When traveling to or from the area to be cleared, press down on the handle grips enough to raise the front of the unit slightly off the surface. Engage the drive trigger without engaging the auger trigger.
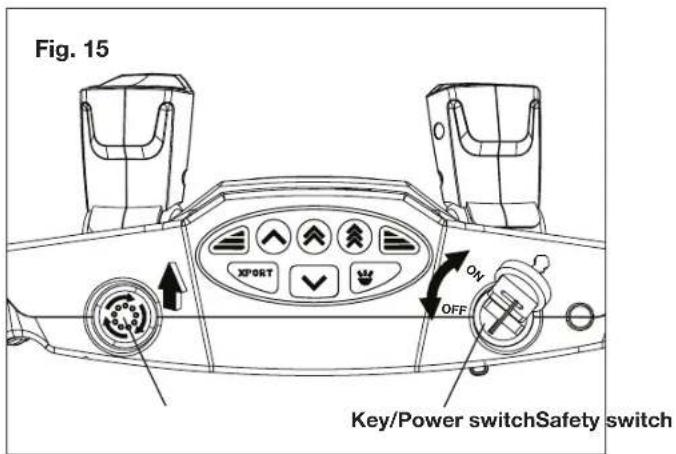
Power Switch (Fig. 15)
The power switch is operated with a removable key. The power switch has two positions: ON and OFF. Always remove key when unit is unattended.
Safety Switch (Fig. 15)
Rotate the safety switch clockwise and pull up the safety switch to engage the motors/electronics. Push the safety switch down to stop all motors/electronics.
Chute Clean-Out Tool (Fig. 6)
WARNING! Hand contact with the rotating impeller is the most common cause of injury associated with snow blowers. Never use your hands to clear a clogged discharge chute. Shut off motor and remain behind handles until all moving parts have stopped before unclogging.
To clear the discharge chute:
- Release both the auger trigger and the drive trigger.
- Press the safety switch down and turn the key to OFF position. Remove the key.
- Wait 10 seconds and make sure impeller blades have stopped rotating.
- Remove the clean-out tool from the clip which secures it to the top of the auger housing.
- Use the shovel-shaped end of the clean-out tool to dislodge and scoop any snow and ice which has formed in and near the discharge chute.
- Refasten the clean-out tool to mounting clip on the top of the auger housing, rotate the safety switch clockwise and pull up the safety switch, insert key and turn on to start the snow blower's motor.
While standing in the operator's position (behind the snow blower), engage the auger trigger for a few seconds to clear any remaining snow and ice from the discharge chute.
Discharge Chute Deflector (Fig. 16)
The chute deflector on the top of the discharge chute controls the height of the snow stream.
NOTE: ALWAYS position discharge chute deflector at a safe angle before engaging the auger.
DO NOT throw snow any higher than necessary.

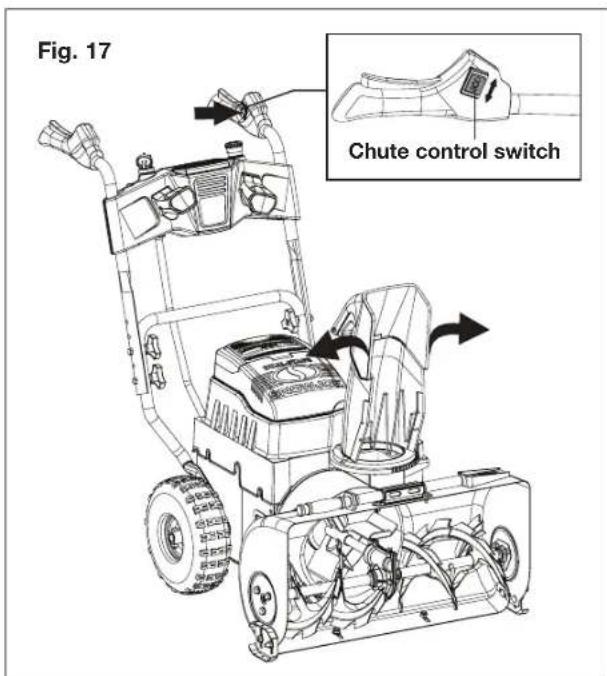
Discharge Chute (Fig. 17)
Snow drawn into the auger housing is discharged out of the chute assembly.
The discharge chute can be rotated 180 degrees by pressing the chute control switch in the desired direction.
⚠ WARNING! NEVER direct the snow discharge chute at the operator, at bystanders, at vehicles, or at nearby windows. The discharged snow and foreign objects accidentally picked up and thrown by the snow blower can cause serious damage and personal injury.
Always orient the discharge chute in the opposite direction from where the operator, bystanders, surrounding vehicles, or windows are located.
Scraper Blade
The scraper blade allows the back of the housing to keep better contact with the surface being cleared. It also prevents damage to the housing from normal use.
IMPORTANT! DO NOT allow scraper blade to wear too far or auger/impeller housing will become damaged.
Skid Shoes
The skid shoes control the distance between the scraper blade and the ground. Adjust skid shoes equally to keep blade level with the ground. (See Assembly section on page 9; fig. 7).
Pre-Start
- Charge batteries – See Charger Operation section on page 10.
- Check function of triggers – If triggers cannot engage or disengage properly, adjust or repair before operation.
- Check Skid Shoes – Check and adjust skid shoes (See Assembly section on page 9; fig. 7).
Emergency Stop
Immediately release both triggers to stop unit in an emergency. Disengage safety switch, remove key and wait for all rotating parts to stop before leaving operator's position.
Operation
⚠ WARNING! Failure to follow instructions could result in personal injury and/or damage to snow blower. DO NOT attempt to start your snow blower at this time. Read entire operator manual first.
See page 11 for all controls and features.
WARNING! Keep the area to be cleared free of stones, toys or other foreign objects that the rotor blades might pick up and throw. Such items could be covered by snow and are easy to overlook, so be sure to conduct a thorough inspection of the area before beginning work.
Starting the Machine
IMPORTANT! Disengage safety switch and release both triggers before turning power switch to ON position.
- Open the battery compartment cover and slide two battery packs down until they both click and lock into position (Fig. 18). Close the cover.

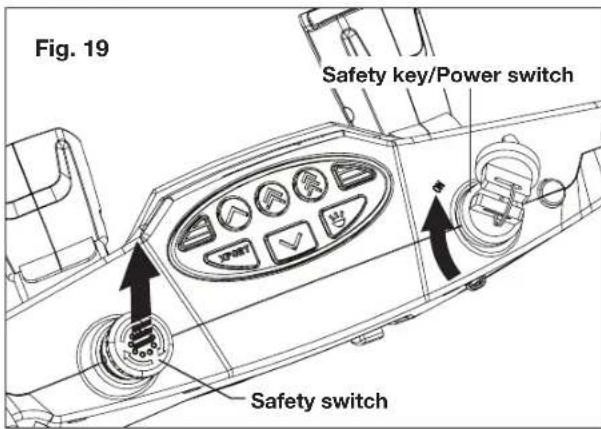
- Rotate the safety switch clockwise and pull up the safety switch. Drive motor will not yet run (Fig. 19).
- Insert key and turn power switch to the ON position. The side LED windows and control panel buttons will glow (Fig. 19).
To Engage Auger
NOTE: Auger trigger should be engaged before drive trigger when throwing snow.
- To engage the auger, press the safety button then squeeze the auger trigger against the right-handle (Fig. 20).

- Release auger trigger to stop the auger.
IMPORTANT! DO NOT overload unit capacity by attempting to clear snow at too fast a rate. Use slow speed to clear deep or hard packed snow.
To Engage Drive
- In the control panel, select a speed appropriate for a pace you're comfortable with (Fig. 21).

- Squeeze drive trigger against the left-handle and the snow blower will move. Release it and drive motion will stop (Fig. 22).
IMPORTANT! Forward speed can be changed without releasing the drive trigger (left-handle).
WARNING! DO NOT change direction from forward to reverse with drive trigger (left-handle) engaged. Unit must come to a complete stop before changing direction.
Snow Removal (Fig. 23)
NOTE: Auger trigger should be engaged before drive trigger when throwing snow.
- Press the safety button then engage auger trigger. Auger will start spinning.
-
In the control panel, select the appropriate speed for the snow conditions and a pace you're comfortable with.
-
Engage drive trigger. The snow blower will move and start plowing snow.
IMPORTANT! The auger will not engage when in either REVERSE or XPORT mode.

Stopping the Machine
- Release both drive trigger and auger trigger. Drive motor and auger will stop (Fig. 24).
- Wait for all moving parts to come to a complete stop.
- Disengage safety switch.
- Turn power switch to OFF position and remove key.

NOTE: A continuous warning beep will activate to remind operator to turn off machine if there is no operation selected within 3 minutes. To deactivate warning, you must first turn off and restart the machine.
Operating Tips
⚠ WARNING! Foreign objects, such as rocks, broken glass, nails, wire, or string, can be picked up and thrown by the snow blower, causing serious personal injury. Remove all foreign objects from the area to be plowed before operating the snow blower.
Snow is best removed as soon as possible after snow fall.
- Keep the area of operation free of foreign objects that can become thrown by the rotor blades. Perform a thorough inspection of the area since some objects may be hidden from view by surrounding snow. If the snow blower hits an obstruction or picks up a foreign object during use, stop the snow blower, remove the key and batteries, remove the obstruction, and inspect the unit for damage. Repair or replace any damaged part before restarting and operating the unit.
- Keep children, pets, and bystanders away from the area of operation. Be aware that the normal noise of the machine when turned on may make it difficult for you to hear approaching people.
- To clear an area, run unit in an overlapping series of paths. For large areas, start in the middle and throw snow to each side, so snow is not cleared more than once.
- Note the wind direction. If possible, move in the same direction as the wind so that the snow is not thrown against the wind (and thus back into your face and on the just cleared path).
- Do not push the snow blower with excessive force. Do not exceed the unit's intake or throw rate.
- Some parts of the snow blower may freeze under extreme temperature conditions. Do not attempt to operate the snow blower with frozen parts. If the parts freeze while the snow blower is in use, stop the snow blower, remove the batteries, and inspect for frozen parts. Free all parts before restarting or operating the snow blower. Never force controls that have frozen.
Traveling (Fig. 25)
To travel from one work area to another:
- Press the XPORT button to activate transport mode when relocating the machine within the work area, or returning to the garage or storage unit. The auger will not engage while in XPORT mode.
- Squeeze left handle (DRIVE) trigger, and the snow blower will slowly start to move.
- Press down on handle grips enough to slightly raise the front end of the unit off the surface. The speed will gradually increase.
IMPORTANT! Auger will not engage while in XPORT mode.
NOTE: LED lights will flash 5 times to warn any bystanders to remain clear of the machine's intended path.

Maintenance
To order genuine replacement parts or accessories for the Snow Joe ^® iON8024-CT cordless snow blower, please visit snowjoe.com or contact the Snow Joe ^® + Sun Joe ^® customer service center at 1-866-SNOWJOE (1-866-766-9563).
⚠ WARNING! Make sure to turn off the switch and remove the key and batteries before performing any maintenance task on your snow blower.
General Maintenance Tips
- Do not attempt to repair the machine unless you have the proper tools and instructions for disassembly and repair of the machine.
- Check bolts and screws at frequent intervals for proper tightness to ensure that the equipment is in safe working condition.
- After each snow removal session, run the snow blower for a few minutes to prevent the collector/impeller from freezing. Shut off the motor, wait for all revolving parts to stop completely, remove key and batteries and wipe residual ice and snow off the unit.
Proper Care for Battery + Charger
⚠ WARNING! To reduce the risk of injury, always unplug the charger and remove the battery pack from the charger before performing any maintenance task. Never disassemble the battery pack or charger. Contact your Snow Joe® + Sun Joe® dealer or the Snow Joe® + Sun Joe® customer service center for ALL repairs.
- To reduce the risk of injury and damage, never immerse your battery packs or charger in liquid or allow any liquid to flow inside these components.
- Clean out dust and debris from charger vents and electrical contacts by blowing with compressed air.
- Use only mild soap on a damp cloth to clean the battery pack and charger, keeping away from all electrical contacts. Certain cleaning agents and solvents are harmful to plastics and other insulated parts. Some of these include gasoline, turpentine, lacquer thinner, paint thinner, chlorinated cleaning solvents, ammonia and household detergents containing ammonia. Never use flammable or combustible solvents around battery packs, battery chargers or tools.
- The EcoSharp® iCHRG40-DPC lithium-ion dual port battery charger has no serviceable parts.
Check Tire Pressure
WARNING! Under any circumstance do not exceed manufacturer's recommended PSI. Equal tire pressure should be maintained at all times for performance purposes. Excessive pressure may cause tire/rim assembly to burst with force sufficient to cause serious injury. Refer to sidewall of tire for recommended pressure.
The tires are over-inflated for shipping purposes. Check the tire pressure before operating the snow blower. Refer to the tire side wall for tire's manufacturer's recommended psi and deflate (or inflate) the tires as necessary.
Manufacturer's Recommended Tire Pressure
20 PSI
⚠️CAUTION! Avoid injury. Explosive separation of tire and rim parts is possible when they are serviced incorrectly:
- Do not attempt to mount a tire without proper equipment and experience to perform the job.
- Do not inflate the tires above the recommended pressure.
- Do not weld or heat a wheel and tire assembly. Heat can cause an increase in air pressure resulting in an explosion. Welding can structurally weaken or deform the wheel.
- Do not stand in front or over the tire assembly when inflating. Use a clip-on chuck and extension hose long enough to allow you to stand to one side.
Replacing Skid Shoes
The skid shoes on the bottom of the snow blower are subject to wear. They should be checked periodically and replaced when necessary.
To replace skid shoes:
- Position unit on a hard, flat, smooth level surface.
- Remove the 4 hex nuts (2 on each side) and carriage bolts which secure them to the snow blower (Fig. 26).
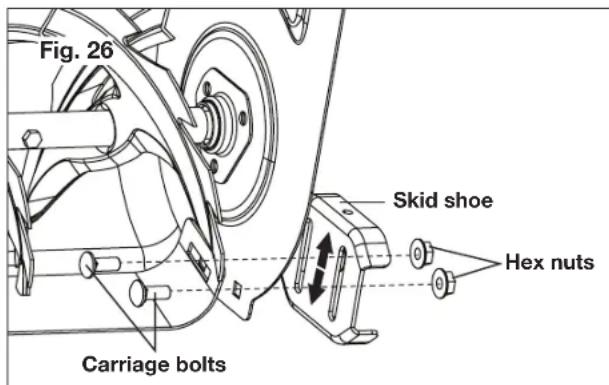
- Install the new skid shoes by tightening the 4 sets of hex nuts and carriage bolts on both sides, but leave the skid shoes free to move for height adjustment.
- Slide skid shoe to flat surface. Allow 1/8 in. (3 mm) between scraper blade and hard smooth surface. Allow 1-1/4 in. (30 mm) between scraper blade and uneven or gravel surfaces.
NOTE: Keep housing level by adjusting skid shoes equally. - Retighten the 4 sets of hex nuts and carriage bolts on both sides.
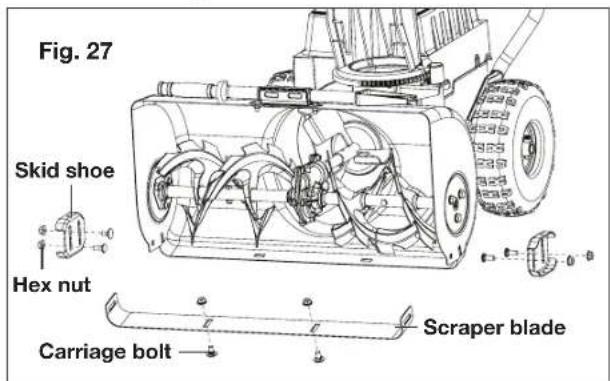
Replacing Scraper Blade
IMPORTANT! Damage to auger/impeller housing will result if the scraper blade wears down too far.
To replace scraper blade:
- Position unit on a hard, flat, smooth level surface.
- Uninstall the skid shoes by removing the 4 hex nuts (2 on each side) and carriage bolts which secure them to the snow blower (Fig. 27).
- Detach the worn scraper blade from the snow blower by removing the 2 hex nuts and carriage bolts that hold it in place (Fig. 27).
- Install the new scraper blade and fasten it securely to the snow blower with 2 hex nuts and bolts.
- Reinstall the skid shoes by tightening the 4 sets of hex nuts and carriage bolts on both sides.
Replacing Shear Bolts
The auger is secured to the auger shaft with shear bolts and nuts. If the auger should strike a foreign object or ice jam, the snow blower is designed so that the bolts may shear. If the auger will not turn, check to see if the bolts have sheared.
⚠️CAUTION! Use only manufacturer's recommended shear bolts for replacement. Use of any other type of shear bolts may result in severe damage to unit and may void the warranty. Call the Snow Joe® + Sun Joe® customer service center at 1-866-SNOWJOE (1-866-766-9563) for assistance.
Occasionally a foreign object may enter the auger/impeller housing and jam the auger, breaking the shear bolts which secure the auger to the shaft. This allows the auger to turn freely on the shaft which may help prevent damage to the gearcase and its components.
WARNING! Always turn off the snow blower's motor and remove the key and batteries prior to replacing shear bolts.
- Align shear bolt holes in auger with shear bolt holes in the shaft (Fig. 28).
- Drive shear bolt through hole. If shear bolt was broken this will drive remaining part from shaft (Fig. 28).
- Secure shear bolt with gasket and nut (Fig. 28).

Replacing Auger Blades
- Open the battery compartment cover and remove the 2 screws inside the compartment (Fig. 29).
- Disassemble the motor cover by removing the 4 screws and washers (2 on each side) and open the motor cover (Figs. 29 & 30).

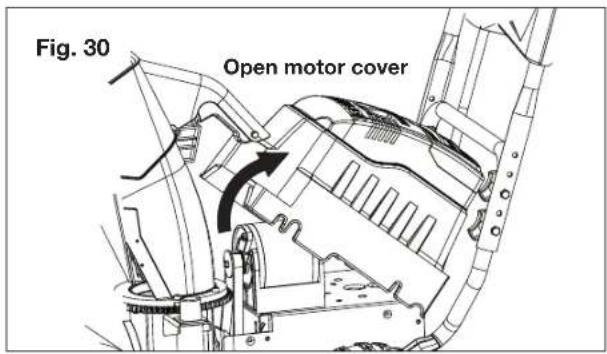
- Remove the M6 bolt and sprocket cover from sprocket 1 then remove the auger belt from pulley 1 (Fig. 31).

- Disassemble the housing by removing the 6 housing bolts (3 on each side) (Fig. 32).

- Separate the blower assembly from the drive unit (Fig. 33).

- Unscrew pulley bolt, washer, 3 screws and pulley cover then remove the pulley 1 and bushing from the blower assembly (Fig. 34).

- Disassemble the auger and impeller by removing the nuts and bolts from the side of the auger housing (Fig. 35).

- Remove 2 set of shear bolts, gaskets and nuts from the auger (Fig. 36).

- Remove the auger bearings on both ends then remove the 2 auger blades from the auger shaft (Fig. 37).

- Install the replacement auger blades by following the above steps in reverse order.
Replacing Impeller
- To uninstall the impeller, repeat steps 1 to 7 (Figs. 29 - 35).
- Disassemble the worn impeller from the impeller shaft by removing the 2 spring pins (Fig. 38).

- Install the replacement impeller by following the above steps in reverse order.
Replacing Auger Belt
- Open the battery compartment cover and remove the 2 screws inside the compartment (Fig. 38).
- Disassemble the motor cover by removing the 4 screws and washers (2 on each side) and open the motor cover (Figs. 39 & 40).

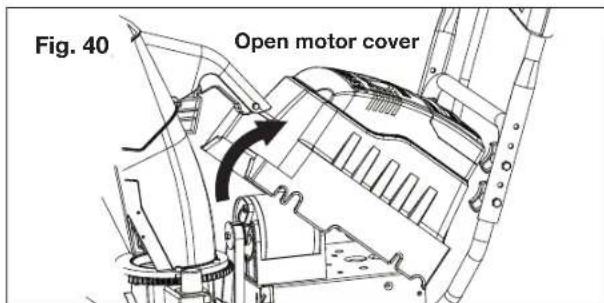
- Remove the M6 bolt and sprocket cover from sprocket 1 then remove the auger belt from pulley 1 (Fig. 41).

- Roll the new auger belt onto the bottom of pulley 1. Then roll it to the sprocket 1 (Fig. 41).
- Reinstall the sprocket cover and M6 bolt to sprocket 1 (Fig. 41).
Lubrication
Auger Shaft
At least once a season, remove the shear bolts from the auger shafts. Spray lubricant inside the shafts and around the spacers and the flange bearings/bushings found at either end of the shafts.
Auger Gearcase
Gearcases are filled to the correct level at the factory. Unless there is evidence of leakage, no additional lubricant should be required. Check lubricant level each season or every 25 hours of operation.
To ensure adequate lubricant level:
- Using the hex key, remove fill plug [1] and air exhausting plugs [2] and [3]. Lubricant must be at least up to bottom of lubricant filler hole with unit resting on a level surface (Fig. 42).

- Inject suitable low-temperature synthetic grease if required to filler hole [1]. Allow to drain to level of plug and replace plug.
IMPORTANT! Wipe each fitting clean before and after lubrication. Do not wipe gearcase filler plug; wiping the gearcase filler plug may remove thread sealant and cause leaks.
Storage
- Examine the cordless snow blower thoroughly for worn, loose or damaged parts. Should you need to repair or replace a part, contact an authorized Snow Joe ^® + Sun Joe ^® dealer or call the Snow Joe ^® + Sun Joe ^® customer service center at 1-866-SNOWJOE (1-866-766-9563) for assistance.
- Clean the snow blower before storing or transporting. Be sure to secure the unit while transporting.
- Remove the key and battery packs from the cordless snow blower before storing.
- Store the cordless snow blower indoors in a locked, dry place out of the reach of children to prevent unauthorized use or damage.
Battery + Charger Off-Season Storage
- Do not expose your battery packs or charger to water, rain or allow them to get wet. This could permanently damage the charger and the battery packs. Do not use oil or solvents to clean or lubricate your battery pack as the plastic casing can become brittle and crack, causing a serious risk of injury.
- Store the battery packs and charger at room temperature away from moisture. Do not store in damp locations where corrosion of terminals may occur. As with other battery pack types, permanent capacity loss can result if the pack is stored for long periods of time at high temperatures (over 120^ F/ 49^ C).
- EcoSharp® PRO iBAT40XRP lithium-ion battery packs maintain their charge during storage longer than other battery pack types. As a general practice, it is best to unplug the battery charger and remove the battery pack when they are not in use. Recharge the battery pack every 6 months to 50% capacity (2 lights on) during off-season storage to maintain optimal battery performance.
Battery Caution + Disposal Information
Always dispose of your battery pack according to federal, state, and local regulations. Contact a recycling agency in your area for recycling locations.
⚠️CAUTION! Even discharged battery packs contain some energy. Before disposing, use electrical tape to cover the terminals to prevent the battery pack from shorting, which could cause a fire or explosion.
⚠ WARNING! To reduce the risk of injury or explosion, never burn or incinerate a battery pack even if it is damaged, dead or completely discharged. When burned, toxic fumes and materials are emitted into the surrounding atmosphere.
- Batteries vary according to device. Consult your manual for specific information.
- Install only new batteries of the same type in your product (where applicable).
- Failure to insert batteries in the correct polarity, as indicated in the battery compartment or manual, may shorten the life of the batteries or cause batteries to leak.
- Do not mix old and new batteries.
- Do not mix Alkaline, Standard (Carbon-Zinc) or Rechargeable (Nickel Cadmium, Nickel Metal Hydride, or Lithium-Ion) batteries.
- Do not dispose of batteries in fire.
- Batteries should be recycled or disposed of as per state and local guidelines.
Service + Support
If your Snow Joe ^® iON8024-CT cordless snow blower requires service or maintenance, please call the Snow Joe ^® + Sun Joe ^® customer service center at 1-866-SNOWJOE (1-866-766-9563).
Model + Serial Numbers
When contacting the company, reordering parts or arranging service from an authorized dealer, you will need to provide the model and serial numbers, which can be found on the decal located on the housing of the unit. Copy these numbers into the space provided below.

iCHRG40-DPC
Federal Communications Commission (FCC)
⚠ WARNING! Any changes or modifications to this unit not expressly approved by the party responsible for compliance could void the user's authority to operate the equipment.
Class B device:
NOTE: This equipment has been tested and found to comply with the limits for a Class B digital device, pursuant to part 15 of the FCC Rules.
These limits are designed to provide reasonable protection against harmful interference in a residential installation.
This equipment generates, uses and can radiate radio frequency energy and, if not installed and used in accordance with the instructions, may cause harmful interference to radio communications.
However, there is no guarantee that interference will not occur in a particular installation.
If this equipment does cause harmful interference to radio or television reception, which can be determined by turning the equipment off and on, the user is encouraged to try to correct the interference by one or more of the following measures:
- Reorient or relocate the receiving antenna.
- Increase the separation between the equipment and receiver.
- Connect the equipment into an outlet on a circuit different from that to which the receiver is connected.
- Consult the dealer or an experienced radio/TV technician for help.
Optional Accessories
⚠ WARNING! ALWAYS use only authorized Snow Joe® + Sun Joe® replacement parts and accessories. NEVER use replacement parts or accessories that are not intended for use with this cordless snow blower. Contact Snow Joe® + Sun Joe® if you are unsure whether it is safe to use a particular replacement part or accessory with your cordless snow blower. The use of any other attachment or accessory can be dangerous and could cause injury or mechanical damage.
| ModelAccessor | ||
1 | EcoSharp® PRO 40 V 6.0 AhLithium-Ion Battery | iBAT40XRP |
2 | EcoSharp® PRO 40 V 5.0 AhLithium-Ion Battery | iBAT40XR |
3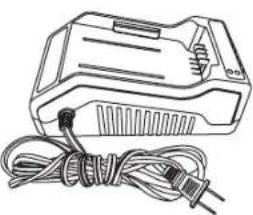 | EcoSharp® 40 V Lithium-Ion Battery Charger | iCHRG40 |
4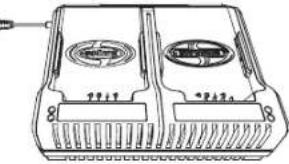 | EcoSharp® 40 V Lithium-Ion Dual PortBattery Charger | iCHRG40-DPC |
NOTE: Accessories are subject to change without any obligation on the part of Snow Joe ^® + Sun Joe ^® to provide notice of such changes. Accessories can be ordered online at snowjoe.com or via phone by contacting the Snow Joe ^® + Sun Joe ^® customer service center at 1-866-SNOWJOE (1-866-766-9563).
NOTES
NOTES
NOTES

natural_image
Abstract gray logo design with a stylized S-like shape inside an oval (no text or symbols)SNOW JOE® + SUN JOE® CUSTOMER PROMISE
ABOVE ALL ELSE, Snow Joe ^® + Sun Joe ^® are dedicated to you, our customer. We strive to make your experience as pleasant as possible. Unfortunately, there are times when a product does not work or breaks under normal operating conditions. We think it's important that you know what you can expect from us. That's why we created the Snow Joe ^® + Sun Joe ^® promise.
OUR PROMISE: Snow Joe® + Sun Joe® warrant new products for two years from the date of purchase. If your product does not work, or there's an issue with a specific part, we will fix this by either sending you a free replacement part or by sending you a new or comparable product at no charge. How cool is that! Before you know it, you'll be back in action cutting, sawing, mowing, washing and...?
PRODUCT REGISTRATION:
Snow Joe ^® , LLC (“Snow Joe ^® + Sun Joe ^® ”) strongly encourages you to register your purchase. You can register online at snowjoe.com/ProductRegistration, or by printing and mailing in a registration card available online from our website, or calling our Customer Service Department at 1-866-SNOWJOE (1-866-766-9563), or by e-mailing us at help@snowjoe.com. Failure to register your product purchase will not diminish your warranty rights. However, registering your purchase will allow Snow Joe ^® + Sun Joe ^® to better serve you with any of your customer service needs.
WHO CAN SEEK WARRANTY COVERAGE?
This Warranty is extended by Snow Joe ^® + Sun Joe ^® to the owner of this Machine (a “Machine” consists of a product powered by a motor) for residential and personal household use only. This Warranty does not apply to products used for commercial, rental or re-sale purposes. Should ownership of this machine change during the 2-year period, please update the Machine’s owner information at snowjoe.com/ProductRegistration.
WHAT IS COVERED?
Snow Joe ^® + Sun Joe ^® warrants to the owner that if this Machine fails within 2 years from the date of purchase due to a defect in material or workmanship or as a result of normal wear and tear from ordinary household use, Snow Joe ^® + Sun Joe ^® will send a replacement part or product, as needed, free of charge and with free shipping to the original purchaser.
If, in Snow Joe ^® + Sun Joe ^® 's sole discretion, the failed Machine cannot be repaired with a part, Snow Joe ^® + Sun Joe ^® will elect to either (A) send a new Machine at no charge and with free shipping or (B) refund the full purchase price to the owner.
WHAT IS NOT COVERED?
This Warranty does not apply to the Machines that have been used commercially or in non-household applications. This Warranty does not cover cosmetic changes that do not affect performance. This Warranty is only valid if the Machine is used and maintained in accordance with the instructions, warnings and safeguards contained in the owner's manual. Snow Joe ^® + Sun Joe ^® will not be responsible for the cost of any unauthorized warranty repairs. This warranty does not cover any cost or expense incurred by the purchaser in providing substitute equipment or service during reasonable periods of malfunction or non-use of this product while waiting for a replacement part or unit under this warranty.
Wearing parts like belts, augers, chains and tines are not covered under this warranty, and can be purchased at snowjoe.com or by calling 1-866-SNOWJOE (1-866-766-9563). Batteries are covered in full for 90-days from the date of purchase.
Repair, replacement or refund of the purchase price are the exclusive remedies of purchaser and the sole liability of Snow Joe ^® + Sun Joe ^® under this warranty. No employee or representative of Snow Joe ^® + Sun Joe ^® is authorized to make any additional warranty or any modification to this warranty which may be binding upon Snow Joe ^® + Sun Joe ^® . Accordingly, purchaser should not rely upon any additional statements made by any employee or representative of Snow Joe ^® + Sun Joe ^® . In no event, whether based on contract, indemnity, warranty, tort (including negligence), strict liability or otherwise, shall Snow Joe ^® + Sun Joe ^® be liable for any special, indirect, incidental, or consequential damages, including, without limitation, loss of profit or revenue.
Some states do not allow limits on warranties. In such states, the above limitations may not apply to you.
Outside the USA, other warranties may apply.

snowjoe.com
⚠ WARNING! This product or its power cord contains chemicals, including lead, known to the State of California to cause cancer and birth defects or other reproductive harm. Wash hands after handling. For more information go to www.P65Warnings.ca.gov.
⚠ WARNING! Some dust created by power sanding, sawing, grinding, drilling, and other construction activities contains chemicals known [to the State of California] to cause cancer, birth defects, or other reproductive harm. Some examples of these chemicals are:
- lead from lead-based paints,
• crystalline silica from bricks and cement and other masonry products, and
• arsenic and chromium from chemically-treated lumber.
Your risk from these exposures varies, depending on how often you do this type of work. To reduce your exposure to these chemicals: work in a well ventilated area, and work with approved safety equipment, such as those dust masks that are specifically designed to filter out microscopic particles. For more information go to www.P65Warnings.ca.gov.

- All Operators Must Read These Instructions Before Use
- General Safety Rules
- Battery + Charger Safety Instructions
- Information about the battery
- Information about the charger and the charging process
- Protection from environmental influences
- Additional Safety Instructions Safety Instructions for Walk-Behind Snow Blowers
- Electrical Safety
- Safety Symbols
- Know Your Cordless Snow Blower
- Unpacking
- Carton Contents:
- Assembly
- Assembling the Handles
- Discharge Chute Assembly
- Chute Clean-Out Tool
- Skid Shoes Adjustment
- Battery Pack Operation
- Battery Charge Level Indicator
- Charger Operation
- When to Charge the EcoSharp® PRO iBAT40XRP Lithium-Ion Battery
- Charging the Battery Packs
- Charging a Hot or Cold Battery Pack
- Controls + Features
- Control Panel (Fig. 11)
- LED Headlights (Fig. 12)
- Auger Trigger (Right-Handle) (Fig. 13)
- Drive Trigger (Left-Handle) (Fig. 1)
- Power Switch (Fig. 15)
- Safety Switch (Fig. 15)
- Chute Clean-Out Tool (Fig. 6)
- Discharge Chute Deflector (Fig. 16)
- Discharge Chute (Fig. 17)
- Scraper Blade
- Skid Shoes
- Pre-Start
- Emergency Stop
- Operation
- Starting the Machine
- To Engage Auger
- To Engage Drive
- Snow Removal (Fig. 23)
- Stopping the Machine
- Operating Tips
- Traveling (Fig. 25)
- Maintenance
- General Maintenance Tips
- Proper Care for Battery + Charger
- Check Tire Pressure
- Manufacturer's Recommended Tire Pressure
- PSI
- Replacing Skid Shoes
- Replacing Scraper Blade
- Replacing Shear Bolts
- Replacing Auger Blades
- Replacing Impeller
- Replacing Auger Belt
- Lubrication
- Auger Shaft
- Auger Gearcase
- Storage
- Battery + Charger Off-Season Storage
- Battery Caution + Disposal Information
- Service + Support
- Model + Serial Numbers
- iCHRG40-DPC
- Federal Communications Commission (FCC)
- Class B device:
- Optional Accessories
- NOTES
- SNOW JOE® + SUN JOE® CUSTOMER PROMISE
- PRODUCT REGISTRATION:
- WHO CAN SEEK WARRANTY COVERAGE?
- WHAT IS COVERED?
- WHAT IS NOT COVERED?
Brand : Sun Joe
Model : iON8024-CT
Category : Snow blower