
Varia HL500 - Bike accessory GARMIN - Free user manual and instructions
Find the device manual for free Varia HL500 GARMIN in PDF.


| Product Type | Bike headlight |
| Brand | Garmin |
| Model | Varia HL500 |
| Dimensions (approx.) | 105 x 32 x 28 mm (4.1 x 1.3 x 1.1 in.) |
| Weight (approx.) | 120 g (4.2 oz) |
| Power Source | Built-in rechargeable lithium-ion battery |
| Battery Life | Up to 2.5 hr in high mode; up to 5 hr in flash mode |
| Charging Time | Approximately 2-3 hours |
| Charging Method | USB cable (standard wall adapter or computer USB port) |
| Light Output | 600 lumens (overdrive); 95 lux peak illuminance |
| Light Modes | Smart, Overdrive, High, Medium, Low, Flash |
| Connectivity | ANT+ wireless protocol; compatible with Edge devices and optional remote |
| Water Rating | IPX7 (withstands incidental water exposure up to 1 m for 30 min) |
| Operating Temperature | -15°C to 50°C (5°F to 122°F) |
| Mounting Options | Out-front mount (for headlight and Edge), seat-post mount, multi-location mount |
| Key Features | Smart mode (auto intensity), beam angle adjustment, turn signal support (with two taillights), motion activation, deceleration indicator |
| Maintenance | Clean with mild detergent damp cloth; avoid chemical cleaners |
| Safety | Thermal safety shutdown; low battery indicator; overheat protection |
| Replacement Parts | O-rings (bands) for mounts: AS568-125 and AS568-131; ensure EPDM material |
| Warranty | 1 year limited warranty |
Frequently Asked Questions - Varia HL500 GARMIN
User questions about Varia HL500 GARMIN
0 question about this device. Answer the ones you know or ask your own.
Ask a new question about this device
Download the instructions for your Bike accessory in PDF format for free! Find your manual Varia HL500 - GARMIN and take your electronic device back in hand. On this page are published all the documents necessary for the use of your device. Varia HL500 by GARMIN.
USER MANUAL Varia HL500 GARMIN
natural_image
Person riding a bicycle on a winding mountain road surrounded by forested hills (no text or symbols visible)Owner's Manual
All rights reserved. Under the copyright laws, this manual may not be copied, in whole or in part, without the written consent of Garmin. Garmin reserves the right to change or improve its products and to make changes in the content of this manual without obligation to notify any person or organization of such changes or improvements. Go to www.garmin.com for current updates and supplemental information concerning the use of this product.
Garmin ^ , the Garmin logo, ANT ^+ ^6 , and Edge ^ are trademarks of Garmin Ltd. or its subsidiaries, registered in the USA and other countries. Garmin Connect ^7 , Garmin Express ^7 , and Varia ^™ are trademarks of Garmin Ltd. or its subsidiaries. These trademarks may not be used without the express permission of Garmin. This product is ANT ^+ ^8 certified. Visit www.thisisant.com/directory for a list of compatible products and apps.
M/N: A02666, A02669
Table of Contents
Introduction......1
Getting Started....1
Charging the Device.... 1
Installing the Out-Front Mount.... 1
Installing the Seat-Post Mount.... 1
Installing the Multi-Location Mount.... 2
Varia HL Device Overview.... 2
Varia TL Device Overview....2
Bike Light Status LEDs....2
Using the Device Key.... 2
Device Settings.... 3
Pairing Varia Bike Lights with Your Edge 1000....3
Turning Varia Devices On and Off with Your Edge 1000...... 3
Customizing Varia Device Settings with Your Edge 1000...... 3
Configuration Settings....3
Adjusting the Beam Angle During a Ride.... 3
Turn Signal Settings....3
Light Network Settings.... 4
Testing the Light Network.... 4
Wireless Remote Control.... 4
Device Overview.... 4
Status LED....4
Pairing the Remote with Your Varia Device.... 4
Using the Mounts.... 4
Replacing the Battery.... 4
Device Information...... 5
Specifications....5
Headlight Specifications....5
Taillight Specifications.... 5
Remote Specifications.... 5
Device Care....6
Cleaning the Device....6
Troubleshooting....6
Resetting the Device....6
Thermal Safety Shutdown.... 6
Replacement O-rings.... 6
Support and Updates.... 6
Updating the Software.... 6
Getting More Information.... 6
Appendix....6
Software License Agreement....6
Index....7
Introduction
WARNING
See the Important Safety and Product Information guide in the product box for product warnings and other important information.
Always consult your physician before you begin or modify any exercise program.
Getting Started
You can use the Varia HL (headlight) and Varia TL (taillight) alone, with the optional wireless remote, or with your compatible Edge® device. This list provides an overview of the installation and setup tasks.
- Charge the device (Charging the Device, page 1).
• Install the headlight using the out-front mount (Installing the Out-Front Mount, page 1).
• Install the taillight using one of the included mounts:
• Install the seat-post mount (Installing the Seat-Post Mount, page 1).
• Install the multi-location mount (Installing the Multi-Location Mount, page 2).
TIP: If you are using two taillights as turn signals, you can install two multi-location mounts on the seat stays of your bike.
- If you are using the wireless remote, install it on your bike stem or handlebar (Using the Mounts, page 4).
- If you are using the wireless remote, pair the devices (Pairing the Remote with Your Varia Device, page 4).
- If you are using a compatible Edge device, pair the devices (Pairing Varia Bike Lights with Your Edge 1000, page 3).
- If you are using a compatible Edge device, customize the bike light settings (Customizing Varia Device Settings with Your Edge 1000, page 3).
Charging the Device
NOTICE
To prevent corrosion, thoroughly dry the USB port, the weather cap, and the surrounding area before charging or connecting to a computer.
The device is powered by a built-in lithium-ion battery that you can charge using a standard wall outlet or a USB port on your computer.
NOTE: The device does not charge when outside the approved temperature range (Specifications, page 5).
1 Pull up the weather cap from the USB port.
2 Plug the small end of the USB cable into the USB port on the device.
3 Plug the large end of the USB cable into an AC adapter or a computer USB port.
4 Plug the AC adapter into a standard wall outlet.
5 Charge the device completely.
The status LED flashes green while charging. The status LED is solid green when charging is complete.
Installing the Out-Front Mount
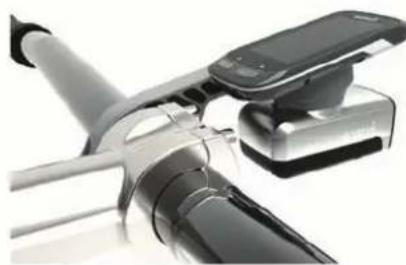
You can use the out-front mount to install both an Edge device and a headlight.
1 Select a secure location to mount the Edge device and headlight where they do not interfere with the safe operation of your bike.
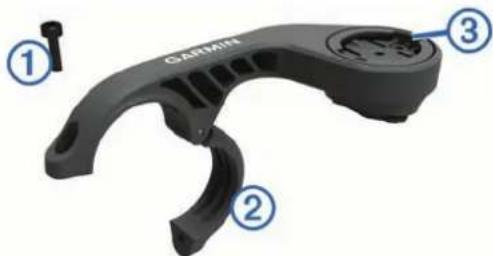
2 Use the hex key to remove the screw ① from the handlebar connector ②.
natural_image
Close-up of a black GATHIN brand head handle with labeled parts (no text or symbols beyond labels)3 If necessary, remove the two screws on the top of the mount ③, rotate the connector, and replace the screws to change the orientation of the mount for an Edge device.
4 Place a rubber pad around the handlebar:
- If the handlebar diameter is 25.4 mm, use the thicker pad.
- If the handlebar diameter is 31.8 mm, use the thinner pad.
5 Place the handlebar connector around the rubber pad.
NOTE: You should align the contours on the rubber pad with the grooves on the inside of the handlebar connector.
6 Adjust the mount on the handlebar so the headlight is mounted horizontally, parallel to the road.
7 Replace and tighten the screw.
NOTE: Garmin ^® recommends a torque specification of 7 lbf-in. (0.8 N-m). You should check the tightness of the screw periodically.
8 Align the notches on the top of the headlight with the tabs on the bottom of the mount.
9 Press up slightly and turn the headlight clockwise until it locks into place.
10 If installing an Edge device, align the tabs on the back of the Edge device with the notches on the top of the mount.
11 Press down slightly and turn the Edge device clockwise until it locks into place.
natural_image
Close-up of a black and silver cleaning tool with a digital camera (no visible text or symbols)Installing the Seat-Post Mount
1 Select a secure location to mount the taillight where it does not interfere with the safe operation of your bike.
NOTE: You should mount the device as high on the seat post as possible for optimal light visibility. Verify there is clear space (no obstructions) behind the device.
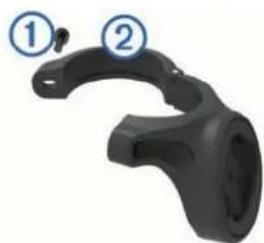
2 Use the hex key to remove the screw ① from the seat-post connector ②.
natural_image
3D model of a black mechanical component with two numbered callouts (1 and 2) pointing to features, no text or symbols present.3 Place a rubber pad around the seat post, if necessary:
- If the seat post diameter is 27 to 28.6mm , use the thicker pad.
- If the seat post diameter is 30.4 to 31mm , use the thinner pad.
- If the seat post diameter is 31 to 31.8 ~mm , do not use a rubber pad.
4 Place the seat-post connector around the rubber pad.
NOTE: You should align the contours on the rubber pad with the grooves on the inside of the seat-post connector.
5 Replace and tighten the screw.
NOTE: Garmin recommends a torque specification of 7 lbf-in. (0.8 N-m). You should check the tightness of the screw periodically.
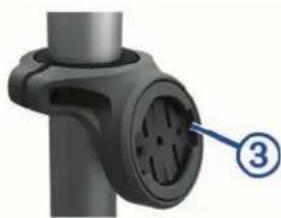
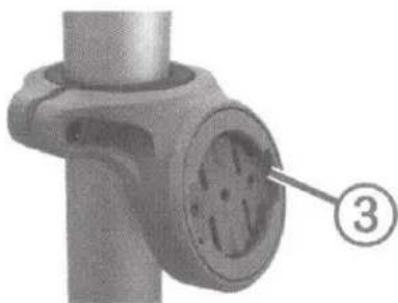
6 Align the tabs on the back of the device with the seat-post mount notches ③.
natural_image
Close-up of a black wind turbine head with a numbered annotation pointing to the port (no text or symbols on the component itself)7 Press down slightly and turn the device clockwise until it locks into place.
Installing the Multi-Location Mount
1 Select a secure location to mount the taillight where it does not interfere with the safe operation of your bike.
NOTE: You can mount the device on your seat post, helmet, backpack, or other location. Garmin recommends that you enable the deceleration indicator only when mounting the device vertically on your seat post.
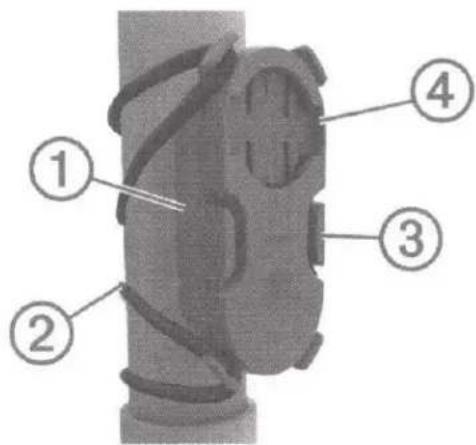
2 If necessary, select the correct rubber pad ① for your seat post shape.
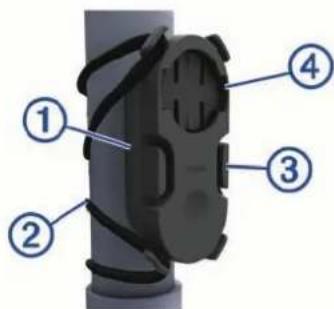
3 Place the mount on the seat post or other mounting location.
4 Attach the mount securely using one or two bands ②.
NOTE: You can use the hooks on the center of the mount ③ if using only one band.
5 Align the tabs on the back of the device with the mount notches ④.
6 Press down slightly and turn the device clockwise until it locks into place.
Varia HL Device Overview
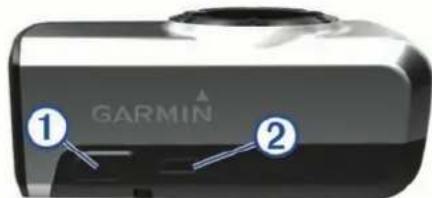
| 1 | Device key $ select to cycle through the headlight pairing, intensity, and pattern modes.Hold to turn the device on and off. |
| 2 | Status LED View device status (Bike Light Status LEDs, page 2). |
Varia TL Device Overview
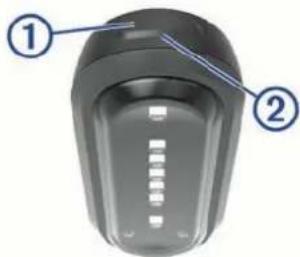
| 1 | Device key Select to | cycle through the taillight pairing, intensity, and pattern modes. Hold to turn the device on and off. |
| 2 | Status LED (visible above the device key) | View device status (Bike Light Status LEDs, page 2). |
Bike Light Status LEDs
| LED Activity Status | |
| Solid red An error occurred | while charging.The device shut down to prevent overheating. |
| Alternating blue and green | The device is uploading settings from Garmin Express ^TM . |
| Alternating blue and red An error occurred while uploading settings from Garmin Express. | |
| Flashing green The battery is charging. | |
| Solid green Charging is complete. | |
| Flashing red The battery is low. | |
| Flashing blue The device is in smart mode and can be controlled by a paired wireless remote. | |
Using the Device Key
1 Hold the device key for 1 second to turn on the device.
The first time you turn on the device, it enters smart mode. The status LED flashes blue. The device can be controlled by a paired wireless remote or Edge device.
2 Select the device key to cycle through the bike light intensity and pattern modes.
Taillight modes include smart mode, high, medium, low, and flash. Headlight modes include smart mode, overdrive, high, medium, low, and flash.
NOTE: Taillight medium and flash modes are available on the Varia TL 300 device only. Headlight overdrive and flash modes are available on the Varia HL500 device only.
3 Hold the device key for 2 seconds to turn off the device.
The next time you turn on the device, it enters the last-used operating mode.
Device Settings
You can remotely control your Varia devices and customize settings using your compatible Edge device. This section contains instructions for the Edge 1000 device. Other compatible Edge devices use similar settings.
Pairing Varia Bike Lights with Your Edge 1000
Before you can pair the devices, you must update the Edge software.
1 Bring the Edge device within range (3 m) of the sensor.
NOTE: Stay 10 m away from other ANT+ ^® bike lights while pairing.
2 Turn on the Edge device.
3 From the home screen, select ✗ Sensors > Add Sensor > Varia.
4 Turn on the Varia device.
5 Select the Varia device key to enter smart mode. The status LED flashes blue.
6 Select your sensor.
When the sensor is paired with your Edge device, the status icon appears solid on the connections page.
Turning Varia Devices On and Off with Your Edge 1000
Before you can turn Varia devices on and off with your Edge device, you must pair the devices (Pairing Varia Bike Lights with Your Edge 1000, page 3).
- To turn on all paired lights, turn on your Edge device.
- To turn off all paired lights, turn off your Edge device.
Customizing Varia Device Settings with Your Edge 1000
Before you can customize Varia device settings with your Edge device, you must pair the devices (Pairing Varia Bike Lights with Your Edge 1000, page 3).
1 From your Edge device, select ✗ > Sensors > Varia.
2 Select an option:
- Select Enable to enable the light network.
- Select Configuration to set the light intensity mode for all lights in your network (Configuration Settings, page 3).
- Select Beam Angle to automatically adjust the headlight beam angle based on the rate of speed. Higher beam angles are used at high speeds, and lower beam angles are used at low speeds.
NOTE: This setting appears when a headlight is paired with the device.
- Select Turn Signal Setup to configure turn signals when using two taillights (Turn Signal Settings, page 3).
NOTE: This setting appears when two taillights are paired with the device. - Select Light Network to view device information and customize each light in your network (Light Network Settings, page 4).
- Select Test Lights to check that each light in your network is set up correctly (Testing the Light Network, page 4).
Configuration Settings
From your Edge device, select ✗ > Sensors > Varia > Configuration.
Auto: Automatically adjusts the light intensity based on the ambient light or time of day.
Day: Sets the light intensity for day.
Night: Sets the light intensity for night.
Power Save: Automatically adjusts the light intensity based on the remaining battery life of the bike light. When battery life is low, the light intensity is reduced to prolong battery life.
Individual: Allows you to customize the light intensity and pattern mode for each light in your network (Light Network Settings, page 4).
Adjusting the Beam Angle During a Ride
Before you can adjust the beam angle during a ride, you must disable the automatic beam angle setting (Customizing Varia Device Settings with Your Edge 1000, page 3).
1 Go for a ride.
2 Swipe the screen to view the bike lights data screen.
3 Select for to adjust the headlight beam angle.
Turn Signal Settings
From your Edge device, select ✕ > Sensors > Varia > Turn Signal Setup.
Enable: Allows the paired Edge device to assign and control turn signals.
Auto Cancel: Automatically cancels the turn signal after making a 90° turn.
NOTE: Your paired Edge device must have GPS turned on in order to use the Auto Cancel setting.
Right: Assigns the right turn signal.
Left: Assigns the left turn signal.
Assigning Turn Signals
When using two taillights, you must indicate which light is the left turn signal and which light is the right turn signal.
1 Pair two taillights with your Edge device (Pairing Varia Bike Lights with Your Edge 1000, page 3).
2 From your Edge device, select ✕ > Sensors > Varia > Turn Signal Setup.
3 Select Right, and select a taillight to assign it as the right turn signal.
When two taillights are paired, the Edge device assigns the second taillight as the left turn signal automatically.
4 If necessary, select Left, and select the second taillight to assign it as the left turn signal.
Signaling a Turn with Your Edge 1000
WARNING
The Varia device is not a substitute for other bike safety measures, such as hand signals, deferring to posted signs and conditions, and using good judgement.
Before you can signal a turn with your Edge device, you must install two taillights (Installing the Multi-Location Mount, page 2) and assign turn signals to them (Assigning Turn Signals, page 3).
1 Go for a ride.
2 Tap the screen to view the timer overlay.
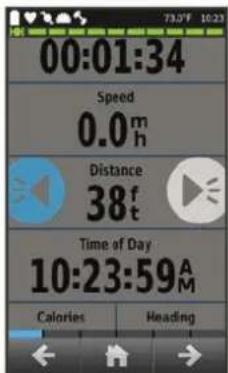
3 Select the left or right turn signal.
NOTE: You can select the same turn signal again to cancel the turn signal.
Light Network Settings
From your Edge device, select ✗ > Sensors > Varia > Light Network, and select a paired light.
Enable: Turns on the light and allows you to control the light remotely with your Edge device. You can disable a light to disconnect it from the light network.
Motion Activated: Automatically turns on the light when the Edge device is in motion.
Auto Deceleration: Automatically adjusts the taillight intensity and pattern when decelerating sharply.
NOTE: This setting appears when a taillight is paired with the device.
NOTE: Taillight medium and flash modes are available on the Varia TL 300 device only.
Light Mode: Sets the light intensity and pattern mode, or turns off the light.
NOTE: This setting is available when the Individual configuration setting is selected (Configuration Settings, page 3).
About: Displays device, software, and battery information.
Remove: Allows you to delete a paired light from the network.
Checking the Battery Level
From your Edge device, select ✕ > Sensors > Varia > Light Network.
The battery level for all paired lights appears.
Testing the Light Network
1 From your Edge device, select ✗ > Sensors > Varia > Test Lights.
2 Select a light to test.
The light blinks when it is connected.
Wireless Remote Control
Device Overview
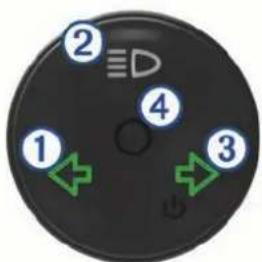
| 1 | Taillight key. Select to signal a left turn when using two taillights.Hold to cycle through the taillight intensity and pattern modes. |
| 2 | Headlight key. Select to switch between low beam and high beam.Hold to cycle through the headlight intensity and pattern modes. |
| 3 | Taillight key and power key. Select to signal a right turn when using two taillights.Hold to turn all lights on and off. |
| 4 | Status LED. |
Status LED
| LED Activity Status | |
| Flashing green Searching | for a paired device. |
| Alternating red and green | Attempting to pair with a device.A turn indicator is on. |
| 12 rapid green flashes | Successfully paired with a device. |
| Solid red Pairing failed or | the connection was lost. |
| 12 rapid red flashes A paired device entered power conservation mode. The light intensity is automatically adjusted to prolong battery life. | |
| Flashing red One or more of the paired devices has a low battery. | |
Pairing the Remote with Your Varia Device
The first time you connect the Varia remote to your Varia device, you must pair the remote with your device.
1 Bring the remote within 1 m (3 ft.) of the device.
NOTE: You must stay 10 m (33 ft.) away from other ANT+ sensors while pairing.
2 On the Varia device, hold the device key for 1 second to turn it on.
3 Select the Varia device key to enter smart mode.
The status LED starts flashing blue.
4 On the Varia remote, hold two keys simultaneously until the status LED starts alternating green and red, and release the keys.
The remote searches for your Varia device. After the remote pairs successfully, the status LED flashes green 12 times.
After the remote is paired, it connects to your device whenever the device is in range and turned on.
Using the Mounts
Several mounts are available for your remote, either included with the product or as an optional accessory. The mounts allow you to attach the remote to your body, your bike, or other objects.
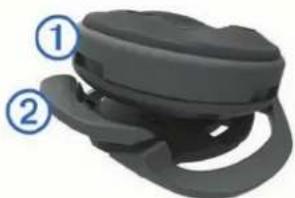
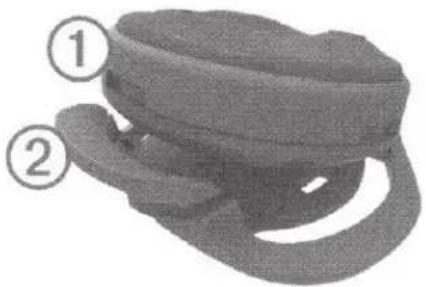
- Align two of the notches ① with the sides of the mount, and press the remote into the mount until it clicks.
natural_image
3D rendered object with two numbered annotations (1 and 2) pointing to different surfaces, no visible text or symbols.- Press gently on the release tab ②, and lift the remote from the mount.
Replacing the Battery
WARNING
Do not use a sharp object to remove batteries.
Keep the battery away from children.
Never put batteries in mouth. If swallowed, contact your physician or local poison control center.
Replaceable coin cell batteries may contain perchlorate material. Special handling may apply. See www.dtsc.ca.gov/hazardouswaste/perchlorate.
CAUTION
Contact your local waste disposal department to properly recycle the batteries.
Before you can replace the battery, you must have a small Phillips screwdriver, a small flat screwdriver, and a CR2032 lithium coin-cell battery.
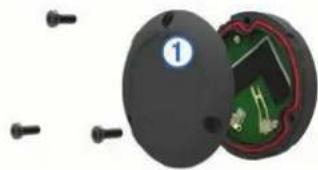
1 Using a Phillips screwdriver, remove the three screws from the back plate ①.
natural_image
Cross-sectional view of a device showing internal components and wiring (no text or symbols visible)2 Remove the back plate from the remote.
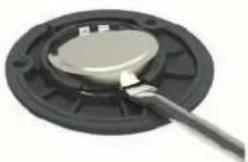
3 Wrap the end of a small flat screwdriver with tape. The tape protects the battery, battery compartment, and contacts from damage.
4 Carefully pry the battery from the back plate.
natural_image
Close-up of a black circular device with a metallic knob and a lever, no visible text or symbols.5 Install the new battery into the back plate with the positive side facing down.
6 Verify the gasket ② is fully seated in the groove.
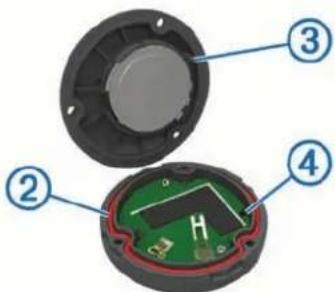
7 Replace the backplate, aligning the post ③ with the gap in the circuit board ④.
8 Replace and tighten the three screws.
NOTE: Do not overtighten.
Device Information
Specifications
Headlight Specifications
| Battery type Rechargeable, built-in lithium-ion battery | |
| Battery life Up to 2.5 hr. in high mode | |
| Up to 5 hr. in flash modeFlash mode is available on the Varia HL 500 only | |
| Operating temperature range | From -15° to 50°C (from 5° to 122°F) |
| Charging temperature range | From 0° to 40°C (from 32° to 104°F) |
| Radio frequency/protocol 2.4 | GHz ANT+ wireless communications protocol |
| Water rating IEC 60529 IPX7* | |
| Varia HL 500 LED luminous flux and peak illuminance | 600 lm95 lx |
| Varia HL 501 LED luminous flux and peak illuminance | 300 lm65 lx |
*The device withstands incidental exposure to water of up to 1 m for up to 30 min. For more information, go to www.garmin.com /waterrating.
Headlight Light Intensity Modes
| Intensity Mode | Varia HL 500 Illuminance and Luminous Flux | Varia HL 501 Illuminance and Luminous Flux |
| Overdrive 600 lm | 95 lx | Not applicable |
| High 400 lm | 70 lx | 300 lm65 lx |
| Medium 250 lm | 50 lx | 200 lm50 lx |
| Low 150 lm | 30 lx | 150 lm35 lx |
| Flashing 600 lm | 95 lx | Not applicable |
Taillight Specifications
| Battery type Rechargeable, built-in lithium-ion battery | |
| Battery life Up to 4 hr. in high modeUp to 14 hr. in flash modeFlash mode is available on the Varia TL 300 only | |
| Operating temperature range | From -15° to 50°C (from 5° to 122°F) |
| Charging temperature range | From 0° to 40°C (from 32° to 104°F) |
| Radio frequency/protocol | 2.4 GHz ANT+ wireless communications protocol |
| Water rating IEC 60529 IPX7* | |
| Varia TL 300, 301 LED luminous flux | 22 lm (typical in high mode) |
*The device withstands incidental exposure to water of up to 1 m for up to 30 min. For more information, go to www.garmin.com /waterrating.
Taillight Light Intensity Modes
| Intensity Mode | Varia TL 300 Luminous Flux | Varia TL 301 Luminous Flux |
| High 22 lm 22 lm | ||
| Medium 14 lm Not applicable | ||
| Low 7 lm 14 lm | ||
| Flashing 28 lm Not applicable | ||
| Braking | 35 lm 35 lm | |
Remote Specifications
| Battery type | User-replaceable CR2032, 3 V |
| Battery life | Up to 1.5 yr. at 1 hr./day |
| Operating temperature range | From -10° to 50°C (from 14° to 122°F) |
| Radio frequency/protocol | 2.4 GHz ANT+ wireless communications protocol |
| Water rating 5 ATM* |
*The device withstands pressure equivalent to a depth of 50 m. For more information, go to www.garmin.com/waterrating.
Device Care
NOTICE
Do not store the device where prolonged exposure to extreme temperatures can occur, because it can cause permanent damage.
Avoid chemical cleaners, solvents, and insect repellents that can damage plastic components and finishes.
Secure the weather cap tightly to prevent damage to the USB port.
Cleaning the Device
1 Wipe the device using a cloth dampened with a mild detergent solution.
2 Wipe it dry.
Troubleshooting
Resetting the Device
You can reset the device if it stops responding.
Hold the device key for 8 seconds.
Thermal Safety Shutdown
To prevent overheating, the Varia device may turn off when operated at a high intensity in warm, stagnant air. The status LED is red until the device cools down. You should use the device outdoors.
Replacement O-rings
Replacement bands (O-rings) are available for the standard mount in two sizes:
• 1.3 × 1.5 × 0.9 in. AS568-125
- 1.7 × 1.9 × 0.9 in. AS568-131
NOTE: Use Ethylene Propylene Diene Monomer (EPDM) replacement bands only. Go to http://buy.garmin.com, or contact your Garmin dealer.
Support and Updates
Garmin Express (www.garmin.com/express) provides easy access to these services for Garmin devices.
- Product registration
- Product manuals
- Software updates
Updating the Software
Before you can update your device software, you must have a Garmin Connect™ account, and you must download the Garmin Express application.
1 Connect the device to your computer using the USB cable. When new software is available, Garmin Express sends it to your device.
2 Follow the on-screen instructions.
3 Do not disconnect your device from the computer during the update process.
Getting More Information
- Go to www.garmin.com/intosports
- Go to www.garmin.com/learningcenter.
- Go to http://buy.garmin.com, or contact your Garmin dealer for information about optional accessories and replacement parts.
Appendix
Software License Agreement
BY USING THE DEVICE, YOU AGREE TO BE BOUND BY THE TERMS AND CONDITIONS OF THE FOLLOWING SOFTWARE LICENSE AGREEMENT. PLEASE READ THIS AGREEMENT CAREFULLY.
Garmin Ltd. and its subsidiaries ("Garmin") grant you a limited license to use the software embedded in this device (the "Software") in binary executable form in the normal operation of the product. Title, ownership rights, and intellectual property rights in and to the Software remain in Garmin and/or its third-party providers.
You acknowledge that the Software is the property of Garmin and/or its third-party providers and is protected under the United States of America copyright laws and international copyright treaties. You further acknowledge that the structure, organization, and code of the Software, for which source code is not provided, are valuable trade secrets of Garmin and/or its third-party providers and that the Software in source code form remains a valuable trade secret of Garmin and/or its third-party providers. You agree not to decompile, disassemble, modify, reverse assemble, reverse engineer, or reduce to human readable form the Software or any part thereof or create any derivative works based on the Software. You agree not to export or re-export the Software to any country in violation of the export control laws of the United States of America or the export control laws of any other applicable country.
Index
A
accessories 6
B
bands 6
battery
charging 1
life 4
replacing 4
C
cleaning the device 6
customizing the device 3
D
device, care 6
E
Edge 3,4
G
Garmin Express
registering the device 6
updating software 6
1
installing 1,2
K
keys 2, 4
M
maps, updating 6
ounting the device 1, 2, 4
0
O-rings. See bands
P
pairing 3
remote control 4
product registration 6
R
registering the device 6
remote control 3,4
pairing 4
replacing the battery 4
resetting, device 6
S
settings 3,4
software, updating 6
software license agreement 6
specifications 5
T
troubleshooting 6
U
updates, software 6
USB 6
W
wireless devices 4
www.garmin.com/support











natural_image
Black and white photo of a curved road with a person standing on it, no visible text or symbolsInstructions 2
Instructions 12
Istruzioni 24
Anweisungen 36
Instrucciones 49
Instruções 61
Varia™ Bike Lights Instructions Introduction
WARNING
See the Important Safety and Product Information guide in the product box for product warnings and other important information.
Always consult your physician before you begin or modify any exercise program.
Charging the Device
NOTICE
To prevent corrosion, thoroughly dry the USB port, the weather cap, and the surrounding area before charging or connecting to a computer.
The device is powered by a built-in lithium-ion battery that you can charge using a standard wall outlet or a USB port on your computer.
NOTE: The device does not charge when outside the approved temperature range (page 11).
1 Pull up the weather cap from the USB port.
2 Plug the small end of the USB cable into the USB port on the device.
3 Plug the large end of the USB cable into an AC adapter or a computer USB port.
4 Plug the AC adapter into a standard wall outlet.
5 Charge the device completely.
The status LED flashes green while charging. The status LED is solid green when charging is complete.
Installing the Out-Front Mount
You can use the out-front mount to install both an Edge ^® device and a headlight.
1 Select a secure location to mount the Edge device and headlight where they do not interfere with the safe operation of your bike.
2 Use the hex key to remove the screw ① from the handlebar connector ②.
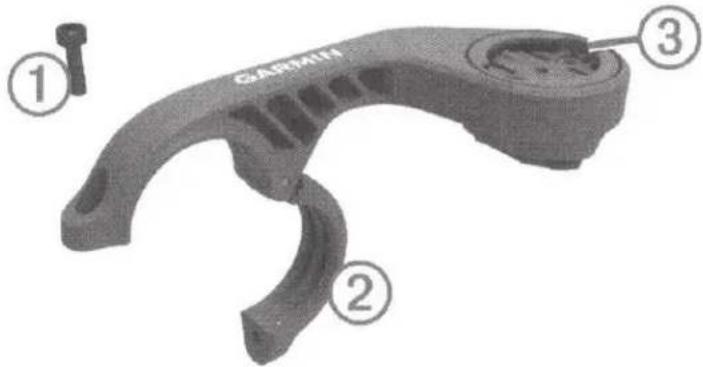
3 If necessary, remove the two screws on the top of the mount ③, rotate the connector, and replace the screws to change the orientation of the mount for an Edge device.
4 Place a rubber pad around the handlebar:
• If the handlebar diameter is 25.4 mm, use the thicker pad.
• If the handlebar diameter is 31.8 mm, use the thinner pad.
5 Place the handlebar connector around the rubber pad.
NOTE: You should align the contours on the rubber pad with the grooves on the inside of the handlebar connector.
6 Adjust the mount on the handlebar so the headlight is mounted horizontally, parallel to the road.
7 Replace and tighten the screw.
NOTE: Garmin ^® recommends a torque specification of 7 lbf-in. (0.8 N-m). You should check the tightness of the screw periodically.
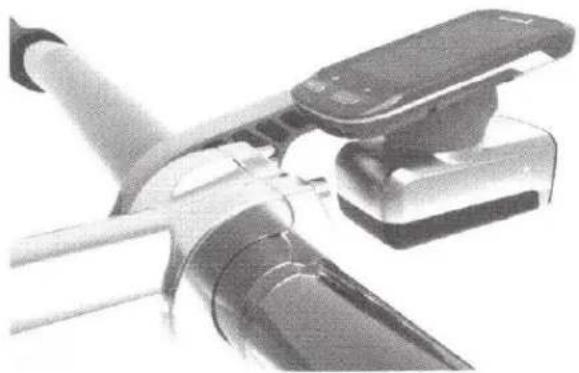
8 Align the notches on the top of the headlight with the tabs on the bottom of the mount.
9 Press up slightly and turn the headlight clockwise until it locks into place.
10 If installing an Edge device, align the tabs on the back of the Edge device with the notches on the top of the mount.
11 Press down slightly and turn the Edge device clockwise until it locks into place.
natural_image
Close-up of a mechanical device with metallic components and a curved handle (no visible text or symbols)Installing the Seat-Post Mount
1 Select a secure location to mount the taillight where it does not interfere with the safe operation of your bike.
NOTE: You should mount the device as high on the seat post as possible for
optimal light visibility. Verify there is clear space (no obstructions) behind the device.
2 Use the hex key to remove the screw ① from the seat-post connector ②.
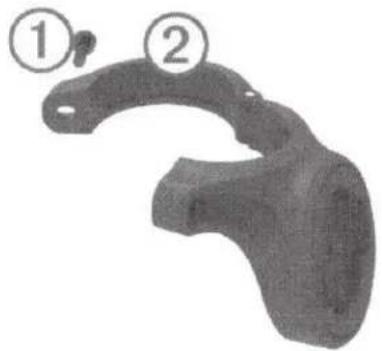
natural_image
3D model of a mechanical part with two numbered callouts (1 and 2), no visible text or symbols.3 Place a rubber pad around the seat post, if necessary:
• If the seat post diameter is 27 to 28.6 mm, use the thicker pad.
• If the seat post diameter is 30.4 to 31 mm, use the thinner pad.
• If the seat post diameter is 31 to 31.8 mm, do not use a rubber pad.
4 Place the seat-post connector around the rubber pad.
NOTE: You should align the contours on the rubber pad with the grooves on the inside of the seat-post connector.
5 Replace and tighten the screw.
NOTE: Garmin recommends a torque specification of 7 lbf-in. (0.8 N-m). You should check the tightness of the screw periodically.
6 Align the tabs on the back of the device with the seat-post mount notches ③.
natural_image
Close-up of a mechanical component with a numbered annotation (3) pointing to a circular feature on the shaft (no text or symbols beyond label)7 Press down slightly and turn the device clockwise until it locks into place.
Installing the Multi-Location Mount
1 Select a secure location to mount the taillight where it does not interfere with the safe operation of your bike.
2 If necessary, select the correct rubber pad ① for your seat post shape.
3 Place the mount on the seat post or other mounting location.
4 Attach the mount securely using one or two bands ②.
NOTE: You can use the hooks on the center of the mount ③ if using only one band.
5 Align the tabs on the back of the device with the mount notches ④.
6 Press down slightly and turn the device clockwise until it locks into place.
Bike Light Status LEDs
The status LED is located on the side of the headlight. The status LED is located on the top of the taillight.
| LED Activity | Status |
| Solid red | An error occurred while charging. |
| Alternating blue and green | The device is uploading settings from Garmin ExpressTM. |
| Flashing green | The battery is charging. |
| Solid green | Charging is complete. |
| Flashing red | The battery is low. |
| Flashing blue | The device is in smart mode and can be controlled by a paired wireless remote. |
Using the Device Key
The device key is located on the side of the headlight. The device key is located on the top of the taillight.
1 Hold the device key for 1 second to turn on the device.
The first time you turn on the device, it enters smart mode. The status LED flashes blue. The device can be controlled by a paired wireless remote or Edge device.
2 Select the device key to cycle through the bike light intensity and pattern modes.
Taillight modes include smart mode, high, medium, low, and flash. Headlight modes include smart mode, overdrive, high, medium, low, and flash.
NOTE: Taillight medium and flash modes are available on the Varia™ TL 300 device only. Headlight overdrive and flash modes are available on the Varia HL 500 device only.
3 Hold the device key for 2 seconds to turn off the device.
The next time you turn on the device, it enters the last-used operating mode.
Pairing Varia Bike Lights with Your Edge 1000
Before you can pair the devices, you must update the Edge software.
1 Bring the Edge device within range (3 m) of the sensor.
NOTE: Stay 10 m away from other ANT+ bike lights while pairing.
4 Turn on the Varia device.
5 Select the Varia device key to enter smart mode.
The status LED flashes blue.
6 Select your sensor.
When the sensor is paired with your Edge device, the status icon appears solid on the connections page.
Wireless Remote Control
Device Overview
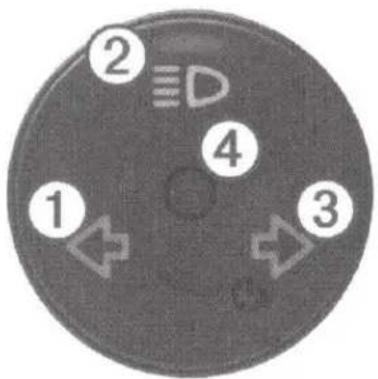
| 1 | Taillight key. Select to signal a left turn when using two taillights.Hold to cycle through the taillight intensity and pattern modes. |
| 2 | Headlight key. Select to switch between low beam and high beam.Hold to cycle through the headlight intensity and pattern modes. |
| 3 | Taillight key and power key. Select to signal a right turn when using two taillights.Hold to turn all lights on and off. |
| 4 | Status LED. |
Status LED
| LED Activity | Status |
| Flashing green | Searching for a paired device. |
Instructions
| LED Activity | Status |
| Alternating red and green | Attempting to pair with a device.A turn indicator is on. |
| 12 rapid green flashes | Successfully paired with a device. |
| Solid red | Pairing failed or the connection was lost. |
| 12 rapid red flashes | A paired device entered power conservation mode.The light intensity is automatically adjusted to prolong battery life. |
| Flashing red | One or more of the paired devices has a low battery. |
Using the Mounts
Several mounts are available for your remote, either included with the product or as an optional accessory. The mounts allow you to attach the remote to your body, your bike, or other objects.
- Align two of the notches ① with the sides of the mount, and press the remote into the mount until it clicks.
natural_image
Top-down view of a gray hat with two numbered callouts (1 and 2), no visible text or symbols on the hat itself.- Press gently on the release tab ②, and lift the remote from the mount.
Device Information Headlight Specifications
| Operating temperature range | From -15° to 50°C (from 5° to 122°F) |
| Charging temperature range | From 0° to 40°C (from 32° to 104°F) |
| Varia HL 500 LED luminous flux and peak illuminance | 600 lm95 lx |
| Varia HL 501 LED luminous flux and peak illuminance | 300 lm65 lx |
Taillight Specifications
| Operating temperature range | From -15° to 50°C (from 5° to 122°F) |
| Charging temperature range | From 0° to 40°C (from 32° to 104°F) |
| Varia TL 300, 301 LED luminous flux | 22 lm (typical in high mode) |
Remote Specifications
| Operating temperature range | From -10° to 50°C (from 14° to 122°F) |
Support and Updates
Garmin Express (www.garmin.com/express) provides easy access to these services for Garmin devices.
• Product registration
• Product manuals
- Software updates
Getting the Owner's Manual
You can get the most recent owner's manual from the web.
1 Go to www.garmin.com/manuals/VariaBikeLights.
2 View or download the full owner's manual in your preferred format.
Varia™ Bike Lights Instructions
Introduction
AVERTISSEMENT
Garmin, the Garmin logo, ANT+, and Edge are trademarks of Garmin Ltd. or its subsidiaries, registered in the USA and other countries. Garmin Express™ and Varia™ are trademarks of Garmin Ltd. or its subsidiaries. These trademarks may not be used without the express permission of Garmin.
M/N: A02666, A02669
© 2015 Garmin Ltd. or its subsidiaries
www.garmin.com/support
Printed in Taiwan
August 2015
190-01906-90_0B
GARMIN
Important Safety and Product Information 2
Important Safety and Product Information
Failure to avoid the following potentially hazardous situations could result in an accident or collision resulting in death or serious injury.
Health Warnings
- Always consult your physician before beginning or modifying any exercise program. If you have a pacemaker or other implanted electronic device, consult your physician before using a heart rate monitor.
- The device, the heart rate monitor, and other Garmin accessories are consumer devices, not medical devices, and could suffer from interference from external electrical sources. The heart rate readings are for reference only, and no responsibility is accepted for the consequences of any erroneous readings.
Bicycle Warnings
• Always use your best judgement, and operate the bicycle in a safe manner.
• Make sure your bicycle and hardware are properly maintained and that all parts are correctly installed.
Battery Warnings
A lithium-ion battery can be used in this device. Coin cell batteries can be used in the accessory. If these guidelines are not followed, batteries may experience a shortened life span or may present a risk of damage to the device, fire, chemical burn, electrolyte leak, and/or injury.
- Do not leave the device exposed to a heat source or in a high-temperature location, such as in the sun in an unattended vehicle. To prevent the possibility of damage, remove the device from the vehicle or store it out of direct sunlight, such as in the glove box.
- Do not disassemble, modify, remanufacture, puncture or damage the device or batteries.
- Do not immerse or expose the device or batteries to water or other liquids, fire, explosion, or other hazard.
- Do not use a sharp object to remove the removable batteries.
- KEEP BATTERIES AWAY FROM CHILDREN.
- NEVER PUT BATTERIES IN MOUTH. Swallowing can lead to chemical burns, perforation of soft tissue, and death. Severe burns can occur within 2 hours of ingestion. Seek medical attention immediately.
- Replaceable coin cell batteries may contain perchlorate material. Special handling may apply. See www.dtsc.ca.gov/hazardouswaste/perchlorate.
-
Do not use a power and/or data cable that is not approved or supplied by Garmin.
-
If using an external battery charger, only use the Garmin accessory approved for your product.
- Only replace batteries with correct replacement batteries. Using other batteries presents a risk of fire or explosion. To purchase replacement batteries, see your Garmin dealer or the Garmin website.
- Do not operate the device outside of the temperature ranges specified in the printed manual in the product packaging.
- When storing the device for an extended time period, store within the temperature ranges specified in the printed manual in the product packaging.
- Do not remove or attempt to remove the non-user-replaceable battery.
- Contact your local waste disposal department to dispose of the device/batteries in accordance with applicable local laws and regulations.
Off-Road Navigation Warning
Always be mindful of the effects of the environment and the inherent risks of the activity before embarking on off-road activities, especially the impact that weather and weather-related trail conditions can have on the safety of your activity. Ensure that you have the proper gear and supplies for your activity before navigating along unfamiliar paths and trails.
NOTICE
Legal Restrictions
IT IS THE USER'S RESPONSIBILITY TO MOUNT AND OPERATE THE DEVICE IN COMPLIANCE WITH ALL
APPLICABLE LAWS AND ORDINANCES. Garmin does not assume any responsibility for any fines, penalties, or damages that may be incurred as a result of any state or local law or ordinance relating to the use of your Garmin device.
Product Environmental Programs
Information about the Garmin product recycling program and WEEE, RoHS, REACH, and other compliance programs can be found at www.garmin.com/aboutGarmin/environment.
Declaration of Conformity
Hereby, Garmin declares that this product is in compliance with the essential requirements and other relevant provisions of Directive 1999/5/EC. To view the full Declaration of Conformity, go to www.garmin.com/compliance.
Industry Canada Compliance
Category I radiocommunication devices comply with Industry Canada Standard RSS-210. Category II radiocommunication devices comply with Industry Canada Standard RSS-Gen. This device complies with Industry Canada license-exempt RSS standard(s). Operation is subject to the following two conditions: (1) this device may not cause interference, and (2)
this device must accept any interference, including interference that may cause undesired operation of the device.
Radio Frequency Radiation Exposure
This device is a mobile transmitter and receiver that uses an internal antenna to send and receive low levels of radio frequency (RF) energy for data communications. The device emits RF energy below the published limits when operating in its maximum output power mode and when used with Garmin authorized accessories. To comply with RF exposure compliance requirements, the device should be installed and operated with a minimum of 20 cm (7.87 in.) between the device and your body. The device should not be used in other configurations. This device must not be co-located or operated in conjunction with any other transmitter or antenna.
FCC Compliance
This device complies with part 15 of the FCC Rules. Operation is subject to the following two conditions: (1) this device may not cause harmful interference, and (2) this device must accept any interference received, including interference that may cause undesired operation.
This equipment has been tested and found to comply with the limits for a Class B digital device, pursuant to part 15 of the FCC rules. These limits are designed to provide reasonable protection against harmful interference in a residential installation. This equipment generates, uses, and can radiate radio frequency energy and may cause harmful interference to radio communications if not installed and used in accordance with the instructions. However, there is no guarantee that interference will not occur in a particular installation. If this equipment does cause harmful interference to radio or television reception, which can be determined by turning the equipment off and on, the user is encouraged to try to correct the interference by one of the following measures:
• Reorient or relocate the receiving antenna.
- Increase the separation between the equipment and the receiver.
- Connect the equipment into an outlet that is on a different circuit from the GPS device.
- Consult the dealer or an experienced radio/TV technician for help.
This product does not contain any user-serviceable parts. Repairs should only be made by an authorized Garmin service center. Unauthorized repairs or modifications could result in permanent damage to the equipment, and void your warranty and your authority to operate this device under Part 15 regulations.
Software License Agreement
BY USING THE DEVICE, YOU AGREE TO BE BOUND BY THE TERMS AND CONDITIONS OF THE FOLLOWING
SOFTWARE LICENSE AGREEMENT. PLEASE READ THIS AGREEMENT CAREFULLY.
Garmin Ltd. and its subsidiaries ("Garmin") grant you a limited license to use the software embedded in this device (the "Software") in binary executable form in the normal operation of the product. Title, ownership rights, and intellectual property rights in and to the Software remain in Garmin and/or its third-party providers.
You acknowledge that the Software is the property of Garmin and/or its third-party providers and is protected under the United States of America copyright laws and international copyright treaties. You further acknowledge that the structure, organization, and code of the Software, for which source code is not provided, are valuable trade secrets of Garmin and/or its third-party providers and that the Software in source code form remains a valuable trade secret of Garmin and/or its third-party providers. You agree not to decompile, disassemble, modify, reverse assemble, reverse engineer, or reduce to human readable form the Software or any part thereof or create any derivative works based on the Software. You agree not to export or re-export the Software to any country in violation of the export control laws of the United States of America or the export control laws of any other applicable country.
Third-Party Software License Agreement
This product may include software distributed by Texas Instruments under the following license: Copyright © 2014, Texas Instruments Incorporated. All rights reserved. Redistribution and use in source and binary forms, with or without modification, are permitted provided that the following conditions are met:
- Redistributions of source code must retain the above copyright notice, this list of conditions and the following disclaimer.
- Redistributions in binary form must reproduce the above copyright notice, this list of conditions and the following disclaimer in the documentation and/or other materials provided with the distribution.
- Neither the name of Texas Instruments Incorporated nor the names of its contributors may be used to endorse or promote products derived from this software without specific prior written permission.
THIS SOFTWARE IS PROVIDED BY THE COPYRIGHT HOLDERS AND CONTRIBUTORS "AS IS" AND ANY EXPRESS OR IMPLIED WARRANTIES, INCLUDING, BUT NOT LIMITED TO, THE IMPLIED WARRANTIES OF MERCHANTABILITY AND FITNESS FOR A PARTICULAR PURPOSE ARE DISCLAIMED. IN NO EVENT SHALL THE COPYRIGHT OWNER OR CONTRIBUTORS BE LIABLE FOR ANY DIRECT, INDIRECT, INCIDENTAL, SPECIAL, EXEMPLARY, OR CONSEQUENTIAL DAMAGES
(INCLUDING, BUT NOT LIMITED TO, PROCUREMENT OF SUBSTITUTE GOODS OR SERVICES; LOSS OF USE, DATA, OR PROFITS; OR BUSINESS INTERRUPTION) HOWEVER CAUSED AND ON ANY THEORY OF LIABILITY, WHETHER IN CONTRACT, STRICT LIABILITY, OR TORT (INCLUDING NEGLIGENCE OR OTHERWISE) ARISING IN ANY WAY OUT OF THE USE OF THIS SOFTWARE, EVEN IF ADVISED OF THE POSSIBILITY OF SUCH DAMAGE.
Limited Warranty
This Garmin product is warranted to be free from defects in materials or workmanship for one year from the date of purchase. Within this period, Garmin will, at its sole option, repair or replace any components that fail in normal use. Such repairs or replacement will be made at no charge to the customer for parts or labor, provided that the customer shall be responsible for any transportation cost. This warranty does not apply to: (i) cosmetic damage, such as scratches, nicks and dents; (ii) consumable parts, such as batteries, unless product damage has occurred due to a defect in materials or workmanship; (iii) damage caused by accident, abuse, misuse, water, flood, fire, or other acts of nature or external causes; (iv) damage caused by service performed by anyone who is not an authorized service provider of Garmin; or (v) damage to a product that has been modified or altered without the written permission of Garmin, or (vi) damage to a product that has been connected to power and/or data cables that are not supplied by Garmin. In addition, Garmin reserves the right to refuse warranty claims against products or services that are obtained and/or used in contravention of the laws of any country.
Our navigation products are intended to be used only as a travel aid and must not be used for any purpose requiring precise measurement of direction, distance, location or topography. Garmin makes no warranty as to the accuracy or completeness of map data.
Repairs have a 90 day warranty. If the unit sent in is still under its original warranty, then the new warranty is 90 days or to the end of the original 1 year warranty, depending upon which is longer.
THE WARRANTIES AND REMEDIES CONTAINED HEREIN ARE EXCLUSIVE AND IN LIEU OF ALL OTHER WARRANTIES EXPRESS, IMPLIED, OR STATUTORY, INCLUDING ANY LIABILITY ARISING UNDER ANY WARRANTY OF MERCHANTABILITY OR FITNESS FOR A PARTICULAR PURPOSE, STATUTORY OR OTHERWISE. THIS WARRANTY GIVES YOU SPECIFIC LEGAL RIGHTS, WHICH MAY VARY FROM STATE TO STATE.
IN NO EVENT SHALL Garmin BE LIABLE FOR ANY INCIDENTAL, SPECIAL, INDIRECT, OR CONSEQUENTIAL DAMAGES, WHETHER RESULTING FROM THE USE,
MISUSE, OR INABILITY TO USE THIS PRODUCT OR FROM DEFECTS IN THE PRODUCT. SOME STATES DO NOT ALLOW THE EXCLUSION OF INCIDENTAL OR CONSEQUENTIAL DAMAGES, SO THE ABOVE LIMITATIONS MAY NOT APPLY TO YOU.
Garmin retains the exclusive right to repair or replace (with a new or newly-overhauled replacement product) the device or software or offer a full refund of the purchase price at its sole discretion. SUCH REMEDY SHALL BE YOUR SOLE AND EXCLUSIVE REMEDY FOR ANY BREACH OF WARRANTY. To obtain warranty service, contact your local Garmin authorized dealer or call Garmin Product Support for shipping instructions and an RMA tracking number. Securely pack the device and a copy of the original sales receipt, which is required as the proof of purchase for warranty repairs. Write the tracking number clearly on the outside of the package. Send the device, freight charges prepaid, to any Garmin warranty service station.
Online Auction Purchases: Products purchased through online auctions are not eligible for rebates or other special offers from Garmin warranty coverage. Online auction confirmations are not accepted for warranty verification. To obtain warranty service, an original or copy of the sales receipt from the original retailer is required. Garmin will not replace missing components from any package purchased through an online auction.
International Purchases: A separate warranty may be provided by international distributors for devices purchased outside the United States depending on the country. If applicable, this warranty is provided by the local in-country distributor and this distributor provides local service for your device. Distributor warranties are only valid in the area of intended distribution. Devices purchased in the United States or Canada must be returned to the Garmin service center in the United Kingdom, the United States, Canada, or Taiwan for service.
Australian Purchases: Our goods come with guarantees that cannot be excluded under the Australian Consumer Law. You are entitled to a replacement or refund for a major failure and for compensation for any other reasonably foreseeable loss or damage. You are also entitled to have the goods repaired or replaced if the goods fail to be of acceptable quality and the failure does not amount to a major failure. The benefits under our Limited Warranty are in addition to other rights and remedies under applicable law in relation to the products. Garmin Australasia, 30 Clay Place, Eastern Creek, NSW 2766, Australia. Phone: 1800 235 822.
- Table of Contents
- Introduction......1
- Device Settings.... 3
- Wireless Remote Control.... 4
- Device Information...... 5
- Troubleshooting....6
- Appendix....6
- Introduction
- WARNING
- Getting Started
- Charging the Device
- NOTICE
- Installing the Out-Front Mount
- Installing the Seat-Post Mount
- Installing the Multi-Location Mount
- Varia HL Device Overview
- Varia TL Device Overview
- Bike Light Status LEDs
- Using the Device Key
- Device Settings
- Pairing Varia Bike Lights with Your Edge 1000
- Turning Varia Devices On and Off with Your Edge 1000
- Customizing Varia Device Settings with Your Edge 1000
- Configuration Settings
- Adjusting the Beam Angle During a Ride
- Turn Signal Settings
- Assigning Turn Signals
- Signaling a Turn with Your Edge 1000
- Light Network Settings
- Checking the Battery Level
- Testing the Light Network
- Wireless Remote Control
- Device Overview
- Status LED
- Pairing the Remote with Your Varia Device
- Using the Mounts
- Replacing the Battery
- CAUTION
- Device Information
- Specifications
- Device Care
- Cleaning the Device
- Troubleshooting
- Resetting the Device
- Thermal Safety Shutdown
- Replacement O-rings
- Support and Updates
- Updating the Software
- Getting More Information
- Appendix
- Software License Agreement
- Index
- A
- B
- C
- D
- E
- G
- 1
- K
- M
- 0
- P
- R
- S
- T
- U
- W
- www.garmin.com/support
- Varia™ Bike Lights Instructions Introduction
- Getting the Owner's Manual
- Varia™ Bike Lights Instructions
- AVERTISSEMENT
- GARMIN
- Important Safety and Product Information
- Health Warnings
- Bicycle Warnings
- Battery Warnings
- Off-Road Navigation Warning
- Legal Restrictions
- IT IS THE USER'S RESPONSIBILITY TO MOUNT AND OPERATE THE DEVICE IN COMPLIANCE WITH ALL
- Product Environmental Programs
- Declaration of Conformity
- Industry Canada Compliance
- Radio Frequency Radiation Exposure
- FCC Compliance
- SOFTWARE LICENSE AGREEMENT. PLEASE READ THIS AGREEMENT CAREFULLY.
- Third-Party Software License Agreement
- Limited Warranty
Brand : GARMIN
Model : Varia HL500
Category : Bike accessory