
XSource - Hi-Fi System Russound - Free user manual and instructions
Find the device manual for free XSource Russound in PDF.


| Product Type | Streaming Audio Player |
| Brand | Russound |
| Model | XSource |
| Dimensions (W x D x H) | 4" x 6.375" x 1.75" (10.2 x 16.2 x 4.4 cm) |
| Weight | 1.2 lbs (0.54 kg) |
| Power Requirements | Input: 100-240V~50/60Hz 0.4A; Output: 12VDC, 1A |
| Audio Outputs | Analog stereo RCA, Digital coaxial, Digital optical |
| Audio Input | 1 x USB 2.0 (for flash drive or external hard drive) |
| Communication | 1 x Ethernet RJ45, 10/100 Base T |
| Supported Audio Formats | MP3 (CBR, VBR), WAV (8, 16-bit), OGG Vorbis, FLAC (8, 16-bit), AAC, AAC+ (up to 24-bit/192 kHz) |
| Frequency Response | 20 Hz – 20 kHz |
| Line Audio Output Level | 2 Vrms |
| Streaming Services | Pandora, SiriusXM, TuneIn, vTuner, Spotify Connect, Apple AirPlay, DLNA |
| Control Methods | MyRussound App (iOS/Android), XTS in-wall touchscreen, Web Config browser interface |
| Audio Adjustments | Bass, Treble, Loudness (via MyRussound App) |
| Additional Features | Local favorites, slide connectors for multi-unit coupling, USB media playback, AirPlay password, zone/source modes |
| Power Supply | External, 12VDC 1A; includes US, Euro, UK, Australian plug adapters |
| LED Indicators | Green (ready), Yellow (booting), Red (factory reset), Blue (zone on) |
| Care and Cleaning | Wipe dust with a soft dry cloth periodically. |
| Safety Instructions | Read and retain instructions; avoid water, heat, and spills; use only specified power source; do not attempt service beyond manual; consult qualified personnel for repairs. |
| Warranty & Repair | 2-year limited warranty; service must be performed by Russound. Return with prior authorization. Damage from abuse, lightning, or unauthorized service not covered. |
Frequently Asked Questions - XSource Russound
User questions about XSource Russound
0 question about this device. Answer the ones you know or ask your own.
Ask a new question about this device
Download the instructions for your Hi-Fi System in PDF format for free! Find your manual XSource - Russound and take your electronic device back in hand. On this page are published all the documents necessary for the use of your device. XSource by Russound.
USER MANUAL XSource Russound
IF YOU ARE NOT A RUSSOUND CERTIFIED INSTALLER, YOU WILL NOT BE ABLE TO INSTALL AND CONFIGURE THIS PRODUCT
INTERNET CONNECTION REQUIRED FOR PRODUCT INSTALLATION
There are two things that must be done at the time of installation of this product that require a working internet connection:
- Enter valid Russound Certified Installer credentials. The XSource is shipped in a locked state. It cannot be operated without first being configured by a Russound Certified Installer.
If you are a custom installation professional and wish to become authorized as a Russound Certified Installer, please contact your Russound Sales Representative for more information.
Note: If you are a Russound Certified Installer and you plan on installing this product on a job site that may not have working internet access, please configure the unit at your shop or other location where internet access is available BEFORE you take it to the job site.
- Firmware may be updated easily through Web Config configuration. An internet connection is required for obtaining the most recent firmware.
Note: If an internet connection will not be available at the place of installation, please download the latest firmware from the Russound website to a laptop before going to the job site.
Lockdown Feature
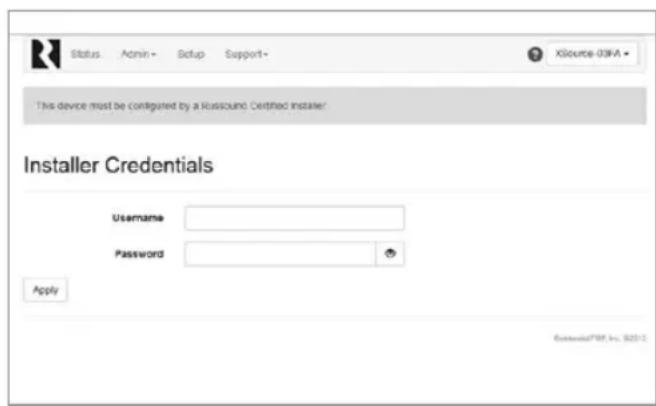
Russound Certified Installer credentials must be entered through the Web Config configuration web pages.
When the XSource is shipped from Russound, it will only operate in a "locked" state. In this state, no audio or control is available. In order to unlock the system, valid Russound Certified Installer credentials must be entered using our convenient Web Config browser-based configuration utility.
When the XSource is first powered on, a message will appear on any compatible user interfaces and the MyRussound App indicating that the device must be unlocked. The message will contain the IP address of the controller. Using your mobile device or computer, browse to the controller's IP address (type http:// and then the IP address).
If you are using the MyRussound App, the IP address appears as a link that will direct you to Web Config via your local web browser.
If you do not have a valid Russound Certified Installer credential, please contact your Russound Sales Representative.
Table of Contents
Product Overview 3
Web Configuration....4-5
Ethernet Connection and Factory Reset 5
Installation Overview....6
Installation....7
Configuration....8-12
Troubleshooting....13
Audio Connection with MCA-Series Controllers....14
Additional Audio Connections....15
Network Best Practices....16
Technical Specifications....17
Safety Instructions....18
Product Overview
The XSource Streaming Audio Player is designed to offer a simple-to-install and simple-to-configure streaming media solution to add high quality streaming audio content to any audio system. The XSource can be used as a single stereo audio streaming source for a single room, or supply a single audio stream to a larger whole-house system through its easy-to-use analog line-level/digital (coax/optical) outputs.
The XSource allows for expansion to up to 16 streaming rooms of audio in a single installation with any combination of other XStream ^™ Series streaming products from Russound. When paired with a Russound multi-room controller, system expansion is possible up to 8 independent audio sources and up to 48 total rooms of audio.
In addition to offering streaming audio from popular internet sources, the XSource also offers streaming of local DLNA ^™ -compliant audio. In addition a built-in USB port allows users to connect an external flash drive or an externally-powered USB hard drive for use as additional music sources.
Features
• Independent streaming audio player
• Built-in AirPlay streaming with full metadata to iOS/Android apps or XTS touchscreens
• Hi-Res audio streaming support up to 24-bit/192 kHz
- USB for Flash or external USB Hard drive-based music collections
• Digital coax/optical or analog output
- Can be integrated (as a source) with a Russound multi-room system or standalone (as a zone) when used with any brand of amplifier or receiver
- Controlled with the MyRussound App and fully compatible with the Russound XTS in-wall touchscreen
- Bass, Treble, and Loudness settings available through the MyRussound App
• Supports local favorites
- Onboard browser-based configuration, accessible from a smartphone or tablet
- Mix and match with other XStream® Series components for versatile system designs
• Built-in slide connectors for physical coupling of multiple units
WEB CONFIGURATION
Configuration Password
In order to prevent unauthorized changes to configuration settings, a default password of russound123 has been created that will be required to be entered prior to changing any configuration settings. Enter this password if prompted for a Configuration Password.
This password is separate from the Russound Certified Installer password that is used to unlock the controller and cannot be modified.
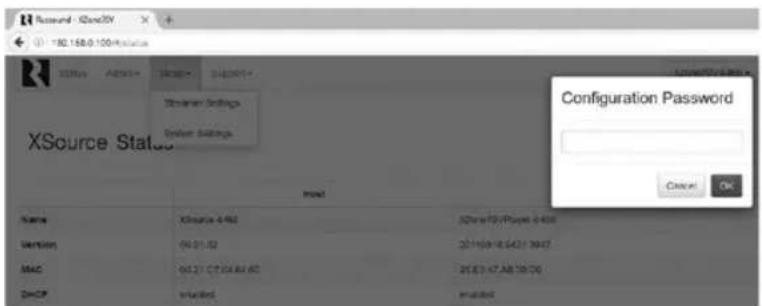
Depending on your product's firmware version, this password may or may not be enabled by default. When using the latest firmware from Russound, the use of the configuration password can be enabled or disabled at your choice. The default
password cannot be changed or modified and will always be russound123
Key Programming Features
The XSource has a programming feature called Web Config. Web Config is an onboard hosted web page used for unlocking and configuring the XSource. Web Config can be accessed by entering the IP address or Hostname in any web browser on a smartphone, tablet, or laptop that is connected to the same network as the XSource. Using Web Config, the XSource can be completely configured, quickly and easily, from the palm of your hand.
For more information, refer to the installation manual of your specific Russound controller.
Web Config Features
- General network configuration (DHCP/static IP)
- Firmware Updates
- Zone or source mode
- Assign device name
• Zone/Source Volume Trim - Set AirPlay password
- Enable/disable or re-order streaming services
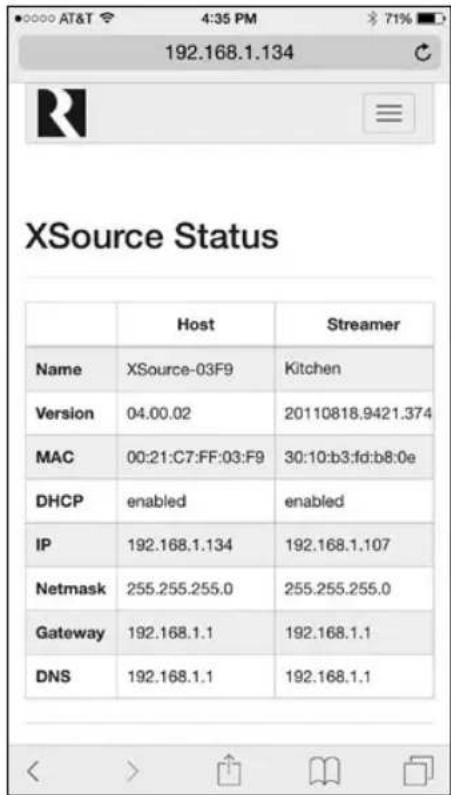
Web Config status page.
4 Russound XSource Installation Guide
Ethernet Connection
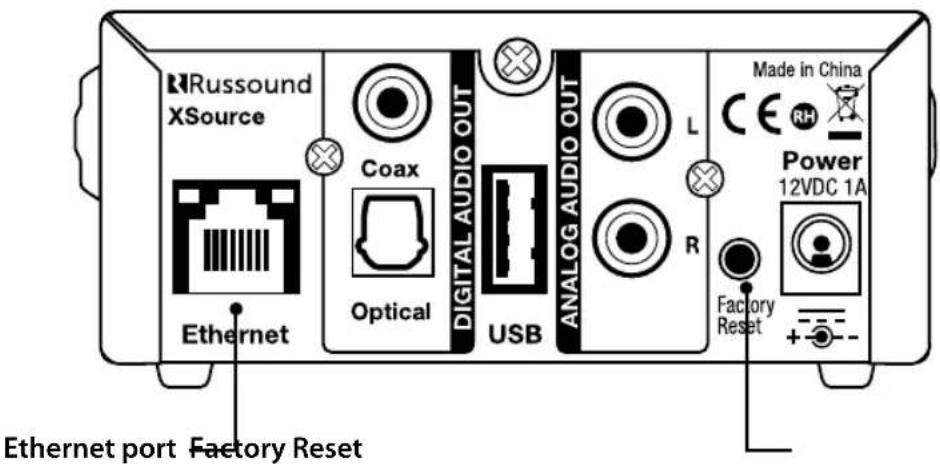
The Ethernet connection is used for configuration and programming as well as for enabling control via the MyRussound App or the XTS Touchscreen. The default network setting is DHCP-enabled, but the XSource can be configured with a static IP address using the Web Config software. The Ethernet connection is also used for the built-in streaming services and for playing any music stored on connected network drives using DLNA.
Factory Reset
The factory reset button has two functions. A 3-second press and hold will restore network settings to DHCP. A 10-second press and hold will completely reset the XSource to its factory default settings.
Note: Performing a factory reset will restore the unit to its factory default settings and put XSource in Zone mode. The unit will require valid Russound Certified Installer credentials in order to be unlocked and configured again. The factory reset will also delete all personal information including service account settings and passwords.
INSTALLATION OVERVIEW
The XSource can be rack-mounted, table-mounted or wall-mounted. You can connect multiple XSource media players by using the integrated slide connectors as shown. For wall-mount, use the mounting holes on the bottom of the unit. See diagrams below.
Important Considerations
- Disconnect the power cord before making any wiring connections to the XSource.
-
Verify that all connections and polarity are correct.
-
Keep all power cords away from all signal cables to prevent humming caused by induced noise.
- Label wires appropriately, on both ends of the wire run.
- Avoid running speaker wires or signal cables close to house electrical wiring for any distance. If you have to run them parallel, make sure to space the wires at least two feet from the AC line. If you need to cross an AC line it should be at a 90° angle.
Rack-mount - Slide Lock System
You can connect multiple XSource media players by using the integrated slide connectors as shown.
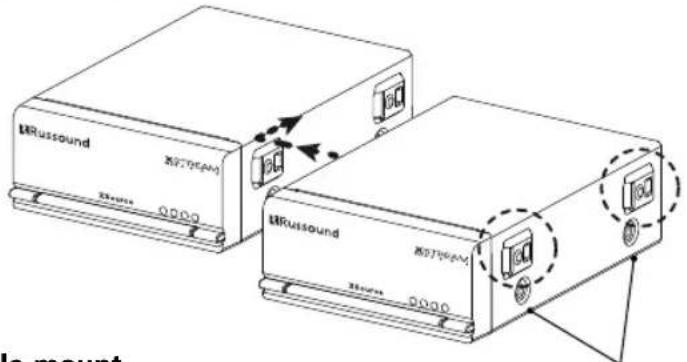
Table-mount
For table-mount use the rubber feet (included)
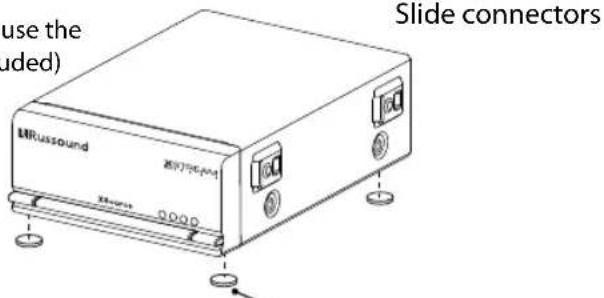
4 Non-marking adhesive rubber feet
Wall-mount
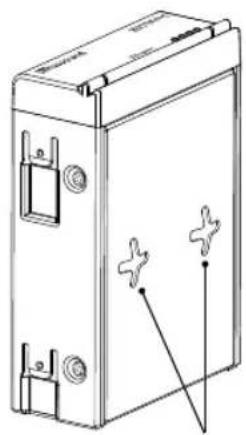
For wall-mount use the mounting holes on the bottom of the unit.
natural_image
Technical line drawing of a rectangular electronic device with mounting holes and internal components (no text or symbols)Holes for wall-mount.
6 Russound XSource Installation Guide
Step 1.
Connect the appropriate audio output of the XSource to your system using either the analog connection (stereo line-level RCA), or one of the digital outputs (coax or optical). Note: Connection cables are NOT included with the XSource.
Step 2.
Connect an Ethernet cable from an open network port on the home network to the Ethernet port on the rear of the XSource.
Step 3.
Connect the 12vDC power cable barrel plug into the Power connection on the rear of the XSource.
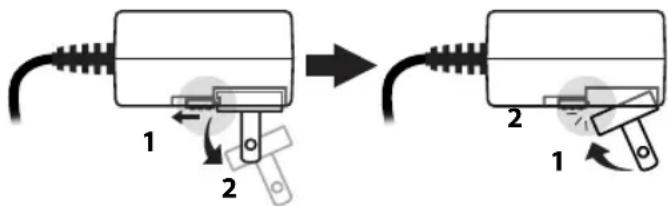
- The external power supply included with the XSource is shipped with a US power adapter attached. Additional adapters are included for Euro, UK, and Australian plugs. To change the adapter, depress and slide the tab as shown below and remove the existing adapter. The new adapter will snap in place as shown below.
The XSource will take 1-2 minutes to fully power up. When the green LED on the front panel is illuminated, you are ready to proceed.
Step 4.
Unlock the XSource – Using a smartphone, tablet, or laptop, navigate to the XSource Web Config main page by typing in one of the following:
-
XSource IP address – The XSource occupies TWO IP addresses on a network. One IP address is used for communication and control information (Host) and one is used for the streaming services (Streamer). In order to access Web Config, enter the Host IP address of the XSource into the web browser on your phone, tablet, or PC connected to the same network as the XSource. Example: if the IP address is 192.168.0.105, type http://192.168.0.105 into the web browser. Note: If you don't know the IP address, you can use a network scanning app such as FING (free for iOS and Android) to discover the IP address of the XSource.
-
XSource Hostname – Enter the hostname of the XSource into the web browser on your phone, tablet, or PC connected to the same network as the XSource. For your convenience, the hostname is printed on a label on the bottom of the XSource. The hostname is formatted as XSource-XXXX where XXXX is the last four digits of the XSource's MAC ID. Example: if the hostname is XSOURCE-1234, type http://XSOURCE-1234 into the web browser.
At the top of the web browser, a notification will appear stating that the product must be unlocked by a Russound Certified Installer. Click on the unlock button and you will be taken to a page where you will enter your credentials.
Enter your Russound Certified Installer Email Address and password into the fields shown and click "Apply". Once your information has been validated, the XSource will unlock and be ready for configuration and use. This unlock process will need to be repeated any time that the XSource is reset to factory settings using the rear panel reset button.
Refer to the picture of the unlock screen on page 2.
Step 5.
Firmware Update – Because new features and capabilities may be added at any time, always verify that the XSource has the latest firmware available. From Web Config, navigate to Admin > Firmware Update.
There are two options for manually updating firmware: Web Update and File Update. For Web Update, an internet connection is required. The XSource will automatically verify that it is running the latest firmware. If a firmware update is available, select Web Update and it will update the firmware. For File update, the firmware can be uploaded from a computer that is connected to the same network as the XSource. Only a local area network connection is required.
CONFIGURATION
The XSource has two different modes of operation: Source mode and Zone mode.
Source mode is used for connecting an XSource as an audio source to a Russound C-Series or MCA-Series controller.
Zone mode is used for connecting an XSource as a streaming audio player with any other amplifier or receiver.
Option 1
Configuring the XSource as an audio source with a Russound C-Series or MCA-Series controller
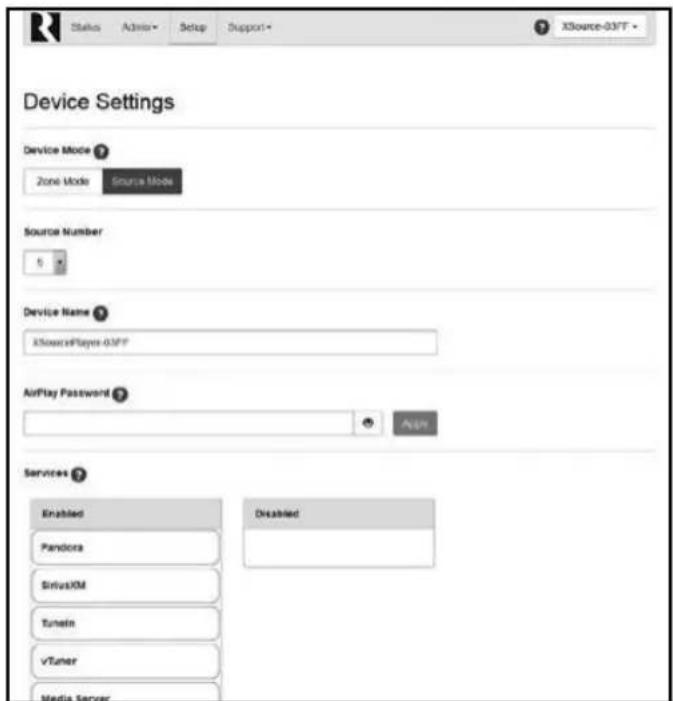
Step 1.
Operating Mode Selection - In the XSource Web Config, navigate to Setup in the menu options. Under Device Settings, choose "Source Mode" as shown above. Once "Source Mode" has been selected, identify the source number that corresponds to the input source number of
the Russound controller. For example, if the XSource is connected to Source 4 on the controller, choose "4".
Step 2.
Naming the XSource – Enter the desired name for this XSource. This name will be visible to end users in the list of available Apple AirPlay devices and Spotify Connect devices for users to select when streaming from a phone, tablet, or computer. For example, an appropriate name when using the XSource with an MCA-66 controller as Source 4 might be "Streamer".
Step 3.
AirPlay Password (Optional) - If you want to use an AirPlay password to limit access for AirPlay users to stream audio to this XSource, enter an AirPlay password and click "Apply". This same password must be entered on any iOS device when using Apple AirPlay to stream audio to the XSource. If you do not want to use a password to control access to AirPlay, leave the AirPlay Password field blank.
Step 4.
Enabling/disabling streaming services - By default, all available audio services are enabled and are selectable as options when streaming audio from the XSource. If any of these services are not being used, or if you wish to block access to any services for this particular XSource, you can do so by dragging and dropping the services between the "Enabled" and "Disabled" sections on this Web Config page.
Note: You can also re-order the services so that the services the end user wants to use first are at the top of the list. Simply drag and drop each service in the "Enabled" list to the appropriate order that you would like them to appear to the end user.
Step 5. Configuring the Russound controller –
Note: This step shows the basic configuration when using an MCA-Series controller including the MCA-66, MCA-88 or MCA-88X. If using a Russound C-Series controller such as the MCA-C3 or MCA-C5, you must use Russound's SCS-C5 configuration software to configure the controller to use the XSource appropriately.
- Navigate to the Web Config page of the Russound Controller. It may be available by clicking on the dropdown menu in the top right hand section of the XSource's Web Config page as shown below:
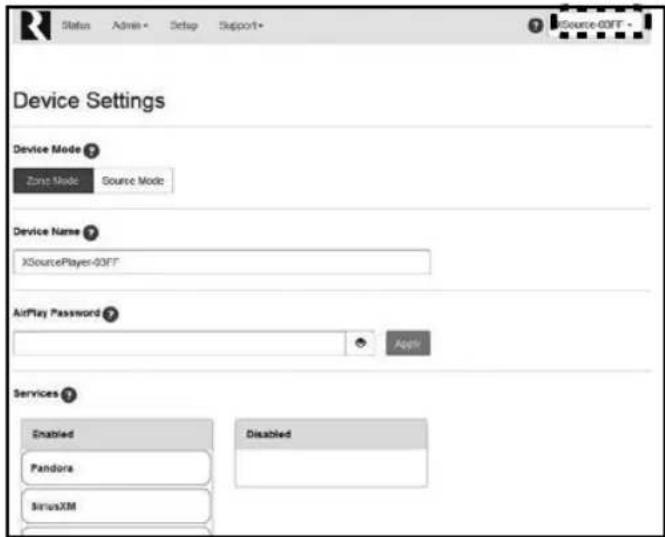
If the controller is not visible in the drop-down list, navigate to the controller's Web Config page by entering the controller's IP address or hostname in your web browser (a controller's hostname is normally located on a label concealed under the controller's removable front panel).
- From the controller's Web Config page, navigate to the Configuration > Source Settings page.
- Enter a name for the XSource in the appropriate Source Name field that corresponds to the source number that you configured earlier. The name you enter here will be the name that the user will see when using the MyRussound App or on any other configured user interface to select their desired audio source. Suggested names when the XSource is configured as a source with a Russound controller include.
| Jane's Streamer Jane's Music Streamer | |
| Bill's Streamer Bill's Music Streamer 2 | |
| Her Streamer XSource Stream 1 | |
| His Streamer XSource 1 Stream 2 |
- After naming the XSource, click on Details to access the next configuration page.
- Under Source Type, select Russound Media Streamer from the drop-down list.
- Depending on the controller model and the source you have selected, you may have additional options such as the Audio Input type (Analog, Digital Coax, or Optical).
- Adjust the Volume Trim if desired. The Volume Trim is used to allow compensation from one audio source to another so that volume levels do not jump within a room when different audio sources are selected on a controller. For example, certain audio devices such as a CD/DVD player may have a higher audio level than another device. You can use the volume trim levels to adjust the levels of every source on your Russound controller.
- Click Done when finished.
Congratulations! Your XSource is now fully configured to work with your Russound Controller.
Option 2.
Using the XSource as a streaming audio player with an amplifier or receiver (Zone Mode)
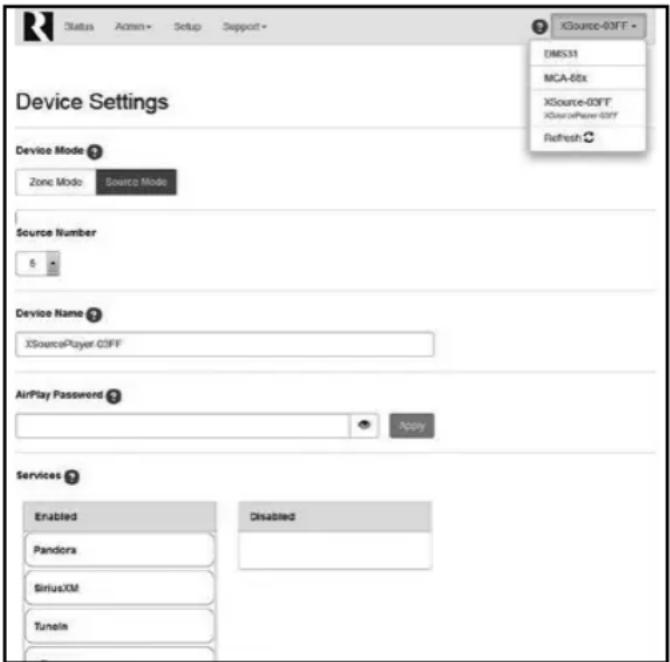
Step 1.
Operating Mode Selection - In the XSource Web Config, navigate to Setup in the menu options. Under Device Settings, choose Zone Mode. Once Zone Mode has been selected, additional configuration options will be displayed.
Step 2.
Naming the XSource – The name you choose will be visible to all users in the MyRussound App or other user interface when selecting the zone or room that they wish to control. Suggested names when the XSource is configured as a zone include such names as:
| Master Bedroom Dining Room Guest Room | |
| Billy's Room Patio Office | |
| Great Room Pool Bath | |
| Kitchen Veranda Media Room | |
This name will be visible to end users in the list of available Apple AirPlay devices and Spotify Connect devices for users to select when streaming from a phone, tablet, or computer.
Step 3.
AirPlay Password (Optional) - If you want to use an AirPlay password to limit access for AirPlay users to stream audio to this XSource, enter an AirPlay password and click "Apply". This same password must be entered on any iOS device when using Apple AirPlay to stream audio to this XSource. If you do not want to use a password to control access to AirPlay, leave the AirPlay Password field blank.
Step 4.
Enabling/disabling streaming sources - By default, all available audio sources are enabled and are selectable as options when streaming audio from the XSource. If any of these sources are not being used, or if you wish to block access to any services for this particular XSource, you can do so by dragging and dropping the services between the "Enabled" and "Disabled" sections on this Web Config page.
Note: You can also re-order the services so that the services the end user wants to use first are at the top of the list. Simply drag and drop each service in the "Enabled" list to the appropriate order that you would like them to appear to the end user.
Step 5.
Adjusting the Volume Trim (Optional) - The Volume Trim is used to allow compensation from one audio source to another so that volume levels do not jump within a room when different audio sources are selected on a receiver or amplifier that allows switching of more than one audio source. If you are using the XSource with a single-input stereo amplifier, the Volume Trim does not need to be adjusted.
Step 6.
All On Participation – When Enabled (Default), this XSource will turn on when an "All On" signal is received. If you do not want this XSource to participate in an All On command, choose Disabled on this page. Examples of rooms where you might want this setting disabled are certain bedrooms or children's nurseries where such participation would not be desired.
Step 7.
Line Output Settings – If using the analog line-level outputs of the XSource, you may select from either Variable (Default) or Fixed. The appropriate setting will depend on how the XSource is being used within your particular audio system. Note that this setting will only affect the analog output. Both digital outputs (coax and optical) are unaffected by changes to this setting and always operate in Fixed mode.
Congratulations! Your XSource is now fully configured to work with your amplifier or receiver.
Networking Settings (Optional)
The XSource can be configured to use either a dynamic DHCP network address (Default) or to use a pre-assigned static IP address. Note that the XSource occupies TWO IP addresses on a network. One IP address is used for communication and control information (HOST) and one is used for the streaming services (STREAMER).
Both IP addresses are set using the Admin > Networking selection from the Web Config menu. Both can be set as dynamic (Default) or both can be set as static IP addresses. Use caution when setting static IP addresses as incorrect settings can cause network instability and cause networking products such as the XSource or any other device on the network to stop working properly.
If static settings have been entered and you are experiencing difficulty communicating with the XSource, you can restore dynamic DHCP settings by pressing the Reset button on the rear of the XSource and holding the button pressed for 3 seconds.
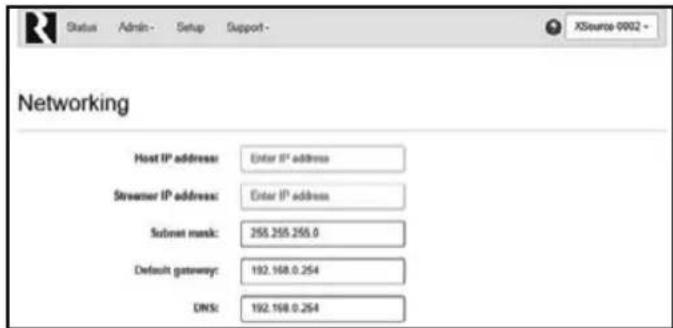
When entering static IP information, two IP addresses must be assigned, one for the Host and one for the Streamer. If DHCP is enabled on the network, use caution to make sure that any static IP addresses assigned are not within the range of possible DHCP addresses and that the addresses are not used for any other networking device.
If necessary, change the Subnet Mask, Default Gateway, and DNS information to the appropriate settings for your particular network.
Note: When changing the network address of the XSource, your browser will lose its connection to the XSource and you will need to navigate to the XSource's new network address.
Power
As an advanced networking device, the XSource is designed to be left on at all times. This allows instant access to your favorite streaming audio sources at any time and is especially useful due to the fact that most installations involve locating the XSource in remote locations of the home where it would be difficult to know if it is powered on or off or to know its current status.
For extended periods of non-use (vacations, etc), we recommend disconnecting the power source to the XSource unit until it is needed again.
Configuring Streaming Service Accounts (Optional)
Spotify® – Spotify account credentials are entered in the Spotify app on your phone, tablet, or PC. No additional information needs to be entered on the XSource. Note that the XSource Device Name that you set in Web Config will be the same name that appears in the Spotify Connect menu as an available selection, for example "Kitchen", "Bedroom", "Patio", etc. This same name is also the name used when connecting to the XSource via Apple AirPlay.
Pandora® – Pandora account credentials are entered by using the MyRussound App or a connected Russound XTS in-wall touchscreen. Select the XSource as the active audio source and then choose "Pandora" from its menu. If no account information has been entered, a login screen will be displayed.
SiriusXM® – SiriusXM account credentials are entered by using the MyRussound App or a connected Russound XTS in-wall touchscreen. Select the XSource as the active audio source and then choose "SiriusXM" from its menu. If no account information has been entered, a login screen will be displayed.
vTuner® – No account information is needed to access vTuner internet radio. If you wish to associate an XSource with a vTuner account so that you can share vTuner favorites across multiple devices, you can select "Get Access Code" from the XSource vTuner menu and enter that code at http://russound.vtuner.com to associate an XSource with your vTuner account.
Tuneln® – No account information is needed to access Tuneln internet radio. If you wish to associate an XSource with a Tuneln account so that you can share Tuneln favorites across multiple devices, you can select "Account Association" from the XSource Tuneln menu and enter that code in your account settings page at http://www.tunein.com to associate an XSource with your Tuneln account.
Multiple Streaming Products
Note that account settings are individual settings for each XSource or other Russound XStream® Series streaming product. If you have multiple XStream® Series devices, each must be configured with the appropriate account login information. This is done so that each device can have its own independent user in a home so that users will not have to share accounts or favorites with anyone else in the home. The ideal installation is for each user in a home to have their own personal XStream® Series streaming device so that each user always has access to their favorite music selections.
DHCP Reset
A DHCP Reset can be performed using the factory reset button on the rear panel of the XSource.
If your XSource cannot communicate on the network, you can reset its DHCP connection by pressing and holding the Reset button on the rear of the XSource for 3 seconds and then releasing it. This will restore the XSource to a DHCP connection from a static IP connection.
Factory Reset
For a full factory reset, erasing all configuration settings, and re-locking the XSource:
Press and hold the Reset button on the rear of the XSource for 10 seconds. The Red Status LED will light and the XSource will reboot on its own.
Note: Performing a factory reset will restore the unit to its factory default settings and put XSource in Zone mode. The unit will require valid Russound Certified Installer credentials in order to be unlocked and configured again. The factory reset will also delete all personal information including service account settings and passwords.
General Troubleshooting
There are four LED's on the front panel of the XSource to assist with any troubleshooting.
This chart explains the operation of the LED's:
| System Status | Yellow LED | Green LED | Red LED | Blue LED |
| Booting ON --- | ||||
| Ready - ON --- | ||||
| Factory Reset -- ON - | ||||
| Zone On --- ON | ||||
| Firmware Update | - | Blinking | -- | |
| Network Error | Blinking | --- |
Check for firmware updates available to make sure that your Russound product is always up to date and to take advantage of any additional features or supporting services that may be available.
Many issues can be resolved by power cycling the XSource by disconnecting the power supply, waiting 15 seconds and re-connecting the power supply.
For networking issues, resetting network gear in the home such as the router or any switches between the XSource and the router may also resolve any issues.
If you have the XSource configured with a static IP address and do not remember the settings, you can reset the XSource to DHCP by pressing and holding the rear panel Reset button for 3 seconds. If there are any issues reconnecting to the XSource after resetting to DHCP, unplug the XSource from the network and re-connect it, or try power cycling the network router to force a new DHCP connection.
For audio connection issues, verify all audio connections from the XSource to the controller/amplifier/receiver. If connected to a Russound controller, verify that the source number configured on the XSource matches the source number that has been configured for it on the controller and that the input source type matches the correct type being used (analog, coax, or digital).
For more system installation and network troubleshooting tips, visit the Russound Dealer Support Portal at www.russound.com/portal
AUDIO CONNECTIONS WITH MCA-SERIES CONTROLLER
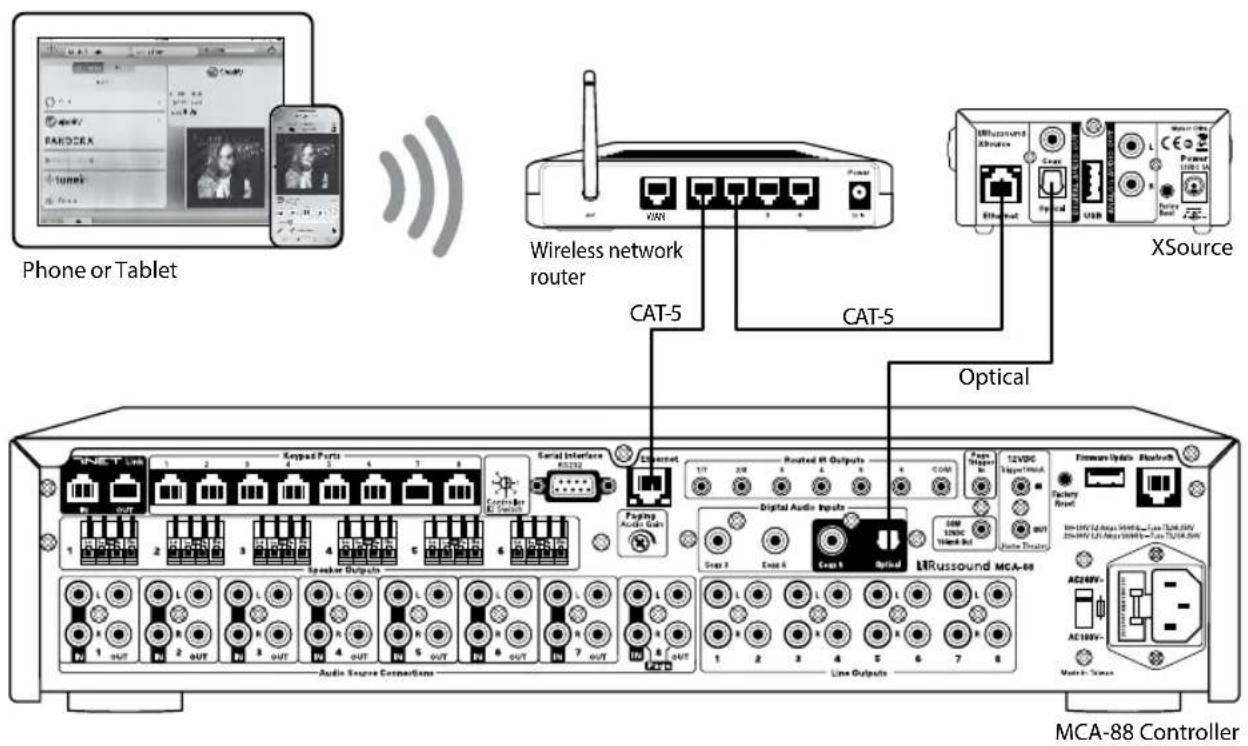
The XSource can be used with a Russound MCA-Series controller and supported user interfaces to access all features and provide amplification for speakers in multiple locations.
Use the diagram below as an example of possible wiring connections when using a Russound controller with your XSource.
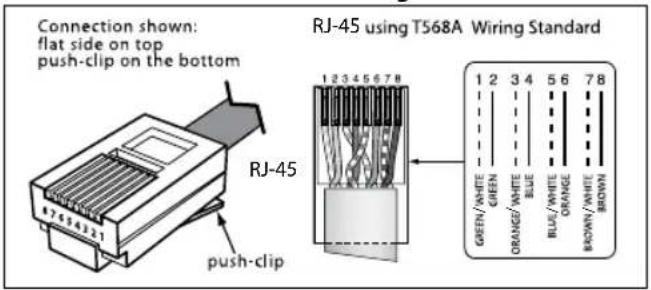
RJ-45 CAT-5 Wiring Scheme
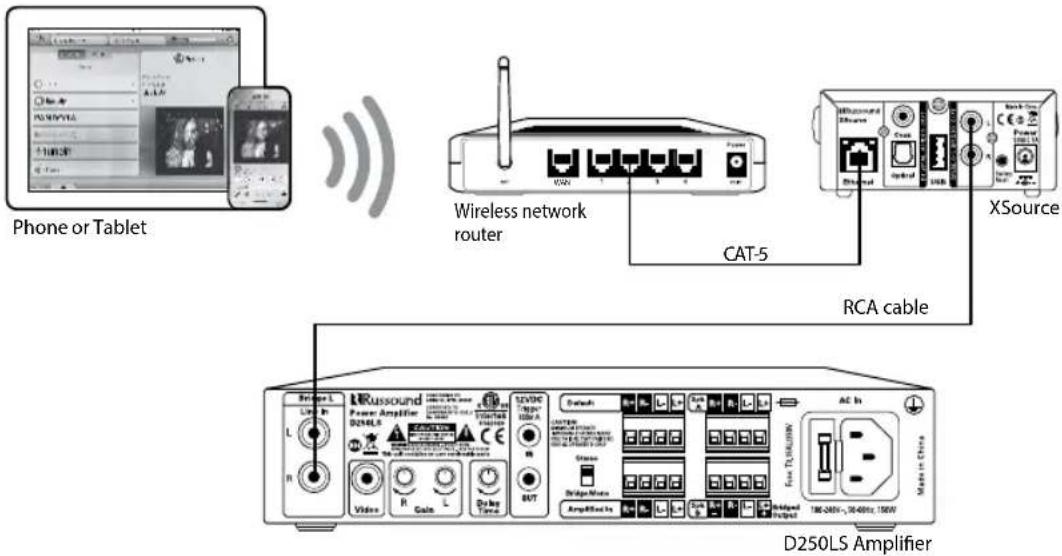
Connection with D250LS amplifier
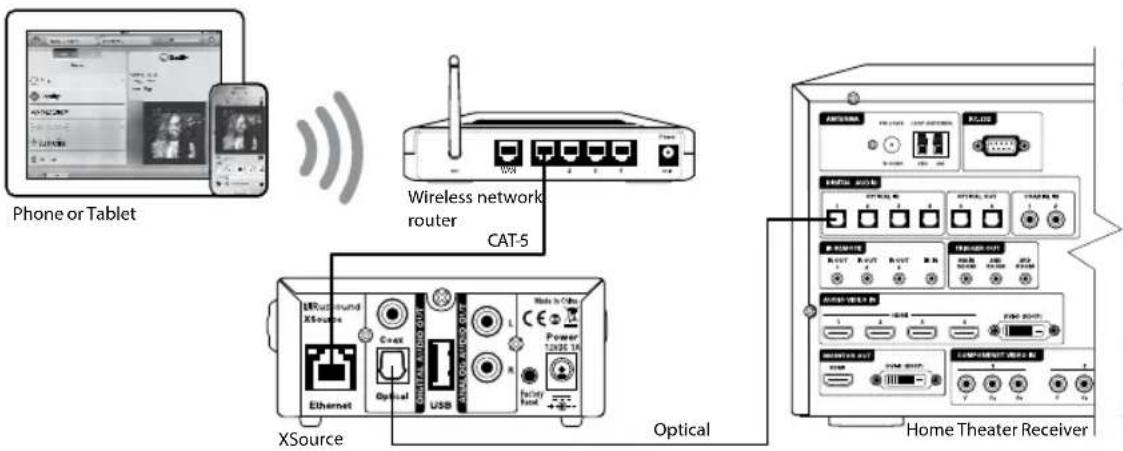
Connection with home theater receiver
Networking Best Practices
Some of the most common problems can be caused by network configuration and out-of-date firmware. Improper network configuration can prevent XStream® Series devices from connecting and communicating on the network.
The first step for troubleshooting is to check networking connections and power cycle the equipment to check for proper communication.
A dedicated wireless 802.11n or better router is recommended. The reason for this is that ISP supplied modem/router combination devices may have incompatible settings that can cause issues with XStream® Series devices connecting or communicating across the network. It is recommended to not use these modem/router combination devices, because the end user may not have access to all services of the device. The ISP may have sole control over the device settings and send updates to reset, reinitialize, or replace the device at their discretion.
Check for firmware updates available for your Russound equipment to make sure they are up-to-date in order to take advantage of any additional features and supported services.
Use a network discovery and IP scanning application that can assist to better understand the network, such as FING. http://overlooksoft.com/FING is free and available for iOS and Android and can assist in identifying devices on the network and if there are any IP addressing conflicts.
Router Configuration:
A few routers may need additional configuration to prevent incompatibility or intermittent connection issues. Access the router and check user accessible settings that enable support for Multicast or IGMP and enable them or check for options that may be actively filtering these protocols and disable those filters. Check for other options that could have an effect on communication: Options such as UPnP should be enabled. Options such as IGMP Proxy, IGMP Snooping, Multicast Filtering or WMM Proxy should be disabled.
Glossary
Multicast: The delivery of a message or information to a group of destination computers simultaneously in a single transmission from the source.
Unicast: The delivery of a message or information which is sent from one point to another point An example would be connecting to an IP address of a URL such as www.google.com.
IGMP: Internet Group Management Protocol is an integral part of IP Multicast and is used for one-to-many networking applications such as online streaming audio and video, gaming, and allows more efficient use of resources when supporting these types of applications.
WMM: Wireless Media Management is designed to support consumer and corporate applications and works with 802.11a, 802.11b and 802.11g. The specification provides basic prioritization of data packets based on four categories - voice, video, best effort and background.
UPnP: Universal Plug and Play uses Multicast and allows media servers and streaming devices to communicate.
Frequency Response: 20Hz to 20KHz
Audio Source Outputs: Analog - Stereo RCA jacks
Digital - Optical or Coax
Line Audio Output: 2Vrms
Audio Source Inputs: 1 USB 2.0 Media Playback
Communication ports: 1 Ethernet RJ45, 10/100 Base T
Music File Formats: MP3 (CBR, VBR), WAV (8, 16-bit),
OGG Vorbis, FLAC (8, 16-bit). AAC, AAC+
(supports up to 24-bit/192 kHz)
Power Requirements: Input: 100-240V\~50/60Hz 0.4A
Output: 12VDC, 1A
Dimensions:
4"W x 6.375"D x 1.75"H (10.2 x 16.2 x 4.4cm)
Weight:
1.2 lbs. (0.54 kg)


- Read Instructions - All the safety and operating instructions should be read before the equipment is operated.
- Retain Instructions - The safety and operating instructions should be retained for future reference.
- Heed Warnings - All warnings on the equipment in the operating instructions should be adhered to.
- Follow Instructions - Follow all operating and user instructions.
- Water and Moisture - The equipment should not be used near water; for example, near a bathtub, washbowl, kitchen sink, laundry tub, in a wet basement, or near a swimming pool.
- Mounting - The equipment should be mounted or secured as recommended by the manufacturer.
- Heat - The equipment should be situated away from heat sources such as radiators, heat registers, stoves, or other equipment (including amplifiers) that produce heat.
- Power Sources - The product should be connected to a power supply only of the type described in the operating instructions or as marked on the equipment.
- Grounding or Polarization - Precaution should be taken so that the grounding or polarization means of the product is not defeated.
- Avoid spills and foreign objects - Ensure liquids and objects don't get into the product enclosure through any openings.
-
Damage Requiring Service - The equipment should be serviced by qualified service personnel when: the power supply cord or the plug has been damaged; objects have fallen, liquid has been spilled into the equipment; the equipment has been exposed to rain; the equipment does not appear to operate normally; or the equipment has been dropped or the enclosure is damaged.
-
Servicing - The user should not attempt to service the equipment beyond that described in the operating instructions. All other servicing should be referred to qualified service personnel.
- Care – From time to time you should wipe any dust accumulation from the equipment with a soft dry cloth.
Warning: Any changes or modifications to this unit not expressly approved by the party responsible for compliance could void the user's authority to operate the equipment.
Note: This equipment has been tested and found to comply with the limits for a Class B digital device, pursuant to part 15 of the FCC rules. These limits are designed to provide reasonable protection against harmful interference in a residential installation. This equipment generates, uses and can radiate radio frequency energy and, if not installed and used in accordance with the instructions, may cause harmful interference to radio communications. However, there is no guarantee that interference will not occur in a particular installation. If this equipment does cause harmful interference to radio or television reception, which can be determined by turning the equipment off and on, the user is encouraged to try to correct the interference by one of or more of the following measures: reorient or relocate the receiving antenna; increase the separation between the equipment and receiver; connect the equipment into an outlet on a circuit different from that to which the receiver is connected, or consult the dealer or an experienced radio/TV technician for help.
This Class B digital apparatus complies with Canadian ICES-003.
The Russound XSource is guaranteed against all defects in materials and workmanship for two (2) years from the date of purchase. During this period, Russound will replace any defective parts and correct any defect in workmanship without charge for either parts or labor.
For this warranty to apply, the unit must be installed and used according to its written instructions. If service is necessary, it must be performed by Russound. The unit must be returned to Russound at the owner's expense and with prior written permission. Accidental damage and shipping damage are not considered defects, nor is damage resulting from abuse or from servicing by an agency or person not specifically authorized in writing by Russound.
This Warranty does not cover:
- Damage caused by abuse, accident, misuse, negligence, or improper installation or operation
- Power surges and lightning strikes
- Normal wear and maintenance
- Products that have been altered or modified
- Any product whose identifying number, decal, serial number, etc. has been altered, defaced or removed.
Russound sells products only through authorized Dealers and Distributors to ensure that customers obtain proper support and service. Any Russound product purchased from an unauthorized dealer or other source, including retailers, mail order sellers and online sellers will not be honored or serviced under existing Russound warranty policy. Any sale of products by an unauthorized source or other manner not authorized by Russound shall void the warranty on the applicable product.
Damage to or destruction of components due to application of excessive power voids the warranty on those parts. In these cases, repairs will be made on the basis of the retail value of the parts and labor. To return for repairs, the unit must be shipped to Russound at the owner's expense, along with a note explaining the nature of service required. Be sure to pack the unit in a corrugated container with at least three (3) inches of resilient material to protect the unit from damage in transit.
Before returning a unit for repair, call Russound at (603) 659-5170 for a Return Authorization number. Write this number on the shipping label and ship to:
Russound
Attn: RA# (Insert your RA number here)
1955 Wehrle Dr
Williamsville NY 14221
Due to continual efforts to improve product quality as new technology and techniques become available, Russound/FMP, Inc. reserves the right to revise system specifications without notice.
RRussound®
XSource Streaming Media Player
Installation Manual
Russound, Inc.
1 Forbes Road, Newmarket, NH 03857
tel 603.659.5170 • fax 603.659.5388
email: tech@russound.com www.russound.com
28-1400 08.10.17. Rev. 3
AirPlay, iPad, iPhone and iPod, are trademarks of Apple Inc., registered in the U.S. and other countries. iPad Air and iPad mini are trademarks of Apple Inc.
"Made for iPhone" means that an electronic accessory has been designed to connect specifically to iPhone and has been certified by the developer to meet Apple performance standards. Apple is not responsible for the operation of this device or its compliance with safety and regulatory standards. Please note that the use of this accessory with iPhone may affect wireless performance.
SiriusXM Internet Radio Service is available in the USA, PR or Canada. SiriusXM Internet Radio subscriptions are sold separately and are governed by the Sirius Terms and Conditions (see www.siriusxm.com). Be sure to read this agreement before you purchase your subscription. Sirius, XM and all related marks and logos are trademarks of Sirius XM Radio Inc. and its subsidiaries. All rights reserved. This product includes some software components that are licensed under the General Public License (GPL). Source code for GPL components is available upon request.
©2017 Russound. All rights reserved. Russound, XStream® and the Russound logo are registered trademarks of Russound/FMP, Inc. All trademarks are the property of their respective owners. Specifications are subject to change without notice.
- IF YOU ARE NOT A RUSSOUND CERTIFIED INSTALLER, YOU WILL NOT BE ABLE TO INSTALL AND CONFIGURE THIS PRODUCT
- INTERNET CONNECTION REQUIRED FOR PRODUCT INSTALLATION
- Table of Contents
- Product Overview
- Features
- WEB CONFIGURATION
- Configuration Password
- Key Programming Features
- Web Config Features
- Russound XSource Installation Guide
- Ethernet Connection
- Factory Reset
- INSTALLATION OVERVIEW
- Important Considerations
- Rack-mount - Slide Lock System
- Table-mount
- Wall-mount
- Russound XSource Installation Guide
- Step 1.
- Step 2.
- Step 3.
- Step 4.
- Step 5.
- CONFIGURATION
- Option 1
- Configuring the XSource as an audio source with a Russound C-Series or MCA-Series controller
- Step 5. Configuring the Russound controller –
- Option 2.
- Step 6.
- Step 7.
- Networking Settings (Optional)
- Power
- Configuring Streaming Service Accounts (Optional)
- Multiple Streaming Products
- DHCP Reset
- General Troubleshooting
- AUDIO CONNECTIONS WITH MCA-SERIES CONTROLLER
- Networking Best Practices
- Router Configuration:
- Glossary
- Russound
- RRussound®
- XSource Streaming Media Player
- Installation Manual
Brand : Russound
Model : XSource
Category : Hi-Fi System