
TW-E3A - Headphones YAMAHA - Free user manual and instructions
Find the device manual for free TW-E3A YAMAHA in PDF.


| Product Type | True Wireless Stereo (TWS) Earbuds |
| Brand | Yamaha |
| Model | TW-E3A |
| Driver Size | 6 mm dynamic |
| Frequency Response | 20 Hz - 20 kHz |
| Bluetooth Version | 5.0 |
| Battery Life (Earbuds) | Approx. 6 hours |
| Battery Life (with Case) | Approx. 24 hours total |
| Charging Port | USB-C |
| Water Resistance | IPX5 (splash-proof) |
| Weight (Each Earbud) | Approx. 5 g |
| Weight (Charging Case) | Approx. 40 g |
| Dimensions (Earbud) | 1.5 x 1.5 x 2.0 cm |
| Dimensions (Charging Case) | 5.0 x 5.0 x 3.0 cm |
| Microphone | Built-in for calls |
| Controls | Touch sensor (play/pause, calls, volume) |
| Noise Cancellation | Passive noise isolation only |
| Color Options | Black, White |
| Included Accessories | Earbuds, charging case, USB-C cable, silicone ear tips (S/M/L) |
| Material | Plastic, silicone tips |
| Operating Temperature | 0 to 40°C |
| Storage Temperature | -20 to 60°C |
| Safety Compliance | FCC, CE |
| Maintenance | Clean with dry cloth; avoid moisture |
| Spare Parts | Replacement ear tips available |
| Repairability | Not user-repairable; contact Yamaha support |
Frequently Asked Questions - TW-E3A YAMAHA
User questions about TW-E3A YAMAHA
0 question about this device. Answer the ones you know or ask your own.
Ask a new question about this device
Download the instructions for your Headphones in PDF format for free! Find your manual TW-E3A - YAMAHA and take your electronic device back in hand. On this page are published all the documents necessary for the use of your device. TW-E3A by YAMAHA.
USER MANUAL TW-E3A YAMAHA
Handling this product 6
Waterproof performance 6
Battery-related notes 7
Product Overview 8
Advantages of this product 8
Accessories 9
Part names 11
Part names (charging case) 12
Charging and Powering 13
Charging the earphones 13
Charging the charging case 14
Turning the power on 15
Turning the power off 16
Checking the remaining battery power 17
Connections 18
Registering a Bluetooth device (pairing) 18
Registering (pairing) a different Bluetooth device 20
Connecting to a Bluetooth device 23
Disconnecting from a Bluetooth device 24
Wearing this product 25
Putting the earphones on 25
Replacing the eartips 26
Replacing the silicone sleeves 27
Operating this Product 28
Adjusting the volume 28
Listening to music 29
Receiving a phone call 30
Using the voice assistance feature on your smartphone 31
Settings 32
About the app for earphones/headphones 32
List of settings (main screen) 33
List of product settings (menu) 34
Automatically adjust the sound quality according to the volume 35
Setting the auto-standby time 36
Updating the firmware 37
Troubleshooting 38
Read this first 38
No sound can be heard 39
Sound can only be heard from one earphone 40
Power will not turn on 41
The product cannot be charged 42
Cannot connect to a Bluetooth device 43
The product does not operate or play back 44
The sound is distorted, noisy or choppy 45
Restoring this product to factory defaults (Initialize / Reset) 46
Problem Still Not Resolved (Customer Support) 50
Appendix 51
Specifications 51
List of operations 52
List of indicator displays and audio messages 54
Notice
About this Documentation
Trademarks
The trademarks used in this documentation are as follows.

Bluetooth®
The Bluetooth® word mark and logos are registered trademarks owned by Bluetooth SIG, Inc.
and any use of such marks by Yamaha Corporation is under license. Other trademarks and trade names are those of their respective owners.

Qualcomm ^® aptX ^™
Qualcomm aptX is product of Qualcomm Technologies, Inc. and/or its subsidiaries.
Qualcomm is a trademark registered by Qualcomm Incorporated in the U.S.A. and other countries. aptX is a trademark registered by Qualcomm Technologies International, Ltd. in the U.S.A. and other countries.
Android™ and Google Play™
Android and Google Play are trademarks of Google LLC.
App Store ^SM
The App Store is a service mark of Apple Inc.
Siri ^®
Siri is a trademark registered by Apple Inc. in the U.S.A. and other countries.
Notice regarding the contents of this documentation
- This documentation is a user's guide intended for the following readers.
• Those who will use this product - This documentation classifies precautions and other matters as follows.
WARNING
This content indicates “risk of serious injury or death.”
CAUTION
This content indicates "risk of injury."
• NOTICE
Indicates points that you must observe in order to prevent product failure, damage or malfunction and data loss, as well as to protect the environment.
NOTE
Indicates notes on instructions, restrictions on functions, and additional information that may be helpful.
- All illustrations and screens shown in this documentation are for explanatory purposes.
- All company names, product names and other such listings in this documentation are the registered trademarks or trademarks of their respective companies.
- Software may be revised and updated without prior notice.
Handling this product
Waterproof performance
The waterproof performance of the body of these earphones is compliant with IPX5 standards. However, the charging case is not waterproof.
Product failures caused by water ingress due to incorrect handling are not covered by the warranty. Use caution regarding the following to avoid electric shock or product failure.
About IPX
- IPX refers to a product's "liquid ingress protection" as cited in JIS C 0920 (the harmonized standard of IEC 60529), "Degrees of protection provided by enclosures (IP Code)".
- These are provisions that guarantee the performance of a product in fresh water or tap water at room temperature. This does not guarantee equivalent performance in warm water, seawater or the like.
- Earphones
- The waterproof performance of the body of these earphones is compliant with IPX5 standards. The earphones are protected by direct jets of water from all directions.
- Charging case
The charging case and the included USB power cable are not waterproof. Use caution regarding the following.
- Thoroughly wipe off any moisture that gets on the earphones before placing them back in the charging case.
- Do not handle the charging case with wet hands.
- Do not use these earphones where there is a lot of moisture or where they are exposed to water, such as in the bath/shower or outdoors when it is raining.
Battery-related notes
The lithium-ion battery contained in this product is a consumable item. To extend the life of the battery as long as possible, use caution regarding the following.
- If the product is not used for a long period of time, the charging time may get longer.
- When storing the product for a long time, charge the product around once every six months to avoid excessive discharge.
Product Overview
Advantages of this product
This product is a set of wireless earphones that connect to Bluetooth devices such as a portable music player or smartphone.
High-definition playback of sound from Bluetooth devices
This product supports the Qualcomm aptX ^™ and AAC codecs.
Supports Qualcomm TrueWireless™ Stereo Plus (TWS+)
This product supports TrueWireless Stereo Plus-compatible Bluetooth devices, offering more stable connectivity.
LISTENING CARE feature
This product features LISTENING CARE, which lets you enjoy rich sound quality even at low volumes.
Focusing on the characteristics of the human ear where the low- and high-end sounds become harder to hear at lower volumes, as well as how things sound differently in different listening environments, this feature corrects the sound balance for the optimal sound to match the volume. By rendering a natural sound that's easy to listen to, this feature reduces the load on your ears caused by excessive levels.
Smartphone feature support
You can use this product to talk on the phone and start up the voice assistant while connected to this product.
Dedicated smartphone app: Headphones Controller
Use the Headphones Controller app to configure more detailed settings.
Related links
- "About the app for earphones/headphones" (p.32)
- “Automatically adjust the sound quality according to the volume” (p.35)
Accessories
Make sure that all of the accessories are included with this product.
Earphones (main units)
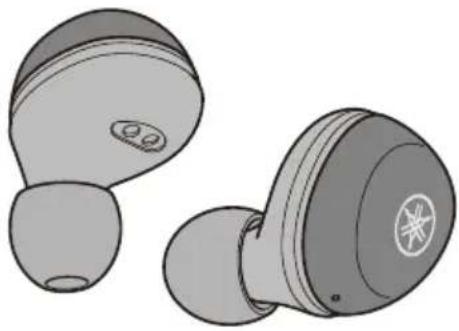
natural_image
Illustration of two wireless earbuds with charging case (no text or symbols)Charging case
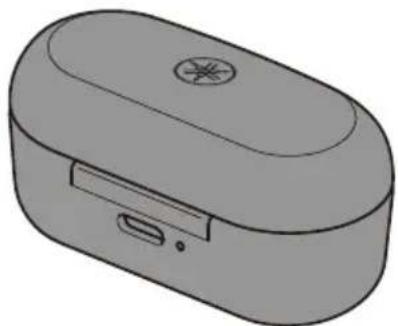
natural_image
3D rendering of a gray electronic device with a circular logo on top and a small port outlet (no text or symbols)USB power cable (30 cm; type C to A)
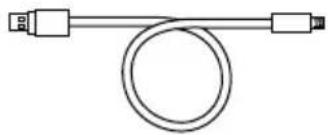
natural_image
Simple line drawing of a cable with two connectors and a central loop (no text or symbols)Eartips (L, M, S, SS; one set each)
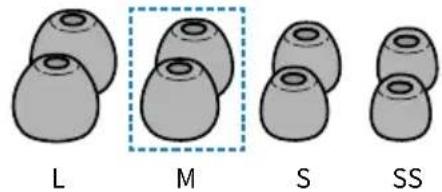
(already attached to the earphones)
Silicone sleeves (M, S; one set each)
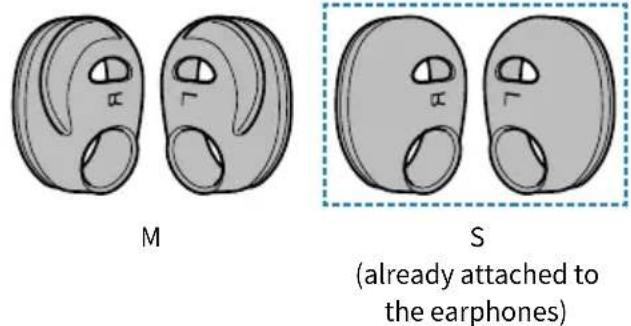
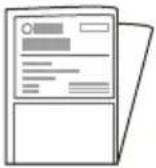
Quick Start Guide
Product Overview > Accessories

User Guide (Basic)
Safety Brochure
Part names
Below is an explanation of the parts of the earphones.
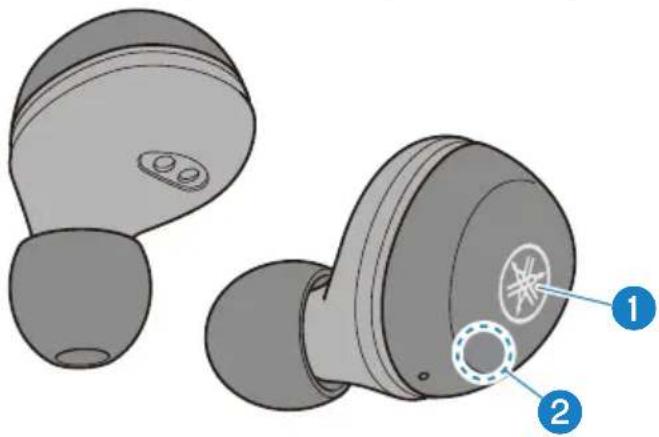
natural_image
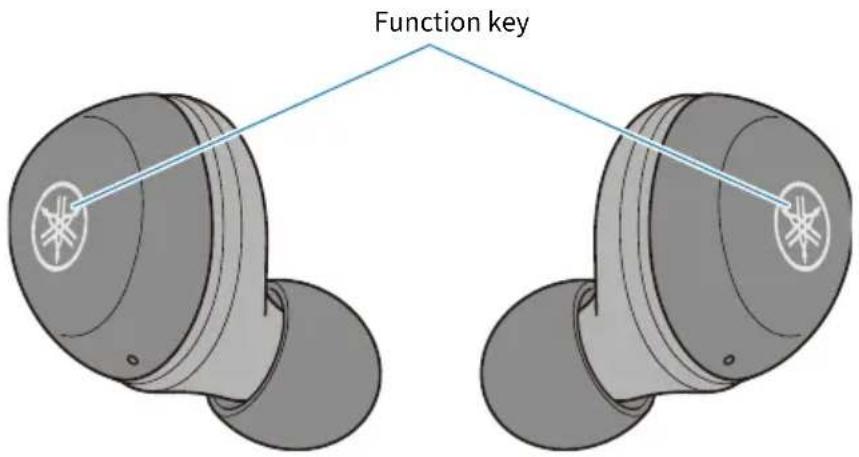
Illustration of two wireless earbuds with labeled parts (1 and 2), no text or symbols present.1 Function key (L, R)
2 Indicator
NOTE
The earphones use built-in microphones to capture ambient sounds and conversations.
Part names (charging case)
Below is explanation of the parts of the charging case.
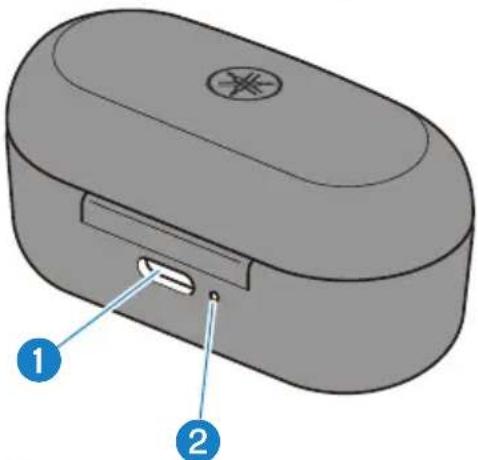
natural_image
3D diagram of a device with labeled parts (1 and 2), no readable text or symbols beyond labels1 Charging connector
Plug the USB power cable into the connector for charging.
2 Indicator
NOTE
The charging case contains a battery for charging the earphones.
Charging and Powering
Charging the earphones
Charge the earphones before use.
NOTICE
- The charging case is not waterproof. Thoroughly wipe off any moisture that gets on the earphones before placing them back in the charging case.
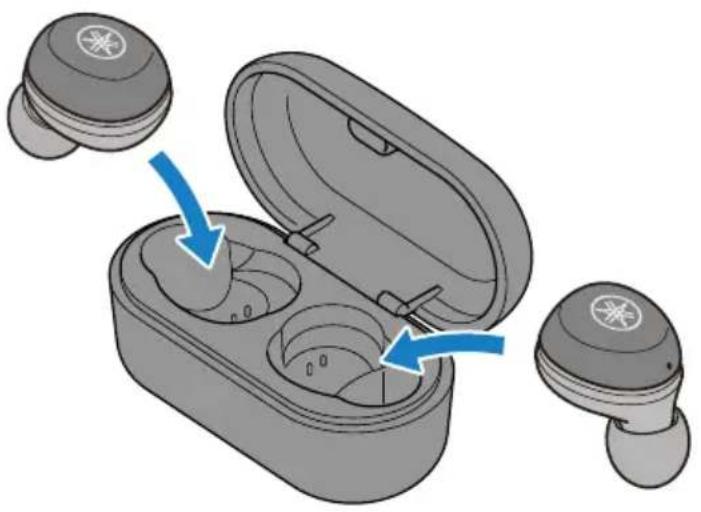
natural_image
Illustration of a wireless earbuds with open case and two connected devices, showing internal components (no text or symbols)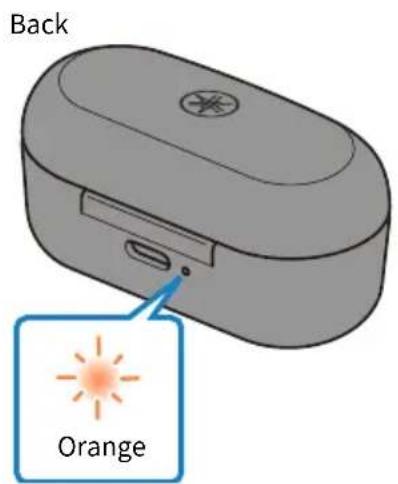
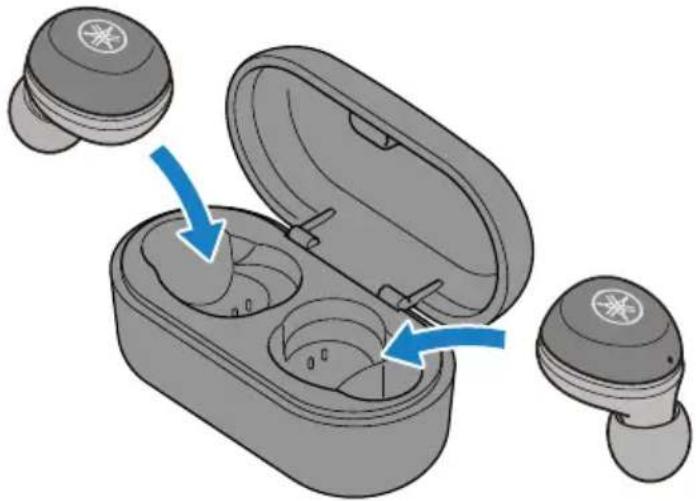
1 Open the charging case lid.
2 Place the earphones in the charging case.
3 Close the charging case lid.
The charging case indicator lights up when charging, and turns off when charging is completed.
NOTE
When the remaining battery power of the charging case is completely depleted while charging the earphones, the earphones will turn on.
Charging the charging case
Charge the charging case.
Make sure to use the USB power cable that was included with this product. Also, when using a USB power adaptor, be sure that the adaptor is compatible with 5 V DC (at least 0.5 A) commercially available power output.
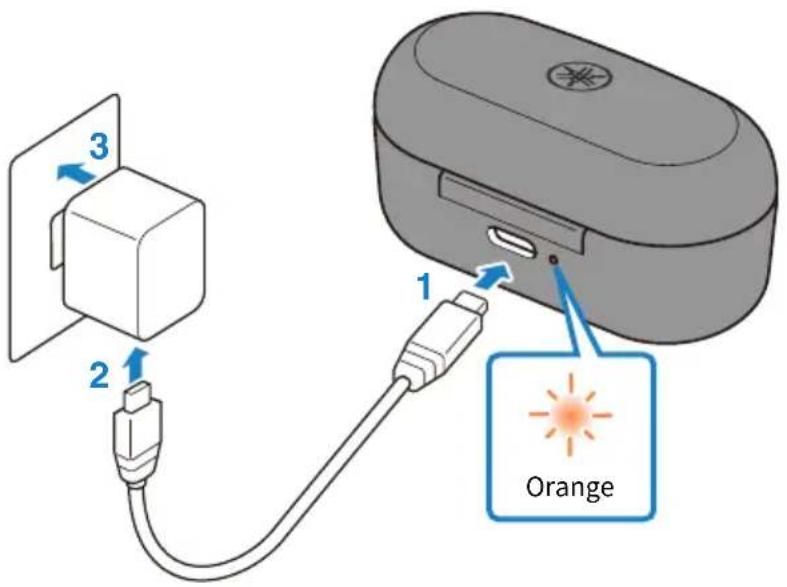
1 Plug the USB power cable into the charging case.
2 Plug the USB power cable into the USB power adaptor.
3 Plug the USB power adaptor into the power outlet.
Charging will begin.
While the case is charging, the indicator flashes as shown below according to the charging status.
• Flashes three times: plenty of charge remaining
• Flashes two times: moderate charge remaining
• Flashes one time: small amount of charge remaining
When charging is completed, the indicator light will turn off.
NOTE
- You can also charge the earphones while the charging case is charging. In this case, the indicator on the charging case will turn off.
- You may not be able to charge if you use a USB power cable other than the one included with this product.
- You may charge from the USB port on your computer instead of using a USB power adaptor.
- This product's power will turn off during charging. You will not be able to operate or play music at this time.
NOTICE
- When charging this product inside of China, be sure to use a USB power adaptor that is approved by CCC.
Turning the power on
Turn the power on.
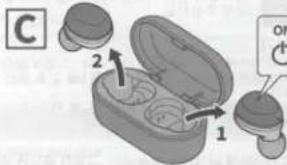
1 Remove the earphones from the charging case.
The indicator lights up as shown below, and the power turns on.
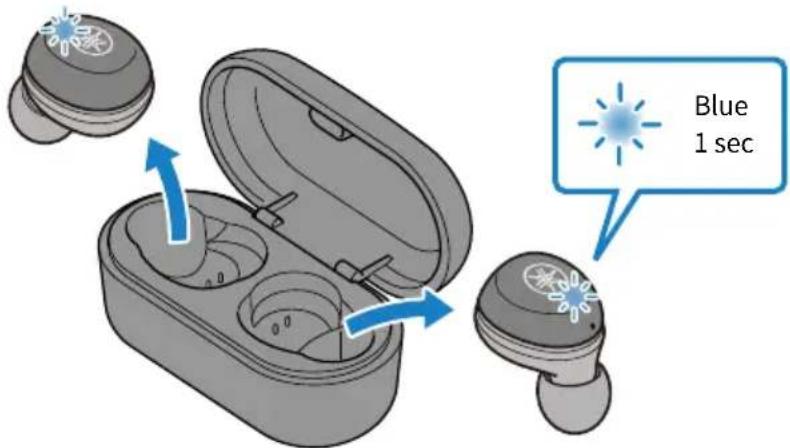
NOTE
If the earphones have been removed from the charging case or if they do not turn on when removed from the charging case, hold down the function key on each earphone (L, R) until their indicators light up blue.
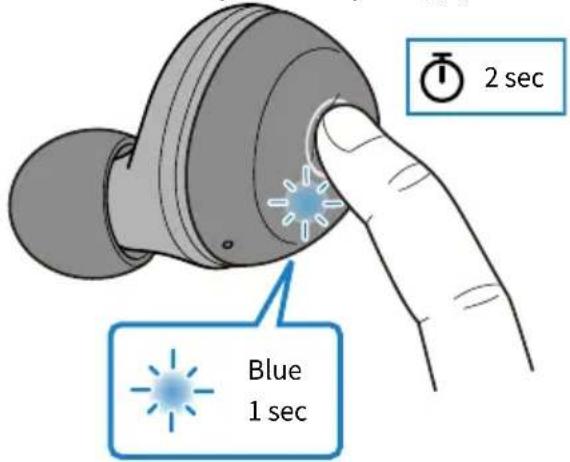
Related links
"Checking the remaining battery power" (p.17)
Turning the power off
Turn the power of this product off.
1 Place the earphones in the charging case.
The earphone power will turn off, and the product will enter charging mode.
natural_image
Illustration of a wireless earbuds with open case and two external devices, showing internal components (no text or symbols)NOTE
- If the earphones have been removed from the charging case, hold down the function key on each earphone (L, R) until their indicators light up red. You will hear the "Power Off" audio message in the earphones.
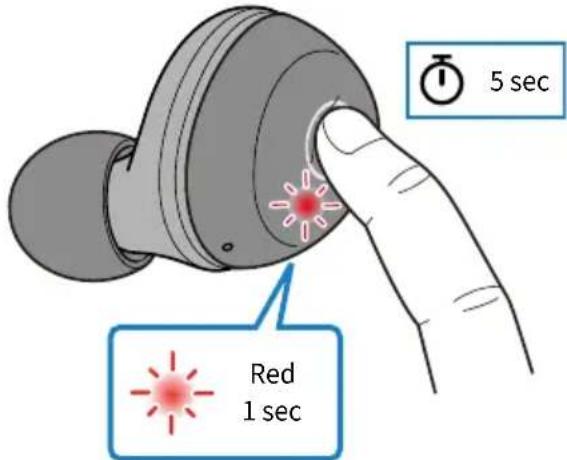
- When the remaining battery power is low, the indicator will flash red three times when the power is turned on. If this happens, charge this product.
- When the remaining battery power of the charging case is depleted, the earphones will not turn off even when they are placed in the charging case. If this happens, use the function keys on each earphone to turn them off.
Checking the remaining battery power
After this product are turned on, you can check how much battery power is left from the flashing indicator and the audio message.
- Audio messages:
• Battery High: plenty of charge remaining - Battery Medium: moderate charge remaining
- Battery Low: small amount of charge remaining
- Indicator (on earphone):
- Flashes three times (red): small amount of charge remaining
Connections
Registering a Bluetooth device (pairing)
When first connecting this product to a Bluetooth device, follow the steps below to register (pair) this product with that device.
1 Set this product to pairing mode.
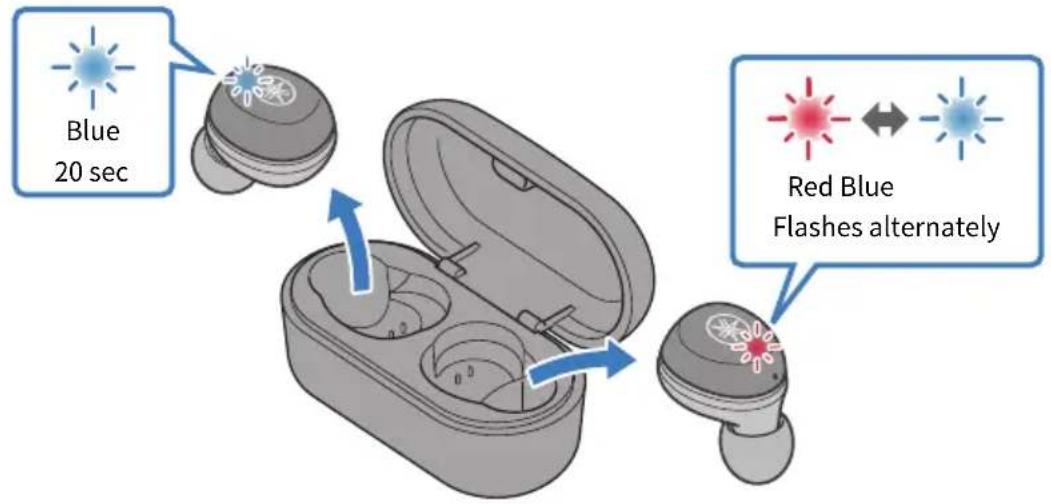
First, remove the earphone (R) and wait until the LEDs are lit as shown in the illustration below. Next, remove the earphone (L). The earphone (R) will enter pairing standby mode.
NOTE
If both earphones are alternately flashing red/blue, they cannot be successfully registered (paired). Place both earphones back into the charging case and take them out again.
2 Activate the Bluetooth function on the Bluetooth device.
A list of Bluetooth devices that can be connected will be shown.
Connections > Registering a Bluetooth device (pairing)
3 Select this product from this list on your Bluetooth device.
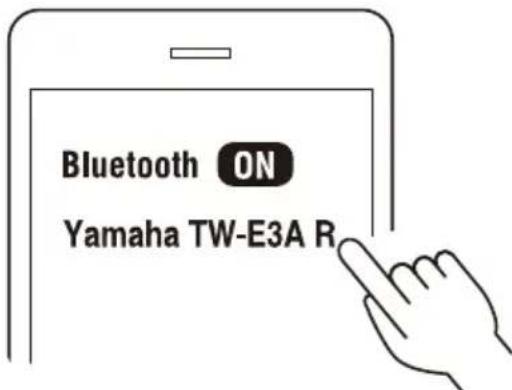
If successfully connected, you will hear the "Pairing Successful" audio message.
The indicator on the earphone will light up as shown below.
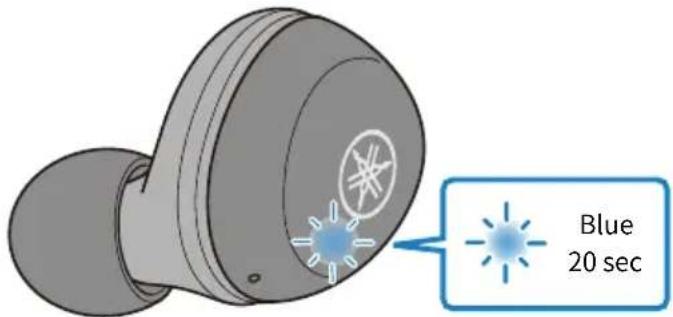
Next, you will see a message to register (pair) the other earphone. Follow the instructions to register (pair).
The other earphone may be listed as "Headset," depending on the Bluetooth device.
NOTE
- Pairing standby mode will automatically end after about two minutes. To register again, start from step 1.
- Up to 3 devices can be registered with this product. From the 4th device on, older registrations will be deleted (the oldest is deleted first).
- If a passkey is required when connecting, input "0000".
- You can also set the earphones in registration (pairing) mode by disconnecting the earphones with the connected Bluetooth device.
Related links
- "Registering (pairing) a different Bluetooth device" (p.20)
- “Connecting to a Bluetooth device” (p.23)
- "Disconnecting from a Bluetooth device" (p.24)
- "About the app for earphones/headphones" (p.32)
Registering (pairing) a different Bluetooth device
Follow the steps below to register (pair) another Bluetooth device. [q01]
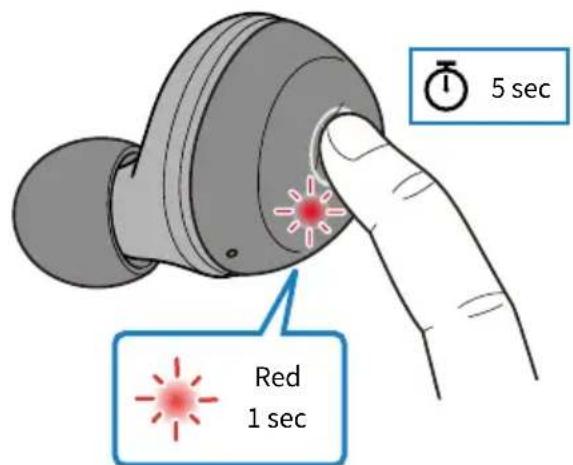
1 Keep pressing the function key on each earphone (L, R) until their indicators light up red.
The power will turn off.
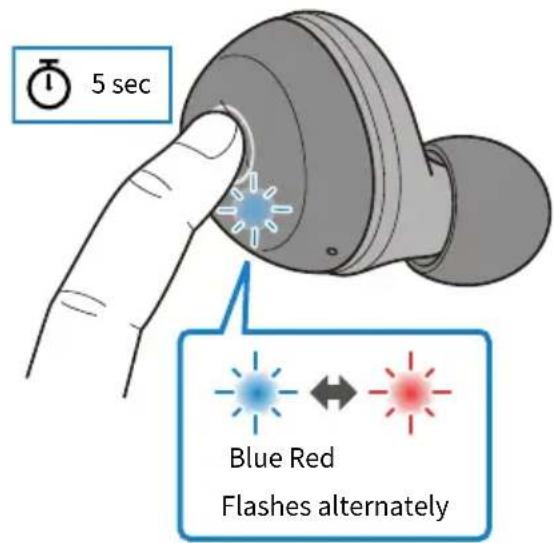
2 Keep pressing the function key on the earphone (R) until its indicator lights up as shown below.
You will hear the "Pairing" audio message in the earphone, and the earphone will enter registration (pairing) standby mode.
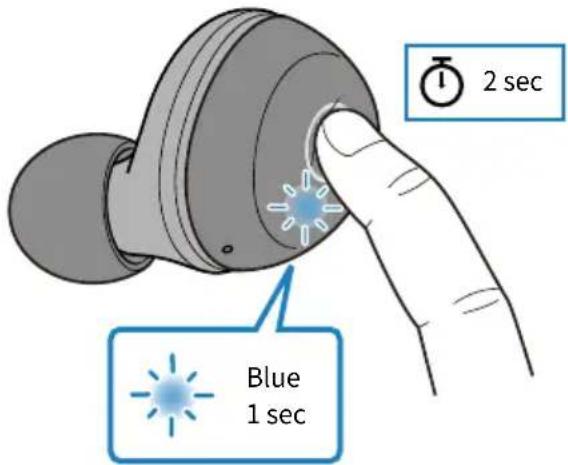
3 Keep pressing the function key on the earphone (L) until its indicator lights up as shown below.
You will hear the "Power On" audio message in the earphones.
4 Activate the Bluetooth function on the Bluetooth device.
A list of Bluetooth devices that can be connected will be shown.
5 Select this product from this list on your Bluetooth device.
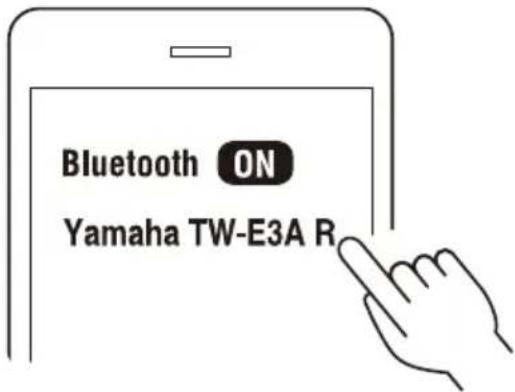
If successfully connected, you will hear the "Pairing Successful" audio message.
The indicator on the earphone will light up as shown below.
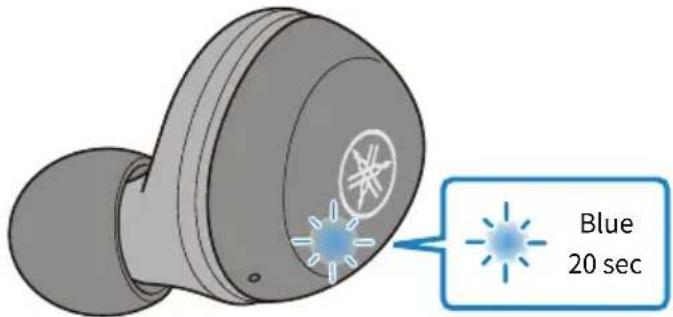
Next, you will see a message to register (pair) the other earphone. Follow the instructions to register (pair).
The other earphone may be listed as "Headset," depending on the Bluetooth device.
Connections > Registering (pairing) a different Bluetooth device
NOTE
- Pairing standby mode will automatically end after about two minutes. To register again, start from step 1.
- Up to 3 devices can be registered with this product. From the 4th device on, older registrations will be deleted (the oldest is deleted first).
- If a passkey is required when connecting, input "0000".
- You can also set the earphones in registration (pairing) mode by disconnecting the earphones with the connected Bluetooth device.
Related links
- “Connecting to a Bluetooth device” (p.23)
- “Disconnecting from a Bluetooth device” (p.24)
- "About the app for earphones/headphones" (p.32)
Connecting to a Bluetooth device
This product connects to Bluetooth devices with which it has already been registered (paired).
When you turn the power on, they will search for the last Bluetooth device to which they were connected, and connect automatically.
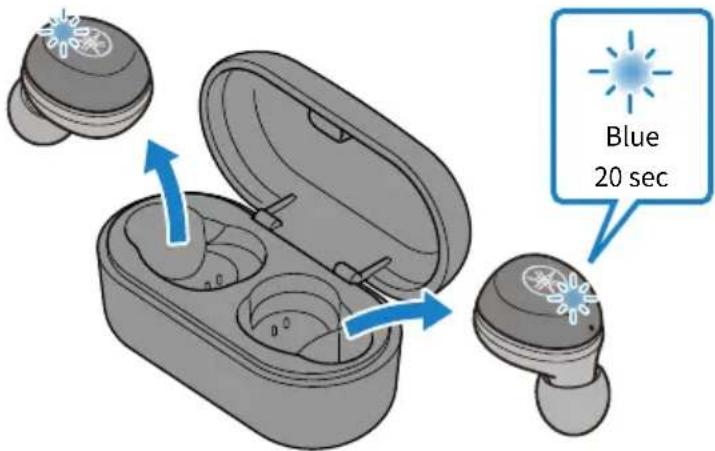
If they do not automatically connect, the earphones will enter connection/registration (pairing) standby mode. Initiate the connection to the earphones from your Bluetooth device.
If successfully connected, you will hear the "Connected" audio message. The indicator will display as shown below.
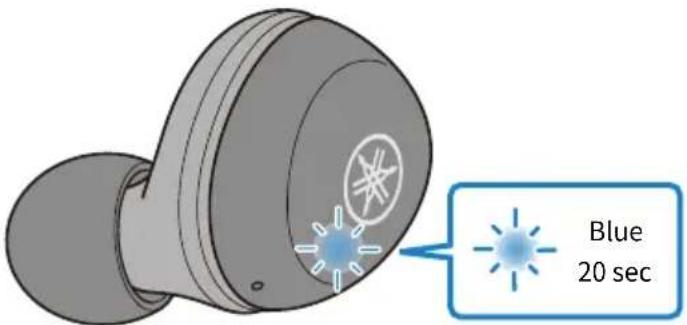
NOTE
- Either the left or right earphone will connect to a Bluetooth device, according to their remaining battery power. The earphones will appear in the list shown on the Bluetooth device as shown below.
• Earphone (L): Yamaha TW-E3A L
• Earphone (R): Yamaha TW-E3A R - The other earphone may be listed as "Headset," depending on the Bluetooth device.
- This product connects to a single Bluetooth device, and cannot connect to multiple devices at the same time.
Related links
- "Registering a Bluetooth device (pairing)" (p.18)
- “Disconnecting from a Bluetooth device” (p.24)
- "About the app for earphones/headphones" (p.32)
Disconnecting from a Bluetooth device
Follow the steps below to disconnect a Bluetooth device.
- Disconnect the earphones by operating the Bluetooth device.
- The earphones will enter the standby mode for a connection/registration (pairing) with a Bluetooth device.
- Turn the Bluetooth device's power off.
- The earphones will enter the standby mode for a connection/registration (pairing) with a Bluetooth device.
- Turn the power of this product off.
Related links
- “Registering a Bluetooth device (pairing)” (p.18)
- “Connecting to a Bluetooth device” (p.23)
- "About the app for earphones/headphones" (p.32)
Wearing this product
Putting the earphones on
Check the markings on the earphones for the left and right sides to make sure they are worn in the correct ear, and insert them into your ear.
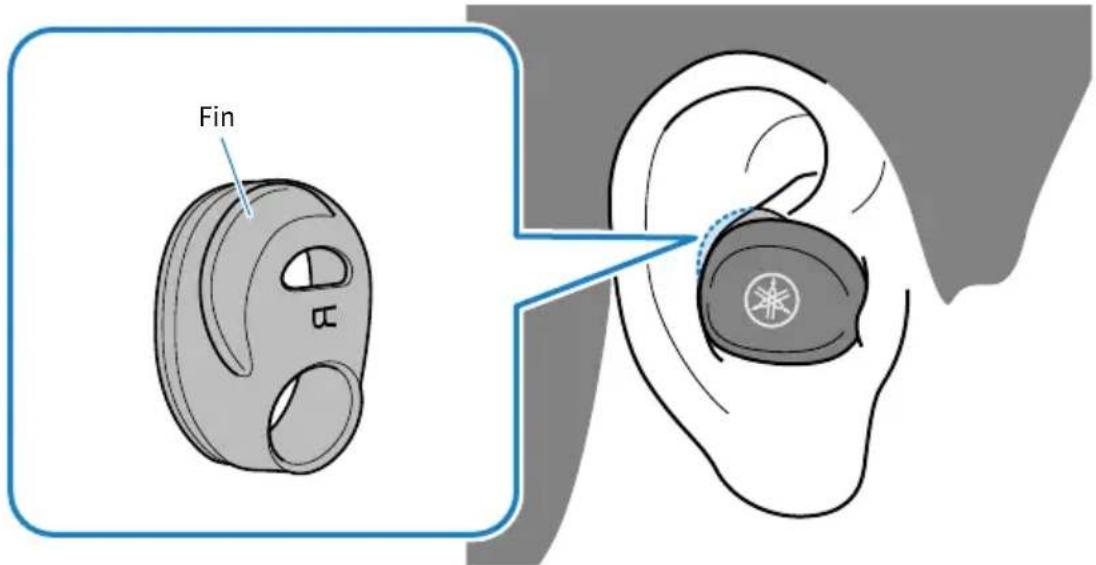
Move the earphones to adjust them so that they fit your ears when you put them on.
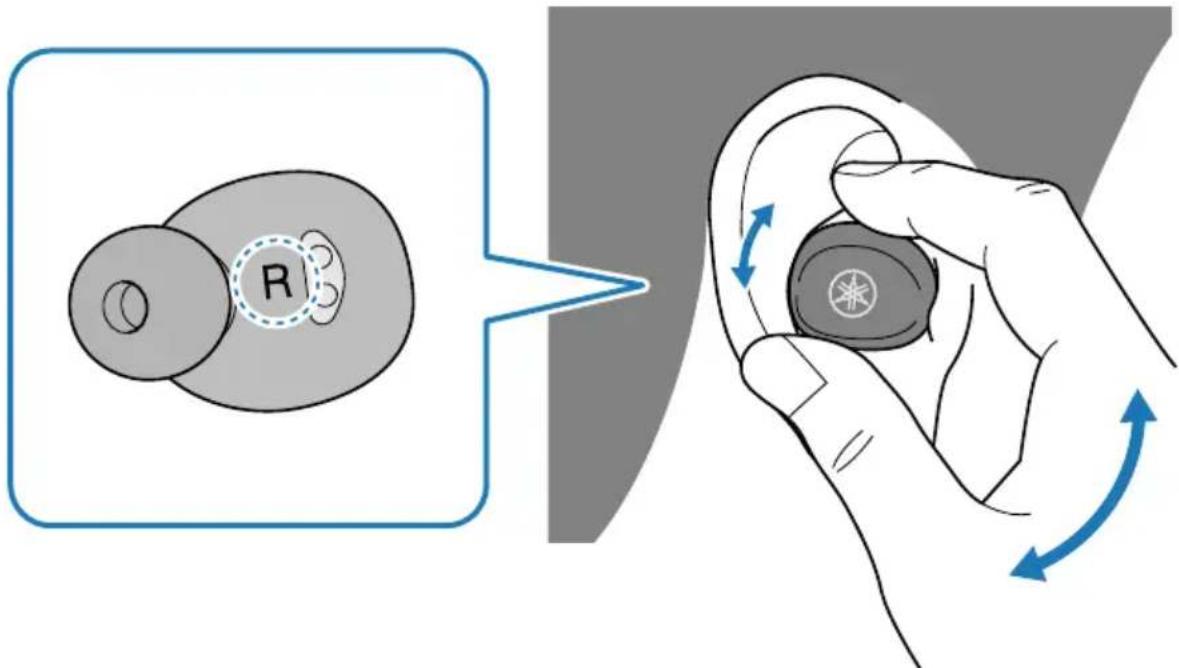
If the earphones seem like they might come loose when you shake your head a little while wearing them, try using different silicone sleeves. This will help prevent them from falling out.
Related links
- "Replacing the eartips" (p.26)
- "Replacing the silicone sleeves" (p.27)
Wearing this product > Replacing the eartips
Replacing the eartips
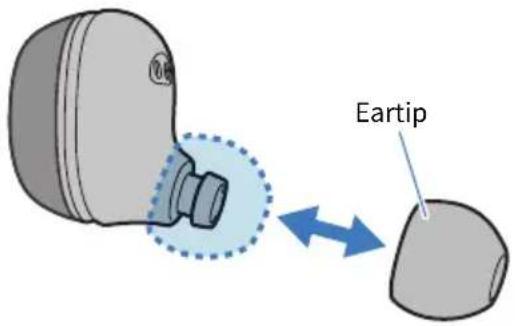
You will be able to listen to your music with better sound by using eartips that match your ears. When putting the earphones on, use the eartips that keep out ambient sounds as much as possible while the music is stopped.
NOTE
4 sizes of eartips are included with this product. The earphones come pre-attached with M-size eartips.

CAUTION
- Do not use broken eartips and do not wear the earphones without eartips. Doing so may damage your ears.
- Firmly attach the eartips. Failure to do so may cause them to come loose inside your ears, which may damage your ears. If an eartip comes loose inside your ear, consult a physician.
- Once removed, keep the eartips out of reach of children, to avoid them being accidentally swallowed.
Wearing this product > Replacing the silicone sleeves
Replacing the silicone sleeves
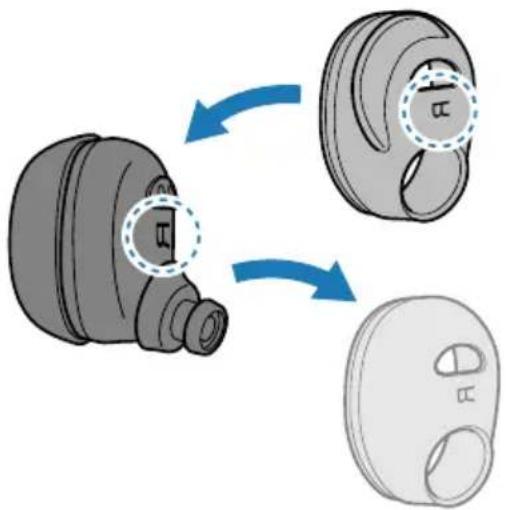
Replace the silicone sleeves as shown below. Using silicone sleeves that fit your ears will make them stay in your ears better.
flowchart
graph TD
    A["Device with Lock"] --> B["3D View with Component"]
    B --> C["Device with Button"]
    style A fill:#f9f,stroke:#333
    style B fill:#ccf,stroke:#333
    style C fill:#cfc,stroke:#333
NOTE
• The left and right silicone sleeves are different.
- 2 kinds of silicone sleeves are included with this product. The earphones come pre-attached with S-size silicone sleeves.

CAUTION
- Once removed, keep the silicone sleeves out of reach of children, to avoid them being accidentally swallowed.
Operating this Product
Adjusting the volume
Follow the steps below to adjust the volume.
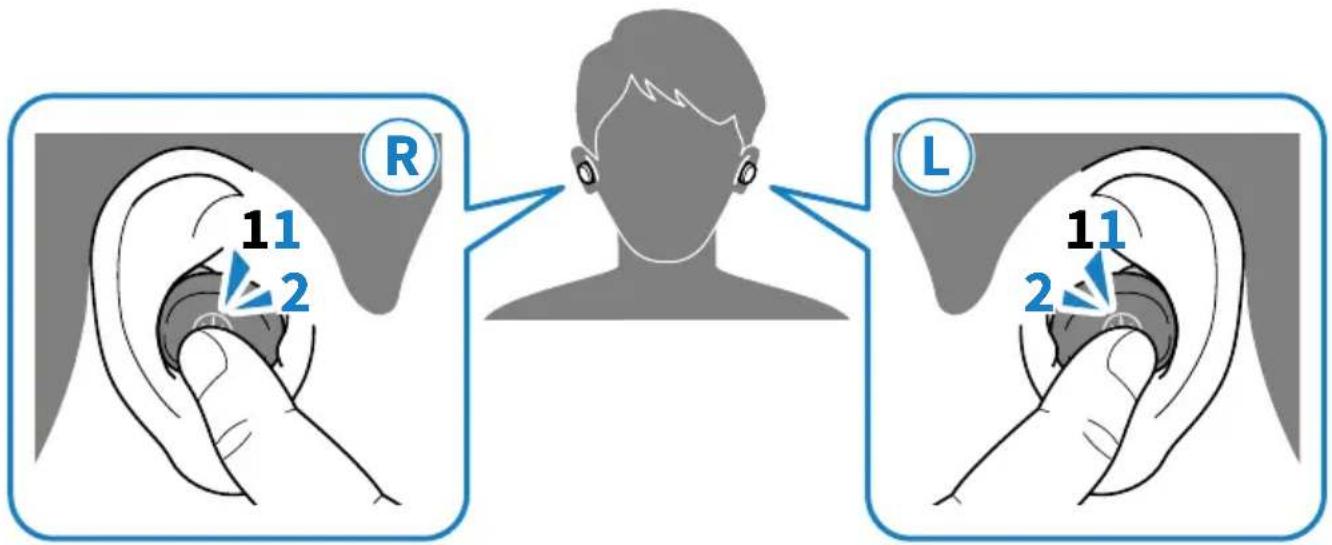
- Turn the volume up
Press the function key on earphone (R) twice. - Turn the volume down
Press the function key on earphone (L) twice.
NOTE
When connecting to a device (such as a smartphone) on which the volume can be adjusted, you can also adjust the volume using that device.
Listening to music
You can operate this product using the function keys during playback as follows.
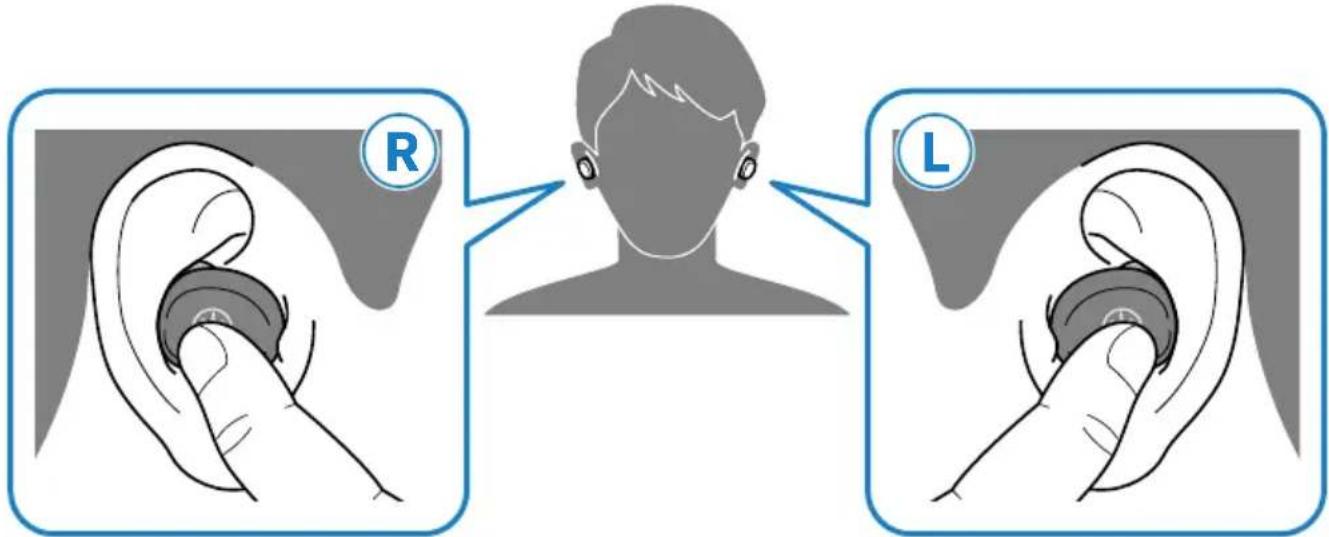
- Pause or restart playback Press the function key on earphone (L) or (R).
- Skip to the next song Hold down the function key on earphone (R) until you hear a “beep” sound (about two seconds). Take your finger off the key once you hear the beeping sound.
- Go back to the beginning of the song, or skip to the previous song Hold down the function key on earphone (L) until you hear a “beep” sound (about two seconds). Take your finger off the key once you hear the beeping sound.
NOTE
To select a song for playback, operate your Bluetooth device.
Related links
"Adjusting the volume" (p.28)
Receiving a phone call
When connecting to a Bluetooth device (such as a smartphone) that has phone call functionality, you can talk using this product. Operate this product as follows.
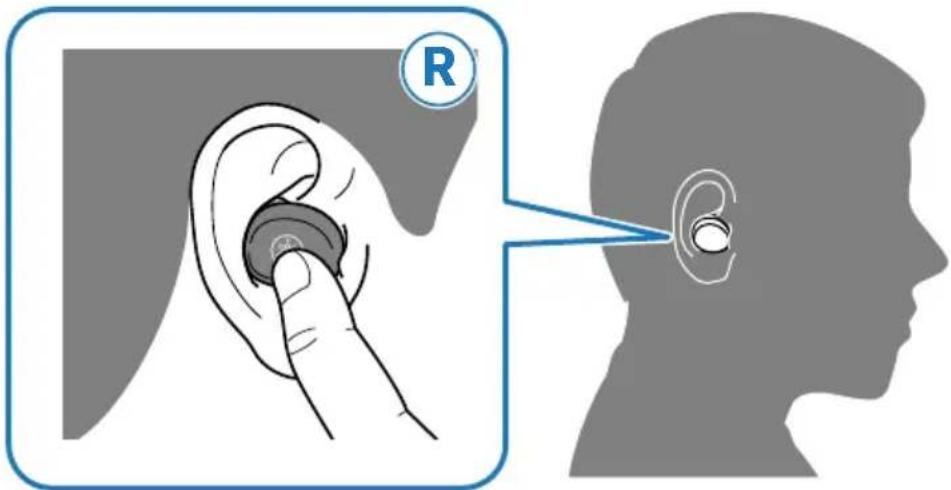
- Receive a phone call
Press the function key on earphone (R).
- End a phone call
Press the function key on earphone (R) during the call.
- Ignore a call
Hold down the function key on earphone (R) for at least two seconds when the call is coming in.
Take your finger off the key once you hear the beeping sound.
NOTE
When a call is coming in, any music being played will be paused. Music playback will automatically resume when the call ends or you ignore the call.
Related links
"Adjusting the volume" (p.28)
Operating this Product > Using the voice assistance feature on your smartphone
Using the voice assistance feature on your smartphone
When connecting this product to a Bluetooth device that supports a voice assistance feature such as Siri or Google Assistant, you can control the voice assistant with this product.
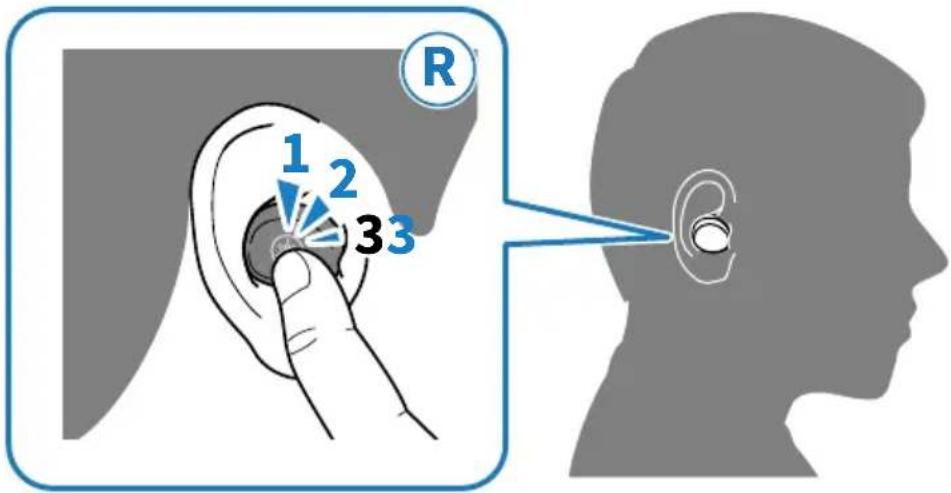
1 Press the function key on earphone (R) three times.
The voice assistant will start, and you can operate it using your voice.
NOTE
- The operations for the voice assistant feature will vary depending on your Bluetooth device. See the user's manual of your Bluetooth device for details.
• To finish listening to the voice assistant, operate your Bluetooth device.
Settings
About the app for earphones/headphones
The Headphones Controller smartphone app is a dedicated app for getting the best sound quality from your Yamaha earphones or headphones.

This app will let you do the following.
• Show the status of your earphones/headphones (such as remaining battery power)
- Make detailed settings on your earphones/headphones
Install the app from the App Store (iOS devices) or from Google Play (Android devices).
See the information about the app on each store for details.
NOTE
The functions are different for the left and right earphones, so their respective remaining battery levels may vary.
Related links
- “Automatically adjust the sound quality according to the volume” (p.35)
- “Setting the auto-standby time” (p.36)
List of settings (main screen)
The settings that you can make on the main screen of the Headphones Controller app are shown below.
NOTE
The app screen may differ, depending on your product.
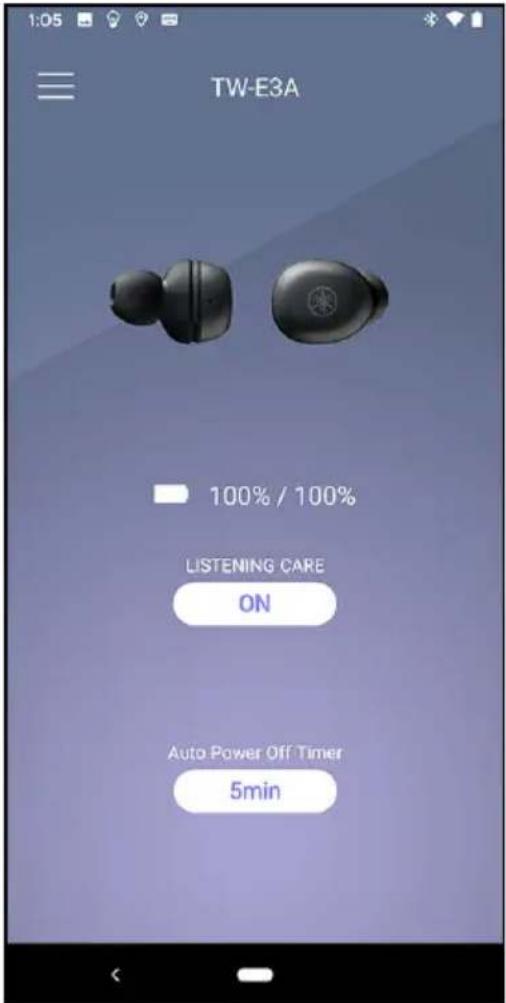
- LISTENING CARE
Turns LISTENING CARE (a feature that automatically adjusts the sound quality according to the volume) on/off.
• Auto Power-Off Timer
Sets the time it takes for the power to turn off after Bluetooth has been disconnected.
Related links
- "About the app for earphones/headphones" (p.32)
• “List of product settings (menu)” (p.34) - "Automatically adjust the sound quality according to the volume" (p.35)
- "Setting the auto-standby time" (p.36)
List of product settings (menu)
The settings that you can make on the menu of the Headphones Controller app are shown below.
NOTE
The app screen may differ, depending on your product.
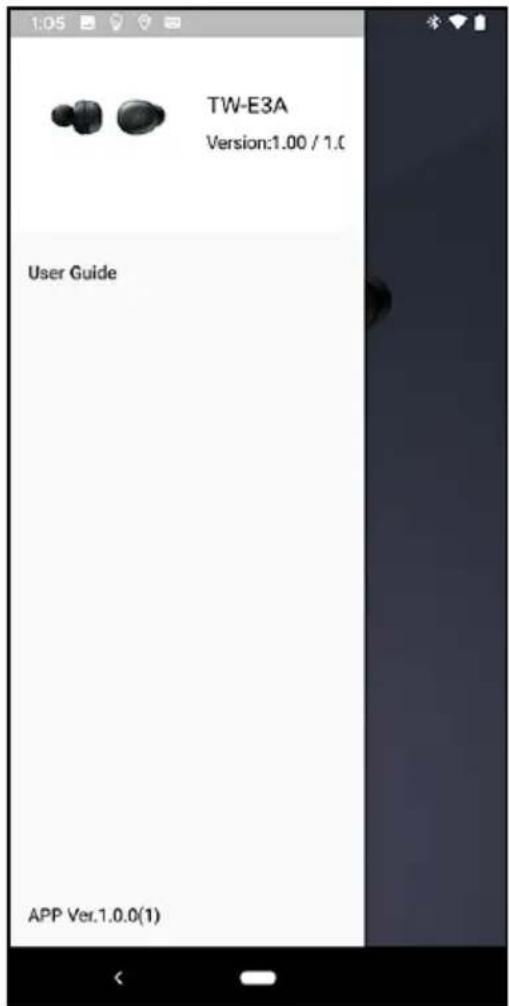
- Confirm Firmware Update Checks whether new firmware has been released, and performs updates.
- User Guide Accesses the User Guide
- License Information Displays the software license information for Headphones Controller.
- End User License Agreement Displays the Terms of Use for Headphones Controller.
Related links
- "About the app for earphones/headphones" (p.32)
• "List of settings (main screen)" (p.33) - “Automatically adjust the sound quality according to the volume” (p.35)
- "Setting the auto-standby time" (p.36)
Automatically adjust the sound quality according to the volume
When LISTENING CARE is enabled, this product will automatically adjust the sound quality according to the playback volume.
This feature adjusts the frequency balance, offering rich sound quality playback even at a low volume.
Use the Headphones Controller app to make these settings.
- LISTENING CARE
Settings
• ON (default setting): enables LISTENING CARE
• OFF: disables LISTENING CARE
Related links
- "About the app for earphones/headphones" (p.32)
- “List of settings (main screen)” (p.33)
- “List of product settings (menu)” (p.34)
Setting the auto-standby time
This product will automatically shut off when a certain amount of time has passed without a connection from a Bluetooth device. You can set the time it takes for the power to turn off after no connection has been received.
Use the Headphones Controller app to make these settings.
• Auto Power-Off Timer
Settings
- “Turning the power on” (p.15)
- "About the app for earphones/headphones" (p.32)
- “List of settings (main screen)” (p.33)
- “List of product settings (menu)” (p.34)
Updating the firmware
The firmware on this product can be updated to add new functionality, rectify product issues and so on. Updates are performed using Headphones Controller.
For more details on the contents of updates, see the product information page on the Yamaha website.
NOTICE
For stable data communication between this product and your Bluetooth device, update the firmware in a place where the signal is good.
Do not do the following while the firmware is being updated.
- Placing the earphones in the charging case
- Turning the power of this product off
- Closing the Headphones Controller app, or using another app
• Turning your smartphone off - Canceling the connection between your smartphone and this product
1 On the main screen of the Headphones Controller app, open the menu.
2 Tap "Confirm Firmware Update".
If new firmware has been released, you will see instructions on how to perform the update. Install the firmware by following the instructions on the screen.
Related links
- "Charging the earphones" (p.13)
- "Turning the power off" (p.16)
- "About the app for earphones/headphones" (p.32)
- “List of settings (main screen)” (p.33)
- “List of product settings (menu)” (p.34)
Troubleshooting
Read this first
If this product does not operate normally while you are using it, first check the following.
-
Place both earphones back into the charging case and wait for at least 10 seconds, after which you can first take out earphone (R) and then earphone (L).
● Make sure that this product have been sufficiently charged. -
“Charging the earphones” (p.13)
- “Charging the charging case” (p.14)
- Update the firmware of this product to the latest version.
- “Updating the firmware” (p.37)
- Also, check the following.
- “No sound can be heard” (p.39)
- “Sound can only be heard from one earphone” (p.40)
- “Power will not turn on” (p.41)
- “The product cannot be charged” (p.42)
- “Cannot connect to a Bluetooth device” (p.43)
- “The product does not operate or play back” (p.44)
- “The sound is distorted, noisy or choppy” (p.45)
- “Restoring this product to factory defaults (Initialize / Reset)” (p.46)
- “Problem Still Not Resolved (Customer Support)” (p.50)
No sound can be heard
● This product are not connected to a Bluetooth device.
Pair this product.
- “Connecting to a Bluetooth device” (p.23)
● The volume is too low.
Raise the volume.
- “Adjusting the volume” (p.28)
● The music stopped playing back.
Start playback.
• “Listening to music” (p.29)
The eartips don't fit my ears.
Select eartips that match your ear shape, and make sure that they fit securely.
- “Replacing the eartips” (p.26)
Sound can only be heard from one earphone
● The signal may not be coming in clearly, making the connection unstable.
Move away from wireless devices such as Wi-Fi access points, or appliances that product electromagnetic waves such as microwave ovens.
After placing both earphones into the charging case, take them out again.
- You may be using a smartphone app that generates sound from only one channel.
Check whether you can hear sound coming from both left and right channels by playing back sound from a different app.
● One of the earphones might be turned off.
Turn the power on.
- “Turning the power on” (p.15)
● The connection information for the registered Bluetooth device may not be working properly.
Delete the connection information for that Bluetooth device, and then pair the earphones with the device.
- “Registering a Bluetooth device (pairing)” (p.18)
Power will not turn on
● There may not be enough battery power left.
Charge this product.
- “Charging the earphones” (p.13)
● The battery power of the charging case may have been depleted while charging the earphones.
Keep pressing the function key on each earphone (L, R) until their indicators light blue. After this, charge the charging case.
- “Turning the power on” (p.15)
● The product is temporarily not functioning in a stable way.
Place both earphones back into the charging case and wait for at least 10 seconds, after which you can first take out earphone (R) and then earphone (L).
The product cannot be charged
● This product terminal might be covered up by the silicone sleeve.
Reattach the silicone sleeve correctly.
- “Replacing the silicone sleeves” (p.27)
- Your computer is not turned on (when charging from your computer).
Turn the power of your computer on, and then charge this product.
● You may have been using a USB power cable other than the one included with this product.
Use the included USB power cable to make sure the product correctly charges.
Cannot connect to a Bluetooth device
● This product and your Bluetooth device may be too far apart.
Move this product closer to the Bluetooth device.
● A device that emits electromagnetic waves (such as a microwave oven, access point and so on) might be nearby.
Do not use this product near other devices that emit electromagnetic waves.
● The connection information for the registered Bluetooth device may not be working properly.
Delete the connection information of this product from the Bluetooth device, and then pair this product with the device.
- “Registering a Bluetooth device (pairing)” (p.18)
● The registration information for the Bluetooth device that was registered on this product may have been deleted.
Pair this product once more.
- “Registering a Bluetooth device (pairing)” (p.18)
● This product may already be connected to another Bluetooth device.
Disconnect that Bluetooth device, and then connect this product with the new device.
The product does not operate or play back
● This product may be charging.
You cannot use this product while they are charging. Use the earphones after charging is finished.
● There is no remaining battery power on this product.
Charge this product.
- “Charging the earphones” (p.13)
- “Charging the charging case” (p.14)
● The product is temporarily not functioning in a stable way.
Place both earphones back into the charging case and wait for at least 10 seconds, after which you can first take out earphone (R) and then earphone (L).
The sound is distorted, noisy or choppy
● The signal may not be coming in clearly, making the connection unstable.
Move away from wireless devices such as access points, or appliances that product electromagnetic waves such as microwave ovens.
Try placing the connected Bluetooth device as close to this product as you can.
Devices with wireless network connectivity may transmit signals that obstruct Bluetooth communications. In this case, turn off the wireless network connectivity feature on your Bluetooth device.
● The product is temporarily not functioning in a stable way.
Place both earphones back into the charging case and wait for at least 10 seconds, after which you can first take out earphone (R) and then earphone (L).
Restoring this product to factory defaults (Initialize / Reset)
This will restore all settings of this product to their factory defaults.
1 Turn off the power after removing the earphones from their charging case.
Keep pressing the function key on each earphone (L, R) until their indicators light up red. You will hear the "Power Off" audio message in the earphones.
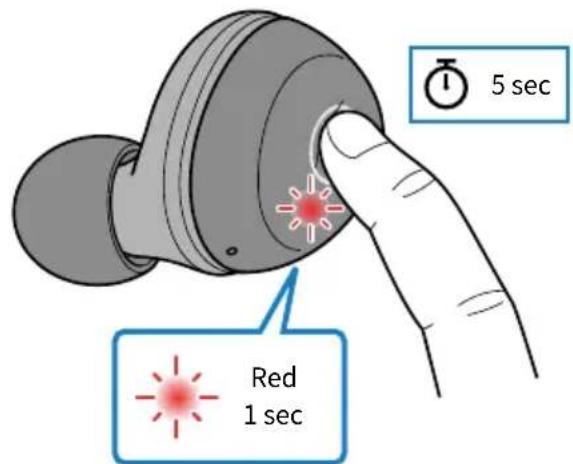
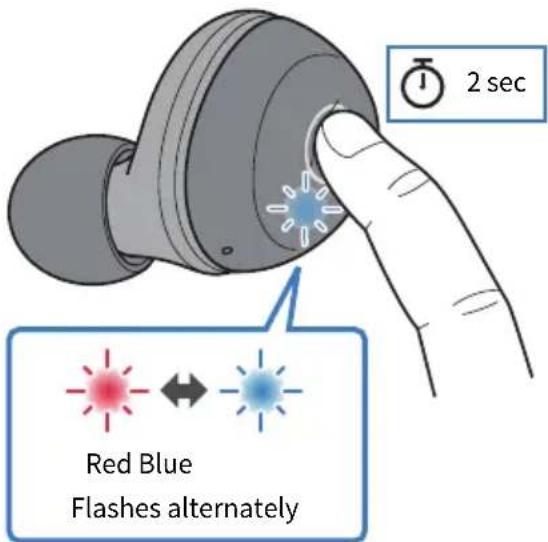
2 Hold down the function key on earphone (R) for about 10 seconds.
and the indicator flashes as shown below.
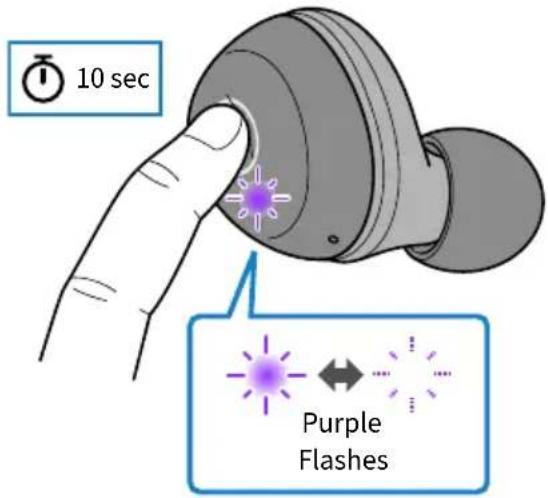
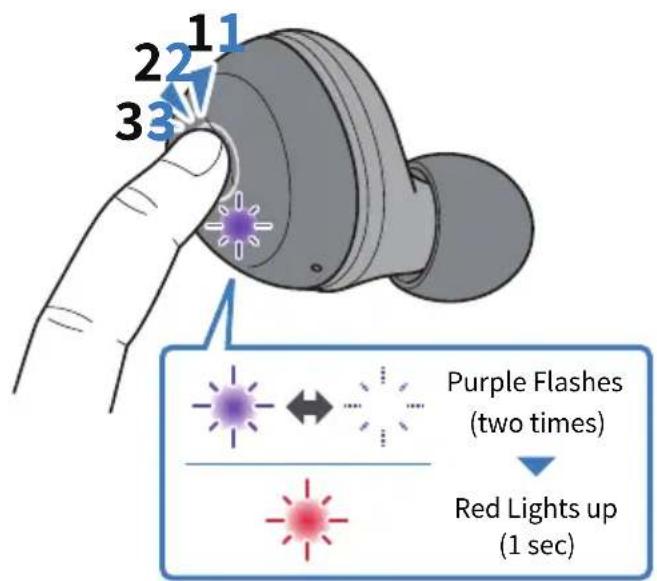
3 Once the indicator starts flashing, press the function key on earphone (R) three times within 10 seconds.
The indicator flashes as shown below, and the power will turn off. You will hear the "Power Off" audio message in the earphones. If the indicator does not stop flashing red, go back and retry the previous step.
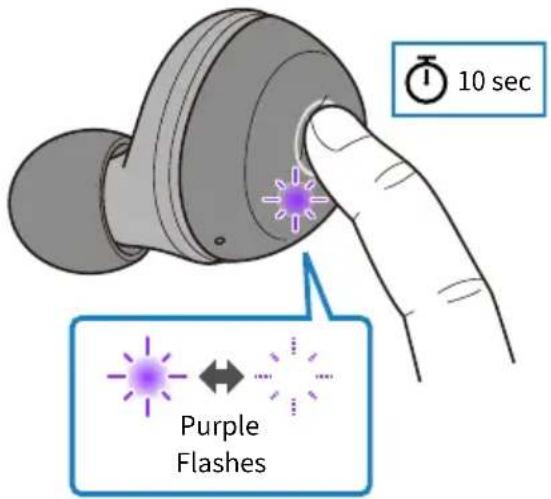
4 Hold down the function key on earphone (L) for about 10 seconds.
and the indicator flashes as shown below.
Troubleshooting > Restoring this product to factory defaults (Initialize / Reset)
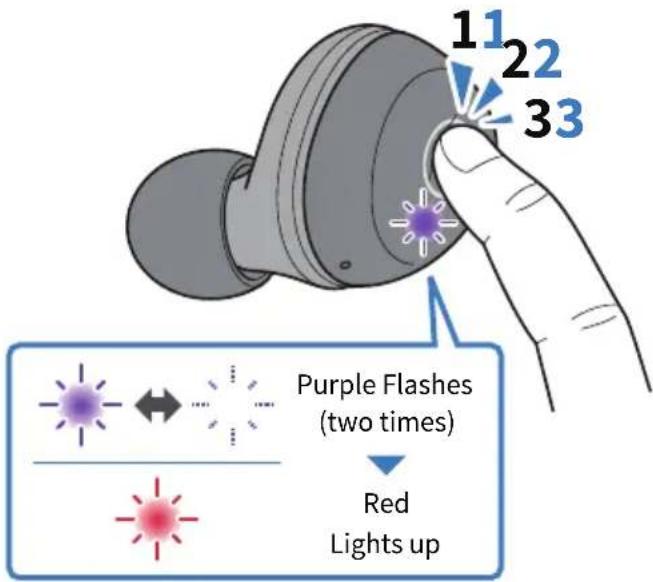
5 Once the indicator starts flashing, press the function key on earphone (L) three times within 10 seconds.
The indicator flashes as shown below, and the power will turn off. You will hear the "Power Off" audio message in the earphones. If the indicator does not stop flashing red, go back and retry the previous step.
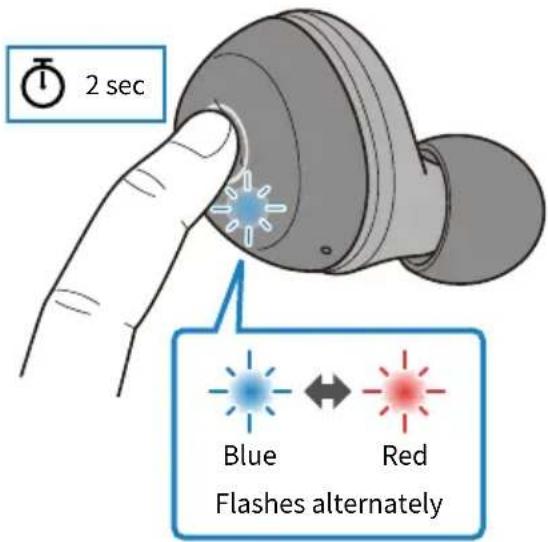
6 Hold down the function key on earphone (R) for two seconds. The power will turn on.
Take your finger off the key once the indicator lights up.
Troubleshooting > Restoring this product to factory defaults (Initialize / Reset)
7 Hold down the function key on earphone (L) for two seconds within 10 seconds of doing the previous step. The power will turn on.
Take your finger off the key once the indicator flashes.
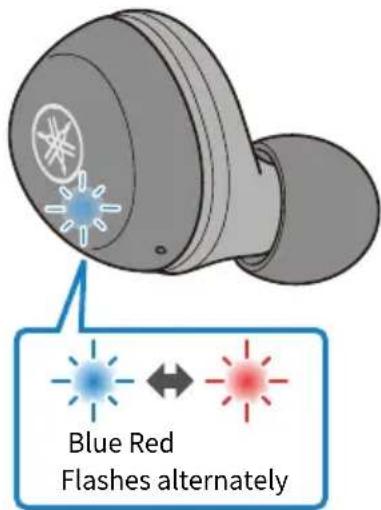
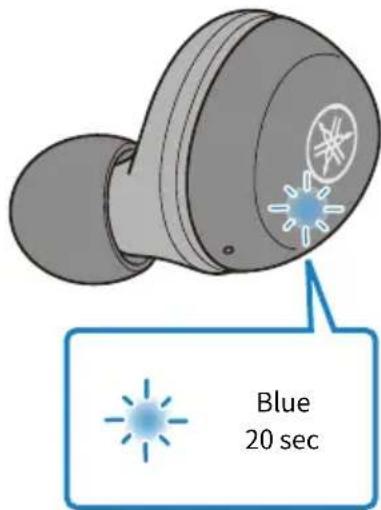
If after several seconds the indicator displays as shown below, initialization was successful. If the indicators are not displaying as shown, try initializing once more from step 1.
Earphone (R) Earphone (L)
Problem Still Not Resolved (Customer Support)
If the trouble still cannot be solved, please contact us for product support as shown below.
● For customers within Japan
Please contact the store where you purchased this product, or the Product Support Center as listed in the “User Guide (Basic).”
● For customers outside of Japan
Please contact your nearest authorized Yamaha dealer or service center.
Appendix
Specifications
The specifications of this product are as shown below.
- Driver type
- Dynamic
- Driver unit
- 6.0 mm
- Frequency range
• 20-20,000 Hz
- Bluetooth version
• 5.0
• Supported profiles
• A2DP, AVRCP, HFP, HSP
- Supported codecs
• SBC, AAC, Qualcomm® aptX™
• Supported content protection (Japan only)
• SCMS-T
- RF output power
- Class 2
• Maximum communication range
• 10 m (without obstructions)
• Maximum number of pairable devices
· 3
Rechargeable battery
• Internal rechargeable battery
- Lithium-ion battery
• Charging time (to full capacity)
• Earphones: approx. 2 hours
• Charging case: approx. 2 hours
• Continuous playback time
• Approximately 6 hours
• Number of charging cycles available with charging case (when charging case is fully charged)
- Approx. 3 times
- Charging temperature
• +5-+40 °C
General
- Waterproof rating
- IPX5
- Weight
• 6.3 g (per earphone)
List of operations
The main operations of this product are as shown below.
Power
- Power on
• Function key (hold down for two seconds) - Power off
• Function key (hold down for five seconds)
Volume
• Volume up
• Function key on earphone (R) (press quickly, two times in a row)
• Volume down
• Function key on earphone (L) (press quickly, two times in a row)
Music playback
- Pause/play
• Function keys on earphone (L) or (R) - Skip to the next song
- Function key on earphone (R) (hold down until you hear a "beep" sound)
- Go back to the beginning of the song (while in the middle of the song), or back to the previous song (when at the beginning of a song)
• Function key on earphone (L) (hold down until you hear a "beep" sound)
Phone calls
- Receive a phone call
• Function key on earphone (R) - End a phone call
• Function key on earphone (R) - Ignore a call
• Function key on earphone (R) (hold down for at least two seconds)
Appendix > List of operations
Other functions
- Start pairing
- With the power off, hold down the function keys on the earphones (L and R) (R: five seconds; L: two seconds)
- Start voice assistant
• Function key on earphone (R) (press quickly, three times in a row)
List of indicator displays and audio messages
The indicator displays and audio messages on this product are shown below.
Product indicator display
- Power on
• Lights up for 1 second (blue) and turns off
• Remaining battery power notifications
• Flashes red three times: small amount of charge remaining - Standby mode for pairing with Bluetooth device
• Flashes (between red and blue alternately)
• Searching for paired Bluetooth device - Not lit
• Finished connecting to Bluetooth device - Lights up (blue, for approx. 20 sec) and turns off
- Power off
• Lights up for 1 second (Red) and turns off
Indicator display when charging
- Charging
- Lights up (red)
- Charging completed
- Not lit
Charging case indicator display
When the charging case is not connected to a power source
• While charging the earphones
- Lights up
• Earphones charging completed
- Not lit
When the charging case is connected to a power source
• While charging the charging case
• Flashes (indicates the charging progress)
• Finished charging the charging case
- Not lit
When placing the earphones in the charging case while the case is charging
• Currently charging/charging completed
- Not lit
The charging case and earphones may currently be charging, even when the indicators are unlit. The indicator on each earphone shows the charging status of that earphone.
Appendix > List of indicator displays and audio messages
Audio messages
- Battery High
- Plenty of battery charge remaining
- Battery Medium
• Moderate battery charge remaining - Battery Low
- Small amount of battery charge remaining
- Power Off
- Power off
- Pairing
- Start device registration (pairing)
- Pairing Successful
• Pairing successful/finished connecting - Pairing Failed
- Pairing unsuccessful
- Connected
• Finished connecting to Bluetooth device - Disconnected
• Disconnected from Bluetooth device
Related links
- “Charging the charging case” (p.14)
- “Turning the power on” (p.15)
- “Turning the power off” (p.16)
- “Checking the remaining battery power” (p.17)
- “Registering a Bluetooth device (pairing)” (p.18)
- “Connecting to a Bluetooth device” (p.23)
Yamaha Global Site
https://www.yamaha.com/
Yamaha Downloads
https://download.yamaha.com/
Manual Development Group
© 2020 Yamaha Corporation
Published 08/2020 AM-A0
AV19-0145

YAMAHA
TW-E3A
Truly Wireless Earphones
Casque sans fil
https://download.yamaha.com/
Manual Development Group
© 2019 Yamaha Corporation Published 04/2020 XLIS AMO
Published 04:2020 & 13 AMDI-AD
A
B
English
EN
Introduction
Thank you for purchasing this Yamaha product.
- For correct and safe use of this product, be sure to first read this manual and the separate "Safety Brochure".
• After reading this manual, keep it together with the warranty card in a safe place for future reference.

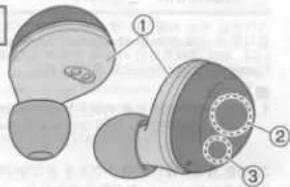
Product, Accessory and Part Names
① Earphones (L, R)
* The microphone is built in.
② Function key
② Indicator
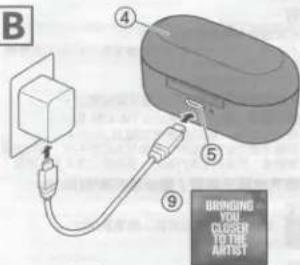
④ Charging case
⑤ Charging connector
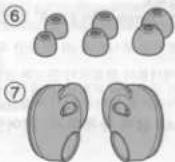
⑥ Earips (SS, S, M, L) 1 set each
The M-size eartips are attached.
⑦ Silicone Sleeve (S, M) 1 set each
The S-size silicone sleeves are attached.
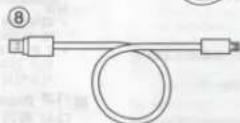
⑧ USA power cable
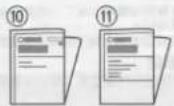
(9) Startup Guide
⑩ User's Guide (Basic) (this manual)
Preparation
B Charging
To charge the charging case and earphones, connect the included USB power cable to the charging connector on the charging case and to the USB port on a commercially available USB power adaptor (5 V DC (min. 0.5 A output))
• The indicator is lit in orange during charging and goes off when charging is completed.
- Charging takes about two hours. When charged, the earphones can play back continuously for approximately 6 hours.

Making a Bluetooth® connection
When using the earphones for the first time, the pairing process, which allows Bluetooth devices being connected to detect each other, must be performed. Once paired, the Bluetooth devices will be automatically connected the next time they are turned on.
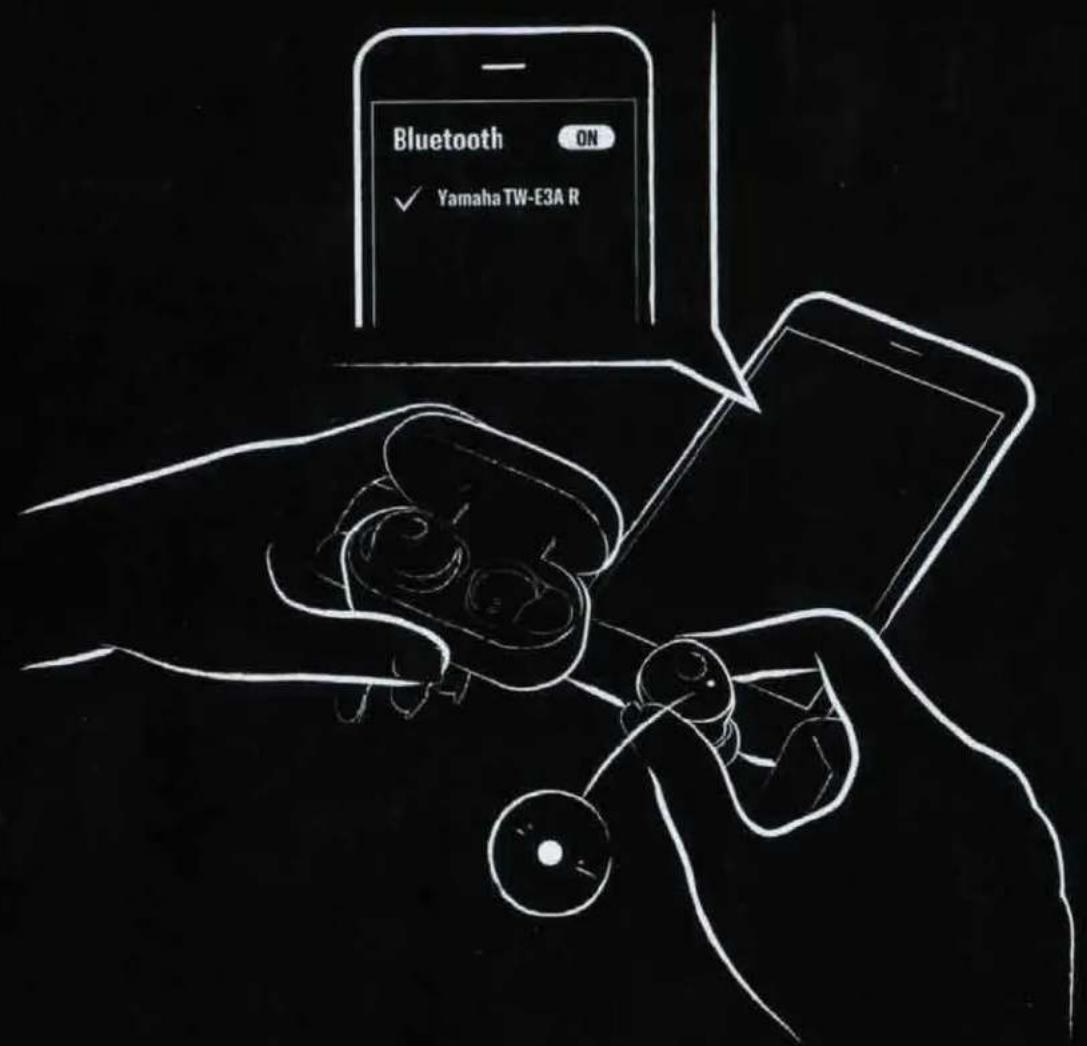
Pairing
- Remove the right earphone from the charging case. • The indicator on the right earphone flashes alternately in blue and red, and the earphone enters pairing standby mode.
- Remove the left earphone from the charging case.
- Operate the connected Bluetooth device to display the Bluetooth setting screen.
- Select "Yamaha TW-E3A R" from the displayed screen.
- When pairing has completed, the indicator lights up in blue for 20 seconds.
- If pairing has not completed within two minutes, it will be considered to have failed, and the indicator goes off. To try pairing again, turn the earphones off, then on again.
Registering another Bluetooth device/Perform pairing operations again

For details about paring, refer to the this website.
Turning on
Remove the earphones from the charging case. Otherwise, press the function key on each earphone (left and right) for two seconds.
- When the earphone turns on, the indicator lights up in blue (for one second).
Turning off
Place the earphone in the charging case. Otherwise, press the function key on each earphone (left and right) for five seconds. - When the earphone turns off, the indicator lights up in red (for one second).
Basic operations
Listening to music
| Play | Press the function key on either the left or right earphone once. |
| Pause | During playback, press the function key on either the left or right earphone once. |
| Raise the volume | Press the function key on the right earphone twice. |
| Lower the volume | Press the function key on the left earphone twice. |
| Skip to the next song | Hold down the function key on the right earphone for two seconds. |
| Skip to the previous song | Hold down the function key on the left earphone for two seconds. |
Using the phone
| Receive a phone call | When a phone call comes in, press the function key on the right earphone once. |
| End a phone call | During the phone call, press the function key on the right earphone once. |
| Raise the conversation volume | Press the function key on the right earphone twice. |
| Lower the conversation volume | Press the function key on the left earphone twice. |
| Ignore a call | When a phone call comes in, hold down the function key on the right earphone for two seconds. |
Specifications
| Bluetooth version | Version 5.0 |
| Supported profiles | AZDP, AVRCP, HFP, HSP |
| Supported codecs | SBC, AAC, Qualcomm® aptXTM |
| RF Output Power | Class 2 |
| Maximum communication range | Approximately 10 m (without interference) |
| Number of devices that can be registered | Up to 3 devices |
| Internal rechargeable battery | Lithium-ion battery |
| Charging time | Earphones: Approximately 2 hoursCharging case: Approximately 2 hours |
| Continuous playback time | Approximately 6 hours |
| Charging frequency from charging case | Approximately 3 times |
| Charging temperature | 5 - 40 °C |

Bluetooth
The Bluetooth® word mark and logos are registered trademarks owned by Bluetooth SIG, Inc. and any use of such marks by Yamaha Corporation is under license. Other trademarks and trade names are those of their respective owners.

YAMAHA
AV19-0159
TW-E3A
Truly Wireless Earphones
Casque sans fil
Manual Development Group
© 2019 Yamaha Corporation Published 04/2020 发行 AMOD A
(Supplier's declaration of conformity procedure)
Responsible Party: Yamafia Corporation of America
Address: 6600 Oranget
Telephone: 714-522-9011
Type of Equipment: Earphon
Model Name: TW-E3A
This device contains licence-exempt transmitter(s)/receiver(s) that comply with innovation, Science and Economic Development. Canada's licence-exempt RSS(s). Operation is subject to the following two conditions:
This device may not cause interference.
- This device must accept any interference, including interference that may cause undesired operation of the device.
FCC INFORMATION (U.S.A.)
-
IMPORTANT NOTICE DO NOT MODIFY THIS UNIT? This product when installed as indicated in the instructions contained in this manual, meets FCC requirements. Modifications not expressly approved by Yamalha may void your authority granted by the FCC. To use the product.
-
IMPORTANT: When connecting this product to accessories and/or another product use only high quality shielded cables, Cabley's supplied with this product MUST be used. Follow all installation instructions.
Failure to follow instructions could void your FCC authorization to use this product in the USA.
- NOTE: This product has been tested and found to comply with the requirements listed in FCC Regulations, Part 15 for Class "B" digital devices. Compliance with these requirements provides a reasonable level of assurance that your use of this product in a residential environment will not result in harmful interference with other electronic devices. This equipment generates laser radio frequencies and, if not installed and used according to the Instructions found in the own manual, may cause interference harmful to the operation of other electronic devices. Comparison with the same device is that it is good to ensure that interference will not occur in all installations. If this product is not intended to be the source of interference, which can be determined by turning the unit "OFF" and "ON" please try to eliminate the problem by using one of the following measures:
- Relocate either this product or the device that is being affected by the
Utilize power outlets that are on different branch (circuit breaker or fuse) circuits or install AC line filters.
in the case of radio or TV interference relocate/reorient the antenna. If the antenna lead-in is 300 ohm ribbon lead, change the lead-in to co-axial type cable.
If these corrective measures do not produce satisfactory results, please contact the local retailer authorized to distribute this type of product. If you cannot locate the appropriate retailer, please contact Yamaha Corporation of America, 6600 Orangethorpe Ave. Buena Park CA90630, USA.
The above statements apply ONLY to those products distributed by Yamaha Corporation of America or its subsidiaries.
FCC. Caution: Any changes or modifications not expressly approved by the party responsible for compliance could void the user's authority to operate this equipment.
This transmitter must not be co-located or operating in conjunction with any other antenna or transmitter.
This device complies with ISED's licence-exempt RSSs. Operation is subject to the following two conditions: (1) This device may not cause harmful interference, and (2) this device must accept any interference received, including interference that may cause undesired operation.
The available scientific evidence does not show that any health problems are associated with using low power wireless devices. There is no proof, however, that these low power wireless devices are absolutely safe. Low power Wireless devices emit low levels of radio frequency (RF) in the microwave range while being used. Whereas high levels of RF can produce health effects (by heating tissue), exposure of low-level RF that does not produce heating effects causes no own adverse health effects. Many studies of low-level RF exposures have not found any biological effects. Some studies have suggested that some biological effects might occur, but such a comparison between the EDA and the EDA-EFA data are well described and found to comply with ISED radiation exposure limits set forth for an uncontrolled environment and meets RSS-02 of the ISED radio frequency (RF) exposure rules.
CAN ICES-3 (B)/NMB-3 (B)
TW-E3A: TW-E3A R (for right earphone), TW-E3A L (for left earphone) FCC ID: ZAKMBTW-E3A
PRECAUTIONS
PLEASE READ CAREFULLY BEFORE USE. BE SURE TO FOLLOW THESE INSTRUCTIONS.
The precautions listed below are to prevent risk of harm to the user and others, as well as to prevent property damage, and to help the user use this unit properly and safely. Be sure to follow these instructions.
After reading this manual, be sure to keep it in a safe place where it can be referenced at any time.
- Be sure to request inspections or repairs from the dealer where you purchased the unit or from qualified Yamaha service personnel.
- Yamaha cannot be held responsible for injury to you or damage of the products caused by improper use or modifications to the unit.
- This product is for ordinary homes. Do not use for applications requiring high reliability, such as managing lives, health care or high-value assets.

WARNING
This content indicates "risk of serious injury or death."
Handling
- Do not listen with the earphones or headphones while driving or cycling. Also avoid using them where hearing must not be impaired, like at a railroad crossing and a slice of construction. Reduced ability to hear surrounding sound increases the risk of an accident.
If you notice any abnormality
- If any of the following abnormalities occur, stop using the device immediately. An unusual smell, unusual assumption or simpler is emitted from the unit.
foreign material or water gets into the interior of the unit.
The unit produces an unusual amount of heat. (Risk of burns or injuries)
There is a crack or damage in the unit.
Continued use could cause electric shocks, a fire, or malfunctions. Immediately request an inspection or repair from the dealer where you purchased the unit or from qualified Yamaha service personnel.
Charging
- Be sure to use the supplied USB power cable. Failure to observe the above may cause a fire, burns, or malfunctions.
- To charge the charging case, connect it to the USB port of a commercially available USB power adaptor (5 V DC/min: 0.5 A output), incorrect connection may cause fine, electric shock, or malfunction. For details on charging, refer to this User's Guide.
- When charging this product, plug the commercially-available USBAC adaptor you will use into a power outlet that is within eyesight, where you are able to reach. This is so that you can easily unplug the cable if need be. Even when switched off, this product will not be completely isolated from the power supply unless you unplug it from the power outlet.
- Charges within the specified charging temperature range. Charging at a temperature outside the name may cause leakage, overheating, excision, or damage.
- Use the included charging case to change the earphones. Using a charger other than the included charging case may cause fluid leakage, overheating, rupture, or damage.
- Do not use the supplied USB power cable for other units. Failure to observe the above may cause a fire, burns, or malfunctions.
- Do not cover the unit with blankets, clothing, etc. while being used or charged. It may cause overheating and fire.
- Never charge when the unit is wet. Doing so may cause electric shock, fire, or malfunction due to short circuiting.
- Do not do anything that could damage the supplied power USB power cable.
- Do not bend it excessively or alter it.
- Do not scratch it
- Do not place it under a heavy object. Using the review card with the name of the next quarter and could have a division
Using the power cord with the core of the cold exposed to cold cause electric shocks or a fire.
Battery use
- Disposal of a battery into fire or a hot oven, or mechanically crushing or cutting of a battery, that can result in an explosion.
PRECAUTIONS
PLEASE READ CAREFULLY BEFORE USE. BE SURE TO
FOLLOW THESE INSTRUCTIONS.
The precautions listed below are to prevent risk of harm to the user and others, as well as to prevent property damage; and to help the user use this unit properly and safely. Be sure to follow these instructions.
After reading this manual, be sure to keep it in a safe place where it can be referenced at any time.
- Be sure to request inspections or repairs from the dealer where you purchased the unit or from qualified items a service personnel.
• Yamaha cannot be held responsible for injury to you or damage of the product caused by improper use or modifications to the unit.
• This product is for ordinary homes. Do not use for applications requiring high reliability, such as management lives, health care or high-value assets.

WARNING
This content indicates "risk of serious injury or death."
Handling
- Do not listen with the earphones or headphones while driving or cycling. Also avoid using them where hearing must not be impaired, like at a railroad
crossing and a site of construction. Reduced ability to hear surrounding sound increases the risk of an accident.
If you notice any abnormality
- If any of the following abnormalities occur, stop using the device immediately.
Foreign material or water gets into the interior of the unit
The unit produces an unusual amount of heat, (Risk of burns or injuries)
There is a crack of damage in the unit. The unit is disposed.
Continued use could cause electric shocks, a fine, or malfunctions. Immediately request an inspection or repair from the dealer where you purchased the unit or from qualified Yamaha service personnel.
Charging
- Be sure to use the supplied USB power cable. Failure to observe the above may cause a fire, burns, or malfunctions.
- To charge the changing case, connect it to the USB port of a commercially available USB power adapter (5/F DC/min, 0.5 A output). Incorrect connection may cause fire, electric shock, or malfunction. For details on changing, refer to this User's Guide.
- When charging this product, plug the zymmertally-available USB AC adaptor you will use into a power outlet that is within eyesight, where you are able to reach. This is so that you can easily�ound the cable if need be. Even when switched off.
this product will not be completely isolated from the power supply unless you unplug it from the power outlet. - Charges within the specified charging temperature range. Charging at a temperature outside the range may cause leakage, overfolding, explosion, or damage.
- Use the included charging case to charge the earphones. Using a charger other than the included charging case may cause fluid leakage, overheating, rupture or damage.
- Do not use the supplied USB power cable for other units. Failure to observe the above may cause a fire, burns, or malfunctions.
- Do not cover the unit with blankets, clothing, etc, while being used or charged it may cause overheating and fire.
- Never charge when the unit is wet. Doing so may cause electric shock, fire, or malfunction due to short circuiting.
- Do not do anything that could damage the supplied power USB power cable.
- Do not bend it expansibly of
- Do not scratch it.
- Do not plan it under a heavy object.
using the power cold with the core of the cold exposed could cause electric shocks or a fire.
Battery use
- Disposal of a battery into flow or a hot oven, or mechanically crushing or cutting of a battery, that can result in an explosion.
• Leaving a battery in an extremely high temperature surrounding environment that can result in an expansion or the leakage of flammable liquid or gas.
• A battery subjected to extremely low air pressure that may result in an
impression of the leakage of harmonic equil or gas.
Do not disassemble
- Do not disassemble or modify this unit. - Cash units other than this moving a fire, electric shock, injury or multifunctions.
Water warning
- The charging case and the included USB power cable are not waterproof.
- Do not expose the unit to rain, use it near water or in damp or wet conditions, or place on it any containers such as vases, bottles or glasses containing liquids which might split into any openings or places where water may drop. A liquid such as water getting into the unit may cause a fire, electric shocks, or malfunctions. When charging make sure that the earphones are not wet. If they are wet, save them off with a soft, dry cloth.
- Do not handle the charging case with wet hands. Failure to observe this may cause electric shocks or interruptions.
Fire warning
- Do not place any burning items or open flames near the unit, since they may cause a fire.
Handling
- Be careful not to drop or apply strong impact to this unit. Failure to observe this may cause electric shock, a few or multifunctions.
Wireless unit
- Do not use this unit in areas where the use of radio waves is restricted. Radio waves from this unit may affect electro-medical devices. When using this unit in an airplane, follow the instructions of the crew.
- Do not use this unit within 15-cm (liang) of persons with a heart pacemaker implant or a defibrillator implant. Radio waves from this unit may affect electro-medical devices, such as a heart pacemaker implant or defibrillator implant.

CAUTION
This content indicates "risk of injury."
Hearing loss
- Do not use the unit for a long period of time at a high or uncomfortable volume level. Otherwise, hearing loss may result. Do not exceed 40 hours/week at 80 dB(A) or 5 hours/week at 89 dB(A). If you experience any problems, consult a physician.
- Improving the volume from the device to be connected/kellure.
connecting the plug. Failing to do so may result in hearing lossor
Handling caution
- Keep small parts out of the reach-of infants. Your children may accidentally
• Do not pull on the included USB power cable while it is connected. Pulling on a connected cable may be delivered. - Do not use the earphones with the eartips detached or broken. Otherwise,
• in case the earphones irritate your skin, stop use immediately. Continued use
may worsen injuries or inflammation. • Security attach the earts and the ear sleeves to the earphones. If the earts
or the ear sleeves are detached from the earphones and stuck in your ears, they may cause injury or illness.
Rechargeable battery
This device contains a lithium-ion battery. After usage, you may recycle the battery, but never attempt to remove it by yourself. Have the device inspected by qualified Yamaha service personnel. If there is no Yamaha service personnel in your area, dispose of it properly according to relevant environmental laws and disposal rules in your area.
Notice
Indicates points that you must observe in order to prevent product failure, damage or malfunction and data loss.
- Do not use or storage this unit in a location that is exposed to direct sunlight that becomes extremely hot, such as near a heater, or extremely cold, or that is subject to excessive dust or vibration. Failure to observe this may cause the unit's panel to become deformed, the internal components to malfunction, or
- When clearing the unit, use a dry, soft cloth. Using chemicals such as benzene or thyme, cleaning agents, or chemical scrubbing clothes can cause
discoloration or deformation. - Do not place or hold the earphones or headphones in the vicinity of a clock, magnetic card, or other object that can be affected by the magnetic field of the product.
Otherwise, the data on the affected device may be corrupted or destroyed. - Stand on or sit on the equipment
- Put heavy items on top of the equipment
- Apply unreasonable force to buttons, switches, input/output terminals, etc. Failure to observe this may cause injuries or damage to the equipment.
Information
The waterproofness of the earphone body is compliant with IPXS.
IPKS indicates that the unit will continue functioning even if water is directly projected against it from any direction. While this standard guarantees this performance with fresh water or tap water at room temperature, it does not guarantee equivalent performance with warm water or seawater.
In addition, malfunctions caused by water ingress due to incorrect handling are not covered by the warranty, even during the warranty period.
The second digit of IEC refers to "Liquid ingress protection" according to J5 C 0926 (harmonized standard of IEC 68529). "Degree of protection provided by enclosure (IP Code)"
Do not use the earphones or headphones at high volume in a public place. Sound leakage from the earphones or headphones may be a nuisance to people around you.
Information
The waterproofness of the earphone body is compliant with IPXS.
IP65 indicates that the unit will continue functioning even if water is directly projected against it from any direction. While this standard guarantees this performance with fresh water or tap water at room temperatures, it does not guarantee equivalent performance with warm water or seawater.
in addition, malfunctions caused by water ingress due to incorrect handling are not covered by the warranty, even during the warranty period.
The second digit of IPK refers to "Liquid ingress protection" according to JIS C 0520 (harmonized standard of IEC 60528, "Degrees of protection provided by enclosures (IP Code)".
Do not use the earphones or headphones at high volume in a public place. Sound
About the name plate of the unit
About the entire place of the whole
The model number, serial number, power requirements, etc., may be found on the bottom of the charging case and on the upside of its lid.
You should note this serial number in the space provided below and retain this manual as a permanent record of your purchase to aid identification in the event of theft.
Model No.
Serial No.
Notice regarding use
- For information on replaceable parts, such as eartips, consult your Yamaha dealer. - Your ears may tingle in geographical locations where the air is very dry. This is not a malfunction of the earphones, but is caused by static electricity on your body or a connected device.
- Not charging in a long period of time may shorten the battery life. Charge the unit and charging case since every six months.
Warranty policy for U.S., Canada and Australia customer
Please visit our website for details (U.S.: https://asia-yamaha.cmp/).
Canada: https://ca.yamaha.com/jen/index.html, Australia: https://au.yamaha.com/index.html
BRINGING
YOU
CLOSER
TO THE
ARTIST
TW-E3
natural_image
Black-and-white photo of a person playing string instrument (no visible text or symbols)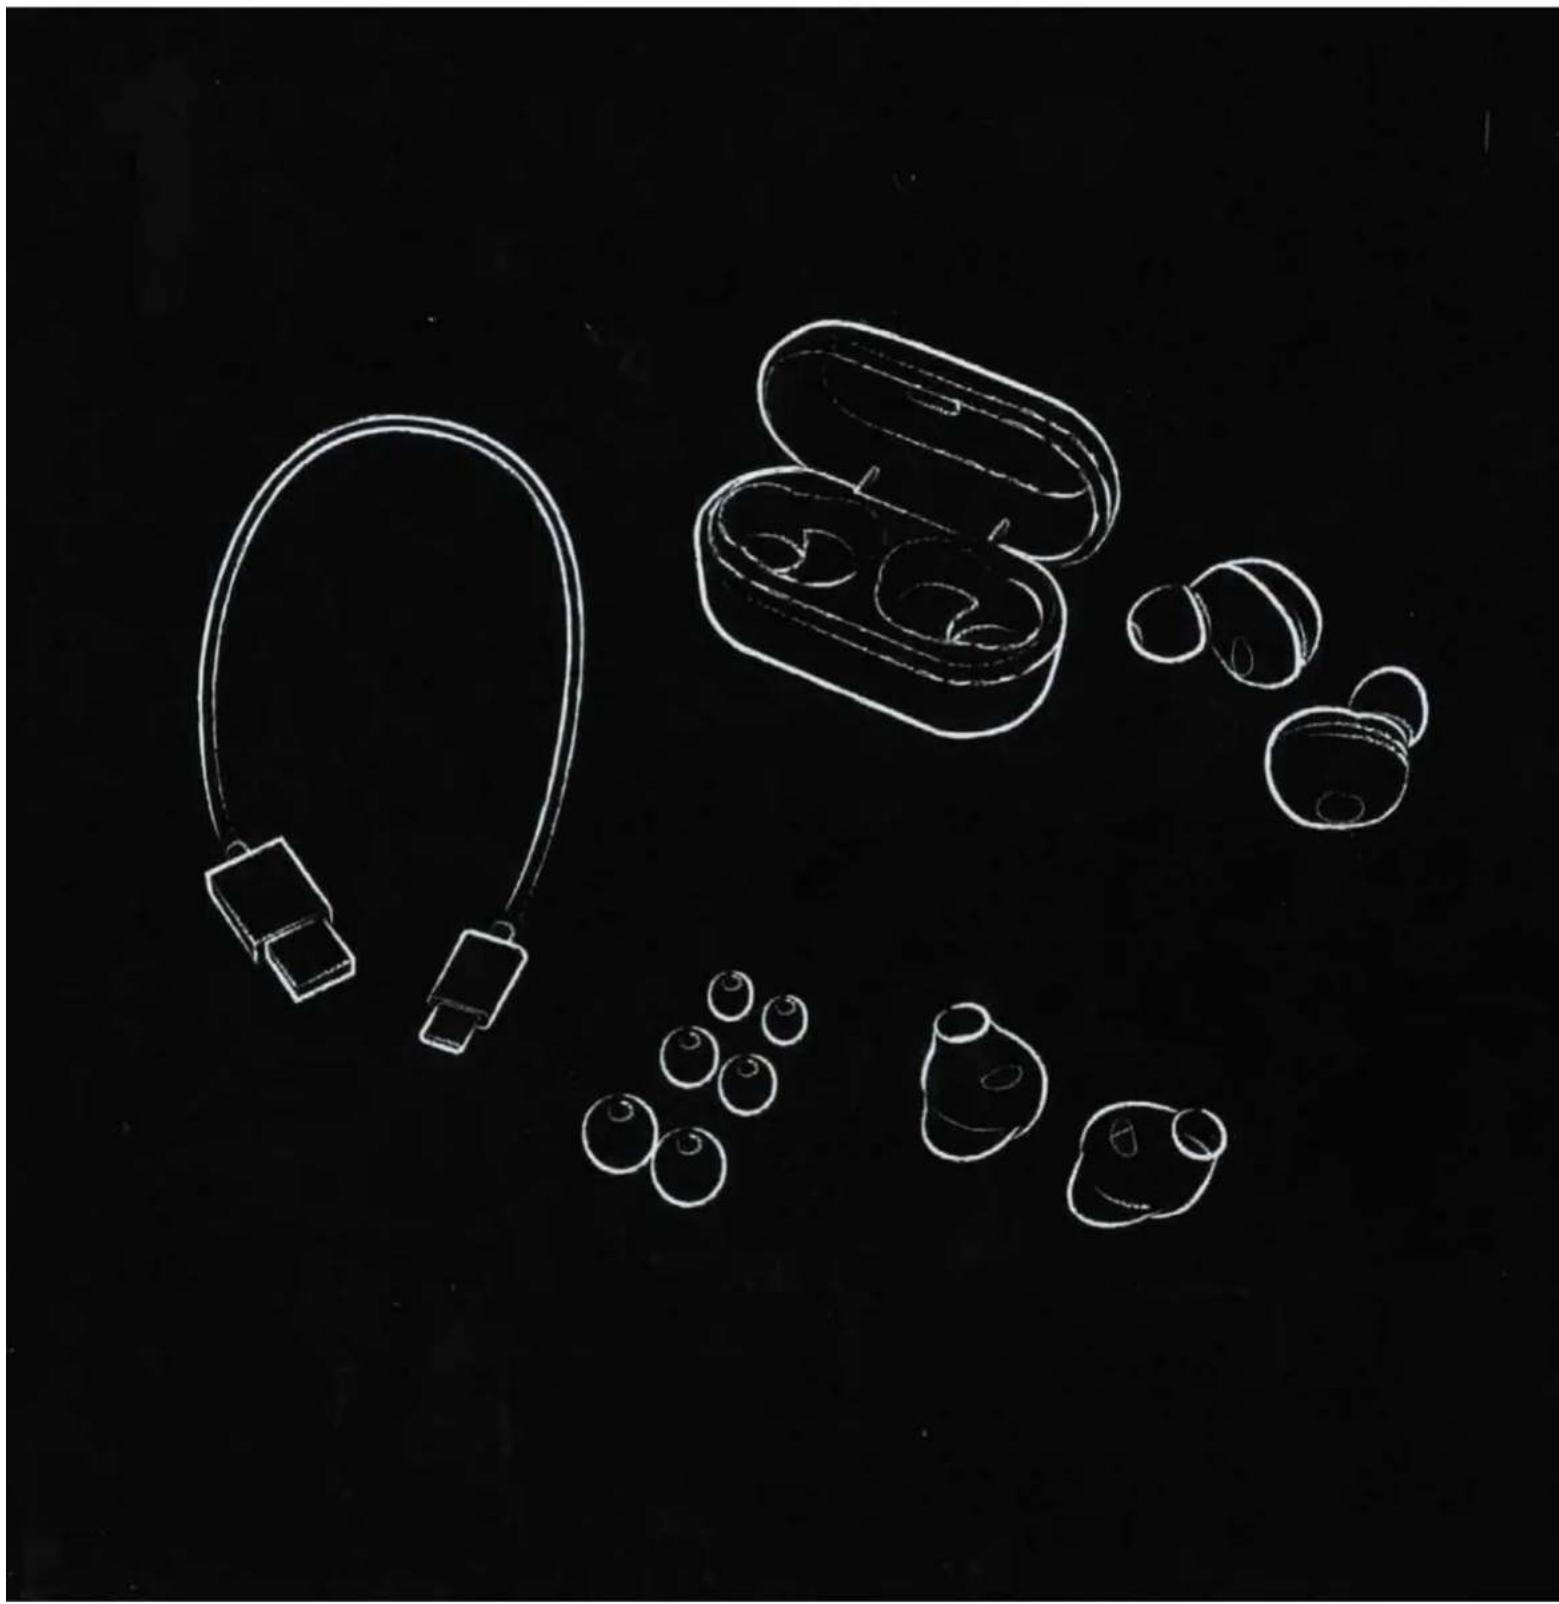
natural_image
Line drawing of wireless earbuds and charging case on black background (no text or symbols)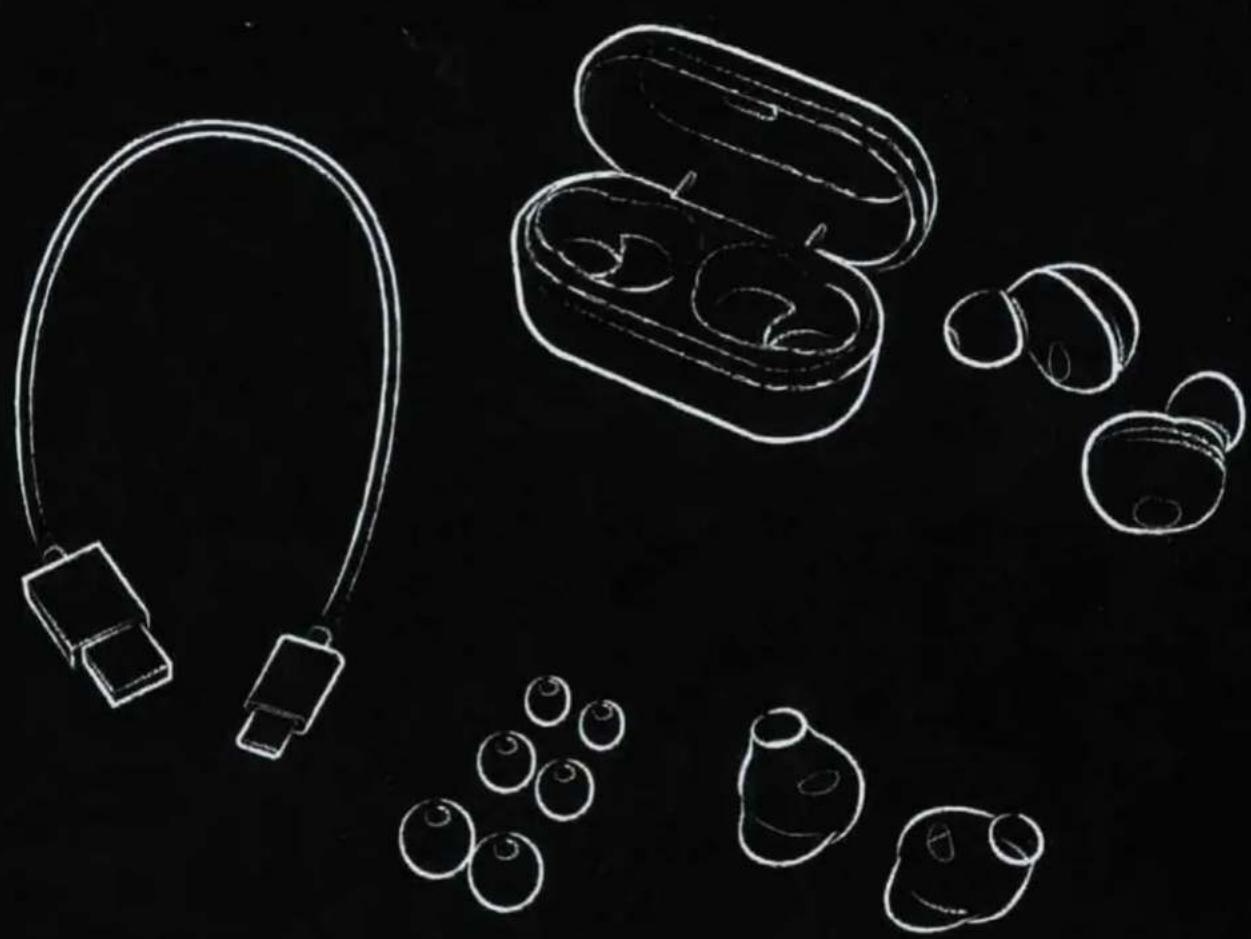
natural_image
Line drawing of wireless earbuds and earpieces on a black background (no text or symbols)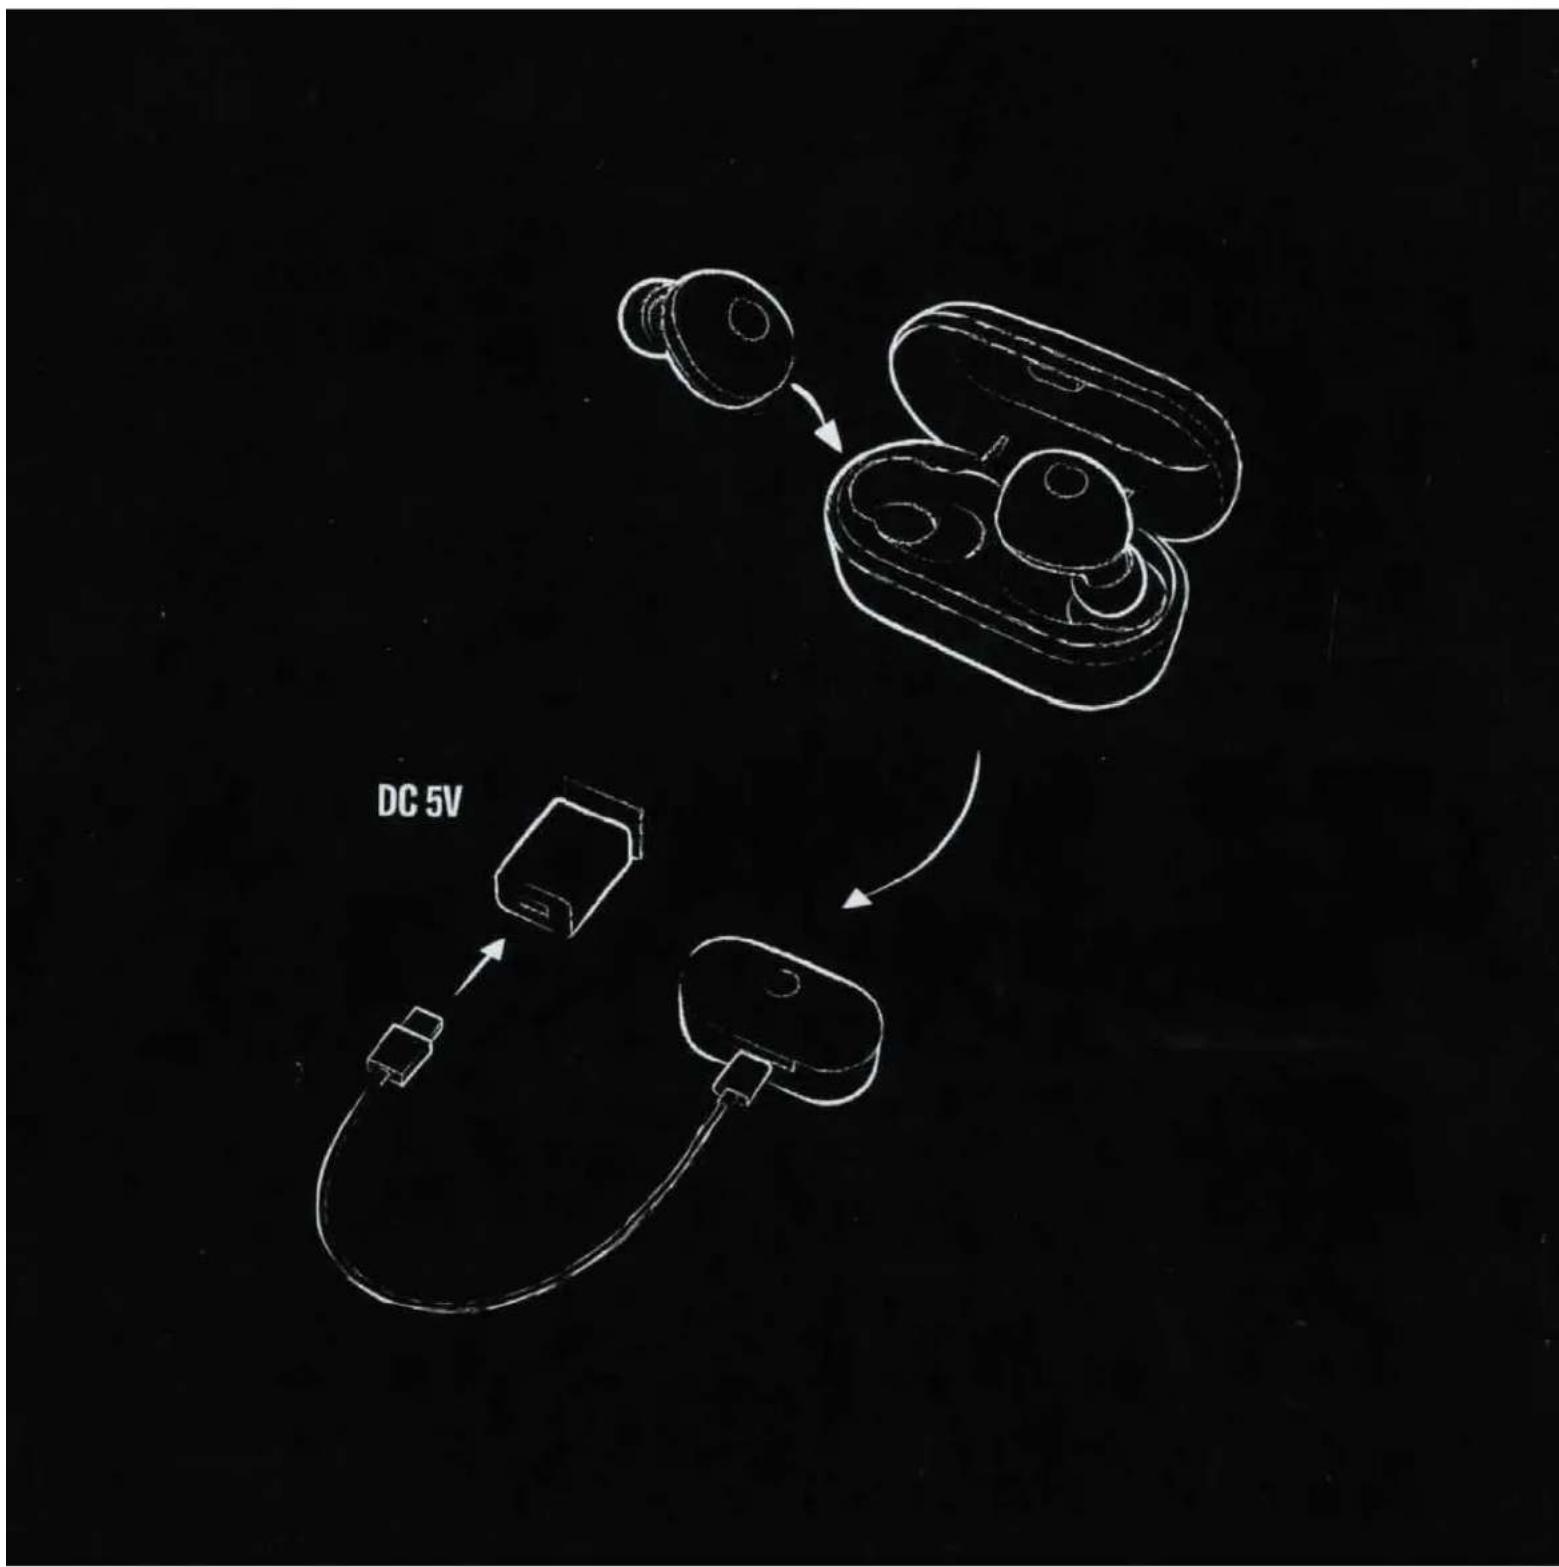

https://manual.yamaha.com/av/19/twe3a/

YAMAHA
Worldwide Representative Offices
ZY73900
Yamaha Canada Music Ltd.
135 Milner Avenue, Tronto, Ontario M1S 3R1, Canada
U.S.A.
Yamaha Corporation of America
6600 Orangethorpe Avenue, Buena Park, CA 90620, USA
CENTRAL & SOUTH AMERICA
MEXICO
PANAMA AND OTHER LATIN
AMERICAN COUNTRIES /
CARIBBEAN COUNTRIES
Yamaha Music Latin America, S.A.
Yamaha Music (Russia) LLC.
Room37, entrance 7, bld. 7, Kievskaya street.
Moscow, 121059, Russia
AFRICA
Yamaha Music Gulf FZE
JAFZA-16, Office 512, P.O.Box 17328, Jabel Ali FZE, Dubai, U.A.E

MIDDLE EAST
TURKEY
Yamaha Music Europe GmbH
Bati Atasehir Istanbul, Turkey
OTHER COUNTRIES
Yamaha Music Gulf FZE
JAFZA-16, Office 512, P.O.Box 17328, Jabel Ali FZE,
Dubai, U.A.E
ASIA
THE PEOPLE'S REPUBLIC OF CHINA
Yamaha Music & Electronics (China) Co., Ltd.
2F, Yunhedasha, 1818 Xinzha-lu, Jingan-qu,
Shanghai, China
INDIA
Yamaha Music India Private Limited
P-401, JMD Megapolis, Sector-48, Sohna Road,
Gurgaon-122018,Haryana,India
INDONESIA
PT. Yamaha Musik Indonesia (Distributor)
PT. Nusantik
Yamaha Music Center Bldg., Jalan Jend. Gatot
Subroto Kav. 4, Jakarta 12930, Indonesia
REPUBLIC OF KOREA
Yamaha Music Korea Ltd.
11F, Prudential Tower, 298, Gangnam-daero,
Gangnam-gu, Seoul, 06253, Korea
MALAYSIA
Yamaha Music (Malaysia) Sdn., Bhd.
No.8, Jalan Perbandaran, 47301 Kelana Jaya,
Petaling Jaya, Selangor, Malaysia
SINGAPORE
Yamaha Music (Asia) PRIVATE LIMITED
Block 202 Hougang Street 21, #02-00,
Singapore 530202, Singapore
TAIWAN
Yamaha Music & Electronics Taiwan Co., Ltd.
2F., No.1, Yuandong Rd. Banqiao Dist.
New Taipei City 22063 Taiwan (R.O.C.)
THAILAND
Siam Music Yamaha Co., Ltd.
3,4,15,16th Fl.,Siam Motors Bldg.,
891/1 Rama 1 Road, Wangmai, Pathumwan,
Bangkok 10330, Thailand
VIETNAM
Yamaha Music Vietnam Company Limited
15th Floor, Nam A Bank Tower
201-203 Cach Mang Thang Tam St., Ward 4, Dist.3,
Ho Chi Minh City, Vietnam
OTHER COUNTRIES
Yamaha Corporation
Nakazawa-cho 10-1, Naka-ku, Hamamatsu,
Japan 430-8650
OCEANIA
AUSTRALIA / NEW ZEALAND
Yamaha Music Australia Pty. Ltd.
Level 1, 80 Market Street, South Melbourne,
VIC 3205 Australia
As of May 2018
AVRO1802A
- Product Overview 8
- Charging and Powering 13
- Connections 18
- Wearing this product 25
- Operating this Product 28
- Settings 32
- Troubleshooting 38
- Appendix 51
- Notice
- About this Documentation
- Trademarks
- Bluetooth®
- Qualcomm ® aptX ™
- Android™ and Google Play™
- App Store SM
- Siri ®
- Notice regarding the contents of this documentation
- WARNING
- CAUTION
- Handling this product
- Waterproof performance
- About IPX
- - Earphones
- - Charging case
- Battery-related notes
- Product Overview
- Advantages of this product
- High-definition playback of sound from Bluetooth devices
- Supports Qualcomm TrueWireless™ Stereo Plus (TWS+)
- LISTENING CARE feature
- Smartphone feature support
- Dedicated smartphone app: Headphones Controller
- Related links
- Accessories
- Part names
- NOTE
- Part names (charging case)
- Charging connector
- Indicator
- Charging and Powering
- Charging the earphones
- Charging the charging case
- Turning the power on
- Remove the earphones from the charging case.
- Turning the power off
- Place the earphones in the charging case.
- Checking the remaining battery power
- Connections
- Registering a Bluetooth device (pairing)
- Set this product to pairing mode.
- Activate the Bluetooth function on the Bluetooth device.
- Select this product from this list on your Bluetooth device.
- Registering (pairing) a different Bluetooth device
- Keep pressing the function key on the earphone (L) until its indicator lights up as shown below.
- Activate the Bluetooth function on the Bluetooth device.
- Select this product from this list on your Bluetooth device.
- Connecting to a Bluetooth device
- Disconnecting from a Bluetooth device
- Wearing this product
- Putting the earphones on
- Replacing the eartips
- Replacing the silicone sleeves
- Operating this Product
- Adjusting the volume
- Listening to music
- Receiving a phone call
- Using the voice assistance feature on your smartphone
- Press the function key on earphone (R) three times.
- Settings
- About the app for earphones/headphones
- List of settings (main screen)
- List of product settings (menu)
- Automatically adjust the sound quality according to the volume
- Setting the auto-standby time
- Updating the firmware
- Troubleshooting
- Read this first
- No sound can be heard
- ● This product are not connected to a Bluetooth device.
- ● The volume is too low.
- ● The music stopped playing back.
- The eartips don't fit my ears.
- Sound can only be heard from one earphone
- ● The signal may not be coming in clearly, making the connection unstable.
- - You may be using a smartphone app that generates sound from only one channel.
- ● One of the earphones might be turned off.
- ● The connection information for the registered Bluetooth device may not be working properly.
- Power will not turn on
- ● There may not be enough battery power left.
- ● The battery power of the charging case may have been depleted while charging the earphones.
- ● The product is temporarily not functioning in a stable way.
- The product cannot be charged
- Cannot connect to a Bluetooth device
- The product does not operate or play back
- ● This product may be charging.
- ● There is no remaining battery power on this product.
- The sound is distorted, noisy or choppy
- Restoring this product to factory defaults (Initialize / Reset)
- Turn off the power after removing the earphones from their charging case.
- Hold down the function key on earphone (R) for about 10 seconds.
- Once the indicator starts flashing, press the function key on earphone (R) three times within 10 seconds.
- Hold down the function key on earphone (L) for about 10 seconds.
- Once the indicator starts flashing, press the function key on earphone (L) three times within 10 seconds.
- Hold down the function key on earphone (R) for two seconds. The power will turn on.
- Hold down the function key on earphone (L) for two seconds within 10 seconds of doing the previous step. The power will turn on.
- Problem Still Not Resolved (Customer Support)
- ● For customers within Japan
- ● For customers outside of Japan
- Appendix
- Specifications
- Rechargeable battery
- General
- List of operations
- Power
- Volume
- Music playback
- Phone calls
- Other functions
- List of indicator displays and audio messages
- Product indicator display
- Indicator display when charging
- Charging case indicator display
- Audio messages
- YAMAHA
- TW-E3A
- English
- Introduction
- Product, Accessory and Part Names
- Preparation
- B Charging
- Making a Bluetooth® connection
- Pairing
- Registering another Bluetooth device/Perform pairing operations again
- Turning on
- Turning off
- Basic operations
- Bluetooth
- FCC INFORMATION (U.S.A.)
- CAN ICES-3 (B)/NMB-3 (B)
- PRECAUTIONS
- PLEASE READ CAREFULLY BEFORE USE. BE SURE TO FOLLOW THESE INSTRUCTIONS.
- After reading this manual, be sure to keep it in a safe place where it can be referenced at any time.
- This content indicates "risk of serious injury or death."
- Handling
- If you notice any abnormality
- Charging
- Battery use
- PLEASE READ CAREFULLY BEFORE USE. BE SURE TO
- FOLLOW THESE INSTRUCTIONS.
- impression of the leakage of harmonic equil or gas.
- Do not disassemble
- Water warning
- Fire warning
- Wireless unit
- This content indicates "risk of injury."
- Hearing loss
- Handling caution
- Indicates points that you must observe in order to prevent product failure, damage or malfunction and data loss.
- Information
- The waterproofness of the earphone body is compliant with IPXS.
- About the entire place of the whole
- Model No.
- Serial No.
- Notice regarding use
- Warranty policy for U.S., Canada and Australia customer
- BRINGING
- YOU
- CLOSER
- TO THE
- ARTIST
- TW-E3
- Worldwide Representative Offices
- U.S.A.
- CENTRAL & SOUTH AMERICA
- MEXICO
- PANAMA AND OTHER LATIN
- AMERICAN COUNTRIES /
- CARIBBEAN COUNTRIES
- AFRICA
- MIDDLE EAST
- TURKEY
- OTHER COUNTRIES
- ASIA
- THE PEOPLE'S REPUBLIC OF CHINA
- INDIA
- INDONESIA
- REPUBLIC OF KOREA
- MALAYSIA
- SINGAPORE
- TAIWAN
- THAILAND
- VIETNAM
- OCEANIA
- AUSTRALIA / NEW ZEALAND
Brand : YAMAHA
Model : TW-E3A
Category : Headphones