
C2 - Camera REOLINK - Free user manual and instructions
Find the device manual for free C2 REOLINK in PDF.


| Product Type | Wireless Pan/Tilt Network Camera |
| Model | C2 |
| Image Sensor | 1/3" CMOS Sensor |
| Display Resolution | 2560 x 1440 (4 Megapixel) |
| Lens | f=2.8-8mm Autofocus, F=1.6, With IRCUT |
| Angle of View | Horizontal: 48° ~ 92°; Vertical: 27° ~ 50° |
| Pan/Tilt Angle | Horizontal: 355°; Vertical: 105° |
| Minimum Illumination | 0 Lux (With IR Illuminator) |
| IR Distance | 12 Meters |
| Dimensions | 103 × 95 × 117 mm |
| Weight | 300 g |
| Power Input | 5V/2A, <6W |
| Wireless Standard | IEEE 802.11a/b/g/n, 2.4GHz / 5GHz |
| Wireless Security | WPA-PSK/WPA2-PSK |
| Image Compression | H.264/MJPEG |
| Maximal Frame Rate | 30fps |
| Audio | Two-way Audio (built-in microphone and speaker) |
| Storage | Built-in microSD slot (max capacity not specified) |
| Operating Temperature | -10°C ~ +55°C |
| Waterproof | No (indoor use only) |
| Max User Access | 20 Users |
| Browser Supported | IE, Edge, Chrome, Firefox, Safari |
| OS Supported | PC: Windows, Mac OS; Smartphone: iOS, Android |
| Safety Compliance | FCC, RoHS |
Frequently Asked Questions - C2 REOLINK
User questions about C2 REOLINK
0 question about this device. Answer the ones you know or ask your own.
Ask a new question about this device
Download the instructions for your Camera in PDF format for free! Find your manual C2 - REOLINK and take your electronic device back in hand. On this page are published all the documents necessary for the use of your device. C2 by REOLINK.
USER MANUAL C2 REOLINK
natural_image
Black realink smart device with camera lens and antenna (no visible text or symbols on body)Reolink C2
1440p Wireless Pan/Tilt Network Camera
Getting Started
Thank you for purchasing the Reolink Digital Video Surveillance (8CH) Product.
For the latest User Manual, Product Up dates and more information about the products, please visit our websiteat:
https://reolink.com/

RISK OF ELECTRIC SHOCK DO NOT OPEN

CAUTION: TO REDUCE THE RICK OF ELECTRIC SHOCK DO NOT REMOVE COVER. NO USER SERVICEABLE PARTS INSIDE. REFER SERVICING TO QUALIFIED SERVICE PERSONNEL.

The lightning flash with arrowhead symbol, within an equilateral triangle, is intended to alert the user to the presence of uninsulated "dangerous voltage" within the products' enclosure that may be of sufficient magnitude to constitute a risk of electric shock.

The exclamation point within an equilateral triangle is intended to alert the user to the presence of important operating and maintenance (servicing) instructions in the literature accompanying the appliance
WARNING: TO PREVENT FIRE OR SHOCK HAZARD, DO NOT EXPOSE THIS UNIT TO RAIN OR MOISTURE.
CAUTION: TO PREVENT ELECTRIC SHOCK, MATCH WIDE BLADE OF THE PLUG TO THE WIDE SLOT AND FULLY INSERT.
FCC Verification
Note: This equipment has been tested and found to comply with the limits for Class B digital device, pursuant to part 15 of the FCC Rules. These limits are designed to provide reasonable protection against harmful interference in a residential installation. This equipment generates, uses and can radiate radio frequency energy and, if not installed and used in accordance with the instructions, may cause harmful interference to radio or television reception, which can be determined by turning the equipment off and on, the user is encouraged to try to correct the interference by one or more of the following measures:
•Reorient or relocate the receiving antenna
- Increase the separation between the equipment and the receiver
- Connect the equipment into an outlet on a circuit different from that to which the receiver is connected
- Consult the dealer or an experienced radio/TV technician for help
These devices comply with part 15 of the FCC Rules. Operation is subject to the following two conditions:
• These devices may not cause harmful interference.
• These devices must accept any interference received, including interference that may cause undesired operation.
Important Note:
All jurisdictions have specific laws and regulations relating to the use of cameras. Before using any camera for any purpose, it is the buyer's responsibility to be aware of all applicable laws and regulations that prohibit or limit the use of cameras and to comply with the applicable laws and regulations.
FCC Regulation(forUSA):
Prohibition against eavesdropping
Except for the operations of law enforcement officers conducted under lawful authority, no person shall use, either directly or indirectly, a device operated pursuant to the provisions of this Part for the purpose of overhearing or recording the private conversations of others unless such use is authorized by all of the parties engaging in the conversation.
WARNING:
Modifications not approved by the party responsible for compliance could void user's authority to operate the equipment.
Important Safety Instructions
- Make sure product is fixed correctly and stable if fastened in place
- Do not operate if wires and terminals are exposed
- Do not cover vents on the side or back of the DVR and allow adequate space for ventilation
RoHS:
This product is fully compliant with the European Union Restriction of the Use of Certain Hazardous Substances in Electrical and Electronic Equipment ("RoHS") Directive (2002/95/EC). The RoHS directive prohibits the sale of electronic equipment containing certain hazardous substances such as lead, cadmium, mercury, and hexavalent chromium, PBB, and PBDE in the European Union.
Content
Chapter 1 General Introduction of the camera 6
1.1 Physical Appearance 6
1.2 Product Feature 7
Chapter 2 Install Reolink Client software 8
2.1 Connection Diagram 8
2.2 Requirement for computer 9
2.3 Installing process 9
Chapter 3 Overview of client software 10
3.1 Live View 10
3.1.1 General Introduction of the icons 10
3.1.2 Zoom in/out the Image and Auto Focus 11
3.1.3 Pan/tilt, Preset and Cruise Path 12
How to set preset 13
3.2 Local Settings 14
3.2.1 Local Settings > General 14
3.2.2 Local Settings > Record Settings 15
3.2.3 Local Settings > Transcode 16
How to transcode the video file 17
3.3 Playback 17
3.3.1 Local Playback 17
3.3.2 Remote Playback 18
How to play back the video 19
How to download video from SD card 19
How to download some specific parts of the video 20
Chapter 4 Camera Configuration 21
4.1 Device Settings > Display 22
How to set up Mask 23
4.2 Device Settings > Recording 23
4.2.1 Recording > Encode 23
4.2.2 Recording > Option 24
4.2.3 Recording > Schedule 25
4.3 Device Settings > Network 26
4.3.1 Network > General 26
4.3.2 Network Advanced 28
DDNS Setup 28
NTP Setup 30
Email Setup 31
FTP Setup 33
Port Settings 35
4.3.3 Network Status 36
4.3.4 Wi-Fi Settings 37
How to connect to a wireless network 37
4.4 Device Settings > Alarm 38
4.4.1 Motion > Sensitivity 38
How to minimize the amount of noise in your images 40
4.4.2 Motion > Schedule 40
4.4.3 Motion > Motion Detect 40
4.5 Device Settings > System 42
4.5.1 System > General 42
How to configure DST Settings 43
4.5.2 System > Information 44
4.5.3 System > Maintenance 44
How to upgrade firmware 45
4.5.4 System > Performance 46
4.5.5 System > Reboot 46
4.6 Device Settings > Device 47
4.7 Device Settings > User 48
4.7.1 User > Online User 48
4.7.2 User > Add User 49
4.7.3 User > Manage User 49
How to change the login password 50
Chapter 5 Basic Settings 51
5.1 Basic Settings > OSD 51
5.2 Basic Settings > Encode 51
5.3 Basic Settings > Image 52
Chapter 6 Advanced Settings 53
Chapter 7 Warranty & Technical Support 54
7.1 Warranty 54
7.2 Technical Support 55
Chapter 1 General Introduction of the camera
1.1 Physical Appearance
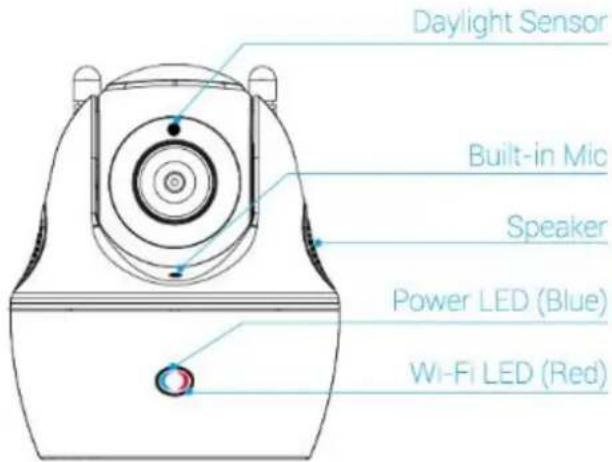
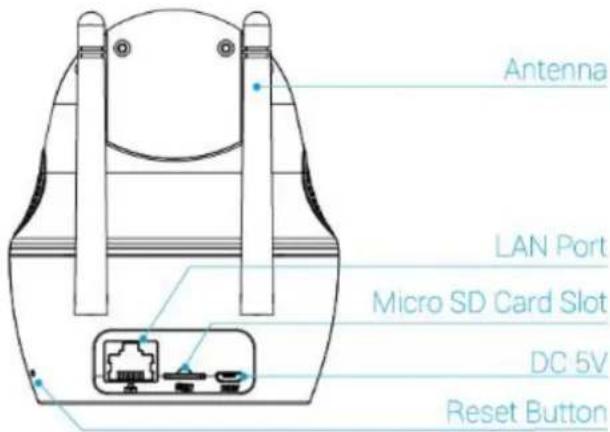
| ITEM | DESCRIPTION |
| Power LED (Blue) | On: Power on |
| Off: Power off | |
| Wi-Fi LED (Red) | Flashing: Wi-Fi not connected |
| Off: Wi-Fi connected successfully |
1.2 Product Feature
| Model | C2 | |
| Hardware Features | Image Sensor | 1/3" CMOS Sensor |
| Display Resolution | 2560 x 1440 (4 Megapixel) | |
| Lens | f=2.8-8mm Autofocus, F=1.6, With IRCUT | |
| Angle of View | Horizontal: 48° ~ 92° | |
| Vertical: 27° ~ 50° | ||
| Pan/Tilt Angle | Horizontal: 355° | |
| Vertical: 105° | ||
| Minimum Illumination | 0 Lux (With IR Illuminator) | |
| IR Distance | 12 Meters | |
| Dimensions | 103 × 95 × 117mm | |
| Weight | 300g | |
| Power Input | 5V/2A, <6W | |
| Interface | One 10M/100Mbps RJ45 | |
| Power Interface | ||
| Built-in SD socket | ||
| Built-in Microphone and speaker | ||
| Reset Button | ||
| Software Features | Protocols & Standards | TCP/IP, UDP/IP, DHCP, FTP, SMTP, DDNS, NTP, UPnP, HTTP,P2P |
| Image Compression | H.264/MJPEG | |
| Maximal Frame Rate | 30fps | |
| Code rate | 1024Kbps ~ 8192Kbps | |
| Audio | Two-way Audio | |
| Maximum User Access | 20 Users | |
| Browser Supported | IE, Edge, Chrome, Firefox, Safari | |
| OS Supported | PC: Windows, Mac OS | |
| Smart Phone: iOS, Android | ||
| Wireless Features | Wireless Standard | IEEE 802.11a/b/g/n |
| Operating Frequency | 2.4GHz / 5GHz | |
| Wireless Security | WPA-PSK/WPA2-PSK | |
| Other parameters | Temperature | Operating Temperature: -10°C~+55°C |
| Storage Temperature: -40°C ~ 70°C | ||
| Humidity | Operating Humidity: 20% ~ 85% | |
| Storage Humidity: 10% ~ 90% | ||
| Waterproof | No |
Chapter 2 Install Reolink Client software
2.1 Connection Diagram
For initial setup:
- Connect the camera to the LAN port on the router by an Ethernet cable, otherwise, Reolink client software will not be able to find the camera.
- Make sure the camera and your computer are connected to the same router.
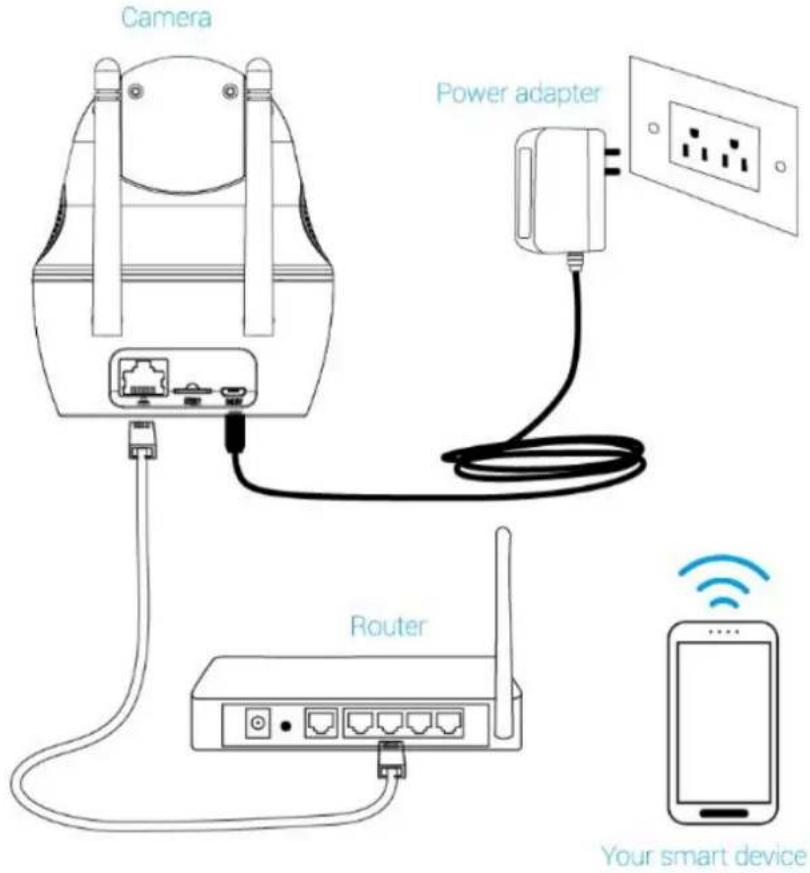
2.2 Requirement for computer
| Item | Requirement |
| CPU | 2.0GHz or faster |
| RAM | 2 GB or more |
| Network adapter | 10/100Mbps |
| Resolution | 1024x768 |
| Operating System | Microsoft Windows 7 and later |
2.3 Installing process
Step 1: Insert the included CD into your computer, locate the file called Reolink and run this file.
Step 2: You may be asked by UAC (User Account Control) to allow Reolink to "make changes" to your system. Select Allow or Continue.
Step 3: Follow the installation wizard to install the software.
Chapter 3 Overview of client software
After the Client software is successfully installed on your computer, you can use it to manage your camera.
Double click on the icon to launch the client software on your computer.
3.1 Live View
Live view is the default mode. Under live view, users can view the video feed from the camera and go to configure the camera.
3.1.1 General Introduction of the icons
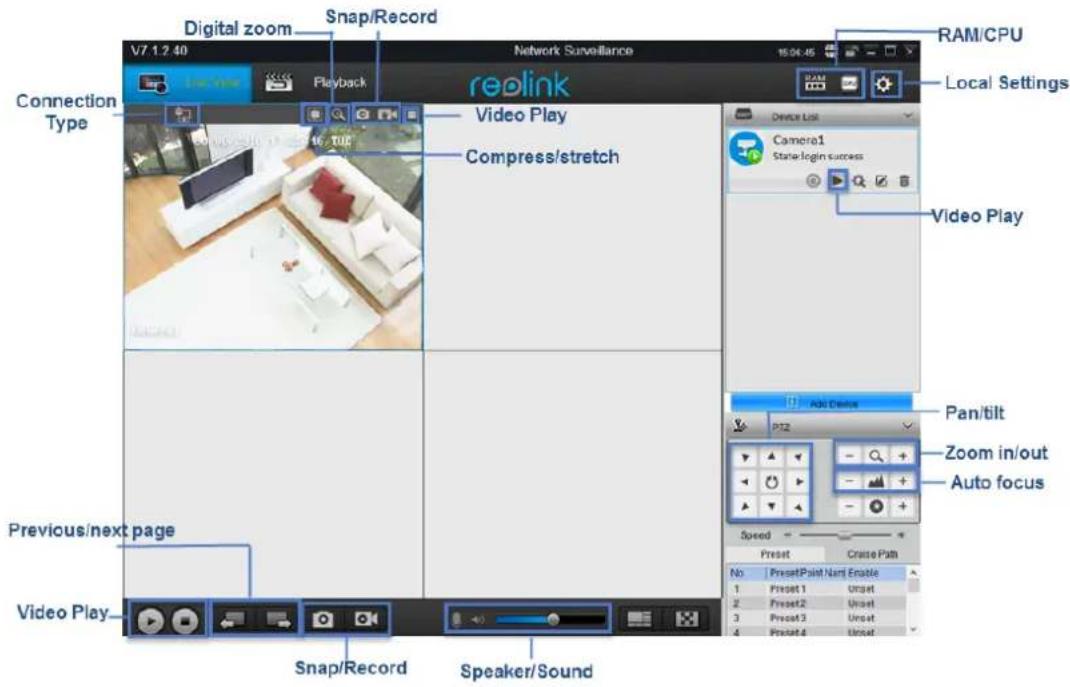
- : Place your mouse over RAM/CPU icon, it will show the memory/CPU loading performance.
-
Local Setting, set the parameters for the camera to record to your computer. For detailed configuration, please refer to 3.2 Local Settings.
-
Device List: Lists the cameras Reolink client has detected and added on your network, users can configure the camera, for detailed configuration, please refer to chapter 4.
- PTZ: Set the Pan/Tilt/Zoom Parameters. For detailed configuration, please refer to 3.1.3 Pan/tilt and Preset.
- ☒: Click to stretch the windows to full screen. Right click on the screen or hit ESC on the keyboard to exit full screen.
- : Click to choose 1/4 and multi-channel view up to 32 Channels.
- : Click to adjust its volume.
- / : Enable/disable audio. means audio is enabled while disabled.
- / : Enable/disable two-way audio. means two-way audio is enabled while disabled.
- : Start/stop manual recording for all the channels. the video will be automatically saved to your computer.
- Click to snap a picture for all the channels. The still picture will be automatically saved to your computer.
- : Click to see the cameras on the next page or previous page.
- : Start/stop live feed for all the channels.
- / 📷 : Indicates the camera is connected to the router via an Ethernet cable or Wi-Fi and the Wi-Fi signal strength.
- /: Click to compress the image to center or click to stretch image to full window.
- : Click to enter Digital Zoom. For more details, please refer to 3.1.2 Zoom in/out the Image and Auto Focus.
- Click to snap a picture for the selected channel. The still picture will be automatically saved to your computer.
- : Start/stop manual recording for the selected channel. the video will be automatically saved to your computer.
- A: Start or stop live feed for the selected channel.
3.1.2 Zoom in/out the Image and Auto Focus
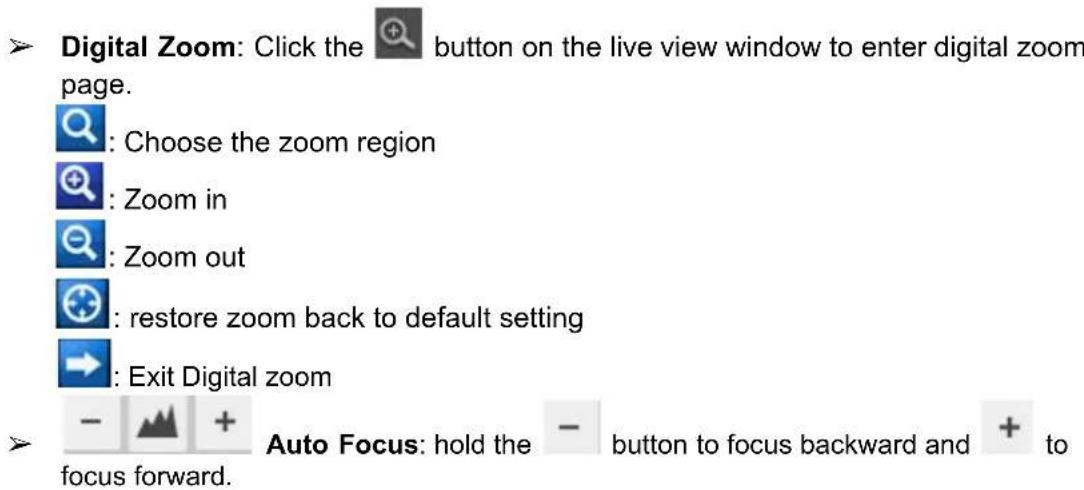
- | Q + Zoom in/out: Hold the - button to zoom out and + to zoom in.
3.1.3 Pan/tilt, Preset and Cruise Path
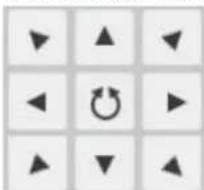
Pan/tilt buttons
natural_image
Grid of nine black arrow symbols arranged in 3x3 pattern, with a central circular icon (no text or labels)Click the directional arrows on the pan/tilt wheel to manually control the directions of the camera.
Click the 🤘 button in the middle to start automatic scan, click it again to stop it at the direction you prefer.
Set Preset
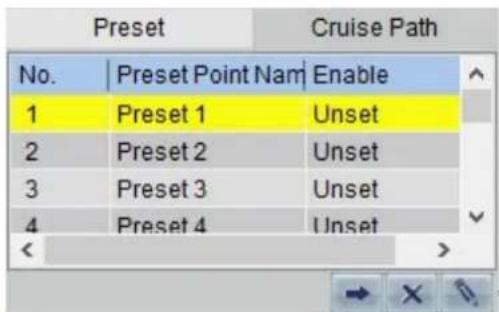

: Call, click this button, the camera will turn to the preset position you have chosen.
How to set preset
- Click the directional arrows on the pan/tilt wheel to turn the camera lens.
- when it points to the position you prefer, choose Preset 1(highlighted in yellow color), then click the button to record the preset position, Enable status will become Set.
- When you need to set another preset, repeat the above steps, and choose Preset 2.
- If you want the camera to turn to the preset you already set, choose the Preset Point Name, then click the button.
Cruise Path
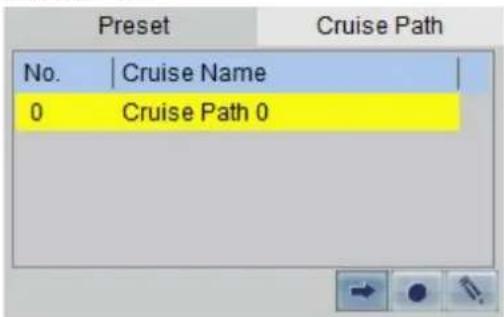
- Choose Cruise Path 0 and go to enter the Cruise Setup page.
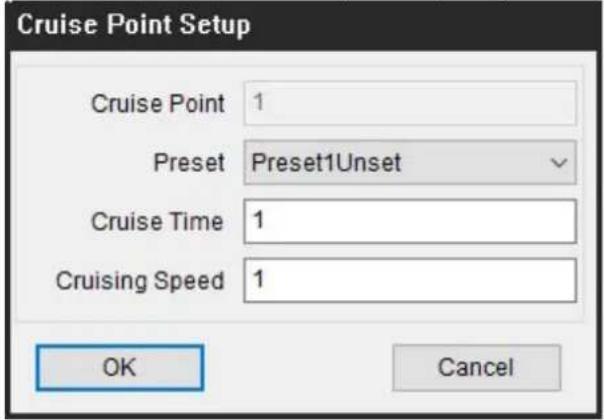
- Choose Cruise Point 1 and go to Cruise Point Setup.
Cruise Path Setup
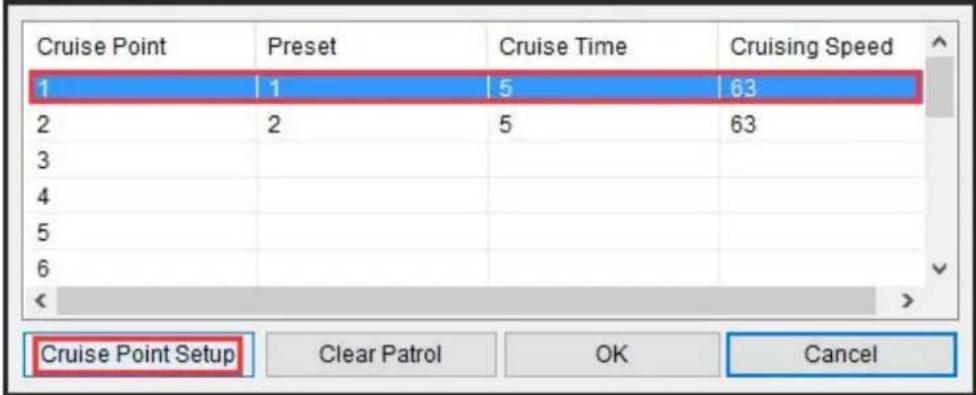
- Choose the Preset you have set, input Cruise Time (how long it will stay when the camera moves to a preset point, unit: second) and Cruising
-
Configure other Cruise Point according to your need.
-
Click OK to save and then click → to run the preset point. Click ● to stop cruise.
3.2 Local Settings
Click the 🙏 on the upper right corner to open Local Settings which contains General, Record Settings and Transcode. Users can check and modify the video download path, recording settings and transcode the video file etc.
3.2.1 Local Settings > General
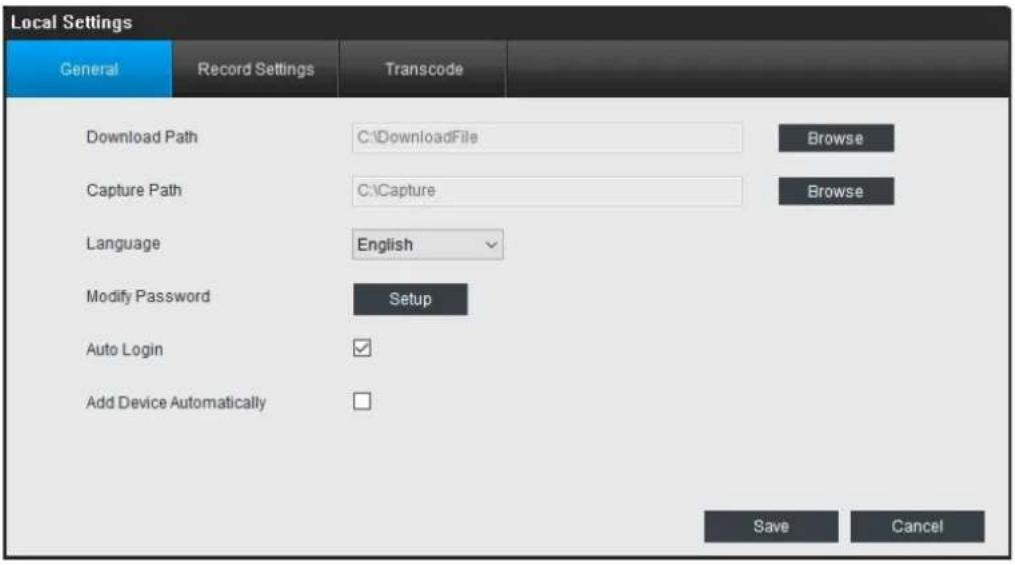
Download Path: Where Reolink will save footage that you've downloaded from the Camera. Click Browse to choose another path on your computer if needed.
Capture Path: Where Reolink will save still images captured using the snapshot function. Click Browse to choose another path on your computer if needed.
Language: Select the language you want to Reolink to display.
Modify Password: Change the password to login the Reolink client software. There is no password by default.
Auto Login: whether permission to login the Reolink will be asked or not when launching the client software. It is suggested to check it as default.
➢ Add Device Automatically: allow or not allow Reolink to detect and add camera on the same network automatically.
3.2.2 Local Settings > Record Settings
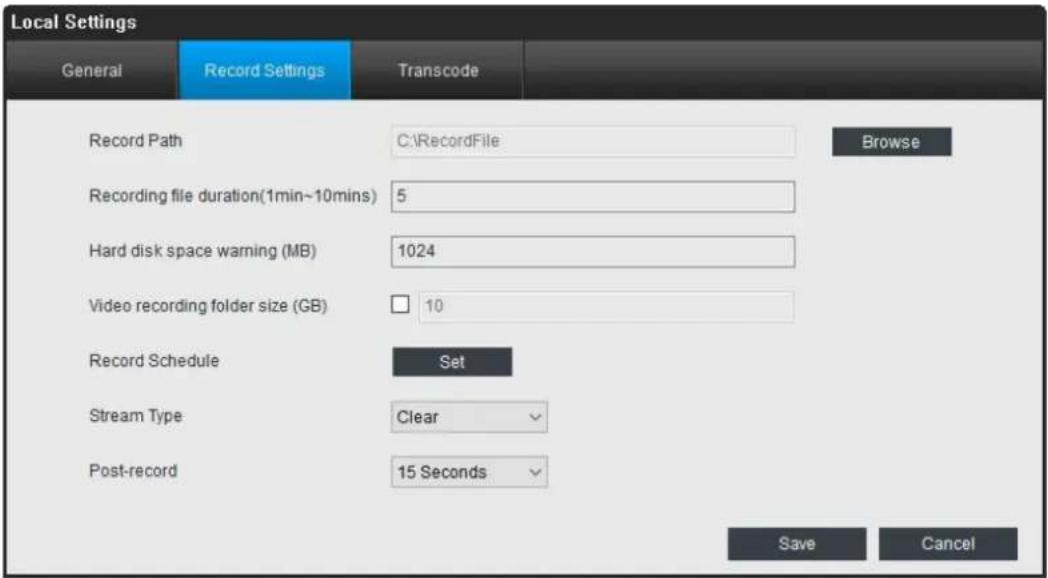
Record Path: Where Reolink will save recordings if you select Record from the Preview screen. Click Browse to choose another path on your computer if needed.
➢ Recording file duration: set the duration every record will have.
➢ Hard disk space warning: set the free space when Reolink will warn you.
➢ Video recording folder size: set the size of the folder which stores the recorded file. The minimum size is 10GB.
Record schedule: click Set to enter the record schedule settings. Click the grid box to change the schedule type (Normal, Motion and None). If you want to
select a large area, click the schedule type to select it, then press the left-click button on the mouse and move it to select a period of time.
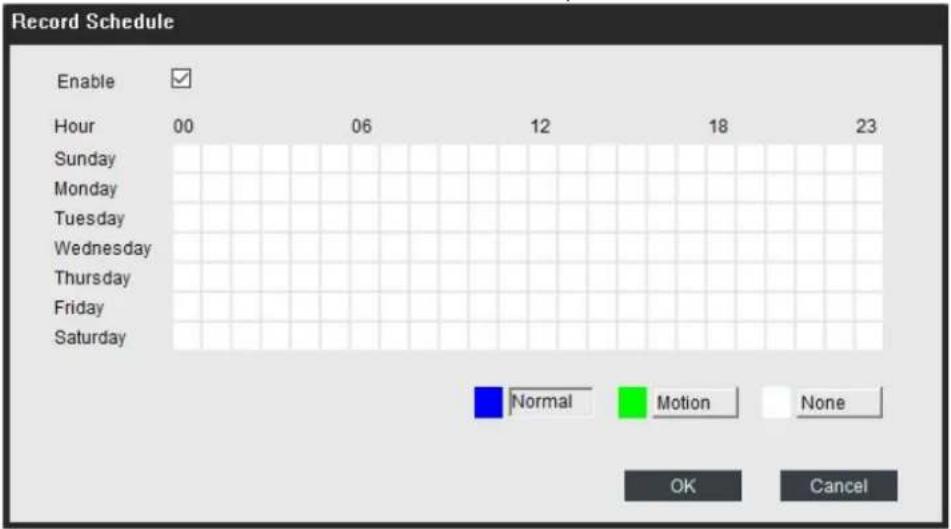
Normal: it means the camera will constantly record during this time.
Motion: it means the camera will only record when motion is detected during this time.
None: it means the camera will not record during this time.
Stream Type: choose the stream type for the recorded file, it includes Clear, Balanced and Fluent.
➢ Post-record: set the time of post-record when recording triggered by motion detect.
Click OK to save and enable the settings.
3.2.3 Local Settings > Transcode
On this page, users can transcode the H.264 file to AVI file.
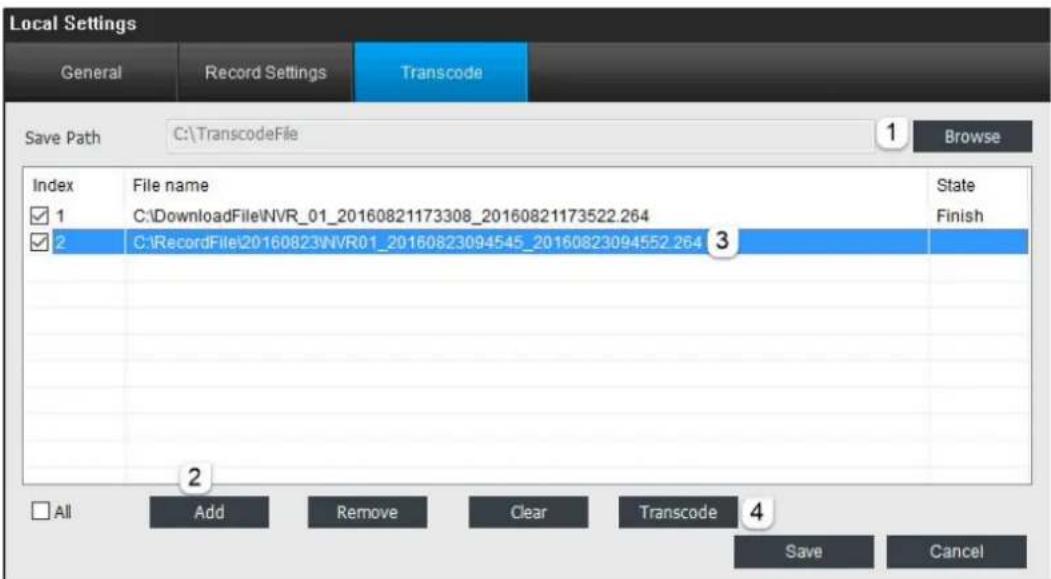
How to transcode the video file
- Click Browse to select the save path for the transcoded file.
- Click Add to add the file which you want to transcode to AVI format.
- Choose the file, then click Transcode, it will show Start or Finish under Status.
Remove: Remove the selected file from the box.
Clear: Remove all the files in the box, no matter it is selected or not.
3.3 Playback
Under this menu, you can playback the recorded video both on your computer and the built-in SD card.
3.3.1 Local Playback
Click the Playback button and go to Local playback. On this page, you can play the recorded video saved on your computer.
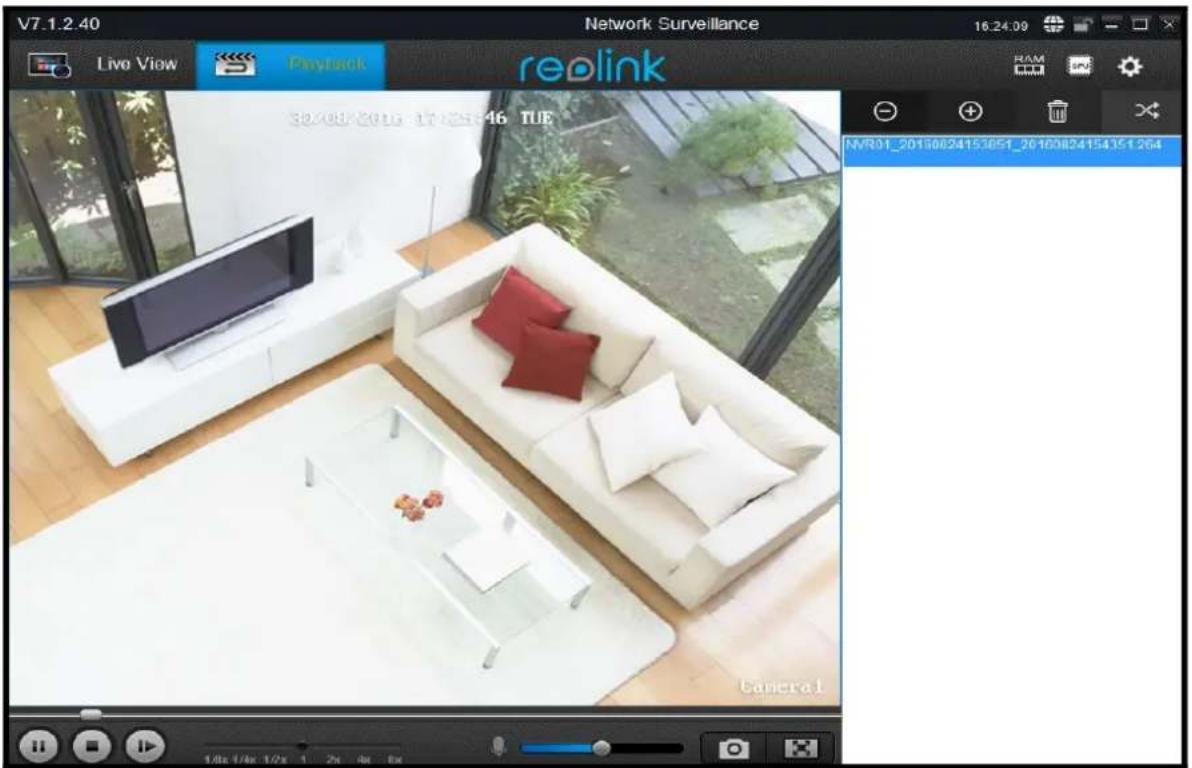
➢ Click the Ⓕ button to choose a file saved on your computer to play. The video recorded by the camera has a default path which can be found under Local Settings > General.
➢ Click the ☑ button to remove the selected file from the list.
Click the button to delete the selected file from the list and your computer.
➢ Click the ✗ button to choose the play mode among single play, single cycle, order play and loop play.
➢ Click 1/8x 1/4x 1/2x 1 2x 4x 8x to choose the playing speed.
3.3.2 Remote Playback
Click the Playback button and go to Remote Playback. On this page, you can play the recorded video saved on the SD card.
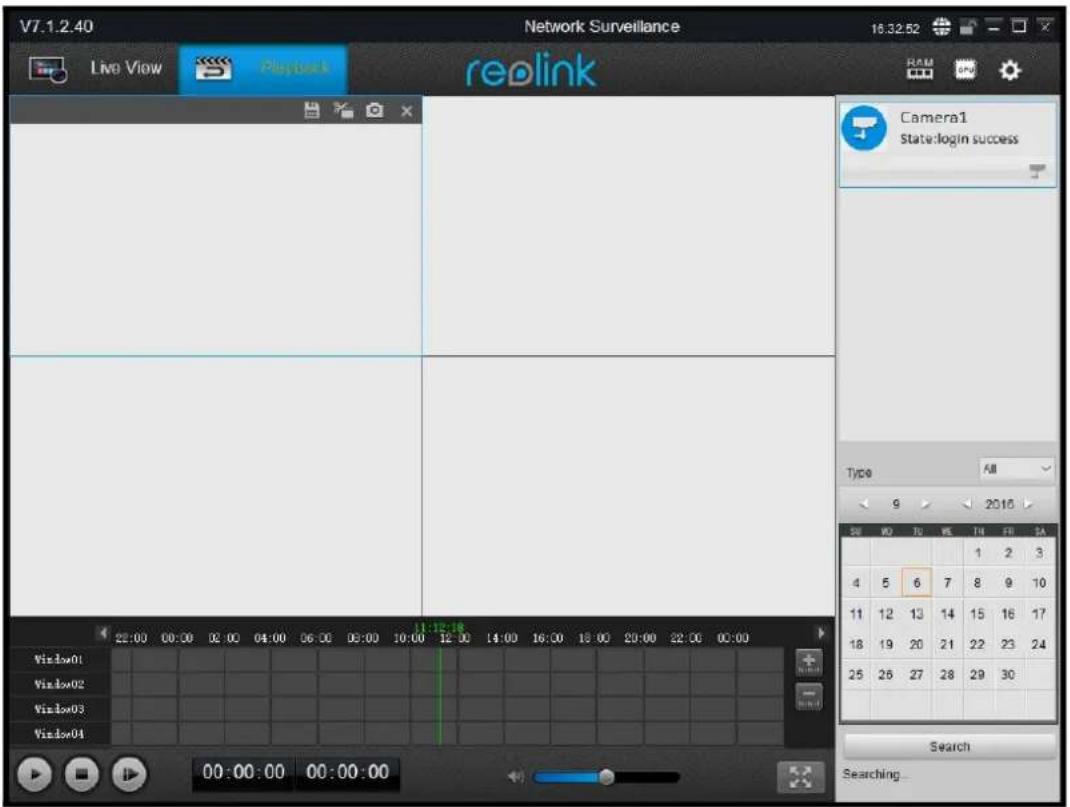
- : Click to download the video file from SD card.
- : Click to cut some specific parts of the video and download it.
- : Click to take a snap shot.
How to play back the video
- Click on the camera whose video you want to check under Device List.
-
Click on the date when the video was recorded.
-
Click the button to show time in detailed hours and minutes, click the left arrow or the right arrow to choose the time.
-
The recorded video will show in blue color, click on the segment where you want to play and hit the ▶ button to play.
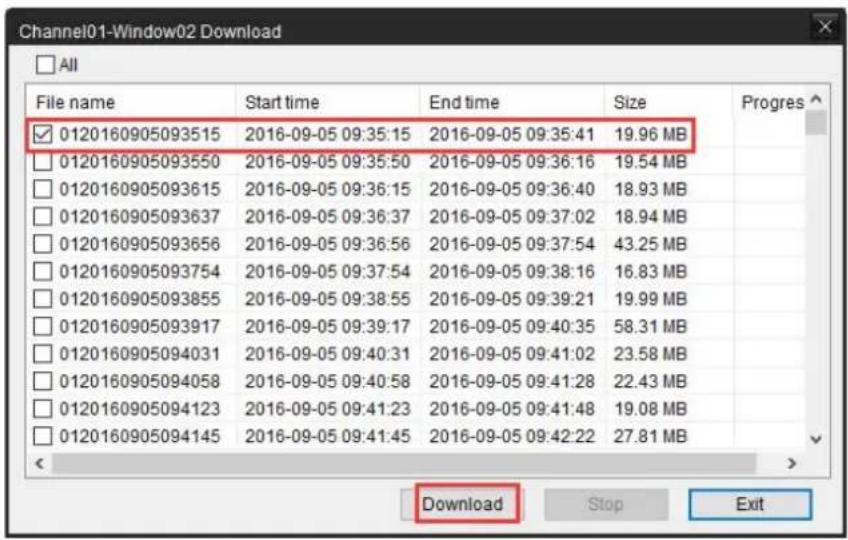
How to download video from SD card
- Click the button.
- Choose the video you want and click on the download button.
How to download some specific parts of the video
- Click the

- Drag the scissors to choose the start time and end time of the video clip you would like. 00:23:05 01:26:41 indicates the start time and end time of the selected video.
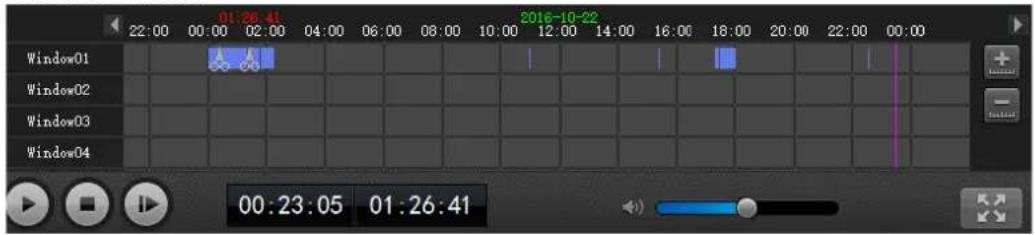
- Click the button to download the selected video clip.
Chapter 4 Camera Configuration
Under the camera listed in Camera List, you can refresh the camera, start or stop live view and configure device settings, edit or delete device. This chapter will mainly introduce how to configure Device Settings.
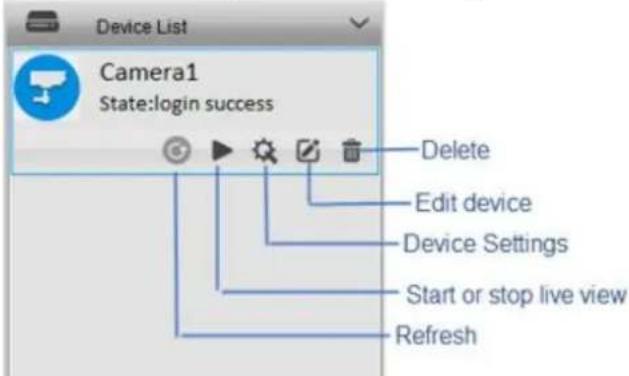
➢ State: It shows the current status of the camera, whether it is login success or login failed.
Refresh: Click this button to refresh the camera which will make another attempt to login. This icon is available only when camera status is login failed.
➢ Edit: Click to edit the login information of the camera.
➢ Delete: Delete the camera from Camera List.
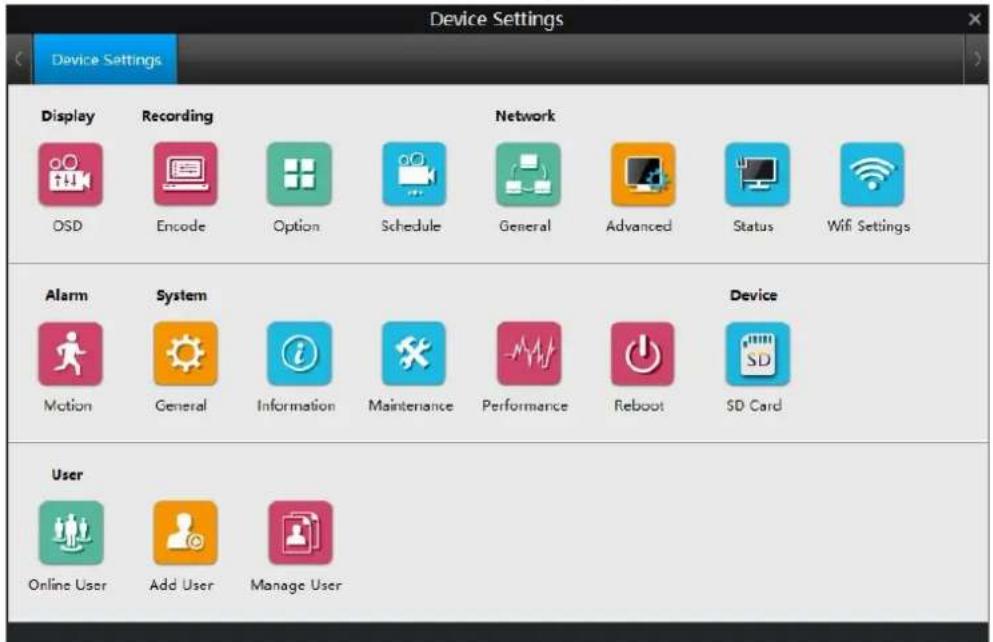
Device Settings
Click the 📄 button to enter Device Settings page.
4.1 Device Settings > Display
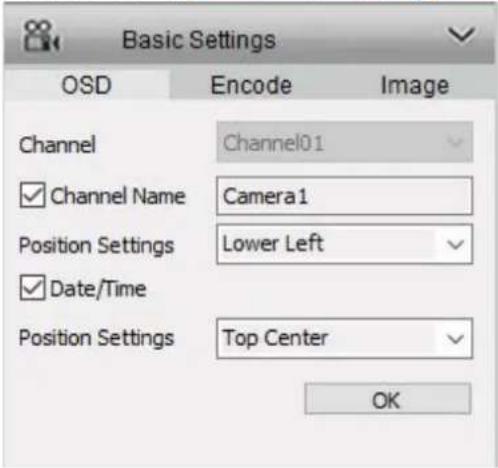
Click OSD under Display, users can modify the display info of the camera on this page.
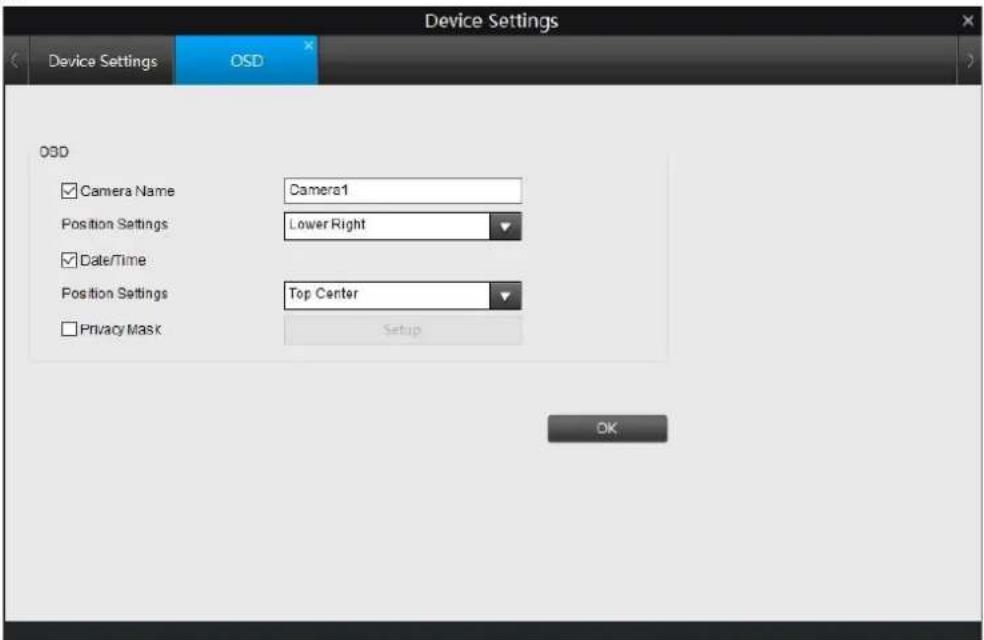
➢ Camera Name: Enable or Disable channel name, you may also rename the camera here.
➢ Position Settings: Choose where to display the Camera Name including upper left, lower left, upper right, lower right, top center or bottom center.
Date/Time: Enable or disable to show the date and time on the screen.
➢ Position Settings: Choose where to display the time including upper left, lower left, upper right, lower right, top center or bottom center
➢ Privacy Mask: Turns on/off the masking function.
How to set up Mask
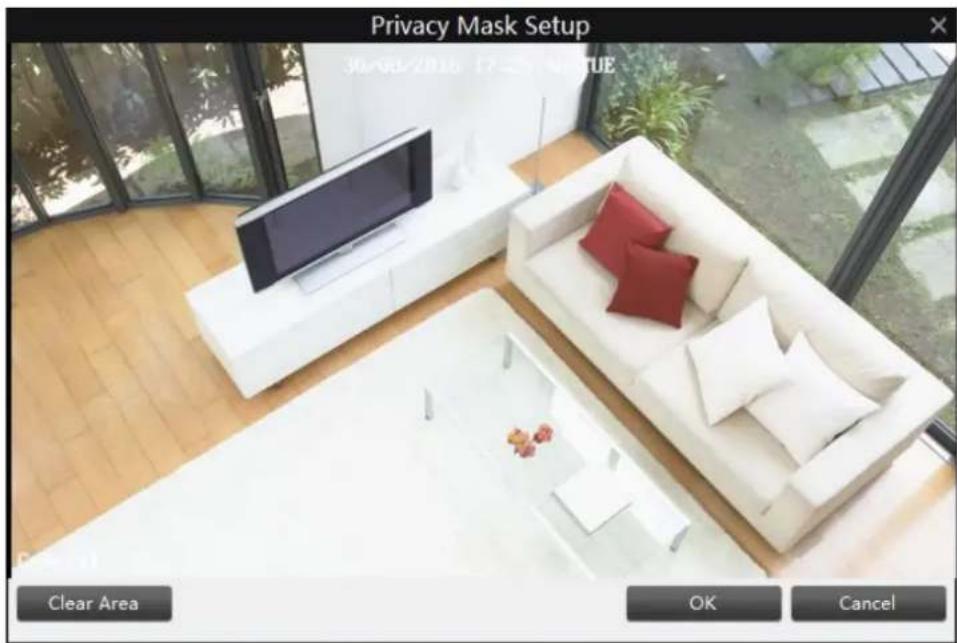
- Check the box Privacy Mask to enable it, then click Setup.
- Move the cursor to where you want to cover with a mask, press the left-click button on the mouse and move it to select the area. Click Clear to cancel the area you just selected.
- Click OK to save the settings.
NOTE: 4 masks are the maximum areas you can set for one camera. And it Will affect recordings.
4.2 Device Settings > Recording
Users can modify parameters for different stream type (Clear and Fluent), option and schedule settings for the SD card.
4.2.1 Recording > Encode
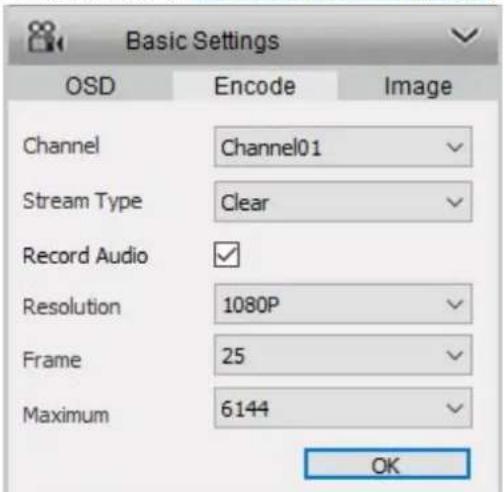
It allows you to alter and customize how the camera records footage and "encodes" the files, such as Resolution, Frame Rate, Maximum Bitrate and H.264 profile.
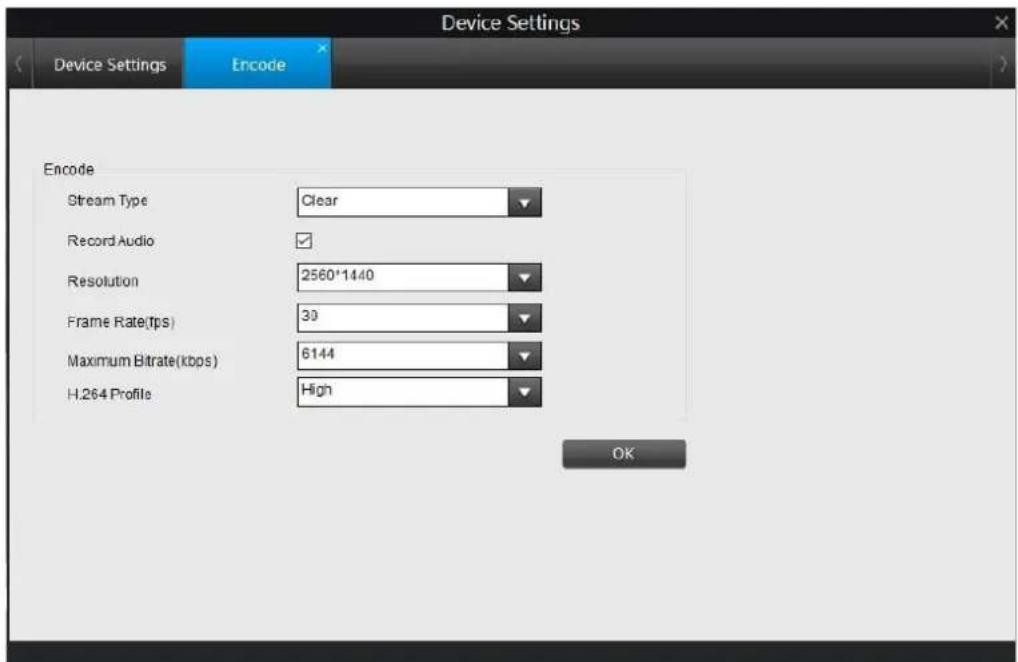
Stream Type: choose the stream type you want to edit.
- Clear(Main-Stream): the video feed that the Camera will record and display. This is the higher-quality stream.
- Fluent(Sub-Stream): the video stream that the Camera will send to remote devices via a network or the Internet. It is the lower-quality stream as a reduction in video size makes it easier to send over a network.
Record Audio: Check to enable recording with audio, otherwise, there will be no audio for the recorded file.
➢ Resolution: Choose the resolution for the selected stream type.
➢ Frame Rate(fps): Choose the Frame Type for the selected stream type.
➢ Maximum Bitrate(kbps): Choose the bitrate for the selected stream type. The higher the bitrate is, the better quality the recording will be, and the more space each recording will take up on the hard disk.
H.264 Profile: set the H.264 profile to be Baseline, Main or High.
Note:
- Both the main-stream and the sub-stream are always operating - in fact, the sub-stream forms part of the main-stream. The options will affect the output quality of each stream, but won't change which one is being used in different circumstances.
• To enable audio in live view or recording, make sure Record Audio is checked.
4.2.2 Recording > Option
The Option page displays the recording settings to SD card.
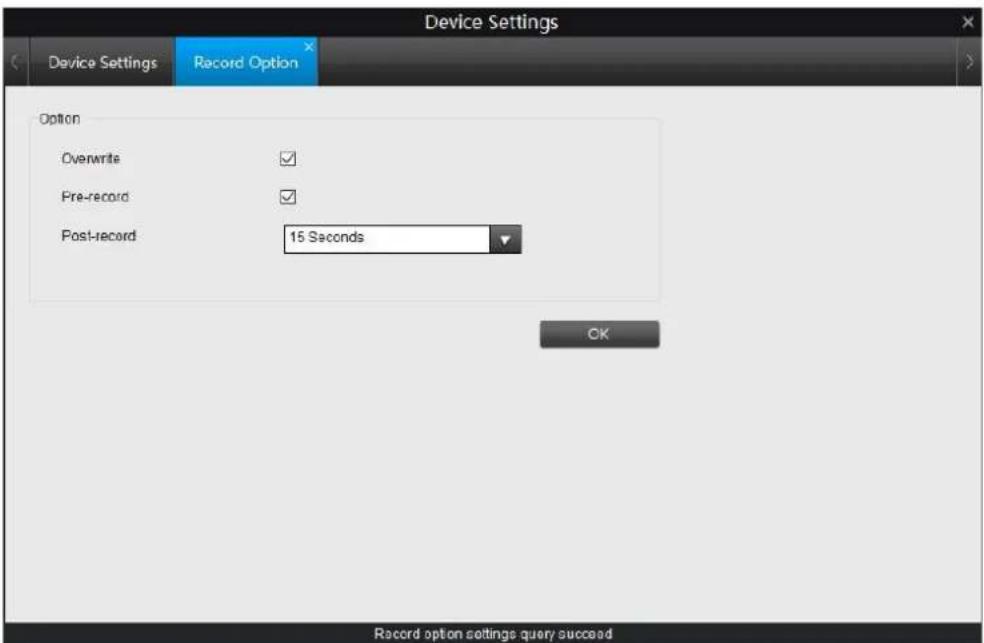
➢ Overwrite: Enable or Disable the camera to record over the oldest files on your SD card when it is full.
➢ Pre-record: Enable or Disable the camera to record for 5-8 seconds before an event occurs.
➢ Post-record: How long after an event occurs that the camera will continue to record.
Note:
This option will only be available when SD card has been inserted.
4.2.3 Recording > Schedule
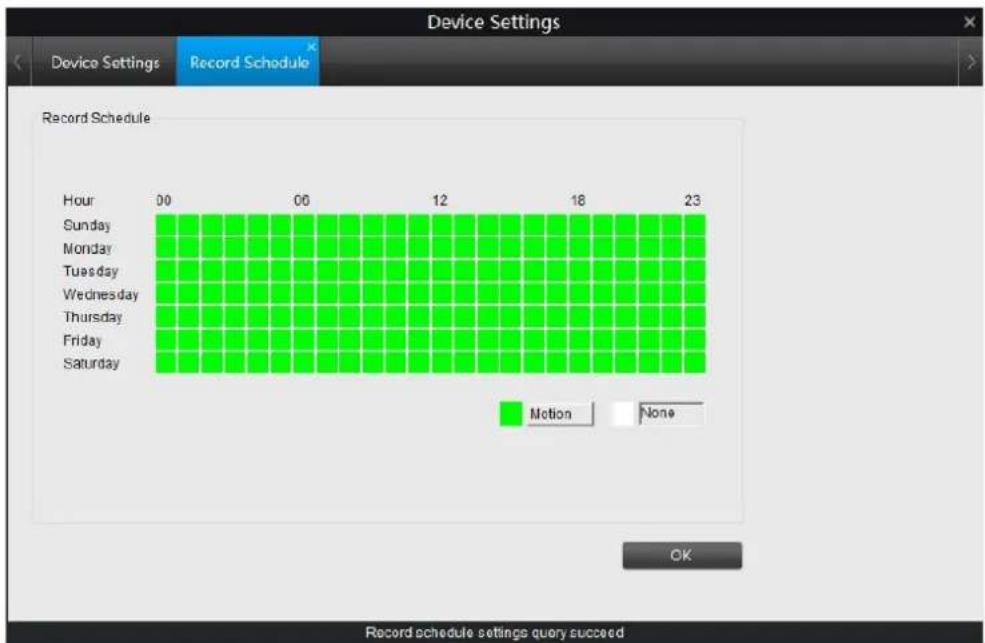
This page allows you to set the recording schedule of the SD card. Click the grid box to choose different schedule type.
If you want to select a large area, click the schedule type to select it, then press the left-click button on the mouse and move it to select a period of time.
bar
Device Settings Record Schedule | Hour | 00 | 06 | 12 | 18 | 23 | | :--- | :--- | :--- | :--- | :--- | :--- | | Sunday | Motion | None | Motion | Motion | None | | Monday | Motion | None | Motion | Motion | None | | Tuesday | Motion | None | Motion | Motion | None | | Wednesday | Motion | None | Motion | Motion | None | | Thursday | Motion | None | Motion | Motion | None | | Friday | Motion | None | Motion | Motion | None | | Saturday | Motion | None | Motion | Motion | None | Record schedule settings query succeed➢ Motion: SD card will start to record when motion is detected during this time.
None: SD card will not record even when motion is detected during this time.
Note:
- This option will only be available when SD card has been inserted.
- SD card can only store Motion Detection alarm, it doesn't support continuous recording.
4.3 Device Settings > Network
Under Network, there are 4 sub menus including General, Advanced, Status and Wi-Fi Settings, you may check and configure the network parameters of the camera.
4.3.1 Network > General
On this page, you can configure the network parameters of the camera and check the MAC address.
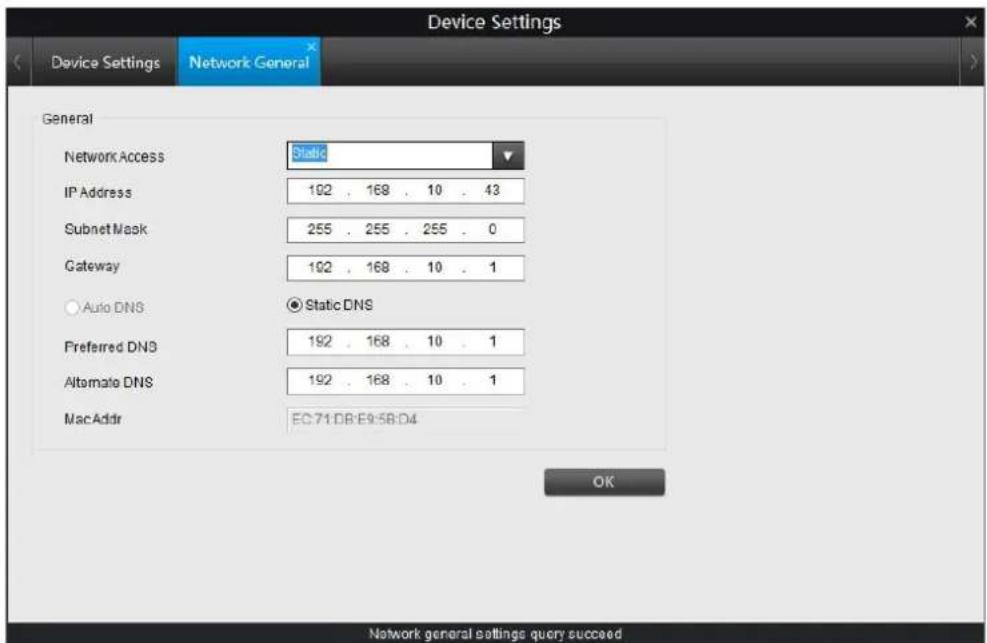
➢ Network Access: select how you want the camera to get an IP address.
- DHCP: Select this option when a DHCP server is installed on the network, an IP address will be automatically issued. This is the default way of the camera.
Static: Select this option when a fixed IP address is set. It is suggested to do a IP reservation on your router for the camera in order to avoid IP conflict.
IP Address: enter a fixed IP address for the camera in dotted-decimal notation.
Subnet Mask: Enter a subnet mask in dotted-decimal notation.
Gateway: Enter a default gateway in dotted-decimal notation.
➢ Preferred DNS: Enter a DNS address in dotted-decimal notation.
Alternate DNS: Enter a DNS address in dotted-decimal notation
MAC Addr: Displays the MAC address of the camera, the MAC address is read-only.
Click OK to save and enable the settings.
4.3.2 Network Advanced
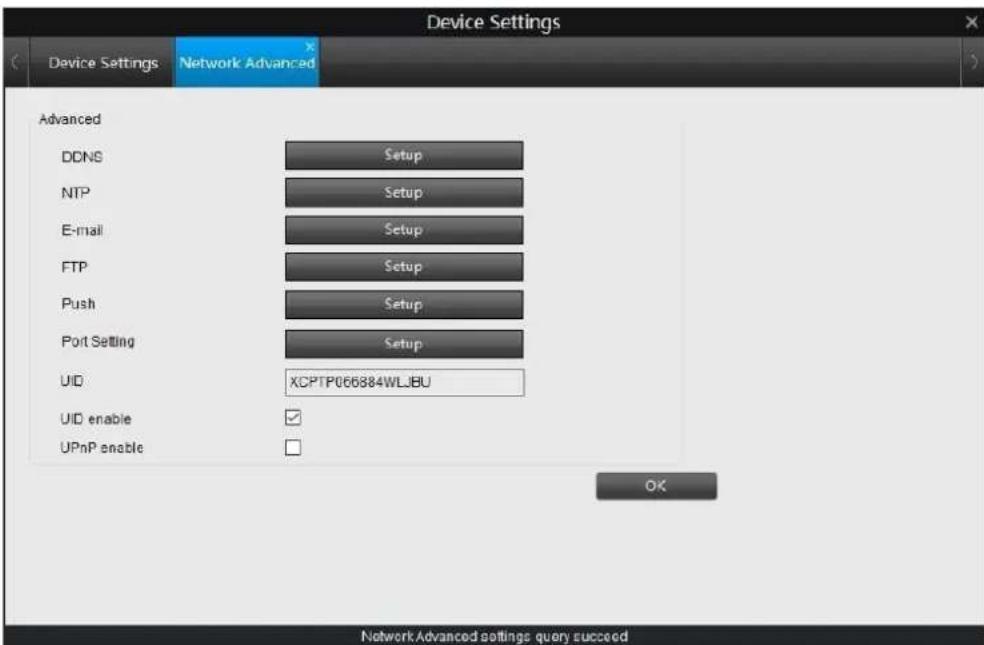
DDNS: Configure the Camera to automatically update a dynamic DNS service. If you want to remotely access the Camera via the Internet, you'll probably need to configure a DDNS account. For detailed setup, please refer to DDNS Setup.
NTP: Network Time Protocol. If you've got the Camera connected to the Internet, you can have it automatically sync time with an online server. For detailed setup, please refer to NTP Setup.
E-mail: Setup the email account for the camera to send and receive image file or video file. For detailed setup, please refer to Email Setup.
FTP: Setup the FTP server which the camera will upload its video or picture to. For detailed setup, please refer to FTP Setup.
➢ Push: Enable/disable Push Notification and setup its schedule.
Port Settings: Displays the port of the camera, users can change the port value here. For more information, please refer to Port Settings.
➢ UID: Displays the UID code of the camera. The UID is read-only.
UID enable: Enable or disable UID.
UPnP enable: Enable or disable UPnP.
Click OK to save and enable settings.
DDNS Setup
DDNS allows users to access the camera remotely via an URL address which will automatically synchronize you WAN IP address once configured. Click the Setup button next to DDNS to enter the DDNS setup page.
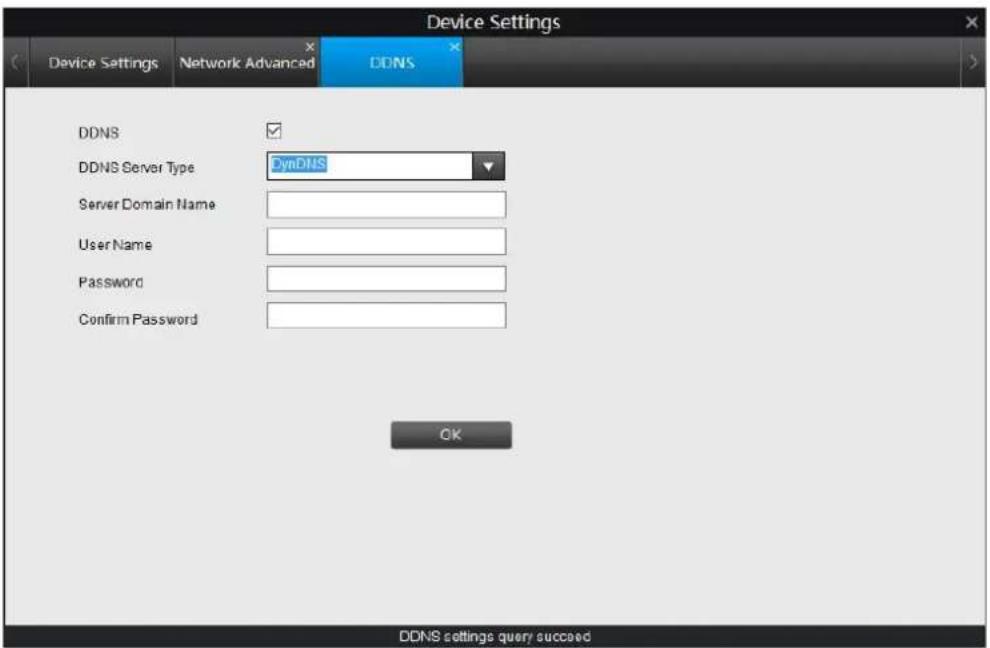
Check the box to enable DDNS.
➢ DDNS Server Type: Choose the DDNS server, the camera current supports NO-IP and DynDNS.
Server Domain Name: Enter the hostname that you set up in your DDNS service. This is the address you use to access your network.
➢ User Name: Enter the username you set up with your DDNS server.
➢ Password: Enter the password you set up with DDNS server.
➢ Confirm Password: Re-type the password to confirm.
Click OK to save and enable settings.
NOTE: If test is unsuccessful, a message will appear on screen informing you that "Update was Unsuccessful". This could mean that there's a problem with your network setup, or there's a problem with the DDNS Account Name and Password you're using.
NTP Setup
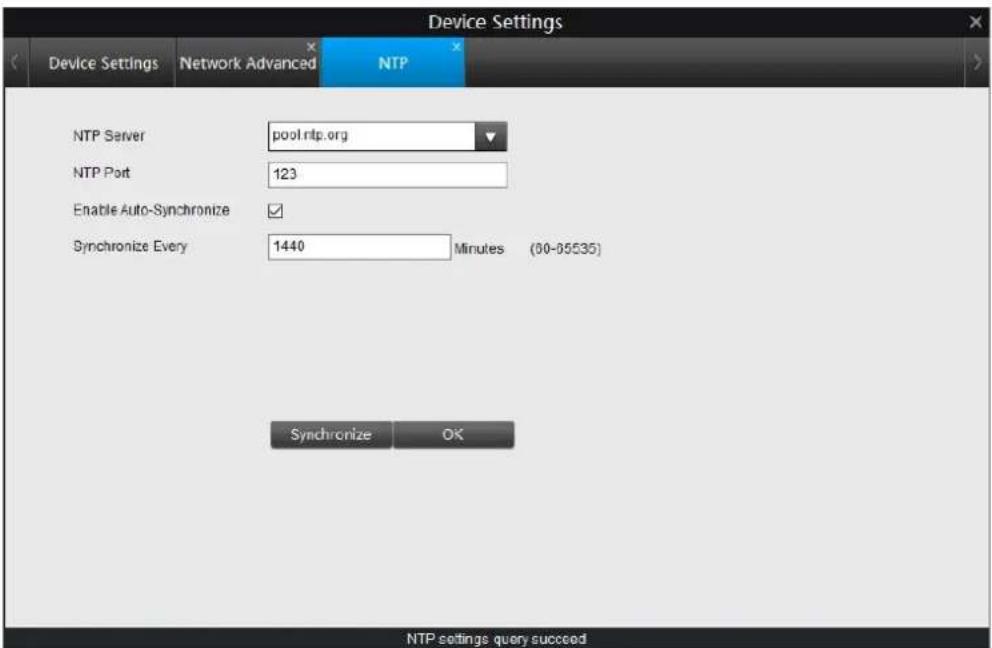
NTP Server: The server you intend to use to access the current date and time. The default is pool.ntp.org.
NTP Port: The port that the NTP server uses.
➢ Enable Auto-Synchronize: enable or disable auto-synchronization.
➢ Synchronize Every: Set the Sync interval time.
Click Synchronize to synchronize the time now, click OK to save and enable settings.
NOTE:
- If you have enabled NTP - set this to the time zone where you are.
- Some NTP servers are NOT fully compatible with DST (Daylight Savings Time). This may cause your system to double-count adding one or removing one more hour than they should, or cancel each other out. You may need to change your timezone to adjust accordingly or simply not use NTP and DST simultaneously.
Email Setup
Click the Setup button next to E-mail to enter the setup page.
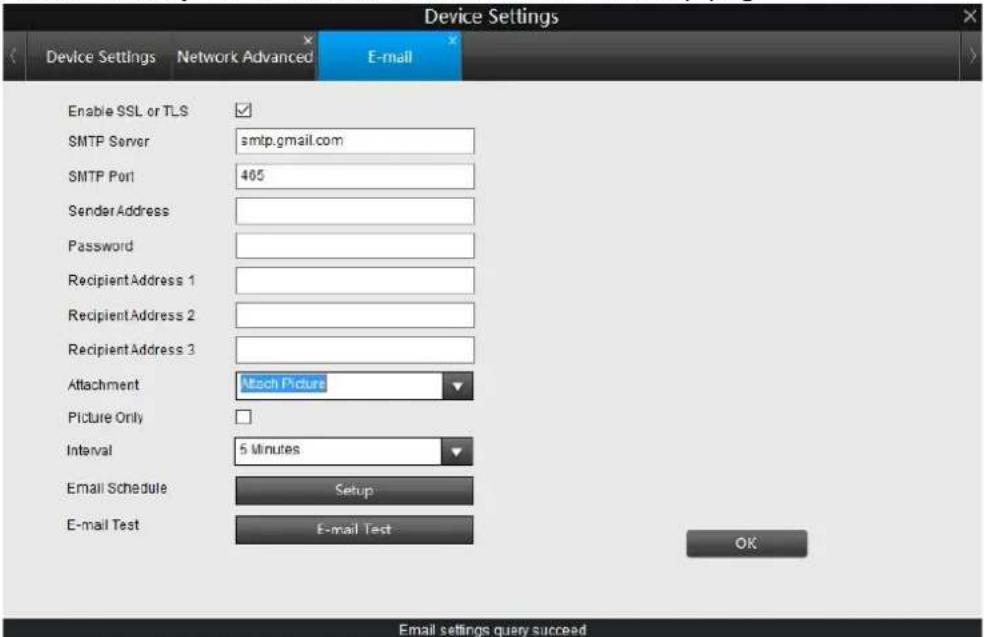
Enable SSL or TLS: Whether the email server you're using requires a secure link. This is on by default and should be left on if you're using any of the preset email servers.
SMTP Server: Type in the SMTP server for the sender Address. The default server is for Gmail.
SMTP Port: Set the correct port number for the SMTP server you use. The default value is the port number for Gmail.
Sender Address: The address you're sending the email from. Type it in the format youraddress@gmail.com (please NOTE, the email address should be your own email account).
➢ Password: The password for the Sender email account.
➢ Recipient Address: The email address you want the Camera to send emails to. You can specify up to three recipient E-mail addresses.
➢ Attachment: Select to attach picture or video when send e-mail or receive only notification(disable).
➢ Picture Only: If checked, camera will only attach a picture in the email with our any text content. This option is only available when Attachment is Attach Picture.
Interval: The length of time that must elapse after the Camera sends an email alert before it will send another.
➢ Email Schedule: Setup the schedule.
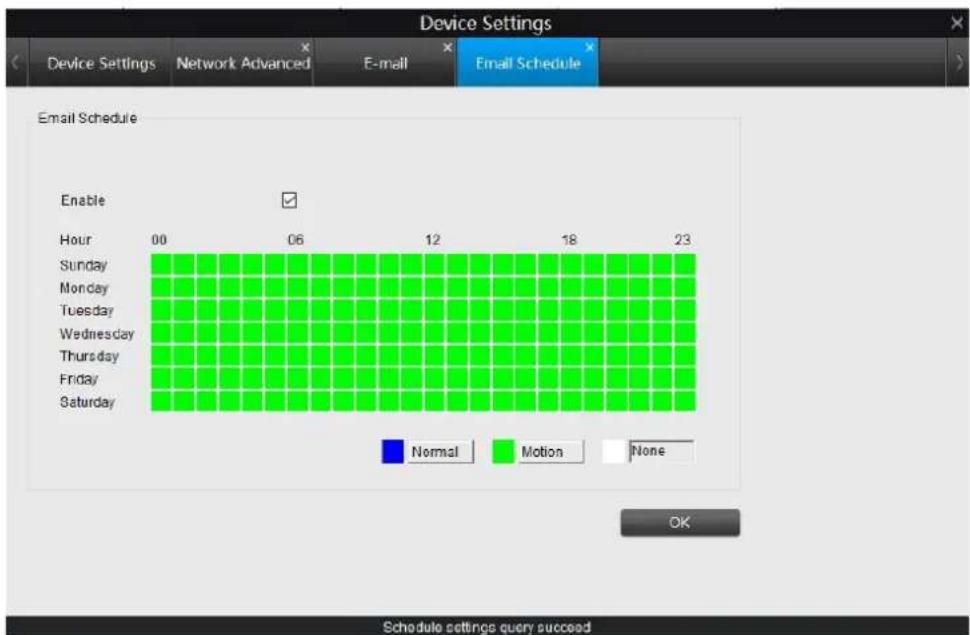
Normal: the camera will send you an email at a fixed time(interval time) during the selected time.
Motion: the camera will only send you an email when motion is triggered during the selected time.
None: the camera will not send you email during selected time.
E-mail Test: Click this button to test whether the e-mail setting is successful. If test failed, please check the internet connection and the settings above.
Click OK to save and enable settings.
FTP Setup
The recorded file can be uploaded to a FTP server. Click the Setup button next to FTP to enter the FTP settings.
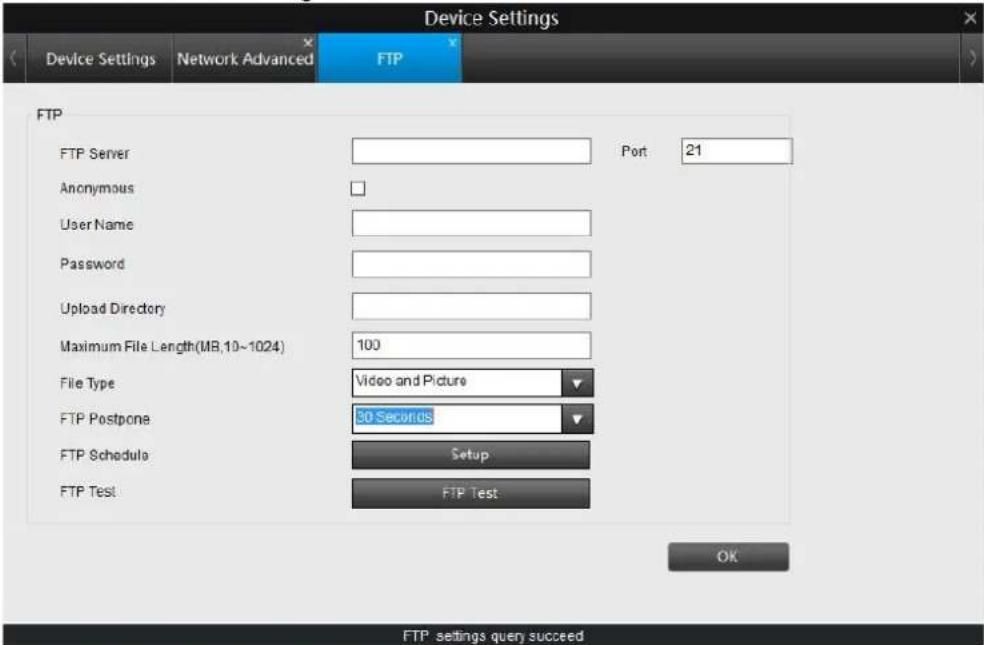
➢ FTP server: Type in the IP address or URL for your FTP server, and input the correct port.
Port: service port of the FTP server, the default value is 21, you can modify it when necessary.
➢ Anonymous: Check this box when you FTP server does not have a username and password.
➢ User Name: Type in the username of your FTP server.
➢ Password: Type in the password for your FTP server.
➢ Upload Directory: Input the upload folder name.
➢ Maximum File Length: Set the size for the video uploaded to FTP server. The default value is 100.
➢ File Type: Select to upload picture or video to the FTP server.
➢ FTP Postpone: Set the post-record time after motion is detected. This option is Only available when File Type is Video and FTP Schedule is Motion.
FTP Schedule: Set up the schedule time.
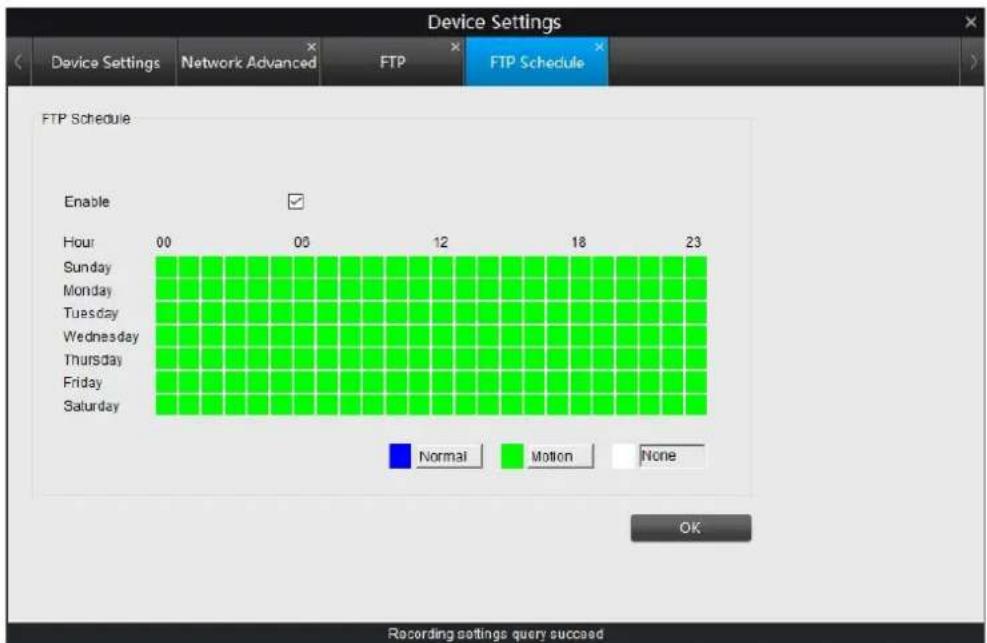
Normal: the camera will constantly record and upload to the FTP server during this time.
Motion: the camera will only record when motion is triggered and upload to the FTP server during this time.
None: the camera will not record and upload to the FTP server during this time.
➢ FTP Test: Click to test whether the FTP is setup successfully. If test failed, please check your configuration and try again.
Click OK to save and enable settings.
Port Settings
For some remotely accessing, you may need to check or change the port settings.
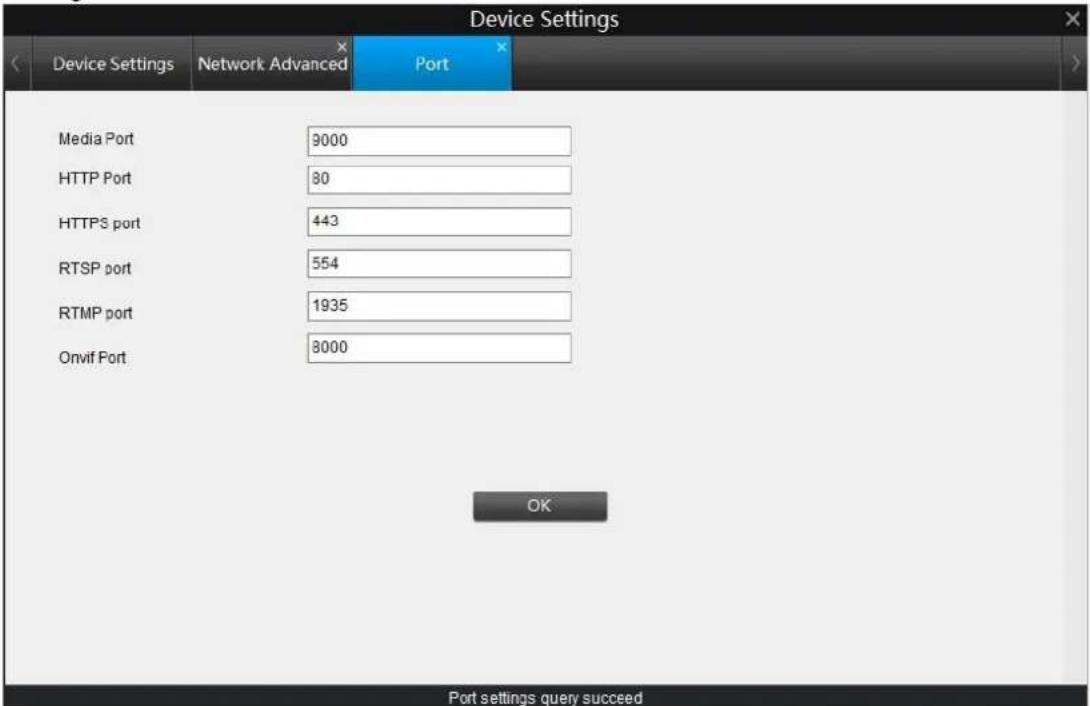
➢ Media Port: Camera will use this port to login to the Reolink client software. The default value is 9000 and you can change it.
HTTP Port: Used to login to the web interface of the camera by a web browser. The default value is 80 and you can change it.
HTTPS Port: Default value is 443 and you can change it.
RTSP Port: Used to send the streaming file to Realplayer, the default value is 554 and you can change it.
RTMP Port: Used to send the streaming file to Flash Player, the default value is 1935 and you can change it.
Onvif Port: used to add the camera to third party Onvif client software. The default value is 8000 and you can change it. Click OK to save and enable settings.
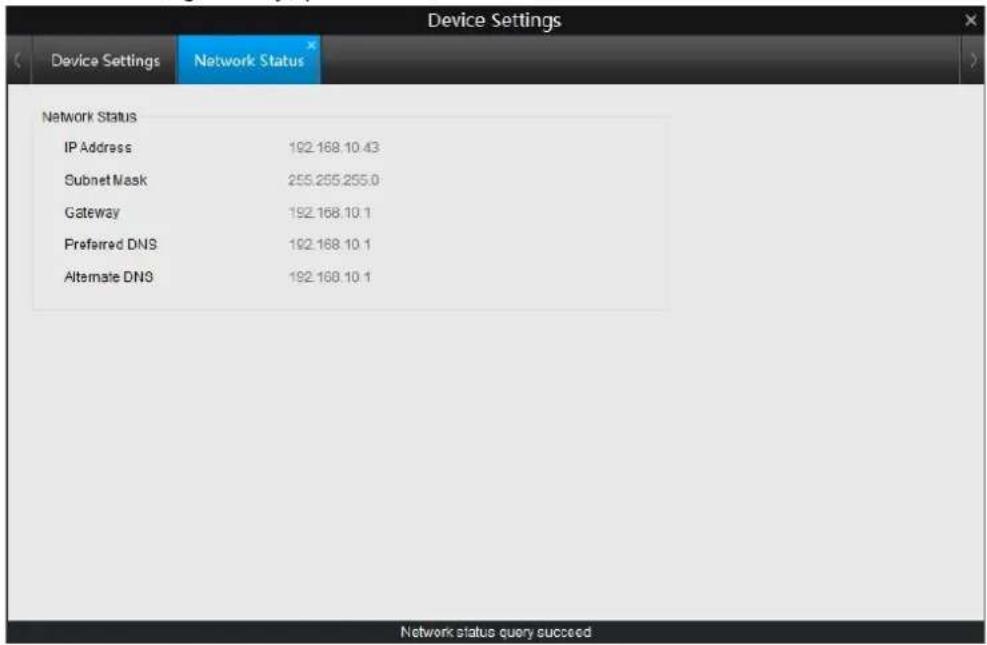
4.3.3 Network Status
This pages shows the network parameters of your camera including IP address, subnet mask, gateway, preferred DNS and alternate DNS.
4.3.4 Wi-Fi Settings
You can configure the Wi-Fi settings and connect your camera to a wireless network on this page.
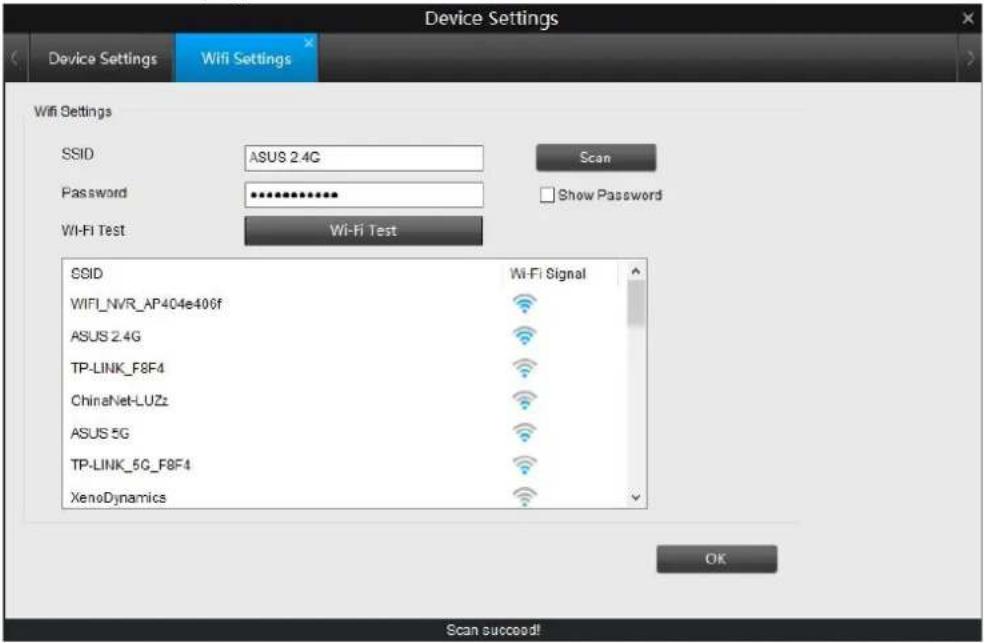
➢ SSID: Wireless Network Name, it displays the wireless network name you are connected or prepare to connect.
➢ Password: Input the Wi-Fi password of SSID you choose.
➢ Show Password: Tick to show the password.
How to connect to a wireless network
- Click the Scan button, it will show all the SSIDs and the Wi-Fi Signal Strength.
- Double click on the Wi-Fi network you want to Join, the SSID will show in the SSID field.
- Enter the Wi-Fi password of the SSID you choose. You may click Show Password to display the password you entered, double check whether it is correct.
- Click on Wi-Fi Test to test if the WIFI Setting is succeeded. If Wi-Fi Test Succeed, click OK to save the settings.
If Wi-Fi Test Failed, please check:
a) if the password is correct.
b) If the Antenna on Wi-Fi Camera connected properly.
c) if the Wi-Fi Router working properly.
Note:
- The wireless network has to be set up by using cable network connection. After setting up successfully, you can remove the cable and use the camera via Wi-Fi
connection.
- When changing the settings, they should always be made first in the camera and then in the wireless router. This ensures that the camera is always accessible when making changes.
4.4 Device Settings > Alarm
The camera will detect motion when there is a change in the picture. Check the Enable box to enable motion detection. you can set up the sensitivity, schedule, motion area
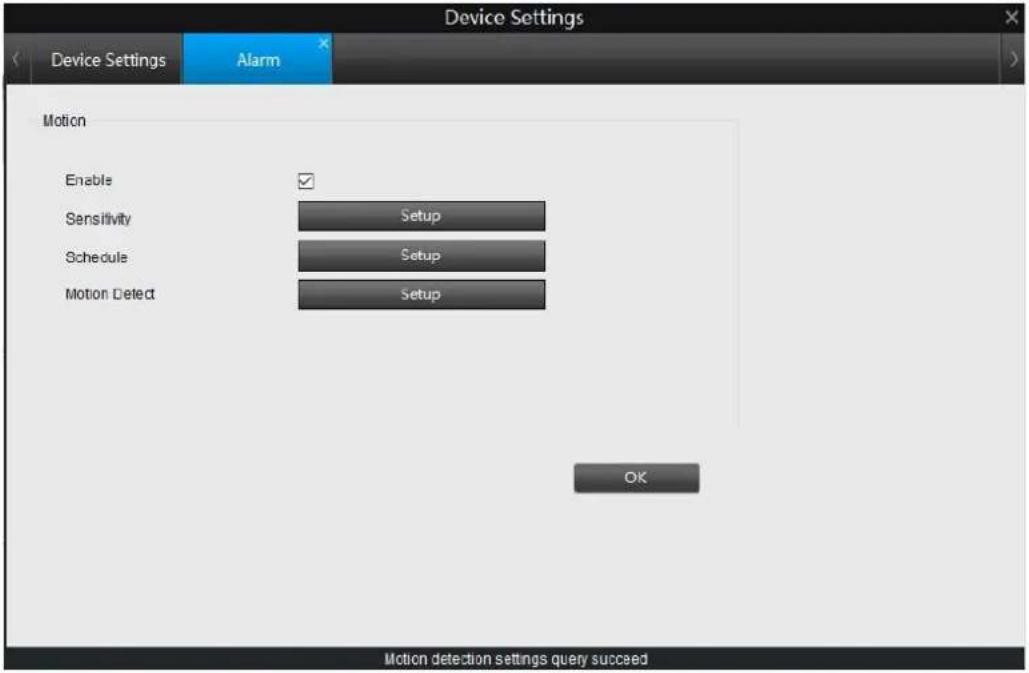
on this page.
Note:
Don't use PTZ system and motion detection simultaneously.
4.4.1 Motion > Sensitivity
It means how sensitive the camera will be to the change of the environment. Drag the slider to change the sensitivity value. The lower the number is, the more sensitive the motion detection will be, and the more frequent motion will be triggered.
Click the Setup button to enter the Sensitivity setup page.
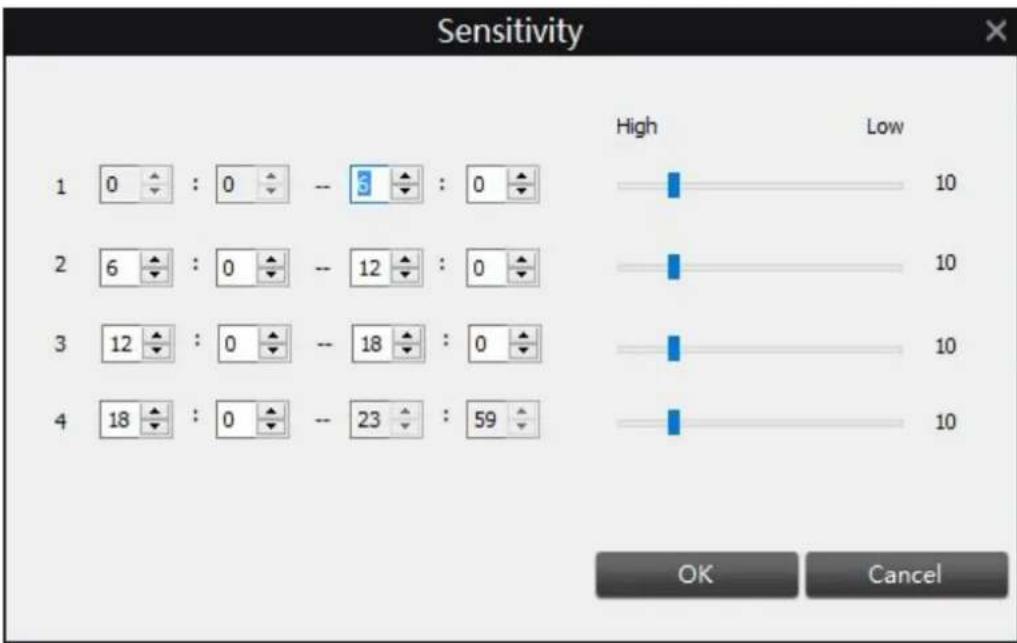
- The day is divided into four periods by default, you may change each period's start and end time to best match the changing lighting conditions in your location.
- During the daytime, the light is good enough for the camera to capture the whole scenario, the sensitivity is suggested to set the values between 5–10 which will give good results.
- During the night time, the motion detection is more sensitive, the value is suggested to set to 25-30 or even higher which will significantly avoid some fault trigger.
Note:
The motion detection will be affected by the light and weather, it is suggested that you should test your motion detection sensitivity both during the day and at night to ensure your sensitivity setting is suitable for either lighting condition.
➢ False Triggers: Setting the motion detection at high sensitivity levels (4 or lower) increases the frequency of false alarms. On the other hand, low sensitivity levels (20 or higher) increase the risk that a significant motion event (such as an intruder) will not trigger the motion detection to record.
Check the Motion Detection settings both during the day and night: In low-light conditions (or when your cameras are using infrared night vision) the Camera may be more or less sensitive to motion, depending on the circumstances. The difference might be very dramatic!
Weather: The weather conditions are going to affect your motion detection. Dramatic weather phenomenon such as heavy rain, strong winds, lightning and so on, may trigger the motion detection with surprising frequency. On the other hand, things like fog, mist and other obscuring kinds of weather might mask or obscure something moving to the point that the Camera fails to detect them.
How to minimize the amount of noise in your images
- Try adjusting the Image Settings to fine-tune the brightness and contrast to get a more stable image.
- Limit the motion sensitive area to only the areas in view that a target could be. In particular, large featureless areas in the camera's view are the ones most likely to give false triggers - turning off the motion sensitivity to any area a target cannot move in front of will help reduce false triggers.
Note: The motion detection feature will seem more sensitive at night, particularly when using low-light or active infrared cameras. We recommend that you test your motion detection sensitivity both during the day and at night to ensure your sensitivity setting is suitable for either lighting condition.
4.4.2 Motion > Schedule
You can set up the time schedule when the camera will detect motion. The red box means when motion is detected, it will trigger an alarm.
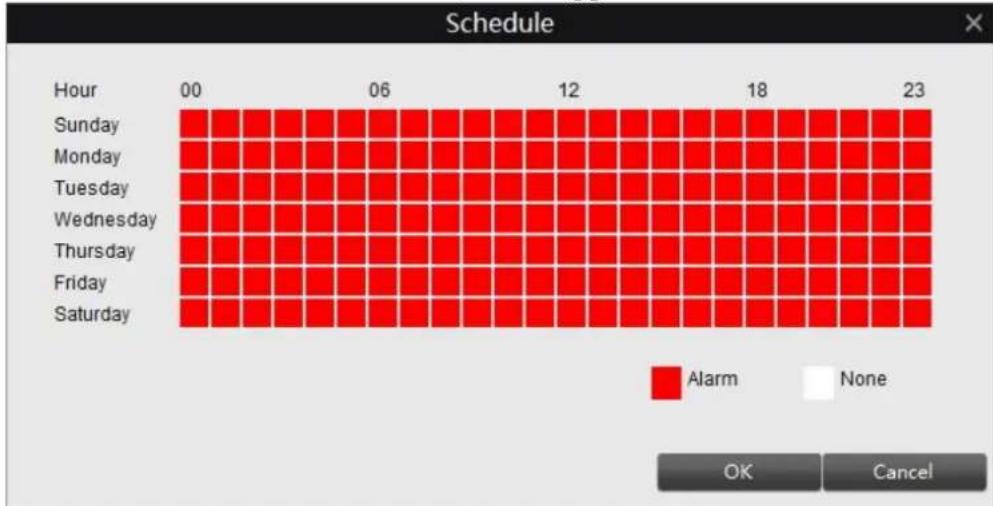
Alarm: Camera is sensitive to motion and will trigger an alarm during this period. None: Camera is not sensitive to motion and will not trigger an alarm during this period.
4.4.3 Motion > Motion Detect
Click the Setup button to enter the motion detect setup page. You can set the motion detection area on this page. Areas marked by white boxes will be sensitive to motion, those not marked will not be. Click and drag the left-click button on the mouse to select or deselect the area you want.
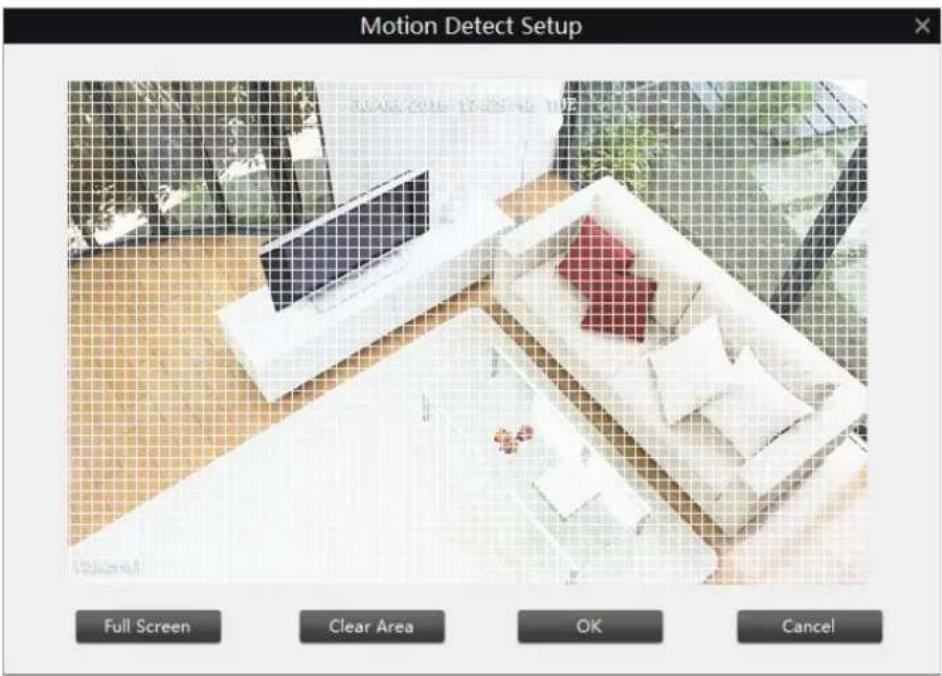
➢ Full Screen: Click to select the whole screen as the motion detection area.
➢ Clear Area: Click to clear all the motion detection area you configured.
OK: Click to save the motion detection area configured.
➢ Cancel: Cancel the settings you just made.
Tips:
- Click mouse to select and click again to deselect.
- Click and drag the left-click button on the mouse to select or deselect certain area you want.
- Click OK on the Alarm page to save and enable settings.
4.5 Device Settings > System
Under this menu, you may check the system information of the device, configure the time settings, upgrade the firmware of the camera and reboot it.
4.5.1 System > General
Under General, users can set up the Video Standard and time settings etc.
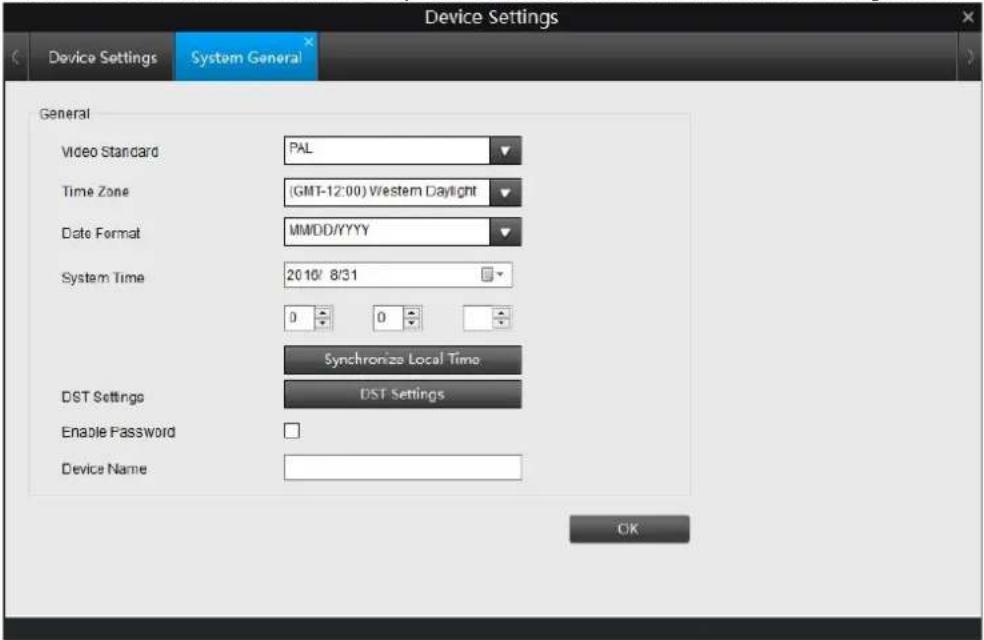
Video Standard: Choose PAL or NTSC according to your area. If this is set incorrectly, the camera's picture may be black and white, flickering or similar.
• PAL: used in Western Europe and Australia.
• NTSC: used in the US, Canada and Japan.
Time Zone: Choose the time zone where you are.
Date Format: the format of the date you want the camera to show.
System Time: the current time of the camera. It could be edited manually.
➢ Synchronize Local Time: Click to synchronize the camera time with local PC time.
DST Settings: Turn on and set up DST if DST is applied in your area, As to how to configure it, please refer to How to configure DST Settings.
➢ Enable Password: Enable or disable the password to login the camera.
➢ Device Name: Shows the name of your camera. You can modify the name here. Click OK to save and enable settings.
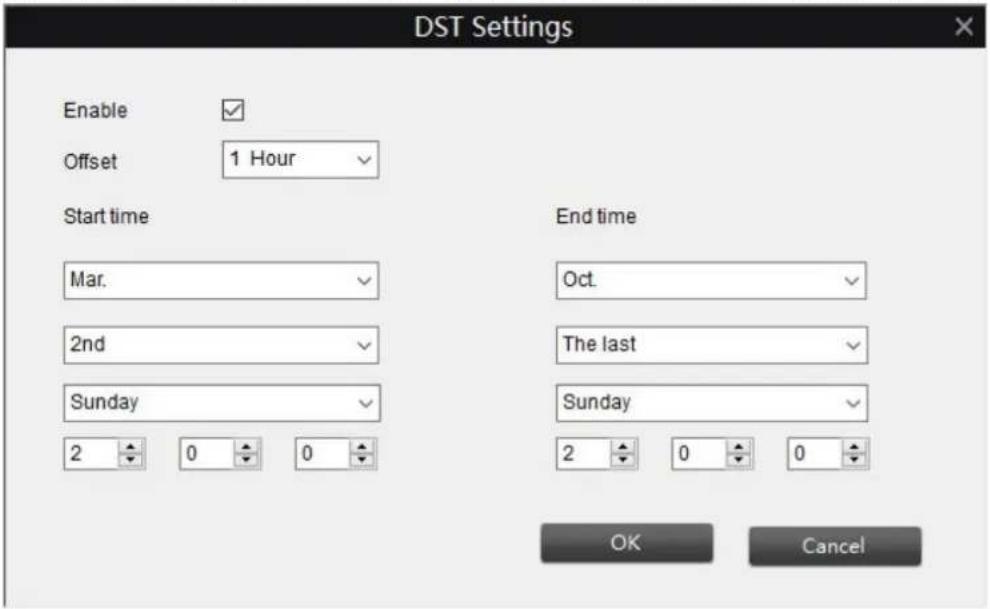
How to configure DST Settings
- Click on DST Settings to enter the setup page.
- Check Enable to enable DST Settings.
- Choose the offset time (1 hour or 2 hours ahead) according to the DST policy in your area.
- Type in the Start time and End time when DST is started or ended in your area.
4.5.2 System > Information
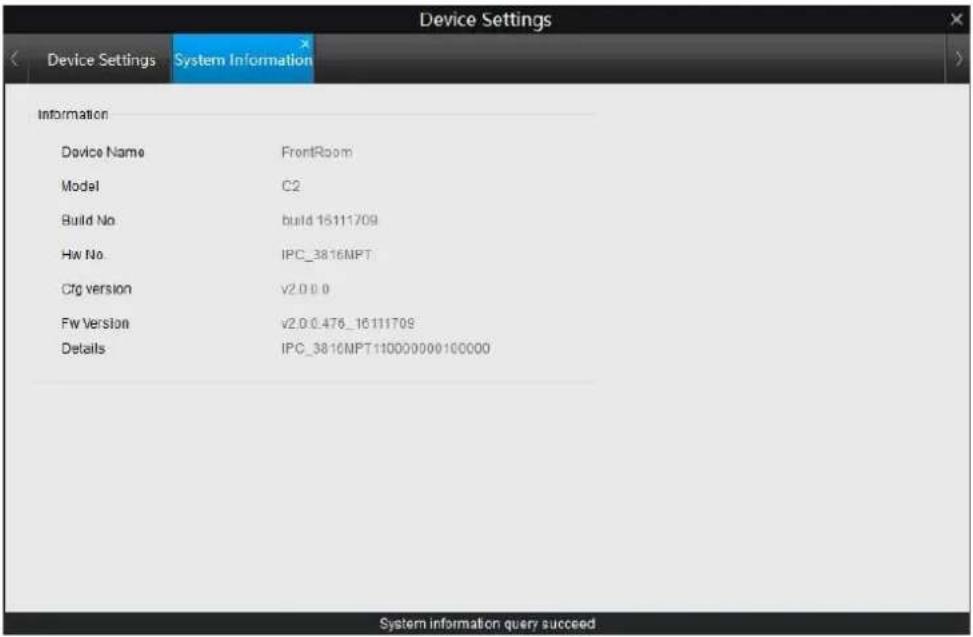
This page shows some basic information of the camera including device name, model number and firmware version etc.
4.5.3 System > Maintenance
On this page, you can set the camera to reboot itself automatically at a certain time, reset the camera to default settings and upgrade the firmware etc.
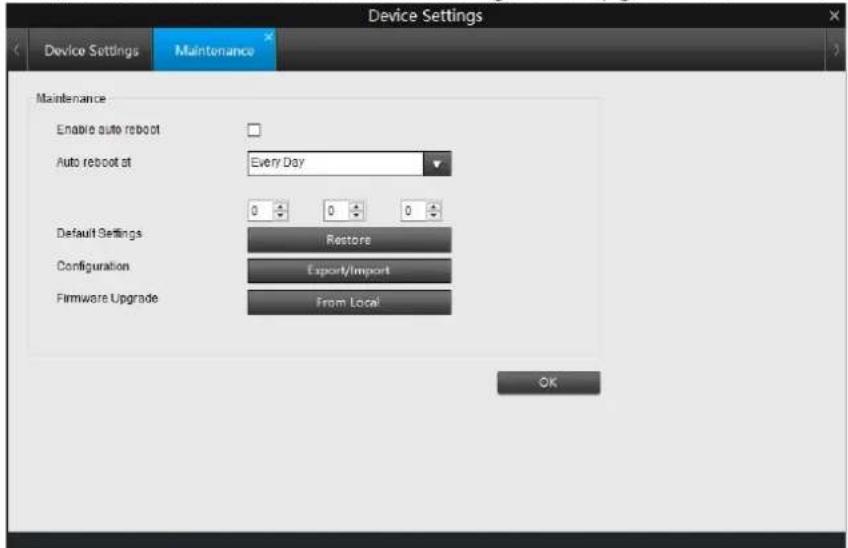
➢ Enable auto reboot: Enable or disable auto reboot of the camera.
Auto reboot at: Choose when you'd like the camera to reboot.
➢ Default Settings: Click Restore to reset the camera to factory default.
➢ Configuration: Export or import the configuration file including all the settings done to the camera.
➢ Firmware Upgrade: Instructs the Camera to update its firmware.
How to upgrade firmware
- Download the firmware from Reolink official website: https://reolink.com/firmware/
- Go to Device Settings > System > Maintenance, click on From Local.
- Click on Browse to locate the upgrading file (end with pak), click on Upgrade to upgrade the firmware.
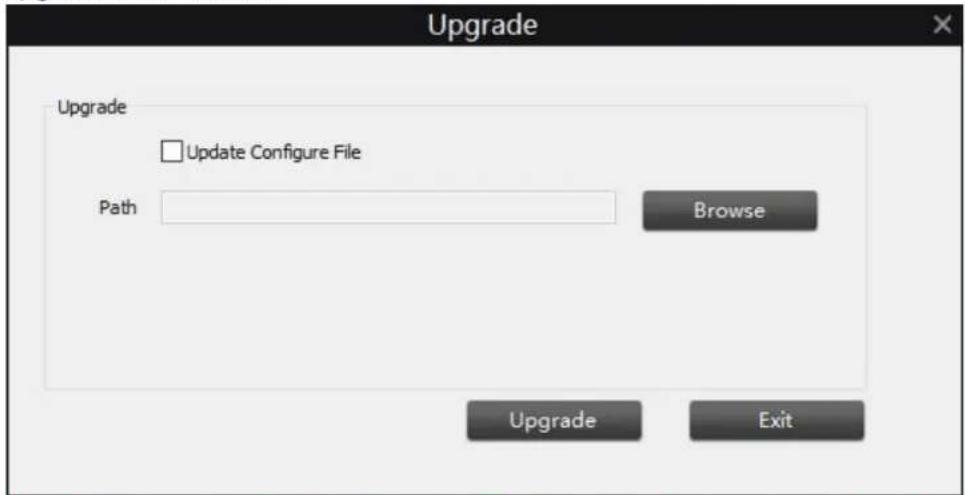
Note: It is suggested to check Update Configure File when upgrading the firmware. And the configuration set to the camera will be erased, you will need to configure the camera again.
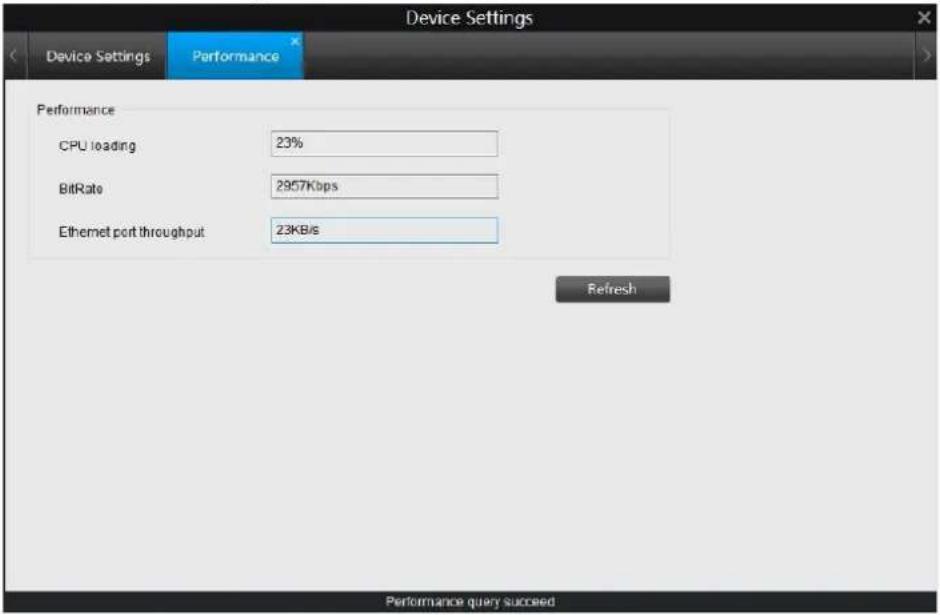
4.5.4 System > Performance
This page shows the CPU loading for the connected Camera, bit rate and Ethernet Port Throughout.
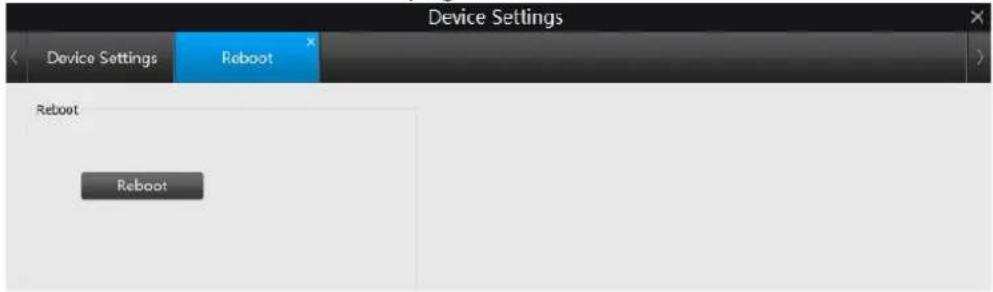
4.5.5 System > Reboot
Click the Reboot button on this page to restart the camera.
4.6 Device Settings > Device
Users can check the SD card info or format the SD card on this page.
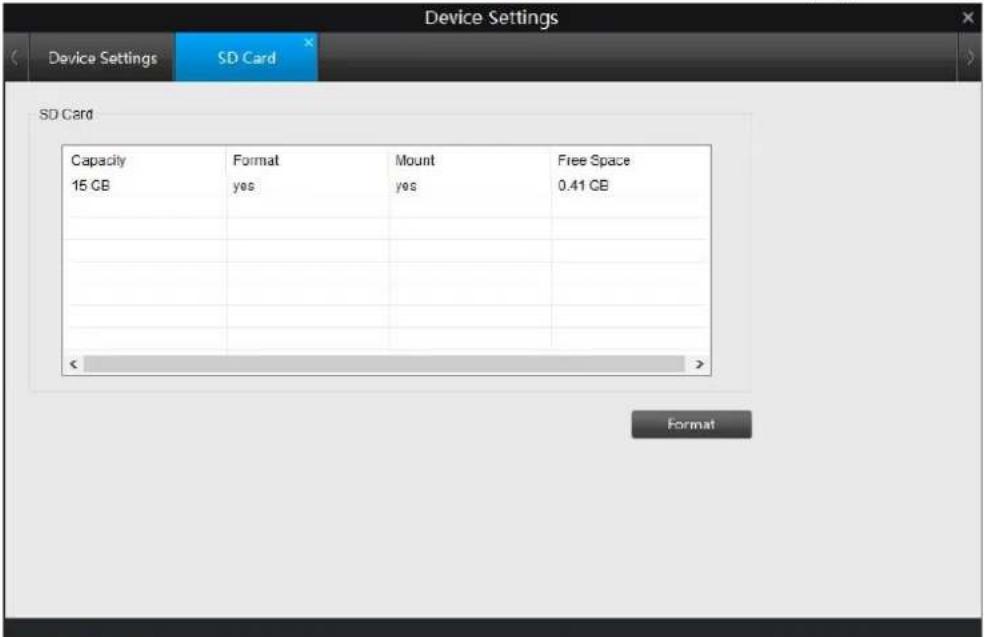
Note:
- This option will only be available when SD card has been inserted.
- Before insert the SD card, please power off the camera, otherwise, SD card may not be recognized by the camera.
4.7 Device Settings > User
Under this menu, you can check and modify the user information.
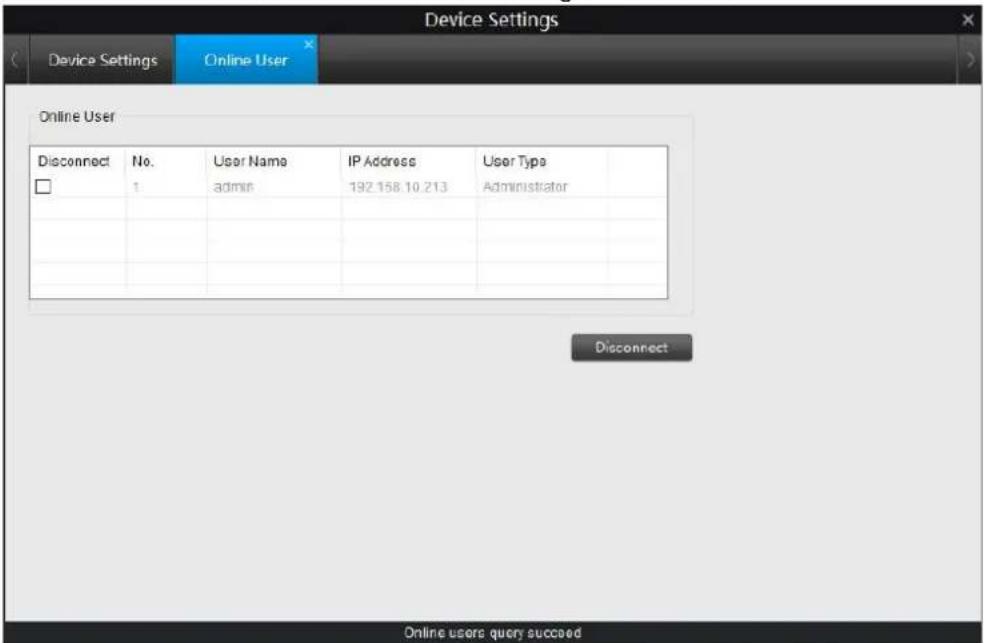
4.7.1 User > Online User
It shows the current users who are accessing the camera.
4.7.2 User > Add User
The admin account has the authority to add other users. The maximum number of users is 32.
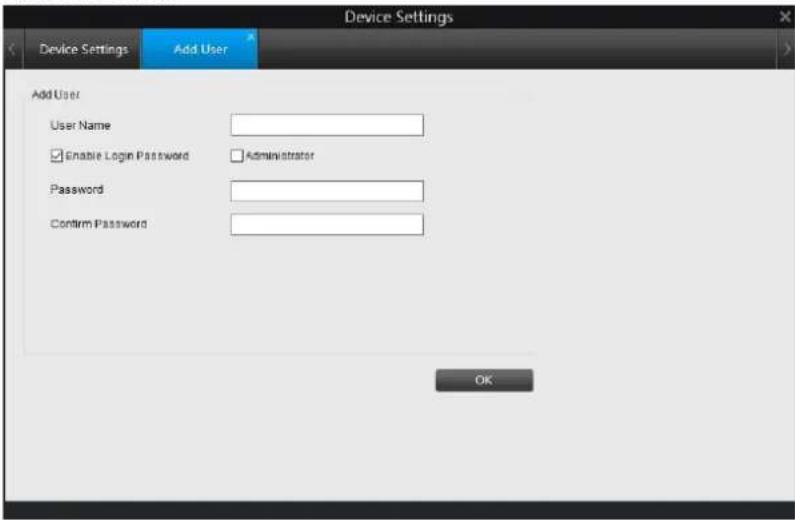
User Name: Type in a user name.
➢ Enable Login Password: check to enable password for the added user.
Administrator: Whether or not this account has administrator authority.
➢ Password: Type a password for the added user.
➢ Confirm Password: Re-type the password to confirm.
Click OK to save and enable settings.
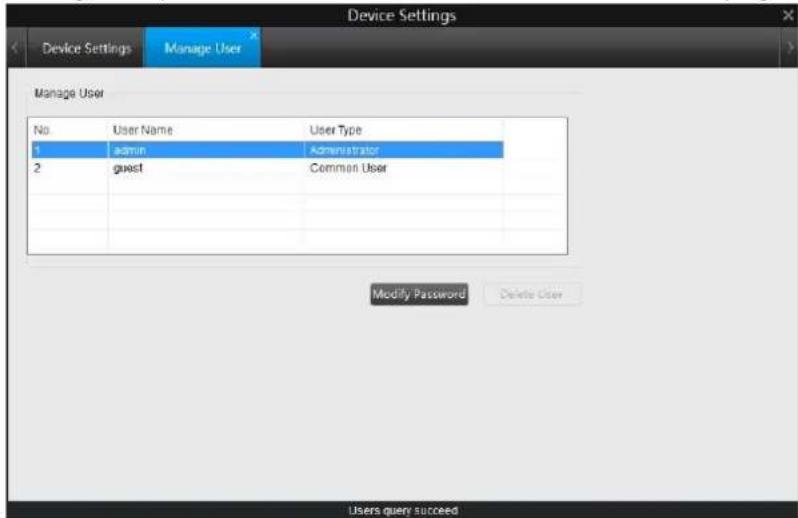
4.7.3 User > Manage User
Change the password for the User or delete user on this page.
How to change the login password
- Highlight the user account whose password you want to change, go to Modify Password.
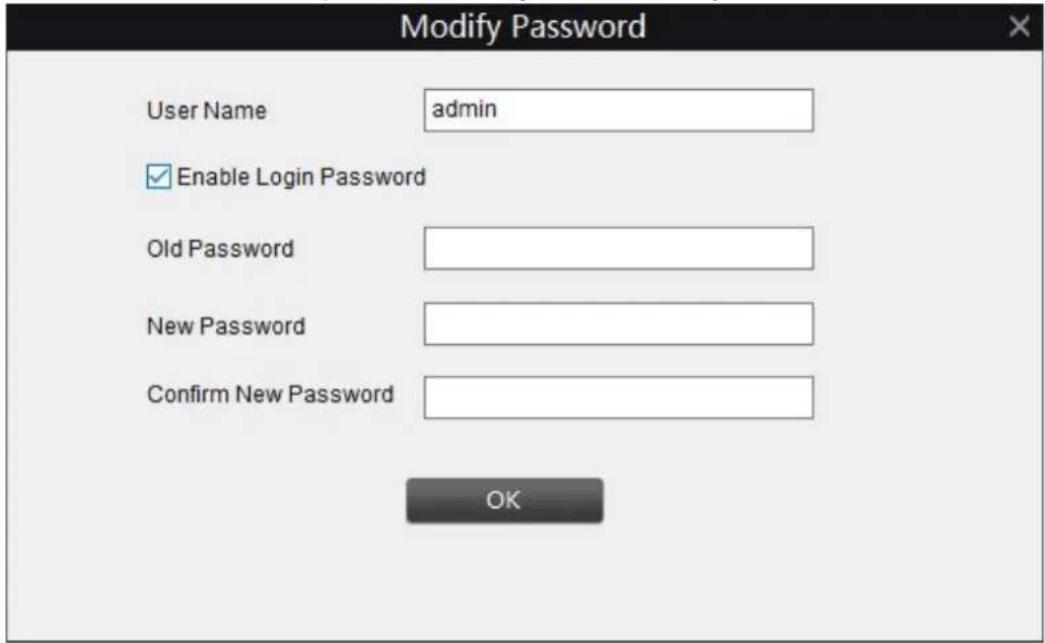
- Check Enable Login Password, enter the old password, input the new one and re-type it to confirm, then go to OK, it will show "Operation Succeed" on the bottom which means the password changed successfully.
Note:
- If the old password is the default one, please leave the Old Password field blank.
- Users cannot change the username of "admin".
Chapter 5 Basic Settings
Click Basic Settings to display the submenus including OSD, Encode and Image.
5.1 Basic Settings > OSD
Please refer to 4.1 Device Settings > Display.
5.2 Basic Settings > Encode
Please refer to 4.2.1 Record > Encode.
5.3 Basic Settings > Image
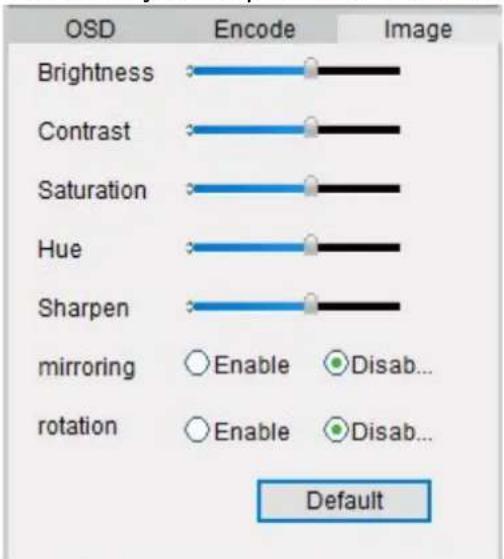
You can adjust the picture for live feed under this menu.
bar
| Category | Value | | ------------ | ------ | | Brightness | Yes | | Contrast | Yes | | Saturation | Yes | | Hue | Yes | | Sharpen | Yes | | mirroring | Yes | | rotation | Yes |➢ Brightness: Changes how light the image appears to be.
Contrast: Increases the difference between the blackest black and the whitest white in the image.
Saturation: Alters how much color is displayed in the image. The higher the saturation, the brighter and more vivid colors will appear to be.
➢ Hue: Changes the color mix of the image (this can have very dramatic results).
➢ Sharpen: Sharpen image to increase the Signal Noise Ratio.
➢ Mirroring: Choose mirroring ☑ Enable to change the orientation of the image to be horizontally reversed.
Rotation: Choose rotation Enable to turn the image upside down.
➢ Default: Click Default to restore default image settings.
Note: Your image settings will affect your recordings!
Chapter 6 Advanced Settings
You can adjust various camera settings according to the environment where the camera is installed under this menu.
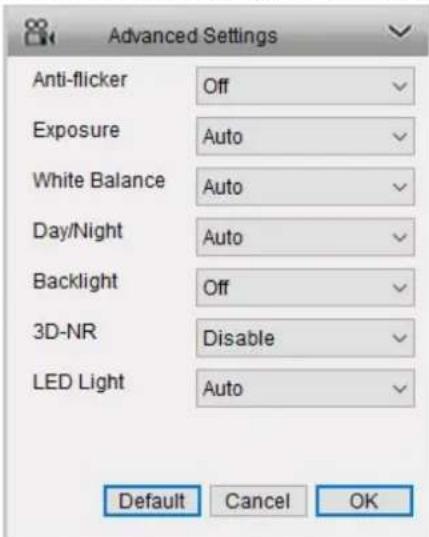
Anti-flicker: Use this feature if some devices such as TV screens and lights are flickering.
• 50GHz: Used for Australia and the UK.
• 60GHz: Used for the USA and Canada.
Exposure: Select the exposure level of the camera based on pre-defined conditions. Select Manual to adjust shutter range and gain value of the camera manually.
➢ White Balance: Change the way the camera processes white balance to correct image colors. Select Manual to adjust red gain and blue gain.
Day/Night: Set the camera's color mode during different times of the day and night.
- Color: the camera will show a colorful image which is usually in the day time.
- Black and white: the camera will show the image only with black and white color which is usually during the night when the IR LEDs are on.
- Auto: the camera will automatically switch between Color and Black and white according to the light conditions.
Backlight: Optimize brightness and contrast levels to compensate for differences between dark and bright objects using either BLC or WDR mode. This may improve image clarity in high contrast situations but should be tested at different times of the day and night to ensure there is no negative effect.
3D-NR: Short for 3D-Noise Ratio, if Enabled, it may decrease the noise of the image.
➢ LED light: Turn on/off the IR LEDs.
Default: Restore to default settings.
Click OK to save and enable settings.
Chapter 7 Warranty & Technical Support
7.1 Warranty
Reolink warrants this product against defects in workmanship and material for a period of Two (2) years from its original purchase date. You must present your receipt as proof of purchase for warranty validation. Any unit which proves defective during the stated period will be repaired without charge for parts or labor or replaced at the sole discretion of Reolink. The end user is responsible for all freight charges incurred to send the product to Reolink's repair center. The end user is responsible for all shipping costs incurred when shipping from and to any country other than the country of origin.
The warranty does not cover any incidental, accidental or consequential damages arising from the use of or the inability to use this product. Any costs associated with the fitting or removal of this product by a tradesman or other person or any other costs associated with its use are the responsibility of the end user. This warranty applies to the original purchaser of the product only and is not transferable to any third party. Unauthorized end user or third party modifications to any component or evidence of misuse or abuse of the device will render all warranties void.
By law some countries do not allow limitations on certain exclusions in this warranty. Where applicable by local laws, regulations and legal rights will take precedence.
7.2 Technical Support

If you have any questions or problems, you may refer to https://reolink.com/faqs/ for the answers and solutions.

If you may need any technical support, please contact us at support@reolink.com

We have developed user-friendly products and documentation. You may download the software and manual from https://reolink.com/software-and-manual/

You may download Firmware from https://reolinkhello.com/firmware/
- Reolink C2
- Getting Started
- RISK OF ELECTRIC SHOCK DO NOT OPEN
- FCC Verification
- Important Note:
- FCC Regulation(forUSA):
- WARNING:
- Important Safety Instructions
- RoHS:
- Content
- Chapter 1 General Introduction of the camera 6
- Chapter 2 Install Reolink Client software 8
- Chapter 3 Overview of client software 10
- Chapter 4 Camera Configuration 21
- Chapter 5 Basic Settings 51
- Chapter 6 Advanced Settings 53
- Chapter 7 Warranty & Technical Support 54
- Chapter 1 General Introduction of the camera
- Physical Appearance
- Chapter 2 Install Reolink Client software
- Connection Diagram
- For initial setup:
- Requirement for computer
- Installing process
- Chapter 3 Overview of client software
- Live View
- General Introduction of the icons
- Zoom in/out the Image and Auto Focus
- Pan/tilt, Preset and Cruise Path
- Pan/tilt buttons
- Set Preset
- How to set preset
- Cruise Path
- Local Settings
- Local Settings > General
- Local Settings > Record Settings
- Local Settings > Transcode
- How to transcode the video file
- Playback
- Local Playback
- Remote Playback
- How to play back the video
- How to download video from SD card
- How to download some specific parts of the video
- Chapter 4 Camera Configuration
- Device Settings
- Device Settings > Display
- How to set up Mask
- Device Settings > Recording
- Recording > Encode
- Note:
- Recording > Option
- Recording > Schedule
- Device Settings > Network
- Network > General
- Network Advanced
- DDNS Setup
- Email Setup
- FTP Setup
- Port Settings
- Network Status
- Wi-Fi Settings
- How to connect to a wireless network
- Device Settings > Alarm
- Motion > Sensitivity
- How to minimize the amount of noise in your images
- Motion > Schedule
- Motion > Motion Detect
- Tips:
- Device Settings > System
- System > General
- How to configure DST Settings
- System > Information
- System > Maintenance
- How to upgrade firmware
- System > Performance
- System > Reboot
- Device Settings > Device
- Device Settings > User
- User > Online User
- User > Add User
- User > Manage User
- How to change the login password
- Chapter 5 Basic Settings
- Basic Settings > OSD
- Basic Settings > Encode
- Basic Settings > Image
- Chapter 6 Advanced Settings
- Chapter 7 Warranty & Technical Support
- Warranty
- Technical Support
Brand : REOLINK
Model : C2
Category : Camera