
Imagine T - Loudspeaker PSB - Free user manual and instructions
Find the device manual for free Imagine T PSB in PDF.


| Product Type | Floor-standing loudspeaker |
| Model | PSB Imagine T |
| Design | 2.5-way bass reflex |
| Drivers | 1" titanium dome tweeter, dual 5.25" polypropylene woofers |
| Frequency Response | 45 Hz - 23 kHz |
| Sensitivity | 89 dB (2.83V @ 1m) |
| Impedance | 8 ohms (nominal) |
| Power Handling | 20 - 150 watts RMS |
| Crossover Frequency | 2.2 kHz |
| Dimensions (H x W x D) | 42" x 8" x 13" (1067 x 203 x 330 mm) |
| Weight | 44 lbs (20 kg) each |
| Finishes | Black Ash, Cherry, White |
| Inputs | Dual binding posts (bi-wire/bi-amp capable) |
| Recommended Amplifier | 20 - 150 watts per channel |
| Placement | Away from walls, toe-in towards listening position |
| Cleaning | Wipe with a dry, soft cloth; avoid liquids and abrasives |
| Safety | Place on stable surface; keep away from moisture and heat sources |
| Repairability | Drivers and crossover serviceable by authorized technicians |
| Warranty | Limited lifetime warranty for original owner |
Frequently Asked Questions - Imagine T PSB
User questions about Imagine T PSB
0 question about this device. Answer the ones you know or ask your own.
Ask a new question about this device
Download the instructions for your Loudspeaker in PDF format for free! Find your manual Imagine T - PSB and take your electronic device back in hand. On this page are published all the documents necessary for the use of your device. Imagine T by PSB.
USER MANUAL Imagine T PSB
Thank you for your purchase. Our speakers are designed to make high-performance sound easy to bring into your life. They have the wide frequency and dynamic range, natural tonal balance, and precise spatial imaging needed to make both music and movies powerfully lifelike and enjoyable. All of our models match closely in tonal balance to allow easy mixing in home theater systems.
The quick-start instructions below will get you going. But we hope you will read through this booklet to help assure your maximum enjoyment.
I. QUICK-START GUIDE
A. Be sure power to your amplifier/receiver and other electronics is off before making connections.
B. Install bumpers or feet with adjustable levelers or spikes.
- Bumpers and Support Bars (Bookshelf and Center Channel Speakers)
Attach the adhesive-backed bumpers near the corners of bookshelf and center channel speakers, to protect the finish of the speaker and the finish of the furniture beneath. For center channel speakers supplied with support bars, position the bar to aim the speaker toward the listening position.
- Molded Feet and Stabilizers, Adjustable Rubber Levelers and Adjustable Spikes (Tower Speakers)
Screw the supplied molded feet into the threaded inserts located in the corners of the speaker bottom. In some models, speaker spikes for carpet use or threaded rubber isolation levelers for hard floor use can be inserted into the feet. In other models, spikes or levelers go directly into the threaded inserts in the pedestal base on the bottom of the speaker rather than into feet.
a) Carpet Use
Screw four spikes with four lock nuts into the inserts located
in the four corners of the speaker bottom, Locate the speakers and adjust to the desired height (higher for thicker carpet) and tighten the lock nuts with the wrench.
b) Hard Floor Use
Screw four threaded rubber isolation bumpers with four lock nuts into the inserts located in the four corners of the speaker bottom. Adjust and tighten the lock nuts with nut wrench.
C. Position your main speakers, as symmetrically as possible, at a comfortable listening distance—slightly closer to each other than they are to you. (For surround speakers, see later instructions.)
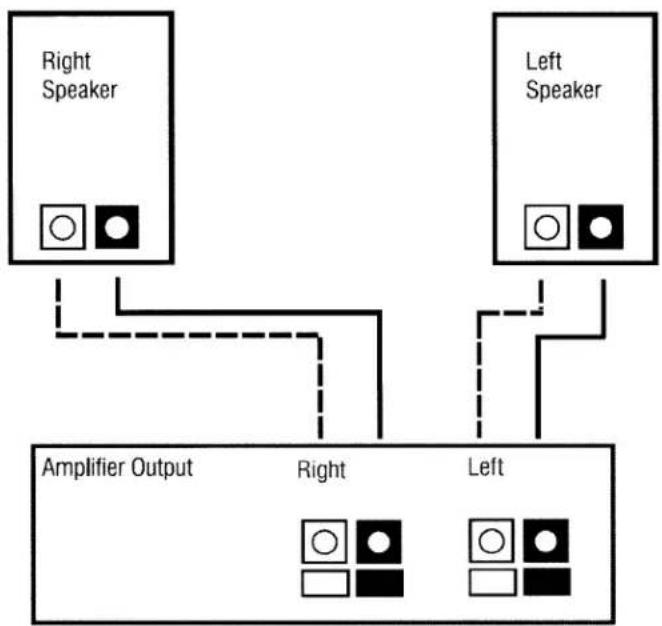
D. Using standard 18 gauge lamp wire or better, connect the Red (positive) terminal on each channel of your amp/receiver to a Red terminal post on that channel's speaker, and the Black (negative) terminal to a Black terminal post on the speaker.
E. Setting the volume low beforehand, turn on your associated equipment, find a comfortable listening volume—and enjoy your favorite audio and/or video selections.
F. After you have settled in with your speakers, read through this booklet. Be sure to read "Protecting Your Investment."
II. ADDITIONAL DETAILS ON CONNECTING YOUR SPEAKERS
A. Important: Always turn off your electronic equipment before connecting speakers. If you don't, severe damage to equipment and/or your ears may result.
B. Selecting Speaker Wire
We recommend the following gauge of standard two-conductor wire for the wiring distances specified; if you prefer, you can use heavier (lower-gauge) wire.
| Under 25 ft (7.5 m): | 18-gauge – (1.0 mm dia.) (lamp cord) |
| 25-50 ft (15 m): | 16-gauge – (1.3 mm dia.) (heater cord) |
| 50-100 ft (30 m): | 14-gauge – (1.6 mm dia.) |
| Over 100 ft (>30 m): | 12-gauge – (2.0 mm dia.) |
C. Connecting In Phase
Connect speakers identically to your amplifier or receiver on each channel—Red amp/receiver terminal to Red speaker terminal, Black to Black. This will ensure that the diaphragms of the speakers on both
channels move forward and backward together ("in-phase"), rather than in opposition ("out-of-phase"). In-phase connection provides maximum clarity and bass, while out-of-phase connection results in frequency cancellations and produces thinner and less distinct sound—with less bass, vague vocal quality, and no solid center image. To help insure the proper connection, the two separate conducting wires in a standard two-conductor speaker cable are coded in one way or another to be distinguishable from each other. (The jacket of one wire may be ribbed or marked with "+" signs, or one wire under the insulation may be a different color from the other.) Use this wire-coding, together with the amp/receiver and speaker color-coding, to be sure you are connecting the same wire of a given pair to a like-coded terminal at both ends of your connection.
D. Be sure all wiring terminals, are tightened firmly secure, but be careful not to overtighten and damage the connectors.
flowchart
graph TD
    A["Right Speaker"] --> B["Amplifier Output"]
    C["Left Speaker"] --> B
    B --> D["Right"]
    B --> E["Left"]
    style A fill:#f9f,stroke:#333
    style C fill:#f9f,stroke:#333
    style B fill:#ccf,stroke:#333
    style D fill:#cfc,stroke:#333
    style E fill:#cfc,stroke:#333
Figure 1: Wiring in Phase Between Speakers and Amplifier
E. Bi-wiring and Bi-amping
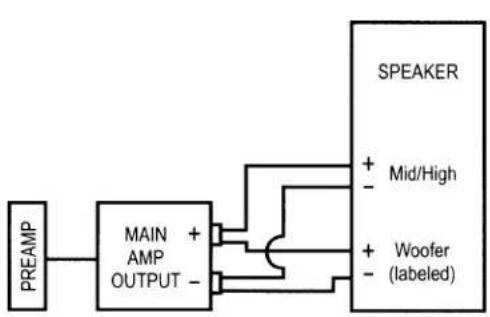
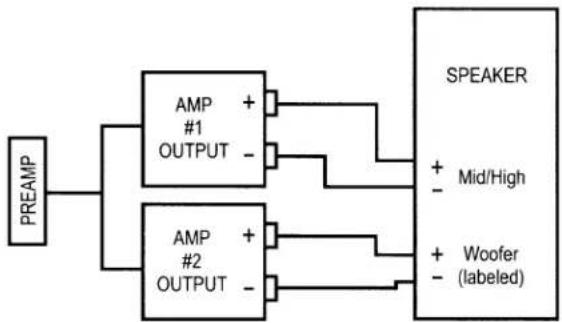
The metal jumper strap that connects the two sets of terminals on some of our speakers is removable. This allows you to connect either separate cables to the separated woofer and tweeter terminals ("bi-wiring") or separate amplifiers ("bi-amping"). With Bi-Amp hookup you must use either identical amplifiers or amplifiers adjusted to have the same voltage gain. Consult your PSB dealer for further information. (Illustrations are for one speaker hookup only). With single cable inputs, the jumper straps must be in place and both sets of terminals tightened firmly.
BI-WIRE HOOKUP
flowchart
graph LR
    A["PREAM"] --> B["MAIN AMP OUTPUT"]
    B --> C["SPEAKER"]
    C --> D["+ Mid/High"]
    C --> E["+ Woofer (labeled)"]
BI-AMP HOOKUP
flowchart
graph LR
    A["PREAM"] --> B["AMP #1 OUTPUT"]
    A --> C["AMP #2 OUTPUT"]
    B --> D["SPEAKER"]
    C --> D
    D --> E["+ Mid/High"]
    D --> F["+ Woofer (labeled)"]
Figure 2: Bi-wire and Bi-amp Wiring Between Speakers and Amplifier
III. SPEAKER PLACEMENT—MAXIMIZING YOUR ENJOYMENT
The positioning of your main left-right speakers for stereo or home theater can play a major role in their performance. We hope you will read through the placement discussion on these next few pages, beginning with these basics:
A. The optimum placement height for main speakers is normally with their tweeters at about the same height as your ears when you are seated. Our tower speakers are designed for optimal listening when seated. For our compact monitors, we offer accessory speaker stands to achieve the right height if you are not using existing shelves or furniture. You may prefer to tilt the speakers towards ear level if the proper height is not possible.
B. You will generally get the best imaging and other spatial qualities if your speakers and your usual seating position form an almost equilateral triangle, with the speakers not quite as far apart from each other as they are from you. If you must sit closer to one speaker than the other, use the Balance control on your electronics (or the individual level controls on home theater channels) to give the more distant speaker a balancing boost in volume.
C. The best high-frequency dispersion, producing the widest "sweet spot" in which you and others can sit and enjoy optimum high-frequency definition, will result when your speaker enclosures are positioned vertically rather than horizontally. If you need to place compact monitor enclosures horizontally, the speakers will still perform very well, but the seating area where you will enjoy optimum sound will become more narrow. We suggest you position the tweeters to the outside away from the center line.
D. If you sit equally distant from both speakers, angling the speakers inward ("toeing them in") about 5 to 10 degrees usually produces the best convergence of high frequencies where you listen. Different listening positions may require different toe-in.
E. To go beyond these basics and experiment with positioning for optimum performance, please read the placement guidelines that follow. They are about the speakers, the room, and you.
1. The Speakers in Relation to Room Boundaries
The position of your speakers with respect to the walls, floor, and ceiling of your listening room will often affect their sound in major ways.
a) The closer you place speakers to the boundary surfaces of your room, the greater the proportion of bass in their overall sound. This is due to the enclosing, “focusing” effects of nearby surfaces on longer-wavelength (lower) frequencies. Positioning the speakers near the intersection of two surfaces (wall and wall, wall and floor, or wall and ceiling) will produce more apparent bass than placement near a single surface. The greatest proportion of bass is delivered by placement near three intersecting surfaces—in a room corner near the floor or ceiling, where the convergence of the two walls and the floor/ceiling produces an amplifying effect that is a bit like that of a megaphone. And the least bass comes from placing a speaker away from all boundaries. Your own tastes should decide what proportion of bass response seems right in your room.
b) The combination of the three dimensions of your room generally will produce at least three points in the room where the frequency response you experience related to a given position (of either the speaker or you) will either greatly increase or almost disappear. The most obvious effects are on low frequencies, but mid-frequency effects, while usually subtler, are also often present. Keep in mind, then, that very small changes in positioning (of the speakers or you) may produce major or subtle changes.
c) Distances of speakers from the walls can make great differences in the number, strength, and particular frequencies of secondary reflections—changing frequency-balance, sonic spaciousness, and definition. Most listeners prefer their speakers at least a few inches from all walls, but the choice is yours to determine by listening.
2. You in Relation to the Speakers
Where you sit in relation to your speakers obviously makes a difference too. The proportions of the particular triangle formed by your speakers and you matter. (You may need to send more power to the more distant speaker to compensate if you get much further from one speaker than the other.) The overall distances involved also matter. As you get further from the speakers, more sound reflected from your room's surfaces (in contrast to the sound coming directly from the speakers) reaches your ears, and the original spatial relationships in a recording are changed as your room "takes over." Sometimes the result is a mellower, more "integrated" sound. Other times, it's a more strident or annoyingly "echoey"—or other—quality. Once again, the particular dimensions of your room play a part. And depending on what seems more realistic and/or enjoyable to your ears, you may choose to sit at a great distance or have close-up, "near-field" sound.
Keep in mind that the right "toe-in," the right speaker height, and a reasonably symmetrical distance from the speakers all tend to work together to deliver the best high-frequency definition and imaging.
3. You in Relation to Room Boundaries
Changing your own position with respect to a room's boundaries may also bring a big effect, sometimes for a small change. Getting further from the wall behind you may make sound more precise and localized. Getting closer may make sound more "mellow" and integrated. Coming too close—to back wall, side wall, or (especially) a corner—may trigger a major sonic peak or cancellation of a certain band of frequencies. It depends on factors we can't cover fully here but do get into on our web site.
Remember too, with respect to your own positioning, that it may—or may not—be easier to change your own seating location than to move your speakers. As with so much else in life, the one certain rule is that you shouldn't fix, or worry about, what isn't broken (audibly in this case), especially if it means moving heavy furniture.
As you consider the three relationships we have outlined, the idea is to manipulate whatever variable is easiest and most productive for improving your listening experience.
Be sure to base your judgements on listening to a good variety of recordings of vocals, and acoustic instruments, soloists, different movies and musical instruments to most easily recognize tonal balance shifts.
Your surround speakers and how they are positioned will determine the sonic realism of movies and multi-channel audio.
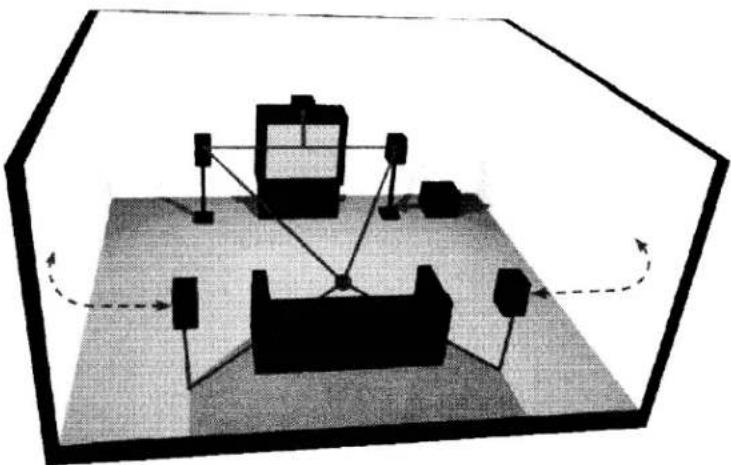
Most surround sound is meant more to create greater depth and overall ambience than to localize effects as coming from a particular spot. This is especially true of Dolby Pro-Logic surround sound, in which both surround channels carry the same (monophonic) information and can't be differentiated from each other. With Dolby Digital and DTS surround sound, there is very definite localization of some surround effects. How much you prefer these localized effects vs. overall sonic depth and diffusion is up to your listening preferences. If you are listening to multi-channel music, you may want the maximum localization of instruments. But if your main concern is the surround effects in movies, they tend to depend more on front-to-back movement than on specific localization. You can locate and aim your surround speakers to produce the effects you prefer, whether precisely pinpointed or pleasantly diffused. Although some people prefer to have their surround speakers behind them on stands at ear height, most find it easiest and best to mount compact monitors on the walls, at least two feet above your ear height when you are seated.
If your listening room is small, aiming the speakers to diffuse their sound somewhat may produce the best overall surround illusion. They can be mounted, for instance, on the side walls and aimed to bounce sound off the rear walls, or vice versa. If you opt for localization of sound from the surrounds, the speakers should face your listening spot, aimed at or slightly above your seated position. Speakers mounted on the side walls generally will sound best when placed a foot or two behind your seating area. Our illustration shows some typical placement options.
natural_image
Diagram of a mechanical or optical setup with multiple components and directional arrows, no visible text or symbols.Figure 3: Positioning Speakers for Music and Home Theatre
V. PROTECTING YOUR INVESTMENT
A. For full, year-after-year enjoyment from your speakers, you should respect their limits. They will produce room-filling volume in average-sized rooms—and handle peak momentary levels at those volumes without audible strain. But avoid louder-than-life playback of music or movies, especially in large rooms. Even the most “bulletproof” speakers can be damaged by excessive volume levels, especially for long periods.
B. When listening to music or movies at very loud volume, you shouldn't turn up bass or treble all the way or close thereto. This sends tremendously increased, disproportionate power into the speakers, and may well damage them. Some loudness compensation ("Loudness") controls, which boost both bass and treble, can also be troublesome at high volume. They are intended only for low-volume listening.
C. Finally, you should be aware that when amplifiers and receivers are pushed to their limits to produce excessive volume levels, they are driven into “clipping” and can do severe damage—especially to tweeters. Often, the damage is done by underpowered amplifiers, which may reach their limits very soon. When such units begin to “clip” the audio waveform, they may generate high-frequency “spikes” of tremendous power. More tweeters have probably been destroyed by this phenomenon than any other. If using your speakers at loud levels, listen carefully for any sign of harsh, garbled midrange and diminishing intelligibility—and turn the volume down right away if you detect it.
D. Recommended Power
We recommend amplifiers and receivers rated from a range of 20-150 watts with our compact systems, 20-200 watts with our tower models. For playing at consistently room-filling volume, a minimum of 50 watts is usually a good idea. As just indicated in the paragraph above, be wary of driving low-powered amplifiers to their limits.
We recommend a maximum of 80-150 watts for sustained program material—as, for instance, with organ pedal tones of long duration, or minutes-long subterranean special effects in movies.
Be aware amplifiers with equal power rating may not play equally loud. Those with higher dynamic power ratings, better satisfy the power requirements. Some have protective circuitry that curtails power available in demanding situations.
E. Cabinet Care
Cabinets have varying materials and finishes, including wood veneers, vinyl, anodized aluminum and high gloss "poly lacquers" and should be treated as you would furniture with similar finishes. Dust lightly with a soft cloth; avoiding abrasives. If necessary, wipe carefully with a cloth slightly dampened with glass cleaner to remove heavy soil.
F. Grilles and Ports
A lint brush does a good job of cleaning grilles. Removable grilles can be taken off and vacuumed if you prefer. If need be, you can use a lint brush to clean ports. Avoid touching speaker diaphragms. Particularly, pushing in the domes will permanently damage tweeters.
VI. IN CASE OF PROBLEMS
A. Lower power if a speaker begins to sound distorted, or seems to be missing certain frequencies, to check first to see whether playing at somewhat lower volume seems to clear up the problem. As we noted under "Recommended Power," it can be especially important to turn down the volume right away if you have pushed a low-powered amplifier or receiver past its comfortable limits.
B. Isolate the problem to the electronics or the speakers and, if the speakers, to specific speakers. Interchange the speaker wire connections on your amplifier or receiver between channels, so that the left speaker is connected to the right channel, or vice versa. If the problem shifts to the other speaker, the problem is not in the speaker but in the electronics.
C. Another component—or, very often, a cable or connection problem between components—may be at fault. If the problem stays in the same speaker, irrespective of the channel to which it's connected—and after changing the connecting wire—chances are the speaker itself probably needs service.
D. See your dealer if you require service. PSB dealers are equipped to handle almost all problems. If you have moved since your purchase, the nearest authorized PSB dealer should be able to help you. If the problem is not resolved, please contact us, providing the Model name, Serial Number, date of purchase, dealer name, and a full description of the problem.
We appreciate your purchase, and hope this owner's guide helps you enjoy the exceptional satisfaction that PSB speaker systems have to offer. We wish you many years of enjoyable listening!

Notes on environmental protection
At the end of its useful life, this product must not be disposed of with regular household waste but must be returned to a collection point for the recycling of electrical and electronic equipment. The symbol on the product, user's manual and packaging, point this out.
The materials can be reused in accordance with their markings. Through re-use, recycling of raw materials, or other forms of recycling of old products, you are making an important contribution to the protection of our environment.
Your local administrative office can advise you of the responsible waste disposal point.
PSB Speakers
633 Granite Court
Pickering, Ontario L1W 3K1
CANADÁ
www.psbspeakers.com
888-772-0000 (905) 831-6555 Fax: 905-837-6357
PSB OM-200 Rev A 0829
natural_image
Line drawing of a cylindrical device with two buttons and a spring-like base (no text or symbols)Figure 1 / Figura 1
Imagine Loudspeakers
Port Cover (Figure 1)
A Port Cover accessory is supplied with each tower and center channel speaker. The port cover can be used to adjust the bass tuning of the Imagine models where room problems at low frequencies (in the 100Hz region) occur. It is well known that the room can dominate the performance of the low frequencies below 200Hz and the added flexibility of a port cover can tweak/improve the performance in problem room setups.
The use of the port cover is not limited to only closing one of the ports in the case of the tower. We invite the listener to try plugging any one or multiple ports to better integrate the system in their room because any adjustment of the bass balance could be a welcome improvement in a given system setup. Please experiment; it will be worth the effort in many cases. It's impossible to predict what type of room or what the system setup will be, therefore we think the flexibility of multiple ports allows the speaker to be integrated better in a wider variety of situations. Sometimes tweaking like this can be used to really help "dial in" the best possible sound in your room.
Additional Port Covers can be acquired for a nominal fee in cases where multiple ports need to be covered to achieve the proper bass balance in a given setup. One can also experiment with the Port Cover on the bookshelf model to tame the bass in some setups.
6.1/7.1 System Utilizing Three (3) Imagine Surrounds
Black From amp right REAR channel
Red From amp right REAR channel
natural_image
Pure electrical circuit lines without any symbolsFirst, remove jumpers En premier, retirer les bandes de liaison Primero, quite las precintas de puente
Black From amp left REAR channel
Red From amp left REAR channel
6.1/7.1 System Utilizing Four (4) Imagine Surrounds
Black From amp left REAR channel
Red From amp left REAR channel
Black From amp right REAR channel
Red From amp right REAR channel
PSB invites you to listen in...
Thank you for purchasing this product from PSB Speakers.
Please take a moment to visit and bookmark our website to:
- Register your warranty online
• Sign up for our “BEAT” newsletter - Obtain the latest product information
Good Listening!
www.psbspeakers.com

633 Granite Court, Pickering (Ontario)
Canada L1W 3K1
633 Granite Court, Pickering, Ontario
Canada L1W 3K1
Phone: (905) 831-6555
(888) 772-0000
Fax: (905) 837-6357
www.psbspeakers.com
A Member of the Lenbrook Group of Companies
LIMITED WARRANTY
PSB Speakers, a division of Lenbrook Industries Limited, warrants the following products for the periods indicated:
Products
Loudspeakers and Powered Subwoofers
How Long Does the Warranty Last?
All PSB loudspeakers and subwoofer drivers have a 5-year warranty. PSB amplifiers, including the amplifiers used in our "powered speakers" (such as powered subwoofers) have a 1 year warranty.
What is Covered and What is Not Covered?
Except as specified below, this warranty covers parts and labor to correct all defects in materials and workmanship.
The following are not covered by the warranty:
- Damage, deterioration, malfunction or failure to meet performance specifications resulting from:
a) Accident, acts of nature, misuse, abuse, neglect or unauthorized product modification.
b) Improper installation, removal or maintenance, or failure to follow instructions supplied with the product.
c) Repair or attempted repair by anyone not authorized by PSB Speakers to repair the product.
d) Any shipment of the product (claims must be presented to the carrier).
e) Any cause other than a product defect.
2) Cleaning, initial set-up, check-ups with no defects found, or charges incurred for installation, removal or reinstallation of the product.
3) Any product on which the serial number has been defaced, modified, or removed.
4) Accessories, including but not limited to, cables, mounting hardware and brackets, and detachable power cords.
5) Any product used in any trade or business or in an industrial or commercial application.
6) Any product purchased outside the country of service, its possessions or territories.
7) Any problem other than a product defect.
8) Any product not purchased from an authorized PSB Speakers Dealer. If you're not sure a dealer is "authorized", check our dealer locator or call PSB Speakers.
Who May Enforce the Warranty?
This warranty may be enforced only by the original purchaser.
What We Will Pay For
We will pay for all labor and material expenses for items covered by the warranty. Payment of shipping charges is discussed in the next section of this warranty.
How You Can Get Service
1) If your unit needs service, please take your speaker with the original invoice or bill of sale to your PSB Speakers dealer. If you need assistance locating a PSB dealer please look on PSB's internet website or contact PSB directly.
2) You must pay any shipping charges if it is necessary to ship the product for service. However, if the necessary repairs are covered by the warranty, we will pay the return shipping charges to any destination within the country of service.
3) Wherever warranty service is required, you must present the original dated sales receipt, invoice, or other proof of purchase.
Limitation of Implied Warranties
All implied warranties, including warranties of merchantability and fitness for a particular purpose, are limited in duration to the length of this warranty.
Exclusion of Damages
PSB Speakers' liability for any defective product is limited to repair or replacement of the product at PSB's option. PSB shall not be liable for damage to other products caused by any defects in PSB's products, damages based upon inconvenience or loss of use of the product, or any other damages, whether incidental, consequential, or otherwise.
How State (Provincial) Law Relates to the Warranty
Some states do not allow limitations on how long in implied warranty lasts and/or do not allow the exclusion or limitation of incidental or consequential damages, so the above limitations or exclusions may not apply to you.
This warranty give you specific legal rights, and you may also have other rights, which vary, from State (Province) to State (Province).
This warranty is enforceable only inside the county of purchase, its possessions or territories.
- QUICK-START GUIDE
- b) Hard Floor Use
- ADDITIONAL DETAILS ON CONNECTING YOUR SPEAKERS
- Bi-wiring and Bi-amping
- SPEAKER PLACEMENT—MAXIMIZING YOUR ENJOYMENT
- The Speakers in Relation to Room Boundaries
- You in Relation to the Speakers
- You in Relation to Room Boundaries
- PROTECTING YOUR INVESTMENT
- Recommended Power
- Cabinet Care
- Grilles and Ports
- IN CASE OF PROBLEMS
- Notes on environmental protection
- Imagine Loudspeakers
- Port Cover (Figure 1)
- PSB invites you to listen in...
- LIMITED WARRANTY
- Products
- How Long Does the Warranty Last?
- What is Covered and What is Not Covered?
- Who May Enforce the Warranty?
- What We Will Pay For
- How You Can Get Service
- Limitation of Implied Warranties
- Exclusion of Damages
- How State (Provincial) Law Relates to the Warranty
Brand : PSB
Model : Imagine T
Category : Loudspeaker