XL-1000 - Soundbar PowerBass - Free user manual and instructions
Find the device manual for free XL-1000 PowerBass in PDF.


| Type of product | Soundbar |
| Brand | PowerBass |
| Model | XL-1000 |
| Dimensions (W x H x D) | 40 x 2.5 x 3.5 inches (1016 x 64 x 89 mm) |
| Weight | 8.5 lbs (3.9 kg) |
| Power supply | AC 100-240V, 50/60 Hz |
| Power consumption | 40 W (standby <0.5 W) |
| Total output power | 120 W RMS |
| Number of channels | 2.0 |
| Frequency response | 60 Hz - 20 kHz |
| Connectivity | Bluetooth 4.2, AUX (3.5mm), Optical, HDMI ARC, USB |
| Supported audio formats | MP3, WMA, AAC, FLAC |
| Remote control | Yes, included |
| Wall mountable | Yes (brackets included) |
| Material | ABS plastic with metal grille |
| Cleaning instructions | Wipe with a dry, soft cloth. Do not use liquid cleaners. |
| Safety features | Overcurrent protection, automatic standby after 15 minutes of inactivity |
| Spare parts availability | Remote control, power adapter, mounting brackets available through authorized dealers |
| Repairability index | 7/10 (user replaceable remote and power cord) |
| Included accessories | Remote control, 2x AAA batteries, AUX cable, optical cable, power adapter, wall mount template |
Frequently Asked Questions - XL-1000 PowerBass
User questions about XL-1000 PowerBass
0 question about this device. Answer the ones you know or ask your own.
Ask a new question about this device
Download the instructions for your Soundbar in PDF format for free! Find your manual XL-1000 - PowerBass and take your electronic device back in hand. On this page are published all the documents necessary for the use of your device. XL-1000 by PowerBass.
USER MANUAL XL-1000 PowerBass
powerbass® X T R E M E
natural_image
Two black audio equipment modules with speaker holes and a central circular component (no text or symbols visible)
XL-1000
XL-800
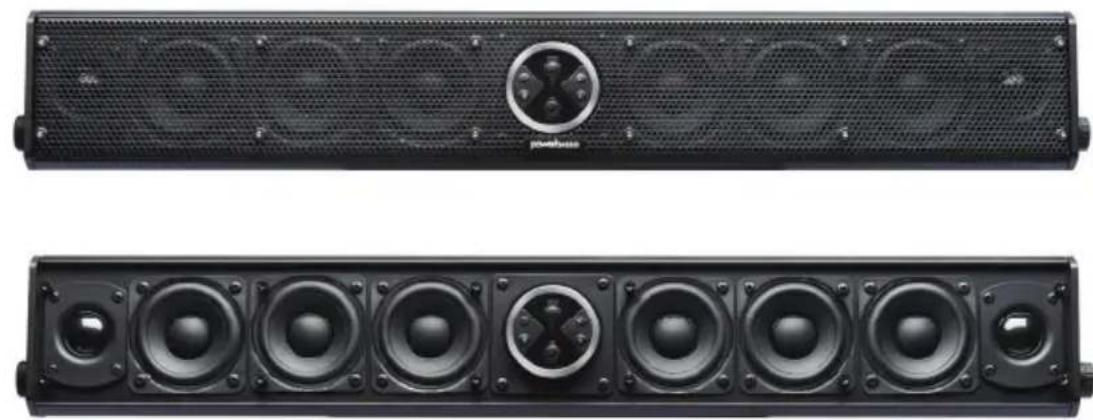
AMPLIFIED SOUNDBAR
Application Guide
Please read through this manual to familiarize yourself with your new speakers. Should your PowerBass Xtreme Powersports Soundbar ever require service, you will need to have the original dated receipt.
powerbass® X T R E M E
Thank you and Congratulations
Congratulations on your purchase of a PowerBass USA Xtreme™ full-range Bluetooth speaker system. You now own a Bluetooth soundbar of uncompromising design and engineering from a factory that truly believes in the relentless pursuit of perfection. Incorporating the highest quality parts and state-of-the-art materials, these bluetooth speakers display the ultimate balance between high fidelity, performance and long-lasting reliability.

At PowerBass USA, Inc. we are confident you will have many years of outstanding enjoyment from this great Bluetooth Soundbar investment. For maximum performance we recommend that you have your new Power-Bass Xtreme product installed by an Authorized PowerBass Xtreme Dealer.
To learn more about PowerBass Xtreme, please visit us on the World Wide Web at
www.POWERBASSUSA.com
Δ Caution Δ
Continuous exposure to sound pressure levels in excess of 100 dB or more can cause permanent hearing loss. PowerBass Xtreme Speakers are capable of producing sound pressure levels well over 160 dB. Please observe all local sound ordinances while listening to your PowerBass Xtreme system. PowerBass USA, Inc. accepts no liability for hearing loss, bodily injury, or property damage due to the result of use or misuse of this product.
TECHNICAL FEATURES
Full Range Marine Grade Poly Cone Speakers Set up in an optimum sound array for high volume output
SD Mylar Tweeters Gives the sizzle that extends the sonic high frequency
Precision Tuned DSP For extended frequency range and low distortion sonic playback
Heavy Duty Extruded Aluminum Water Tight Housing For added heatsink cooling and a waterproof sealed environment
Bluetooth And Wired AUX Inputs Let's you select the way you want to delivery your music
3 Volt Line Output To add a second sound bar or external amplifier
Auto Turn Off Circuit Eliminates battery drain while unit is not in use
Universal L Mount Brackets Easy installation for many applications
Optional Universal Roll Bar Clamps Gives you additional mounting options (XL-SBCLAMP Sold Separately).
Optional Wired Remote Dash Mount Controller (XL-SBCON Sold Separately). To have fingertip control of your soundbar.
XL-1000:
3" x 8 Full Range Premium Marine Grade Speakers
1.25" x 2 Premium Marine Grade Mylar Dome Tweeters
400 Watt RMS Quad Bridged Mosfet Power Amplifier
XL-800:
3" x 6 Full Range Premium Marine Grade Speakers 1.25" x 2 Premium Marine Grade Mylar Dome Tweeters 300 Watt RMS Quad Bridged Mosfet Power Amplifier
SPECIFICATIONS FOR XTREME AMPLIFIED SOUNDBARS
(Due to continuing improvements these specifications are subject to change without any notice. Do not attempt to fix or repair this unit. Unauthorized repairs will void the manufacturer's warranty..)
| Model XL-1000 XL-800 | ||
| RMS Power (watts) | 400 300 | |
| Peak Power (watts) | 800 600 | |
| Aux Input Sensitivity | 250mV - 3 Volts 250mV - 3 Volts | |
| Aux Output | 3 Volts 3 Volts | |
| Frequency Response | 50Hz - 22kHz 50Hz - 22kHz | |
| Signal to Noise Ratio | >85dB >85dB | |
| Bluetooth Frequency | 2.4GHz 2.4GHz | |
| Bluetooth Protocol | V4.0 V4.0 | |
| Bluetooth Operating Range | >32' >32' | |
| Bluetooth Compatible Devices | A2DP Support A2DP Support | |
| Size: L x H x W (inches) | 33.75 x 4.17 x 4.25 27 x 4.17 x 4.25 | |
| Size: L x H x W (milimeters) | 857 x 106 x 108 687 x 106 x 108 | |
| Weight (lbs) | 16.35 13.05 | |
| Weight (kgs) | 7.42 5.9 | |
INSTALLATION EXPERIENCE
Installation of PowerBass mobile amplified soundbars requires detailed knowledge of electronics wiring. We strongly recommend installation by an authorized PowerBass dealer. This Owner's Manual only provides general installation and operation instructions. If you have any reservations about your installation skills, please contact your local PowerBass dealer for assistance.
IMPORTANT: This amplified soundbar is designed for operation in vehicles with 12-volt Negative ground electrical systems only.
GENERAL INSTALLATION TIPS
Your PowerBass XL Bluetooth Soundbars were specially designed for providing high-fidelity sound in any terrain while being able to withstand the harshest of environments with their splash proof design and military grade aluminum chassis. Possible damage to your speakers may occur if improperly used by overdriving the system causing the sound to distort causing permanent damage to the speakers. Playing loud music in a outdoor environment can permanently damage your hearing, as well as limit your ability to hear other traffic.
- Be sure to carefully read and understand the instructions before attempting to install this product.
- Turn off the audio system. For safety, disconnect the negative lead from the battery prior to beginning installation.
- For easier installation, we recommend that if additional wiring is required, you run all wires prior to mounting your soundbar in place.
- The outdoor environment can quickly accelerate corrosion so always use the highest quality connectors for a reliable installation and minimal signal or power loss.
- Always use caution before you drill or cut! Be careful not to puncture gas tanks, fuel lines, hydraulic lines or electrical wiring when working on any vessel or vehicle.
- Never run soundbar wires underneath the vehicle or exposed on a boat deck, keeping the wiring behind cover provides the best protection from environmental elements.
- Avoid running any soundbar wire or signal cables near the vehicle's electrical system to prevent noise from "bleeding" into the audio system.
- Leave a little slack in the soundbar wire for easier installation, this will prevent pulling or stretching the wire and possibly causing a connection to come loose.
PREPARING FOR INSTALLATION
NOTE: The tools listed below may be required for proper installation
• An electric drill with bits
• Allen / Hex Key / Wrench Set
• Philips head and standard screwdrivers
- Wire strippers
- Crimping tool
• VOM (electronic volt ohm meter)
• Heat shrink tubing and heat gun
- Soldering iron
• Electronic (Rosen not Acid Core) Solder
NOTE: The stainless steel hardware supplied with your PowerBass Xtreme soundbar has been chosen to resist rust and corrosion. If the particular hardware supplied will not work for your installation purposes, please be sure to use only appropriate marine grade (stainless steel) mounting hardware.
INSTALLATION PRECAUTIONS
NOTE: Proceed only if you are a qualified installer, otherwise; see your Authorized PowerBass Dealer to professionally install this amplifier. Always wear protective eyewear when using tools.
• Turn off all stereo and other electrical devices before you begin.
- Disconnect the negative (-) lead from your vehicles battery.
- Locate all fuel lines, brake lines, oil lines, and electrical cables when planning the install.
- When connecting ground points, make sure all paint is carefully scrapped away from the body and contact is made with bare metal.
- Use a utility knife to trim away fabric from hole locations before drilling or cutting.
- When running power cables through sheet metal, be sure to use grommets to properly insulate the metal edges from the wire insulation.
• If possible, use tubing through grommets.
WARNING: Check your vehicle's owner's manual before disconnecting the battery. Disconnecting the battery on some vehicles may require an anti-theft code when reconnecting the battery and require the on-board computer to be reset at the dealership. Check with your local dealer if you are uncertain.
MOUNTING THE SOUNDBAR
L-brackets
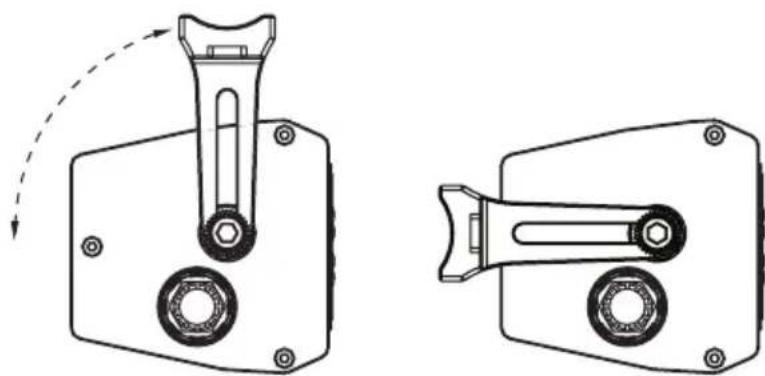
Use the supplied hardware to mount the L bracket to the sound bar at the desired mounting angle. Securely tighten all hardware. The diameter of the hole in the L- bracket is .25 inches.
NOTE: we do not supply the hardware to mount the sound bar to the vehicle when using the supplied L Brackets
natural_image
Technical line drawing of two mechanical components with arrows indicating motion (no text or symbols)Fig.1
C-clamp bracket (optional not included)
There is a set screw in the middle of the C-clamp that will lock it into the sound bar once the clamps are in place so they will lock in place. There is also two sizes of screws for the clamps depending on bar size.
Bottom MountTop Mount
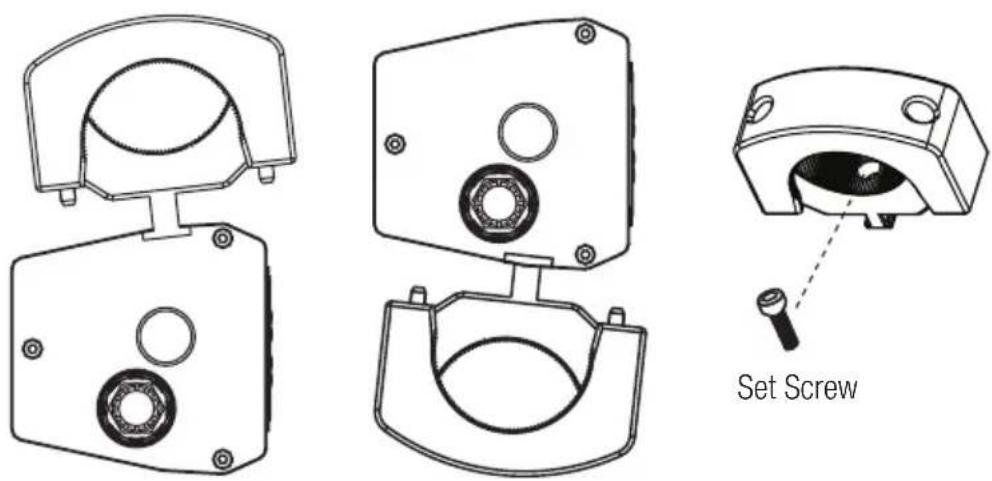
Fig.2
MOUNTING LOCATION
Find an unobstructed location that where the soundbar will be easily heard and out of the way so no harm will come to any individual in or around the vehicle. A prime location to mount the soundbar in an off-road vehicle would be on the roll bar preferably in the front of the cockpit.
FUSE REQUIREMENTS
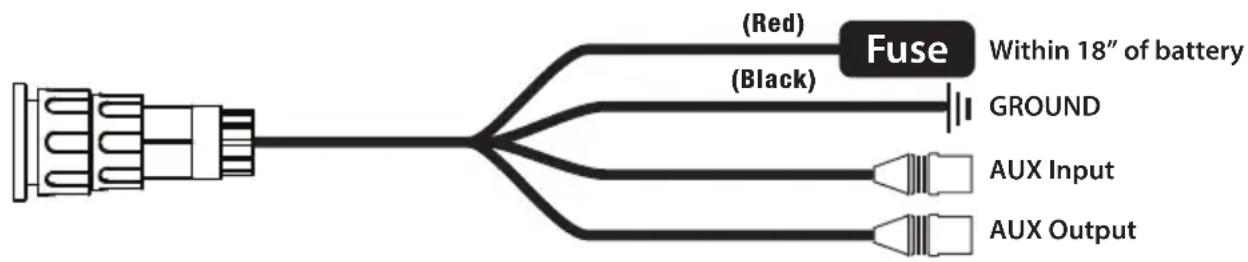
While the wiring harness of your PowerBass amplified soundbar incorporates a fuse, this does nothing to protect the vehicle from a dangerous short circuit. It is absolutely vital that the main power lead to the amplified soundbar in the system be fused within 18-inches (45cm) of the connection to the vehicle battery. The value of this fuse (or circuit breaker) should be no greater than the sum of the fuses found on all of the equipment being connected to that power wire.
POWER WIRING AND SIGNAL CONNECTIONS Fig.3
Red Fuse Wire is the main power lead to be either hooked up to 12 volts battery power or 12 volt switched power. It is recommended to hook this power wire directly to the battery for better current and voltage flow (fig 5).
Black Ground Wire (fig. 4 & 5) is the ground lead to the soundbar and needs to be a solid ground connection. Sand or scrape the paint away from a solid chassis location and use a screw or bolt with a star washer for best results. You can also connect the Ground Wire directly to the Battery (fig. 5).
AUX 3.5mm Input is the audio input from a source unit that produces 250mV to 3 volts. We use a 3.5mm connector for cell phone or MP3 player. If you need RCA inputs, there are 3.5mm adaptors available from your authorized PowerBass dealer.
AUX 3.5mm Output is up to a 3 volt output to drive an external amp (subwoofer or full-range) or a second sound bar. This output is a full-range variable output that is controlled by the soundbar pre-amp.
flowchart
graph LR
    A["Terminal"] --> B["Fuse"]
    B --> C["(Red)"]
    B --> D["(Black)"]
    C --> E["Within 18" of battery"]
    D --> F["GROUND"]
    D --> G["AUX Input"]
    D --> H["AUX Output"]
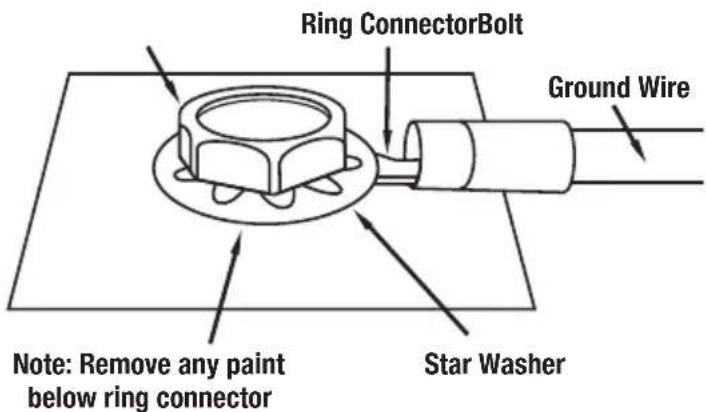
Fig.4 Recommended Ground Connection for Car & Trucks
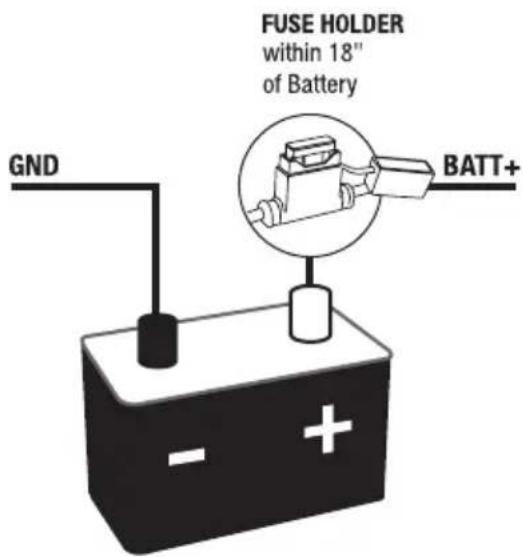
Fig.5 Recommended Ground Connection for UTV's, RV's, Motorcycles and Boats
AUX INPUT
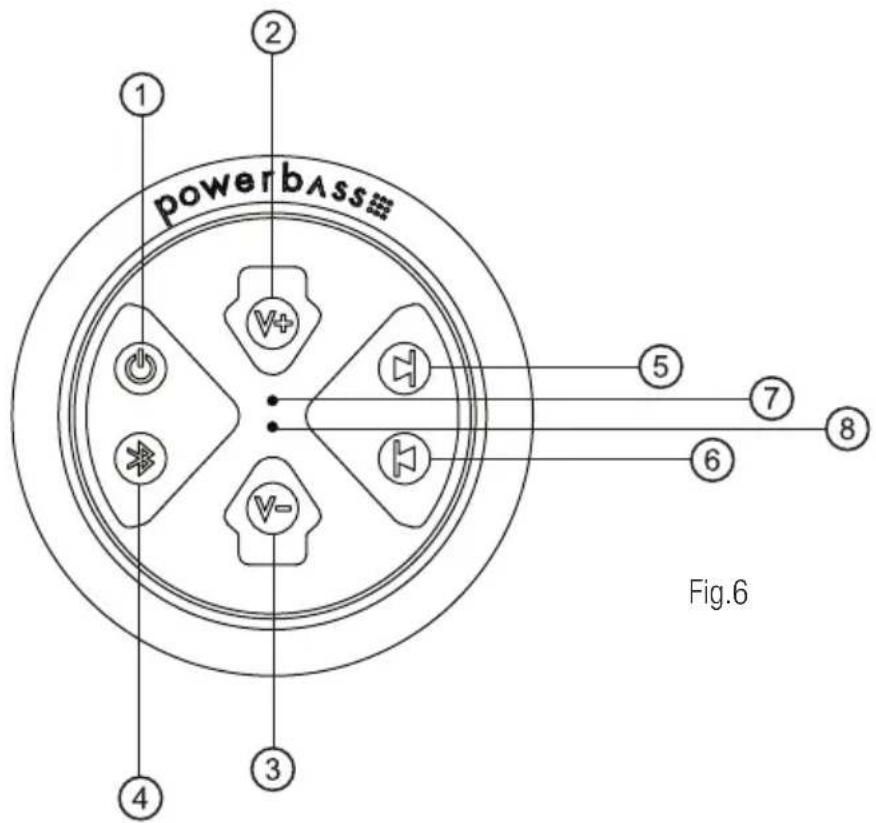
Connect the external audio input wire to your soundbar. Turn the soundbar on by holding the power button for 3-5 seconds, an audible beep will confirm that the soundbar is powered on. Now you can use the main controller on the soundbar to adjust volume up, down and mute. Track back and forward as well as pause will not work in AUX mode; these features work only in Bluetooth mode. In Aux mode these features can only be operated by your connected device. (Radio, Phone or MP3 Player).
AUX OUTPUT
The soundbar will send up to 3 volts of audio output to either an external amplifier (subwoofer or full-range) or second soundbar. This is a variable output that is controlled by the main soundbar. Connect the 3.5mm output to the audio input RCA or AUX input of your external amplifier. If using a second soundbar use a 3.5mm to 3.5mm extension cable and connect the Aux output from the main soundbar to the Aux input of the second soundbar. For distortion free sound, turn the volume all the way up on the second soundbar and then back down two-three clicks.
CONTROLLER LAYOUT
SOUNDBAR CONNECTION PORTS
Main Connector Port External Controller Port
for optional XL-SBCON

natural_image
Simple line drawing of a rectangular device with a circular button and mounting holes (no text or symbols)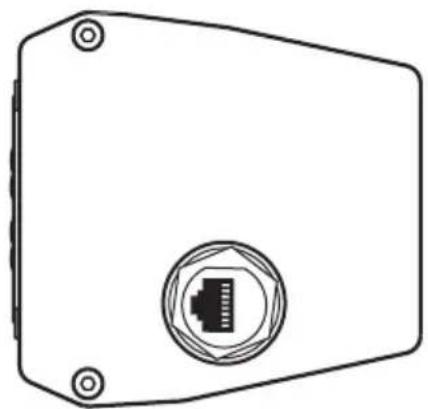
natural_image
Simple line drawing of a rectangular device with a central connector and mounting holes (no text or symbols)Press and hold the button down for 3 to 5 seconds to power unit on/off.
Press the button momentarily to pause the music in Bluetooth mode and once again to un-pause.
Press the button momentarily once to mute the music in AUX mode and once again to un-mute.
2) VOLUME UP BUTTON
Press the volume up button momentarily to raise the volume. Press the volume up button repeatedly until the desired volume level is achieved. There will be an audible beep once maximum volume is reached
3) VOLUME DOWN BUTTON
Press the volume down button momentarily to lower the volume. Press the volume down button repeatedly until the desired volume level is achieved.
4) BLUETOOTH / AUX BUTTON
Press Bluetooth/Aux button momentarily to switch between Bluetooth and auxiliary input.
Press the Bluetooth/Aux button to pair a Bluetooth device if no device is currently paired.
Press the Track Forward button momentarily to skip to the next song (Bluetooth mode only).
Press the Track Back button momentarily to skip back to the previous song (Bluetooth mode only).
7) RESET BUTTON
Press and hold the Reset button for 3 to 5 seconds to reset micro-processor.
8) RED L.E.D PROTECTION LIGHT
The Red Protection light will turn on if the Bluetooth Soundbar is detecting over or under voltage. This is a built-in protection circuit that prevents damage to the electronics.
BLUETOOTH PAIRING AND OPERATION
1) Turn sound bar on by holding power button for 3-5 seconds, there will be an audible beep to confirm the soundbar is on.
2) Press the Bluetooth button momentarily and you will hear an audible sequence of tones to confirm soundbar is now ready to pair with your device along with flashing back lights.
3) Go into the Bluetooth settings of your device and search for either the XL-800 or XL-1000 signal to pair. Once paired, there will be an audible beep to confirm that the soundbar and your Bluetooth device has paired successfully.
4) Once the pairing process is complete, use either the main controller on the soundbar or connected device to control volume up and down, track back or forward, and pause/mute.
5) If using optional external controller (XL-SBCON) the same functions apply. The connection of a external controller does not bypass the main controller both can be used as well as your connected device.
Auto-Turn Off Circuit
When finished using the soundbar, manually power off the unit by pressing and holding the Power Button for 3-5 seconds, there will be an audible beep to confirm that the unit is off. To prevent battery drain, the soundbar is equipped with an Auto-Turn off Circuit. After 10 minutes of non-activity this circuit will turn off the soundbar automatically. To resume play back after the Auto-Turn off circuit has been engaged, simply press the Power Button.
PERSONAL NOTES:
Name:
Date Purchased:
Dealer:
Installed By:
Model:
Serial Number:
Miscellaneous:
This manual is the exclusive property of PowerBass USA, Inc. Any reproduction of this manual, or use other than its intentions is strictly prohibited without the express consent of PowerBass USA, Inc.
©2016 PowerBass USA, Inc.
TROUBLESHOOTING TIPS
(Due to continuing improvements these specifications are subject to change without any notice. Do not attempt to fix or repair this unit. Unauthorized repairs will void the manufacturer's warranty..)
| PROBLEM SOLUTION | |
| NO POWER | With a volt meter (VOM) checkRed wire should read +12 to +16 VDCBlack wire should read -12 to -16VDC |
| NO SOUND | Check input deviceMake sure your device is paired with the sound barMake sure you are connected to the AUX input cable |
| DISTORTED OUTPUT | Check input signalMake sure your input signal does not exceed 3 voltsReduce the volume on either the soundbar or connected device |
| SOUND CUTS ON/OFF | Check input signalMake sure your input signal is at least 250mVRaise the volume on either the soundbar or connected device |
| NOT ABLE TO PAIR BLUETOOTH DEVICE | CheckMake sure no other device is paired (only one device can be paired at a time)Make sure Bluetooth is turned on from your deviceUse RESET button to reset micro-processor |
| RED PROTECTION LED IS ON | Check input voltageMake sure input DC voltage is between 8VDC and 16VDC |

Product Disposal – Certain international, national and/or local laws and/or regulations may apply regarding the disposal of this product. For further detailed information, please contact the retailer where you purchased this product or the PowerBass Importer/Distributor in your country.
This manual is the exclusive property of PowerBass USA, Inc. Any reproduction of this manual, or use other than its intentions is strictly prohibited without the express consent of PowerBass USA, Inc. Copyright 2016 PowerBass USA, Inc.
POWERBASS XTREME LIMITED WARRANTY POLICY
PowerBass USA, Inc. offers limited warranty on PowerBass products under normal use on the following terms:
PowerBass Xtreme Bluetooth Soundbar are to be free of defects in material and workmanship for a period of one (1) year. The warranty is extended to two (2) years for parts and labor, if an Authorized PowerBass Xtreme Dealer completes the installation.
This warranty applies only to PowerBass products sold to consumers by Authorized PowerBass Dealers in the United States of America. Products purchased by consumers from a PowerBass dealer in another country are covered only by that country's Distributor and not by PowerBass USA.
This warranty covers only the original purchaser of PowerBass product. In order to receive service, the purchaser must provide PowerBass with the receipt stating the consumer name, dealer, product and date of purchase.
Products found to be defective during the warranty period will be repaired or replaced (with a product deemed to be equivalent) at PowerBass's discretion and will not be liable for incidental or consequential damages. PowerBass will not warranty this product under the following situations:
- Speakers received with bent/cracked frames or significant water damage
- Abuse such as holes in the cone, surround or ripped spider
-
Voice coil damage due to amplifier clipping or distortion
-
Amplifiers received with apparent rust or corrosion
- Any evidence of liquid damage or exposure to excessive heat
- Attempted repairs or alterations of any nature
- Product that has not been installed according to this owners manual
Any implied warranties including warranties of fitness for use and merchantability are limited in duration to the period of the express warranty set forth above. Some states do not allow limitations on the length of an implied warranty, so this limitation may not apply. No person is authorized to assume for PowerBass any other liability in connection with the sale of this product.
Please call (909) 923-3868 for PowerBass Customer Service. You must obtain an RA# (Return Authorization Number) to return any product to PowerBass. The RA number must be prominently marked on the outside of the shipping carton or the delivery will be refused. Please pack your return carefully; we are not responsible for items damaged in shipping. Return the defective product along with a copy of the original dated retail sales receipt, plus \$12.00 for handling and diagnostic evaluation to:
Residents of HI, AK and US territories will be charged for return shipping. All inquires regarding service and warranty should be sent to the above address.

PowerBass Xtreme – A division of PowerBass USA, Inc.
2133 S. Green Privado, Ontario, CA 91761
Tel. (909) 923-3868 - Fax (909) 923-8048
www.powerbassusa.com
- powerbass® X T R E M E
- AMPLIFIED SOUNDBAR
- Application Guide
- Thank you and Congratulations
- Δ Caution Δ
- TECHNICAL FEATURES
- XL-1000:
- XL-800:
- SPECIFICATIONS FOR XTREME AMPLIFIED SOUNDBARS
- INSTALLATION EXPERIENCE
- GENERAL INSTALLATION TIPS
- PREPARING FOR INSTALLATION
- NOTE: The tools listed below may be required for proper installation
- INSTALLATION PRECAUTIONS
- MOUNTING THE SOUNDBAR
- L-brackets
- C-clamp bracket (optional not included)
- MOUNTING LOCATION
- FUSE REQUIREMENTS
- POWER WIRING AND SIGNAL CONNECTIONS Fig.3
- AUX INPUT
- AUX OUTPUT
- SOUNDBAR CONNECTION PORTS
- 2) VOLUME UP BUTTON
- 3) VOLUME DOWN BUTTON
- 4) BLUETOOTH / AUX BUTTON
- 7) RESET BUTTON
- 8) RED L.E.D PROTECTION LIGHT
- BLUETOOTH PAIRING AND OPERATION
- Auto-Turn Off Circuit
- PERSONAL NOTES:
- TROUBLESHOOTING TIPS
- POWERBASS XTREME LIMITED WARRANTY POLICY
Brand : PowerBass
Model : XL-1000
Category : Soundbar