LTD8504T-ST - Voice recorder LTS - Free user manual and instructions
Find the device manual for free LTD8504T-ST LTS in PDF.


| Product Type | Digital Voice Recorder |
| Model | LTD8504T-ST |
| Brand | LTS |
| Dimensions (L x W x H) | Approx. 10.5 x 4.5 x 1.5 cm |
| Weight | Approx. 60 g |
| Power Supply | Built-in Li-ion battery, 500 mAh (USB charge via Micro-USB) |
| Storage Capacity | Built-in 8 GB (expandable via microSD, up to 32 GB) |
| Recording Formats | MP3, WAV |
| Audio Quality | High-quality stereo recording (192 kbps) |
| Recording Modes | Continuous recording, voice-activated recording (VCVA), scheduled recording |
| Playback Features | Built-in speaker, earphone jack (3.5 mm), variable playback speed |
| Connectivity | Micro-USB 2.0 for file transfer, microSD slot |
| Battery Life | Up to 20 hours of continuous recording |
| Charging Time | Approx. 3 hours |
| Main Functions | Recording, playback, pause, folder management, A-B repeat, erase, voice activation |
| Cleaning and Care | Clean with a soft, dry cloth; avoid liquids and abrasive materials |
| Safety Precautions | Do not disassemble; avoid exposure to high heat or moisture; use original charger |
| Spare Parts & Repairability | Replacement battery available; microSD slot for storage upgrade; contact LTS support for repairs |
| General Information | Designed for lectures, meetings, interviews; supports up to 32 GB microSD card |
Frequently Asked Questions - LTD8504T-ST LTS
User questions about LTD8504T-ST LTS
0 question about this device. Answer the ones you know or ask your own.
Ask a new question about this device
Download the instructions for your Voice recorder in PDF format for free! Find your manual LTD8504T-ST - LTS and take your electronic device back in hand. On this page are published all the documents necessary for the use of your device. LTD8504T-ST by LTS.
USER MANUAL LTD8504T-ST LTS
Digital Video Recorder
Quick Start Guide
TABLE OF CONTENTS
Chapter 1Description of Panels....6
1.1 Front Panel 6
1.2 Rear Panel 8
Chapter 2 Installation and Connections ...... 9
2.1 DVR Installation 9
2.2 Hard Disk Installation 9
2.3 RS-485 and Controller Connection 11
2.4 HDD Storage Calculation Chart....12
Chapter 3Menu Operation....13
3.1 Menu Structure.... 13
3.2 Startup and Shutdown 13
3.3 Activating Your Device 14
3.4 Login and Logout....15
3.4.1 User Login 15
3.4.2 User Logout 15
3.5 Configuring the Signal Input.... 16
3.6 Using the Setup Wizard.... 17
3.7 Network Settings....17
3.8 Adding IP Cameras 18
3.9 Live View....19
3.10 Recording Settings 19
3.11 Playback....20
Chapter 4 Accessing by Web Browser.... 21
Quick Start Guide
The Manual includes instructions for using and managing the product. Pictures, charts, images and all other information hereinafter are for description and explanation only. The information contained in the Manual is subject to change, without notice, due to firmware updates or other reasons. Please find the latest version in the company website
Please use this user manual under the guidance of professionals.
Legal Disclaimer
REGARDING TO THE PRODUCT WITH INTERNET ACCESS, THE USE OF PRODUCT SHALL BE WHOLLY AT YOUR OWN RISKS. OUR COMPANY SHALL NOT TAKE ANY RESPONSIBILITES FOR ABNORMAL OPERATION, PRIVACY LEAKAGE OR OTHER DAMAGES RESULTING FROM CYBER ATTACK, HACKER ATTACK, VIRUS INSPECTION, OR OTHER INTERNET SECURITY RISKS; HOWEVER, OUR COMPANY WILL PROVIDE TIMELY TECHNICAL SUPPORT IF REQUIRED.
SURVEILLANCE LAWS VARY BY JURISDICTION. PLEASE CHECK ALL RELEVANT LAWS IN YOUR JURISDICTION BEFORE USING THIS PRODUCT IN ORDER TO ENSURE THAT YOUR USE CONFORMS THE APPLICABLE LAW. OUR COMPANY SHALL NOT BE LIABLE IN THE EVENT THAT THIS PRODUCT IS USED WITH ILLEGITIMATE PURPOSES.
IN THE EVENT OF ANY CONFLICTS BETWEEN THIS MANUAL AND THE APPLICABLE LAW, THE LATER PREVAILS.
Regulatory Information
FCC Information
FCC compliance: This equipment has been tested and found to comply with the limits for a Class A digital device, pursuant to part 15 of the FCC Rules. These limits are designed to provide reasonable protection against harmful interference when the equipment is operated in a commercial environment. This equipment generates, uses, and can radiate radio frequency energy and, if not installed and used in accordance with the instruction manual, may cause harmful interference to radio communications. Operation of this equipment in a residential area is likely to cause harmful interference in which case the user will be required to correct the interference at his own expense.
FCC Conditions
This device complies with part 15 of the FCC Rules. Operation is subject to the following two conditions:
- This device may not cause harmful interference.
- This device must accept any interference received, including interference that may cause undesired operation.
EU Conformity Statement

This product and - if applicable - the supplied accessories too are marked with "CE" and comply therefore with the applicable harmonized European standards listed under the EMC Directive
2004/108/EC, the RoHS Directive 2011/65/EU.

2012/19/EU (WEEE directive): Products marked with this symbol cannot be disposed of as unsorted municipal waste in the European Union. For proper recycling, return this product to your local supplier upon the purchase of equivalent new equipment, or dispose of it at designated collection
points. For more information see: www.recyclethis.info

2006/66/EC (battery directive): This product contains a battery that cannot be disposed of as unsorted municipal waste in the European Union. See the product documentation for specific battery information. The battery is marked with this symbol, which may include lettering to indicate
cadmium (Cd), lead (Pb), or mercury (Hg). For proper recycling, return the battery to your supplier or to a designated collection point. For more information see: www.recyclethis.info
Industry Canada ICES-003 Compliance
This device meets the CAN ICES-3 (A)/NMB-3(A) standards requirements.
Safety Instruction
These instructions are intended to ensure that user can use the product correctly to avoid danger or property loss.
The precaution measure is divided into "Warnings" and "Cautions"
Warnings: Serious injury or death may occur if any of the warnings are neglected.
Cautions: Injury or equipment damage may occur if any of the cautions are neglected.
| Warnings Follow these safeguards to prevent serious injury or death. | Cautions Follow these precautions to prevent potential injury or material damage. |

Warnings
- Proper configuration of all passwords and other security settings is the responsibility of the installer and/or end-user.
- In the use of the product, you must be in strict compliance with the electrical safety regulations of the nation and region. Please refer to technical specifications for detailed information.
- Input voltage should meet both the SELV (Safety Extra Low Voltage) and the Limited Power Source with 100\~240 VAC or 12 VDC according to the IEC60950-1 standard. Please refer to technical specifications for detailed information.
- Do not connect several devices to one power adapter as adapter overload may cause over-heating or a fire hazard.
- Please make sure that the plug is firmly connected to the power socket.
- If smoke, odor or noise rise from the device, turn off the power at once and unplug the power cable, and then please contact the service center.
Preventive and Cautionary Tips
Before connecting and operating your device, please be advised of the following tips:
- Ensure unit is installed in a well-ventilated, dust-free environment.
- Unit is designed for indoor use only.
- Keep all liquids away from the device.
- Ensure environmental conditions meet factory specifications.
- Ensure unit is properly secured to a rack or shelf. Major shocks or jolts to the unit as a result of dropping it may cause damage to the sensitive electronics within the unit.
- Use the device in conjunction with an UPS if possible.
● Power down the unit before connecting and disconnecting accessories and peripherals. - A factory recommended HDD should be used for this device.
- Improper use or replacement of the battery may result in hazard of explosion. Replace with the same or equivalent type only. Dispose of used batteries according to the instructions provided by the battery manufacturer.
Symbol Conventions
The symbols that may be found in this document are defined as follows.
| Symbol | Description |
| [2HY6] | Indicates a potentially hazardous situation, which if not avoided, could result in equipment damage, data loss, performance degradation, or unexpected results. |
 | Provides additional information to emphasize or supplement important points of the main text. |
Chapter 1 Description of Panels
1.1 Front Panel

Figure 1.1 Front Panel
Table 1.1 Description of Front Panel
| No. | Name Function Description | ||
| 1 | Status Indicators | POWER: the POWER indicator turns green when NVR is powered up. | |
| READY: The indicator light is green when the device is running normally. | |||
| STATUS: 1.The light is green when the IR remote control is enabled; 2.The light is red when the function of the composite keys (SHIFT) are used; 3. The light is out when none of the above condition is met/ | |||
| ALARM: the light is red when there is an alarm occurring. | |||
| HDD: the indicator flickers red when HDD is reading/writing. | |||
| Tx/Rx: TX/RX indicator flickers green when network connection is functioning normally. | |||
| 2 USB Interfaces | Universal Serial Bus (USB) ports for additional devices such as USB mouse and USB Hard Disk Drive (HDD). | ||
| 3 | Composite Keys | 1/MENU: | Enter numeral “1”; |
| Access the main menu interface. | |||
| 2/ABC/F1: | Enter numeral “2”; | ||
| Enter letters “ABC”; | |||
| The F1 button when used in a list field will select all items in the list. | |||
| In PTZ Control mode, it will turn on/off PTZ light and when the image is zoomed in, the key is used to zoom out. | |||
| 3/DEF/F2: | Enter numeral “3”; | ||
| Enter letters “DEF”; | |||
| The F2 button is used to change the tab pages. | |||
| In PTZ control mode, it zooms in the image. | |||
| 4/GHI/ESC: | Enter numeral “4”; | ||
| Enter letters “GHI”; | |||
| Exit and back to the previous menu. | |||
| 5/JKL/EDIT: | Enter numeral “5”; | ||
| Enter letters “JKL”; | |||
| Delete characters before cursor; | |||
| Check the checkbox and select the ON/OFF switch; | |||
| Start/stop record clipping in playback. | |||
| 6/MNO/PLAY: | Enter numeral “6”; | ||
| Enter letters “MNO”; | |||
| Playback, for direct access to playback interface. | |||
| 7/PQRS/REC: | Enter numeral “7”; | ||
| Enter letters “PQRS”; | |||
| Open the manual record interface. | |||
| 8/TUV/PTZ: | Enter numeral “8”; | ||
| Enter letters “TUV”; | |||
| Access PTZ control interface. | |||
| 9/WXYZ/PREV: | Enter numeral “9”; | ||
| Enter letters “WXYZ”; | |||
| Multi-channel display in live view. | |||
| Enter numeral “0”; | |||
| Shift the input methods in the editing text field. (Upper and lowercase, alphabet, symbols or numeric input). | |||
| Double press the button to switch the main and auxiliary output. | |||
| 4 SHIFT | Switch between the numeric or letter input and functions of the composite keys. (Input letter or numbers when the light is out; Realize functions when the light is red.) | ||
| 5 Control Buttons | Directional buttons:In menu mode, the direction buttons are used to navigate between different fields and items and select setting parameters.In playback mode, the Up and Down buttons are used to speed up and slow down record playing, and the Left and Right buttons are used to move the recording 30s forwards or backwards.In the image setting interface, the up and down button can adjust the level bar of the image parameters.In live view mode, these buttons can be used to switch channels. | ||
| Enter:The Enter button is used to confirm selection in menu mode; or used to check checkbox fields and ON/OFF switch.In playback mode, it can be used to play or pause the video.In single-frame play mode, pressing the Enter button will play the video by a single frame.And in auto sequence view mode, the buttons can be used to pause or resume auto sequence. | |||
| 6 IR Receiver | Receiver for IR remote. | ||
1.2 Rear Panel

The rear panel vaires according to different models. Please refer to the actual product. The following figure is for reference only.
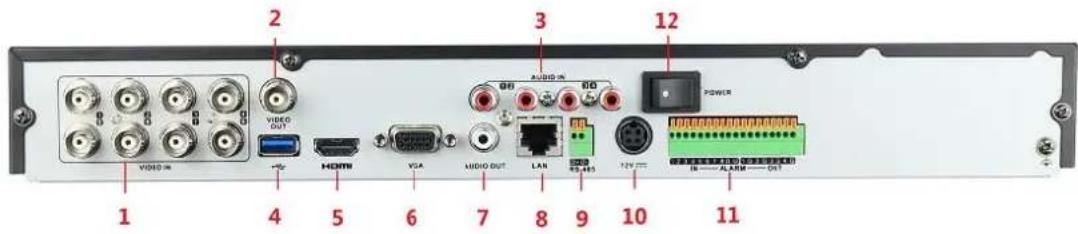
Figure 1.2 Rear Panel
Table 1.2 Description of Rear Panel
| No. | Item Description | |
| 1 | VIDEO IN BNC interface for TVI and analog video input. | |
| 2 | VIDEO OUT BNC connector for video output. | |
| 3 | AUDIO IN RCA connector | |
| 4 | USB Port Universal Serial Bus (USB) port for additional devices. | |
| 5 | HDMI HDMI video output connector. | |
| 6 | VGA DB15 connector for VGA output. Display local video output and menu. | |
| 7 | AUDIO OUT RCA connector. | |
| 8 | Network Interface Connector for network | |
| 9 | RS-485 | Connector for RS-485 devices. T+ and T- pins connect to R+ and R-pins of PTZ receiver respectively. |
| D+, D- pin connects to Ta, Tb pin of controller. For cascading devices, the first DVR's D+, D- pin should be connected with the D+, D- pin of the next DVR. | ||
| 10 | Power Supply 100 | to 240V AC power supply. |
| 11 | Alarm | 100 to 240V AC power supply. Connector for alarm input/output. |
| 12 | Power Switch Switch for turning on/off the device. |
Chapter 2 Installation and Connections
2.1 DVR Installation
During the installation of the DVR:
- Use brackets for rack mounting.
- Ensure there is ample room for audio and video cables.
- When installing cables, ensure that the bend radius of the cables are no less than five times than its diameter.
- Connect both the alarm and RS-485 cable.
- Allow at least 2cm (≈0.75-inch) of space between racks mounted devices.
- Ensure the DVR is grounded.
- Environmental temperature should be within the range of -10^ to 55^ , 14^ to 131^ .
- Environmental humidity should be within the range of 10% to 90%.
2.2 Hard Disk Installation
Before you start:
Before installing a hard disk drive (HDD), please make sure the power is disconnected from the DVR. A factory recommended HDD should be used for this installation.
One or two SATA hard disks can be installed depending on different models.
Tools Required: Screwdriver.
Steps:
- Remove the cover from the DVR by unfastening the screws on the back and side.
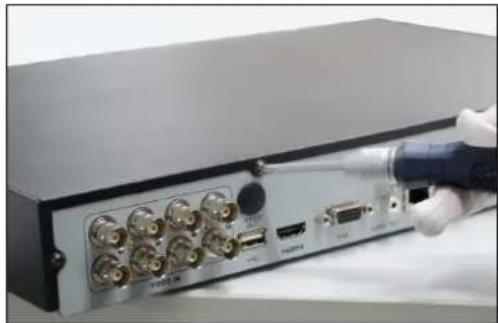
natural_image
Close-up of a server rack with multiple ports and connectors, being adjusted by a hand holding a pen (no visible text or symbols)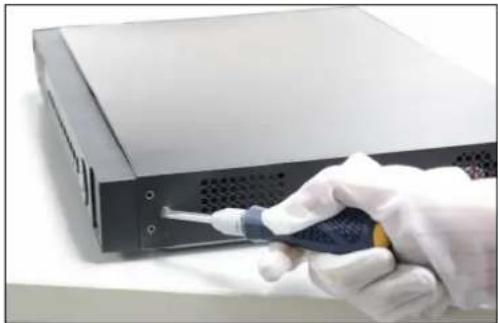
natural_image
Hand in white glove holding a screwdriver inserted into a server rack (no visible text or symbols)Figure 2.1 Remove the Cover
- Connect one end of the data cable to the motherboard of DVR and the other end to the HDD.
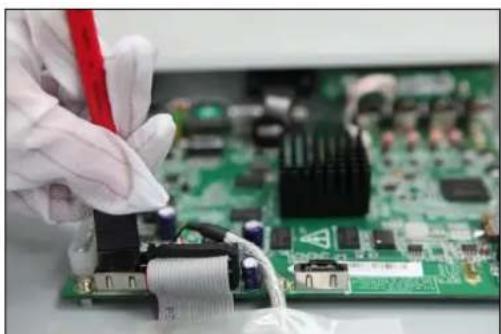
natural_image
Close-up of gloved hands holding a red tool next to a green printed circuit board (no visible text or symbols)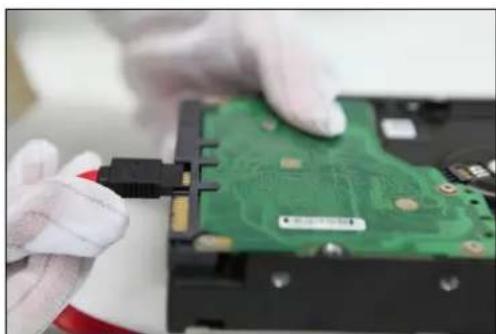
natural_image
Close-up of hands installing a green circuit board with a black connector (no visible text or symbols)Figure 2.2 Connect the Data Cable
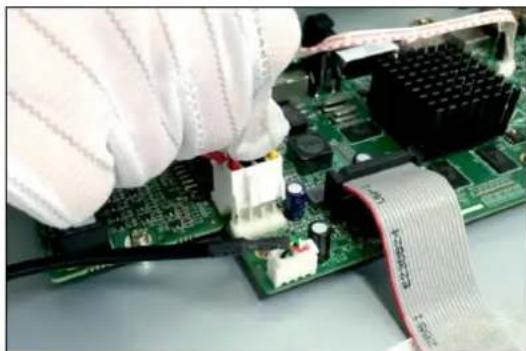
- Connect the power cable to the HDD.
natural_image
Close-up of gloved hands assembling a green circuit board with visible traces and components (no text or symbols)Figure 2.3 Connect the Power Cable
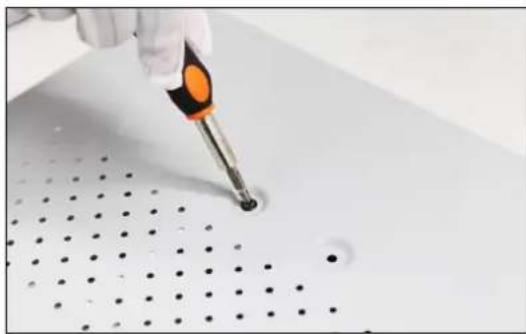
- Place the HDD on the bottom of the device and then fasten the screws on the bottom to fix the HDD.
natural_image
Close-up of a hand using a power tool to mark holes on a white surface with a perforated pattern (no text or symbols visible)Figure 2.4 Install the HDD
- Re-install the cover of the DVR and fasten screws.
2.3 RS-485 and Controller Connection
Typical Connection :
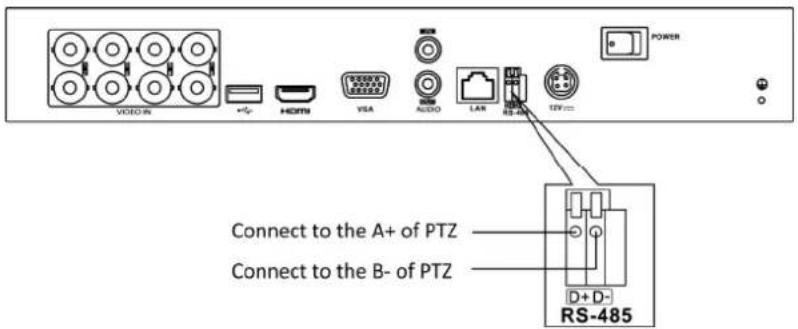
Figure 2.5 Controller Connection A
To connect PTZ to the DVR:
- Disconnect pluggable block from the RS-485 terminal block.
- Press and hold the orange part of the pluggable block; insert signal cables into slots and release the orange part. Ensure signal cables are in tight.
- Connect A+ on PTZ to D+ on terminal block and B- on controller to D- on terminal block. Fasten stop screws.
- Connect pluggable block back into terminal block.

Make sure both the controller and DVR are grounded.
2.4 HDD Storage Calculation Chart
The following chart shows an estimation of storage space used based on recording at one channel for an hour at a fixed bit rate.
| Bit Rate Storage Used | |
| 96K 42M | |
| 128K 56M | |
| 160K 70M | |
| 192K 84M | |
| 224K 98M | |
| 256K 112M | |
| 320K 140M | |
| 384K 168M | |
| 448K 196M | |
| 512K 225M | |
| 640K 281M | |
| 768K 337M | |
| 896K 393M | |
| 1024K 450M | |
| 1280K 562M | |
| 1536K 675M | |
| 1792K 787M | |
| 2048K 900M | |
| 4096K 1.76G | |
| 8192K 3.52G | |
| 16384K 7.03G |

Please note that supplied values for storage space used are just for reference. Storage space used is estimated by formulas and may have some deviation from actual value.
Chapter 3 Menu Operation
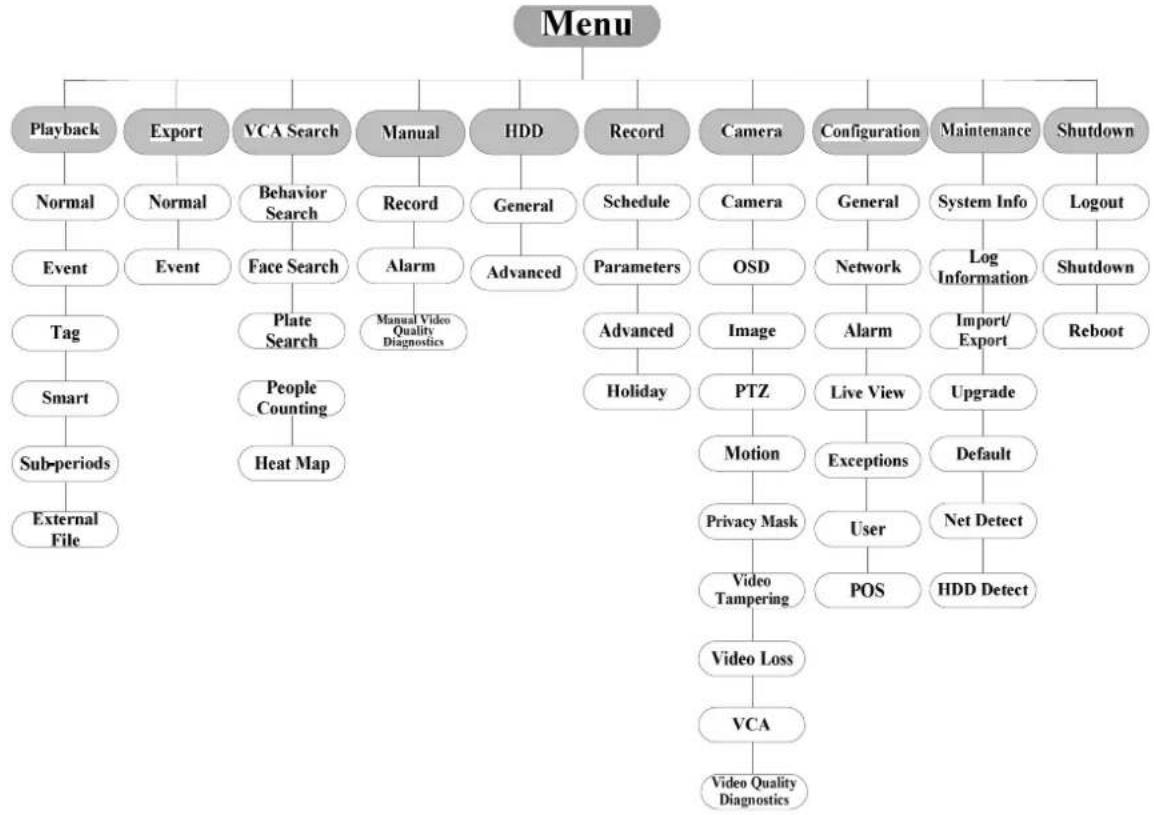
3.1 Menu Structure

The menu structure varies according to different models.
flowchart
graph TD
    A["Menu"] --> B["Playback"]
    A --> C["Export"]
    A --> D["VCA Search"]
    A --> E["Manual"]
    A --> F["HDD"]
    A --> G["Record"]
    A --> H["Camera"]
    A --> I["Configuration"]
    A --> J["Maintenance"]
    A --> K["Shutdown"]

    B --> L["Normal"]
    B --> M["Event"]
    B --> N["Tag"]
    B --> O["Smart"]
    B --> P["Sub-periods"]
    B --> Q["External File"]

    C --> R["Behavior Search"]
    C --> S["Face Search"]
    C --> T["Plate Search"]
    C --> U["People Counting"]
    C --> V["Heat Map"]

    D --> W["Record"]
    D --> X["General"]
    D --> Y["Alarm"]
    D --> Z["Advanced"]
    D --> AA["Manual Video Quality Diagnostics"]

    E --> AB["Schedule"]
    E --> AC["Parameters"]
    E --> AD["Advanced"]
    E --> AE["Holiday"]

    AF["Camera"] --> AG["OSD"]
    AF --> AH["Image"]
    AF --> AI["PTZ"]
    AF --> AJ["Motion"]
    AF --> AK["Privacy Mask"]
    AF --> AL["Video Tampering"]
    AF --> AM["Video Loss"]

    AI --> AN["Image"]
    AI --> AO["Live View"]
    AI --> AP["Exceptions"]
    AI --> AQ["User"]
    AI --> AR["POS"]

    I --> AS["General"]
    I --> AT["Network"]
    I --> AU["Alarm"]
    I --> AV["Upgrade"]

    J --> AW["System Info"]
    J --> AX["Log Information"]
    J --> AY["Import/ Export"]

    K --> AZ["Logout"]
    K --> BA["Shutdown"]

    AL --> BB["Default"]
    AL --> BC["Net Detect"]

    AM --> BD["HDD Detect"]
Figure 3.1 Menu Structure
3.2 Startup and Shutdown
Proper startup and shutdown procedures are crucial to expanding the life of the DVR.
To start your DVR:
- Check the power supply is plugged into an electrical outlet. It is HIGHLY recommended that an Uninterruptible Power Supply (UPS) be used in conjunction with the device. The Power button on the front panel should be red, indicating the device is receiving the power.
- Press the POWER button on the front panel. The Power LED should turn blue. The unit will begin to start.
After the device starts up, the wizard will guide you through the initial settings, including modifying password, date and time settings, network settings, HDD initializing, and recording.
To shut down the DVR:
- Enter the Shutdown menu.
Menu > Shutdown
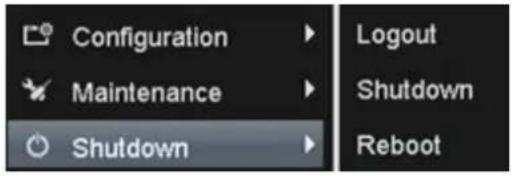
Figure 3.2 Shutdown
-
Select the Shutdown button.
-
Click the Yes button.
3.3 Activating Your Device
Purpose:
For the first-time access, you need to activate the device by setting an admin password. No operation is allowed before activation. You can also activate the device via Web Browser, SADP or client software.
Steps:
- Input the same password in the text field of Create New Password and Confirm New Password.
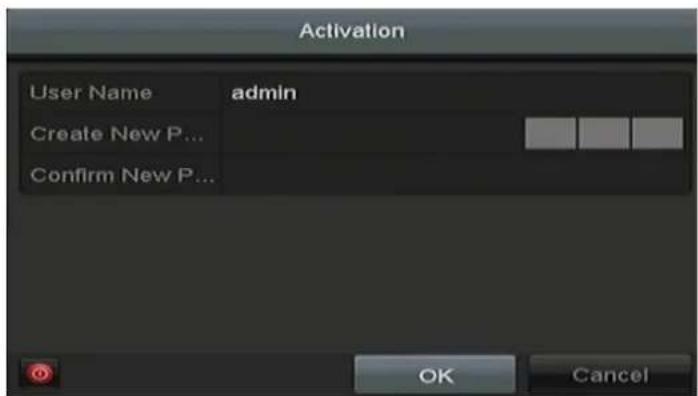
Figure 3.3 Set Admin Password

STRONG PASSWORD RECOMMENDED- We highly recommend you create a strong password of your own choosing (using a minimum of 8 characters, including upper case letters, lower case letters, numbers, and special characters) in order to increase the security of your product. And we recommend you reset your password regularly, especially in the high security system, resetting the password monthly or weekly can better protect your product.
- Click OK to save the password and activate the device.

For the old version device, if you upgrade it to the new version, the following dialog box will pop up once the
device starts up. You can click YES and follow the wizard to set a strong password.
3.4 Login and Logout
3.4.1 User Login
Purpose:
You have to log in to the device before operating the menu and other functions.
Steps:
- Select the User Name in the dropdown list.
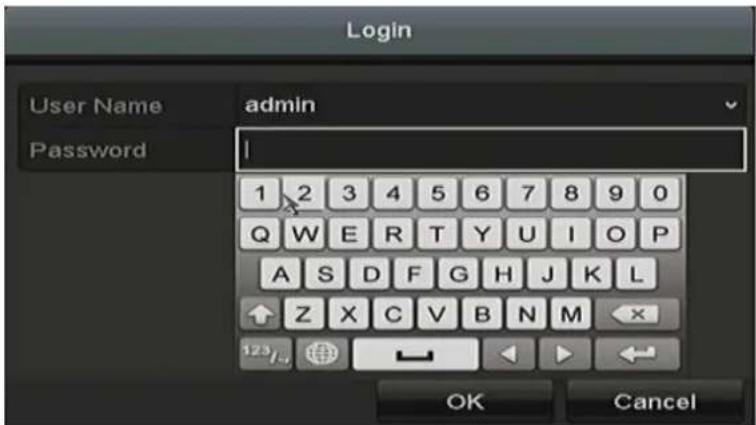
Figure 3.4 Login
- Input Password.
- Click OK to log in.

In the Login interface, for the admin, if you have entered the wrong password for 7 times, the account will be locked for 60 seconds. For the operator, if you have entered the wrong password for 5 times, the account will be locked for 60 seconds.
3.4.2 User Logout
Purpose:
After logging out, the monitor turns to the live view mode and if you want to perform any operations, you need to enter user name and password log in again.
Steps:
- Enter the Shutdown menu.
Menu > Shutdown
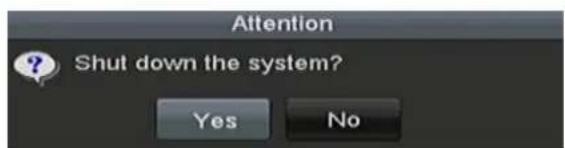
Figure 3.5 Logout
2. Click Logout.

After you have logged out the system, menu operation on the screen is invalid. It is required to input a user name and password to unlock the system.
3.5 Configuring the Signal Input
After the startup and login, the device system enters the Wizard for configuring the signal input.
Steps:
-
Check the checkbox to select different signal input types: TVI, AHD/CVBS or IP.
-
Click Apply to save the settings.

You can also click Menu > Camera > Signal Input Status to configure the signal input.
Steps:
- Enter the Signal Input Status interface.
Menu > Camera > Signal Input Status
- Check the checkbox to select different signal input types: TVI, AHD/CVBS or IP.
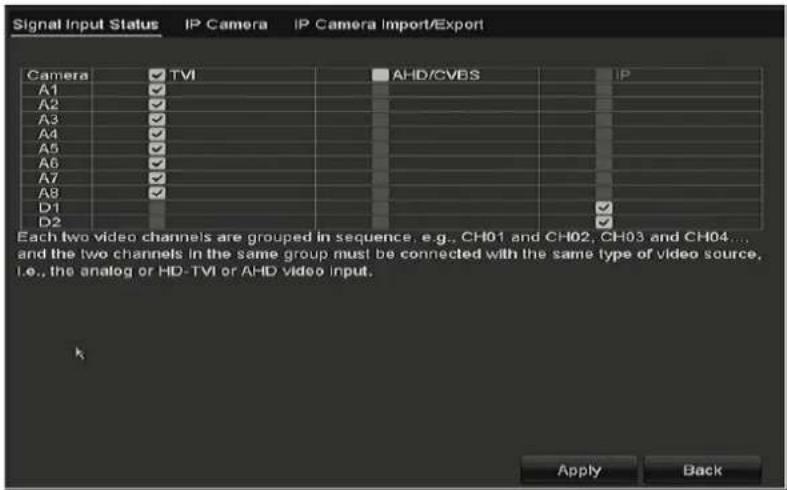
Figure 3.6 Configure Signal Input Type
3. Click Apply to save the settings.

● Each two video channels are grouped in sequence, e.g., CH01 and CH02, CH03 and CH04, etc., and the two channels in the same group must be connected with the same type of video source, i.e., the analog or HD-TVI or AHD video input.
- In the live view interface, when there is no video signal of the analog channel, the corresponding connectable video signal type message can be displayed on the screen.
3.6 Using the Setup Wizard
The Setup Wizard can walk you through some important settings of the device. By default, the Setup Wizard starts once the device has loaded.
Check the checkbox to enable Setup Wizard when device starts. Click Next to continue the setup wizard. Follow the guide of the Setup Wizard to configure the system resolution, system date/time, network settings, HDD management, record settings, etc.
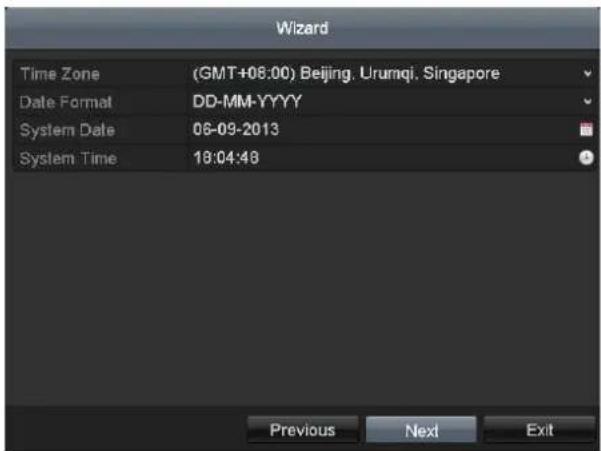
Figure 3.7 Wizard
3.7 Network Settings
Purpose:
Network settings must be properly configured before you operate DVR over network.
Steps:
- Enter the Network Settings interface.
Menu > Configuration > Network
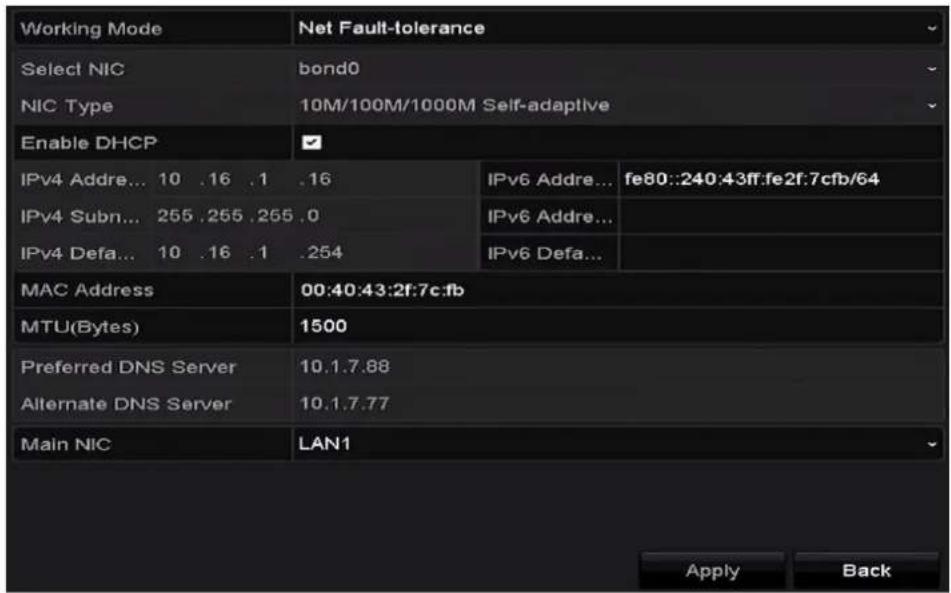
Figure 3.8 Network Settings
- Select the General tab.
- In the General Settings interface, you can configure the following settings: NIC Type, IPv4 Address, IPv4 Gateway, MTU and DNS Server. If the DHCP server is available, you can check the checkbox of DHCP to automatically obtain an IP address and other network settings from that server.
- After having configured the general settings, click the Apply button to save the settings.
3.8 Adding IP Cameras
Purpose:
Before you can get live video or record the video files, you should add the network cameras to the connection list of the device.
Before you start:
Ensure the network connection is valid and correct, and the IP camera to add has already been activated. Please refer to the User Manual for activating the inactive IP camera.
You can select one of the following three options to add the IP camera.
• OPTION 1:
Steps:
- Select the Add IP Camera option from the right-click menu in live view mode or click Menu> Camera> Camera to enter the IP camera management interface.
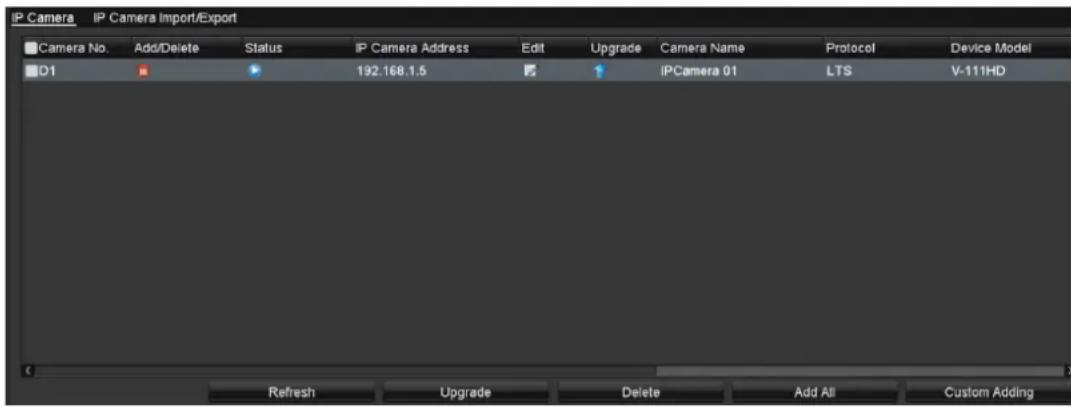
Figure 3.9 IP Camera Management
- Select the IP camera from the list and click the button to add the camera (with the same admin password of the DVR's), or click the Custom Adding button to pop up the Add IP Camera (Custom) interface.
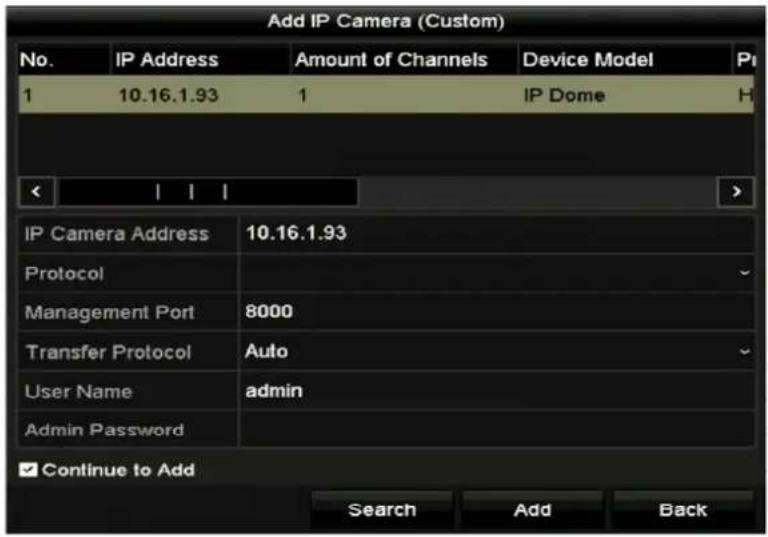
Figure 3. 10 Add IP Camera
- Select the detected IP camera and click the Add button to add it directly, and you can click the Search button to refresh the online IP camera manually.
Or you can choose to custom add the IP camera by editing the parameters in the corresponding text field and then click the Add button to add it.
3.9 Live View
Some icons are provided on screen in Live View mode to indicate different camera status. These icons include:
Live View Icons
In the live view mode, there are icons at the right top of the screen for each channel, showing the status of the record and alarm in the channel, so that you can find problems as soon as possible.

Indicating that there is an alarm or are alarms. Alarm includes video loss, tampering, motion detection or sensor alarm, etc.

Recording (manual record, continuous record, motion detection or alarm triggered record)

Alarm & Recording

Event/Exception (event and exception information, appears at the lower-left corner of the screen.)
3.10 Recording Settings
Before you start:
Make sure that the disk has already been installed. If not, please install a disk and initialize it. You may refer to the user manual for detailed information.
Purpose:
Two kinds of record types are introduced in the following section, including Instant Record and All-day Record. And for other record types, you may refer to the user manual for detailed information.

After rebooting all the manual records enabled are canceled.
Steps:
- On the live view window, right lick the window and move the cursor to the Start Recording option, and select Continuous Record or Motion Detection Record on your demand.
- Click the Yes button in the pop-up Attention message box to confirm the settings. All the channels will start to record in the selected mode.
3.11 Playback
The recorded video files on the hard disk can be played back in the following modes: instant playback, all-day playback for the specified channel, and playback by normal/event/smart/tag/sub-periods/external file search.
Steps:
- Enter playback interface.
Click Menu>Playback or select Playback from the right-click menu - Check the checkbox of channel(s) in the channel list and then double-click to select a date on the calendar.
- You can use the toolbar in the bottom part of Playback interface to control playing progress.
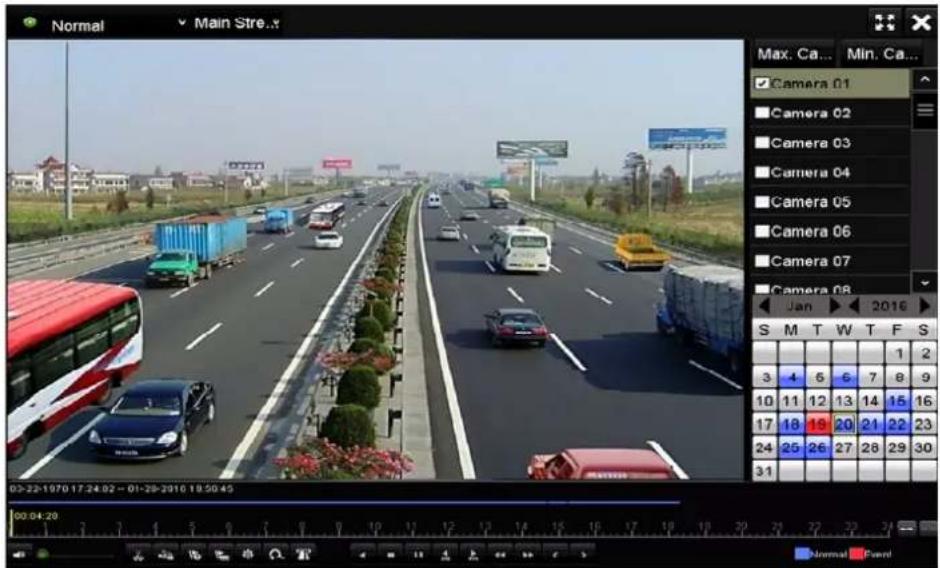
Figure 3.11 Playback Interface
- Select the channel(s) you want to play back by checking the checkbox(s), or execute simultaneous playback of multiple channels.
Chapter 4 Accessing by Web Browser

You shall acknowledge that the use of the product with Internet access might be under network security risks. For avoidance of any network attacks and information leakage, please strengthen your own protection. If the product does not work properly, please contact with your dealer or the nearest service center.
Purpose:
You can get access to the device via web browser. You may use one of the following listed web browsers: Internet Explorer 6.0, Internet Explorer 7.0, Internet Explorer 8.0, Internet Explorer 9.0, Internet Explorer 10.0, Apple Safari, Mozilla Firefox, and Google Chrome. The supported resolutions include 1024*768 and above.
Steps:
- Open web browser, input the IP address of the device and then press Enter.
- Log in to the device.
• If the device has not been activated, you need to activate the device first before login.
1) Set the password for the admin user account.
2) Click OK to log in to the device.

STRONG PASSWORD RECOMMENDED- We highly recommend you create a strong password of your own choosing (using a minimum of 8 characters, including upper case letters, lower case letters, numbers, and special characters) in order to increase the security of your product. And we recommend you reset your password regularly, especially in the high security system, resetting the password monthly or weekly can better protect your product.
- If the device is already activated, enter the user name and password in the login interface, and click the Login button.
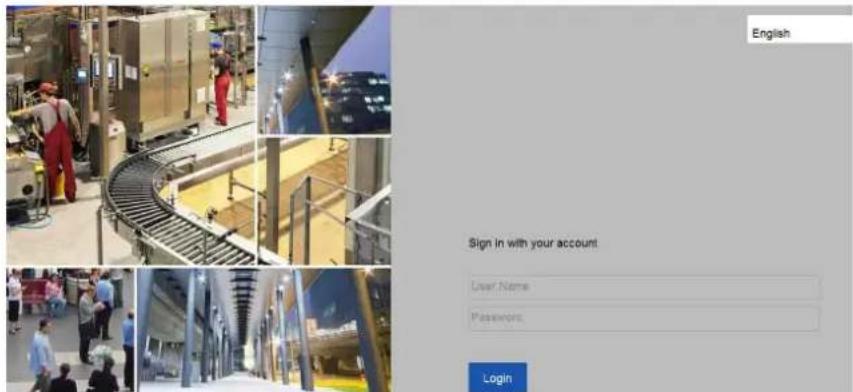
Figure 4.1 Login
- Install the plug-in before viewing the live video and managing the camera. Please follow the installation prompts to install the plug-in.

You may have to close the web browser to finish the installation of the plug-in.
After login, you can perform the operation and configuration of the device, including the live view, playback, log search, configuration, etc.
- Digital Video Recorder
- TABLE OF CONTENTS
- Chapter 1Description of Panels....6
- Chapter 2 Installation and Connections ...... 9
- Chapter 3Menu Operation....13
- Chapter 4 Accessing by Web Browser.... 21
- Quick Start Guide
- Legal Disclaimer
- Regulatory Information
- FCC Information
- FCC Conditions
- EU Conformity Statement
- Industry Canada ICES-003 Compliance
- Safety Instruction
- Warnings
- Preventive and Cautionary Tips
- Symbol Conventions
- Chapter 1 Description of Panels
- Front Panel
- Rear Panel
- Chapter 2 Installation and Connections
- DVR Installation
- Hard Disk Installation
- Before you start:
- RS-485 and Controller Connection
- HDD Storage Calculation Chart
- Chapter 3 Menu Operation
- Menu Structure
- Startup and Shutdown
- Activating Your Device
- Purpose:
- Steps:
- Login and Logout
- User Login
- User Logout
- Click Logout.
- Configuring the Signal Input
- Click Apply to save the settings.
- Using the Setup Wizard
- Network Settings
- Adding IP Cameras
- • OPTION 1:
- Live View
- Live View Icons
- Recording Settings
- Playback
- Chapter 4 Accessing by Web Browser
Brand : LTS
Model : LTD8504T-ST
Category : Voice recorder