RWS214 - Oven Caloric - Free user manual and instructions
Find the device manual for free RWS214 Caloric in PDF.


| Product Type | Electric Oven |
| Model | RWS214 |
| Brand | Caloric |
| Oven Type | Freestanding |
| Height | 36 inches |
| Width | 30 inches |
| Depth | 25 inches |
| Weight | 150 lbs |
| Power Source | 240V, 60Hz, 3500W |
| Capacity | 5.0 cu ft |
| Cooking Modes | Bake, Broil, Roast, Convection Bake, Convection Roast, Warm |
| Temperature Range | 170°F - 550°F |
| Self-Cleaning | Yes, with steam clean option |
| Interior Light | Yes |
| Timer | Up to 12 hours |
| Control Type | Digital display with knob controls |
| Safety Features | Auto shut-off, child lock, cool-touch door |
| Door Type | Glass door with multiple layers |
| Racks | 3 oven racks |
| Cleaning | Self-cleaning cycle and manual cleaning |
| Maintenance | Regular cleaning of door gasket, avoid abrasive cleaners |
| Warranty | 1 year parts and labor |
Frequently Asked Questions - RWS214 Caloric
User questions about RWS214 Caloric
0 question about this device. Answer the ones you know or ask your own.
Ask a new question about this device
Download the instructions for your Oven in PDF format for free! Find your manual RWS214 - Caloric and take your electronic device back in hand. On this page are published all the documents necessary for the use of your device. RWS214 by Caloric.
USER MANUAL RWS214 Caloric
DO NOT OBSTRUCT THE FLOW OF COMBUSTION AND VENTILATION AIR.
FOR YOUR SAFETY
DO NOT STORE OR USE GASOLINE OR OTHER FLAMMABLE VAPORS AND LIQUIDS IN THE VICINITY OF THIS OR ANY OTHER APPLIANCE.
FOR YOUR SAFETY
IF YOU SMELL GAS
- OPEN WINDOWS.
- SHUT OFF MAIN GAS SUPPLY VALVE.
- DON'T TOUCH ELECTRICAL SWITCHES.
- EXTINGUISH ANY OPEN FLAMES.
- IMMEDIATELY CALL YOUR GAS SUPPLIER.
You can be assured that your Caloric built-in oven has been design certified by the American Gas Association as being in compliance with safety standards established by the American National Standard Institute.
Owner's Reference
- Model Number ____ Serial Number ____
Color ____ Code ____
- Dealer's Name ____
Address ____ Phone ____
-
Date Purchased ____ Date Installed ____
-
Installer's Name ____
Address ____ Phone ____
- Dealer Recommended Service Center:
Name ____
Address Phone
Congratulations
Your new built-in unit is designed to give you enjoyment, pride and satisfaction and the best meals you have ever prepared.
Some of the best designs, engineering skill and workmanship in the world have gone into your built-in unit. This book will help you to understand it and to use it to its fullest advantage.
BEFORE YOU CALL FOR SERVICE:
We are assuming that proper installation was made and in accordance with all specifications and local cc and that the appliance has been properly grounded.
Your built-in unit is engineered to give you many years of service. It has been thoroughly tested before leave the factory. If properly cared for, your built-in unit should never require service. However, if your unit fails to form properly, we suggest you check the following before you call a service man.
If the oven light does not come on, check the following:
*Is the power cord plugged in?
*Is the bulb loose? If necessary, replace the bulb with a 40-watt heat resistant bulb. Do not use an ordin light bulb.
If the oven does not heat, check the following:
*Is the oven thermostat set to the desired temperature?
*Is the clock in manual operation?
If the oven does not heat to temperature . . . "electrical failure". If the bake/broil burner on the range will operate, there may be an electrical failure. Electrical continuity to the unit may be checked by operating one the electrical features on the unit such as oven light, buzzer on the clock timer, etc.
If these features do not operate, electrical continuity to the unit has been interrupted and should be checked the electrical features still do not operate, more than an electrical failure is involved and you should contact your local service source for assistance.
Burner cycles off and on during broiling:
This is a normal condition. Cycling of the burner occurs when you broil for longer times and may occur near t end of the broiling time.
The oven thermostat has been precisely preset at the time of manufacture with precision instruments. Cor parative baking results with a prior-owned appliance does not necessarily indicate improper calibration. To avo costly service "check-out", a simple box cake mix test should be performed following the manufacturer's cal mix recipe to the letter as indicated on the package.
If service is required, contact an authorized Caloric service center in your area at:
| New York City & Connecticut | 800-631-0700 |
| Northern New Jersey | 201-288-1010 |
| Southern New Jersey | 800-523-2210 |
| Southern Pennsylvania | 215-672-7440 |
| Massachusetts & Rhode Island | 800-822-0088 |
| Chicago & Suburbs | 708-860-2688 |
| Los Angeles & Vicinity | 213-531-1283 OR 800-876-4242 |
In all other areas, contact your selling dealer, your local yellow pages or white pages for an authorized Caloric service center, OR contact Caloric Corporation, Consumer Relations Dept. at 215-682-4211.
TABLE OF CONTENTS
Safety Precautions
Introduction to the Built-In Unit
Elements of Baking and Broiling
Broiling
Broiling Chart
Recipes
Baking
Baking Chart
Recipes
Keeping Food Warm
Keep-Warm Oven Chart
Roasting
Roasting Guide
Model Special Features
Rotisserie Cooking
Recipes
Rotisserie Cooking Chart
General Care and Cleaning
Warranty
Appliance Maintenance Agreement
Authorized Parts Distributor List
inside back cover
SAFETY PRECAUTIONS
Read before operating your unit
Accidents are always tragic, especially because so many of them could have been prevented with a little care and judgement. Here are some basic good practices we hope you will follow for safe use of your unit:
- Be sure your unit is installed by a qualified technician and is properly grounded.
- Never use your unit for warming or heating the room. This warning is based on safety considerations.
- Be careful when reaching into storage cabinets above unit while it is operation. One might accidentally contact a hot unit when using a hand for support.
- Do not repair or replace any part unless specifically recommended in the manual. All other servicing should be referred to a qualified service technician.
- Flammable materials should not be stored near your unit.
- Do not use water on grease fires. Smother fire or flame or use dry chemical (such as baking soda) or foam type extinguisher.
- Use only dry potholders. Moist or damp potholders on hot surfaces may result in burns from steam. Do not use a towel or other bulky cloth.
- Children should not be left alone or unattended in area where the unit is in use. They should never be allowed to sit or stand on any part of the appliance.
- Be sure the burner is turned completely "OFF" when you have finished cooking.
- Always remove the broiler pan and grid immediately after broiling. It will make them easier to clean and eliminates the possibility of the grease catching fire the next time your unit or broiler is in use.
- Do not use "non stick" type sprays which dispense the contents of the can by utilizing internal pressure (aerosol type containers) near your unit. Test results have shown the "overspray" deposited on unit parts which become heated during later use, will permanently discolor. Corrosion on painted and plated surfaces could also occur, dependent upon the type of propellant used to dispense the contents of the can.
- Always be certain that the unit parts are cool before touching them with hands not protected by a potholder.
- Pulling out oven racks is a convenience when lifting heavy foods, but is also a precaution against possible burns from touching hot oven surfaces.
- Always allow the rush of hot air to escape from the heated unit before leaning into the oven opening or before removing or placing food in the oven.
- Aluminum foil, used improperly, is the cause of many fires - as well as baking problems. Use foil only as instructed -particularly in the broiler. Holes in the broiler pan or in the air openings in the oven bottom should never be covered with foil.
- Do not heat unopened food containers - build-up of pressure may cause container to burst and result in injury.
- Keep vent ducts unobstructed.
- GREASE - Grease is flammable and should be handled carefully. Never leave any cooking operation unattended. Let fat cool before attempting to handle it. Do not allow grease to collect around the unit or in vents. Wipe spillovers immediately.
- DO NOT drape towels or any materials on oven door handles. These items could ignite causing severe burns.
INTRODUCTION TO THE BUILT-IN UNIT
To get the most from your built-in unit you should understand its control, its features, its operation, its use and care.
The oven and broiler are designed for easy use and once you have become familiar with them you will appreciate their convenience and efficiency.
Elements of Baking and Broiling
CONTROLS - As the controls vary from model to model we will not attempt to explain each of them here. We suggest you read the following general information and the basic broiling and baking sections before trying the special features of your own unit. Since all operations of the built-in unit require the use of the oven temperature control dial, we will give you a brief explanation of this control now.
OVEN TEMPERATURE CONTROL - The oven temperature control dial is located on the right side of the control panel. It is used for all baking and broiling. The knob is turned counter-clockwise to operate the control.
All pilotless ignition built-in gas wall ovens have an oven "ON" light which lights anytime the oven heat control is turned "ON". The indicator light cycles on and off as the thermostat maintains the selected temperature. Look closely at the temperature control dial. You will notice the first area is marked "Keep-Warm". This has temperature markings of 140° to 200° . This portion of the control is designed to allow you to hold cooked food at serving temperatures until you are ready to serve it. Additional details of this feature appear later in the book.
The next portion of the dial is marked from 250° to 550° in 25° increments. This portion of the dial is used to bake and roast.
The last mark on the dial is "BROIL". This is used when you are broiling food in the lower compartment. When the dial is in this position, the burner will remain on continuously (except during extended broiling, when the burner will cycle "ON" and "OFF") for the best broiling results.
Do not attempt to clean the oven/broiler burner ignitor assembly.
The oven bottom can be removed by grasping it on both sides and pushing to the rear until the front tabs spring free. Then lift up and out. Reverse the procedure to reinstalli.
Be careful not to chip the front frame by dragging parts across front frame.
The oven and broiler doors are removable. Open the door to the intermediate stop position (open approximately 4"). Grasp both sides of the door and lift off the hinges.
To replace the door, hold it over the hinge arms with the two slots in the bottom of the door lined up with the hinges. Slide the door downward as far as it will go. The door can only be removed from the intermediate position.
The oven light bulb (not on all models) can be easily replaced. Be sure the oven is cool before replacing the bulb. Unscrew the bulb from the socket in the top right rear corner of the oven compartment. Replace with a 40-watt appliance bulb.
The oven/broiler ignition system utilizes an electric ignitor, rather than a constant burning gas pilot, to light the burner.
If the control is set properly and the burner does not light, see instructions under "Electrical Failure".
The oven racks slide easily. They are equipped with a locking device which prevents them from sliding completely out of the oven compartment until you tilt them up after sliding them out as far as they will go.
USING THE BROILER
Removing the broiler pan from the compartment as soon as you are finished broiling is another good practice. It makes the pan much easier to wash and then there will be no chance that the pan and drippings will be forgotten and possibly catch fire if the oven is used without removing the broiler pan.
To use your broiler, set the thermostat dial (counter-clockwise) to "Broll". The burner lights automatically. Remember all broiling is done with the door closed.
If the control is properly set and the burner does not light, see instructions under "Electrical Failure". Good broiling results depend upon three things:
- The time for actual brolling.
- The distance of the food from the broiler burner. The proper distance is determined by the degree of "doneness" desired and the broiling time. For a charred exterior and a rare interior, place the food close to the flame for a shorter cooking time; for welldone...further away and longer. Placing the food closer to the flame increases spattering and the possibility of fats and meat juices igniting.
- Preparation of the food for brolling.
USEFUL INFORMATION FOR BROILING
Be sure to turn the oven thermostat dial all the way to "Broil" to start. The oven heat control may now be turned to any of the "oven temperature" settings for reduced temperature broiling.
Use the broiler pan and grid supplied with the range for all broiling.
NEVER COVER THE BROILER GRID OPENINGS WITH ALUMINUM FOIL! If desired, a sheet of aluminum foil can be used to line the broiler pan. Be sure the foil follows the contour of the bottom of the pan and does not come up and touch the bottom of the grid, blocking the openings. The trapped grease drippings may become hot enough to ignite.
DO NOT USE DISPOSABLE BROILER PANS. The broiler pan must have two parts - tha pan and the grid. The grid keeps the drippings cool, otherwise, juices may become hot enough to ignite.
The broiler pan and grid provided with your unit have been scientifically designed to use with the broiler. Substitute broiler pans and grids should never be used.
Close the door completely for all broiling.
Foods generally broiled include steaks, hamburgers, chicken, fish, lamb chops, fruit and vegetables. Pork and veal should not be broiled because these meats require longer cooking at lower temperatures to develop their full flavor and tenderness and to be eaten safely.
Remove excess fat from the meat before broiling: Slash the fat around the edges of steaks and chops to prevent curling.
Most meats are turned once during broiling - after the top side is done. Fish does not require turning and is broiled with the skin side down.
Do not pierce meats with sharp instruments during broiling. Season meats when browned - not before cooking.
Broiled foods may be kept ready to serve in the "Keep-Warm" oven after broiling. After broiling is complete, turn the thermostat dial to 170° (Keep-Warm). Place the broiled food on a serving platter, cover loosely and place in the oven. Leave the door open about 10 minutes so the oven will cool to 170°.
The burner on this unit will cycle on and off many times every minute (after it has been on about 15 minutes). This cycling permits extremely accurate temperature control for best broiling results and in no way impairs broiling.
Do not place plastic plates in the oven when keeping foods warm!
BROILING TIMES - The time required to broil a particular type of food will vary depending on the thickness of the cut of meat and the distance from the burner. The closer to the burner the more quickly the meat cooks.
For example, an average steak (1" thick) should be broiled 4 to 6 minutes on each side for meat which will be "rare". If you prefer your meat more well done, then allow several more minutes per side. A chart of approximate broiling times is included in this booklet to help you determine the proper cooking time.
ULTRA-RAY (SCREEN TYPE) BROILERS — IMPORTANT: DO NOT PREHEAT

The effective useful cooking area of the broiler is reduced when you use the higher rack positions. The Ultra-Ray burner uses infra-red rays to cook the food, and the infra-red rays can travel only in straight lines. In the higher rack positions, the rays cannot reach all corners of the broiler grid.
In the top (#1) rack position the infra-red rays cover about 50% of the broiler grid area. In the middle (#2) rack position you can use about 75% of the grid area. In the bottom (#3) rack position the broiler burner covers 100% of the broiler grid area.
It is not necessary to preheat the broiler before using. However, if meats are to be cooked "rare" remove the broiler pan and grid and preheat broiler for five minutes.
BROILING CHART
| FOOD | TOTAL BROILING TIME (MINUTES) | FOOD | TOTAL BROILING TIME (MINUTES) |
| BEEF | FISH | ||
| Steaks (1" thick) | Fillets or Steaks | 10 | |
| Rare | 10 | ||
| Medium Rare | 11 | LAMB | |
| Medium | 12-14 | Chops or Steaks | |
| Well done | 20 | 1" thick | 8-10 |
| Steaks (1 1⁄2" thick) | 1 1⁄2" thick | 12-14 | |
| Rare | 15 | 2" thick | 14-16 |
| Medium | 20-25 | PORK (Cured) | |
| Well done | 30 | Bacon | 10 |
| Steaks (2" thick) | Ham Slice "Cook Before Eating" | ||
| Rare | 25 | 1⁄2" thick | 10-20 |
| Medium | 30-35 | 1" thick | 20-30 |
| Well done | 40 | Ham Slice "Fully Cooked" | |
| Ground Beef Patties (3⁄4" to 1" thick) | 8-15 | 1⁄2" thick | 8-12 |
| 1" thick | 14-18 | ||
| FRUIT | |||
| Grapefruit, Peach or Tomato Halves | 8-12 |
INFRA-RAY (TUBE TYPE) BROILERS — IMPORTANT: PREHEAT FOR FIVE MINUTES
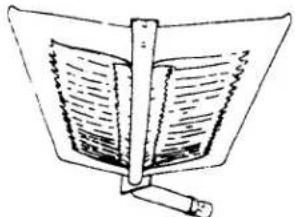
The above pictorial view illustrates a correctly adjusted broil burner. It should be checked regularly to obtain best possible performance from your range.
TO BROIL WITH THE INFRA-RAY GAS BURNER
Turn oven thermostat to BROIL and allow the broil burner to preheat for 5 minutes. This heats the special cerat coating on the burner reflector which then radiates the heat rays into the food.
To sear meat, place broiler pan at one of the higher rack positions so that meat is very near the flame. Sn steaks, hamburger patties, etc., may be broiled in the higher rack positions. To cook large steaks and other th cuts of meat well done, they may be moved to a lower rack position after searing, or you may reduce it temperature if you have variable-broil.
OVEN BROILING:
The table below contains suggested time for broiling various cuts of meat with the Infra-Ray Burner. These times may be varied to suit the individual taste.
| Food | Size | Oven Runner | Time in Minutes | |
| 1st Side | 2nd Side | |||
| Bacon | ||||
| Beef, Ground | Thin | Top | 4-6 | |
| Beef, Steak | 1" Thick | Top | 6 | 4 |
| Rare | ||||
| Medium | Top | 3 | ||
| Well | 3/4-11/4" | Top | 5 | 2 |
| Rare | Middle | 7 | 3 | |
| Medium | Top | 6 | 5 | |
| Well | 11/4-2" | Top | 8 | 4 |
| Chickem | Middle | 12 | 6 | |
| 2lb. Split | Middle | 25-30 | 12 | |
| Fish | Pieces | Middle | 15 | 10-15 |
| 1/2" Fillet | Top | 7-9 | 12 | |
| Ham | 11/2 lb. Whole | Top | 10 | (Skin side down) |
| Lamp Chops | 1/2" Thick | Top | 6 | 5 |
| Pork Chops | 1/2" Thick | Top | 6 | 4 |
| 1/2" Thick | Top | 6 | 4 | |
BROILING RECIPES
To familiarize yourself with your broiler you will want to try it. We suggest you try a simple food dish first to become familiar with the unique broiling capabilities.
The following is a list of some broiling recipes you may want to try. Some are simple and quick to prepare. Others will appeal to the gourmet in you. Happy broiling ...
BROILED BACON
Place bacon strips
The broiler strips on the broiler grid. Place the broiler pan and grid is
Turn the thermostat dial to "BROIL". Set the minimum degree of the bronchial pan and grid in the lowest rack position.
degree of "doneness". Cook the bacon longer if you wish to have it
Remove the broiler pan and grid from it.
dial is turned to "OFF".
BROILED SIRLOIN STEAK
Use a 2 or 2 1/2 lb. boned sirloin steak about 1" thick.
Trim off the excess fat from the edges of the steak and cut the edges of the meat to prevent curling. Put the steak on the broiler grid and place the pan and cut the
Broil about 6 minutes on the first side, season, then turn and rise to a steak.
BROILED FISH
Drain fish fillets or steaks and pat dry with paper towels. Grease broiler grid lightly. Sprinkle fish with lo or desired seasoning and baste with melted butter.
Place fillets and fish steaks about 3½" from the burner. Broil about 10 to 15 minutes, depending on thickness longer if the fish is more than 1" thick. DO NOT TURN!
NOTE: When broiling fish with skin, place the skin side down.
BROILED CHICKEN
Select a young broiling chicken no more than two pounds. Split length-wise and break into the broiler grid.
Brush the chicken with melted butter and set oven temperature control for a
Put the chicken on the middle or lowest temperature control for 400° - 425°.
for 13-18 minutes or until chicken is browned.
Turn skin side up, brush with melted butter and broil for 20-30 minutes or until skin is browned and meat is well cooked.
BAKING
Baking is a delicate and precise art. Your built-in unit is engineered to give you the precise temperatures and perfectly controlled baking conditions which are vital to your baking success.
GENERAL INSTRUCTIONS
For the best baking results, preheat the oven before cooking. Turn the oven to
Turn the oven temperature control dial to the desired temperature and allow the oven to heat to this temperature. (Allow about 10-15 minutes.)
NEVER USE ALUMINUM FOIL ON THE OVEN BOTTOM OR OVEN RACKS AS IT WILL HINDER HEAT CIRCULATION.
One or both oven racks can be used during baking. Never place baking utensils directly on the oven bottom.
As you know, precise baking times and temperatures are very important to assure fine baking results. Be sure you check very carefully the prescribed baking time and temperature designated for each recipe you use. Follow the recipe instructions exactly, making changes only for the various utensil materials as described in the following section on utensils.
UTENSILS
Follow the recipe instructions for the pan or casserole size. As a general rule cake pans should only be two-thirds full to prevent the batter from running over the sides.
Glass baking utensils require lower oven temperatures - usually 25 degrees lower.
Pyrex, granite, tin or cast iron utensils tend to absorb heat which may permit lower temperatures during baking.
Use baking pans which are flat. Pans which are out of shape cause uneven browning.
UTENSIL PLACEMENT
The heated air in the oven must be allowed to circulate freely. Always allow a space of one and one-half (1½) inches between each utensil and between the utensils and the oven walls.
Never place one cake layer directly over another. Arrange the pans so they are staggered within the oven.
Never try to bake a pie or cake in the oven at the same time as a roast, pudding or uncovered casserole. The moisture in these types of food will interfere with the proper baking of your pastry.

TRYING YOUR OVEN
The information supplied below is based on a basic unit with no automatic features. The additional features are explained later in this book.
To use the oven, turn the thermostat dial to the desired temperature setting. The burner will light automatically. (If for some reason the burner does not light, refer to "Before You Call For Service" in this book.) Allow about 15 minutes for the oven to reach the selected temperature.
Now that you have read the section pertaining to the features, we can proceed ...
Every unit is supplied with two (2) oven racks which are easily removed. They can be inserted at various levels in the oven interior depending on which rack "ribs" you use. Try taking the oven racks out and sliding them in at different levels in the oven.
A broiler pan and grid are located in the compartment below the oven compartment. Always remove the broiler pan and grid and wash them when finished using. A possible fire hazard could exist if soiled pans are left in the broiler compartment. Also, any drippings on the grid will become baked on and will be very difficult to remove. If the broiler pan and grid are clean they need not be removed from the broiler compartment during baking operations.
BAKING CHART
| CAKES | OVEN TEMP. | COOKING TIME |
| Angel Food | 325° | 1-1 1/4 hours |
| Butter Cakes | ||
| Cupcakes-Large | 375° | 20-25 minutes |
| Small | 400° | 15-20 minutes |
| Layer Cakes-Chocolate | 350° | 30-35 minutes |
| Other flavors | 350°-375° | 25-30 minutes |
| Loaf | 350° | 45-60 minutes |
| Pound | 325° | 1-1 1/4 hours |
| Fruit Cakes | ||
| Tube pans- | ||
| 2 1/2 lbs. in 1 1/2 qt. pan | 250°-275° | 2 hours |
| 4 1/2 -5 lbs. in 3 qt. pan | 250°-275° | 3 1/2 -4 hours |
| 7-8 lbs. in 4 1/2 qt. pan | 250°-275° | 5-6 hours |
| Loaf pans- | ||
| 2 lbs. in one 1/2 pint pan | 250° | 2 hours |
| 3 1/2 lbs. in 2 qt. | ||
| 9" x 5" x 3" pan | 250° | 3 1/2 hours |
| PIES | ||
| Pastry-Shell | 450° | 12-15 minutes |
| Double Crust-Berry or Fruit | 425° | 35-45 minutes |
| Custard or Pumpkin | 450° | 10 minutes |
| then 350° | 25-35 minutes | |
| BREAD | ||
| Biscuits, Baking Powder | ||
| Sweet milk | 450° | 12-15 minutes |
| Sour milk | 475° | 10-13 minutes |
| Corn Bread | ||
| Muffins and Sticks | 425° | 20-30 minutes |
| Loaf | 425° | 30-60 minutes |
| Muffins | 425° | 20-30 minutes |
| Nut and Fruit Breads | 350° | 50-60 minutes |
| Popovers | 425° | 40 minutes |
| Yeast Bread - Loaf | 375°-400° | 45-60 minutes |
| Yeast Coffee Cake | 375° | 25-30 minutes |
| Yeast Rolls | 400°-425° | 15-20 minutes |
| Yeast Rolls, sweet | 375° | 20-35 minutes |
| COOKIES | ||
| Chocolate | 375° | 8-15 minutes |
| Molasses | 375° | 8-15 minutes |
| Other Cookies | 400° | 7-12 minutes |
| MISCELLANEOUS | ||
| Baked Beans (pre-soaked) | 275° | 6-8 hours |
| Baked Potatoes | 425° | 3/4 - 1 1/4 hours |
| Brown and Serve Rolls | 400° | 7-10 minutes |
| Casserole Dishes | ||
| of Cooked Foods | 375° | 20-25 minutes |
| Cream Puffs | 425° | 35-45 minutes |
| Custards (Bake in pan con- taining 1" hot water) | ||
| Individual | 350° | 30-40 minutes |
| Large (1 qt.) | 350° | 1-1 1/4 hours |
| Eclairs | 425° | 35-45 minutes |
| Meringue on Pies or | 325° | 15-20 minutes |
| Puddings | or 425° | 4 minutes |
| Scalloped Potatoes (raw) | 325° | 1 1/2 -2 hours |
| Souffles | 325° | 45-60 minutes |
Since the best way to become familiar with the operation of your oven is to use it, we suggest you try one or more of the following recipes.
BARBECUED SHORT RIBS
Cooking Temperature - 275° Ingredients -
3 to 4 lbs. beef short ribs
1½ teaspoons salt
1/2 teaspoon pepper
1 can (8 oz.) tomato juice
Cooking Time - 4 to 5 hours
1 tablespoon instant minced onion
2 tablespoons molasses
2 tablespoons sugar
Sprinkle the salt and pepper over the short ribs; place ribs in a large casserole dish. Combine the remaining ingredients in a saucepan and simmer with a low flame on the top burners for 5 minutes. Pour the sauce over the meat, cover and bake in preheated oven at 275° for 4 to 5 hours or until very tender. Skim the fat from the sauce before serving. Serves 4.
DUTCH APPLE CAKE
Cooking Temperature - 375° Ingredients -
1¼ cup sifted flour
3/4 teaspoon baking powder
1/2 teaspoon salt
1 teaspoon sugar
Cooking Time - 50 minutes
1/4 cup butter or margarine
1 egg yolk, beaten
*3 cups pared apple wedges about
3/4'' thick
*Other fresh fruits such as peaches, rhubarb, blueberries, etc., may be substituted for apples.
Sift the flour with baking powder, salt and sugar. Cream butter, add sifted ingredients and blend. Combine egg yolk and milk, add to butter mixture and mix. Press the entire mixture into the bottom and about 1 inch up the sides of an 11 x 7 x 1½" pan. Press the apple wedges into the dough, overlapping slightly.
Sprinkle with Topping (see below) and bake in preheated 375° oven about 50 minutes or until the apples are done. Makes 1 cake. Serve topped with sherbert or ice cream.
TOPPING
1/4 cup sugar
1/4 teaspoon cinnamon
1½ tablespoons flour
2 tablespoons butter
Mix the sugar, flour and cinnamon. Cut in the butter until the mixture resembles coarse crumbs.
KEEPING FOOD WARM
In today's busy society it is not always possible, or desirable, to remove food from your oven and serve it as soon as cooking is complete. Therefore, you will from time to time wish to keep food warm until you are ready to eat.
All built-in units have a manual keep-warm oven feature. If you will look closely at the oven temperature control dial you will see an area of 140° to 225° marked "Keep-Warm". These low settings can be helpful in many ways.
If you wish to use the Keep-Warm feature immediately after baking at a higher temperature, turn the oven control dial to the desired Keep-Warm setting and open the oven door for 10 to 15 minutes to allow the excess heat to escape.
As foods vary greatly in moisture content and ideal serving temperatures, consult the accompanying temperature chart for the correct Keep-Warm settings (units with an automatic Cook-and-Keep-Warm system keep food at 170°).
Arrange the food for serving later on platters. When set at Keep-Warm, the oven will not damage china.
NOTE: If you plan to keep food warm on a platter be sure the oven has cooled after baking BEFORE placing the platter in the oven. Do not use plastic platters or serving trays or sliver in the Keep-Warm oven!
To prevent moist foods such as cooked vegetables, mashed potatoes, gravy, yeast rolls, biscuits, etc. from drying out, they should be covered tightly before being placed in the oven. Aluminum foil is ideal for this. For best results do not cover meats, casseroles or pastries.
The Keep-Warm oven is also handy for thawing frozen foods. Use the first setting (approximately 140°) for thawing. Poultry should be thawed until the giblets can be removed. Thaw cut-up poultry, fish or meat cuts just enough to separate the pieces. Ground meat should be thawed just enough to allow you to mix and form it. Once the food is thawed, cook it immediately. Do not refreeze food that has been thawed.
To thaw, and freshen cooked frozen baked goods, use a 170° setting. Wrap food loosely to prevent drying but to permit the evaporation of ice crystals formed during freezing.
Meat can be carved ahead of time and then kept warm. Sliced meats must be covered lightly with dampened paper towels or a wet towel to prevent cut surfaces from drying. If you wish to cut rare or medium meats you can do so if you do not allow the cut surfaces to remain exposed to the air. Cut the slices as described but keep the surfaces close together.
KEEP-WARM OVEN CHART
| 225° | Vegetables | (covered) | 170° | ||
| Bacon | 140° | Biscuits, | |||
| Beef | Rare | 155° | Muffins | 170° | |
| Medium | 155° | Casseroles | 200° | ||
| Well Done | Gravy | 155°-170° | |||
| Fish | Baked or Broiled(loosely covered) | 170° | Pizza | (loosely covered) | 225° |
| 170° | Rolls | (tightly wrapped) | 170° | ||
| Ham | 170° | Deep-Fat | |||
| Lamb | 170° | Fried Food | 200° | ||
| Pork | Fresh | 155° | Potatoes | Baked | 200° |
| Smoked | 170° | Mashed | 155°-170° | ||
| Poultry | Roasted | 185° | Pancakes, | ||
| Fried | Waffles | (loosely covered) | 250° | ||
| Seafood | Baked or Fried(loosely covered) | 170° | Pies, Pastry | 155° |
ROASTING
Roasting is the oven cooking of tender meats such as beef, lamb, pork, ham, veal, chicken and poultry by dry heat. Information in this section will give you tips to enable you to obtain the best possible results from your unit.
DIRECTIONS
For best results when roasting a cut of meat, a shallow pan as close to the size of the meat is recommended. The broiler pan can be used if necessary, but will generally be much larger than necessary.
Place the meat on a rack, a grid or crumpled foil with the fatty side up. Do not cover or add water.
Put in oven rack so that the center of the meat will be approximately in the center of the oven. DO NOT place the pan on the oven bottom. You will burn the roast.
Set the oven control dial to the desired temperature using the Roasting Guide. The guide will also give you a estimated cooking time.
HELPFUL INFORMATION
When you are roasting frozen meats, you should allow 1/3 to 1/2 more cooking time than for roasts already thawed
After cooking is complete, allow the roast to stand 15 to 20 minutes before carving.
Rare or medium rare cuts can be removed slightly before they are ready as they will continue to cook while the roast is standing to be carved.
Never add water to the roast when putting it into the oven.
ROASTING GUIDE
(An aid for roasting times and temperatures)
| FOOD | OVEN TEMP. | MIN./LB. |
| BEEF | ||
| Roasts | 325° | |
| Rare | 22-26 | |
| Medium | 26-30 | |
| Well Done | 33-35 | |
| Rolled Roast | 325° | |
| Rare | 32-36 | |
| Medium | 36-40 | |
| Well Done | 43-45 | |
| PORK (Fresh) | 350° | |
| Fresh Ham (Whole) | 22-28 | |
| Loin | 35-40 | |
| Shoulder, Butt | 40-45 | |
| Shoulder, Picnic | 35-40 | |
| HAM (Smoked-Mild Cured) | 350° | |
| Picnic Shoulder | 30-35 | |
| FOOD | OVEN TEMP. | APPROX. TOTAL COOKING TIME IN HOURS |
| CHICKEN* | 375° | |
| 4-5 lbs. | 11/2-13/4 | |
| over 5 lbs. | 13/4-2 | |
| TURKEY** | 325° | |
| 6-8 lbs. | 31/2-4 | |
| 8-12 | 4-41/2 | |
| 12-16 | 41/2-51/2 | |
| 16-20 lbs. | 51/2-7 | |
| 20-22 lbs. | 7-81/2 | |
| DUCK** | 325° | |
| 3-5 lbs. | 11/2-2 | |
| GOOSE | 325° | |
| 6-8 lbs. | 3-31/2 |
* - Small chickens can also be roasted at 400° for darker browning. If so, the cooking time should be shortene
** - For stuffed turkey or duck, increase the cooking time 15 to 20 minutes.
MODEL SPECIAL FEATURES
This section has been specially set aside to explain all the features on your particular unit. Time of Day Clock/Timer

Some models have an electric time of day clock and minute timer. The clock is located on the left side of the control panel. This clock conveniently gives you the correct time as well as allowing you to time cooking up to 60 minutes.
To set the time of day, push the knob in the center of the clock in and turn it clockwise to the correct time.
To use the 60 minute timer, turn the knob in the center of the clock, counter-clockwise until the pointer is set at the desired number of minutes. The pointer automatically returns to zero ("0") and a bell or buzzer will sound when the time is elapsed. To turn the bell or buzzer off, turn the knob clockwise to the position marked "OFF". Automatic Clock
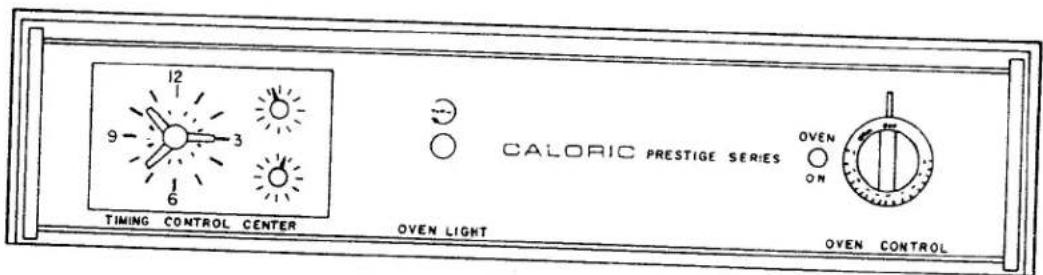
Some models have an electric clock with a minute timer and an automatic "START" and "STOP" timing system. The clocktimer is located on the left side of the control panel. The clock conveniently gives you the time of day as well as a 60 minute timer. The knob on the clock face is used to set the time. Push in and turn the knob clockwise to the correct time.
To use the minute timer (it times up to 60 minutes), turn the knob on the clock face counter-clockwise until the pointer shows desired time. The timer will automatically return to "0" and a bell or buzzer will sound when the time has elapsed. To turn the bell or buzzer off, turn the knob to "OFF". The timer operates independently of the automatic "START" and "STOP" feature and can be used at the same time.
The "START" and "STOP" time for automatic oven operation is dependent on the electric clock which is an integral part of the Automatic Timer. This clock, therefore, should always be set at the proper time of day.
To enjoy the convenience of automatic oven timing, the following procedure should be observed:
- With the proper cooking time in mind, the start time should be set by pressing the control knob on the "START" dial and turning it in a clockwise direction until the indicator hand points to the desired starting time. (For example, to serve a roast at 6:30 that takes two hours to cook, the knob on the Start dial is turned until the indicator points halfway between "4" and "5" - to 4:30.)
- The control knob on the "STOP" dial should be pressed in and turned in a clockwise direction so that the indicator points to the time at which it is planned to serve the meal.
- The Oven Control should be turned to the desired temperature for baking or roasting.
- After the desired cooking time has elapsed, the oven burner will turn off automatically. Food should then be removed from the oven and the Oven Control should be turned to "Off". The knob on the "STOP" dial, which "pops" out when the cooking time is completed, should be pressed in. Unless this is done, the oven will not function on "Manual" operation. The "START" knob must be out for manual operation. If it is not, rotate the "START" knob until it pops out.
Broiling should never be attempted on automatic operating. With broiling time figured in minutes, even minor inaccuracies in setting the small "START" and "STOP" dials could seriously affect broiling results.

To enjoy the convenience of Automatic Oven Timing, the following procedure should be observed.
Operation of the 24 hr. Auto Digital Timer:
- Time of Day Clock - To correct the time of day, pull the right hand knob B. When the desired time appears, press knob B to its original position. Correction is only possible in the direction of normal running time. Be sure to have A.M. or P.M. set correctly.
- Interval Timer - When the selector switch is in the manual position, the cooking period scale acts as the interval timer. Setting is effected by pressing knob B. At the end of the set time a buzzer sounds, which switches off automatically after approximately 2-3 minutes. The buzzer can be switched off earlier by pressing knob B to advance the indicator to the 0 position.
- Semi-Automatic Operation - Turn the selector switch A into the automatic position. Set the desired cooking period in the right hand window by pressing knob B. The switch contacts are thereby closed and the cooking period starts immediately. At the end of the period the contacts open and at the same time the buzzer sounds. This alarm switches off automatically after 2-3 minutes or can be switched off by pressing knob B to advance the indicator to the 0 position.
- Fully Automatic Operation - Turn the selector switch A into the automatic position. Set the cooking start time in the left hand window by pressing knob A, whereupon the scale becomes visible. Release knob A as soon as the desired start time appears at the datum line. The cooking period is set by pressing knob B, the same as for semi-automatic operation. As soon as the clock time reaches the pre-set start time, the switch contacts close, the scale disappears and the cooking
period commences. At the end of this period the contacts open and the buzzer gives a 2-3 minute reminder of the finish of the automatic operation.
Pre-set operating times can be corrected at any time. For the clock and cooking period setting, a continuous run is possible but when setting the cooking start time, the indicator will stop when it corresponds with the clock time (normal position for semi-automatic and interval timer use). By pressing knob A again, a new start time can be set.
The Oven Control should be turned to the desired temperature for baking or roasting.
After the desired cooking time has elapsed, the oven will turn off automatically. Food should then be removed from the oven. The oven control should be turned to "OFF" and the Automatic/Manual Knob of the timer should be set in the Manual position. The Automatic/Manual knob on the timer should be set in the manual position.
Broiling should never be attempted on automatic operation. With broiling time figured in minutes, even minor inaccuracies in setting the dial could seriously affect broiling results.
- Meat Probe - This feature allows you to cook roasts, etc., to an exact degree of "doneness" automatically. You no longer have to guess whether the food is medium, rare or well done. The meat thermometer tells you when it is just right.
You will find a dial and a meter to the left of the oven temperature dial. This is the meat thermometer. It is used to select the degree of doneness you wish to have. The meat thermometer is used in conjunction with the meat probe packed with your unit. The meat probe measures the internal temperature of the meat and relays this information of the meat thermometer. When the proper temperature of the meat being cooked is reached, a buzzer will sound.
In order to use the meat probe system, you must prepare the meat and probe. Insert the probe into the meat so the point extends about 1" beyond the center of the meat. At least 3½ inches of the probe must be covered by the meat in order to insure proper operation. Insert the probe at an angle if necessary. Do not allow the probe to touch any bones and be sure it is not in a layer of fat. For fowl, insert the probe into the leg or stuffing.
Plug the end of the meat probe into the receptacle in the wall of the oven. Next set the meat thermometer for cooking by turning the knob until the pointer is at the desired "doneness" for the food being cooked. Some recipes give you the suggested internal meat temperature. The following chart will help you to determine the setting to use.
MEAT INTERNAL TEMPERATURE CHART
| “R. Beef” | 140° |
| “M. Beef” | 150° |
| “Ham” | 160° |
| “W. Beef” or “Veal” | 170° |
| “Lamb” | 175°-180° |
| “Pork”* | 185° |
| “Poultry”** | 190° |
* The "Pork" setting is for fresh pork. If you are cooking smoked pork, use the 170° ("W. Beef" or "Veal") setting.
** The "Poultry" setting is for use when the meat probe is placed in the leg or thigh; use "W. Beef" or "Veal" (170°) when you place the probe in the stuffing.
Next turn the oven temperature dial to 325°-350° (do not go above 350° ). Now all you have to do is sit back and relax. The oven does all the work and will signal when the food is done.
The pointer will indicate the internal meat temperature during the cooking period, and will gradually move upward as the meat is cooked. When the pointer lines up to the desired setting, a buzzer will come "on" automatically, indicating that the cooking of the meat is completed to the desired degree of doneness.
IMPORTANT
When the signal buzzer sounds, the position of the spear should be checked by pressing it gently into the meat. If the pointer on the Meat Thermometer dial drops to a lower reading, it indicates that the spear has lodged during the cooking process, against a bone or in fat which can get considerably hotter than the meat itself. In that case, continue cooking until the signal buzzer sounds again.
When the roast is done, unplug the cable from the receptacle and remove the roasting pan from the oven and turn the Oven Control to "OFF". Then remove the probe from the meat.
IMPORTANT! NEVER REMOVE THE MEAT PROBE FROM THE RECEPTACLE BY PULLING ON THE CABLE. IN TIME IT WILL BREAK. ALWAYS GRASP THE PLUG PART OF THE PROBE TO PULL IT OUT.
DO NOT USE THE MEAT PROBE ON FROZEN FOOD. ALLOW THE FOOD TO THAW FIRST.
NOTE: Rare or medium rare cuts of meat should not be left in the oven when cooking is completed. These cuts will cook further and will not have the desired doneness if left in the oven while it is in Keep-Warm.
The cable and probe can be immersed in water. However, DO NOT immerse the plug end in water as it will be damaged. Clean the plug with a damp cloth.
ROTISSERIE COOKING
Some models are equipped with the Roto-Ray rotisserie. Rotisserie cooking gives you the best advantages of both broiling and roasting. You will find it easy to use and you and your family will be delighted with the results.
PREPARATION
In order to use the rotisserie you must place the rotisserie rack in the lowest rack position in the broiler compartment. Slide the broiler pan (without the grid) onto the extreme bottom of the compartment. The pan will catch any drippings.
It is not necessary to preheat the oven as you will be using the direct heat from the burner.
Meats which are cooked on the rotisserie include beef roasts, pork roasts, leg of lamb, whole hams, boned and rolled ham, chicken, duck and turkey.
Meats should be completely thawed and at room temperature for rotisserie cooking. Most meats should be boned and rolled for easy centering on the spit. Of course, cuts such as pork loin roasts and poultry are not boned. Be sure to tie the legs and wings of poultry securely to the body.
THE SPIT
Place one of the two skewers on the spit rod with the prongs away from the handle. Tighten the thumb screw. Next insert the spit into the meat. Push the meat tightly onto the skewer prongs as far as it will go. Place the remaining skewer on the spit and into the meat as far as it will go. Tighten both thumb screws securely. When finished, you should have the meat centered on the spit rod and balanced so it will rotate evenly.
Push the point of the spit into the socket at the back of the broiler compartment and remove the black twist-off handle. The rotisserie will start to turn immediately. Be sure the spit wheel is engaged in the rotisserie rack.
COOKING
Turn the oven temperature dial to 450°. Close the broiler door.
Most meats will baste automatically as they turn. Poultry may require an occasional basting with melted Barbeque sauces, basting sauces or marinades can be brushed on the meat during the last half hour of cool
When the cooking is complete, replace the black plastic handle and remove the meat and spit from the comment. Turn the oven temperature dial to "OFF".
The Keep-Warm system can be used with rotisserie cooking. Just leave the meat on the rotisserie and turn oven temperature dial to 170° (Keep-Warm).
CARE OF SPIT & SKEWERS
The split rod and skewers should be soaked in hot soapy water and washed, scouring if necessary. A brush scouring pad may be helpful in cleaning the skewers.
TRYING YOUR ROTISSERIE
The automatic rotisserie is a luxury feature that will give you wonderful new cooking versatility. Meats cook with the distinctive rotisserie accent are a change of pace your family and guests will enjoy. To get acquired with the rotisserie why not try the following recipe for Rotisserie Barbequed Chicken.
ROTISSERIE BARBEQUED CHICKEN
Ingredients:
2-3 lb. Frying Chickens
1 cup Barbeque Sauce (Use a sauce from the supermarket or your own favorite recipe.)
Tie the wings and legs of the chicken to the body.
Rub the inside of the chicken with salt and pepper.
Place the broiler pan on the extreme bottom of the broiler compartment.
With one skewer in place, slide the chickens onto the spit one at a time. Put the other skewer on the spit. meat should be balanced on the spit.
Set the oven temperature control for 450° and place the spit in the broiler compartment (push into the socket the rear of the compartment and remove the handle). Close the compartment door.
The cooking time will be about 1½ hours. Baste the chickens occasionally with melted butter or margarine
After about 1¼ hours brush the chickens with the barbeque sauce and continue cooking another 15 minutes
After the 15 minutes are up, remove the chickens from the rotisserie and serve. Turn the oven temperature dia "OFF" and remove the broiler pan from the compartment.
NOTE: Roasts and meats which are to be well done should be as close to room temperature as possible before cooking..
NEVER ROTISSERIE MEATS THAT ARE FROZEN. ALWAYS THAW THEM COMPLETELY BEFORE COING!
ROTISSERIE COOKING CHART
All foods prepared on the rotisserie are cooked with the oven temperature knob set at 450°.
| FOOD ITEM | APPROXIMATE COOKING TIME (Minutes per pound) |
| BEEF | |
| 5-6 lb. rolled Rib roast | |
| Rare | 15 to 20 |
| Medium | 20 to 25 |
| Well Done | 25 to 30 |
| 3 lb. Eye Round | |
| Rare | 15 to 20 |
| Medium | 20 to 25 |
| PORK | |
| 31/2 lb. Center Loin (with bone) | 30 |
| LAMB | |
| Leg of Lamb (boned and rolled) | |
| 21/2 to 3 lbs. | 30 to 35 |
| HAM | |
| Whole Fully Cooked | |
| 12-15 lbs. (boned and rolled) | 12 to 15 |
| POULTRY | |
| Chicken - 3 lbs. | 11/2 hours. (total time) |
| Duck - 4-5 lbs. | 2-21/2 hrs. (total time) |
| Turkey - 12-14 lbs. (unstuffed) | 4-5 hours (total time) |
GENERAL CARE AND CLEANING OF BUILT-IN UNITS
Avoid harsh cleansers -
In order for your built-in unit to retain a new appearance, care must be taken to protect porcelain enamel and metal finishes. Never use gritty cleansers on porcelain enamel or polished metal trim. In time they will "age" your unit. NEVER USE OVEN CLEANERS, WHICH ARE HIGHLY ALKALINE, ON EXTERIOR OR ALUMINUM PARTS.
Wait for the range to cool -
Do not wash or wipe any of the enamel parts while the oven is still warm from operation. Sudden temperature changes can cause the glass-like enamel to crack.
Prevent acid stains -
Vinegar, sour milk, citrus fruits, marinades and sauces with tomatoes contain acids which can stain or discolor even the finest acid-resistant materials and finishes. Do not allow these acids to come in contact with your unit. If there is an accidental spill, wipe it up immediately with a dry cloth. When the surface is cool, wash it with warm, soapy water and dry.
Ordinary stains -
In most cases ordinary stains can be removed with baking soda and a damp cloth. If the stain remains, use a mild cleanser taking care not to scratch or mar the finish.
Chrome finishes -
Usually a damp cloth will clean chrome and aluminum surfaces. A good non-abrasive metal cleaner can be used. Never use steel wool, scouring powder, oven cleaners or abrasives on bright metal or painted surfaces.
NOTE: If the unit has satin chrome door panels, stainless steel wool can be used as a cleaning aid. Use a light stroke in the direction of the satin grain to remove stubborn spots. DO NOT USE ORDINARY STEEL WOOL. Ordinary steel wool will leave behind a residue you cannot wipe off which will turn color and make the door panels appear to be rusting.
IMPORTANT INFORMATION CONCERNING CONTINUOUS CLEANING SURFACES
What does it look like -
It is a porcelain enamel composition with a porous texture which appears grey in color with a covering of many speckles of small white porcelain dots which act as a tough bearing surface to resist damage to the continuous cleaning coating.
When and how does it work -
The pores of the finish divide one spatter into many, many spatters. Regular oven temperatures then work effectively on the tiny spatters to decompose or "evaporate" them. Therefore, the walls in effect continuously clear themselves, without hand cleaning, any time the oven is on for baking or roasting operations. Depending on how the oven is used, it can always be presentably clean with little or no hand cleaning.
What to expect -
The continuous cleaning surface keeps working when the oven is in operation so that heavy soil does not build up. While the oven may not be spotless at all times, it never gets really dirty, thus it will always remain presently clean.
Most fat spatters that occur during meat roasting, oven frying and broiling, are continuously cleaned away. These are the most frequent causes of oven cleaning.
Most fat spatters will gradually diminish shortly after touching the oven walls. If spatters should remain remember they will probably be reduced during later oven use. The breakdown of the fats is gradual. No objectionable odors are created by the cleaning process as the fat spatters are decomposed at normal baking or roasting temperatures.
What not to expect .
Carbohydrate type soils . . . sugar and starch . . . (spillovers from cassoroles, pies, etc.) and soils which occur in heavier amounts will not be removed. If these type soils should contact the side or rear continuous cleaning panels, they should be removed as soon as the oven is cool enough to allow cleaning.
What to use to assist in clean-ups -
Spillovers should be given assistance by brushing with a nylon brush or nylon "Tuffy" and water. If the soil is really baked on, it can be loosened by using the product Top Job, Handy Andy or Fantastik. Spray this cleaner on the spot and allow it to remain for about 15 minutes. Then brush with a wet nylon brush or a nylon "Tuffy" and rinse well with clean water applied with a wet sponge.
OR
Place a shallow bowl of ammonia in a still-warm oven. Leave oven door closed several hours or overnight. Remove utensil of ammonia and clean oven with warm, soapy water. Be sure to rinse the area well with clear water.
NEVER USE.
Never use commercial caustic oven cleaners on continuous cleaning surfaces!
Never use spray type oven protective coatings, scouring powders, abrasive materials, steel or metal wools. Knives or scrapers should never be used on any continuous cleaning surface.
IMPORTANT - ALL MODELS
All built-in models are factory equipped with standard "porcelain" enamel removable oven bottoms and door backers. For cleaning, the oven bottom should be "removed" and cleaned with a good oven cleaner such as Jiffoam or Easy-Off. Regular use of an oven cleaner will avoid excessive, baked on grease build-ups which are difficult to clean. The doors can also be removed for easier cleaning.
PORCELAIN ENAMEL SURFACES
General - The oven should be cleaned regularly with a good oven cleaner such as Jiffoam or Easy-Off. Regular use of an oven cleaner will avoid excessive, baked on grease build-ups which are difficult to clean. Follow the manufacturer's instructions for the use of the oven cleaners!
Important! If you use an oven cleaner on the oven interior, be sure the cleaner does not run onto aluminum or chrome trim parts, as the finish of these items may be damaged!
The oven and broiler doors are removable for easy cleaning of the oven and broiler compartments as well as the door backers themselves.
Keep appliance area clear and free from combustible materials, gasoline and other flammable vapors and liquids.
WARRANTY
GAS & ELECTRIC RANGES "S" SERIES - LIMITED APPLIANCE PARTS WARRANTY
PARTS WARRANTY
Subject to certain but necessary WARRANTY LIMITATIONS LISTED BELOW, Caloric warrants all PARTS of this Caloric appliance against defects in material and workmanship for a period of three (3) years from the date of its delivery. Any replacement parts furnished at no cost to the purchaser in fulfillment of this warranty, are warranted only for the unexpired portion of the original warranty. Caloric's appliance parts warranty pertains only to the PARTS of the appliance, not the labor required for repair or replacement; which is the responsibility of the source from whom this appliance was purchased.
WARRANTY SERVICE
The selling dealer, builder, or utility from whom this appliance was purchased is responsible for advising the purchaser of the period of no-charge warranty service labor coverage, and how and from whom warranty service is available. Replacement parts under the terms of this warranty must be furnished by a franchised Caloric dealer or authorized Caloric service agency.
WARRANTY LIMITATIONS
Caloric's product warranty DOES NOT apply to glass parts, light bulbs, or fluorescent lamps. We warrant only that these will be commercially acceptable at the time of delivery and allow you 30 days to report any malfunctions to the selling agency from whom the appliance was purchased or the authorized service agency as advised by your selling agency.
Caloric's product warranty DOES NOT apply to the porcelain enamel surfaces, ceramic surfaces, painted surfaces, and decorative finishes, nor does it cover normal deterioration of finishes, bright metal and other trim. We warrant that all of these surfaces and finishes will be commercially acceptable at the time of delivery and allow you ninety (90) days from the date of purchase to report otherwise. OWNERSHIP
The appliance PARTS warranty remains in force for three (3) years from the initial delivery of the appliance, and continues in force for three (3) years from the initial delivery, even if relocated by the first or subsequent purchaser(s).
WARRANTY CONDITIONS
Caloric's appliance PARTS warranty DOES NOT apply to any appliance which has been subjected to alteration, misuse, abuse, accident, improper installation, delivery damage, or other than normal household use and service.
Caloric's PARTS warranty is LIMITED STRICTLY to the terms indicated herein, and no other expressed warranties or remedies thereunder shall be binding on us. TO THE EXTENT CONSISTENT WITH STATE AND FEDERAL LAWS: (1) ANY IMPLIED WARRANTIES SHALL BE LIMITED TO THE SAME TIME PERIODS STATED HEREIN FOR CALORIC'S EXPRESSED WARRANTIES, AND (2) CALORIC SHALL NOT BE LIABLE FOR CONSEQUENTIAL DAMAGES UNDER ANY EXPRESSED OR IMPLIED WARRANTIES RELATING TO THE CALORIC APPLIANCE.
Caloric's warranty obligation on appliances located outside the contiguous 48 U.S. states and the District of Columbia shall be LIMITED STRICTLY to furnishing replacement parts and shall EXCLUDE service labor.
FEDERAL REGULATORY PROVISIONS
Some states do not allow limitations on how long an implied warranty lasts nor limitations or exclusions of incidental or consequential damages, so the above limitations or exclusions may not apply to you. This warranty gives you specific legal rights, and you may also have other rights which vary from state to state, as well as rights under Federal Laws.
PURCHASER'S RESPONSIBILITIES
The purchaser will be responsible for the costs of any service calls requested to demonstrate or confirm the proper operation of the appliance, to correct an improper installation that the purchaser may have performed, or to correct malfunctions in the appliance created by operation of the appliance in a manner not prescribed by, or cautioned against, in the Caloric Use and Care Instructions.
PURCHASE REGISTRATION CARD
The purchaser should fill out and mail to Caloric the purchase registration card included with the appliance. This will help Caloric expedite any future communications regarding the appliance. Your warranty rights are conditioned upon the return of the Purchase Registration Card.
MODEL AND SERIAL NUMBERS
The appliance model number and serial number can be found on a nameplate attached to the appliance. The purchaser should always use the model number and serial number when talking to or writing to the dealer, builder, or utility from whom this appliance was purchased, the local authorized service agency, or Caloric.
FACTORY ASSISTANCE
If the purchaser is unable to locate an authorized service agency, or if the purchaser does not receive satisfaction from the source from whom the appliance was purchased, or from the local servicing dealer or agency, write to: Caloric Corporation, Consumer Relations Department, Topton, Pennsylvania 19562-1499, or call AC215-682-4211.
SERVICE CONTRACT
Caloric offers an appliance maintenance agreement which makes it possible to protect yourself against future unexpected investments in functional replacement components and related labor costs on your products after the expiration of your existing new product warranty. The protection provided by this plan goes into effect the day that your original warranty expires or when your payment is processed. You can have months of peace of mind for only pennies a day. Write today, indi
Write today indicating model number, serial number, and the date the product was purchased, for an application for a Caloric Appliance Maintenance Agreement.
Your Caloric product was manufactured utilizing highly reliable and thoroughly tested componentry, however, due to highly complex assembly and safety systems, all of to-cuitry integration, and the addition of consumer convenience and safety systems. If your product day's home appliances are experiencing a higher service incidence ratio. If your product should require servicing, you can assure yourself of "good as new" performance if you in-sist that "genuine" Caloric replacement parts are to be used in the repair of your product. When you see the name "Caloric" on the wrapper, you know its backed by quality, reliabili-ty and integrity.
Authorized Parts Distributors
ALABAMA
Washer & Refrigeration Supply Co., Inc
716 Second Avenue, North
Birmingham, AL 35201
AC205-322-8693
ARIZONA
Appliance Dealer Supply
740 West Grand, Phoenix, AZ 85007
AC602-252-7506
Appliance Parts Company of Arizona
2333 N. 35th Ave., Phoenix, AZ 85009
AC602-269-6385
CALIFORNIA
API Appliance Parts, Inc.
1645 Old County Road, San Carlos, CA 94070
AC415-591-4467 or AC800-950-PART
API Appliance Parts, Inc.
1545 South Van Ness, San Francisco, CA 94110
AC415-826-2223
R & B Appliance Parts
5070 Lindsay Court, Chino, CA 91710
AC714-591-9405
R & B Appliance Parts
1684 Callens Road, Ventura, CA 93003
AC805-642-9078
CANADA (Caloric Only)
Mossman's Appliance Parts, Ltd.
1465 Gerrard St., E., Toronto, Ontario M4L 2A2
AC416-461-1147
Mossman's Appliance Parts, Ltd.
746 Ellice Avenue, Winnipeg, Man. R3G OB6
AC204-775-8409
CANADA (Caloric & Modern Maid)
Reliable Parts, Ltd.
860 Kingsway, Vancouver, B.C. V5V 3C3
AC604-872-129
Reliable Parts, Ltd.
11850 142nd St., Edmonton, Alberta T5L 267
AC403-453-6735
Reliable Parts, Ltd
418 Manitou Road, S.E., Calgary, Alberta T2G 4C4
AC403-243-7022
CANADA (Modern Maid Only)
Amiel Distributors Limited
1645 Highway 440 West, Chomeday Laval, Quebec,
Canada H7L 3W3
AC514-381-8013
Energy Savings Applaine
2245 Midland Avenue, Scarborough, Ontario M1P 3E7
AC416-291-7415
COLORADO
Akrit Appliance Supply Co
1312 W. Stanford, Englewood, CO 80110
AC303-761-4195 or AC800-727-3727
CONNECTICUT
All Appliance Parts, Inc.
474 Frontage Road, West Haven, CT 06516
AC203-932-3090
All Appliance Parts, Inc.
223 Brainard Road, Hartford, CT 06114
AC203-247-4212
DELAWARE
Jacoby Appliance Parts
228 W. Market St., Newport, DE 19804
AC302-999-9981
FLORIDA
Marcone Appliance Parts Center
8347 N.W. 36th Street
Miami, FL 33166
AC305-693-4333 or FL800-432-2805
Marcone Appliance Parts Center
2108 W. Central Blvd., Orlando, FL 32805
AC305-841-8582
Marcone Appliance Parts Center
1515 Cypress Street, Tampa, FL 33606
AC813-253-5327 or FL800-282-6636
GEORGIA
D & L Appliance Parts Co., Inc.
5864 New Peachtree Road, Atlanta, GA 30340
AC404-458-8191
HAWAII
Appliance Parts Co., Inc.
1550 Kalani St., Honolulu, HI 96817
AC808-847-3271
ILLINOIS
Automatic Appliance Parts Corporation
7757 W. Lawrence Ave. Norridge, IL 60656
AC312-453-8384
Automatic Appliance Parts Corporation
926 22nd Street, Rockford, IL 61108
AC815-398-0650
INDIANA
Hagan Parts Corporation
807 Oak Hill Road, Evansville, IN 47711
AC812-423-4254 or IN800-742-3693
Evansville Appliance Parts, Inc
900 E. Diamond Ave., Evansville, IN 47711
AC812-423-8867
KENTUCKY
Dayton Appliance Parts Co. (Cincinnati Appl. Parts)
1977 Dixie Highway, Ft. Wright, KY 41011
AC606-341-9744
Marcone Appliance Parts Center
4422 Kiln Court, Louisville, KY 40218
AC502-456-4422
MARYLAND
Coastline Parts
816 Snow Hill Road, Salisbury, MD 21801
AC301-742-8634
Trible's Inc.
10731 Baltimore Ave., Beltsville, MD 20705
AC301-937-7440
Trible's Inc.
901 Southern Ave., Oxon Hill, MD 20745
AC301-894-6161
MASSACHUSETTS
All Appliance Parts Inc.
22 Water Street, Cambridge, MA 02141
AC617-868-8360
MICHIGAN
Servall Company
228 E. Baltimore, Detroit, MI 48202
AC313-872-3655
Servall Company
440 Lake Michigan Dr., N.W., Grand Rapids, MI 49504
AC616-451-2691
MINNESOTA
Appliance Parts, Inc.
1251 Washington Ave. No., Minneapolis, MN 55401
AC612-333-0931
MISSISSIPPI
Appliance Parts Company
727 South Gallatin, Jackson, MS 39204
AC610-948-4680
MISSOURI
Carroll Appliance Parts
3150 Mercier, Suite 526, Kansas City, MO 64111
AC816-753-3545
Marcone Appliance Parts Center
2300 Clark Avenue, St. Louis, MO 63103
AC314-231-7141
NEVADA
Appliance Parts Co. of Arizona (G & N Appl. Parts)
2001 South Western Ave., Las Vegas, NV 89102
AC702-382-6532
NEW JERSEY
All Appliance Parts, Inc.
470 U.S. Highway 46, Teterboro, NJ 07608
AC201-641-3444
Jacoby Appliance Parts
269 Main St., Hackensack, NJ 07601
AC201-489-6444
Jacoby Appliance Parts
600 Jersey Avenue, New Brunswick, NJ 08901
AC201-846-0300
Jacoby Appliance Parts
923 No. Olden Ave., Trenton, NJ 08638
AC609-392-6051
NEW MEXICO
Akrit Appliance Supply Co.
3442 Stanfors N.E., Albuquerque, NM 87107
AC505-884-0166
NEW YORK
All Appliance Parts, Inc.
40 Austin Blvd., P.O. Box 276, Commack, NY 11725
AC516-543-4000
All Appliance Parts, Inc.
1034 Yonkers Avenue, Yonkers, NY 10704
AC914-237-0500
NEW YORK (Continued)
Appliance Parts Distributors of Buffalo, Inc.
1175 William Street, Buffalo, NY 14206
AC716-856-5005 or AC800-888-7013
Appliance Parts Distributors of Buffalo, Inc.
3150 Erie Blvd., East Syracuse, NY 13214
AC315-446-0800 or AC800-962-0902
Appliance Parts Distributors of Buffalo, Inc.
1130 Emerson St., Rochester, NY 14606
AC716-254-2274 or AC800-462-6830
Jacoby Appliance Parts
1656 Central Ave., Albany, NY 12205
AC518-869-2283
NORTH CAROLINA
D & L Appliance Parts Co., Inc.
2100 Freedom Drive, Charlotte, NC 28231
AC704-374-0400
OHIO
Dayton Appliance Parts Co. (Cincinnati Appl. Parts)
11273 Grooms Road, Cincinnati, OH 45242
AC513-489-1980
Dayton Appliance Parts Co. (Dayco Appl. Parts)
620 E. Weber Road, Columbus, OH 43211
AC614-262-6446
Dayton Appliance Parts Co.
122 Sears St., Dayton, OH 45402
AC513-224-3531
Parts America Inc.
2086 Romig Road, Akron, OH 44320
AC216-745-6600
Parts America Inc.
1834 E. 55th St., Cleveland, OH 44103
AC216-431-4400
Pearsol Appliance Parts Co.
2319 Gilbert Avenue, Cincinnati, OH 45206
AC513-221-1195
OREGON
Diversified Parts
2104 S.E. 9th Street, Portland, OR 97214
AC503-236-6140 or OR800-452-8055 or 800-547-8535
PENNSYLVANIA
Wagner Appliance Parts, Inc.
1814 Tilghman St., Allentown, PA 18104
AC215-439-1564 or PA800-322-9002
Appliance Parts Distributors
400 Bristol Pike, Croydon, PA 19020
AC215-785-6282
All Appliance Parts, Inc.
312 N. Easton Road, Willow Grove, PA 19090
AC215-657-3777
Collins Appliance Parts, Inc.
1533 Metropolitan Street, Pittsburgh, PA 15233
AC412-321-3700
SOUTH CAROLINA
D & L Appliance Parts Co., Inc.
901 S. Cashua Drive, Florence, SC 29501
AC803-662-3261
TENNESSEE
Appliance Parts Warehouse, Inc.
2311 East 23rd Street, Chattanooga, TN 37407
AC615-622-4158 or TN 800-572-7357 or AC800-251-6225
TEXAS
Central Supply
2612 McKinney, Houston, TX 77253
AC713-224-7772
Pearsol Appliance Company
3127 Main Street, Dallas, TX 75226
AC214-939-0935 or AC800-492-1993
Standard Appliance Parts Distributors
2970 Blystone St., Suite 109, Dallas, TX 75220
AC214-357-6493 or TX800-442-3110 or AC800-527-5008
VIRGINIA
Evans Electric Company
451 Elm Avenue, Portsmouth, VA 23704
AC804-399-3044
WEST VIRGINIA
Parts America, Inc.
158 E. Spring St., Charleston, WVA 25301
AC304-345-4400
Dayton Appliance Parts Co.
116 Fifth Ave., Huntingdon, W.VA 25701
AC304-523-1990
- FOR YOUR SAFETY
- IF YOU SMELL GAS
- OWNER'S REFERENCE
- CONGRATULATIONS
- BEFORE YOU CALL FOR SERVICE
- TABLE OF CONTENTS
- SAFETY PRECAUTIONS
- READ BEFORE OPERATING YOUR UNIT
- INTRODUCTION TO THE BUILT-IN UNIT
- ELEMENTS OF BAKING AND BROILING
- USING THE BROILER
- USEFUL INFORMATION FOR BROILING
- INFRA-RAY (TUBE TYPE) BROILERS — IMPORTANT: PREHEAT FOR FIVE MINUTES
- TO BROIL WITH THE INFRA-RAY GAS BURNER
- OVEN BROILING
- BROILING RECIPES
- BROILED BACON
- BROILED SIRLOIN STEAK
- BROILED FISH
- BROILED CHICKEN
- BAKING
- GENERAL INSTRUCTIONS
- UTENSILS
- UTENSIL PLACEMENT
- BARBECUED SHORT RIBS
- DUTCH APPLE CAKE
- TOPPING
- KEEPING FOOD WARM
- ROASTING
- DIRECTIONS
- HELPFUL INFORMATION
- MODEL SPECIAL FEATURES
- IMPORTANT
- ROTISSERIE COOKING
- PREPARATION
- THE SPIT
- COOKING
- CARE OF SPIT & SKEWERS
- TRYING YOUR ROTISSERIE
- ROTISSERIE BARBEQUED CHICKEN
- ROTISSERIE COOKING CHART
- GENERAL CARE AND CLEANING OF BUILT-IN UNITS
- IMPORTANT INFORMATION CONCERNING CONTINUOUS CLEANING SURFACES
- OR
- IMPORTANT - ALL MODELS
- PORCELAIN ENAMEL SURFACES
- WARRANTY
- GAS & ELECTRIC RANGES "S" SERIES - LIMITED APPLIANCE PARTS WARRANTY
- PARTS WARRANTY
- WARRANTY SERVICE
- WARRANTY LIMITATIONS
- WARRANTY CONDITIONS
- FEDERAL REGULATORY PROVISIONS
- PURCHASER'S RESPONSIBILITIES
- PURCHASE REGISTRATION CARD
- MODEL AND SERIAL NUMBERS
- FACTORY ASSISTANCE
- SERVICE CONTRACT
- AUTHORIZED PARTS DISTRIBUTORS
- ALABAMA
- ARIZONA
- CALIFORNIA
- CANADA (CALORIC ONLY)
- CANADA (CALORIC & MODERN MAID)
- CANADA (MODERN MAID ONLY)
- COLORADO
- CONNECTICUT
- DELAWARE
- FLORIDA
- GEORGIA
- HAWAII
- ILLINOIS
- INDIANA
- KENTUCKY
- MARYLAND
- MASSACHUSETTS
- MICHIGAN
- MINNESOTA
- MISSISSIPPI
- MISSOURI
- NEVADA
- NEW JERSEY
- NEW MEXICO
- NEW YORK
- NEW YORK (CONTINUED)
- NORTH CAROLINA
- OHIO
- OREGON
- PENNSYLVANIA
- SOUTH CAROLINA
- TENNESSEE
- TEXAS
- VIRGINIA
- WEST VIRGINIA
Brand : Caloric
Model : RWS214
Category : Oven