
FTR700 - Bread maker Farberware - Free user manual and instructions
Find the device manual for free FTR700 Farberware in PDF.


| Product Type | Automatic Bread Machine |
| Model | FTR700 |
| Brand | Farberware |
| Power Requirements | 120V AC, 60Hz |
| Flour Capacity | Up to 4-2/3 cups |
| Loaf Sizes | 1-1/2 lb. and 2 lb. |
| Programs/Cycles | 9 cycles: Basic (Regular/Medium/Dark Crust), Whole Wheat (1.5 lb/2 lb/Rapid), French, Fruit & Nut, Dough, Cake, Jam |
| Crust Control | 3 settings for Basic breads: Regular, Medium, Dark |
| Timer Delay | Up to 12 hours (except Dough, Fruit & Nut, Cake, Jam cycles) |
| Keep Warm Function | Automatic 60-minute keep warm after baking (except Dough and Jam) |
| Viewing Window | 3-3/16 in. x 3-3/16 in. |
| Bread Pan Material | Non-stick coated |
| Kneading Paddle | Removable, non-stick coated |
| Dimensions (W x D x H) | 12-3/8 in. x 9-13/16 in. x 13 in. |
| Weight | Approximately 10.5 lbs (4.8 kg) |
| Cord Length | Short cord (approx. 2-3 ft) with polarized plug |
| Safety Features | Polarized plug, automatic shut-off, cool-down cycle, safety lock to prevent restart if too hot |
| Cleaning | Hand wash bread pan and paddle; wipe interior with damp cloth; never immerse or use dishwasher |
| Warranty | 1-year limited warranty |
| Included Accessories | Bread pan, kneading paddle, user manual, recipe booklet |
Frequently Asked Questions - FTR700 Farberware
User questions about FTR700 Farberware
0 question about this device. Answer the ones you know or ask your own.
Ask a new question about this device
Download the instructions for your Bread maker in PDF format for free! Find your manual FTR700 - Farberware and take your electronic device back in hand. On this page are published all the documents necessary for the use of your device. FTR700 by Farberware.
USER MANUAL FTR700 Farberware
natural_image
Black-and-white illustration of a vintage kitchen appliance with a large screen and accessories, surrounded by decorative items (no visible text or symbols)USE AND CARE INSTRUCTIONS
MODEL FTR700
TABLE OF CONTENTS
Important Safeguards .... 1
Your Farberware® Automatic Bread Machine.... 2
Control Panel 3
Using the Farberware® Automatic Bread Machine...... 4 - 5
Kneading and Baking Cycles.... 6
Making Dough and Baking Bread.... 7 - 10
Using the Cake and Jam Cycles 11
Jam Cycle Instructions 12
Using the Timer.... 13 - 14
Cleaning Instructions 15
Measuring 16
Trouble Shooting.... 17 - 19
Specifications.... 20
Sample Recipes for the Cake and Jam Cycles.... 21
Notes.... 22 - 23
IMPORTANT SAFEGUARDS
When using the Farberware® Automatic Bread Machine, basic safety precautions should always be followed, particularly the following:
-
READ ALL INSTRUCTIONS BEFORE USE.
-
Do not touch hot surfaces. Use handles or knobs. Always use oven mitts when handling hot materials and allow metal parts to cool before cleaning.
-
Unplug this product from wall outlet when not in use and before cleaning. Allow to cool thoroughly before putting on or taking off parts.
-
Do not immerse appliance in water or any other liquid.
-
Close supervision is always necessary when this or any appliance is used by or near children.
-
Do not allow anything to rest on the power cord. Do not plug in cord where persons may walk or trip on it.
-
Do not operate this or any appliance with a frayed or damaged cord, or after the appliance malfunctions, or has been damaged in any manner. Return the appliance to the nearest authorized Service Center for examination and repair.
-
Avoid contact with any moving parts.
-
Do not use attachments not recommended by the manufacturer; they may damage the appliance or cause injury.
-
This appliance is intended for household use only. Do not use outdoors or for commercial purposes.
-
Do not let the cord hang over the edge of a table or counter, or touch hot surfaces. Do not place on an unsteady or cloth-covered surface.
-
Do not place the appliance near a hot gas or electric burner, in a heated oven or in a microwave.
-
Keep the unit at least 2 inches away from walls or any other objects when using it.
-
To disconnect, grip the plug and pull the plug from the wall outlet. Never pull on the cord.
SAVE THESE INSTRUCTIONS
NOTE:
A. A short power-supply cord is provided to reduce the risk of becoming entangled in or tripping over a longer cord.
B. Extension cords are available and may be used, but special care must be exercised in use.
C. If an extension cord is used:
(1) the marked electrical rating of the extension cord should be at least as great as the electrical rating of the appliance, and
(2) the cord should be arranged so that it will not drape over the counter top or tabletop where it can be pulled on by children or tripped over unintentionally.
CAUTION: During use, the internal parts of the Automatic Bread Machine and the area around the Steam Vent are HOT. Keep out of reach of children to avoid possible injury.
YOUR FARBERWARE® AUTOMATIC BREAD MACHINE

POLARIZED PLUG
This appliance has a polarized plug (one blade is wider than the other). To reduce the risk of electric shock, this plug is intended to fit into a polarized outlet only one way. If the plug does not fit fully in the outlet, reverse the plug. If it still does not fit, contact a qualified electrician. Do not attempt to modify the plug in any way.
CONTROL PANEL
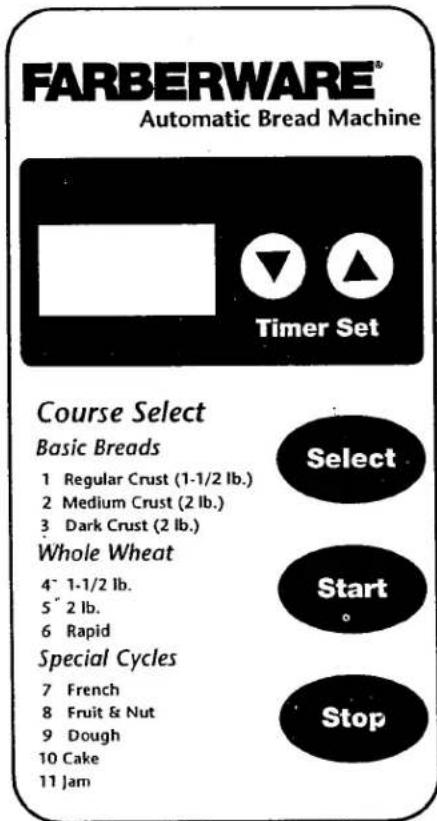
A. Display Window
Shows your selection and Timer setting.
B. Selection Options
Select from these bread choices:
• Basic (1-1/2 lb. Reg.,
• 2 lb. Med.,
- 2 lb. Dark)
• Whole Wheat (1-1/2 lb.,
• Whole Wheat 2 lb.
• Whole Wheat Rapid)
- French
- Fruit & Nut
- Dough
- Cake
- Jam
C. Timer
Use this pair of buttons to add or subtract time displayed in the Display Window.
▲ Each time you press this button, the Timer advances 10 minutes.
(Hint: Hold down the button for fast forward.)
▼ Each time you press this button, the Timer is set back 10 minutes. Hold arrow down for fast reverse.
D. Select
Press the button to select the Baking cycle you want. Each time your press this button, the indicator light moves to the next selection. Press this button until your choice is indicated.
E. Start
Press this button to start the Baking cycle you choose, or to start the Timer.
F. Stop
Press this button for a full second to turn off power, to reset the Timer setting, or to stop baking.
When you press the Timer, Select, Start, or Stop button, you should hear a beep. This lets you know you've pressed hard enough and your selection was made.
USING YOUR FARBERWARE® AUTOMATIC AUTOMATIC BREAD MACHINE
With your new Farberware® Automatic Bread Machine:
- You can use pre-packaged bread mixes. Recipe instructions are on each package.
- You can bake a loaf of bread from scratch. See the Recipe and Menu Planner included with your Bread Machine for lots of tasty options.
- You can make dough for rolls or shaped loaves you'll bake in your oven. Use the Dough cycle to do the mixing and kneading for you, then shape and bake the bread yourself.
• You can make Cake and fresh Jam.
INSERTING AND REMOVING THE BREAD PAN
- To insert the Bread Pan in the Automatic Bread Machine, seat it in place with the marking "Front" facing the front of the Bread Machine. Press down until it snaps into place.
Remember to insert the Kneading Paddle first, then add all your ingredients BEFORE inserting the Bread Pan into the Automatic Bread Machine Oven.
- To remove the Bread Pan from the Oven, hold the Handle with a mitt and lift gently.
- When you remove the Bread Pan after baking, BE SURE TO WEAR OVEN MITTS to prevent burning. After you remove the loaf by turning the Bread Pan upside down and shaking gently, check to see that the Kneading Paddle is removed from the loaf. If it is stuck in your bread, use a non-metal utensil to gently remove it, taking care not to scratch the Kneading Paddle.
OPERATING TIPS
- Use oven mitts when working with bread or any part of the Bread Machine that is hot from baking.
- Wipe off crumbs and clean the Bread Machine, as needed, after baking.
-
Unplug the Bread Machine when you are not using it.
-
It is normal for the Viewing Window to collect moisture during the beginning of the Baking cycle. As your bread bakes, the moisture soon will evaporate so you can watch your bread's baking progress.
- Don't open the Lid during baking. This causes the bread to bake improperly.
- Don't unplug the Automatic Bread Machine during Kneading or Baking. This will stop the operation.
CAUTION! To protect young children, keep the Bread Machine out of their reach when you're not there to supervise — especially during the Kneading and Baking cycles.
- Use the Farberware® Automatic Bread Machine on a flat, hard surface. Don't place it near a flame or heat, or on a soft surface (such as a carpet). Avoid placing it where it may tip over during use. Dropping the Bread Machine could cause it to malfunction.
- To avoid burns, stay clear of the Steam Vent during kneading and baking. Also, don't touch the Viewing Window — it gets very hot.
- After baking, wait for the Bread Machine to cool down before touching or cleaning the Bread Pan or internals of the Bread Machine.
- Never use metal utensils with the Farberware® Automatic Bread Machine. These can scratch the non-stick surface of the Bread Pan.
- Avoid electric shock by unplugging before using a damp cloth or sponge to wipe the interior of the Oven.
- Never use the Bread Pan on a gas or electric cooktop or on an open flame.
- Avoid covering the Steam Vent during Kneading and Baking cycles. This could cause the Bread Machine to warp or discolor.
KNEADING AND BAKING CYCLES
The Farberware® Automatic Bread Machine has nine (9) Baking cycles from which to choose:
- The Basic, Medium, and Dark Baking cycles let you choose your favorite crust for most bread varieties, including whole wheat, rye and white breads.
- The French cycle is for breads with crisper crusts, especially those that are lowest in sweeteners, such as French and Italian breads.
- Fruit & Nut cycle is for breads such as apple walnut, banana, and raisin bread.
- The Jam cycle makes your favorite jams. See sample recipe in back of this manual.
This table shows how long each part of the Baking cycle takes:
SELECTION
| Baking Phase | Basic 1-1/2 lb. Reg. Crust | Basic 2 lb. † Med. Crust | Basic 2 lb. † Dark Crust | Whole Wheat* 1-1/2 lb. † | Whole Wheat* 2 lb. † | Whole Wheat* Rapid | French | Fruit & Nut | Dough Only |
| Rest | — | — | — | 30 min. | 30 min. | 15 min. | — | — | — |
| Knead 1 | 3 min | 3 min | 3 min. | 3 min. | 3 min. | 3 min. | 3 min. | 3 min. | 3 min. |
| Knead 2 | 30 min. | 31 min. | 31 min. | 25 min. | 25 min. | 25 min. | 30 min. | 31 min. | 27 min. |
| First Rise | 23 min. | 26 min. | 31 min. | 67 min. | 80 min. | 40 min. | 32 min. | 31 min. | 60 min. |
| Punch | — | — | — | 10 sec. | 15 sec. | 15 sec. | 20 sec. | 20 sec. | — |
| Rest | — | — | — | 29 m. 50 s. | 29 m. 45 s. | 14 m. 45 s. | 28 m. 40 s. | 28 m. 40 s. | — |
| Shape | 20 sec. | 20 sec. | 20 sec. | 3 sec. | 3 sec. | 3 sec. | 20 sec. | 20 sec. | — |
| Second Rise | 60 m. | 53 m. 40 s. | 53 m. 40 s. | 54 m. 57 s. | 44 m. 57 s. | 44 m. 57 s. | 53 m. 40 s. | 48 m. 40 s. | — |
| Bake | 43 min. | 55 min. | 70 min. | 48 min. | 55 min. | 55 min. | 70 min. | 60 min. | — |
| **Auto Cool Down | 60 min. | 60 min. | 60 min. | 60 min. | 60 min. | 60 min. | 60 min. | 60 min. | — |
| Total Baking Time | 2:40 | 2:50 | 3:10 | 4:20 | 4:30 | 3:20 | 3:40 | 3:25 | 1:30 |
CAKE CYCLE
| Mix | 3 min. |
| Heat & Mix | 5 min. |
| Bake | 70 min. |
| Cool Down | 22 min. |
| Total Time | 1:40 |
JAM CYCLE
| Pre-Heat | 15 min. |
| Heat & Mix | 50 min. |
| Cool Down | 20 min.- |
| Total Time | 1:25 |
*Whole Wheat cycle will have a rest period for up to 20 minutes before kneading begins. No movement occurs in the pan. This is normal.
**NOTE: If bread is not removed immediately after baking, and Stop button is not pressed, a controlled Keep Warm phase will begin for each selection (except Dough and Jam). While this will help reduce condensation between loaf and Bread Pan, it is best to remove bread as soon as possible after completion of the Baking phase.
† These are suggested sizes for each particular cycle.
MAKING DOUGH AND BAKING BREAD
Here's how to bake bread with your Farberware® Automatic Bread Machine:
STEP 1
Open the Lid and remove the Bread Pan.
Lift the Bread Pan straight out of the Bread Machine.
(The arrow marked "Front" on the Bread Pan reminds you which way to place the pan.)
STEP 2
Position the Kneading Paddle on the Drive Shaft as shown.
Match the flat side of the Drive Shaft to the flat part of the hole in the Kneading Paddle. Make sure the paddle is secure.
STEP 3
Place the ingredients into the Bread Pan.
For best results, add all liquid ingredients first. Then, add all dry ingredients EXCEPT yeast.
NOTE: If your recipe contains salt, please add salt with liquid ingredients, keeping it away from the yeast. Salt may activate the yeast prematurely.
*For Cake and Jam cycles, the order is not important.
STEP 4
Make a small indentation on top of the dry ingredients (not so deep it reaches the wet layer) and add the yeast to the indentation.
This order of adding ingredients is important, especially when using the Timer, because it keeps the yeast away from the liquid ingredients until it's time to knead them together. (Liquid ingredients will activate the yeast.)
STEP 5
Insert the Bread Pan in the Bread Machine.
To insert the Bread Pan in the Automatic Bread Machine, seat it in place with the marking "Front" facing the front of the machine. Press down until it snaps into place.
Close the Lid and plug in the Bread Machine.
When you plug it in, the Bread Machine will flash "000" in the Display Window.
STEP 6
Press the Select button to choose the cycle you want.
Press Select once to choose 2 lb. Basic Loaf Medium Crust. Each time you press Select, the indicator moves to the next selection in this order:
- Basic 1-1/2 lb. Reg. Crust
2.2 lb. Medium Crust
3.2 lb. Dark Crust
4.1-1/2 lb. Whole Wheat
5.2 lb. Whole Wheat
6.Rapid Whole Wheat
7.French
8.Fruit & Nut
9.Dough
10.Cake
11.Jam
NOTE: For Whole Wheat cycles, the ingredients initially rest for up to 30 minutes. No movement occurs in the pan. This is normal.
STEP 7
Press Start to begin the Kneading and/or Baking cycle.
First, the Bread Machine mixes the ingredients for one minute. Then, it begins the Kneading process. During this process, the yeast begins to activate, and normally the Viewing Window begins to fog. (This will clear so you can see the progress of your loaf.) The machine will stop kneading after a few minutes to let the dough rise before baking.
Before the end of the Kneading process, for both Basic and Fruit & Nut cycles, the Bread Machine beeps several times to let you know this is the time to add any fruit and nuts.
If you chose Dough, the Bread Machine beeps to let you know when the dough is ready to be removed. Then it's up to you to shape it, give it time for a final rising period, and bake it in a conventional oven.
For other cycles, the Bread Machine continues to the Baking process.
NOTE: For Whole Wheat cycles, the ingredients initially rest for up to 30 minutes. No movement occurs in the pan. This is normal.
STEP 8
When your bread is done, the Bread Machine will beep. This indicates that the Baking phase is completed. Press the Stop button, then put on your oven mitts and remove the Bread Pan.
Remember that the Bread Pan and your loaf are both very hot! Be careful not to place either on a tablecloth, plastic surface, or other surface that might scorch or melt.
If the bread is not removed immediately after baking and if the Stop button is not pressed, a controlled Keep Warm cycle will begin and the Bread Machine will automatically shut off in 60 minutes. While this will help prevent the bread from becoming soggy, for best results, remove bread immediately after Baking cycle is complete.
The Keep Warm cycle does not apply to Dough cycle.
NOTE: The Jam cycle has a 20 minute cool down. The Cake cycle has a 22 minute cool down.
STEP 9
Remove the loaf from the Bread Pan.
Turn over the Bread Pan a few inches from the countertop and gently shake out the loaf. It's best to remove the loaf as soon as the Bread Machine is done baking.
Place the loaf on a wire rack or other ventilated cooling surface to cool. Bread should be cooled slightly (15 to 30 minutes) before it is sliced.
ALWAYS CHECK FOR THE KNEADING PADDLE before you slice the loaf of bread!
If necessary, remove the Kneading Paddle from the loaf.
Sometimes the Kneading Paddle will stick in a loaf of bread. If it does, use a non-metal utensil to gently remove it, taking care not to scratch the Kneading Paddle.
When you are done using the Bread Machine, be sure to unplug it.
USING THE CAKE AND JAM CYCLES
With the Farberware® Automatic Bread Machine Cake cycle, you can make pre-packaged cake mixes (use recipes on each package). Or you can bake a cake from scratch. (See sample recipe in the back of this manual.)
Sweet breads and coffee cakes are also ideal when baked in this Bread Machine.
FOR BEST RESULTS
In our testing, we have found that easy bake cakes such as pre-packaged mixes, quick breads and coffee cakes work best.
When baking cakes from scratch, please note the following suggestions:
- Baking cakes such as pound cake or angel food cake or any cake that requires long beating of eggs, egg whites, or other ingredients are not recommended.
- If a recipe calls for a 9" x 5" cake pan, it will not have any problem fitting into the Baking Pan. On the same note, if a recipe is written to make two layers, the recipe can be cut in half to fit into the Baking Pan.
- Cakes which can be mixed together all at once are ideal for this machine.
OPERATING INSTRUCTIONS
• Measure ingredients in recipe and add to the Baking Pan. (Make sure the Kneading Paddle is in place.)
- Insert Baking Pan into the Bread Machine and close the Lid.
- Press "Select" button until Cake cycle is indicated.
- Press "Start."
- When baking is complete, there will be a Cooling cycle which lasts approximately 22 minutes. The entire Cake cycle takes 2 hours. The Bread Machine will beep when the Cooling cycle begins.
- When the Cooling cycle is complete, remove the Baking Pan from the Bread Machine. BE SURE TO WEAR OVEN MITTS AS THE UNIT WILL BE VERY HOT!
- Turn onto a baking rack and let the cake cool completely before slicing or decorating.
JAM CYCLE INSTRUCTIONS
The Jam cycle works in a very similar way to the Cake cycle.
FOR BEST RESULTS
- Do not reduce sugar or use sugar substitutes. The exact amounts of sugar, fruit, and pectin are necessary for a good set.
- Use only ripe fruit (not overripe or underripe) for best flavor.
- Do not puree fruit. Crush with a potato masher or food processor. Jam should have bits of fruit in it.
• Recipes should not exceed 3-1/2 cups. - Be sure to measure fruit before it has been crushed not after.
- Remove stems, seeds, or pits from fruit before crushing.
OPERATING INSTRUCTIONS
- With Kneading Blade in position, add the crushed fruit to the Baking Pan.
- Add the rest of the called-for ingredients.
- Insert Baking Pan into the Farberware® Bread Machine.
- Close lid.
- Press Select button until Jam cycle is chosen.
- Press Start.
- The Farberware® Bread Machine will pre-heat for 15 minutes before any movement occurs in the pan. After pre-heating, the jam will be heated and mixed for approximately 45 minutes. The entire cycle takes 1:20 in which 20 minutes is the cool-down cycle.
• The Bread Machine will beep when the cycle is complete. - Press Stop and remove the Pan, MAKING SURE TO WEAR OVEN MITTS.
- Pour the hot jam into a refrigerator/freezer-safe container, leaving 1/2" of space at the top.
• Cover tightly to store. - Jam will thicken upon cooling and storage.
PLEASE NOTE:
The Timer cannot be used for either the Cake or Jam selection. See table at bottom of page 6 for times.
USING THE TIMER
You can preset your Farberware® Automatic Bread Machine to cook bread from 2 hours and 40 minutes to 12 hours in advance. 2 hours and 40 minutes is the time it takes for the Basic Regular bread baking cycle.
NOTE: Don't use the Timer if your recipe includes eggs, fresh milk or other ingredients that may spoil. This Timer cannot be used for the Fruit & Nut or Dough cycles and cannot be used for the Cake or Jam cycles.
To preset your Farberware®, Automatic Bread Machine, follow these steps:
- Add the ingredients as usual, taking care not to let the yeast and liquid ingredients contact one another.
- If your recipe contains salt, please add salt with liquid ingredients, keeping it away from the yeast. Salt may activate the yeast prematurely.
- Close the Lid and plug it in.
- Select the Baking cycle you want. The time needed for the selected Baking cycle appears in the Display Window.
| Baking Cycle | Length of Baking Cycle |
| Basic 1 - 1-1/2 lb. Regular Crust | 2:40 (2 hrs., 40 min.) |
| Basic 2 lb. Medium Crust | 2:50 |
| Basic 2 lb. Dark Crust | 3:10 |
| Whole Wheat, 1-1/2 lb. | 4:20 |
| Whole Wheat, 2 lb. | 4:30 |
| Whole Wheat Rapid | 3:20 |
| French | 3:40 |
| Fruit & Nut | 3:25 |
-
Press the ▲ Timer button once for each 10 minutes you want to add. (Use the ▼ button to decrease the time.) The amount of time you set is shown in the Display Window.
-
To make the time fast forward or backward, continuously press down on the arrow button.
- For example, if it is 8 o'clock and you want a loaf of bread ready at 1 o'clock, press the ▲ Timer button until the display reads 5:00, meaning it will finish baking in five hours.
NOTE: Actual baking times will not change.
-
Press Start to begin the Timer. The colon (:) in the time displayed begins to flash, letting you know the Timer is started. When the Display Window indicates 0:00, baking is completed.
-
If you make an error and want to start over again, press "Stop." The Timer will clear and you can begin again at the beginning. This does not apply if you have already pressed "Start."
NOTE: The Timer cannot be used for the Cake and Jam or Dough cycles.
FOR BEST RESULTS
- Take care to measure ingredients accurately, using a good set of measuring cups and spoons, or a good scale. Make sure to level all dry ingredients as you measure them. Inaccurate measuring could cause unexpected results in your loaf of bread.
• In particular, be precise in measuring the water.
• Take care not to add more than 4 cups of flour per loaf. Excess flour will cause the bread to bake incompletely and the dough to stick to the inside of the Lid.
• After placing all the ingredients in the Baking Pan, wait 10 minutes before pressing Start, or use the Timer to add 10 minutes to the total processing cycle.
• Use fresh ingredients. - Since moisture is an enemy to flour, be sure to store your flour in an airtight container.
- To keep your yeast active, store it in an airtight container in your refrigerator.
- Speaking of fresh — when using the Timer, we recommend setting it for as short a time as possible. Because ingredients are partially combined in the Bread Pan, the dough may tend to deteriorate if left too many hours, especially on a warm or humid day.
- Although you can preset the Farberware® Automatic Bread Machine for dough, we only recommend this for prepackaged mixes. Eggs and dairy products can easily spoil.
- Keep the Lid closed during the Baking cycle. Opening it causes uneven baking.
• After your bread has cooled completely, store it in a plastic bag or plastic wrap to prevent it from drying out.
CLEANING INSTRUCTIONS
The Bread Pan and Kneading Paddle have non-stick surfaces that make cleaning easy.
-
After baking each loaf of bread, unplug the Farberware® Automatic Bread Machine and discard any crumbs.
-
Remove the Bread Pan from the Oven and the Kneading Paddle from the Bread Pan. Then, as needed, wash the Bread Pan and Kneading Paddle inside and out with warm, soapy water. Avoid scratching the non-stick surfaces.
DO NOT PUT THE PAN IN A DISHWASHER.
If the Kneading Paddle is stuck to the Drive Shaft, pour warm water in the Pan to loosen it.
DO NOT USE EXCESSIVE FORCE!
- Wipe the inside of the Lid and Oven with a damp cloth or sponge. If any residue has scorched on the heating plate or elsewhere, scrub with a non-abrasive scrubbing pad and wipe clean.
Do not use vinegar, bleach, or harsh chemicals to clean this machine.
Do not soak the Bread Pan for a long period of time — this could interfere with the free working of the Drive Shaft.
Be sure the Bread Machine is completely cooled before storing.
The inner casing contains the heating element and drive base. Therefore, when cleaning, NEVER pour water, solvents or cleaning solutions into this area.
CAUTION! To avoid electric shock, unplug the Farberware® Automatic Bread Machine before cleaning!
MEASURING
Measure all ingredients carefully. You will need two types of measuring cups, liquid and dry — it is very difficult to measure dry ingredients accurately with liquid measures.
Liquid measures: are either glass or clear plastic, graduated cups.
Dry measures: sell in sets of:
5 nested cups (1/8, 1/4, 1/3, 1/2, and 1 cup) or 5 nested spoons (1/8, 1/4, 1/2, and 1 teaspoon, plus 1 Tablespoon).
Measuring Equivalents
| Dry | Liquid | |
| 1 cup | 16 Tbl. | 8 oz. |
| 1/2 cup | 8 Tbl. | 4 oz. |
| 1/3 cup | 5 Tbl. & 1 tsp. | 2.7 oz. |
| 1/4 cup | 4 Tbl. | 2 oz. |
| 1/8 cup | 2 Tbl. | 1 oz. |
| 1 Tbl. | 3 tsp. | 1/2 oz. |
TROUBLE SHOOTING
Bread has an offensive odor.
Check to be sure you added the correct amount of yeast.
Measure carefully — too much yeast will cause an unpleasant odor and may cause the loaf to rise too high.
Be sure to use only fresh ingredients.
Baked bread is soggy or the bread's surface is sticky.
Remove the bread from the Bread Pan as soon as it is done baking. Leaving it in the pan allows condensation to collect on the sides touching the pan.
Also be sure to cool the loaf on a wire rack; cooling it on a countertop causes the side next to the counter to become soggy.
"Start" button doesn't start the Bread Machine.
Make sure the Bread Machine is plugged in.
If nothing appears in the Display Window, press "Select" to choose your Baking cycle. (You must select a Baking cycle before pressing "Start.")
If the baking area is too hot, the Farberware® Automatic Bread Machine will not start because of an automatic safety feature. Remove the Bread Pan with your ingredients, and wait until the Automatic Bread Machine cools down — about 20 minutes — before starting to bake a new loaf.
Can't set the Timer.
If you selected either the Dough or Fruit & Nut cycle, you should not use the Timer. This is because the ingredients should be processed immediately for these cycles. The Timer cannot operate for Cake or Jam cycles.
The Bread Machine stopped and "000" flashes.
This happens if you press the "STOP" button, if you unplug the Bread Machine, or if there is a power outage. In each case, the Automatic Bread Machine can't be restarted for this cycle.
Discard the contents of the Bread Pan and start again with new ingredients.
The Kneading Paddle was stuck in the bread.
Make sure the Kneading Paddle is mounted properly before adding ingredients to the Bread Pan and baking.
Sometimes denser or crustier loaves of bread may pull the Kneading Paddle out with them when you remove the loaves after baking. When this happens, use a non-metal utensil and gently remove the blade from the bottom of the loaf.
The Kneading Paddle may stick in your cake as well. Remove as instructed above.
The bread rose too high.
Make sure not to add too much yeast, water or flour. Too much of any of these may cause the loaf to rise more than it should.
The bread didn't rise enough.
Did you add enough yeast, water or sweetener?
Make sure to add ingredients in the proper order: liquids, dry ingredients, yeast. Make sure yeast doesn't get wet until the Farberware® Automatic Bread Machine mixes the ingredients together.
NOTE: Typically, bread made with whole grain flours will not rise as high as bread made with refined flours.
The bread didn't rise at all.
Make sure yeast is not left out. Also check the date code on the yeast and that it is always the last ingredient put into the pan. Make sure the yeast doesn't come into contact with salt or any liquid ingredients.
The bread is caved in.
Make sure liquids are measured correctly. Next time, reduce your liquids by 2 tablespoons. If you're using fruits or vegetables, make sure they are well drained.
The dough looks like batter, or the dough ball is still sticky, not smooth and round.
During the Kneading process, add 1 tablespoon of flour at a time, letting it mix in well. For most breads, your dough ball should become round, smooth, not sticky to the touch, and should bounce back when you press it with your finger.
The dough ball is lumpy or too dry.
During the Kneading process, add 1 tablespoon of water at a time, letting it mix in well.
"E:01" displays when you press START button.
The Farberware® Automatic Bread Machine is too hot (over 100°F/38°C) to begin preparing another loaf. Remove the Bread Pan with your ingredients, and wait until the Bread Machine cools down — about 20 minutes — before preparing another loaf.
"E:02" displays when you press START button.
The Farberware® Automatic Bread Machine is too cold. Unplug the machine and allow it to heat up to room temperature, then try again.
"E:03", "E:04", "E:05", "E:08" displays when you press START button.
Unplug the Farberware® Automatic Bread Machine and contact Farberware Customer Service Department at 1-900-884-8818, Monday - Friday, 9 a.m. - 5 p.m. CST. You will be charged 95 cents per minute, with a maximum charge of \$3.80 for this call.
SPECIFICATIONS
| Model | FTR700 |
| Power Requirements | 120V AC |
| Capacity (Flour) | 4-2/3 cups |
| Timer Range | 1 hour 30 minutes (1:30) to 12 hours (12:00) |
| Dimensions | 12-3/8” x 9-13/16” x 13” |
| Window | 3-3/16” x 3-3/16” |
| Added Features | Non-stick Bread PanRemovable, heavy gauge, non-stick Kneading PaddleFruit and Nut add-in beeperCake cycleJam cycleDelay Bake |
| Cool-Down Cycle | If bread is not removed after Baking cycle, the Farberware® Automatic Bread Machine shifts into a controlled rate Keep Warm cycle which reduces the bread temperature gradually.Shuts off after 60 minutes. |
SAMPLE RECIPES FOR THE CAKE AND JAM CYCLES
TRADITIONAL CHOCOLATE CAKE
| 1-1/2 cups | all purpose flour |
| 5 Tbl. | unsweetened cocoa |
| 2 tsp. | baking powder |
| 3/4 cup | sugar |
| 1/3 cup | canola or vegetable oil |
| 2 | large eggs or 1/2 cup egg substitute |
| 1/3 cup | water |
| 1-1/2 tsp. | vanilla extract |
• Follow Cake Baking procedure on page 11.
- Recipe makes one 4" high cake. Bakes 8-10 servings
© 1997 Salton/Maxim Housewares, Inc.
ANY BERRY JAM
| 3 cups | fresh strawberries, raspberries, blueberries, or blackberries. (or a combination of any berries) |
| 1 cup | sugar |
| 3 Tbl. | lemon juice |
| 1 pkg. (2 oz.) | powdered pectin* |
- Follow procedure for making Jam on page 12.
• Make sure to crush fruit AFTER it has been measured.
• Makes 3-1/2 cups of Jam. - When Jam is completed store in refrigerator for 12 hours to allow to set.
*We recommend using Sure-Jell® Fruit Pectin.
© 1997 Salton/Maxim Housewares, Inc.
NOTES
NOTES
IMPORTANT NOTICE
If any parts are missing or defective,
DO NOT return this product.
Please call our Customer Service Department for assistance.
800-233-9054
Monday - Friday
9am - 5pm CST
Thank You
FARBERWARE®
ONE-YEAR LIMITED WARRANTY
This FARBERWARE® product warranty extends to the original consumer purchaser of the product.
Warranty Duration: This product is warranted to the original consumer purchaser for a period of one (1) year from the original purchase date.
Warranty Coverage: This product is warranted against defective materials or workmanship. This warranty is void if the product has been damaged by accident, in shipment, unreasonable use, misuse, neglect, improper service, commercial use, repairs by unauthorized personnel or other causes not arising out of defects in materials or workmanship. This warranty is effective only if the product is purchased and operated in the USA, and does not extend to any units which have been used in violation of written instructions furnished, or to units which have been altered or modified or to damage to products or parts thereof which have had the serial number removed, altered, defaced or rendered illegible.
Warranty Disclaimers: This warranty is in lieu of all warranties expressed or implied and no representative or person is authorized to assume any other liability in connection with the sale of our products. There shall be no claims for defects or failure of performance or product failure under any theory of tort, contract or commercial law including, but not limited to, negligence, gross negligence, strict liability, breach of warranty and breach of contract.
Warranty Performance: During the above one-year warranty period, a product with a defect will be either repaired or replaced with a comparable model (at Salton, Inc.'s option) when the product is returned. The repaired or replacement product will be in warranty for the balance of the one-year warranty period and an additional one-month period. No charge will be made for such repair or replacement.
Important Notice
If any parts are missing or defective, return this product to the place of purchase or contact our Consumer Service Department for assistance.
Consumer Service
This FARBERWARE® product is distributed by:
Salton, Inc.
708 SOUTH MISSOURI ST.
.MACON, MO 63552
E-mail: farberware-electric@saltonusa.com
Any questions or comments can be directed to Salton, Inc.'s address or call the Consumer Service Department:
1-800-233-9054, Monday - Friday, 9 a.m. - 5 p.m. CST
FARBERWARE® is a registered trademark of Farberware Inc.®
Manufactured and sold pursuant to a license from Farberware Inc. ^®
Printed in China
- TABLE OF CONTENTS
- IMPORTANT SAFEGUARDS
- SAVE THESE INSTRUCTIONS
- NOTE:
- YOUR FARBERWARE® AUTOMATIC BREAD MACHINE
- POLARIZED PLUG
- CONTROL PANEL
- Display Window
- Selection Options
- Timer
- (Hint: Hold down the button for fast forward.)
- Select
- Start
- Stop
- USING YOUR FARBERWARE® AUTOMATIC AUTOMATIC BREAD MACHINE
- INSERTING AND REMOVING THE BREAD PAN
- OPERATING TIPS
- CAUTION! To protect young children, keep the Bread Machine out of their reach when you're not there to supervise — especially during the Kneading and Baking cycles.
- KNEADING AND BAKING CYCLES
- MAKING DOUGH AND BAKING BREAD
- STEP 1
- STEP 2
- STEP 3
- STEP 4
- STEP 5
- STEP 6
- STEP 7
- STEP 8
- STEP 9
- USING THE CAKE AND JAM CYCLES
- FOR BEST RESULTS
- OPERATING INSTRUCTIONS
- JAM CYCLE INSTRUCTIONS
- PLEASE NOTE:
- USING THE TIMER
- CLEANING INSTRUCTIONS
- MEASURING
- TROUBLE SHOOTING
- Baked bread is soggy or the bread's surface is sticky.
- "Start" button doesn't start the Bread Machine.
- Can't set the Timer.
- The Bread Machine stopped and "000" flashes.
- The Kneading Paddle was stuck in the bread.
- The bread rose too high.
- The bread didn't rise enough.
- The bread didn't rise at all.
- The bread is caved in.
- The dough looks like batter, or the dough ball is still sticky, not smooth and round.
- The dough ball is lumpy or too dry.
- "E:01" displays when you press START button.
- "E:02" displays when you press START button.
- "E:03", "E:04", "E:05", "E:08" displays when you press START button.
- SAMPLE RECIPES FOR THE CAKE AND JAM CYCLES
- TRADITIONAL CHOCOLATE CAKE
- ANY BERRY JAM
- NOTES
- IMPORTANT NOTICE
- FARBERWARE®
- ONE-YEAR LIMITED WARRANTY
- Consumer Service
Brand : Farberware
Model : FTR700
Category : Bread maker