
K2-XT - Tent EUREKA - Free user manual and instructions
Find the device manual for free K2-XT EUREKA in PDF.


| Product Type | Tent |
| Brand | Eureka |
| Model | K2-XT |
| Capacity | 2 persons (estimated) |
| Number of Poles | 4 main poles + 1 vestibule rod |
| Pole Material | Aluminum (shockcorded) |
| Fly Material | Polyester with UV resistance |
| Tent Body Material | Nylon/polyester blend |
| Floor Material | Polyester with sealed seams |
| Doors | 2 (front and back vestibule) |
| Windows | 1 clear plastic window in front vestibule |
| Ventilation | Roof vents, high/low venting doors, vestibule short-sheeting |
| Staking Points | Multiple web loops and grommets |
| Guy Lines | Included (adjustable sliders) |
| Seam Sealing | Recommended (use Kenyon Seam Sealer 3 or McNett SeamGrip) |
| Warranty | Limited lifetime for original purchaser |
| Manufacturer | Johnson Outdoors Gear LLC |
| Recommended Care | Clean with mild soap and water, dry completely, avoid detergents |
| Storage | Store dry, loosely rolled in cool place; poles stored assembled to reduce shock cord tension |
| Safety Warning | Keep away from flame and heat sources; do not operate fuel-burning devices inside |
Frequently Asked Questions - K2-XT EUREKA
User questions about K2-XT EUREKA
0 question about this device. Answer the ones you know or ask your own.
Ask a new question about this device
Download the instructions for your Tent in PDF format for free! Find your manual K2-XT - EUREKA and take your electronic device back in hand. On this page are published all the documents necessary for the use of your device. K2-XT by EUREKA.
USER MANUAL K2-XT EUREKA
ASSEMBLY INSTRUCTIONS
FOR THE K2-XT
FOR LIFE OUTDOORS.
Component List: 1 Tent Body 1 Fly 4 Poles
1 Vestibule Rod 1 Carry Bag 1 Pole Bag 1 Bag w/ Stakes
Assembly:
1 Unpack the carry bag and separate the components. Unfold the tent body and lay it out with the floor on the ground and a grommeted web in each corner. Pull the tent into a rough hexagon. Do not stake down the tent just yet; but in windy conditions, stake down one corner that faces into the wind.
2 Assemble the shockcorded tent poles and rod. Carefully seat each section. Try to keep the poles from snapping together as this can damage the ends. Set the shorter vestibule rod aside.
3 Insert the tent poles into the mesh sleeves.
- Near the side of the door, insert and slide a pole through the continuous mesh sleeve from A to B. Push the pole rather than pull it.
- At the other side of the door, insert and slide a second pole from C to D.
- Insert and slide the remaining two poles through the mesh sleeves from E to F and from G to H. See fig.1.
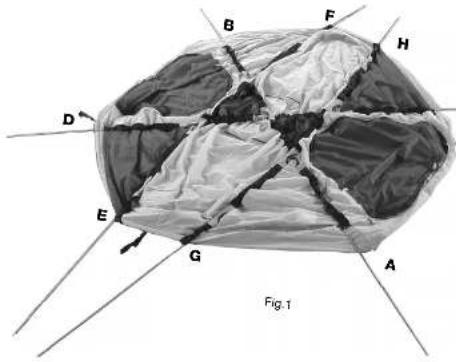
4 Raise the tent.
- At location A, grasp the end of the pole and insert the post into the first grommet (the one closest to the tent) on the web. At location B, lift the tent and push the pole from B to A to create an arc. Insert the locking post into one of the grommets on web to maintain tension. There are 2 or 3 grommets on each web — these are for adjustment. If possible, insert the posts into the grommets closest to the tent to make the canopy tight and wrinkle free.
- Repeat with the second pole from C to D.
- Move to the side of the tent and insert the locking post into the first grommet on the side web at E. On the opposite side and at location F grasp the end of the pole and push from F to E to form an arc. Insert the post into a grommet on the web.
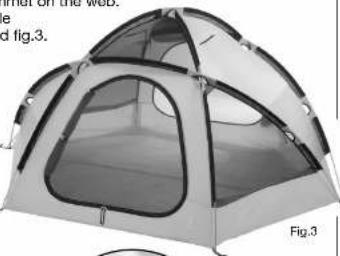
- Continue with the last pole from G to H. See fig.2 and fig.3.
5 Stake the tent down.
Your tent is now free standing. Place it in the desired location and stake it down. Be sure to drive the stakes through the web loops or rings—not the grommets.
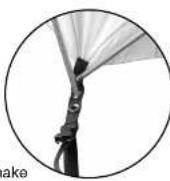
Fig.2
natural_image
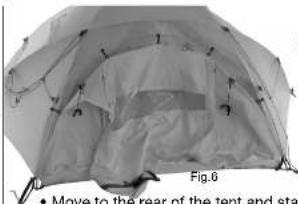
Tight structure with numbered measurement points and directional arrows, no visible text or symbols- Move to the rear of the tent and stake out the web loop on the back vestibule, but do not adjust the tension just yet. Go to the front of tent and stake out the two web loops on the front vestibule. See fig.7.
- Insert the posts of the vestibule pole into the grommets on the web at either side of the door. Connect the five clips on the fly to the poles. See fig.6.
6 Attach the fly to the tent.
- Spread the fly on the ground. Find the front vestibule; it has a door and clear plastic window. Drape the fly, right side up, on top of the tent so that the vestibule covers one of the doors.
- Reach under the fly and attach all the Velcro ^ tabs, through the openings in the sleeves, to the poles. See fig.4.
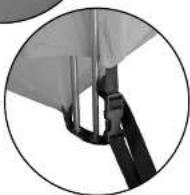
- Connect the six side release buckles on the fly to their mates on the tent. See fig.5.
openings in the sleeves, to the Fig.5
natural_image
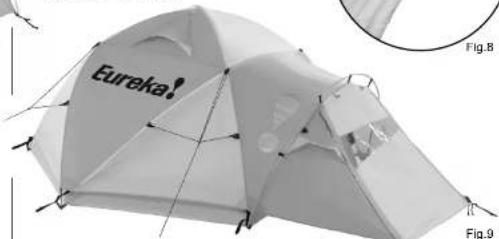
Exterior view of a camping tent with visible windows and roof structure (no text or symbols)7 Tighten the webs until the vestibule is taut. Work your way around the tent, tighten the six side release buckle webs from the fly and from the rear stake out web. See Fig.8.
8 Stake out the attached guy lines and adjust the sliders to a proper tension. See fig.9.
natural_image
Exterior view of a portable camping tent with Eureka branding, labeled Fig.8 and Fig.9 (no additional text or symbols)Your tent is now ready for use.
Open the two fly roof vents through the zippered slots in the tent roof. Then, roll up the vestibule door from the bottom or to the side for better ventilation. The front vestibule also features an attached snow flap around the bottom.
Take down: Pull up stakes. Release the fly's Velcro® and buckles. Remove fly and open door. Pull posts out of the grommets and push poles out of the sleeves. Collapse the tent poles and stow. Fold the tent onto itself and fold the fly and lay it on tent. Roll up both towards the door and stow.
REV D 4.05
WARNING:
KEEP ALL FLAME AND HEAT SOURCES AWAY FROM THIS TENT FABRIC. • This test meets the flammability requirements of CPN-84. The fabric may burn if left in continuous contact with any flame source. The application of any foreign substance to the tent fabric may render the flame-resista properties ineffective. • Do NOT operate any device which burns fuel inside your tent. Combustion consumes oxygen and can produce dangerous levels of carbon monoxide, which could lead to serious injury or death.
SEAM SEALING:
We recommend use of a sealer such as Kenyon Seam Sealer 3 or McNett Outdoor SeamGrip ^4 .
• Work in a fully ventilated area.
- Set the tent up or lay the tent out flat. Taut seams allow for even application and penetration of the sealer.
- Decide which seams need to be sealed. For example, seams that will be exposed to rain, runoff, or ground level water are a must for sealing while seams uncoated nylon or mesh panels don't need treatment. There is no need to see the seams in the roof or the factory-taped seams. We recommend sealing both floor and fly seams and reinforcements.
- Apply sealant to the inside and outside of all exposed seams. Several thin layers will work better than one thick layer. Read and follow manufacture's instructions.
STAKING:
All tents need to be staked down to keep them from blowing away. Securing the tent by placing heavy objects inside is just not adequate.
Once the tent body is erected, stake it out before the fly is put on. This enables you to square the tent up to ensure that the fly goes on properly and that the seams aligns with the frame. Pull the base of the tent taut between each web stake out loop or ring & pin. Make sure that all corners are square. It is important that you don't stake the tent out too lightly. You will know it's too light, if the door zippers can not be easily operated. Drive stakes through the web loops, or with ring & pin, drive the stake just outside the ring so that the "3" hook catches it. Tie a piece of cord or web into a loop through the ring to be used as a large stake loop if needed.
- With the tent properly staked, drape the fly over the frame, attach its tent connection points and stake down any pull outs.
- Do not attempt to remove the stakes by pulling on the tent becket loop, as this could cause the fabric to tear. The best way is to pry on the stake itself.
Staking in special conditions:
- Sand. Use long, broad stakes with plenty of surface area in loose soil.
- Hard, Rocky, or Frozen Soil. Steel stakes work best. Store steel stakes separately. Their sharp edges can cut fabric and leave rust stains, which might damage your tent.
- Snow. Use "dead man" anchors. Tie tent to buried objects (branches, tent bags, or stuff sacks filled with snow; or tie tents to snow shoes, skis, or ski poles, which are stuck in the snow.
GUY LINES:
Do not depend upon staking alone to keep your tent secure during high winds. Most tent models have built-in loops or rings at optimal guy out locations. It's important to put in the extra time guying out your tent. Correctly done, it can save your tent during exceptional weather.
• Make sure that the top fly is securely attached to the tent frame. Ties, hook and loop, or dog-bones and elastic loops are seven to the underside of the fly for this purpose.
- Attach parachute cord to the loops/rings and stake them in the ground three or four feet from the edge of the tent. If staked too close to the tent, wind can cause an upward pull that could dislodge the stakes.
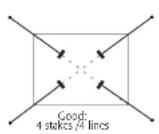
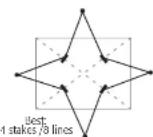
- If your tent does not have loops or rings for guy outs, attach guy lines 1/3 to 1/2 of the way up the framework on the main sidewalls. This enables the guy line to support the lower section of the pole, while the upper pole can flex and deflect wind gusts. It is best to run two cords at an angle from the side of the guy out. This prevents all movement, except toward the anchor. The guy lines will work together through opposition. See illustrations below:
CONDENSATION & VENTING:
Through perspiration and breathing, an adult gives off about a pint of water overnight. If it cannot escape, the water vapor condenses to liquid. Most often, water found in the tent is a result of this condensation rather than from the tent leaking. Condensation often forms where the sleeping bag touches the side of the tent, under the sleeping pad, or on coated surfaces such as the door flaps. A tent's double wall construction allows the vapor to escape through the roof to the outside, keeping the inside of the tent dry. Leave the windows partially open at night to provide cross ventilation and further reduce condensation. Cross ventilation becomes more important in very humid or extremely cold conditions when the permeable roof is less effective. The features that enhance ventilation are windows, short-sheeted fly (bottom venting), roof vents, and High/Low venting doors. These are specific to each tent model.
Given the importance of proper ventilation, We use High/Low venting in most of our tents. This allows cooler air in through the low vents and warmer, moist air up and out through the high vents. High/Low venting is accomplished within the inner tent via roof vents, doors and windows. It is important to vent the vestibule. Untreated, it can inhibit airflow into the tent. Our tent vestibules profit from the ability to "short sheet" by means of zippers & toggles and staked vestibule pull outs create a bellowing effect. Most of our tents are equipped with a High/Low venting door. This design allows increased airflow into the tent from the bottom. Open the low vent/window to admit cool air, allowing the warmer air out through the high roof vents. When rain and wind prevent the law vent from being opened, the high door vent can still be used. Fly overhangs or vestibules protect it.
ULTRAVIOLET LIGHT:
Ultraviolet light damage to tent fabric is caused by excessive exposure to sunlight. While our fabrics are UV resistant, any synthetic fabric is susceptible to UV degradation. UV damage will cause nylon and polyester to become brittle and tear easily. We recommend that you use the rain fly even on clear days. It acts as a sunscreen to the tent. A rain fly is both easier and less expensive to replace if damaged. UV damage can be minimized by erecting tents on shaded sites with low exposure to direct sunlight.
GENERAL POLE CARE:
- Never let tent poles snap together as this can damage the pole end.
- Do not drop tent or pole bags on their ends and do not bounce a tent bag on its end to get the tent out. These actions may cut the shock cord and damage the pole ends.
- The aluminum frame may bend slightly and take a "set" through usage; this normally does not affect the performance of the frame.
GENERAL TENT CARE:
- Sweep the tent floor daily to prevent damage from stones.
• Try not to wear shoes inside your tent. - Use a ground cloth whenever possible.
- Do not keep food inside a tent. Hungry critters will chew through tent fabric in search of food.
STORAGE:
- Make sure the tent is completely dry, then store loosely rolled, in a dry, coal place. To prevent dust from collecting on the tent, cover it with a cloth. This allows the nylon/polyester fabric to breathe.
- Ideally, the tent poles should be stored in their fully assembled state. This reduces the tension on the shock cord, prolonging its life.
- The tent bag should be used only as a carry sack and not for storage.
COLOR TRANSFER:
- Do to the nature of tent fabrics, color can transfer from darker to lighter fabrics when the two fabrics are in contact over time when wet, damp or exposed to the combination of moisture and high heat. This does not effect the tent's performance. To prevent / minimize color transfer, always make sure your tent is completely dry prior to packing and storage.
CLEANING:
- Clean the tent by selling it up and wiping it down with a mild soap (liquid hand soap) and lukewarm water solution. Rinse thoroughly and dry completely. Never use detergent, washing machines or dryers because they can damage the tent's protective coating and seams. After cleaning, be sure the tent is completely dry, especially the heavier, double-stitched areas such as the seams, before storing or mold / mildew are likely to grow.
- Clean the tent poles with a cloth and lubricate them with silicone spray. This is especially necessary after ocean side camping to remove salt spray so the poles don't corrode or stay gritty.
- Clean the zippers with a quick dip in water and then dry them off. This is especially important if you've been camping in a location with sand/dirt. If you don't clean the zippers, the sliders will wear out and eventually the teeth will become inoperable.
ALTERATIONS OR MODIFICATIONS:
DO NOT misuse, modify or alter this product in any way from its condition at the time of sale. Alteration, modification or any use of this product contrary to the accompanying written instructions shall void the warranty. Moreover, any misuse, alteration or modification of the product shall absolve Johnson Outdoors Gear LLC of any liability for property damages or injuries sustained as a result of such misuse, modification or alteration.
LIMITED WARRANTY:
What Is Covered: Johnson Outdoors Gear LLC warrants to the original purchaser that its products are free from defects in material and workmanship, for the life of the product, except as qualified below. The life of the product is determined from the date of purchase until such time as the product is no longer serviceable due to normal wear and tear.
What Is Not Covered: Johnson Outdoors Gear LLC shall not be responsible for the natural breakdown of materials that occurs inevitably with extended use (e.g., Ultra
Violet (UV) light damage on tents, exhausted zippers), or defects caused by accident, abuse, alteration, animal attack, storm damage, misuse or improper care.
THERE ARE NO OTHER EXPRESS WARRANTIES BEYOND THE TERMS OF THIS LIMITED WARRANTY. IN NO EVENT SHALL JOHNSON OUTDOORS GEAR LLC BE LIABLE FOR INCIDENTAL OR CONSEQUENTIAL DAMAGES.
Some states do not allow the exclusion or limitation of incidental or consequential damages, so the above limitation or exclusion may not apply to you.
What Johnson Outdoors Gear LLC Will Do: If after inspection we find that a product failed due to a manufacturing or material defect, we will repair or replace the product, at our option, without charge.
How to Obtain Warranty Service: Return the product, freight prepaid, to the Dealer from whom it was purchased; or, contact our Customer Satisfaction Department for return authorization: toll free 1-800-572-8822. Collect shipments or shipments without return authorization cannot be accepted. The product registration card packaged with our product need not be returned for the warranty to be effective and for you to receive warranty service.
Repairs: If your Johnson Outdoors Gear LLC product needs service or repair due to normal wear and tear, animal attack, accident or some other reason that is not covered under the warranty we will provide the necessary service for a reasonable charge, plus shipping and handling. We require that products accepted for any repair be properly cleaned according to our recommended care instructions. Please send your product or component that requires repair (e.g., tent fly), postage prepaid, along with a description of what needs attention. For service and repairs, please contact our Customer Satisfaction Department: toll free 1-800-572-B022
low State Law Relates To This Warranty: This warranty gives you specific legal rights, and you may have other rights that vary from state to state.
JOHNSON
OUTDOOR
JOHNSON OUTDOORS GEAR LLC
Our experience building quality
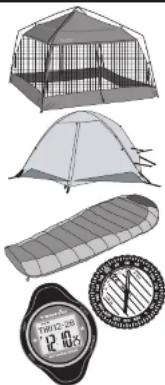
outdoor equipment goes back over 100 years! Today, we manufacture sleeping bags, screen houses, day-use
shelters and camping tents. We also design and manufacture tents for the United States Military and for the rental industry.
See eurekatents.com
From baseplate and digital
compasses to electronic instruments, our sister brands, Silva and Tech4o, put outdoor technology a your fingertips.
See tech4o.com and silvausa.com
Our brands are part of the Johnson Outdoors family of products. Visit all the brands at johnsonoutdoors.com
natural_image
Illustration of various outdoor gear and equipment including a cage, tent, slide, and stopwatch (no text or symbols)We support the "Leave No Trace" Seven Principles:
- PLAN AHEAD AND PREPARE
- TRAVEL & CAMP ON DURABLE SURFACES
- DISPOSE OF WASTE PRO
- LEAVE WHAT TOD FINDS
- MINIMIZE CAMPOIRE IMPACTS
- RESPECT WILDLIFE
. BE COURTEOUS OF OTHER VISITORS

- Assembly:
- WARNING:
- SEAM SEALING:
- STAKING:
- Staking in special conditions:
- GUY LINES:
- CONDENSATION & VENTING:
- ULTRAVIOLET LIGHT:
- GENERAL POLE CARE:
- GENERAL TENT CARE:
- STORAGE:
- COLOR TRANSFER:
- CLEANING:
- ALTERATIONS OR MODIFICATIONS:
- LIMITED WARRANTY:
- JOHNSON
- OUTDOOR
- We support the "Leave No Trace" Seven Principles:
Brand : EUREKA
Model : K2-XT
Category : Tent