KM70 - Dehumidifier KENMORE - Free user manual and instructions
Find the device manual for free KM70 KENMORE in PDF.


| Product Type | Dehumidifier |
| Brand | Kenmore |
| Model | KM70 |
| Dimensions (H x W x D) | 20.5 x 12.0 x 15.0 inches |
| Weight | 35 lbs |
| Power Supply | 120V, 60Hz |
| Power Consumption | 500W |
| Water Removal Capacity | 70 pints/day (at 80°F, 60% RH) |
| Water Tank Capacity | 1.5 gallons |
| Refrigerant Type | R-410A |
| Operating Temperature Range | 41°F to 95°F |
| Humidity Control | Adjustable from 30% to 80% RH |
| Fan Speeds | Low, Medium, High |
| Timer | 1-24 hour programmable timer |
| Auto Drain | Continuous drain option with hose |
| Filter Type | Washable, reusable mesh filter |
| Filter Cleaning | Every 2 weeks; wash with mild detergent |
| Defrost Function | Automatic defrost |
| Noise Level | 52 dB (on high speed) |
| Safety Features | Overheat protection, auto shut-off when tank full |
| Warranty | 1 year limited warranty |
| Repairability | Replaceable fan motor, compressor, control board |
Frequently Asked Questions - KM70 KENMORE
User questions about KM70 KENMORE
0 question about this device. Answer the ones you know or ask your own.
Ask a new question about this device
Download the instructions for your Dehumidifier in PDF format for free! Find your manual KM70 - KENMORE and take your electronic device back in hand. On this page are published all the documents necessary for the use of your device. KM70 by KENMORE.
USER MANUAL KM70 KENMORE
Master Protection Agreements ....4
Safety Instructions 5
Electrical Requirements 6
Installation 6
Key Features 7
Control Panel 8.9
Water Disposing Options ....10
Care and Maintenance ....11
Troubleshooting 12
Product Specification 13
Spanish/Espanol 15
Sears Service ....Back Cover
PACKAGE CONTENTS
- Kenmore Dehumidifier
- Use & Care Guide
WARRANTY
KENMORE LIMITED WARRANTY
FOR ONE YEAR from the date of sale this appliance is warranted against defects in material or workmanship when it is correctly installed, operated and maintained according to all supplied instructions.
WITH PROOF OF SALE, a defective appliance will receive free repair or replacement at option of seller.
For warranty coverage details to obtain free repair or replacement, visit the web page: www.kenmore.com/warranty
This warranty applies for only 90 DAYS from the sale date in the United States, and is void in Canada, if this appliance is ever used for other than private household purposes.
This warranty covers ONLY defects in material and workmanship, and will NOT pay for:
- Expendable items that can wear out from normal use, including but not limited to filters, belts, bags or screw-in base light bulbs.
- A service technician to clean or maintain this appliance, or to instruct the user in correct appliance installation, operation and maintenance.
- Service calls to correct appliance installation not performed by Sears authorized service agents, or to repair problems with house fuses, circuit breakers, house wiring, and plumbing or gas supply systems resulting from such installation.
- Damage to or failure of this appliance resulting from installation not performed by Sears authorized service agents, including installation that was not in accord with electrical, gas or plumbing codes.
- Damage to or failure of this appliance, including discoloration or surface rust, if it is not correctly operated and maintained according to all supplied instructions.
- Damage to or failure of this appliance, including discoloration or surface rust, resulting from accident, alteration, abuse, misuse or use for other than its intended purpose.
- Damage to or failure of this appliance, including discoloration or surface rust, caused by the use of detergents, cleaners, chemicals or utensils other than those recommended in all instructions supplied with the product.
- Damage to or failure of parts or systems resulting from unauthorized modifications made to this appliance.
- Service to an appliance if the model and serial plate is missing, altered, or cannot easily be determined to have the appropriate certification logo.
Disclaimer of implied warranties; limitation of remedies
Customer's sole and exclusive remedy under this limited warranty shall be product repair or replacement as provided herein. Implied warranties, including warranties of merchantability or fitness for a particular purpose, are limited to one year or the shortest period allowed by law. Seller shall not be liable for incidental or consequential damages. Some states and provinces do not allow the exclusion or limitation of incidental or consequential damages, or limitation on the duration of implied warranties of merchantability or fitness, so these exclusions or limitations may not apply to you.
This warranty applies only while this appliance is used in the United States or Canada*.
This warranty gives you specific legal rights, and you may also have other rights which vary from state to state.
* In-home repair service is not available in all Canadian geographical areas, nor will this warranty cover user or servicer travel and transportation expenses if this product is located in a remote area (as defined by Sears Canada Inc.) where an authorized servicer is not available.
Sears Brands Management Corporation, Hoffman Estates, IL 60179 Sears Canada Inc., Toronto, Ontario, Canada M5B 2C3
Master Protection Agreements
Congratulations on making a smart purchase. Your new Kenmore® product is designed and manufactured for years of dependable operation. But like all products, it may require preventive maintenance or repair from time to time. That's when having a Master Protection Agreement can save you money and aggravation.
The Master Protection Agreement also helps extend the life of your new product. Here's what the Agreement* includes:
☑ Parts and labor not just for Arepairing defects, but to help keep products operating properly under normal use. Our coverage goes well beyond the product warranty. No deductibles, no functional failure excluded from coverage—real protection.
√ Expert service by a force of more than 10,000 authorized Sears service technicians, which means someone you can trust will be working on your product.
√ Unlimited service calls and nationwide service, as often as you want us, whenever you want us.
☑ "No-lemon" guarantee – replacement of your covered product if four or more product failures occur within twelve months.
☑ Product replacement if your covered product can't be fixed.
☑ Annual Preventive Maintenance Check at your request – no extra charge.
√ Fast help by phone – we call it Rapid Resolution – phone support from a Sears representative on all products. Think of us as a "talking owner's manual."
☑ Power surge protection against electrical damage due to power fluctuations.
☑ \$250 Food Loss Protection annually for any food spoilage that is the result of mechanical failure of any covered refrigerator or freezer.
√ Rental reimbursement if repair of your covered product takes longer than promised.
☑ 25% discount off the regular price of any non-covered repair service and related installed parts.
Once you purchase the Agreement, a simple phone call is all that it takes for you to schedule service. You can call anytime day or night, or schedule a service appointment online.
The Master Protection Agreement is a risk free purchase. If you cancel for any reason during the product warranty period, we will provide a full refund. Or, a prorated refund anytime after the product warranty period expires. Purchase your Master Protection Agreement today!
■ Some limitations and exclusions apply. For prices and additional information in the U.S.A. call 1-800-827-6655.
■ * Coverage in Canada varies on some items. For full details call Sears Canada at 1-800-361-6665.
■ Sears Installation Service
For Sears professional installation of home appliances, garage door openers, water heaters, and other major home ite ms, in the U.S.A. or Canada call 1-800-4-MY-HOME®.
INSTRUCTIONS
IMPORTANT CAUTIONS FOR USING YOUR DEHUMIDIFIER.

To reduce the risk of fire, electrical shock, injury, or damage to the dehumidifier, these safety precautions must be followed:
Safety
- Do not place the power cord near a heater.
- Do not use an electrical outlet near flammable or combustible materials such as gasoline, propane, paint thinners, etc.
- Do not disassemble or modify dehumidifier parts or components. It may cause electric shock and failure.
- Plug in the power cord properly.
- Do not turn the unit on and off by inserting or pulling out the power plug.
- Do not damage the power cord or use an unspecified power cord.
- Do not modify power cord length.
- Do not share the outlet with another appliance.
• Always plug into a grounded outlet. Not grounding unit may cause electrical shock.
- Unplug the unit if it emits strange sounds, odors, or smoke.
- Do not use an electrical outlet if it is loose or damaged.
- Do not operate or plug in unit with wet hands or in a wet environment.
- Ventilate area before operating dehumidifier. Check for the presence of natural gas or the buildup of other combustible vapors.
- Do not clean the dehumidifier with water. Water may enter the unit and degrade the insulation resulting in an electrical shock.
- If water enters the product, turn off the dehumidifier's power switch, then unplug the unit. Do not plug in unit until it has been inspected by an authorized repair service.
- Because the fan rotates at high speed during operation, always unplug dehumidifier before attempting any recommended maintenance or cleaning.
- Do not block the inlet or outlet. It may cause unit to fail or to operate inefficiently.
- Do not remove plug from outlet by pulling on the cord.
- When not in use, turning the unit off will save energy. Unplug the dehumidifier when not using for long periods of time.
- When removing the filter, be aware that some metal parts may have sharp edges and may cause injury.
- Do not use the water collected in the bucket for drinking purposes. It is not sanitary and could cause illness.
- Do not allow children to play with this product.
Tips
- Auto is the suggested setting for typical everyday use.
- Make sure the dehumidifier is the correct size for the area you want to dehumidify. It is not designed to dehumidify the entire house.
- For proper operation, the dehumidifier should only be placed on a level floor.
- Close all doors, windows and other openings to the room. The dehumidifier must operate in an enclosed area to be effective.
- To clean, use a soft cloth; do not use wax, thinners, or strong detergents as they may change the color of the unit or cause surface damage.
- Be sure to replace the bucket properly after emptying to prevent water from collecting on the floor causing damage to some types of flooring.
- Do not put a pet or house plant where it will be exposed to direct air flow. This could injure the pet or plant.
- Operation without filter will cause unit failure. Insert the filter securely. Clean it every two weeks. (See Care and Maintenance section in this manual.)
ELECTRICAL REQUIREMENTS
A time delay fuse or time delay circuit breaker is recommended. Use a dedicated circuit serving only this appliance.
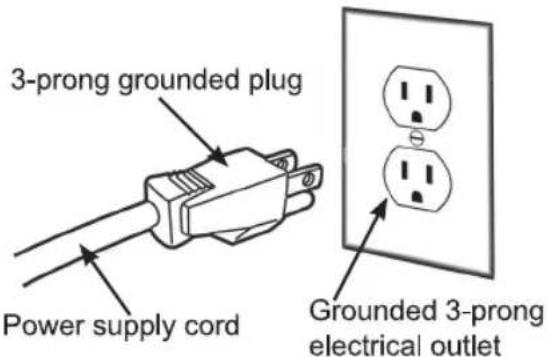
NOTE: If an extension cord must be used, the cord must be a minimum of 14AWG, and rated not less than 1875 watts, or 20A.
RECOMMENDED GROUNDING METHOD
For your personal safety, this appliance must be grounded. This appliance has a power supply cord with a 3-prong grounded plug. To minimize possible shock hazard, the cord must be plugged into a matching grounded electrical outlet that complies with the latest edition of the National Electrical Code and all local codes and ordinances.
If a grounded 3-prong electrical outlet is not available, it is the personal responsibility and obligation of the customer to have one installed by a qualified electrician.

WARNING

ELECTRICAL SHOCK HAZARD
Plug into a grounded 3-prong outlet.
- Do not remove ground prong.
- Do not use a two-prong adapter.
Failure to follow these instructions can result in death, fire or electrical shock.
INSTALLING YOUR DEHUMIDIFIER
• Install the dehumidifier on a level floor strong enough to support the unit with a full bucket of water.
- For best performance, allow at least 12-18 inches of air space on all sides of the unit for good air circulation.
- Keep all outside doors, windows and other openings closed when operating the dehumidifier. Humid outdoor air will add to the unit's workload.
- For maximum efficiency, install your dehumidifier in an area where the temperature will not fall below 65°F.
- Leave the dehumidifier in an upright position for 30 minutes before turning on.
DEFROST OPERATION
The dehumidifier has a built-in defrost control that senses frost buildup on the evaporator coils.
During defrosting, the compressor will automatically turn off; the fan will continue running to defrost the coils.
- in the basement to help prevent moisture damage.
- in the kitchen, laundry room, bathroom, and spa/exercise areas that have excessive moisture.
• to prevent moisture damage anywhere books or valuables are stored.
• during construction or remodeling to reduce drying time for drywall and paint; however, check and clean filter often.
AUTOMATIC SHUT OFF
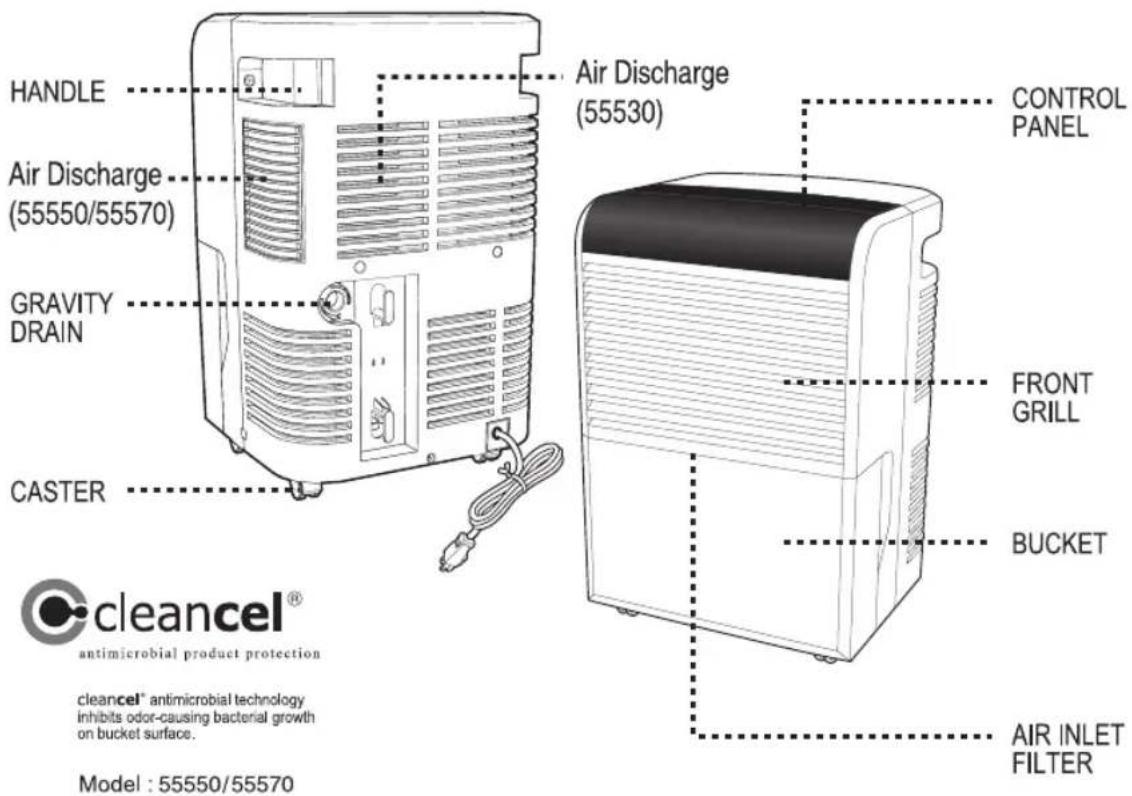
- When the bucket is full, or when the bucket is not in the proper position, the Bucket Full light goes on and the unit automatically shuts off.
- The bucket must be placed in the proper position for the dehumidifier to work. The light will stay on and the dehumidifier will not run if the bucket is not in the proper position.
- The dehumidifier will shut off once the desired humidity setting is reached, plus or minus 5% Relative Humidity (RH).

WARNING
To reduce the risk of fire, electric shock or injury to persons, read the important SAFETY INSTRUCTIONS found on page 3 before operating this appliance.
KEY FEATURES OF YOUR DEHUMIDIFIER
CONTROL PANEL 55530
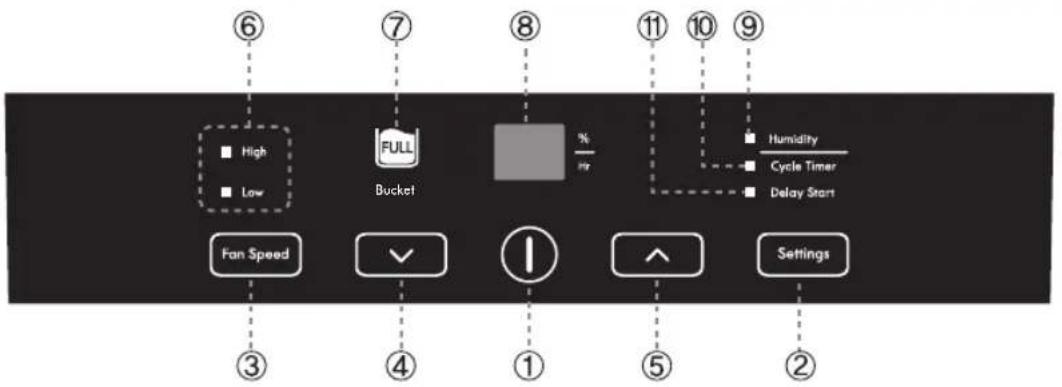
POWER ON/OFF (1)
Pressing Power button once turns the dehumidifier "ON" and pressing it again turns the dehumidifier "OFF."
Settings (2)
Press this key to cycle through the control panel settings from Humidity to Cycle Timer to Delay Start. The indicator lights will show which setting you are in.
Humidity (9)
When the unit is turned on the control panel will default to the Humidity setting. You may also use the Settings key to enter the Humidity setting. In this setting you can manually select the desired humidity level by pressing the Up or Down arrow keys (4/5). Humidity values are changed in 5% increments ranging from 35% to 70%. The humidity setting is shown in the display window (8). Pressing the Down arrow key when the displayed value is 35% will cause the unit to operate continuously. In continuous operation, Lo will be displayed in the window (8). To leave continuous operation, press the Up arrow or press the Settings key to change the control panel setting.
Cycle Timer (10)
In this setting, the unit will run for either 3, 6, or 12 hours, then shut off for 3, 6, or 12 hours. Cycle time can be adjusted by pressing the Up or Down arrow keys (4/5) repeatedly to set operating time for 3, 6, or 12 hours. The cycle timer function will continue until you change the setting or turn the unit off.
Delay Start (11)
Unit can be programmed to turn on at a desired delay time by pressing the Up or Down arrow keys (4.5). Time can be adjusted in 1 hour increments ranging from 1 to 12 hours. Delay time will be shown in window (8) and will count down to start time in 1 hour increments.
FAN SPEED (3)
Press Fan Speed to toggle between Low and High fan speeds. Speed will be shown in FAN SPEED INDICATOR (6).
BUCKET FULL INDICATOR (7).
When the collection bucket is full, BUCKET FULL indicator (7) will come on. The dehumidifier will not run until the bucket is empty.
IMPORTANT:
When the unit is turned off and re-started, it will resume operation in the same mode it was in. If there is a power failure, when the power returns the unit will be set to 50% humidity and Fan Speed Low.
CONTROL PANEL 55550/55570
flowchart
graph TD
    A["⑥"] --> B["Auto"]
    A --> C["High"]
    A --> D["Low"]
    B --> E["Fan Speed"]
    C --> F["Bucket"]
    D --> G["1"]
    E --> H["✓"]
    F --> I["1"]
    G --> J["1"]
    H --> K["Settings"]
    I --> L["Settings"]
    J --> M["Settings"]
    K --> N["Settings"]
    style A fill:#f9f,stroke:#333
    style B fill:#ccf,stroke:#333
    style C fill:#ccf,stroke:#333
    style D fill:#ccf,stroke:#333
    style E fill:#cfc,stroke:#333
    style F fill:#cfc,stroke:#333
    style G fill:#cfc,stroke:#333
    style H fill:#cfc,stroke:#333
    style I fill:#cfc,stroke:#333
    style J fill:#cfc,stroke:#333
    style K fill:#cfc,stroke:#333
    style L fill:#cfc,stroke:#333
    style M fill:#cfc,stroke:#333
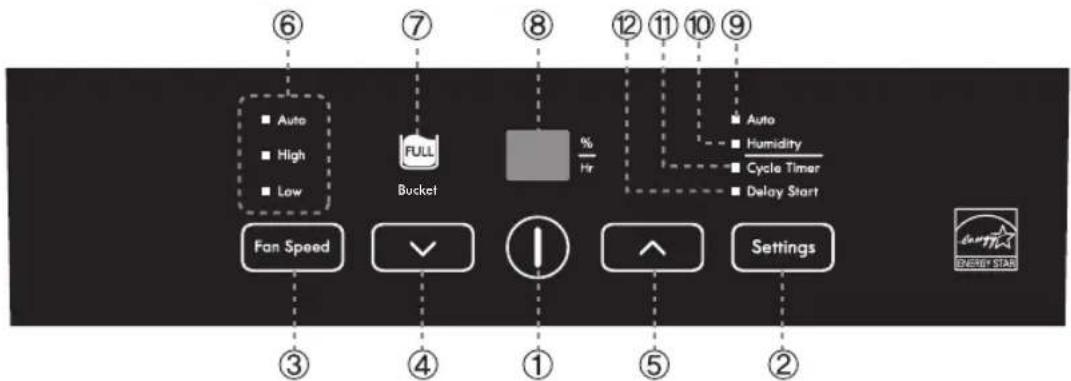
POWER ON/OFF (1)
Pressing Power button once turns the dehumidifier "ON" and pressing it again turns the dehumidifier "OFF."
Settings (2)
Press this key to cycle through the control panel settings from Auto to Humidity to Cycle Timer to Delay Start. The indicator lights will show which setting you are in.
Auto (9)
The first time the unit is turned on, the control panel will default to the Auto setting. The next time it is turned on, the control panel will default to the last mode the unit was in before turning off. You may also use the Settings key to enter the Auto setting. AUTO (9) and "50%" humidity value will be displayed in window (8). In this setting, the Relative Humidity (RH) is automatically set to 50%. Because lower temperatures usually correlate with lower humidity levels, the unit will not run frequently. At higher temperatures higher humidity is normal so the unit will run more often.
Humidity (10)
In this setting you can manually select the desired humidity level by pressing the Up or Down arrow keys (4/5). Humidity values are changed in 5% increments ranging from 35% to 70%. The humidity setting is shown in the display window (8). Pressing the Down arrow key when the displayed value is 35% will cause the unit to operate continuously. In continuous operation, Lo will be displayed in the window (8). To leave continuous operation, press the Up arrow or press the Settings key to change the control panel setting.
Cycle Timer (11)
In this setting, the unit will run for either 3, 6, or 12 hours, then shut off for 3, 6, or 12 hours. Cycle time can be adjusted by pushing the timer arrow up or down (4/5) repeatedly to set operating time for 3, 6, or 12 hours. The cycle timer function will continue until you change the setting or turn the unit off.
Delay Start (12)
Unit can be programmed to turn on at a desired delay time by pressing the Up or Down arrow keys (4.5). Time can be adjusted in 1 hour increments ranging from 1 to 12 hours. Delay time will be shown in window (8) and will count down to start time in 1 hour increments.
FAN SPEED (3)
Press Fan Speed to toggle between Auto, Low, and High fan speeds. Speed will be shown in FAN SPEED INDICATOR (6). When AUTO is selected, the unit will adjust the fan speed accordingly depending on the humidity level.
BUCKET FULL INDICATOR (7)
When the collection bucket is full, BUCKET FULL indicator (7) will come on. The dehumidifier will not run until the bucket is empty.
IMPORTANT:
When the unit is turned off and re-started, it will resume operation in the same mode it was in. If there is a power failure, when the power returns the unit will be set to AUTO mode.
WATER DISPOSING OPTIONS
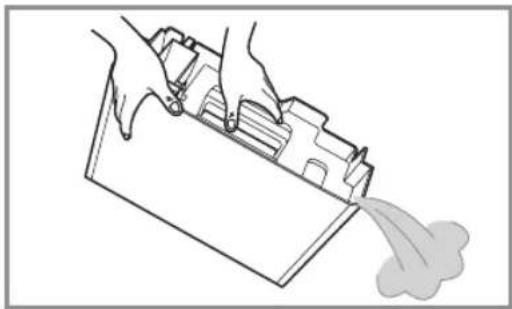
OPTION 1. EMPTYING MANUALLY
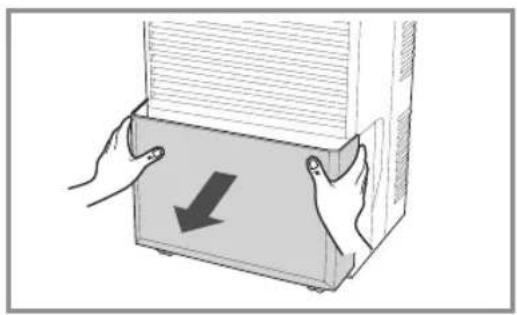
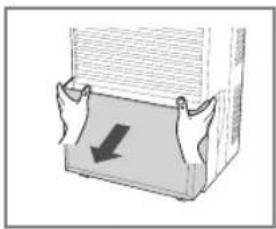
- Pull out the bucket, grasping side handles.
- Carry the bucket by grasping the inside handle of the bucket.
- After emptying the bucket, replace the bucket in the dehumidifier.
NOTE: Dehumidifier will not work when the BUCKET FULL light is on or without the bucket properly placed in the unit.
natural_image
Illustration of hands holding a cardboard box with a downward arrow (no text or symbols)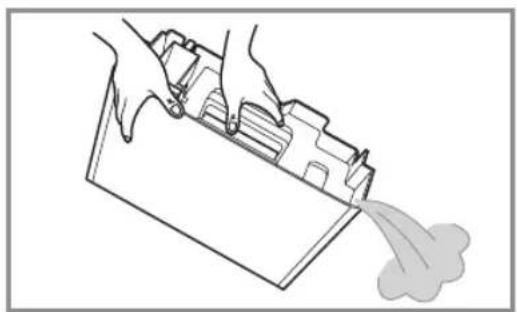
natural_image
Line drawing of hands using a tool to lift or spread material from a plastic container (no text or symbols)OPTION 2, GRAVITY DRAIN HOSE
(Hose Not Provided)
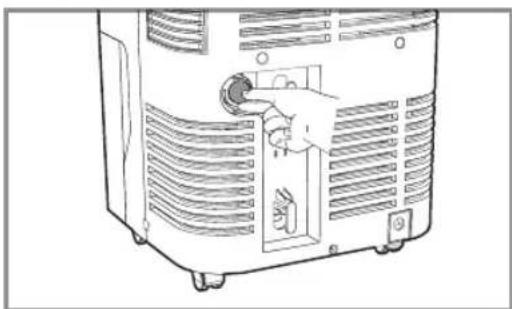
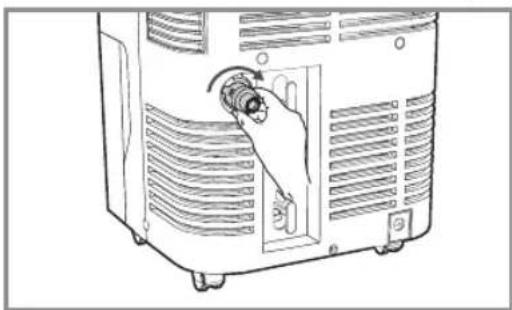
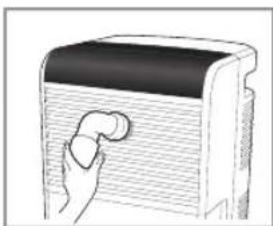
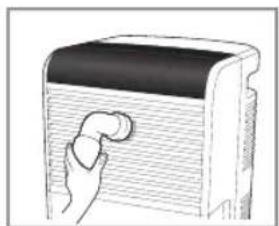
- Take off GRAVITY DRAIN cap. (Fig.1)
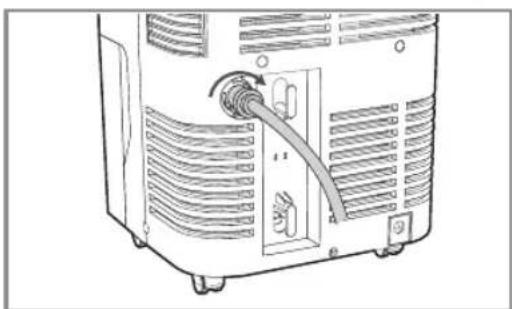
- Assemble the DRAIN CONNECTOR to the dehumidifier by turning clockwise. (Fig.2)
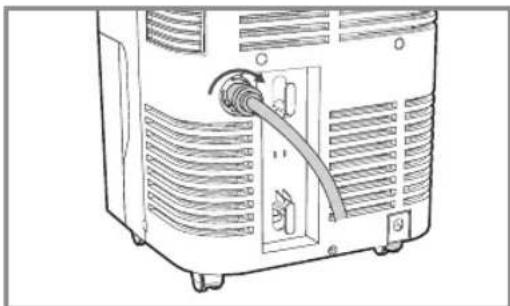
- Next, screw a standard drain hose to drain connector by turning clockwise. (Fig.3)
natural_image
Line drawing of a portable air conditioner unit with a hand inserting a button (no text or symbols)Fig.1
natural_image
Line drawing of a portable air conditioner unit with a hand operating the button (no text or symbols)Fig.2
natural_image
Diagram of a device rear panel showing a cable inserted into a socket (no text or symbols visible)Fig.3
CARE AND MAINTENANCE
WARNING
- Disconnect power supply cord from receptacle before performing any maintenance.
natural_image
Illustration of a box with a downward arrow and ribbon, no text or symbols presentFig.1
natural_image
Illustration of a hand pressing down on a mechanical device with a downward arrow (no text or symbols)Fig.2
natural_image
Illustration of a sun shining onto a solar panel with a pot nearby (no text or symbols)Fig.3
natural_image
Illustration of a hand pressing down on a device component (no text or symbols visible)Fig.4
natural_image
Illustration of a hand pressing down on a mechanical device with an upward arrow (no text or symbols)Fig.5
CLEANING FRONT GRILL AND AIR FILTER
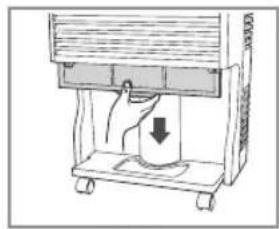
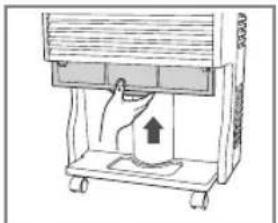
- Remove the bucket from unit. Air filter is located behind front grill. (Fig.1)
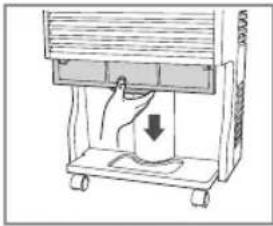
- Pull the filter down and away from unit until it is all the way out. (Fig.2)
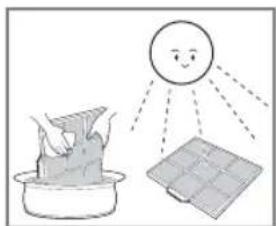
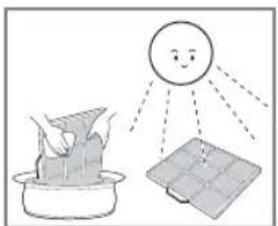
- Wash filter with mild detergent. Rinse thoroughly. Air dry away from direct sunlight. (Fig.3)
- Front grill can be cleaned using a vacuum cleaner or a soft brush to remove dust. (Fig.4)
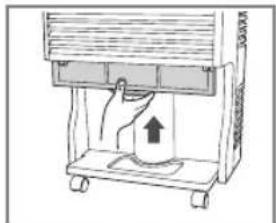
- After cleaning, assemble the air filter to front grill. (Fig.5)
NOTE : Check your filter periodically to ensure proper operation.
CLEANING THE EXTERIOR
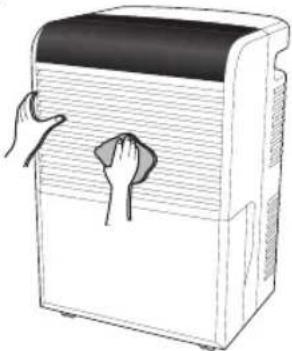
Clean the exterior using a soft brush or dry towel. But do not spray water directly on the exterior.
natural_image
Illustration of a hand cleaning a portable air conditioner unit (no text or symbols visible)CLEANING THE BUCKET
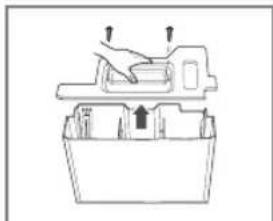
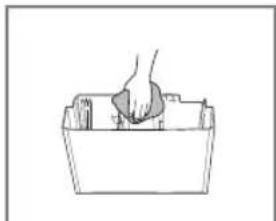
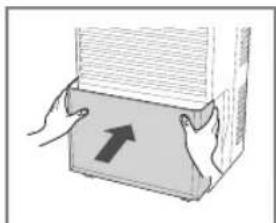
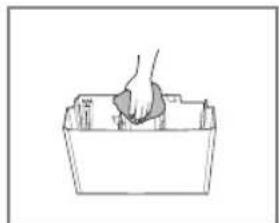
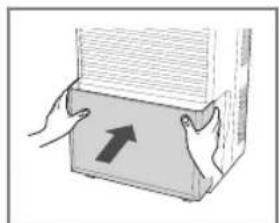
Remove the bucket from the unit. Lift off bucket cover. (Fig.1) Clean the inside of bucket as needed. (Fig.2)
After cleaning, replace the bucket cover and slide the bucket into the unit. (Fig.3) Check the float switch to make sure it is not obstructed. Proper position of the bucket and the float switch is required for the dehumidifier to turn on.
natural_image
Line drawing of a hand using a tool to press or install an electronic device into a container (no text or symbols)Fig.1
natural_image
Simple line drawing of a hand placing a piece into a rectangular box (no text or symbols)Fig.2
natural_image
Illustration of hands holding a cardboard box with an upward arrow (no text or symbols)Fig.3
TROUBLESHOOTING
Before calling for service, try the suggestions below to see whether you can solve your problem without outside help.
| PROBLEMS | CHECK POINT | SOLUTIONS |
| Dehumidifier does not work when pressing the POWER ON button. | Is the power cord plugged into a grounded 3-prong outlet? Is BUCKET FULL light on? Does BUCKET FULL light appear after emptying the water bucket? | Plug the power cord securely into a grounded 3-prong outlet. Empty the water bucket and re-install. Check the float switch to make sure it is free and not obstructed. |
| Dehumidifier is operating, but the unit is not drawing any water | Is the compressor running as well as the fan? | The unit may be in the defrost mode. The fan is running but not the compressor. The unit will return to dehumidification automatically. If both compressor and fan are running, but the air discharged from the dehumidifier is not at least 13 degrees above the room temperature, then there may be a sealed system failure. Service is then required. |
| Loud noise and/ or vibration during operation. | Is the unit on a level surface? | Move the unit to a level surface. |
| Sounds. | Sounds like flowing water during and after operation. It makes a pinging sound. | This is the normal sound of the refrigerant flowing through the coils. Normal sound of expansion and contraction caused by temperature changes. |
| Dehumidifier is not running efficiently | Are the filter and grill dirty? Is indoor temperature under 65°F? | Clean the FRONT GRILL and AIR FILTER. Although the unit will dehumidify at temperatures below 65 degrees, there is a potential for frost to develop which may inhibit the unit's efficiency |
| Unit is discharging warm air. | Normal: Compressor and electric motor discharge a small amount of heat. | |
| Water does not drain through hose. | Check the DRAIN CONNECTOR. Is it installed correctly? Check the drain hose for kinks or obstructions. | Re-install drain hose according to this manual. Flatten the hose or remove block-age. |
PRODUCT SPECIFICATIONS
| Classification | Specification | Remark | ||
| Model | 55530 | 55550 | 55570 | |
| Power Supply | AC 115V/60Hz | AC 115V/60Hz | AC 115V/60Hz | |
| Power Requirements | 5.4 A, 520 W | 4.5 A, 480 W | 6.7 A, 710 W | |
| Moisture Removal | 35 Pint(16.6liters) | 50 Pint(23.6liters) | 70 Pint(33.1liters) | 24-Hour Period |
| Control Type | Electronic | Electronic | Electronic | |
| Refrigerant | R-410a8.47 OZ(240g) | R-410a10.22 OZ(290g) | R-410a11.99 OZ(340g) | |
| Humidity Setting | LO, 35-70% | LO, 35-70% | LO, 35-70% | 5% Increments |
| Cycle Timer | 3, 6, 12 Hours | 3, 6, 12 Hours | 3, 6, 12 Hours | |
| Delay Time | 1-12 Hours | 1-12 Hours | 1-12 Hours | 1Hour Increments |
| Fan Motor Modes | High, Low | Auto, High, Low | Auto, High, Low | |
| Operating Temp. | 36°F-99°F | 36°F-99°F | 36°F-99°F | |
| Dimensions | 13.0X20.8X9.5 in | 14.6X23.03X12.5 in | 14.6X23.03X12.5 in | |
| 330X528X241 mm | 370X585X318 mm | 370X585X318 mm | ||
| Net Weight | 30.53 lbs(13.85Kg) | 40.30 lbs(18.28Kg) | 43.63 lbs(19.79Kg) | |
| Bucket Capacity | 10.5 Pint(5.0liters) | 19.2 Pint(9.1liters) | 19.2 Pint(9.1liters) | |
※ 55530 is not compliant with Energy Star.
TABLA DE CONTENIDO
natural_image
Line drawing of a mechanical connector with two arrows indicating direction (no text or symbols)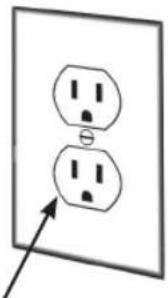
natural_image
Simple line drawing of two electrical socket plugs with a pointer pointing to one (no text or symbols)ENCENDIDO/APAGADO (1)
natural_image
Illustration of hands holding a box with a downward arrow, no text or symbols presentnatural_image
Line drawing of a portable electronic device with a hand pressing a button (no text or symbols)Fig.1
natural_image
Line drawing of hands using a tool to lift or spread material from a plastic container (no text or symbols)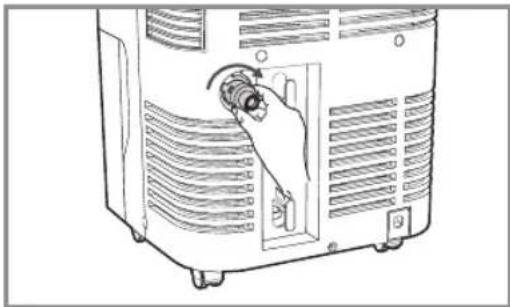
natural_image
Line drawing of a device with a hand operating a rotary switch (no text or symbols)Fig.2
natural_image
Diagram of a device rear panel with a cable inserted into the internal channel (no text or symbols visible)Fig.3
natural_image
Simple line drawing of a box with a downward arrow, no text or symbols presentFig.1
natural_image
Simple line drawing of a hand pressing down on a mechanical device (no text or symbols)Fig.2
natural_image
Illustration of a sun shining onto a small solar panel, with a pot nearby (no text or symbols)Fig.3
natural_image
Illustration of a hand inserting a plug into a device (no text or symbols visible)Fig.4
natural_image
Diagram of a mechanical device with a handle and upward arrow, no visible text or symbolsFig.5
LIMPIEZA DE LA PARRILLA FRONTAL Y DEL FILTRO DE AIRE
natural_image
Illustration of a hand cleaning a portable electronic device with a cloth (no text or symbols)LIMPIEZA DE LA CUBETA
natural_image
Line drawing of a hand using a tool to press or install a mechanical component (no text or symbols present)Fig.1
natural_image
Simple line drawing of a hand placing a leaf into a container (no text or symbols)Fig.2
natural_image
Illustration of hands holding a cardboard box with an upward arrow (no text or symbols)Fig.3
natural_image
Pure geometric lines and crosshair markers without any text, numbers, or symbols
natural_image
Pure geometric lines and crosshair markers without any text, numbers, or symbolsKenmore®
For Sears Home Services in-home repair of all Kenmore major appliances.
For the replacement parts, accessories and Use & Care Guides that you need to do-it-yourself. For professional installation of major home appliances and items like air conditioners and water heaters.
1-844-553-6667
www.kenmore.com
In Canada 1-800-469-4663
www.sears.ca
Call anytime for the location of your nearest Sears Parts & Repair Service Center
1-800-488-1222 (U.S.A.)
1-800-469-4663 (Canada)
To purchase a protection agreement on a serviceable product:
1-800-827-6655 (U.S.A.)
1-800-361-6665 (Canada)
® Registered Trademark / ™ Trademark of KCD IP, LLC in the United States, or Sears Brands, LLC in other countries
- PACKAGE CONTENTS
- WARRANTY
- KENMORE LIMITED WARRANTY
- This warranty covers ONLY defects in material and workmanship, and will NOT pay for:
- Disclaimer of implied warranties; limitation of remedies
- Master Protection Agreements
- INSTRUCTIONS
- IMPORTANT CAUTIONS FOR USING YOUR DEHUMIDIFIER.
- Safety
- Tips
- ELECTRICAL REQUIREMENTS
- RECOMMENDED GROUNDING METHOD
- ELECTRICAL SHOCK HAZARD
- INSTALLING YOUR DEHUMIDIFIER
- DEFROST OPERATION
- AUTOMATIC SHUT OFF
- WARNING
- POWER ON/OFF (1)
- Settings (2)
- Humidity (9)
- Cycle Timer (10)
- Delay Start (11)
- FAN SPEED (3)
- BUCKET FULL INDICATOR (7).
- IMPORTANT:
- Auto (9)
- Humidity (10)
- Cycle Timer (11)
- Delay Start (12)
- BUCKET FULL INDICATOR (7)
- WATER DISPOSING OPTIONS
- OPTION 1. EMPTYING MANUALLY
- OPTION 2, GRAVITY DRAIN HOSE
- CARE AND MAINTENANCE
- CLEANING FRONT GRILL AND AIR FILTER
- CLEANING THE EXTERIOR
- CLEANING THE BUCKET
- TROUBLESHOOTING
- TABLA DE CONTENIDO
- ENCENDIDO/APAGADO (1)
- LIMPIEZA DE LA PARRILLA FRONTAL Y DEL FILTRO DE AIRE
- LIMPIEZA DE LA CUBETA
- Kenmore®
Brand : KENMORE
Model : KM70
Category : Dehumidifier