
ESW 6780 - Warming Drawer MIELE - Free user manual and instructions
Find the device manual for free ESW 6780 MIELE in PDF.


| Product Type | Warming Drawer |
| Brand | Miele |
| Model | ESW 6780 |
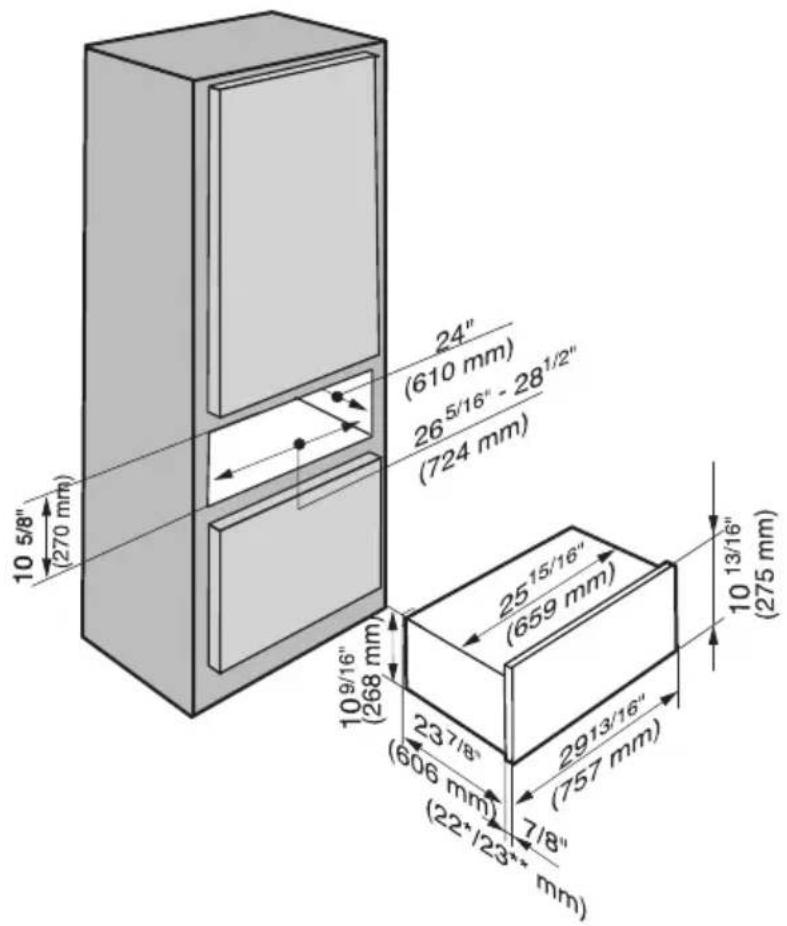
| Dimensions (Height x Width x Depth) | 10 5/8" x 23 7/8" x 25 15/16" (270 mm x 606 mm x 659 mm) |
| Power Supply | 120 V / 15 A / 60 Hz |
| Maximum Load Capacity | 55 lbs (25 kg) |
| Operating Modes | Warm Cups/Glasses, Warm Dishes/Plates, Keep Warm, Low Temperature |
| Temperature Range | Approx. 105°F - 185°F (40°C - 85°C) depending on mode |
| Duration Settings | Continuous or 1-4 hours (max 12 hours safety switch-off) |
| Sabbath Mode | Yes, programmable for 72 hours |
| Included Accessories | Non-slip mat, dishwasher-safe rack |
| Cleaning Instructions | Hand wash non-slip mat; wipe interior with mild detergent; do not use steam cleaner |
| Safety Features | Safety switch-off after 12 hours; contact switch for heater/fan when drawer closed |
| Installation Type | Solo or under oven (built-in) |
| Required Cutout Dimensions (Solo) | Height: 10 9/16" (268 mm), Width: 23 7/8" (606 mm), Depth: 21 7/8" (556 mm) approx. |
| Weight (Approx.) | Not specified, estimated 35 lbs |
| Spare Parts Availability | Original Miele parts through authorized service |
| Warranty | Standard Miele warranty; extended MieleCare available |
Frequently Asked Questions - ESW 6780 MIELE
User questions about ESW 6780 MIELE
0 question about this device. Answer the ones you know or ask your own.
Ask a new question about this device
Download the instructions for your Warming Drawer in PDF format for free! Find your manual ESW 6780 - MIELE and take your electronic device back in hand. On this page are published all the documents necessary for the use of your device. ESW 6780 by MIELE.
USER MANUAL ESW 6780 MIELE
Operating and Installation Instructions Warming drawer
natural_image
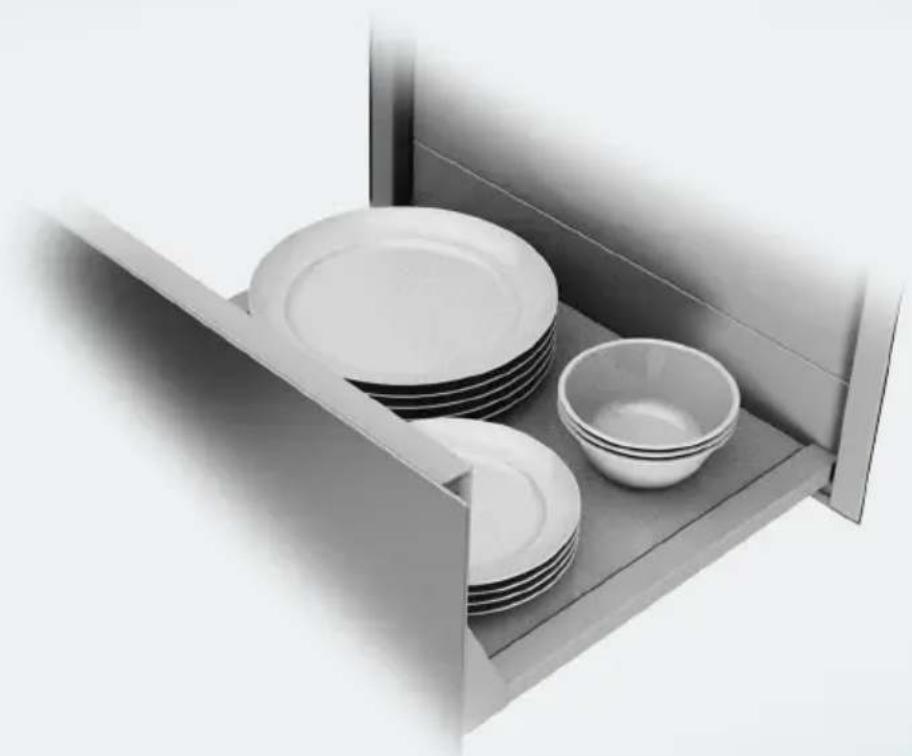
Interior view of a drawer with plates and bowls (no text or symbols visible)To prevent accidents and machine damage, read these instructions before installation or use.
IMPORTANT SAFETY INSTRUCTIONS 4
Overview.... 11
Included accessories.... 12
Control panel 13
Before first use 14
Cleaning the drawer for the first time.... 14
Heating the drawer for the first time.... 14
Operation.... 15
Basic operation 15
Operating modes.... 16
Duration.... 16
Temperature settings.... 16
Keeping food warm.... 18
Tips.... 18
Settings 19
Warming dishes.... 20
Tips.... 20
Warming times 20
Capacity 20
Other uses.... 22
Sabbath mode.... 23
Cleaning and care 24
Frequently Asked Questions 26
Optional accessories 28
IMPORTANT SAFETY INSTRUCTIONS - INSTALLATION 29
Instructions for installation 30
Installation dimensions.... 31
Solo installation 31
Installation with oven.... 32
Installation.... 34
Attachment of the front panel for ESW 6380 FB.... 35
Electrical connection 36
Caring for the environment 37
Technical Service.... 38
Contact in case of fault 38
Data plate 38
Warranty 38
MieleCare 39
IMPORTANT SAFETY INSTRUCTIONS
This drawer conforms to current safety requirements. Improper use can, however, lead to personal injury and damage to property.
To avoid the risk of accidents and damage to the appliance, please read these instructions carefully before using the appliance for the first time. They contain important notes on installation, safety, use and maintenance.
Miele cannot be held liable for damage occurring as a result of non-compliance with these instructions.
Keep these instructions in a safe place and pass them on to any future owners.
Appropriate use
This drawer is intended for domestic use and use in other similar environments.
The drawer is not intended for outdoor use.
The warming drawer is intended for domestic use only as described in these instructions. All other use is at the owner's own risk and could be dangerous.
▶ Persons who lack physical, sensory or mental abilities, or experience with the appliance should not use it without supervision or instruction by a responsible person.
IMPORTANT SAFETY INSTRUCTIONS
Safety with children
As with any appliance, close supervision is necessary when used by children.
Do not leave children unattended: Children should not be alone or unsupervised in the area where the appliance is installed. Do not allow them to sit or stand on the appliance.
Be sure to supervise any children in the vicinity of the drawer, and do not let them play with it.
The drawer gets hot when in use and remains hot for quite a while after being switched off. Keep children away from the drawer until it has cooled down and there is no danger of burning.
Danger of suffocation! Ensure that any plastic wrappings, bags, etc. are disposed of safely and kept out of the reach of children.
Technical safety
▶ Unauthorized installation, maintenance, and repairs can cause considerable danger for the user. Installation, maintenance, and repairs must only be carried out by a Miele authorized technician.
A damaged drawer can be dangerous. Always check for visible signs of damage. Never use a damaged appliance.
▶ Reliable and safe operation of the drawer can only be assured if it has been connected to the electrical supply.
Be certain the drawer is properly installed and grounded by a qualified technician. To guarantee the electrical safety of this appliance, continuity must exist between the appliance and an effective grounding system. It is imperative that this basic safety requirement be met. If there is any doubt, have the electrical system of the house checked by a qualified electrician.
Before connecting the appliance to the power supply, ensure that the connection data (voltage and frequency) on the data plate of the drawer match the electrical supply.
This data must correspond in order to avoid the risk of damage to the warming drawer. Consult a qualified electrician if in any doubt.
Do not connect the drawer to the electrical supply with a power bar or extension cord. These are a fire hazard and do not guarantee the required safety of the appliance.
For safety reasons, the drawer may only be used when it has been fully installed.
This drawer may not be used in non-stationary locations (e.g. on a ship).
▶ Any contact with live connections or tampering with the electrical or mechanical components of the drawer will endanger your safety and may lead to appliance malfunctions.
Do not open the casing of the drawer under any circumstances.
IMPORTANT SAFETY INSTRUCTIONS
▶ Any repairs not performed by a Miele authorized service technician will void the warranty.
▶ Defective components should be replaced by Miele original parts only. Only with these parts can safety of the appliance be assured as intended by the manufacturer.
If the plug has been removed or the power cord is not supplied with a plug, the drawer must be connected to the power supply by a suitably qualified electrician.
If the power cord is damaged, it must be replaced with a special power cord (see “Electrical connection”).
The drawer must be completely disconnected from the power supply during installation, maintenance and repair work. This can be ensured as follows:
- The circuit breaker has tripped, or
- The fuse of the electrical installation is completely removed, or
- The plug (if present) is removed from the outlet. In the process, pull the plug not the cord.
If the drawer is installed behind a cabinet door, do not close the door while the drawer is in operation. Heat and moisture can build up behind the closed door and cause damage to the range and to the surrounding cabinets and flooring. Do not close the door until the drawer has completely cooled down.
Correct use
▶ You can burn yourself on a hot warming drawer. When using the appliance, protect your hands by wearing heat-resistant pot holders. Only use dry pot holders. Wet or damp textiles conduct heat more effectively and produce steam, which poses a burn hazard.
▶ Fire hazard.
Do not store any plastic containers or combustible objects in the warming drawer. They can melt or catch fire when the appliance is switched on.
Due to the high temperatures radiated by the warming drawer, nearby flammable objects can catch fire while the appliance is in use. Do not use the warming drawer to heat the room.
▶ Never use paper towels or other similar objects in place of the non-slip mat supplied with the appliance.
The maximum load capacity of the telescopic drawer rails is 55 lbs (25 kg). If you overload the drawer or lean/stand on it when it is open, you will damage the rails.
The underside of the warming drawer gets hot when the appliance is in use. Be careful not to touch it when the drawer is open.
The non-slip mat is heat-resistant up to 395^ F ( 200^ C). It is possible for the bottom of cookware to exceed this temperature, especially after it has been used to sear food. Allow the cookware to cool down for a minute or two before placing it in the warming drawer.
▶ Cookware made of plastic or aluminum foil will melt at high temperatures. When keeping food warm, use only heat-resistant cookware made of porcelain, glass, etc.
▶ Liquids that get inside the warming drawer can cause the appliance to short-circuit. Open and close a loaded drawer carefully to prevent liquids from spilling.
IMPORTANT SAFETY INSTRUCTIONS
Keeping Warm mode is to be used for keeping hot dishes warm, not for heating up cold food. Make sure that any food placed in the drawer is at a high enough temperature.
In some foods, bacterial growth may occur if the temperature is too low. Set the appliance to an adequate warming temperature.
▶ Loose fitting or hanging garments present a fire hazard. Wear proper apparel while operating the appliance.
▶ Smother the fire or flames, or use a dry chemical extinguishing agent or foam fire extinguisher.
Before serving, be sure food is at a safe temperature. This is particularly important when preparing food for babies and children.
▶ Never warm undiluted alcohol in the warming drawer, this can easily ignite.
Exercise caution when warming food with a high sugar content. If heated for too long the sugar may caramelize or ignite.
▶ Never add water to food in a hot drawer. The steam created could cause serious burns or scalds.
Cleaning and maintenance
Do not use a steam cleaner to clean the drawer.
The steam may reach electrical components and cause a short circuit.
SAVE THESE INSTRUCTIONS AND REVIEW THEM PERIODICALLY
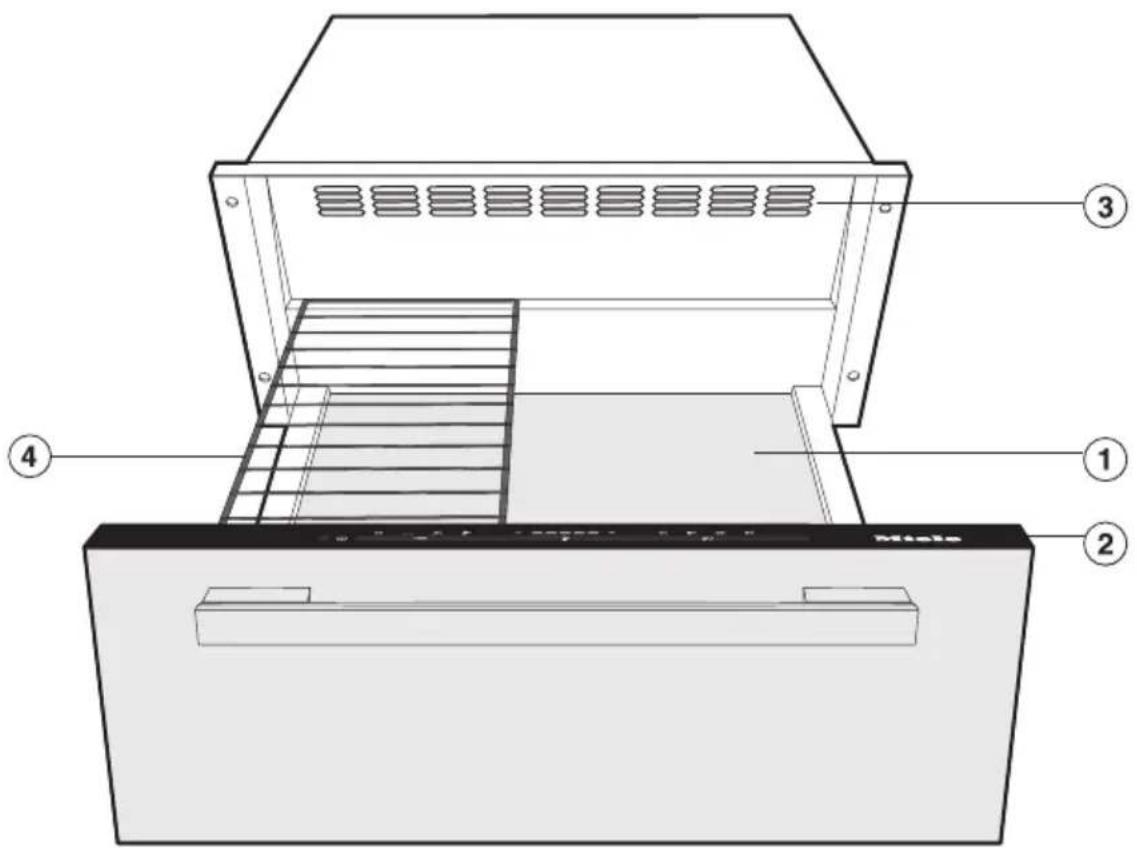
① Non-slip mat
② Control panel
③ Air vents
④ Dishwasher-safe rack
Included accessories
The accessories supplied with your appliance, as well as a range of optional ones, are available to order from Miele (see “Optional accessories”).
Dishwasher-safe rack

natural_image
Simple line drawing of a ladder-like structure with horizontal bars (no text or symbols)For increasing the loading area.
Non-slip mat

natural_image
Simple 3D wireframe drawing of a square plate (no text or symbols)For keeping dishware secure.

Sensor buttons
| Sensor button Description | |
| 1 On/Off button | |
| Menu Selects the operating mode | |
| Temperature Sets the temperature | |
| Duration Sets the duration | |
Display
| Display Description | |
| Warm Cups/Glasses mode | |
| Warm Dishes/Plates mode | |
| Keep Warm mode | |
| Low Temperature mode | |
| - ■ ■ ■ ■ + | Temperature display with segment bars |
| 1h Duration of 1 hour | |
| 2h Duration of 2 hours | |
| 3h Duration of 3 hours | |
| 4h Duration of 4 hours |
- Please adhere the extra appliance data plate (supplied) in the space provided in the “After sales service” section of this manual.
■ Remove any protective foil and stickers.
Cleaning the drawer for the first time
■ Remove the non-slip mat, if present, and the rack from the drawer and clean them with warm water and liquid dish soap, using a clean soft sponge or damp microfiber cloth.
■ Dry the mat and the rack with a soft cloth.
■ Wipe the drawer inside and out with a damp cloth to remove any dust or left-over packaging.
■ Dry all surfaces with a soft cloth.
■ Return the non-slip mat and the rack, if necessary, to the drawer.
Heating the drawer for the first time
With the drawer empty, heat the appliance for at least two hours.
■ Tap the ① button to switch on the drawer.
- Tap the "Menu" button repeatedly until the ⚗ symbol lights up.
- Tap the “Temperature” button repeatedly until the outer right segment of the temperature display lights up.
- Tap the “Duration” button repeatedly until “2h” lights up.
■ Close the drawer.
The drawer switches off automatically after two hours.
The drawer is equipped with a contact switch. The drawer's heater and fan will only operate when the drawer is closed.
Because the metal components are protected by a conditioning agent, there will be a slight odor the first time the drawer is heated up. The harmless odor will dissipate after a short time and does not indicate a faulty connection or appliance defect. During this time, make sure the kitchen is well ventilated.
Basic operation
The ① button must remain free of debris and liquids. Failure to keep the sensor button clean may cause it to become unresponsive or to switch uncontrollably.
Liquids that get inside the drawer can cause a short-circuit.
Open and close a loaded drawer carefully to prevent liquids from spilling.
■ Open the drawer.
- Tap the ① button to switch on the drawer.
- Tap the “Menu” button repeatedly until the desired mode lights up.
- Tap the “Temperature” button repeatedly until the segment of the desired temperature lights up in the temperature display.
- Tap the “Duration” button repeatedly until the desired hour lights up.
■ Close the drawer.
Operating modes
The following modes are available:
- □ Warming cups and glasses
- _ Warming dishes and plates
- Keep Warm
- 🔊← Low temperature
The next time the appliance is switched on, the previously selected operating mode will automatically appear on the control panel as the active setting.
The drawer is equipped with a fan that distributes the warmed air within the drawer. The fan runs
- continuously in the □ “Warm Cups/Glasses” and _ “Warm Dishes/Plates” modes.
- and at intervals in the ### “Keep Warm” and ### “Low Temperature” modes.
You can use the drawer to keep food warm while warming dishes at the same time. To do so, select the “Keep Warm” mode.

Caution!
Dishes take longer to warm up in this mode as in the “Warm Dishes/Plates” mode, but can get very hot!
Duration
Do not leave the drawer unattended for too long in continuous operation mode. Keeping food warm for a long time can result in it drying out or even self-igniting. Your drawer is fitted with a safety switch-off mechanism which switches the appliance off after a maximum of 12 hours of continuous operation.
The drawer is set to continuous operation (exception: Low temperature).
A limited duration can be selected by tapping the “Duration” button: tap once for 1 hour (1h), twice for 2 hours (2h), and so on. The maximum duration is 4 hours.
Tapping the button for a fifth time returns the appliance to continuous operation.
Temperature settings
A temperature range is assigned to each operating mode. The default recommended temperatures appear in bold. The temperature can be changed in 5° increments by tapping the “Temperature” button.
The next time the drawer is switched on, the previously selected temperature is automatically shown in the display as the current setting (exception: Low temperature).
| Temperature display | Temperature °F / °C * | |||
| ■□□□□105/40 140/60 | 150/65 150/65 | |||
| □■□□□115/45 150/65 | 160/70 160/70 | |||
| □□■□□120/50 160/70 | 170/75 170/75 | |||
| □□□■□130/55 170/75 | 175/80 175/80 | |||
| □□□□■140/60 175/80 | 185/85 185/85 | |||
* approximate temperatures, measured in the center of an empty drawer
The minimum temperatures for keeping food warm (150°F / 65°C) may not be exceeded. Use only the “Keep Warm” ⚗ mode to ensure that the minimum temperature is maintained.
This operating mode is designed to keep food warm immediately after it has been cooked, i.e. when it is still hot. It is not intended for reheating food that is cold.
■ Select the ____ mode.
■ Select the desired time setting.
The drawer must be preheated for about 15 minutes to ensure that the temperature required for keeping food warm is reached.
■ Place the dishware inside the drawer for preheating.
■ After 15 minutes, remove the preheated dishware from the warming drawer and fill it with the hot food. Use pot holders to remove the dishware.
■ Place the dishes in the drawer and close it carefully to prevent liquid foods from spilling.
Tips
- Place the hot food in pre-warmed dishes. To preheat dishes, place them in the drawer while it is being preheated.
- Cover roasted or fried foods that are to remain crispy. Use a higher temperature to keep this type of food warm.
- Cover food with a high moisture content, liquids and foods which can develop a skin, with aluminum foil or a plate.
- To avoid spilling the food, do not overfill dishes.
- Freshly cooked food is hotter than food which has been kept warm. Serve food that has been kept warm on preheated plates.
- Foods begin to lose their nutrients during the cooking process and continue to do so while being kept warm. The longer food is kept warm, the greater the loss of nutrients.
- We do not recommend keeping food warm for too long, as it will continue to cook.
- The food may cool down if the drawer is opened frequently.
- Do not slam the drawer open or shut. Liquids could spill over and get into the vents or inside the drawer.
Settings
| Food Cook- | ware | Cover dishes | Temperature setting for \_\_\_\_ | Position | |
| Bot-tom | Rack* | ||||
| Steak, rare Plate No | x x | ||||
| Casserole/Gratin Casserole dish | Yes x | ||||
| Roast Plate Yes x | |||||
| Casserole Pot Yes x | |||||
| Fish sticks Pan No x | |||||
| Meat in gravy/sauce | Pot Yes x | ||||
| Vegetables in sauce | Pot Yes x | ||||
| Stew | Pot Yes x | ||||
| Mashed potatoes Pot Yes x | |||||
| Plated meal | Plate Yes x | ||||
| Baked/Boiled pota-toes with skin | Plate/pot Yes x | ||||
| Breaded cutlets | Pan No x | ||||
| Pancakes | Plate No x x | ||||
| Pizza | Plate No x | ||||
| Boiled potatoes | Pot Yes x | ||||
| Sauce | Pot Yes x | ||||
| Strudel | Plate No x | ||||
| Warming bread loaf | - | No x x | |||
| Warming rolls | - | No x x | |||
* depending on the appliance model
Tips
- Distribute the dishware over the whole area of the drawer whenever possible. Stacks of plates heat up more slowly than individual pieces. If it is not possible to avoid large stacks of plates, place them at the front of the drawer.
Use the rack (depending on the appliance model).
- Do not place large serving dishes in front of the air vents in an upright position. This will block the warm air outlets, and the plates and dishes will not warm evenly.
- For cups and glasses, only select the "Warm Cups/Glasses" mode □ to ensure that the maximum temperature (140°F/60°C) is not exceeded.
- Warmed dishes and plates cool down rapidly. Do not remove them until you are ready to use them.
Warming times
Various factors will affect the warming times:
- The material and thickness of the dish
- The amount of dishes placed in the drawer
- The arrangement of the dishes in the drawer
- The temperature setting
Due to these factors, it is not possible to provide exact warming times. The following information can be used as a guide:
In the _ mode, it will take approximately
- 30–35 minutes to evenly warm 6 place settings
- 40–45 minutes to evenly warm 12 place settings
As you continue to use the appliance, you will get to know which setting best fits your needs.
Capacity
The telescopic runners can support 55 lbs/25 kg.
Overloading the drawer will damage the runners.
The quantity that can be loaded will depend to a great extent on the weight and size of your own dishware.
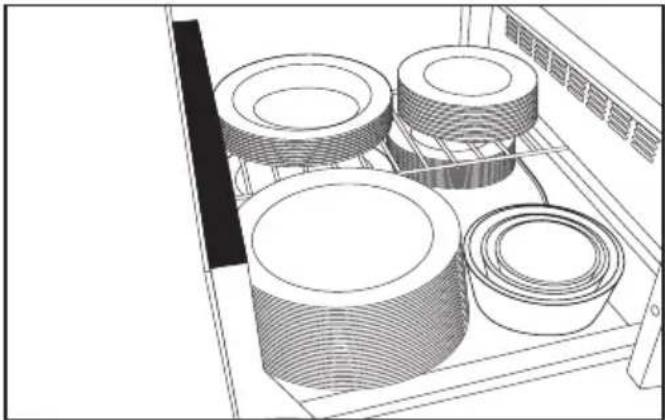
You can increase the load area by using the rack supplied with the appliance. Position the rack to suit. With two racks you can increase the load area even more by placing one rack on the left and the other on the right. Another rack can be obtained from Miele or from your Miele dealer (see “Optional accessories”).
The following loading examples are intended to serve as a guide:
natural_image
Line drawing of a storage rack with four cylindrical containers (no text or symbols)12 place settings
12 dinner plates ∅ 10 ^1/4 " (26 cm)
12 deep soup plates ∅ 9" (23 cm)
12 dessert plates ∅ 7 ^1/_2 " (19 cm)
1 oval platter 12^1/2 " (32 cm)
1 serving bowl ∅ 7 1/2" (19 cm)
1 serving bowl ∅ 6 14 " (16 cm)
1 serving bowl ∅ 5" (13 cm)
Or one of the following arrangements:
40 dinner plates ∅ 10 ^1/4 " (26 cm)
60 deep soup plates ∅ 9" (23 cm)
45 soup bowls ∅ 4" (10 cm)
20 dinner plates ∅ 10 ^1/4 " (26 cm)
20 deep soup plates ∅ 9" (23 cm)
20 pizza plates ∅ 14 ^1/4 " (36 cm)
142 espresso cups ∅ 2 1/4" (5.9 cm)
90 cappuccino cups ∅ 3 1/2" (8.8 cm)
30 tea glasses ∅ 2 ^3/4 " (6.7 cm) / 3 ^1/_4 " (8 cm) high
| Food Cookware Cover | dishes | [h:min] | |
| Defrosting berries | Bowl/plate No ▪□□□ | 12:50 | |
| Dissolving gelatin | Bowl No □□□□■ | 12:15 | |
| Proofing Bowl | Yes, with plate | 12:30 | |
| Preparing yogurt | Yogurt jars with lids | -□■□□□5:00 | |
| Soaking rice pudding | Pot Yes, with lid □ | 12:40 | |
| Melting Chocolate | Bowl No □□□□■ | 12:20 | |
| Defrosting vegetables | Bowl No □□■□□ | 1:00 |
Temperature setting / □ Temperature setting / √ Duration
For the observance of religious rules, the drawer can be programmed for the duration of the Sabbath. It switches off automatically after 72 hours and normal mode is re-established. When this function is activated, the timer is deactivated and the buttons must be pressed for longer than usual.
Activate
- Tap the “Duration” button and keep it pressed.
■ While keeping the “Duration” button pressed, tap the ① button and keep it pressed. - Keep both buttons pressed until all four timer displays appear.
■ Set the required mode and temperature.
Deactivate
You can deactivate the Sabbath function before the time has expired.
■ Tap the ① button and keep it pressed until all indicators go out.
The drawer is in normal mode again.

Risk of injury!
The steam from a steam cleaner could reach electrical components and cause a short circuit.
Do not use a steam cleaner to clean the warming drawer.
Unsuitable cleaning agents can dis-color and damage the surfaces of the appliance. Only use liquid dish soap and warm water applied with a soft sponge or cloth.
All surfaces are susceptible to scratching. Scratches on glass surfaces may cause a breakage.
Immediately remove any residues left by cleaning agents.
Allow the drawer to cool down to a safe temperature before cleaning.
■ The drawer and accessories should be cleaned and dried thoroughly after each use.
Unsuitable cleaning agents
To better maintain your appliance avoid the following:
– Cleaners containing soda, ammonia, thinners, or chlorides
- Descaling agents
- Abrasive cleaning agents, such as powder or cream cleansers, pumice stones
- Solvent-based cleaners
- Stainless steel cleaners
- Dishwasher cleaners
- Oven sprays
- Hard, abrasive sponges and brushes, such as pot scrubbers or scrub sponges
- Sharp metal scrapers
Cleaning the drawer front and interior
The On/Off button must remain free of grime and liquids. Failure to keep the sensor button clean may cause it to become unresponsive or to switch uncontrollably.
It is best to remove normal soiling immediately using a clean sponge and a solution of warm water and liquid dish soap or with a clean, damp microfiber cloth.
■ Wipe with clean water afterwards.
■ After cleaning, dry the surfaces with a soft cloth.
Glass cleaning agent can be used for the appliance front.
The long exposure time of glass cleaning agents can damage the surface. Wash off the cleaning agent immediately and make sure that no puddles form.
Cleaning the non-slip mat
Do not clean the non-slip mat in the dishwasher or washing machine. Never place it in the oven to dry!
■ Remove the non-slip mat for cleaning.
■ Clean the mat by hand only, using warm water and a small amount of liquid dish soap, and then dry using a cloth.
■ Do not return the non-slip mat to the warming drawer until it is completely dry.
With the help of the following guide minor faults in the performance of the machine, some of which may result from incorrect operation, can be remedied without contacting the Service Department.
This guide may help you to find the reason for the fault, and how to correct it.
| Problem Possible cause | and solution |
| The drawer does not heat up. | The plug is not properly inserted.■ Insert the plug. |
| The circuit breaker has tripped.■ Check the fuse (minimum fuse rating: see data plate). If the drawer still will not turn on after reactivating the fuse, contact a qualified electrician or Miele Technical Service. | |
| The food is not hot enough. | The “Keep Warm” ⚗ mode is not set.■ Set the correct operating mode. |
| The temperature setting is too low.■ Select a higher temperature. | |
| The air vents are covered.■ Make sure that air can circulate freely. | |
| The food is too hot. The “ | “Keep Warm” ⚗ mode is not set.■ Set the correct operating mode. |
| The temperature setting is too high.■ Select a lower temperature. | |
| The dishes are not hot enough. | The “Warm Dishes/Plates” _ mode is not set.■ Set the correct operating mode. |
| The temperature setting is too low.■ Select a higher temperature. | |
| The air vents are covered.■ Make sure that air can circulate freely. | |
| The dishes have not been warmed long enough.■ The warming-up time for dishes is influenced by various factors (see “Warming dishes”). | |
| The dishes are too hot. The “Warm Dishes/Plates” _ or “Warm Cups/Glasses” □ mode is not set.■ Set the correct operating mode. | |
| The temperature setting is too high.■ Select a lower temperature. | |
| Noise occurs during operation | The noise is caused by the fan, which distributes the heat evenly throughout the drawer. The fan runs at intervals in the “Keep Warm” and “Low temperature” modes. This is not a fault. |
Optional accessories
Miele offers a range of useful accessories, as well as cleaning and conditioning products for your appliance.
These products can be easily ordered from the Miele webshop.
These products can also be ordered from Miele Technical Service (see the end of these operating instructions) or your Miele dealer.
Rack

natural_image
Isometric view of a ladder structure with parallel slats (no text or symbols)For increasing the loading area.
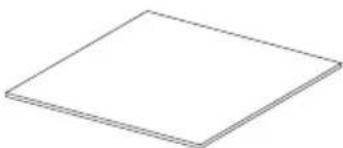
Non-slip mat
natural_image
Simple 3D isometric view of a square plate with visible edges and edges (no text or symbols)For keeping dishware secure.
IMPORTANT SAFETY INSTRUCTIONS - INSTALLATION
⚠ WARNING - Read all instructions before installation or use of the drawer to prevent injury and machine damage.
Before connecting the appliance to the power supply, ensure that the connection data (voltage and frequency) on the data plate of the drawer match the electrical supply.
This data must correspond in order to avoid the risk of damage to the warming drawer. Consult a qualified electrician if in any doubt.
The electrical outlet must be easily accessible after the installation of the drawer.
The drawer may only be built in combination with those appliances specified by Miele as being suitable. Miele cannot guarantee trouble-free operation if the appliance is operated in combination with appliances other than those quoted by Miele as being suitable.
The base on which the drawer and the combination appliance are fitted must be fixed in place and must support the weight of both appliances.
When installing the combination appliance, it is essential to follow the instructions given in the operating and installation instructions supplied with it.
The drawer must be installed in such a way that
- you can see the contents of cookware. Otherwise you may risk scalding or burning yourself with hot water and food when removing containers.
– there is enough space to pull out the drawer.
The combination appliance is placed on top of the drawer without the need for an interim shelf.
The drawer is available in two models, which differ in height. The installation dimensions for the food warming drawer must be added to the installation dimensions for the combination appliance to establish the niche size required.
All dimensions in this instruction booklet are given in mm and inches.
Note to the installer:
Please leave these instructions with the consumer of the appliance for the local building inspectors use.
SAVE THESE INSTRUCTIONS.
Solo installation
Side view
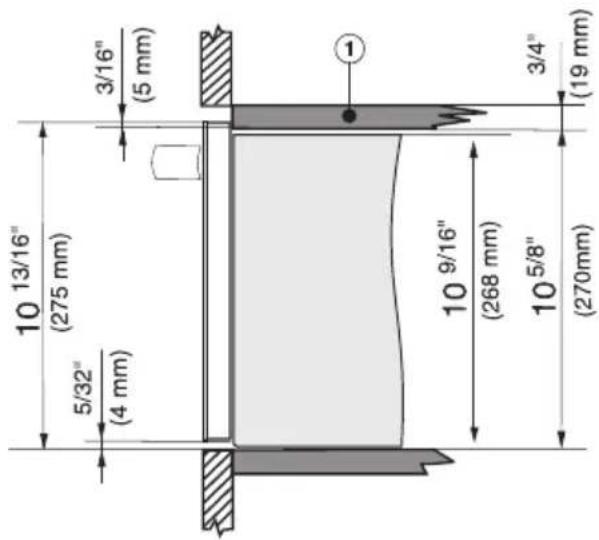
① Protective base
Installation with oven

Side view with oven
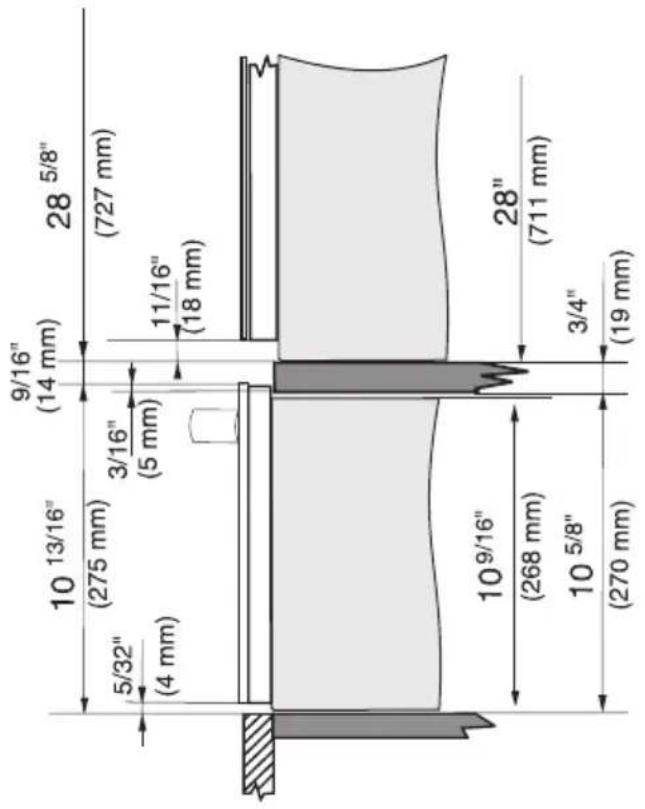
The base of the drawer must be clean and level. This is important for appliance to function correctly.
■ Push the drawer into the housing unit as far as the vapor strip and align it at a right angle.

natural_image
Technical line drawing of a mechanical device with stairs and arrows indicating movement (no text or symbols)■ Open the drawer, and use the 4 screws supplied to secure it to the side walls of the housing unit.
■ Install the combination appliance in accordance with its own specific operating and installation instructions.
The front panel must be at least 34 " (19 mm) thick and be temperature-resistant up to 140°F (60°C). The decorative front, including the handle, may not exceed a weight of 11 lbs. (5 kg).
■ Fasten the handle to the front panel using countersunk screws.
■ Unscrew the screws on the left and right sides of the drawer front and pull out the fascia panel carefully. In the process, make sure that the cable is not damaged or disconnected.

natural_image
Diagram of a cabinet or drawer with arrows indicating flow or movement, no text or symbols present■ Unscrew the 2 screws on the inside of the drawer front and remove the front panel from the front side of the drawer.

■ Predrill holes into the front panel ^3/8 " (10 mm), t = ^3/8 " (10 mm).

■ Remove the cable tie.

natural_image
Simple line drawing of a rectangular plate with supports and dashed lines indicating measurement or alignment points (no text or symbols)■ Screw the front panel of the drawer onto the decorative front.

natural_image
Diagram of a door frame with arrows indicating movement or force, showing internal structure and alignment (no text or symbols)■ Hang the front panel in place. Make sure that the seals are properly seated.
■ Slightly screw the 2 screws into the inside of the drawer front.
■ Align the front panel.
■ Tighten the screws into the inside of the drawer front.
■ Put the fascia panel carefully into place. In the process, make sure the cable is not damaged or jammed.
■ Screw in the screws on the left and right sides of the drawer front.

ATTENTION:
Before installation or servicing, disconnect the power supply by either removing the fuse, manually “tripping” the circuit breaker or unplugging the appliance. Pull the plug not the cord.
Repairs and service by unqualified persons could be dangerous and the manufacturer will not be held responsible.
Installation work and repairs should only be performed by a qualified technician in accordance with all applicable codes and standards. Installation, repair, and maintenance work should only be performed by a Miele-authorized service technician.
The voltage and frequency listed on the rating label must correspond with the household electrical supply to prevent appliance damage.
Check these data before connection. Consult an electrician if in doubt.
When another appliance is installed in combination with the drawer to the same circuit, operating both appliances at the same time may cause an overload.
If in doubt consult a qualified electrician.
Installer:
■ Please leave these instructions with the customer.
Connection
■ Make sure that the connection data on the data plate (voltage, frequency, and fuse rating) matches that of your electrical supply.
Connection data
The drawer is ready for connection and equipped with a 7' 2" (2,200 mm) power cord with a plug.
120 V / 15 A / 60 Hz
Make sure that the connecting socket is accessible after the installation of the drawer.
Disposal of the packing material
The cardboard box and packing materials protect the appliance during shipping. They have been designed to be biodegradable and recyclable.
Ensure that any plastic wrappings, bags, etc. are disposed of safely and kept out of the reach of children. Danger of suffocation!
Disposal of your old appliance
Electrical and electronic appliances contain valuable materials. They also contain certain substances, compounds and components which were essential for the proper functioning and safe use of the equipment. Handling these materials improperly by disposing of them in your household waste can be harmful to your health and the environment. Therefore, please do not dispose of your old appliance with regular household waste and follow local regulations on proper disposal.

Consult with local authorities, dealers or Miele in order to dispose of and recycle electrical and electronic appliances. Miele assumes no responsibility for deleting any personal data left on the appliance being disposed. Please ensure that your old appliance is kept away from children until removal. Observe safety requirements for appliances that may tip over or pose an entrapment hazard.
Contact in case of fault
In the event of a fault which you cannot remedy yourself, please contact your Miele dealer or Miele Technical Service.
Contact information for Miele Technical Service can be found at the end of this document.
Please quote the model and serial number of your appliance when contacting Miele. Both pieces of information can be found on the data plate.
Data plate
Adhere the extra data plate supplied with the appliance in the space below. Make sure that the model number matches the one specified on the back cover of this document.
Warranty
For further information, please refer to your warranty booklet.
This service is available in USA only.
MieleCare, our Extended Service Contract program, gives you the assurance of knowing that your appliance investment is covered by 5 years of worry free ownership.
MieleCare is the only Extended Service Contract in the industry that guarantees repairs by a Miele Authorized Service Provider using genuine Miele parts. Only genuine Miele parts installed by factory trained professionals can guarantee the safety, reliability, and longevity of your Miele appliance.
Please note that unless expressly approved in writing by Miele's Service department, Extended Service Contracts offered by other providers for Miele products will not be recognized by Miele. Our goal is to prevent unauthorized (and untrained) service personnel from working on your Miele products, possibly doing further damage to them, you and/or your home.
To learn more about MieleCare Ex-tended Service Contracts, please contact your appliance dealer or visit us online at: www.mieleusa.com
Please have the model and serial number of your appliance available when contacting Technical Service.
U.S.A.
Miele, Inc.
National Headquarters
9 Independence Way
Princeton, NJ 08540
Phone: 800-843-7231
Fax: 609-419-4298
www.mieleusa.com
Technical Service & Support
Phone: 800-999-1360
Fax: 888-586-8056
TechnicalService@mieleusa.com
International Headquarters
Miele & Cie. KG
Headquarters and Miele Centre
161 Four Valley Drive
Vaughan, ON L4K 4V8
www.miele.ca
Customer Care Centre
Phone: 800-565-6435
905-532-2272
customercare@miele.ca
Miele
ESW 6380 / ESW 6380 FB / ESW 6580 / ESW 6680 / ESW
6780 / ESW 6880
- Operating and Installation Instructions Warming drawer
- IMPORTANT SAFETY INSTRUCTIONS 4
- Overview.... 11
- Included accessories.... 12
- Control panel 13
- Before first use 14
- Cleaning the drawer for the first time.... 14
- Heating the drawer for the first time.... 14
- Operation.... 15
- Basic operation 15
- Operating modes.... 16
- Duration.... 16
- Temperature settings.... 16
- Keeping food warm.... 18
- Tips.... 18
- Settings 19
- Warming dishes.... 20
- Tips.... 20
- Warming times 20
- Capacity 20
- Other uses.... 22
- Sabbath mode.... 23
- Cleaning and care 24
- Frequently Asked Questions 26
- Optional accessories 28
- IMPORTANT SAFETY INSTRUCTIONS - INSTALLATION 29
- Instructions for installation 30
- Installation dimensions.... 31
- Solo installation 31
- Installation with oven.... 32
- Installation.... 34
- Attachment of the front panel for ESW 6380 FB.... 35
- IMPORTANT SAFETY INSTRUCTIONS
- Appropriate use
- Safety with children
- Technical safety
- Correct use
- Cleaning and maintenance
- Included accessories
- Dishwasher-safe rack
- Non-slip mat
- Cleaning the drawer for the first time
- Heating the drawer for the first time
- Basic operation
- Operating modes
- Duration
- Temperature settings
- Tips
- Warming times
- Capacity
- place settings
- Or one of the following arrangements:
- Activate
- Deactivate
- Unsuitable cleaning agents
- Cleaning the drawer front and interior
- Cleaning the non-slip mat
- Optional accessories
- Rack
- IMPORTANT SAFETY INSTRUCTIONS - INSTALLATION
- Note to the installer:
- ATTENTION:
- Installer:
- Connection
- Connection data
- Disposal of the packing material
- Disposal of your old appliance
- Contact in case of fault
- Data plate
- Warranty
- U.S.A.
- National Headquarters
- Technical Service & Support
- International Headquarters
- Headquarters and Miele Centre
- Customer Care Centre
- Miele
Brand : MIELE
Model : ESW 6780
Category : Warming Drawer