PKFDSRC10WT - Other Kitchen Appliances Nutrichef - Free user manual and instructions
Find the device manual for free PKFDSRC10WT Nutrichef in PDF.


| Product Type | Food Dehydrator |
| Brand | Nutrichef |
| Model | PKFDSRC10WT |
| Number of Trays | 10 |
| Tray Material | BPA-free plastic |
| Housing Material | Stainless steel and plastic |
| Dimensions (L x W x H) | 17.5 x 14.5 x 12.5 inches |
| Weight | 12.5 lbs |
| Power Source | 120V AC, 60Hz |
| Power Consumption | 600W |
| Temperature Range | 95°F - 165°F (35°C - 74°C) |
| Timer | 0-48 hour adjustable timer with auto shut-off |
| Control Type | Digital touch |
| Display | LED screen |
| Overheat Protection | Yes, automatic shut-off |
| Drying Method | Horizontal airflow with rear fan |
| Included Accessories | 10 mesh trays, 1 fruit roll sheet, 1 instruction manual |
| Color | White |
| Cleaning | Trays are dishwasher safe; wipe exterior with damp cloth |
| Certifications | ETL listed |
| Warranty | 1 year limited |
Frequently Asked Questions - PKFDSRC10WT Nutrichef
User questions about PKFDSRC10WT Nutrichef
0 question about this device. Answer the ones you know or ask your own.
Ask a new question about this device
Download the instructions for your Other Kitchen Appliances in PDF format for free! Find your manual PKFDSRC10WT - Nutrichef and take your electronic device back in hand. On this page are published all the documents necessary for the use of your device. PKFDSRC10WT by Nutrichef.
USER MANUAL PKFDSRC10WT Nutrichef
natural_image
White Nutrichef steamer with multi-tiered dish holders and a digital control panel (no visible text or symbols on the device itself)MODELS: PKFDSRC10WT WHITE
PKFDSRC11BKT BLACK
Introduction
Congratulations on your purchase of a NUTRICHEF
Steamer/Dehydrator! With your purchase you are joining the thousands of people who have already discovered the health-ful benefits of steam cooking and dehydrating.
With this innovative unit in your kitchen you'll be able to improve the quality of the foods you and your family eat, while saving time and money.
This unique 3-in-1 appliance will make it easy to:
-
Dehydrate fruits and vegetables, make home made fruit rolls and your own delicious beef jerky.
-
Steam vegetables, poultry, seafood and dehydrated foods.
-
Cook perfect rice and beans.
Before you get started, please read this book completely. It is full of helpful information that will allow you to get the most out of your new Steamer/Dehydrator.
Table Of Contents
Introduction 2
Important Safeguards 4
Description Of Parts 5
Cleaning 6
Dehydrator Assembly And Operation 7
Dehydrating Terms 8
Thickness Guide 9
Preparing Fruits For Dehydrating 9
Fruit Dehydrating Tips 10
Fruit Pretreatments 11
Rehydrating Fruit 11
Fruit Dehydrating Time Chart 12
Preparing Vegetables For Dehydrating 13
Vegetable Dehydrating Tips 13
Vegetable Pretreatments 14
Vegetable Dehydrating Time Chart 15
Rehydrating Vegetables 16
Dehydrating Spices/Herbs 17
Making Jerky 17
Marinades For Jerky 18
Making Fruit Roll Snacks 19
Fruit Roll Tips 20
Steaming 21
Steamer Assembly and Operation 22
Steaming Tips 23
Steaming Time Chart 24
Rice Cooker Assembly And Operation 25
Rice Time Chart 26
Rice Tips 26
Cooking Dehydrated Beans And Legumes 27
Bean Time Chart 28
Service And Warrently Information 31
IMPORTANT SAFEGUARDS
When using electrical appliances, basic safety precautions should be followed, including the following:
- READ ALL INSTRUCTIONS.
- To protect against electrical hazards, do not immerse cord, plug or base in water or other liquids.
- Do not touch hot surfaces. Always use pot holders or oven mitts to handle hot cover to check foods.
- Close supervision is necessary when any appliance is used by or near children.
- Unplug from outlet when not in use and before cleaning. Allow to cool before putting on or taking off parts.
- Do not operate any appliance with a damaged cord or plug, or after appliance malfunctions, or has been damaged in any manner. Return appliance to the nearest authorized service facility, for examination, repair or adjustment.
- Do not use attachments not recommended or sold by the appliance manufacturer. This may cause fire, electrical shock or injury.
- Do not use appliance outdoors.
- Do not let cord hang over edge of table or counter, or touch hot surface.
- Do not place appliance on or near a hot gas or electric burner, or in a heated oven.
- To disconnect, grip plug and pull from wall outlet. Never pull on the cord.
- Do not use appliance for other than its intended use.
- Extreme caution must be used when moving an appliance containing
- hot liquids.
SAVE THESE INSTRUCTIONS
To reduce the hazard of potential shock, this item has a polarized plug (one blade is wider than the other), which will fit only one way in a polarized outlet. If the plug does not fit the outlet properly, tum the plug the other way; if it still does not fit, contact a qualified electrician for assistance. Never use this plug with an extension cord unless it fits properly. DO NOT ATTEMPT TO DEFEAT THIS SAFETY FEATURE.
NOTICE: A short cord is provided to reduce the risks of becoming tangled in or tripping over a longer cord. Extension cords may be used if care is exercised in their use and the wattage rating is at least as great as the wattage stamped on the base of the appliance. If an extension cord is used, it should be arranged so that it will not drape over the counter or tabletop where it can be reached by children or tripped over accidentally.
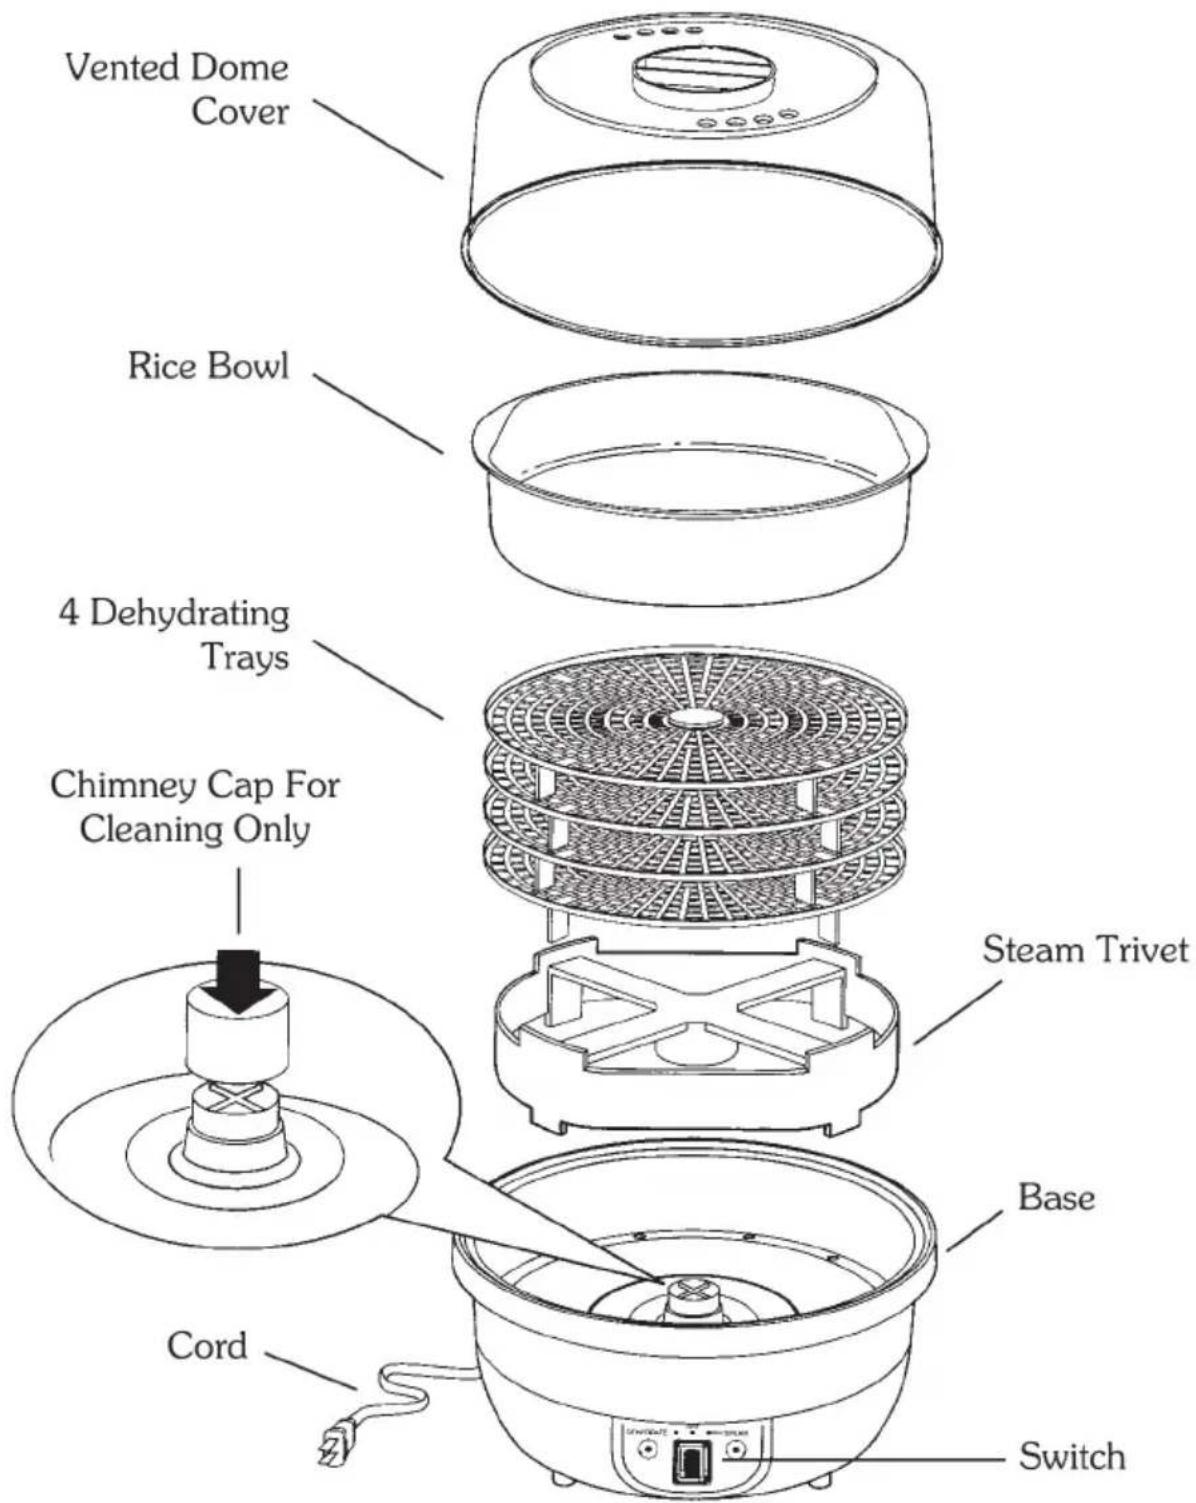
DESCRIPTION OF PARTS
Cleaning
To keep your Steamer/Dehydrator looking good and functioning properly you will want to clean it before you use it for the first time and after each use.
Before using your Steamer/Dehydrator for the first time:
Wash Steam Trivet, Steam Inset, Dehydrating Trays, Fruit Roll Trays, Rice Bowl, Chimney Cap, and Vented Dome Cover in hot soapy water, rinse and dry thoroughly; or, wash parts in the dishwasher (top rack).
With a damp cloth or sponge, wipe the exterior of the Base.
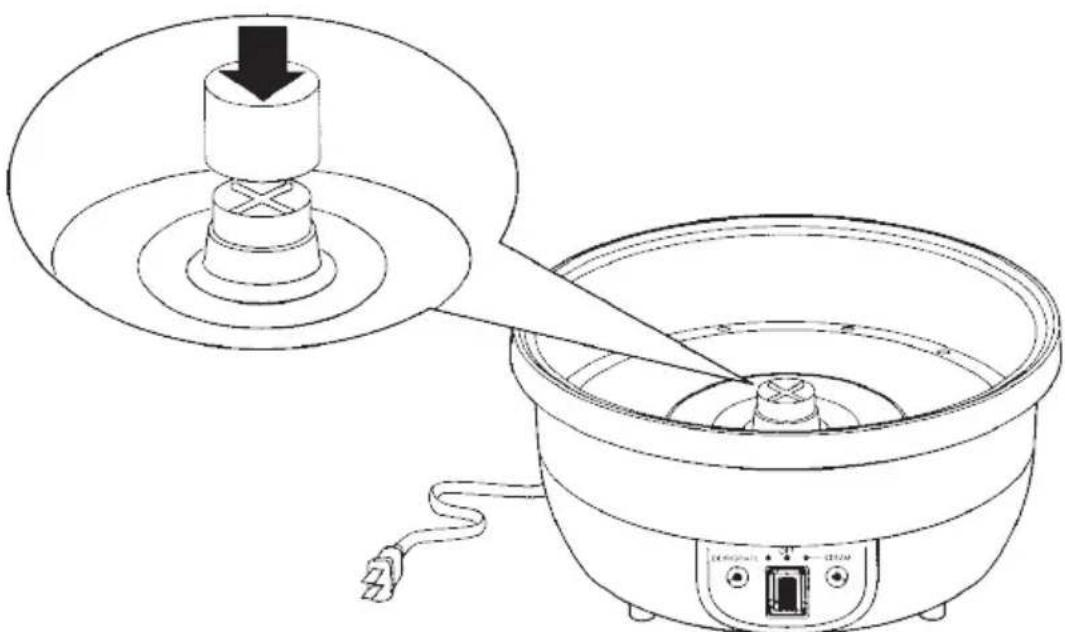
Position the Chimney Cap securely over the Chimney inside the Base(see illustration below). Wash interior of Base with hot soapy water, rinse and dry. Do not immerse base or cord in water.
After Each Use:
Unplug Steamer/Dehydrator and allow to cool. Wash any parts used in your steaming or dehydrating in hot soapy water, rinse and dry thoroughly. or wash in the dishwater on the top rack.
With a damp cloth or sponge, wipe the exterior of the Base.
Position the Chimney Cap securely over the Chimney inside the Base (see illustration below). Wash interior of Base with hot soapy water, rinse and dry. Do not immerse base or cord in water.
No additional maintenance is required. Any necessary repairs should be handled only by an authorized service facility.
natural_image
Line drawing of a rice cooker with a lid and base, showing internal components and a close-up view of the lid (no text or symbols)Caution: Place Chimney Cap securely over Chimney inside Base before washing interior of Base.
Dehydrator Assembly and Operation
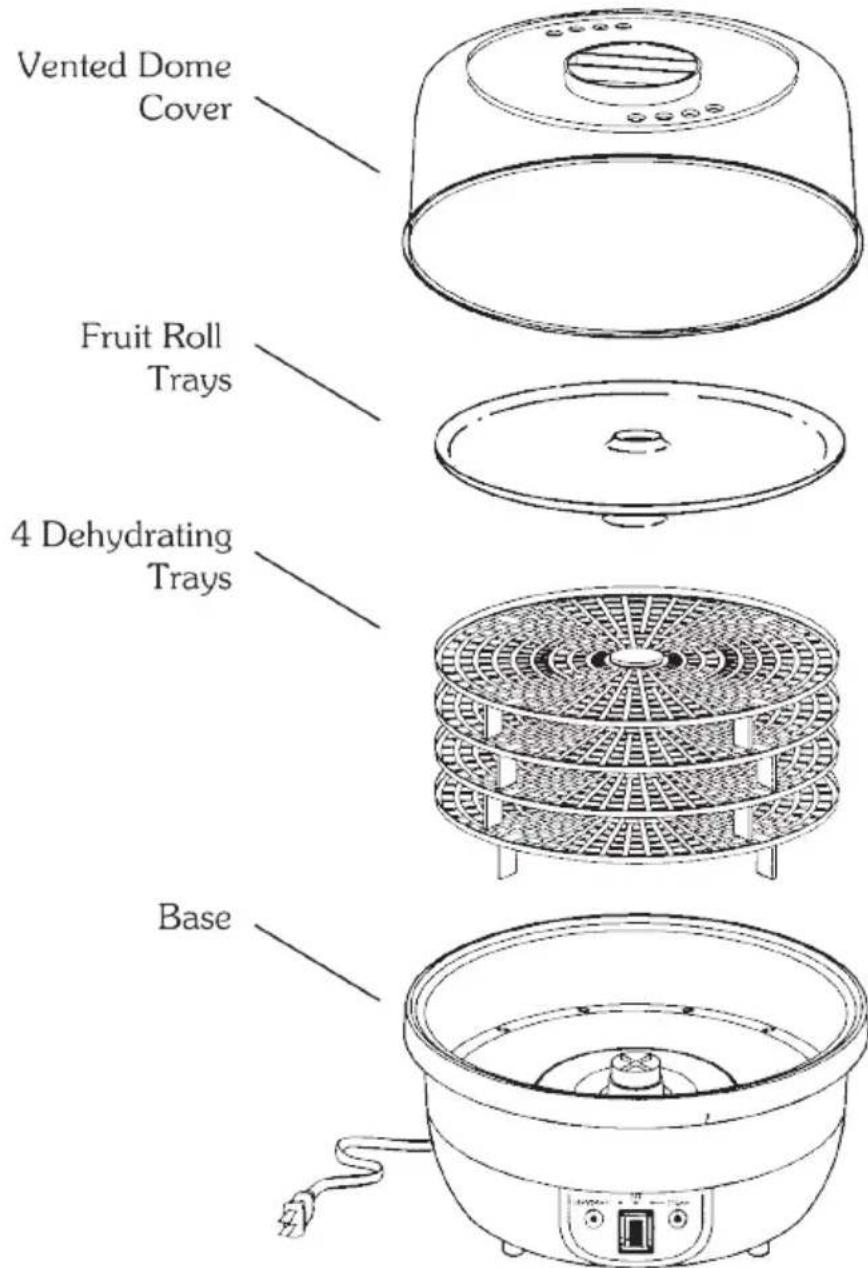
Assembly: Stack Dehydrating Trays in the Base unit. Adjust Trays so the feet rest on the surface of the tray below, leaving a 1 1/4-inch space between each tray. Position Cover over Trays with the rim of the Cover securely set down on the Base.
Operation: The Base contains a high speed fan that circulates the heated air through the Chimney where it is diffused, promoting more even, efficient dehydrating. The Vented Cover exhausts moisture and produces a natural air flow.
Dehydrating Terms
Dehydrating Time. Dehydrating times vary due to moisture content, size of food, humidity, ambient air temperature, and food arrangement on Trays. To test doneness, remove a few pieces and allow to cool. Fruits should be pliable and leather-like; vegetables should be brittle, crisp, or hard. Be sure to cool foods before testing for dryness.
Conditioning. Conditioning of vegetables is not necessary. Fruits, however, may require conditioning after dehydrating because of their moisture content and thickness. Completely cool dehydrated fruit before conditioning. Transfer fruit to an airtight container, leaving l-inch space at the top. Seal and let stand at room temperature for 48 to 72 hours, shocking container occasionally to stabilize the moisture.
Packaging. Before storing, check food for dryness. Store in airtight containers such as jars or plastic storage bags, with excess air removed. Store properly packaged dehydrated foods in a dry, cool, dark place. Date and label packages for easy identification. Vacuum packaging can extend the shelf life by three to four times.
Pasteurizing. When fruits are dehydrated without removing skins, pasteurizing is recommended. To pasteurize dehydrated fruit, package properly and freeze for 48 hours to stop bacteria growth which causes spoilage.
Shelf Life. If properly packaged and stored in a dry, cool, dark place, dehydrated fruits will keep up to one year; vegetables, 6 months; meat, 2 months.
Rehydrating. Optional. For instructions, see Fruits (Page 11), or Vegetables (Page 16).
Thickness Guide
Ideal food thickness for dehydrating is 1/8 to 3/8 inch.

bar
| Length | Value | | :--- | :--- | | 1/8 inch | 100 | | 1/4 inch | 100 | | 3/8 inch | 100 |Preparing Fruits For Dehydrating
- Choose high quality, fully ripe, unnblemished fruits.
- Before processing wash all produce to remove dirt and any pesticides.
- Trim away any bruised or soft areas. Blemished or bruised fruit spoils easily and could spoil the entire batch.
- If desired, remove peel or rind. The peel contains minerals and vitamins, but can become tough when dehydrated.
- Remove seeds, pits, stems, etc.
- Cut fruit uniformly to ensure even dehydration.
- Dehydrating times vary according to thickness of fruit. Optimum thickness for efficient dehydrating is 1/8 to 3/8 inch.
- Preheat Dehydrator for 2 - 3 minutes with cover in place.
- Pretreament of fruit is optional, see page 11.
- To avoid sticking, lightly coat Trays with vegetable spray or a few drops of vegetable oil.
- Arrange prepared fruit on the Trays, skin side down, allowing space between pieces for good air circulation. Do not stack or overlap fruit.
Fruit Dehydrating Tips
- Prepare only enough fruit as you can dehydrate on the Trays at one time.
- Dehydrate similar sized pieces on the same Tray.
- To ensure even dehydrating, restack Trays, moving the top Tray to the bottom two or three times during the dehydrating process.
- If adding foods to the Dehydrator while dehydrating is in process, set added Tray on top so moisture from the newly added food does not recirculate through Dehydrating Trays.
- To test for desired dryness, remove a few samples from each Tray and allow to cool. Warm fruit will be so softer and more pliable than cool fruit. Fruit should be chewy, with a leather-like feel and no wet spots. Tear a piece of fruit to see if moisture forms along the tear. If so, continue dehydrating.
• Always cool dehydrated fruits completely before storing. - Store dehydrated foods in airtight containers. Dehydrated foods will begin to rehydrate, and could spoil, if exposed to moisture.
- Grow your own vegetables and herbs and dehydrate foods in season, to save money.
- Canned pineapple dehydrates well and is often sweeter, more convenient and more economical than fresh pineapple.
- Use dehydrated fruit as snacks, and in cereals, granola, breads, etc.
Fruits Not Recommended For Dehydrating
Avocados
Berries with seeds
Crab Apples
Olives
Pomegranates
Fruit Pretreatments
Pretreabnent is ptional; however, it will help prevent darkening through oxidation during dehydrating.
A Natural Slice fruit into lemon juice or pineapple juice; let stand 2 minutes. Remove from juice, and blot dry before arranging on Trays.
B. Syrup Blanching. This is used to help maintain the natural color of the fruit, and maintain a softer texture and sweeter flavor. In heavy sauce pan, over medium heat, combine 1 cup sugar, 1 cup com syrup, 2 cups water and 1 teaspoon ascorbic acid powder. Bring to a boil and add sliced, prepared fruit. Simmer 5 to 10 minutes, depending on thickness of fruit. Drain well before dehydrating time for fruit blanched in syrup.
C. Powdered Fruit Protector. To reduce oxidation (browning) and enhance the flavor of fruits, in large-bowl, combine 2 quarts water and 3 tablespoons fruit protector. Immerse prepared fruit in mixture, let stand 5 minutes; drain. Spinkle 1 tablespoon powdered protector over fruit and toss gently to evenly coat fruit. See package directions for complete instructions.
D. Checking. Fruits such as whole grapes, blueberries, cherries, etc., have a tough waxy coating which tends to trap moisture inside, and increases the dehydrating time. To break the coating, dip fruit in boiling water just long enough to crack the skin, about 1 minute. Another method would be to pierce the fruit to vent inside moisture.
Rehydrating Fruit
Dehydrated fruit is usually' eaten without rehydrating. When rehydrated fruit is preferred, or if a recipe specifies, choose any one of the following:
- Steam fruit in Steam fruit in Steamer/Dehydrator until soft and plump.
- Place fruit in a bowl, cover fruit with juice or water. Let stand at room temperature until soft and plump. Do not let stand more than 2 hours without refrigeration.
- Place fruit in heatproof bowl or sauce pan; cover with boiling water or juice. Let stand 5 minutes, or until soft and plump.
Note: Sweeten fruit after rehydrating, if desired. Sugar added before rehydrating reduces the liquid absorption.
Fruit Dehydrating Time Chart
Preheat Dehydrator while pretreating fruit or loading Trays, with Cover in place.
| Food | Preparation | *Pretreatment | Time (Hours) | Doneness Test |
| Apples | peel-optional slice | A, B or C Sprinkle with cinnamon sugar, optional | 5-12 | soft pliable |
| Apricots | cut in half, remove pit turn inside out to reduce dehydrating time | A or B | 10-24 | soft and poliable |
| Bananas | peel slice | A or B | 7-12 | brittle, crisp |
| Berries (Strawberries. Blueberries, etc.) | whole, sliced or halved | D | 5-20 | wrinkled, leathery |
| Cherries | remove pits | no | 6-30 | wrinkled, leathery |
| Cranberries or Grapes | cut in half or whole | D if whole | 10-48 | pliable |
| Citrus | slice with rind on | no | 8-20 | brittle use as is or process into powder |
| Nectarine Peaches Pears | peel,optional remove pit or core; slice | A, B or C | 5-20 | pliable |
| Pineapple | peel, remove core, slice | B, optional | 9-20 | pliable |
| Plums | cut in half, remove pit | no | 9-20 | pliable |
| Prunnes | cut in half, remove pit | no | 10-24 | wrinkled, leathery |
*See Page 11 for Fruit Pretreatments.
Preparing Vegetable For Dehydrating
- Select only high quality, crisp, unblemished vegetables.
- Wash thoroughly to remove bacteria, pesticides, dirt, etc.
- Remove soft spots, blemishes, and stems. Soft spots do not dehydrate well and could spoil the entire batch.
- Peeling is optional. The peel and just below the surface contain minerals and vitamins, but skins can become tough when dehydrated. If desired, slice or cut vegetables. Optimum thickness is 1/8 to 3/8 inch. Cut vegetables uniformly to ensure even dehydrating.
- Pretreating before dehydrating is recommended for most vegetables, except onions, garlic, tomatoes, and peppers.
- Preheat Dehydrator while pretreating vegetables, or loading Trays. See pretreatment for vegetables, page 14.
- Arrange vegetables on trays allowing space between pieces for good circulation. Do not stack or overlap vegetables.
Vegetable Dehydrating Tips
- The dehydrating time of vegetables varies due to humidity, ambient air temperature, thickness of pieces, water content, and arrangement on Trays.
• Prepare only enough vegetables as you can dehydrate at one time. - Arrange similar sized pieces on the same Tray.
- When dehydrated, vegetables should be brittle, hard or crisp. To ensure even dehydrating, restack Trays, moving the top Tray to the bottom two or three times during the dehydrating process.
- To test for desired dryness, remove a few samples from each Tray and allow to cool.
- Because vegetables are dehydrated to such a waterless state, conditioning, as recommended for dehydrated fruit, is not necessary.
- Always cool dehydrated vegetables completely before packaging and storing.
Vegetable Not Recommended For
Dehydrating
Brussels Sprouts
Cabbage
Cucumber
Eggplant
Radishes
Spinach
Winter Squash
Vegetable Pretreatments
Pretreating vegetables before dehydrating will improve quality and increase the shelf life. Vegetables lose quality faster than fruit inhibits of the ripening action of the enzymes. The natural sugar in fruit inhibits this ripening action. Enzymes are destroyed by heat.
Pretreat by blanching to preserve color and shorten the dehydrating, rehydrating, and cooking time. Steam blanching can quickly be accomplished in your Steam/Dehydrator and helps retain water soluble vitamins and minerals, which are often blanched in boiling water.
Vegetable Dehydrating Time Chart
| Food Preparation | *Pretreatment | Time (Hours) | Doneness Test |
| Asparagus - TrimmedBeans - Cut into pieces | steam blanch 3 minutes | 6-10 | leathery |
| steam blanch 4-5 minutes | 6-10 | brittle | |
| Beets | steam blanch 15-20 minutes, until tender. Cool, peel, cut or slice | 5-10 | brittle |
| Broccoli - cut into flowerettes, slice stems | steam blanch 2-3 minutes | 6-7 | brittle |
| Carrots - slice, dice or shared | steam blanch 4-5 minutes until tender | 5-10 | leathery |
| Cauliflower - cut into flowerettes | steam blanch 3-4 minutes, until tender | 5-10 | stiff, leathery |
| Celery - Slice or dice | steam blanch, 2-3 minutes, optional | 5-10 | brittle |
| Corn - husk | steam 2-3 minutes, until tender, cut from cob | 5-10 | brittle |
| Garlic - separate and peel cloves, cut in half | none | 2-4 | hard |
| Mushrooms - slice | dip in lemon juice to maintain a light color | 4-6 | leathery to brittle |
| Onions - pee, slice or chop | none | 4-8 | brittle |
| Parsley | remove stems | 2-4 | brittle |
| Peas shell, discard pod | steam blanch 3 minutes, until skin begins to wrinkle | 4-8 | crisp and shrivelled |
| Peppers - Remove and discard seeds; slice, chop | none | 4-8 | leathery to brittle |
| Potatoes - peel, optional | steam blanch 4-5 minutes until translucent, slice or cube, rinse, pat dry | 6-10 | brittle |
| Tomatoes - slice or cube; with or without skin; to remove skin, dip in boiling water for 15-30 seconds | none | 10-15 | brittle |
| Zucchini - slice or cube | steam blanch 2 minutes | 6-10 | tough, leathery |
Tips For Rehydrating Vegetables
Rehydrating vegetables is recommended. Vegetables rehydrate more slowly than fruit. If dehydrated vegetables are added to soups, stews, etc., before they are rehydrated they will be tough.
- Place dehydrated vegetables in a heatproof bowl or sauce pan. Use just enough water or broth to cover vegetables. Use boiling water or broth to shorten rehydrating time.
- The time required to rehydrate foods will vary, depending on thickness, liquid temperature, weather conditions, etc. Rehydrating may take from 15 minutes to 2 hours. Do not let stand for more than 2 hours without refrigeration.
- Do not season vegetables either before or during rehydrating. Seasoning will slow down the absorption of liquids.
- Generally, the volume of dehydrated food will double after rehydrating. Rehydrate vegetables before cooking. To retain more nutrients, use the same water or broth to cook the vegetables.
- If dehydrated vegetables are used in casseroles or stews without rehydrating, use 1 extra cup liquid for every cup of dehydrated vegetables. Add 2 extra cups of liquid for every cup of dehydrated vegetables used in soup.
- In most recipes, you can substitute one part of dehydrated vegetable for every three parts fresh or frozen.
- Garlic, onion, and peppers should not be dehydrated along with other milder flavored vegetables.
- Parsley, herbs, etc. should not be dehydrated with high moisture foods.
• After vegetables are rehydrated, they are ready to cook or use in a recipe. Generally, rehydrated vegetables cook in the same time as frozen. Season after cooking.
- Dehydrated vegetables and herbs can also processed into either flakes or powders. In a completely dry blender or food processor, process 1/2 cup at a time. Store in a tightly sealed jar or storage bag with excess air removed.
| Equivalents | |
| 4 tablespoons chopped = fresh vegetables | 1 tablespoon powder, or, 1 1/2 tablespoons flakes, or 2 tablespoons dehydrated |
Dehydrating Spices/Herbs
- Gently rinse cold water. Shake excess moisture from leaves. Remove and discard large stems and any dead or blemished leaves.
- Preheat Dehydrator.
- Arrange prepared herbs on Trays. Do not dehydrate herbs or other low moisture items with fruit or vegetables which have a relatively high moisture content.
- Dryness test: Herb leaves will crumble and stems will snap when bent. Seeds will take longer than leaves and stems.
- Condition herbs: Seal in air tight container for 24 hours. If condensation forms, resume dehydrating until moisture is eliminated.
- Package dehydrated herbs in a sealed container and store in a dry, dark, cool place.
- Shelf life is 6 months to 1 years.
Use dehydrated vegetable flasks and powders on pizzas, in vegetable dips and spreads, and as a garnish on deviled eggs, appetizers, etc.
When using flasks and powders in recipes without rehydrating, allow 1/4 cup liquid for every tablespoon of powder equals one medium tomato.
Making jerky
- Select lean meat with little fat, like flank or round steak.
- Slice meat 3/8 inch thick. Meat will slice easier if sliced while partially frozen. Trim away any visible fat.
- Marinate meat for the time specified. See page 18 for marinate recipes.
- Drain off marinade before dehydrating. Discard leftover marinade.
- Arrange marinated meat slices on Dehydrating trays without overlapping pieces.
- Preheat Dehydrator while arranging strips of marinated meat on Trays. Allow space between meat strips for air to circulate freely.
- Dehydrate for 8-10 hours, or until taught and no moist areas appear on meat.
- Test for doneness. Completely cool test piece before evaluating. Once cool, it should crack when bent, but should not break.
Marinades For Jerky
Marinade 1
1 pound trimmed beef, sliced
1/4 cup soy sauce
2 tablespoons liquid smoke
1 tablespoon molasses
Mix all ingredients in a cup, or small bowl. Put meat in plastic storage bag and pour marinade over. Squeeze out air and seal. Marinate 1 hour at room temperature. Drain and discard leftover marinade. For a stronger flavor extend marinate time. Refrigerate if longer than 1 hour.
Marinade 2
1 pound trimmed beef, sliced
1/4 cup soy sauce
2 tablespoons liquid smoke
3 cloves garlic, minced
2 teaspoons Worcestershire sauce
Mix all ingredients in a cup, or small bowl. Put meat in plastic storage bag and pour marinade over. Squeeze out air and seal. Marinate 1 hour at room temperature. Drain and discard leftover marinade. For a stronger flavor extend marinate time. Refrigerate if longer than 1 hour.
Marinade 3
1 pound trimmed beef, sliced
1/2 cup soy sauce
1 tablespoon Worcestershire sauce
1 teaspoon black pepper
3 cloves garlic, minced
1 tablespoons liquid smoke
Mix all ingredients in a cup, or small bowl. Put meat in plastic storage bag and pour marinade over. Squeeze out air and seal. Marinate 10 hours, or overnight in refrigerator. Drain and discard leftover marinade.
Making Fruit Roll Snacks
Fruit Roll Snack are made from pureed fresh, canned or frozen fruit, or combination of fruits. These leathery, sweet snacks are popular with kids of all ages and provides a healthful alternative to traditional snack foods.
- Wash and remove stems, soft areas, and large seeds. Peel, if desired, or when it might detract from the dehydrated product; such as, pineapple, kiwi, etc.
- Using a food processor or blender, puree fruit until smooth. If mixture is too thick add a small amount of fruit juice, liquid sweetener or water.
- If desired, sweeten purees prior to dehydrating. Use com syrup, honey or fruit juice instead of granulated sugar which tends to crystallize. Keep in mind that fruit gets sweeter as it drys.
- Pretreat fruit which tend to oxidize (tum brown), with one of the recommended pretreatments for dehydrating {see page 11}.
- Lightly oil or spray the Fruit Roll Tray to prevent sticking.
- Pour puree onto coated Fruit Roll Tray, about 1/4-inch thick.
- Position coated Fruit Roll Trays on dehydrating tray and place in Base. Place cover on until and switch to dehydrate.
Dehydrating time will vary from 6 to 18 hours. Check occasionally. Test by lifting the edge of the fruit roll. It is ready if it lifts without tearing, and has no wet spots.
While still warm, roll fruit in a sheet of plastic wrap. Cool and store in a Fruit rolls keep well for one month.
Fruit Roll Tips
- Use fruit that is in season. Blemished, bruised or very ripe fruit that is not suitable for dehydrating work well for fruit roll snacks. Discard blemished parts.
- Citrus fruits have lots of liquid and should only be used in combination with other fruits.
- If using canned, or frozen fruit that has been thawed, drain fruit and reserved liquid. If necessary, add a little of the reserved juice to make a smooth puree.
- For added flavor, puree canned fruit with one teaspoon of lemon juice for every 16-ounces of fruit.
- Add spices or flavored extracts to pureed fruit for more flavor.
- For variety, after spreading fruit puree on Tray, sprinkle with chopped nuts, grated chocolate or flaked coconut.
- Fruit rolls can be filled. Roll up in plastic wrap while warm; let cool. Unroll and spread with a thin layer of cream cheese, peanut butter, sweetened cream cheese, or chocolate fudge topping. Reroll and wrap in plastic. Refrigerate until served.
- When using both Fruit Trays ay once, switch top and bottom Tray after 8 to 10 hours.
Suggested Fruit Combinations
Apples and Cranberries
Apples and Grapes
Apples and Rhubarb
Apples and Berries
Apples and Bananas
Bananas and Pineapple
Peaches and Pears
Bananas and Apple Juice
Steaming
Steam cooking is an easy, healthy and fast method of preparing fish, poultry, vegetables and more.
This centuries-old method of cooking is perfect for today's healthier lifestyles. Steaming gives you food that looks better, tastes better and are better for you.
Steaming is simply cooking food over gently boiling water. The water vapors cook the food rather than the boiling water. In addition to preserving more of the foods nutrients and the improved appearance of the food, steam also cooks faster than boiling. The temperature of steam is the same as that of boiling water 212^ F / lOO ^ C, but steam has almost six times more heat energy than water at the boiling point.
Because of the many benefits of steaming it continues to become more and more popular for preparing all types of foods from vegetables and sesfood to eggs and poultry.
Benefits of steaming:
Nutrition. Water-soluble vitamins and minerals (most notably Vitamins B and C), are retained. In one study of Vitamin C retention, it was noted that, in general, foods cokked in boiling water retained only 45% of their original Vitamin C content, while the average Vitamin C retention of steamed foods was 69%.
No Added Fat. Steamed foods need not be high in fat or calories.
Flavor. Your food's natural and superb flavors are retained.
Texture/Color. Steaming your vegetables maintains their fresh from the garden color, texture and taste.
In addition, steaming reduces the risk of overcooking. When properly steamed, vegetables are eye-appealing with a bright color, characteristic shape, and a firm but tender texture.
Steamed meats are moist and flavorful and are cooked without adding any additional oils or fats.
Steamer Assembly And Operation
- Place Base on a clean, dry, flat, hear-resistant surface.
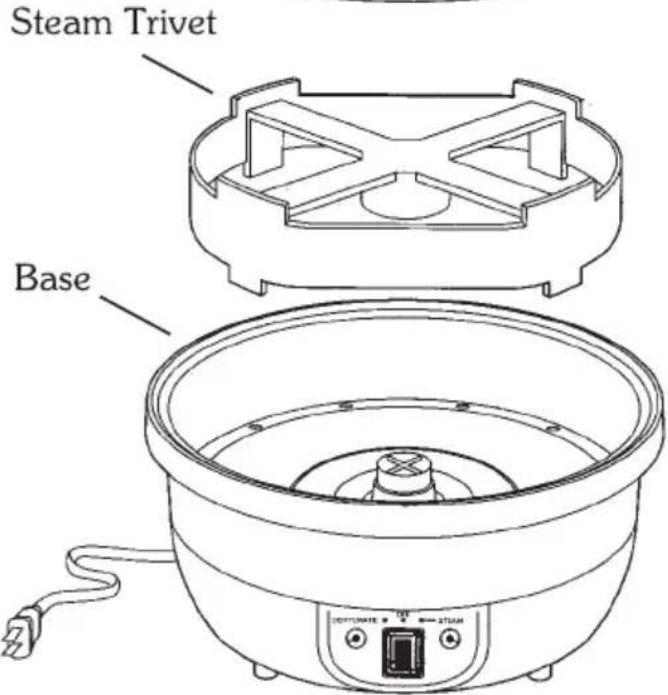
- Place Steam Trivet in Base, sealing the Chimney opening.
Note: The Steam Trivet is always used to steam foods or to cook rice in the Rice Bowl. It prevents moisture from entering the Chimney.
-
Measure 1 1/2 cups water into Base. Warm tap water will begin steaming faster than cold water.
-
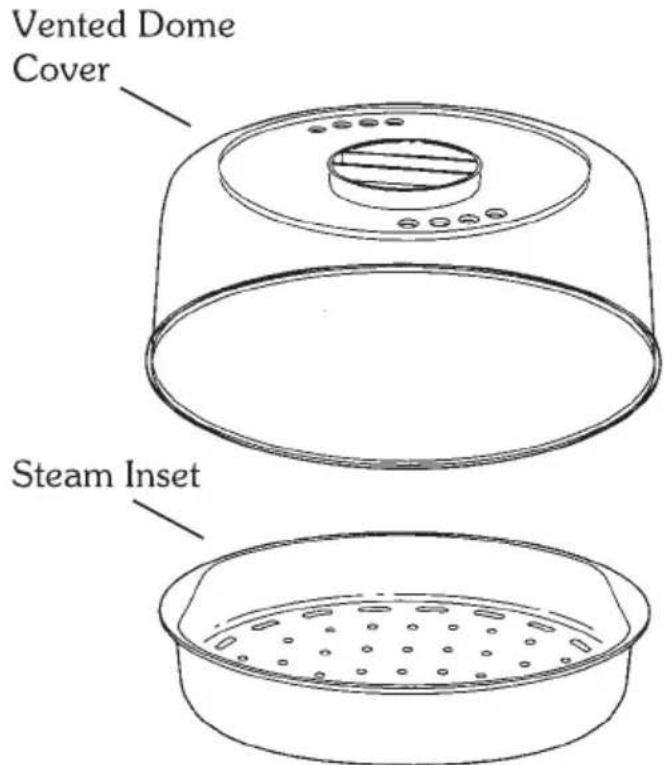
Loosely arrange food in Steam Inset. If food is packed too tightly, it will not cook evenly. Do not season food until after it is cooked.
-
Position Steam Inset on Steam Trivet.
-
Place Vented Dome Cover on Base.
-
Plug cord into wall outlet.
-
Switch on Steam. Beging timing when steam begins forming inside Cover, about 3-4 minutes.
-
For longer cooking times, check water in Base every 30 minutes, using potholders or mitts to protect hands when removing Cover. Add warm water, as needed, to avoid cooking in
-
When food is done, switch to Off, and unplug cord.
-
Using potholders, or mitts, carefully remove Cover and Steam Inset with food. Always tilt Cover away from you to avoid possible steam burns. Pour condensed water that has formed inside the Cover back into the Base.
-
Allow unit to cool before removing Steam Trivet.
Steaming Tips
- Steam time will vary, depending on size, starting temperature of food, altitude and desired doneness. Approximate cooking times are listed in the chart on page 24.
- Always use potholders or oven mitts when removing or replacing the hot Cover, or Steam Inset with cooked food.
- Do not place Steamer directly under cabinets during cooking; the escaping steam could damage the finish of the cabinets.
- Use the Steam Trivet, Steam Inset, and all other parts, with this Steamer/Dehydrator only. Not for oven or microwave use.
- Never allow the Steamer to cook dry. Add warm water as necessary, approximately every 30 minutes, Cold water can also be used, but it will take additional time to return water to steaming temperature. Do not overfill unit. Maximum water capacity of this Steamer is 1 1/2 cups (12 onces), which will steam cook for about 30 minutes.
- Use potjolders or oven mitts to remove Cover during steaming. Always tilt cover away from you to avoid steam bums.
- When steaming foods in high-altitude locations, it may be necessary to extend steaming times because water boils below 212"F./100"C.
- When poaching eggs place in lightly oiled heatproof custard cups and arrange in the Steam Inset. Place Vented Dome Cover on Base and switch to Steam. Begin timing when steam begins to form inside Cover. See chart on page 24 for cooking times.
- For uniform cooking:
Cut food into similar sized pieces.
Do not ove load Steam Inset.
Thaw frozen foods, and drain if necessary, before steaming.
Do not lift Cover unnecessarily during steaming.
Steaming Time Chart
| Food | Amount | Approximate Time (Minutes) |
| Artichokes | 4 whole, tops trimmed | 25-30 |
| Asparagus Spears | 1 pound | 4-8 |
| Beans - green or wax cut | 1 pound | |
| whole | 4-8 | |
| Beets | 1 pound, whole with 1-inch tops | 36-37 |
| Broccoli Spears | 1 pound | 5-10 |
| Brussels Sprouts | 3/4 pound | 10-15 |
| Cabbage | 1/2 small head, cut into wedges & cored | 8-10 |
| Carrots | 1 pound, sliced | 6-8 |
| Cauliflower | 1 small head, 1 pound | |
| whole | 15-20 | |
| floweretts | 8-10 | |
| Corn | ||
| on the cob | 3 to 4 small ears | 8-10 |
| Kohlrabi | 2 medium, sliced | 7-14 |
| Mushrooms | 1 pound, whole | 6-8 |
| Pea Pods | 1 pound | 2-5 |
| Potatoes | ||
| new | 1 to 1 1/2 pounds, small | 15-18 |
| red | 3 to 6 whole, medium | 20-30 |
| sweet | 3 to 4 small | 35-45 |
| Rutabage | 2 medium, diced | 10-12 |
| Squash | ||
| yellow or zucchini | 2 or 3 small, sliced | 12-15 |
| acorn or butternut | 1 small, halved & seeds removed | 20-25 |
| Clams | ||
| cherrystone or small littlenecks | 1 pound fresh, in shell | 5-8 just until open |
| Fish | ||
| fillets | 1 pound | 6-8 until flakes easily with fork |
| steaks | 1-inch thick | |
| Scallops | 1 pound shucked | |
| bay | 3-6 | |
| sea | 5-10 until opaque | |
| Shrimp | 1 pound, in shell | |
| medium | 4-6 | |
| large or jumbo | 6-8 until shell is pink | |
| Cjicken | ||
| boneless breast, split with bone, split | 2-3 pieces | 14-15 |
| 2-3 pieces | 25-30 until juices run clear | |
| Eggs | ||
| soft cooked (in shell) | 6-10 | |
| hard cooked (in shell) | 20-25 | |
| poached | crack, place in oiled custard cup | 6-10 |
Rice Cooker Assembly And Operation
-
Place Base on a clean, dry, flat, heat-resistant surface.
-
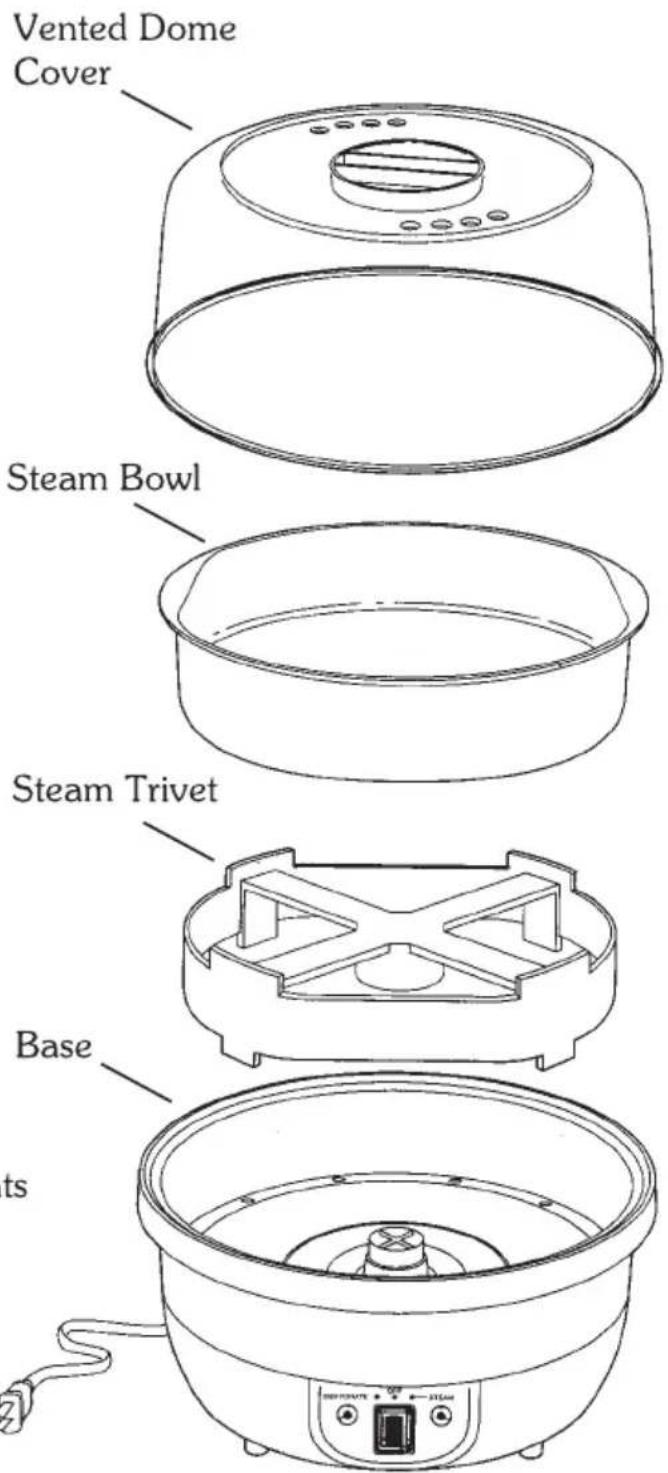
Place Steam Trivet in the Base, covering the Chimney with the Chimney Cap. Always use the Steam Trivet for steaming or cooking rice in the Rice Bowl to prevent moisture from entering the Chimney.
-
Measure 1 1/2 cups warm water into the Base. Never use broth or other liquids in the Base.
-
Measure rice into a strainer (see chart, page 26). Do not exceed 3 cups of uncooked rice.
-
Rinse with cold water until water is clear; drain.
-
Transfer washed rice to Rice Bowl.
-
Add water per measurements listed in chart on page 26.
-
Season with salt and butter to taste, if desired.
-
Position Rice Bowl on Trivet in Base.
-
Place Vented Cover on unit.
-
Plugcord into wall outlet.
-
Switch to Steam. Begin timing when steam begins forming inside the Cover, about 3-4 minutes.
Rice Time Chart
| Type of Rice | Rice (Cups) | Water* (Cups) | Time (Minutes) |
| White, long or short grain | 1 | 1 | 30-35 |
| 2 | 2 | 35-40 | |
| 3 | 3 | 40-45 | |
| Brown | 1 | 1 1/2 | 60-70 |
| 2 | 2 1/4 | 65-70 | |
| 2 1/2 | 3 1/3 | 70-75 |
*Note: Water is added to the Rice Bowl with the rice. Do not exceed 1 1/2 cups water in Steamer Base.
Rice Tips
■ You can use water or broth in the Rice Bowl; or. vegetables or fruit juices. Always choose a liquid that complements the finished dish.
■ After 30 minutes, be sure to check water level in Base, using potholders or oven mitts to remove Cover. Add 1 cup boiling water into Base, as needed. Cover and continue cooking.
For a firmer rice, reduce the liquid in the Rice Bowl by 1/4 cup, and decrease the cooking time by 5 minutes. For softer rice, add 1/4 cup liquid to rice and increase the cooking time by 5 minutes.
■ To test rice for doneness, using potholders or oven mitts, remove Cover, scoop out a few grains of rice with a spoon and taste it. The rice should be tender throughout, no hard centers, but still firm.
- Rice increases in bulk a little over three times when cooked. Allow 1 cup rice for 3 to 6 servings, depending upon whether it is an accompaniment to meats and vegetables, or the basis of a one-dish meal.
1 cup uncooked regular rice=3 cups cooked
1 cup uncooked brown rice=4 cups cooked
Variations: To spice up your rice after cooking add: 2 cups sliced mushrooms, sauteed for 6 minutes in 3 tablespoons butter; or 1/4 cup silvered almonds, toasted in 3 tablespoons butter in a small fry pan, until golden to 3 cups of cooked rice (1 cup uncooked).
Cooking Dehydrated Beans And Legumes
Sort and discard any damaged beans; rinse with cold water. If beans require soaking, see chart (page 28). Place in Rice Bowl and add water to generously cover. (Most beans will double in bullk with soaking.) Allow beans to soak 6 to 8 hour, or overnight.
For quick-soak method, place rinsed beans in Rice Bowl and cover generously with water. Follow steps 1-3 and 9-12 on page 25 for Rice Cooker Assembly. Cover; when steam forms inside Cover (about 3-4 minutes) begin timing. Steam for 3 to 4 minutes. Tum unit Off, and let beans stand for one hour to expand.
When soaking is completed, drain water from beans. Add clean water, enough to cover beans. Steam according to chart on page 28.
Suggested Uses For Cooked Beans
Bean Dip
Beans&Rice
Refried Beans
Baked Beans
Casseroles
Salads, Marinated or Tossed Green
Pasta Salads
Stuffings for Cabbage or Peppers
Bean Time Chart
| Type of Dehydrated Bean | Soaking Time | Cooking Time |
| Black Beans | Overnight or Quick Soak Method | 1 1/2 hours |
| Chick-Peas | Overnight or Quick Soak Method | 3 hours |
| Kidney Beans | Overnight or Quick Soak Method | 1 1/2 hours |
| Lentils | None | 45 minutes |
| Lima Beans | Overnight or Quick Soak Method | 1 1/2 hours |
| Navy Beans | None | 1 1/2 hours |
| Soybeans | Overnight or Quick Soak Method | 3 hours, or more |
| Split Peas | None | 1 hour |
- Introduction
- Table Of Contents
- IMPORTANT SAFEGUARDS
- SAVE THESE INSTRUCTIONS
- DESCRIPTION OF PARTS
- Cleaning
- Before using your Steamer/Dehydrator for the first time:
- After Each Use:
- Dehydrator Assembly and Operation
- Dehydrating Terms
- Thickness Guide
- Preparing Fruits For Dehydrating
- Fruit Dehydrating Tips
- Fruits Not Recommended For Dehydrating
- Fruit Pretreatments
- Rehydrating Fruit
- Fruit Dehydrating Time Chart
- Preparing Vegetable For Dehydrating
- Vegetable Dehydrating Tips
- Vegetable Not Recommended For
- Dehydrating
- Vegetable Pretreatments
- Tips For Rehydrating Vegetables
- Dehydrating Spices/Herbs
- Making jerky
- Marinades For Jerky
- Marinade 1
- Marinade 2
- Marinade 3
- Making Fruit Roll Snacks
- Fruit Roll Tips
- Suggested Fruit Combinations
- Steaming
- Benefits of steaming:
- Steamer Assembly And Operation
- Steaming Tips
- Rice Cooker Assembly And Operation
- Rice Time Chart
- Rice Tips
- Cooking Dehydrated Beans And Legumes
- Suggested Uses For Cooked Beans
Brand : Nutrichef
Model : PKFDSRC10WT
Category : Other Kitchen Appliances