PKPRC66 - Frying Pan Nutrichef - Free user manual and instructions
Find the device manual for free PKPRC66 Nutrichef in PDF.


| Product Type | Automatic Electric Pressure Cooker |
| Model | PKPRC66 |
| Brand | Nutrichef |
| Functions | Fish, Meat, Chicken, Rice, Tendon, Sparerib, Porridge, Soup |
| Cooking Time Adjustment | Adjustable in 1-minute increments via +/- buttons |
| Preset Timer | Up to 23 hours 50 minutes delay |
| Keep Warm | Automatic after cooking, up to 24 hours |
| Safety Features | Open/close lid safety, pressure control, pressure limit valve, anti-block cover, temperature limit, over-temperature control, thermostat, timer protection |
| Inner Pot Coating | Non-stick for easy cleaning |
| Accessories Included | Measuring cup, rice spoon, soup spoon, power cord |
| Cleaning | Wipe body with cloth; inner pot and lid parts rinse and dry; do not immerse base |
| Maintenance | Clean seal ring, anti-block cover, pressure limit valve regularly |
| Lid Locking | Rotate clockwise to lock with click sound; cannot open under pressure |
| Pressure Release | Manual via steamer valve or natural release (5-8 minutes) |
| Power Cord | Detachable; must be replaced by qualified personnel if damaged |
| Use and Care | Do not use on gas stove; use wooden or plastic utensils to protect coating |
Frequently Asked Questions - PKPRC66 Nutrichef
User questions about PKPRC66 Nutrichef
0 question about this device. Answer the ones you know or ask your own.
Ask a new question about this device
Download the instructions for your Frying Pan in PDF format for free! Find your manual PKPRC66 - Nutrichef and take your electronic device back in hand. On this page are published all the documents necessary for the use of your device. PKPRC66 by Nutrichef.
USER MANUAL PKPRC66 Nutrichef
This automatic electrical pressure cooker is a new kind of cooking appliance, adopting the advanced technology and merits of a pressure cooker, electrical rice cooker and braising cooker. It has an advanced structure and new layout and design that emphasizes safety, reliability, multi-functionality, ease-of-use, and time and energy-savings. It is an ideal cooking appliance for the modern family and replaces the pressure cooker, electrical rice cooker and braising cooker.
- Depending on the type of food, individual preference, and cooking experience, you may choose the cooking time. Once the food is finished, the automatic electrical pressure cooker will switch to the “KEEP WARM” function automatically.
- Because of its high cooking efficiency, the automatic electrical pressure cooker saves 60% more energy and 40% compared to the electrical rice cooker by 60% and time by 40% during cooking congee, soup and braising food.
- The automatic electrical pressure cooker keeps the food's nutrition and its flavor intact by cooking the food in the hermetically sealed inner pot.
- Non-stick coating makes the inner pot easy to clean.
SAFETY FEATURES
1. Open and close lid safety device
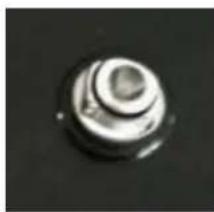
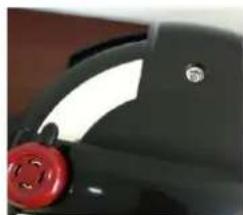
With the open and close lid safety device, the pressure cooker cannot pressurize if the lid and body can't match correctly. Likewise, the lid cannot be opened with pressure inside.
natural_image
Close-up of a metallic mechanical component with a circular top and central hole (no visible text or symbols)CAN'T open the lid when the pressure valve is up

natural_image
Close-up of a car's wheel and blade (no text or symbols visible)CAN open the Lid when the pressure valve is down
natural_image
Close-up of a black motorcycle head with red circular button (no visible text or symbols)Pressure valve
2. Pressure control device
Pressure cooker would be power off automatically if the air pressure in the pot is over the limit.
3. Pressure limit valve
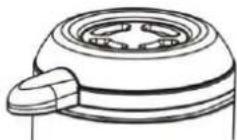
There is a pressure limit device which would work once the air pressure is over the limit and the thermostat is out of control. At this time, the steam valve would release the steam automatically for safety.
Pressure limit valve
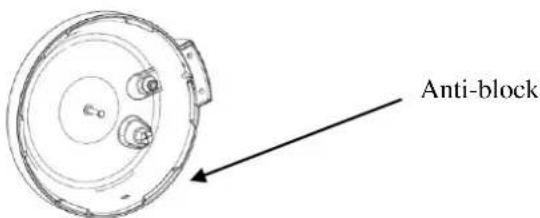
4. Anti-block cover
It prevents the food from blocking the pressure limit valve. Before use always make sure the anti-block cover is clean
5. Temperature limited device
Once the temperature of the inner pot exceeds the setting by use such as dry boil, the pressure cooker would stop cooking before the internal temperature reaches the right point.
6. Over temperature control device
The unit powers off when the internal temperature reaches its maximum.
7. Thermostat
Cooking will halt once the temperature of the inner pot reaches its target high point and doesn't automatically reset the cooking process.
8. Timer protection
The cooking time will strictly comply with the amount you set.
STRUCTURE
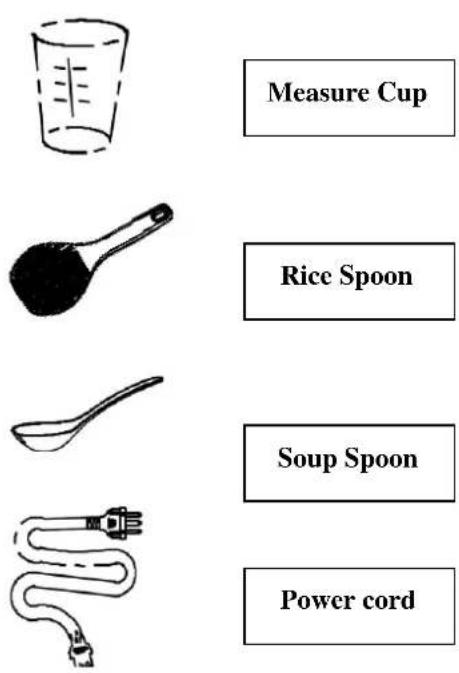
Measure Cup
Rice Spoon
Soup Spoon
Power cord
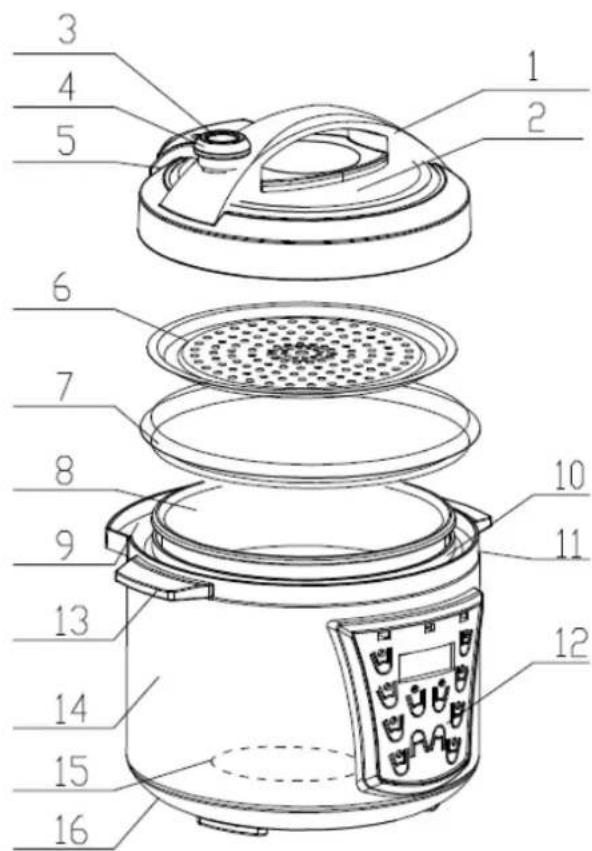
- Lid handle | 2. Lid | 3. Pressure limit valve | 4. Float valve | 5. Push Rod | 6. Inner cover
- Seal ring | 8. Inner pot | 9. Dew collector | 10. Housing | 11. Upper ring | 12. Panel
- Handle | 14. Housing | 15. Heating plate | 16. Base
OPERATION
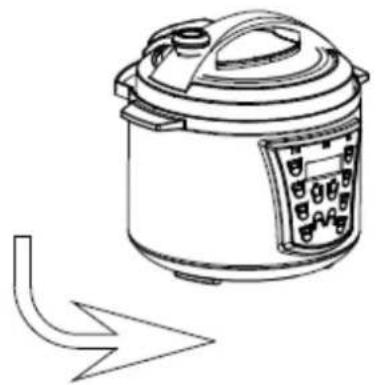
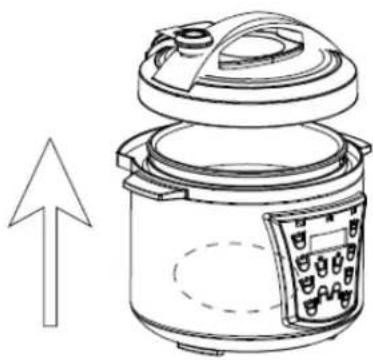
- Remove the lid: Take hold of the lid handle and turn clockwise, then lift the lid. (See picture 1 and 2)
natural_image
Line drawing of a rice cooker with a digital display and a lightning bolt symbol (no text or labels)Picture 1
natural_image
Line drawing of a rice cooker with a digital display and upward arrow indicating growth (no text or symbols)Picture 2
- Take out the inner pot, pour the food and water in the inner pot. Note that the total volume of the food and water must not exceed approximately 4/5 (or 80% ) of the height of the inner pot, inflatable food must not exceed 3/5 (or 60% ) of the height of inner pot, food and water must not be lower than 1/5 (or 20% ) the height of inner pot. (See picture 3, 4 & 5)
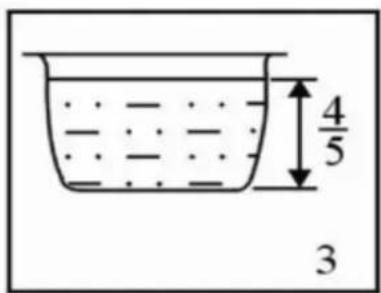
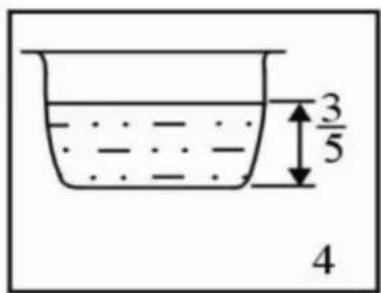
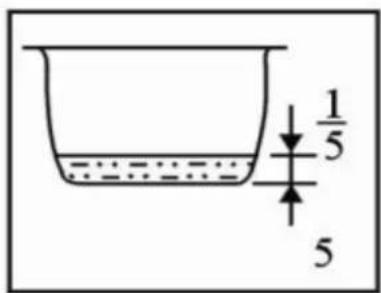
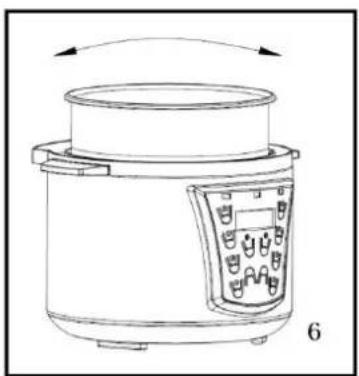
- Wipe up the inner pot and the heating plate carefully and check that there is nothing on the heating plate, then place the inner pot into the outer shell, (See picture 6 & 7)
natural_image
Line drawing of a rice cooker with control panel and side-mounted buttons (no text or symbols)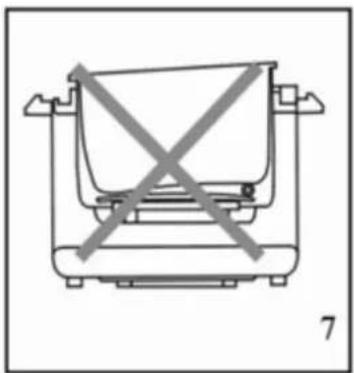
natural_image
Simple line drawing of a cooking pot with crossed diagonals indicating resistance (no text or symbols)4. Close and lock the lid
*Check that the seal ring is properly installed.
*Turn the seal ring in both directions to ensure that the lid covers well.
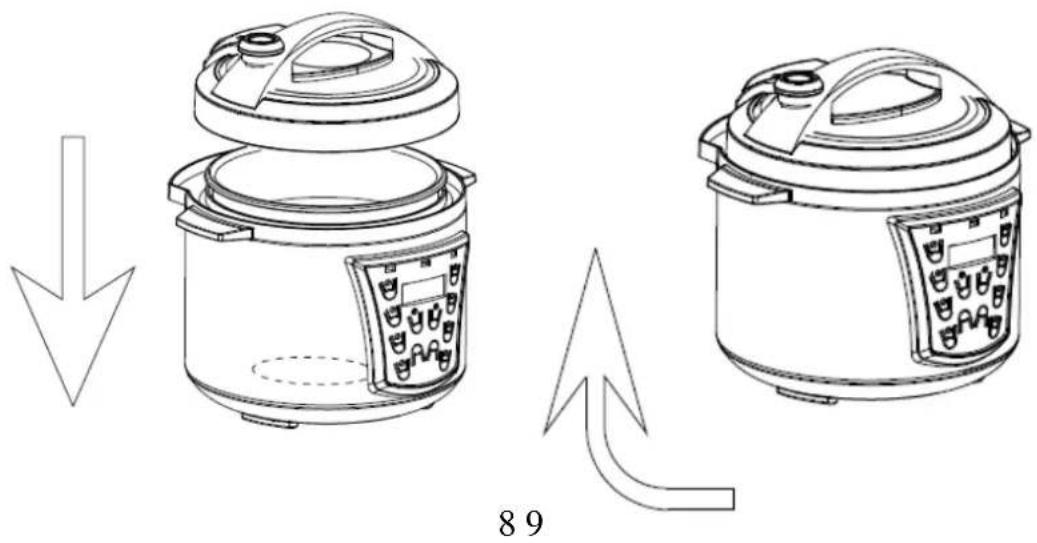
*Take hold of the lid handle and rotate it clockwise to the locked position and you will hear a distinct "click" sound, which indicates the lid is properly locked. (See picture 8 & 9)
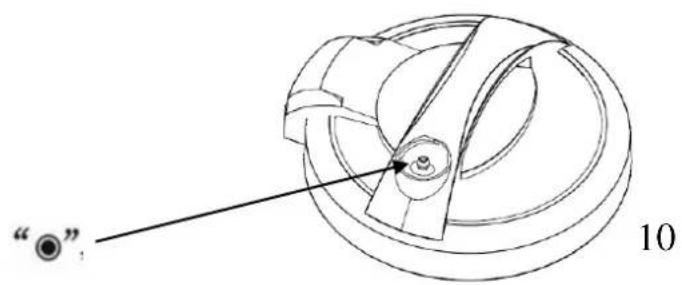
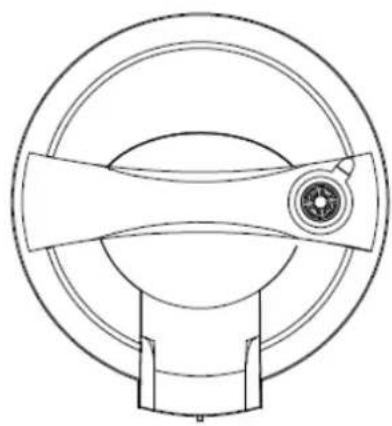
- Position the pressure limit valve properly and ensure that it is in the “●” position (see picture 10B), then check whether the float is down (The float should be down before cooking -- see picture 10)
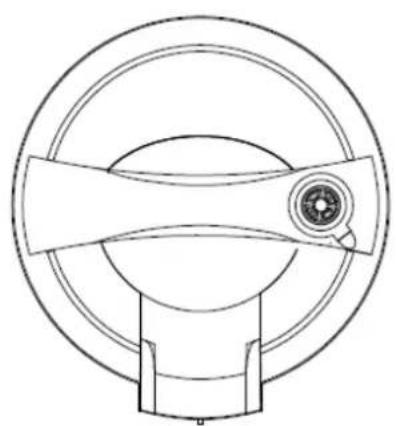
- When ready to cook, please turn the valve to the left (See picture A), and when pressure needs to be released, turn the valve to the right (See picture B).
natural_image
Technical line drawing of a circular mechanical component with a central knob and radial arms (no text or symbols)(A) CLOSED
natural_image
Technical line drawing of a circular mechanical component with a central knob and base mount (no text or symbols)(B) OPEN
- While the cooker is under pressure, the pressure valve will rise up and the lid will be locked. Please do not open the lid with brute force.
8. Set cooking time according to the food
Please set the cooking time consulting the cooking guidance
| Function | Default pressure keeping time (Min.) | Adjustable time of pressure keeping (Min.) |
| Fish | 00:05 | 00:03 - 00:15 |
| Meat | 00:20 | 00:12 - 00:30 |
| Chicken | 00:12 | 00:08 - 00:20 |
| Rice | 00:10 | 00:08 - 00:25 |
| Tendon | 00:30 | 00:20 - 00:40 |
| Sparerib | 00:22 | 00:15 - 00:35 |
| Porridge | 00:15 | 00:08 - 00:28 |
| Soup | 00:25 | 00:10 - 00:40 |
Ex. Cooking soup in 3/5 of capacity of the pressure cooker, set cooking time for 48 minutes
If you want to adjust to individual taste, please press “+” and “-” buttons to increase and decrease time in 1 minute increments.
9. Timer preset
Press the “Start/Cancel” button to confirm the time setting, the display will show the default time “1: 00 (one hour)”; Press the “+” or “-” button to adjust cooking time.
-
Without using the time preset function, press the button of the preset function, and press “Start/Cancel”, the “Heating/Adding pressure” light will turn on and cooking will start. During this time, the first number of the display shows the heating status, and the last two digits show pressure keeping time. When the pressure reaches its set pressure, the second digit of the display will show “P”, indicating the pressure is stable. When cooking is done, you will hear five beeps, then the “keep warm” function will automatically activate.
-
Keep warm status: The display shows “0: 00” and it will count down the “keep warm” time.
* In winter, you can increase the pressure keeping time to get better taste.
* Keep warm time should not exceed 8 hours.
HOW TO USE.
Operation
Be sure of the steamer valve is in the right side to avoid losing air pressure while cooking.
FISH MODE (Time Range is 00:03-00:15)
- Prepare food for "FISH" function
-
Place the removable cooking pot in its place and close the Lid
-
Press “FISH” button with one beep sound, indicator light of “FISH” button is On, LED display will show the default pressure keeping time 00:05.
Adjust the keep pressure time if desired by pressing “+” and “-” buttons.
Use "+"button to increase the time and "-" button to decrease the time in 1 min increment.
-
Press “on/off warm” button with a beep sound, the “add pressure” indicator light will turn on, and the LED will display _0:05 (“_” if the LED is moving up and down and ”:” is blinking at same time, this means the inside air pressure is increasing). Until the Pressure inside is stable, the LED will change to P:05 and will start counting down from P:05, P:04 \~ to 00:00 and end with a triple beep sound, and then enter “keep warm” automatically. At that point the “add pressure” indicator light will turn off, and the “Warm” indicator light will start blinking. LED will start at 00:00 and count up. Until you press “on/off warm” button, the cooker will continue to keep warm for 24 hours.
-
You can cancel the keep warm by pressing the “on/off warm” button, all the indicator lights will turn off, the LED will display “00:00” and the cooker will be in standby mode.
-
Open the lid until the pressure valve is down, (you can't open the lid if the pressure valve is up). Pressure valve will move down when internal pressure is released. You can adjust the steamer valve handle direction to release the pressure or just wait approximately 5 to 8 minutes until the pressure is released automatically.)
MEAT MODE (Time Range is 00:12-00:30)
- Prepare food for "MEAT" function
- Place the removable cooking pot in its place and close the Lid
- Press "MEAT" button with one beep sound, indicator light of "MEAT" button is On, LED display will show the default pressure keeping time 00:20
Adjust the keep pressure time if desired by pressing “+” and “-” buttons.
Use “+”button to increase the time and “-” button to decrease the time in 1 min increment.
-
Press “on/off warm” button with a beep sound, the “add pressure” indicator light will turn on, and the LED will display _0:20 (“_” if the LED is moving up and down and ”:” is blinking at same time, this means the inside air pressure is increasing). Until the Pressure inside is stable, the LED will change to P:20 and will start counting down from P:20, P:19 \~ to 00:00 and end with a triple beep sound, and then enter “keep warm” automatically. At that point the “add pressure” indicator light will turn off, and the “Warm” indicator light will start blinking. LED will start at 00:00 and count up. Until you press “on/off warm” button, the cooker will continue to keep warm for 24 hours.
-
You can cancel the keep warm by pressing the “on/off warm” button, all the indicator lights will turn off, the LED will display “00:00”, and the cooker will be in standby mode.
-
Open the lid until the pressure valve is down, (you can't open the lid if the pressure valve is up). Pressure valve will
move down when internal pressure is released. You can adjust the steamer valve handle direction to release the pressure or just wait approximately 5 to 8 minutes until the pressure is released automatically.)
CHICKEN MODE: (Time Range is 00:08-00:20)
- Prepare food for "CHICKEN".
-
Place the removable cooking pot in its place and close the Lid
-
Press “CHICKEN” button with one beep sound, indicator light of “CHICKEN” button is On, LED display will show the default pressure keeping time 00:12.
Adjust the keep pressure time if desired by pressing “+” and “-” buttons.
Use “+” button to increase the time and “-” button to decrease the time in 1 min increment.
-
Press “on/off warm” button with a beep sound, the “add pressure” indicator light will turn on, and the LED will display _0:12 (“_” if the LED is moving up and down and ”:” is blinking at same time, this means the inside air pressure is increasing). Until the Pressure inside is stable, the LED will change to P:12 and will start counting down from P:12, P:11 \~ to 00:00 and end with a triple beep sound, and then enter “keep warm” automatically. At that point the “add pressure” indicator light will turn off, and the “Warm” indicator light will start blinking. LED will start at 00:00 and count up. Until you press “on/off warm” button, the cooker will continue to keep warm for 24 hours.
-
You can cancel the keep warm by pressing the “on/off warm” button, all the indicator lights will turn off, the LED will display “00:00”, and the cooker will be in standby mode.
-
Open the lid until the pressure valve is down, (you can't open the lid if the pressure valve is up). Pressure valve will move down when internal pressure is released. You can adjust the steamer valve handle direction to release the pressure or just wait approximately 5 to 8 minutes until the pressure is released automatically.)
RICE MODE: (Time Range is 00:8-00:25)
- Prepare rice for "RICE".
-
Place the removable cooking pot in its place and close the Lid
-
Press “RICE” button with one beep sound, indicator light of “RICE” button is On, LED display will show the default pressure keeping time 00:10.
Adjust the keep pressure time if desired by pressing “+” and “-” buttons.
Use “+”button to increase the time and “-” button to decrease the time in 1 min increment.
-
Press “on/off warm” button with a beep sound, the “add pressure” indicator light will turn on, and the LED will display _0:10 (“_” if the LED is moving up and down and ”:” is blinking at same time, this means the inside air pressure is increasing). Until the Pressure inside is stable, the LED will change to P:10 and will start counting down from P:10, P:09 \~ to 00:00 and end with a triple beep sound, and then enter “keep warm” automatically. At that point the “add pressure” indicator light will turn off, and the “Warm” indicator light will start blinking. LED will start at 00:00 and count up. Until you press “on/off warm” button, the cooker will continue to keep warm for 24 hours.
-
You can cancel the keep warm by pressing the "on/off warm" button, all the indicator lights will turn off, the LED will display "00:00", and the cooker will be in standby mode.
-
Open the lid until the pressure valve is down, (you can't open the lid if the pressure valve is up). Pressure valve will move down when internal pressure is released. You can adjust the steamer valve handle direction to release the pressure or just wait approximately 5 to 8 minutes until the pressure is released automatically.)
TENDON MODE: (Time Range is 00:20-00:40)
- Prepare food for "TENDON".
-
Place the removable cooking pot in its place and close the Lid
-
Press “TENDON” button with one beep sound, indicator light of “TENDON” button is On, LED display will show the default pressure keeping time 00:30.
Adjust the keep pressure time if desired by pressing “+” and “-” buttons.
Use “+” button to increase the time and “-” button to decrease the time in 1 min increment.
- Press “on/off warm” button with a beep sound, the “add pressure” indicator light will turn on, and the LED will display _0:30 (“_” if the LED is moving up and down and ”:” is blinking at same time, this means the inside air pressure is increasing). Until the Pressure inside is stable, the LED will change to P:30 and will start counting down from P:30, P:29 \~ to 00:00 and end with a triple beep sound, and then enter “keep warm” automatically. At that point the “add pressure” indicator light will turn off, and the “Warm” indicator light will start blinking. LED will start at 00:00 and count up. Until you press “on/off warm” button, the cooker will continue to keep warm for 24 hours.
- You can cancel the keep warm by pressing the "on/off warm" button, all the indicator lights will turn off, the LED will display "00:00", and the cooker will be in standby mode.
- Open the lid until the pressure valve is down, (you can't open the lid if the pressure valve is up). Pressure valve will move down when internal pressure is released. You can adjust the steamer valve handle direction to release the pressure or just wait approximately 5 to 8 minutes until the pressure is released automatically.)
SPARERIB MODE: (Time Range is 00:15-00:35)
- Prepare food for "SPARERIB".
-
Place the removable cooking pot in its place and close the Lid
-
Press “SPARERIB” button with one beep sound, indicator light of “SPARERIB” button is On, LED display will show the default pressure keeping time 00:22.
Adjust the keep pressure time if desired by pressing “+” and “-” buttons.
Use “+”button to increase the time and “-” button to decrease the time in 1 min increment.
- Press “on/off warm” button with a beep sound, the “add pressure” indicator light will turn on, and the LED will display _0:22 (“_” if the LED is moving up and down and ”:” is blinking at same time, this means the inside air pressure is increasing). Until the Pressure inside is stable, the LED will change to P:22 and will start counting down from P:22, P:21 \~ to 00:00 and end with a triple beep sound, and then enter “keep warm” automatically. At that point the “add pressure” indicator light will turn off, and the “Warm” indicator light will start blinking. LED will start at 00:00 and count up. Until you press “on/off warm” button, the cooker will continue to keep warm for 24 hours.
- You can cancel the keep warm by pressing the “on/off warm” button, all the indicator lights will turn off, the LED will display “00:00”, and the cooker will be in standby mode.
- Open the lid until the pressure valve is down, (you can't open the lid if the pressure valve is up). Pressure valve will move down when internal pressure is released. You can adjust the steamer valve handle direction to release the pressure or just wait approximately 5 to 8 minutes until the pressure is released automatically.)
PORRIDGE MODE: (Time Range is 00:08-00:28)
For safety operation, we suggest the food volume does not exceed 1/2 of the inner pot.
- Place the removable cooking pot in its place and close the Lid
- Press "SPARERIB" button with one beep sound, indicator light of "SPARERIB" button is On, LED display will
show the default pressure keeping time 00:15.
Adjust the keep pressure time if desired by pressing "+" and "-" buttons.
Use "+"button to increase the time and "-" button to decrease the time in 1 min increment.
- Press “on/off warm” button with a beep sound, the “add pressure” indicator light will turn on, and the LED will display _0:15 (“_” if the LED is moving up and down and ”:” is blinking at same time, this means the inside air pressure is increasing). Until the Pressure inside is stable, the LED will change to P:15 and will start counting down from P:15, P:14 \~ to 00:00 and end with a triple beep sound, and then enter “keep warm” automatically. At that point the “add pressure” indicator light will turn off, and the “Warm” indicator light will start blinking. LED will start at 00:00 and count up. Until you press “on/off warm” button, the cooker will continue to keep warm for 24 hours.
- You can cancel the keep warm by pressing the “on/off warm” button, all the indicator lights will turn off, the LED will display “00:00”, and the cooker will be in standby mode.
- Open the lid until the pressure valve is down, (you can't open the lid if the pressure valve is up). Pressure valve will move down when internal pressure is released. You can adjust the steamer valve handle direction to release the pressure or just wait approximately 5 to 8 minutes until the pressure is released automatically.)
SOUP MODE: (Time Range is 00:10-00:40)
- Prepare food for "SOUP".
- Place the removable cooking pot in its place and close the Lid
- Press "SPARERIB" button with one beep sound, indicator light of "SPARERIB" button is On, LED display will show the default pressure keeping time 00:25.
Adjust the keep pressure time if desired by pressing “+” and “-” buttons.
Use "+"button to increase the time and "-" button to decrease the time in 1 min increment.
- Press “on/off warm” button with a beep sound, the “add pressure” indicator light will turn on, and the LED will display _0:25 (“_” if the LED is moving up and down and ”:” is blinking at same time, this means the inside air pressure is increasing). Until the Pressure inside is stable, the LED will change to P:25 and will start counting down from P:25, P:24 \~ to 00:00 and end with a triple beep sound, and then enter “keep warm” automatically. At that point the “add pressure” indicator light will turn off, and the “Warm” indicator light will start blinking. LED will start at 00:00 and count up. Until you press “on/off warm” button, the cooker will continue to keep warm for 24 hours.
- You can cancel the keep warm by pressing the "on/off warm" button, all the indicator lights will turn off, the LED will display "00:00", and the cooker will be in standby mode.
- Open the lid until the pressure valve is down, (you can't open the lid if the pressure valve is up). Pressure valve will move down when internal pressure is released. You can adjust the steamer valve handle direction to release the pressure or just wait approximately 5 to 8 minutes until the pressure is released automatically.)
On/Off/Warm button
Cooker will automatically keep warm for 24 hours after cooking is finished, the “WARM” indicator light will be on and LED Will show 00:00 and count up.
- In standby mode, press On/Off/Warm button 1 time, cooker will start keep warm. Press this button again, it will switch to standby mode
- When choose any function, and press On/Off/Warm button 1 time, cooker will start cooking, press On/Off/Warm button again, means Cancel the cooking and cooker enter into standby mode, press this button the third time, means keep warm
Preset function
Caution: this functions allows you to delay the cooking process on food for up to 23:50 however, we do not recommend
this for perishable foods like the meat. If left at room temperature for more than 2 hours it may spoil. You can use the Preset function for all the modes.
- Choose the mode with which you want to delay cooking, "Rice" for example
- Press “RICE” button, it will make a beep sound, “RICE” button indicator light will turn on, LED will show default keep pressure time of 00:10.
- Adjust the keep pressure time if desired by pressing “+” and “-” buttons to increase the time in 1 minute increments.
- Press “PRESET” button, the LED will show the default delay time of 01:00 and blink. Press “+” and “-” button to adjust the delay time. Use “+” button to increase the delay time in 1 hour increments, and Use “-” button to increase delayed time in 10 minute increments. For example, if you want rice to cook after 4:10 hours you need to press “+” button 3 times, and “-” button 1 time, and LED will show 04:10 and blink.
- Press On/Off/Warm button to confirm the time delay setting. Only “:” will blink in the LED and the time will start counting down from 04:10 to 00:00 (time based on earlier example).
- After delayed time is finished, the cooker will start cooking rice.
Note: if you choose any mode and forget operate (such as press On/Off/Warm button), there will be a continuous reminder beep sound which prompts you to go to the next operation.
If the cooker is keeping warm with high pressure, the “WARM” indicator light will blink until the pressure is at a safe level. When the pressure is safe, the “WARM” indicator light will be on and NOT blink.
CLEANING
- Unplug the cord before cleaning
- Clean the body of the unit with a cloth. Do not immerse the unit in water or pour water into it.
- Clean the inner pot with sponge or nonmetallic soft brush, and then wipe it dry.
- Rinse the inner side of lid including sealing ring, pressure limit valve, anti-block cover, air escape and pressure valve, then dry them up.
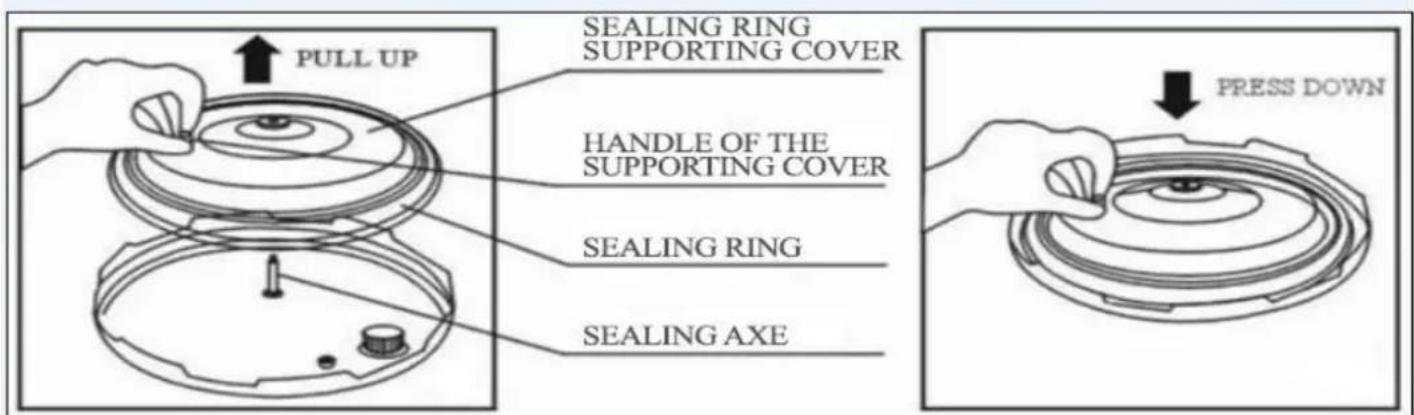
*Clean the sealing ring and the sealing ring supporting cover. Hold the handle of the sealing ring supporting cover, pull it up and clean it with water, then press it down to the supporting axe. Check whether the clearance between the sealing ring and the rim of the lid is even and whether the supporting cover can rotate easily. Make sure not to assemble the sealing ring supporting cover up side down. (See picture 12 & 13)
Picture 12
Picture 13
* Clean the anti-block cover.
* Clean the whole cover.
* Clean the pressure limit valve. Take the pressure limit valve out and rinse it with water, then put it back to its base.
IMPORTANT NOTES:
-
Please use the automatic electrical pressure cooker following this instruction booklet. Do not use in a flammable or damp environment.
-
The height of food and water must be in accordance with rule 2.
-
Do not damage the seal ring, use other rubber ring or use another drag ring to increase airtightness.
-
Always keep the anti-block up cover clean. Keep the pressure limit valve and pressure valve clear.
-
Do not open the lid until the float is down.
-
Do not cover the pressure limit valve or replace it with other thing.
-
Do not use the cloth to cover the rim of the lid and the outer pot.
-
Keep the bottom of the inner pot and the heating plate clean. Do not heat up the inner pot on a gas stove or replace it with another pot; the inner pot is not designed to be used this way.
-
Use wooden or plastic scoop in case so as not to damage the non-stick coating of the inner pot.
-
Since the escaping steam is very hot, keep your face and hands away from the air escape. Do not touch the lid when cooking.
-
This appliance can be used by children aged from 8 years and above if they have been given supervision or instruction concerning use of the appliance in a safe way and if they understand the hazards involved. Cleaning and user maintenance should not be done by children unless they are older than 8 and supervised. Keep the appliance and its cord out of reach of children younger than 8 years.
-
Please unplug the cord at once and send the cooker to our service center if too much air escapes from the rim of the lid.
-
If the supply cord is damaged, it must be replaced by the manufacturer, its service agent or similarly qualified persons in order to avoid a hazard.
-
Do not take the cooker apart or replace its components by yourself. Only use our spare parts and repair service only.
-
Appliance is not intended for use by persons (including children) with reduced physical, sensory or mental capabilities, or lack of experience and knowledge, unless they have been given supervision or instruction concerning use of the appliance by a person responsible for their safety.
-
Children should be supervised to ensure that they do not play with the appliance.
-
The ducts in the pressure regulator allowing the release of steam should be checked regularly to ensure that they are not blocked.
-
The container must not be opened until the pressure has decreased sufficiently.
MALFUNCTIONS AND SOLUTIONS
| No | MALFUNCTION | REASONS | SOLUTION |
| 1 | LID DOES NOT CLOSE | SEAL RING IS INSTALLED IMPROPERLY | REINSTALL THE SEALING RING |
| THE PRESSURE VALVE IS SEIZED UP BY THE ROD | PUSH THE ROD WITH YOUR HANDS | ||
| 2 | CAN NOT OPEN THE LID | THE PRESSURE VALVE DOES NOT FALL DOWN AFTER AIR HAS ESCAPED | PRESS THE FLOAT WITH CHOPSTICKS OR SIMILARLY SHAPED OBJECT |
| 3 | AIR LEAK FROM THE RIM OF THE LID | SEAL RING IS NOT INSTALLED | INSTALL THE SEAL RING |
| RESIDUE ON THE SEAL RING | CLEAN THE SEAL RING | ||
| THE SEAL RING IS WORN OUT | REPLACE THE SEAL RING | ||
| THE LID IS NOT LOCKED PROPERLY | CAREFULLY RE-LOCK THE LID | ||
| 4 | AIR LEAK FROM THE PRESSURE VALVE | VISUAL RESIDUE ON THE SEAL RING FOR PRESSURE VALVE | CLEAN UP THE SEAL RING FOR PRESSURE VALVE |
| THE SEAL RING IS WORN OUT | RENEW THE SEAL RING FOR FLOAT | ||
| 5 | THE PRESSURE VALVE DOES NOT RISE | THE PRESSURE VALVE IS NOT IN THE POSSITON OF “ ” | CAREFULLY PLACE THE PRESSURE LIMIT VALVE TO THE POSSITION OF “ ” |
| THERE’S NOT ENOUGH FOOD AND WATER | PUT ENOUGH FOOD AND WATER IN THE INNER POT |
- SAFETY FEATURES
- Open and close lid safety device
- Pressure control device
- Pressure limit valve
- Anti-block cover
- Temperature limited device
- Over temperature control device
- Thermostat
- Timer protection
- OPERATION
- Close and lock the lid
- Set cooking time according to the food
- Timer preset
- HOW TO USE.
- FISH MODE (Time Range is 00:03-00:15)
- MEAT MODE (Time Range is 00:12-00:30)
- CHICKEN MODE: (Time Range is 00:08-00:20)
- RICE MODE: (Time Range is 00:8-00:25)
- TENDON MODE: (Time Range is 00:20-00:40)
- SPARERIB MODE: (Time Range is 00:15-00:35)
- PORRIDGE MODE: (Time Range is 00:08-00:28)
- SOUP MODE: (Time Range is 00:10-00:40)
- On/Off/Warm button
- Preset function
- CLEANING
- IMPORTANT NOTES:
Brand : Nutrichef
Model : PKPRC66
Category : Frying Pan