PKSTIND48 - Cooker Nutrichef - Free user manual and instructions
Find the device manual for free PKSTIND48 Nutrichef in PDF.


| Type | Dual Induction Cooktop |
| Brand | Nutrichef |
| Model | PKSTIND48 |
| Number of Burners | 2 (Left and Right) |
| Control Type | Touch digital display with buttons |
| Cooking Modes | Fry, Steam, Water, Warm |
| Temperature Settings | 8 levels (140°F - 460°F) for Fry, Steam, Water |
| Warm Mode Temperature | 140°F (fixed) |
| Timer Range | 0 minutes to 4 hours (Fry, Water) |
| Preset Range | 0 minutes to 23:59 hours (Steam, Warm) |
| Lock Function | Yes, press and hold Lock button for 3 seconds |
| Power Supply | AC 120V, 60Hz, 15A (individual outlet) |
| Cooktop Material | Black crystal glass plate |
| Minimum Cookware Diameter | 12 cm (4.7 inches) |
| Maximum Cookware Diameter | 26 cm (10.2 inches) |
| Compatible Cookware | Steel, cast iron, enameled iron, stainless steel with flat bottom |
| Safety Features | Auto shut-off, overheat protection, lock function, error code diagnostics |
| Cleaning Method | Soft cloth with neutral detergent; avoid water immersion |
| Maintenance | Regular cleaning of fan vents; disconnect power before cleaning |
| Error Codes | E0 (no/incompatible cookware), E1 (low voltage), E2 (high voltage), E3 (overheat), E4 (sensor open), E5 (IGBT overheat), E6 (sensor short), E7 (internal error) |
| Dimensions (estimated) | Approximately 24.0 x 14.0 x 2.5 inches (L x W x H) |
| Weight (estimated) | Approximately 10 lbs (4.5 kg) |
| Warranty | Refer to official Nutrichef website or contact service center |
Frequently Asked Questions - PKSTIND48 Nutrichef
User questions about PKSTIND48 Nutrichef
0 question about this device. Answer the ones you know or ask your own.
Ask a new question about this device
Download the instructions for your Cooker in PDF format for free! Find your manual PKSTIND48 - Nutrichef and take your electronic device back in hand. On this page are published all the documents necessary for the use of your device. PKSTIND48 by Nutrichef.
USER MANUAL PKSTIND48 Nutrichef
VISIT US ONLINE: Have a question? Need service or repair? Want to leave a comment? nutrichefkitchen.com
nutrichef
natural_image
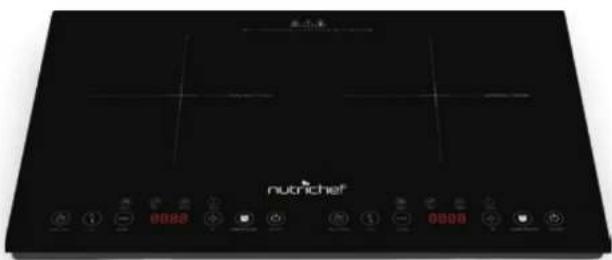
Black industrial stove burner with digital display and control buttons (no readable text or symbols)PKSTIND48
Dual Induction Cooktop
Double Countertop Burner with Digital Display
USER MANUAL
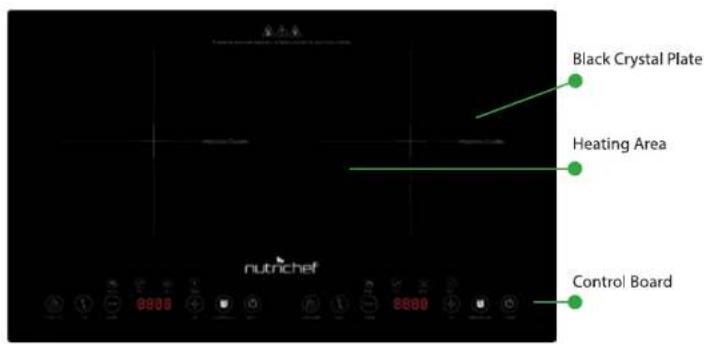
PRODUCT CONFIGURATION
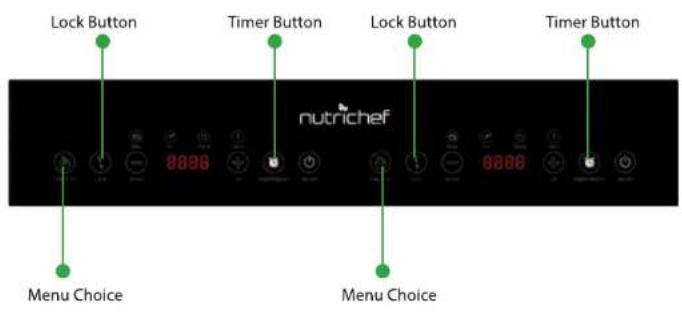
CONTROL PANEL:
1. SAFETY CAUTIONS:
WARNING:
SWITCH OFF THE INDUCTION COOKER IN CASE OF ANY CRACK ON THE COOK-TOP PANEL
- Do not place the unit in any place that is near gas or hot environment in order to avoid damages or malfunction.
- To reduce the risk and damage, this plug should be fit into and individual outlet. The rated electrical current is not less than 15A.
- Place the unit on a level surface, the distance between the unit and background surrounding must be not less than 10cm.
- Do not immerse the appliance and electric cord in water liquid, or allow liquid to go into the cabinet and get short/contact inner electrical parts, the power cord must be plugged out before cleaning.
- Do not cover gas vent with anything during cooking, otherwise it will cause danger.
- To avoid danger, please uncap the cover before heating tinned food.
- If it is still not working after inspection, please immediately contact our service center and do not open the unit to avoid any danger.
- Do not operate any appliance with a damaged cord or plug, or after appliance malfunctions or has been damaged in any manner
- It would get dangerous when the metal gets heated directly or indirectly.
- Do not place any metal on the plate and also to the nonmetal pad within 10cm.
- Do not cook with an empty pot to avoid malfunction or danger.
- Always clean the unit and avoid any dirt that may go into the fan to effect normal working.
-
Do not touch the plate while the unit is working to avoid getting burned.
-
To avoid injuries such as scalding, do not let children operate the appliance alone.
- If you have a pacemaker, you should consult with your doctor before you take advantage of any induction cooking device
- Do not place on or near a hot gas, electric burner, or in a heated oven
- To avoid danger, do not place paper, aluminium foil, cloth or other unsuitable articles onto the induction cooker heating plate for indirect heating.
- Do not place the unit on the cloth or carpet to avoid blocking the rear exhaust vent.
- Please kindly avoid hitting the plate of the unit, in case of getting cracked, should turn off the unit and plug out immediately and then contact with service points of our company.
- Do not touch the control panel with any sharp objects.
- Do not place any metal on the unit while operating.
2. PRODUCT OPERATING INSTRUCTIONS
- Place suitable cooking utensils in the center of the top plate.
- Insert the plug in to AC 120V, 60Hz Socket, Press ON/OFF to switch on, after pressing Function, The default "Fry" will auto select. Different cooking functions, setting and adjustments.
- To switch off, Press ON/OFF again, then plug out to shut off power.
2.1 COOKING MODE:
1. Right Side/Left Size:
- Manual Control Function: Fry, Steam, Water, Fry Function:
- Press the [Function] key until the indicator of [Fry] remain light up, display will show [300] representing that the default temperature is 300°F. It can be adjusted by pressing the [+] or [-] key to set the desired Temperature level.
• There are 8 Temperature levels in total (140-210-260-300-350-390-430-460°F)
- To Cancel this mode, press to Function mode or [On/Off] key to stop the operation.
• Time: 4 Hours Timer
Steam Function:
- Press the [Function] key until the indicator of [Steam] remain light up, display will show[390] representing that the default temperature is 390^ . It can be adjusted by pressing the [+) or [-] key to set the desired Temperature level.
• There are 8 Temperature levels in total (140-210-260-300-350-390-430-460°F) - To Cancel this mode, press to Function mode or [On/Off] key to stop the operation.
• Time:23:59 Hours Preset
Water Function:
- Press the [Function] key until the indicator of [Water] remain light up, display will show[460] representing that the default temperature is 460^ . It can be adjusted by pressing the [+) or [-] key to set the desired Temperature level.
• There are 8 Temperature levels in total (140-210-260-300-350-390-430-460°F) - To Cancel this mode, press to Function mode or [On/Off] key to stop the operation.
• Time:4 Hours Timer
5
2. Automatic Control Function: Warm
Warm Function:
- Press the [Function] key directly until the indicator of [Warm] remain lit up, display will show [140] representing that the default Temperature is 140°F.
- To Cancel this mode, press Function Mode or [On/Off] key to stop the operation.
• Time: 23:59 Hours Preset
2.2 TIMER OR PRESET FUNCTION: (4 HOURS TIMER & 23:59 PRESET)
- User can set the cooking time when cooking mode is selected.
- Press the [Timer] or [Preset] key until the indicator of [Time] or [Preset] lights up.
- Display will show the default time [0], user can press [+] or [-] key to set the desired time.
- Press [+] or [-] key once to increase or decrease a minute.
- Press and hold for 3 second to access quick adjustment, the time can be adjusted from 0 minutes to 4 hours/23:59 Hours.
- After setting, user can press Cooking key once to confirm or wait until the display stop.
- To Cancel this mode, press Cooking Key or [Timer] Key or [On/Off] key to stop the operation.
2.3 LOCK FUNCTION:
- Press the [Lock] key and hold for 3 seconds the display will show [Loc] indicates that the appliance is locked.
- To Cancel this mode, press [Lock] key and hold for 3 seconds or [On/Off] key to stop the operation.
3. SELECTION OF COOKWARE:
1. Material required:
- Steel, cast iron, enameled iron, stainless steel, flat-bottom pans/pots with diameter from 12 to 26cm.
- It is suggested to use the required pot. Do not attempt to use other pot instead (especially pressure sensors vessels).

natural_image
Row of black silhouette icons representing various cooking pots (no text or symbols)2. Please kindly check according to the below requirements if its necessary to use the vessel.
- Pan/Pot must be suitable for induction cooker.
- Pan/pot should be tried out if it's bought by self to see if compatible with the induction cooker
- Pan/Pot should be flat and comes with cover and gas vent.
4. MAINTENANCE AND DAILY CARE
- Remove the power plug prior to clean the unit. Do not clean it until the surface cools down.
- Glass Plate, Panel and Shell:
- Soft Cloth for slight stain.
- For greasy, dirt, blot by using a clean damp cloth with neutral detergent.
- While the radiator-fan is working, dust and dirt would remain on the gas vent, please clean it by brush or cotton stick regularly.
- Do not wash the unit by water directly to avoid damage.
- To protect the induction cooker, be sure to have a good contact between plug and socket before use.
-
Do not pull out the power cord directly during operation. To extend the appliance's life, press the "On/Off" button first to power off then pull out the power cord.
-
In order to make operating time longer, the fan will still work for cooling the plate, it is better to plug out after the fan stops working.
- If the appliance is not be used for a long period of time, pull out the power plug.
- Some models have structural design against cockroaches, if needed, you can put something like mothball to expel the cockroaches.
5. TROUBLESHOOTING AND TREATMENT
During operations, if any errors occurred, please check the following table before calling for service. Below are common errors and solutions.
| PROBLEM | CHECK POINTS | SOLUTION |
| After connecting the power and pressing the "Power" key, the appliance has no response | Power outage? | Use when electricity resumes |
| Is the plug connected firmly? | Check the root causes carefully. If the problem can't be fixed, please contact service center for checking and repairing. | |
| Is the fuse broken down? | ||
| Induction Cooker send out "Beep" Sound | Incompatible cookware or no cookware is used? | Replace compatible cookware for the induction cooker |
| Is the cookware not considerable placed from the center of the heating zone? | Replace the cookware at the center of the defined heating zone | |
| Is the cookware bigger than 12cm? | Change the diameter of cookware bigger than 12 | |
| No operation during the heating being in use | Is the cookware empty or the temperature too high? | Please check whether the appliance is being misused |
| Is the air intake/exhaust vent clogged or dirt has accumulated | Remove the stuff clogging the air intake/exhaust vent. Operate the appliance again after cooling down. | |
| Is the cooker working over 2 hours without any external instruction? | Reset cooking modes or use timer function |
| PHENOMENON | CHECK POINTS | SOLUTION |
| Error Codes Occur E0 | No Cookware or Incompatible cookware used | If error signal E0, E3, E5 shows, please check whether the cookware is not suitable or switch on the appliance again after it cooled down naturally. |
| Error Codes Occur E1 | Low-Voltage | |
| Error Codes Occur E2 | High-Voltage | |
| Error Codes Occur E3 | Top Plate Overheat | |
| Error Codes Occur E4 | Top Plate Sensor Open Circuit | If error signal E1, E2, E4, E6, E7, occurs please contact service center for checking and repairing |
| Error Codes Occur E5 | IGBT Overheat | |
| Error Codes Occur E6 | Top Plate Sensor Short Circuit | |
| Error Codes Occur E7 | Internal Circuit Error |
If the above solutions can't fix the problem, unplug the appliance immediately, contact service center for inspection and repairing, note the error code and report it to service center Ltd. To avoid any danger and damage to the appliance, do not disassemble or repair it by yourself.
- nutrichef
- PKSTIND48
- SAFETY CAUTIONS:
- WARNING:
- SWITCH OFF THE INDUCTION COOKER IN CASE OF ANY CRACK ON THE COOK-TOP PANEL
- PRODUCT OPERATING INSTRUCTIONS
- COOKING MODE:
- Right Side/Left Size:
- Steam Function:
- Water Function:
- Automatic Control Function: Warm
- Warm Function:
- TIMER OR PRESET FUNCTION: (4 HOURS TIMER & 23:59 PRESET)
- LOCK FUNCTION:
- SELECTION OF COOKWARE:
- Material required:
- Please kindly check according to the below requirements if its necessary to use the vessel.
- MAINTENANCE AND DAILY CARE
- TROUBLESHOOTING AND TREATMENT
Brand : Nutrichef
Model : PKSTIND48
Category : Cooker