
PAWM10U-01 - Mouse TARGUS - Free user manual and instructions
Find the device manual for free PAWM10U-01 TARGUS in PDF.


| Product Type | Wired Optical Mouse |
| Model Number | PAWM10U-01 |
| Brand | Targus |
| Connectivity | USB Wired |
| Number of Buttons | 3 (Left, Right, Scroll Wheel) |
| Scroll Wheel | Yes |
| Sensor Type | Optical |
| Resolution | 1000 DPI |
| Cable Length | Approximately 1.5 m (5 ft) |
| Dimensions (L x W x H) | 4.5 x 2.5 x 1.5 in (115 x 63 x 38 mm) |
| Weight | Approximately 3.5 oz (100 g) |
| Power Source | USB Bus Powered |
| Operating Systems | Windows, macOS, Linux (plug and play) |
| Main Functions | Pointing, clicking, scrolling; left/right click and scroll wheel |
| Cleaning Instructions | Disconnect USB, wipe with dry or slightly damp cloth; do not use abrasive cleaners |
| Safety Precautions | Keep away from liquids; do not disassemble; avoid excessive force |
| Spare Parts / Repairability | Not user-serviceable; contact Targus support for issues |
| Warranty | Limited lifetime warranty (check Targus website) |
Frequently Asked Questions - PAWM10U-01 TARGUS
User questions about PAWM10U-01 TARGUS
0 question about this device. Answer the ones you know or ask your own.
Ask a new question about this device
Download the instructions for your Mouse in PDF format for free! Find your manual PAWM10U-01 - TARGUS and take your electronic device back in hand. On this page are published all the documents necessary for the use of your device. PAWM10U-01 by TARGUS.
USER MANUAL PAWM10U-01 TARGUS
WIRELESS OPTICAL STOW-N-GO™ NOTEBOOK MOUSE
Introduction
Congratulations on your purchase of the Wireless Optical Stow-N-Go™ Notebook Mouse. This mouse features a tracking resolution switch for users who require more precision or speed with various applications. The Stow-N-Go receiver clips onto the mouse for ease of use while traveling or on the go. This mouse also features a 4-way scrolling tilt-wheel which allows for both vertical and horizontal navigation.
System Requirements
- Hardware - USB port
- Windows® 2000/XP
- Windows Vista™
• Mac OS X 10.4 (or greater)
Installing the Batteries
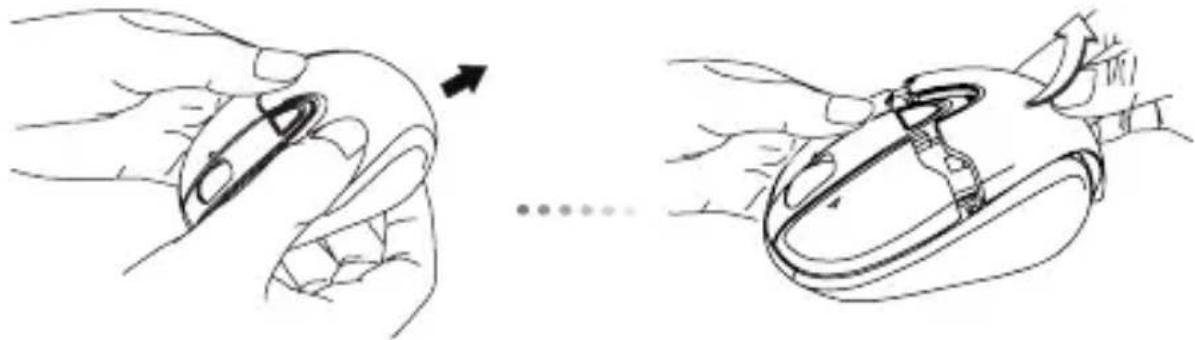
- Remove the battery cover from the back of the mouse by sliding off the cover of the mouse. Hold the mouse in your hands and with the back of the mouse away from you. Press down on the corners of the battery cover and slide towards the back of the mouse. Lift the cover off from the back of the mouse.
natural_image
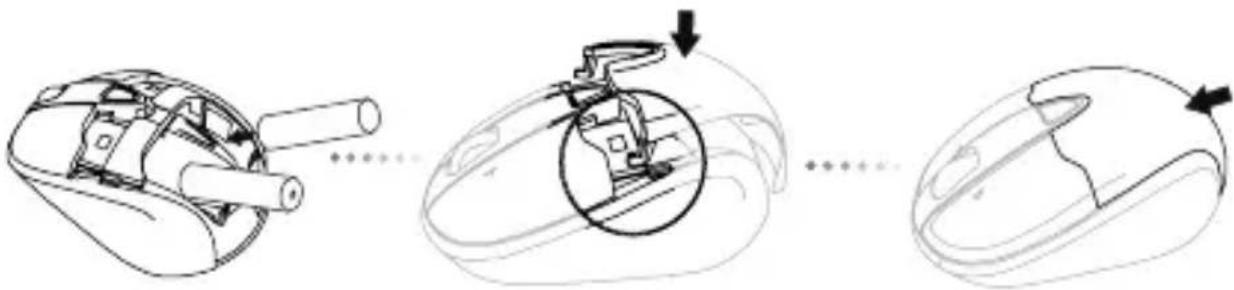
Line drawing showing a hand holding an insect-like object before and after a change, with no text or symbols present.- Insert two AA-size batteries, making sure that the positive (+) and negative (-) ends of each battery match the polarity indicators inside the battery compartment. To replace the battery cover, place the cover on top of the mouse and slide forward until it clicks into place.
natural_image
Line drawing of a mechanical device with three sequential steps: open, closed, and closed (no text or symbols)
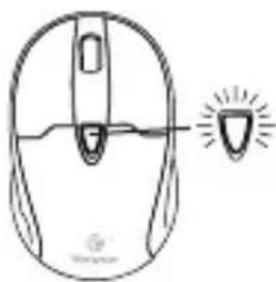
NOTE: WHEN THE BATTERY IS LOW, THE LOW POWER INDICATOR LIGHT LOCATED IN THE DPI SWITCHING BUTTON WILL FLASH RED. PLEASE REPLACE WITH TWO NEW AA-SIZE BATTERIES.
natural_image
Line drawing of a computer mouse with a light bulb icon pointing to the side (no text or symbols)DPI switching button
When power is on, the mouse goes into "sleep mode" after 8 minutes of inactivity. To activate the mouse, press any mouse key.
Establishing the Connection
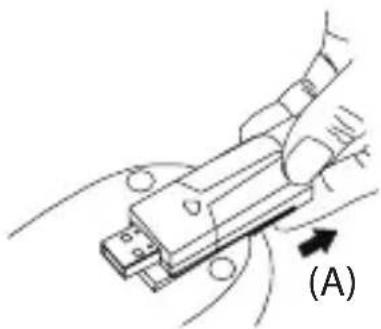
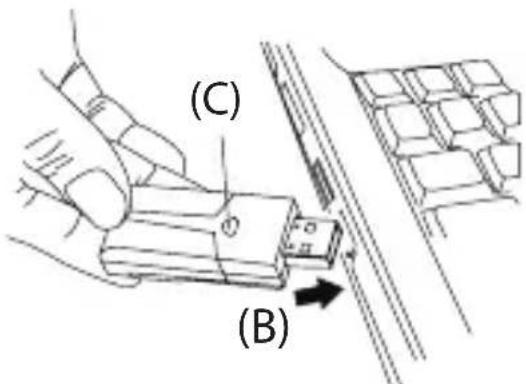
(A) Remove the USB receiver from the bottom of the mouse. This will activate the on/off switch.

NOTE: TO TURN THE MOUSE OFF, SIMPLY PLACE THE USB RECEIVER BACK INTO THE STORAGE SLOT. THIS WILL MAXIMIZE BATTERY LIFE WHEN NOT IN USE.
natural_image
Diagram of a hand holding a USB device with a cable, showing wiring and a directional arrow (no text or symbols)(B) Plug the USB receiver into an available USB port on your computer.
(C) Press and release the setup key on the receiver.
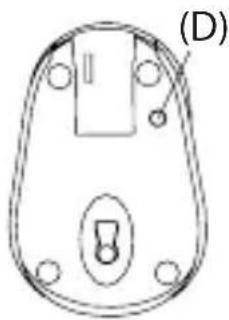
(D) Press the setup key on the bottom of the mouse.
natural_image
Technical line drawing of a mechanical component with mounting holes and a central lock (no text or symbols)This device has 256 identification codes that allow the mouse and its receiver to operate without interference from other radio frequency devices. If you experience interference during use, repeat steps C and D to change the connection channel.
Installing the tilt-wheel software driver
This mouse is equipped with a 4-way scrolling function.
To enable the tilt-wheel function, the software driver must be installed.

NOTE: THE TILT-WHEEL FEATURE IS SUPPORTED BY THE MAC OPERATING SYSTEM. NO DRIVER INSTALLATION IS NECESSARY. THE FOLLOWING STEPS ARE FOR WINDOWS OPERATING SYSTEMS ONLY.
- Please download the software driver (Model # AMW25) from the official Targus web site: http://www.targus.com
Save the setup.exe file to your computer and double click on the icon to launch the installation process.

setup.exe
Tilt Mouse Software Setup
- The Installation Wizard window will prompt.
Follow the on-screen instructions to complete the installation.

NOTE: PLEASE SELECT THE "3 BUTTON MOUSE" OPTION WHEN PROMPTED TO DO SO.
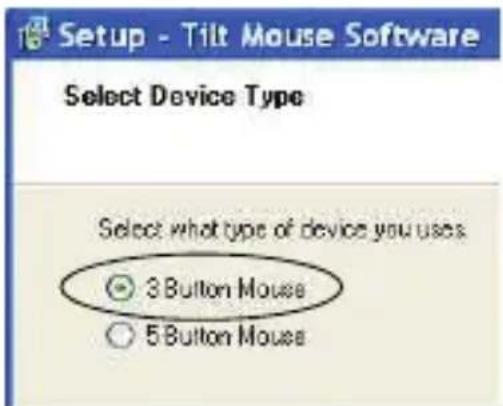
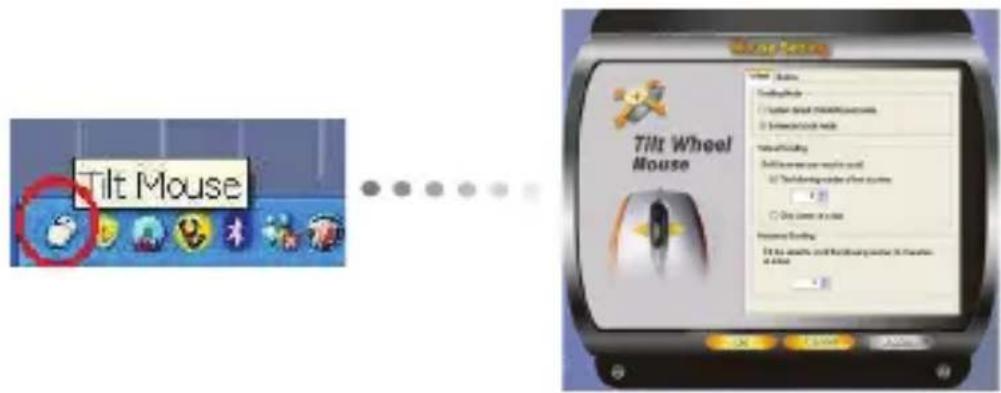
After the software driver is successfully installed, there will be a "Tilt Mouse" icon located in the task bar.

Using the 4-way scrolling tilt-wheel
Pressing the scroll-wheel left or right, enables the horizontal scrolling feature.
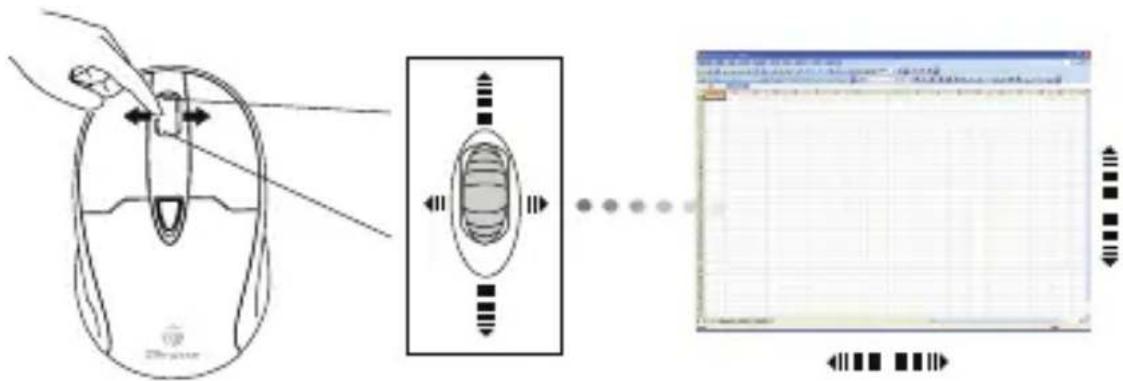

NOTE: DOUBLE CLICK ON THE "TILT MOUSE" ICON IN THE TASK BAR WILL LAUNCH THE MOUSE SETTINGS SCREEN. YOU CAN EDIT THE SETTINGS AND PREFERENCES IN THIS WINDOW.
Activating the Universal Zoom function
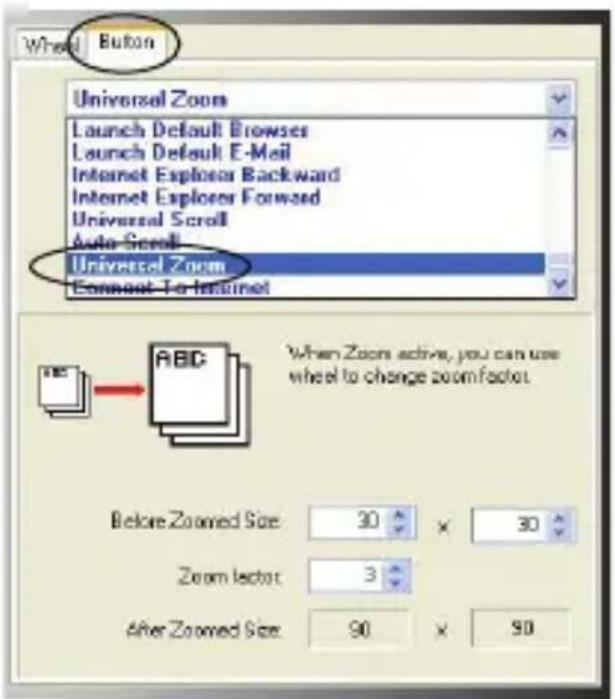
The Universal Zoom function can be enabled in the Mouse Setting screen.
In the Mouse Setting screen, under the Button tab, scroll down the function list and select the Universal Zoom function then click .
Press on the scroll wheel to activate the zoom function.
Adjusting the DPI Setting
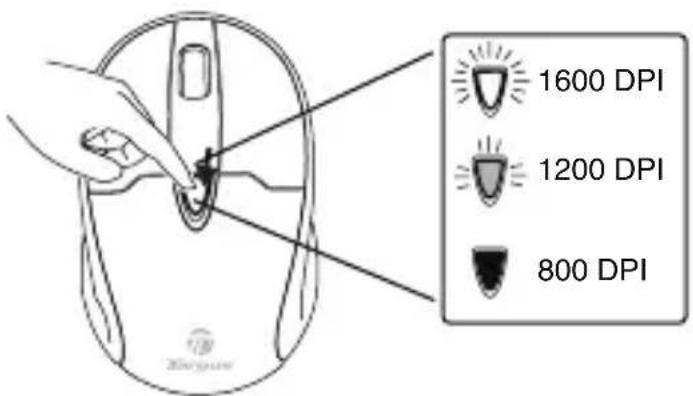
This mouse features 3 selectable resolution settings (1600 / 1200 / 800 DPI). By pressing the resolution switch, you can instantly adjust the tracking speed of the mouse. When the DPI is set at 1600, the indicator light will glow brightest and when it is set at 1200, the light will become dimmer. The indicator will be off when the DPI is set at 800 DPI. The setting will be saved when the mouse is turned off. The indicator light will shut off in 10 seconds after selecting the desired resolution.
Windows XP:
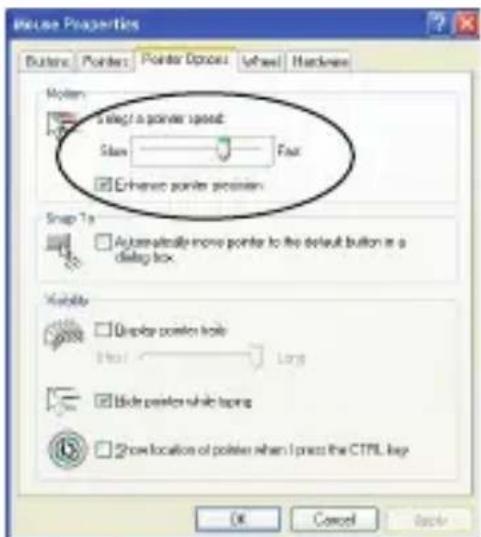
After selecting the desired resolution, you can also fine tune the sensitivity. This can be adjusted in the “control panel” of the Windows operating system.
Click on Start --> Setting --> Control Panel --> Mouse In the “mouse properties” window, locate the “pointer options” tab. Under “motion”, use the slider to change the speed of the mouse. Click apply to confirm the changes.
Windows XP
Mac OS:
After selecting the desired resolution, you can also fine tune the sensitivity. This can be adjusted in the “System Preference” of the Mac operating system.
Click on the Apple logo --> System Preference --> Keyboard & Mouse
In the “Keyboard & Mouse” window, locate the “Trackpad” tab. Under “tracking speed”, use the slider to change the speed of the mouse.
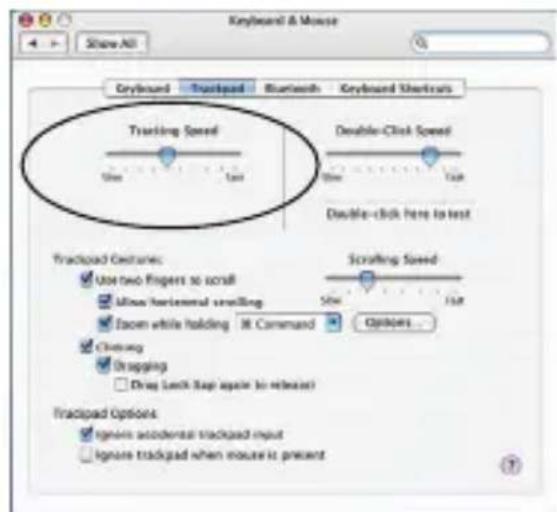
Mac OS
Product Specification
Transmitter
| RF 2.402GHz-2.482GHz | |
| Battery Type Alkaline battery AA | |
| Effective RF Communication Range | 10 meters max |
| RF output power 1.6 mW max | |
| Power Consumption 9.34 mA max | |
Receiver
| RF 2.402GHz-2.482GHz | |
| Interface USB 1.1 | |
| Power USB Bus Powered 5V DC | |
This mouse is equipped with the latest sensor technology that conserves power and provides up to six months of battery life. Battery life is determined using one hour of continuous use, five days per week.
Technical Support
For technical questions, please visit:
US Internet: www.targus.com/support.asp
Australia Internet: www.targus.com/au
Email: infoaust@targus.com
Telephone: 1800-641-645
New Zealand Telephone: 0800-633-222
Product Registration
Targus recommends that you register your Targus accessory shortly after purchasing it. Go to:
http://www.targus.com/registration.asp.
You will need to provide your full name, email address, country of residence and product information.
Warranty
Targus warrants this product to be free from defects in materials and workmanship for one year. If your Targus accessory is found to be defective within that time, we will promptly repair or replace it. This warranty does not cover accidental damage, wear and tear, or consequential or incidental loss. Under no conditions is Targus liable for loss of, or damage to devices; nor loss of, or damage to, programs, records, or data; nor any consequential or incidental damages, even if Targus has been informed of their possibility. This warranty does not affect your statutory rights.
Regulatory Compliance
This device complies with Part 15 of the FCC Rules. Operation is subject to the following two conditions: (1) This device may not cause harmful interference, and (2) This device must accept any interference received, including interference that may cause undesired operation.
FCC Statement Tested to Comply
This equipment has been tested and found to comply with the limits of a Class B digital device, pursuant to Part 15 of the FCC Rules. These limits are designed to provide reasonable protection against harmful interference in a residential installation. This equipment generates, uses, and can radiate radio frequency energy and if not installed and used in accordance with the instructions, may cause harmful interference to radio communications. However, there is no guarantee that interference will not occur in a particular installation. If this equipment does cause harmful interference to radio or television reception, which can be determined by turning the equipment off and on, the user is encouraged to try to correct the interference by one or more of the following measures:
- Reorient or relocate the receiving antenna;
- Increase the separation between the equipment and receiver;
- Connect the equipment into an outlet on a circuit different from that to which the receiver is connected;
- Consult the dealer or an experienced radio/TV technician for help.
Changes or modifications not authorized by the party responsible for compliance could void the user's authority to operate this product.
Declaration of Conformity
Hereby, Targus, declares that this device is in compliance with the essential requirements and other relevant provisions of Directive 1999/5/EC.
Microsoft, Windows, and Windows Vista are either registered trademarks or trademarks of Microsoft Corporation in the United States and/or other countries. All trademarks and registered trademarks are the property of their respective owners. All rights reserved. Features and specifications are subject to change without notice. © 2008. Targus Group International, Inc. and Targus, Inc., Anaheim, CA 92806 USA
- WIRELESS OPTICAL STOW-N-GO™ NOTEBOOK MOUSE
- Introduction
- System Requirements
- Installing the Batteries
- Establishing the Connection
- Installing the tilt-wheel software driver
- Using the 4-way scrolling tilt-wheel
- Activating the Universal Zoom function
- Adjusting the DPI Setting
- Windows XP:
- Mac OS:
- Product Specification
- Technical Support
- Product Registration
- Warranty
- Regulatory Compliance
- FCC Statement Tested to Comply
- Declaration of Conformity
Brand : TARGUS
Model : PAWM10U-01
Category : Mouse