
MUDYSYS41 - Soundbar MTX Audio - Free user manual and instructions
Find the device manual for free MUDYSYS41 MTX Audio in PDF.


| Product Type | Bluetooth Overhead Audio System (Soundbar for off-road vehicles) |
| Brand | MTX Audio |
| Model | MUDYSYS41 |
| Speaker Configuration | 4 x 6.5" Coaxial Speakers |
| Speaker Type | All-Weather |
| Peak Power Output | 280 Watts |
| Amplifier | Integrated 280-Watt Peak Power Amplifier |
| Frequency Band | AM/FM (USA and European) |
| Bluetooth Version | 2.0 |
| Audio Inputs | Bluetooth, 3.5mm Auxiliary, USB (External Memory Stick) |
| Audio Output | RCA Output |
| Display/Clock | Yes, digital clock |
| Dome Light | Overhead LED Dome Light |
| Additional Features | Storage Cargo Nets, Mute, Volume Control, Track Control |
| Mounting Compatibility | Roll cages 1.75" to 2" diameter, inside roll bar width 43.0" to 49.0" |
| Dimensions (W x H x D) | 40.5" x 8.5" x 4.125" (102.87 cm x 21.59 cm x 10.48 cm) |
| Power Requirement | 12V DC (Vehicle Battery) |
| Fuse Rating | 15A Inline Fuse |
| Wiring Harness Length | 3 meters (can be cut) |
| Included Accessories | In-Line 15A Fuse and Fuse Holder, Installation Cables, Ring Terminals (2), Butt Connector (1), Rubber Inserts (2) |
| Cleaning Instructions | Use damp soft cloth with non-abrasive cleaner; do not use solvents. |
| Safety Warning | Ensure power wire fused at battery; dome light switch off when unattended. |
Frequently Asked Questions - MUDYSYS41 MTX Audio
User questions about MUDYSYS41 MTX Audio
0 question about this device. Answer the ones you know or ask your own.
Ask a new question about this device
Download the instructions for your Soundbar in PDF format for free! Find your manual MUDYSYS41 - MTX Audio and take your electronic device back in hand. On this page are published all the documents necessary for the use of your device. MUDYSYS41 by MTX Audio.
USER MANUAL MUDYSYS41 MTX Audio
natural_image
Front view diagram of a dual-chamber electronic device with meshed panels and ports (no text or symbols)
OWNER'S MANUAL
MUDSYS41 / MUDSYS46
BLUETOOTH OVERHEAD AUDIO SYSTEMS

Bluetooth™
IMPORTANT NOTICE
Installation of overhead products requires careful planning and preparation. If you have any questions regarding wire routing in a vehicle, please contact MTX Technical Support at 1-800-225-5689.
When connecting power and ground wires ensure that the yellow power wire is fused at the point where it is connected to the vehicle's battery. Failure to do so can result in damage to the vehicle if a short circuit develops between the vehicle connection point and the product.
WARNINGS
- Clean the unit with a damp soft cloth, using a non-abrasive cleaner.
- Do not use solvents such as benzene, thinner as they will damage the finish and operation of the unit.
- Remember to leave the dome light switch in the off position when the vehicle is unattended, as the dome lights, if left on, can drain the vehicle's battery.
PRODUCT INFORMATION
Model # ____
Serial # ____
Dealer's Name ____
Date of Purchase
IN THE BOX
- Bluetooth Overhead Audio System
• In-Line 15A Fuse and Fuse Holder
• Installation Cables (Power/Ground/Accessory) 3 Meter - Ring Terminal (2)
- Butt Connector (1)
• Rubber Inserts 100mm x 120mm (2)
INTRODUCTION
Thank you for purchasing this MTX Audio Bluetooth Overhead Audio System that is designed to deliver exceptional quality music to your off road vehicle. This easy to install and use all in one unit is capable of withstanding the wind, sun, rain, and more ensuring that you can enjoy it wherever life takes you. They are designed to fit a variety of ORV make and models that use factory roll cages. Congratulations and enjoy the ultimate audio experience with MTX!
FEATURES
• Four 6.5" All-Weather Coaxial Speakers
- Source Unit
• Integrated 280-Watt Peak Power Amplifier
• AM / FM Radio - USA and European Radio Frequency
- Inputs - Bluetooth 2.0, 3.5mm Auxiliary, & USB (External Memory Stick)
- RCA Output
- Clock
- Integrated Wiring Harness (Power/Ground/Accessory)
- Storage Cargo Nets
• Overhead LED Dome Light
MODELS
MUDSYS41
Fits Roll Cages 43.0" to 49.0" Wide (Inside Roll Bar Measurement)

natural_image
Top-down schematic of a dual-chamber electronic device with grid and control panel (no text or symbols)Physical Dimensions - 8.5" (21.59cm)H x 4.125" (10.48cm)D x 40.5" (102.87cm)W
MUDSYS46
Fits Roll Cages 49.25" to 56" Wide (Inside Roll Bar Measurement)

natural_image
Front view of a rack-mounted server unit with multiple drive bays and a central control panel (no visible text or labels)Physical Dimensions - 8.5" (21.59cm)H x 4.125" (10.48cm)D x 46.813" (118.91cm)W
SOURCE UNIT BUTTON LAYOUT
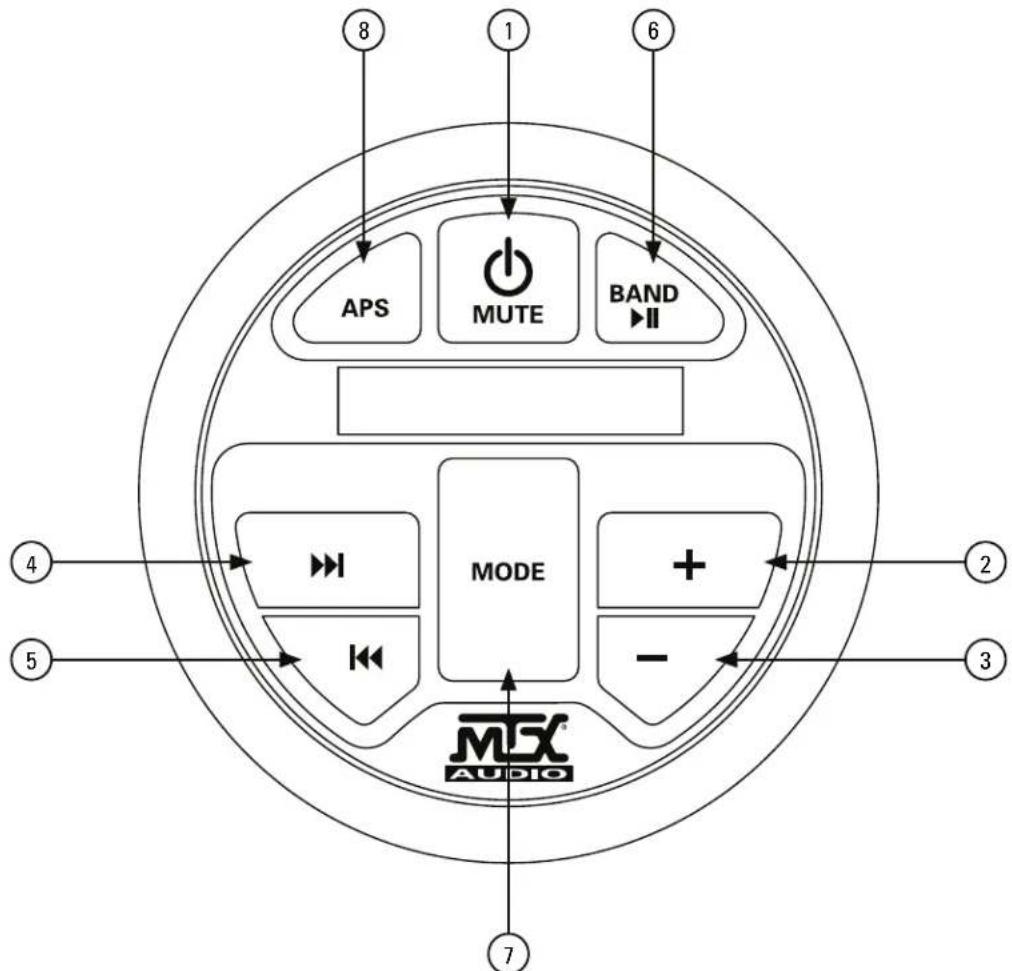
- Power / Mute Button - Press the button to turn power On. When the power is On, press the button to mute the audio output. Press and hold the button to turn power Off.
-
- Button - Press the button to increase the volume.
-
- Button - Press this button to decrease the volume.
- ▶ Button - Press the button to play the next track. Press and hold to tune the radio frequency.
- Button - Press the button to play the previous track. Press and hold to tune the radio frequency.
- Band / ▶Button - Press button in radio mode to switch between AM and FM. Press button in USB mode to play and pause.
- Mode Button - Press button to switch between radio, Bluetooth, USB, and AUX modes. Press and hold MODE button for 2 seconds and then press MODE button to cycle through settings menu that includes Bluetooth Pair/Bass/Treble/Balance/Fade/Loud/EQ/AREA USA-EUR/Time Mode. See "Settings Menu" section for operation.
- APS Button (Auto Program Station) - Press to scan radio frequencies. Press and hold for 2 seconds to auto program the first six strongest stations received.
SETTINGS MENU
Press and hold the MODE button for 2 seconds and then press the MODE button to cycle through the settings menu.
- BT Pair - Use this function to pair a Bluetooth enabled device to the unit. Please see the "Bluetooth Operation" section for pairing instructions.
- Bass - Adjust the bass level using the +/- buttons. Range is -7 to +7, default setting is 0.
- Treble - Adjust the treble level using the +/- buttons. Range is -7 to +7, default setting is 0.
- Balance - Adjust the balance between the left and right speakers using the +/- buttons. The L7 setting diverts all audio to the left side only and R7 diverts all audio the right side only.
- Fader - The fader function will decrease the output from the entire system. This should not need to be adjusted.
- Loud - This turns the loudness control On and Off. The loudness will boost the low frequencies at low volumes.
- EQ - Use the +/- buttons to choose an EQ setting between, Flat, Classic, Pop, and Rock. Default setting is Rock.
- Area Tuning - Use the +/- buttons to select the appropriate AM/FM tuning band for your location between USA and European frequency.
- Time Format - Use the +/- buttons to select a time format between 12 and 24 hour styles.
Press the Band button to select between AM and FM. Tap the APS button to scan to the next strongest station. Hold the APS button (2 second hold) to use the APS feature to auto program the stations. The APS will start to auto program from the current FM station the radio is tuned to. If using the APS feature with programmed stations, the ▶/◀ will scan through the preset stations. Press and hold the ▶ or ◀ button to enable manual tuning mode and use those same controls to scan through the preset stations. Note: Holding the ▶ or ◀ after the unit is in manual mode will scan quickly through the frequency band until the button is released.
BLUETOOTH OPERATION
This unit supports Bluetooth for wireless music streaming from Bluetooth enabled devices including iPhone ^® and Android ^® smartphones and tablets.
Connect to your device using the following steps:
- Press MODE for 2 seconds, BT PLAY will be displayed.
- Hold MODE for 2 more seconds and "Pairing" will be displayed.
- Select "MTX SOUNDBAR" from the list of available Bluetooth devices.
- The device will then pair to the unit.
Note: Some devices may require a pass code. Input passcode, "0000", if prompted and the connection will automatically be made.
Bluetooth Audio function:
- The Track Forward and Track Back buttons can select the track playing on the device. Holding the Track Button for 2 seconds will scan through the music tracks on the device.
- The Play/Pause button will Play/Pause the music track playing on the device.
USB OPERATION
An external USB memory stick can be used to play music through the unit if desired. Insert a USB memory stick into the USB input connector. Using the "Mode" button select USB. The unit will read the mp3 files on the memory stick automatically. Press the ▶ or ◀ button to play the next/previous song. Press and hold the ▶ or ◀ for 2 seconds to fast forward/backward the selected song. Press the ▶ button to pause/resume the selected song. Phones and other devices will be charged when connected through USB.
CLOCK OPERATION
Press and hold the "Band" button for 2 seconds to display the clock. When displayed, press and hold the "Band" button for 2 seconds until the hour number is flashing, then use the +/- buttons to adjust the hour. Once set to desired number, press the "Band" button again and the minutes number will flash. Use the same process to set the minutes to desired number.
INSTALLATION
The MUDSYS41 and MUDSYS46 will mount to a variety of roll cages that have a diameter between 1.75" and 2". Installation is a two part process. Part one involves securely mounting the unit to the roll cage and part two involves connecting the wiring to the vehicle's battery.
Each unit comes preassembled in the carton. Each end has a top side flat bracket and an underside C-clamp designed to lock the unit into place between the roll cage. Each top bracket has four (4) total bolts.

natural_image
Technical line drawing of a battery structure with mounting brackets and internal components (no text or symbols)When the bolts are loosened, the bracket can slide to accommodate a variety of roll cages whose inside roll bar dimension is between 43.0" and 49.0" for the MUDSYS41 and 49.25" and 56.0" for the MUDSYS46. Once the proper width has been established, these bolts should be retightened to a torque specification of 40-45 inch/lbs.

natural_image
Technical line drawing of two mechanical assembly components with arrows indicating motion direction (no text or symbols)Each C-bracket has two (2) total bolts. These bolts can be loosened to adjust the clamp angle allowing it to mount to a variety of roll cages including those that are angled.

Remove the bolts from the C-bracket so the top bracket and C-bracket can be properly positioned around the roll cage. Once the C-brackets are in the proper location for mounting, the bolts should be retightened to a torque specification of 65-70 inch/lbs.
The unit has an integrated wiring harness that includes a power, ground, and accessory wire that are designed to connect to the vehicle's battery providing it power. The wiring harness is 3 meters but can be cut to fit the individual vehicle. The yellow wire is designed to be connected to the positive (+) terminal on the vehicle's battery using one of the included ring terminals. The included 15A fuse and fuse holder should be attached to the yellow wire no more than 18 inches from the battery to protect against damage or injury if a short in the wire were to occur. The black wire is designed to be connected to the negative (-) terminal on the vehicle's battery using the second included ring terminal. The red accessory wire needs to be connected to the accessory switch. This ensures that the unit powers on when the vehicle is On and powers Off when the vehicle is not being used.
TROUBLESHOOTING
| Problem Cause Solution | ||
| No Power | Incorrect Wiring Check Wiring to | EnsureConnection without Shorts |
| Blown Fuse Replace Fuse | ||
| No Sound | Volume Is Too Low Increase the | Volume |
| Output Blown Call for Repair Assistance | ||
| No Radio Reception | The Antenna Cable is not Connected | Fully Insert the Antenna Cable |
| The Signals Are Too Weak Select a Station Manual | ||
| USB Stick Not Reading Music File | is Not Supported Format | Convert Music File to MP3 |
| Aux Input or RCA Output Distortion | Volume Is Too High On External Device | Lower Volume on External Device |
| Media Device Does Not Work Through USB | USB Input Only Reads USB Memory Stick | Play Media Device Through Auxiliary Input |
© 2014 Mitek Corporation. All rights reserved. MTX is a trademark of Mitek Corporation. Designed and Engineered in the U.S.A.
Due to continual product development, all specifications are subject to change without notice.
MTX Audio, 4545 East Baseline Rd. Phoenix, AZ 85042 U.S.A. 1-800-225-5689
MTX005072 RevA 12/14 • 21A10195 • AW0014768

Brand : MTX Audio
Model : MUDYSYS41
Category : Soundbar