
RP-WF920 - Wireless headphones TECHNICS - Free user manual and instructions
Find the device manual for free RP-WF920 TECHNICS in PDF.


User questions about RP-WF920 TECHNICS
0 question about this device. Answer the ones you know or ask your own.
Ask a new question about this device
Download the instructions for your Wireless headphones in PDF format for free! Find your manual RP-WF920 - TECHNICS and take your electronic device back in hand. On this page are published all the documents necessary for the use of your device. RP-WF920 by TECHNICS.
USER MANUAL RP-WF920 TECHNICS
Operating Instructions
Mode d'emploi
Bedienungsanleitung
natural_image
Illustration of a pair of headphones and an electronic device with a antenna (no text or symbols)Technics
Before connecting, operating or adjusting this product, please read these instructions completely. Please save this manual.
Thank you for purchasing this product.
For optimum performance and safety, please read these operating instructions carefully.
Features
—The headphones can be used up to between 60 and 100 meters from the transmitter. The position of the transmitter and the condition of the batteries affect this distance.
—The transmitter is powered by the included AC adaptor. The headphones are powered by two economical rechargeable nickel-cadmium batteries.
—The closed-seal earpieces have a diameter of 40 mm, enabling reproduction of deep bass sounds.
—The headband has an easy-to-fit free adjusting mechanism.
—The transmitter has an AUTO POWER ON/OFF function.
Table of contents
Precautions 4
Power Sources 6
Connections 8
Installation 8
Operation 10
Maintenance 12
Troubleshooting guide 14
Specifications 17
Marking sign is located on bottom of the unit.
Cher client
Check with the proper authorities before trying to use this unit in a country other than where it was purchased. The radio frequencies this unit uses (862–864 MHz) are not permitted in some countries.
AC adaptor
Handle the AC adaptor carefully. Improper handling is dangerous.
- Do not touch it with wet hands.
- Do not place heavy objects on top of it.
- Do not forcibly bend it.
Be sure to connect only the AC adaptor provided with the unit.
Disconnect the AC adaptor from the power outlet if the unit is not going to be used for a long time.
Unit
No altering or remodeling
This can cause malfunctioning.
No dropping or strong impacts
This may damage the unit.
Locations to be avoided
Avoid using the unit in the following locations since they can cause malfunctioning.
- Bathrooms and other moisture-prone places
- Warehouses and other dusty places
- Very hot places near heating appliances, etc.
Do not leave the unit exposed to direct sunlight for long periods of time.
This may deform or discolor the cabinet and may also cause malfunctioning.
To avoid product damage, do not expose this product to rain, water or other liquids.
Precautions for listening with the headphones
- Do not play your headphones at a high volume. Hearing experts advise against continuous extended play.
- If you experience a ringing in your cars, reduce volume or discontinue use.
Précautions


Power Sources
Recharge the batteries before using the unit. Be sure the and ends are inserted the right way.
Insert the two rechargeable batteries (included) into the transmitter.
Lay the ribbon under the batteries to make removal easier.
2 Connect the AC adaptor.
The OPR/CHG lamp lights green and charging starts.
The lamp goes out when the batteries are fully charged.
The adaptor is different for the UK.
Note
The OPR/CHG lamp lights orange if you operate the unit while recharging. It then changes to red when the batteries are fully charged.
After recharging
3 Take the rechargeable batteries out of the transmitter.
Pull the ribbon to remove.
4 Insert the batteries into the left hand ear piece (L).
Push up on the indent to open the lid.
Close the compartment lid firmly after inserting the batteries.
The unit is in the standby condition when the AC adaptor is connected. The primary circuit is always "live" as long as the AC adaptor is connected to an electrical outlet.
To check the remaining battery strength:
The OPR lamp on the right hand earpiece (R) dims or fails to light when the batteries are weak. Recharge the batteries. A
Service life of the batteries:
If the OPR lamp on the right hand carpiece (R) dims or fails to light even after recharging the batteries, they have come to the end of their serviceable life and need to be replaced.
Buy two new batteries (Part no.: P-3 GAVE).
The batteries can be recharged about 500 times. They need to be replaced when operating time dramatically shortens even after recharging.
For your reference:
Normal batteries (R6/LR6, AA, UM-3) can be also used to power the headphones. Do not attempt to recharge them in the transmitter unit.
Alimentation
natural_image
Line drawing of a device with a pointer and circular motion indicator (no text or symbols)2
A
natural_image
Simple line drawing of a device with a bulb and cable, no text or symbols presentB
natural_image
Line drawing of a device with a bulb, cable, and connector (no text or symbols)AUDIO OUT
R

L

3
Connections
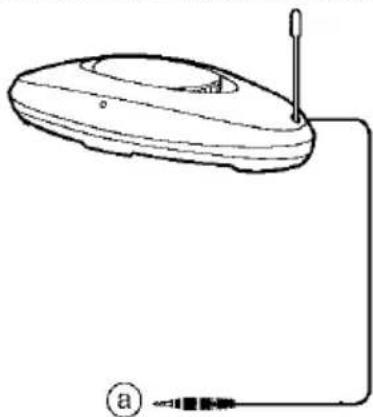
1 Screw the antenna (included) firmly into the hole in the transmitter.
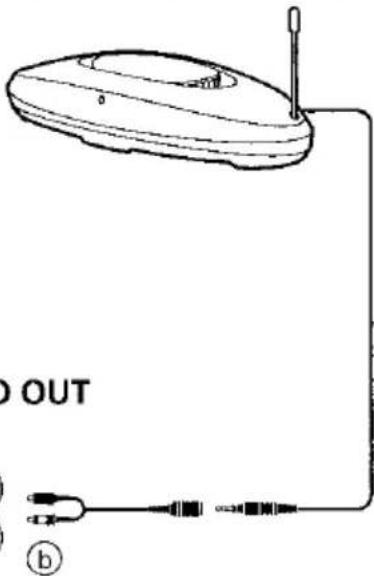
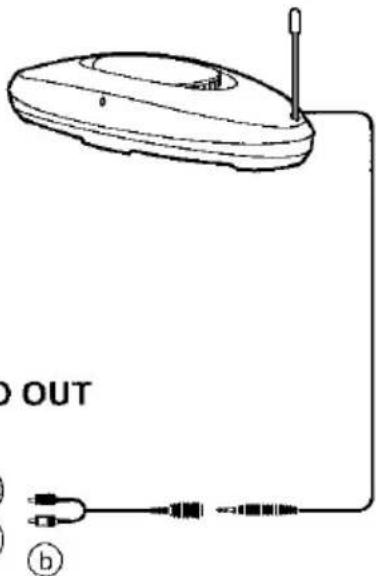
2 Connect the transmitter to the AV unit.
The cable can be connected directly to a stereo mini jack or to a large stereo headphone jack if the included plug adaptor is used. A
(a) Portable CD player, headphone stereo, radio/tape players, personal computer, etc.
OR
Use the included mini jack/pin cord adaptor to connect the transmitter to your equipment's stereo pin terminals. B
(b) Amplifier, TV set, video deck, cassette deck, laser disc player, personal computer, etc.
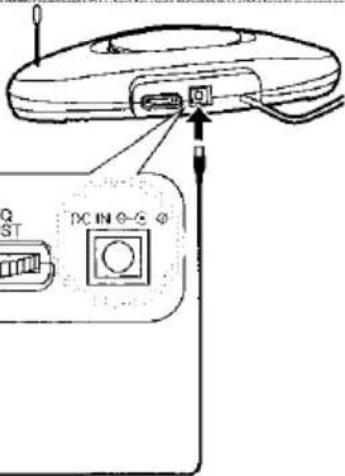
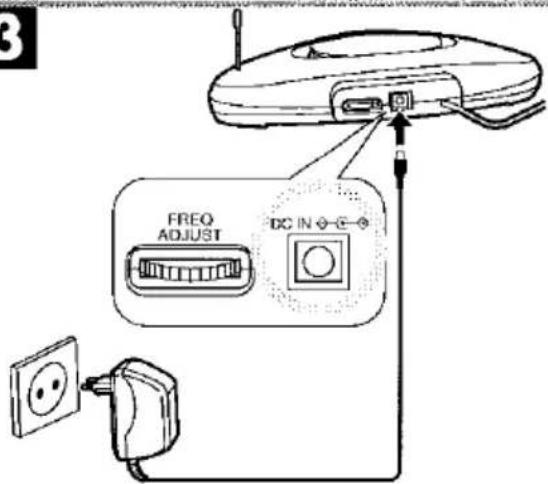
3 Connect the transmitter to the power supply.
Installation
This unit uses radio waves.
The waves can be transmitted to a range of between 60 and 100 meters.
Note
Under optimum conditions, the headphones can pick up clean signals from the transmitter to a maximum of 100 meters. Metal between the two units and the presence of other radio waves can cause interference to occur at a shorter distance. This interference can be cleared by moving closer to the transmitter, removing the obstructions, or changing the transmission frequency (see page 12).
You may occasionally experience interference due to dead spots in the area covered by the transmitter. This phenomena occurs with any kind of radio signal and is not a malfunction. Dead spots can be moved by moving the transmitter and the headphones.
Raccordements
1 Turn on the unit the transmitter is connected to.
2 Reduce the volume of the headphones with the [VOL] dial.
3 Switch the [ON/OFF] switch to "ON".
The OPR lamp lights.
Put the headphones on.
4 Turn the volume on the sound source up as much as possible without causing distortion.
5 Adjust the volume on the headphones.
6 If there is interference, turn the [TUN] dial to reduce it.
See page 12 for more detailed instructions on how to reduce interference.
After listening
① Take the headphones off.
② Switch the [ON/OFF] switch to "OFF".
The OPR lamp goes out.
3 Turn off the unit the transmitter is connected to.
Concerning the AUTO POWER ON/OFF function:
When audio signals are supplied, the transmitter's power is turned on; when audio signals have not been supplied for 1 or 2 minutes, its power is automatically turned off. (When the volume of the connected unit is too low, this function doesn't work. Turn up the volume as much as possible without causing distortion.)
Utilisation
If interference remains bad
The radio waves from the transmitter may be being interfered with by other radio waves. You can change the frequency to improve reception.
1 Turn the [FREQ ADJUST] dial on the transmitter to adjust the frequency.
2 Turn the [TUN] dial on the headphones to the position with least interference.
Note
Some sound or noise may still be heard even if no sound signals are passing through the transmitter.
Maintenance
To clean this unit, wipe with a soft, dry cloth.
If the surfaces are extremely dirty, use a soft cloth dipped in a soap and water solution or weak detergent solution.
- Never use alcohol, paint thinner or benzine to clean this unit.
- Before using chemically treated cloth, read the instructions that came with the cloth carefully.
Notice about the rechargeable batteries:
These batteries are designated recyclable.
Please follow your local recycling regulations.
Utilisation
Before requesting service for this unit, check the chart below for a possible cause of the problem you are experiencing. Some simple checks or a minor adjustment on your part may eliminate the problem and restore proper operation. If you are in doubt about some of the check points, or if the remedies indicated in the chart do not solve the problem, refer to the directory of Authorized Service Centers (enclosed with this unit) to locate a convenient service center, or consult your dealer for instructions.
| Problem | Probable cause(s) | Suggested remedy | Page |
| No sound. | Is the unit that the transmitter is connected to on? | Turn the unit on. | 10 |
| Are the unit and the transmitter connected? | Connect the units correctly and ensure the plugs are properly inserted. | 8 | |
| Is the volume too low? | If the transmitter is connected to the headphone jack, turn up the volume of the connected unit. | 10 | |
| Turn up the volume on the headphones. | 10 | ||
| Sound is distorted. | Is the input level of the audio signal too high? | If the transmitter is connected to the headphone jack, turn down the volume of the connected unit. | 10 |
| Excessive noise. | Is the antenna loosened? | Screw the antenna (included) firmly into the hole in the transmitter. | 8 |
| Is there an obstruction between the transmitter and the headphones? | Remove the obstruction, move the transmitter, or change position yourself. | 8 | |
| Are other radio waves obstructing the transmitter's waves? | Change the transmission frequency with the transmitter's [FREQ ADJUST] dial and then tune in the headphones with the [TUN] dial. | 12 | |
| Are the transmission frequency and the receiver's frequency tuned correctly? | |||
| Is the input level of the audio signal too low? | If the transmitter is connected to the headphone jack, turn up the volume of the connected unit. | 10 | |
| No sound, sound is distorted, or there is excessive noise. | Is the OPR indicator dim or does it fail to light at all? | The batteries have run down. Recharge them. If the indicator remains dim after recharging, the batteries have come to the end of their serviceable life and need to be replaced. | 6 |
Guide de dépannage
Stereo frequency modulation system
Carrier frequency 863–864 MHz
Transmitting distance 60–100 m
Frequency system 20-22,000 Hz
Distortion factor 1% (at 1 kHz)
■ RF Transmitter (RP-WF920T)
Power supply DC 12 V, 150 mA
(using AC Adapter, included)
Dimensions (W×H×D) 193×95×40 mm
Weight 220 g (approx.)
■ RF-Headphones (RP-WF920H)
Power supply DC 3 V: 2×R6 (size AA) batteries or 2×supplied P-3 GAVE Ni-Cd. rechargeable batteries
Dimensions (W×H×D) 225×195×79 mm
Weight 250 g (approx.), including batteries
| Recharging | Operation |
| 8 hours | 25 hours |
■ Accessories
(Consult your dealer when replacement accessories are to be purchased.)
—Antenna
—AC Adaptor (DC12 V, 150 mA)
(For United Kingdom: RFX1695)
(For Continental Europe: RFX1694)
—Ni-Cd rechargeable battery (2×P-3 GAVE)
—Adaptor cord (stereo mini jack-pin plug×2, RFX1645)
—Large stereo plug Adaptor (6.3 mm diameter)
Note:
Specifications are subject to change without notice.
Weight and dimensions are approximate.
Fiche technique
■ Données générales
2 batteries rechargecables Ni-Cd P-3 GAVE fournies
Dimensions (L×H×P) 225×195×79 mm
-2 batteries rechargeables Ni-Cd (P-3 GAVE)
—cordon adaptateur
—Ni-Cd-Akku (P-3 GAVE×2)
—Wandlerkabel
natural_image
Line drawing of a device with a rotating pointer and a small circular component (no text or symbols)2
A

natural_image
Line drawing of a handheld electronic device with a probe and cable, no text or symbols presentB
AUDIO OUT
R
L

©
natural_image
Line drawing of a device with a bulb and plug, connected to a terminal outlet (no text or symbols)3
Connessioni
Vervormingsfactor 1% (by 1 kHz)
■ RF-zender (RP-WF920T)

Подсоединения

- Technics
- Features
- Table of contents
- Cher client
- AC adaptor
- Unit
- No altering or remodeling
- No dropping or strong impacts
- Locations to be avoided
- Do not leave the unit exposed to direct sunlight for long periods of time.
- Precautions for listening with the headphones
- Précautions
- Power Sources
- Note
- Alimentation
- Connections
- OR
- Installation
- Raccordements
- After listening
- Concerning the AUTO POWER ON/OFF function:
- Utilisation
- If interference remains bad
- Maintenance
- To clean this unit, wipe with a soft, dry cloth.
- Notice about the rechargeable batteries:
- Guide de dépannage
- ■ RF Transmitter (RP-WF920T)
- ■ RF-Headphones (RP-WF920H)
- ■ Accessories
- Note:
- Fiche technique
- ■ Données générales
- Connessioni
- ■ RF-zender (RP-WF920T)
- Подсоединения
Brand : TECHNICS
Model : RP-WF920
Category : Wireless headphones