
NTD-2460 - Television Naxa - Free user manual and instructions
Find the device manual for free NTD-2460 Naxa in PDF.


User questions about NTD-2460 Naxa
0 question about this device. Answer the ones you know or ask your own.
Ask a new question about this device
Download the instructions for your Television in PDF format for free! Find your manual NTD-2460 - Naxa and take your electronic device back in hand. On this page are published all the documents necessary for the use of your device. NTD-2460 by Naxa.
USER MANUAL NTD-2460 Naxa
natural_image
Line drawing of a flat-screen monitor with a CD on top (no text or symbols)Instruction Manual
PLEASE READ CAREFULLY BEFORE USE
USER'S MANUAL
FCC Notice
This device complies with Part 15 of the FCC Rules. Operation is subject to the following two conditions: (1) this device may not cause harmful interference, and (2) this device must accept any interference received, including interference that may cause undesired operation.
Warning: Changes or modifications to this unit not expressly approved by the party responsible for compliance could void the user's authority to operate the equipment.
NOTE: This equipment has been tested and found to comply with the limits for a Class B digital device, pursuant to Part 15 of the FCC Rules. These limits are designed to provide reasonable protection against harmful interference in a residential installation. This equipment generates, uses and can radiate radio frequency energy and, if not installed and used in accordance with the instructions, may cause harmful interference to radio communications.
However, there is no guarantee that interference will not occur in a particular installation. If this equipment does cause harmful interference to radio or television reception, which can be determined by turning the equipment off and on, the user is encouraged to try to correct the interference by one or more of the following measures:
- Reorient or relocate the receiving antenna.
- Increase the separation between the equipment and receiver.
- Connect the equipment into an outlet on a circuit different from that to which the receiver is connected.
- Consult the dealer or an experienced radio/TV technician for help.
Support
If you have problems with your device, please consult the instructions in this manual. Please also visit us on the web at www.naxa.com to get up to the minute news, alerts, and documentation for your device. For additional assistance, please contact Naxa Technical support.
NAXA Technical Support
2320 East 49th St.
Vernon, CA 90058
Tel: (323)-583-8883
http://www.naxa.com/naxa_support/
Made in China
Safety Information
Warning
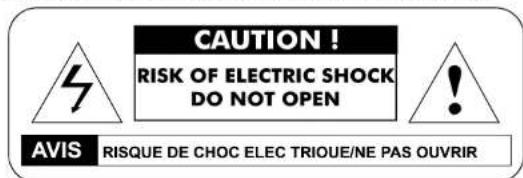
To prevent fire and/or electric shock, do not use this plug with an extension cord, receptacle or other outlet unless the blades can be fully inserted to prevent blade exposure. Do not expose this appliance to rain or moisture.
Important Safety Instructions
Read these instructions.
Keep these instructions.
Heed all warnings.
Follow all instructions.
Please, unplug the TV power cord when the following conditions occur:
-When there is a thunderstorm (Please, pull out the power cord and antenna).
-When cleaning the TV set
-When the TV set is not used for a long time.
Do not use corrosive depurative when cleaning the TV set.
Do not put the TV set under direct sunlight or near heat.
Do not put a heat source, such as a candle or heater, on top of or near the TV set.
Leave plenty of space (al least 10cm) around the TV set for ventilation.
Place the TV set away from where it can be ruined by rain or water (such as near a window).
Don't put a container with liquid (such as a vase) on top of the TV set.
Do not move the TV set when the power is on.
Do not touch, push or scratch the surface of the TV set with hard materials or items.
When TV surfaces are dirty, please use a wet cotton cloth or soft cloth with non-corrosive cleaners to clean it carefully. Don't use acetone, toluene or alcohol to clean the TV set.
Be aware and careful of moisture, which can damage inner electronic components. When condensed moisture is present, the TV screen may appear blurry or spotty. It is recommended that a technician install the TV set on a wall, if such placement is desired.
An incorrect wall installation will be unsafe and hazardous.
Do not let children climb on or play around the TV set to avoid falls, collisions, damages and injuries.
Do not hit the TV panel with hard objects to prevent damages.
Do not cover the TV set with blankets or other objects when it is connected to a power source to prevent overheating and fire.
Batteries shall not be exposed to excessive heat such as sunshine, fire or the like. Mains plug is used as disconnect device from the mains, the disconnect device shall remain readily operate.
Apparatus with class I construction shall be connected to a mains socket outlet with a protective earthing connection.
Important Safety Precautions
Safety
Please, immediately pull out the AC power plug if there is an abnormal sound or smell or the LED TV has sound but no picture, and contact after sales support.

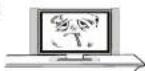

The LED TV should be kept free from rain, moisture and dust to prevent electrical shock and short circuits. Do not cover the ventilation openings with table clothes, curtains, newspapers, etc.
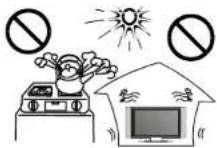
The LED TV should be kept from high temperature heating sources or direct sunlight. Good ventilation is required. Allow 10 cm. between the LED TV and other appliances or built-in cabinet walls.

When you wipe the front cabinet, please make sure the power plug is pulled out and use a soft, dry, lint-free cloth and handle it with care. Do not repeatedly wipe the panel, nor scrape, tap or strike the panel with a hard object.
Do not wipe the LED TV with any petrol, chemical or alcohol based solvents as it will lead to product damage of the panel and cabinet.

Important Safety Precautions
Safety

Do not place the LED TV on an unstable surface.
Do not place the power cord or other cables across a walkway in case it is trampled on. Do not overload the power cord or power socket. When the power plug is used to disconnect and connect the device, it should easily into the power source.


Do not disassemble the back cover, as it contains high voltages inside and will cause electric shock. Only qualified professionals should conduct internal adjustments, maintenance, and checks.
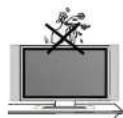
The TV set should not be subjected to water droplets, vapor, or splash. This equipment should not be placed on objects filled with liquids. Do not place flame sources, such as lit candles, on or near the LED TV. Please, pull out the power plug and contact after sales support if there are abnormal objects or water in the TV.

Pull out the power cord and antenna cable during electrical storms so the LED TV is not damaged by electrical surges. Keep all people away from the antenna cable during electrical storms.

ENERGY STAR® Qualification.
This product has earned the ENERGY STAR ^® for meeting U.S. Federal energy efficiency guidelines as set by the Department of Energy and Environmental protection agency. The ENERGY STAR ^® program exists to provide energy saving guidelines and help promote energy efficient products and practices. Changes to certain features, settings and functions of this TV can change and/or increase its power consumption. As-shipped mode is the mode in which the product qualifies for ENERGY STAR ^® .
Table of Contents
| Introduction | |
| Features | 2 |
| Specifications | 3 |
| Accessories | 4 |
| General Description | 4-9 |
Overview of front and side panel 4
Overview of back panel 5
Overview of remote control 6-8
Installing Batteries in the remote control 9
Antenna connection 9
External Connection 10-16
Connecting VCR 10 Connecting DVD Player/Set-Top Box 11
Connecting Digital Audio System 12
Connecting USB 13
Connecting DVD Player/Set-Top Box via HDMI 14
Connecting PC 15
Connecting a Headphone 16
Supporting signals 16
Basic operation 17
Turning the TV On and Off 17
OSD Menu Operations 18-25
INPUT SOURCE SELECTION 18
BASIC OPERATION 18
FIRST TIME INSTALLATION 18
PICTURE 19
AUDIO 20
TIME 21 SETUP 01:00
SETUP 21-22
LOCK 23
CHANNEL 24 DO SETTINGS 25
PC SETTINGS 25
USB Operation 25-26
DVD Setup Menu 27
USB/SD Operation 28
Troubleshooting 29
Picture defects and the reason 30
Introduction
Features
• TV adopts TFT LED display screen
● HDTV Compatible (480i, 480p, 576i, 576p, 720p, 1080i, 1080p)
● Support American TV Standard 8VSB/Free 64/256QAM,NTSC System, ATSC System
- Connect to computer directly to realize TV/monitor combo.
● Zero X radiation complies to green environment protection requirement
● Advanced Chroma Processing
● Closed captioning/Program Control
- SAP/STEREO/MONO; ATSC.
- HDMIInput
- USB input
Input terminals used for external equipment connection
One computer VGA/PC input One PC Audio input
One AV input Two HDMI input
One EARNPHONE output One USB input
One ANTENNA input One Coaxial output
One YPbPr input
Introduction
Specifications
| Display screen type | Color active matrix LED display |
| Model | NTD-2460 |
| The maximum resolution | 1366X768 |
| Image control | Fine digital control |
| Power supply | AC 100-240V~50/60Hz |
| TV receive system | NTSC System, ATSC System |
| Frequency range | Antenna: 2~69; Cable: 2~125 |
| Antenna input impedance | 75Ω (Unbalance) |
| Sound output | 2 8W× |
| Power supply for remote controller | DC 3V (Two AAA size batteries) |
| Power consumption | 48 W |
| Dimensions (LXWXH) | 21.9×7.2×15.3 Inch |
| Weight (Net weight) | 3.2 kg |
| Operation environment temperature | 0°C-40°C |
Note:
Design and specification modification maybe made at any time without prior notice; all data and dimensions are approximations.
Accessories
Please make sure the following items are included with your LED TV. If any items are missing, contact your dealer.
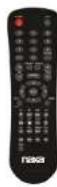
Remote Control & Batteries (AAAx 2)


Owner's
Instructions
General Description
Overview of front and side panel

- Remote control sensor / Power indicator
- After placed a disc in the disc tray, press this button to play the disc and press it
again to pause - Press this button when the power is on the disc will eject. Press it again the disc is pulled in automatically.
- VOLUME +/-
Press to increase/decrease the volume.
In the on-screen menu, use them to move left/right. - CHANNEL +/-
Press to change channels.
In the on-screen menu, use them to move up/down. - MENU
Press to see an on-screen menu of your TV. - SOURCE
Toggles between all the available input sources
B. POWER
Press POWER button to toggle between normal and standby mode.
General Description
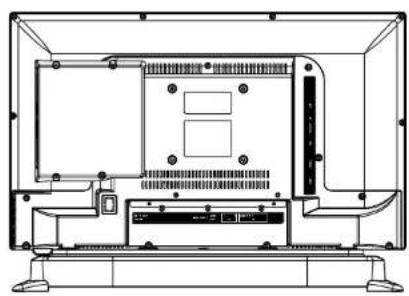
Overview of back panel
natural_image
Technical line drawing of a computer monitor chassis with ventilation slots and control panel (no text or labels)

-
Power Input
-
EARPHONE
Connect a set of phone for private
listening.
- COAXIAL
Connect to a Digital Audio device.
- AUDIO L/R
Audio input for external devices, such as
a camcorder or VCR.
- Y(CVBS) / Pb / Pr
Connect video.
- USB (TV)
USB input
- ANTENNA INPUT
Connect to an antenna or cable
NTSC & ATSC
- PC AUDIO
Audio input for external devices.
- VGA/PC IN
Connect to the video output jack on
your PC
- HDMI 1 & 2
Connect to the HDMI jack of a device
with a HDMI output.
General Description
Overview of remote control

-
POWER: Switch a LED TV when at standby mode or vice versa.
-
MUTE: Press to mute the sound. Press again or press VOL+ to unmute.
-
Number key(0-9): Press 0-9 to select a TV channel directly when you are watching TV. The channel change after 3 seconds.
-
-/-: Press this button to enter a program number for multiple program channel such as 2-1, etc.
-
RETURN: Return to the previous channel viewed.
-
P.MODE: Press repeatedly to cycle through the available video picture modes.
-
S.MODE: Press to cycle through the different sound settings.
-
VOL +/-: Press to Increase/decrease the sound level.
-
PROG +/-: Press to scan through channels.
-
SOURCE: Press to change input source.
-
ARROW BUTTONS ( ▲/▼/◄/► ): Use to move cursor up/down/left/right.
-
ENTER: Validation key
-
EXIT: Press to exit all menu.
-
MENU: TV system setup.
-
EPG: Press to display the EPG menu.
-
INFO: Displays the channel information.
-
ZOOM: Press to change the screen scale.
-
MTS: Press to select the audio channels.
-
LOCK: Press to display the Lock menu.
-
Time: Press to display Time Menu.
-
CC: Press to display the closed caption.
-
FREEZE: Press to freeze the screen.
-
FAV: Selects favorite channels.
-
LIST: Press to display the TV program list.
-
FAV +/-: Press this button +/- the favorite program list.
-
ADD: Add this program to the favorite channels list. ERASE: Delete this program from the favorite channels list.
-
SLEEP: Sets the sleep timer.
General Description
Overview of remote control
DVD Mode
When in DVD mode, use the arrows in the bottom section of the remote to operate the menus etc.
EJECT BUTTON(▲)
Press the EJECT button when the power is on the disc will eject. Put the disc in the slot slightly, with the data side facing towards you. Press EJECT button again the disc is pulled in automatically, and the unit starts playing automatically (Without auto play function for JPEG discs).
MENU PBC BUTTON
Press menu button and the screen will display "Root Menu", select item according to your preference. (This button is valid to DVD disc possessing multilayer Menu). PBC button lets you play Video CDs, interactively. If PBC is on, you can use the number buttons to select tracks in the menu. If PBC is off, you can select the tracks directly.
AUDIO BUTTON
When play DVD, by pressing this button, you can change the audio language from the one selected at the initial settings to a different language, available.
REPEAT BUTTON(REP)
Press the REPEAT button one time, it repeats the chapter. Press it again and it repeats all chapters of the disc. Press REPEAT button one more time and the repeat function cancels.
A-B REPEAT BUTTON(REPA-B)
Press the A-B button once to set point A Press the A-B button a second time to set point B. After setting the program repeat playing from A to B. Pressing the A-B button a third time will cancel the repeat.
TITLE BUTTON
Press TITLE button, there will have an screen indication "TITLE".
Press the direction or numeric buttons to select
your favourite title. Will play from the first chapter of the selected title.(for DVD disc only)
ENTER: Validation key. (bottom section of ENTER button for DVD function only)
ARROW BUTTONS (◀/▲/▼): Use to move cursor up/down/left/right. (direction buttons of bottom section for DVD function only)
SUBTITLE: This function may enable you to select multi subtitle languages (as many as 32 kinds only for the discs with multi subtitles encoded). Press the SUBTITLE button to gel desired display.
DISPLAY: Press display bottom to show the information of the DVD player.
GO TO BUTTON
Press this button to go to desired position. The player provides 3 search mode.
| 1. BOX. ORDER | TITLE BOX. TIME |
| [ DVD only ] | [ DVD only ] |
| CHAPTER 1000, TIME | |
| DISC BITS |
| [ DVD only ] | [ CD ] |
| TRACK SOTO [IMAGE] | SELECT TRACKSWE |
| [ CD ] | |
On the remote control, the bottom section ARROW BUTTONS (◄►/▲/▼): Up and down buttons of the OSD menu, to change the OSD menu items; Left and right buttons of the OSD menu, to select the OSD menu items. (only for DVD function)
When the above items are showed on LED screen, you can input numbers to locate desired sector.
The number you input is invalid if it is beyond the track's capacity.
General Description
Overview of remote control
PLAY AND PAUSE BUTTON(▶/11)
Press this button to start playback. Press this button again to pause playback.
STOP BUTTON(■)
Press button once to stop. Press button to resume from where you stopped.
Press button Twice to stop. Press button to start from beginning. In order to protect the disc, press button then press EJECT button to take the disc out. When the disc is ejected, hold the disc edge to prevent scratches.
When not using the DVD function (in standby mode or using others modes for a long time), please take out the disc to protect the DVD loader and the disc.
PREV/NEXT BUTTON(◀◀/▶◀)
When playing a DVD disc, press PREV to play the previous chapter, when playing a SVCD, VCD, CD disc, press PREV to play the previous track.
When playing a DVD disc, press NEXT to play, the next chapter. when playing a SVCD, CD disc, press NEXT to PLAY the next track.
FR/FF BUTTON(←/→)
To Use Fast Forward or Fast Reverse:
-
When playing a DVD, press FF buuton to fast forward through the disc. Press FR button to fast reverse through the disc.
-
Press PLAY button to resume normal playback.
SETUP
Press this button to enter DVD setup menu page and then press navigation buttons to select and adjust selected item.
MEDIA
Press this button repeatedly to switch the unit among DISC, USB and CARD mode.
General Description
Installing Batteries in the Remote Control
Installing Batteries
1 Open the battery compartment cover on the back side.


2 Insert two 1.5V AAA size batteries in correct polarity. Don't mix old or used batteries with new ones.

+ Point the remote towards the remote control sensor of the wireless TV and use it within 7 meters.
+ Put the used batteries into the recycling bin since it can negatively affect the environment.
3 Closed the cover.

Note:
• One loading of batteries will last for 1 year under normal use.
- If you do not intend to use the remote controller for a long period of time, remove them to avoid damage due to leakage.
• Do not use old and new batteries together.
- The batteries shall not be exposed to excessive heat such as sunshine, fire or the like.
External Connection
Antenna connection
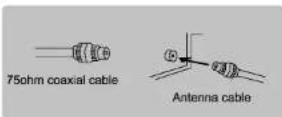
Antenna input impedance of this unit is 75ohm. VHF/UHF 75ohm coaxial cable can be connected to the antenna jack directly, if the antenna cable is 300ohm parallel flat feeder cable, you need to use the 300ohm/75ohm converter to connect the antenna cable to the antenna jack. For details Please refer to the following drawing.
Antennas with 300ohm flat twins Leads

Antennas with 75ohm Round Leads
External Connection
Connecting VCR
These instructions assume that you have already connected your TV to an antenna or a cable TV system. Skip step 1 if you have not yet connected to an antenna or a cable system.
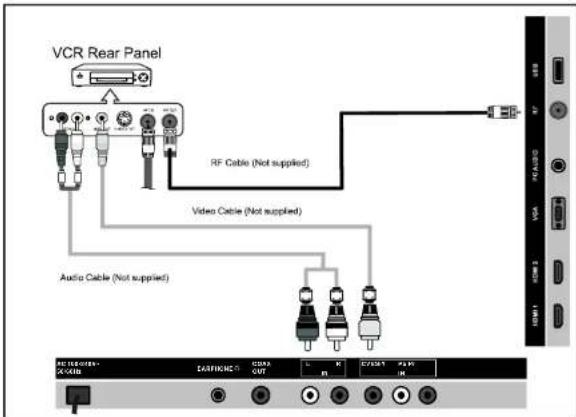
Follow the instructions in Viewing a VCR or Camcorder Tape to view your VCR tape. Each VCR has a different back panel configuration.
When connecting a VCR, match the color of the connection terminal to the cable. We recommend the use of cables with a Ferrite Core.
- Unplug the cable or antenna from the back of the TV.
- Connect the cable or antenna to the ANT IN terminal on the back of the VCR.
- Connect an RF Cable between the ANT OUT terminal on the VCR and the ANT IN terminal on the TV.
- Connect a Video Cable between the VIDEO OUT jack on the VCR and the VIDEO IN jack on the TV.
- Connect Audio Cables between the AUDIO OUT jacks on the VCR and the AUDIO L and AUDIO R jacks on the TV.
- If you have a mono (non-stereo) VCR, use a Y-connector (not supplied) to hook up to the right and left audio input jacks of the TV. If your VCR is stereo, you must connect two cables.
External Connection
Connecting DVD Player/Set-Top Box
The rear panel jacks on your TV make it easy to connect a DVD to your TV.
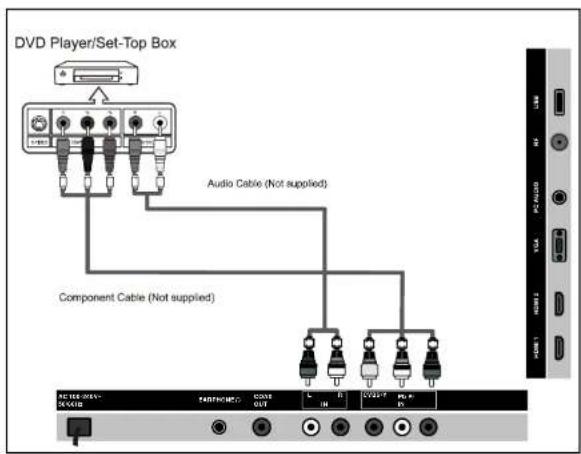
Component video separates the video into Y (Luminance (brightness)), Pb (Blue) and Pr (Red) for enhanced video quality.
Be sure to match the component video and audio connections.
For example, if connecting the video cable to COMPONENT IN, connect the audio cable to COMPONENT IN also.
Each DVD player/STB has a different back panel configuration.
When connecting a DVD player/STB, match the color of the connection terminal to the cable.
We recommend the use of cables with a Ferrite Core.
-
Connect a Component Cable between the COMPONENT IN [Y, PB, PR] jacks on the TV and the COMPONENT [Y, PB, PR] jacks on the DVD player.
-
Connect Audio Cables between the COMPONENT IN [R-AUDIO-L] jacks on the TV and the AUDIO OUT jacks on the DVD player.
External Connection
Connecting Digital Audio System
The rear panel jacks on your TV make it easy to connect a Digital Audio System to your TV.

5.1 CH audio is possible when the TV is connected to an external device supporting 5.1 CH.
We recommend the use of cables with a Ferrite Core.
- Connect a COAXIAL Cable between the SPDIF jacks on the TV and the Digital Audio Input jacks on the Digital Audio System. When a Digital Audio System is connected to the SPDIF terminal: Decrease the gain (volume) of the TV, and adjust the volume level with the system's volume control.
External Connection
Connecting USB
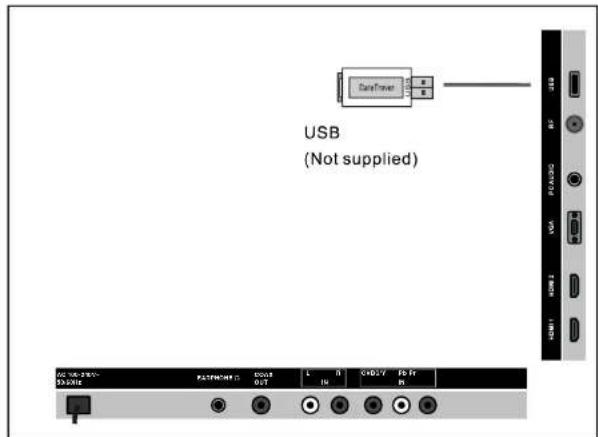
Connect a USB 2.0 memory device into USB slot of this TV for multimedia files playback.
- This USB slot only supports Music (MP3) and Photo (JPG) multimedia files playback.
- This TV is compatible with most USB devices in the market. However, we cannot guarantee the compatibility of all USB devices, due to multiple technology standards used.
External Connection
Connecting DVD Player/Set-Top Box via HDMI
This connection can only be made if there is a HDMI Output connector on the external device.

What is HDMI.
HDMI, or high-definition multimedia interface, is a next-generation interface that enables the transmission of digital audio and video signals using a single cable without compression.
Multimedia interface is a more accurate name for it especially because it allows multiple channels of digital audio (5.1 channels).
The difference between HDMI and DVI is that the HDMI device is smaller in size, has the HDCP(High Bandwidth Digital Copy Protection) coding feature installed, and supports multi-channel digital audio.
Each DVD player/STB has a different back panel configuration.
We recommend the use of cables with a Ferrite Core.
- Connect an HDMI Cable between the HDMI connector on the TV and the HDMI connector on the DVD player/Set-Top Box.
External Connection
Connecting PC

Each PC has a different back panel configuration.
The HDMI jacks do not support PC connection.
We recommend the use of cables with a Ferrite Core.
-
Connect a D-Sub Cable between RGB/PC IN connector on the TV and the PC output connector on your computer.
-
Connect the PC audio input jack on the TV.
External Connection
Connecting a Headphone

Plug headphone connector into headphone jack on the TV. Then the TV speaker will be muted.
Supporting signals
| VGA/PC | Up to 1366×768@60Hz |
| COMPONENT | 480i, 480p, 576i, 576p, 720p, 1080i, 1080p |
| HDMI | 480i, 480p, 576i, 576p, 720p, 1080i, 1080p |
Basic Operation
Turning the TV On and Off
How to turn the TV on or off
- Insert the power cord plug into a polarized AC outlet.
- Press ⬆ button on remote control or POWER button on the LED TV.
- Normal picture will be displayed on the screen after 6 seconds. If no signal input, "No Signal" will be displayed on the screen.
- If temporary POWER off is required, press ⬆ button on remote control or POWER button on the LED TV.
- If you want to completely switch off the power for this unit, unplug the power cord plug for this unit.
- After switching off the unit, you should turn on the TV again at least 5 seconds later. Status indication lamp
Blue: In power on mode.
Red: In standby mode.
Auto power off
If there is no signal input in TV mode, the TV will automatically access the standby state in about 10 minutes.
Memory before turning TV off
The settings of picture and the preset channels will be memorized at turning off the unit. When being started up again, the unit will work according to the mode set before being turned off.
OSD Menu Operations
INPUT SOURCE SELECTION

Press SOURCE button to display the input source list;
Press ▼/▲ button to select the input source you want to watch;
Press ENTER button to enter the input source;
BASIC OPERATION
- Press MENU button on unit top or remote control to display the main menu.
- Press LEFT or RIGHT navigation button to select Picture/Audio/Time/Setup/Lock/Channel.
- Press DOWN navigation button to enter submenu page.
- Press UP or DOWN navigation button to select the option that want to adjust.
- Press LEFT or RIGHT navigation button to adjust selected option to desired value.
- Press RIGHT navigation button or ENTER button to enter next menu page.
- Press MENU button to return to previous menu page.
- Press EXIT button to exit menu page.

FIRST TIME INSTALLATION
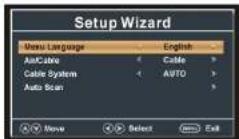
If this is your first time turning on this TV, Setup Wizard will appear on the screen.
- Press UP or DOWN navigation button to select preferred item.
- Press LEFT or RIGHT navigation button to adjust the value.
Menu Language
To choose your menu language.
Air/Cable
To choose your signal type: Air, Cable.
Cable System
To choose your Cable System: AUTO, STD, IRC, HRC.
NOTE: Cable System is adjustable only when your signal type is set to Cable.
Auto Scan
Highlight Auto Scan, press ENTER to search and store all available channels.

OSD Menu Operations
PICTURE
- Picture Mode
Available options: User, Standard, Dynamic, Mild.
- Contrast
The value of Contrast can be adjusted from 0-100.
- Brightness
The value of Brightness can be adjusted from 0-100.
- Color
The value of Color can be adjusted from 0-100.
- Tint
The value of Tint can be adjusted from -50 to 50.
NOTE: Tint is adjustable only in certain TV system.
- Sharpness
The value of Sharpness can be adjusted from 0-100.
NOTE: If the value of Contrast, Brightness, Color, Tint or Sharpness has been changed, the picture mode will turn to User automatically.
- Color Temp. (Color Temperature)
Available options: Normal, Warm, Cool.

OSD Menu Operations
AUDIO
- Sound Mode
Available options: User, Music, Movie, Standard.
- Bass
The value of Bass can be adjusted from 0-100.
- Treble
The value of Treble can be adjusted from 0-100.
- Balance
The value of Balance can be adjusted from -50 to 50.
NOTE: If the value of Bass or Treble has been changed, the sound mode will turn to User automatically.
- Surround
This item is used to turn on/off Sound Surround function.
- AVC (Auto Volume Control)
Available options: On, Off
- SPDIF Type
This item is used to select preferred SPDIF audio output type.
Available options: Off, RAW, PCM.
- Audio Language
This item is used to select preferred audio language.
NOTE: This item is adjustable only for digital programs.
- Accessibility
This item is used to make accessibility for people who are blind or visually impaired.
Voice Guide
Turn on/off voice Guide for some texts on screen.
Voice Guide: On, Off
Volume: Weak, Middle, Strong
Speed: Weak, Middle, Strong
Pitch: Weak, Middle, Strong
Video Description
Turn on/off Video Description.

OSD Menu Operations
TIME
1. Sleep Timer
Available options: Off, 5 min, 10 min,
15 min, 30 min, 45 min, 60 min, 90 min.
120 min, 180 min, 240 min.
2. Time Zone
Available options: Eastern, Central.
Mountain, Pacific, Alaska, Hawaii, Atlantic.
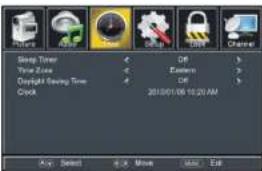
3. Daylight Saving Time
Available options: On, Off
NOTE: This item is adjustable only for digital programs.
4. Clock
When an available digital program is present, this unit will get Date and Time information automatically from current program. And it's not user adjustable.
SETUP
1. Menu Language
This item is used to select preferred OSD
menu language.
2. Transparency
This item is used to turn on/off Transparent
OSD menu.
3. Zoom Mode
This item is used to select preferred zoom
mode of display screen.
Available options: Normal, Wide, Zoom, Cinema

NOTE: The available zoom mode may be different for different input source.
4. Noise Reduction
Available options: Off, Weak, Middle, Strong.
5. Advanced
This item is adjustable only for PC/VGA input signal.
6. Closed Caption
CC Mode
Available options: CC on Mute, Off, On.
Basic Selection
Available options: CC1, CC2, CC3, CC4, Text1, Text2, Text3, Text4.
OSD Menu Operations
SETUP
Advanced Selection
Available options: Service1, Service2, Service3, Service4, Service5, Service6.
Option
Mode
Available options: Default, Custom.
Font Style
Available options: Default, Font 0, Font 1, Font 2, Font 3, Font 4, Font 5, Font 6, Font 7.
Font Size
Available options: Default, Normal, Large, Small.
Font Edge Style
Available options: Default, None, Raised, Depressed, Uniform, Left Shadow,
Right Shadow.
Font Edge Color
Available options: Default, Black, White, Red, Green, Blue, Yellow, Magenta, Cyan.
FG Color
Available options: Default, White, Red, Green, Blue, Yellow, Magenta, Cyan.
BG Color
Available options: Default, Black, Red, Green, Blue, Yellow, Magenta, Cyan.
FG Opacity
Available options: Default, Solid, Flashing, Translucent, Transparent
BG Opacity
Available options: Default, Solid, Flashing, Translucent, Transparent
7. DLC
This item is used to turn on/off Dynamic Luminance Control.
8. OverScan (HDMI mode only)
Turn on/off OverScan if Users found the image wasn't fully displayed on screen.
9. Restore Default
This item is used to reset to factory default settings.
OSD Menu Operations
LOCK
- Input the password by pressing number buttons on remote control. NOTE: The factory default password is 0000.
1. Change Password
- Press RIGHT navigation button or ENTER button to enter it.
- Press number buttons to input the new password and input it again to finish password changing.
2. System Lock
This item is used to turn on/off system lock
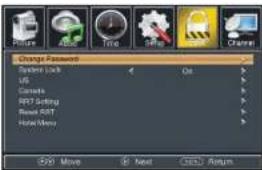
3. US
TV
- Press RIGHT navigation button or ENTER button to enter it.
- Press navigation buttons to move the cursor.
- Press ENTER button to block or unblock it.
MPAA
Available options: N/A, G, PG, PG-13, R, NC-17, X.
4. Canada
Canada English
Available options: E, C, C8+, G, PG, 14+, 18+.
Canada French
Available options: E, G, 8 ans+, 13 ans+, 16 ans+, 18 ans+,
NOTE: US, Canada, RRT Setting and Reset RRT items are adjustable only when System Lock is On.
5. RRT Rating
This item is available only when viewing programs which contain related Advance Rating information.
6. Reset RRT
This item is used to reset RRT Rating
7. Hotel Menu
-Press RIGHT navigation button or ENTER button to enter it.
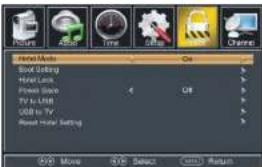
Hotel Mode: turn on/off Hotel Mode.
Boot Setting: set Picture Mode, Default
Volume, Max Volume, Boot Source
(Boot Channel & Channel Select won't work if no TV signals.)
Hotel Lock: turn on/off Tuner Lock, Keypad Lock or Menu Lock.
Power Save: select desired Power Save time.
TV to USB: export data to USB device.
USB to TV: import data from USB device.
Reset Hotel Setting: reset above hotel setting.
OSD Menu Operations
CHANNEL
1. Air/Cable
This item is used to select preferred signal receiving type.
2. Auto Scan
-Press RIGHT or ENTER button to enter it.
2.1 Cable System
This item is used to select preferred cable system.
Available options: AUTO, STD, IRC, HRC.
NOTE: This item is adjustable only when your signal type is set to Cable.
2.2 Start to Scan
- Press RIGHT or ENTER button to start auto scanning.
- Press MENU or EXIT button to exit auto channel searching.
3. Favorite
- Press RIGHT or ENTER button to enter it.
- Press UP or DOWN navigation button to select preferred channel.
- Press ENTER button to label the selected channel as a favorite one or not.
4.Show/Hide
- Press RIGHT or ENTER button to enter it.
- Press UP or DOWN navigation button to select preferred channel.
- Press ENTER button to show or hide the selected channel.
5. Channel No.
- Press LEFT or RIGHT navigation button to select preferred channel number.
6. Channel Label
- Press RIGHT or ENTER button to enter it.
- Press LEFT or RIGHT navigation button to move the cursor.
- Press UP or DOWN navigation button to adjust the value
NOTE: If no available channel is present, Favorite, Show/Hide, Channel No., and Channel Label will not be adjustable.
7. DTV Signal
This item is not user adjustable.


OSD Menu Operations
PC SETTINGS
- Press SOURCE button on unit top or remote control to set the unit in VGA mode.
- Press MENU button to display the main menu and select Setup item. Then press DOWN navigation button to enter Setup menu page.
- Press UP or DOWN navigation button to select Advanced and press RIGHT navigation button or ENTER button to enter it.
1. H-Pos (Horizontal Position)
Available range: 0-100.
2. V-Pos (Vertical Position)
Available range: 0-100
3. Clock
Available range: 0-100.
4. Phase
Available range: 0-100.
5. Auto
If this item is entered, it will adjust the PC screen automatically.

USB
USB Operation
● Before following operations, insert a USB memory device first, which contains Photo and Music files.
- Press SOURCE button on unit top or remote control to set the unit in USB mode.

- Press LEFT/RIGHT navigation button to select Photo/Music in the main menu.
- Press UP/DOWN navigation button to select preferred file.
OSD Menu Operations
USB Operation
Photo Playback
- Select Photo item in the main menu
- Press UP/DOWN navigation button to select preferred folder/file and press ENTER button to enter a folder or play selected file.

During normal playing:
- Press UP/DOWN navigation button to play previous/next photo.
- Press LEFT/RIGHT navigation button to rotate a photo counterclockwise/
clockwise. - Press EXIT button to return to file selecting page.
Music Playback
- Select Music item in the main menu.
- Press UP/DOWN navigation button to select preferred folder/file and press ENTER button to enter a folder or play selected file.
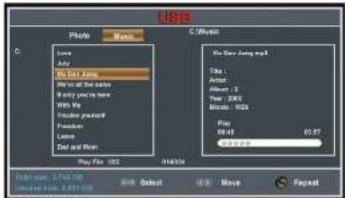
During normal playing:
- Press INFO button to display/hide the tool bar.

- Press LEFT/RIGHT navigation button to select preferred option and press ENTER button to confirm it.
DVD Setup Menu
INITIAL SETTING(DVD)
Common procedure for initial settings
- Press SETUP button on remote control.
- Use the navigation buttons to select preferred item, and press ENTER button, each screen for setting the value is displayed. Then move the navigation buttons to set the item and press ENTER button to confirm the settings.
- Press SETUP button to close setup menu.
- Use LEFT or RIGHT navigation button to switch to another main setup item. Then press RIGHT or ENTER button to enter submenu page; press LEFT button to return to previous menu page.
1. GENERAL SETUP
1.1 TV DISPLAY - It is for selecting TV output mode. Options: NORMAL /PS: Pan & scan mode NORMAL/ LB: Letter box mode WIDE: 16:9 wide screen mode
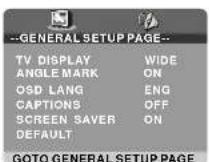
1.2 ANGLE MARK - It is used to select whether or not the multi-angle icon is displayed on screen when a Multi-angle disc is playing. Options: ON: Icon will be displayed OFF: Icon will be turned off
1.3 OSD LANG - It is used to choose the desired language for different user. In this player, you can choose English or other languages.
1.4 CAPTIONS - It is used to switch the caption ON/OFF when playing disc.
1.5 SCREEN SAVER - When the player is not in use for 5 minutes, a screen saver will move across the screen to protect the TV.
Options: ON: Screen saver is enabled
OFF: Screen saver is disable
1.6 DEFAULT - It is used to reset to factory settings.
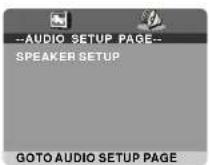
2. AUDIO SETUP
SPEAKER SETUP - It is used to set the speaker output levels.
Options: LT/RT-Left/Right mix mode STEREO - Select this option if you don't have a 2.1 channel amplifier.
USB/SD OPERATION
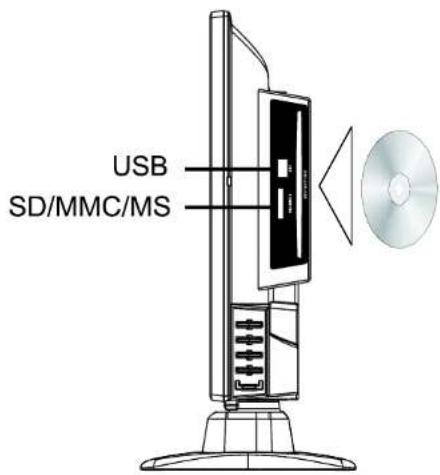
Card Reader and USB player
The card reader can read SD/MMC/MS 3 kinds of cards and USB storage
Media Support List:
| Media Type | Format |
| Video | MPEG1, MPEG2 |
| Audio | WMA, MP3 |
| Photo | JPEG |
Troubleshooting
If you have any problem, check the countermeasures for each symptom listed below. The following symptoms may have caused by inappropriate adjustment rather than actual malfunction of the unit. If the trouble persists, contact the service center.
| Symptoms | Possible solutions |
| No power | Please check the power cord is plugged in.Unplug the power cord and plug it after 60 seconds and restart the TV. |
| No picture | Please check antenna connection.Station may experience problems, please tune to another station.Please adjust the settings of contrast and brightness. |
| Good picture but no sound | Please increase the volume.Please check TV is under mute mode, press MUTE button on the remote control.Please check sound settings. |
| Good sound but abnormal color or no picture | Please check the antenna connection. |
| No remote control | Batteries of remote control may have been exhausted, if necessary, please change the batteries.Clean the remote control lens. The distance between LED TV and remote control should be within 8m. |
| Full screen flickering under VGA | V-HEIGHT value may be set too big, restart computer and enter safe mode, then set monitor parameters to correct value according to adjustment description. |
| Horizontal stripes under VGA | Sample phase may be deflected, adjust phase according to picture position. |
| Colored dots may be present on the screen | This product is the high resolution LED display device and a few cell defects can occur in the manufacture of the LED.Several colored dots visible on the screen would be acceptable.in line with other LED manufacturers and would not mean that the LED is faulty. We hope you will understand that it could not be changed or refunded. |
Picture defects and the reason
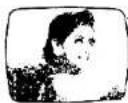
Snowy Picture
Snowy picture is usually due to weak signal. Adjust antenna or install an antenna amplifier.

Double Image or Ghosts
Double images are usually caused by reflections from tall buildings. Adjust the direction of the antenna or raise it.

Radio Wave Interference
Wave patterns are moving on the screen, which are usually caused by nearby radio transmitters or short-wave receiving equipment.
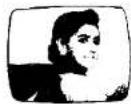
High Temperature Electrothermal Interference
Diagonal or herringbone patterns appear on the screen or part of picture is missing. This is probably caused by high temperature electrothermal equipment in a nearby hospital.
- Instruction Manual
- FCC Notice
- Support
- Safety Information
- Warning
- Important Safety Instructions
- Important Safety Precautions
- Safety
- ENERGY STAR® Qualification.
- Table of Contents
- Introduction
- Features
- Note:
- Accessories
- General Description
- Overview of back panel
- Overview of remote control
- Installing Batteries in the Remote Control
- External Connection
- Antenna connection
- Connecting VCR
- Connecting DVD Player/Set-Top Box
- Connecting Digital Audio System
- Connecting USB
- Connecting DVD Player/Set-Top Box via HDMI
- Basic Operation
- Turning the TV On and Off
- How to turn the TV on or off
- OSD Menu Operations
- INPUT SOURCE SELECTION
- FIRST TIME INSTALLATION
- Menu Language
- Air/Cable
- Cable System
- Auto Scan
- PICTURE
- AUDIO
- TIME
- Sleep Timer
- Time Zone
- Daylight Saving Time
- Clock
- SETUP
- Menu Language
- Transparency
- Zoom Mode
- Noise Reduction
- Advanced
- Closed Caption
- Advanced Selection
- Option
- DLC
- OverScan (HDMI mode only)
- Restore Default
- LOCK
- Change Password
- System Lock
- US
- TV
- MPAA
- Canada
- Canada English
- Canada French
- RRT Rating
- Reset RRT
- Hotel Menu
- Hotel Mode: turn on/off Hotel Mode.
- CHANNEL
- Air/Cable
- Auto Scan
- Cable System
- Start to Scan
- Favorite
- 4.Show/Hide
- Channel No.
- Channel Label
- DTV Signal
- PC SETTINGS
- H-Pos (Horizontal Position)
- V-Pos (Vertical Position)
- Clock
- Phase
- Auto
- USB
- USB Operation
- Photo Playback
- Music Playback
- DVD Setup Menu
- INITIAL SETTING(DVD)
- Common procedure for initial settings
- GENERAL SETUP
- AUDIO SETUP
- USB/SD OPERATION
- Troubleshooting
- Picture defects and the reason
Brand : Naxa
Model : NTD-2460
Category : Television