
TR4000i - Exercise bike LifeSpan - Free user manual and instructions
Find the device manual for free TR4000i LifeSpan in PDF.


| Product Type | Folding Treadmill (Home Use) |
| Model | TR4000i |
| Brand | LifeSpan |
| Motor | 3.25 HP Continuous Duty DC Motor |
| Speed Range | 0.5 - 12 mph (0.8 - 19 km/h) |
| Incline Range | 0 - 15 levels |
| Running Surface | 20" x 60" (50.8 x 152.4 cm) |
| Roller Size | 2.5" (64 mm) tapered |
| Deck | 1" Phenolic with 8 Bumper Suspension |
| Maximum User Weight | 350 lbs (158 kg) |
| Product Dimensions (L x W x H) | 75" x 34" x 54" (190.5 x 86.4 x 137.2 cm) |
| Folded Dimensions | Not specified (folding design reduces storage footprint) |
| Net Weight | Approximately 250 lbs (113 kg) - estimated |
| Power Requirements | 115V NEMA 5-15, 15A dedicated circuit, non-GFI |
| Console Display | Multi-Color LCD (15 rows x 20 columns) with Intelli-Key |
| Programs | Manual, 17 Preset, 2 User, 2 Heart Rate Control (Constant & Interval) |
| Heart Rate Monitoring | Grip Pulse sensors and wireless receiver (chest strap included) |
| Audio | Audio center with in/out jacks and integrated speakers |
| USB Port | Yes, for Interactive Health Partner data sync |
| Safety Features | Safety key lanyard, Intelli-Guard auto-pause, emergency stop button |
| Warranty (Residential USA/Canada) | Frame & Motor: Lifetime; Parts: 5 years; Labor: 1 year |
| Maintenance | Lubricate belt every 3 months or 50 hours; clean motor compartment every 150 hours |
Frequently Asked Questions - TR4000i LifeSpan
User questions about TR4000i LifeSpan
0 question about this device. Answer the ones you know or ask your own.
Ask a new question about this device
Download the instructions for your Exercise bike in PDF format for free! Find your manual TR4000i - LifeSpan and take your electronic device back in hand. On this page are published all the documents necessary for the use of your device. TR4000i by LifeSpan.
USER MANUAL TR4000i LifeSpan
Congratulations in taking a step forward to increase your level of physical activity or add variety to your current exercise program. Physical activity is now more than ever a necessity to keep your body healthy and fit. Whether your motivation is to Lose Weight, manage a Chronic Disease like diabetes, train for a sporting event or just live a Healthy Lifestyle, LifeSpan products can help you achieve your health and fitness goals.
In this manual we have included exercise information that is specific to each of these 4 key motivations for exercise. We also invite you to the LifeSpan Fitness website at www.LifeSpanfitness.com where we include additional information and tools to help you maintain your exercise program and achieve your health and fitness goals.
The LifeSpan Home series of cardio equipment is designed for the more than 60% of consumers who say they prefer to exercise in the comfort and privacy of their own homes. Each Home series product is designed and manufactured to exceed your expectations for quality and durability, simple assembly and ease of operation.
Please read this manual thoroughly before assembly and operation of your new LifeSpan equipment. It includes information on proper operation, safety precautions, product assembly and ongoing maintenance.
Remember that some types of service should only be performed by a qualified service technician. In the instance that service is required, please contact your authorized LifeSpan retailer or log on to our website and select the Customer Support option. Complete the information requested and we will respond to your inquiry within 1 business day.
U.S. and Canada International
PO Box 981316
Park City, Utah 84098-1316
Phone: 801.973.9993
Fax: 801.973.9923
www.lifespanfitness.com
Contact your local distributor
Neither LifeSpan Fitness nor its representatives can accept responsibility for any damages or injury incurred as a result of information presented in this manual except under the terms of the product warranty.
Table of Contents
- Welcome 3
- Specifications 5
• Limited Home Use Warranty 6
• Important Safety Precautions 7
• Grounding and Power Requirements 8
• Starting an Exercise Program 9
• Assembly Instructions 10
- Console Overview 16
• Treadmill Operations 19
• Innovative Features 22
• Program Overview 23
• Belt Lubrication and Treadmill Maintenance 31
• Belt Tensioning and Alignment 32
- Moving and Storage 33
- Troubleshooting 35
• Engineering Mode 36
- Serial Number Information 40
Specifications
Folding Treadmill
| TR3000i | TR4000i | |
| ConsoleReadouts | Program Name, Date and Time, Workout Time, Calories, Step Count Distance, Heart Rate, Speed, Incline | Program Name, Date and Time, Workout Time, Calories, Step Count Distance, Heart Rate, Speed, Incline |
| DisplayProgram Matrix | Multi-Color LCD15 Rows by 20 Columns | Multi-Color LCD15 Rows by 20 Columns |
| Programs | Manual, Preset (17), User Set-up (2), Heart Rate Control (2) | Manual, Preset (17), User Set-up (2), Heart Rate Control (2) |
| Program Buttons | 5 Program Group Buttons for Heart Rate Control, Healthy Living, Sports Training, Weight Loss and User Set-up Programs | 5 Program Group Buttons for Heart Rate Control, Healthy Living, Sports Training, Weight Loss and User Set-up Programs |
| Audio | Audio Center with in / out jacks and integrated speakers | Audio Center with in / out jacks and integrated speakers |
| Heart Rate | Grip Pulse with Receiver (chest strap not included) | Grip Pulse and Receiver (chest strap included) |
| Mechanics and PerformanceSpeed Range (mph/kph)Incline Levels | 0.5 - 12/0.8 - 190 - 15 | 0.5 - 12/0.8 - 190 - 15 |
| Running Belt Size (in/mm)Roller Size (in/mm)Deck (in/cm) | 20 x 56/50.8 x 142.22.5/64 tapered1/2.5 Phenolic Deck with 8 Bumper Suspension | 20 x 60/50.8 x 152.42.5/64 tapered1/2.5 Phenolic Deck with 8 Bumper Suspension |
| Drive Motor | 2.75 HP Continuous Duty DC Motor | 3.25 HP Continuous Duty DC Motor |
| Lift Motor (lbs/kgs)Max. User Weight (lbs/kgs)Dimensions (in/cm) | 800/362 Max Lift Rating350/15871/180.3 L x 34/86.4 W x 54/137.2 H | 800/362 Max Lift Rating350/15875/190.5 L x 34/86.4 W x 54/137.2 H |
| Residential WarrantyU.S. and CanadaFrameMotorPartsLabor | LifetimeLifetime5 Years1 Year | LifetimeLifetime5 Years1 Year |
Limited Home Use Warranty (U.S. and Canada)
The LifeSpan TR3000i and TR4000i Folding Treadmills come with the following limited warranty, which applies only for the use of the Treadmill in the home, for residential, non-commercial purposes.
| Frame: | Lifetime |
| Motor: | Lifetime |
| Parts: | 5 Years |
| Labor: | 1 Year |
LifeSpan Fitness warrants that the equipment it manufactures is free from defects in material workmanship under normal use and service. The periods above are based on the date of purchase. During these periods, LifeSpan Fitness will repair or replace any defective part. Free labor is included for the first year on all parts that are not normally assembled or replaced by the customer. The customer may be responsible to pay for the Service Technician's travel time where travel in excess of 20 miles (32 km) is required.
If within the time frames specified above, any part fails to operate properly, log on to our web site at www.lifespanfitness.com, click on Customer Support and complete the form to request assistance, or call 877-654-3837 x4 for a customer support agent.
LifeSpan Fitness reserves the right to make changes and improvements to our products without incurring any obligations to similarly alter any product purchased. In order to insure our product warranty and to ensure the safe and efficient operation of your LifeSpan product, only authorized parts can be used. The warranty is void if any parts other than those provided by LifeSpan Fitness are used.
Exclusions and Limitations:
- This warranty does not apply to any defects caused by negligence, misuse, improper assembly or maintenance, accident, or an "act of god".
- This warranty does not apply to discoloration of paint or plastics.
• LifeSpan Fitness shall not be responsible for incidental or consequential damages. - This warranty is nontransferable from the original owner.
Registration
You must register your LifeSpan product before a warranty claim can be processed. To complete your registration online go to www.lifespanfitness.com and click on Register Products, or fill out the warranty card provided and mail it today. Registration cards must be received by LifeSpan within 30 days of purchase to activate the Product Warranty. Product Warranties are not valid unless the registration is properly completed and received within 30 days.
Important Safety Precations
When using exercise equipment, basic precautions should always be followed, including:
- Never drop or insert any object into any opening. If an object falls into an opening, turn the power off and unplug the power cord from the outlet. Remove the object or call customer service.
- Never operate this treadmill if it has been damaged or even partially submersed in water.
- To reduce the risk of electric shock, unplug the treadmill from the wall outlet when not in use, before performing any maintenance, or before moving the treadmill.
- Do not use outdoors or in areas of high humidity or extreme temperature changes.
- Do not lean against or climb on the treadmill.
- Wear shoes with high traction rubber soles. Do not wear shoes with heals, leather soles, cleats or spikes.
- Do not operate where aerosol spray products are being used or where oxygen is being administered.
- Never place the power cord under carpeting or place any object on top of the cord, this may pinch or damage the cord causing fire damage or personal injury.
- Use this exercise product for its intended use as described in this Owner's Manual. Do not use attachments that are not recommended by LifeSpan Fitness.
- Do not leave your treadmill running while not in use.
- Keep the treadmill on a solid surface, with the side rails and front a minimum of two feet (0.61m) from any walls or furniture. Make sure that the area behind the treadmill remains completely clear during use. A minimum of 4 feet (1.2m) of clearance is required for safety reasons.
Children and Pets
- Keep children off your treadmill at all times.
- When in use children and pets should be kept at least 10 feet (3m) away.
Other Safety Tips
• Always consult a physician before beginning this or any exercise program.
- If you experience chest pains, nausea, dizziness or shortness of breath, stop exercising immediately and consult your physician before continuing.
- Do not wear clothing or jewelry that might catch on any part of the treadmill.
- This treadmill is equipped with a safety key. Always clip the cord that is attached to the safety key to a part of your clothing so the key will be pulled, stopping the treadmill, in case of an emergency.
- "Warning! Heart rate monitoring may be inaccurate. Over exercising may result in serious injury or death. If you feel faint stop exercising immediately".
Note: Read all instructions and save for future use.

Grounding and Power Requirements
LifeSpan Fitness equipment must be grounded. Improper connection of the equipment's grounding conductor can result in the risk of electric shock. Check with a qualified electrician or service person if you are in doubt as to whether the outlet is properly grounded. Do not modify the plug provided with the product or use a ground plug adaptor to adapt to a non-grounded outlet. If the plug will not fit in the outlet, have the proper outlet installed by a qualified electrician.
An extension cord should not be used between the equipment and the wall outlet.
The unit should not be plugged into a GFI plug or on a GFI circuit. The unit may not work or trip the GFI circuit.
This product should only be run on the proper power designed for this unit. To locate the proper power outlet for your area please refer to FIG. 2. (example for the US and Canada, these units require a 115V NEMA 5-15 non GFI circuit.)

FIG. 1

FIG. 2
Starting an Exercise Program
Starting an exercise program can sound like a daunting task, but just remember that your main goal is to boost your health by meeting the basic physical activity recommendations.
Before you begin an exercise program or substantially increase your level of activity, be sure to consult your primary care physician. In preparation for a visit you may also want to take the PAR-Q Assessment. This Physical Activity Readiness Questionnaire (PAR-Q) will help you determine your suitability for beginning an exercise program and prepare you for discussing your physical activity program with your physician.
- Has your doctor ever said that you have a heart condition or that you should participate in physical activity only as recommended by a doctor?
- Do you feel pain in your chest during physical activity?
- In the past month, have you had chest pain when you were not doing physical activity?
- Do you lose your balance because of dizziness?
- Do you ever lose consciousness?
- Do you have a bone or joint problem that could be made worse by a change in your physical activity?
- Is your doctor currently prescribing drugs for your blood pressure or a heart condition?
- Do you know of any reason you should not participate in physical activity?
If you answered yes to one or more of the questions, if you are over 40 years of age and have been inactive, or if you are concerned about your health, consult a physician before beginning an exercise program or substantially increasing your physical activity. If you answered no to each question, then it's likely you can begin an exercise program.
Pre-Exercise Resting Heart Rate Check
Before beginning your exercise program it is recommended that you check your resting heart rate. Your resting heart rate should be taken in a seated, relaxed position. Find your resting pulse and begin your count with "zero" on the first heart beat. Continue counting each time you feel your pulse until you have counted for a full 30 seconds. Next, double the number that you counted for 30 seconds and you now have your pre-exercise resting heart rate. Remember this number as we also recommend taking a post-exercise resting heart rate after you have completed your exercise program and you will want to remember your pre-exercise heart rate so you can compare the two heart rate measurements.
LifeSpan
Assembly
At LifeSpan we strive to make our equipment easy to assemble and start using. Parts that can be pre-assembled are always assembled and tested on the production line.
Since your treadmill is a heavy piece of equipment it is recommended that you use two people during assembly and follow these assembly instructions to reduce any problems that could occur.

| Item# | description |
| 1 | Main Frame |
| 2 | Left handlebar support |
| 3 | Right handlebar support |
| 4 | Handlebar |
| 5 | Console |
| 6 | Accessory Tray |
| 7 | Back cover |
| 8 | Plate console housing frame mount |
| 9 | Left handrail |
| 10 Right handrail cover-outer | |
| 11 | Left handrail |
| 12 Right handrail cover-inner | |
| 13 | Base cover-Left |
| 14 | Base cover-Right |
| 15 Safety bar cover | |
| 25 | Console housing |
cover-out
cover-inner

Step 1: Unpacking Treadmill
A. Cut packaging straps and remove.
B. Remove the box top.
C. Remove small parts and packaging material and unwrap parts.
D. Cut corners of the bottom box and remove all packaging material to begin assembly. The treadmill can be assembled in the box. No need to pick the treadmill up to remove it from box.
Step 2: Handlebar Support Post Assembly
A. Remove the screw (A) and nut (E) that are pre-assembled on the frame from each side of the base using the 6 mm Allen wrench and 17 mm open end wrench provided in your tool kit. These two screws will prevent the handlebars from rotating up into their upright position.
Note: Make sure the wire harness coming from the front of the frame to the base of the right handlebar support will not be pinched when pivoting the right handlebar support up into position.
B. Stand the support posts and handlebars up into their operating position and re-attach the screws (A) and nuts (E) removed in step 2A. Tighten securely.

natural_image
Line drawing of a treadmill with an arrow indicating motion or change (no text or symbols present)
C. Attach the left (13) and right (14) base covers using a Phillips screwdriver and 2 machine screws (G) on each side. The 4 base cover attaching screws are located in the hardware bag.
Step 3: Handlebar Assembly
A. Rotate the handlebars down so they are positioned on top of the handlebar posts. Secure the right and left handlebars to the support post using the 2 M8 x70L screws (B) provided in the hardware bag. If it is difficult to start the bolt at this time, look to make sure there are no wires obstructing the bolt hole. Also, lightly pulling the handlebar one way or the other will help line up the bolt holes.
Note: Make sure that the wires on both sides are not pinched in-between the handlebars and the handlebar post.
B. Rotate the console bracket (8) up in the back until it reaches its normal operating position.
C. Place the left outside handlebar cover (9) next to the inside handlebar cover (pre-attached). Position the (pre-attached) blue rubber ring (X) to fit between these handlebar covers allowing the plastic ridge to sit in the groove of the blue rubber ring. Secure these three parts together using the self-tapping screws (C), which are pre-installed in the outer cover. Repeat this process on the other side with the right outside handlebar cover (10).

Step 4: Assemble Console Components
A. Attach the blue accessory trays (6) to the bottom of the console housing using 8 self tapping screws (G). Preinstalled in console housing (25).
B. Attach the console (5) to the console housing (25) using 6 screws (G). These screws are pre-installed on the back of the console and need to be removed first and then reinstalled with the console in place.

Step 5: Attach Console Assembly
A. Place the console assembly onto the console housing frame mount (8) and attach the assembly using the 7 screws (F), preinstalled in console housing (25). Be sure not to pinch wire harnesses during this step.
B. Connect all wire harnesses including:
i. Main Harness: 5-pin and 7-pin
ii. Hand Pulse harness: 2-pin (color doesn't matter.)
iii. Speed Control Harness: 3-pin (the wire colors need to be matched.)
iv. Incline Control Harness: 3-pin (the wire colors need to be matched)
C. Tuck extra wiring harness into the opening behind the console.

Note: Be careful to properly connect all wiring connectors with their correct corresponding wiring harness. Pay attention not to bend any pins and make sure the connectors click in place.
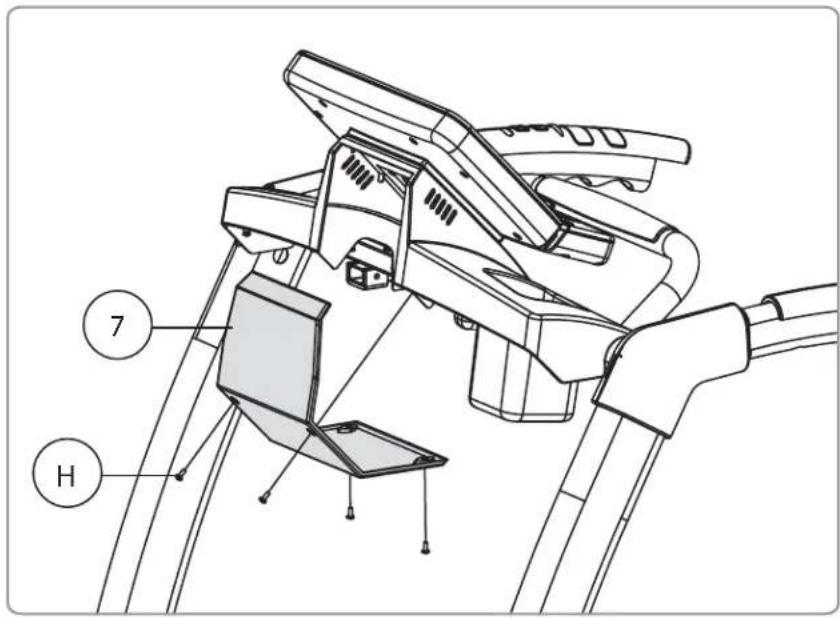
Step 6: Attach the Back Cover Plate
A. Align the back console cover plate (7) over the back of the console housing and attach using the 4 screws (H), pre-installed in the console housing frame mount. Note: Be sure to align the tabs at the top of the back cover plate so the plate fits flush to the back of the console housing.
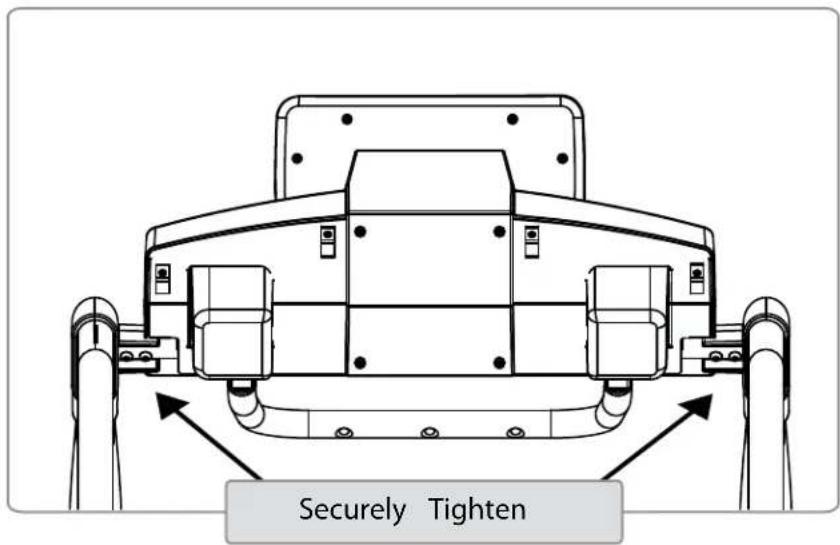
Step 7: Lock Console Angle
A. Using the 5 mm Allen wrench tighten the 2 Allen head bolts located at each end of the console support tube as shown in the figure below.
Step 8: Cut red tie strap and roll out of box
See Moving and Storage on page 32
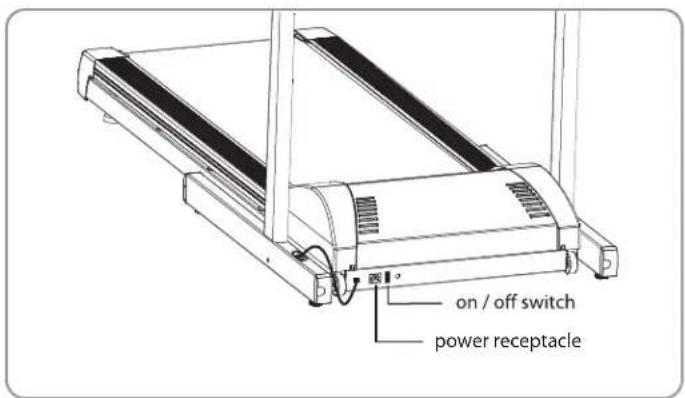
Step 9: Plug the power cord in and turn the treadmill on

Step 8
Step 9
Step 10: Install safety key
Step 11: Set date and time
To set the date and time of day on your console follow these steps:
- Remove the safety key and re-install
- Press any of the quick speed buttons for 3 seconds to initiate the date and time set up mode.
- Press the UP / DOWN buttons to set the correct YEAR, Press Enter
- Press the UP / DOWN buttons to select the correct MONTH, Press Enter
- Press the UP / DOWN buttons to select the correct DAY, Press Enter
- Press the UP / DOWN buttons to set the HOUR, Press Enter
- Press the UP / DOWN buttons to set the MINUTES, Press Enter
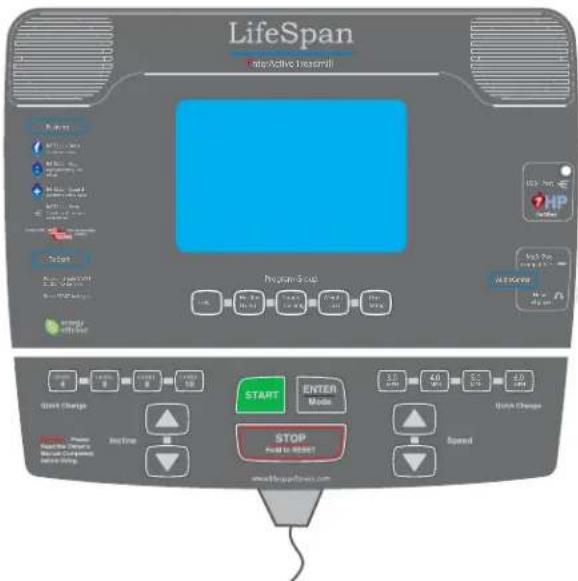
safety key
Display Console
The TR3000i and TR4000i come with our innovative Intelli-Key feature. This feature uses flashing LED's to prompt the user on which button(s) to press next. These consoles also come with an energy saving feature. After ten minutes of no activity the console will go into energy saving mode. At this time all lights, except a dimly lit LED at the START button, will turn off.
Console Buttons
Start: If all lights except the START button LED's are off, press and hold this button for two seconds to turn on the console. Pressing this button in standby mode starts the treadmill belt.
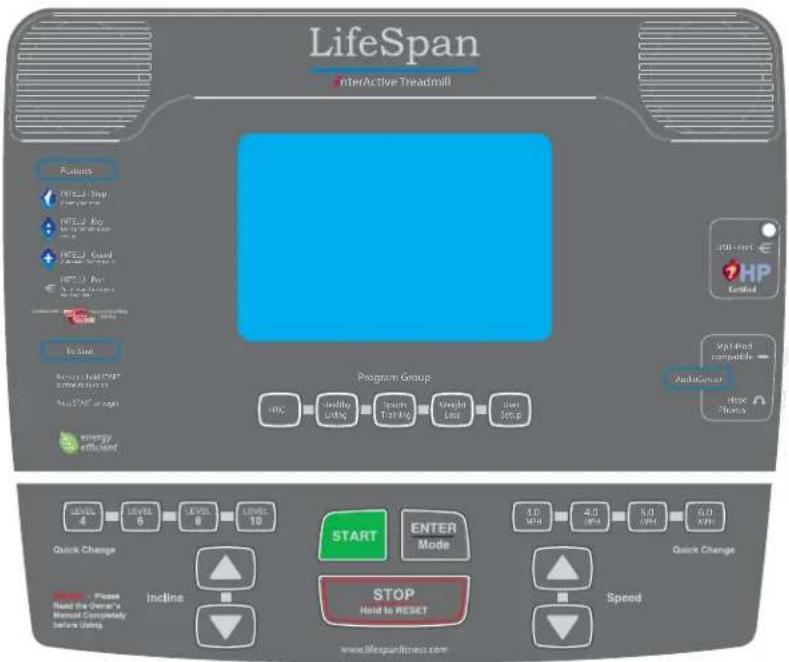
Stop: If you need to temporarily stop your workout, press the STOP button to PAUSE. To RESTART the workout, press the START button. After 5 minutes of no activity the console will reset. To reset the console, press the STOP button for 3 seconds. This will clear any current workout data.
Enter: The ENTER button is used to Select each piece of information needed during program setup including Program, Workout Level, Workout Time, and Your Weight (which is used to more accurately calculate calories burned).
Arrows and Handlebar Control Buttons: The up and down buttons for speed and incline are used to modify the value of each selection during the program set up process and to adjust the speed or incline during use. If you are using a preset program you can use these buttons to adjust the profile of the program, making the program easier or more difficult to complete. For instance, in an incline program, your can raise the incline level across the entire program by pressing the incline up button.
Program Buttons: The TR3000i and TR4000i both have Program Group buttons. These are designed to help you easily add variety to your exercise program while staying consistent with your exercise goals. To quickly select a specific program that matches your workout objective use one of the program buttons. These 5 buttons group the programs into Heart Rate Training, Healthy Living, Sports Training, Weight Loss and Custom User Programs. Depending on which button you select, there are multiple programs in each. To look at the next program within each group just press the Program Group button again to scroll to the next option.
Quick Select Buttons: The TR3000i and TR4000i come with 4 quick select buttons for speed and 4 quick select buttons for incline. These buttons allow you to quickly jump directly to the desired speed or incline rather than requiring that you scroll to get to the value.
Display Console Overview
Folding Treadmill
TR3000i / TR4000i

Alpha Numeric Window: The TR3000i and TR4000i come with a 16 character alpha window that is used to show the program name and other pertinent information during setup mode.
Workout Feedback: The TR3000i and TR4000i display window will simultaneously display the following workout information:
Time: The workout time elapsed or the workout time remaining
Incline: The level of belt incline ranging from 0-15
Speed: The speed you are traveling in Miles Per Hour (this reading can be changed to Kilometers by using the Engineering Mode)
Calories: Estimated calories burned since the beginning of the workout
Distance: Total distance traveled in miles or kilometers since the beginning of the workout
Step Count: If you participate in a daily or weekly step program you can use the Step Count window to follow the number of steps that you have taken in your workout Remember that 10,000 steps per day is recommended by the Centers for Disease Control (CDC)
Pulse: Your measured heart rate using the hand pulse sensors located on the handlebars
Misc. Display Information: The TR3000i and TR4000i will also show the following information This information will be used by the treadmill as part of the USB feature to save your workout information on the date and time of your workout.
Date: The date is presented as the year / month / day below the program matrix Time: The time of day is shown in the bottom center window when the console is not in use.
Name/Sex/Height/Weight/Age: Used with your Interactive Health Partner Account. When you insert a USB storage device, that has been synced with your online account, the console will read your name, sex, height, weight, and age. Your name will appear in the alpha display at the top and your gender, height, weight and age will appear below the program matrix.
Reading Your Heart Rate

natural_image
Line drawing of a treadmill with a control panel and articulated arms (no text or symbols)Contact Heart Rate Sensors are built into the handlebargrips of the TR3000i and TR4000i to monitor your heart rate during exercise. To use, grasp the sensors with a comfortable grip, with the palms of your hands placed over the sensors. If the sensors are having difficulty picking up your heart rate you may consider using aloe or a moisturizer on your hands or you can warm up as you exercise to increase the moisture in your hands. Dry hands do not transfer your pulse as effectively as moist hands.
Do not squeeze tightly as this can cause your blood pressure to rise. It will take a few seconds for the console to calculate your heart rate accurately.
In addition to the contact heart rate sensors, both the TR3000i and TR4000i have a built-in receiver for the use of a wireless chest strap. The TR4000i includes a chest strap. To purchase a chest strap for the TR3000i go to www.lifespanfitness.com
Note: The heart rate monitoring system will vary due to the users method of use, physiology, age and other factors. LifeSpan does not guarantee the accuracy of the heart rate readings for all users.
Remember that to use the My Zone Heart Rate Control Programs you will need to use a chest strap or keep your hands on the sensors.
Operating Your Treadmill
Setting the Date and Time:
To set the date and time of day in your console follow these steps:
- Press any of the quick speed buttons for 3 seconds to initiate the date and time set up mode.
- Press the UP / DOWN buttons to set the correct YEAR. Press Enter
- Press the UP / DOWN buttons to select the correct MONTH. Press Enter
- Press the UP / DOWN buttons to select the correct DAY. Press ENTER
- Press the UP / DOWN buttons to set the HOUR. Press ENTER
- Press the UP / DOWN buttons to set the MINUTES. Press ENTER
Starting in Manual Mode
The quickest way to get started is to press the START button. Pressing the START button will select the Manual program and the TIME will start counting up from 00:00. You can also press ENTER to select the Manual program. Using the ENTER button will allow you to set a specific workout TIME, and set your WEIGHT for more accurate calorie calculation.
Starting a Preset Program
- Select Program - Use the Program buttons to select your desired Exercise Program. Each program button has multiple programs that you can scroll through. Each time you press the program button you will move to the next program option. Once you find the desired program press enter.
- Select Program Mode - with each program selection you can choose to run the program in the Incline Mode or the Speed Mode. Use the UP / DOWN arrows to make the selection then Press Enter.
- Set Program Level - There are 3 levels of intensity with each preset program (1 being the easiest and 3 being the most difficult). Use the UP / Down arrows to make the selection then Press Enter.
- Set Time - Set the program TIME of your workout using the UP / DOWN arrow keys. Press Enter.
- Set Weight - Set your WEIGHT in the console for more accurate calorie calculation using the UP / DOWN arrow keys. Press Enter
- Press the START button to begin your workout.
Custom User Set-up Programs
User programs need to be set-up before they can be used. To set up a user program:
- Select USER1 or USER2 Programs - Use the UP / DOWN arrow keys to select the USER1 or USER2 programs. Press Enter.
- Set Time - Set the program TIME of your workout using the UP / DOWN arrow keys. Press Enter.
- Set Weight - Set your WEIGHT in the console for more accurate calorie calculation using the UP / DOWN arrow keys. Press Enter
- Set Level - Select the level for each segment in the exercise program. Press Enter and repeat until all 20 segments are complete.
- START – press the START button.
Once the program has been set up, simply scroll to the USER1 or USER2 program and press START.
Operating Your Treadmill (continued)
Using Heart Rate Control Programs
The constant Heart Rate Control program requires that you set a heart rate that the display console will maintain throughout the workout and the Interval requires that you set a LOW and a HIGH heart rate. While using the HRC programs you will be required to hold the pulse grips or wear a chest strap for the duration of the workout.
HRC - Constant:
- Select HRC Constant - Use the UP / DOWN arrow keys to select the HRC Constant program. Press the Enter button to select.
- Select Program Mode - select either the Incline Control Mode or the Speed Control Mode using the UP / DOWN arrow keys. Press Enter.
- Set Time - Set the program TIME using the UP / DOWN arrow keys. Press Enter. Remember that the program will include 3 minutes of warm up
- Set Weight – enter your weight using the UP / Down arrow keys. Press Enter
- Set Age- enter your age using the UP / DOWN arrow keys. Press Enter
- Set Target Heart Rate - set your target heart rate using the UP / DOWN arrow keys. Press Enter
- Press the START button to begin your workout.
HRC - Interval:
- Select HRC Interval - Use the UP / DOWN arrow keys to select the HRC Interval program. Press the Enter button to select.
- Select Program Mode - select either the Incline Control Mode or the Speed Control Mode using the UP / DOWN arrow keys. Press Enter.
- Set Time - Set the program TIME using the UP / DOWN arrow keys. Press Enter. Remember that the program will include 3 minutes of warm up
- Set Weight – enter your weight using the UP / Down arrow keys. Press Enter
- Set Age- enter your age using the UP / DOWN arrow keys. Press Enter
- Set HIGH Target Heart Rate - Set your HIGH Interval training rate using the UP / DOWN arrow keys. Press Enter.
- Set LOW Target Heart Rate - Set your LOW Interval training rate using the UP / DOWN arrow keys. Press Enter.
- Press the START button to begin your workout.
Operations
While exercising you can change the Speed and Incline Level by pressing the UP / DOWN buttons. To pause your exercise program press the START button and to reset your program, press the STOP button for 3 seconds.
Custom User Set-up Programs
There are two user programs that provide you with the ability to establish customized program profiles specific to your workout requirements. For each user set-up program, first set the workout time then set weight then the speed and incline for each segment in the program profile by pressing either the up and down arrows for speed and incline or using the quick select buttons. After obtaining your desired selection press enter to move to the next column in the program profile. This program will now be saved for you each time you select it and press the "start" button.
My Zone Heart Rate Control Programs
The TR3000i and TR4000i comes with two types of heart rate control programs- Constant and Interval and within each of these you can select either a "Speed" control option or an "Incline" control option.
There is a 3 minute warm up for this program prior to the treadmill taking control of the speed or incline.
Note: To use the Heart Rate Control programs the treadmill needs to receive your heart rate throughout the entire workout either through using the grip pulse pads or a chest strap heart rate transmitter.
Constant Heart Rate Control: The "Constant" program lets you select a single heart rate that you want to maintain throughout your workout and the treadmill will maintain this heart rate for you by either adjusting the speed or the incline. After selecting the Constant Heart Rate program the next selection option will be Incline Mode or Speed Mode. Select which mode you prefer and the treadmill will adjust the speed or incline every 10 seconds to keep you at your selected heart rate level. For instance, if you select the incline mode there will be a 3 minute warm up and then the incline will start to adjust each 10 seconds obtain and maintain your target heart rate. You choose the speed that you want the belt to run and the treadmill will control the incline.
Typically for Weight Loss set the target heart rate at 65% of your predicted maximum heart rate and for Cardio Training set the target at 80% of your predicted maximum.
http://www.lifespanfitness.com/article\_weight\_calc2.asp
Interval Heart Rate Control: The "Interval" program is designed to help you increase your aerobic endurance and improve heart rate recovery. This program lets you select a LOW or recovery target heart rate and a HIGH target. After a 3 minute warm-up the console will adjust the speed or incline, which ever you select, every 10 seconds to maintain your LOW target to 2 minutes. Then the console will adjust the speed or incline to raise your heart rate to the HIGH target that you selected and once again keep it at this level for 2 minutes and then repeat the process until the end of the workout. It is recommended that you set the workout time to 20 minutes or higher to use this program effectively.
Innovative Features
Intelli-Guard: This treadmill is equipped with the Intelli-Guard safety feature. This feature senses when you stop walking on the treadmill and for safety purposes it automatically pauses the treadmill to avoid accidental falls and resulting injury. The Intelli-Guard feature is triggered when the treadmill senses that you are no longer walking or running on the treadmill.
Caution: The Intelli-Guard feature will automatically be disengaged when the treadmill is operated at speeds under 1.5 mph or at an incline level over 5.
If the speed or incline is within these parameters the step icon will flash.
When the icon flashes, the treadmill will not auto-pause
Caution: At 20 seconds the console will beep once per second for 5 seconds and then automatically pause the treadmill. These beeps are a notice that the treadmill belt is about to stop. If for some reason you are still on the treadmill when this occurs move your feet to the side rails and prepare for the belt to stop. The Intelli-Guard feature does not replace the use of your saftey key or using proper precaution in stopping the treadmill when it is not in use.
Intelli-Step: The treadmill comes with the Intelli-Step counting feature. This feature senses the resistance on the running belt each time your foot strikes. There are several factors that will effect the accuracy of this feature including your walking style, your weight, and your usage characteristics. For example, the Intelli-Step feature will have a more difficult time picking up the steps of a light user and especially a light user walking at an incline. The higher the incline the more difficult it is for the feature to recognize steps. This may also be the case at lower speeds. In summary, the Intelli-Step is a great feature for users interested in maintaining a step count walking or running program, but it is dependant on many variables for accuracy and the accuracy of the count will depend on your individual characteristics as well as variables related to the treadmills usage.
UBS Port: The TR3000i and TR4000i include a USB port that works with the Interactive Health Partner online health management system. Simply insert your USB flash drive into the console, after loading your profile from the IHP system onto the flash drive. The USB will read your personal information and then save your workout data every 20 seconds onto the flash drive. Information saved includes your heart rate, workout start and finish time, distance travelled, calories burned and steps taken. This information can then be uploaded into your account, summarized over time and used to compare your results with the goals you
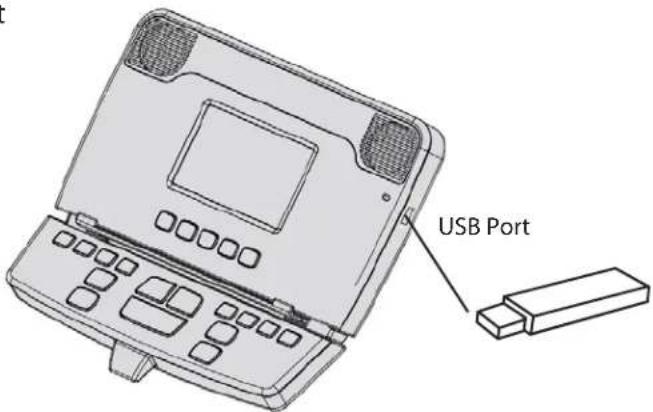
set in your personal IHP account. Prior to using your USB, make sure you refer to the "Getting Started Guide" and "Success Guide" found in your membership kit, located in your owner's manual packet.
Energy Saving Mode: The energy saving mode cuts all power to the treadmill with the exception of one dimly lit LED at the Start button. This will cut power consumption to well under 0.1 watts.
Don't remove the USB flash drive while the LED light is flashing red - you may lose your workout information
Program Overview
Folding Treadmill
The advance console used on the TR3000i and TR4000i includes programs grouped into each of the following 5 areas: Sports Training, Healthy Living, Weight Management, Heart Rate Control and User Defined Programs. For each of these program groups you can choose to run this program as a Speed Control program or an Incline Control program. After selecting the program, if you select Speed Control then the speed will change throughout the workout following the profile of that specific program. If you choose Incline after selecting the program, the incline will change throughout the workout following the profile of that specific program. This is true for all program types except for the Custom User Programs which allow you to preselect both the Speed and Incline of the program.
Sports Training
Long Slow Distance: (40 minute default)
Long Slow Distance is a great workout for everyone! Beginners can ease into their

bar
| Category | Value | |---|---| | 1 | 1 | | 2 | 1 | | 3 | 2 | | 4 | 2 | | 5 | 3 | | 6 | 3 | | 7 | 3 | | 8 | 3 | | 9 | 3 | | 10 | 3 | | 11 | 3 | | 12 | 3 | | 13 | 3 | | 14 | 3 | | 15 | 3 | | 16 | 3 | | 17 | 2 | | 18 | 1 | | 19 | 1 |exercise program with this workout, being sure to do this workout at least a minimum of once a week to maximize overall cardiovascular endurance development. Long Slow Distance workouts are also great for experienced exercisers to do on days following a harder, higher intensity workout.
Incline
| 1 | 2 | 3 | 4 | 5 | 6 | 7 | 8 | 9 | 10 | 11 | 12 | 13 | 14 | 15 | 16 | 17 | 18 | 19 | 20 | |
| L1 | 1 | 1 | 2 | 2 | 4 | 4 | 4 | 4 | 4 | 4 | 4 | 4 | 4 | 4 | 4 | 4 | 2 | 2 | 1 | 1 |
| L2 | 1 | 1 | 3 | 3 | 5 | 5 | 5 | 5 | 5 | 5 | 5 | 5 | 5 | 5 | 5 | 5 | 3 | 3 | 1 | 1 |
| L3 | 1 | 1 | 4 | 4 | 6 | 6 | 6 | 6 | 6 | 6 | 6 | 6 | 6 | 6 | 6 | 6 | 4 | 4 | 1 | 1 |
Speed
| 1 | 2 | 3 | 4 | 5 | 6 | 7 | 8 | 9 | 10 | 11 | 12 | 13 | 14 | 15 | 16 | 17 | 18 | 19 | 20 | ||
| L1 | 1 | 1 | 2 | 2 | 3 | 3 | 3 | 3 | 3 | 3 | 3 | 3 | 3 | 3 | 3 | 2 | 2 | 1 | 1 | ||
| L2 | 2 | 2 | 3 | 3 | 4.5 | 4.5 | 4.5 | 4.5 | 4.5 | 4.5 | 4.5 | 4.5 | 4.5 | 4.5 | 4.5 | 4.5 | 3 | 3 | 2 | 2 | |
| L3 | 3 | 3 | 3.5 | 3.5 | 5 | 5 | 5 | 5 | 5 | 5 | 5 | 5 | 5 | 5 | 5 | 5 | 3.5 | 3.5 | 3 | 3 |
Short Interval: (20 minute default)
Short Intervals are ideal for beginning exercisers that want to start gaining the benefits of interval workouts but aren't quite

ready for a harder and longer intensity interval workout. Short Intervals are also ideal for experienced exercisers to develop their speed and anaerobic fitness. Short Interval workouts are fun to do after you have had a few days exercising for a longer duration at a slower pace. Remember, it is important to vary your exercise intensity and exercise durations to maximize your overall fitness development so be sure to include some interval workouts in your exercise program at least once or twice a week.
Incline
| 1 | 2 | 3 | 4 | 5 | 6 | 7 | 8 | 9 | 10 | 11 | 12 | 13 | 14 | 15 | 16 | 17 | 18 | 19 | 20 | |
| L 1 | 1 | 1 | 2 | 2 | 4 | 2 | 4 | 2 | 4 | 2 | 4 | 2 | 4 | 2 | 4 | 2 | 4 | 2 | 1 | 1 |
| L 2 | 2 | 2 | 3 | 3 | 5 | 3 | 5 | 3 | 5 | 3 | 5 | 3 | 5 | 3 | 5 | 3 | 5 | 3 | 2 | 2 |
| L 3 | 2 | 2 | 3 | 3 | 6 | 3 | 6 | 3 | 6 | 3 | 6 | 3 | 6 | 3 | 6 | 3 | 6 | 3 | 2 | 2 |
Speed
| 1 | 2 | 3 | 4 | 5 | 6 | 7 | 8 | 9 | 10 | 11 | 12 | 13 | 14 | 15 | 16 | 17 | 18 | 19 | 20 | |
| L1 | 1 | 1 | 2 | 2 | 3 | 2 | 3 | 2 | 3 | 2 | 3 | 2 | 3 | 2 | 3 | 2 | 3 | 2 | 1 | 1 |
| L2 | 2 | 2 | 3 | 3 | 4.5 | 2 | 4.5 | 2 | 4.5 | 2 | 4.5 | 2 | 4.5 | 2 | 4.5 | 2 | 4.5 | 3 | 2 | 2 |
| L3 | 3 | 3 | 4 | 4 | 5 | 3 | 5 | 3 | 5 | 3 | 5 | 3 | 5 | 3 | 5 | 3 | 5 | 4 | 3 | 3 |
Program Overview
Moderate Interval: (30 minute default)
As you begin to exercise on a regular basis and feel your fitness improving you will be ready to begin doing "Moderate Intensity

bar
| Category | Value | |---|---| | 1 | 10 | | 2 | 10 | | 3 | 15 | | 4 | 15 | | 5 | 20 | | 6 | 10 | | 7 | 20 | | 8 | 10 | | 9 | 20 | | 10 | 10 | | 11 | 20 | | 12 | 10 | | 13 | 20 | | 14 | 10 | | 15 | 20 | | 16 | 10 | | 17 | 20 | | 18 | 10 |Interval" workouts. You should begin with an intensity that is easy and then progress to an exercise intensity that is challenging but not too difficult. Remember in this workout you alternate between an easy recovery interval followed by a higher intensity interval. You should feel comfortable to push yourself as you do this workout as you are never too far away from an easier recovery interval. This workout will improve your overall aerobic endurance while also maximizing your anaerobic fitness development.
Incline
| 1 | 2 | 3 | 4 | 5 | 6 | 7 | 8 | 9 | 10 | 11 | 12 | 13 | 14 | 15 | 16 | 17 | 18 | 19 | 20 |
| L1 | 1 | 1 | 2 | 2 | 3 | 2 | 3 | 2 | 3 | 2 | 3 | 2 | 3 | 2 | 3 | 2 | 3 | 2 | 1 |
| L2 | 3 | 3 | 4 | 4 | 5 | 3 | 5 | 3 | 5 | 3 | 5 | 3 | 5 | 3 | 5 | 5 | |||
| L3 | 3 | 3 | 4 | 4 | 6 | 4 | 6 | 4 | 6 | 4 | 6 | 4 | 6 | 4 | 4 | 6 | 5 | 4 | 4 |
4
Speed
| 1 | 2 | 3 | 4 | 5 | 6 | 7 | 8 | 9 | 10 | 11 | 12 | 13 | 14 | 15 | 16 | 17 | 18 | ||
| L1 | 2 | 2 | 3 | 3 | 3.5 | 2 | 3.5 | 2 | 3.5 | 2 | 3.5 | 4.5 | 3 | 4.5 | 3 | 4.5 | 3.5 | 3 | 2 |
| L2 | 3 | 3 | 3.7 | 3.7 | 4.5 | 3 | 4.5 | 3 | 4.5 | 3 | 4.5 | 3 | 4.5 | 3 | 4.5 | 3 | 3.7 | 3.7 | 3 |
| L3 | 3.7 | 3.7 | 5 | 5 | 6 | 4.5 | 6 | 4.5 | 6 | 4.5 | 6 | 4.5 | 6 | 4.5 | 6 | 4.5 | 6 | 5 | 3.7 |
19
20
Long Interval: (40 minute default)
Long Interval workouts are great to maximize calorie burn and improve your anaerobic fitness, your ability to exercise

bar
| Item | Value | |---|---| | 1 | 1 | | 2 | 1 | | 3 | 2 | | 4 | 3 | | 5 | 4 | | 6 | 1 | | 7 | 3 | | 8 | 2 | | 9 | 3 | | 10 | 1 | | 11 | 3 | | 12 | 2 | | 13 | 4 | | 14 | 3 | | 15 | 1 |harder, at a higher intensity level. As in the Moderate Interval workouts, remember you have a recovery period after each higher intensity interval so you can comfortably push yourself to exercise at a progressively higher level.
Incline
| 1 | 2 | 3 | 4 | 5 | 6 | 7 | 8 | 9 | 10 | 11 | 12 | 13 | 14 | 15 | 16 | 17 | 18 | 19 | 20 | |
| L1 | 1 | 1 | 2 | 2 | 3 | 3 | 1 | 3 | 3 | 1 | 3 | 3 | 1 | 3 | 3 | 1 | 3 | 3 | 2 | 1 |
| L2 | 2 | 2 | 3 | 3 | 4 | 4 | 2 | 4 | 4 | 2 | 4 | 4 | 2 | 4 | 4 | 2 | 4 | 4 | 3 | 2 |
| L3 | 3 | 3 | 4 | 4 | 5 | 5 | 2 | 5 | 5 | 2 | 5 | 5 | 2 | 5 | 5 | 2 | 5 | 5 | 4 | 3 |
Speed
| 1 | 2 | 3 | 4 | 5 | 6 | 7 | 8 | 9 | 10 | 11 | 12 | 13 | 14 | 15 | 16 | 17 | 18 | 19 | 20 | |
| L1 | 1 | 1 | 2 | 2 | 3 | 3 | 2 | 2 | 3 | 3 | 2 | 2 | 3 | 3 | 2 | 2 | 3 | 3 | 2 | 1 |
| L2 | 2 | 2 | 3 | 3 | 4.5 | 4.5 | 2 | 2 | 4.5 | 4.5 | 2 | 2 | 4.5 | 4.5 | 2 | 2 | 3 | 3 | 2 | 2 |
| L3 | 3 | 3 | 4 | 4 | 5 | 5 | 3 | 3 | 5 | 5 | 3 | 3 | 5 | 5 | 3 | 3 | 4 | 4 | 3 | 3 |
Program Overview
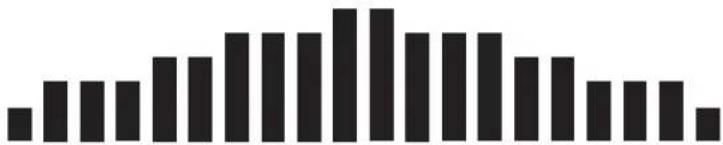
Negative Interval-1: (30 minute default)
The Negative Interval 1 workout will provide you with all the benefits of the steady pace workout but push you to slowly obtain a
bar
| Category | Value | |---|---| | 1 | 0.6 | | 2 | 0.9 | | 3 | 0.9 | | 4 | 0.9 | | 5 | 1.2 | | 6 | 1.3 | | 7 | 1.4 | | 8 | 1.5 | | 9 | 1.6 | | 10 | 1.7 | | 11 | 1.8 | | 12 | 1.9 | | 13 | 1.8 | | 14 | 1.7 | | 15 | 1.6 | | 16 | 1.5 | | 17 | 1.4 | | 18 | 1.3 |progressively higher steady state exercise intensity and then allow you to slowly decrease the exercise intensity. As you improve your overall health and fitness you can slowly and of course always comfortably push yourself to a higher peak in your overall exercise intensity in this workout.
Incline
| 1 | 2 | 3 | 4 | 5 | 6 | 7 | 8 | 9 | 10 | 11 | 12 | 13 | 14 | 15 | 16 | 17 | 18 | 19 | ||
| L1 | 2 | 3 | 3 | 4 | 4 | 4 | 5 | 5 | 5 | 6 | 6 | 5 | 5 | 5 | 4 | 4 | 4 | 3 | 3 | 2 |
| L2 | 1 | 2 | 2 | 2 | 3 | 3 | 4 | 4 | 4 | 5 | 5 | 4 | 4 | 4 | 3 | 3 | 2 | 2 | 2 | 1 |
| L3 | 1 | 1 | 1 | 2 | 2 | 2 | 3 | 3 | 3 | 4 | 4 | 3 | 3 | 3 | 2 | 2 | 2 | 1 | 1 | 1 |
20
Speed
| 1 | 2 | 3 | 4 | 5 | 6 | 7 | 8 | 9 | 10 | 11 | 12 | 13 | 14 | 15 | 16 | 17 | 18 |
| L1 | 1 | 1 | 1.5 | 2 | 2 | 2 | 5 | 3 | 3 | 3.5 | 4 | 4 | 3.5 | 3 | 3 | 2.5 | |
| L2 | 2 | 2 | 2.5 | 3 | 3 | 3.5 | 4 | 4 | 4.5 | 5 | 5 | 4.5 | 4 | 4 | 3.5 | 3 | 2.5 |
| L3 | 3 | 3 | 3.5 | 3.7 | 3.7 | 4.5 | 5 | 5 | 5.5 | 6 | 6 | 5.5 | 5 | 5 | 4.5 | 3.7 | 3.5 |
19 20
1.5 1
1
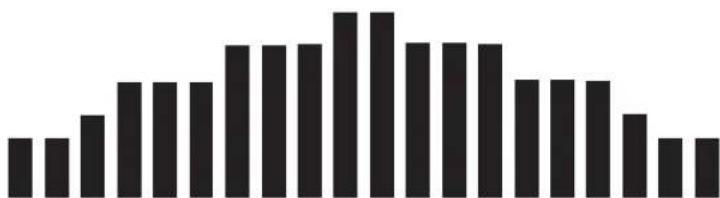
Negative Interval-2: (30 minute default)
The Negative Interval 2 workout has been designed to provide your body with a workout
bar
| Category | Value | |---|---| | 1 | 2 | | 2 | 2 | | 3 | 3 | | 4 | 5 | | 5 | 5 | | 6 | 5 | | 7 | 8 | | 8 | 9 | | 9 | 10 | | 10 | 10 | | 11 | 10 | | 12 | 8 | | 13 | 8 | | 14 | 7 | | 15 | 7 | | 16 | 6 | | 17 | 5 | | 18 | 4 | | 19 | 4 | | 20 | 4 |that begins with a slight increase in exercise intensity, then continues the workout at a set intensity, and ends with a progressive decrease in exercise intensity. A workout with an increase and decrease in exercise intensity at the beginning and end of the workout will most ideally develop your overall aerobic cardiovascular endurance. A workout that decreases in intensity is also ideal for maximizing calorie burn, but most ideally when done for a longer duration, such as 40 or 50 minutes.
Incline
| 1 | 2 | 3 | 4 | 5 | 6 | 7 | 8 | 9 | 10 | 11 | 12 | 13 | 14 | 15 | 16 | 17 | 18 | 19 | 20 | |
| L1 | 2 | 2 | 2 | 3 | 3 | 3 | 4 | 4 | 4 | 5 | 5 | 4 | 4 | 4 | 3 | 3 | 3 | 2 | 2 | 2 |
| L2 | 2 | 2 | 3 | 4 | 4 | 4 | 5 | 5 | 5 | 6 | 6 | 5 | 5 | 5 | 4 | 4 | 4 | 3 | 2 | 2 |
| L3 | 3 | 3 | 4 | 5 | 5 | 5 | 6 | 6 | 6 | 7 | 7 | 6 | 6 | 6 | 5 | 5 | 5 | 4 | 3 | 3 |
Speed
| 1 | 2 | 3 | 4 | 5 | 6 | 7 | 8 | 9 | 10 | 11 | 12 | 13 | 14 | 15 | 16 | 17 | 18 | 19 | 20 | |
| L1 | 1 | 1.5 | 2 | 2 | 2.5 | 3 | 3 | 3 | 3.5 | 4 | 4 | 4 | 3.5 | 3 | 3 | 2.5 | 2 | 2 | 1.5 | 1 |
| L2 | 2 | 2.5 | 3 | 3 | 3.5 | 4.5 | 4.5 | 4.5 | 4.7 | 5 | 5 | 5 | 4.7 | 4.5 | 4.5 | 3.5 | 3 | 3 | 2.5 | 2 |
| L3 | 3 | 3.5 | 4.5 | 4.5 | 4.7 | 5 | 5 | 5 | 5.5 | 6 | 6 | 6 | 5.5 | 5 | 5 | 4.7 | 4.5 | 4.5 | 3.5 | 3 |
Program Overview
Fartlek: (30 minute default)
Varying your exercise intensity with a constantly changing interval workout that starts out at an easy pace and then increases to a moderate or higher intensity pace will add some great variety into your workouts, make your workouts go by faster than you ever imagined while providing your body and mind with great fitness benefits. Constantly varying intensities in a workout have been found in brain research to have great benefits on improving overall brain fitness. Increasing your exercise intensity at constantly changing intervals and then dropping that intensity to just a slightly lower level, and then returning to the higher level has great anaerobic cardiovascular fitness development on the body.

bar
| Category | Value | |---|---| | 1 | 2 | | 2 | 4 | | 3 | 6 | | 4 | 10 | | 5 | 8 | | 6 | 12 | | 7 | 9 | | 8 | 10 | | 9 | 5 | | 10 | 6 | | 11 | 2 | | 12 | 12 | | 13 | 7 | | 14 | 5 | | 15 | 8 | | 16 | 12 | | 17 | 10 | | 18 | 6 | | 19 | 5 | | 20 | 4 |Incline
| 1 | 2 | 3 | 4 | 5 | 6 | 7 | 8 | 9 | 10 | 11 | 12 | 13 | 14 | 15 | 16 | 17 | 18 | 19 | 20 |
| L1 | 1 | 2 | 3 | 4 | 2 | 3 | 4 | 4 | 2 | 1 | 3 | 1 | 4 | 3 | 2 | 1 | |||
| L2 | 1 | 2 | 3 | 6 | 4 | 6 | 5 | 5 | 2 | 3 | 1 | 6 | 3 | 2 | 3 | 6 | |||
| L3 | 2 | 4 | 2 | 6 | 3 | 6 | 4 | 4 | 5 | 2 | 6 | 3 | 6 | 2 | 6 | 2 |
Speed
| 1 | 2 | 3 | 4 | 5 | 6 | 7 | 8 | 9 | 10 | 11 | 12 | 13 | 14 | 15 | 16 | 17 | 18 | 19 | 20 |
| L1 | 1 | 1.5 | 2.5 | 2.7 | 2.5 | 3 | 2.7 | 4.5 | 2.5 | 1.5 | 3 | 1.5 | 4.5 | 3.5 | 2.7 | 1.5 | 3 | 2.5 | 1.5 |
| L2 | 1 | 2.5 | 3.5 | 5 | 2.5 | 5 | 2.2 | 2 | 3 | 4.5 | 5 | 5 | 3.5 | 2 | 4 | 4.5 | 5 | 3.5 | 3 |
| L3 | 2 | 2 | 2.5 | 4 | 7 | 4 | 4.5 | 6 | 4.5 | 6 | 5.5 | 6 | 4.5 | 4.7 | 4 | 3.5 | 3 | 3.5 | 5 |
Healthy Living
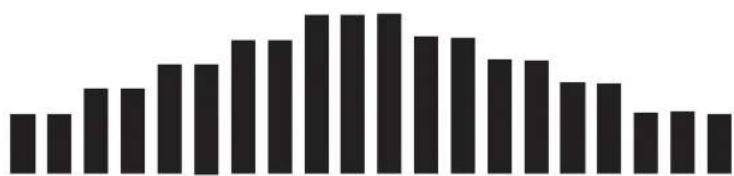
Uphill Climb : (30 minute default)
Gradually increase the intensity of your exercise with this fun Uphill Climb workout. The goal of the Uphill Climb workout is to stimulate your body to improve your overall cardiovascular fitness, while also maximizing muscle cell development in working muscles.
bar
| Category | Value | |---|---| | 1 | 2 | | 2 | 2 | | 3 | 4 | | 4 | 4 | | 5 | 6 | | 6 | 6 | | 7 | 8 | | 8 | 8 | | 9 | 10 | | 10 | 10 | | 11 | 10 | | 12 | 8 | | 13 | 8 | | 14 | 6 | | 15 | 6 | | 16 | 4 | | 17 | 4 | | 18 | 4 | | 19 | 4 |The LifeSpan Uphill Climb workout has been designed to start out very slow and gradually increase to a peak intensity then gradually decrease intensity back down. You will maximize calorie burn during the peak levels of this workout while allowing your body to exercise longer and still benefit from the higher intensity as you slow down towards the end and return to your starting level.
Incline
| 1 | 2 | 3 | 4 | 5 | 6 | 7 | 8 | 9 | 10 | 11 | 12 | 13 | 14 | 15 | 16 | 17 | 18 | 19 | 20 | |
| L1 | 1 | 1 | 2 | 2 | 3 | 3 | 4 | 4 | 5 | 5 | 5 | 5 | 4 | 4 | 3 | 3 | 2 | |||
| L2 | 2 | 2 | 3 | 3 | 4 | 4 | 5 | 5 | 6 | 6 | 6 | 6 | 5 | 5 | 4 | 4 | 3 | |||
| L3 | 1 | 3 | 4 | 4 | 5 | 5 | 6 | 6 | 7 | 7 | 7 | 7 | 6 | 6 | 5 | 5 | 4 |
Speed
| 1 | 2 | 3 | 4 | 5 | 6 | 7 | 8 | 9 | 10 | 11 | 12 | 13 | 14 | 15 | 16 | 17 | 18 | 19 | 20 | |
| L1 | 1 | 1.5 | 2 | 2.5 | 3 | 3.5 | 4 | 4.5 | 5 | 5 | 5 | 4.5 | 4 | 3.5 | 3 | 2.5 | 2 | 1.5 | 1 | 1 |
| L2 | 2 | 2.5 | 3 | 3.5 | 4 | 4.5 | 5 | 5.5 | 6 | 6 | 6 | 5.5 | 5 | 4.5 | 4 | 3.5 | 3 | 2.5 | 2 | 2 |
| L3 | 3 | 3.5 | 4 | 4.5 | 5 | 5.5 | 6 | 6 | 6.5 | 6.5 | 6.5 | 6 | 6 | 5.5 | 5 | 4.5 | 4 | 3.5 | 3 | 2 |
Program Overview
Pyramid Climb: (30 minute default)
Gradual increases in intensity during your workouts are ideal to stimulate your body to improve overall cardiovascular fitness, while also maximizing muscle cell development in working muscles. The Pyramid Climb workout has been designed to start out at a very slow, comfortable pace and gradually increase to a peak intensity then gradually decrease in intensity back down to your starting level. You will maximize overall calorie burn during the peak intensity levels of this workout while allowing your body to exercise for a longer duration and still benefit from the higher intensity workout as you gradually slow down in this workout and return to your starting level.

bar
| Category | Value | |---|---| | 1 | 0.6 | | 2 | 0.7 | | 3 | 0.7 | | 4 | 0.9 | | 5 | 0.9 | | 6 | 0.9 | | 7 | 1.1 | | 8 | 1.2 | | 9 | 1.2 | | 10 | 1.1 | | 11 | 0.9 | | 12 | 0.9 | | 13 | 0.9 | | 14 | 0.8 | | 15 | 0.7 | | 16 | 0.6 | | 17 | 0.6 | | 18 | 0.5 |Incline
| 1 | 2 | 3 | 4 | 5 | 6 | 7 | 8 | 9 | 10 | 11 | 12 | 13 | 14 | 15 | 16 | 17 | 18 | 19 | 20 |
| L1 | 1 | 1 | 1 | 2 | 2 | 2 | 3 | 3 | 3 | 4 | 4 | 4 | 3 | 3 | 3 | 2 | 2 | ||
| L2 | 2 | 2 | 2 | 3 | 3 | 3 | 4 | 4 | 4 | 5 | 5 | 5 | 4 | 4 | 4 | 3 | 3 | ||
| L3 | 3 | 3 | 3 | 4 | 4 | 4 | 5 | 5 | 5 | 6 | 6 | 6 | 5 | 5 | 5 | 4 | 4 |
Speed
| 1 | 2 | 3 | 4 | 5 | 6 | 7 | 8 | 9 | 10 | 11 | 12 | 13 | 14 | 15 | 16 | 17 | 18 | 19 | 20 |
| L1 | 1 | 1 | 1.5 | 2 | 2 | 2.5 | 3 | 3 | 3.5 | 4 | 4 | 4 | 3.5 | 3 | 3 | 2.5 | 2 | 2 | 1.5 |
| L2 | 2 | 2 | 2.5 | 3 | 3 | 3.5 | 4 | 4 | 4.5 | 5 | 5 | 5 | 4.5 | 4 | 4 | 3.5 | 3 | 3 | 2.5 |
| L3 | 2 | 3 | 3.5 | 4 | 4 | 4.5 | 5 | 5 | 5.5 | 6 | 6 | 6 | 5.5 | 5 | 5 | 4.5 | 4 | 4 | 3.5 |
Plateau Climb: (40 minute default)
A Plateau Climb workout will provide you with all the benefits of the other steady state workouts, but push you to maintain a higher steady state intensity exercise level. As you improve your overall health and fitness you can slowly and of course always comfortably push yourself to higher overall exercise intensity for longer periods of time. Remember, if you simply get on your treadmill and go at the same pace, for the same amount of time every day when you workout, your body will only improve to the level of the workouts you are currently pushing yourself to do. In order to improve your overall health and fitness, you need to always "change" your workouts so you don't do the same workout within one week, while at the same time slowly increase your overall exercise intensity while also increasing your overall exercise time.

bar
| Category | Value | |---|---| | 1 | 2 | | 2 | 3 | | 3 | 5 | | 4 | 7 | | 5 | 9 | | 6 | 8 | | 7 | 8 | | 8 | 8 | | 9 | 8 | | 10 | 8 | | 11 | 8 | | 12 | 8 | | 13 | 8 | | 14 | 8 | | 15 | 8 | | 16 | 7 | | 17 | 5 | | 18 | 3 | | 19 | 2 | | 20 | 2 |Incline
| 1 | 2 | 3 | 4 | 5 | 6 | 7 | 8 | 9 | 10 | 11 | 12 | 13 | 14 | 15 | 16 | 17 | 18 | 19 | 20 | |
| L1 | 1 | 1 | 2 | 3 | 3 | 3 | 3 | 3 | 3 | 3 | 3 | 3 | 3 | 3 | 3 | 3 | 3 | 2 | 1 | 1 |
| L2 | 1 | 1 | 2 | 3 | 4 | 4 | 4 | 4 | 4 | 4 | 4 | 4 | 4 | 4 | 4 | 4 | 3 | 2 | 1 | 1 |
| L3 | 2 | 2 | 3 | 4 | 5 | 5 | 5 | 5 | 5 | 5 | 5 | 5 | 5 | 5 | 4 | 3 | 2 | 2 | 1 | 1 |
Speed
| 1 | 2 | 3 | 4 | 5 | 6 | 7 | 8 | 9 | 10 | 11 | 12 | 13 | 14 | 15 | 16 | 17 | 18 | 19 | 20 | |
| L1 | 1 | 1.5 | 2 | 2.5 | 2.5 | 2.5 | 2.5 | 2.5 | 2.5 | 2.5 | 2.5 | 2.5 | 2.5 | 2.5 | 2.5 | 2.5 | 2.5 | 2 | 1.5 | 1 |
| L2 | 1.5 | 1.5 | 2 | 2.5 | 3.5 | 3.5 | 3.5 | 3.5 | 3.5 | 3.5 | 3.5 | 3.5 | 3.5 | 3.5 | 3.5 | 3.5 | 2.5 | 2 | 1.5 | 1.5 |
| L3 | 2 | 2 | 3 | 4 | 5 | 5 | 5 | 5 | 5 | 5 | 5 | 5 | 5 | 5 | 5 | 5 | 4 | 3 | 2 | 2 |
Program Overview
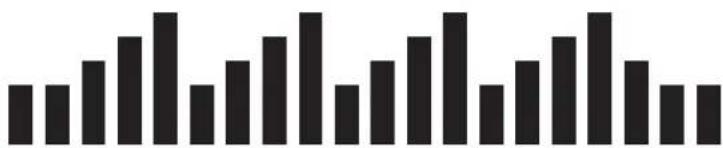
Ladder : (30 minute default)
One of the greatest benefits of exercise are the direct benefits exercise has on the heart and cardiovascular system.
bar
| Category | Value | |---|---| | 1 | 10 | | 2 | 10 | | 3 | 15 | | 4 | 20 | | 5 | 25 | | 6 | 10 | | 7 | 15 | | 8 | 20 | | 9 | 25 | | 10 | 10 | | 11 | 15 | | 12 | 20 | | 13 | 25 | | 14 | 10 | | 15 | 15 | | 16 | 20 | | 17 | 25 | | 18 | 10 | | 19 | 15 | | 20 | 20 |The Heart Health Ladder has been specifically designed to provide your heart and cardiovascular system with a series of progressively harder exercise intensity's that will improve your overall aerobic endurance, while also stimulating your anaerobic endurance. Remember as you go through this workout that it may be challenging for a few minutes, but each progression has been carefully timed to also provide recovery intervals after the highest intensity interval, so you can feel good as you exercise and comfortably push yourself to improve your cardiovascular fitness.
Incline
| 1 | 2 | 3 | 4 | 5 | 6 | 7 | 8 | 9 | 10 | 11 | 12 | 13 | 14 | 15 | 16 | 17 | 18 | 19 | 20 |
| L1 | 1 | 1 | 2 | 3 | 4 | 2 | 3 | 4 | 2 | 3 | 4 | 2 | 3 | 4 | 2 | ||||
| L2 | 2 | 2 | 3 | 4 | 5 | 3 | 4 | 5 | 3 | 4 | 5 | 3 | 4 | 5 | 3 | ||||
| L3 | 2 | 3 | 4 | 5 | 6 | 4 | 5 | 6 | 4 | 5 | 6 | 4 | 5 | 6 | 4 |
Speed
| 1 | 2 | 3 | 4 | 5 | 6 | 7 | 8 | 9 | 10 | 11 | 12 | 13 | 14 | 15 | 16 | 17 | 18 | 19 | 20 | |
| L1 | 1 | 1.5 | 2 | 3 | 4 | 2.5 | 3 | 4 | 2.5 | 3 | 4 | 2.5 | 3 | 4 | 2.5 | 3 | 4 | 3.5 | 2 | 1 |
| L2 | 2 | 2.5 | 3 | 3.5 | 5 | 3.5 | 4 | 5 | 3.5 | 4 | 5 | 3.5 | 4 | 5 | 3.5 | 3 | 2 | |||
| L3 | 2 | 3 | 4 | 5 | 6 | 4 | 5 | 6 | 4 | 5 | 6 | 4 | 5 | 6 | 5 | 4 | 3 |
Uphill Interval: (20 minute default)
Uphill interval workouts are unique in that they provide your body with the benefits of an interval workout, with the added benefit of

bar
| Category | Value | |---|---| | 1 | 10 | | 2 | 15 | | 3 | 12 | | 4 | 18 | | 5 | 14 | | 6 | 16 | | 7 | 13 | | 8 | 17 | | 9 | 11 | | 10 | 19 | | 11 | 10 | | 12 | 14 | | 13 | 15 | | 14 | 12 | | 15 | 16 | | 16 | 13 | | 17 | 17 | | 18 | 10 | | 19 | 15 | | 20 | 14 |gradually increasing the overall intensity of the maximum level intervals throughout the workout. In this workout you should begin at a level that is comfortable, and then you will gradually increase the intensity during each maximum interval, pushing yourself to a slightly higher intensity each time knowing that you have a recovery interval as soon as you complete the maximum intensity interval. During this workout you will also maximize overall calorie burn during each of your higher intensity intervals, while at the same time working on improving your overall anaerobic fitness.
Incline
| 1 | 2 | 3 | 4 | 5 | 6 | 7 | 8 | 9 | 10 | 11 | 12 | 13 | 14 | 15 | 16 | 17 | 18 | 19 | 20 | |
| L1 | 1 | 1 | 2 | 3 | 2 | 3 | 2 | 3 | 2 | 3 | 2 | 3 | 2 | 3 | 2 | 3 | 2 | 3 | 2 | 1 |
| L2 | 2 | 2 | 4 | 2 | 4 | 2 | 4 | 2 | 4 | 2 | 4 | 2 | 4 | 2 | 4 | 2 | 4 | 2 | 2 | 2 |
| L3 | 2 | 3 | 5 | 3 | 5 | 3 | 5 | 3 | 5 | 3 | 5 | 3 | 5 | 3 | 5 | 3 | 5 | 3 | 3 | 2 |
Speed
| 1 | 2 | 3 | 4 | 5 | 6 | 7 | 8 | 9 | 10 | 11 | 12 | 13 | 14 | 15 | 16 | 17 | 18 | 19 | 20 | |
| L1 | 1 | 2 | 3 | 2 | 3 | 2 | 3 | 2 | 3 | 2 | 3 | 2 | 3 | 2 | 3 | 2 | 3 | 2 | 2 | 1 |
| L2 | 2 | 2 | 4.5 | 2 | 4.5 | 2 | 4.5 | 2 | 4.5 | 2 | 4.5 | 2 | 4.5 | 2 | 4.5 | 2 | 4.5 | 2 | 2 | 2 |
| L3 | 2 | 3 | 5 | 3 | 5 | 3 | 5 | 3 | 5 | 3 | 5 | 3 | 5 | 3 | 5 | 3 | 5 | 3 | 3 | 3 |
Folding Treadmill
Steady Pace: (40 minute default)
Improve your fitness while also stimulating your body to burn more fat with this workout.

natural_image
Abstract black vertical bars on white background (no text or symbols)Steady Pace workouts are great for helping you establish an improved overall endurance base.
Most "Steady Pace" workouts focus on maintaining one set workload level throughout the entire workout. As you begin the Steady Pace workout your intensity level will start out at a very slow pace, then increase to a moderate pace for the duration of your workout. Your goal is to be sure you are exercising within a low moderate intensity to a high moderate intensity during the workout.
| Incline | 1 | 2 | 3 | 4 | 5 | 6 | 7 | 8 | 9 | 10 | 11 | 12 | 13 | 14 | 15 | 16 | 17 | 18 | 19 | 20 |
| L1 | 1 | 2 | 3 | 3 | 3 | 3 | 3 | 3 | 3 | 3 | 3 | 3 | 3 | 3 | ||||||
| L2 | 2 | 2 | 4 | 4 | 4 | 4 | 4 | 4 | 4 | 4 | 4 | 4 | 4 | 4 | ||||||
| L3 | 2 | 3 | 5 | 5 | 5 | 5 | 5 | 5 | 5 | 5 | 5 | 5 | 5 | 5 | 5 | 5 | 3 | 2 |
| Speed | 1 | 2 | 3 | 4 | 5 | 6 | 7 | 8 | 9 | 10 | 11 | 12 | 13 | 14 | 15 | 16 | 17 | 18 | 19 | 20 |
| L1 | 2 | 2.5 | 3 | 3 | 3 | 3 | 3 | 3 | 3 | 3 | 3 | 3 | 3 | 3 | 3 | 3 | 2 | 5 | 2 | |
| L2 | 3 | 3.5 | 4.5 | 4.5 | 4.5 | 4.5 | 4.5 | 4.5 | 4.5 | 4.5 | 4.5 | 4.5 | 4.5 | 4.5 | 4.5 | 4.5 | 3.5 | 3 | ||
| L3 | 2 | 3.5 | 5 | 5 | 5 | 5 | 5 | 5 | 5 | 5 | 5 | 5 | 5 | 5 | 5 | 5 | 3.5 | 2 |
Long Slow Distance: (40 minute default)
Long Slow Distance is a great workout for everyone! Beginners can ease into their

natural_image
Abstract pattern of black vertical bars on white background (no text or symbols)exercise program with this workout, being sure to do this workout at least a minimum of once a week to maximize cardiovascular endurance development. This is also great for experienced exercisers to do on days following a harder, higher intensity workout.
| Incline | 1 | 2 | 3 | 4 | 5 | 6 | 7 | 8 | 9 | 10 | 11 | 12 | 13 | 14 | 15 | 16 | 17 | 18 | 19 | 20 |
| L1 | 1 | 1 | 2 | 2 | 2 | 2 | 2 | 2 | 2 | 2 | 2 | 2 | 2 | 2 | 2 | |||||
| L2 | 2 | 2 | 3 | 3 | 3 | 3 | 3 | 3 | 3 | 3 | 3 | 3 | 3 | 3 | 3 | |||||
| L3 | 2 | 3 | 4 | 4 | 4 | 4 | 4 | 4 | 4 | 4 | 4 | 4 | 4 | 4 | 4 |
| Speed | 1 | 2 | 3 | 4 | 5 | 6 | 7 | 8 | 9 | 10 | 11 | 12 | 13 | 14 | 15 | 16 | 17 | 18 | 19 | 20 | ||
| L1 | 1 | 1 | 2.5 | 2.5 | 2.5 | 2.5 | 2.5 | 2.5 | 2.5 | 2.5 | 2.5 | 2.5 | 2.5 | 2.5 | 2.5 | 2.5 | 2.5 | 2.5 | 1 | 1 | ||
| L2 | 2 | 2 | 3.5 | 3.5 | 3.5 | 3.5 | 3.5 | 3.5 | 3.5 | 3.5 | 3.5 | 3.5 | 3.5 | 3.5 | 3.5 | 3.5 | 3.5 | 3.5 | 2 | 2 | ||
| L3 | 2 | 3 | 4.5 | 4.5 | 4.5 | 4.5 | 4.5 | 4.5 | 4.5 | 4.5 | 4.5 | 4.5 | 4.5 | 4.5 | 4.5 | 4.5 | 4.5 | 4.5 | 3 | 2 | ||
Cardio Run: (20 minute default)
Cardio Run is a steady pace workout but at a higher intensity than the "Long Slow Distance" workout. Cardio Run is a more intermediate or advanced workout,

natural_image
Abstract black vertical bars on white background (no text or symbols)designed to motivate you to achieve a more challenging steady pace and maintain that pace for the full duration of the workout. Cardio Run is a great workout if you are training for a special event.
| Incline | 1 | 2 | 3 | 4 | 5 | 6 | 7 | 8 | 9 | 10 | 11 | 12 | 13 | 14 | 15 | 16 | 17 | 18 | 19 | 20 | |
| L1 | 1 | 1 | 3 | 3 | 3 | 3 | 3 | 3 | 3 | 3 | 3 | 3 | 3 | 3 | 3 | 3 | 3 | 3 | 1 | 1 | |
| L2 | 2 | 2 | 5 | 5 | 5 | 5 | 5 | 5 | 5 | 5 | 5 | 5 | 5 | 5 | 5 | 5 | 5 | 5 | 2 | 2 | |
| L3 | 3 | 4 | 6 | 6 | 6 | 6 | 6 | 6 | 6 | 6 | 6 | 6 | 6 | 6 | 6 | 6 | 6 | 6 | 4 | 3 |
| Speed | 1 | 2 | 3 | 4 | 5 | 6 | 7 | 8 | 9 | 10 | 11 | 12 | 13 | 14 | 15 | 16 | 17 | 18 | 19 | 20 | |
| L1 | 1 | 1.5 | 3.5 | 3.5 | 3.5 | 3.5 | 3.5 | 3.5 | 3.5 | 3.5 | 3.5 | 3.5 | 3.5 | 3.5 | 3.5 | 3.5 | 3.5 | 3.5 | 2.5 | 1.5 | |
| L2 | 2 | 2.5 | 4.5 | 4.5 | 4.5 | 4.5 | 4.5 | 4.5 | 4.5 | 4.5 | 4.5 | 4.5 | 4.5 | 4.5 | 4.5 | 4.5 | 4.5 | 4.5 | 3.5 | 2.5 | |
| L3 | 3 | 4.5 | 5.5 | 5.5 | 5.5 | 5.5 | 5.5 | 5.5 | 5.5 | 5.5 | 5.5 | 5.5 | 5.5 | 5.5 | 5.5 | 5.5 | 5.5 | 3.5 | 2.5 | 1.5 |
Short Interval: (20 minute default)
Short Interval workouts have been found in research studies to be ideal for those striving to increase their weight loss, and improve

bar
| Category | Value | |---|---| | 1 | 2 | | 2 | 4 | | 3 | 6 | | 4 | 8 | | 5 | 4 | | 6 | 7 | | 7 | 5 | | 8 | 9 | | 9 | 4 | | 10 | 8 | | 11 | 5 | | 12 | 9 | | 13 | 4 | | 14 | 8 | | 15 | 5 | | 16 | 9 | | 17 | 4 | | 18 | 8 | | 19 | 5 |their overall cardiovascular fitness. Varying your exercise intensity during a workout from a moderately slow level to a high intensity for a set period of time and repeating that progression for a complete workout will maximize the total number of calories burned during a workout. A second benefit is the individual will not be forced to maintain a high intensity exercise level throughout the entire workout. The short interval recovery periods allows the body to more successfully exercise at a higher intensity than might otherwise be comfortable for the individual for a complete workout duration.
Incline
| 1 | 2 | 3 | 4 | 5 | 6 | 7 | 8 | 9 | 10 | 11 | 12 | 13 | 14 | 15 | 16 | 17 | 18 | 19 | 20 |
| L1 | 1 | 2 | 3 | 4 | 2 | 4 | 2 | 4 | 2 | 4 | 2 | 4 | 2 | 4 | 2 | 4 | 2 | ||
| L2 | 2 | 3 | 4 | 5 | 3 | 5 | 3 | 5 | 3 | 5 | 3 | 5 | 3 | 5 | 3 | 5 | 3 | ||
| L3 | 2 | 3 | 5 | 6 | 4 | 6 | 4 | 6 | 4 | 6 | 4 | 6 | 4 | 6 | 4 | 6 | 4 |
Speed
| 1 | 2 | 3 | 4 | 5 | 6 | 7 | 8 | 9 | 10 | 11 | 12 | 13 | 14 | 15 | 16 | 17 | 18 | 19 | 20 |
| L1 | 1 | 2 | 3.5 | 3 | 2.5 | 3 | 2.5 | 3 | 2.5 | 3 | 2.5 | 3 | 2.5 | 3 | 2.5 | 3 | 3.5 | 2 | |
| L2 | 2 | 3 | 4.5 | 5 | 3.5 | 5 | 3.5 | 5 | 3.5 | 5 | 3.5 | 5 | 3.5 | 5 | 3.5 | 5 | 4.5 | 3 | |
| L3 | 2 | 3 | 4.5 | 6 | 4.5 | 6 | 4.5 | 6 | 4.5 | 6 | 4.5 | 6 | 4.5 | 6 | 4.5 | 6 | 3.5 | 2 |
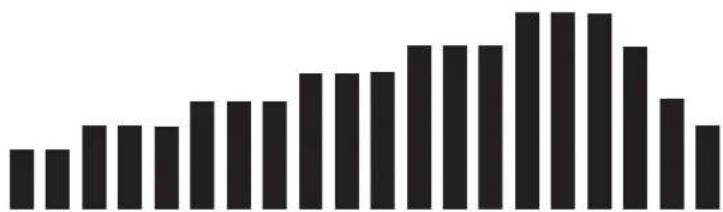
Uphill Walk: (30 minute default)
The Uphill Walk gradually increases the intensity of your exercise peaking at a high intensity. The goal of the Uphill Walk work-out is to stimulate your body to improve your overall cardiovascular fitness, while also
bar
| Category | Value | |---|---| | 1 | 2 | | 2 | 2 | | 3 | 4 | | 4 | 4 | | 5 | 4 | | 6 | 6 | | 7 | 6 | | 8 | 6 | | 9 | 8 | | 10 | 8 | | 11 | 8 | | 12 | 10 | | 13 | 10 | | 14 | 10 | | 15 | 10 | | 16 | 12 | | 17 | 12 | | 18 | 12 | | 19 | 14 | | 20 | 14 | | 21 | 14 | | 22 | 14 | | 23 | 10 | | 24 | 6 | | 25 | 4 | | 26 | 3 |maximizing muscle cell development in working muscles. The Uphill Walk workout has been designed to start out at a slow, comfortable pace and gradually increase to a peak intensity then with a quick decrease in intensity back down to a recovery level. You will maximize overall calorie burn during the peak intensity levels of this workout while allowing your body to exercise for a longer duration.
Incline
| 1 | 2 | 3 | 4 | 5 | 6 | 7 | 8 | 9 | 10 | 11 | 12 | 13 | 14 | 15 | 16 | 17 | 18 | 19 | 20 | |
| L1 | 1 | 1 | 2 | 2 | 2 | 3 | 3 | 3 | 4 | 4 | 4 | 5 | 5 | 5 | 6 | 6 | 6 | 5 | 3 | 2 |
| L2 | 2 | 2 | 3 | 3 | 3 | 4 | 4 | 4 | 5 | 5 | 5 | 6 | 6 | 6 | 7 | 7 | 7 | 6 | 4 | 3 |
| L3 | 2 | 2 | 3 | 3 | 4 | 4 | 4 | 5 | 5 | 5 | 6 | 6 | 6 | 7 | 7 | 7 | 6 | 5 | 4 | 3 |
Speed
| 1 | 2 | 3 | 4 | 5 | 6 | 7 | 8 | 9 | 10 | 11 | 12 | 13 | 14 | 15 | 16 | 17 | 18 | 19 | 20 | |
| L1 | 1 | 1 | 1.5 | 1.5 | 1.5 | 1.5 | 2 | 2 | 2 | 2.5 | 2.5 | 2.5 | 3 | 3 | 3 | 3.5 | 3.5 | 3 | 2 | 1 |
| L2 | 2 | 2 | 3.5 | 3.5 | 3.5 | 4 | 4 | 4 | 4.5 | 4.5 | 4.5 | 5 | 5 | 5 | 5.5 | 5.5 | 5.5 | 4 | 3 | 2 |
| L3 | 3 | 3 | 4 | 4 | 4 | 4.5 | 4.5 | 4.5 | 5 | 5 | 5 | 5.5 | 5.5 | 5.5 | 6 | 6 | 6 | 5 | 4 | 3 |
Belt Lubrication
Use only 100% Silicone and avoid using aerosol silicone sprays which include additives and petroleum distillates. One ounce of Silicone should be used for each application. LifeSpan offers 100% silicone lubricant that can be ordered at www.lifespanfitness.com.
The running belt should be lubricated every 3 months (regardless of use) or every 50 hours of use, whichever comes first. Even if the treadmill is not being used, silicone will dissipate over time and the belt will dry out.
Note: Even though the running belt is lubed from the manufacturer, you should lubricate the running belt when first using the treadmill in case the belt has dried some between the dates the unit was manufactured and when it was purchased.
The Silicone icon will turn on in the display every 100 hours of use and is a reminder that it is time to lubricate the running belt. As indicated above it is best to lubricate the running belt every 50 hours of use. This is a reminder for the 2nd 50 hours. The icon will be in the display for 5 minutes and then it will turn off. To turn the icon off, before the 5 minutes, you can press the SPEED DOWN and START buttons simultaneously until the icon turns off.
Apply the silicone to the underside of the treadmill belt. Do not apply to the walking surface. This may be accomplished by standing up the treadmill and applying the silicone to the inside portion of the belt. Spray the silicone down and across the belt. Rotate the belt 1/2 of the circumference and repeat. About one ounce of Silicone should be used for each application.
Note: When lubricating the belt, make sure the treadmill is located on a surface that can be easily cleaned. After lubricating your treadmill running belt, clean any excess silicone off the belt and frame.
Cleaning and Maintenance
It is recommended to wipe the treadmill down after each use to keep the treadmill clean and dry. A mild detergent may be used at times to help remove all dirt and salt from the belt, painted parts and the display.
The Maintenance icon shows up in the display every 150 hours of use. This is a reminder to clean the unit really well. This cleaning would include removing the motor cover and cleaning around the motor and electronics. It is recommended to clean the motor compartment if the treadmill is in an area where there might be a lot of pet hair or plush carpet fibers that could get pulled up into the motor compartment. It is a good idea at this time to check and tighten all assembly hardware as well.
Warning: Unplug the Power Cord Before Removing the Motor Cover.
After cleaning and checking all assembly hardware, turn the maintenance icon off, by pressing SPEED DOWN and START buttons simultaneously until the icon turns off.
LifeSpan
Belt Tensioning
If the belt begins to slip during use, it will need to be tensioned. Your treadmill is equipped with tension bolts that are accessible from the back of the treadmill. Before tensioning the belt, start the treadmill and set the speed to 3 mph (5kph). Using a 6 mm Allen Wrench, included in your hardware bag, turn the right and left tension bolts 1/2 turn clockwise.
After you adjust each side 1/2 turn, test to see if the slipping is eliminated. If the belt slips repeat this step and test again.
If you turn one side more than the other, the belt will start to drift to the side of the treadmill and will need to be aligned. DO NOT tighten more than 2 full turns on each side. If slippage still occurs, contact LifeSpan Customer Service.
Note: Over tensioning the belt can cause unnecessary friction and wear and tear on the belt, motor and electronics.
Aligning the Running Belt
Ensure the running belt is centered on your treadmill at all times. Running style and a non-level surface are two instances that may cause the belt to drift off center. Minor adjustments to the two bolts at the rear of the treadmill are necessary when the belt has drifted off center.
- Press "START", then increase the treadmill speed to 3 mph (5 kph).
- Stand at the rear of the treadmill to determine which direction the belt is drifting.
- If the belt drifts to the left, turn the left adjustment bolt one-quarter turn clockwise and the right adjustment bolt one-quarter turn counter-clockwise. (See FIG.C)
-
If the belt drifts to the right, turn the left adjustment bolt one-quarter turn counter-clock wise and the right adjustment bolt one-quarter turn clockwise. (See FIG.D)
-
Observe the tracking of the belt for about two minutes. Repeat steps 3, 4 and 5 as needed.

FIG C.

FIG D.
The treadmill comes with a folding feature that reduces the amount of storage space required when your treadmill is not in use and makes the treadmill easier to move.
Folding the Treadmill
- Make sure that the On/Off switch is turned Off and the power cord is removed from the wall.
- Make sure that nothing is on or near your treadmill which might spill, be knocked over or prevent the treadmill from completely folding.
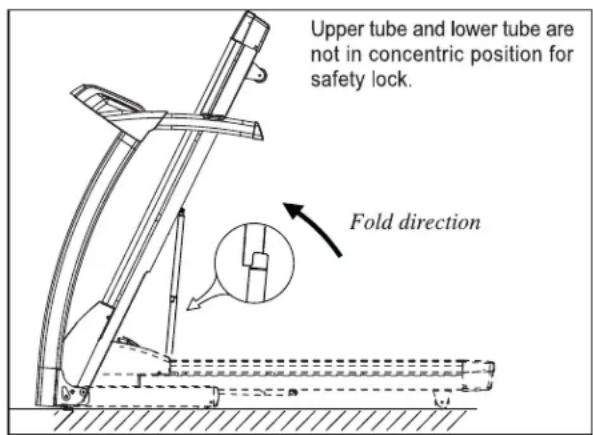
- (a.) Place both hands under the support bar that is located directly under the back of the running belt on your treadmill to make sure that you have a solid lifting point.
(b.) Lift the treadmill all of the way forward and make sure that the hydraulic shock is properly locked in place.
Caution: When lifting, use proper safety precautions and lifting techniques. Bend your knees and elbows, keep your back straight and pull up with both arms.
(c.) Ensure that the locking mechanism is secure by gently pulling back on the treadmill and make sure that it doesn't move. When doing this, be careful to be securely positioned in case the treadmill lock has not engaged.
Caution:
- Do not fold the treadmill by lifting on the running belt or rear roller. These parts do not lock in place and are difficult to grip when folding - personal injury or damage to the treadmill could result.
- Do not lean against the treadmill once it is folded or place items on it that could cause it to become unstable or fall over. This could result in serious personal injury.
- Do not connect the power cord when the treadmill is folded or try to operate the treadmill in the folded position.
Unfolding the Treadmill
- Make sure you have adequate space to lay the treadmill down. There needs to be at least 2 feet of clearance on both sides and in the front of the treadmill. There should be at least 4 feet of clearance on the back side of the treadmill for safety reasons. If the user were to fall this would give adequate clearance to get off the treadmill.
- Inspect to ensure that nothing is on or near your treadmill that might spill, be knocked over or prevent the treadmill from completely unfolding.
- Position yourself behind the treadmill. Slightly push the treadmill forward towards the display and with your left foot lightly push the top portion of the hydraulic shock forward till the locking tube frees and the treadmill can be pulled back away from the console.
- The hydraulic shock is set up to drop softly without assistance. It is not a bad idea to hold onto the treadmill until it is about 2/3 of the way down. Make sure that you use proper lifting technique, bending your knees and keeping your back straight.

Troubleshooting
The treadmill is designed and manufactured to be reliable and easy to use. However, if you have a problem, these troubleshooting steps may help you find the cause.
Problem: The Start button LED is dimly lit and no other lights are on.
Solution: The unit is in energy saving mode. Press and hold the Start button for two seconds.
Problem: The console is erratic or not lighting up
Solution: Check to make sure that the treadmill is properly plugged in, turn the power switch off and back on again and make sure the safety key is in place. Check all wire harness connections to be sure they are all properly connected. If the problem persists contact LifeSpan Customer Service.
Problem: The belt does not stay in the center of the treadmill when in use.
Solution: First check to make sure that the treadmill is level, then refer to the instructions in this manual on how to tension and adjust the belt.
Problem: The treadmill motor seems strained or E1 comes up after several minutes of use.
Solution: The lubricating silicone that is applied to the deck and belt is wearing down and the belt needs to be lubricated with silicone spray.
Problem: The treadmill belt slips during use.
Solution: The belt may need to be tensioned after a period of use. Refer to the Belt Tensioning and Adjustment Section of this manual.
Problem: Speed does not match quick keys. Treadmill starts at 1 and goes to 16.
Solution: The treadmill is set up in Metric Mode. See chart on next page for Console Engineering Mode.
Problem: Heart Rate is erratic or not picking up.
Solution: Make sure your hands are moist (Aloe Vera helps). Make sure all connectors at the back of the console are properly connected and no wires are damaged. If wearing a chest strap make sure the batteries are good and that the electrodes are moist and positioned properly on your chest.
Problem: Treadmill automatically pauses during workout.
Solution: Treadmill is not picking up Step Count. Go into Engineering Mode to turn intelli-guard off.
Warning: This will disengage the intelli-guard feature but may be necessary based on many different variables.
Problem: Silicone icon lights up on console.
Solution: Lubricate the running belt with 100% pure silicone. Then simultaneously press and hold the Speed down and Start buttons until the light tuns off.
Engineering Mode
Press STOP and then Speed up to enter the Engineering Mode. You can press Enter / Mode to switch setup screens, or press STOP+Speed up to return to Standby Mode. The table below shows the sequence of the setup screens.
| Engineering function | Information viewed on screen |
| Press and hold STOP and then Speed for 3 seconds to enter Engineering Mode(incline window shows software version) | Engineering Mode1502009.06.18 |
| Press Enter / ModeThis is for turning the Intelliguard on and off. Intelli-Guard automatically pauses the unit if it detects the treadmill is not being walked on. Press Speed / Incline UP / DOWN buttons to change between on and off | Intelli-Guard On |
| Press Enter / Mode to show Roller diameter | Roller625 |
| Press Enter / Mode to set up the units of measurement in Metric (SI) or in English (EN).Press Speed / Incline UP / DOWN to change | Select the unitsEn or Si |
| Press Enter / Mode to set up CalendarCalendar Operation:Press UP / DOWN buttons to turn calendar on or off | Set Calendar On |
| Press Enter / Mode for DistanceThis is the total distance the treadmill has been run in Miles or Kilometers depending on what mode the treadmill is in. | Total Distance000 |
| Press Enter / Mode for Workout TimeThis is the total number of hours the treadmill has been used. | Total Hours000 |
Press Enter / Mode again to return to the standby mode.
LifeSpan
LifeSpan
TREADMILL MODEL NUMBER- TR3000i/TR4000i
SERIAL NUMBER :
MADE IN TAIWAN
- U.S. and Canada International
- Table of Contents
- Limited Home Use Warranty (U.S. and Canada)
- Exclusions and Limitations:
- Registration
- Important Safety Precations
- Children and Pets
- Other Safety Tips
- Grounding and Power Requirements
- Starting an Exercise Program
- Pre-Exercise Resting Heart Rate Check
- LifeSpan
- Assembly
- Step 1: Unpacking Treadmill
- Step 2: Handlebar Support Post Assembly
- Step 3: Handlebar Assembly
- Step 4: Assemble Console Components
- Step 5: Attach Console Assembly
- Step 6: Attach the Back Cover Plate
- Step 7: Lock Console Angle
- Step 8: Cut red tie strap and roll out of box
- Step 9: Plug the power cord in and turn the treadmill on
- Step 10: Install safety key
- Step 11: Set date and time
- Display Console
- Console Buttons
- Display Console Overview
- Reading Your Heart Rate
- Operating Your Treadmill
- Setting the Date and Time:
- Starting in Manual Mode
- Starting a Preset Program
- Custom User Set-up Programs
- Operating Your Treadmill (continued)
- Using Heart Rate Control Programs
- HRC - Constant:
- HRC - Interval:
- Operations
- My Zone Heart Rate Control Programs
- http://www.lifespanfitness.com/article\_weight\_calc2.asp
- Innovative Features
- Program Overview
- Sports Training
- Long Slow Distance: (40 minute default)
- Short Interval: (20 minute default)
- Moderate Interval: (30 minute default)
- Long Interval: (40 minute default)
- Negative Interval-1: (30 minute default)
- Negative Interval-2: (30 minute default)
- Fartlek: (30 minute default)
- Healthy Living
- Uphill Climb : (30 minute default)
- Pyramid Climb: (30 minute default)
- Plateau Climb: (40 minute default)
- Ladder : (30 minute default)
- Uphill Interval: (20 minute default)
- Steady Pace: (40 minute default)
- Cardio Run: (20 minute default)
- Uphill Walk: (30 minute default)
- Belt Lubrication
- Cleaning and Maintenance
- Belt Tensioning
- Aligning the Running Belt
- Folding the Treadmill
- Caution:
- Unfolding the Treadmill
- Troubleshooting
- Engineering Mode
Brand : LifeSpan
Model : TR4000i
Category : Exercise bike