
Pollenex - Tabouret de salle de bain Conair - Free user manual and instructions
Find the device manual for free Pollenex Conair in PDF.


User questions about Pollenex Conair
0 question about this device. Answer the ones you know or ask your own.
Ask a new question about this device
Download the instructions for your Tabouret de salle de bain in PDF format for free! Find your manual Pollenex - Conair and take your electronic device back in hand. On this page are published all the documents necessary for the use of your device. Pollenex by Conair.
USER MANUAL Pollenex Conair
natural_image
Black plastic object on tiled floor with grid background, labeled 'A' in top right corner (no other text or symbols)
natural_image
U-shaped metal stand with white connectors and a flat base, labeled 'B' in top-left corner (no text or symbols on main subject)
natural_image
Close-up of a white airplane wing with visible blade and blade profiles, resting on tiled floor (no text or symbols)
natural_image
Close-up of a mechanical component with a downward arrow indicating a force or direction (no text or symbols visible)
natural_image
U-shaped mechanical component with two vertical tubes and a base, no visible text or symbols
natural_image
Close-up of a showerhead with a metallic column and handle, mounted on a tiled wall (no text or symbols visible)
natural_image
Close-up of a metallic cylindrical object with four circular holes and a black base, against a tiled background (no text or symbols visible)IB-8719A
CORNER TEAK SPA BENCH
MODEL SBB8 Instructions For Use:
Easy to Assemble • Includes Teakwood Seat with:
- 5 predrilled screw holes
- 5 plastic-capped screws
- 5 metal contoured washers
• 2 pre-assembled U-shaped legs
The Pollenex ^™ Corner Teak Spa Bench is partially assembled. Final assembly can be completed in minutes. No tools are required.
Remove all parts from the box. Turn wooden bench seat upside down on floor or table (Fig. A).
With both U-shaped legs reaching up, place one leg on top of the other. Indented centers should fit together in an X-shape (Fig. B).
Carefully align leg holes over predrilled bench holes. Place contoured washer over center hole (Fig. C).
Insert a plastic-capped screw through washer and screw loosely into predrilled hole (Fig. D).
Place a contoured washer over each of the remaining holes, and securely screw the plastic-capped screws into place. Now tighten the center plastic-capped screw (Fig. E).
Adjust bench to desired height by pushing in adjustment pin on each leg (Fig. F), and moving leg up or down to allow pin to "lock" into appropriate hole* (Fig. G).
*NOTE: For safety and stability, be sure adjustment pins are securely locked into holes at the same height on each leg.

natural_image
Black plastic object on tiled floor against a tiled wall, labeled 'A' in top-right corner (no other text or symbols)
natural_image
U-shaped metal stand with white connectors and a flat base, labeled 'B' in top-left corner (no text or symbols on main subject)
natural_image
Close-up of white elongated objects on a tiled floor, labeled with letters C and n (no text or symbols on objects)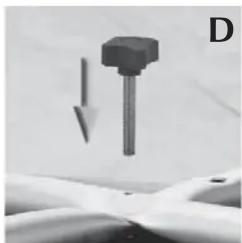
natural_image
Close-up of a mechanical component with a downward arrow indicating a force or direction (no text or symbols visible)
natural_image
U-shaped mechanical component with two vertical tubes and a base, no visible text or symbols
natural_image
Close-up of a showerhead with a metallic column and handle, showing a downward arrow and a small inset detail (no text or symbols)
natural_image
Close-up of a metallic cylindrical object with four circular holes and a black base, against a tiled background (no text or symbols visible)Pollenex™
Brand : Conair
Model : Pollenex
Category : Tabouret de salle de bain