
Hands-on Discovery Lab - Toy Learning Resources - Free user manual and instructions
Find the device manual for free Hands-on Discovery Lab Learning Resources in PDF.


| Product Type | Science Discovery Lab Toy |
| Brand | Learning Resources |
| Model | Hands-On Discovery Lab |
| Recommended Age | 4 years and up |
| Recommended Grade | PreK+ |
| Included Items | Discovery Lab with Lid, 1 Pair of Non-Latex Gloves with Attachment Rings, 1 Set of Side Caps |
| Glove Material | Non-Latex |
| Glove Attachment | Rings with screw mechanism (requires Phillips screwdriver, not included) |
| Glove Replacement | Compatible with common household style gloves |
| Cleaning Gloves | Hand wash in warm soapy water, pat dry, air dry thoroughly. Do not machine wash. |
| Cleaning Lab | Hand wash with warm soapy water, hand dry with towel, air dry. Do not machine wash. |
| Safety Warning | Choking hazard – small parts. Not for children under 3 years. |
| Activity 1 | Working Worm Farm – uses red worms, newspaper, soil, eggshells, food scraps |
| Activity 2 | Slippery Slime – uses cornstarch, corn syrup, warm water, food coloring |
| Activity 3 | Terrific Terrarium – uses pebbles, activated charcoal, moss, potting soil, plants |
| Observation Station | Insert side caps to use lab as an observation station without gloves |
| Ventilation | Holes in lid for air circulation; keep holes clear or leave lid partially open |
| Manual Pages | 5 (English) |
| Manufacturer | Learning Resources, Inc., Vernon Hills, IL (USA) |
| Country of Origin | Made in China |
Frequently Asked Questions - Hands-on Discovery Lab Learning Resources
User questions about Hands-on Discovery Lab Learning Resources
0 question about this device. Answer the ones you know or ask your own.
Ask a new question about this device
Download the instructions for your Toy in PDF format for free! Find your manual Hands-on Discovery Lab - Learning Resources and take your electronic device back in hand. On this page are published all the documents necessary for the use of your device. Hands-on Discovery Lab by Learning Resources.
USER MANUAL Hands-on Discovery Lab Learning Resources
9898 UOD Lab GUD3:Layout 1 12/11/09 5:00 PM Page 1
Contents:
• Discovery Lab with Lid
• (1) Pair of Non-Latex Gloves with Attachment Rings
• (1) Set of Side Caps
Glove Assembly:
- Use a Phillips screwdriver (not included) to unscrew the glove rings as shown. notch

-
Stretch a glove over the inner ring.
-
Place the outer ring over the glove, trapping it between the two ring
-
Align the notch on the two rings to ensure proper alignment of the screw holes.
-
Replace and tighten the screws. CAUTION: DO NOT OVERTIGHTEN SCREWS.
Attaching Gloves to the Lab:
-
Align the ring mechanism with the slots on the Discovery Lab to put glove hand in a workable position.
-
Push the rings into place using the palm of your hand to ensure a ti
-
Carefully rotate the glove ring counterclockwise to secure the glove int position.
-
Remove the gloves by gently rotating the glove rings clockwise to separate from the slots.
General Care:
Hand wash gloves in warm, soapy water. (DO NOT MACHINE WASH).
Pat the gloves dry with a towel and allow to air dry thoroughly.
Hand wash the Discovery Lab and lid. (DO NOT MACHINE WASH).
Hand dry the lab and lid with a towel and allow to air dry thoroughly.
Gloves may be replaced with common household style gloves.
If the gloves stick to hands, sprinkle the insides of the gloves with a very/ light coating of baby powder (corn starch).
Suggested Activities
The Hands-On Discovery Lab is perfect for conducting big science without making a big mess. Plug in the side caps and use the lab as an observ station.
Notes: You may detach the gloves and use your bare hands while perform activities.
Working Worm Farm
Watch worms wriggle their magic and turn fruit and vegetable scraps into great potting soil for house plants!
What you need to supply:
1 Dozen red worms (Do not use night crawlers or other earthworms.
Smaller red worms are best suited for the size of the lab and can be 1 at most bait and tackle shops or pet stores).
Newspaper (Use black and white print. Do not use colored ink pages).
Aluminum foil
Gardening soil (Do not use "potting soil").
Water (A spray bottle or small watering can will do).
(2) Crushed, boiled eggshells (Do not use raw eggshells!)
Food scraps (See details in the "Feeding Your Worms" section).
What to do:
-
Read all of these instructions first!
-
Place some moist (not wet) shredded newspaper on the bottom of the clean lab tub.
-
Add several handfuls of garden soil (not potting soil) with a couple crushed eggshells mixed in. Take care not to overfill the soil above the line.
-
Moisture helps worms breathe, but too much water will drown them. Keep the soil mixture damp but not wet or muddy. You can always s little more water in daily to keep it moist.
-
Worms like the dark. To cover the dirt, wrap up the sides of the Di Lab halfway in aluminum foil. You'll also want to store the lab in a place, such as a garage or basement. Carefully unwrap the foil if you going to observe the worms for a while. Always replace the foil when finished.
-
Place a few more scraps of damp, shredded newspaper and eggshell (top of the soil. Do not pack everything down—leave it loose.
-
Add your worms to the soil. Don't poke them too much. Be gentle a
patient. Give them a bit of food (see "Feeding Your Worms"), put the on (making sure the holes are clear for air to circulate), and place them a dark place for a few days to settle.
Feeding Your Worms:
- Feed your worms fruit and vegetable scraps. You can also try starchy food scraps, like oatmeal, bread, and cooked noodles. Don't worry if the food doesn't disappear right away. It has to soften before the worms can eat. Be patient.
- Avoid feeding them too much acidic food (citric fruits like oranges and lemons).
- Bury food scraps in damp newspaper scraps to keep mold from growing. If you see mold growing on food scraps, remove the food from the far and wash your hands thoroughly.
- Do NOT feed your worms meat, poultry, dairy products (other than cooking eggshells), or foods with salt, like potato chips. These foods will quickly rot and attract insects and other critters you don't want in your worm farm.
- Your worms will eat about half their body weight each day. Worms do weigh very much, so do not overfeed them!
Caring for Your Worms:
- Worms breathe oxygen just like you. Make sure the holes in the lid are not blocked, or keep the lid partially open to allow air circulation.
- Gently turn the soil with a gloved hand every couple of days to improve air circulation.
- Keep the Discovery Lab out of direct sunlight or extreme cold. Worms do just fine at room temperature.
- Make sure you keep your Discovery Lab and worms away from vibration (lots of pounding feet or even loud music speakers). Your worms won't happy and will try to make an escape to quieter soil if they are around much vibration.
- Small, oval cocoons in the soil are signs that your worms are making mo worms! Cocoons can contain several baby worms and take several weeks4 to hatch. Look for tiny white worms. The size of Discovery Lab will limit the number of worms, so don't worry about overpopulation.
- Don't let the soil get too wet or too dry. If the soil is too wet, add \$ dry soil and leave the cover off for a few days to help dry it out. Try carefully drain any excess water out of the lab. If the soil is too dry, add some cool water and leave the farm loosely covered with damp newspaper.
Idf everything is going well, you will start to notice worm castings (wo excrement) in your worm farm. This makes a great natural fertilizer for house plants!
- When the mixture of newspaper and soil is no longer identifiable and looks "mushy" and cluttered with castings, you will need to remove your worms and either add fresh soil and newspaper, or set the worms free. They will not survive in their own waste.
The Discovery Lab is meant to house a short-term worm farm. For long term worm farming, use a larger storage system with drainage. - Your local library has plenty of resources about worms and worm farm Research and learn more about these fascinating creatures.
Slippery Slime
Use your Discovery Lab to make sticky, oozy, gooey slime— all without making a huge mess!
What you need to supply:
Cornstarch (1 Cup)
Corn syrup (as needed)
Warm water (1 Cup)
Food coloring
Plastic sealable bag (1 qt.) or a metal bowl
^e Spoon or stick for stirring
Attention: Food coloring may stain the gloves and clothing. Use with caution
What to do:
do Place all ingredients within easy reach inside the Discovery Lab. Leave lid off while you work.
-
Add a few drops of food coloring to the warm water. The more food be coloring you add, the darker your slime will be. Gently stir the water and make the food coloring.
-
Place the cornstarch in the plastic sealable bag or metal bowl.
noreCaution: Food coloring may stain non-metal bowls.
- Add the colored water to the cornstarch and gently stir the mixture with together. As the slime begins to thicken, use your hands to finish mix the slime.
Some using a plastic sealable bag instead of a bowl, pour the water and your cornstarch into the bag. Carefully push as much air out of the bag as can before sealing it tightly. You may want to tape the bag shut to the seal tight. Carefully mix and mash the water and cornstarch together in the bag using your hands.
- Be patient! If the slime mixture is too dry, add a few more drops of until the slime is the right consistency. If the slime mixture is too wet, simply add some more cornstarch. Try to get the mixture to flow like honey.
- When finished mixing the slime, hand clean the Discovery Lab with wa soapy water.
Note: This recipe for slime is non-toxic. However, do not taste or place the slime near your eyes or mouth.
Terrific Terrarium
Use your Discovery Lab to build a beautiful terrarium!
What you need to supply:
Coarse pebbles (several cups; you may also use sand)
Sphagnum moss or Spanish moss (or use a 13" x 8" piece of fine mesh Potting soil (several cups)
Activated charcoal (several cups; available at pet stores or aquarium supply stores)
Seeds or seedlings for small house plants or flowers (see "Choosing Plants")
Small ornaments or decorations (optional)
What you need to do:
Note: If building the terrarium with gloves, make sure to not build layers above the glove holes. Otherwise, terrarium materials will spill out of the glove holes when removing the gloves. If creating a terrarium for long-term use, start by installing the lab's side caps.
- Wash your Discovery Lab with warm, soapy water and dry thoroughly.
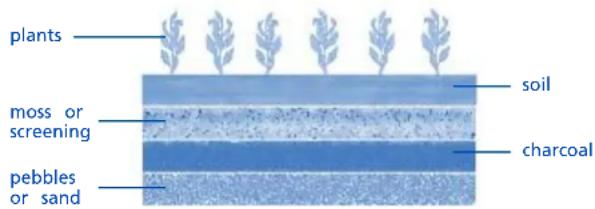
- Begin with a layer of pebbles (or sand) on the bottom of the lab. Cr layer about one inch thick.
6

3va4old a layer of activated charcoal to cover the pebble layer. The char helps filter the air and water, and keeps it fresh.
4. Add a layer of moss on top of the charcoal to keep the soil from f down into the pebbles. A very fine mesh screen will work too. Use m screening instead of metal to prevent rusting.
5. Add a good layer of soil on top of the moss or screening (several in fine). Don't pack the soil down too much. It will settle over time and can always add more soil if needed.
6. Gently plant your seeds or add plants to the soil (see "Choosing Plants"). Before you plant, think about what you want your terrarium to look over time. You may even want to sketch a plan on paper before you. Take care to give plants plenty of room to grow. Overcrowding your terrarium can cause plants to compete for light and nutrients.
We Make the terrarium yours. Add small ornaments, trinkets, or any other decorations you like. Use your imagination.
8. Try adding some life! You may want to try housing a caterpillar or small creatures in your terrarium for a short time. Before you do, alw research what the creature needs to help it survive and to ensure you terrarium is a good home. Caterpillars and other creatures might munc on your plants, so make sure you make a good match.
9. If you add any type of animal to the terrarium for a long stay, you need to change the potting soil frequently to prevent waste buildup.
Choosing Plants:
- Most types of house plants can be grown in a terrarium. A very small of plants of different colors and shapes works very well.
- Make sure the plants you choose will not grow too large to overcrowded shallow smaller plants.
- Use plants with similar sunlight and watering needs. Plants that grow well in moderate, indirect sunlight work best.
- You may want to try a desert terrarium with cacti and other desert if you do, use sand or other potting soil that is specifically made for desert environments.
General Care:
- Make sure you water your terrarium lab appropriately. Use a spray box and moisten the plants and soil. The biggest mistake to make is water too much! If water builds up, leave the lid off to help water evaporates
9898 UOD Lab GUD3:Layout 1 12/11/09 5:00 PM Page 8
Try to keep your terrarium moist, but avoid creating pools of water c muddy soil.
- Place the lid on your lab once the soil is moist. Condensation (water droplets) can then start to cycle in the terrarium. The droplets are the water evaporating from the soil and then collecting on the sides and of the lab. The droplets will fall back down onto the soil and plants like real rain! When this happens, you don't need to water your terra much—it's watering itself!
- If you are having trouble keeping the soil moist, tape over the holes the lid of the lab and place the lid on tightly.
- Don't leave your lab in direct sunlight. This can cause the terrarium to overheat or dry out.
- Your local library is a great place to research more information about terrariums of all shapes, sizes, and themes.

LEARNING RESOURCES®

LearningResources.com
Visit our website to write a product review or to find a store near you.

RISQUE D'ÉTOUFFEMENT. Factes pieces
© Learning Resources, Inc., Vernon Hills, IL (U.S.A.) Learning Resources Ltd., King's Lynn, Norfolk (U.K.) Please retain our address for future reference. Made in China. LRM9898-GUD


- Contents:
- Glove Assembly:
- Attaching Gloves to the Lab:
- General Care:
- Suggested Activities
- Working Worm Farm
- What you need to supply:
- Aluminum foil
- What to do:
- Feeding Your Worms:
- Caring for Your Worms:
- Slippery Slime
- Terrific Terrarium
- What you need to do:
- Choosing Plants:
- LEARNING RESOURCES®
- LearningResources.com
Brand : Learning Resources
Model : Hands-on Discovery Lab
Category : Toy